development of one piece fashion garment with four panels
TRANSCRIPT

Marmara Journal of Pure and Applied Sciences 2015, Special Issue-1: 99-106 DOI:10.7240/mufbed.86097
Development of One Piece Fashion Garment with Four Panels using Draping Techniques Stitched with 505 Stitch Type
Wazeer Hussain SOLANGIL1, Rubeena Wazeer SOLANGI2, Zulfiqar Ali NOONARI2
1Pak-Korea Garment Technology Institute, Karachi, Sindh, Pakistan2Misbah Garments Company, Karachi, Pakistan
Corresponding Author: Wazeer H. SOLANGIL, Tel: 285 61 83, E-mail: [email protected] Submitted: 15 October 2014, Revised: 04 March 2015, Accepted: 01 July 2015
ABSTRACT
In this research work we made a fashion style Garment called one piece garment having four panels by using new techniques of Draping without making any kind of pattern stitched by Overlock machine. After selection of the mannequin and fashion style for making fashion Garment, the first and basic process started line taping in which mannequin has to divided into two part (i.e. front and back body) and then front side of the body divided into two parts left front and right front, similarly back side of the body divided into two parts i.e. left back and right back side. Then made new design by using Draping techniques and made new style of fashion Garment stitched by Overlock machine only and also that garment may be used any party wear as well because of flare, The results shows that the Fashion Garment produced by Draping techniques looks very good in normal appearing on the body and also satisfied to produce fitted Garment as per body.
Keywords: Drape, Flare, Mannequin, Fashion Garment, Line taping, Muslin, Pinning.
I. INTRODUCTION
1.1. Introduction to Draping
Draping technique is the technique which means the way of fabric hanging, Draping is the process of positioning and pinning test fabric on dress forms to design clothing. The fashion designer sees where the darts and seams should be placed using muslin or other synthetic materials, making all alterations and corrections to the design before creating the final sewing pattern. Draping classes are typically offered in fashion design schools. Draping is an important skill because it teaches the art of designing clothes from scratch and also offers the opportunity to quickly correct fitting issues.
Drape is the way that fabric hangs. The process of draping involves sewing loosely hanging material to a garment to create a flowing look. Though it can make for a very dramatic effect when done properly, it does take skill and practice. Many designers choose to experiment with the way fabric hangs, but there are also objective ways to measure drape. This technique is commonly used in making dresses, but can also be used to make blouses, skirts, and pants. [1]
1.2. The Process of Draping
Draping usually begins with a designer taking a basic garment and putting it on a dressmaker’s model. The
garment is generally already sewn into its core shape — for instance, a bias-cut dress would start out as a bias tube on the model. Next, the designer takes pieces of fabric and pins them to the garment where the drape is desired, which will give the final garment its shape. Most of the time the pinned fabric is not the same as the fabric that will be used for the final garment, but rather a similar cheaper fabric. This is because the fabric that’s pinned on the dress will often be cut or marked on during the design process, which can be expensive with fine cloths.
Once the designer has the garment looking the way he or she wants it, he or she will make final marks on the fabric to show where it should be cut or sewn on the final garment, and will then remove all the fabric pieces. The designer will then take the pieces and trace them on paper to make a pattern for the final garment. This will be used when the designer cuts the fabric for the final garment and as a guide for constructing the garment, so it’s important for the designer to make detailed marks on the practice fabric. [1] [2]
1.3. Components of Draping
Designers have to take a lot of factors into consideration when it comes to draping fabric. The type and weight of a fabric can considerably change the way it drapes on a

100
Marmara J. Pure Appl. Sci. 2015, Special Issue-1:99-106 Draping Techniques
garment, as can the shape of the garment itself. Chiffons, satins and silks are quite frequently used in draped clothing, but many other fabrics can be used as well. More rigid fabrics are often unsuitable for this effect.
1.4. Objective and Subjective Measurements
Though many designers prefer to experiment with fabrics to see how they hang, there are objective ways to test a fabric’s drape. This can be done either by determining the stiffness of a fabric sample or by using a device called a drape meter to determine a drape coefficient. This is written as a number from zero to 100. For instance, twill fabric usually has a much smaller drape coefficient than fabrics like sateen, which has a larger coefficient. Practically speaking, fabrics with a higher drape coefficient usually hang in a puffier manner than those with lower coefficients. [3] Draping Techniques is based on following basic steps for draping on any kind of dress form. It is necessary that a draping master should beware the basics of Draping and is process steps and dress maker should know Fashion Draping subjects.
1.4.1. Preparation of your dress form
Make sure the measurements are accurate. If you haven’t already, mark the center line of the dress form with tape. This will help you keep your draping even across the body. If you already have an idea of the lines of your garment, such as the shape of the neckline, you can add those with tape, as well. This helps keep your draping on track [3]
1.4.2. Work from a sketch or photograph
You should have a design idea in mind when you get to the dress form. A sketch or reference photograph will give you an idea of how you need to manipulate the fabric. Of course, you can also just play with the fabric and use its behaviour as the basis of your design, but less experienced designers will be less frustrated when they have something to work off of [3] [4]
1.4.3. Start with muslin
You might want to start with fitting muslin to avoid wasting good fabric, but keep in mind that different types and weights of fabric behave very differently when draped, so choose a muslin weight that is close to the weight of your fabric[4].
1.4.4. Create your foundation piece and pin it to your dress form
Most fabrics will require a foundation piece of some sort to support the weight of the fabric. You can skip this step
if you’re working with a very sturdy fabric. If your main fabric is sheer, be sure to choose a fabric that’s close to your skin tone or one that matches the main fabric if you don’t want to see the foundation fabric when the garment is worn. The foundation piece should be fitted to the dress form. (If you’ve constructed a bodice Sloper based on your measurements, that’s an excellent place to start!) If you have a basic idea of the design details you want to include (such as a sweetheart neckline or off-the-shoulder sleeves), be sure the foundation piece reflects that, since it will make Step 5 much easier [4]
1.4.5. Start pinning
Make sure you have enough fabric to cover the area. You can always cut the extra off later. Draping is usually done in sections: front bodice, back bodice, front skirt, and back skirt. Choose a spot where the folds are most prevalent and begin there. Your sketch or photograph will come in handy at this point.
Trial and error coupled with patience is the name of the game. If you find yourself getting frustrated, take a step back and walk away for a bit. Use chalk to mark any additional seam lines or darts.
1.4.6. Paste the fabric to the foundation piece.
Once you’re satisfied with the draping, use a contrasting color thread to baste the fabric to the foundation piece (or to itself if you’re not using a foundation piece). Go slowly so you won’t miss any folds in the process. This will allow you to remove the pins without undoing all of your hard work [4]
1.4.7. Trim off any excess fabric and continue constructing your garment.
The raw edges of your draping should be hidden in the seams. At this point, you can remove your basting stitches.
Further following steps are being used in my research work
• Mannequin measurement
• Line Tape draping
• Princess Line draping:
• Basic pattern making on the muslin
• Fabric cutting with seam amount
• Fabric pinning on the body
• Muslin marking on the body
• Truing/tracing
101
Marmara J. Pure Appl. Sci. 2015, Special Issue-1:99-106Draping Techniques
II. MATERIAL AND PROCESS METHODOLOGY
2.1. Material
A basic material that is very important for above mentioned work is given below:
1- Mannequin: Mannequin is the basic requirement for draping on which you create the basic design by starting with Line Tape Draping
2- Muslin: Muslin fabric is actually greigh fabric Muslin fabric it is coarse weave of medium weight fabric that is the most common material used for draping because the grain is easily recognized, is inexpensive and falls loosely over the dress form, making it easy to manipulate to create different looks. The fabric used in draping must be similar to the fabric that will be used on the final garment: Using a completely different fabric won’t give the correct vision of how the final fabric will fit on the body when it’s shaped and darted. A large supply of pins, scissors for cutting fabric, and markers or pens for identifying seams are also important supplies for draping, this is also known as toile muslin [4].
3- Four thread Over lock machine: Four thread Over lock machine was the basic need for stitching one piece Fashion Garment, in my research work Four thread Over lock machine of model SC 9212 (Sun Star, South Korea) brand for stitching purpose.
4- Line Tape /Style Tape: A narrow ribbon tape, usually black to contrast with the muslin; it is used to indicate style lines {Black Tape used for body Taping whereas Red Tape is used for princess line (Design/Style Line)}
5- Steel Pins: These pins are used to pin out the Line Tape on the mannequin and also used for joining the two piece of muslin in dress form on the mannequin
6- Scissors: Nine-Inch, good quality scissors are recommended; they must be kept well sharpened.
7- Measurement Tape: The tape measure should have a smooth surface and be clearly marked.
8- Plastic Ruler: Eighteen inches by 2 inches, marked with squared lines at 1/4th inch intervals.
9- French curve: A Clear plastic, irregular curve used for armhole and necklines.
10- Hip Curve: A Shallow curved metal ruler.
11- Sewing Thread: Sewing thread of good strength have been used for stitching purpose during my research
12- L-Square: An L-shaped metal ruler; the long arm measurers 24 inches and the short arm 14 inches.
13- Tracing Wheel: The Tracing wheel with the small serrated edges is used for draping purposes.
14- Pencils: Numbers-2 pencils, well sharpened at the times
15- Tracing Paper: Large sheets of carbon tracing paper or white sheet should be used for transfer of the lines from piece of the muslin to the paper, the paper should never use when draping directly in the fabric of the finished garment.
2.2. Process Methodology
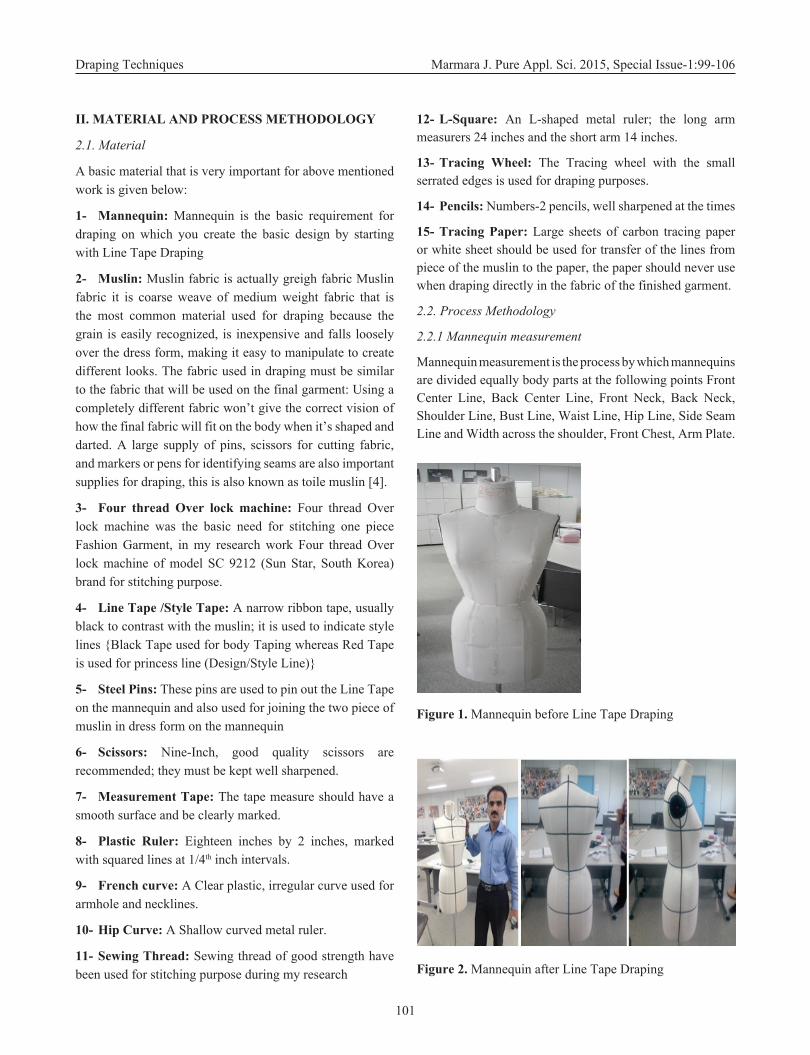
2.2.1 Mannequin measurement
Mannequin measurement is the process by which mannequins are divided equally body parts at the following points Front Center Line, Back Center Line, Front Neck, Back Neck, Shoulder Line, Bust Line, Waist Line, Hip Line, Side Seam Line and Width across the shoulder, Front Chest, Arm Plate.
Figure 1. Mannequin before Line Tape Draping
Figure 2. Mannequin after Line Tape Draping

102
Marmara J. Pure Appl. Sci. 2015, Special Issue-1:99-106 Draping Techniques
2.2.2. Line tape draping
After Mannequin measurement next process is Line Tape draping in which Black line tape used for normal line tape draping and Red Tape is used for special design called Princess Line, the major points of line tape draping are, Front Center Line, Back Center Line, Front Neck, Back Neck, Shoulder Line, Bust Line, Waist Line, Hip Line, Side Seam Line and Width across the shoulder, Front Chest, Arm Plate. As shown in Figure 3-4
a b
Figure 3. Line tape draping
2.2.3. Princess line draping
This is the process by which we can produce our desired design as shown in Figure 4.
Figure 4. Line draping
2.2.4. Preparation of Muslin for Draping
i) Estimate size of muslin piece needed, allowing a reasonable amount of extra fabric for ease, seam allowance, and styling.
ii) Clip edges of the muslin with scissors, and tear across the grain with sufficient pressure to break yarn evenly.
iii) Then mark the true crosswise grain or lengthwise grain on the Muslin for draping.
iv) Then iron the tear muslin samples by apply heat pressing and steam pressing where required.
v) At the end add the seam allowance, beginning students
are expected to add One-inch seam allowance on all straight seams including side seam, shoulder seam, waist seam and under arm seam whereas for all curved seamareplannedwith½-inchseamallowance.
2.2.5. Basic Pattern Making or Muslin drape on the mannequin
There are two process may be used for making this fashion Garment,
1. Take measurement of the body and make draft first and then make required pattern, after making pattern stitched garment.
2. Cut the required pieces of muslin as per your required design then press it. Put that muslin drapes around the mannequin and fixed with steel pins as per line Tape and Princess Line then mark with the pencil by creating tucks and gathers. Continue draping until the final shape of the garment takes shape on the dress form. Use a marker to mark the tucks and darts, and then remove the garment for truing, which is the process of using rulers and other tools to finalize the markings. Cut and remove all excess material, then place the pinned drape back on the dress form to check for a proper fit. When you feel that the garment is draped to the appropriate fit and style, remove it from the dress form and press it. Record all seams and markings and create your final sewing pattern. [3]
2.2.6. Preparation of muslin for pinning on the Mannequin for required style
Start pinning the muslin as per style garment by using princess line to form a fashion Garment, in my research there are four piece of muslin (two front & two Back) whereas one for sleeve and one for collar were used. Then tear Muslin as per given pattern (Figure 5) and at the end mark the grain line.
2.2.6.1. Draping steps for Front & Back
Figure 5. Draping steps

103
Marmara J. Pure Appl. Sci. 2015, Special Issue-1:99-106Draping Techniques
a) Center Front (F1) panel:
i. Pin the center front panel to apex center front
ii. Smooth muslin from center front towards the style tape, keeping crosswise grains perfectly aligned; pin along the style tape.
iii. Drape the neck line and pin the shoulder
iv. Place style tape curved from bust to mid-armhole on front of form. Place pins two inches above and two inches below bust point to use for notches.
v. On back, place style tape curved to mid-armhole.
vi. Place 2 pins on curve to use for notch reference.
vii. Place fold of straight grain to centerline and pin. Line up bust bridge with cross grain guideline.
viii. Pin drape to bust bridge then make Smooth and clip muslin to neckline.
ix. Pin drape at shoulder and along style line; trim excess fabric.
x. Clip to style line above bust bridge.
xi. Clip to waist.
xii. Mark pin at armplate front.
xiii. Mark shoulder seam.
xiv. Dot style line.
xv. Mark notches (single mark). Use pins placed in Step 1 for reference.
xvi. Mark top and bottom of style line.
xvii. After piece is clearly marked, pin muslin away from Princess Line.
b) Side front (F2) panel:
i. Place side panel on form with straight grain centered and perpendicular to waistline. Pin at top and bottom of grainline.
ii. Smooth and pin at waist, side seam, and style line, adding a 1/4” (1/8” on the fold) ease tuck at armhole.
iii. Trim excess fabric along waistline and clip to waist
iv. Pinch excess fabric at bust mound and pin.
v. Trim excess fabric and dot style line.
vi. Mark notches (single mark). Use pins placed in Step 1 for reference.
vii. Pencil rub side seam.
viii. At armhole depth, add 1/2” ease.
ix. Using ruler draw line from side seam/waist to ease marking.
x. Mark waistline, bust point, and style line.
xi. Once side front panel is fully marked pin it away from side seam
c) Center Back (B1) panel:
Figure 6. Centre back
i. Place fold of straight grain at centerline and pin.
ii. Smooth and clip muslin and clip to neck.
iii. Pin at base of style line and clip to waist.
iv. Smooth muslin from middle of centerline to armscye/style line intersection. Excess will appear at shoulder.
v. Mark drape at center line and base of style line.
vi. Mark shoulder seam.
vii. Trim muslin around armhole.
viii. Trim along style line.
ix. Mark back of armplate and style line/armhole intersection.
x. Dot style line and mark notch (double mark).
xi. Once back panel is completely marked, pin it away from style tape.
d) Side Back (B2) panel:
i. Place fabric on form with straight grain centered and perpendicular with waist.
ii. Pin at waist, side seam, and style line.

104
Marmara J. Pure Appl. Sci. 2015, Special Issue-1:99-106 Draping Techniques
iii. Trim excess fabric at waist and clip to waist.
iv. Trim excess fabric around armhole.
v. Pin 1/4” (1/8” on the fold) ease tuck at waist.
vi. Dot along style line clearly marking top and bottom.
vii. Mark notch. (double mark)
viii. Pencil rub side seam.
ix. At armhole depth measure ease (3/4” for sleeved garments and 1/2” for sleeveless garments).
x. Using ruler draw line from side seam/waist to ease marking
2.2.6.2. Draping steps for Sleeve
Figure 7. Sleeve draping
i. Cut the fabric as per basic sleeve.
ii. Pin the underarm seam of the sleeve. Lift the arm to expose the underarm seams and pin the underarm seam of the sleeve to the underarm seam of the bodice armhole. Place the pins Parallel to the stitch line, from the front notches down and around to the back notches.
iii. Pin the sleeve cap to the remaining portion of the armhole, matching the shoulder notch to the shoulder seam of the bodice and all remaining stitch lines [6-7].
2.2.7. Pin Test / Fitting test
Figure 8. Fitting test
i. Fold center front panel on shoulder seam markings and crease on fold.
ii. Lap front panel over back panel, matching up shoulder marking and evenly distributing back shoulder ease. Pin perpendicular to seam through all muslin layers. (Do not pin to form.)
iii. Fold and crease center front panel on style line markings
iv. Match notches below bust and pin.
v. Match notches above bust; evenly distribute ease between upper and lower notches.
vi. Pin along style line.
vii. Fold and crease center back panel on style line markings
viii. Pin pieces together along style line.
ix. Be sure to line up notches.
x. Fold & crease side front panel on ruler drawn line. Lap over side back panel, matching up lines.
xi. Side view of finished garment.
xii. Front view of pin-tested drape.
xiii. Back view of pin-tested drape.
2.2.8. Truing/tracing
Tracing is the process by which we can trace out the actual pattern from the draped dress form onto the paper sheet by the help of tracing wheel, it means if we need paper pattern for required dress then we should use this technique called tracing/trueing and if we don’t want to make patter for required dress then this step you can skip.
2.2.9. Ready 4-Panel fashion garment for stitching after tracing on the pattern or direct from the muslin
This is the final step by which we can cut the fabric as per predetermined design; therefore we should have to follow the following process
i. Ready draped muslin/ traced pattern
ii. Fabric selection
iii. Pressing the fabric if required
iv. Pattern Tracing on actual fabric
v. Addition the seam allowance
vi. Cutting the fabric
vii. Fusing attachment if required
viii. Stitching
ix. Finishing

105
Marmara J. Pure Appl. Sci. 2015, Special Issue-1:99-106Draping Techniques
III. RESULTS AND DISCUSSION
The results of studying this research mainly based on the Fashion garment appearance start from measurement, fitting on the muslin and actual fabric, both side fitting and flare
3.1. Measurement
Measurement is the basic operation for making any Garment, in this research we skip the measurement process and only we started work on the direct mannequin by using Line tape draping (Line Tape draping discussed above) Garment appearance based on the fitting
3.2. Fitting
A- fitting garment is an article of clothing that tightly follows the contours of the part of the body being covered. There are numerous types of clothing which typically are or which can be made form-fitting. For example, stockings, leggings, tights and socks are usually form-fitting. Clothing used in dance and in exercise as well, Though many materials can be used to make form-fitting garments, the thinner materials, such as synthetic fibers, are the most commonly used, because of the smooth line that can be produced as well as their extra strength when pulled tight, but here in my research I have developed a Fashion Garment with good fitting quality that satisfied the wearer the material used is Knitted fabric with good elasticity and having excellent drape with two tone effect[9].
3.2.1. Fitting check on muslin
This is the prior fitting process that used to check fitting of the garment before stitched and after satisfaction the results we can produce a fitted garment. The results of fitting Garment on muslin and on stitched garment satisfied from Front (F1 & F2), Back (B1 & B2) side as shown in Figure 9. Here in this case there is no need to make any dart below the bust for fitting due to F2 & B2 panel, these panel are stitched such a way that the Fashion Garment already satisfied the garment over the body at the fitting.
Figure 9. Fitting check on muslin
3. 3. Fabric Pattern and pattern transferring
After satisfying the results from fitting on the mannequin it is necessary to make the actual pattern on the muslin after proper marking which will be very supportive for development fitted garment as shown in Figure 10. Here in this case I have make a Pattern on the fabric and after satisfaction I use to make a paper pattern by tracing the fabric pattern on the paper with tracing wheel and then cut the fabric as per pattern design (four panel with Front-1, Front-2 & Back-1, Back-2) Figure 10.
Figure 10. Fabric pattern
3.4. Four panel Fashion garment flare look and fall
The fall and the flare of the Four piece fashion garment has a good appearance as shown in Figure 11. The flare look satisfied the wearer as per party wearing, also in other words. It flare satisfied for party wearing dresses and the fall of the dress depends upon the fabric GSM and fabric quality, here in this case the flare starts from the waist of the body below the F2 & B2 panels, and the size of the flare depends upon you that how much quantity of the fabric you do have to use in width, if you use more fabric in width then you can increase the flare which also satisfy the fitting and the fall of the fabric.
Figure 11. The fall and the flare of the Four piece fashion garment

106
Marmara J. Pure Appl. Sci. 2015, Special Issue-1:99-106 Draping Techniques
IV. CONCLUSIONS AND FUTURE WORK
Following conclusions are drawn after the completion of my above research:
• Draping is the easy process by which we can produce Fashion Garment with four panels.
• The fitting of fashion garment looks attractive as compared to the normal pattern.
• Also wearer satisfied and like fitted garment made by draping without making any dart
• Pregnant women can also wear Fashion Garments made on Knitted (Jersey) fabric.
• The flare and fall of the fashion garment satisfied upon the selection of the Fabric and design
• The side panel (F2 & B2) from side view and front view of stitch garment looks satisfactory.
Although I tried my best to achieve the goal of the project, and I am too much satisfy with the above research work, and developed a new fashion Garment by using draping techniques without measurement and making master pattern, although it is very easy way to create any king of fashion Garment/ fitted garment by using your own ideas, and in future I will try to create such fashion garment having new style and new techniques which will be very newer one and very beneficial for fashion designers in my country. Also in future I want to include the students of my institute (Pak-Korea Garment Technology Institute Karachi, Pakistan) such type of projects and research as well.
ACKNOWLEDGEMENT
We pay our un-pretentious and heart-strings utterances to Almighty Allah, Whose mercy enabled us to work in a learning environment and assist us to be in the verge of seeking knowledge throughout the completion of this Research.
I would like to say special Thanks to my Korean Expert Professor Park Yung Sil, she taught me a lot for the creation
and development of new fashion style by using draping techniques during my Fellowship training (Garment Technology/Fashion Design) program at KOPO South Korea (July-Oct 2013) this is due to her kind cooperation and sharing the technical knowledge.
Sincerest thanks to my dear students of Batch 21 & Batch 3A2 (1Mr. Muhammad Obaid Khan, Mr. Shahzad Khan & Mr. Muhammad Bilal) of Pak-Korea Garment Technology Institute (PKGTI), Karachi Pakistan, they also work hard with me to complete this project Finally, we wish to offer a lot of thanks and regards to the faculty members and Staff members of PKGTI for their continuous cooperation throughout our research.
REFERENCES
[1] Oppenheimer, L. (Ed.). (n.d.). In fashion what is a drape. Retrieved August 13, 2014, from http://www.wisegeek.com
[2] Draping fashion. (n.d.). Retrieved June 19, 2013, from http://www.ehow.com
[3] Tips for draping on dress form. (n.d.). Retrieved March 17, 2014, from http://www.craftsy.com
[4] Draping text. (n.d.). Retrieved March 22, 2012, from http://www.wordpress.com
[5] Draping fashion. (n.d.). Retrieved May 25, 2013, from http://www.ehow.com
[6] Jaffe, H.,(1973). Draping for fashion design. Fashion Institute of Technology, 1973
[7] Jaffe, H., & Relis, N. (1975). Draping for fashion design. Reston, Va.: Reston Pub.
[8] Rosen, S. (2004). Patternmaking: A comprehensive reference for fashion design. Upper Saddle River, NJ: Prentice Hall.
[9] Form fitting garment. (n.d.). Retrieved April 4, 2014, from http://en.wikipedia.org/wiki/Webcitation.org