development of sensor using graphical user interface
TRANSCRIPT

DEVELOPMENT OF SENSOR USING GRAPHICAL USER
INTERFACE
MUHAMAD ZULFIKRI BIN SAIDIN
UNIVERSITY MALAYSIA PAHANG

v
ABSTRACT
A sensor is a device that measures or detects a real-world condition, such as
motion, heat or light. When flow sensors are devices used for measuring the flow
rate or quantity of a moving fluid or gas. The key in selecting correctly between the
many available flow sensors and flow meters is one of the requirements of the
particular application. The purpose for this project is to interface the flow sensor with
MATLAB GUI. The MATLAB GUI will display the result and the data that will get
from the flow sensor. To interface between them the PIC 16F877 and MAX232 will
be use. The PIC will convert the analog data to digital data and MAX232 will
connect the PIC to serial port at computer. This is to make sure the computer (GUI)
will be able to read the data. As a result, flow measurement using GUI is able to
display generated signal from the developed flow sensor.

1
CHAPTER 1
INTRODUCTION 1.1 Overview
This is project about flow sensor with using MATLAB GUI. This project will
use few devices that need to be taken into consideration to successfully accomplish
this project. The devices that are need to be considered are flow sensor (movement of
air or liquid), analog to digital converter (ADC), Peripheral interface controller and
graphical user interface using MATLAB GUI.
Flow sensors are devices used for measuring the flow rate or quantity of a
moving fluid or gas. The key to selecting correctly between the many available flow
sensors and flow meters is a clear understanding of the requirements of the particular
application. Measuring the flow of liquids is a critical need in many industrial plants.
In some operations, the ability to conduct accurate flow measurements is so
important that it can make the difference between making a profit and taking a loss.
A PIC microcontroller chip combines the function of microprocessor, ROM
program memory, some RAM memory and input/output interface in one single
package which is economical and easy to use. The PIC-Logicator system is designed
to be used to program a range of 8, 18, 28 pin reprogrammable PIC microcontrollers
which provide a variety of output, digital input and analogue input option to suit
school project uses.

2
A graphical user interface (GUI) is a pictorial interface to a program. A good
GUI can make programs easier to use by providing them with a consistent
appearance and with intuitive controls like pushbuttons, list boxes, sliders, menus,
and so forth. The GUI should behave in an understandable and predictable manner,
so that a user knows what to expect when he or she performs an action.
MATLAB is viewed by many users not only as a high-performance language
for technical computing but also as a convenient environment for building graphical
user interfaces (GUI). Data visualization and GUI design in MATLAB are based on
the Handle Graphics System in which the objects organized in a Graphics Object
Hierarchy can be manipulated by various high and low level commands. If using
MATLAB7 the GUI design more flexible and versatile, they also increase the
complexity of the Handle Graphics System and require some effort to adapt to.
1.2 Objective
i. Design MATLAB GUI for flow sensor GUI
Able to create and design GUI using GUIDE in MATLAB software
package to make an easier for the user to use. The design in GUI must be
user-friendly to make the user understand to use it.
ii. To display a signal that generated by flow sensor through PIC to GUI
To be able display the actual signal that needed for movement liquid or
air in MATLAB GUI. The signal that display in MATLAB GUI must be the
correct one to make sure the project successfully done.

3
1.3 Scope of Project
The first element need to be considered for scope of this project is hardware.
The main contribution for hardware in this project is Peripheral Interface Controller
(PIC). This PIC use to interface between sensor and computer. For the PIC, must
design the appropriate program and coding for the PIC and the circuit design to
interface with computer using serial port.RS232.
The second element is software that becomes the main part of this project.
The software that use in this project is Graphical User Interface Development
Environment (GUIDE) in MATLAB software package. This software is to design
and create the GUI layout to make a user-friendly for user. For this GUIDE software
is divide into two, first is GUI layout design with a consistent appearance and with
intuitive controls like pushbuttons, list boxes, sliders, menus, and so forth. And
second is for the program M-File, must design and use the right coding to make sure
the design in GUI layout is work properly like what is needed.
1.4 Problem Statement The sensor is able to detect any movement that through it but it’s difficult to
get the value that had been measure by the sensor. Many sensors have been created
to detect any movement but it will not show the value directly. In this development
country, the flow meter has been created to show and display the value that had been
measured by the sensor. Same for this project, but the different with flow meter is the
flow meter show the value at the gauges but with this project the measurement that
has been made by the sensor will able to display at the MATLAB program that is
GUIDE. The advantages of this GUIDE is it will not only display the value but it will
also able to explain the purpose of this program with interesting button and figure
and can guide the users to use this program.

4
1.5 Thesis Organization This thesis consists of five chapters including this chapter. The contents of
each chapter are outlined as follows. Chapter 2 contains a detailed description on the
GUI, PIC and the sensor. It will explain the detail about what is GUI and function of
PIC and what sensor that had been used. Chapter 3 includes the project methodology.
This will explain how the project is organized and the flow of the process in
completing this project. Chapter 4 presents the result of the sensor. It will show the
result and display that data at MATLAB GUI and also with comparison with
oscilloscope. Finally the conclusions for this project are presented in Chapter 5. This
chapter also included the future recommendation, costing and commercialization of
this project.

5
CHAPTER 2
LITERATURE REVIEW
2.1 Graphical User Interface (GUI) 2.1.1 Definition of GUI A graphical user interface (GUI) is a human-computer interface (i.e., a way
for humans to interact with computers) that uses windows, icons and menus and
which can be manipulated by a mouse (and often to a limited extent by a keyboard as
well) [1] [2] [3] [19] [20].
GUIs stand in sharp contrast to command line interfaces (CLIs), which use
only text and are accessed solely by a keyboard. The most familiar example of a CLI
too many people is MS-DOS. Another example is Linux when it is used in console
mode (i.e., the entire screen shows text only) [1].
An icon is a small picture or symbol in a GUI that represents a program (or
command), a file, a directory or a device (such as a hard disk or floppy). Icons are
used both on the desktop and within application programs. Examples include small
rectangles (to represent files), file folders (to represent directories), a trash can (to
indicate a place to dispose of unwanted files and directories) and buttons on web
browsers (for navigating to previous pages, for reloading the current page, etc.) [1].

6
Commands are issued in the GUI by using a mouse, trackball or touchpad to
first move a pointer on the screen to, or on top of, the icon, menu item or window of
interest in order to select that object [1] [2] [3]. Then, for example, icons and
windows can be moved by dragging (moving the mouse with the held down) and
objects or programs can be opened by clicking on their icons [1] [2] [19].
2.2 MATLAB GUI 2.2.1 Introduction
A graphical user interface (GUI) is a pictorial interface to a program. A good
GUI can make programs easier to use by providing them with a consistent
appearance and with intuitive controls like pushbuttons, list boxes, sliders, menus,
and so forth [2] [3] [4] [20]. The GUI should behave in an understandable and
predictable manner, so that a user knows what to expect when he or she performs an
action. For example, when a mouse click occurs on pushbutton, the GUI should
initiate the action described on the label of the button. This chapter introduces the
basic elements of the MATLAB GUIs [2] [3] [4]. The chapter does not contain a
complete description of components or GUI features, but it does provide the basics
required to create functional GUIs for your programs [2] [19] [20].
Applications that provide GUIs are generally easier to learn and use since the
person using the application does not need to know what commands are available or
how they work [3] [4] [20]. The action that results from a particular user action can
be made clear by the design of the interface [2] [3] [4] [20].
7
2.2.2 Operation in GUI
A graphical user interface provides the user with a familiar environment in
which to work. This environment contains pushbuttons, toggle buttons, lists, menus,
text boxes, and so forth [1] [2] [3] [4]. All of which are already familiar to the user,
so that he or she can concentrate on using the application rather than on the
mechanics involved in doing things. However, GUIs are harder for the programmer
because a GUI-based program must be prepared for mouse clicks (or possibly
keyboard input) for any GUI element at any time [1] [2] [3]. Such inputs are known
as events, and a program that responds to events is said to be event driven. The three
principal elements required to create a MATLAB Graphical User Interfaces are [2]:-
1. Components. Each item on a MATLAB GUI (pushbuttons, labels, edit boxes,
etc.) is a graphical component. The types of components include graphical controls
(pushbuttons, edit boxes, lists, sliders, etc.), static elements (frames and text strings),
menus, and axes. Graphical controls and static elements are created by the function
uicontrol, and menus are created by the functions uimenu and uicontextmenu. Axes,
which are used to display graphical data, are created by the function axes [1] [2] [3]
[4].
2. Figures. The components of a GUI must be arranged within a figure, which is
a window on the computer screen. In the past, figures have been created
automatically whenever we have plotted data. However, empty figures can be created
with the function figure and can be used to hold any combination of components [2].
3. Callbacks. Finally, there must be some way to perform an action if a user
clicks a mouse on a button or types information on a keyboard. A mouse click or a
key press is an event, and the MATLAB program must respond to each event if the
program is to perform its function. For example, if a user clicks on a button, that
event must cause the MATLAB code that implements the function of the button to be
executed. The code executed in response to an event is known as a call back. There
must be a callback to implement the function of each graphical component on the
GUI [2] [3].

8
2.3 Analog Digital Converter (ADC) 2.3.1 Introduction An analog-to-digital converter (abbreviated ADC, A/D or A to D) is an
electronic circuit that converts continuous signals to discrete digital numbers. The
reverse operation is performed by a digital-to-analog converter (DAC) [17].
Typically, an ADC is an electronic device that converts an input analog voltage to a
digital number. The digital output may be using different coding schemes, such as
binary and two's complement binary. However, some non-electronic or only partially
electronic devices, such as rotary encoders, can also be considered ADCs [17].
The resolution of the converter indicates the number of discrete values it can
produce over the range of voltage values. It is usually expressed in bits. For example,
an ADC that encodes an analog input to one of 256 discrete values (0.255) has a
resolution of eight bits, since 28 = 256 [17].
Resolution can also be defined electrically, and expressed in volts. The
voltage resolution of an ADC is equal to its overall voltage measurement range
divided by the number of discrete values [17].
2.3.2 Flash ADC This is one of the most common ways of implementing an electronic ADC
that is direct conversion ADC. A direct conversion ADC or flash ADC has a
comparator that fires for each decoded voltage range. The comparator bank feeds a
logic circuit that generates a code for each voltage range. Direct conversion is very
fast, but usually has only 8 bits of resolution (256 comparators) or fewer, as it needs
a large, expensive circuit. ADCs of this type have a large die size, a high input
capacitance, and are prone to produce glitches on the output (by outputting an out-of-
sequence code). They are often used for video or other fast signals [17].

9
2.4 Peripheral Interface Controller (PIC) 2.4.1 Introduction PIC is a family of Harvard architecture microcontrollers made by Microchip
Technology, derived from the PIC1650 originally developed by General Instrument's
Microelectronics Division. PICs are popular with developers due to their low cost,
wide availability, large user base, extensive collection of application notes,
availability of low cost or free development tools, and serial programming (and re-
programming with flash memory) capability [5].
The original PIC was built to be used with GI's new 16-bit CPU, the CP1600.
While generally a good CPU, the CP1600 had poor I/O performance, and the 8-bit
PIC was developed in 1975 to improve performance of the overall system by
offloading I/O tasks from the CPU. The PIC used simple microcode stored in ROM
to perform its tasks, and although the term wasn't used at the time, it is a RISC
design that runs one instruction per cycle (4 oscillator cycles) [5].
In 1985 General Instruments spun off their microelectronics division, and the
new ownership cancelled almost everything — which by this time was mostly out-
of-date. The PIC, however, was upgraded with EPROM to produce a programmable
channel controller, and today a huge variety of PICs are available with various on-
board peripherals (serial communication modules, UARTs, motor control kernels,
etc.) and program memory from 512 words to 32k words and more (a "word" is one
assembly language instruction, varying from 12, 14 or 16 bits depending on the
specific PIC micro family) [5].
Microchip Technology does not use PIC as an acronym; in fact the brand
name is PICmicro. It is generally regarded that PIC stands for Peripheral Interface
Controller, although General Instruments' original acronym for the PIC1650 was
"Programmable Intelligent Computer" [5].]
10
2.4.2 Programmer PIC There is much method use to program the PIC. One of those methods is using
ladder logic diagram (LDmicro). The LDmicro generates native code for certain
Microchip PIC16 and Atmel AVR microcontrollers. Usually software for these
microcontrollers is written in a programming language like assembler, C, or BASIC.
A program in one of these languages comprises a list of statements [18]. These
languages are powerful and well-suited to the architecture of the processor, which
internally executes a list of instructions. PLCs, on the other hand, are often
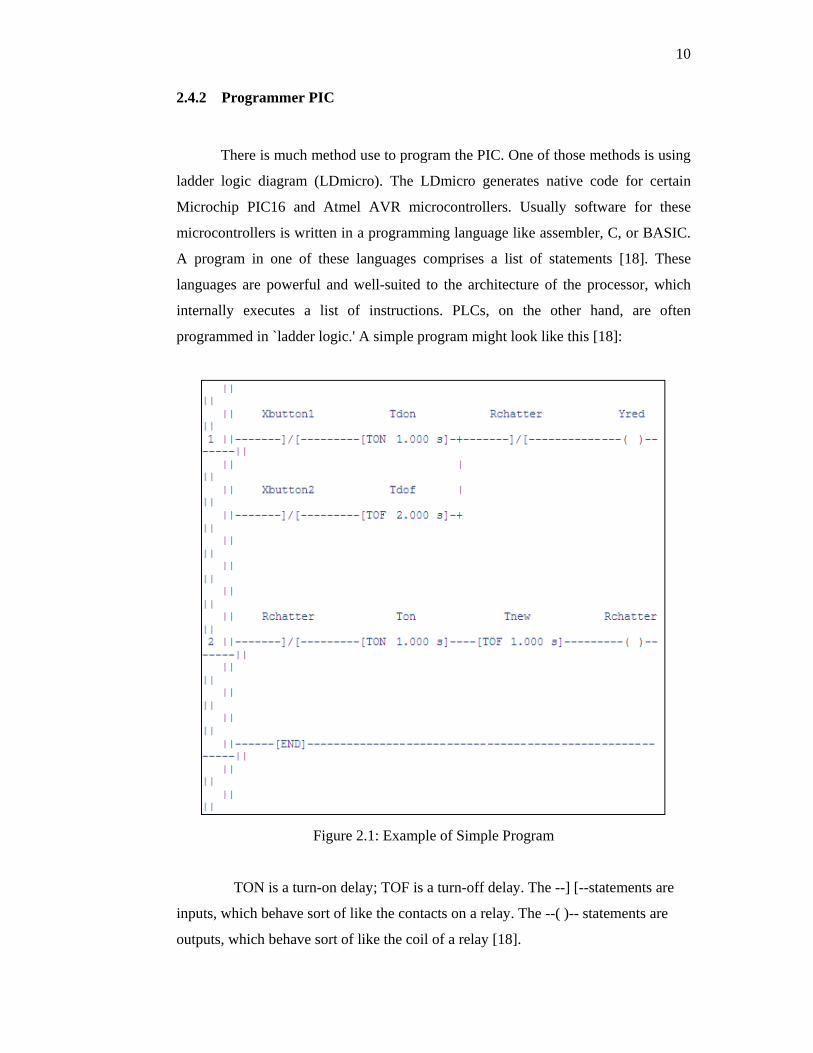
programmed in `ladder logic.' A simple program might look like this [18]:
Figure 2.1: Example of Simple Program
TON is a turn-on delay; TOF is a turn-off delay. The --] [--statements are
inputs, which behave sort of like the contacts on a relay. The --( )-- statements are
outputs, which behave sort of like the coil of a relay [18].

11
2.5 Sensor 2.5.1 Definition of Sensor
A detector [6]. A device that measures or detects a real-world condition, such
as motion, heat or light and converts the condition into an analog or digital
representation. An optical sensor detects the intensity or brightness of light, or the
intensity of red, green and blue for color systems [7] [8] [9] [10]. Also means sensing
element, the basic element that usually changes some physical parameter to an
electrical signal [7].
Sensors are normally components of some larger electronic system such as a
computer control and/or measurement system. Analog sensors most often produce a
voltage proportional to the measured quantity [10]. The signal must be converted to
digital form with a {ADC} before the CPU can process it. Digital sensors most often
use serial communication such as {EIA-232} to return information directly to the
controller or computer through a {serial port} [10].
A sensor is a technological device or biological organ that detects, or senses,
a signal or physical condition and chemical compounds [11]. A device that converts
physical conditions into information so that the control system can understand the
commands and turns it into a signal which can be measured or recorded [12]. An
instrument, usually consisting of optics, detectors, and electronics, that collects
radiation and converts it into some other form suitable for obtaining information.
This may be a certain pattern (an image, a profile, etc.), a warning, a control signal,
or some other signal [13].

12
2.5.2 Flow Sensor
A flow sensor is a device for sensing the rate or quantity of fluid flow
whether it be a gas, steam , liquid or solid [14] [15] [16]. The flow sensor directory
will enable you to source single-point sensors as well as multi-point sensors [16].
Flow sensor configurations are available for use in liquids or gases with flow rates
from ultra low flow sensing to fast transient flow sensors [14] [15] [16]. The flow
sensor directory prides itself by the fact it tries to list only quality products, from
well known flow sensor manufacturers with worldwide sales support [16].
The key to selecting correctly between the many available flow sensors and
flow meters is a clear understanding of the requirements of the particular application.
Measuring the flow of liquids is a critical need in many industrial plants. In some
operations, the ability to conduct accurate flow measurements is so important that it
can make the difference between making a profit and taking a loss [16].
With most fluid flow sensors, the flow rate is determined directly or
inferentially by measuring the liquid's velocity or the change in kinetic energy.
Velocity depends on the pressure differential that is forcing the liquid through a pipe
or conduit. Because the pipe's cross-sectional area is known and remains constant,
the average velocity is an indication of the flow rate [16].
Normally a flow sensor is the sensing element used in a flow meter, or flow
logger or a flow data logging device to record the flow of fluids. [14] [15]. The flow
sensor can normally measure whether velocity, flow rate or totalized flow of fluids
flowing through them [14] [15] [16]. Flow sensors are sometimes related to sensors
called velocimeters that measure speed of fluids flowing through them, these use
units like ft/sec [14] [15] [16]. A very basic relationship for determining the fluid's
flow rate in such cases is [16]:
; Where
Q = liquid flow through the pipe; V = average velocity of the flow;
A = cross-sectional area of the pipe.
13
Other factors that affect flow rate include the liquid's viscosity, density and
temperature. Some other factors may be considered such as frictional forces and pipe
configurations [16].
There are three basic types of flow sensors and flow meters. Mass flow
sensors measure flow rate in terms of the mass of the fluid substance and have units
such as lbs/min. Volumetric flow sensors measure flow rate in terms of how much of
the material is flowing and use units like mol/min [16]. Velocity flow sensors
measure flow rate as in terms of how fast the material is moving. These use units like
ft/sec [14] [15] [16]. Critical specifications for flow sensors and flow meters are the
measuring range, what type of medium and measurement is to be used, and the
operating temperature and pressure ranges [14] [16].
The most common types of Flow sensors are designed to measure the flow of
media through pipes, hoses and systems. They can be classified into three categories
[16]:
I. Mass flow sensors
- Measure flow rate in units of mass flow, for example, lbs/min [16].
II. Velocity flow sensors
- Measure flow rate as in units of velocity, for example, ft/sec [14] [15] [16].
III. Volumetric flow sensors.
- Measure flow rate in units of volumetric flow, for example, mL/min [16].
Most flow sensors are designed to handle a single style of media, while a few
are designed to provide multimedia measurements. Specific are designed as air flow
sensors and other gas flow sensors, water flow sensors and other liquid flow sensors,
or solid flow sensors [16].
In addition to the main classification, the flow sensor technology can be
based on such things as light, heat, electromagnetic properties, ultrasonic and many
other technologies in a wide spectrum. Some of the most common types of flow
sensor technologies are magnetic flow sensors, turbine flow sensors and ultrasonic
flow sensors. [15] [16]. Ultrasonic flow sensors use sound frequencies above audible
pitch to determine flow rates. They can be either Doppler Effect sensors or Time-of-
Flight sensors [14] [16].

14
Doppler flow sensors measure the frequency shifts caused by fluid flow [14]
[16]. The frequency shift is proportional to the liquid's velocity.
Time of flight sensors use the speed of the signal traveling between two transducers
that increases or decreases with the direction of transmission and the velocity of the
fluid being measured [16].
Turbine flow sensors measure the rate of flow in a pipe or process line via a
rotor that spins as the media passes through its blades. The rotational speed is a direct
function of flow rate and can be sensed by magnetic pick-up, photoelectric cell, or
gears [16].
Magnetic flow sensors apply Farraday's law to measure liquid flow. The
sensor contains two electrodes that produce a magnetic field when energized. When a
conductive liquid passes through the electrodes in the flow meter, a voltage is
induced. The voltage is proportional to the electric field strength, diameter of the
pipe, and flow velocity [16].
A fluid dynamics problem is easily solved (especially in non-compressible
fluids) by knowing the flow at all nodes in a network [14]. Alternatively, pressure
sensors can be placed at each node, and the fluid network can be solved by knowing
the pressure at every node [14] [16]. These two situations are analogous to knowing
the voltages or knowing the currents at every node (noncompressible fluid being
conserved in the same manner as Kirchoff's current or voltage laws, in which
conservation of fluid is analogous to conservation of electrons in a circuit).Flow
meters generally cost more than pressure sensors, so it is often more economical to
solve a fluid dynamics network monitoring problem by way of pressure sensors, than
to use flow meters [14] [16].

15
CHAPTER 3
METHODOLOGY 3.1 Introduction
This chapter presents the methodology of this project. It describes on how the
project is organized and the flow of the steps in order to complete this project. The
methodology is diverged in two parts, first is software with the main part using
MATLAB GUI. Design the layout GUI to display the result from the sensor. The
second part is software with using peripheral interface controller (PIC) to interface
with computer.
3.2 Methodology
There is few mains method in order to develop this project. Before interface
the main parts hardware and software. The PIC can be simulating with using PIC
simulator IDE program. This program can simulate the hardware part before the real
project is developing to interface with MATLAB GUI. The ladder logic diagram
(Ldmicro) is use to program the PIC. This program also can simulate before burn to
real PIC. The figure below show the diagram and flow chart for this project.

16
3.2.1 Project Diagram
Figure 3.1: Simplified Block Diagram
From this project, the flow sensor will be an input and the output it will show
at MATLAB GUI. The flow sensor will detect movement of liquid or air and from
that the sensor will capture the data about that movement and produced in analog
signal. And it will go through PIC. The PIC is to convert the input analog to digital
number. From that the PIC will connect to MAX232 and the MAX232 will connect
to the computer with communication port using DB9. It will connect to MATLAB
GUI through serial port of computer. The PIC will transfer the data that get from the
sensor via ADC to MATLAB GUI and from that the data will show in MATLAB
GUI. It will show the data that we need from the movement of air or liquid like
waveform, quantity, velocity and so forth.

17
3.2.2 Flow Chart of Project
Figure 3.2: Flow Chart

18
From the flow chart above after get the topic of the project and go to case
study to find more related information and to deep knowledge about the project. Find
the information whether at internet, book or anything else that is related to the topic.
After that, define the part of the project and divide it into two parts. The first part is
about the hardware. First is defining the hardware that want to use after that design
the circuit for this hardware and interfacing it. After done with interfacing the
circuits that have design test it whether is okay or not okay. If not okay redesign the
circuit and try to troubleshoot the circuit until the circuit have function correctly.
The second part for this project is about the software. For this project the
software that has to use is MATLAB GUI. First, study about the software
programming and understand how to use it. For this software has divide by two parts,
first is GUI layout design with a consistent appearance and with intuitive controls
like pushbuttons, list boxes, sliders, menus, and so forth. And second is for the
program M-File, must design and use the right coding to make sure the design in
GUI layout is work properly like what is needed. After the two parts have done, test
it to make sure the software that has been design is work properly. Is not, identify the
problem and overcome it.
After the hardware and software part have work properly, interface the two of
this part. Simulate and testing it whether is okay or not. And troubleshoot this part if
not okay until get the satisfied result. After the testing is work properly and correctly,
finally these projects have done and submit the thesis about this project.
19
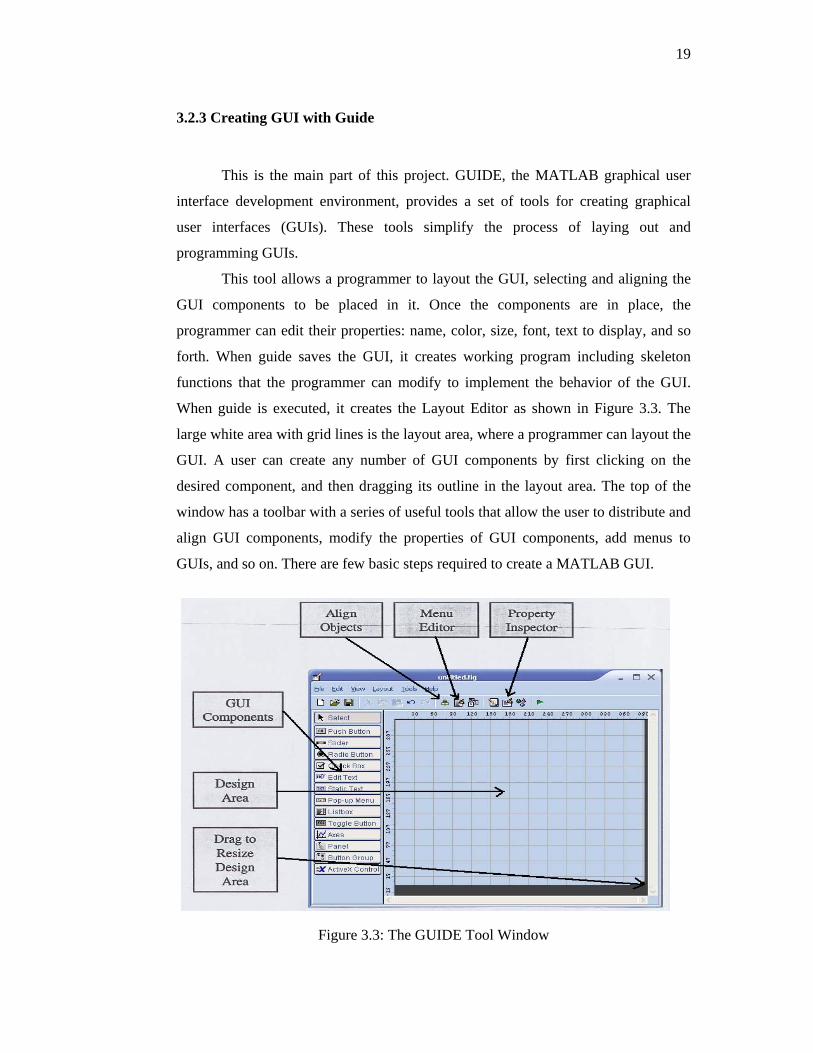
3.2.3 Creating GUI with Guide This is the main part of this project. GUIDE, the MATLAB graphical user
interface development environment, provides a set of tools for creating graphical
user interfaces (GUIs). These tools simplify the process of laying out and
programming GUIs.
This tool allows a programmer to layout the GUI, selecting and aligning the
GUI components to be placed in it. Once the components are in place, the
programmer can edit their properties: name, color, size, font, text to display, and so
forth. When guide saves the GUI, it creates working program including skeleton
functions that the programmer can modify to implement the behavior of the GUI.
When guide is executed, it creates the Layout Editor as shown in Figure 3.3. The
large white area with grid lines is the layout area, where a programmer can layout the
GUI. A user can create any number of GUI components by first clicking on the
desired component, and then dragging its outline in the layout area. The top of the
window has a toolbar with a series of useful tools that allow the user to distribute and
align GUI components, modify the properties of GUI components, add menus to
GUIs, and so on. There are few basic steps required to create a MATLAB GUI.
Figure 3.3: The GUIDE Tool Window

20
Firstly, decide what elements are required for the GUI and what the function
of each element will be and then make a rough layout of the components by hand on
a piece of paper. Then, after that use a MATLAB tool called guide (GUI
Development Environment) to layout the Components on a figure. The size of the
figure and the alignment and spacing of components on the figure can be adjusted
using the tools built into guide. This figure below show some basic component of
GUI that can be use to design the layout GUI.
Table 3.1: Some Basic GUI Component [1]

21
After design the layout, MATLAB tool called the Property Inspector (built
into guide) is use to give each component a name (a "tag") and to set the
characteristics of each component, such as its color, the text it displays, and so on.
This figure below had shown the example of property inspector on push button.
Figure 3.4: Property Inspector
After done with setting the property inspector in all components and then
save the figure to a file. When the figure is saved, two files will be created on disk
with the same name but different extents. The fig file contains the actual GUI that
has been created, and the M-file contains the code to load the figure and skeleton call
backs for each GUI element. Figure 3.5 and Figure 3.6 show the layout GUI after
done with the designation with few basic components that had been used like push
button and axes.

22
Figure 3.5: Example Layout GUI (Main Window)
Figure 3.6: Example Layout GUI (Air Flow Sensor)

23
Finally, when save GUI layout, it will automatically generate an M-file and
then write code to implement the behavior associated with each callback function in
M-file as shown in Figure 3.7. This last step is the difficult part in GUIDE. This part
is where the programmer can add code to the callbacks to perform the functions that
what we want. If the coding is not correct then it cannot perform the function that we
want.
Figure 3.7: Example of M-file
Unlike GUI objects, MATLAB does not automatically create callback strings
and stub functions for menu items. The programmer must perform this function
manually. Only the Label, Tag, Callback, Checked, and Separator properties of a
menu item can be set from the Menu Editor. If want to set any of the other properties,
use the Property Editor (propedit) on the figure, and select the appropriate menu item
to edit.

24
3.2.4 Programming the GUI After the layer out GUI is been created then need to program its behavior.
The code that had been write, control how the GUI responds to events such as button
clicks, slider movement, menu item selection, or the creation and deletion of
components. This programming takes the form of a set of functions, called callbacks,
for each component and for the GUI figure itself.
A callback is a function that writes and associates with a specific GUI
component or with the GUI figure. It controls GUI or component behavior by
performing some action in response to an event for its component. This kind of
programming is often called event-driven programming. When an event occurs for a
component, MATLAB invokes the component’s callback that is triggered by that
event. As an example, suppose a GUI has a button that triggers the plotting of some
data. When the user clicks the button, MATLAB calls the callback that associated
with clicking that button, and the callback, which have programmed, then gets the
data and plots it.
The GUI figure and each type of component have specific kinds of callbacks
with which it can be associated. The callbacks those are available for each
component is defined as properties of that component. For example, a push button
has five callback properties: Callback, CreateFcn, DeleteFcn, ButtonDownFcn, and
KeyPressFcn as shown in Figure 3.8 after right click at the push button. The
programmer can, but are not required to, create a callback function for each of these
properties. The GUI itself, which is a figure, also has certain kinds of callbacks with
which it can be associated. Each kind of callback has a triggering mechanism or
event that causes it to be called. The following Table 3.2 is lists the callback
properties that GUIDE makes available, their triggering events, and the components
to which they apply.