device firmware update (dfu) for windows · prompt asks user to input file path of firmware .bin...
TRANSCRIPT

INFORMATION IN THIS DOCUMENT IS PROVIDED IN CONNECTION WITH INTEL® PRODUCTS. NO LICENSE, EXPRESS OR IMPLIED, BY ESTOPPEL OR OTHERWISE, TO ANY INTELLECTUAL PROPERTY RIGHTS IS GRANTED BY THIS DOCUMENT. EXCEPT AS PROVIDED IN INTEL'S TERMS AND CONDITIONS OF SALE FOR SUCH PRODUCTS, INTEL ASSUMES NO LIABILITY WHATSOEVER, AND INTEL DISCLAIMS ANY EXPRESS OR IMPLIED WARRANTY, RELATING TO SALE AND/OR USE OF INTEL PRODUCTS INCLUDING LIABILITY OR WARRANTIES RELATING TO FITNESS FOR A PARTICULAR PURPOSE, MERCHANTABILITY, OR INFRINGEMENT OF ANY PATENT, COPYRIGHT OR OTHER INTELLECTUAL PROPERTY RIGHT.UNLESS OTHERWISE AGREED IN WRITING BY INTEL, THE INTEL PRODUCTS ARE NOT DESIGNED NOR INTENDED FOR ANY APPLICATION IN WHICH THE FAILURE OF THE INTEL PRODUCT COULD CREATE A SITUATION WHERE PERSONAL INJURY OR DEATH MAY OCCUR.
Intel may make changes to specifications and product descriptions at any time, without notice. Designers must not rely on the absence or characteristics of any features or instructions marked "reserved" or "undefined." Intel reserves these for future definition and shall have no responsibility whatsoever for conflicts or incompatibilities arising from future changes to them. The information here is subject to change without notice. Do not finalize a design with this information.
The products described in this document may contain design defects or errors known as errata which may cause the product to deviate from published specifications. Current characterized errata are available on request. Contact your local Intel sales office or your distributor to obtain the latest specifications and before placing your product order.
All products, platforms, dates, and figures specified are preliminary based on current expectations, and are subject to change without notice. All dates specified are target dates, are provided for planning purposes only and are subject to change. This document contains information on products in the design phase of development. Do not finalize a design with this information. Revised information will be published when the product is available. Verify with your local sales office that you have the latest datasheet before finalizing a design.
Code names featured are used internally within Intel to identify products that are in development and not yet publicly announced for release. Customers, licensees and other third parties are not authorized by Intel to use code names in advertising, promotion or marketing of any product or services and any such use of Intel's internal code names is at the sole risk of the user.
Intel, RealSense, and the Intel logo are trademarks of Intel Corporation in the U.S. and other countries.
*Other names and brands may be claimed as the property of others.
Copyright © 2018, Intel Corporation. All rights reserved.
Legal Disclaimer

Device Firmware Update (DFU) for Windows
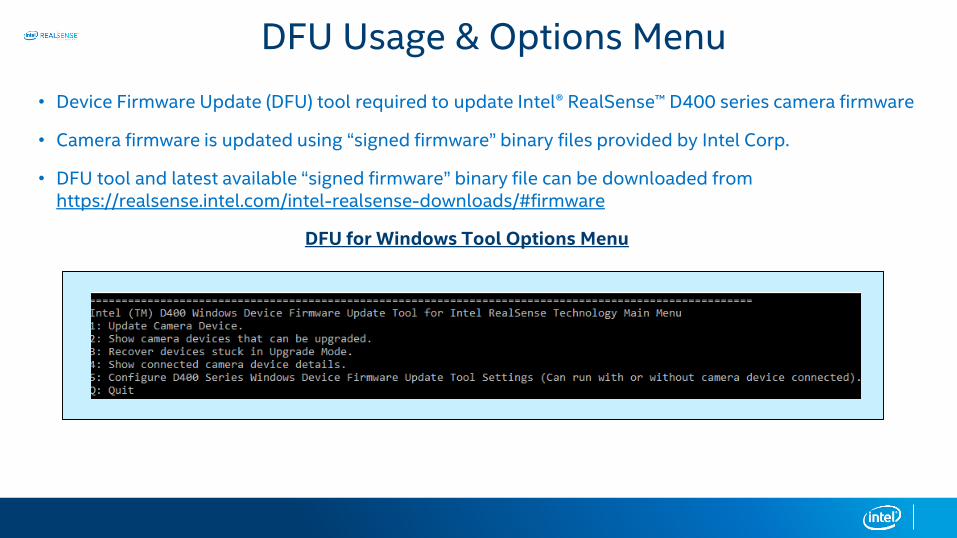
DFU Usage & Options Menu
• Device Firmware Update (DFU) tool required to update Intel® RealSense™ D400 series camera firmware
• Camera firmware is updated using “signed firmware” binary files provided by Intel Corp.
• DFU tool and latest available “signed firmware” binary file can be downloaded from https://realsense.intel.com/intel-realsense-downloads/#firmware
DFU for Windows Tool Options Menu
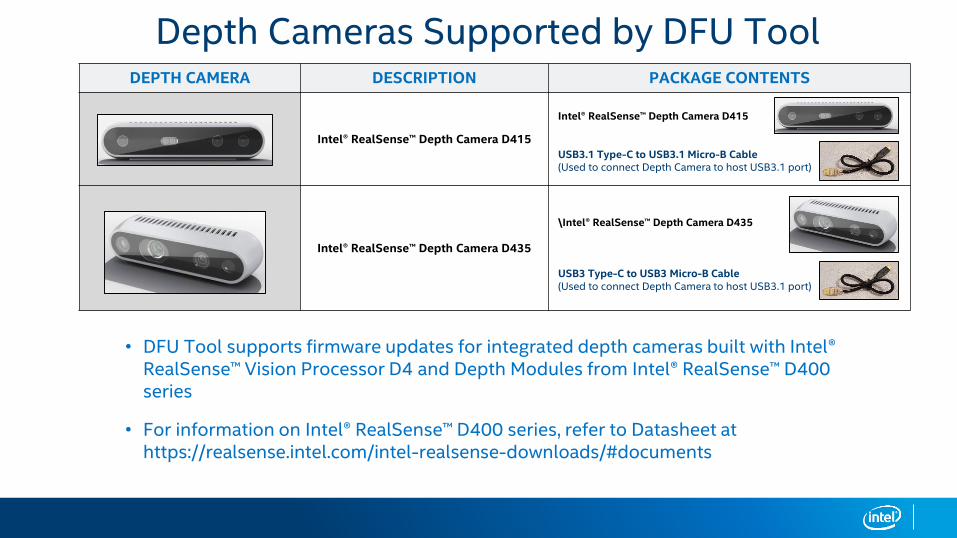
DEPTH CAMERA DESCRIPTION PACKAGE CONTENTS
Intel® RealSense™ Depth Camera D415
Intel® RealSense™ Depth Camera D415
USB3.1 Type-C to USB3.1 Micro-B Cable(Used to connect Depth Camera to host USB3.1 port)
Intel® RealSense™ Depth Camera D435
\Intel® RealSense™ Depth Camera D435
USB3 Type-C to USB3 Micro-B Cable(Used to connect Depth Camera to host USB3.1 port)
Depth Cameras Supported by DFU Tool
• DFU Tool supports firmware updates for integrated depth cameras built with Intel® RealSense™ Vision Processor D4 and Depth Modules from Intel® RealSense™ D400 series
• For information on Intel® RealSense™ D400 series, refer to Datasheet at https://realsense.intel.com/intel-realsense-downloads/#documents
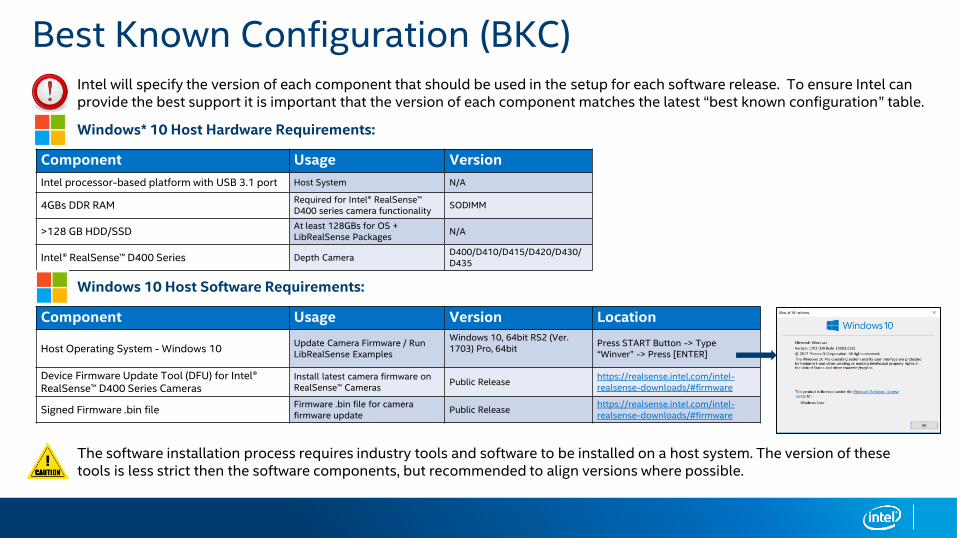
Best Known Configuration (BKC)Intel will specify the version of each component that should be used in the setup for each software release. To ensure Intel can provide the best support it is important that the version of each component matches the latest “best known configuration” table.
Component Usage Version
Intel processor-based platform with USB 3.1 port Host System N/A
4GBs DDR RAMRequired for Intel® RealSense™ D400 series camera functionality
SODIMM
>128 GB HDD/SSDAt least 128GBs for OS + LibRealSense Packages
N/A
Intel® RealSense™ D400 Series Depth Camera D400/D410/D415/D420/D430/D435
Windows* 10 Host Hardware Requirements:
The software installation process requires industry tools and software to be installed on a host system. The version of thesetools is less strict then the software components, but recommended to align versions where possible.
Windows 10 Host Software Requirements:
Component Usage Version Location
Host Operating System - Windows 10Update Camera Firmware / Run LibRealSense Examples
Windows 10, 64bit RS2 (Ver. 1703) Pro, 64bit
Press START Button -> Type “Winver” -> Press [ENTER]
Device Firmware Update Tool (DFU) for Intel® RealSense™ D400 Series Cameras
Install latest camera firmware on RealSense™ Cameras
Public Releasehttps://realsense.intel.com/intel-realsense-downloads/#firmware
Signed Firmware .bin fileFirmware .bin file for camera firmware update
Public Releasehttps://realsense.intel.com/intel-realsense-downloads/#firmware

Camera Enumeration

Enumeration Details1. Plug D400 Series camera to Windows 10 Host
via USB3.1 port. > “Setting Up Device” dialog box should appear on very first plug in of device.
2. Open Device Manager> Right click Start button.> Click on Device Manger.
3. Notice the D400 series number of appropriatecamera is shown under “Cameras”. If camera is not shown under “Cameras”, please make sure all Windows 10 Updates aredownloaded and installed.Also verify if Windows 10 RS2 1706 is installed.
Device Enumeration – Windows* 10 Host SystemIn order for Windows* 10 to recognize D400 Series devices and install correct drivers; all Windows Updates must be applied prior to plugging D400 Series camera to Windows Host System. For below instructions, D410 camera was used, device enumeration will differ from D400/D415/D420/D430/D435. Driver installation across Windows* 10 remains the same.
1
Camera Cable
2
3

DFU Tool Install/Usage
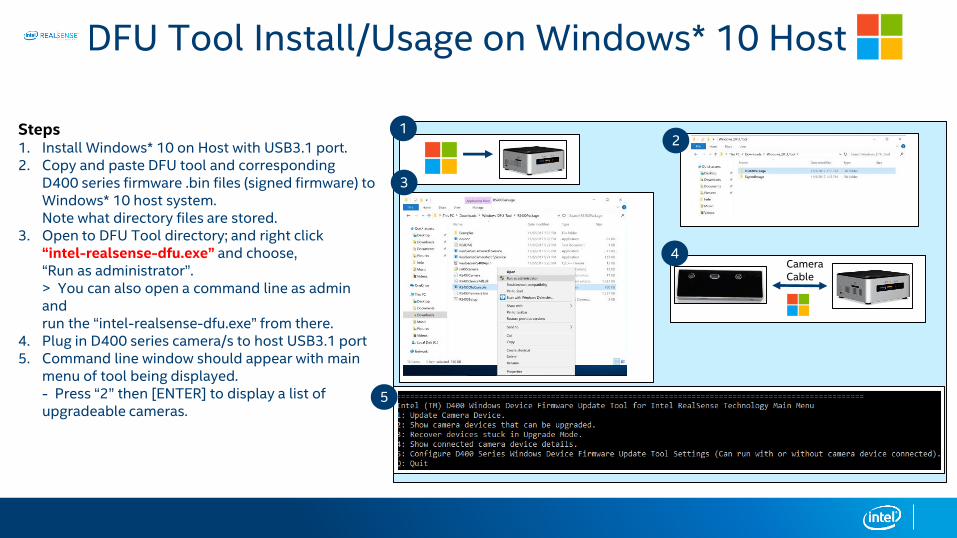
Steps1. Install Windows* 10 on Host with USB3.1 port.2. Copy and paste DFU tool and corresponding
D400 series firmware .bin files (signed firmware) to Windows* 10 host system.Note what directory files are stored.
3. Open to DFU Tool directory; and right click“intel-realsense-dfu.exe” and choose,“Run as administrator”.> You can also open a command line as admin andrun the “intel-realsense-dfu.exe” from there.
4. Plug in D400 series camera/s to host USB3.1 port5. Command line window should appear with main
menu of tool being displayed.- Press “2” then [ENTER] to display a list of upgradeable cameras.
DFU Tool Install/Usage on Windows* 10 Host
12
3
Camera Cable
4
5

Steps (Contd.)6. Notice a list is produced in command line window;
press “1” [ENTER] to select D400 series cameraand begin firmware update process.
7. Prompt asks user to input file path of firmware .binfile.> Type the full file path with firmware filename included and press [ENTER].
8. Notice output of downloaded bytes transmitting,this process takes ~3 minutes until completion.
DFU Tool Install/Usage on Windows* 10 Host
6
8
7

Steps (Contd.)
9. When firmware upgrade is complete, the camera willreset. A windows icon saying “Device is undergoingadditional setup” should pop up.The main menu will appear again.
10. Verify the firmware version installed on camera bypressing, “4” and [ENTER] followed by “1” and [ENTER] Notice the firmware version has changed on the Intel® RealSense™ Camera selected for firmware update
DFU Tool Install/Usage on Windows* 10 Host
9
10

Intel Customer Support via Email
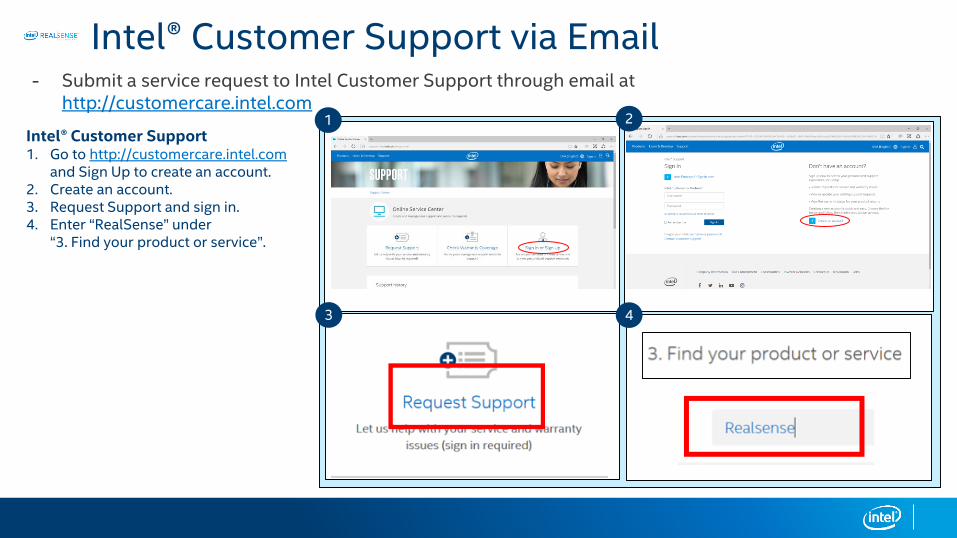
Intel® Customer Support via Email- Submit a service request to Intel Customer Support through email at
http://customercare.intel.com
Intel® Customer Support1. Go to http://customercare.intel.com
and Sign Up to create an account. 2. Create an account.3. Request Support and sign in.4. Enter “RealSense” under
“3. Find your product or service”.
1 2
43
Intel® Customer Support via Email (Cont.)- Submit a service request to Intel Customer Support through email at
http://customercare.intel.com
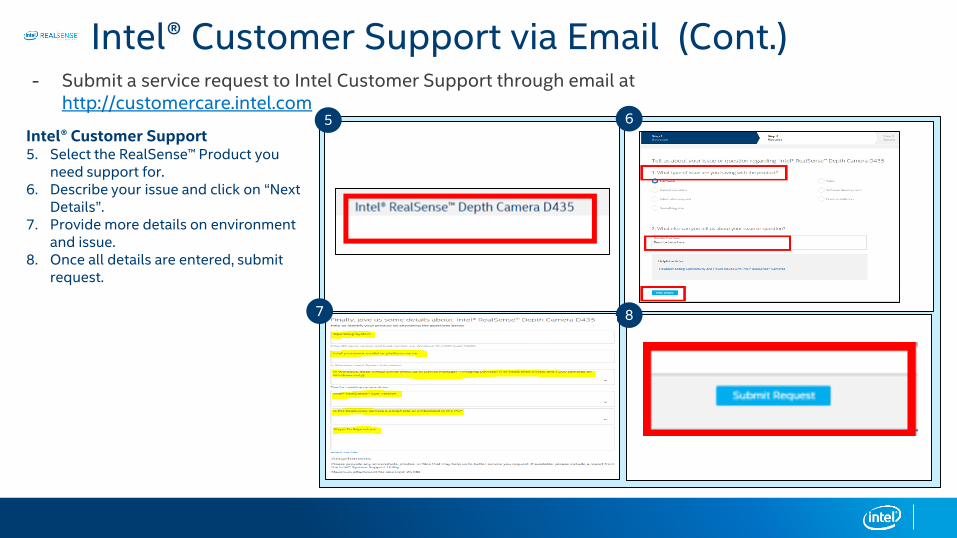
Intel® Customer Support5. Select the RealSense™ Product you
need support for.6. Describe your issue and click on “Next
Details”.7. Provide more details on environment
and issue.8. Once all details are entered, submit
request.
5 6
87

RealSense™ Community Issue Submission
RealSense™ Community Issue Submission- Customers need to login on the Intel® RealSense™ Community- RealSense™ Community Link: https://communities.intel.com/community/tech
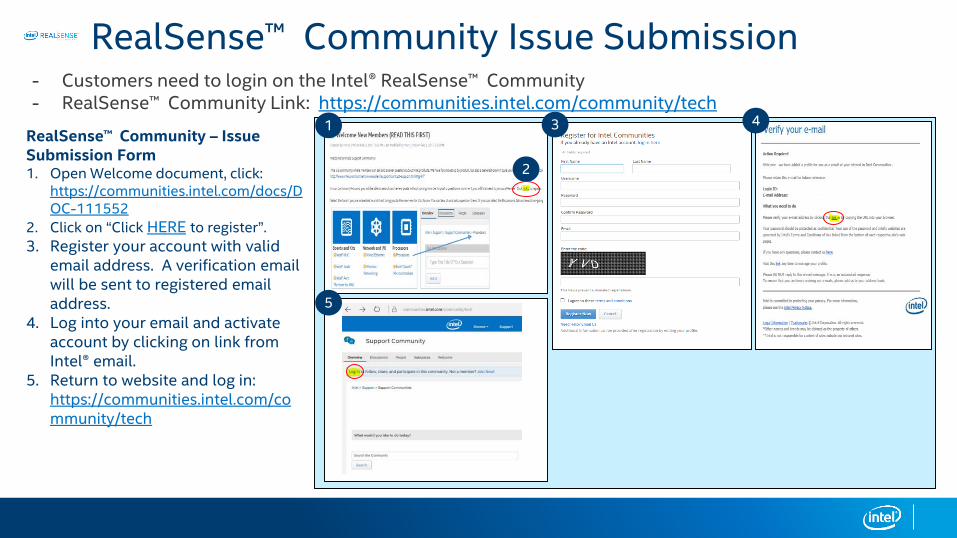
RealSense™ Community – Issue Submission Form1. Open Welcome document, click:
https://communities.intel.com/docs/DOC-111552
2. Click on “Click HERE to register”.
3. Register your account with valid email address. A verification email will be sent to registered email address.
4. Log into your email and activate account by clicking on link from Intel® email.
5. Return to website and log in: https://communities.intel.com/community/tech
1
2
3 4
5

RealSense™ Community Issue Submission (Cont.)- Customers need to login on the Intel® RealSense™ Community- RealSense™ Community Link: https://communities.intel.com/community/tech
RealSense™ Community – Issue Submission Form6. Click on “Intel® RealSense™
Community under “Boards and Kits”.7. Click on link “Ask a question.” 8. A window will open and user can ask a
question or state an issue they are seeing with their RealSense™ Camera.> Use a proper title(IE: D410 Intel® RealSense™ Camera does not stream video) > Enter as much details about issue as possible. The more information – the better the RealSense™ community can help with an issue.> Select a category for issue, such as “RealSense™ for PC”, depending on what camera is being used.
9. When all information is entered, click“Post” submit issue to RealSense™ Community.
6 7
8
9

Issue Submission via GitHub

Issue Submission Process on GitHub- Customers need to create a GitHub account and login.- GitHub Link: https://github.com/IntelRealSense/libRealSense/issues
GitHub Issue Submission Process forLibRealSense Releases1. Once logged into site, click on
“Issues” tab.2. Click “New Issue” Icon.3. Enter proper name of new issue.4. Fill out required information such as,
camera model, FW version, OS, and actual issue description.
5. When finished documenting issue, click icon “Submit new issue”.
6. Once a new issue is submitted, aforum is created allowing for Intel® ™ teams to begin fixing / commenting onnew issue.
1 2
3
4
5
6
