dfa product simpli ication operation library · dfa product simpli ication viewing and...
TRANSCRIPT
Operation Library / 1
DFA Product Simpli�ication
Operation Library
Some steps that are necessary when assembling a product do not involve the simultaneous addi� on of a part or subassembly. In DFA, these steps are called separate opera� ons and are added to an analysis from the program’s opera� on library. This opera� on library is completely customizable. Any of your custom opera� ons can be added to the library and then later used in your analyses.
This tutorial fi rst describes how to use in an analysis an exis� ng opera� on to es� mate the process � me and process cost for the applica� on of thread locking compound to two screws. The second sec� on of this tutorial shows how to view the formula for the Apply adhesive drops opera� on that was used in the fi rst sec� on of this tutorial. Some of the more important aspects of the formula and the opera� on formula window are also described. The third sec� on of this chapter shows how to create within the opera� ons library a new opera� on for automa� c robo� c welding.
Using an operation in an analysisOpen the analysis fi le for the Pneuma� c control that has been installed with your DFA so� ware. Select Open from the File menu, browse to DFMA\data\samples, and double click the pneuma� c control.dfax analysis fi le. A� er the fi le opens, click the Original design - completed analysis tab.
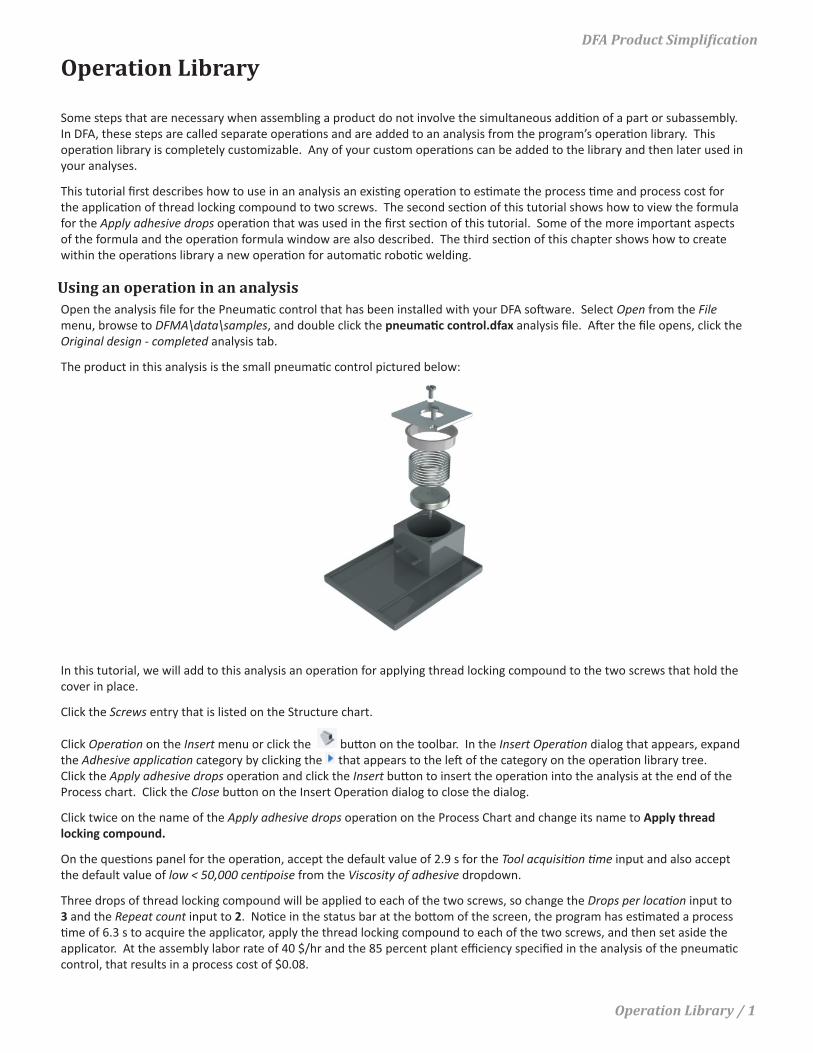
The product in this analysis is the small pneuma� c control pictured below:
In this tutorial, we will add to this analysis an opera� on for applying thread locking compound to the two screws that hold the cover in place.
Click the Screws entry that is listed on the Structure chart.
Click Opera� on on the Insert menu or click the bu� on on the toolbar. In the Insert Opera� on dialog that appears, expand the Adhesive applica� on category by clicking the that appears to the le� of the category on the opera� on library tree. Click the Apply adhesive drops opera� on and click the Insert bu� on to insert the opera� on into the analysis at the end of the Process chart. Click the Close bu� on on the Insert Opera� on dialog to close the dialog.
Click twice on the name of the Apply adhesive drops opera� on on the Process Chart and change its name to Apply thread locking compound.
On the ques� ons panel for the opera� on, accept the default value of 2.9 s for the Tool acquisi� on � me input and also accept the default value of low < 50,000 cen� poise from the Viscosity of adhesive dropdown.
Three drops of thread locking compound will be applied to each of the two screws, so change the Drops per loca� on input to 3 and the Repeat count input to 2. No� ce in the status bar at the bo� om of the screen, the program has es� mated a process � me of 6.3 s to acquire the applicator, apply the thread locking compound to each of the two screws, and then set aside the applicator. At the assembly labor rate of 40 $/hr and the 85 percent plant effi ciency specifi ed in the analysis of the pneuma� c control, that results in a process cost of $0.08.
2 / Operation Library
DFA Product Simpli�ication
Viewing and understanding the formula for an operationOpen the Opera�on Library by selec�ng Opera�ons from the Libraries menu at the top of your program screen.
When the Opera�on Library opens, if necessary, expand the Adhesive opera�ons category by clicking the that appears to the le� of the category name on the library tree.
Click the Apply adhesive drops opera�on to select it. The library window is divided into two panes; the library tree on the le�, which lists the categories and opera�ons, and the opera�on pane on the right. In the Opera�on pane, the formula status indicates if the formula entered for the opera�on is valid or contains syntax errors. The formula status will also indicate if no formula has been entered for the opera�on. The informa�on defined in the details and picture boxes will appear alongside the opera�on ques�on panel inputs a�er the opera�on is added to an analysis.
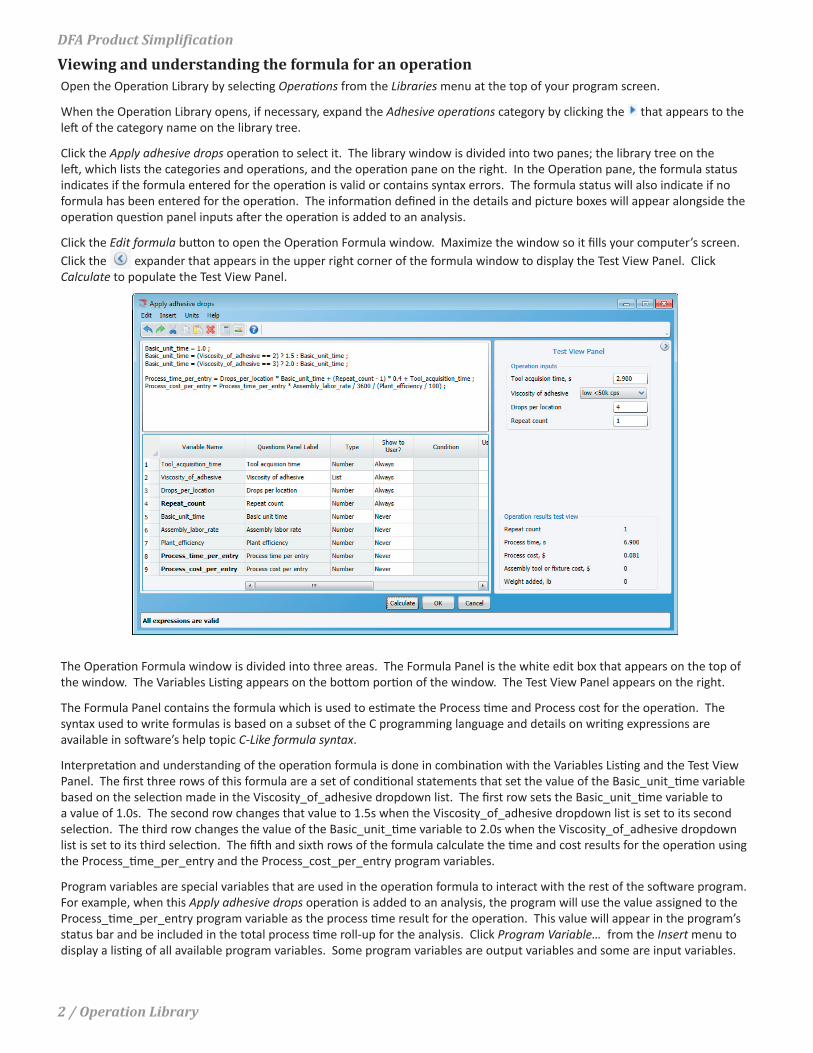
Click the Edit formula bu�on to open the Opera�on Formula window. Maximize the window so it fills your computer’s screen. Click the expander that appears in the upper right corner of the formula window to display the Test View Panel. Click Calculate to populate the Test View Panel.
The Opera�on Formula window is divided into three areas. The Formula Panel is the white edit box that appears on the top of the window. The Variables Lis�ng appears on the bo�om por�on of the window. The Test View Panel appears on the right.
The Formula Panel contains the formula which is used to es�mate the Process �me and Process cost for the opera�on. The syntax used to write formulas is based on a subset of the C programming language and details on wri�ng expressions are available in so�ware’s help topic C-Like formula syntax.
Interpreta�on and understanding of the opera�on formula is done in combina�on with the Variables Lis�ng and the Test View Panel. The first three rows of this formula are a set of condi�onal statements that set the value of the Basic_unit_�me variable based on the selec�on made in the Viscosity_of_adhesive dropdown list. The first row sets the Basic_unit_�me variable to a value of 1.0s. The second row changes that value to 1.5s when the Viscosity_of_adhesive dropdown list is set to its second selec�on. The third row changes the value of the Basic_unit_�me variable to 2.0s when the Viscosity_of_adhesive dropdown list is set to its third selec�on. The fi�h and sixth rows of the formula calculate the �me and cost results for the opera�on using the Process_�me_per_entry and the Process_cost_per_entry program variables.
Program variables are special variables that are used in the opera�on formula to interact with the rest of the so�ware program. For example, when this Apply adhesive drops opera�on is added to an analysis, the program will use the value assigned to the Process_�me_per_entry program variable as the process �me result for the opera�on. This value will appear in the program’s status bar and be included in the total process �me roll-up for the analysis. Click Program Variable… from the Insert menu to display a lis�ng of all available program variables. Some program variables are output variables and some are input variables.
Operation Library / 3
DFA Product Simpli�icationOutput variables take their assigned values from the opera�on formula and pass them back to the main program. Input variables take values from the main program and pass them into the opera�on formula for use in formula calcula�ons. The output program variables each correspond to a result at the bo�om of the test view panel and are:
Repeat_count
Process_�me_per_entry
Process_cost_per_entry
Assembly_tool_or_fixture_cost
Weight
The Input program variables are:
Assembly_labor_rate
Assembly_length
Assembly_depth
Assembly_width
Life_volume
Plant_efficiency
Tool_acquisi�on_�me
Click the Close bu�on on the bo�om of the Program variables window to return to the Opera�on formula window.
The variables that appear in the Variables Lis�ng are automa�cally generated by the program based on the variables defined in the opera�on’s formula. The order of the listed rows determines the order in which inputs are displayed on the ques�ons panel a�er the opera�on is added to an analysis. Many of the columns are editable so that various characteris�cs of each variable can be defined. The column defini�ons are:
• Variable Name - The name of the row’s variable used in the formula. Variable names must use underscores instead of spaces.
• Ques�ons Panel Label - The text label for the input that will be used on the ques�ons panel when the opera�on is added to an analysis. This column defaults to the same value as the Variable Name but with underscores replaced by spaces.
• Type - Iden�fies how the input will appear on the ques�ons panel a�er the opera�on is added to an analysis.
• Show to User? - Indicates whether or not the input will be shown on the ques�ons panel a�er the opera�on is added to an analysis.
• Condi�on - Contains the name of the checkbox variable that is true when the input should be displayed on the ques�ons panel a�er the opera�on is added to an analysis. This column is only available for edi�ng when the Show to user? column is set to Some�mes.
• User Can Edit? - Indicates whether or not the input can be changed on the ques�ons panel a�er the opera�on is added to an analysis.
• Value - The value currently stored for the row’s variable. This can be a constant value that you type into the column or the result of a calcula�on done using the opera�on’s formula.
• Number of Decimals - The number of decimal places that will be shown on the ques�ons panel a�er the opera�on is added to an analysis.
• The next columns define the English and metric units as well as the conversion factor used to convert between English and metric units.
• Descrip�on - The text that is displayed in a pop-up when help is requested for the input a�er the opera�on is added to an analysis.
4 / Operation Library
DFA Product Simpli�icationThe top por�on of the Test View Panel shows how the ques�ons panel will look a�er the opera�on is added to an analysis. The bo�om por�on of the Test View Panel indicates the value of each output program variable when the inputs defined in the top por�on of the Test View Panel are used in the opera�on formula. These two areas are normally used when crea�ng a new opera�on so that you can easily preview the appearance of the ques�ons panel and the results and then make any changes necessary to the formula or variables lis�ng.
Click Cancel to close the opera�on formula window and return to the opera�ons library screen.
Creating a new operationOne improvement made to the present version of DFA is the ability to use, with separate opera�ons, process rates that are different than the labor rate specified for the main assembly. This makes it much easier to add and use opera�ons that u�lize a high level of automa�on to reduce their hourly process rate. To illustrate this improvement, we’ll be crea�ng a new opera�on for Robo�c MIG welding.
On the opera�ons library tree, expand the Welding category by clicking the that appears to the le� of the category name and then click the last opera�on in the category, Manual MIG/TIG Vbu� weld, to highlight it. Click Opera�on from the Insert menu to add a new opera�on and then name it Robo�c MIG Weld. Click the Edit formula bu�on to open the Opera�on Formula Window and then, if necessary, maximize the window so it fills your computer’s screen. Be sure that English is checked on the Units menu so that you develop the opera�on using English units.
Into the Formula Panel, enter the following formula text:
Welding_speed = Material == 1 ? 13.6 : 24.2 ;
Material_cost_per_length = Material == 1 ? 0.035 : 0.028 ;
Weight = Material == 1 ? Length_of_welds * 0.0014 : Length_of_welds * 0.0005 ;
Welding_�me = Length_of_welds / Welding_speed * 60 + (Number_of_welds + 1) * 0.8 ;
Process_�me_per_entry = (Time_to_start_machine + Welding_�me) ;
Assembly_tool_or_fixture_cost ;
Material_cost = Include_material_cost ? Material_cost_per_length * Length_of_welds : 0 ;
Process_cost_per_entry = (Time_to_start_machine / 3600 * (Operator_rate + Machine_rate) + Welding_�me / 3600 * Machine_rate) / (Plant_efficiency/100) + Material_cost ;
Click the expander that appears in the upper right corner of the formula window to display the Test View Panel. Click Calculate to populate the Variables Lis�ng and the Test View Panel.
Click the row number to the le� of Row 1 on the Variables Lis�ng and select Group from the Insert menu to insert an input group box. Replace the Group �tle name that appears by default in the Ques�ons Panel Label column with the name Welding data.
Insert two more groups into the Variables lis�ng, one onto row 2 and another onto row 3. Name one group Machine data and the other group Results.
Variable rows can be moved by clicking a row number and then dragging and dropping the row into another loca�on on the Variables Lis�ng. Move the variable rows into the ques�ons panel display order that is shown below.
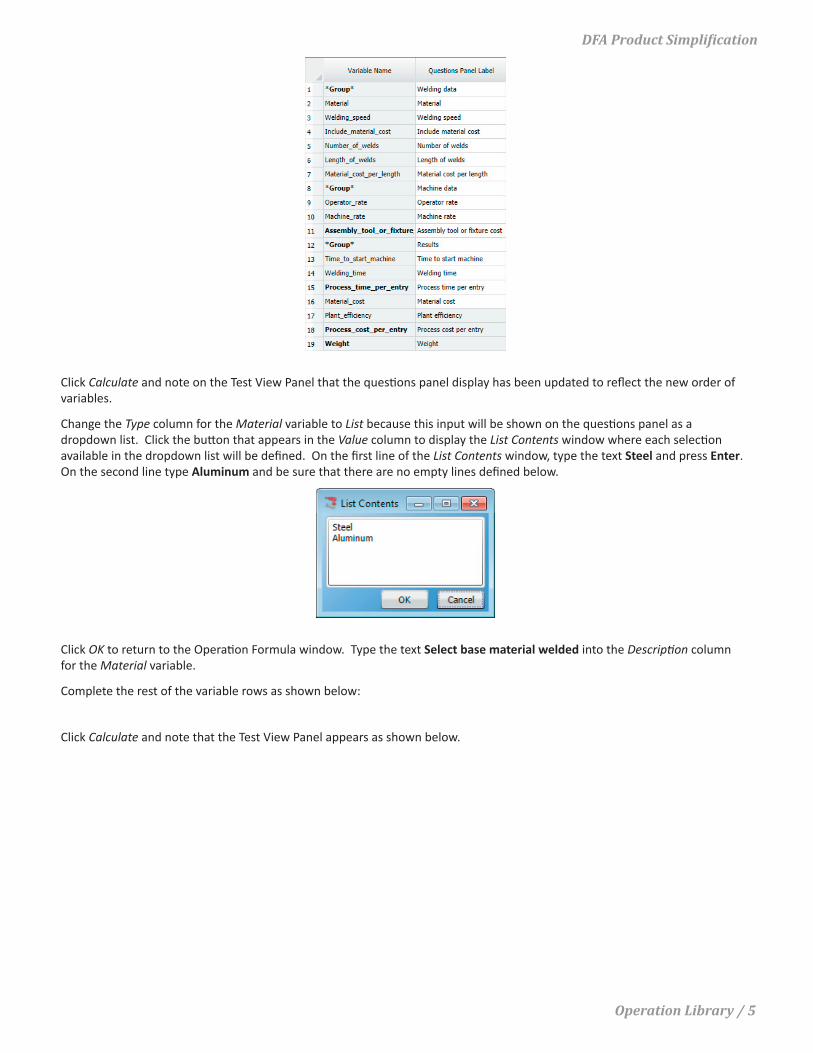
Operation Library / 5
DFA Product Simpli�ication
Click Calculate and note on the Test View Panel that the ques�ons panel display has been updated to reflect the new order of variables.
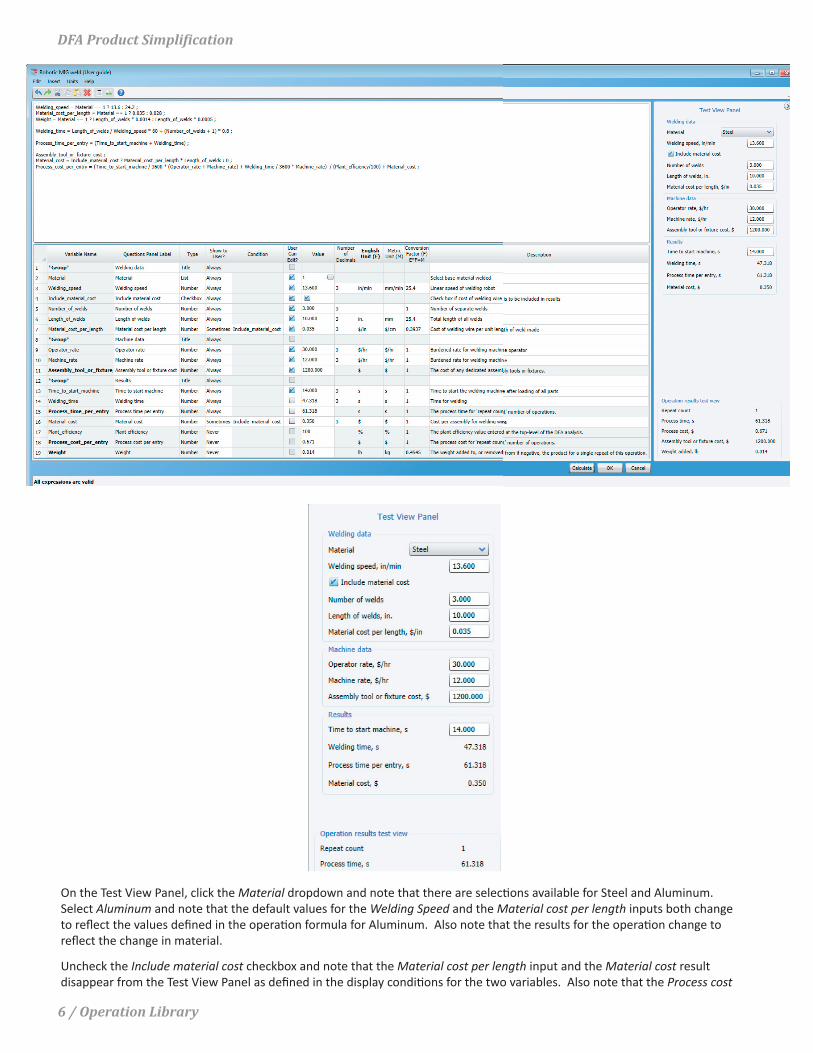
Change the Type column for the Material variable to List because this input will be shown on the ques�ons panel as a dropdown list. Click the bu�on that appears in the Value column to display the List Contents window where each selec�on available in the dropdown list will be defined. On the first line of the List Contents window, type the text Steel and press Enter. On the second line type Aluminum and be sure that there are no empty lines defined below.
Click OK to return to the Opera�on Formula window. Type the text Select base material welded into the Descrip�on column for the Material variable.
Complete the rest of the variable rows as shown below:
Click Calculate and note that the Test View Panel appears as shown below.
6 / Operation Library
DFA Product Simpli�ication
On the Test View Panel, click the Material dropdown and note that there are selec� ons available for Steel and Aluminum. Select Aluminum and note that the default values for the Welding Speed and the Material cost per length inputs both change to refl ect the values defi ned in the opera� on formula for Aluminum. Also note that the results for the opera� on change to refl ect the change in material.
Uncheck the Include material cost checkbox and note that the Material cost per length input and the Material cost result disappear from the Test View Panel as defi ned in the display condi� ons for the two variables. Also note that the Process cost
Operation Library / 7
DFA Product Simpli�icationresult for the opera�on no longer includes the cost of material, as defined in the opera�on formula.
Click OK to close the opera�on formula window and return to the main library screen. Close the library and return to the main program screen by clicking Exit on the File menu. Click Yes when the program asks if you want to save changes.
On the main program screen, insert the opera�on onto the Structure Chart. Click Opera�on on the Insert menu or click the bu�on on the toolbar. In the Insert Opera�on dialog that appears, expand the Welding category by clicking the that appears to the le� of the category on the opera�on library tree. Click the Robo�c MIG weld opera�on and click the Insert bu�on to insert the opera�on onto the Structure Chart. Close the Insert Opera�on dialog.
On the ques�ons panel for the opera�on, change the Material dropdown from Steel to Aluminum and note that the default values and results change as they did on the Test View Panel when the opera�on was developed. Also, uncheck the Include material cost checkbox and note the ques�ons panel behaves as it did on the Test View Panel. Press F1 on your keyboard to request help on the Include material cost checkbox and note a pop-up appears that contains the descrip�on for the Include_material_cost variable.