digication e-portfolio help guide
TRANSCRIPT

1
Log in to Digication
Go to your school!s Digication login page. For assistance in finding the login page,
contact your school!s help desk or [email protected]. At the sign-in area (shown
below), enter your username and password and click Log In. Your username is usually
your school email address. Your password was created for you by your school.
If you don!t know or can not remember your password, click on Forgot your password?
and fill out the contact form. You will receive instructions by email on how to reset your
password.
Ready to Create Your e-Portfolio
After you log in, your Home page lists everything to which you have access on Digication
– a Calendar, e-Portfolios, Courses, and Communities.
To create a new e-Portfolio, click the Create button in the My e-Portfolios section.
You will be directed to the "Portfolio Settings! page. On this page you will fill out basic
information about your e-Portfolio. The only two required fields are e-Portfolio Title
Where do I start?
DIG
ICA
TIO
N E
-PO
RT
FO
LIO
HE
LP
GU
IDE
2
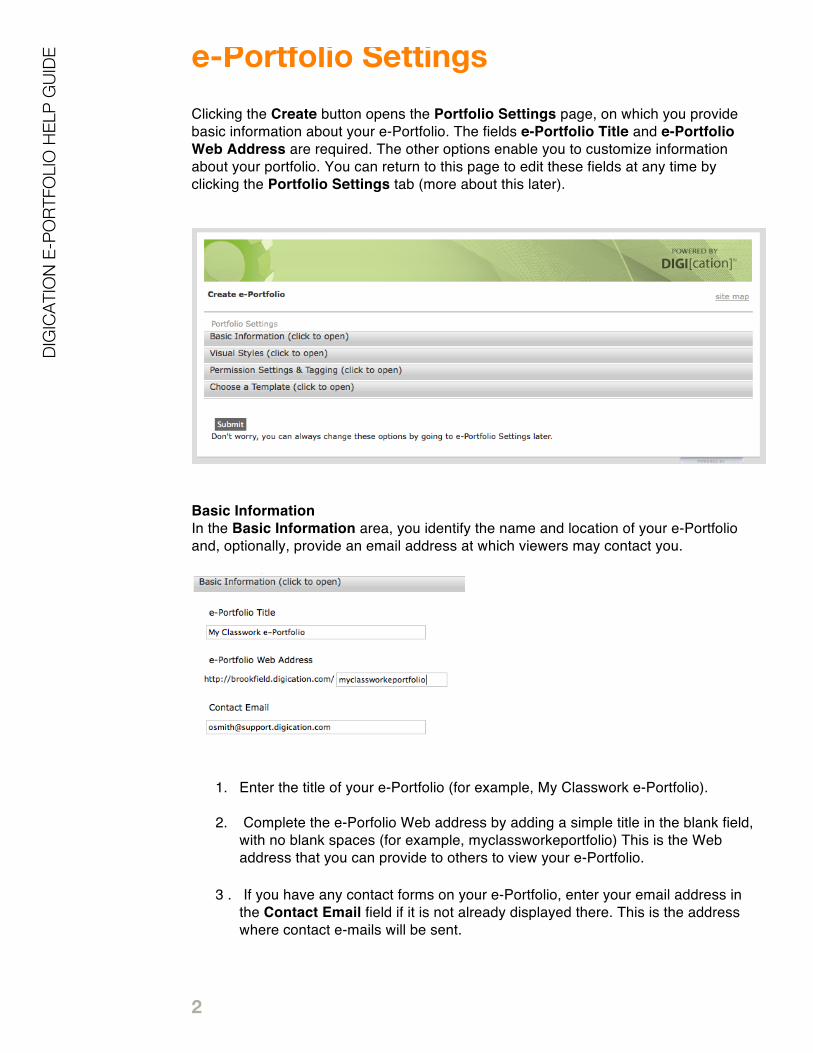
Clicking the Create button opens the Portfolio Settings page, on which you provide
basic information about your e-Portfolio. The fields e-Portfolio Title and e-Portfolio
Web Address are required. The other options enable you to customize information
about your portfolio. You can return to this page to edit these fields at any time by
clicking the Portfolio Settings tab (more about this later).
Basic Information
In the Basic Information area, you identify the name and location of your e-Portfolio
and, optionally, provide an email address at which viewers may contact you.
1. Enter the title of your e-Portfolio (for example, My Classwork e-Portfolio).
2. Complete the e-Porfolio Web address by adding a simple title in the blank field,
with no blank spaces (for example, myclassworkeportfolio) This is the Web
address that you can provide to others to view your e-Portfolio.
3 . If you have any contact forms on your e-Portfolio, enter your email address in
the Contact Email field if it is not already displayed there. This is the address
where contact e-mails will be sent.
e-Portfolio Settings
DIG
ICA
TIO
N E
-PO
RT
FO
LIO
HE
LP
GU
IDE

3
Categories
To categorize your e-Portfolio, select a category from the drop-down list, and click the
plus sign next to it. Your e-Portfolio can belong to as many categories as you want.
Visual Styles
Click on the gray bar Visual Styles for the option to upload a directory icon and header
for your e-Portfolio and to enter footer text.
Directory Icon: This icon is displayed in the directory of e-Portfolios if you choose to
have your e-Portfolio listed there. The default Digication image shown in the sample
screen above is used if you do not upload your own icon. Click the Browse button to
upload an image file as your own icon from your computer.
Header Image: This image is displayed at the top of every page of your e-Portfolio. The
default Digication image shown in the sample screen above or an alternate default
image provided by your school is used if you do not upload your own image. Click the
Browse button to upload an image file as your own header image from your computer.
Portfolio Footer: The footer text is displayed at the bottom of every page of your
e-Portfolio. For example, you can enter a saying, a quotation, or copyright information
here.
.
DIG
ICA
TIO
N E
-PO
RT
FO
LIO
HE
LP
GU
IDE

4
Permission Settings & Tagging
Click on the gray bar Permission Settings & Tagging to choose settings for privacy,
permissions and collaboration for your e-Portfolio.
Directory Listing: This setting determines whether your e-Portfolio is listed in the
Digication directory. Even if you choose Yes, it will be listed only for those who have
access to your e-Portfolio itself..
Tags: Tags are keywords that you or others who have access to your e-Portfolio can
assign to the e-Portfolio pages. Tags make it easier to find individual pages of the
portfolio in searches. You can turn tagging on or off at any time.
Permission Settings: To control who can view and edit your e-Portfolio, choose from
the first three options, or click the More Options button to give access to specific
people or groups at your school.
See the next page for more about Permission Settings.
DIG
ICA
TIO
N E
-PO
RT
FO
LIO
HE
LP
GU
IDE
5
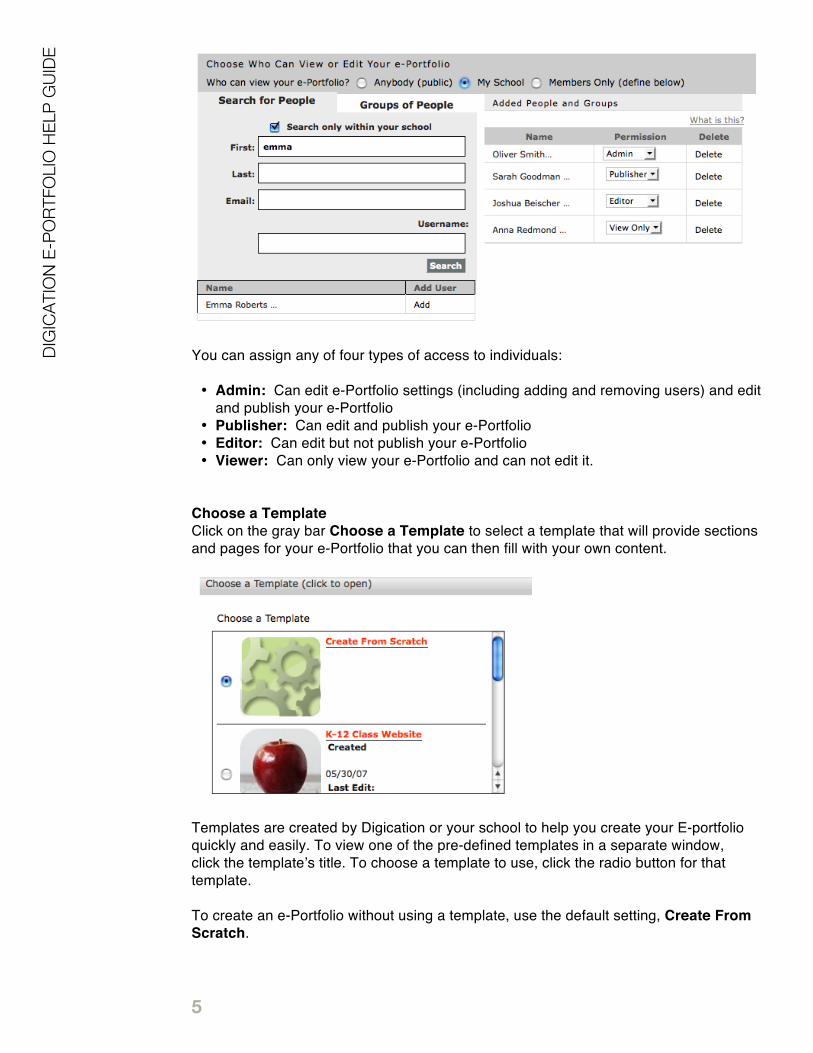
You can assign any of four types of access to individuals:
• Admin: Can edit e-Portfolio settings (including adding and removing users) and edit
and publish your e-Portfolio
• Publisher: Can edit and publish your e-Portfolio
• Editor: Can edit but not publish your e-Portfolio
• Viewer: Can only view your e-Portfolio and can not edit it.
Choose a Template
Click on the gray bar Choose a Template to select a template that will provide sections
and pages for your e-Portfolio that you can then fill with your own content.
Templates are created by Digication or your school to help you create your E-portfolio
quickly and easily. To view one of the pre-defined templates in a separate window,
click the template!s title. To choose a template to use, click the radio button for that
template.
To create an e-Portfolio without using a template, use the default setting, Create From
Scratch.
DIG
ICA
TIO
N E
-PO
RT
FO
LIO
HE
LP
GU
IDE
6
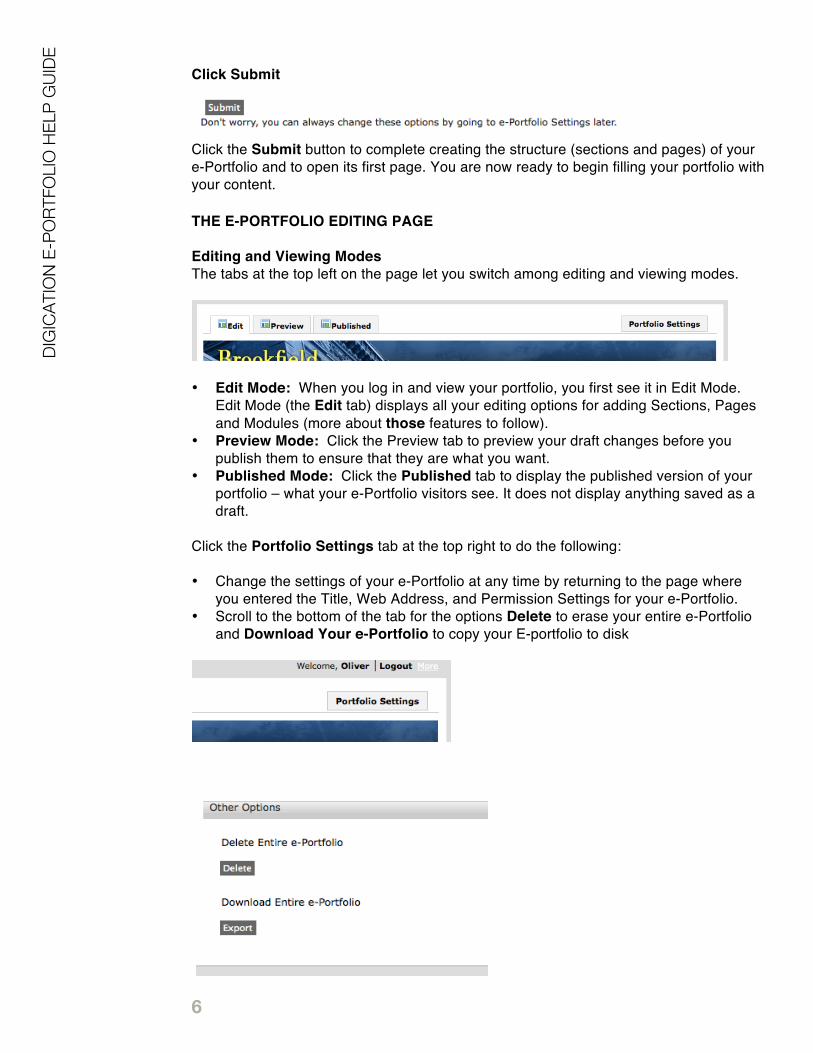
Click Submit
Click the Submit button to complete creating the structure (sections and pages) of your
e-Portfolio and to open its first page. You are now ready to begin filling your portfolio with
your content.
THE E-PORTFOLIO EDITING PAGE
Editing and Viewing Modes
The tabs at the top left on the page let you switch among editing and viewing modes.
• Edit Mode: When you log in and view your portfolio, you first see it in Edit Mode.
Edit Mode (the Edit tab) displays all your editing options for adding Sections, Pages
and Modules (more about those features to follow).
• Preview Mode: Click the Preview tab to preview your draft changes before you
publish them to ensure that they are what you want.
• Published Mode: Click the Published tab to display the published version of your
portfolio – what your e-Portfolio visitors see. It does not display anything saved as a
draft.
Click the Portfolio Settings tab at the top right to do the following:
• Change the settings of your e-Portfolio at any time by returning to the page where
you entered the Title, Web Address, and Permission Settings for your e-Portfolio.
• Scroll to the bottom of the tab for the options Delete to erase your entire e-Portfolio
and Download Your e-Portfolio to copy your E-portfolio to disk
DIG
ICA
TIO
N E
-PO
RT
FO
LIO
HE
LP
GU
IDE
7
Organizing Your e-Portfolio
Creating Sections and Pages
Before adding content to your e-Portfolio, plan the structure of your e-Portfolio. Also,
remember that you can create more than one e-Portfolio with your account, so you do
not need to fit all your projects or content into one e-Portfolio.
What sections would best represent the work, information, topics, or achievements that
you will present in your e-Portfolio? Within each section, what pages will you need to
organize your content? You can modify these sections and pages later, but you need an
initial structure to get started.
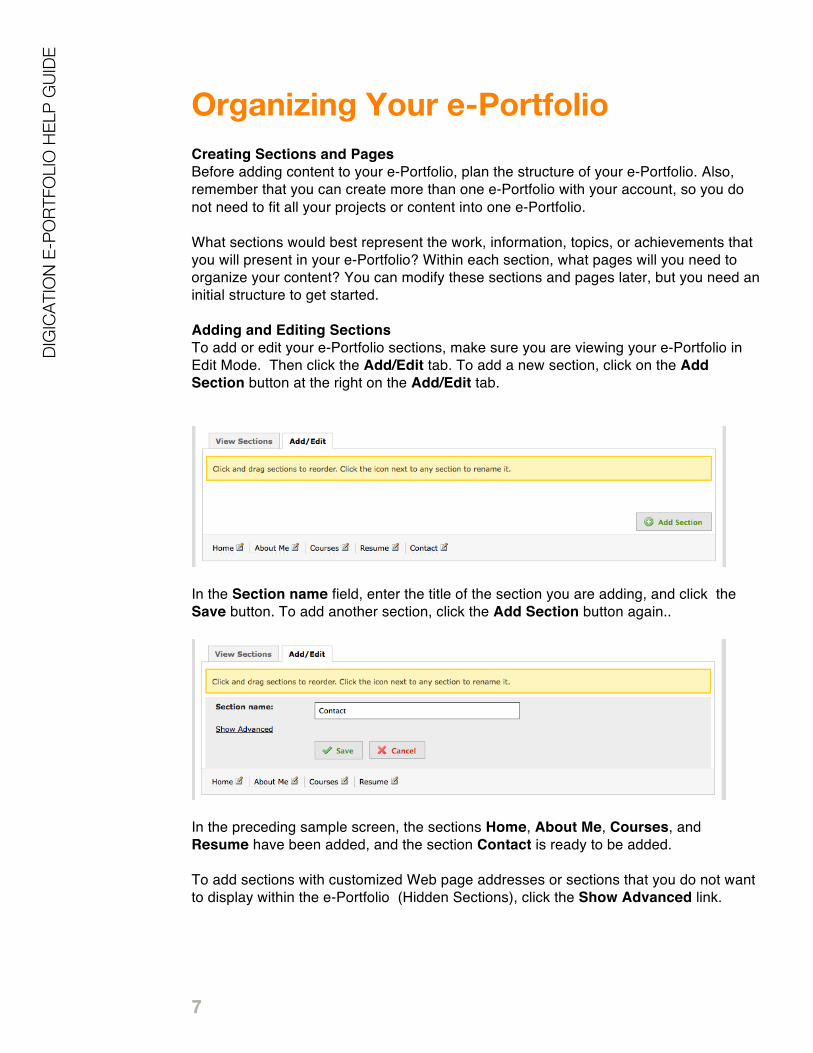
Adding and Editing Sections
To add or edit your e-Portfolio sections, make sure you are viewing your e-Portfolio in
Edit Mode. Then click the Add/Edit tab. To add a new section, click on the Add
Section button at the right on the Add/Edit tab.
In the Section name field, enter the title of the section you are adding, and click the
Save button. To add another section, click the Add Section button again..
In the preceding sample screen, the sections Home, About Me, Courses, and
Resume have been added, and the section Contact is ready to be added.
To add sections with customized Web page addresses or sections that you do not want
to display within the e-Portfolio (Hidden Sections), click the Show Advanced link.
DIG
ICA
TIO
N E
-PO
RT
FO
LIO
HE
LP
GU
IDE

8
To customize the Web page address of the section you are adding, complete the
displayed Section address.
To hide the section, click the Hide this page check-box.
To return to the page at which you can add sections without customized Web addresses,
click the Hide Advanced link.
To edit an existing section, click the icon to the right of that section name at the bottom
of the page.
Changing the order of sections
You can change the order of sections by dragging and dropping a section to a new place
in the sequence. A red dotted line indicates the area where it may be dropped.
DIG
ICA
TIO
N E
-PO
RT
FO
LIO
HE
LP
GU
IDE

9
Adding Pages
To add e-Portfolio pages:
1. Make sure the Edit tab is highlighted.
2. In the View Sections area, click the section to which you want to add pages. In
the following example, the section About Me was selected.
3. In the View Pages area, click the Add/Edit tab. To add a new page, click the
Add Page button at the right.
4. Enter the page name, and click the Save button.
To add another new page, click the Add Page button again.
In the preceding sample screen, the pages Education and Interests have been added
and the page Hobbies is ready to be added.
To add sections with customized Web page addresses or sections that you do not want
to display within the e-Portfolio (Hidden Sections), click on the Show Advanced link.
Editing Pages
To edit an existing page, click the icon to the right of the page.
DIG
ICA
TIO
N E
-PO
RT
FO
LIO
HE
LP
GU
IDE

10
Changing the order and priority of pages
You can change the order of pages by dragging and dropping a page to a new place in
the sequence. You can also create a sub-page by dropping a page in an indented
location, as shown in the preceding sample screen..
Adding and Editing Modules
To add or edit content within your e-Portfolio you must be in Edit Mode. Select a section
and a page within your e-Portfolio for which you want to add or edit content. In the
following sample screen, the section Courses and the page Art History are selected.
You can use any combination of the following two options to structure the content of your
e-Portfolio pages.
The basic building block of structuring a page is a Module. Modules define what kind of
content can be added and also the layout of this content within the page. You can add
multiple modules to a page for flexibility in how you customize the presentation of your
work.
Adding Content to Your e-Portfolio D
IGIC
AT
ION
E-P
OR
TFO
LIO
HE
LP
GU
IDE

11
There are several types of Modules from which to choose:
Image/Video Module
The Image/Video module enables you to display a single large piece of media, such as
a movie or an image.
Rich Text Module
The Rich Text module provides a rich text area that can contain formatted text and
display links, files, and images in-line.
Gallery Module
The Gallery module gives you the flexibility of presenting multiple images on a page,
using thumbnails or simple numbering across the page to link to large images. Each
image has a rich text caption field as well.
Contact Form Module
For added security and to avoid unsolicited e-mails, the Contact Form module enables
you to be contacted through your e-Portfolio by email without publishing your email
address..
You can choose multiple modules for each page you create. The variety of layouts
enable you to choose ones that will best present your work.
Adding a Module to a Page
To add a module to a page:
DIG
ICA
TIO
N E
-PO
RT
FO
LIO
HE
LP
GU
IDE

12
1. Select the module type to add. In the following sample screen, the Image/Video
module has been selected.
2. Click Add This Module.
3. Click Done.
Module Options
After you finish adding a Module of any text or media type by clicking Done, several
buttons and tabs are available as options.
These buttons are at the top of the page:
• Add A Module: Add another module to the current page.
• Publish All: Publish any saved media or text modules to your e-Portfolio. This is
especially helpful when there are multiple modules on a page. (More about
Publishing and Drafts later.)
DIG
ICA
TIO
N E
-PO
RT
FO
LIO
HE
LP
GU
IDE

13
These tabs are in a row below the buttons:
• View Media or ViewText: Display your saved but not published module content.
• Edit: Add and edit module content.
• Publish: Publilsh a specific module within your e-Portfolio.
• Delete: Erase the module from the page.
• Drag to reorder: Rearrange modules on a page.
Adding Media from Your Computer
To begin adding content to the module, click the Edit tab, and click the button Replace
This Image/Video. A new window displays options to upload media from your computer
or from the Web.
1. Select the From My Computer tab.
2. Click the Browse for media button.
DIG
ICA
TIO
N E
-PO
RT
FO
LIO
HE
LP
GU
IDE
DIG
ICA
TIO
N E
-PO
RT
FO
LIO
HE
LP
GU
IDE

14
3. In the dialog box, select the file you want to add, and click the Select button.
As the file uploads, a progress bar displays how much of your file has uploaded and the
approximate time remaining to complete the upload.
When you add a media item to the page, it will not display larger than 500 pixels wide. It
will be resized to fit within your chosen module, preserving the original aspect ratio.
If you upload the incorrect file, click the Remove link.
The file size limit is 12 MB per file, but you can add an unlimited number of files to
your portfolio. For help in compressing files in order to add them to your portfolio, contact
your school!s help desk or contact [email protected].
After the upload process completes, a thumbnail of the image or the name of the file
listed is displayed. Click the Done button at the bottom of the window to add the file to
your portfolio.
DIG
ICA
TIO
N E
-PO
RT
FO
LIO
HE
LP
GU
IDE

15
Within your Image/Video Module on your portfolio page, you can now view the media.
Adding Video from the Web
To begin adding content to the module, click on the Edit tab, and click the button
Replace This Image/Video. A new window displays options to upload media from your
computer or from the Web.
To add video to your portfolio from the Web instead of from your computer:
1. Click the Video from Web tab.
DIG
ICA
TIO
N E
-PO
RT
FO
LIO
HE
LP
GU
IDE
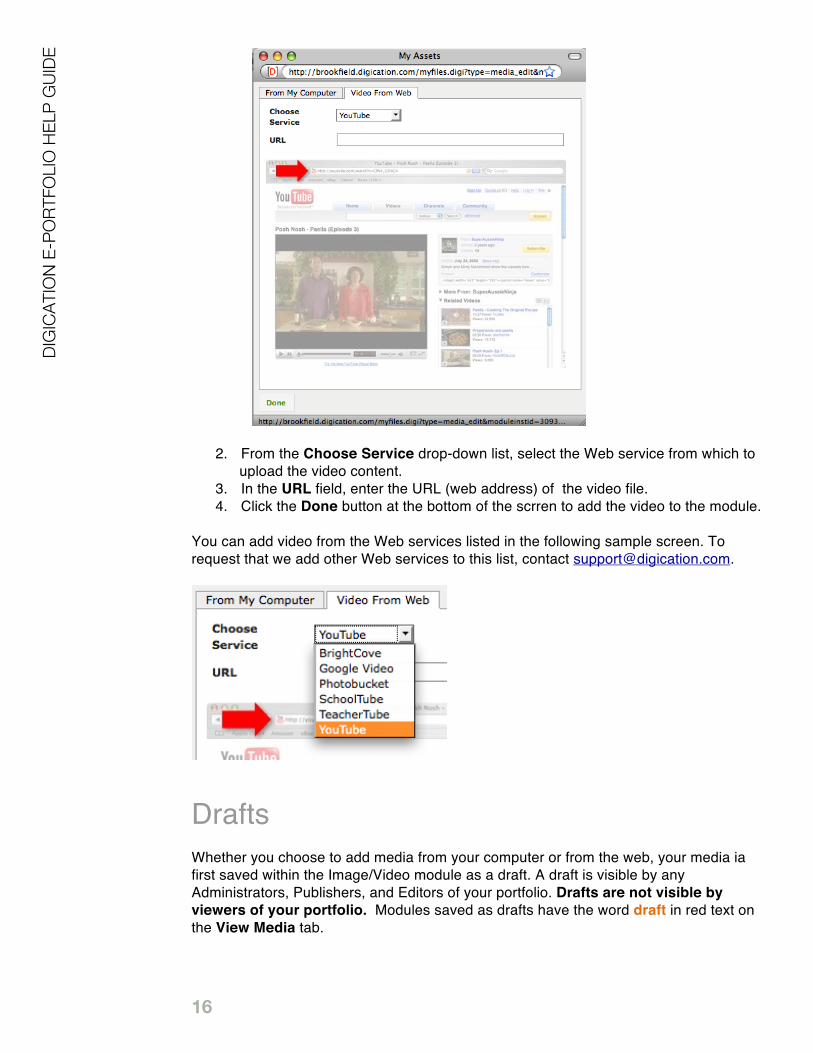
16
2. From the Choose Service drop-down list, select the Web service from which to
upload the video content.
3. In the URL field, enter the URL (web address) of the video file.
4. Click the Done button at the bottom of the scrren to add the video to the module.
You can add video from the Web services listed in the following sample screen. To
request that we add other Web services to this list, contact [email protected].
Drafts
Whether you choose to add media from your computer or from the web, your media ia
first saved within the Image/Video module as a draft. A draft is visible by any
Administrators, Publishers, and Editors of your portfolio. Drafts are not visible by
viewers of your portfolio. Modules saved as drafts have the word draft in red text on
the View Media tab.
DIG
ICA
TIO
N E
-PO
RT
FO
LIO
HE
LP
GU
IDE

17
To make the media visible to viewers of your portfolio you must publish the module.
Publishing Modules
To view information on changes to your module before you publish them, click the
Publish tab. This tab lists any unpublished changes with information on when and by
whom the module was created, last edited, and, if applicable, last published.
To make the changes visible to viewers of your portfolio, click the Publish Changes
button.
A confirmation screen confirms that the publication succeeded.
To publish multiple modules on a page in one action instead of individually, click Publish
All and then the Publish All Changes button.
DIG
ICA
TIO
N E
-PO
RT
FO
LIO
HE
LP
GU
IDE

18
When your changes are published they can be seen by viewers of your portfolio.
Edit Modules Anytime
You can edit your module anytime, even after changes have been published. Click the
Edit tab and then the Replace This Media button.
Reordering Modules
You can add multiple modules to a page. Each new module is added to the bottom of the
page. To change the order of the modules, use the Drag to reorder button to drag and
drop any module to a different location.
Rich Text Module
DIG
ICA
TIO
N E
-PO
RT
FO
LIO
HE
LP
GU
IDE

19
The Rich Text module can contain formatted text and display links, files, and images
inline. To add a rich text module to your page:
1. Select Rich Text from the menu at the left.
2. Click the Add This Module button.
3. Click Done (or select more modules to add from the menu at the left).
DIG
ICA
TIO
N E
-PO
RT
FO
LIO
HE
LP
GU
IDE

20
When you click Done to add a rich text module, a sample rich text module is displayed.
Click the Edit tab to begin adding your content.
Use the rich text editor to enter text, link to media files of any type, add images, and link
to other websites.
Overview of the Rich Text module Toolbar
A toolbar at the top of each rich text area contains icons similar to those of recent word
processing software..
DIG
ICA
TIO
N E
-PO
RT
FO
LIO
HE
LP
GU
IDE

21
Click an icon to perform its function:
1. Undo: Retracts the last change made within the text editor.
2. Redo: Reinstates the last change that was undone.
3. Paste from Microsoft ®
Word: Pastes any text from Microsoft Word into the
window that pops up instead of pasting it directly into the text editor. Click Insert to
import the text into the text editor for further editing.
4. Find: Searches the text editor for key words or phrases.
5. Find/Replace: Searches for and replace words or phrases within the text editor.
6. Align Left: Left-aligns text that you have highlighted.
DIG
ICA
TIO
N E
-PO
RT
FO
LIO
HE
LP
GU
IDE

22
7. Align Center: Center text that you have highlighted.
8. Align Right: Right-aligns text that you have highlighted.
9. Justify: Justifies text that you have highlighted.
10. Insert File: Uses the text editor to insert a link to a file. Browse to the file on
your computer, and click the Insert button. You can link to Adobe®
PDF files,
Microsoft PowerPoint®
presentations, Microsoft Word documents, and files of other
types.
11. Insert Media: Inserts an image file directly into the text editor. Browse to the
file on your computer or insert the file from the Web.
12. Color Swatches: Changes the color of text you have highlighted, Click on the
desired color in the displayed screen of colors.
DIG
ICA
TIO
N E
-PO
RT
FO
LIO
HE
LP
GU
IDE

23
13. Font family: Changes the font of text you have highlighted. Select the new font on
the drop-down menu.
14. Font size: Changes the font size of text you have highlighted. Select the new size
on the drop-down menu.
15. Bold: Changes text that you have hightlighted to bold,.
16. Italics: Italicizes text that you have hightlighted.
17. Underline: Underlines text that you have hightlighted.
18. Strikethrough: Puts a line through (i.e., crosses out) text that you have
highlighted.
19. Bulleted List: Makes a bulleted list. Each paragraph of the text you have
highlighted will be a bulleted item in the list.
DIG
ICA
TIO
N E
-PO
RT
FO
LIO
HE
LP
GU
IDE
24
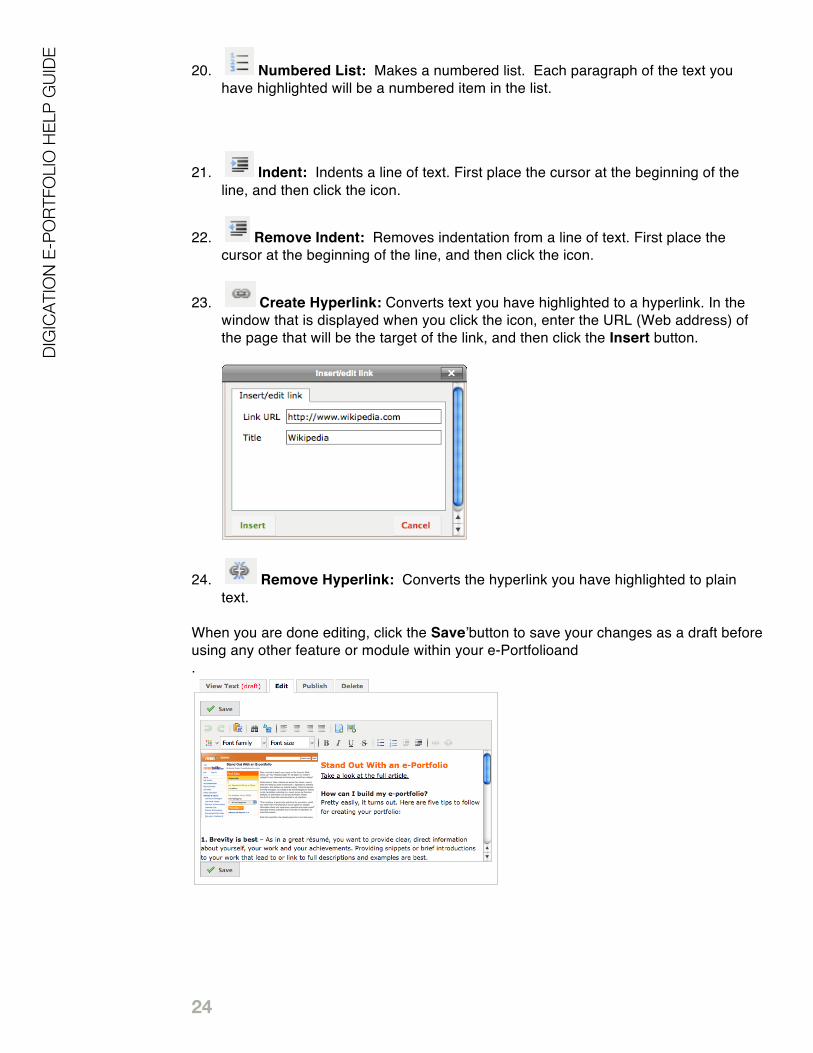
20. Numbered List: Makes a numbered list. Each paragraph of the text you
have highlighted will be a numbered item in the list.
21. Indent: Indents a line of text. First place the cursor at the beginning of the
line, and then click the icon.
22. Remove Indent: Removes indentation from a line of text. First place the
cursor at the beginning of the line, and then click the icon.
23. Create Hyperlink: Converts text you have highlighted to a hyperlink. In the
window that is displayed when you click the icon, enter the URL (Web address) of
the page that will be the target of the link, and then click the Insert button.
24. Remove Hyperlink: Converts the hyperlink you have highlighted to plain
text.
When you are done editing, click the Save!button to save your changes as a draft before
using any other feature or module within your e-Portfolioand
.
DIG
ICA
TIO
N E
-PO
RT
FO
LIO
HE
LP
GU
IDE
25
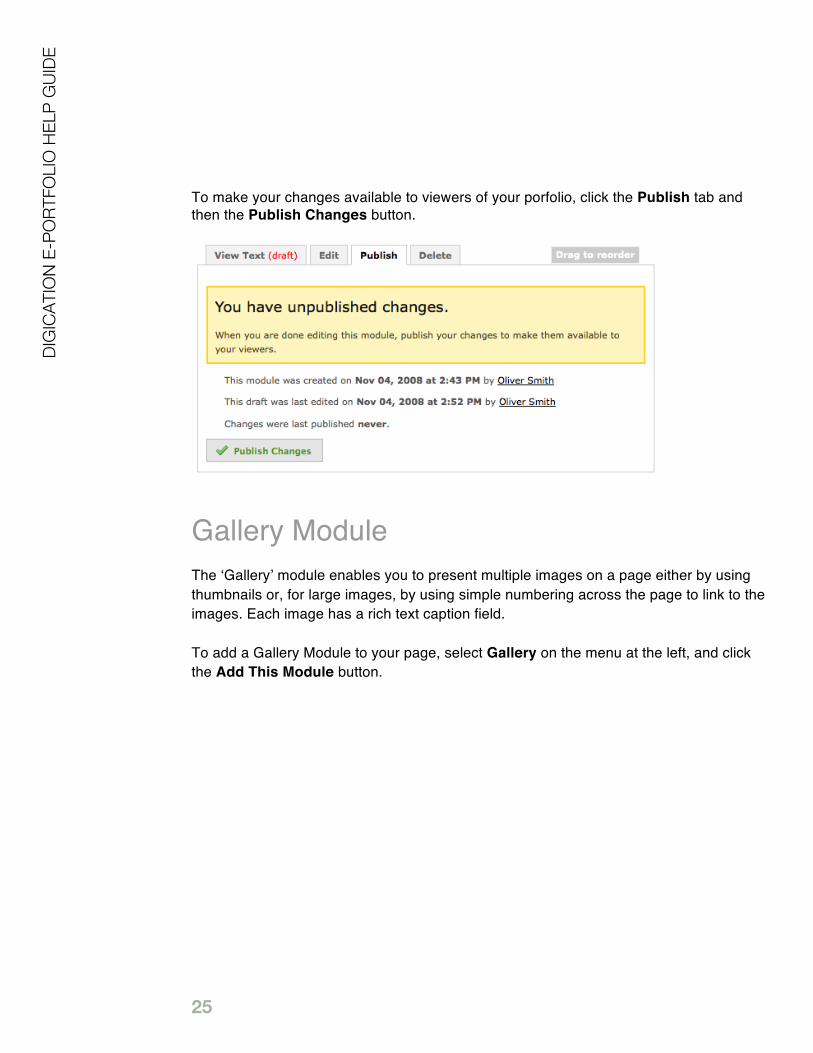
To make your changes available to viewers of your porfolio, click the Publish tab and
then the Publish Changes button.
Gallery Module
The "Gallery! module enables you to present multiple images on a page either by using
thumbnails or, for large images, by using simple numbering across the page to link to the
images. Each image has a rich text caption field.
To add a Gallery Module to your page, select Gallery on the menu at the left, and click
the Add This Module button.
DIG
ICA
TIO
N E
-PO
RT
FO
LIO
HE
LP
GU
IDE

26
An empty Gallery Module is displayed.
DIG
ICA
TIO
N E
-PO
RT
FO
LIO
HE
LP
GU
IDE

27
To begin adding content to the Gallery Module:
1. Click the Edit tab
2. Click the !Add Images/Videos" button.
3. To add a video from the Web, click the Video From Web tab, enter the URL
(Web address) of the video, and click the Done button. Then skip the remaining
steps and go to Reordering Gallery Images and Thumbnail Layout.
To add files from your computer, perform steps 4 through 6.
4. On the From My Computer tab, click the Browse for Media button to select one
or more files from your computer.
5. Clck the Done button. When the progress bar shows that the upload is complete,
the screen displays thumbnails of the images or a confirmation message.
DIG
ICA
TIO
N E
-PO
RT
FO
LIO
HE
LP
GU
IDE

28
6. Click the !Done" button again to return to the Edit tab where you can reorder the
images, add captions, or make other changes to the gallery.
Reordering Gallery Images and Thumbnail Layout
To reorder the images or videos displayed in the gallery, drag and drop any of them to a
DIG
ICA
TIO
N E
-PO
RT
FO
LIO
HE
LP
GU
IDE
29
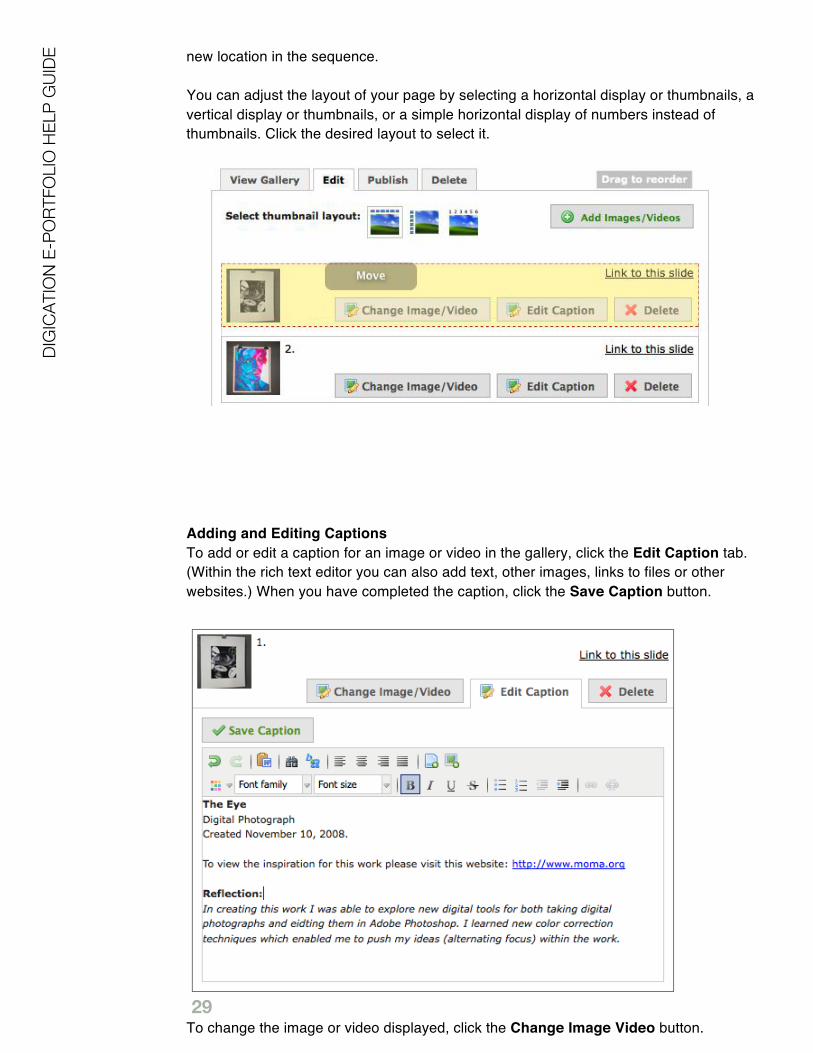
new location in the sequence.
You can adjust the layout of your page by selecting a horizontal display or thumbnails, a
vertical display or thumbnails, or a simple horizontal display of numbers instead of
thumbnails. Click the desired layout to select it.
Adding and Editing Captions
To add or edit a caption for an image or video in the gallery, click the Edit Caption tab.
(Within the rich text editor you can also add text, other images, links to files or other
websites.) When you have completed the caption, click the Save Caption button.
To change the image or video displayed, click the Change Image Video button.
DIG
ICA
TIO
N E
-PO
RT
FO
LIO
HE
LP
GU
IDE
30
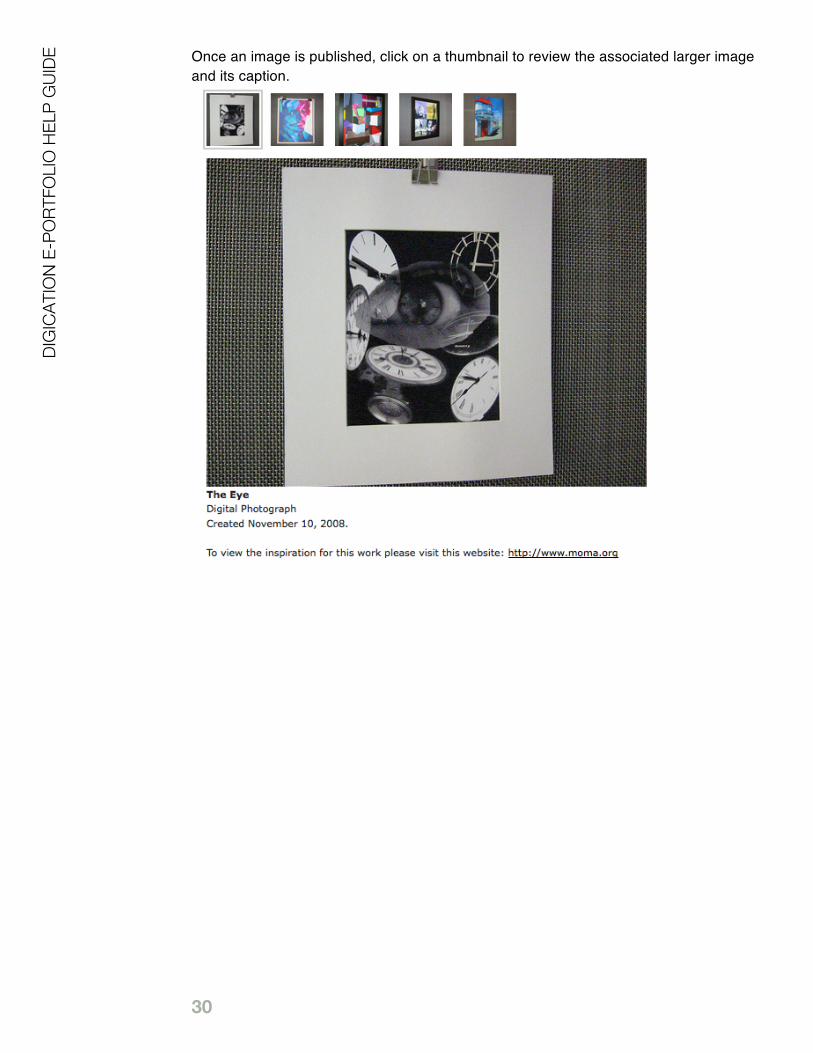
Once an image is published, click on a thumbnail to review the associated larger image
and its caption.
DIG
ICA
TIO
N E
-PO
RT
FO
LIO
HE
LP
GU
IDE

31
Contact Form Module
For added security and to avoid unsolicited e-mails, the Contact Form module enables
you to be contacted through your e-Portfolio by email without publishing your email
address.
To add the contact form module to your page, select Contact Form from the menu at
the left, and click the Add This Module button.
The Contact Form module contains a form with fields for the viewer!s email address, an
email subject, and message. After completing those fields, the viewer must enter the
letters listed at bottom right and then click Send Email.
DIG
ICA
TIO
N E
-PO
RT
FO
LIO
HE
LP
GU
IDE

32
To modify your email address to which email messages will be sent from the contact
form, click the Settings tab.
Enter the email address in the provided field, and click the Save button.
To delete the Contact Form module from the page, click the Delete tab. You are then
asked to confirm the deletion.
Click the Yes, permanently delete this module check-box to mark it, and then click
the Delete button.
DIG
ICA
TIO
N E
-PO
RT
FO
LIO
HE
LP
GU
IDE

33
Receiving Feedback on Your
Portfolio Managing Comments
Comments are an important way to receive feedback on your portfolio. You can manage
them at the bottom of each of your portfolio pages and within the site map of your
portfolio.
Click the Settings tab for the following options to manage comments:
• An option that controls who can leave comments
• An option with these three choices for when and to whom comments will be
visible:
o Visitiors to your portfolio can view comments as soon as the comments
are entered.
o You must approve comments before visitors to your portfolio can view
them.
o You alone, not your portfolio visitors, can view comments.
DIG
ICA
TIO
N E
-PO
RT
FO
LIO
HE
LP
GU
IDE

34
Accessing Portfolios in Digication The Dashboard & e-Portfolio Directory
My e-Portfolios
After you create an e-Portfolio, it is shown on your dashboard (the home page) when you
log in in to the My e-Portfolios area.
To access editing mode within a portfolio, click the icon or the title of that portfolio on this
page.
DIG
ICA
TIO
N E
-PO
RT
FO
LIO
HE
LP
GU
IDE

35
e-Portfolio Directory
The e-Portfolio Directory displays all the e-Portfolios created within your school that have
not been made private. The directory provides the best way to search for portfolios
created by your peers and colleagues to exchange ideas and share resources.
There are several ways to browse and search this directory.
Featured e-Portfolios
At the top of the e-Portfolio directory page is the listing, Featured e-Portfolios. These
e-Portfolios are either the most visited ones within the directory or were selected by an
administrator at your school. Click an e-Portfolio icon to open that e-Portfolio.
DIG
ICA
TIO
N E
-PO
RT
FO
LIO
HE
LP
GU
IDE

36
Sort By
You can sort the directory by Title, School, Last Updated, Last Created, or Number
of hits (i.e., the number of times each e-Portfolio has been visited).
Searching the Directory
You can choose how to search the selected e-Portfolio Directory by clicking on one of
the tabs – By Person (first or last name), By e-Portfolio Title, or By Tag – and entering
the name or keywords in the provided field.
If your school has enabled Categories, an additional tab, By Category is available to
select. A category is often a department, program, or grade level within a school.
DIG
ICA
TIO
N E
-PO
RT
FO
LIO
HE
LP
GU
IDE

37
Viewing Directory Pages
The directory is organized in pages, with 8 portfolios displaying on each page. To move
from page to page, click the arrows at the bottom of the directory page or enter a specific
page number. Then click the Go button.
Each e-Portfolio listing in the Directory contains the following:
• An icon
• An e-Portfolio title
• The date on which the portfolio was created
• A statement of when the portfolio was last edited
• The school associated with the portfolio
• The number of hits (visits) the portfolio has received
• The owners of the portfolio, which you display by placing the cursor on the
Owners link.
If you need further assistance or have additional questions, contact
DIG
ICA
TIO
N E
-PO
RT
FO
LIO
HE
LP
GU
IDE