digicom 2000 disk utilities - zygo-usa · 2016-02-26 · digicom disk utilities digicom files can...
TRANSCRIPT

7
DigiCom 2000Disk Utilities
Chapter Seven
CHAPTER_.7A 4/8/00 10:00 PM Page 1
7
7-1
DigiCom Disk UtilitiesDigiCom files can be backed up onto a floppy disk and files from a floppy disk can be restoredinto a DigiCom. Each 3 1/2” HD floppy disk canhold 1.4 MBytes of data (equivalent to about 16 minutes of speech). The floppy disks arerewritable, so you can replace the old files withthe new ones. Both the drive and the disks aresensitive to rough handling, so be sure to readabout their care.
In this ChapterIn this chapter you will learn the basics of setting up the disk drive and backing up/restoring yourfiles to/from disk. You will learn about:
❑ The disk drive and disks
❑ Setting up the drive and using the disks
❑ Backing up files to disk
❑ Restoring files from disk
CHAPTER_.7A 4/8/00 10:00 PM Page 2

About the Disk Drive and DisksThe DigiCom disk drive stores the digital data recorded inside of the DigiCom onto floppydiskettes. This data is equivalent to speech and, ina sense, a disk can be thought of as a specialaudio cassette.
7-2
7
CHAPTER_.7A 4/8/00 10:00 PM Page 3

7
7–3
Care for the Drive and DisksBoth the drive and the disks are very sensitive to rough treatment. Here are some ways to help youcare for them and prolong the life of both:
1. Do not drop either the disk drive or the disks. The recording heads in the drive are precisely set and can be knocked out of alignment if the drive is jarred or subjected to severe vibrations.
2. Keep both your disks and the drive safe from excessive heat, cold, or humidity. Do not leave disks in your car where they will sit in the sun or where they will freeze over night. Do not get either wet.
3. Floppy disks are very sensitive to magnetic fields. Do not put your disks near home or car speakers or on top of a television set or computer monitor. If you are using the DigiComin a hospital setting, be careful of the strong
magnetic fields associated with some diagnostic equipment such as MRI scanners. Floppy disks can be easily damaged if subjected to even weak magnetic fields.
4. Do not tamper with or handle your disks or the drive carelessly. Do not slide back the cover on the disk or touch the inner disk with your fingers. You can easily destroy the data that may have taken hours to program into your DigiCom. Do not stick a pencil or similar object into the disk drive opening.
5. Do not attempt to use the DigiCom disk drive with other devices and do not use disks formatted for the DigiCom with other disk drives.
CHAPTER_.7A 4/8/00 10:00 PM Page 4

Setting up the Drive and Using a Disk
Connecting the DriveBefore you can use the disk drive, you must connect it to the DigiCom. The DigiCom has a 25pin port on the back panel for connecting thedisk drive. It looks like the photograph below.
7–4
7
CHAPTER_.7A 4/8/00 10:00 PM Page 5

Connecting the Drive (cont.)
Make sure the connector is right-side up with the broader end of the connector on the bottom (see photo). Holding the DigiCom firmly, line upthe connector with the port and push firmly. Pushit in straight to prevent mangling either the connector or the port. Do not force it. If youencounter resistance, pull it out and check forbent pins. For reference, look at the photographbelow:
7–5
7
CHAPTER_.7A 4/8/00 10:01 PM Page 6

Using the Correct DiskettesUse only 3 1/2” high density disks with the DigiCom disk drive. This is what they look like:
7–6
7
An HD (high density) disk will have a logo on theupper right hand corner indicating it is a high density disk. In addition to this, there is a squarehole at the bottom right that tells the drive it is anHD disk. Also, there is an arrow that indicates theend which should be inserted into the drive first.What you see here is the top side. It should befacing up when you are inserting the disk into the drive. Some generic disks do not have anywriting, but should still have the arrow, the HDlogo, and the square holes on the bottom.
CHAPTER_.7A 4/8/00 10:01 PM Page 7

7–7
7
To insert a disk: Insert the disk slowly. Do not forcethe disk. Push it all the way into the opening. Justbefore it’s all the way in, a spring mechanism willgrab the disk and put it in place.
9 WARNING:Improper insertion of disks, or the insertion of non compatible disks may cause damage to theDigiCom disk drive. Please follow the aboveinstructions carefully.
Inserting a Disk (cont.)
Before inserting a new disk, make sure there is not a disk already in the drive. If there is a disk, removeit by pressing the eject button on the right side ofthe front of the drive (like in this photograph):
CHAPTER_.7A 4/8/00 10:01 PM Page 8

Removing a DiskTo remove the disk : Wait until the light on the left of the front panel of the drive has turned off (indicating that the disk in no longer being used)and then press the Eject button on the right. Putyour disks in a safe, organized place when youare not using them.
7–8
7
9 WARNING:Do not try to remove the disk while the DigiCom issaving data to it. You will lose the data that isbeing saved on disk and will have to resave it.Worse, you may damage the disk or even thedrive by trying to eject the disk prematurely. Youwill know when data is being saved by the message on the display, and the light on the lefthand side of the disk drive which will glow.
Disconnecting the DriveYou may leave the disk drive plugged into the DigiCom for long periods when you aren’t usingit. However, you will need to disconnect the drivewhen you are moving the DigiCom or the drive.Do not pick up the DigiCom, letting the drivehang by the connector cord.
To pull out the connector from either the DigiComor the drive, be certain the screws are releasedand then grab firmly onto the connector. Do nottry to pull out the connector by the cable as you may damage it, the connector or theDigiCom. If the connector is sticking, a slot screw driver can be used to gently pry up thesides of the connector. Take care to pull out theconnector as straight as possible.
CHAPTER_.7A 4/8/00 10:01 PM Page 9

The Disk CommandTo backup files to a disk, to restore files from a disk, to update the DigiCom application or to format a disk, the DigiCom should be plugged inand it must be in Program Mode. In summary, toswitch between Program and Play modes:
1. Press [SET UP] and then [PROGRAM/PLAY]2. Scroll to PROGRAM mode and press [OK]
to confirm selection.
With the DigiCom in Program Mode, perform thefollowing to access the disk utilities:
1. Press [COMMAND] and then [DISK].2. The display will show:
7–9
7
Disk: BACKUP
< > OK Cancel
Disk: FORMAT
< > OK Cancel
Disk: APP UPDATE
< > OK Cancel
Disk: RESTORE
< > OK Cancel
3. Press the [<] or [>] key to see all the disk utilitiesavailable for you to select and the screen willshow:
or
* reserved utility
or
4. Press [OK] to continue with the selected utility.Press [CANCEL] any time if you wish to abort theprocedure.
CHAPTER_.7A 4/8/00 10:01 PM Page 10
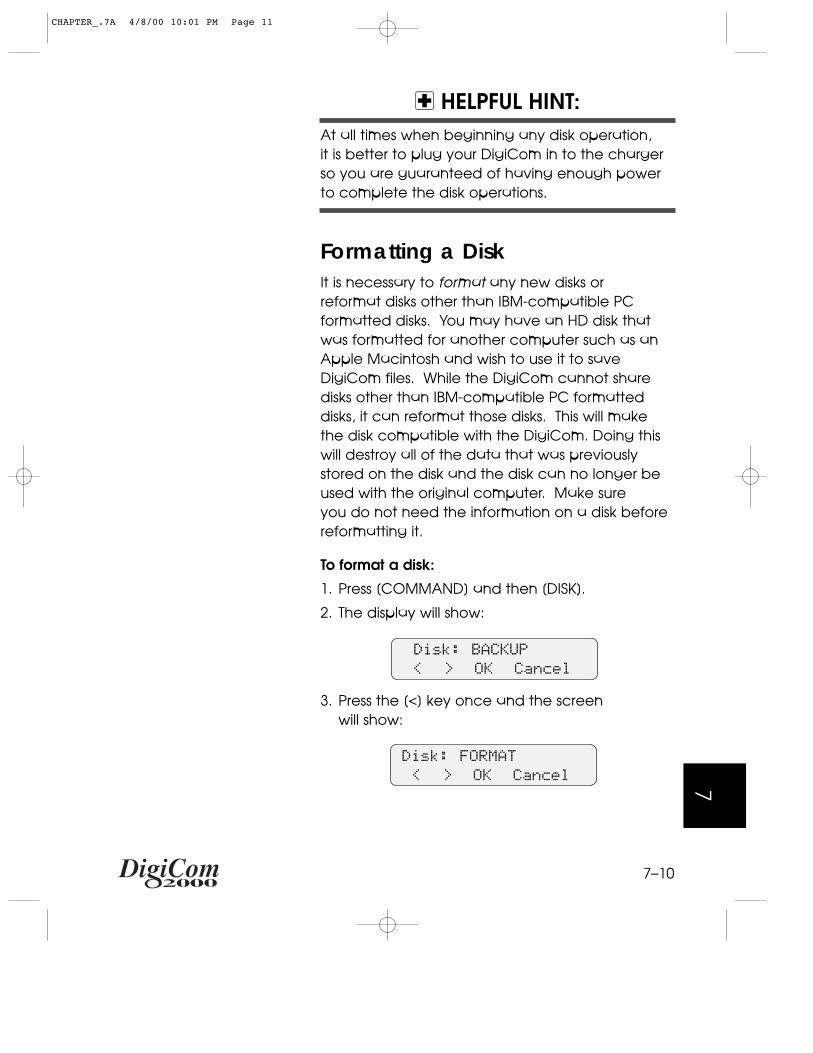
Formatting a DiskIt is necessary to format any new disks or reformat disks other than IBM-compatible PC formatted disks. You may have an HD disk thatwas formatted for another computer such as anApple Macintosh and wish to use it to saveDigiCom files. While the DigiCom cannot sharedisks other than IBM-compatible PC formatteddisks, it can reformat those disks. This will makethe disk compatible with the DigiCom. Doing thiswill destroy all of the data that was previously stored on the disk and the disk can no longer beused with the original computer. Make sure you do not need the information on a disk beforereformatting it.
To format a disk:
1. Press [COMMAND] and then [DISK].
2. The display will show:
7–10
7
Disk: BACKUP
< > OK Cancel
Disk: FORMAT
< > OK Cancel
3. Press the [<] key once and the screen will show:
8 HELPFUL HINT:At all times when beginning any disk operation,it is better to plug your DigiCom in to the chargerso you are guaranteed of having enough powerto complete the disk operations.
CHAPTER_.7A 4/8/00 10:01 PM Page 11

7. When the DigiCom has 100% completed the formatting procedure without any errors, the display will show the current settings:
7–11
7
GROUP A: PROGRAM
LEVEL 1: Areas
20% Complete
� � � � � �
The approximate time for formatting a disk is3–4 minutes
< HAVING TROUBLE?If the DigiCom will not format your disk and gives you an error message, see the section in this chapter, “Disk Drive Trouble Shooting” whichlists disk error messages and appropriate actionsto take.
ARE YOU SURE ?
OK Cancel
Formatting a Disk (cont.)
4. If you press [OK] you will then be prompted with:
5. Press [CANCEL] if you decide not to format the disk.
6. If you press [OK] the DigiCom will format the disk and show its progress with the following screen:
CHAPTER_.7A 4/8/00 10:01 PM Page 12

7
7–12
Backing up to a Blank Disk
Using the DigiCom disk drive, you can backup one single group onto a disk. You can backupALL levels in a group or each level separately.
If you wish to backup the files from any level or all 8 levels of the current group to a blank disk:
1. Be certain the disk is an HD disk that is properlyformatted.
2. Note what Group you are backing up.
3. Put the DigiCom into that group. (i.e. if backing up Group A, be certain your DigiCom is set on Group A, then access the Disk command.)
4. Press [Command] and then [Disk].You will then be prompted:
Disk:BACKUP
< > OK Cancel
Free Space
1423KB
Backup: ALL
< > OK Cancel
Press [OK].
The display will briefly show the free space available on the floppy disk:
The display will then show:
ALL allows you to backup levels 1–8 of the currentgroup.
CHAPTER_.7A 4/8/00 10:01 PM Page 13

Backing up to a Blank Disk (cont.)
To backup single levels press [<] or [>] to scroll to the desired level.
5. Select either ALL or a desired level, then Press (OK) to confirm your selection.
6. The disk drive will begin backing up and the display will show:
7–13
7
Backup: Msg 1
� � � � � � �
Backup LEVEL2
it will then change and show the progression ofthe backup with displays showing the messagebackup. For example:
7. When the backup is complete the display will return to current status.
GROUP A: PROGRAM
LEVEL 1: Areas
The time it takes to backup a disk is dependent onthe number and length of messages and quantityyou decide to back up.
< HAVING TROUBLE?If you receive the prompt ‘Incompatible Disk 0094’, press [OK] and see the section, Formattinga Disk, to learn how to format. After formatting,repeat this procedure in full, before continuing.
CHAPTER_.7A 4/8/00 10:01 PM Page 14

7–14
7Backing up to a DigiCom Disk with Existing Files
Using the DigiCom disk drive, you can backup one single group onto a disk. And you can backup ALL levels in a group or each level separately.
If you wish to backup the files from any level or all 8 levels of the current group to a disk that alreadycontains backed up message data from a groupon the DigiCom:
1. Be certain you want to backup to this disk and understand what levels you want to backup or overwrite.
2. Put the DigiCom into the correct Group.
3. Press (Command) and then (Disk).You will then be prompted:
Disk: BACKUP
< > OK Cancel
Free Space
1423KB
4. Press [OK].
The display will briefly show the free space available on the floppy disk:
If you receive the prompt ‘Incompatible Disk’, seethe section, Formatting a Disk, to learn how to format a disk before continuing with the backup.
The display will then show:
Backup: ALL
< > OK Cancel
6. Press [OK] to backup ALL or Press [<] or [>] to scroll to the Level you wish to backup.
CHAPTER_.7A 4/8/00 10:01 PM Page 15

Backing up to a DigiCom Disk with Existing Files (cont.)
7. If the disk already has the files of the selected level on it, the display will briefly show:
7–15
7
LEVEL1 Backup
Exists
8. And will then ask either of the following:if the selected level is not on the Disk:
Backup: LEVEL1
< > OK Cancel
or
if the selected level exists on the disk:
Overwrite: LEVEL1
< > OK Cancel
9. Press [OK] to make a new back up of the level and overwrite the messages previously saved on that disk.
or
Press [<] or [>] arrow keys to skip the level and move to the next level you wish to backup.
or
Press [CANCEL] to exit from the backup procedure completely.
CHAPTER_.7A 4/8/00 10:01 PM Page 16

Backing up to a DigiCom Disk with Existing Files (cont.)
10. If you pressed [OK] to backup or overwrite any levels, the DigiCom will show its progress with the following prompts:
7–16
7
Backup LEVEL1
Backup LI
� � �
and
and
Backup KI
� � � � � � � �
and so on:
Backup MSG0
� � �
11.The DigiCom will return to Program modewhen the backup is completed.
GROUP A: PROGRAM
LEVEL 1: Areas
or
Charging Battery
* If you have the charger plugged in. To see the status message, press the Level function key.
CHAPTER_.7A 4/8/00 10:01 PM Page 17
7
7–17
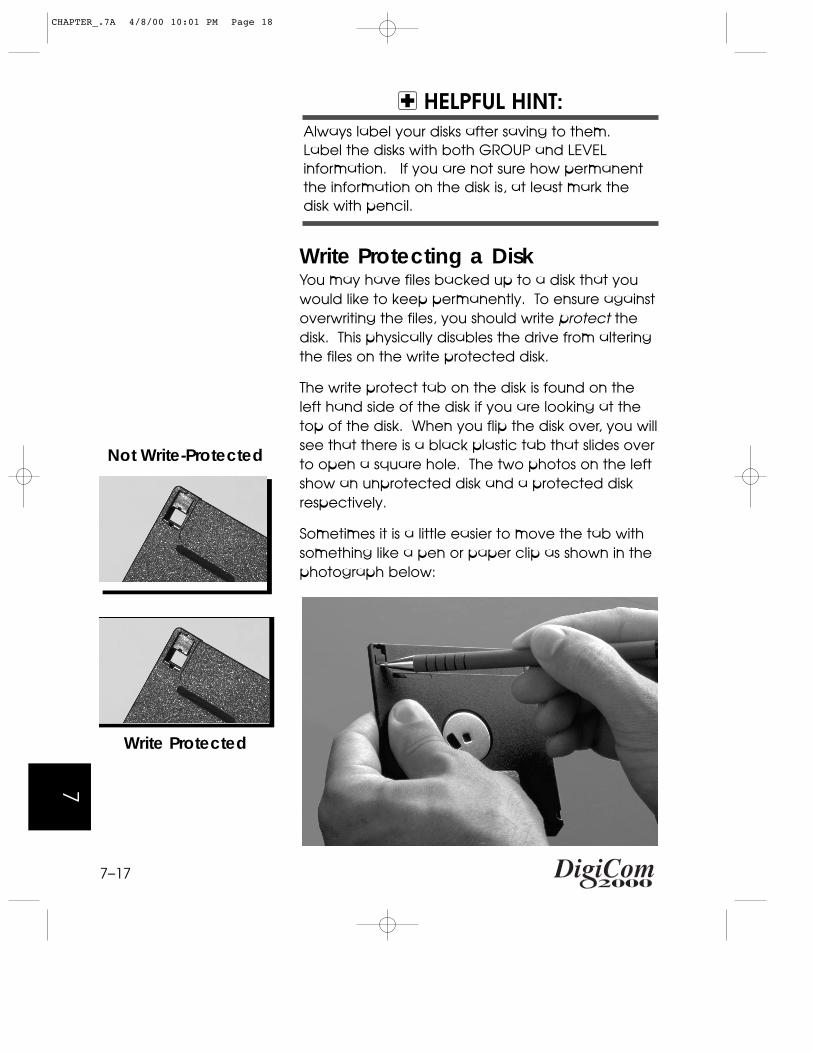
8 HELPFUL HINT:Always label your disks after saving to them. Label the disks with both GROUP and LEVEL information. If you are not sure how permanentthe information on the disk is, at least mark thedisk with pencil.
Write Protecting a DiskYou may have files backed up to a disk that you would like to keep permanently. To ensure against overwriting the files, you should write protect thedisk. This physically disables the drive from alteringthe files on the write protected disk.
The write protect tab on the disk is found on theleft hand side of the disk if you are looking at thetop of the disk. When you flip the disk over, you willsee that there is a black plastic tab that slides overto open a square hole. The two photos on the leftshow an unprotected disk and a protected diskrespectively.
Sometimes it is a little easier to move the tab withsomething like a pen or paper clip as shown in thephotograph below:
Not Write-Protected
Write Protected
CHAPTER_.7A 4/8/00 10:01 PM Page 18

7–18
7Restoring Files from a DiskRestoring files from a disk is much simpler than backing them up. However, before you restorethe files from the disk, you should consider howimportant the message files currently in thatGroup of DigiCom are and whether they will beneeded again.
Disk: BACKUP
< > OK Cancel
Restore: ALL
< > OK Cancel
4. Press the [>] key once and the screen will show:
Press the [<] or [>] key to select a level or [OK] to select all 8 levels to restore.
6. If you selected a specific level to restore, press [OK]
5. Press [OK] and the screen will show:
Disk: RESTORE
< > OK Cancel
9 WARNING:By reloading files into the DigiCom, you will replace that Groups current info and message files and erase what was there.
If you wish to restore the files from any level or all 8 levels from a disk:1. Put your DigiCom into the correct Group to
which you are restoring files (i.e. if I want the messages to go to Group B, I will set DigiCom to Group B and restore my Group B disk).
2. Press [COMMAND] and then [DISK].
3. The DigiCom will display:
CHAPTER_.7A 4/8/00 10:01 PM Page 19

Restoring Files from a Disk (cont.)
The DigiCom will then indicate the progress of the ‘restore’:
7–19
7
Restore LEVEL1
Restore LI
� � �
Restore KI
� � � �
Restore MSG0
� � � � �
GROUP A: PROGRAM
LEVEL 1: Areas
The DigiCom will then return to normal Program mode with the message files from the disk now inits internal memory. To be certain, go to a level inthe Group you restored and check a messagekey. Be certain to use the appropriate overlay.
and
and
and so on:
7. When completed, the display will show current settings:
CHAPTER_.7A 4/8/00 10:01 PM Page 20

7–20
7Application Updates:At any time, if there is a software update, you may be instructed to use this command to update yoursoftware without the need to ship your DigiComto the service center. This option is only possiblefor customers who have purchased a DigiComDisk Drive.
This message will only be used when instructed by
the manufacturer:
DISK: APP UPDATE
< > OK Cancel
CHAPTER_.7A 4/8/00 10:01 PM Page 21

Disk Drive TroubleShootingWhen faced with problems concerning the disk or disk drive, never fear! The DigiCom will displaythe possible problem and by reading this section,you will be ready to remedy most problems.
✔ Check the CableAn indicator that a drive related problem is due to the cable will be the display prompt:
7–21
7
Bad Connection
009F OK
The problem could be one of the following:
1. Either end of the cable is not plugged in. Check to see that the cable is plugged in at both ends correctly.
2. The cable itself has come detached from either of the two connectors. This can happen through rough handling of the connectors while unplugging the drive from the DigiCom.Do not pull out the connector from the port by the cable. Also, be careful not to pick up the DigiCom when the drive is still plugged in. If the drive is left dangling by the cable, it could damage the cable, the DigiCom, and the drive. A damaged cable must be replaced by purchasing a new cable.
3. The cable could have a fine break in it somewhere. Inspect the cable carefully to look for spots where it may be cut or crimped.If this is the case, it will need to be replaced by purchasing a new cable.
CHAPTER_.7A 4/8/00 10:01 PM Page 22

7–22
7✔ Insert a DiskIf you know that the drive is connected properly, but you still have problems, watch for error messages on the display of your DigiCom:
Prompt:
No Disk Inserted
0090 OK
The problem could be one of the following:
1. Insert the disk you intend to use into the drive and then press [OK] to begin again. If you get this message and you do have a disk in the drive already, eject the disk and reinsert it.
2. If there is no power or insufficient power going to the disk drive, it will not be able to detect a disk and the DigiCom will send you this message. If the main battery has too little charge to run the drive properly, you can plug the charger directly into the DigiCom (see the photo in the column) to gain sufficient power.
8 HELPFUL HINT:To conserve the main battery, always plug the charger into the DigiCom when “backing up to”or “restoring from” the disk. The floppy driverequires significant power to operate and will otherwise quickly drain the main battery.
CHAPTER_.7A 4/8/00 10:01 PM Page 23

7–23
7
✔ Check the Write Protect TabPrompt:
Write Protected
0093 OK
The disk inserted has the write protect tab set sothat no data may be saved to or changed on thedisk. You will still be able to restore files from thedisk (you will not get this error message if that is allyou are doing), but you cannot backup files tothe disk until the write protect tab is closed. Seethe photo to the left for reference.
✔ Check for the Correct DiskPrompt:
Incompatib. Disk
0094 OK
The disk inserted has been formatted, but not bythe DigiCom nor IBM-compatible PC. It is a diskthat is compatible with some other computer system (Macintosh, etc.). You have to reformatthe disk to work with the DigiCom. That will destroyall data currently stored on the disk. Refer toFormatting a Disk in this Chapter.
8 HELPFUL HINT:It is so important to keep your disks labeled. If you have a stack of a dozen disks and none arelabeled, you will waste time trying to figure outwhich disk is which. Also, keep all the disks as aset, together with an elastic band or with colorcoded labels.
Not Write-Protected
Write Protected
CHAPTER_.7A 4/8/00 10:01 PM Page 24

7–24
7✔ Drive ErrorPrompt:
Drive ERROR
0092 OK
While the drive was attempting to either readfrom the disk or write to it, it had problems. Try theoperation again to see if there are still problems.It may be one of the following:
1. The disk may have been damaged. There may be a bad sector or track (areas where data gets recorded) or the disk may have been subjected to harmful environmental influences such as moisture, heat, or magnetic fields.
2. The read/write head in the drive may be out of alignment. This must be corrected at the DigiCom Service Center.
✔ General ErrorPrompt:
If you try using the wrong type of disk (such as adouble density disk), you will get this message.You will also get this message if, while verifying theformat, the DigiCom detected gross errors in thedisk. If you purchase high quality disks to use withyour DigiCom, you can prevent this kind of error.
General ERROR
0091 OK
CHAPTER_.7A 4/8/00 10:01 PM Page 25

7–25
7
✔ Call Technical Support
If the trouble shooting solutions do not work, you may need to send the disk drive to theDigiCom Service Center. You must call a DigiCom technical support representative beforeshipping equipment in for service. For directions,see the last section of Chapter Eight, (GettingService).
; COMING UP NEXT:You now know the principles behind backing up files with the DigiCom disk drive option and howto restore those files. You will probably want toreturn to this chapter periodically as a referenceguide. The final chapter, Trouble Shooting, is forworking through problems with your DigiCom. If something should go wrong with your DigiCom or it just doesn’t seem to be operatingquite right, you should consult this chapter of themanual before calling for service.
CHAPTER_.7A 4/8/00 10:01 PM Page 26