digital hydrometer sbs-2003 · digital hydrometer sbs-2003 instruction ... blindness may occur if...
TRANSCRIPT
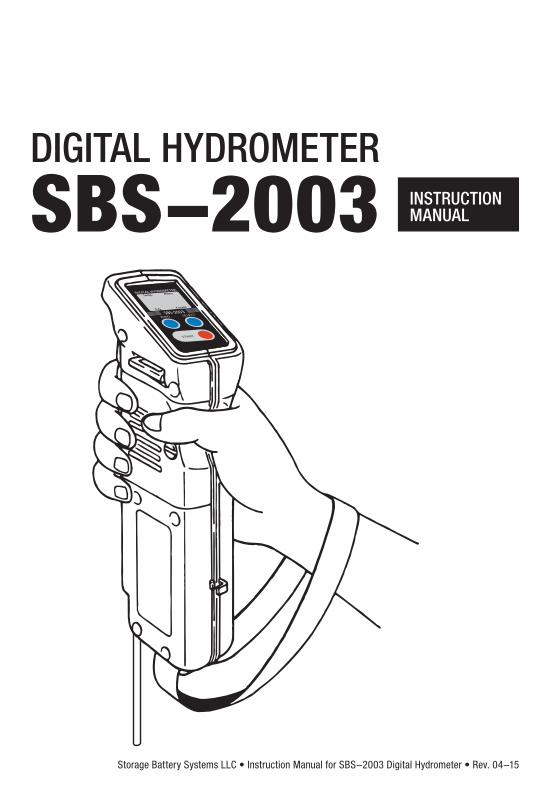
DIGITAL
HYDROMETER
p_p
=
J
MenuTemp.
S.G. Count
DIGITAL HYDROMETER
SBS-2003 INSTRUCTIONMANUAL
Storage Battery Systems LLC • Instruction Manual for SBS-2003 Digital Hydrometer • Rev. 04-15
SBS-2003
1www.sbsbattery.com 1-800-554-2243 [email protected]
PrecautionsPlease read before use.
Warning! • When measuring toxic substances, be well aware of its properties and put on protective gloves, goggles, etc.
• The electrolyte contains sulfuric acid and is toxic. Burns may occur if contact is made on the skin or clothes. Blindness may occur if contact is made to the eyes. Always wear protective glasses and rubber gloves. If the electrolyte is splashed onto the skin or clothing, rinse with sufficient amounts of cold water. If it gets into the eyes, flush with cold, clean water for a minimum of 15 minutes and seek immediate medical attention.
Thank you for purchasing the SBS-2003 Digital Hydrometer.
Please read and follow the below instructions carefully.
Caution! • Care should be taken to avoid damage to the prism. Use soft tissue paper when wiping the prism surface to avoid scratching. Never use any metal tools or abrasive materials on the prism.
• The instrument is designed to measure the electrolyte solution of lead acid batteries. Do not use for the measurement of other electrolyte solutions such as in alkaline batteries. (i.e., NiCd, LIOH, NMH)
• Remove the battery from the instrument before storing for long periods of time.
2www.sbsbattery.com 1-800-554-2243 [email protected]
Note • Read this manual carefully to understand the operation and functions of the instrument. • Make sure that the instrument is calibrated correctly by zero-setting daily before taking measurements.
• Handle the product with care. Do not drop the instrument or expose it to a strong shock. • SBS will not be held liable for any damages or injury resulting from any improper or unintended use of the instrument.
• SBS will not be held liable for any damages or injury resulting from the qualities and characteristics of samples measured with this instrument.
Attention to the following note is needed during measurement when the temperature of the electrolyte varies greatly from the ambient temperature:
The SBS-2003 compensates for the temperature of the sample automatically by detecting the temperature on the prism in the Sample Chamber. If the temperature of the sample is different from the prism temperature, wait approximately 3 seconds for every 1°C℃ (2°F) of the difference between temperatures before pressing the START key. (If very large differences in temperatures are suspected, allow time for the sample to warm the prism before pressing the START key.)
Note about Temperature
ERRATIC READINGS OR ERRORS
When the SBS-2003 seems to be malfunctioning or out of order, check the battery power first. Malfunctions can often be solved by simply replacing the battery.
3www.sbsbattery.com 1-800-554-2243 [email protected]
Table of Contents
Unpacking℃℃℃℃℃℃℃℃℃℃℃℃℃℃℃℃℃℃℃℃℃℃ 4
Names and Functions of Parts℃℃℃℃℃℃℃℃℃℃℃℃℃ 4
Inserting Sample Tube℃℃℃℃℃℃℃℃℃℃℃℃℃℃℃℃℃ 6
Attaching Wrist Strap 7
Inserting Battery 8
Zero-setting 10
Measuring Sample 12
Temperature 14
Settings Menu℃℃℃℃℃℃℃℃℃℃℃℃℃℃℃℃℃℃℃℃ 15
Bluetooth Data Logging 17
Alternate Method of Bluetooth Data Transfer 26
Error Messages 29
Maintenance 31
Troubleshooting℃℃℃℃℃℃℃℃℃℃℃℃℃℃℃℃℃℃℃℃ 34
Specifications℃℃℃℃℃℃℃℃℃℃℃℃℃℃℃℃℃℃℃ 37
4www.sbsbattery.com 1-800-554-2243 [email protected]
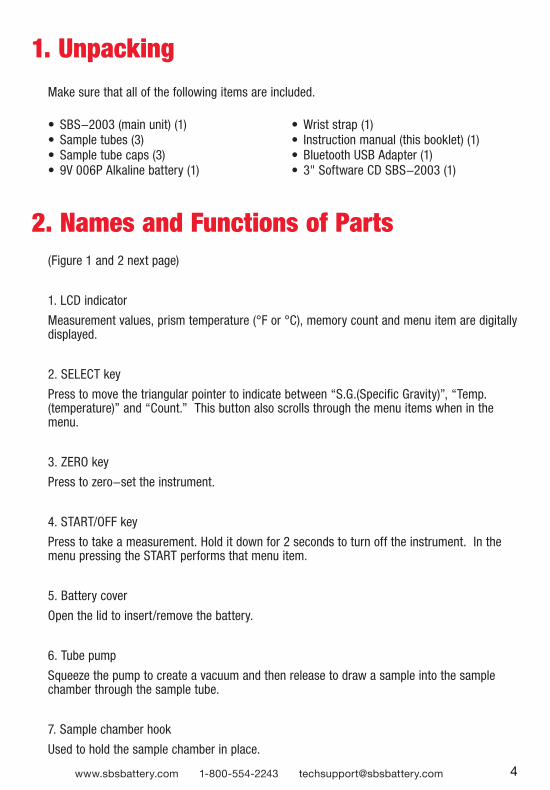
(Figure 1 and 2 next page)
1. LCD indicator
Measurement values, prism temperature (°F or °C), memory count and menu item are digitally displayed.
2. SELECT key
Press to move the triangular pointer to indicate between “S.G.(Specific Gravity)”, “Temp.(temperature)” and “Count.” This button also scrolls through the menu items when in the menu.
3. ZERO key
Press to zero-set the instrument.
4. START/OFF key
Press to take a measurement. Hold it down for 2 seconds to turn off the instrument. In the menu pressing the START performs that menu item.
5. Battery cover
Open the lid to insert/remove the battery.
6. Tube pump
Squeeze the pump to create a vacuum and then release to draw a sample into the sample chamber through the sample tube.
7. Sample chamber hook
Used to hold the sample chamber in place.
2. Names and Functions of Parts
• ℃SBS-2003 (main unit)℃℃℃℃℃℃℃℃ (1) • ℃Sample tubes℃℃℃℃℃℃℃℃℃℃℃ (3) • ℃Sample tube caps (℃℃℃℃℃℃℃℃3) • ℃9V 006P Alkaline battery (℃℃℃℃℃1)
• ℃Wrist strap ℃℃℃℃℃℃℃℃℃℃℃(1) • ℃Instruction manual (this booklet)℃℃ (1) • Bluetooth USB Adapter (1) • 3" Software CD SBS-2003 (1)
Make sure that all of the following items are included.
1. Unpacking
5www.sbsbattery.com 1-800-554-2243 [email protected]
8. Sample chamber
Samples come in contact with the prism and are measured.
9. Sample tube
Sample is drawn through the sample tube.
10. Sample tube cap
Used to protect the tip of the sample tube.
N
RQPO
DIGITAL HYDROMETER
p_p=J
MenuTemp.
S.G. Count
Figure 1 Figure 2
10
9
8
7
6
SBS-2003
6www.sbsbattery.com 1-800-554-2243 [email protected]
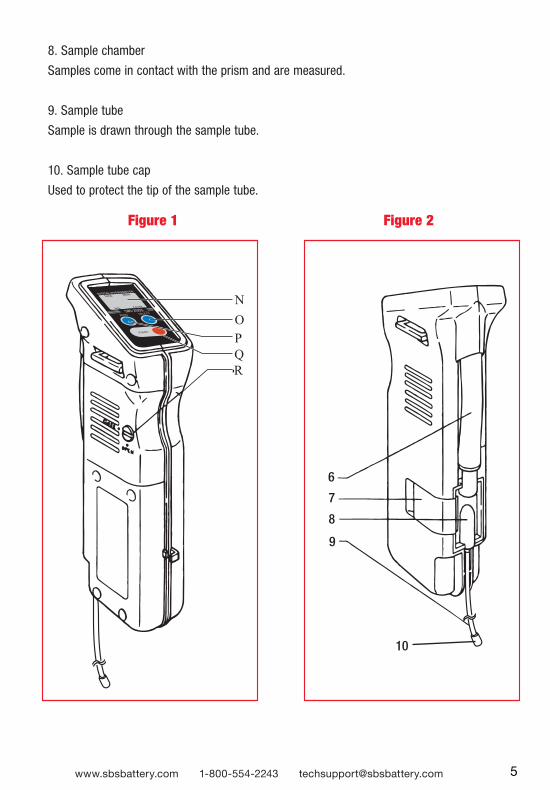
The sample tubes come detached from the main unit. Follow the instructions below to attach them.
(1) Push the sample tube into the hole located at the bottom of the sample chamber until it stops. (Figure 3)
(2) Fit the sample tube into the groove on the side by pushing it in with the thumb.(Figure 4)
3. Inserting Sample Tube
Figure 3
Figure 4
7www.sbsbattery.com 1-800-554-2243 [email protected]
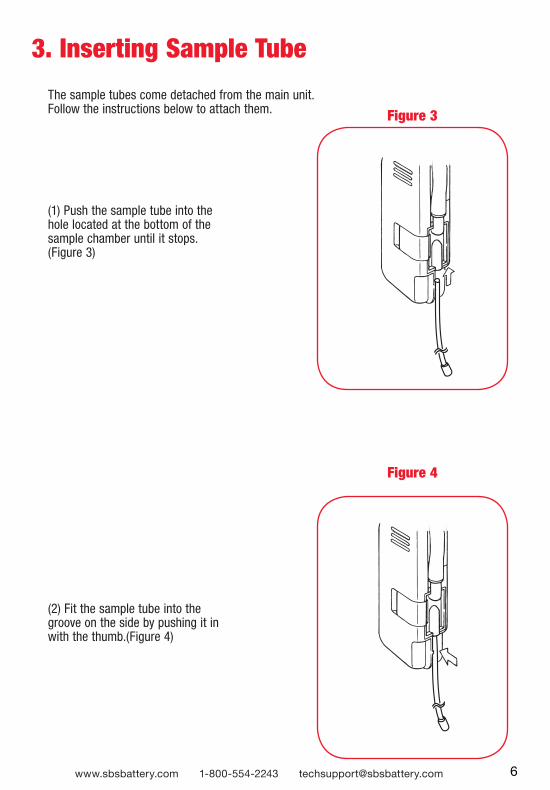
Follow the instructions below to attach the included wrist strap. Use the strap to prevent dropping the instrument as shown on the front cover of this manual.
(2) Loop the strap through the strap adjuster buckle. (Figure 6)
(1) Put the strap through the rectangular opening at the bottom of the instrument. (Figure 5)
4. Attaching Wrist Strap
Figure 5
Figure 6

8www.sbsbattery.com 1-800-554-2243 [email protected]
5. Inserting Battery
(1) Turn the screw on the battery cover lid counterclockwise with screwdriver until the slot is aligned with the “OPEN” position marker. (Figure 7)
Warning! • Do not touch the battery with wet fingers to avoid shock.
Caution! • Insert the battery with the correct polarity (plus + and minus ℃terminals). Operating with a battery with incorrect polarity may cause a failure of the instrument.
Figure 7
DIGITAL HYDROMETER
=J
MenuTemp.
S.G. Count
SBS-2003
9www.sbsbattery.com 1-800-554-2243 [email protected]
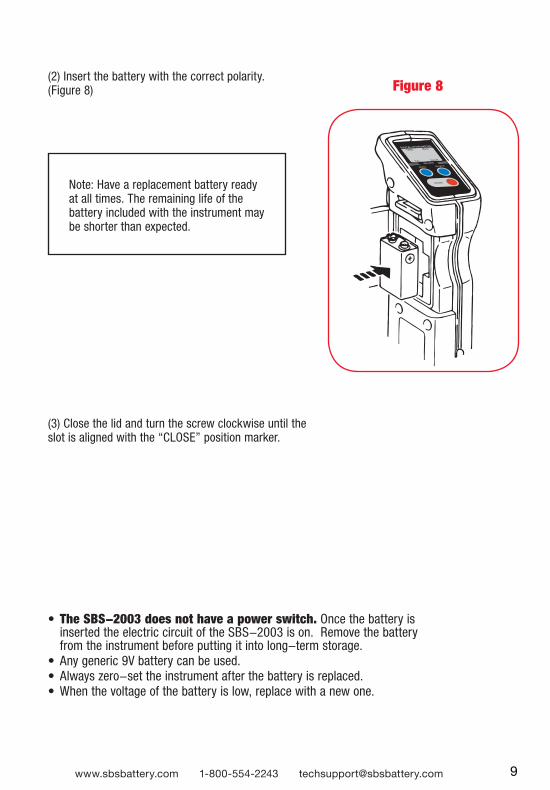
Note: Have a replacement battery ready at all times. The remaining life of the battery included with the instrument may be shorter than expected.
(2) Insert the battery with the correct polarity. (Figure 8)
• The SBS-2003 does not have a power switch. Once the battery is inserted the electric circuit of the SBS-2003 is on. Remove the battery from the instrument before putting it into long-term storage.
• Any generic 9V battery can be used. • Always zero-set the instrument after the battery is replaced. • When the voltage of the battery is low, replace with a new one.
(3) Close the lid and turn the screw clockwise until the slot is aligned with the “CLOSE” position marker.
DIGITAL
HYDROMETER
p_p
=
J
MenuTemp.
S.G. Count
Figure 8
SBS-2003

10www.sbsbattery.com 1-800-554-2243 [email protected]
Note: Confirm that the sample chamber is completely filled with water. If any air bubbles are present, pump water again.
1. Remove the sample tube cap.
2. Have distilled or de-ionized water ready.
3. Press the START key to turn on the SBS-2003, then press the SELECT key to move the triangular pointer to “Temp.” or “S.G.”(Figure 9)
4. Submerge the tip of the sample tube in water. Squeeze and then release the tube pump. Water is drawn up into the sample chamber. (Figure 10)
6. Zero-setting
Figure 10
Figure 9
DIGITAL HYDROMETERMenu
Temp.
S.G. Count
DIGITAL HYDROMETERTemp. Menu
S.G. Count
SBS
-2003
Caution! • The SBS-2003 needs to be zero-set at the beginning of each day. Moreover, each time the ambient temperature changes while in use, it needs to be zero-set.
• Zero-setting is also needed whenever the battery is replaced.
• Allow 30 to 60 minutes for the instrument to be acclimated to the ambient temperature.
SBS-2003
11www.sbsbattery.com 1-800-554-2243 [email protected]
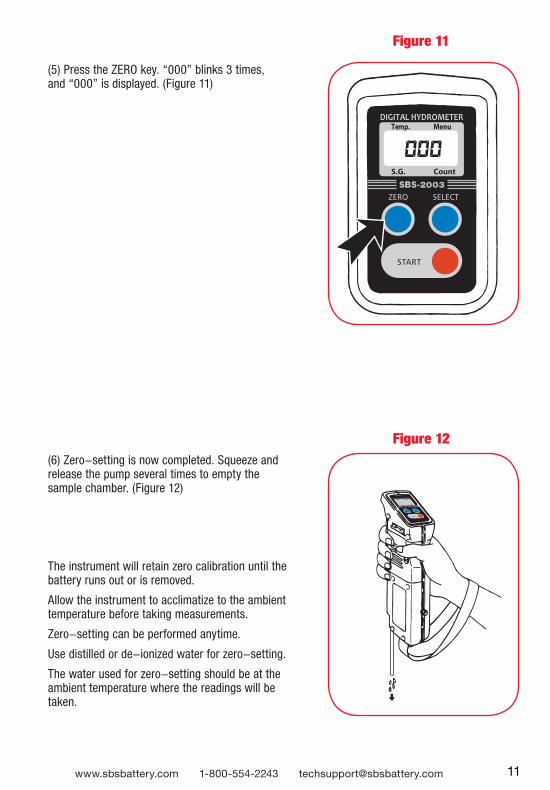
(5) Press the ZERO key. “000” blinks 3 times, and “000” is displayed. (Figure 11)
(6) Zero-setting is now completed. Squeeze and release the pump several times to empty the sample chamber. (Figure 12)
℃The instrument will retain zero calibration until the battery runs out or is removed.
℃Allow the instrument to acclimatize to the ambient temperature before taking measurements.
℃Zero-setting can be performed anytime.
℃Use distilled or de-ionized water for zero-setting.
℃The water used for zero-setting should be at the ambient temperature where the readings will be taken.
Figure 11
Figure 12
DIGITAL HYDROMETER
=J
MenuTemp.
S.G. Count
DIGITAL HYDROMETERTemp. Menu
S.G. Count
SBS -2003
SBS-2003
12www.sbsbattery.com 1-800-554-2243 [email protected]
7. Measuring Sample
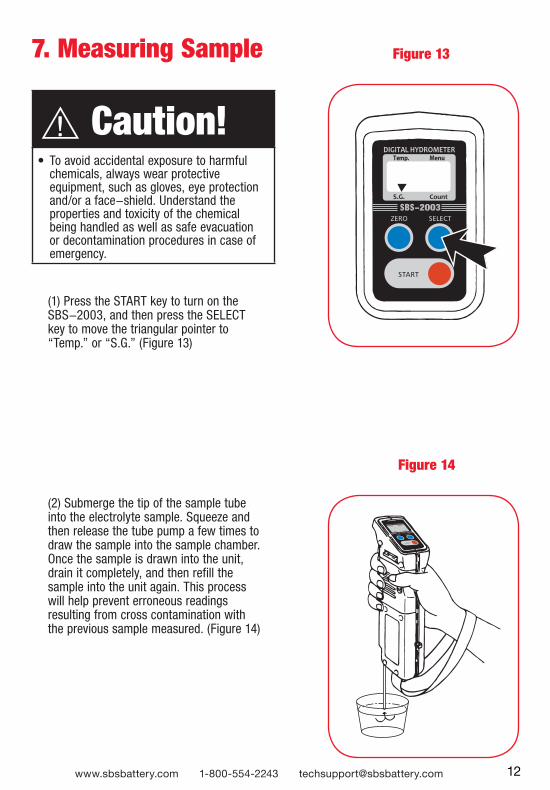
(1) Press the START key to turn on the SBS-2003, and then press the SELECT key to move the triangular pointer to “Temp.” or “S.G.” (Figure 13)
(2) Submerge the tip of the sample tube into the electrolyte sample. Squeeze and then release the tube pump a few times to draw the sample into the sample chamber. Once the sample is drawn into the unit, drain it completely, and then refill the sample into the unit again. This process will help prevent erroneous readings resulting from cross contamination with the previous sample measured. (Figure 14)
Caution! • To avoid accidental exposure to harmful chemicals, always wear protective equipment, such as gloves, eye protection and/or a face-shield. Understand the properties and toxicity of the chemical being handled as well as safe evacuation or decontamination procedures in case of emergency.
Figure 13
Figure 14
DIGITAL HYDROMETERTemp. Menu
S.G. Count
SBS -2003
DIGITAL HYDROMETER
=
MenuTemp.
S.G. Count
SBS-2003
13www.sbsbattery.com 1-800-554-2243 [email protected]
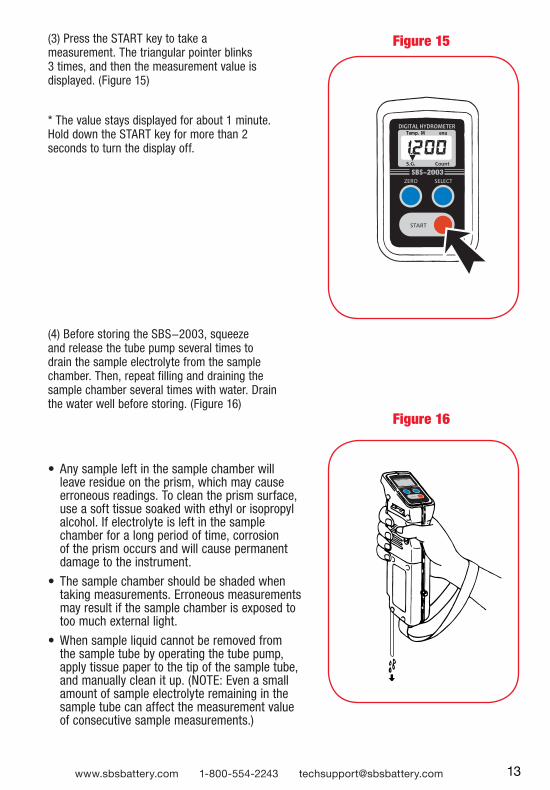
(3) Press the START key to take a measurement. The triangular pointer blinks 3 times, and then the measurement value is displayed. (Figure 15)
* The value stays displayed for about 1 minute. Hold down the START key for more than 2 seconds to turn the display off.
(4) Before storing the SBS-2003, squeeze and release the tube pump several times to drain the sample electrolyte from the sample chamber. Then, repeat filling and draining the sample chamber several times with water. Drain the water well before storing. (Figure 16)
• ℃Any sample left in the sample chamber will leave residue on the prism, which may cause erroneous readings. To clean the prism surface, use a soft tissue soaked with ethyl or isopropyl alcohol. If electrolyte is left in the sample chamber for a long period of time, corrosion of the prism occurs and will cause permanent damage to the instrument.
• ℃The sample chamber should be shaded when taking measurements. Erroneous measurements may result if the sample chamber is exposed to too much external light.
• ℃When sample liquid cannot be removed from the sample tube by operating the tube pump, apply tissue paper to the tip of the sample tube, and manually clean it up. (NOTE: Even a small amount of sample electrolyte remaining in the sample tube can affect the measurement value of consecutive sample measurements.)
Figure 15
Figure 16
DIGITAL HYDROMETERTemp. M enu
S.G. Count
SBS -2003
DIGITAL HYDROMETER
SBS -2003
MenuTemp.
S.G. Count

14www.sbsbattery.com 1-800-554-2243 [email protected]
To display the current temperature, press the SELECT key to move the triangular pointer to point to “Temp.” (Figure 17)
To switch between Celsius and Fahrenheit, see settings menu (see page. 16).
8. Temperature Figure 17
Note: The temperature indicated is the temperature of the sample chamber, not
necessarily the temperature of the sample itself.
DIGITAL HYDROMETERTemp. Menu
S.G. Count
SBS -2003
15www.sbsbattery.com 1-800-554-2243 [email protected]
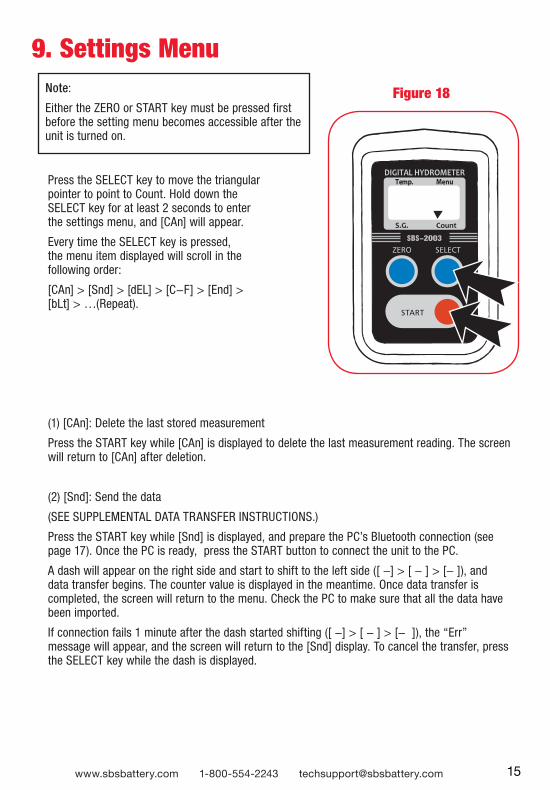
Press the SELECT key to move the triangular pointer to point to Count. Hold down the SELECT key for at least 2 seconds to enter the settings menu, and [CAn] will appear.
Every time the SELECT key is pressed, the menu item displayed will scroll in the following order:
[CAn] > [Snd] > [dEL] > [C-F] > [End] > [bLt] > …(Repeat).
(1) [CAn]: Delete the last stored measurement
Press the START key while [CAn] is displayed to delete the last measurement reading. The screen will return to [CAn] after deletion.
(2) [Snd]: Send the data
(SEE SUPPLEMENTAL DATA TRANSFER INSTRUCTIONS.)
Press the START key while [Snd] is displayed, and prepare the PC’s Bluetooth connection (see page 17). Once the PC is ready, press the START button to connect the unit to the PC.
A dash will appear on the right side and start to shift to the left side ([ -] > [ - ] > [- ]), and data transfer begins. The counter value is displayed in the meantime. Once data transfer is completed, the screen will return to the menu. Check the PC to make sure that all the data have been imported.
If connection fails 1 minute after the dash started shifting ([ -] > [ - ] > [- ]), the “Err” message will appear, and the screen will return to the [Snd] display. To cancel the transfer, press the SELECT key while the dash is displayed.
9. Settings Menu
Figure 18
DIGITAL HYDROMETERTemp. Menu
S.G. Count
SBS -2003
Note:
Either the ZERO or START key must be pressed first before the setting menu becomes accessible after the unit is turned on.
16www.sbsbattery.com 1-800-554-2243 [email protected]
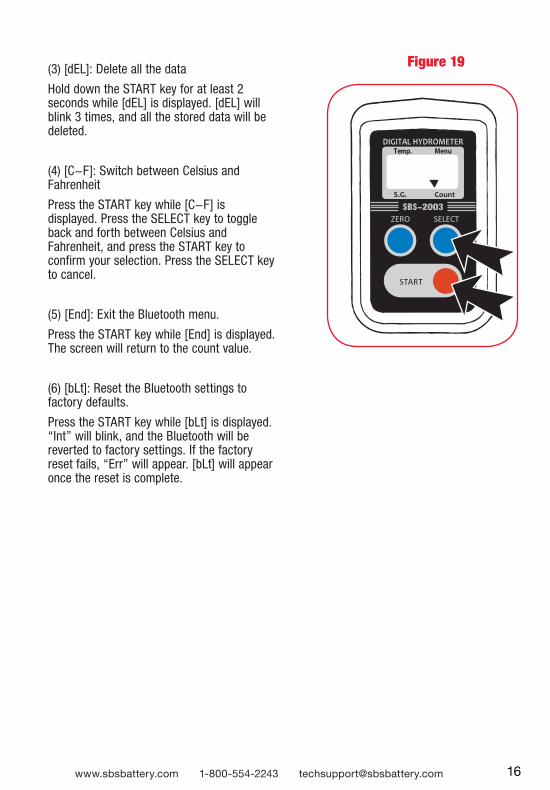
(3) [dEL]: Delete all the data
Hold down the START key for at least 2 seconds while [dEL] is displayed. [dEL] will blink 3 times, and all the stored data will be deleted.
(4) [C-F]: Switch between Celsius and Fahrenheit
Press the START key while [C-F] is displayed. Press the SELECT key to toggle back and forth between Celsius and Fahrenheit, and press the START key to confirm your selection. Press the SELECT key to cancel.
(5) [End]: Exit the Bluetooth menu.
Press the START key while [End] is displayed. The screen will return to the count value.
(6) [bLt]: Reset the Bluetooth settings to factory defaults.
Press the START key while [bLt] is displayed. “Int” will blink, and the Bluetooth will be reverted to factory settings. If the factory reset fails, “Err” will appear. [bLt] will appear once the reset is complete.
Figure 19
DIGITAL HYDROMETERTemp. Menu
S.G. Count
SBS -2003
17www.sbsbattery.com 1-800-554-2243 [email protected]
The SBS-2003 is capable of transferring measurement data to PC via Bluetooth connection and the SBS-2003 Macro enabled Workbook.
10. Bluetooth data logging
10.1 Preparing Bluetooth Communications
10.1.1 Install the supplied Bluetooth adapter into an available open USB port on the PC.
10.1.2 Windows XP Instructions
10.1.2.1 Found New Hardware Wizard will identify the Bluetooth device and install the appropriate windows drivers.
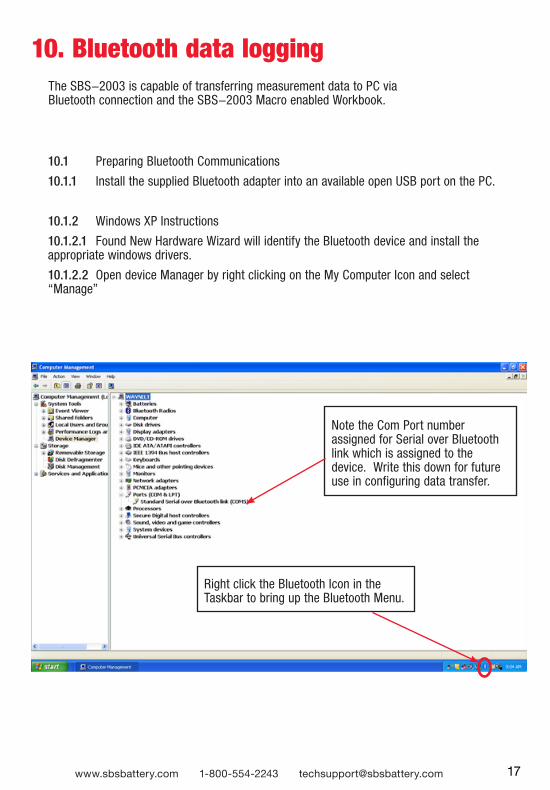
10.1.2.2 Open device Manager by right clicking on the My Computer Icon and select “Manage”
Note the Com Port number assigned for Serial over Bluetooth link which is assigned to the device. Write this down for future use in configuring data transfer.
Right click the Bluetooth Icon in the Taskbar to bring up the Bluetooth Menu.
18www.sbsbattery.com 1-800-554-2243 [email protected]
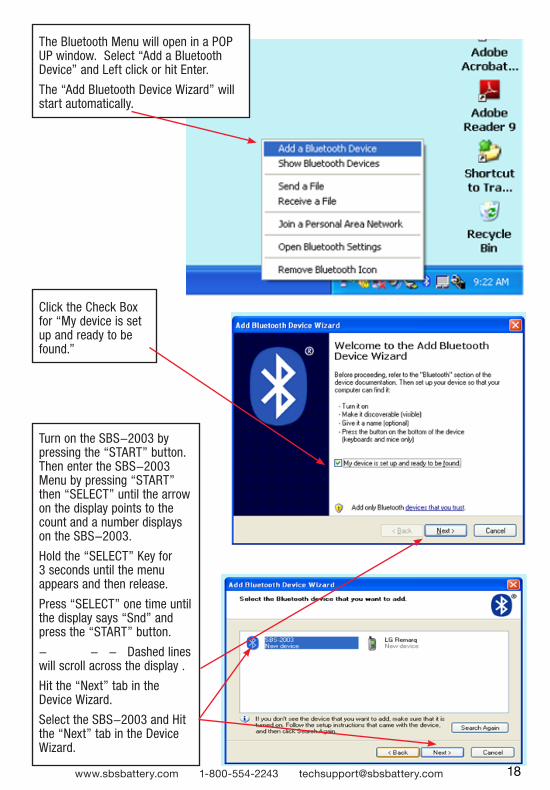
The Bluetooth Menu will open in a POP UP window. Select “Add a Bluetooth Device” and Left click or hit Enter.
The “Add Bluetooth Device Wizard” will start automatically.
Click the Check Box for “My device is set up and ready to be found.”
Turn on the SBS-2003 by pressing the “START” button. Then enter the SBS-2003 Menu by pressing “START” then “SELECT” until the arrow on the display points to the count and a number displays on the SBS-2003.
Hold the “SELECT” Key for 3 seconds until the menu appears and then release.
Press “SELECT” one time until the display says “Snd” and press the “START” button.
- - - Dashed lines will scroll across the display .
Hit the “Next” tab in the Device Wizard.
Select the SBS-2003 and Hit the “Next” tab in the Device Wizard.
19www.sbsbattery.com 1-800-554-2243 [email protected]
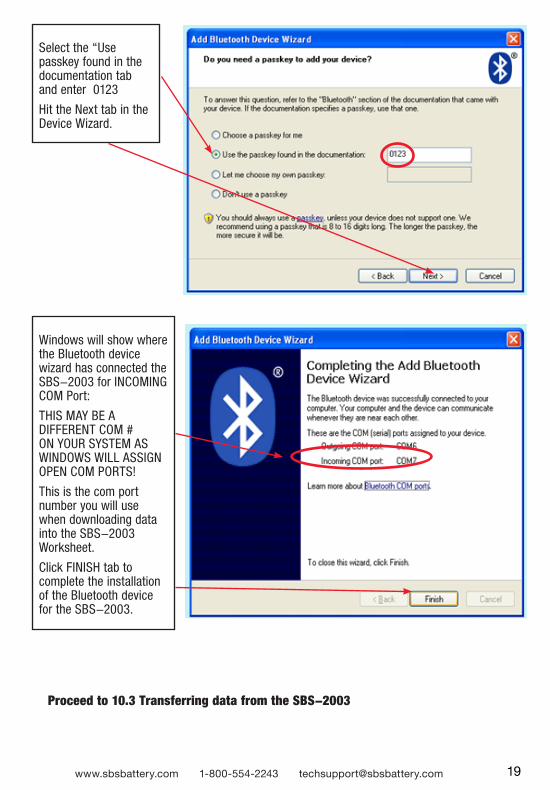
Select the “Use passkey found in the documentation tab and enter 0123
Hit the Next tab in the Device Wizard.
Windows will show where the Bluetooth device wizard has connected the SBS-2003 for INCOMING COM Port:
THIS MAY BE A DIFFERENT COM # ON YOUR SYSTEM AS WINDOWS WILL ASSIGN OPEN COM PORTS!
This is the com port number you will use when downloading data into the SBS-2003 Worksheet.
Click FINISH tab to complete the installation of the Bluetooth device for the SBS-2003.
Proceed to 10.3 Transferring data from the SBS-2003
20www.sbsbattery.com 1-800-554-2243 [email protected]
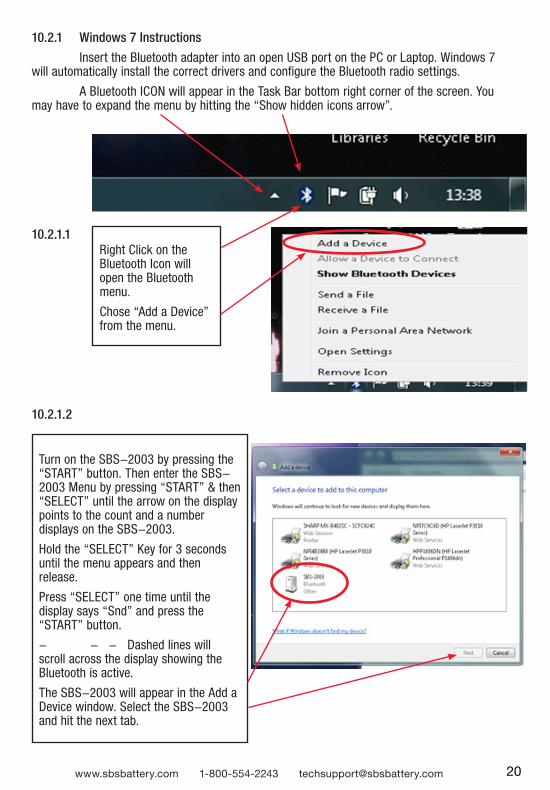
10.2.1 Windows 7 Instructions
Insert the Bluetooth adapter into an open USB port on the PC or Laptop. Windows 7 will automatically install the correct drivers and configure the Bluetooth radio settings.
A Bluetooth ICON will appear in the Task Bar bottom right corner of the screen. You may have to expand the menu by hitting the “Show hidden icons arrow”.
10.2.1.1
10.2.1.2
Right Click on the Bluetooth Icon will open the Bluetooth menu.
Chose “Add a Device” from the menu.
Turn on the SBS-2003 by pressing the “START” button. Then enter the SBS-2003 Menu by pressing “START” & then “SELECT” until the arrow on the display points to the count and a number displays on the SBS-2003.
Hold the “SELECT” Key for 3 seconds until the menu appears and then release.
Press “SELECT” one time until the display says “Snd” and press the “START” button.
- - - Dashed lines will scroll across the display showing the Bluetooth is active.
The SBS-2003 will appear in the Add a Device window. Select the SBS-2003 and hit the next tab.
21www.sbsbattery.com 1-800-554-2243 [email protected]
10.2.1.3
10.2.1.4
10.2.1.5
10.2.1.6
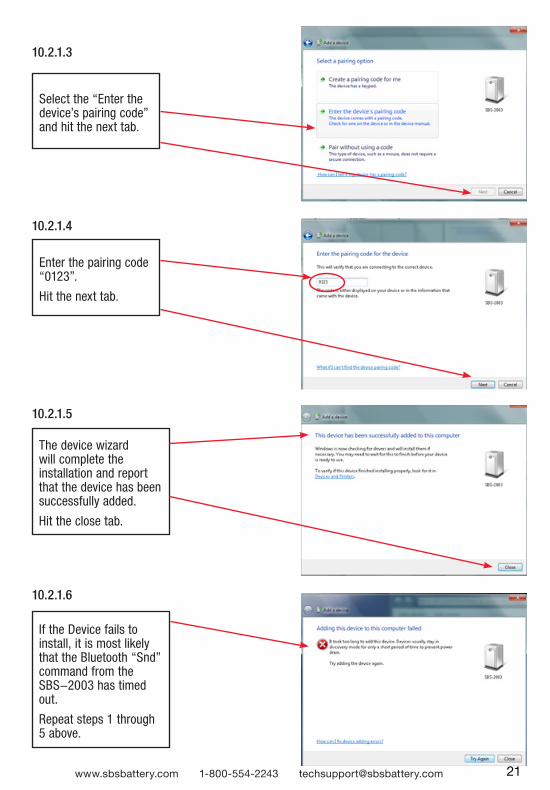
Select the “Enter the device’s pairing code” and hit the next tab.
Enter the pairing code “0123”.
Hit the next tab.
The device wizard will complete the installation and report that the device has been successfully added.
Hit the close tab.
If the Device fails to install, it is most likely that the Bluetooth “Snd” command from the SBS-2003 has timed out.
Repeat steps 1 through 5 above.
22www.sbsbattery.com 1-800-554-2243 [email protected]
10.2.1.7
10.2.1.8
10.2.1.9
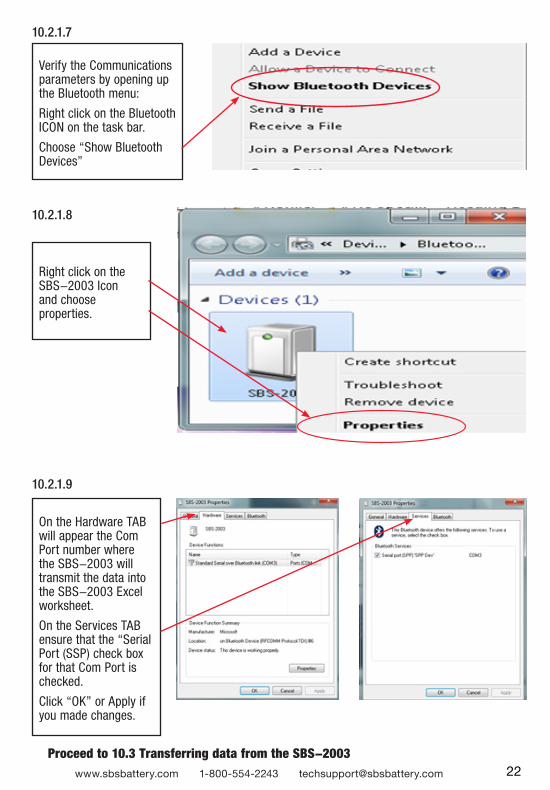
Verify the Communications parameters by opening up the Bluetooth menu:
Right click on the Bluetooth ICON on the task bar.
Choose “Show Bluetooth Devices”
Right click on the SBS-2003 Icon and choose properties.
On the Hardware TAB will appear the Com Port number where the SBS-2003 will transmit the data into the SBS-2003 Excel worksheet.
On the Services TAB ensure that the “Serial Port (SSP) check box for that Com Port is checked.
Click “OK” or Apply if you made changes.
Proceed to 10.3 Transferring data from the SBS-2003
23www.sbsbattery.com 1-800-554-2243 [email protected]
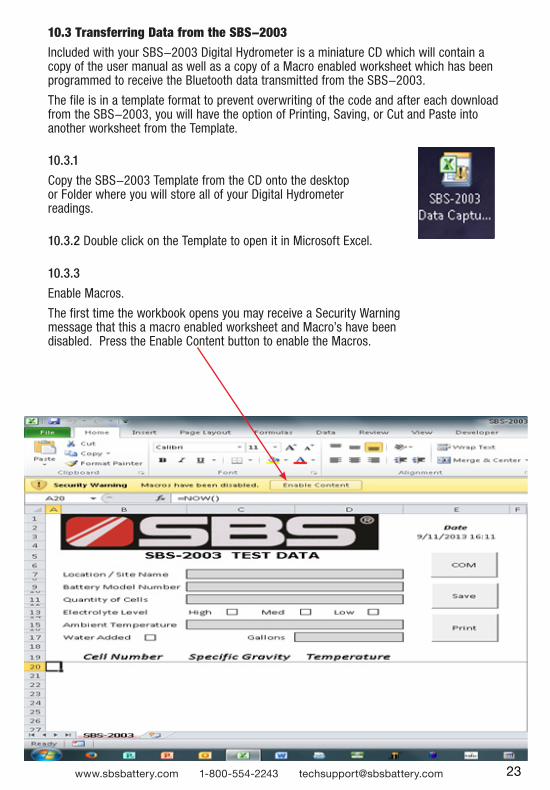
10.3 Transferring Data from the SBS-2003Included with your SBS-2003 Digital Hydrometer is a miniature CD which will contain a copy of the user manual as well as a copy of a Macro enabled worksheet which has been programmed to receive the Bluetooth data transmitted from the SBS-2003.
The file is in a template format to prevent overwriting of the code and after each download from the SBS-2003, you will have the option of Printing, Saving, or Cut and Paste into another worksheet from the Template.
10.3.1
Copy the SBS-2003 Template from the CD onto the desktop or Folder where you will store all of your Digital Hydrometer readings.
10.3.2 Double click on the Template to open it in Microsoft Excel.
10.3.3
Enable Macros.
The first time the workbook opens you may receive a Security Warning message that this a macro enabled worksheet and Macro’s have been disabled. Press the Enable Content button to enable the Macros.
24www.sbsbattery.com 1-800-554-2243 [email protected]
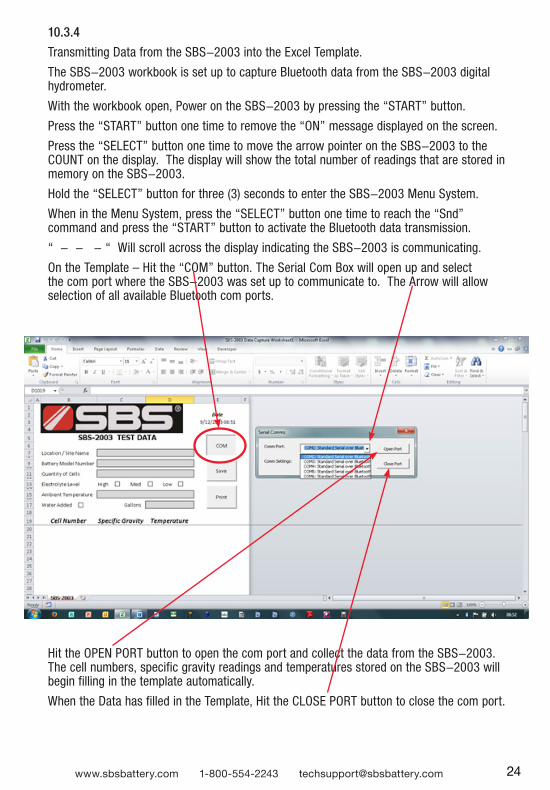
10.3.4
Transmitting Data from the SBS-2003 into the Excel Template.
The SBS-2003 workbook is set up to capture Bluetooth data from the SBS-2003 digital hydrometer.
With the workbook open, Power on the SBS-2003 by pressing the “START” button.
Press the “START” button one time to remove the “ON” message displayed on the screen.
Press the “SELECT” button one time to move the arrow pointer on the SBS-2003 to the COUNT on the display. The display will show the total number of readings that are stored in memory on the SBS-2003.
Hold the “SELECT” button for three (3) seconds to enter the SBS-2003 Menu System.
When in the Menu System, press the “SELECT” button one time to reach the “Snd” command and press the “START” button to activate the Bluetooth data transmission.
“ - - - “ Will scroll across the display indicating the SBS-2003 is communicating.
On the Template – Hit the “COM” button. The Serial Com Box will open up and select the com port where the SBS-2003 was set up to communicate to. The Arrow will allow selection of all available Bluetooth com ports.
Hit the OPEN PORT button to open the com port and collect the data from the SBS-2003. The cell numbers, specific gravity readings and temperatures stored on the SBS-2003 will begin filling in the template automatically.
When the Data has filled in the Template, Hit the CLOSE PORT button to close the com port.
25www.sbsbattery.com 1-800-554-2243 [email protected]
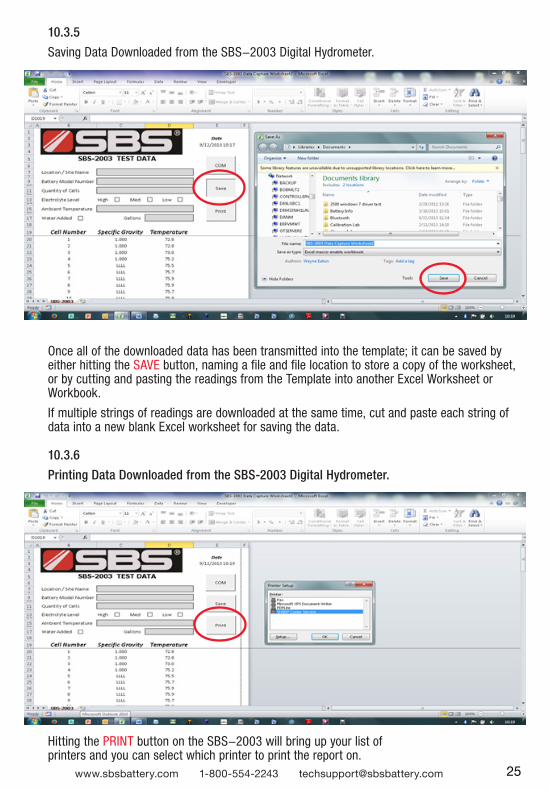
10.3.5
Saving Data Downloaded from the SBS-2003 Digital Hydrometer.
10.3.6
Printing Data Downloaded from the SBS-2003 Digital Hydrometer.
Once all of the downloaded data has been transmitted into the template; it can be saved by either hitting the SAVE button, naming a file and file location to store a copy of the worksheet, or by cutting and pasting the readings from the Template into another Excel Worksheet or Workbook.
If multiple strings of readings are downloaded at the same time, cut and paste each string of data into a new blank Excel worksheet for saving the data.
Hitting the PRINT button on the SBS-2003 will bring up your list of printers and you can select which printer to print the report on.
26www.sbsbattery.com 1-800-554-2243 [email protected]
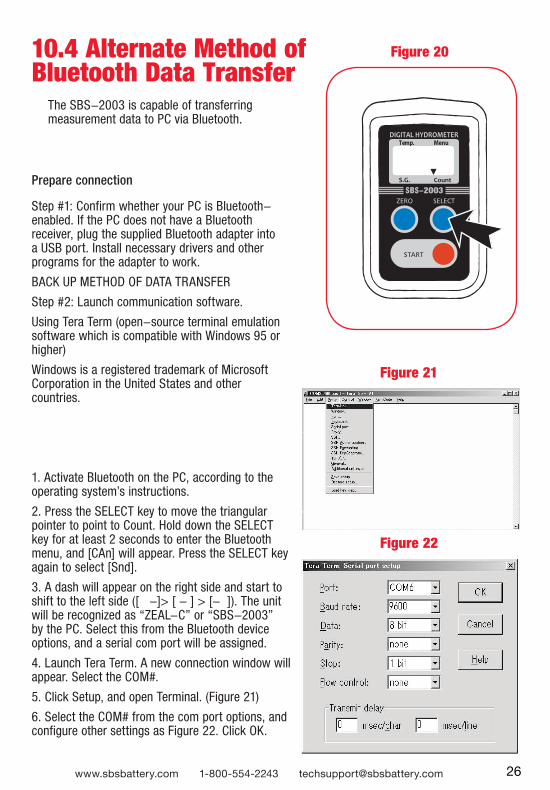
Step #1: Confirm whether your PC is Bluetooth-enabled. If the PC does not have a Bluetooth receiver, plug the supplied Bluetooth adapter into a USB port. Install necessary drivers and other programs for the adapter to work.
BACK UP METHOD OF DATA TRANSFER
Step #2: Launch communication software.
Using Tera Term (open-source terminal emulation software which is compatible with Windows 95 or higher)
Windows is a registered trademark of Microsoft Corporation in the United States and other countries.
1. Activate Bluetooth on the PC, according to the operating system’s instructions.
2. Press the SELECT key to move the triangular pointer to point to Count. Hold down the SELECT key for at least 2 seconds to enter the Bluetooth menu, and [CAn] will appear. Press the SELECT key again to select [Snd].
3. A dash will appear on the right side and start to shift to the left side ([ -]> [ - ] > [- ]). The unit will be recognized as “ZEAL-C” or “SBS-2003” by the PC. Select this from the Bluetooth device options, and a serial com port will be assigned.
4. Launch Tera Term. A new connection window will appear. Select the COM#.
5. Click Setup, and open Terminal. (Figure 21)
6. Select the COM# from the com port options, and configure other settings as Figure 22. Click OK.
Prepare connection
The SBS-2003 is capable of transferring measurement data to PC via Bluetooth.
10.4 Alternate Method of Bluetooth Data Transfer
Figure 20
DIGITAL HYDROMETERTemp. Menu
S.G. Count
SBS -2003
Figure 22
Figure 21
27www.sbsbattery.com 1-800-554-2243 [email protected]
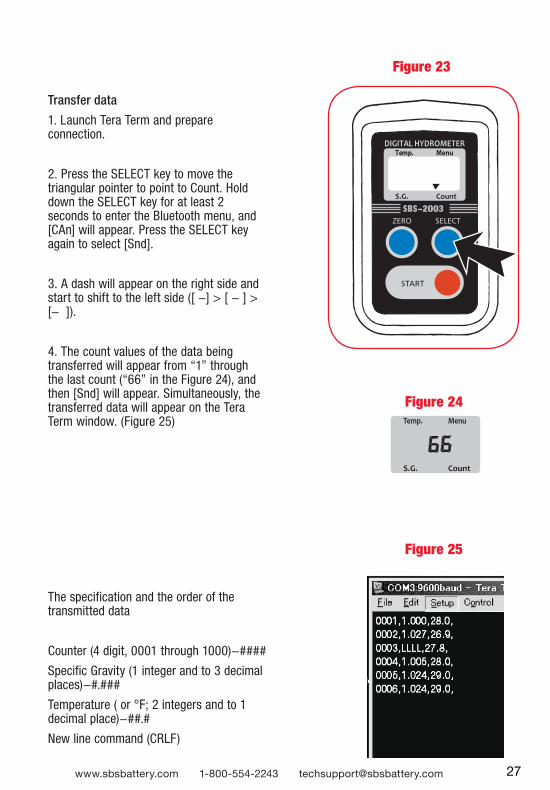
Transfer data
1. Launch Tera Term and prepare connection.
2. Press the SELECT key to move the triangular pointer to point to Count. Hold down the SELECT key for at least 2 seconds to enter the Bluetooth menu, and [CAn] will appear. Press the SELECT key again to select [Snd].
3. A dash will appear on the right side and start to shift to the left side ([ -] > [ - ] > [- ]).
4. The count values of the data being transferred will appear from “1” through the last count (“66” in the Figure 24), and then [Snd] will appear. Simultaneously, the transferred data will appear on the Tera Term window. (Figure 25)
The specification and the order of the transmitted data
Counter (4 digit, 0001 through 1000)-####
Specific Gravity (1 integer and to 3 decimal places)-#.###
Temperature (℃ or °F; 2 integers and to 1 decimal place)-##.#
New line command (CRLF)
Figure 23
Figure 24
Figure 25
DIGITAL HYDROMETERTemp. Menu
S.G. Count
SBS -2003
28www.sbsbattery.com 1-800-554-2243 [email protected]
FCC COMPLIANCE STATEMENTMODEL: SBS-2003 (CONTAINS FCC ID:E9O001ZEAL-C02/ CONTAINS IC:10171A-001ZEALC02)
USA-Federal Communication Commission (FCC)
This device complies with part 15 of the FCC rules. Operation is subject to the following two conditions:
(1) This device may not cause harmful interference, and (2) this device must accept any interference received, including interference that may cause undesired operation.
INFORMATION TO USER:
This equipment has been tested and found to comply with the limit for a Class B digital device, pursuant to Pat 15 of FCC Rules. These limits are designed to provide reasonable protection against harmful interference in a residential installation. This equipment generates, uses, and can radiate radio frequency energy. If not installed and used in accordance with the instructions, it may cause harmful interference to radio communications. However, there is no guarantee that interference will not occur in a particular installation. If this equipment does cause harmful interference to radio or television reception, which can be determined by turning the equipment off and on, the user is encouraged to try and correct the interference by one or more of the following measures:
- Reorient or relocate the receiving antenna
- Increase the distance between the equipment and the receiver.
- Connect the equipment to outlet on a circuit different from that to which the receiver is connected.
- Consult the dealer or an experienced radio/TV technician for help.
FCC Caution: Any changes or modifications not expressly approved by the party responsible for compliance could void the user’s authority to operate this equipment.
Canada-Industry Canada
Operation is subject to the following two conditions: (1) this device may not cause interference, and (2) this device must accept any interference, including interference that may cause undesired operation on this device.
L’utilisation de ce dispositif est autorisee seulement aux conditions suivantes (1)il ne doit pas produire de brouillage et (2) 1’utilisateur du dispositif doit etre pret a accepter tout brouillage radioelectrique recu, meme si ce brouillage est susceptible de compromettre le fonctionnement du dispositif.
To reduce potential radio interference to other users, the antenna type and its gain should be so chosen that the equivalent isotropically radiated power (EIRP) is not more than that required for successful communication.
Caution: Exposure to Radio Frequency Radiation.
To comply with RSS 102 RF exposure compliance requirements, for mobile configurations, a separation distance of at least 20 cm must be maintained between the antenna of this device and all persons. This device must not be co-located or operating in conjunction with any other antenna or transmitter.

29www.sbsbattery.com 1-800-554-2243 [email protected]
AAA Zero-setting error (Figure 26-1) • ℃Zero-setting was attempted with nothing in the sample chamber.
• ℃Zero-setting was attempted with a liquid other than water in the sample chamber.
Error messages below are displayed when problems with the operation or the instrument itself are detected.
LLL Sampling error (Figure 26-2)℃Electrolyte in the sample chamber is insufficient to cover the prism surface or air bubbles may be present.
LLL Out of range error (Figure 26-2)℃The sample measured lower than the specified measurement range.
HHH Out of range error (Figure 26-3)℃The sample measured higher than the specified measurement range.
. . . Temperature error (Figure 26-4)℃The temperature of the sample in the sample chamber is below -10℃°C (14°F) or above 50°C ℃(122°F) when zero-setting or measurement was attempted.
Note: This error message may not occur when the concentration of the sample is low (close to that of water). Be sure to use distilled or de-ionized water when zero-setting.
11. Error Messages
Figure 26-2
Figure 26-1
Figure 26-3
Figure 26-4

30www.sbsbattery.com 1-800-554-2243 [email protected]
Lo Low battery warning (Figure 26-5)℃ The battery is low, and it is time to replace it.
When the battery is close to running out completely, the instrument may start malfunctioning without displaying this warning message.
EEE Memory error (Figure 26-7)The “EEE” message will appear when the EEROM has failed due to faults which may be temporary or permanent. Once this message is displayed, the unit will turn itself off in 20 seconds. Try changing the battery with a fresh, new one. If the error message persists after the battery is changed, the EEROM is out of order; Contact SBS Technical Support.
Err Bluetooth connection error (Figure 26-8)The “Err” message will appear when the unit cannot find a Bluetooth-enabled device while searching or connect to the paired device during data transfer after attempting to do so for more than 1 minute.
FUL Data full error (Figure 26-6)The “FUL” message will appear to indicate that the 1,000 measurement memory capacity is reached, at which point the unit stops recording further measurement data on its Electrically Erasable Read-Only Memory (EEROM). “FUL” will appear after the START key is pressed to take the 1,001st measurement, and then the measurement value will be displayed. Resolve this error by deleting stored data from the settings menu (see page 16).
Figure 26-5
Figure 26-6
Figure 26-7
Figure 26-8
31www.sbsbattery.com 1-800-554-2243 [email protected]
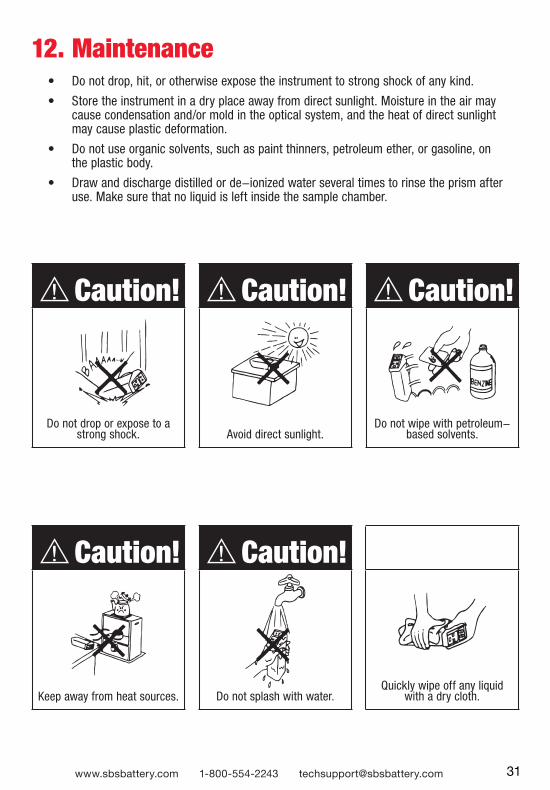
• Do not drop, hit, or otherwise expose the instrument to strong shock of any kind.
• Store the instrument in a dry place away from direct sunlight. Moisture in the air may cause condensation and/or mold in the optical system, and the heat of direct sunlight may cause plastic deformation.
• Do not use organic solvents, such as paint thinners, petroleum ether, or gasoline, on the plastic body.
• Draw and discharge distilled or de-ionized water several times to rinse the prism after use. Make sure that no liquid is left inside the sample chamber.
12. Maintenance
Caution!
Do not drop or expose to a strong shock.
Caution!
Avoid direct sunlight.
Caution!
Do not wipe with petroleum-based solvents.
Caution!
Keep away from heat sources.
Caution!
Do not splash with water.Quickly wipe off any liquid
with a dry cloth.

32www.sbsbattery.com 1-800-554-2243 [email protected]
Cleaning the prism and the sample chamber
Release the sample chamber hook (Figure 27) and check if the prism and sample chamber are dirty or wet.
Wipe them clean with a soft tissue. (Figure 28)
Check the leakage at sample tube and sample chamber.
NOTE: Check periodically for any leakage at the sample tube or sample chamber. (Figure 29)
Figure 27
Figure 28
Figure 29
33www.sbsbattery.com 1-800-554-2243 [email protected]
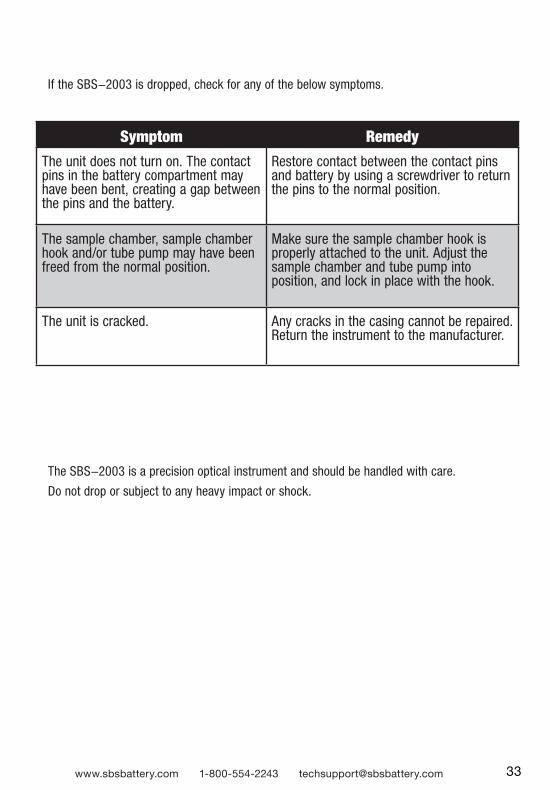
The SBS-2003 is a precision optical instrument and should be handled with care.
Do not drop or subject to any heavy impact or shock.
If the SBS-2003 is dropped, check for any of the below symptoms.
Symptom Remedy
The unit does not turn on. The contact pins in the battery compartment may have been bent, creating a gap between the pins and the battery.
Restore contact between the contact pins and battery by using a screwdriver to return the pins to the normal position.
The sample chamber, sample chamber hook and/or tube pump may have been freed from the normal position.
Make sure the sample chamber hook is properly attached to the unit. Adjust the sample chamber and tube pump into position, and lock in place with the hook.
The unit is cracked. Any cracks in the casing cannot be repaired. Return the instrument to the manufacturer.
34www.sbsbattery.com 1-800-554-2243 [email protected]
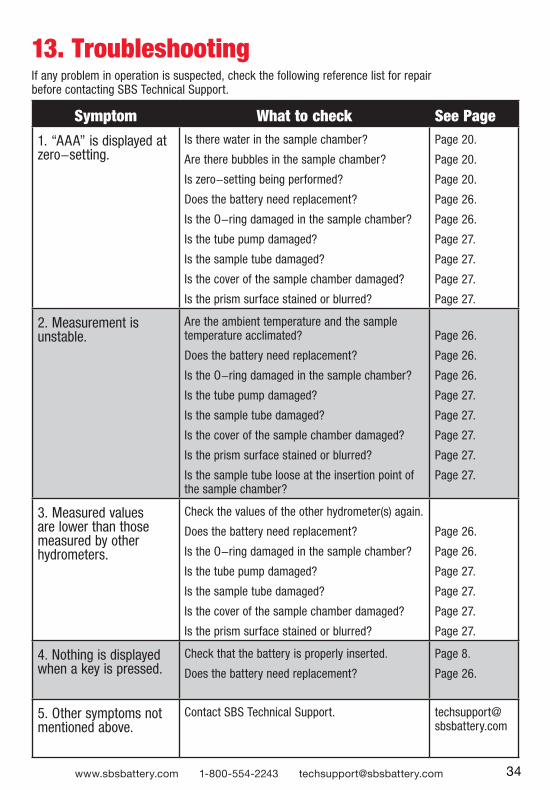
If any problem in operation is suspected, check the following reference list for repair before contacting SBS Technical Support.
13. Troubleshooting
Symptom What to check See Page
1. “AAA” is displayed at zero-setting.
Is there water in the sample chamber?
Are there bubbles in the sample chamber?
Is zero-setting being performed?
Does the battery need replacement?
Is the O-ring damaged in the sample chamber?
Is the tube pump damaged?
Is the sample tube damaged?
Is the cover of the sample chamber damaged?
Is the prism surface stained or blurred?
℃Page 20.
℃Page 20.
℃Page 20.
℃Page 26.
℃Page 26.
℃Page 27.
℃Page 27.
℃Page 27.
℃Page 27.
2. Measurement is unstable.
Are the ambient temperature and the sample temperature acclimated?
Does the battery need replacement?
Is the O-ring damaged in the sample chamber?
Is the tube pump damaged?
Is the sample tube damaged?
Is the cover of the sample chamber damaged?
Is the prism surface stained or blurred?
Is the sample tube loose at the insertion point of the sample chamber?
Page 26.
℃Page 26.
℃Page 26.
℃Page 27.
℃Page 27.
℃Page 27.
℃Page 27.
Page 27.
3. Measured values are lower than those measured by other hydrometers.
Check the values of the other hydrometer(s) again.
Does the battery need replacement?
Is the O-ring damaged in the sample chamber?
Is the tube pump damaged?
Is the sample tube damaged?
Is the cover of the sample chamber damaged?
Is the prism surface stained or blurred?
℃
Page 26.
℃Page 26.
℃Page 27.
℃Page 27.
℃Page 27.
℃Page 27.
4. Nothing is displayed when a key is pressed.
Check that the battery is properly inserted.
Does the battery need replacement?
℃Page 8.
℃Page 26.
℃5. Other symptoms not mentioned above.
Contact SBS Technical Support. [email protected]
35www.sbsbattery.com 1-800-554-2243 [email protected]
℃Is the power level of the battery low?
The unit does not measure if the battery is low.
The battery level can be checked by using a multi-meter. (Figure 30) If the battery is low, replace it with a new battery. (Refer to page 8 on how to replace the battery and other remarks.)
The unit uses a 9V alkaline battery (006P)
℃Is the O-ring damaged in the sample chamber?
Remove the sample chamber cover from the unit, and check the O-ring for deformation or damage. (Figure 31)
If the O-ring has been deformed or damaged, replace it with a new O-ring (available through your supplier).
After replacing the O-ring, properly replace the sample chamber.
℃Is there a major difference between the room temperature and sample temperature?
The unit automatically compensates for temperature by detecting the temperature of the sample in the sample chamber.
If the temperature of the sample is different from that of the unit, wait 3 seconds for every 1℃°C or 2°F ℃of the discrepancy after extracting the sample before pressing the START key.
Figure 30
Figure 31
36www.sbsbattery.com 1-800-554-2243 [email protected]
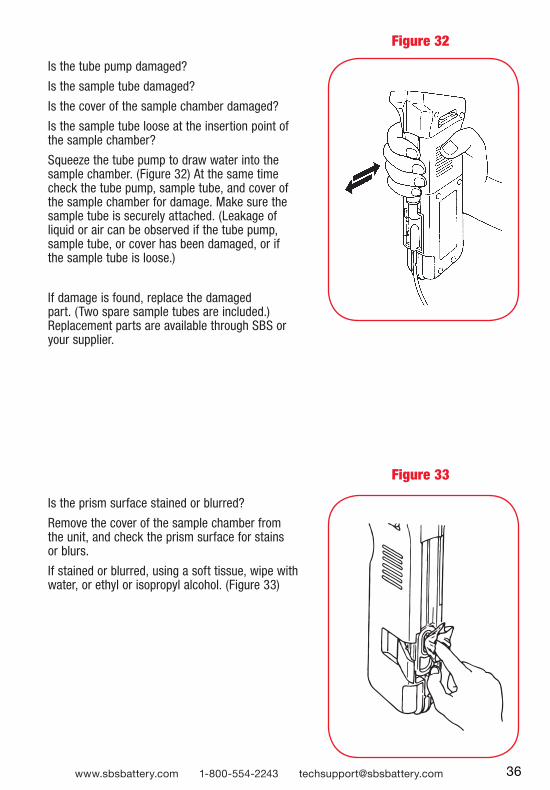
℃Is the tube pump damaged?
℃Is the sample tube damaged?
℃Is the cover of the sample chamber damaged?
℃Is the sample tube loose at the insertion point of the sample chamber?
Squeeze the tube pump to draw water into the sample chamber. (Figure 32) At the same time check the tube pump, sample tube, and cover of the sample chamber for damage. Make sure the sample tube is securely attached. (Leakage of liquid or air can be observed if the tube pump, sample tube, or cover has been damaged, or if the sample tube is loose.)
If damage is found, replace the damaged part. (Two spare sample tubes are included.) Replacement parts are available through SBS or your supplier.
℃Is the prism surface stained or blurred?
Remove the cover of the sample chamber from the unit, and check the prism surface for stains or blurs.
If stained or blurred, using a soft tissue, wipe with water, or ethyl or isopropyl alcohol. (Figure 33)
Figure 33
Figure 32
37www.sbsbattery.com 1-800-554-2243 [email protected]
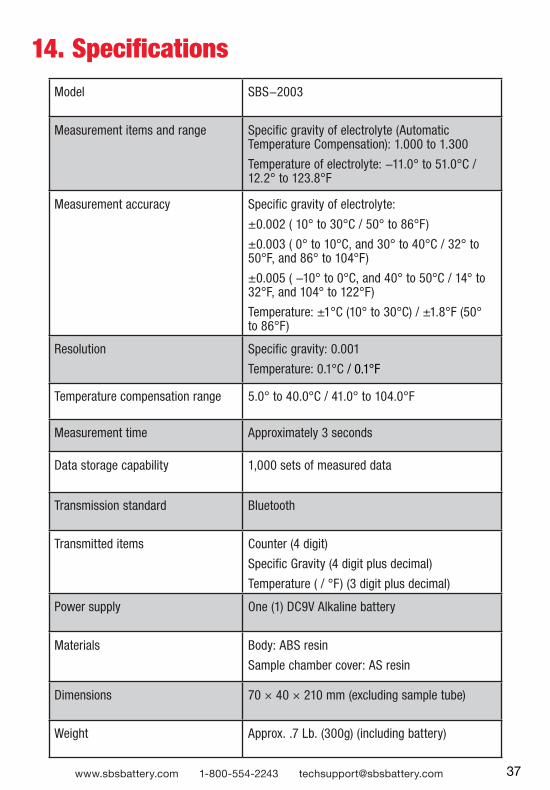
14. SpecificationsModel SBS-2003
Measurement items and range Specific gravity of electrolyte (Automatic Temperature Compensation): 1.000 to 1.300
Temperature of electrolyte: -11.0° to 51.0°C℃ / 12.2° to 123.8°F
Measurement accuracy Specific gravity of electrolyte:
±0.002 ( 10° to 30°C℃ / 50° to 86°F)
±0.003 ( 0° to 10℃°C, and 30° to 40°C℃ / 32° to 50°F, and 86° to 104°F)
±0.005 ( -10° to 0°C℃, and 40° to 50℃°C / 14° to 32°F, and 104° to 122°F)
Temperature: ±1℃°C (10° to 30°C℃) / ±1.8°F (50° to 86°F)
Resolution Specific gravity: 0.001
Temperature: 0.1°C℃ / 0.1°F
Temperature compensation range 5.0° to 40.0℃°C / 41.0° to 104.0°F
Measurement time Approximately 3 seconds
Data storage capability 1,000 sets of measured data
Transmission standard Bluetooth
Transmitted items Counter (4 digit)
Specific Gravity (4 digit plus decimal)
Temperature (℃ / °F) (3 digit plus decimal)
Power supply One (1) DC9V Alkaline battery
Materials Body: ABS resin
Sample chamber cover: AS resin
Dimensions 70 × 40 × 210 mm (excluding sample tube)
Weight Approx. .7 Lb. (300g) (including battery)

38www.sbsbattery.com 1-800-554-2243 [email protected]

HEADQUARTERSN56 W16665 Ridgewood Dr.Menomonee Falls, WI [email protected]: 262-703-5800Fax: 262-703-30731-800-554-2243www.sbsbattery.com
Storage Battery Systems LLC • Instruction Manual for SBS-2003 Digital Hydrometer • Rev. 04-15