digital learner macbook air quick start student user guide · digital learner macbook air quick...
TRANSCRIPT

2014‐2015
Howell Township
Public Schools
DigitalLearnerMacBookAirQuickStartStudentUserGuide

1 | P a g e
DigitalLearnerMacBookAirQuickStartStudentUserGuide
The Digital Learner MacBook Air Quick Start Student User Guide is a resource to help acquaint
students with the laptop and provide answers to frequently asked questions. Students should
refer to this document first. If a student cannot find an answer to their question, they should
ask their computer teacher, classroom teacher, or stop by the school’s Help Desk. The quick
start guide can also be located on the district’s website under the 21st Century Learning
Environment section.
LogintotheLaptop
Press the Power Button to wake up or turn on the laptop.
Enter student username and password and then press RETURN. NOTE: Don’t worry that the laptop indicates “Network accounts are unavailable.” It will disappear when you begin to enter your student network account.
CHECK IT OUT! PRACTICE THIS WHEN YOU GET HOME.
Turn on or wake up the laptop and log in.
Press and hold the Power Button for 5 seconds to learn another way to Shut Down, Restart or Sleep the laptop.
Quick Fix Tip – If the laptop ever becomes frozen on a screen, press and hold the Power Button for 10 seconds or until the laptop screen shuts off (turns black). You can then turn on the laptop.

2 | P a g e
GettingtoKnowtheLaptopandAccessories
CHECK IT OUT! PRACTICE THIS WHEN YOU GET HOME
Open the wings on the charger.
Create a loop (like a rabbit ear) when
wrapping to relieve stress on cord.
Excessive strain on cable. Cord is pulled too tight.
Properly wrapped cable.
CHECK IT OUT! PRACTICE THIS WHEN YOU GET HOME
After you properly wrap the cord around the power adaptor wings, place the charger in the front zipper of the laptop carrying bag.

3 | P a g e
ChargingtheLaptop
MagSafe Power Port: Magnetic port that will disconnect from the laptop if you accidentally trip
over the cord.
STEP 1 – Plug cord into MagSafe2 Power Connector
STEP 2 – Power Adaptor will turn amber when charging
STEP 3 – Fully charged when Power Adaptor turns green
CHECK IT OUT! PRACTICE THIS WHEN YOU GET HOME.
Look before you plug anything into the laptop. Remember, the power connector is magnetic, watch out for staples or paper clips.
Fully charge the laptop – wait until the light turns green.
Charging Tips – When connecting: plug into wall outlet first, then laptop.
When disconnecting: unplug power connector from laptop first, then wall outlet.
Pay attention to the following icons in your menu bar for battery status. If there is a Battery
Alert, bring the laptop to the school’s Help Desk.

4 | P a g e
Trackpad
CHECK IT OUT! PRACTICE THIS WHEN YOU GET HOME
Practice using the Pinch to Zoom gesture/accessibility features when in an application or
on the Internet.
5 | P a g e
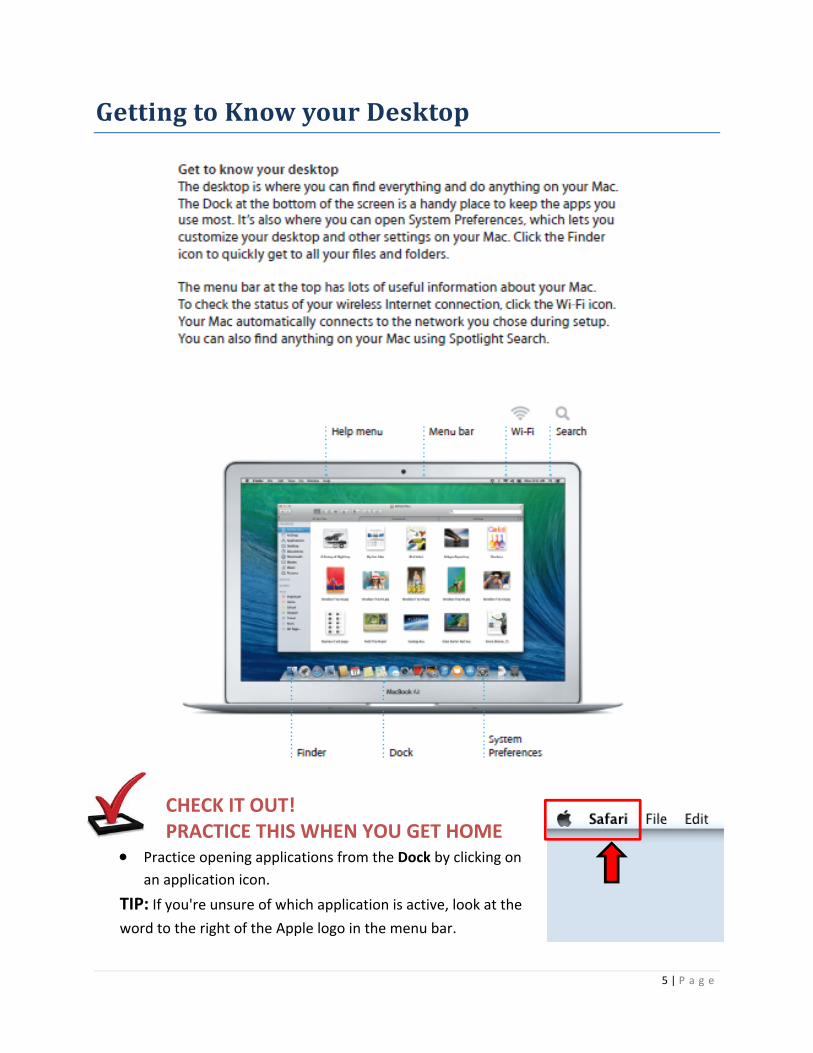
GettingtoKnowyourDesktop
CHECK IT OUT! PRACTICE THIS WHEN YOU GET HOME
Practice opening applications from the Dock by clicking on
an application icon.
TIP: If you're unsure of which application is active, look at the
word to the right of the Apple logo in the menu bar.

6 | P a g e
KeyboardFunctionKeys
Function Keys: The very top row of your keyboard is where the function keys are located. The
keys F1 through F12 allow you to perform different functions.
CHECK IT OUT! PRACTICE THIS WHEN YOU GET HOME
Practice using the Mute, Volume down and Volume up Function Keys. Often, you will
need to utilize these keys in school.
Adjust the screen display brightness using the F1 and F2 keys to customize the laptop.
Adjust the keyboard brightness using the F5 and F6 keys.
Launch the Launchpad to quickly access all of the apps which are currently loaded on
the laptop using the F4 key.
TIP: You can save battery life by adjusting/dimming the display and keyboard brightness.
7 | P a g e
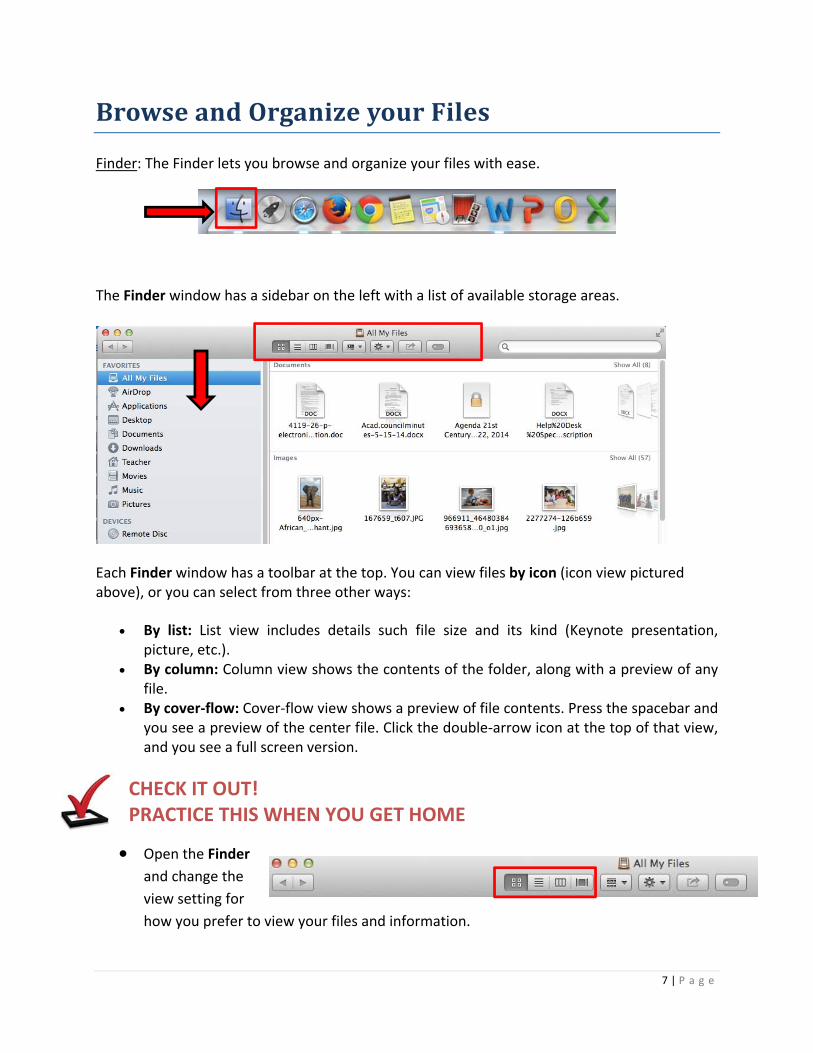
BrowseandOrganizeyourFiles
Finder: The Finder lets you browse and organize your files with ease.
The Finder window has a sidebar on the left with a list of available storage areas.
Each Finder window has a toolbar at the top. You can view files by icon (icon view pictured above), or you can select from three other ways:
By list: List view includes details such file size and its kind (Keynote presentation, picture, etc.).
By column: Column view shows the contents of the folder, along with a preview of any file.
By cover‐flow: Cover‐flow view shows a preview of file contents. Press the spacebar and you see a preview of the center file. Click the double‐arrow icon at the top of that view, and you see a full screen version.
CHECK IT OUT! PRACTICE THIS WHEN YOU GET HOME
Open the Finder
and change the
view setting for
how you prefer to view your files and information.

8 | P a g e
LocatingyourFiles–FishingforInformation
Spotlight: Spotlight search makes locating something
on your laptop fast and easy.
CHECK IT OUT! PRACTICE THIS WHEN YOU GET HOME
Access Spotlight from the menu bar icon and
search for answers to questions you may have.
Spotlight starts finding files when you begin
typing in the Spotlight search field.
CreatingFolders
1. Navigate to the location where you want to create
the new folder.
2. Click on File in the
menu bar and
select New Folder. 3. Type the desired name for your
folder.
CHECK IT OUT! PRACTICE THIS WHEN YOU GET HOME
Create a folder in the Documents folder.
DeletingFilesorFolders
Click and drag the file or folder onto the Trash icon on the
Dock.
Click and hold the Trash icon until
you see the Empty Trash option.

9 | P a g e
ConnectingtoWirelessInternetatHome
From the Wi‐Fi menu ( ), located on the top right
of the Menu Bar, choose the network you want to
connect to. If a lock icon appears next to the network
name, you will be prompted to enter a password to
join.
HowtoResourcesfortheMacBookAir
If you are looking for more information or “How To”
resources, then try this websites.
https://www.apple.com/support/macbookair/
REMEMBER!
Practice at home and
then bring your laptop
to school beginning
October 2nd.