digital storefront...digital storefront | 5 introduction digital storefront is efi’s award winning...
TRANSCRIPT

Fiery Integration Guide
Digital StoreFront

2 EFI Digital StoreFront | Fiery Integration Guide
Copyright © 2004 - 2017 by Electronics for Imaging, Inc. All Rights Reserved.
EFI Digital StoreFront | Fiery Integration Guide
April 2017 Doc v. 2.2
This publication is protected by copyright, and all rights are reserved. No part of it may be reproduced or transmitted in any form or by any means for any purpose without express prior written consent from Electronics for Imaging, Inc. Information in this document is subject to change without notice and does not represent a commitment on the part of Electronics for Imaging, Inc.
Patents
This product may be covered by one or more of the following U.S. Patents: 4,716,978, 4,828,056, 4,917,488, 4,941,038, 5,109,241, 5,170,182, 5,212,546, 5,260,878, 5,276,490, 5,278,599, 5,335,040, 5,343,311, 5,398,107, 5,424,754, 5,442,429, 5,459,560, 5,467,446, 5,506,946, 5,517,334, 5,537,516, 5,543,940, 5,553,200, 5,563,689, 5,565,960, 5,583,623, 5,596,416, 5,615,314, 5,619,624, 5,625,712, 5,640,228, 5,666,436, 5,745,657, 5,760,913, 5,799,232, 5,818,645, 5,835,788, 5,859,711, 5,867,179, 5,940,186, 5,959,867, 5,970,174, 5,982,937, 5,995,724, 6,002,795, 6,025,922, 6,035,103, 6,041,200, 6,065,041, 6,112,665, 6,116,707, 6,122,407, 6,134,018, 6,141,120, 6,166,821, 6,173,286, 6,185,335, 6,201,614, 6,215,562, 6,219,155, 6,219,659, 6,222,641, 6,224,048, 6,225,974, 6,226,419, 6,238,105, 6,239,895, 6,256,108, 6,269,190, 6,271,937, 6,278,901, 6,279,009, 6,289,122, 6,292,270, 6,299,063, 6,310,697, 6,321,133, 6,327,047, 6,327,050, 6,327,052, 6,330,071, 6,330,363, 6,331,899, 6,340,975, 6,341,017, 6,341,018, 6,341,307, 6,347,256, 6,348,978, 6,356,359, 6,366,918, 6,369,895, 6,381,036, 6,400,443, 6,429,949, 6,449,393, 6,476,927, 6,490,696, 6,501,565, 6,519,053, 6,539,323, 6,543,871, 6,546,364, 6,549,294, 6,549,300, 6,550,991, 6,552,815, 6,559,958, 6,572,293, 6,590,676, 6,606,165, 6,633,396, 6,636,326, 6,643,317, 6,647,149, 6,657,741, 6,662,199, 6,678,068, 6,707,563, 6,741,262, 6,748,471, 6,753,845, 6,757,436, 6,757,440, 6,778,700, 6,781,596, 6,816,276, 6,825,943, 6,832,865, 6,836,342, RE33,973, RE36,947, D341,131, D406,117, D416,550, D417,864, D419,185, D426,206, D439,851, D444,793.
Trademarks
The APPS logo, AutoCal, Auto-Count, Balance, Best, the Best logo, BESTColor, BioVu, BioWare, ColorPASS, Colorproof, ColorWise, Command WorkStation, CopyNet, Cretachrom, Cretaprint, the Cretaprint logo, Cretaprinter, Cretaroller, Digital StoreFront, DirectSmile, DocBuilder, DocBuilder Pro, DockNet, DocStream, DSFdesign Studio, Dynamic Wedge, EDOX, EFI, the EFI logo, Electronics For Imaging, Entrac, EPCount, EPPhoto, EPRegister, EPStatus, Estimate, ExpressPay, Fabrivu, Fast-4, Fiery, the Fiery logo, Fiery Driven, the Fiery Driven logo, Fiery JobFlow, Fiery JobMaster, Fiery Link, Fiery Prints, the Fiery Prints logo, Fiery Spark, FreeForm, Hagen, Inktensity, Inkware, Jetrion, the Jetrion logo, LapNet, Logic, MiniNet, Monarch, MicroPress, OneFlow, Pace, PhotoXposure, PressVu, Printcafe, PrinterSite, PrintFlow, PrintMe, the PrintMe logo, PrintSmith, PrintSmith Site, Printstream, Print to Win, Prograph, PSI, PSI Flexo, Radius, Rastek, the Rastek logo, Remoteproof, RIPChips, RIP-While-Print, Screenproof, SendMe, Sincrolor, Splash, Spot-On, TrackNet, UltraPress, UltraTex, UltraVu, UV Series 50, VisualCal, VUTEk, the VUTEk logo, and WebTools are trademarks of Electronics For Imaging, Inc. and/or its wholly owned subsidiaries in the U.S. and/or certain other countries.
All other terms and product names may be trademarks or registered trademarks of their respective owners, and are hereby acknowledged.
Contents 3
Contents
Introduction ........................................................................................................................ 5
Contact Information ............................................................................................................................. 5
Overview of EFI™ Digital StoreFront® – EFI™ Fiery® Integration ............................ 5
Step 1: Discover Fiery Devices ....................................................................................... 7
Step 2: Map Fiery Capabilities to Digital StoreFront Print Services ........................ 13
Step 3: Map Fiery Media to Digital StoreFront Media ................................................. 14
Step 4: Set Up Hot Folders for non-Fiery JDF-enabled Fiery devices ..................... 17

Digital StoreFront | 5
Introduction
Digital StoreFront is EFI’s award winning web-to-print platform. Digital StoreFront offers the industry’s leading print buyer experience and onramp to a digital workflow, plus a best-of-class toolset for configuring and managing this printing e-commerce platform.
As we continue to evolve the product, the most important input comes from our existing customer base. We value your feedback. Submit feature requests to [email protected]. Submit documentation requests to [email protected].
Contact Information
Digital StoreFront Service & Support
US Hours: 8 a.m.–8 p.m. EST
Phone: 888.334.8650 (select option 4 then option 1)
E-mail: [email protected]
Europe Hours: 9 a.m. – 5 p.m. CET
Phone: +31 20 658 8080 (NL)
+49 2102 745 4500 (DE)
+44 12462 98085 (UK)
E-mail: [email protected]
APAC Hours: 9 a.m. – 5 p.m. AET
Phone: 1300-555-667 (AUS)
09356 3779 (NZ)
E-mail: [email protected]
Outside of these hours, you may leave a voice mail message Response time is based on the severity of the issue.
Note For problems involving infrastructure (i.e., computers, networks, operating systems, backup software, printers, third-party software, etc.), contact the appropriate vendor. EFI cannot support these types of issues.
EFI Professional Services
US Phone: 651.365.5321
US Fax: 651.365.5334
E-Mail: [email protected]
Note EFI Professional Services can help you perform EFI software installations, upgrades, and updates. This group can also help you implement, customize, and optimize your EFI software plus offer a range of training options.
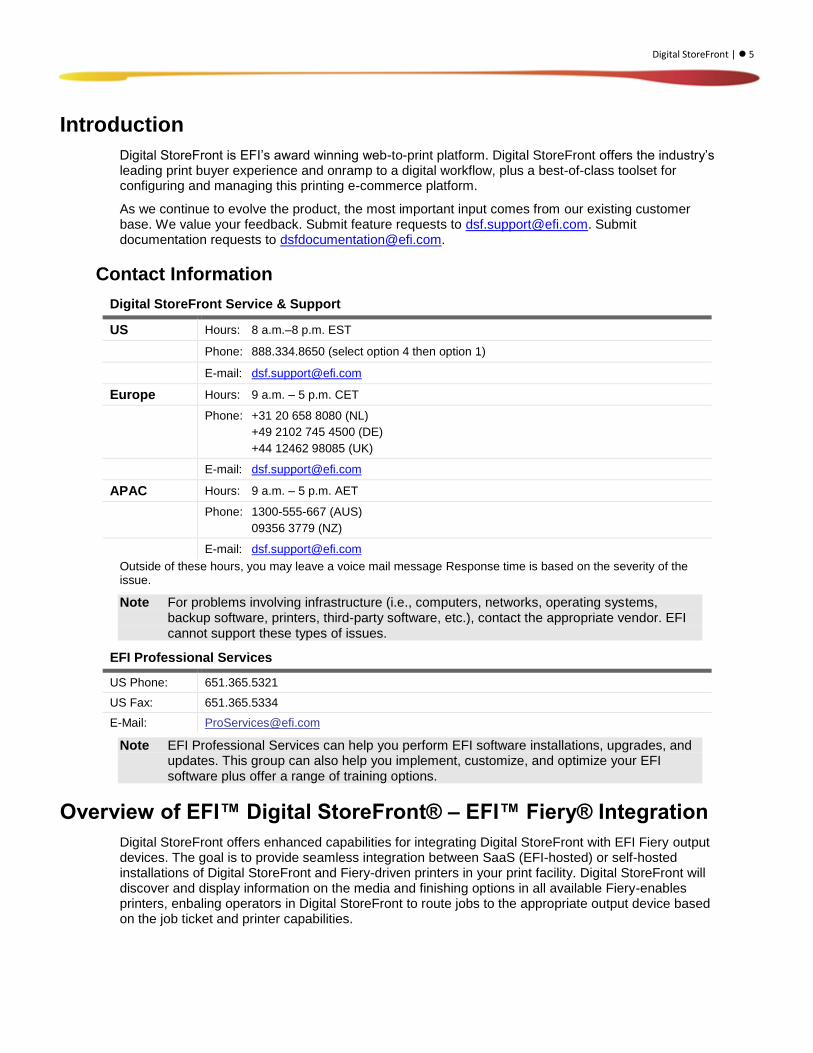
Overview of EFI™ Digital StoreFront® – EFI™ Fiery® Integration
Digital StoreFront offers enhanced capabilities for integrating Digital StoreFront with EFI Fiery output devices. The goal is to provide seamless integration between SaaS (EFI-hosted) or self-hosted installations of Digital StoreFront and Fiery-driven printers in your print facility. Digital StoreFront will discover and display information on the media and finishing options in all available Fiery-enables printers, enbaling operators in Digital StoreFront to route jobs to the appropriate output device based on the job ticket and printer capabilities.
6 EFI Digital StoreFront | Fiery Integration Guide
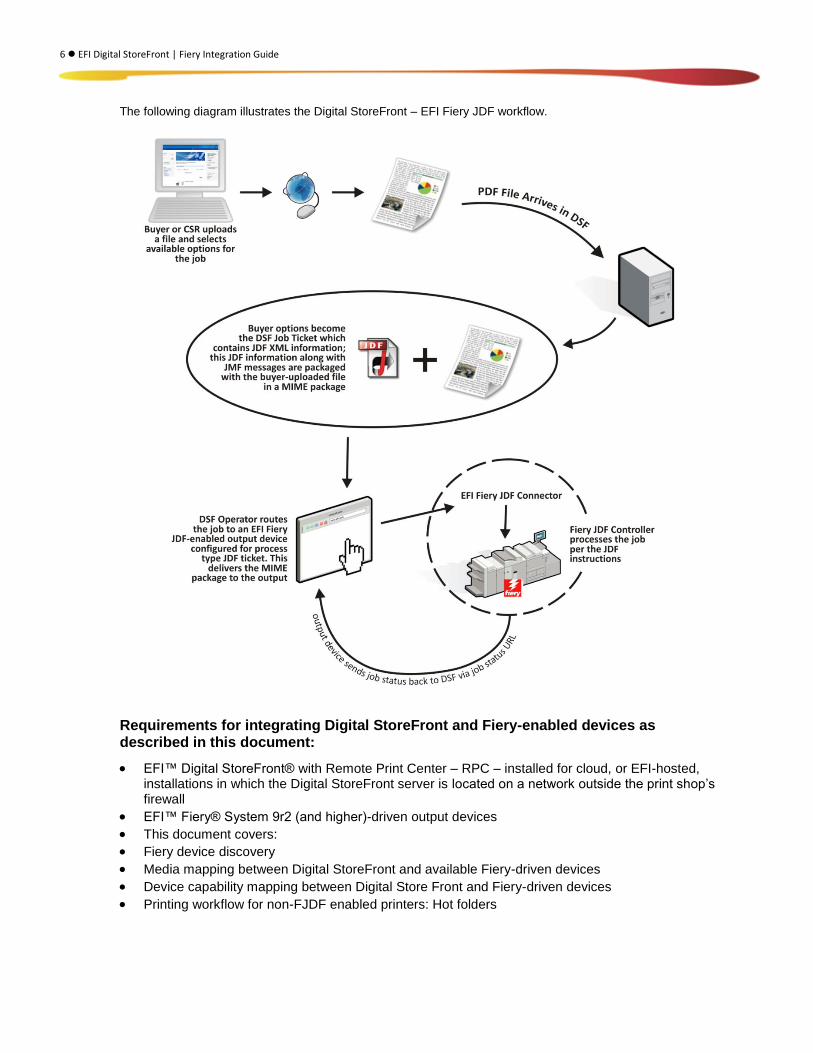
The following diagram illustrates the Digital StoreFront – EFI Fiery JDF workflow.
Requirements for integrating Digital StoreFront and Fiery-enabled devices as described in this document:
EFI™ Digital StoreFront® with Remote Print Center – RPC – installed for cloud, or EFI-hosted, installations in which the Digital StoreFront server is located on a network outside the print shop’s firewall
EFI™ Fiery® System 9r2 (and higher)-driven output devices
This document covers:
Fiery device discovery
Media mapping between Digital StoreFront and available Fiery-driven devices
Device capability mapping between Digital Store Front and Fiery-driven devices
Printing workflow for non-FJDF enabled printers: Hot folders
Digital StoreFront | 7
Step 1: Discover Fiery Devices
The first step in integrating Digital StoreFront with your Fiery output devices is to discover and add the output devices you want to integrate to Digital StoreFront. Digital StoreFront will scan your print shop’s network and discover all available Fiery devices—both Fiery JDF (FJDF)-enabled printers and non-FJDF-enabled printers and return the URL for FJDF-enabled printers.
To discover Fiery devices on your network
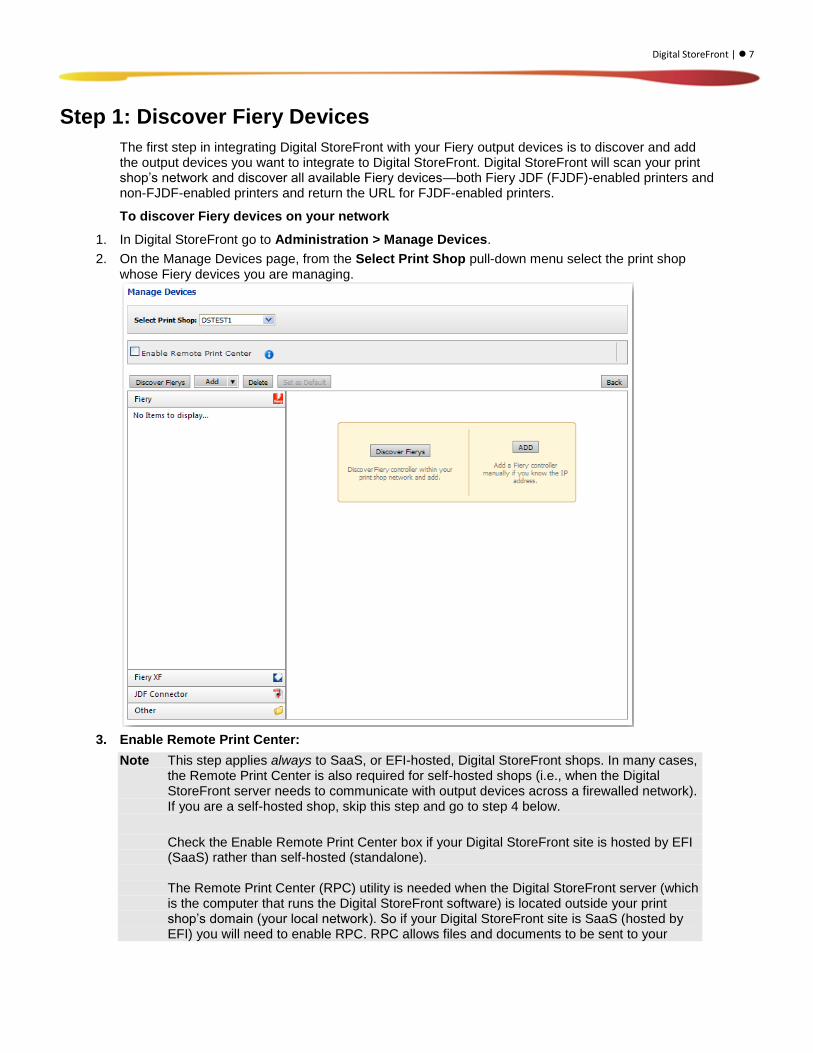
1. In Digital StoreFront go to Administration > Manage Devices.
2. On the Manage Devices page, from the Select Print Shop pull-down menu select the print shop whose Fiery devices you are managing.
3. Enable Remote Print Center:
Note This step applies always to SaaS, or EFI-hosted, Digital StoreFront shops. In many cases, the Remote Print Center is also required for self-hosted shops (i.e., when the Digital StoreFront server needs to communicate with output devices across a firewalled network). If you are a self-hosted shop, skip this step and go to step 4 below.
Check the Enable Remote Print Center box if your Digital StoreFront site is hosted by EFI (SaaS) rather than self-hosted (standalone). The Remote Print Center (RPC) utility is needed when the Digital StoreFront server (which is the computer that runs the Digital StoreFront software) is located outside your print shop’s domain (your local network). So if your Digital StoreFront site is SaaS (hosted by EFI) you will need to enable RPC. RPC allows files and documents to be sent to your
8 EFI Digital StoreFront | Fiery Integration Guide
firewall-secured local network.
Remote Print Center for SaaS (EFI-Hosted) Installations of Digital StoreFront In the SaaS (EFI-hosted) scenario: Digital StoreFront is installed on a server in EFI’s web hosting center, which of course is outside the shop’s firewalled network. Thus, the Digital StoreFront server at EFI cannot communicate directly with Fiery devices on the shop’s network. To enable the hosted Digital StoreFront server to communicate with the hosted shop’s network, Digital StoreFront uses a software utility called Remote Print Center (RPC). The RPC acts as a proxy for Digital StoreFront and monitors the shop’s hosted Digital StoreFront server to determine if it needs to perform any tasks (e.g., download document files for the print shop to print, communicate statuses to the shop). The RPC is required for discovery of Fiery-driven devices on the hosted shop’s network. In the self-hosted (standalone) scenario: Digital StoreFront is installed locally within the shop’s firewalled network and can communicate directly with output devices on the network. Thus, the RPC utility is not needed.
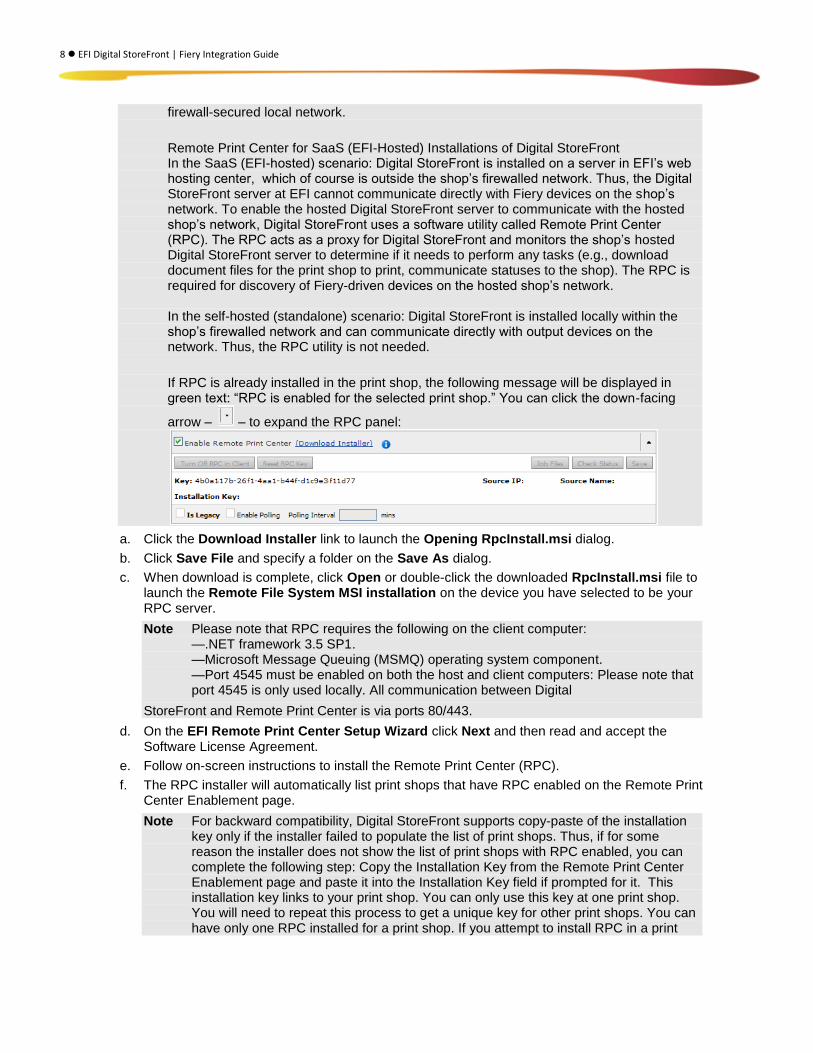
If RPC is already installed in the print shop, the following message will be displayed in green text: “RPC is enabled for the selected print shop.” You can click the down-facing
arrow – – to expand the RPC panel:
a. Click the Download Installer link to launch the Opening RpcInstall.msi dialog.
b. Click Save File and specify a folder on the Save As dialog.
c. When download is complete, click Open or double-click the downloaded RpcInstall.msi file to launch the Remote File System MSI installation on the device you have selected to be your RPC server.
Note Please note that RPC requires the following on the client computer: —.NET framework 3.5 SP1. —Microsoft Message Queuing (MSMQ) operating system component. —Port 4545 must be enabled on both the host and client computers: Please note that port 4545 is only used locally. All communication between Digital
StoreFront and Remote Print Center is via ports 80/443.
d. On the EFI Remote Print Center Setup Wizard click Next and then read and accept the Software License Agreement.
e. Follow on-screen instructions to install the Remote Print Center (RPC).
f. The RPC installer will automatically list print shops that have RPC enabled on the Remote Print Center Enablement page.
Note For backward compatibility, Digital StoreFront supports copy-paste of the installation key only if the installer failed to populate the list of print shops. Thus, if for some reason the installer does not show the list of print shops with RPC enabled, you can complete the following step: Copy the Installation Key from the Remote Print Center Enablement page and paste it into the Installation Key field if prompted for it. This installation key links to your print shop. You can only use this key at one print shop. You will need to repeat this process to get a unique key for other print shops. You can have only one RPC installed for a print shop. If you attempt to install RPC in a print
Digital StoreFront | 9
shop that already has RPC installed, the installer will inform you that RPC is already configured for the print shop.
g. In the Machine Name field enter the name of the computer you are installing RPC on.
Note If your machine (i.e., server) name contains an underscore RPC will not function correctly. Please edit your host name so that it contains no underscore (_) characters.
h. In the Machine IP field enter the network URL address for the computer you are installing RPC on.
i. From the Printshops pull-down list select the Digital StoreFront Print Shop you are installing the RPC for.
j. Click Finish.
k. Restart your system as directed.
Note For more information on the Remote Print Center consult the Digital StoreFront online help.
Additional RPC controls:
Is Legacy: Check this box if RPC was installed from a previous version of Digital StoreFront.
Note Legacy refers to RPCs installed from a previous version of Digital StoreFront.
Enable Polling: Check this box to enable polling for the selected print shop’s RPC (polling is when the RPC calls into Digital StoreFront to report the status of the RPC).
Note If you do not enable polling you will not be able to bring Remote Print Center status back to online status until you restart the “EFI Distributed Services” service that governs the Remote Print Center. Please make sure you restart the service after setting Polling Enabled status back to True. To do so: (1) Go to Control Panel > Administrative Tools > Services. (2) Make sure the “EFI Distributed Services” service is in “Started” status.
Polling Interval: The interval (in seconds) between polling calls (if Polling Enabled is turned on). The minimum value is 1 second and the maximum value is 999 seconds.
Click Turn Off RPC in Client to stop the RPC service on the client machines for the selected RPC and uncheck Enable Polling, thus preventing polling from automatically starting again when the client machine is rebooted).
Note This can serve as a “panic” button to shut off the RPC service.
Click Reset RPC Key to remove the RPC key (i.e., do this if you need to reinstall the RPC for this print shop – for example, on another client machine – because the installer is set up to prevent installation of more than one RPC per print shop).
Note This setting is for backward compatibility and gives you the option of keying in the RPC installation key. Note that this is available only when there is a failure in generating the list of print shops.

10 EFI Digital StoreFront | Fiery Integration Guide
Click Check Status to manually poll and update the status of all RPCs. The status of the print shop’s RPC from the latest poll:
4. Discover Fiery-driven devices:
Note You can integrate a Fiery device with Digital StoreFront either: (1) automatically or (2) manually.
a. Automatic integration:
Click Discover Fierys.
On the Add a new Device dialog, select AutoSearch (or choose another option if you want to limit your search to a specific range of IP addresses on your network) and then click Go to search for all Fiery devices on your network.
The Discovering Fiery Controllers dialog will open.
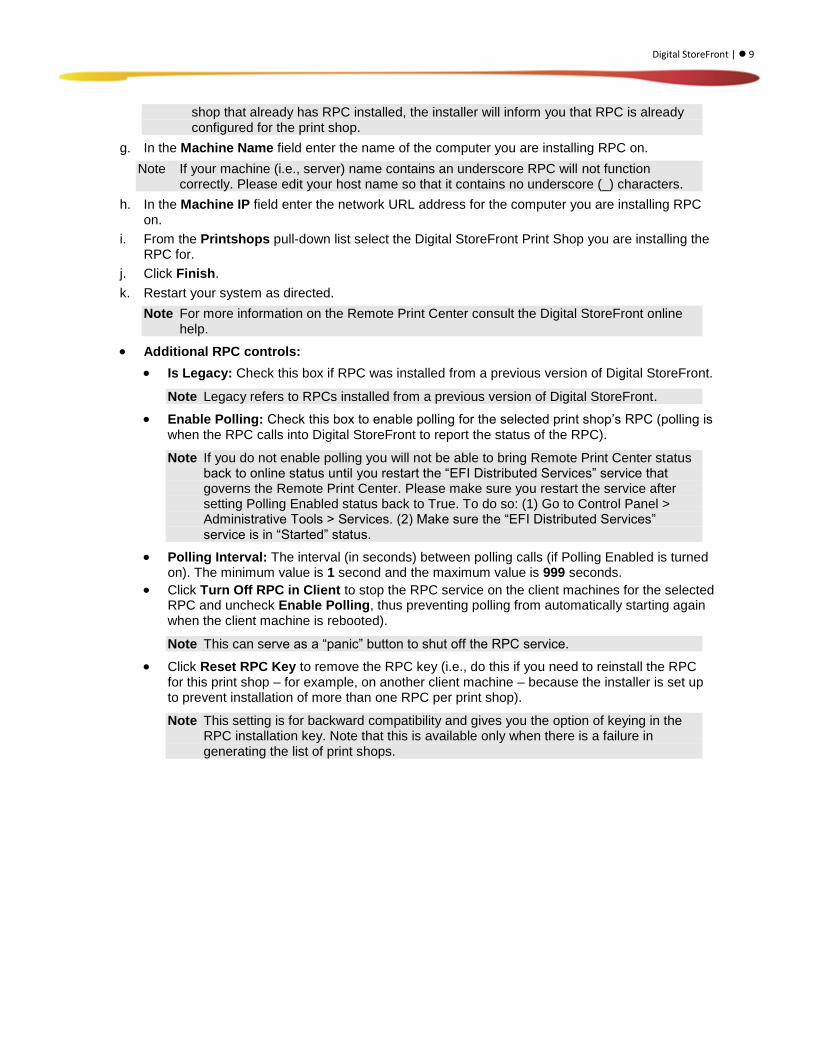
A dialog listing all discovered Fiery devices will open:
Digital StoreFront | 11
Device Name: the name of the Fiery device.
IP Address: the network address for the device.
Type: specifies whether the device is Fiery JDF-enabled (FJDF) or non-Fiery JDF-enabled.
Select the devices you want to integrate with Digital StoreFront and then click Add.
The Device List will show all Fiery devices selected.
b. Manual integration:
If you know the IP address (or range within) for the Fiery device you want to integrate with Digital StoreFront:
Click Add.
On the Add a new Device dialog, select the Source (AutoSearch, Subnet, or IP range).
Enter the From and To ranges within which to discover devices.
Click Go.
If you do not know the exact IP address for the Fiery device you want to integrate with Digital StoreFront:
Click the down arrow on the Add button and select the appropriate Fiery device from the menu.
12 EFI Digital StoreFront | Fiery Integration Guide
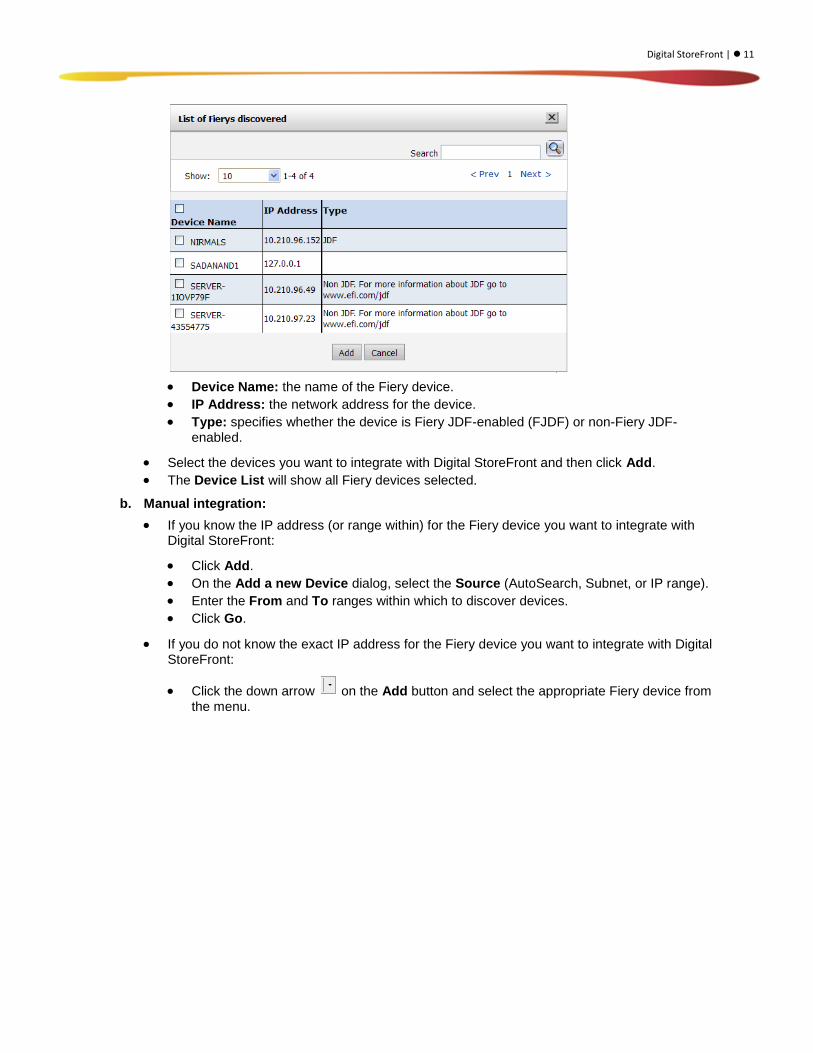
On the Create New dialog, enter the Name and URL (network IP address) of the device.
Note Port 8010 is the standard port for JDF-enabled devices (and should generally be
used, e.g., http://[machine name or IP address]:8010).
Ticket Type:
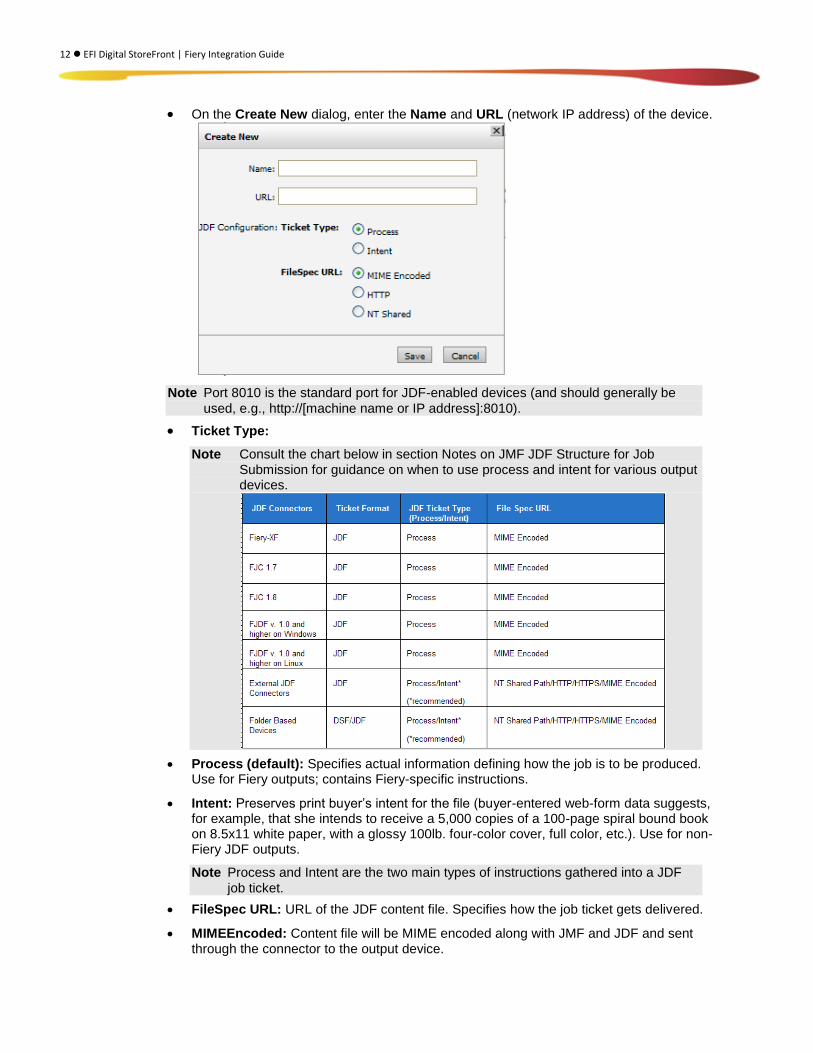
Note Consult the chart below in section Notes on JMF JDF Structure for Job Submission for guidance on when to use process and intent for various output devices.
Process (default): Specifies actual information defining how the job is to be produced. Use for Fiery outputs; contains Fiery-specific instructions.
Intent: Preserves print buyer’s intent for the file (buyer-entered web-form data suggests, for example, that she intends to receive a 5,000 copies of a 100-page spiral bound book on 8.5x11 white paper, with a glossy 100lb. four-color cover, full color, etc.). Use for non-Fiery JDF outputs.
Note Process and Intent are the two main types of instructions gathered into a JDF
job ticket.
FileSpec URL: URL of the JDF content file. Specifies how the job ticket gets delivered.
MIMEEncoded: Content file will be MIME encoded along with JMF and JDF and sent through the connector to the output device.
Digital StoreFront | 13
HTTP: JMF message will have a link to the JDF file as a shared path URL and the JDF file will have a link to the content file as a shared path/HTTP/HTTPS URL.
NTShared (Network Shared): Job ticket XML is embedded in the content file sent through the connector to the output device.
Click Save.
Note Digital StoreFront supports Fiery virtual printers. When a Fiery device is added, all virtual printers associated with the device (and its URL) will be listed on the Print Shop Outputs page and available for printing from the Operator View. Printing options specified in the ticket template for a product will override the default options specified for the virtual printer. For example, if the virtual printer default setting is for tabloid-size (11x17) paper but the job in Digital StoreFront specifies (i.e., on the JDF ticket) letter-size output, the Fiery device will print the job on letter-size paper.
Step 2: Map Fiery Capabilities to Digital StoreFront Print Services
The second step in integrating Digital StoreFront with your Fiery output devices is to map the Fiery devices’ capabilities to the print services you have configured in Digital StoreFront for a seamless production workflow.
Note Automatic generation of device capabilities is available for all System 9R2, System 10,
and FS 100 Fiery and higher servers.
Note Mapping Digital StoreFront print services with Fiery device capabilities is for Fiery JDF (FJDF)-enabled devices. Fiery devices that do not support JDF can be enabled only for hot folder integration with Digital StoreFront.
To map Fiery device capabilities to Digital StoreFront print services
1. In Digital StoreFront go to Administration > Manage Devices.
2. After discovering Fiery devices on your network, select a Fiery device to map to Digital StoreFront.
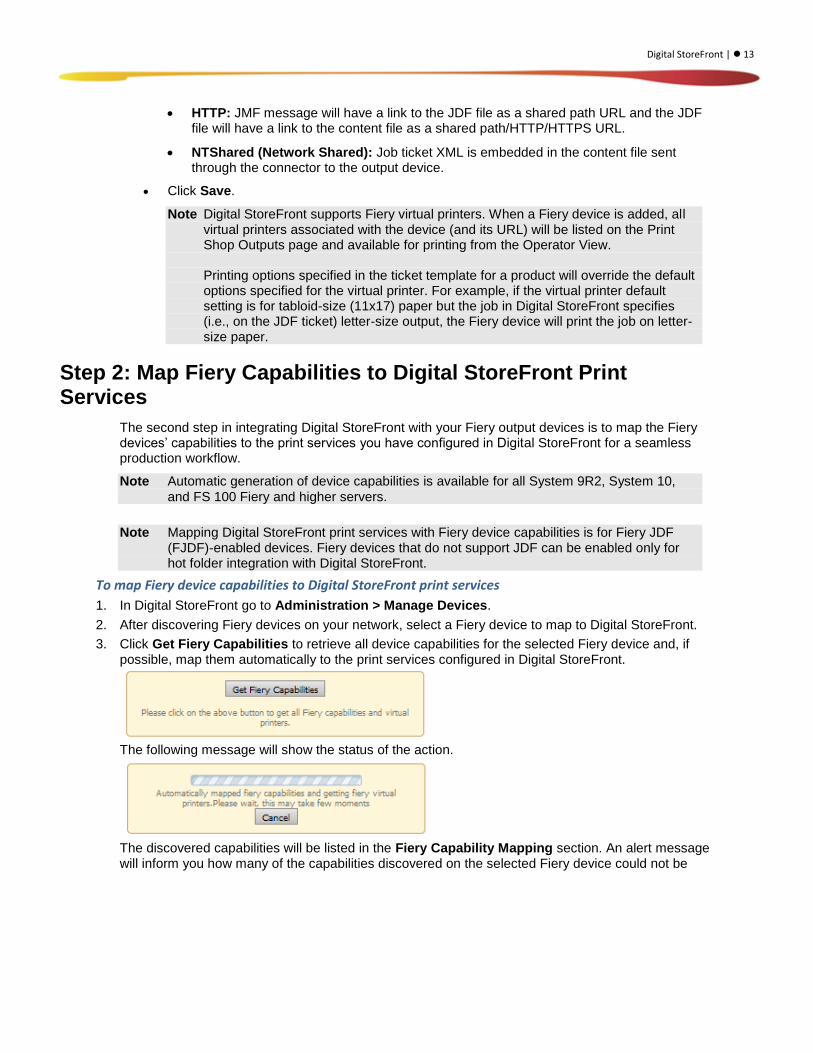
3. Click Get Fiery Capabilities to retrieve all device capabilities for the selected Fiery device and, if possible, map them automatically to the print services configured in Digital StoreFront.
The following message will show the status of the action.
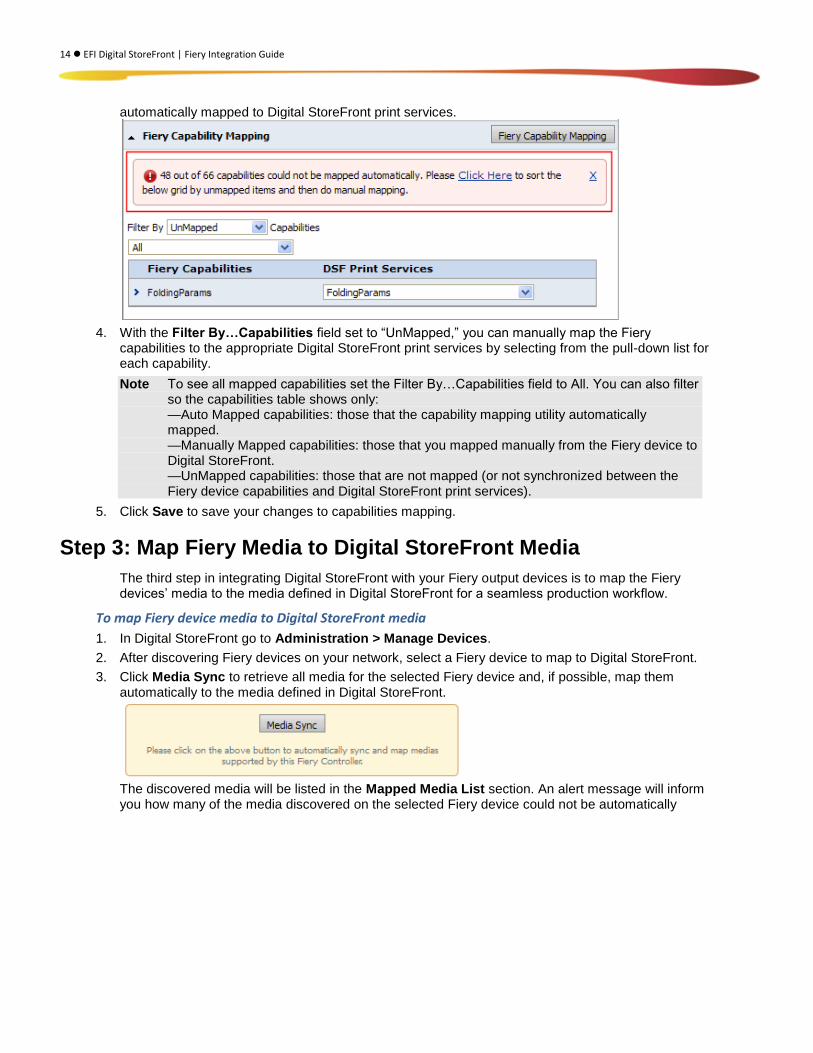
The discovered capabilities will be listed in the Fiery Capability Mapping section. An alert message will inform you how many of the capabilities discovered on the selected Fiery device could not be
14 EFI Digital StoreFront | Fiery Integration Guide
automatically mapped to Digital StoreFront print services.
4. With the Filter By…Capabilities field set to “UnMapped,” you can manually map the Fiery capabilities to the appropriate Digital StoreFront print services by selecting from the pull-down list for each capability.
Note To see all mapped capabilities set the Filter By…Capabilities field to All. You can also filter so the capabilities table shows only: —Auto Mapped capabilities: those that the capability mapping utility automatically mapped. —Manually Mapped capabilities: those that you mapped manually from the Fiery device to Digital StoreFront. —UnMapped capabilities: those that are not mapped (or not synchronized between the Fiery device capabilities and Digital StoreFront print services).
5. Click Save to save your changes to capabilities mapping.
Step 3: Map Fiery Media to Digital StoreFront Media
The third step in integrating Digital StoreFront with your Fiery output devices is to map the Fiery devices’ media to the media defined in Digital StoreFront for a seamless production workflow.
To map Fiery device media to Digital StoreFront media
1. In Digital StoreFront go to Administration > Manage Devices.
2. After discovering Fiery devices on your network, select a Fiery device to map to Digital StoreFront.
3. Click Media Sync to retrieve all media for the selected Fiery device and, if possible, map them automatically to the media defined in Digital StoreFront.
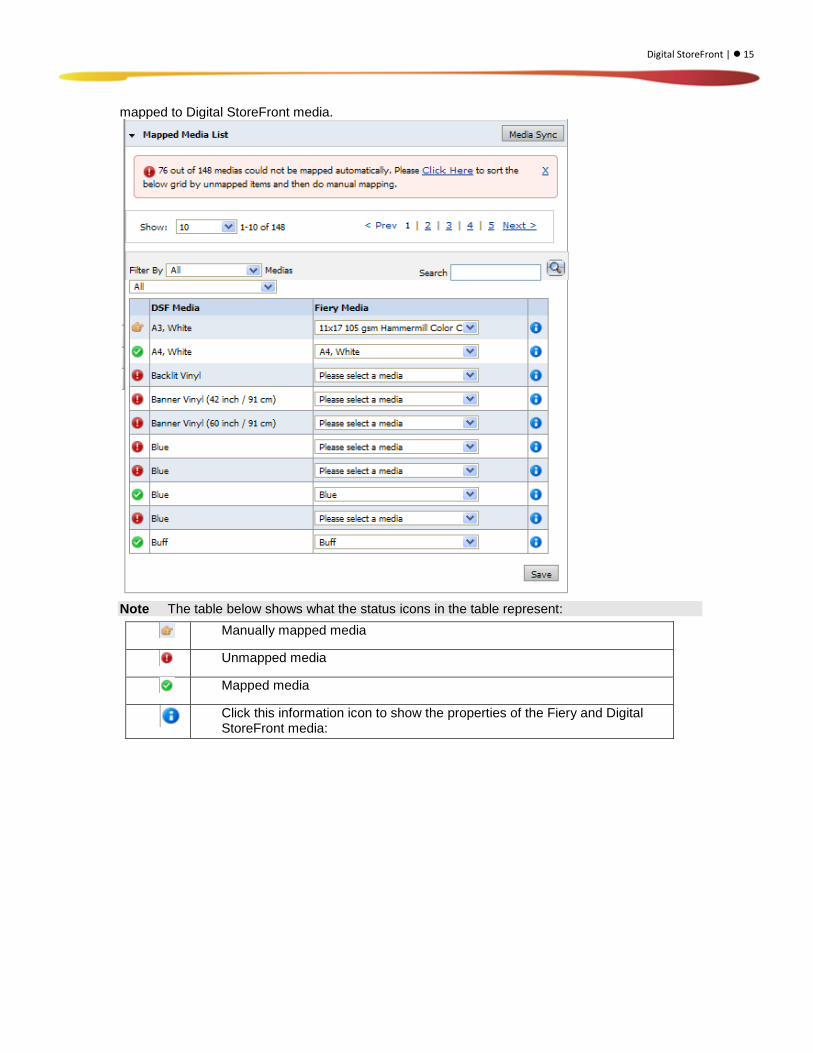
The discovered media will be listed in the Mapped Media List section. An alert message will inform you how many of the media discovered on the selected Fiery device could not be automatically
Digital StoreFront | 15
mapped to Digital StoreFront media.
Note The table below shows what the status icons in the table represent:
Manually mapped media
Unmapped media
Mapped media
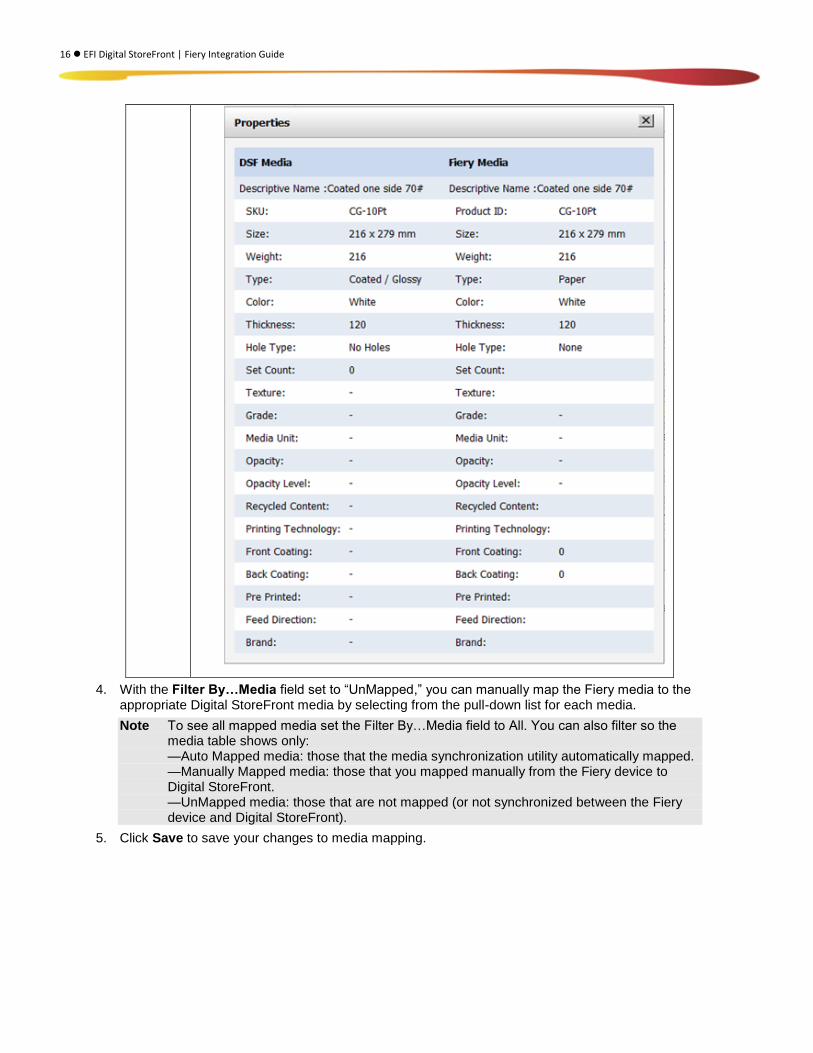
Click this information icon to show the properties of the Fiery and Digital StoreFront media:
16 EFI Digital StoreFront | Fiery Integration Guide
4. With the Filter By…Media field set to “UnMapped,” you can manually map the Fiery media to the appropriate Digital StoreFront media by selecting from the pull-down list for each media.
Note To see all mapped media set the Filter By…Media field to All. You can also filter so the media table shows only: —Auto Mapped media: those that the media synchronization utility automatically mapped. —Manually Mapped media: those that you mapped manually from the Fiery device to Digital StoreFront. —UnMapped media: those that are not mapped (or not synchronized between the Fiery device and Digital StoreFront).
5. Click Save to save your changes to media mapping.

Digital StoreFront | 17
Step 4: Set Up Hot Folders for non-Fiery JDF-enabled Fiery devices
Capability and media mapping are not supported for older Fiery devices that are not Fiery JDF (FJDF)-enabled. For these devices only hot folder output functionality is available. The following diagram illustrates the Digital StoreFront – non-Fiery JDF workflow.
To configure hot folder output for non-Fiery JDF-enabled devices
1. In Digital StoreFront go to Administration > Manage Devices.
Note Non-JDF-enabled devices will be marked in the Device List as “No JDF.”
2. Select the non-JDF-enabled device and set up the hot folder:
Display Name: Enter a descriptive name for the output device
Output Ticket XML: Digital StoreFront is the default ticket for all non-JDF output devices.
Device Directory: Enter a valid directory path. It is recommended that you create this file directory as a subfolder in the installation folder for the system.
Note An example of a valid path is C:/[web site abbreviation]/files/outputs/default. This directory is used to store copies of files. When a device such as MicroPress monitors

18 EFI Digital StoreFront | Fiery Integration Guide
this file directory, the device will pick up the job/file from the specified directory, “read” the job ticket, and process the file appropriately.
3. Click Save to save your changes.