direct transmission using data innovations instrument
TRANSCRIPT

Direct Transmission Using Data
Innovations Instrument Manager™
User Guide


© College of American Pathologists. All rights reserved. Page 2 of 67
Table of Contents
1 About Direct Transmission .............................................................................................. 3
1.1 What is this service? ..................................................................................................................... 3 1.2 How does it work? ......................................................................................................................... 3 1.3 Customer Requirements ............................................................................................................... 4 1.4 Use Limitations .............................................................................................................................. 5 1.5 Contact Information ....................................................................................................................... 5 1.6 Online Tutorials ............................................................................................................................. 5
2 Getting Started .................................................................................................................. 6
2.1 Verifying a Network Connection .................................................................................................... 6 2.2 Enrolling/Registering for e-LAB Solutions Suite............................................................................ 6 2.3 Registering Data Innovations Instrument Manager....................................................................... 8 2.4 Obtaining the Data Innovations CAP PT Driver ............................................................................ 8 2.5 Configuring the CAP PT Driver and Getting Connected ............................................................... 9
3 CAP Code Mapping ..........................................................................................................23
3.1 About CAP Code Mapping .......................................................................................................... 23 3.2 Why use CAP Code Mapping? ................................................................................................... 23 3.3 Test Code and Fluid Code Mapping ........................................................................................... 24 3.4 Mapping Your Proficiency Testing Menu to the CAP Codes ...................................................... 25 3.5 Exporting and Importing Mapping Codes .................................................................................... 35
4 Instrument Manager Rules ..............................................................................................38
4.1 About Instrument Manager Rules ............................................................................................... 38 4.2 Rule Syntax ................................................................................................................................. 38 4.3 The “CAP PT Specimen Identification” Rule ............................................................................... 38 4.4 Creating Instrument Manager Rules ........................................................................................... 39
5 Testing Submission Configurations ...............................................................................53
5.1 About the Test Submission Service ............................................................................................ 53 5.2 Using the Test Submission Service ............................................................................................ 53
6 Proficiency Test Data Submission, Review, and Approval ...........................................56
6.1 Entering and Submitting PT Data................................................................................................ 56 6.2 Reviewing and Approving Results in e-LAB Solutions Suite ...................................................... 56 6.3 Tracking Proficiency Testing Results in e-LAB Solutions Suite .................................................. 62 6.4 Instrument and Method Verification and Maintenance ............................................................... 64 6.5 Quality Cross Check Result Reporting ....................................................................................... 64

© College of American Pathologists. All rights reserved. Page 3 of 67
1 About Direct Transmission
1.1 What is this service?
The College of American Pathologists (CAP), in conjunction with Data Innovations, LLC (DI),
has developed a software connectivity solution to enable the electronic transmission of
proficiency testing (PT) data. This service provides laboratories with the ability to electronically
transmit quantitative PT results from their automated instruments to the PT result form data
entry interface in e-LAB Solutions Suite without user intervention.
1.2 How does it work?
PT results are transmitted through the Data Innovations Instrument Manager™ middleware
using a specifically designed CAP PT driver. This driver translates your laboratory’s test codes
to the CAP PT codes and then routes the PT results directly to e-LAB Solutions Suite, where it
automatically populates the result forms. This process effectively eliminates manual data entry
clerical errors, saves laboratories hours of data entry on an annual basis, and meets CLIA and
the CAP’s Laboratory Accreditation Program checklist requirement to treat PT specimens more
like patient specimens.
Submission Mechanism
Automated data submission is triggered by the entry of laboratory orders that comply with a
documented convention that “flags” resulting data for submission to the CAP’s CLIA-compliant
PT service.
PT data is packaged into XML instance documents that comply with a CAP-supplied XML
schema.
The XML files are then uploaded to e-LAB Solutions Suite via a secure, SOAP-based web
service protocol.
Production Service
PT data will be packaged into XML files and transferred to the CAP via a CAP-supported web-
service endpoint.
The Web service will be available on port 443 and 128-bit SSL encryption will be required.
The Web service will be routable at the following addresses:
• Server URL: https://www.cap.org
• Service URL: https://access.cap.org/lab2pt/ResultsUpload
• WSDL URL: https://access.cap.org/lab2pt/ResultsUpload?WSDL
Web protocols are:
• HTTPS (SSL) over TCP/IP
• SOAP-based Web services compliant with WS-Security and WS-Reliability

© College of American Pathologists. All rights reserved. Page 4 of 67
Scope of the Data to be Submitted Automatically
Automated submission applies only to data that result from laboratory tests of PT specimens
delivered to the laboratory by the CAP’s PT service.
Automated submission is currently limited to quantitative data (eg, numeric data) that are
transferred from an automated instrument to the laboratory’s Laboratory Information System
(LIS) and/or Health Information System (HIS) via the DI middleware.
Automated submission does not include (by design) any of the following:
• Interpretations (eg, normal/abnormal, present/absent, susceptible/resistant)
• Data entered directly into an LIS user interface
• Textual or encoded data (eg, bacterial species/genus identifications, blood cell
identifications)
Privacy and Protection of Patient Information
The CAP/DI systems allow only data identified for PT to be transmitted from the laboratory to
the CAP if all recommended procedures are followed. The transmission of this data is
accomplished by writing a rule, using the Instrument Manager Rules feature, which will ensure
only PT results are collected and sent to the CAP’s e-LAB Solutions Suite system. Refer to the
section “

© College of American Pathologists. All rights reserved. Page 5 of 67
Instrument Manager Rules” in this user guide for more information about rules.
Customer Service and Support
Service support for direct transmission is available from the CAP and Data Innovations. Support
from Data Innovations is covered by the maintenance and support associated with the
Instrument Manager connection. The CAP and Data Innovations will work to resolve
transmission failures and/or service interruptions as quickly as possible. During such periods,
your laboratory can still submit PT data to the CAP’s e-LAB Solutions Suite manually.
1.3 Customer Requirements
Use of the direct transmission solution requires the following:
• Data Innovations Instrument Manager middleware (version 8.15 or higher with the
Specimen Management module)
• CAP Proficiency Testing driver (“CAP PT driver”): The CAP PT driver (capprfcl)
contains a user interface to map a laboratory’s test descriptions to those recognized by
the CAP. The driver must be installed and configured within Instrument Manager to
integrate the laboratory’s LIS and/or HIS with at least one of its automated instruments.
Instructions for obtaining and configuring the CAP driver are provided in the sections,
“Obtaining the Data Innovations CAP PT Driver,” and, “Configuring the CAP PT Driver
and Getting Connected,” respectively.
• Security credentials: After the CAP PT driver has been licensed, the CAP will provide a
user ID and password to a laboratory administrator. These credentials must be added to
the configuration data housed within the Data Innovation device’s CAP PT driver.
• Mapped codes: The laboratory must map the laboratory’s test names and/or codes to
the CAP codes using the automated functionality within the DI device’s CAP PT driver.
The mapping process is described in the section, “CAP Code Mapping.”
• Rule installation: The Rules feature of the Specimen Management module automates
the collection of PT results from the instruments. The process for installing rules is
described in the section, “

© College of American Pathologists. All rights reserved. Page 6 of 67
• Instrument Manager Rules.”
• Inbound and outbound firewall access: Use of the direct transmission service
requires access to and through any existing laboratory networking firewalls. Specifically,
a laboratory’s networking firewall must not restrict inbound and outbound connections
over SSL (HTTPS over port 443) to access cap.org from the PC or server on which the
Data Innovations Instrument Manager software executes.
• Network connection for the CAP PT driver: To connect to the CAP, subscribers will
also require an Instrument Manager connection for the CAP PT driver. Instructions for
verifying a connection are provided in the section, “Verifying a Network Connection.”
1.4 Use Limitations
Personal and Noncommercial Use Limitation
The services provided by CAP/DI software are for your individual laboratory and for
noncommercial use only. You may not copy, modify, distribute, transmit, display, perform,
reproduce, publish, license, create derivative works from, transfer, or sell any information,
software, programs, or services obtained from the service.
1.5 Contact Information
For additional information or help regarding direct transmission, contact the CAP or Data
Innovations:
• CAP Customer Contact Center: 800-323-4040 or 847-832-7000 option 1, or
• Data Innovations: 802-658-2850, or [email protected]
1.6 Online Tutorials
Video tutorials are available on cap.org. These tutorials provide step-by-step instructions for
configuring and using this service. Note that all of the information in the tutorials is also provided
in this user guide.
See: https://www.cap.org/laboratory-improvement/proficiency-testing/e-LAB-solutions-connect

© College of American Pathologists. All rights reserved. Page 7 of 67
2 Getting Started
2.1 Verifying a Network Connection
To verify that the service can be reached from the Instrument Manager PC or server, open a
web browser such as Internet Explorer or Mozilla Firefox, copy the following URL into the
address bar, and press the Enter key:
https://access.cap.org/lab2pt/ConnectToCAP.jsp
If a network connection is possible, then a Web page will display that looks similar to the
example below:
If a network connection is not possible, a Web page will display that looks similar to this
example:
Note: The CAP PT driver will not work if there is a proxy server in the network path. It is the responsibility
of the laboratory to work with their Information Technology department to facilitate access.
2.2 Enrolling/Registering for e-LAB Solutions Suite
Before a laboratory can submit PT results via direct transmission, the laboratory must first
enroll/register for e-LAB Solutions Suite by completing the following tasks and steps:
Task 1: Create a CAP web account
1. Go to cap.org.

© College of American Pathologists. All rights reserved. Page 8 of 67
2. Click Login.
3. On the Login page, click Create an Account.
4. In the account creation window, enter your name and credentials, then choose a unique
user ID and password. Then, click Next.
5. Select three security questions and provide answers. This information will only be used to
verify your identity if you require assistance logging in at any point in the future.
6. Provide either a business or home address to continue.
7. Once you have entered at least one address, click Finish. You will be notified by email
within one business day that your web account has been activated.
Task 2: Request Access to Laboratory Data and Programs
Before you request access, make sure that your laboratory has enrolled/registered. The
laboratory director has been assigned as the site administrator. You will also need a Web
account to request access (see above).
1. Go to cap.org and click Access e-LAB Solutions Suite. Log in using the web account user
ID and password you created in Task 1.
2. Click Request Access From Your Site Admin.
3. Enter your organization’s seven-digit CAP number, then click Submit.
4. At the confirmation screen, review the information and click Submit.
5. Your request will be sent to your laboratory’s site administrator to grant or deny access.
6. Once you have been granted or denied access, you will receive an email message detailing
your access privileges (functions you have been authorized to use by your site
administrator).
Task 3 (for Site Administrators only): Enroll/Register Your Laboratory for Online
Programs
Only site administrators can opt in their laboratories to e-LAB Solutions Suite. A laboratory only
has to enroll/register once to gain access to online programs.
1. Go to cap.org, click Access e-LAB Solutions Suite, and log in.
2. Click Manage Lab Users Online Permissions.
3. Enter the CAP number and PIN provided on your laboratory’s letter, and click Submit. If
you do not have a PIN available, contact the CAP at 800-323-4040 option 1 for assistance.
Task 4: Enroll in Direct Transmission using Data Innovations Instrument Manager
1. Enroll using the form available on cap.org. This form requires both your laboratory’s primary
seven-digit CAP number and your DI license number, which can be found at the bottom of
any Instrument Manager screen or Help > About screen.
2. Call the CAP Customer Contact Center at 800-323-4040 or 847-832-7000, option 1, to
complete your enrollment.
3. The CAP will email you a user name, password, and user guide to configure the CAP PT
driver. Once you have entered these values into the CAP Proficiency Testing Configuration
screen, you do not have to re-enter them.

© College of American Pathologists. All rights reserved. Page 9 of 67
2.3 Registering Data Innovations Instrument Manager
For security purposes, a laboratory must register each DI Instrument Manager license with the
CAP. Registration entails the generation of a user name and password by the CAP for each DI
Instrument Manager license. The user name and password must be entered into a configuration
dialog provided by the CAP PT driver.
To ensure that each license of the DI Instrument Manager software is registered correctly, follow
the steps below:
1. Start Instrument Manager.
2. Open the Help menu and select About. The About dialog displays the License number.
3. Contact the CAP Customer Contact Center. Read the license number to the Customer
Contact Center representative. (Alternatively, you could capture a screen shot and email
that screen shot to the Customer Contact Center.)
4. Provide the main CAP number of the primary laboratory associated with the DI Instrument
Manager license.
Note: A single DI Instrument Manager license may be used for multiple CAP numbers. In this case, one
of them needs to be designated as the primary lab number. As desired, the laboratory contact may
optionally provide a textual description of the specific DI Instrument Manager license.
5. The CAP’s Customer Contact Center works with the internal CAP IT staff to generate a user
name and password for that specific license of the DI Instrument Manager.
6. The CAP representative conveys the user name and password to the laboratory contact, via
email. (Later you will enter these values into the User Name and Password fields in the
driver properties section of the CAP PT driver.)
2.4 Obtaining the Data Innovations CAP PT Driver
Data Innovations has created a CAP-specific driver that can be loaded into an existing Data
Innovations Instrument Manager installation and configured to map laboratory test codes to
CAP codes. Once configured, laboratories can transmit their quantitative PT results from the
instrument to DI Instrument Manager and subsequently to the CAP.
Follow these steps to download and install the CAP PT driver:
1. Download the most current version of the CAP PT driver (capprfcl) from the Data
Innovations customer web portal using the CWP user name and password provided by Data

© College of American Pathologists. All rights reserved. Page 10 of 67
Innovations.
2. Launch Instrument Manager.
3. Load the driver into Instrument Manager.
2.5 Configuring the CAP PT Driver and Getting Connected
Before you can use the CAP PT driver to submit data, you must configure the driver using the
credentials provided by the CAP and start a connection with the CAP. To do this, complete the
following tasks and steps:
Task 1: Add a configuration
1. Launch Instrument Manager.

© College of American Pathologists. All rights reserved. Page 11 of 67
2. Open the Configuration menu and select Configuration Editor.

© College of American Pathologists. All rights reserved. Page 12 of 67
3. In the Configuration Editor screen, click Add.

© College of American Pathologists. All rights reserved. Page 13 of 67
4. In the Add Configuration dialog, type a name for the configuration in the Configuration
Name field (eg, “CAP PT Driver”).
5. Type a description for the configuration in the Configuration Description field (eg, “CAP
PT Result Uploader”).
6. Select the CAP PT Driver from the Driver Type drop-down menu.
7. Click Close.
8. In the confirmation dialog, click Yes to save your changes.
4
5
6
7

© College of American Pathologists. All rights reserved. Page 14 of 67
Task 2: Configure the CAP PT driver properties
1. Select the CAP PT driver in the list of drivers.
2. Click Properties.

© College of American Pathologists. All rights reserved. Page 15 of 67
3. The Configuration Properties window opens. Click Driver Properties.

© College of American Pathologists. All rights reserved. Page 16 of 67
4. The CAP Proficiency Testing Configuration window opens. Enter the Username and
Password provided by the CAP.
Tip: It is a best practice to copy and paste these items from your email rather than typing them manually.
5. Enter the contact information for the person in your laboratory who will be responsible for
managing this solution for direct transmission of PT results. This includes name, email
address, and telephone number.
6. (Optional) The Transmission Errors preference defaults to resending messages three
times every ten seconds. You may change this to a different setting if you prefer.
7. Kit # Contents and Specimen # Contents menus will have a default value of “none” when
you first set up the program. The CAP recommends using “Patient First Name” and “Patient
Last Name” respectively.
8. Enter the Default CAP Number. This is your laboratory’s primary seven-digit CAP number.
9. Click the Test Connection button to test the connection with the CAP.
4
5
6
7
8
9

© College of American Pathologists. All rights reserved. Page 17 of 67
10. If the connection has been established you will see an “OK” message indicating that the
Instrument Manager has been successfully configured to communicate to the CAP.
Note: If the connection fails, a pop-up similar to the one shown below appears.
If this occurs, verify that Port 443 has been opened in your firewall and that the user name, password and
CAP number have been correctly entered. If this information has been correctly entered, then you should
also verify that basic network connectivity exists as described in the section “Verifying a Network
Connection.” If basic connectivity does not work, then troubleshoot to isolate the problem. If you continue
to have problems establishing a connection, call the CAP at 800-323-4040 or 847-832-7000, option 1 for
assistance.
11. Assuming the connection is established, click OK.
12. Click Close to close the Configuration window.
13. Click Yes to save your changes.
14. Click Close to close the Configuration Properties window.
15. Click Close to close the Configuration Editor window.
Tip: If you need help using Instrument Manager, you can access the Instrument Manager Help file by
pressing the F1 key on your keyboard. The Help file provides instructions for:
• Accessing the e-LAB Solutions Suite interface
• Testing your connection to the e-LAB Solutions Suite interface
• Configuring how information is submitted to the CAP
• Mapping local test codes to the CAP codes

© College of American Pathologists. All rights reserved. Page 18 of 67
Task 3: Add a Connection Assignment for the configuration you just created
1. Open the Configuration menu and select Connection Assignment.

© College of American Pathologists. All rights reserved. Page 19 of 67
2. In the Connection Assignment window, click Add.

© College of American Pathologists. All rights reserved. Page 20 of 67
3. In the Connection Properties window, enter a name for the connection in the Connection
Name field (eg,” CAP Connection”).
4. Open the Configuration Name menu and select the configuration you created using the
Configuration Editor (“CAP PT Driver”).
Note: Because the driver is an outbound unidirectional driver it doesn’t ever send data to other
connections so you don’t have to change the destination line settings.
Leave the default setting for the Number of Days to Keep set to three days. This controls the number
days before data is purged.
Leave the Device set to “NULL.”
5. Check the checkbox for Include in Specimen Management under Advanced Options.
6. (Optional) Check the checkbox(es) for Update Specimen Management in Status
Messages and/or Overwrite Patient Data
7. Click Close.

© College of American Pathologists. All rights reserved. Page 21 of 67
8. Click Yes to save your changes.
9. Click Close to close the Connection Assignment window.
3
4
5
6 (optional
7

© College of American Pathologists. All rights reserved. Page 22 of 67
Task 4: Start the connection
1. Open the System menu and select Status.

© College of American Pathologists. All rights reserved. Page 23 of 67
2. The Status Display window opens. In the list of connections, the status of the CAP
Connection is “Off.” Select the CAP Connection.
3. Click Start Selected Connections.
4. The status changes from “Off” to “On.” Once the connection status is listed as “On,”
Instrument Manager will be ready to route all PT tests to the CAP PT driver (after you set up
Instrument Manager rules, described later in this user guide).
5. Click Close to close the Status Display window.
2
3

© College of American Pathologists. All rights reserved. Page 24 of 67
3 CAP Code Mapping
3.1 About CAP Code Mapping
The CAP maintains a list of codes to map your test codes to enable standardization of
language. These codes provide a consistent means by which analytes can be identified across
various systems. CAP Codes will be used to identify the PT results from your instruments
transmitted to e-LAB Solutions Suite.
3.2 Why use CAP Code Mapping?
Each laboratory has its own “local” code originating from instrumentation or the LIS. For
example, when testing for glucose, one laboratory system might issue results for “glu,” another
for “test 29,” and another for “glucose, serum.” The CAP system has its own naming convention
to identify data from customers from all the proficiency testing programs.
CAP code mapping enables recognition of each laboratory’s local code and matches it to the
correct CAP test code. The CAP PT driver provides the mechanism to link your local code to the
CAP code that has been established as the “one to use” for a certain analyte and unit of
measure. In this way, your PT data are filed directly into e-LAB Solutions Suite for your
verification of accuracy without any manual intervention.
The CAP Code Database
The CAP code database is a universal master file of standard test names and codes that will
cover most of the entries in the files of operational laboratory systems. This database allows the
terms in the operational laboratory system files to be mapped directly to universal master codes
and names. The names created correspond most closely to the “long test descriptions” seen in
test master files. The CAP code names are fully specified names, meaning all the information
needed to map a local test name to one of the fully specified names is present in the CAP code
name.
CAP code mapping aims to achieve a level of detail in the definition of a test that will map one-
to-one to the separately reported observations on a clinical laboratory report. If a test has its
own column on a clinical report, a reference range that is significantly different from other tests,
or a different clinical meaning than other related tests, it will usually be assigned a separate
code and name. CAP code mapping delivers these fully specified names, their codes, and their
related names as a database in which each line corresponds to a unique test measurement.
Each record corresponds to a single result. The record includes fields for specifying:
• Component (analyte)—eg, potassium, hemoglobin, hepatitis C antigen
• Property measured (units of measure)—eg, a mass concentration or enzyme activity (catalytic rate)
• Timing (whether the measurement is an observation at a moment of time or an observation integrated over an extended duration of time)—eg, 24-hour urine
• Type of specimen—eg, urine or blood

© College of American Pathologists. All rights reserved. Page 25 of 67
• Type of scale—eg, whether the measurement is quantitative (a true measurement), ordinal (a ranked set of options), nominal (such as Escherichia coli or Staphylococcus aureus), or narrative (such as dictation results from x-rays)
• Method used, where relevant—to produce the result or other observation
There can be multiple CAP codes for the same type of Survey if there are different analytes
and/or units of measure for that Survey. Here are examples:
Survey Analyte Unit of Measure CAP Code
B-type Natriuretic Peptides B-type Natriuretic Peptide pg/mL (ng/L) 30934-4
B-type Natriuretic Peptides NT-proBNP pg/mL (ng/L) 33762-6
Basic Hematology Hematocrit % 20570-8
Basic Hematology Hemoglobin g/L 40719-7
Basic Hematology Hemoglobin g/dL 718-7
Basic Hematology MCV fL 47282-9
Basic Hematology Platelet count x 10E9/L 777-3
Basic Hematology RBC count x 10E12/L 789-8
Basic Hematology WBC count x 10E9/L 6690-2
Chemistry ALT (SGPT) U/L 1742-6
Chemistry AST (SGOT) U/L 1920-8
Chemistry Albumin g/L 32293-3
Chemistry Albumin g/dL 1751-7
Chemistry Alkaline phosphatase U/L 6768-6
Note: The CAP will provide the CAP code mapping to be used for result reporting. Laboratories are
responsible for setting up their local test codes to map to the corresponding CAP codes through the
CAP/DI driver interface.
3.3 Test Code and Fluid Code Mapping
The CAP PT driver provides a configuration screen to map test codes to the associated CAP
codes. A situation may occur whereby it is required to map a single test code to multiple CAP
codes based upon the fluid type. When this is required, the test code and fluid code mapping
functionality within the CAP PT driver must be utilized.
Within the Instrument Manager architecture, the CAP PT driver is considered an LIS interface.
Refer to the Instrument Manager Getting Started Setup Guide Chapter A-6 for a complete
description of mapping.
Note: Fluid code mapping is now configured with your test code mapping. This section will only be utilized
if you are manually entering fluid type. Refer to the “Mapping Your Codes to the CAP Codes” tutorial for
additional information.
Example:
1. An instrument has the ability to process GLU on two different fluids but reports the test
as GLU in both cases with an identifier of Serum or Urine for the fluid type.

© College of American Pathologists. All rights reserved. Page 26 of 67
2. Test code and fluid code mapping must be configured for the CAP PT driver to map
these to two separate LIS/Host test codes.
3. The CAP Code Mapping Configuration screen is then used to map the LIS/Host test
codes.
3.4 Mapping Your Proficiency Testing Menu to the CAP Codes
Follow these instructions to map your laboratory’s codes to the CAP codes.
Task 1: Turn off the CAP PT driver
1. Launch Instrument Manager.
2. Open the System menu and select Status.

© College of American Pathologists. All rights reserved. Page 27 of 67
3. The Status Display window opens. In the list of connections, the status of the CAP
Connection is “On.” Select the CAP Connection.
4. Click Stop Selected Connections.
5. The status changes from “On” to “Off.”
Note: While the CAP PT driver must be offline during this mapping, the individual instrument does not
have to be offline.
3
4

© College of American Pathologists. All rights reserved. Page 28 of 67
Task 2: Map the codes
1. Open the Configuration menu and select Configuration Editor.
2. Select the CAP PT driver in the list of drivers.

© College of American Pathologists. All rights reserved. Page 29 of 67
3. Click Properties.

© College of American Pathologists. All rights reserved. Page 30 of 67
4. The Configuration Properties window opens. Click Driver Properties.
5. The CAP Proficiency Testing Configuration window opens showing the contact information
you entered earlier when configuring the driver. Open the Connection Name menu.
6. Select a connection name for the instrument you will be mapping to.
Select the desired connection
name (eg, MRE1)

© College of American Pathologists. All rights reserved. Page 31 of 67
7. (Optional) Enter a different CAP Number, Contact Name, and/or Contact Email.
Note: If you leave the CAP Number, Contact Name, and Contact Email fields empty, the system will
send alerts to the default person or group named in the Contact Information section. Such alerts include
error messages that can be useful for troubleshooting.
If you want these alerts to be sent to another contact in addition to the default contact, you should enter
that person’s or group’s contact information here. If this person is affiliated with the same laboratory as
the default contact, there’s no need to enter a CAP number. If the person is affiliated with another CAP
number, that number should be entered in the CAP Number column.
8. Verify that the Test Submission checkbox is checked.
Note: Checking the Test Submission checkbox lets you test your mapping later, before you go live. This
process is explained in the section “
© College of American Pathologists. All rights reserved. Page 32 of 67
Testing Submission Configurations.” Remember to uncheck the Test Submission box once you are
ready to submit actual proficiency testing data to the CAP.
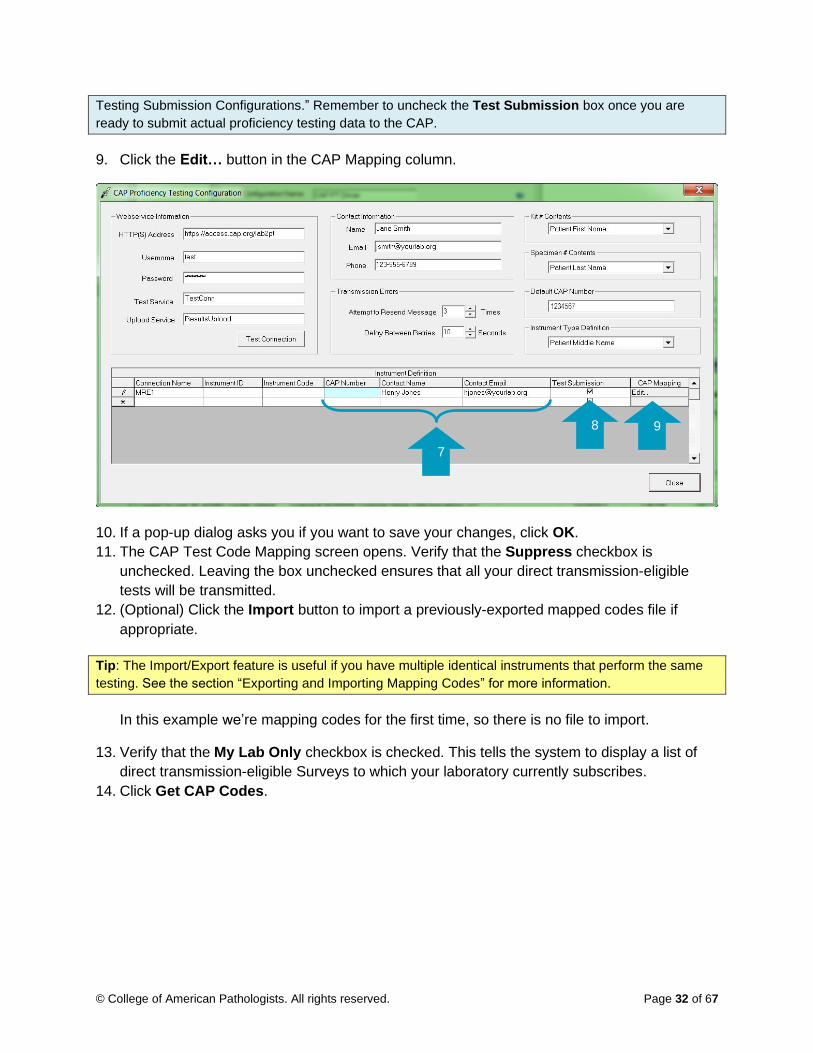
9. Click the Edit… button in the CAP Mapping column.
10. If a pop-up dialog asks you if you want to save your changes, click OK.
11. The CAP Test Code Mapping screen opens. Verify that the Suppress checkbox is
unchecked. Leaving the box unchecked ensures that all your direct transmission-eligible
tests will be transmitted.
12. (Optional) Click the Import button to import a previously-exported mapped codes file if
appropriate.
Tip: The Import/Export feature is useful if you have multiple identical instruments that perform the same
testing. See the section “Exporting and Importing Mapping Codes” for more information.
In this example we’re mapping codes for the first time, so there is no file to import.
13. Verify that the My Lab Only checkbox is checked. This tells the system to display a list of
direct transmission-eligible Surveys to which your laboratory currently subscribes.
14. Click Get CAP Codes.
8
7
9

© College of American Pathologists. All rights reserved. Page 33 of 67
15. The Get CAP Codes screen appears, displaying only the direct transmission-eligible
Surveys that your laboratory has ordered. Verify that the checkbox for Query for Selected
Surveys Only is checked.
16. Select all the Surveys for which you want to map codes for this instrument from the
Available Surveys list. We recommend you map just one Survey at a time. (In this example,
we have selected Cardiac Markers.)
17. Click the Select >>> button to move the survey(s) to the Selected Surveys list.
11
13 14 12 (optional)
15
16
17

© College of American Pathologists. All rights reserved. Page 34 of 67
18. Click Update.
19. The CAP Code Mapping screen is updated with the CAP codes for your selected Surveys.
Review the list of codes.
Note: There might be a single assay with different units of measure. The CAP does not convert units of
measure so be sure to choose the appropriate IM test code that corresponds to the CAP Code with the
unit of measure used by your laboratory.
20. For each analyte that you want to map, open the drop-down menu under the IM Test Code
column and select the appropriate instrument test code.
Rows highlighted in yellow
indicate possible codes that
have not yet been mapped.
In this example, there are two codes for
assay CK-MB because each uses a
different unit of measure.

© College of American Pathologists. All rights reserved. Page 35 of 67
21. In the IM Fluid Code column, select the appropriate matrix if necessary.
Note: If you report on only a single fluid type, then you do not have to define a fluid code. If you report on
more than one fluid type, you have to define all appropriate fluid types for that analyte.
In our example, serum is the only fluid type used for a Cardiac Markers program. So while
we could select Serum “S” for all the analytes, it is not necessary so we won’t enter any fluid
codes.
22. To save your mapped codes, click Close.
Tip: You could add more Surveys by clicking the Get CAP Codes button, but we recommend that you
map one Survey at a time and save your mapped codes after that Survey’s mapping is complete.
The Test Description, as it is
defined in the individual instrument
driver, populates automatically.

© College of American Pathologists. All rights reserved. Page 36 of 67
23. A pop-up dialog asks you if you want to save your changes. Click Yes.
24. If you have not selected a test code associated with this Survey, a dialog reminds you that
one or more test codes are null. If you want to go back to select more test codes, click No. If
you want to continue, click Yes.
25. Repeat step 14–24 until you have mapped all the surveys for the instrument.
26. Close the Configuration Properties window.
27. Close the Configuration Editor window.
Task 3: Turn on the CAP PT driver
1. In the Status Display screen (which should still be open), click Start Selected Connections
to turn the CAP PT driver connection back on.
3.5 Exporting and Importing Mapping Codes
If you have multiple identical instruments that perform the same testing, you can save mapping
time by using the “Export” and “Import” tools in Instrument Manager.
The Export tool lets you save the entire mapping chart for an instrument that has already been
mapped. The chart is saved as a single file on your computer that you can later import into
another instrument that uses the same testing configuration.
21 (If necessary). In this example, the
instrument uses fluid code “O” for other,
“S” for serum, and “U” for urine.
22
© College of American Pathologists. All rights reserved. Page 37 of 67
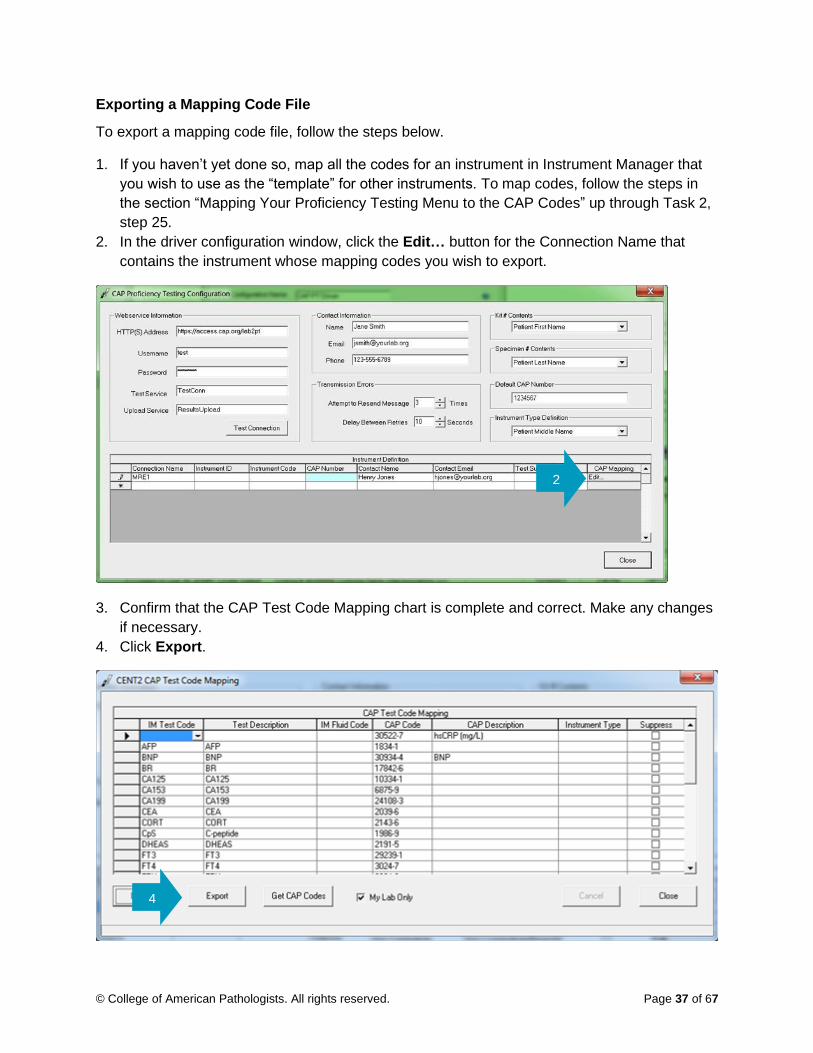
Exporting a Mapping Code File
To export a mapping code file, follow the steps below.
1. If you haven’t yet done so, map all the codes for an instrument in Instrument Manager that
you wish to use as the “template” for other instruments. To map codes, follow the steps in
the section “Mapping Your Proficiency Testing Menu to the CAP Codes” up through Task 2,
step 25.
2. In the driver configuration window, click the Edit… button for the Connection Name that
contains the instrument whose mapping codes you wish to export.
3. Confirm that the CAP Test Code Mapping chart is complete and correct. Make any changes
if necessary.
4. Click Export.
4
2

© College of American Pathologists. All rights reserved. Page 38 of 67
5. A Save As dialog box will appear. Use the dialog to choose the folder where you wish to
save the export file.
6. Enter a file name for the export file.
7. Make sure the “Save as type” option is set to Tab Delimited Files (*.txt).
8. Click Save.
9. Turn the CAP PT driver back on following the steps described in “Mapping Your Proficiency
Testing Menu to the CAP Codes,” Task 3: Turn on the CAP PT driver.”
Importing a Mapping Code File
To import a mapping code file to an unmapped instrument, follow the steps below.
1. If you had turned on the CAP PT driver, be sure to turn it off before importing.
2. Decide which unmapped instrument you want to map using the export file you created
earlier. With that instrument in mind, follow all the steps in the section “Mapping Your
Proficiency Testing Menu to the CAP Codes” up to Task 2, step 12.
3. In the CAP Test Code Mapping window, click Import.
4. An Open dialog box appears. Browse to and select, or enter, the code file you wish to
import.
5. Click Open.
6. The CAP Test Code Mapping chart will be completed.
7. Save the mapping by following the steps in “Mapping Your Proficiency Testing Menu to the
CAP Codes” Task 2, step 22–26.
8. Turn the CAP PT driver back on following the steps described in “Mapping Your Proficiency
Testing Menu to the CAP Codes,” Task 3: Turn on the CAP PT driver.”
2

© College of American Pathologists. All rights reserved. Page 39 of 67
4 Instrument Manager Rules
4.1 About Instrument Manager Rules
To meet requirements, you must create a rule in Instrument Manager that distinguishes PT
samples from patient samples. This rule allows IM to route the PT samples correctly to the CAP
PT driver. Each instrument must have this rule defined in Instrument Manager.
Recall that when you configured the CAP PT driver, you specified which fields would contain the
values for the Kit # Contents and Specimen # Contents. The CAP recommends using the
“Patient First Name” and “Patient Last Name” fields respectively. This means that the Kit #
contents (the eight-digit kit number) will be found in the Patient First Name field and the
Specimen # contents (specimen ID) will be found in the Patient Last Name field.
4.2 Rule Syntax
Rules contain at least two logical statements: If and Then. The “If” statement is a condition. If
the condition is met, then the software performs the “Then” statement. If the condition is not
true, then the software does nothing (unless you specify a third, “Else” statement).
In general, a simple two-statement in the instrument drivers will follow this format:
IF ({Specimen # data element} {Matches Pattern of} "1.4A1""-
""2N") {AND} ({Kit # data element} {Matches Pattern of} "8N" )
Then: {Set Destination Connection} e-LAB Solutions Connect
Connection
This rule will look for Kit # contents and Specimen # in these data elements. If this information
is found in the results coming from the instrument, the rule then sets the destination connection
to the CAP PT driver.
4.3 The “CAP PT Specimen Identification” Rule
When you create the rule, we recommend you call it the “CAP PT Specimen Identification” rule.
To create the “CAP PT Specimen Identification” rule, copy the appropriate code below into
Instrument Manager. Make sure you copy the code for your version of your Instrument Manager
application.
The rule looks for Kit # Contents and Specimen
# Contents values in fields you specified when
you configured the CAP PT driver.

© College of American Pathologists. All rights reserved. Page 40 of 67
If you are using Instrument Manager version 8.7 to 8.11:
For this rule statement…
Copy this code:
If: ( ( {Extract Component of} {Patient Name} {Using} {Component Delimiter} {From} "1" {To} "1" {Matches Pattern of} "1.5A1""-""2N" ) {OR} ( {Extract Component of} {Patient Name} {Using} {Component Delimiter} {From} "1" {To} "1" {Matches Pattern of} "1.3A1N1""-""2N" ) ) {AND} ( ( {Extract Component of} {Patient Name} {Using} {Component Delimiter} {From} "2" {To} "2" {Matches Pattern of} "8N" ) )
Then: {Set Destination Connection} "CAP"
If you are using Instrument Manager version 8.12 or higher:
For this rule statement…
Copy this code:
If: ( ( {Extract Component of} {Patient Name} {Using} {Component Delimiter} {From} "1" {To} "1" {Matches Pattern of} "1.5A1""-""2N" ) {OR} ( {Extract Component of} {Patient Name} {Using} {Component Delimiter} {From} "1" {To} "1" {Matches Pattern of} "1.3A1N1""-""2N" ) ) {AND} ( ( {Extract Component of} {Patient Name} {Using} {Component Delimiter} {From} "2" {To} "2" {Matches Pattern of} "8N" ) )
Then: {Add Destination Connection(s)} "CAP"
Else: Not applicable (no code needed)
Note: It is the laboratory’s responsibility to test the rule it uses to ensure that no patient samples will
transmit to the CAP.
Note: Depending on the version of Instrument Manager installed, not all data elements may be available
for use within the rules engine. Please refer to your Instrument Manager Rules Manual for details on how
to write rules and which data elements will be available.
4.4 Creating Instrument Manager Rules
Before you create the “CAP PT Specimen Identification” rule, make sure you have a copy of this
user guide available and open on the computer you’re using to run Instrument Manager. Use a
flash drive if necessary. Follow the instructions below to create the rule.

© College of American Pathologists. All rights reserved. Page 41 of 67
Task 1: Create the Rule
1. Launch Instrument Manager.
2. Open the Configuration menu.
3. Select Specimen Management Configuration.
4. Select Rules Processing.
2
3
4

© College of American Pathologists. All rights reserved. Page 42 of 67
5. The Rules Setup screen appears. Open the Select Configuration drop-down menu.
6. Select the instrument configuration for which you want to create the rule.
5
6
© College of American Pathologists. All rights reserved. Page 43 of 67
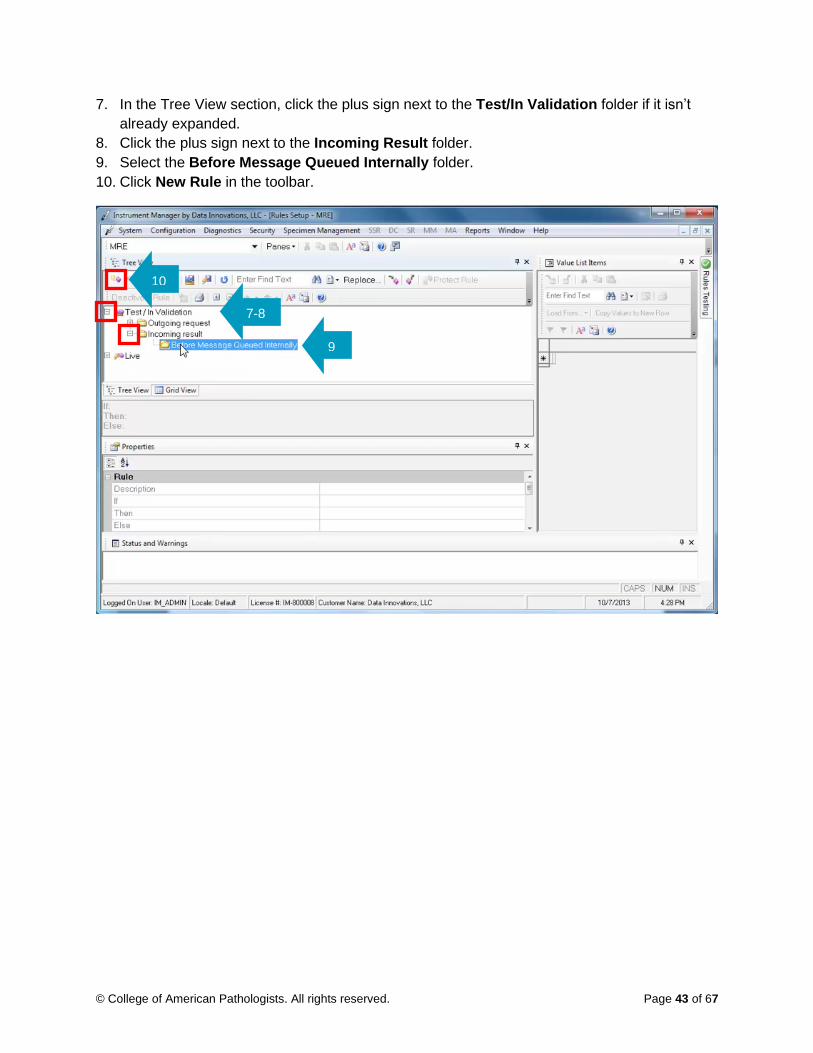
7. In the Tree View section, click the plus sign next to the Test/In Validation folder if it isn’t
already expanded.
8. Click the plus sign next to the Incoming Result folder.
9. Select the Before Message Queued Internally folder.
10. Click New Rule in the toolbar.
7-8
9
10

© College of American Pathologists. All rights reserved. Page 44 of 67
11. An item called New Rule appears with If, Then and Else sub-items. In the box below the
Tree view, copy and paste the appropriate rule code from this user guide to create the If
statement for this rule.
Paste the appropriate codes for the If
and Then statements here.

© College of American Pathologists. All rights reserved. Page 45 of 67
Tip: You can type the rule manually, but to avoid errors we strongly recommend that you copy and paste
the rule from the user guide.
a. Switch over to the user guide (which should be open on your computer) and
locate the “CAP PT Specimen Identification” in the guide.
b. Highlight the code for the If statement and copy it to the clipboard.
Note: There is more than one version of the code. Make sure you copy the code for your version of your
Instrument Manager application.
Make sure you copy the code for your version of your Instrument Manager application.
11a-b

© College of American Pathologists. All rights reserved. Page 46 of 67
c. Switch back to Instrument Manager.
d. Click next to the “If” heading in the section below the tree and paste the code.
11d

© College of American Pathologists. All rights reserved. Page 47 of 67
12. Repeat step 11 for the “Then” statement code. The “If” and “Then” codes automatically
populate their respective parts of the New Rule in the Tree View above.
Note: Ensure that the destination connection name that appears in quotes in the Then statement matches
the name of your CAP connection exactly. In this example, the connection name is “CAP”; however, your
name may be different.
The code text will be colored red to let you know that the
rule has not been saved to the live production area.
The connection name that appears in quotes must match the name of
your CAP connection exactly. In this example, the connection name is
“CAP”; however, your name may be different.

© College of American Pathologists. All rights reserved. Page 48 of 67
13. Name the rule. In the Properties section click into the Description field, highlight the default
description (“New Rule”) and replace it by typing “CAP PT Specimen Identification” into
the field.
13

© College of American Pathologists. All rights reserved. Page 49 of 67
Task 2: Save the Rule Set
1. Click Save Test/In Validation Rule Set.
1

© College of American Pathologists. All rights reserved. Page 50 of 67
2. Click Yes.
3. A dialog displays the results of the save process, including errors, if any. Click OK.
Tip: If an error in the rule is detected, the error will be highlighted in yellow in the Tree View. If there were
an error, you would have to go back and fix it before continuing to the next Task.
3
If an error in the rule is detected, the error
will be highlighted in yellow here.

© College of American Pathologists. All rights reserved. Page 51 of 67
Task 3: Save the Rule Set to the Live Environment
1. Click Save Live Rule Set.
2. Click Yes.
Note: Clicking Yes will replace all live rules for this configuration with the rules from the Test/In
Validation Rule Set.
1

© College of American Pathologists. All rights reserved. Page 52 of 67
Task 4: Copy the Rule Set to another instrument configuration
1. Open the Live folder
2. Open the Incoming Result folder.
3. Open the Before Message Queued Internally folder.
4. Select the rule.
5. Click the Copy Rule(s) button in the toolbar.
1-3
5
4

© College of American Pathologists. All rights reserved. Page 53 of 67
6. A window opens showing a list of available instrument configurations. Check the
configuration to which you want to copy the rule.
7. Click Copy Rules.
8. Click Close.
9. Repeat steps 1-7 for all other instrument configurations.
Note: You must save this rule within each instrument’s connection for the rule to apply for that instrument.
Tip: If you have any issues setting up this rule or other rules, please contact your Data Innovations
Support Representative.
6
7 8

© College of American Pathologists. All rights reserved. Page 54 of 67
5 Testing Submission Configurations
5.1 About the Test Submission Service
The test submission service allows laboratory personnel to test their CAP PT driver
configurations without actually submitting live PT results to e-LAB Solutions Suite. These
configurations include new instrument updates, CAP code mapping, and instrument rules.
Tip: The phrase “Test Submission Service” refers to a service that tests the submission process. It does
not refer to a service that submits tests.
Recall that when you mapped your laboratory’s PT codes to the CAP codes in Instrument
Manager, you left the check box for Test Submission checked on the CAP Proficiency Testing
Configuration screen. This check box enables the test submission service and prevents
submissions from going live until you uncheck it.
5.2 Using the Test Submission Service
To use the test submission service to test a submission, follow the steps below.
1. Verify that you have selected the Test Submission check box for each Instrument for which
you would like to validate your PT driver configurations.
2. Select a valid kit and specimen number from a prior PT activity that is past the due date.
Note: The kit number and specimen ID must be from the year in which you are testing the submission.
Note: If you were to run this specimen without having checked the Test Submission box, you will receive
a “too late” error message as the PT due date has passed.
3. Log the PT specimen into your LIS using the Kit and Specimen ID numbers in the first and
last name demographic fields of your LIS.
The Test Submission check box enables the Test
Submission Service and prevents submissions
from going live until you uncheck it.

© College of American Pathologists. All rights reserved. Page 55 of 67
Tip: The CAP recommends using first and last names as a best practice; if necessary, your laboratory
may use another configuration.
4. Accession the specimen and run the sample for the analytes you want to test on the
instrument.
Tip: Any random patient or QC sample that contains the appropriate analyte(s) may be used to perform
the testing.
5. You will receive an email that includes the challenge details and success or failure status for
each challenge in the submission. (This process is similar to sending the data through the
direct transmission process and viewing the results via e-LAB Solutions Suite.)
In this example email, the overall status indicates that errors were detected:
Details about any errors or warnings are provided in the Status column for that challenge.
You can address these errors before submitting the PT data to the live server.

© College of American Pathologists. All rights reserved. Page 56 of 67
In this example, all the challenges were successful, so no action is required:
6. When you are ready to transmit your PT data to the live e-LAB Solutions Suite environment,
uncheck the Test Submission check box in Instrument Manager for the relevant
instruments.
Remember to uncheck the Test Submission check box
for the instruments when you are ready to transmit your
PT data to the live e-LAB Solutions environment.

© College of American Pathologists. All rights reserved. Page 57 of 67
6 Proficiency Test Data Submission, Review, and Approval
6.1 Entering and Submitting PT Data
Your laboratory should follow its normal processes for logging in and testing PT specimens.
Ensure that the kit number (preprinted on the result) and the specimen ID (exactly as it appears
on the individual specimen) are placed into the positions as defined in the CAP PT driver
configuration. This information must accompany the results as they are sent from the instrument
to ensure that the specimens are identified to DI Instrument Manager as PT specimens and for
the e-LAB Solutions Suite server to be able to file the result into the PT form. Once the data
have been received and saved, the result form can be viewed in e-LAB Solutions Suite.
6.2 Reviewing and Approving Results in e-LAB Solutions Suite
On-time reporting of PT results remains the responsibility of the laboratory. Implementation of
the technology still requires that laboratories ensure that they test, enter, submit, and approve
result data prior to the due date on the result form.
Note: The result forms indicate the due date in which results must be received. Any data received by any
means (fax, online entry, or direct transmission) after midnight (CST) of the date indicated will not be
evaluated, resulting in a failure for all analytes included in the specific Survey event. Cut-off dates are
mandated by the Centers for Medicare and Medicaid Services (CMS) for all approved PT providers.
Remember to review and approve your results by the due date!

© College of American Pathologists. All rights reserved. Page 58 of 67
To review and approve PT results in e-LAB Solutions Suite, follow the steps below.
Note: Wait at least 30 minutes until after the last PT sample was processed by the instrumentation for
that specific PT kit; otherwise your data might not be available.
1. After logging on to cap.org, click View, enter, or submit PT Results.
1

© College of American Pathologists. All rights reserved. Page 59 of 67
2. To view all the PT kits and results you have transmitted through direct transmission, click
Result Form Data Entry using either the link on the page or the link in the Access e-LAB
Solutions Suite menu.
3. The Result Form Data Entry page appears. If you are authorized to access only one
laboratory in e-LAB Solutions Suite, that laboratory’s information appears by default. If you
are authorized to access multiple laboratories, click Lab Selector to select the appropriate
laboratory before continuing.
3

© College of American Pathologists. All rights reserved. Page 60 of 67
The page shows all PT kits due within 60 days. The list includes the associated mailing
number, kit number, sequence number, status, and CAP number. Here are the possible kit
statuses and their meanings:
Status Meaning
Not Received The CAP has not received any PT result data for that kit.
Pending Approval The kit data have been saved and are ready for review and approval.
Received You have successfully reviewed and approved that kit.
4. To review and approve all the pages within a kit whose status is pending approval, click the
row.
For each result form page, you’ll see its status, date received, and method of receipt (either fax
or online).
5. Click the Approve and Submit to CAP to review and approve all available pages.
Tip: When one or more pages in a kit are in a “Pending Approval” status, the Approve and Submit to
CAP button is activated. You would click that button to review all pages. If you wanted to review only a
specific page, you could click the View/Edit link for that page instead.
5
If you wanted to review
only a specific page, you
could click the View/Edit
link for that page.
4

© College of American Pathologists. All rights reserved. Page 61 of 67
Remember: Page data submitted within the last 30 minutes might not be available. If you try to view this
page too soon, a message will remind you that if the links are disabled you’ll have to check back after a
certain time. This prevents anyone at the customer’s laboratory from altering the result form while the
electronic data is being processed.
Once sufficient time has passed, click Refresh to update the list and verify that transmission is complete.
The link appears in an onscreen message:

© College of American Pathologists. All rights reserved. Page 62 of 67
6. A window with all of the pages for which you transmitted data is generated. Review your
result form and verify that the data is presented exactly as you wish it to be evaluated. Make
sure that:
• Quantitative results were transmitted correctly in the appropriate response boxes/fields.
• All required fields are populated, for example method, instrument, or reagent codes.
7. If you need to make edits, (a) enter the changes directly into the form and (b) click Save.
8. When you’re done reviewing or editing the current page, use the arrows or drop-down menu
at the top of the window to review the other pages.
9. After you have reviewed the last page in the kit, and are satisfied that the data is complete,
the kit is ready for approval. To approve the kit, click Approve & Submit to CAP.
Note: As with any other form of data submission, the customer can alter data on a result form prior to the
cut-off date for that Survey. Notify the CAP if you are unable to make edits before the cut-off date.
The data appears as though it has been
keyed in, but in reality the data has been
automatically populated from the direct
transmission using Instrument Manager.
Enter any necessary changes directly
into the form.
8
7a
7b 9

© College of American Pathologists. All rights reserved. Page 63 of 67
Remember: To approve a kit, you must review and approve all pages in the kit for the data to be
evaluated. Data on result forms not approved by the customer cannot be evaluated.
10. If the Approval is successful, the Result Form Detail page status column will display
“Received.”
Caution: It is important that a laboratory have policies and procedures cautioning/admonishing
employees from accessing patient or proficiency reports under other CLIA certificates than the one by
which they are employed. Failure to adhere to such prescribed policies and procedures could result in
federal sanctions.
6.3 Tracking Proficiency Testing Results in e-LAB Solutions Suite
The e-LAB Solutions Suite interface provides an audit trail for results submitted via direct
transmission. Currently, if you access result entry information for your laboratory, a display will
list PT kits in process.
Note: If the due date for any of the kits on your list is within five days, the kit will be tagged with a red alert
(!) and your site administrator will receive an email alerting him/her to the fact that results are due within
five days.
The audit trail for PT results submitted via direct transmission will be similar to the audit trail
generated if you submit your data online or via fax.
You or another e-LAB Solutions Suite user can track your laboratory’s PT kit review history at
any time by following the steps below.
1. Go to cap.org and click View, enter, or submit PT Results.
2. Log in.
3. Navigate to the Result Form Data Entry page.
4. Click the row for the kit you wish to track.
5. The Result Form Details page shows basic information about whether and when a kit’s
pages were received. To see all of the transactions related to each page in the kit, click
View Kit Transaction History.
Kits that are successfully approved are
given “Received” status.

© College of American Pathologists. All rights reserved. Page 64 of 67
6. The Kit Transaction History window shows an audit trail for each page in a kit, including
each action taken on that page, the date and time of the action, and the ID of the user who
performed the action.
The window will show when a kit
was locked and unlocked after
the 30 minute waiting period.
The ID “LAB2PT” identifies this action
as a direct transmission using
Instrument Manager.
5

© College of American Pathologists. All rights reserved. Page 65 of 67
6.4 Instrument and Method Verification and Maintenance
The CAP will continue to maintain each laboratory’s instrument and method codes within the
CAP computer system.
Note: Customers must verify that the codes that have been retained by the CAP are still accurate. If a
code changes, it is the responsibility of the laboratory to make the changes on the appropriate result
form prior to approving and submitting data.
6.5 Quality Cross Check Result Reporting
To report Quality Cross Check results using direct transmission, your laboratory will need to
identify the primary (first) and secondary (second) instruments performing this testing in
Instrument Manager. Third instrument results cannot be directly transmitted to the CAP at this
time. You can only enter results for a third instrument online via e-LAB Solutions Suite. To
identify primary and secondary instruments, follow the steps below.
1. In Instrument Manager open the System menu and select Status.
© College of American Pathologists. All rights reserved. Page 66 of 67
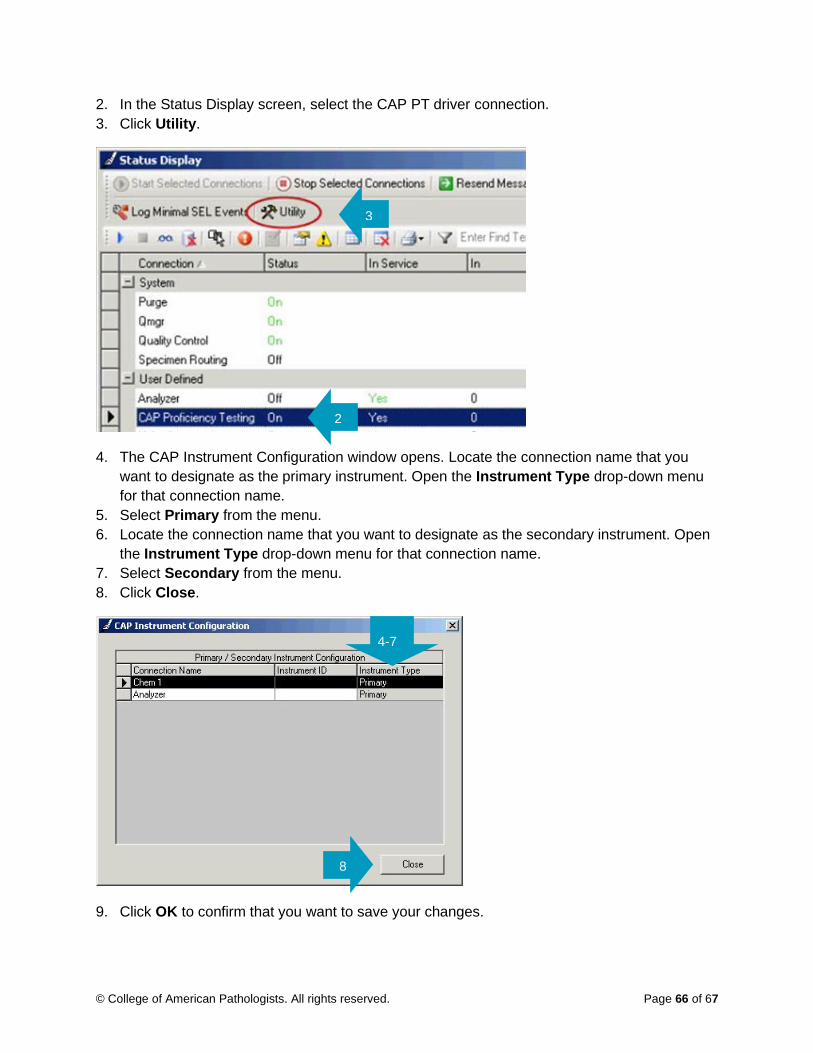
2. In the Status Display screen, select the CAP PT driver connection.
3. Click Utility.
4. The CAP Instrument Configuration window opens. Locate the connection name that you
want to designate as the primary instrument. Open the Instrument Type drop-down menu
for that connection name.
5. Select Primary from the menu.
6. Locate the connection name that you want to designate as the secondary instrument. Open
the Instrument Type drop-down menu for that connection name.
7. Select Secondary from the menu.
8. Click Close.
9. Click OK to confirm that you want to save your changes.
3
2
4-7
8

© College of American Pathologists. All rights reserved. Page 67 of 67
Note: You do not have to stop the driver to access/change the primary or secondary instrument
designations. You may change the designations as many times as you want.
Another way to report primary and secondary instruments is to use the data stream from the
LIS. To do this, pick a field that identifies the type, then use the Instrument Type Definition
drop-down menu in the CAP Proficiency Testing Configuration window to select the data
element you want to use. You would then have to include the value in the downloaded
message.
A third method for reporting primary and secondary instruments is to designate the instrument
type during CAP mapping.
You can use the Instrument Type
Definition field to select the data
element you want to use to report
primary or secondary instruments.
You can designate primary and
secondary instruments using the
Instrument Type drop-down menu.

© College of American Pathologists. All rights reserved. Page 67 of 67
26124-Direct Transmission using Data Innovations Instrument Manager User Guide-120718jvd
© College of American Pathologists. All rights reserved. The College does not permit reproduction of any substantial portion of the material in this report without its written authorization. The College hereby authorizes participants in the program to use the material in this report solely for educational purposes within institutions. The College prohibits use of the material in the report—and any unauthorized use of the College’s name or logo—in connection with promotional efforts by marketers of laboratory equipment, reagents, materials, or services.