directory - m.media-amazon.com
TRANSCRIPT

Shenzhen Eloam Technology Co., Ltd.
1
Directory
I、 System Requirement ........................................................................................................... 3
II、 Software Installation ........................................................................................................... 4
III、 Scanning ............................................................................................................................. 9
1. Starting a Scan.............................................................................................................................. 9
2. Scan Standards ........................................................................................................................... 13
IV、 Scan Mode................................................................................................................................... 14
1. Scan Mode Setting ..................................................................................................................... 15
1) Color Mode ......................................................................................................................... 15
2) Insert Mode......................................................................................................................... 17
3) Process Mode ...................................................................................................................... 18
4) Special Scan Mode .............................................................................................................. 19
Auto Scan ......................................................................................................................... 19
Image Merge .................................................................................................................... 20
2. Scan Area ................................................................................................................................... 22
3. Image List ................................................................................................................................... 24
V、 Preview Mode .............................................................................................................................. 25
1. Image Preview ............................................................................................................................ 27
2. Scan Correction .......................................................................................................................... 29
1) Scan Correction Basics ........................................................................................................ 30
2) Flatten Effect Correction ..................................................................................................... 32
3) Split Effect Correction ......................................................................................................... 34
3. Image Adjust .............................................................................................................................. 36
1) Intelligent Fill - Remove Finger Effect Correction ............................................................... 38
2) Pen – Cover Unwanted Spots .............................................................................................. 40
3) Watermark .......................................................................................................................... 42
4. Batch Processing ........................................................................................................................ 44
5. Import ........................................................................................................................................ 47
6. Export ......................................................................................................................................... 48
1) Export Format ..................................................................................................................... 48
2) Export Steps ........................................................................................................................ 48

Shenzhen Eloam Technology Co., Ltd.
2
7. OCR Recognition ........................................................................................................................ 50
8. Project Management ................................................................................................................. 52
VI、 Software Settings ............................................................................................................ 55
VII、 Offline Mode – Scanned Image Processing ................................................................ 58
VIII、 Visual Presenter............................................................................................................. 59
1. Mark on Screen .......................................................................................................................... 61
2. Add Watermark .......................................................................................................................... 62
3. Video Recording ......................................................................................................................... 63
4. Screen Recording ....................................................................................................................... 64
5. Image Comparison ..................................................................................................................... 66
IX、 Service & Support ..................................................................................................................... 67

Shenzhen Eloam Technology Co., Ltd.
3
I、System Requirement
CPU: Intel® Core™ i3 or higher processor
RAM: 2GB and above
Hard Disk: more than 50GB available space
USB Port: 2.0/3.0 USB Port
Operating System: Windows XP/ Win 7/ Win 8/ Win 10
Note: The software does not support Mac or Linux system
Back to Directory

Shenzhen Eloam Technology Co., Ltd.
4
II、Software Installation
Step 1 Insert the installation CD into your CD-ROM drive. If your computer does not have a CD-
ROM, please download it from our website at http://www.eloamscanner.com/products-
download.html
Step 2 Double-click on the setup file [Eloam book scanner 2.3_en setup.exe] (Please refer to the
latest version on our website), and the Scanner Installer will start to guide you through the
installation. (See below)
Select the language
Click [Next]

Shenzhen Eloam Technology Co., Ltd.
5
Select the destination folder and click [Next]
Set the shortcut on Start Menu and click [Next]
Create a desktop icon and click [Next]

Shenzhen Eloam Technology Co., Ltd.
6
Confirm the information and click [Install]
Click [Next] on the pop-up window of ffdshow2 installer (required media decoder)
Install the default selection and click [Next]

Shenzhen Eloam Technology Co., Ltd.
7
Click [Next]
Confirm the information and click [Install]
Click [Finish] to complete the ffdshow2 installation and it will lead you back to the Eloam Scanner Wizard
Shenzhen Eloam Technology Co., Ltd.
8
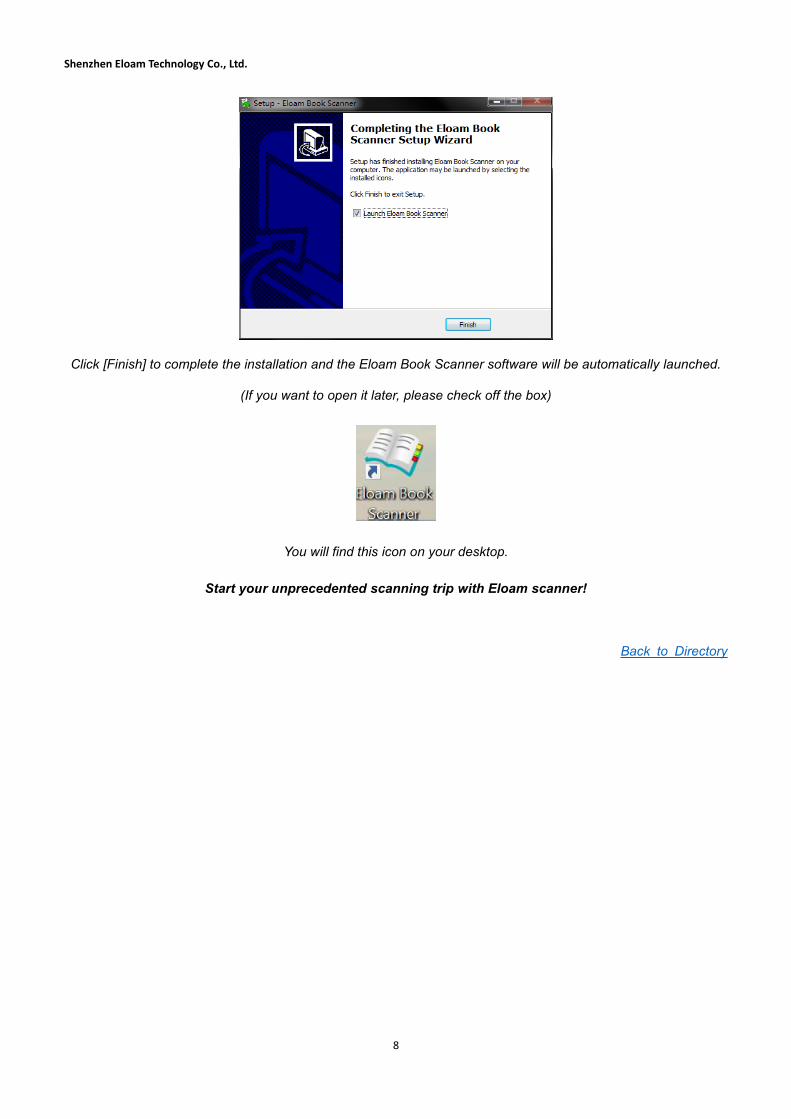
Click [Finish] to complete the installation and the Eloam Book Scanner software will be automatically launched.
(If you want to open it later, please check off the box)
You will find this icon on your desktop.
Start your unprecedented scanning trip with Eloam scanner!
Back to Directory

Shenzhen Eloam Technology Co., Ltd.
9
III、Scanning
You can scan books, magazines, photos or any paper documents and save them as digital files.
1. Starting a Scan
① Make sure the scanner is powered on and connected to your computer. Otherwise, the software
cannot be launched.
② Open the “Eloam Book Scanner” software and choose ‘Book Scanner’ mode.
③ Follow the on-screen direction and click to enter the scan mode.

Shenzhen Eloam Technology Co., Ltd.
10
④ The first thing you need to do is to set the output directory where all of the scanned images will be
saved at. For that reason, we recommend you not to select your C drive but to select another drive
with sufficient free space.
⑤ The next step is to create a category and name your first scanning project. (Learn more in “Project
Management”)
⑥ After creating your project, you will be led to the scan mode interface (see below). According to the
scan result you would like to have, select the Color Mode, Insert Mode and Process Mode before
scanning. (Learn more in “Scan Mode Setting”)

Shenzhen Eloam Technology Co., Ltd.
11
⑦ Put the soft background pad under the camera and make sure it completely fills up the screen. Then,
put the document you want to scan in the center of the scan area align with the green dotted lines
as shown below. (Learn more in ‘Scan Standards’)

Shenzhen Eloam Technology Co., Ltd.
12
⑧ When you are ready to scan, press the hand button / foot pedal or click at the screen
bottom. Keep the book still and don’t move your pressing fingers until the scanning process finished,
which will only take 2-3 seconds.
⑨ After it finished scanning, you will see the processed image on the right panel, the “Image Preview
Area”. (Learn more in ‘Image List’)
⑩ By double-clicking the image, you will enter the ‘Preview Mode” (see below), where you will be able
to preview the scanned result in details, correct the flatten effect, adjust the processed image, import
and export images and etc. (Learn more in “Preview Mode”)
Back to Directory

Shenzhen Eloam Technology Co., Ltd.
13
2. Scan Standards
In order to guarantee the scan quality, please comply with the following standards when scanning.
a. Please use the black pad as the background and make sure there are no any other objects
in the scanning area.
b. Please put the book in the middle of the scan area align with the green dotted lines.
c. Please make sure there are black areas surrounded between the book and the green
frame.
d. If the book is too thick to stay open, please use your fingers to press the book margin and
make sure it’s flat.
Notes: · Please put your fingers in the middle of the book margin.
· You MUST wear the black fingertips.
· Please make sure that your fingers do not cover any contents in the book like words,
charts, images and etc.
Back to Directory

Shenzhen Eloam Technology Co., Ltd.
14
IV、Scan Mode
Scan Mode Interface
The Scan Mode interface is divided into four parts. From left to right: Mode Setting Area, Scan Area,
Image List and Control Buttons at the bottom. The function and details of each part will be introduced in
the following.
Control Buttons:
Scan Button: Click to scan image. You can also press the hand button or step on the foot
pedal.
Record Button: Click to record video. The recording will start immediately after the click.
Click the red button to stop recording.
Note: The video format, video size, frame rate and other parameters can be adjusted in ‘Video Settings’
under ‘Settings’ menu. (Learn more in ‘Software Settings’)

Shenzhen Eloam Technology Co., Ltd.
15
1. Scan Mode Setting
1) Color Mode
➢ Color (Default): Scan in full color.
➢ Grayscale: Scan in grayscale.
➢ Black & White (‘B&W'): Scan in black and white.
➢ Remove Background: Remove the background of the document.
➢ Stamps: Strengthen the stamp effect on the document.
Note: The color mode of image can also be changed after scanning.
Examples:
Color Mode Grayscale Mode B&W Mode
Before After
Remove Background Mode

Shenzhen Eloam Technology Co., Ltd.
16
Before After
Stamps Mode
Back to Directory

Shenzhen Eloam Technology Co., Ltd.
17
2) Insert Mode
➢ Bottom (Default): Insert the scanned image to the end of the image list.
➢ Above: Insert the scanned image in front of the selected image.
➢ Below: Insert the scanned image after the selected image.
➢ Replace: The scanned image will replace the selected image.
Back to Directory

Shenzhen Eloam Technology Co., Ltd.
18
3) Process Mode
➢ No Split: The scanned image will be automatically flattened but not split. The facing pages
will be on the same image as shown below.
➢ Split (Default): The scanned image will be automatically flattened and split into 2 pages.
The facing pages will be separated in two images as shown below.
➢ No Flatten: The scanned image will not be flattened or split. You can choose whether to
deskew and crop the image automatically by checking the box as shown below.
Note: If you want to change the process mode after scanning, please enter ‘Flatten Correction’
mode, switch the process mode and click ‘Save’. (Learn more in ‘Split Effect Correction’)
Back to Directory

Shenzhen Eloam Technology Co., Ltd.
19
4) Special Scan Mode
Auto Scan
By clicking the ‘Auto Scan’ button, you will enter the Auto Scan mode in which the scanner
will automatically scan every time when it detects the page has been turned. You only need
to smoothly turn the book page, keep the book and your hand still, and make another move
until the software prompts (as shown below).
Note: Please wear the black fingertip when turning pages.
Auto Scan Process
Back to Directory

Shenzhen Eloam Technology Co., Ltd.
20
Image Merge
The ‘Image Merge’ function is only available under ‘No Flatten’ mode. It allows you to scan
a double-sided document and merge the two sides into one image, especially for ID card,
insurance card and etc.
Step 1: Select ‘No Flatten’ mode and click ‘Image Merge’. It will automatically scan the front
side of the document.
Step 2: Flip the document over. Click ‘Image Merge’ again to scan the back side.

Shenzhen Eloam Technology Co., Ltd.
21
Step 3: Choose the merge order: Horizontal or Vertical. Then, save the image.
Back to Directory

Shenzhen Eloam Technology Co., Ltd.
22
2. Scan Area
Crop the scan area
After checking the box, the green image frame will appear on the screen and it will enable you to
adjust the scan area. For example, if you only want to scan a part of the document, you can simply
adjust the frame size as shown below to crop the scan area and the scanner will only process the
part within the frame.

Shenzhen Eloam Technology Co., Ltd.
23
Zoom Control
To zoom in or zoom out the scan area, you can drag the seek bar beneath the scan area (as
shown below) or use your mouse wheel to control.
Back to Directory

Shenzhen Eloam Technology Co., Ltd.
24
3. Image List
List View / Thumbnail View
As long as the scanning finished, the scanning result will immediately appear in the Image List
area. The view mode by default is Thumbnail View. You can change it to List View by clicking
on the top left corner.
List View Thumbnail View
Delete Image
➢ Delete a single image: Click the button beside the image.
➢ Delete multiple images: Check the circle beside the images or click ‘Select All’ at
the bottom if you want to delete all the images. Then, click ‘Delete Selected’ at the bottom.
➢ Delete the left/right page of a split image: Right-click on the image and select ‘Delete the left
page’ or ‘Delete the right page’.
Reorder
By checking ‘Reorder’ at the bottom, you can change the image order by using the direction control
buttons beside: Move to Top, Move Up, Move Down and Move to End.
Back to Directory
In Thumbnail View, the images are shown
in double-page mode.
‘Split’ image appears separately. The left
part and the right part are two individual
pages.
‘No Split’ image appears on the left part
since it is single page.

Shenzhen Eloam Technology Co., Ltd.
25
V、Preview Mode
Preview Mode Interface
The Preview Mode interface is divided into five parts. From left to right: Project List, Preview Area, Image
List, Batch Processing at the top and Control Buttons at the bottom. The function and details of each
part will be introduced in the following.

Shenzhen Eloam Technology Co., Ltd.
26
Control Buttons:
Scan Button: Back to Scan Mode. (bottom-right corner)
Hide Switch: Hide the left panel – ‘Project List’. (bottom-left corner)
Control Panel
Fit on Screen: Adjust the image size to fit on screen.
Actual Size: Adjust the image size to original.
Rotate Buttons: Rotate Right 90°/ Left 90°
Direction Buttons: Previous Image / Next Image
Print: Print the current image
OCR Scan: Recognize the current image and export in OCR. (Learn more in ‘OCR Recognition’)
Scan Correction: Correct the flatten effect of the image. (Learn more in ‘Scan Correction’)
Image Adjust: Adjust and edit the flattened image. (Learn more in “Image Adjust’)
Back to Directory

Shenzhen Eloam Technology Co., Ltd.
27
1. Image Preview
Preview Mode
In the Preview Area, the images are shown in double-page preview mode by default:
➢ ‘Split’ image appears separately. The left part and the right part are two individual pages.
➢ ‘No Split’ image appears on the left part since it is single page.
Preview Area (double-page preview mode)
By double-clicking any part of the image area, it will turn into single-page preview mode (as shown
below). To resume the double-page preview mode, just double-click the preview area again.
Preview Area (single-page preview mode)

Shenzhen Eloam Technology Co., Ltd.
28
Zoom & Move
Zoom in & Zoom out: Scroll the mouse wheel or use the touchpad to control.
Move: Click on the image and hold down the left mouse button to move.
Note: The image can only be moved when the display scale is over 100%.
Color Mode Switch
Beneath the preview area is the color mode tab bar (as shown below). You can easily change the
color mode of the image by switching mode on the bar. (Learn more in ‘Color Mode’)
Back to Directory

Shenzhen Eloam Technology Co., Ltd.
29
2. Scan Correction
Due to various reasons related to the scanning material, surroundings and improperly operation,
the scanning result may occur problems such as blurring, tilt, distortion, content missing and etc. To
correct the effect, you can click from the control panel to enter the ‘Scan Correction’ mode
and correct it by manual.
The Scan Correction interface is divided into two parts (as shown below). The left part is the edit
area; the right part is the preview area.
Scan Correction Interface

Shenzhen Eloam Technology Co., Ltd.
30
1) Scan Correction Basics
Curve Dot
In the edit area (as shown below), you will see the image is surrounded by multiple white dots –
‘Curve Dot’, the foundation of the flattening algorithm. The curve dot surrounded area is the flatten
area. By adding, deleting or moving the curve dots, you can adjust the flatten area by manual so
that the flatten effect can be corrected.
Split Line
The red line in the middle is the split line. By moving the green dots on both ends, you can adjust
how the image being split. The red line only appears when the image is processed under Split Mode.
Edit Area
Zoom & Move
Note: The display scale by default is 100%. You may need to zoom in the image in order to make
corrections more conveniently.
Zoom in & Zoom out: Scroll the mouse wheel or use the touchpad to control.
Move: Click on the image and hold down the left mouse button to move.

Shenzhen Eloam Technology Co., Ltd.
31
Control Panel
Control Buttons:
Process Mode Switch: Switch the image from ‘Split’ mode to ‘No Split’ mode or vice
versa. (Learn more in ‘Process Mode’)
Auto: Generate curve dots automatically.
Delete: Delete all the curve dots.
Add a curve dot: Move the cursor to the edge of the document (as shown below) and click to
add a dot. The closer it gets to the edge, the more accurate the flatten effect is.
Delete a curve dot: Move the cursor to the dot till it turns red and click it to delete. To delete
multiple curve dots, you can hold down the left mouse button and move the cursor like an eraser.
Move a curve dot: Move the cursor to the dot till it turns red and hold down the left mouse
button to move.
Remove Finger: Automatically remove the finger/ fingertip.
Save (Flatten): After making changes to the curve dots, click this to check the flatten result.
Switch to mouse mode: Switch the cursor from curve dots editor to mouse in order to zoom or
move the image.
Exit
Back to Directory

Shenzhen Eloam Technology Co., Ltd.
32
2) Flatten Effect Correction
When the scanning result occurs problems such as blurring, distortion and content missing, it’s
probably due to ineffective flattening.
Example:
In the example shown above, the reason caused the distortion and blurring is the ineffective
flattening. According to the flatten algorithm, the curve dots decide the flatten area so that the
dots need to be on the edge. The closer it gets to the edge, the more accurate the flatten
effect is. The correction method is as following.

Shenzhen Eloam Technology Co., Ltd.
33
Correction Steps:
Step 1 Click ‘Move’ button Move the cursor to the ineffective curve dot until it turns red.
Step 2 Click on the dot and hold down the mouse button. Move the dot as close as possible to
the book edge (as shown below).
Step 3 Click ‘Flatten’ button to show the corrected result and save the changes.
Before After
Note: In some situations, you may need to delete all the curve dots and generate dots by manual.
Back to Directory

Shenzhen Eloam Technology Co., Ltd.
34
3) Split Effect Correction
① When the scanning result occurs problems such as tilt and distortion, it’s probably due to
improper split.
Example:

Shenzhen Eloam Technology Co., Ltd.
35
In the example shown above, the reason caused the distortion and tilt is the improper split and
the correction method is as following.
Correction Steps:
Step 1 Click ‘Move’ button Move the cursor to the end of the red split line and the curve
dot will turn from green to red.
Step 2 Click on the dot and hold down the mouse button. Move the dot until the split line
coincides with the central line of the book (as shown below).
Step 3 Click ‘Flatten’ button to show the corrected result and save the changes.
② If you mistakenly selected the process mode and want to change the scanned image from
‘Split’ to ‘No Split’ mode or vice versa, please open the ‘Process Mode’ drop-down menu from
the control panel (as shown below). Then, select the mode you want to switch and click ‘Flatten’
to save.
Back to Directory

Shenzhen Eloam Technology Co., Ltd.
36
3. Image Adjust
When the scanning result does not have flatten issues but needs to improve in appearance, add
watermark, cover unwanted spots and etc., you can click from the control panel to enter the
‘Image Adjust’ mode and adjust it by manual.
Image Adjust Interface
Control Panel
Control Buttons:
Fill: Remove fingertips. (Learn more in ‘Intelligent Fill’)
Crop: Crop the scanned image.

Shenzhen Eloam Technology Co., Ltd.
37
Rotate: Set the angle value and click the direction buttons to rotate.
Note: If you want to flip the image horizontally or vertically, please click ‘Rotate’ from the ‘Batch
Processing’ bar. (Learn more in ‘Batch Processing’)
Reset, Save and Exit
Pen: Cover unwanted spots. (Learn more in ‘Pen’)
Color Adjust: Adjust the saturation, contrast and sharpness parameters of the image.
Watermark: Add watermark to the image. (Learn more in ‘Watermark’)
Exit
Back to Directory
✓ The default parameters are 0.
✓ By checking ‘Keep values for preview’,
you can save the parameters for other
images.
✓ By clicking ‘Default’, the parameters will
restore to 0

Shenzhen Eloam Technology Co., Ltd.
38
1) Intelligent Fill - Remove Finger Effect Correction
When the scanning result did not automatically remove the finger/ fingertips, you can click
from the ‘Image Adjust’ interface and enter ‘Intelligent Fill’ mode to correct it by manual.
Example:
Correction Steps:
Step 1 Click from the ‘Image Adjust’ interface and enter ‘Intelligent Fill’ mode. A red frame
will appear on screen (as shown below).
Step 2 The image inside of the frame is the real-time effect preview. Adjust the size of the frame
and move it to cover the fingertip until it completely disappeared but not exceed the fingertip
size too much (as shown below).
Step 3 Click button to execute the filling action and click to save the changes or
click to reset.
Step 1 Step 2 Step 3

Shenzhen Eloam Technology Co., Ltd.
39
Before After
Back to Directory

Shenzhen Eloam Technology Co., Ltd.
40
2) Pen – Cover Unwanted Spots
When the document you would like to scan has spots or contents that you want to cover, click
from the ‘Image Adjust’ interface and enter ‘Pen’ mode to correct it by manual.
Examples:
Example 1 Example 2
Correction Steps:
Step 1 Click from the ‘Image Adjust’ interface and enter Pen’ mode. The control panel will
appear on screen (as shown below).
Control Panel
Pen Shape: Select the square / circular shape for covering.
Pen Size: Select the pen size from 1 to 29.
Pen Color: Select a color from the eight color options or use the ‘Color Picker’ to select
from the document.

Shenzhen Eloam Technology Co., Ltd.
41
Switch to mouse mode: Switch the cursor from pen to mouse in order to zoom or move
the image.
Reset, Save and Exit
Step 2 Move the ‘Pen’ to the spot / content that you’d like to cover and click. Repeat the action
until it is completely covered.
Step 3 Click to save the changes or click to reset.
Before After
Before After
Back to Directory

Shenzhen Eloam Technology Co., Ltd.
42
3) Watermark
If you would like to add a watermark to the scanning result, click from the ‘Image Adjust’
interface and enter ‘Watermark’ mode as shown below.
Step 1 Select the type of watermark that you want to add: Custom Text or Time.
Step 1
Step 2 Set the size, color, angle and transparency of the watermark. Enter the text content if
you select ‘Custom Text’.
Custom Text Watermark - Step 2 Time Watermark – Step 2
Step 3 The position of watermark by default is at the top left corner. Click on the watermark,
hold down the mouse button and drag it to the position that you would like to have it appeared.

Shenzhen Eloam Technology Co., Ltd.
43
Examples:
Text Watermark Time Watermark
Back to Directory

Shenzhen Eloam Technology Co., Ltd.
44
4. Batch Processing
Batch Processing Bar
Step 1 Select the images that you want to edit at the same time by checking the circle beside them (as
shown below).
Step 2 Choose the batch processing function from the following.
➢ Color Mode: Change the color mode of the selected images all at once.

Shenzhen Eloam Technology Co., Ltd.
45
➢ Rotate: Rotate the selected images all at once.
➢ Crop Pro: Crop/ Fill the margins of the selected images all at once.
Step 1 Select how you would like to deal with the margin: ‘Fill with white’ or ‘Remove’.
Step 2 Set the value of margins. If you couldn’t see any difference after cropping, try to increase the
values (Max: 100).
Note: For high resolution image, you may need to input the largest value and crop several
times to achieve the effect.
Crop Pro Interface

Shenzhen Eloam Technology Co., Ltd.
46
Example:
Before After
➢ Color Adjust: Adjust the saturation, contrast and sharpness parameters of the selected images all
at once.
➢ Print: Print the selected images all at once.
Back to Directory

Shenzhen Eloam Technology Co., Ltd.
47
5. Import
Other than processing the scanned images, you can also import files from local computer or a TF
Card (Micro SD card).
Step 1 Import Settings
Click ‘Import’ at the top of the Image List area and select the color mode and process mode of the
imported images. (Learn more in ‘Color Mode’ and ‘Process Mode’)
Step 2 Image Selection
Click ‘Import’ and select the image files. Then, click ‘Open’.
Back to Directory

Shenzhen Eloam Technology Co., Ltd.
48
6. Export
1) Export Format
The program supports nine export formats as following:
➢ Image: JPG, PNG, BMP, TIF
➢ OCR: DOC, XLS, TXT, Searchable PDF
2) Export Steps
Step 1 Export Settings
Click ‘Export Settings’ at the top right corner of the Image List area and select the export format
you would like to have.
Step 2 Image Selection
Note: If you would like to export all the images, please ignore this step.
Select the image(s) that you want to export by checking the circle beside them (as shown below).

Shenzhen Eloam Technology Co., Ltd.
49
Step 3 Export
Click ‘Export All’ to export all the images listed;
OR Click ‘Export Selected’ to export the selected images.
Export All Export Selected
Then, select the output folder (as shown below).
Back to Directory
Shenzhen Eloam Technology Co., Ltd.
50
7. OCR Recognition
The OCR (‘Optical Character Recognition’) function of the scanner can automatically convert the
typed, handwritten or printed text on the scanned image into machine-encoded text. With this
function, you can easily transform a book into a searchable PDF or an editable document.
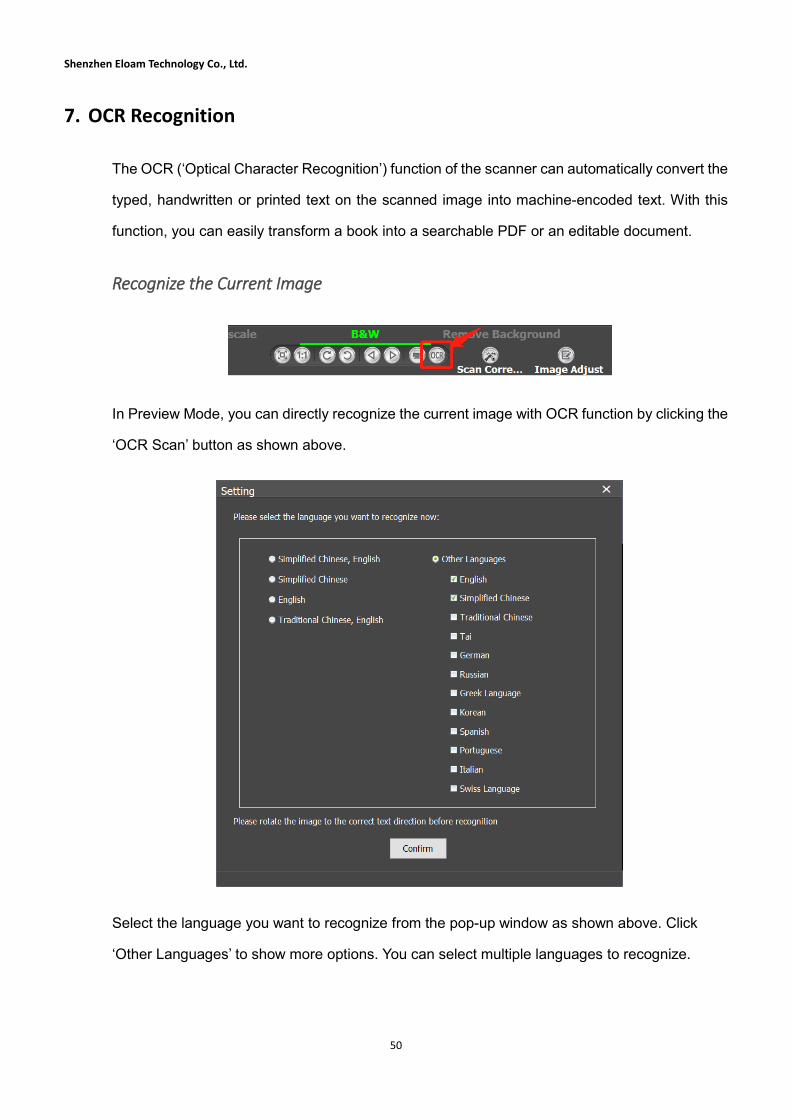
Recognize the Current Image
In Preview Mode, you can directly recognize the current image with OCR function by clicking the
‘OCR Scan’ button as shown above.
Select the language you want to recognize from the pop-up window as shown above. Click
‘Other Languages’ to show more options. You can select multiple languages to recognize.

Shenzhen Eloam Technology Co., Ltd.
51
Then, select the output folder and name the file. You can also change the export format by
opening the drop-down menu of ‘Save as type’ (as shown above).
Note: The OCR recognition process may take a while and it will go through the steps as shown
below. After it finished recognizing, you can choose to open the file immediately or not.
Batch Recognition
The OCR batch export steps are same with the other formats. (Learn more in ‘Export Steps’)
Back to Directory

Shenzhen Eloam Technology Co., Ltd.
52
8. Project Management
Project List
On the left side of the Preview interface is the ‘Project List’ area, where you can use it as a library
to manage your multiple scan projects in an organized and efficient way (as shown above).
➢ Root Directory: There is only one root directory - ‘Books’
➢ Category: You can create multiple ‘Category’ directories under ‘Root Directory’ by right-clicking
‘Books’ and select ‘Create a Category’.
➢ Project: You can create multiple ‘Project’ directories under ‘Category’ by right-clicking the category
name and select ‘Add a subdirectory’.
➢ Subproject: You can create multiple ‘Subproject’ directories under ‘Project’ by right-clicking the
project name and select ‘Add a subdirectory’.
➢ Subitem: You can create multiple ‘Subitem’ directories under ‘Subproject’ by right-clicking the
subproject name and select ‘Add a subdirectory’.
Note: The scanned images cannot be saved directly under ‘Root Directory’ or ‘Category’. They can only
be saved under ‘Project’, ‘Subproject’ or ‘Subitem’ directory.
Root Directory
Category
Project
Subproject
Subitem

Shenzhen Eloam Technology Co., Ltd.
53
Rename
By right-clicking the directory name and selecting ‘Rename’, you can change the name of the
directory. You can also rename the directory by slowly double-clicking the name.
Note: The ‘Root Direcotry’ cannot be renamed.
Delete
By right-clicking the directory name and selecting ‘Delete’, you can delete the images under this
directory all at once.
Note: The delete action cannot be undone.
Open in Explorer
By right-clicking the directory name and selecting ‘Open in Explorer’, you can view the directory
file in the folder where it’s located (as shown below).
Fiction Directory – Open in Explorer
The screenshot above is the example of opening ‘Fiction’ directory in Explorer. The folder
includes ‘Source’, ‘Processed’ and the three subprojects.
Each ‘Project’, ‘Subproject’ or ‘Subitem’ will have its own ‘Source’ folder and ‘Processed’ folder,
where they will respectively save the original scanned images and the processed scanned
images.

Shenzhen Eloam Technology Co., Ltd.
54
Export
By right-clicking the directory name and selecting ‘Export’, you can export the images under this
directory and its subdirectories all at once (as shown below).
Note: The ‘Root Direcotry’ and ‘Category’ cannot be exported.
Fiction Directory – Export
By checking off the selection box, you can unselect the image or subdirectory that you don’t
want to export.
You can choose the export format from following:
➢ Image: JPG, PNG, BMP, TIF
➢ OCR: DOC, XLS, TXT, Searchable PDF
Back to Directory
Shenzhen Eloam Technology Co., Ltd.
55
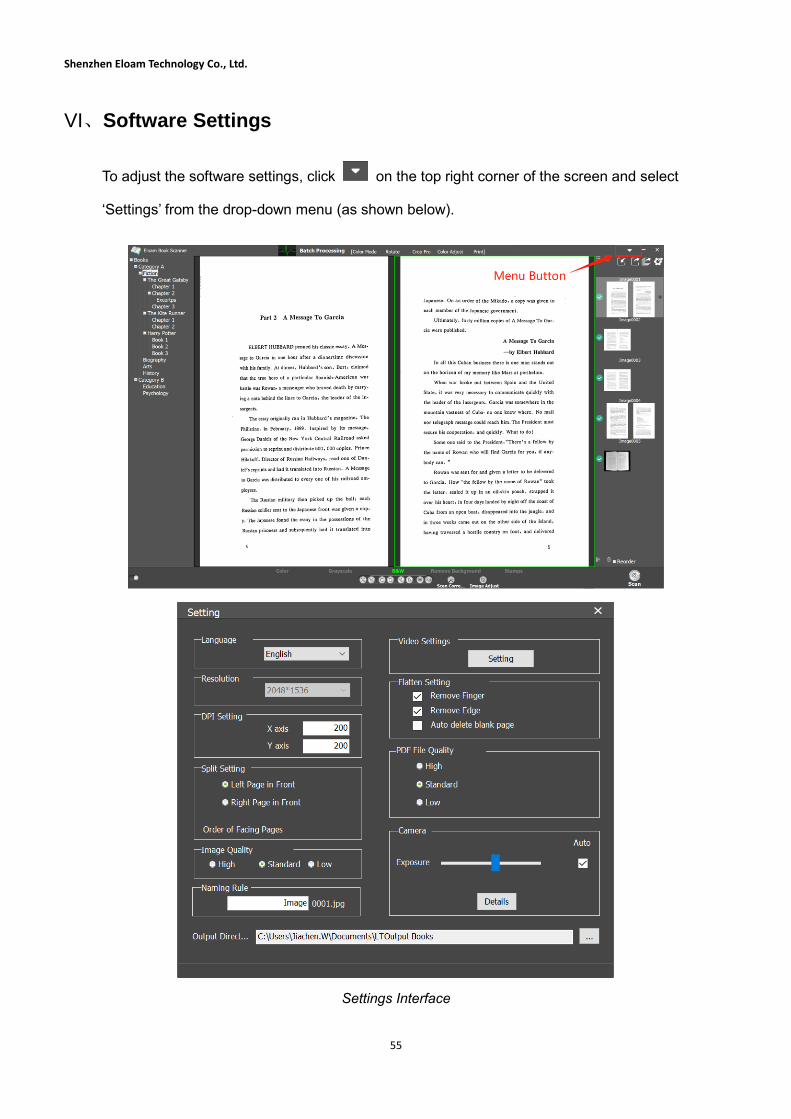
VI、Software Settings
To adjust the software settings, click on the top right corner of the screen and select
‘Settings’ from the drop-down menu (as shown below).
Settings Interface

Shenzhen Eloam Technology Co., Ltd.
56
➢ Language: Set the software language. It supports 10 language options including English, French,
German, Japanese, Korean, Russian, Thai, Vietnamese, Simplified Chinese and Traditional
Chinese.
➢ Resolution: Set the resolution parameter of the camera.
➢ DPI settings: Set the DPI (dots per inch) value of the X axis and Y axis
➢ Split Setting: Set the order of facing pages in ‘Split’ process mode.
· Left page in front (default)
· Right page in front
➢ Image quality: Set the quality of the scanned image. The higher the image quality is, the larger the
document size is.
· High – Large size
· Standard – Medium size
· Low – Small size
➢ Naming Rule: Set the prefix of the image name (e.g., Image0001.jpg, ScanImage0001.jpg)
➢ Output Directory: Set the output directory of the scanned images.
Note: Resetting the output directory will clear all the data of the current project.
➢ Video Settings:
· Video Format: AVI, MP4, WMV, FLV.
· Video Size: 1080P, 720P, 600P, 480P.
· Frame Rate: 1 to 25
· Compression Ratio: Very High, High, Medium, Low, Very Low.
· Output Directory

Shenzhen Eloam Technology Co., Ltd.
57
Video Settings Interface
➢ Flatten Setting:
· Remove Finger (default): The flattening program will automatically remove finger/finger tips from
the scanned image.
· Remove Edge (default): The flattening program will automatically remove the thickness edges of
the scanned image.
· Auto delete blank page: The blank page will be deleted automatically while scanning in ‘Split’
mode. (Note: This function only works in ‘Split’ process mode)
➢ PDF File Quality: Set the quality of the exported PDF document. The higher the quality is, the
larger the file size is.
· High – Large size
· Standard – Medium size
· Low – Small size
➢ Camera: Set the camera parameters.
· Auto: Adjust the parameters automatically
· Default: Resume to the default values.
Back to Directory

Shenzhen Eloam Technology Co., Ltd.
58
VII、Offline Mode – Scanned Image Processing
Some of our book scanner models support offline mode, which means you don’t need to connect the
scanner to your computer to conduct scanning. Insert a TF card (Micro SD card) into the scanner, and
you can bring it to any places to scan wirelessly. The scanning result will be saved on the TF card.
TF Card (Micro SD Card) Requirement:
· Capacity: 32G to 64G
· Transfer Speed: C10
· Suggested Format: FAT32
In Offline Mode, instead of using the software buttons to control, you need to use buttons on the scanner
base. All of the other scanning steps are the same. To learn more about offline mode scanning steps,
please refer to the printed ‘Book Scanner User Manual’ included in the package box.
Import images from TF card
Step 1 To read / edit files on your TF card, please connect the scanner to your computer and then
press on the scanner base, it will turn into flash drive mode OR you can also pull
out the TF card and use other readers.
Step 2 Open the software and follow the import steps. (Learn more in ‘Import’)
Back to Directory
Shenzhen Eloam Technology Co., Ltd.
59
VIII、Visual Presenter
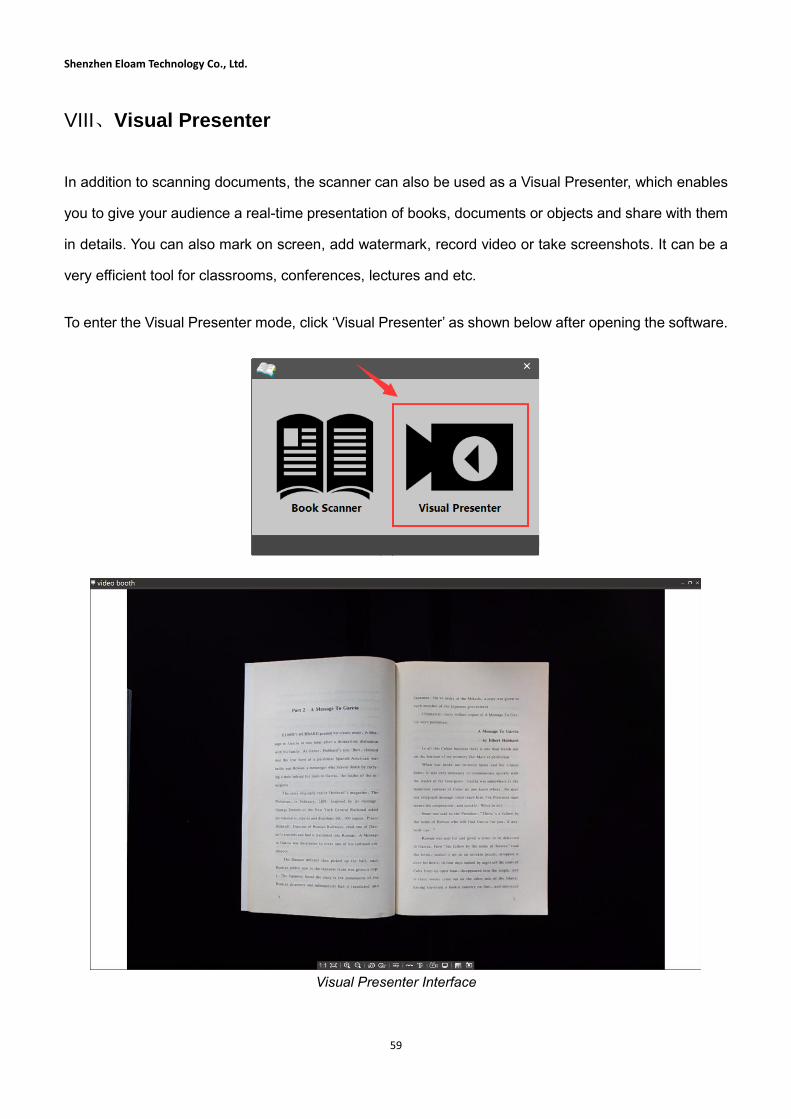
In addition to scanning documents, the scanner can also be used as a Visual Presenter, which enables
you to give your audience a real-time presentation of books, documents or objects and share with them
in details. You can also mark on screen, add watermark, record video or take screenshots. It can be a
very efficient tool for classrooms, conferences, lectures and etc.
To enter the Visual Presenter mode, click ‘Visual Presenter’ as shown below after opening the software.
Visual Presenter Interface

Shenzhen Eloam Technology Co., Ltd.
60
Control Buttons:
(1) Actual Size: Adjust the image size to original.
(2) Fit on Screen: Adjust the image size to fit on screen.
(3) Zoom In
(4) Zoom Out
(5) Rotate Left 90°: Rotate the video screen 90 degrees to the left.
(6) Rotate Right 90°: Rotate the video screen 90 degrees to the left.
(7) Camera Settings: Set the parameters of the camera such as brightness, contrast, sharpness and
etc.
(8) Pen: Mark on screen
(9) Watermark: Add watermark to the screenshot
(10) Record Video:
(11) Record Screen:
(12) Image Comparison: Contrast two images on the same screen.
(13) Screenshot: Take a screenshot
Back to Directory

Shenzhen Eloam Technology Co., Ltd.
61
1. Mark on Screen
By clicking the ‘Pen’ button on the toolbar, you will be able to mark on screen making
annotations or emphasis.
Control Buttons:
(1) Mouse Mode: Switch the cursor from pen to mouse.
(2) Rectangle: Draw a rectangle mark on screen.
(3) Oval: Draw an oval mark on screen.
(4) Line: Draw a line on screen.
(5) Text: Add text mark on screen. The size and color of the text can be selected from the bar as
shown below.
(6) Undo: Remove the last mark.
(7) Redo: Restore the last mark.
(8) Clear: Clear all the marks.
Back to Directory
The size and color of the marks
can be selected from the bar as
shown below.

Shenzhen Eloam Technology Co., Ltd.
62
2. Add Watermark
By clicking the ‘Watermark’ button on the toolbar, you will be able to add watermark on the
screenshot. Set the text content, size, position, color, angle and transparency of watermark in the
pop-up window as shown below.
Note: The watermark can ONLY be added on screenshot, not directly on the screen.
Add Watermark Steps:
Step 1 Check the ‘On’ box.
Step 2 Set the watermark parameters.
Step 3 Click on the top right corner.
Remove Watermark Steps:
Step 1 Check off the ‘On’ box.
Step 2 Click on the top right corner.
Back to Directory

Shenzhen Eloam Technology Co., Ltd.
63
3. Video Recording
By clicking the ‘Record Video’ button on the toolbar, you will be able to record videos. Set
the format, resolution, frame rate, compression ratio and save path of the video in the pop-up window
as shown below.
· Video Format: AVI, MP4, WMV, FLV.
· Video Size: 1024*768, 800*600, 640*480, 320*240.
· Frame Rate: 10, 15, 20, 30
· Compression Ratio: High, Medium, Low
· Microphone: The video recording function supports voice recording as well.
Step 1 Click the button and set the video parameters as listed above.
Step 2 Click ‘OK’ to start recording
Step 3 Click the button again to stop. The video will be automatically saved in the path you
have selected.
Video Settings Interface
Note: The video recording will only record the subject itself. If you want to record your operations
on your computer, please select ‘Record Screen’ (Learn more in ‘Screen Recording’).
Back to Directory

Shenzhen Eloam Technology Co., Ltd.
64
4. Screen Recording
By clicking the ‘Record Screen’ button on the toolbar, you will be able to record the screen. It
will enable you to record all of your operations on your computer including making annotations on
the screen, opening other documents and etc. (Note: It does not support voice recording.)
The blue dotted line area is the screen recording area. The area size can be adjusted by dragging
the four green buttons or quick set by selecting the size option at the bottom right corner.
· Screen Size Options: Full Screen, 1024*768, 800*600, 640*480.
Screen Recording Interface
Screen Size Options

Shenzhen Eloam Technology Co., Ltd.
65
Step 1 Click the button and adjust the recording area.
Step 2 Click button to set the output directory.
Step 3 Click ‘Save’ to start recording.
Step 4 Click the button again to stop recording. The video will be automatically saved in the
path you have selected
Note: The screen recording will only record your operations on screen. It does not support voice
recording. If you want to record voice, please select ‘Record Video’ (Learn more in ‘Video
Recording’).
Back to Directory

Shenzhen Eloam Technology Co., Ltd.
66
5. Image Comparison
By clicking the ‘Image Comparison’ button on the toolbar, you will be able to compare and
contrast two images on the same screen. The screen is split into two areas as shown below. In
each area, you can click to take a screenshot, or click to import an existing image
document.
Image Comparison Interface
Zoom In & Zoom Out: Use the mouse wheel or click buttons from the toolbar beneath.
Exit the Comparison Mode: Click on the top right corner.
Back to Directory

Shenzhen Eloam Technology Co., Ltd.
67
IX、Service & Support
- If you need further support, please email us at [email protected] and we will respond to
you as soon as possible.
To avoid delays, please include the following information in your email.
✓ Scanner model number (Located at the bottom of the scanner) ;
✓ Your current operating system;
✓ A detailed description of the problem.
Back to Directory