disappearing hour glass - hobby stash · 2019-05-04 · figure 3: cutting hst block square each hst...
TRANSCRIPT

1 © 2014 Linda Dufresne – Hobbystash.com - All Rights Reserved. 11/24/2014 12:45 PM
Disappearing Hour Glass
Finished Size 71 x 81
Finished Block Size 10 ½ x 10 ½
Pattern Design based on Missouri Star Quilt Company’s You Tube Video: The Disappearing Hourglass Quilt- Easy Quilting with Layer Cakes!
Cutting Redesign By Linda Dufresne - HobbyStash.com
The above picture is an illustration of my first Quilt of Valor made using Missouri Star’s Disappearing Hour Glass video as my guide. I love the look but hated wrestling with the blocks. A layer cake friendly pattern, utilizes two 10-inch squares to make four half-square triangle blocks. The result is the fabric bias is on the outer edge. Frankly, it was a wrestling match to get everything to line up. No matter how carefully I pressed those blocks, I had stretching issues. Since I want to use this pattern again, I set out to redesign it using HST blocks made the traditional way (straight fabric grain on the outer edges of the block).
No matter which way you decide to make your blocks, I highly recommend watching the video. She does an excellent job illustrating how to cut and reassemble this block. The pattern is also fat quarter friendly. As you can see above, I used multiple prints of the reds, creams, and blues to make the QOV quilt.

2 © 2014 Linda Dufresne – Hobbystash.com - All Rights Reserved. 11/24/2014 12:45 PM
Figure 1: Fabric Requirements
Background Fabric – 3 ½ yards*
13 ½ x 13 ½ 14
6 ¾ x 6 ¾ 4
Middle border 3 ½ x width of fabric 8
Blue Fabric/Red Fabric – 2 ¼ yards each color*
13 ½ x 13 ½ 7
6 ¾ x 6 ¾ 2
Inner red border 3 ½ x width of fabric 7
Outer blue border 3 ½ x width of fabric 8
*yardage is based on 40-inch wide fabric
Piecing/Assembly
Match one 13 ½ inch background square to each of the blue and red 13 ½ inch squares, right sides
together. Draw a diagonal line corner to corner twice on the wrong side of the background square.
Stitch ¼ inch on each side of the drawn lines (Figure 2). To make 8 half-square triangle blocks (HST
blocks), cut as indicated in Figure 3.
Figure 2: Making Half Square Triangles

3 © 2014 Linda Dufresne – Hobbystash.com - All Rights Reserved. 11/24/2014 12:45 PM
Figure 3: Cutting HST block
Square each HST block to 6 ¼ inches. Using 4 HST blocks arrange as indicated in Figure 4 and sew
together. Your unfinished block size should now be 12 inches.
Figure 4: Hour Glass Block
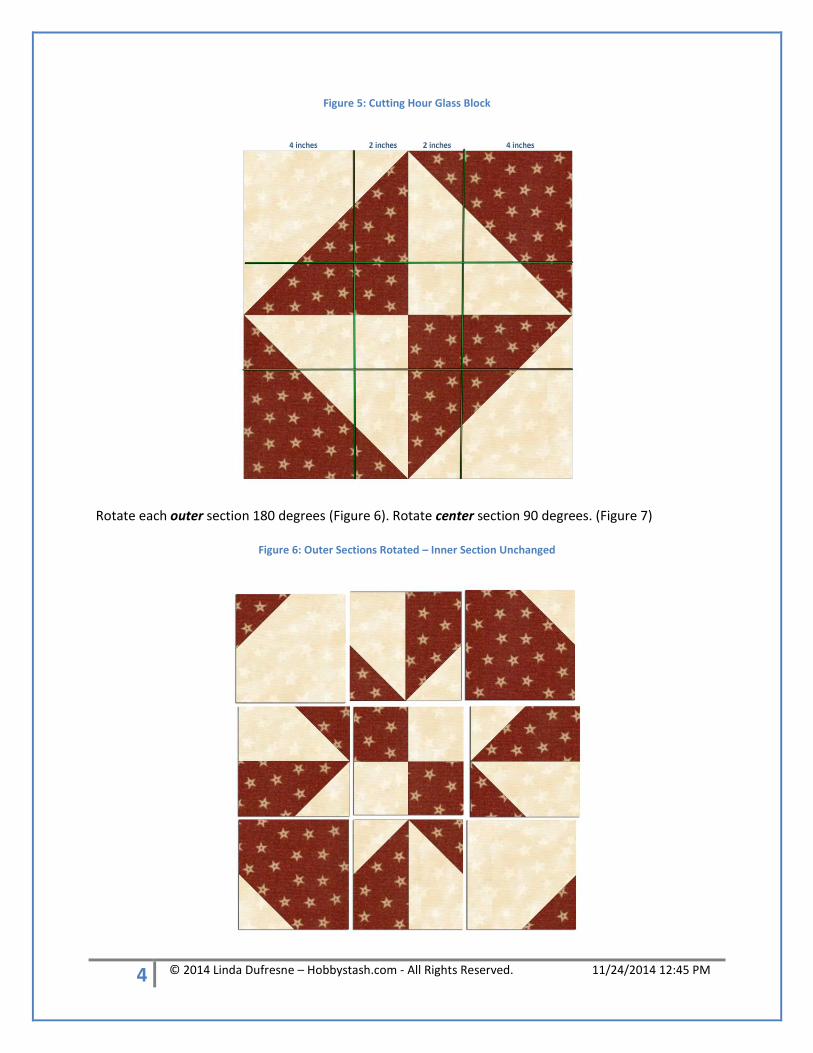
You will be making 4 cuts to this block: 2 inches from the center sewing lines horizontally and vertically (Figure 5).
4 © 2014 Linda Dufresne – Hobbystash.com - All Rights Reserved. 11/24/2014 12:45 PM
Figure 5: Cutting Hour Glass Block
Rotate each outer section 180 degrees (Figure 6). Rotate center section 90 degrees. (Figure 7)
Figure 6: Outer Sections Rotated – Inner Section Unchanged

5 © 2014 Linda Dufresne – Hobbystash.com - All Rights Reserved. 11/24/2014 12:45 PM
Figure 7: Inner Section Rotated
Sew the nine sections of the block together (Figure 8). Your unfinished block size should now be 11 inches. Make 15 red blocks and 15 blue blocks.
Figure 8: Completed Block
Assemble blocks in 6 rows of 5 blocks each, alternating between red and blue blocks (Figure 9).

6 © 2014 Linda Dufresne – Hobbystash.com - All Rights Reserved. 11/24/2014 12:45 PM
Border
With red fabric, piece together strips to make the two side borders 63 ½ inches long. Sew to sides of
quilt top. Piece together strips to make top and bottom borders 59 inches long. Sew to top and bottom
of quilt top.
With background fabric, piece together strips to make the two side borders 69 ½ inches long. Sew to
sides of quilt top. Piece together strips to make top and bottom borders 65 inches long. Sew to top and
bottom of quilt top.
With blue fabric, piece together strips to make the two side borders 75 ½ inches long. Sew to sides of
quilt top. Piece together strips to make top and bottom borders 71 inches long. Sew to top and bottom
of quilt top.
Figure 9: Quilt Layout