disclaimer - mylapssupport.mylaps.com/kb/en/b2b/manuals/datacollector_eng.pdf4 welcome thank you for...
TRANSCRIPT

1
DISCLAIMER
This publication is to be used for version 3.0 of Data Collector. This publication has been written with great care. However, the manufacturer cannot be held responsible, either for any errors occurring in the publication or for their consequences. Information in this document is subject to change without notice.
Copyright © 2007-2011 by MYLAPS Sports Timing.
All rights reserved. No part of this publication may be reproduced, stored in a retrieval system, or transmitted, in any form or by any means, electronic, mechanical, photocopying, recording, or otherwise, without the prior written consent of the publisher.
MYLAPS Sports TimingZuiderhoutlaan 42012 PJ HaarlemThe Netherlands
Phone: +31 23 7600 100Fax: +31 23 529 0156 Email: [email protected] Web: www.mylaps.com
Printed in the Netherlands.

2
TABLE OF CONTENTS
DISCLAIMER .......................................................... 1
TABLE OF CONTENTS ........................................... 2
WELCOME .............................................................. 4 About this document ..................................... 4 Who are we? .................................................... 4
1. BASIC CONCEPTS ............................................. 5 System overview ............................................ 5 Single loop system ......................................... 6 Multiloop system ........................................... 6 Timelines ......................................................... 6 Transponder .................................................... 6 Detection loop................................................. 6 Decoder ............................................................ 7 Signal strength, Background noise and Hits 7
2. GETTING STARTED ........................................... 8 System requirements .................................... 8 Adiminstrator ................................................. 8 Installation ...................................................... 8 Activate the program ..................................... 8 Firewalls .......................................................... 10 Language setup .............................................. 11 Help .................................................................. 11
3. OVERVIEW......................................................... 12 Starting DataCollector ................................... 12 DataCollector Interface................................. . 12 DataCollector Server ...................................... 12 Column Selection ........................................... 13
4. EVENT SETUP ................................................... 14 Overview ......................................................... 14 Event Management ...................................... 14 Load or save an event ................................... 14 Create a new event ........................................ 15 Event settings ................................................ 15 System setup ................................................. 15 Decoders ......................................................... 16 Connect to a decoder .................................... 16

3
Connection issues ......................................... 17 Check Timing System Setup ........................ 18 Synchronization ............................................ 18 Time zone ....................................................... 19 GPS Status .................................................... 19 Warnings and errors .................................... 20 Timing System Status ................................. 20 Timeline status ............................................. 21 Noise .............................................................. 21
5. REGISTRATION.................................................. 22 Overview ....................................................... 22 Competitors ................................................. 22 Competitor Details ....................................... 22 Managing Competitors ................................ 23 Registration Decoder ................................... 23 Import competitors ...................................... 24 Export competitors ....................................... 24
6. PROCESSING ..................................................... 25 Overview ......................................................... 25 Views ............................................................... 25 All Passings view ............................................ 25 Passings list .................................................... 25 Passing list columns ...................................... 26 Indications in the passing list ....................... 26 Start Times view ............................................. 27 Competitors view ............................................ 27 Timeline View .................................................. 28 Export Functions ............................................. 28 Live Export ....................................................... 30 Passing trigger functions .............................. 31 Live export status ............................................ 31 Timeline Fucntions .......................................... 32
7. APPENDICES ....................................................... 33 Appendix A – File formats .............................. 33 Appendix B – Passings table format.............. 35 Appendix C – Trigger Function........................ 37 Appendix D – Competitor File format............. 39
4
WELCOME
Thank you for choosing DataCollector 3! This manual is intended to familiarize you with the AMB Data Collector software and to help you handle different timing situations.
About this document This document explains the basics in using AMB Data Collector 3 to perform timing and scoring using single or multiple detection points. This document can be used as a reference manual in your day-to-day operations.
Who are we? MYLAPS Sports Timing specializes in the development of timing and scoring solutions for different kinds of racing sports. The software is developed for use in combination with MYLAPS timing hardware.
MYLAPS Sports Timing is staffed by the same group of engineers who have developed programs like Timegear, Orbits, MyLaps Monitor and the results part of the MyLaps.com website. MYLAPS software is distributed by MYLAPS offices in the Netherlands, USA, Japan and Australia.

5
1. BASIC CONCEPTS
This chapter describes the basic concepts of timing and scoring. These concepts are essential for everyone involved in timing and scoring. System overviewData Collector enables easy connectivity to multiple decoders and collection of transponder identification data and passing times. You can use your own custom software, or a third party software, such as Runscore and The Race Director, in combination with DataCollector.
MYLAPS timing systems are designed to time and score different kinds of events. A transponder is mounted on, by example, a bicycle. The signal sent by a transponder is picked up by a detection loop installed in the surface. The detection loop is connected to a MYLAPS decoder. The decoder timestamps the received transponder signals and sends this data to a connected computer.
The detection loop is embedded in or taped to the track surface. When passing the detection loop, the transponder transmits its unique signal, which is picked up by the loop and transferred to the decoder. The transponder is designed to be worn on a neoprene ankle strap, fixed onto the competitor’s shoe laces, or mounted directly onto the bicycle. The figure below shows the basic overview of a MYLAPS system, and the following is a brief description for each of the system’s components.
Transponder
Detection loop
Power
Headphone
Decoder
Computer

6
Single loop systemAll race organizations use a finish line to score an event. The type of timing and scoring where only one ‘timing line’ or ‘detection point’ is involved is commonly referred to as: single loop timing.
Multiloop systemTiming and scoring with a multi loop system can add great value to a race, due to the multiple loops installed. Much more information will be available, like split times, speeds and differential times at various parts of the race course.
Installing multiple loops and therefore multiple decoders makes both the hardware and the software part of the system more complex. The complexity of the system will be handled for the most part by the AMB Data Collector system. Therefore operating a multi loop system is, in general, as simple as operating a single loop system.
Timelines The start/finish line plays a major role in timing an event. In a multi loop environment there are more lines where competitors are timed. Throughout this manual we will refer to these physical lines by the term: Timelines.
The picture above shows an example setup with 4 timelines.
Start• IP1 (Intermediate 1)• IP2 (Intermediate 2)• Finish•
TransponderMYLAPS transponders enable you to give each competitor a unique identification number. For motorsports, the transponder is affixed to the vehicle with a transponder holder that is secured with bolts, screws, rivets or zip ties. For active sports, the transponder can be worn on a neoprene ankle strap, fixed onto the competitor’s shoe laces, or mounted directly onto the bicycle with zip ties. When passing over the detection loop on the race course, the transponder sends its signal to the loop.
Detection loopThe detection loop is embedded into the track surface and picks up each transponder passing. The unique signal of the transponder is picked up by the loop and transferred to the MYLAPS decoder. Several transponders can be picked up at exactly the same time. This ensures no transponders will be missed, even if 7 or 8 transponders pass the loop at exactly the same time.

7
DecoderThe MYLAPS decoder is connected to the detection loop via a coax cable and receives the transponder passing data from the detection loop. It reads the unique transponder signal and gives the transponder an exact passing time. When received, it sends the passing information to the computer running the DataCollector 3 program. DataCollector can be used in combination with TranX, TranX2, TranX3, TranX Pro and MX for Motorsports (car, karting, motorcycle, motocross) and ProChip in Active Sports (cycling, running, triathlon, skating, skiing).
Signal strength, background noise, and hitsThe parameter’s signal strength, background noise, and number of hits describe the overall performance of decoders and transponders.
During the crossing of transponders, the signal is repeatedly received by the decoder. The number of repeated contacts is the number of hits. On each hit, the transponder number and status is received by the decoder. Since the number of hits may vary a lot depending on the speed when passing the detection loop, a typical value cannot be given. However, values of 20 and higher are normally seen.
The average background noise is sent by the decoder every 5 seconds. The background noise indicates the amount of interference received in the AMB system frequency range. Since mobile communications do not interfere with the MYLAPS system, a person standing near the detection loop using a mobile phone will not result in an increase of background noise. Typical values are in the range of 0 to 30.
If the noise level is higher, the received transponder signal strength should be 60 above the noise level to ensure a perfect functioning of the system.
The transponder signal strength is normally quite constant between passings of the same transponder. For all MYLAPS systems, the received transponder’s signal strength always should be a minimum of 100.

8
2. GETTING STARTED
This chapter guides you through the installation process of DataCollector.
System requirementsThe minimum hardware specifications to run the DataCollector program are:
IBM Compatible Pentium III processor or better (600 MHz)• 512 MB Memory, 1024 MB Recommend• Approximately 50 MB of hard disk space• CD-Rom player• Network adapter or a free COM Port• Operating Systems: Windows 2000, Windows XP all versions, Windows • Vista all versions
AdministratorYou need to have administrator rights in order to install the program.
InstallationThe DataCollector program is supplied on a CD-ROM. To install the software program:
Put the CD-ROM in your CD-ROM player• The setup program will start automatically (if your computer does not • support this Auto run function, please run the DataCollector_3_Setup.exe program in the DataCollector directory on the CD-ROM)Follow the instructions of the installation program•
Shortcuts to DataCollector are added under the Start menu and on your desktop.
Activate the programWhen you start DataCollector for the first time, you will see the Activation wizard that will help you to activate and personalize your copy of DataCollector. To perform the activation, an Internet connection is required.
You can activate DataCollector in two ways:Activate online• > This will perform the activation on the computer DataCollector is installed on. This way of activating is recommended.Activate with help of another computer• > Use this option only when it is not possible to connect the main computer – the one you installed DataCollector on - to the Internet.

9
Activate OnlineTo activate online, enter your unique serial number and click ‘Next >>’. The serial number can be found on the back of the DataCollector manual.
In the page that follows, you have to enter login information from an existing MYLAPS account. This can be one of the following accounts:
Account for the MYLAPS Support website• Account that you have used for uploading results to MYLAPS.com.•
If you do not have either of these accounts, you can also create a new account here.
On the next screen, you can enter your registration information for DataCollector.
Important: The organization name you enter cannot be changed afterwards and will be visible on the bottom of your print-outs.
Once you have entered the registration information, the wizard is complete. You can start DataCollector by clicking the ‘Finish’ button.
10
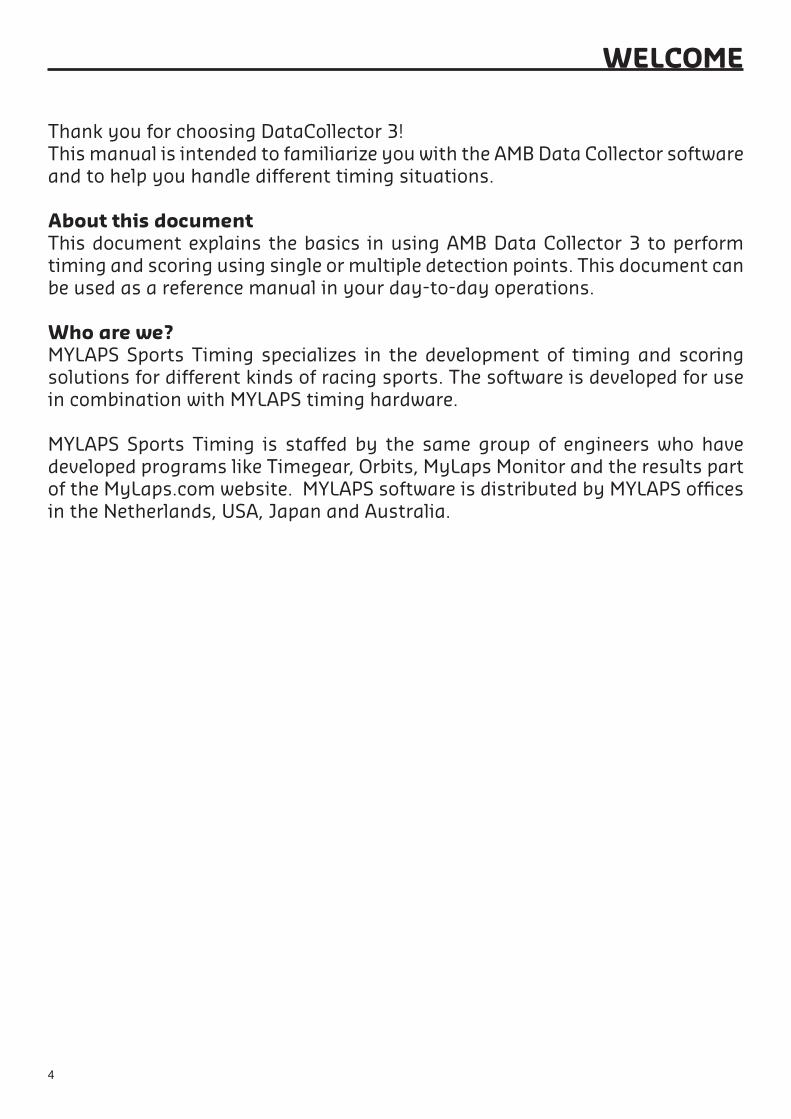
Activate with another computerTo activate with another computer, choose ‘Activate with help of another computer’ in the 2nd step of the wizard and click ‘Next >>’.
The wizard will provide you with a computer code that you will need during the activation process. Write down that computer code, and visit http://activate.amb-it.com on a computer with Internet connectivity.
On the website, enter your serial number and the generated computer code. The file that contains your license information can be saved on a USB storage device. The website will provide a small license file. With that file, return to the computer with DataCollector 3, and import the generated file into the wizard by clicking the ‘Browse’ button.
If the file is OK, the ‘Next >> button’ will be enabled. Click it to complete the activation process. AMB Data Collector is now fully registered and will be started as soon as you press the finish button.
FirewallsYou may experience problems if you have a firewall in place that does not allow the DataCollector 3 to pass through the firewall.
Open the following ports in your firewall for DataCollector 3: Port 5400 TCP/UDP – to communicate with the decoder• Port 5403 TCP/UDP – to communicate with the decoder•
11
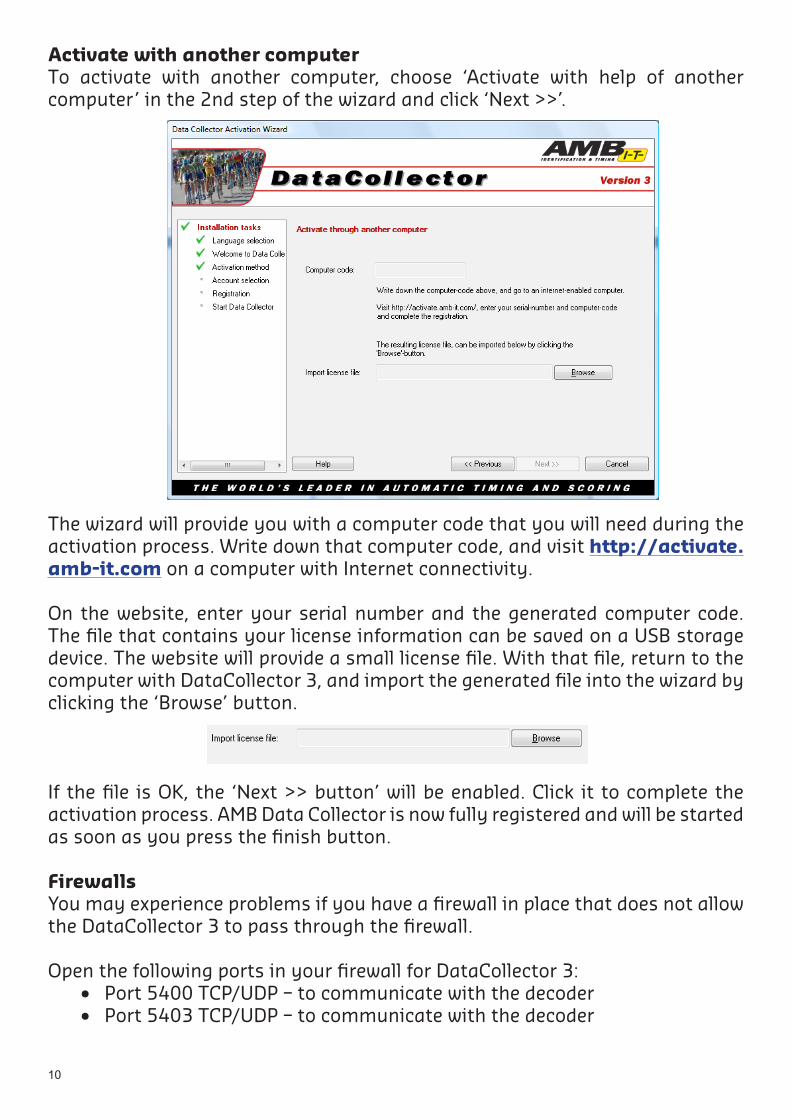
For Windows XP and Windows Vista usersThere is an Internet connection firewall on the Windows XP system. By default it is disabled. But it may be enabled so requests may be blocked by the firewall.
To configure the Internet connection firewall of Windows XP, please follow these steps:
Open Network Connections (Click Start, click Control Panel, and then double-• click Network Connections) Click the Dial-up, LAN or High-Speed Internet connection, and then, under • Network Tasks, click Change settings of this connection. On the ‘Advanced’ tab, click the ‘Settings...’ button.• Then Click on the ‘Exceptions...’ button. • Click the ‘Add Port...’ button to add a service.•
Language setupDataCollector supports multiple languages. The choice of language can be changed before or after the race. The language can be changed by selecting Help – Change Language, followed by selecting the required language from the drop-down list. If your language is not listed, please contact MYLAPS for the availability.
HelpDataCollector features an in-depth built-in Windows Help File accessible by selecting Help – Contents or pressing ‘F1’ in the program.

12
3. OVERVIEW
This chapter deals with the configuration and setup of DataCollector. Starting DataCollector The DataCollector program can be started by double-clicking the DataCollector shortcut icons on the Windows desktop or via the Windows Start button. DataCollector can be found under Programs –> DataCollector 3.
DataCollector consists of two programs, the DataCollector interface and the DataCollector server. The DataCollector server is running in the background and is started automatically when you start the DataCollector program.
DataCollector InterfaceThe Interface consists of three sections
Event setup• > In this section, you can configure the system setup, monitor the system status and connect to your decoder(s).Registration• > In this section, you can manage your competitor data.Processing• > This section includes the functionality to export passings to a database or to a file.
DataCollector ServerThe DataCollector Server is a separate program running in the background. It handles the communication with the MYLAPS decoder, stores the passings, and calculates the results. When the DataCollector server is running, the following icon will appear on the Windows taskbar at the bottom right part of your screen. This server should always be running when you use DataCollector.
13
DataCollector server icon:
Note: The visible parts of the program, the DataCollector Interface, are separate from the DataCollector Server. This means that if the DataCollector Interface is accidentally shut down, the server is still running and the decoder records will continue to be stored and processed. After restarting DataCollector, the race can be continued without loss of data. The server is started automatically when the DataCollector program is started. When the DataCollector program is shut down, the DataCollector server will keep running. Shutting down the server is only possible by clicking the right mouse button on the server icon and selecting Exit AMB Data Collector Server.
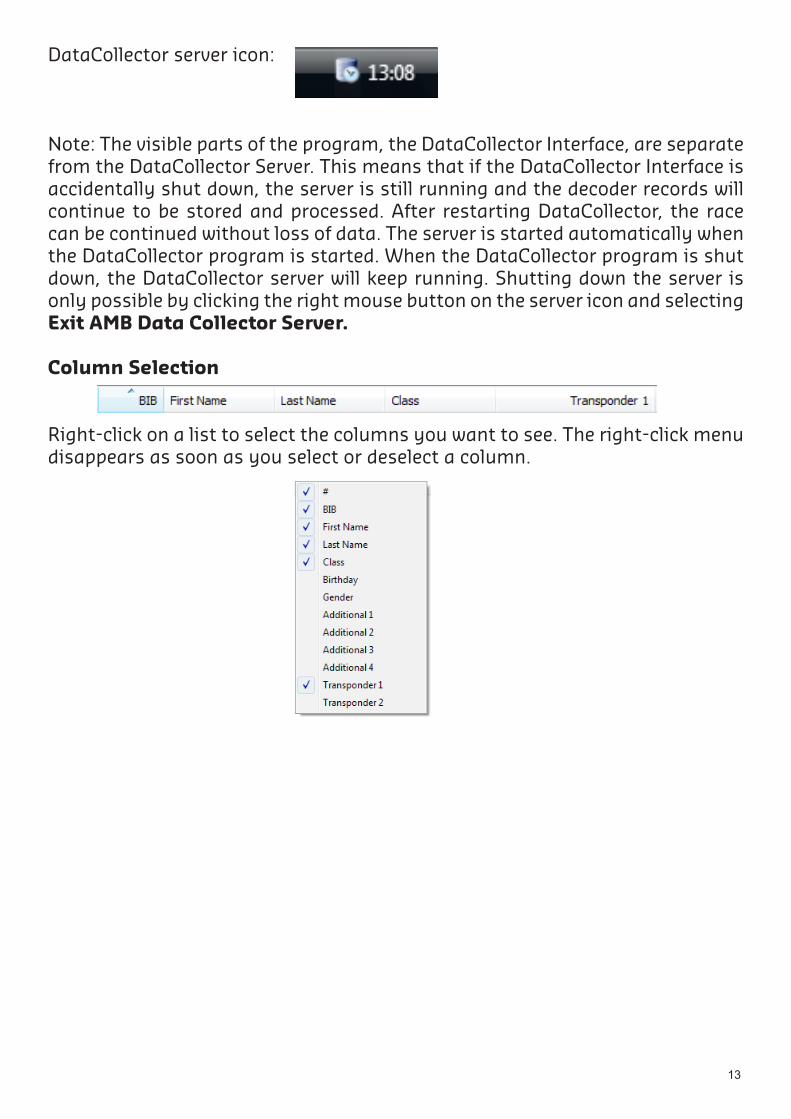
Column Selection
Right-click on a list to select the columns you want to see. The right-click menu disappears as soon as you select or deselect a column.

14
4. EVENT SETUP
This chapter describes how an event can be prepared and how you need to configure your timing system setup.
Overview Open the event setup page of the program by clicking on the Event Setup button at the top of the program or by pressing CTRL + 1.
Event managementDataCollector stores the information per event. This means that prior to each event you hold, a new event has to be created in DataCollector. The name of the loaded event is displayed at the top of the screen.
When you start the program, you have the following options.Create a new event• Load the previous event• Load the previous event and reconnect to the decoders. All passings that • were detected while the program was not running will be downloaded automatically from the decoder memory.
Load or save an event The event setup, the competitors, and the passings can be saved to a data file. This can be done from the file menu File – Save event or at the left side of the screen by clicking on Save event. Once a minute, Data Collector will automatically save your changes to disk.

15
The event setup, the competitors, and the passings can be loaded from a data file. This can be done from the file menu File – Load event or at the left side of the screen by clicking on Load event.
Create a new eventYou can create a new event from the Event Setup page. Click on Create a new event to start the ‘System Setup Wizard’. Now the wizard will guide you through this process.
Event settingsYou can specify the following info on the first page of the wizard.
Event NameThe name of the event.
Highlight passingsLap times recorded below the specified minimum lap time will be highlighted and are displayed in red in the passing screen. When the ‘Automatically delete passings’ box that is below minimum laptime is checked, the passing(s) will be deleted automatically.
System setupNext step is to select your system setup. Depending on the number of timelines you can select your configuration from the list. The layout shows the timelines of the selected system setup. Each timeline has a unique name in this configuration. DataCollector has several built-in configurations available (up to 10 timelines).

16
If your configuration is not in the list, you may contact your local MYLAPS office. On the next page, you can change the name of the timeline(s) if needed. Select a predefined name from the option list, or use a new name. DecodersAfter you have created your event and configured your timing system setup, you can select your decoders.
Connect to a decoderTo connect to a MYLAPS decoder, you can double click on a timeline, or choose “register a new decoder” from the system setup tasks. Now the ‘Decoder Connection Wizard’ will open. This can be found under Decoder - Decoder Settings. The system first scans the network for available decoders. On the first page, all decoders that are found in the network are listed on the screen. Select the decoder you want to use and click on the Next button.
Now the program will try to make a connection to the decoder. If the decoder is successfully connected, the decoder details screen will open.

17
If the decoder is marked with warning icon or if your decoder is not displayed in the list, see Connection issues for more details.
COM PortIf the decoder is attached to the serial port of the computer, you must add the decoder manually by selecting the COM Port option from the selection list. Now you need to select the COM Port from the choice list.
NetworkIf your decoder is connected to your network, but not in your list, you must add the decoder manually by selecting “Network option” from the selection list. Now you need to enter the IP address of the decoder. See connection issues for more info about the decoders IP address.
Connection issues
Serial number is redIf the serial number is highlighted red, this means you need to upgrade your decoder firmware. To update a decoder, go to the support section of the MYLAPS website or click the button. Check for available updates (Online).

18
IP address has a warning iconIf the IP Address is not in the same network range as the computer, a warning icon will appear. This means that you need to change the IP Address of the decoder. You can do this by right clicking on the decoder and select change decoder settings. You can now connect to your decoder by selecting it from the list and hit the Next button.
My decoder is not in the listIf your decoder is not listed, first check if it is powered on and that all connectors are firmly in place. If it still does not connect, it is possible that the decoder has an old firmware version. Manually connect to the decoder by selecting the network option and hitting the Next button. You can now enter your IP Address, hit the Next button to connect. If it connects, it means that the decoder firmware needs to be updated. It is possible to do timing in compatibility mode, but some new features will not be supported. Check timing system setupIf all decoders seem to work properly, it is time to check the system setup and generate passings on each decoder.
Therefore you can start the Timing System Setup Check. This can be started by selecting Check timing system setup. This wizard will guide you through some simple steps to check your timing system setup. With this test, you can verify that all decoder(s) are connected and configured properly. You need a transponder to check your timing system setup. Please specify the number of the transponder that you will use for this test. This transponder will be used to check of the decoders. With this you can check if all decoders are working and if the timelines are configured properly.
SynchronizationEach decoder has its own clock. These clocks are used for time stamping the passings. When you have multiple decoders, all clocks need to be synchronized to one main clock. The program will convert the passing times to time of day using the computer or laptop clock.

19
To synchronize the clocks of all decoders, DataCollector uses one of the following principles:
Portable System RackIf you have multiple decoders in a Portable System Rack, the decoder clocks are synchronized by the controller.
GPSIf you use multiple decoders for timing that are on several locations around the track, all decoders needs to be synchronized by GPS. The accuracy of the GPS system is well known. It is the most affordable and highest quality time-transfer system available in the world today. The only requirement is a clear view of the sky. Once a decoder has an active GPS connection, the internal clock of the decoder is set to UTC (Coordinated Universal Time). The advantage of a decoder with an active GPS connection is that the decoder handles its own time synchronization. When all decoders in the network have active GPS connections, you can be sure that their clocks will be perfectly synchronized at all times.
The decoders are not connected to GPS or in a Track Side BoxIf the decoders are not connected to GPS, the program will use the local computer time to synchronize the different decoders. This is less accurate then connecting decoders to a GPS receiver. The program will convert the passing times to time of day. The accuracy depends on the latency of the associated network configuration and drift is not compensated. Time zoneIf your decoders are synchronized by GPS, the current system time zone settings control how DataCollector converts between GPS time to local time. DataCollector will use the system time zone settings for selecting the time zone. You can see the system time zone by opening the decoder details screen.
Note: If you change your system time zone, you need to restart DataCollector before these settings take effect. DataCollector will give a warning message when you change the system time-zone. GPS Status
Red icon means that a GPS module is attached to the decoder, but that the module is not synchronized to GPS yet. Yellow icon means that the decoder clock has been synchronized with GPS, but the GPS module doesn’t receive records at this time (lost GPS-connection).
Green icon means that the decoder clock is synchronized with GPS.

20
The number of satellites found is a good indication of the GPS signal quality. You can see the number of satellites in the decoder details screen. For good synchronization, 4 or more satellites are required.
Warnings and errors
Decoder is synchronized by GPS, but the signal is lost.Make sure that the GPS module which is attached to the decoder has a clear view of the sky. If the decoder is positioned between a lot of metal objects, try moving it around a little. Sometimes you have to find a ‘sweet spot’. The number of satellites found is a good indication of the signal quality. You can see the number of satellites in the decoder details screen.
Decoder is not synchronized to a controller or by GPSNo GPS device is attached to the decoder or it is not recognized as such. The decoder is now relying on its internal clock to retain timing accuracy. Even though this clock is very accurate, a GPS connection is preferred. You can check the connector of the GPS device. It may be loose or dirty, try another GPS device on the same decoder, the device or the wire may be broken.
No GPS device attached to the decoder No GPS device is attached to the decoder or it is not recognized as such. The decoder is now relying on its internal clock to retain timing accuracy. Even though this clock is very accurate, a GPS connection is preferred.
Check the connector of the GPS device. It may be loose or dirty.• Try another GPS device on the same decoder, the device or the wire may • be broken.
Decoder is synchronized to a different controllerThe decoder is synchronized by a different controller. When you do not use GPS, make sure that all decoders are synchronized by the same controller.
Timing system statusOn the system setup page, you can see the status of your system setup. The image displays your current system status.
This image indicates that there is an active connection with the decoder.
A question marks means that no decoder is selected for that timeline. Double click on the timeline to select a decoder.

21
An ‘X’ means that the connection to the decoder is lost. Right click on the decoder to reconnect.
If you move the mouse pointer above the timeline, you get an info tip with detailed information.
Timeline statusIn the timeline status screen, you can see the status of each timeline and find detailed information about a decoder if connected. The left part of the screen displays the status of the timeline.
NoiseThe background noise in combination with the signal strength is the most important indicator of the performance of the hardware system. If a decoder is connected to the computer, the background noise will be indicated in the timeline status screen, which can be found on the Event Setup page.
The average background noise is sent to the computer by the decoder every five seconds. The normal value for the background noise is between 0 and 30. An increased value of the background noise may indicate interference. If the background noise is higher, the received transponder signal strength should be 60 units above the background noise to ensure a reliable detection of the transponder.
A high background noise level may be indicated for a longer period of time than the actual duration of high noise levels. If no 5 second time interval passes without any transponder passings occurring, the background noise measurement is taken. Therefore the higher (and at that moment incorrect value) is shown again. Any electrical switch in the area, or (usually at night) short-wave radio stations can cause peaks in the background noise. Electronic equipment or a bad hardware system installation may also cause an increased background noise. Please refer to your Hardware Manual for further information.

22
5. REGISTRATION
This chapter describes how you can enter competitors.
Overview Open the registration page of the program by pressing the Registration button at the top of the program.
Competitors All competitors are stored in the event file. Right click on the header to select the columns you want to see. The right click menu disappears as soon as you select or deselect a column. To create a new competitor, right click in the competitor list and select New Competitor from the menu. You can search for a specific competitor using the Search option at the bottom of the screen
Competitor Details
BIBDataCollector accepts 5-digit alphanumeric bib numbers.
First Name/Last NameThe first and last name fields must be filled out carefully to make the sorting by name work correctly. If you want ‘Mc Donalds’ to be sorted on ‘Donalds’, please place ‘Mc’ in the first name field. In the results on screen and on printouts, the full name will be printed as a combined string, with first name and last name after each other. If you want the program to first display the last name and then the first name, please enter the last name in the First Name field and vice versa.

23
ClassIn the Class drop down box, all available classes are listed. You can either select an existing class or fill out a new one.
Transponder/2nd TransponderIt is only necessary to fill out the transponder number(s) if the competitor has his/her own personal transponder(s). The 2nd transponder field can be used in case a racer is equipped with a new transponder during a session or has two transponders on (example: speed skaters wear a transponder on each ankle).
AdditionaldatafieldsIn the additional data fields, you can enter any necessary additional data on the competitor. Headings for all additional data fields can be named in the Additional Data fields dialog.To enter another competitor, select the Next button. Once all competitor information is entered, select the OK button.
Managing competitorsBy clicking the right mouse button on a competitor, a pop-up menu will appear for adding, editing, or deleting competitors. Shortcut keys are indicated on the right side of the options pop-up menu.
Adding new competitors:To add a new competitor, click right mouse button anywhere on the competitor list and choose Add competitor.
Editing existing competitors:If you want to edit a competitor, highlight the corresponding row in the competitor database, click the right mouse button, and choose Edit. To select more than one competitor, press and hold Shift or Ctrl while highlighting them.
If you have selected multiple competitors to edit, the bottom part of the Modify Competitor screen will show how many competitors you have to go (e.g. ‘To do: 5’).
Deleting competitors:To delete one or more competitors, highlight them, click the right mouse button, and select Delete. You will be asked to confirm that you want to delete the selected competitors.
Registration decoderIt is also possible to assign transponders by connecting to a decoder.

24
Double click on the “Registration decoder” text to select a decoder for this. Now when you create a new competitor, or select an existing competitor, the transponder number field will automatically be filled in when you cross a transponder over the loop.
Import competitorsFrom the registration screen, you can start importing competitors from a file. Click on Import competitors to start the import wizard.
The wizard guides you through this process. After selecting the file you would like to import, you can set the relations between the DataCollector fields and the fields in the file. Below the field selection, the wizard shows a preview of how the competitors will be imported.
It is possible to save the selected column setup as a template. This makes it easier to import the same file format next time. If you import a DataCollector exported competitor file, the wizard automatically recognize the fields in the file and will skip this page. On the next page, you can make a selection of the competitors you would like to import. Use the checkboxes to select or deselect the competitors. The final page will give you an overview of all successfully imported competitors.
Export competitorsFrom the Competitor database, you can export competitors to file. Click on Export competitors to start the ‘Export competitors wizard’. This wizard guides you through this process.

25
6. PROCESSING
This chapter describes how you can export passings to a database or to a file.
Overview The processing page can be accessed by clicking on the Processing tab, which can be found at the top of the screen.
Views You can select a view by clicking on the corresponding icon in the list.
The processing page give you access to the following views. All Passings• Shows the passings of all timelinesCompetitors• Competitor overview, displays the last passing on each timelineStart times• Start times overviewTimeline• Shows the passings of a specific timeline
All Passings view This screen gives you an overview of all incoming passings. For each transponder passing, a new line will appear in the passings list.
Passings list The passings list displays all information from the decoders along with any manual additions to do timing. Each transponder passing will result in a new line in the list.
26
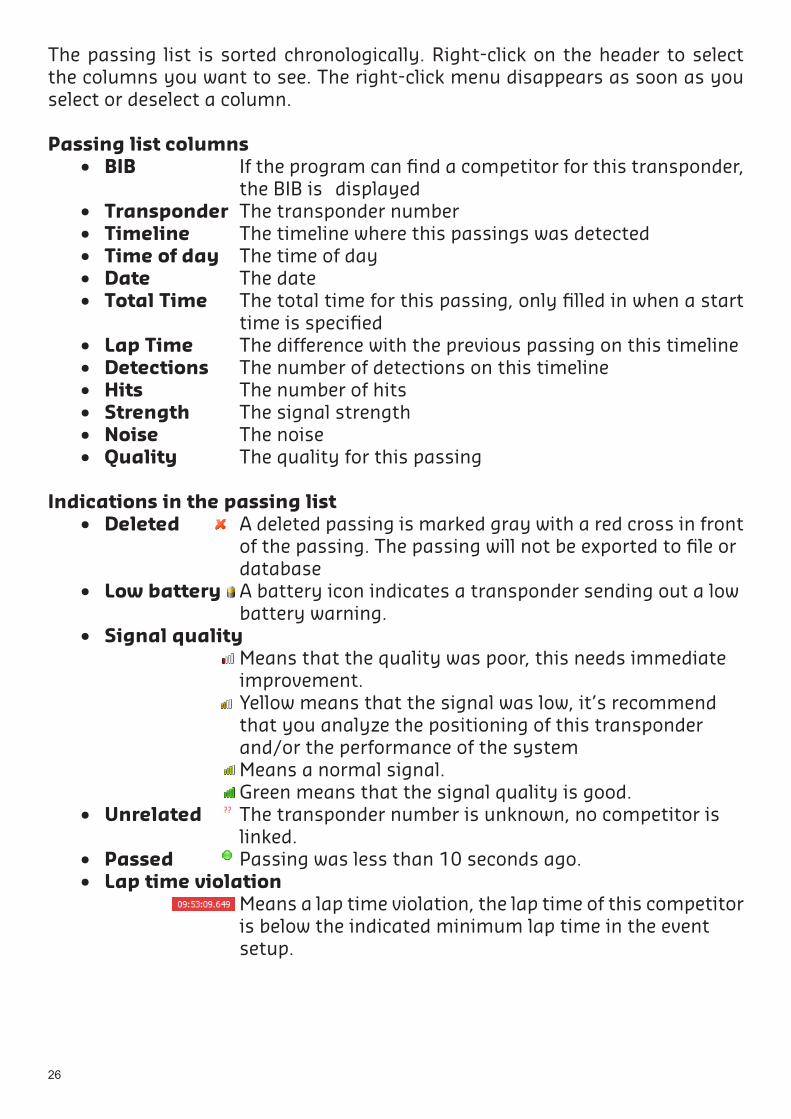
The passing list is sorted chronologically. Right-click on the header to select the columns you want to see. The right-click menu disappears as soon as you select or deselect a column.
Passing list columns BIB• If the program can find a competitor for this transponder, the BIB is displayedTransponder• The transponder numberTimeline • The timeline where this passings was detectedTime of day• The time of dayDate• The dateTotal Time• The total time for this passing, only filled in when a start time is specifiedLap Time• The difference with the previous passing on this timelineDetections• The number of detections on this timelineHits • The number of hitsStrength • The signal strengthNoise• The noiseQuality• The quality for this passing
Indications in the passing listDeleted• A deleted passing is marked gray with a red cross in front of the passing. The passing will not be exported to file or databaseLow battery• A battery icon indicates a transponder sending out a low battery warning.Signal quality• Means that the quality was poor, this needs immediate improvement.
Yellow means that the signal was low, it’s recommend that you analyze the positioning of this transponder and/or the performance of the system Means a normal signal. Green means that the signal quality is good.
Unrelated • The transponder number is unknown, no competitor is linked.Passed• Passing was less than 10 seconds ago.Lap time violation • Means a lap time violation, the lap time of this competitor is below the indicated minimum lap time in the event setup.

27
Start Times viewThis allows you to set the class, start date, start, stop date, and stop time for a specific class. The start time is used to calculate the total time for a passing.
By clicking on a class, you can modify the start time. Modifying the Start time will not update the total time for passings that are already exported to the database!
If you select a class, you can use the following shortcut keys to assign the time.
Start (F5) Press F5 to assign the start time with the current time.
Stop (F7) Press F7 to assign the stop time with the current time.
Competitors view The competitors screen shows all competitors. In this list, you can see a live overview of each competitor’s status.

28
When a competitor passes over a timeline, the name column will be marked with a green background color. The corresponding timeline column will also be marked with a green background color.
Timeline view This screen gives you an overview of the incoming passings for a specific timeline. For each transponder passing, a new line will appear in the passings list.
Export functionsData Collector has several ways to export passings to 3rd party programs. These options include export to file, export to database, or a live feed.
ExporttofileExport the passings to a text file. First select the timeline you want to export and then choose Export passings to file which can be found under Export passing tasks.
First you need to select the output format. Appendix A describes the different output formats available. Next step is to select which passings you want to export.
All passings• > All the passings will be exported to one file. The program will not export the deleted passings. The program will ask for a location to save the export file.Duplicate passings• > Each duplicate passing from one transponder will be exported to a separated file. The program will not export the deleted passings. The program will ask for a location to save the export file. Duplicate passings will be exported in a file with a “_<passing count>” extension.Selected passings• > With this option, you can manually select the passings that you want to export to a file. The program will not export the deleted passings. The program will ask for a location to save the export file.
Specify the file you want to export to and click Next.
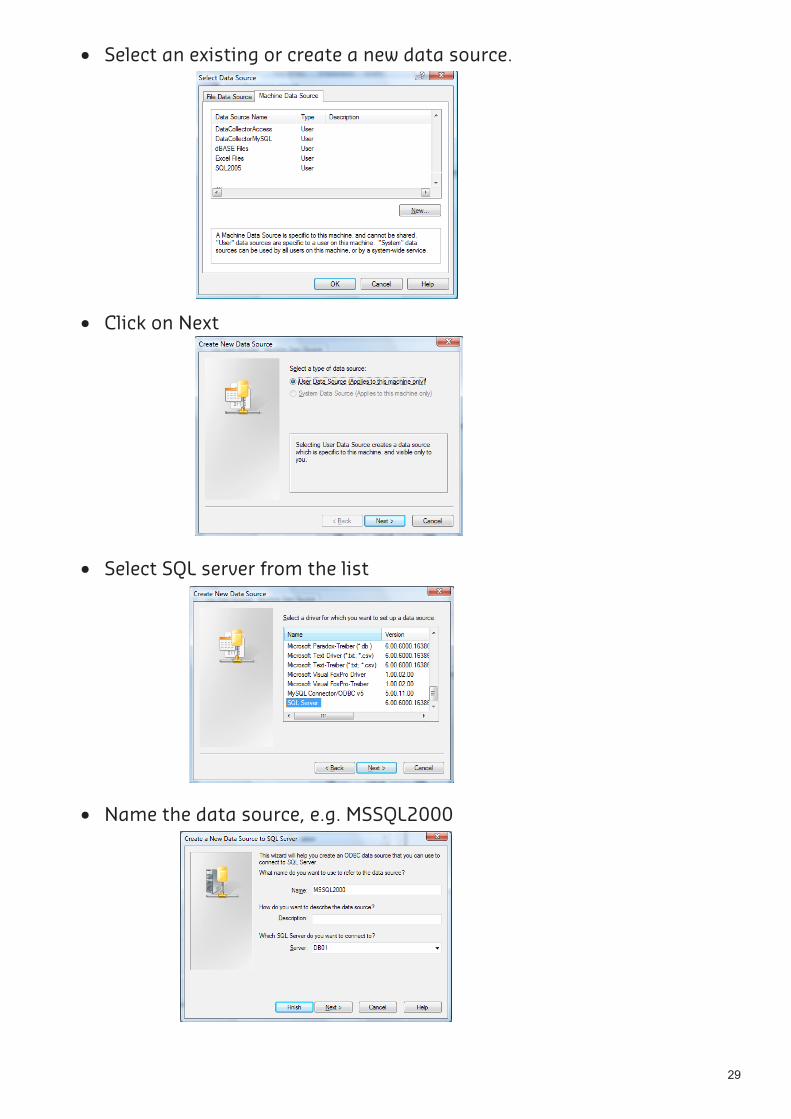
Export to database All passings will be exported to a database. Select the All Passings view for exporting all the passings or select a specific timeline to only export the passings of that timeline. Please read Appendix B for the supported databases and the passings table structure. Select the database you want to export to. Select “Select MS Access database” to create an MS Access database directly. By pressing the button “Select other database” you can select a database using an ODBC-connection. The following screenshots describe the process of selecting a MSSQL2000 database.
29
Select an existing or create a new data source. •
Click on Next•
Select SQL server from the list •
Name the data source, e.g. MSSQL2000•

30
Select the default database •
Delete all records from the passing table before exportThe program will first delete all passings from the table and then export the passings of the selected timeline.
Export in compatibility modeThis will export the passings in compatibility mode. Please see Appendix B for the database structure. Click on Next to start exporting the passings. Live export This option will export all passings live to database or to file.
Liveexporttofile This option will export all passings live to a directory, the DataCollector will create a separate file for each time line. You can find this option under Live export passing tasks.

31
There are three methods to save the passings live to file:Save every X passings• > Saves the passing to a file every time it received X passings.Save every X seconds• > Saves the passing to a file every X seconds.Save on deletion• > Saves the passing to a file when the destination file does not exist.
The files are exported in the format as selected. Appendix A describes the different output formats available. Live database export This option will export all passings live to a database. You can find this option under Live export passing tasks. Select the database you want to export to. Select “Select MS Access database” to create an MS Access database directly. By pressing the button “Select other database” you can select a database using an ODBC-connection.
Passing trigger functions The Data Collector program will send a trigger when a passing is detected on one of the timelines. You can find this function under the Live export passing tasks by clicking on Passing trigger settings. More information about the passing trigger can be found under Appendix C.
Live export status The bottom of the processing screen displays the latest information and the live export statistics.
32
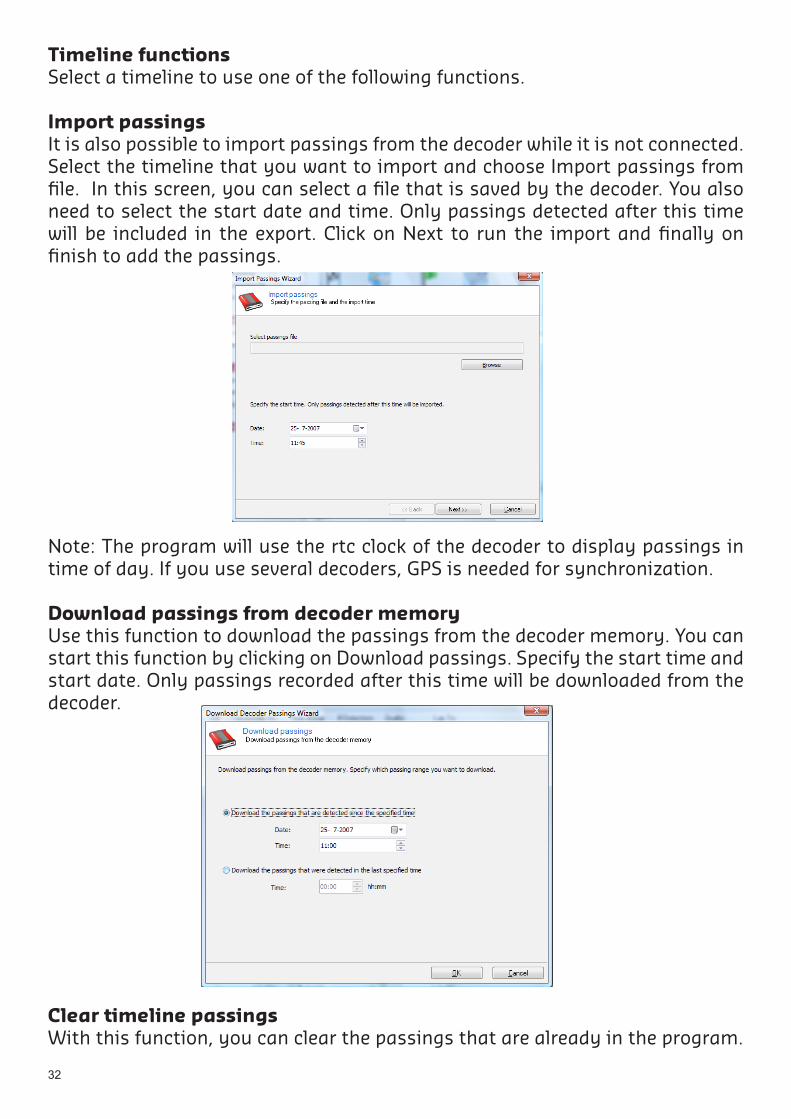
Timeline functions Select a timeline to use one of the following functions.
Import passings It is also possible to import passings from the decoder while it is not connected. Select the timeline that you want to import and choose Import passings from file. In this screen, you can select a file that is saved by the decoder. You also need to select the start date and time. Only passings detected after this time will be included in the export. Click on Next to run the import and finally on finish to add the passings.
Note: The program will use the rtc clock of the decoder to display passings in time of day. If you use several decoders, GPS is needed for synchronization. Download passings from decoder memory Use this function to download the passings from the decoder memory. You can start this function by clicking on Download passings. Specify the start time and start date. Only passings recorded after this time will be downloaded from the decoder.
Clear timeline passings With this function, you can clear the passings that are already in the program.

33
7. APPENDICES
The appendices contain information about photocells and file formats. Appendix A – File FormatsDataCollector offers the following output formats
Fixed positionsThe program will export the passings to a text file. The file is exported in a format that programs like Runscore and Race Director can import it.
Transponder Number 7 GH77304Time Of Day 12 11:25:40.80Not used 5 2171Lap Nr for this passing 3 1Sequence Number 4 0000Not Used 6Check Number 2 C6Line Feed 2 \r\n
Sample LineGH77304 11:25:40.80 2171 10000 C6
Tab delimited text The program will export the passings to a tab delimited file, which can be easily imported in programs like Excel. Transponder Number GH77304BIB 3Name Martijn KeijClass SeniorTimeline StartLap Nr for this passing 2Date 8/21/2007Time of Day 11:41:16.533Lap time 1:16.533Total time 00:41:16.533Hits (Signal Quality) 15Strength (Signal Quality) 164Noise 0Line Feed \r\n
34
SampleGH77304 3 Martijn Keij Senior Start 2 8/21/2007 11:41:16.533 1:16.533 00:41:16.533 15 164 0
The following exports are compatible with DataCollector V1 and V2 export.
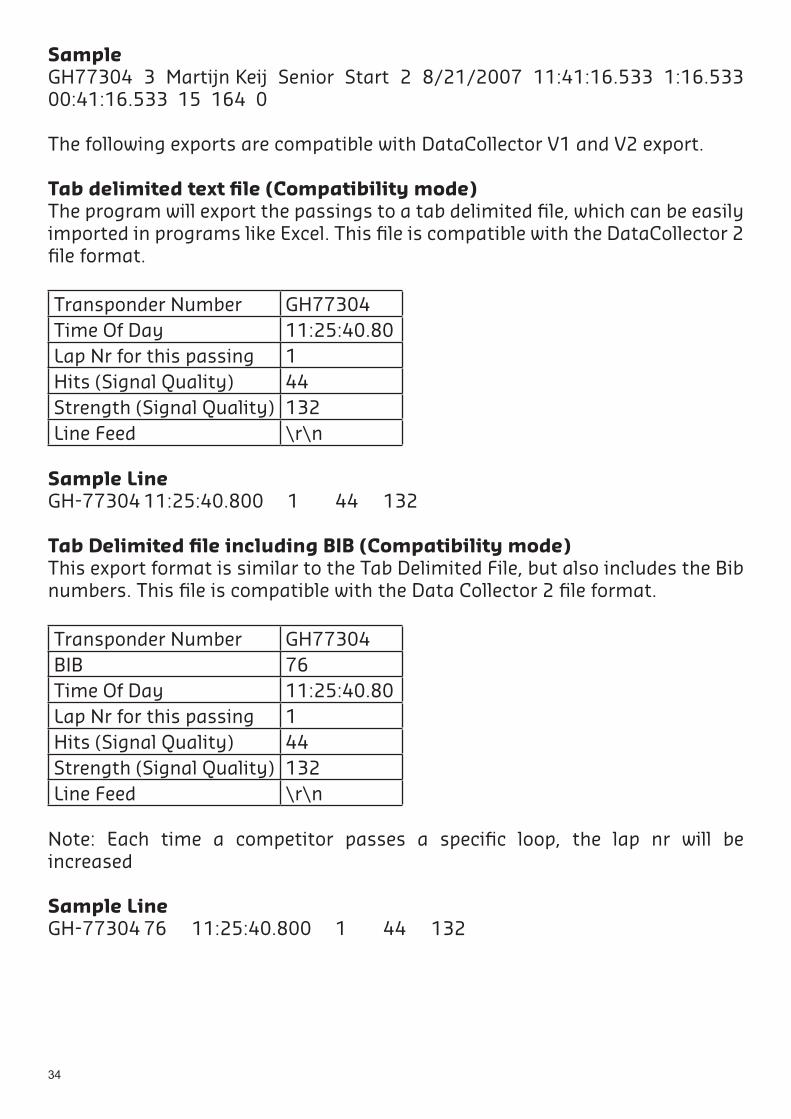
Tabdelimitedtextfile(Compatibilitymode)The program will export the passings to a tab delimited file, which can be easily imported in programs like Excel. This file is compatible with the DataCollector 2 file format.
Transponder Number GH77304Time Of Day 11:25:40.80Lap Nr for this passing 1Hits (Signal Quality) 44Strength (Signal Quality) 132Line Feed \r\n
Sample LineGH-77304 11:25:40.800 1 44 132
TabDelimitedfileincludingBIB(Compatibilitymode)This export format is similar to the Tab Delimited File, but also includes the Bib numbers. This file is compatible with the Data Collector 2 file format.
Transponder Number GH77304BIB 76Time Of Day 11:25:40.80Lap Nr for this passing 1Hits (Signal Quality) 44Strength (Signal Quality) 132Line Feed \r\n
Note: Each time a competitor passes a specific loop, the lap nr will be increased
Sample LineGH-77304 76 11:25:40.800 1 44 132

35
Appendix B – Passings table format
Data Collector supports the following databases:MSAccess direct or via ODBC• MSSQL7.0 via ODBC• MSSQL2000 via ODBC• MSSQL2005 via ODBC• MySQL via ODBC (Download the ODBC connector from the MySQL • website)
Passings table format
ID AUTOINCREMENT(1,1) Auto increment IDTransponder VARCHAR(25) Transponder numberDecoderMAC VARCHAR(25) Decoder’s MAC addressDecoderPassingID NUMERIC Decoder’s passing IDTimeOfDay * NUMERIC Time of DayTotalTime ** NUMERIC Total TimeLapTm ** NUMERIC Lap TimeBIB VARCHAR(25) BIB numberName VARCHAR(50) Competitor’s nameClass VARCHAR(30) Competitor’s classTimeline VARCHAR(25) Time line namePassingCount Integer Number of passings per locationHits Integer Number of hits of the passingStrength Integer Signal strength of the passingNoise Integer Decoder’s noise
* Time of day is stored in microseconds since 1/1/1970.** Times are stored in microseconds.
Note: To avoid duplicate records in the database, DataCollector creates a unique PassingID. This is a combination of DecoderMAC and DecoderPassingID. It is important to clear the passings in the database when you clear the decoder memory. Otherwise, duplicate Passing IDs will not be written!

36
Compatibility passings table format (DataCollector V1 and V2)The following database is compatible with DataCollector V1 and V2 database.
ID AUTOINCREMENT(1,1) Auto increment IDTransponder VARCHAR(25) Transponder numberBIB VARCHAR(25) BIB NumberTimeOfDay * NUMERIC Time of DayLapTm * NUMERIC Lap TimePassingCount Integer Number of passings per locationLocation VARCHAR(25) Location nameHits Integer Number of hits of the passingStrength Integer Signal strength of the passing
* If a start time is specified, this is the total time.* All times are stored in microseconds.

37
Appendix C – Trigger function
The program will send a trigger when a passing is detected on one of the timelines. There are two communication channels for this trigger.
NetworkThe program acts as a server and will listen for TCP connections on port 50003.
Serial portThe serial port has the following uses the following parameters:Baudrate 9600Data bits 8Stop bits 1Parity bits 0
General StructureEvery message starts with a < character and ends with CR/LF. The records are in XML format. It starts with an element name. See below for a description of the elements.
Passing RecordA passing record is sent after a transponder has been received and the passing time has been calculated. The element name for the passing record is ‘passing’.mac The MAC address of the decoder (Serial number)id Unique ID is given by the decodertx Alpha numeric transponder codetod Represent the number of us since 1 janhits Number of succesful receptions of a transponderstrength Signal strength of the received transpondernoise noise level
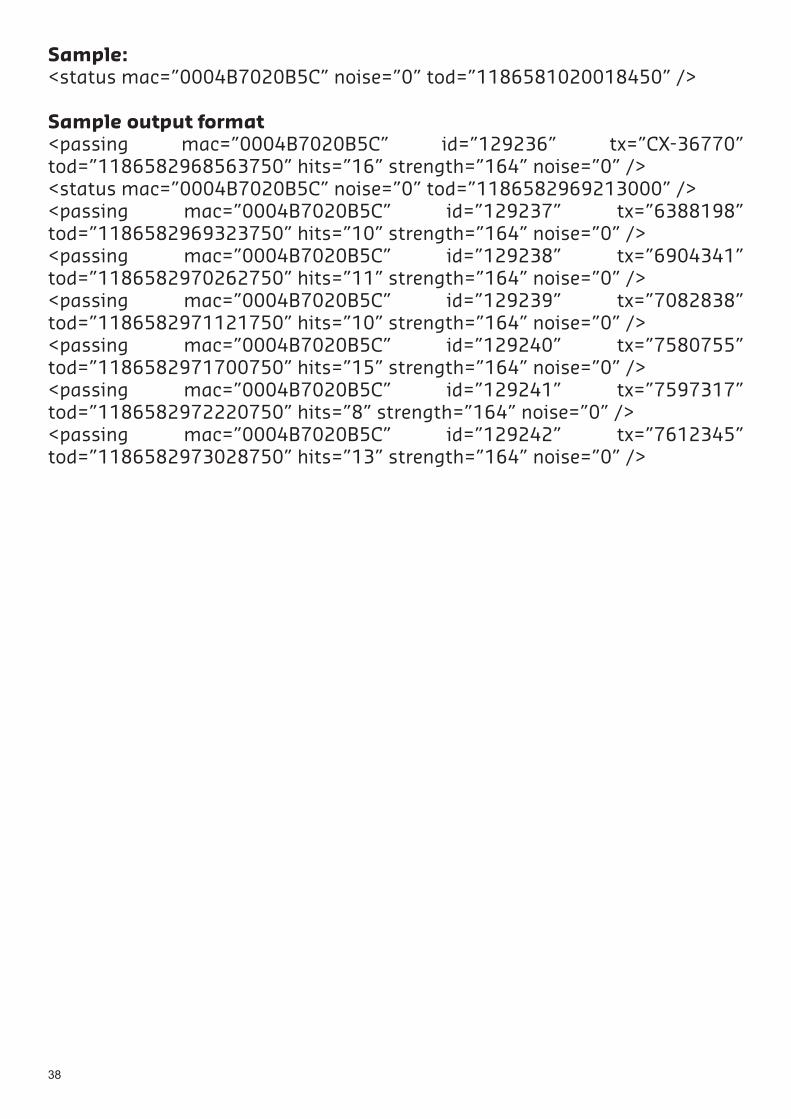
Sample: <passing mac=”0004B7020B5C” id=”126689” tx=”CX-75761” tod=”1186581018883650” hits=”13” strength=”164” noise=”0” />
Status RecordThe status record is issued about every 5 seconds. The element name for the status record is ‘status’.mac The MAC address of the decoder (Serial number)noise noise leveltod Represent the number of us since 1 jan
38
Sample: <status mac=”0004B7020B5C” noise=”0” tod=”1186581020018450” />
Sample output format<passing mac=”0004B7020B5C” id=”129236” tx=”CX-36770” tod=”1186582968563750” hits=”16” strength=”164” noise=”0” /><status mac=”0004B7020B5C” noise=”0” tod=”1186582969213000” /><passing mac=”0004B7020B5C” id=”129237” tx=”6388198” tod=”1186582969323750” hits=”10” strength=”164” noise=”0” /><passing mac=”0004B7020B5C” id=”129238” tx=”6904341” tod=”1186582970262750” hits=”11” strength=”164” noise=”0” /><passing mac=”0004B7020B5C” id=”129239” tx=”7082838” tod=”1186582971121750” hits=”10” strength=”164” noise=”0” /><passing mac=”0004B7020B5C” id=”129240” tx=”7580755” tod=”1186582971700750” hits=”15” strength=”164” noise=”0” /><passing mac=”0004B7020B5C” id=”129241” tx=”7597317” tod=”1186582972220750” hits=”8” strength=”164” noise=”0” /><passing mac=”0004B7020B5C” id=”129242” tx=”7612345” tod=”1186582973028750” hits=”13” strength=”164” noise=”0” />

39
AppendixD-CompetitorfileformatThe competitor file contains the competitors information.
Record layoutDepending on the selected file type the output file has the following record layout:Txt file: - FIELD - <TAB> - FIELD - <cr/lf>Csv file: - FIELD - <COMMA> - FIELD - <cr/lf>
Fields can be numeric or alphanumeric depending on the field. Fields separator is a comma “,” (ASCII code 44 decimal) or a tab (ASCII code 9 decimal). Record separator is a carriage return (cr) plus linefeed(lf). Alphanumeric data is started and ended with quotes. The first line of the export file contains the header information.
Record format for competitor
No Start number of the competitor, max 4, alpha numericClass Class of competitor, alpha numeric (Only when show
class column is on)First Name First name of the competitor, alpha numericLast Name Last name of the competitor, alpha numericTransponder 1 1st transponder number, numeric or alpha numericTransponder 2 2nd transponder number, numeric or alpha numericAdditional Data 1 Additional Data 1 of competitor, alpa numericAdditional Data 2 Additional Data 2 of competitor, alpa numericAdditional Data 3 Additional Data 3 of competitor, alpa numericAdditional Data 4 Additional Data 4 of competitor, alpa numericGender Gender of competitorBirthday Birth date of competitor
Sample“No”<TAB>”Class”<TAB>”FirstName”<TAB>”LastName”<TAB>”Transponder1”<TAB>“Transponder2”<TAB>”Additional1”<TAB>”Additional2”<TAB>”Additional3”<TAB>”Additional4”<TAB>”Gender”<TAB>”Birthday”<TAB><cr/lf>”