discover your phone how to - philips › files › c › cts890blk... · 2006-09-27 · restore...
TRANSCRIPT

Off Hold down ).
Press L.
h Press the R.
Press +.
enu Press -.
u Press ,.
age Press <.
Press >.
ry Press (.
Press C.
er Hold down C.
Press the right side key.
S890_00_DiscoverYourPhone.fm Page 0 Friday, September 8, 2006 4:37 PM
Discover Your Phone
Philips continuously strives to improve its products.Therefore, Philips reserves the rights to revise this userguide or withdraw it at any time without prior notice.Philips provides this user guide “as is” and does notaccept, except as required by applicable law, liability forany error, omission or discrepancy between this userguide and the product described. The device is meant tobe connected to GSM/GPRS networks.
How to...
Back of the phone: camera lensSide of the phone: Side key
Navigation keys
Left softkey
Dial key
Microphone
Earplug jack
65,000 colourmain screen
Camera key
Hang up key
Number keys
Charger jack / Data transfer connector
OK key
Right soft key
Switch the phone On/
Enter the main menu
Enter the Quick Searcmenu
Enter the Audio Playermenu
Enter the Shortcuts m
Enter the main men
Enter the Write Messmenu
Enter the Alert Type menu
Display the call histo
Enter the camera preview mode
Enter the Video Playmenu
Adjust the volume

1
orm the function of the promptlayed in lower left corner of the screen.
orm the function of the promptlayed in lower right corner of theen.
l and pick up calls. In standby mode, All Calls record list.
a call or reject incoming calls. Holdn the key to power on/off. In most
umstances, pressing this key will putmobile phone into standby mode.
er numbers and letters with theber keys from 0-9, and rapidly
ct menu items. Dial the number of ad dial key by holding down theesponding number key, etc.
s key has different functions inerent modes and menus.
s key has different functions inerent modes and menus.
tandby mode, press this key to entermain menu directly. In most menu,function of , is the same as L.
Keypad introductions
Take photos Press the right side keys,C or ,.
Enter the phone number Press the number keys.
End a call Press ).
</> Move the cursor when editing text. Instandby mode, press < to enter WriteMessage menu, press > to enter Alert Typemenu. In the camera preview mode,press </> to switch to EV, Zoom, ImageEffect and Image Size. In the File Manager,press < to return the previous menu,press > to open the file.
+/- Scroll up and down to view names,phone numbers, SMS, MMS, etc. Movethe cursor up and down when editingtext. In standby mode, press + to enterAudio Player, press - to enter Shortcuts,which is in the Extra menu. In camerapreview mode, press +/- keys to adjustthe parameter of the selected item.
L Perfdisp
R Perfdispscre
( Diaview
) Enddowcircthe
Numberkeys
Entnumselespeecorr
* Thidiff
# Thidiff
, In sthe the

2
</>/+/- keys are referred to as navigation keys. In thisuser guide, the phrase "press the key" refers to pressingand thereafter releasing a key; "Hold down a key"refers to pressing a key and keeping it depressed for 2seconds or longer.

3
....................................................... 22......................................................... 22......................................................... 26Server ........................................... 32Message ........................................ 32ory ................................................ 33ls .................................................... 33ls ..................................................... 33alls ................................................ 33l Log .............................................. 33......................................................... 34......................................................... 34ter .................................................. 34nter ................................................ 34......................................................... 35......................................................... 35er ................................................... 37yer .............................................. 38
yer ............................................... 39rder .............................................. 39
er .................................................... 39
Table of contents1. Getting Started ............................................5
Removal and Insertion of the SIM Card ......5Removal and Insertion of the Memory Card .....................................................................5Removal and Installation of the Battery ......6Battery charging ................................................7Turning the Phone On and Off ......................8Unlocking the Phone Lock ..............................8Unlocking the SIM card ...................................8Connecting to the Network ..........................9
2. Main Functions ......................................... 10Characteristic Function ................................ 10Dialing ............................................................... 12Emergency Calls ............................................. 13Receiving Calls ................................................ 13Ending a Call .................................................... 13Call record ...................................................... 13Call Option ...................................................... 14
3. Function Menu .......................................... 15How to Use the Function Menu ................ 15Structure of the Function Menu ................. 15
4. Phone Book ................................................ 18
5. MessagesSMS ..........MMS .........Voice Mail Broadcast
6. Call HistMissed CalDialed CalReceived CDelete CalCall Time Call Cost .SMS CounGPRS Cou
7. Camera .Camera ....ImageView
8. Audio Pla9. Video Pla
Video RecoVideo Play
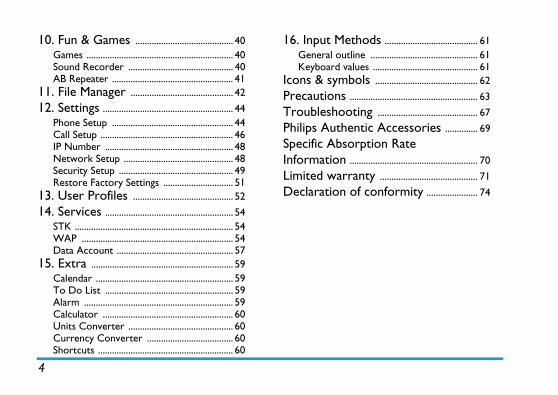
10. Fun & Games .......................................... 40 16. Input Methods ........................................ 61............................................. 61............................................. 61............................................ 62
............................................. 63
........................................... 67
Accessories .............. 69
on Rate ............................................. 70
.......................................... 71
nformity ...................... 74
4
Games ............................................................... 40Sound Recorder ............................................. 40AB Repeater .................................................... 41
11. File Manager ............................................ 42
12. Settings ........................................................ 44Phone Setup .................................................... 44Call Setup ......................................................... 46IP Number ....................................................... 48Network Setup ............................................... 48Security Setup ................................................. 49Restore Factory Settings .............................. 51
13. User Profiles ........................................... 52
14. Services ....................................................... 54STK .................................................................... 54WAP ................................................................. 54Data Account .................................................. 57
15. Extra ............................................................. 59Calendar ........................................................... 59To Do List ....................................................... 59Alarm ................................................................ 59Calculator ........................................................ 60Units Converter ............................................. 60Currency Converter ..................................... 60Shortcuts .......................................................... 60
General outline .Keyboard values
Icons & symbols
Precautions ..........
TroubleshootingPhilips AuthenticSpecific AbsorptiInformation ..........
Limited warrantyDeclaration of co

5
d Insertion of the SIM
acts on the SIM card can be easilymust remove it from its holder
inserting it into the phone.hone; remove the battery and unplugpower sources. card into the SIM card slot as showng picture.
ed to remove the SIM card, pleasehe phone, remove the battery, then
card.
d Insertion of the ard
hone; remove the battery and unplugpower sources.
Getting Started
1. Getting Started
Before using your mobile phone, you must insert avalid SIM (Subscriber Identity Module) card into thephone. The SIM card is supplied by your networkprovider.
The information recorded on the chip of the SIM cardinclude data required in order to establish aconnection with the network, the names and numbersin your phonebook, your messages, etc. The SIM card can be removed from your mobilephone, and inserted in any other GSM/GPRS mobilephone to be read (a new mobile phone willautomatically read the SIM card).To prevent losing or damaging the data stored on thecard, you should avoid touching the metal contacts onthe card and keep the SIM card away from electricityor magnets. Once the SIM card is damaged, you willnot be able to enter the GSM/GPRS network and usethe mobile telephone.
Before removing the SIM card, you must turn off themobile phone. Do not insert or remove the SIM cardwhile the phone is connected to an external powersource, as this could damage the SIM card.
Removal anCard
The metal contscratched. You carefully before • Turn off the p
other external • Insert the SIM
in the followin
• When you nefirst turn off tremove the SIM
Removal anMemory C
• Turn off the pother external
Getting Started
• Push up the lid on the memory card trough, place ur mobile phone before removing no circumstances should youhen the mobile phone is turnedge the SIM card and your mobile
e battery, follow the steps below: arrowhead direction, align theobile phone;
arrowhead direction, press downck it to the mobile phone.
6
the memory card into the memory card trough.• Push down the lid, and glide it to secure the
memory card in the memory card trough.• When you need to remove the memory card, please
first turn off the phone, remove the battery, thenremove the memory card.
Removal and Installation of the Battery
• When removing the battery, follow the steps below:1. According to the arrowhead direction, push away
the battery lock;2. According to arrowhead direction, lift up the
bottom of the battery to remove the battery fromthe mobile phone.
You must turn off yothe battery. Underremove the battery won, as this may damaphone.
• When installing th1. According to the
battery with the m2. According to the
the battery and lo

7
battery icon is displayed and stopsans that the battery is fully charged.phone is charging while it is turnedstill be an indication on the screen tohe charging is complete. This processetween 1 and 2.5 hours.
ne and charger will become warm and this is normal.
g is complete, unplug the charger the electrical outlet and the mobile
e performed in a well-ventilated areaure between -10oC and +55oC. Youwith the supplied charger. Using anrger could be dangerous. In addition provisions of the repair warranty, itcertification of this mobile phone.
phone automatically shuts down, orry is low, you should immediatelyttery. If the battery power has not used up before recharging, theation will be automatically reduced.
Getting Started
Battery charging
The new battery is partially charged (about 50%) andmay be used directly out of the box. During the firstthree charge cycles, you must ensure that the batteryis fully discharged before re-charging. This will enableoptimum performance of the battery.
• Plug the charger into the electrical outlet.• Plug the charger connector into the bottom of the
phone (with the arrow pointing upward).• At this time, the charge level icon will repeatedly
flash at the top right corner of the screen. If themobile phone is charging while it is turned off, acharge indicator will appear on the screen. If youcontinue to use the mobile phone when there isinsufficient power, the charge indicator may onlyappear only after a few minutes of charging.
• When a full flashing, it meIf the mobile off, there will indicate that tusually takes b
The mobile phoduring charging
• When charginconnector fromphone.
Charging must bwith a temperatcan only charge unapproved chato breaching thealso violates the
• If the mobile indicates Battecharge the babeen entirelyrecharging dur

Getting Started
Turning the Phone On and Off If you forget your lock code, you must contact yourorized repair and maintenance the lock code opened.
SIM card
authorized usage, the SIM cardIdentification Number) number.ion, then every time you turn on
r the Phone Lock number (if youk number), you must also enterck the SIM card before you can. You may turn off the SIM card
s case, you cannot preventhe SIM card.turn on the mobile phone;number. Press R to deletewith # or press L OK. is set as 1234, then enter the
4 ,ber is entered three times in card will be locked by the
bile phone will prompt you for
8
To turn the phone on or off, hold down ).If you turn on the phone without inserting the SIMcard, the phone will display Insert SIM. After insertingthe SIM card, the phone will automatically check ifthe SIM card is useable.The following will be displayed in this order:• Enter Phone Lock Code: if you have set Phone Lock.• Enter PIN: if you have set SIM Lock.• Searching: The phone will search for the appropriate
network connections.
Unlocking the Phone Lock
To protect against unauthorized usage, a lock codemay be set for your phone. If you choose this option,then every time you turn on your phone, you mustenter the lock code before you can use the mobilephone as normal. You may turn off the phone lockcode protection. In this case, you cannot preventunauthorized use of your mobile phone.• Enter the lock code. Press R to delete mistakes.
Confirm with # or press L OK.For example, if your phone lock code is set as 0000,then enter the following:0 0 0 0 # or 0 0 0 0 ,
retailer or local authservice centre to have
Unlocking the
To protect against unuses a PIN (Personal If you choose this optyour phone and entehave set a Phone Locthe PIN so as to unlouse the mobile phoneprotection. In thiunauthorized use of t• Hold down ) to • Enter the PIN
mistakes. Confirm For example, if PINfollowing:1 2 3 4 # or 1 2 3 If an incorrect numsuccession, your SIMnetwork and the mothe PUK number.

9
Getting StartedYour SIM card comes with a standard 4-8 digit PINnumber supplied by your network provider. You shouldchange this to your own number as soon as possible.
Connecting to the Network
When the SIM card is successfully opened, yourmobile phone will start to search for an availablenetwork (Searching will be displayed on the screen).When a connection is made, the name of the networkprovider will appear in the middle of the screen. Atthis time, your mobile phone will go into standbymode. In addition to dialling and receiving calls, youcan also perform the following:• Press R to enter Name/Quick Search.• Press L to enter the function menu.
If Emergency is displayed on the screen, this means thatyou are outside the normal coverage of the networkarea; but you can still make emergency calls dependingon the strength of the signal.
Your phone supports GPRS (General Packet RadioService) service. If your network operator hasactivated your GPRS service and your phone is withinthe GPRS network area, you may access WAP servicethrough the GPRS network.

Main Functions
phone automatically stores callrds so that you can view them. can directly dial a number in
call history, save the number to phone book, send SMS to the
ber, delete a number or deleteumbers in the list.
res a maximum of 200 SMS in phone; supports EMShanced Messaging Service). You use a template when you write SMS; search in the SIM card orne memory; extract a number the SMS, etc.
ports multimedia messageice. Allows you to receive andd all kinds of multimediasages, e.g., text, picture andnd, etc. You can also sendures to friends and colleaguesg MMS.
y music of different file formats,h as *.wav, *.amr, *.mid, *.imy,p3, etc.
10
2. Main FunctionsCharacteristic FunctionThis mobile phone has the following characteristicfunctions:
Phone Book Offers quick search function. The phone can hold a maximum of300 phonebook records and eachphonebook record can hold amaximum of 4 phone numbers.The number of phonebook recordsthat the SIM card can hold isdependent on your SIM cardcapacity. The menu allows you tosend SMS, copy a record to the SIMcard or phone, make an IP call,copy phonebook records betweenthe SIM card and phone, andquickly delete the records in theSIM card and phone.
Call History TherecoYouthethenumall n
SMS Stothe(Encanthephofrom
MMS Supservsenmessoupictusin
MP3 Play Plasuc*.m

11
Record video
Sets your mobile phone’s ring toneaccording to conditions andenvironments.
Offers a wide range of applications.Supports up to three alarm time,calculator function, etc.
Customize user settings, such asphone setup, call setup, IP numbersetup, network setup and securitysetup. You can set different functionsto suit different needs, e.g., time anddate, schedule power on/off, speeddial, call barring, etc.
The mobile phone supports WirelessApplication Protocol (WAP) service.
The phone offers many interestinggames.
Offers a wide range of inputmethods, such as Multitap ABC,Multitap abc, Numeric, Smart ABC,Smart abc.
Main Functions
SoundRecorder
Allows you to record sound in bothcalling and non-calling modes.When the phone is in calling mode,you can press C to record thedialogue, or press L Option toselect the sound recorder. Recordedsound is saved in *.amr or *.wavformats and stored in the SoundRecorder folder of the File Manager(D:\ or E:\); when the phone is notin calling mode, you can enter Fun &Games menu to select the soundrecorder option.
U Disk The phone can serve as a portablehard disk. Close the slider of thephone and connect the phone to aPC using the USB data cable. Thephone becomes a U disk, where youcan store files.
Camera Take pictures, set picture options,e.g., EV, Zoom, Image Effect and ImageSize, etc. The phone supportscontinuous shoot function. You canset the camera sound effects, etc.
Video Player
User Profiles
Extra
Settings
Services
Fun & Games
Input Methods

Main Functions
Calling Fixed Line Extensions extensions cannot be calledirst go through the switchboarde extension. Press * to displayial the extension number.switchboard number and the
this order:oard number > P > extension
ional callsal calls, hold down * until theprefix "+" appears on the screen. make an international call in anywhat the international call prefix
efix, enter the country code andsh to call. The country code ision: Germany is 49, England 44,.ational calls, you should omit the
he Shanghai service hotline, you14ational calls in this order:a code > telephone number > dial
12
DialingYou may make and receive calls on your phone whenthe symbol of your network provider appears on thescreen. The information bar on the upper left cornerof the screen indicates network strength (the signal isstrongest when there are four lines visible).Barriers greatly affect call quality, thus slightly movingyour position can increase the quality of the phonecall.
Making Domestic CallsUse the number keys to enter the telephone number,and then press ( to dial the number. If you need tochange the phone number, press R Clear to delete acharacter to the left of the cursor. The dialinganimation appears on the screen when dialing is inprogress. When the other party picks up the phone,the screen will display information about the call.You can dial domestic calls in this order:Area code > phone number > dial key
Some fixed phonedirectly. You must fbefore you can dial ththe letter "P", then dYou can enter the extension number inArea code > switchbnumber > dial key
Making InternatTo make internationinternational phone This will allow you tocountry regardless of is (e.g., 86 in China).After entering the prfull number you wiaccording to conventSweden 46 and so onWhen making interninitial 0 of area codesFor example, to dial tshould dial +86 21 1You can enter intern+ Country code > arekey
Display Allows you to configure how menusare displayed onscreen.
Side Key Supports side key function. You canset different functions according toyour needs.

13
g Callseive calls in different modes. If you havewer in answer mode, then you can pick upply sliding up the phone; otherwise, you up the phone and press ( or L. If there already plugged in, you can use theed on the earphones to pick up a call. If itent for you to press the button, then youas On. In this way, when the earphones arethe phone will automatically pick up theging or vibrating for 5 seconds. If you
ny Key, you can pick up the call by pressingept ), R and the side key.
Calless ) or hold down > to reject anll. During a call, you can press ) to endan also cancel a call you have just dialed).
orde phone stores your Missed Calls, Dialedd Calls, etc.
Main Functions
Dialing Calls from the Call LogYour mobile phone can also store records of the mostrecently missed, received and dialed calls, as well as thecall time of the last call and the accumulated time ofcalls received and dialed. When the call log is full, theold numbers will be erased automatically.• In standby mode, press ( to view Missed/
Dialed/Received Calls record.• All the numbers in the call log may be dialed
directly by pressing (.When the call log appears, you can press L Ok to viewdetails of that call record, then press L Option to carryout the following functions in the call log: Delete, Saveto Phone book, Dial, etc.
Emergency CallsIf you are located within the network area (you canfind this out by looking at the network strengthindicator located on the upper left corner of yourmobile phone screen), you should be able to makeemergency calls. If your network provider does notprovide roaming service where you are located,Emergency will appear on the screen. If you are locatedwithin a network area, even if you do not have a SIMcard, you will be able to make emergency calls.
ReceivinYou can recset Cover Ansa call by simneed to slideearphones abutton locatis inconvenican set Auto plugged in, call after rinhave set as Aany key, exc
Ending aYou can princoming caa call. You cby pressing
Call recYour mobilCalls, Receive
Main Functions
Call Option
ilable only in specific situations.pears only when there are two
call has been hung up; Multiparty on the service provider.
ctivate or activate DTMFd.
up a waiting incoming call and it with a multiparty call; put aference call on hold; carry on aprivately with one party whileing all the other parties on; connect two parties andove yourself from thetiparty call; put one party of ap on hold; end all calls inress and all calls on hold.
14
During a call, press L Option to enter the call optionmenu; press R H-Free to activate and increasevolume, press R H-Held again to deactivate anddecrease volume.The call option menu can only be seen while a call isbeing made. Functions such as call waiting, call divert,and conference calls require network support. Pleasecontact your network provider. You can carry out the following operations:
Multiparty option is avaFor example, Swap apcalls in progress and afunction is dependent
Hold/Retrieve Pause a call or retrieve a call that hasbeen put on hold.
Swap Switch between the current activecall and a call on hold.
End End the current call.
New Call Dial new call.
Phone Book Enter the list of phone book entries.
SMS Enter the SMS menu.
SoundRecorder
Record voice memos.
Mute Stop the transmission of voice tothe other party.
DTMF Deasoun
Multiparty Pickjoinconcall keepholdremmulgrouprog
15
f the Function Menu
u has the following default structure:
OS Number
referred Storage/Fields
rite Message/Template/
box/Outbox/Drafts/
d Message/Languages/Channel Setting
Function Menu
3. Function MenuHow to Use the Function Menu
Scroll to select a function• In standby mode, press L Menu to enter the main
menu. During a call, press L Option to enter thecall option menu, then use +/- to scroll to thedesired item on the call menu, and press L toselect the function.
• In all the menus and submenus, use +/- to scroll tothe desired function and press L or , to enterthe function item.
Quickly select a functionMost main menus and submenus have speednumbers. This speed number is the function’scorresponding index number.• In standby mode, press L Menu to enter the main
menu, use +/- to scroll to the desired item on themenu.
• Enter the speed number of the main menu orsubmenu to access the corresponding option.
Exit a MenuUsually, when in the function menu, you can exitfrom a menu item by pressing R. You can also press) to return to standby mode.
Structure o
The function men
Phone BookQuick SearchSearch EntryAdd New EntryCopy AllDelete AllCaller GroupExtra NumberOwner Number/SSettingsMemory Status/P
MessagesSMSInbox/Outbox/WMessage SettingsMMSWrite Message/InMessage SettingsVoice Mail ServerBroadcast MessageReceive Mode/Rea

Function Menu
Call History Fun & Games
er/Game Setting
dule Power On/Off /Language/thods/Default Encoding Type/tic/Greeting Text/Speed Dial/cuts
ng/Call Divert/Call Barring/Call Time Display/Auto Redial
n/Preferred Networks/Bandnection
ock/Auto Keypad Lock/Fixedange Password
16
Missed CallsDialed CallsReceived CallsDelete Call LogCall TimeLast Call Time/Total Sent/Total Received/Reset AllTimeCall Cost Last Call Cost /Total Cost/Reset Cost/Max Cost/Price Per UnitSMS CounterSent/ReceivedGPRS CounterLast Sent/Last Received/All Sent/All Received/ResetCounter
CameraCameraImageViewer
Audio PlayerVideo PlayerVideo RecorderVideo Player
GamesF1Race/Smash/CoptSound RecorderAB Repeater
File ManagerSettingsPhone Setup Time and Date/SchePreferred Input MeDisplay CharacterisDedicated key/ShortCall SetupCaller ID/Call WaitiTime Reminder/CallIP NumberNetwork SetupNetwork SelectioSelection/GPRS ConSecurity SetupSIM Lock/Phone LDial/Barred Dial/ChRestore Factory SettingsUser Profiles

17
Function MenuGeneralActivate/CustomizeMeetingActivate/CustomizeOutdoorActivate/CustomizeIndoorActivate/CustomizeHeadsetCustomize
ServicesSTK*WAPData Account
ExtraCalendarTo Do ListAlarmCalculatorUnits ConverterCurrency ConverterShortcuts
The items that appear under the STK menu may bedifferent according to the network operator.

Phone Book
to user profile in the File Manager, it as the associated sound.
a new record to thenebook. You can save theber To SIM or To Phone. A newrd is added to the PhoneBook,
ept Name, Numbers, Homember, Office Number, Faxmber. You can set the following:ompany Name: edit companyame.mail Address: edit email address.ssociate Picture: set a personalizedicture for the current phonetry.
ssociate Sound: set a personalizedng tone for the current phonetry. You can press </> to selectpersonalized ring tone for
coming calls.
gorize the telephone numbersed in the phonebook intoerent groups.
18
4. Phone BookYou can use To Phone option in the phonebook menuto save name card information such as Name,Number, Home Number, Company Name, EmailAddress, Office Number, Fax Number, AssociatePicture, Associate Sound, and Caller Group. To display a list of telephone numbers, all you need todo is to press R Name in standby mode to enter theQuick Search function of the phonebook directly.
Note: The mobile phone can save up to 300 telephonenumbers. The number of telephone records that can bestored on your SIM card is dependent on the SIM cardcapacity.
You can select any of the following eight functions inthe phonebook: Quick Search, Search Entry, Add NewEntry, Copy All, Delete All, Caller Group, Extra Number orSettings.
When the file is sent you can select and set
Quick Search view all the entries recorded in thephonebook.
Search Entry search for an entry in thephonebook by name. In thetelephone number list mode, pressR to return to the previous menu.
Add New Entry addphonumrecoexcNuNu• C
n• E• A
pen
• Ariena in
Caller Group catesavdiff

19
the phone supports caller groupfunction. You can select a groupfrom the Caller Group list to view itand edit the Caller Group details.Caller Group details include groupname, ringtone of the incomingcall, picture link of the incomingcall. You can also add and deletemembers from the group.
you can set the following numbers: • Owner Number: edit and set up
two groups of owner number atmost. You can also set acorresponding name to appear.
• SOS Number: edit and set up tofive groups of SOS Number.
select Memory Status, Preferred Storageand Fields item:• Memory Status: view the total
memory capacity and utilizedmemory space of the phonebooksfor both the mobile phone andthe SIM card.
Phone Book
When you copy telephone number entries from yourmobile phone onto your SIM card, only the names andtelephone numbers will be copied.
You need to enter a password to delete all thephonebook entries in the SIM card or phone. Thedefault password is "0000".
Copy All select From SIM to copy all thetelephone entries on your SIM cardonto your mobile phone, or selectFrom Phone to copy all the telephoneentries on your mobile phone ontoyour SIM card.
Delete All select From SIM or From Phone torespectively delete all the entries inthe SIM card or mobile phonephonebook. You can select One ByOne to delete a telephone number.
Caller Group
Extra Number
Settings

Phone Book
book entry is saved on the SIMly view the name and telephone
detailed information of therent phonebook entry. You can information such as, name,
up, telephone number,sonalized ring tone, personalizedoming call picture, etc. If thermation in the entry exceeds oneen length, you can use +/- toll. If you have set an associatedure, you can press L View to the incoming call picture of the
rent phonebook entry.
nd revamp the contents of thet phonebook entry.
the current phonebook entry.
20
In the phonebook, you can enter the list of phonebookentries via Quick Search, then press +/- to scroll andselect a phonebook entry.Press L or , to select the following options:
If the current phonecard, then you can onnumber of the entry.
• Preferred Storage: set a defaultsetting for the storage oftelephone numbers: to SIM orPhone. You can also choose thepreferred storage when adding anew phone entry.
• Fields: show or hide HomeNumber, Company Name, EmailAddress, Office Number, FaxNumber, Associate PictureAssociate Sound, Caller Groupfields. Select On to show the item,or Off to hide.
Dial press L to dial the currentphonebook entry.
IP Dial if the IP number has been set, select IPDial will automatically add the IPnumber before the number and dial it.
Send SMS send a short message to the currentphonebook entry.
View viewcurviewgroperincinfoscrescropictviewcur
Edit edit acurren
Delete delete
21
Phone BookYou can press ( to dial the selected phonebook entryin the phonebook list or in the detailed informationinterface mode of the phonebook entry. If there is morethan one telephone number in the entry, when youpress (, the list of numbers will appear. Select thedesired number and press ( again.
Copy copy the current phonebook entry toanother phone or SIM card. If thephonebook entry is on the phone, thisaction makes a copy on the SIM card.If the phonebook entry is on the SIMcard, this action makes a copy on thephone.
Move move the current phonebook entry toanother phone. If the phonebookentry is on the phone, this actionmoves the entry to the SIM card. Ifthe phonebook entry is on the SIMcard, this action moves the entry tothe phone.
Duplicate make a copy of the currentphonebook entry in the phone or SIMcard, depending on which mediumthe phonebook entry is stored.
Messages
will be automatically saved in your SIM card. Theessages that can be saved (thisssages as well as saved messages)ory capacity of the SIM card. IfSIM card is full, a flashing " ".
ge, enter the Inbox and press Lessage.
short message list in Inbox, theber or name (if the name has
d in the phonebook) will bete that the short message waslayed. short message list, you can useort message. When the short
x appears, you can press L OKof a message, the date and time name (if the name has alreadyhonebook) or telephone numberhis time, you can also press Lthe following operations:
a short message to the sender
the current message and then Send Only, Save and Send, Save,To Many, or Send By Group.
22
5. MessagesIn the main menu, scroll to select Messages, and thenpress L to enter. The available options include: SMS,MMS, Voice Mail Server and Broadcast Message.
SMS
If your network supports SMS (Short Message Service)and you have applied for this service from your networkprovider, you can send English and Chinese shortmessages through the short message service centre. Themobile phone supports EMS (Enhanced MessagingService), and you can insert picture, animation,melody, sound, etc. to your messages. You can also usethe template to create short messages. Enter SMS to select the following: Inbox, Outbox, WriteMessage, Template or Message Settings.
InboxEnter the Inbox to view received messages. When youreceive a short message, your mobile phone willvibrate (if Alert Type is set to Vibration), ring (if theMessage Tone function is enabled), and display the newmessage alert information. If you do not wish to readit immediately, an envelope icon will appear at the topof the screen in standby mode, and the short message
number of short mincludes received meis based on the memthe memory in your icon will be displayedTo read a new messaOK to read the new m• When viewing the
sender’s phone numalready been savedisplayed. The dareceived is also disp
• When viewing the+/- to select a shmessage list in Inboto read the details of receipt and thebeen saved in the pof the sender. At tOption to carry out
Reply send
Forward edit selectSend

23
to view the short messages (saved innd phone memory) in the mobile
ge list in Outbox appears, you can useort message, and press L OK to readtents of the selected message. At thislso press L Option to carry out theions:
send the current message.
edit the current message.
delete the current short message.
delete all messages of which thenumber is the same as the selectednumber in the Outbox.
delete all messages in the Outbox.
extract the telephone number of therecipient in the current messagethat contains the numbers (3-40bit). The numbers will be displayedas a list. You can select the number,save it to your phonebook, or dialthe number.
Messages
OutboxEnter the Outboxthe SIM card aphone. When the messa+/- to select a shthe detailed contime, you can afollowing operat
Edit edit the current message.
Delete delete the current message.
Delete Same Number
delete all messages of which thenumber is the same as the selectednumber in the Inbox.
Delete All delete all messages in the Inbox.
Use Number extract the telephone number of thesender in the current message thatcontains the numbers (3-40 bit). Thenumbers will be displayed as a list.You can select the number, save it toyour phonebook, or dial the number.
Save Objects extract sound and picture object inthe current message (EMS), and saveit. If the current message containsmultiple objects, you can press +/- toselect an object, and save it. You cansave pictures, animations andmelodies to My Picture, My Animation,and My Melody folders respectively.
Send
Edit
Delete
Delete Same Number
Delete All
Use Number

Messages
Write Message
you can select Save to save the the Outbox. If you select Send
ompted to enter the recipient’st this time, you can enter theber keys, or press L Search to
ok where you can select theIf you select Send To Many, yout, which allows you to send onecutively to several people.If youyou can send information to allp.
ntres of some cities and districtst messages with more than 160aracters). You can only send andmations and melodies betweenones.
ew Paragraph: add a newaragraph with Automaticlignment mode, Left Alignmentode, Center Alignment mode,
ight Alignment mode. nput Method: offers 8 input
ethods and Insert Symbolsption menu.
24
Before writing a short message, please confirm thatyou have set the short message service centre number. You can edit your short message via Write Message.Press L to enter the Option menu:
After selecting Done,current message intoOnly, you will be prtelephone number. Anumber with the numaccess the phoneborecipient’s number. will enter the Edit Lisshort message conseselect Send By Group, members of the grou
The short message cedo not support shorletters (70 Chinese chreceive pictures, anicompatible mobile ph
Done After finishing your message youcan select this option and use +/- toselect Send Only, Save and Send, Save,Send To Many or Send By Group.
Use Template To select a pre-configured message.
Insert Object To add picture, animation, melodyand sound to your message.
Format Text set text format as follows:• Text Size: set text size as Small,
Medium, or Large. But this optionis not applicable for Chinesecharacters.
• Text Style: set the text style as Bold,Italics, Underline, or Strikethrough.
• Alignment: select the alignmentmode: Automatic, Left, Center, orRight.
• NpAmR
• Imo

25
ting
used to display the storage status of then SIM card and phone.
ragews you to select preferred storage to messages.
To select the type of the message.This option is network dependent.
To edit the name of the profile.
When On, this option will informyou via SMS whether your ownSMS was received or not. Thisfeature is subscription dependent.
When On, this option allows you totransmit the number of your SMSmessage centre together with themessage. The recipient can thenreply using your own SMS centreand not theirs. This speeds up therate of transmission. This feature issubscription dependent.
Messages
TemplateThis menu allows you to predefine up to ten messagesthat you use most frequently. Select a message andpress L to access the next optons.
Message SettingsThis menu allows you to configure the SMS settings.The options are:Profile Setting
Common Set
Memory StatThis option is usmessages saved i
Preferred StoThis option allosave the received
Edit To write a new message or edit theselected predefined message.
Erase To delete the selected predefinedmessage.
SC Address To select your default SMS centre.If not available on your SIM card, youmust enter your SMS centre number.
Valid Period To select the length of time yourmessages are to be stored in the SMScentre. This is useful when therecipient is not connected to thenetwork (and thus cannot receiveyour message immediately). Thisfeature is subscription dependent.
Message Type
Profile Name
DeliveryReport
Reply Path

Messages
Pref. Bearer not know that the message was sent to this recipient),content. You can select a phonehe destination, and every MMS isltiple objects.r text or insert different kinds ofion and select Edit. following operations:
ter text to current page.
it and amend text.
move text.
lect a picture from File Managerd insert into the current page.
it the current image.
lete the current image.
lect an audio from File Managerd insert into the current page.
it the current audio.
lete the current audio.
d the attachment to the currentge from the File Manager.
it the current attachment.
26
This option allows you to set the preferredtransmission mode. For further detail, please contactwith network provider.
MMS
MMS refers to Multimedia Message Service. Itsupports multimedia functions and can send text,images, sound and many multimedia file formats.The MMS function is operator dependent. Beforeusing this function, please confirm that your SIM cardsupports this service or contact your networkoperator. If your mobile phone supports MMSfunction, then after the necessary MMS settings, youcan send and receive MMS.Each MMS is like a slide projector with continuouspages, each page containing text, images, sound, etc. Enter the MMS to carry out the following operations:Write Message, Inbox, Outbox, Drafts and MessageSettings.
Write MessageIn this menu interface, you need to specify: recipient,copy (copy the current MMS to this recipient),confidential copy (send a confidential copy of themessage to this recipient, whereby other recipients will
subject and message number or E-mail as tcapable of sending muYou can directly enteobjects. Press L OptYou can carry out the
Add text en
Edit text ed
Remove Text re
Add image sean
Edit Image ed
Remove Image de
Add audio sean
Edit Audio ed
Remove Audio de
Add Attachment adpa
Edit Attachment ed
27
ve options appear only under certainr example, Delete Slide only appears
t MMS exceeds one page. Each page ofy contain one picture and one sound.t page contains a sound or picture, Adde to Edit image or Add Audio will change
hen editing an MMS, the status bar at the top of the screen will display current page/total pages; and the total
MMS, when you receive a new MMS, yourwill vibrate (if Alert Type is set tog (if the Message Tone function is on).w MMS Message will be displayed on
feedback as to whether or not therecipient has read the MMS.
feedback as to whether or not theMMS has been successfully sent tothe recipient.
set the priority of the currentMMS. This includes Normal, Highand Low.
Messages
Select Done when you have completed the editing ofthe current MMS, and you can carry out the followingoperations: Send Only, Save and Send, Save to Drafts, SendOptions, or Exit.You can customize the following Send options:
Some of the abocircumstances; fowhen the currena MMS can onlWhen the currenimage will changto Edit Audio. Winformation linethe following: thesize of the MMS.
Receive NewIn standby modemobile phone Vibration) and rinAt this time, Nethe screen.
RemoveAttachment
delete the current attachment.
Insert New Slide insert a new slide after the currentpage.
Delete Slide delete the current page.
Previous Slide return to the previous page.
Next Slide enter the next page.
Preview preview the current MMS.
Slide Timing set the display time of the currentpage, different pages can havedifferent display timings.
Validity period set the duration that the currentMMS will be saved in the MMScentre (this is dependent on theservice provided by your networkoperator). You can select Max, 1 Hour, 12 Hours, 1 Day or 1 Week.
Read report
Delivery report
Priority

Messages
When you are in your home network, and the nload the current MMStent (if the MMS is notnloaded to the phone). Press OK, to display the MMS size confirm whether to download.
the current MMS content,ss R to stop playing. When therent page is bigger than theen, move +/- to view the fulle. When the MMS finishedying, press L Option to replay current MMS, go to the nexte or Save Audio As/Save Image As / Attachments, etc.
ss L to enter, view the sender'sber, copy, subject, sent time
date, etc.
t the MMS and reply the sender,the same time, the subject isnged to "Re: ....".
t the MMS and reply all, at thee time, the subject is changed to: ....".
28
Retrieval mode is set as Immediate, an icon will bedisplayed on the standby screen to indicate that youhave received a new MMS. At this time, the MMS willbe temporarily saved in the cache.If a new MMS is received when you are not in standbymode, continuously press R or ) to return tostandby mode; press L to read the MMS content;press R to return.If the network stop when you are in your homenetwork, and the Retrieval mode is set as Immediate, orwhen you set the Retrieval mode as Delayed, you willbe prompted as to whether or not to download theMMS when a new MMS arrives. The MMS size willalso be displayed.
InboxAll received MMS are saved in the Inbox.Enter the Inbox. Your mobile phone will display a listof MMS in the Inbox (including download prompt).Press +/- to scroll to the MMS you wish to read, andpress L Options to carry out the following operationson the current MMS:
Download dowcondowLand
View viewprecurscrepagplatheslidView
Properties prenumand
Reply ediat cha
Reply to all edisam"Re
29
MS that are not ready for sending.her edited and sent. Enter Drafts, theill display a list of MMS in Drafts.ll to the MMS you wish to read, and to carry out the following operationsMS:
send the current MMS to others.
delete the current MMS.
delete all the MMS in the Outbox.
extract the number of the senderand recipient, Dial or Save To PhoneBook.
browse the contents of the currentMMS.
view detailed information of thecurrent MMS such as: To, Cc,Subject, MMS Size, Date, etc.
if the current draft MMS containsrecipients, copy, etc, the MMS willbe sent to the specified recipients.
edit the current message.
Messages
OutboxMMS that are not sent successfully or that you chooseto save before sending are saved in the Outbox.Enter the Outbox. Your mobile phone will display a listof MMS in the Outbox. Press +/- to scroll to the MMSyou wish to read, and press L Options to carry out thefollowing operations:
DraftsDrafts contains MThey can be furtmobile phone wPress +/- to scropress L Optionson the current M
Forward edit the MMS and forward it, at thesame time, the subject is changed to"Fw: ...".
Delete delete the current MMS.
Delete All delete all the MMS in the inbox.
Use Number extract the number of the sender,Dial or Save To Phone Book.
View browse the contents of the currentMMS.
Properties view detailed information of thecurrent MMS such as: To, Cc,Subject, MMS Size, Date, etc.
Resend resend the current MMS, this itemis available only when the currentMMS is not sent successfully.
Send to others
Delete
Delete All
Use Number
View
Properties
Send
Edit message

Messages
elivery report: feedback as tohether or not the MMS haseen successfully sent to theecipient.riority: set the priority of theurrent MMS. This includesormal, High and Low.lide Timing: control the defaultisplay time of the page. You cannter a number between 1 and 60.elivery time: set the duration for
esending - Immediate, In oneour, In 12 hours or In 24 hours.
the retrieval parameter as follows:ome network: set the degree of
ergency in the downloading ofMS. If you select Immediate, theMS will be downloadedmediately when it arrives; if
ou select Delayed, you will beotified that you have received aew MMS and you can decidehether or not to download. Youn select Restricted to reject theceipt of MMS.
30
Message SettingsThe user must make the necessary settings in order touse the MMS feature.Enter MMS Settings and carry out the followingsettings:
Delete delete the current MMS.
Delete All delete all the MMS in the draftsfolder.
Use Number extract the number of the senderand recipient, Dial or Save To PhoneBook.
Sending set sending parameters as follows:• Validity period: set the duration that
the current MMS will be saved inthe MMS centre (this isdependent on the service providedby your network operator). Youcan select 1 Hour, 12 Hours, 1 Day,1 Week or Max using </>. Maxduration is determined by theMMS service centre.
• Read report: feedback as towhether or not the recipient hasread the MMS.
• Dwbr
• PcN
• Sde
• Drh
Retrieval set • H
emMMimynnwcare
31
d Delivery Report require networkontact your network provider.
one has a dedicated space for the. When the space is fully utilized, youme MMS in order to save new ones.
set the default MMS centre address,http://mmsc.monternet.com.
press L Select, to select one dataaccount from the list.
select Connectionless or Connection-oriented.
set the IP address in the MMSnetwork.
set username; can be empty.
set password; can be empty.
view the memory status in thephone. Usage - ratio of memorycurrently utilized against the totalMMS memory; Free - currentlyavailable memory space.
Messages
Read Report ansupport. Please c
Your mobile phstorage of MMSneed to delete so
• Roaming: set the degree ofemergency in the downloadingof MMS when you are roaming.You can select As Home, Delayed,or Restricted.
• Read Report: set whether or notread report should be sent. Youcan select Send, Never Send, orOn request.
• Delivery Report: turn reportsending on/off, to allow orforbid the sending of deliveryreports.
Filters set the parameter as follows:• Max Size (KB): set the max size,
between 1 and 50.• Anonymous: set whether or not to
receive anonymous MMS. SelectAllow or Reject.
• Advertisement: set whether or notto receive advertisement MMS.Select Allow or Reject.
Edit Profile set network and activate profile.
Rename Profile edit and save the profile name.
Homepage
Data Account
ConnectionType
IP Address
Username
Password
Memory Status

Messages
Voice Mail Server Please contact with the network provider, they willl and info list.
o set the function of broadcast you can receive the broadcastou can not receive messages.
message after activating receive
e of the message that can be
nel, you can select Select, Add, Edit
32
This will automatically direct incoming calls to thevoice mail centre when you cannot answer the call.The caller can leave a message on the voice mailsystem of the service network. If the caller leave amessage, you can access the message by calling thevoice mail system.• Enter Voice Mail Server. You can set up to two voice
mail servers. • Press L OK to enter mail option. You can select
Edit to enter your voice mailbox number, Erase toclear the mail setting of the voice mailbox, orConnect to Voice to listen to voice mail.
• The network operators must support the Voice MailServer function for it to be available. You may haveto apply for the service before you can use the voicemail feature. For further details and informationregarding your voice mailbox number, pleasecontact your network operator.
Broadcast Message
This is a kind of public messages broadcasted to agroup of mobile users. The message are broadcastedon numbered channels. Generally speaking eachbroadcast channel can transmit one kind message.
supply usable channe
Receive ModeThis menu is used tmessage. When On,message. When Off, y
Read MessageTo read broadcast mode.
LanguagesTo set the languagreceived.
Channel SettingPress L to set chanor Delete.

33
s
, the dialed calls will be displayed as ard, then press L OK to check the call
Option, the available options and theire same as Missed Calls.
alls
lls, the received calls will be displayedrecord, then press L OK to check the. Option, the available options and theire same as Missed Calls.
l Log
nter Delete Call Log. When the call logu can delete Missed Calls, Dialed Calls, All Calls records.
save the selected number to thephonebook.
edit and save the number of themissed call.
Call History
6. Call HistoryIn the main menu, press the navigation keys to scrolland select Call History, then press L OK to enter. Youcan look up information on the call records.
Missed Calls
Enter Missed Calls, the screen displays the name of thecaller (if the name is already stored in the phonebook)and telephone number of the missed call. Select arecord in the missed calls list, and press L OK to viewdetails. The date, time and name of the caller,telephone number and number of times the call ismissed are displayed.Press L Option for the following operations:
Dialed Call
Enter Dialed Callslist. Select a recoinformation. If you press L operations are th
Received C
Enter Received Caas a list. Select a call informationIf you press L operations are th
Delete Cal
Press L OK to eis not empty, yoReceived Calls and
Dial call the selected number.
IP Dial if you have set the IP Number, youcan select this option to add the IPNumber in front of the currentnumber, and then dial the number.
Send SMS send an SMS to the selectednumber.
Delete delete the selected record.
Save to Phonebook
Edit

Call History
Call Time r must be able to support Callu can use it. You need to enterthe Max Cost and Price Per Unit.twork provider to obtain this
SMS counter. The optionsved.
r to view the volume of datawork via GPRS. The availableent, Last Received, All Sent or Allreset it to zero via Reset Counter.
34
Press L OK to enter Call Time. You can checkinformation regarding the call duration.
Call Cost
Press L OK to enter Call Cost. You can checkinformation regarding the call cost.
Your network operatoCost function before yoyour PIN2 code to set Please contact your necode.
SMS Counter
To view the currentinclude: Sent and Recei
GPRS Counter
Enter the GPRS Countetransmitted on the netoptions include: Last SReceived. You can also
Last Call Time view the duration of the last call.
Total Sent view the total duration of outgoingcalls made.
Total Received view the total duration of incomingcalls received.
Reset All Time clear all call timers.
Last Call Cost view the cost of the last call.
Total Cost view the accumulated cost of all calls.
Reset Cost clear the call cost record. PIN2 codeis required.
Max Cost view and set a limit on the call cost.When there is no limit, “0” isdisplayed.
Price Per Unit view and set the call cost unit.

35
ings, press C to enter the preview window
ress </> to select EV, Zoom, Image Effectpress +/- to adjust an item. Thearameter is displayed on the top of
e, the following shortcut operations
adjust the brightness of the photo.There are 7 levels in total;[ ],[ ],[ ],[ ],[ ],[ ],[ ],the higher the level, the brighter thepicture.
adjust the focus of the camera. Thedefault setting is normal [ ]. Press+ to zoom in, and press - to zoomout. Zoom multiple include: Zoom1x [ ], Zoom 2x [ ] and Zoom 4x[ ].
set the colour style of the pictures tobe take, which include: Normal, Fog,Moon Light, Antique, Cool, Warm andSepia.
Camera
7. CameraThis mobile phone is equipped with a high resolutioncamera (30 thousand picture element), which you canuse to take pictures, and then save them in yourmobile phone, use them as your mobile phonewallpaper (main screen size) or send them to yourfriends and colleagues via MMS.In the main menu, press the navigation keys to scrolland select Camera. The options in the menu includeCamera and Image viewer.
In standby mode, press C to enter the preview modedirectly, press ,, C or the right side key to takepictures.
Camera
Enter the Camera. Now, the camera is in previewmode.
Camera SettIn standby modeof the camera. Por Image Size; corresponding pthe screen.In preview modare available:
EV
Zoom
Image Effect

Camera
e, adjust the lens to position theraphed in the viewfinder.icture you wish to take, keep the press ,, C or > to take the
Image Size, Image Quality and File. The operations for Image Sizethe same as the shortcut
rations; Image Quality include:mal, High, Fine and Low; File Pathlude: Phone and Memory Card.
shot sound: None, Sound 1, Soundr Sound 3.
number of continuous shot: Off, Shot, Three Shot or Five Shot.
delay time. When you press thection key to take a picture, theture will be taken in the time set.
ert the parameters of the cameradefault setting, except self
ture mode.
36
When size of the image is set as 640x480, zoom is notsupported; when size of the image is set as 320x240,Zoom 1x and Zoom 2x are supported.
In the preview window of the camera, press L Optionto carry out the following operations:
Taking a photo• In view finder mod
object to be photog• After framing the p
camera steady andpicture.
Image Size set the size at which the picture willbe saved. There are three sizes:640x480 [ ], 320x240 [ ] andMain LCD Size [ ].
ToImageViewer
go to ImageViewer. The picturesthat are saved in the ImageViewerare displayed as a list. If File Path isset to Phone, the pictures inD:\Photos in the File Manager aredisplayed; if File Path is set to MemoryCard, the pictures in E::\Photos inthe File Manager are displayed.
Camera Setting set EV, Zoom, Image Effect, finishsetting, and press L OK to activatethe current setting. EV, Zoom andImage Effect operation are the sameas the shortcut operation.
Image Setting set Pathare opeNorinc
Shot Sound set 2 o
Cont Shot set One
Delay Timer Setfunpicyou
Restore Default revto cap

37
Camera• After taking the picture, press L or , to save it(default File Path is Phone), then return to viewfinder mode. Or press R to return to view findermode without saving the picture.
• When Cont Shot is set to On, saving and taking of aphoto will finish at the same time.
• By default, the image is saved and named as IMG + 4serial number of the picture (the number willincrease according to the sequence that the picturesare taken) + a letter from A to Z. You can view thephotos from the ImageViewer menu, or from Photosfolder in the File Manager (if File Path is set to Phone,items in D:\ are displayed; if File Path set to MemoryCard, items in E:\ are displayed).
ImageViewer
Select ImageViewer to view the photos list. Press LOption to select: View, Forward, Rename, Delete, Delete AllFiles, Sort or Storage (if Phone is selected, items in D:\ aredisplayed; if Memory Card is selected, items in E:\ aredisplayed). Press +/- to view the photos. You can usethe Forward operation to forward the photo To Power OnDisplay, To Power Off Display, To Wallpaper, To Screen Saver,To PhoneBook, To MMS, To EMS. The success or failure ofthe forward operation is dependent on the size of theavailable MMS storage space, screen size, etc.

38 Audio Player
8. Audio PlayerIn the main menu, press the navigation keys to scrolland select Audio Player, then press L OK to enter. In the Audio Player menu, press +/- to control themusic, such as pause or resume; press </> to play themusic in the playlist one after another; press > toadjust the volume.In the Audio Player menu, press L List to display themusic playlist. Option menu in Audio Player: Play,Details, Add to Rings, Refresh List, Settings. Options in the Settings menu include:
Play List select the location: From Phone or FromCard.
List Auto Gen
select On or Off. When you select On,the music will be automatically updatedin the playlist in the root directory andAudio. When you select Off, you can goto Option menu, and select Add to addmusic to the play list, select Remove orRemove All to remove the selected file orall files from the play list.
Skin select skin1, skin2 or skin3.
Repeat change the repeat mode, press </> toset Off (not repeat), One (repeat onemusic) and All (repeatedly play all themusic in the playlist).
Shuffle change the order of playback. SelectOn (random order) or Off (playaccording to order of the playlist).
BackgroundPlay
press </> to select On, where you canplay background music in othermodes (except camera, sound recorderand games etc., that involves soundoperation).

Video Player 39
9. Video PlayerIn the main menu, press the navigation keys to scrolland select Video Player, then press L OK to enter.
Video Recorder
Enter Video Recorder, the video recorder displays theview finder interface. Press ,, C or L Record tobegin recording, then press ,, C or L to stop andsave, or press R to exit and save. The recorded videois saved in Movies (D:\ or E:\) folder.
Video Player
Select VideoPlayer, press L to enter. The movies aredisplayed as a list. Press L Option, then select thefollowing operations: Play, Rename, Delete, Delete AllFiles, Sort or Storage.
The mobile phone plays video files in *.mjp formatonly.
Play play the current movie.
Rename change the name of the currentmovie.
Delete delete the current movie.
Delete All Files delete all movies in Movies (D:\ orE:\) folder.
Sort sort all movies By Name, By Type, ByTime and By Size or choose None
Storage select the storage path: Phone orMemory Card.

Fun & Games
Press L to select Option and carry out the following
a new voice memo. In the interface, press L to selector Cont., where you can pause orue recording. Press R to selecthere you can edit and save the
ress ) to exit and save the fileatically. The recorded memo isto Sound Recorder folder under
anager. (If your preferred storagene, then it will be saved inund Recorder; if your preferrede is Card, then it will be saved inund Recorder).
he current voice memo.
d sound to the memo.
e the name of the voice memo.
the voice memo.
all voice memos.
40
10. Fun & GamesIn the main menu, press the navigation keys to scroll andselect Fun & Games, then press L OK to enter. Itcomprises the following: Games, Sound Recorder, ABRepeater and Karaoke.
Games
Select a game, press L. For details about each game,you can refer to the direction on the screen.
Game SettingTurn Game Audio and Game Vibration On or Off. Movecursor using +/-, you can also set the correspondingeffect using </>.
Sound Recorder
The mobile phone records voice memos in *.amr or*.wav format, and display the time and date above it.If the sound recorder is empty, it will display EmptyFolder.
operations:
Record recordrecordPause continStop, wfile. Pautomsaved File Mis PhoD:\SostoragE:\So
Play play t
Append appen
Rename chang
Delete delete
Delete All delete

41
in the Audio folder in the D:\ andmory card has been inserted into thehe files are then displayed in theRepeater function supports theseAF .
Fun & Games
AB Repeater
Enter the menu and select the repeat file, then pressL Option to carry out the following operations:
Sound file is savedE:\ drives (if a memobile phone). Tmenu list. AB formats: AMR, D
Settings change the File Format andPref.Storage. To select AMR or WAV asthe file format, press </>. To selectPhone or Card as the preferred storage,press </>.
Forward forward current file to To User Profile,or To MMS.
Select enter the AB Repeater operationinterface, press the right side key toadjust the volume; press +/- to playthe file or stop. When playing thefile, press </> to move back quickly.Press # to Switch Screen (Recordand Repeat); in the Repeat mode,you can press * to switchbetween Once Repeat Switch or AlwaysRepeat Switch.
Storage select Phone or Card as the storagepath.
HelpTitle Help function.

File Manager
Select one file, and press L Option:
the picture file. If photoat is not supported, the phone
l display an error prompt.
y multimedia file. If file formatot supported, the option will
appear.
ard the different format files toerent destinations. Forwardsic file To User Profile as ringe; or To MMS as MMS edit; or ToS as EMS edit. ward photo file To Power Onlay, To Power Off Display, To
llpaper, To Screen Saver, ToneBook, To MMS, To EMS. Theions available may be differentording to the object.
lay details, including Date and.
nge the file name.
42
11. File ManagerIn the main menu, press the navigation keys to scrolland select File Manager, and then press L OK to enter.The menu displays "D:\" and "E:\"(if a Memory cardhas been inserted into the mobile phone).
Open the file manager to display a list of files, select afolder, and press L Option:
Open allows you to open the folder.
Create Folder create a new folder and edit thefolder name.
Format format NOR flash, NAND flashand Memory card. This operationwill delete data in the current Norflash.
Open allows you to open the folder.
Create Folder create a new folder.
Rename change the current file name.
Delete delete the current file.
Sort select sorting method: By Name, ByType, By Time and By Size, or selectNone.
View viewformwil
Play plais nnot
Forward forwdiffmutonEMForDispWaPhooptacc
Detail dispSize
Rename cha

43
tion is the same as D:\ and E:\.
e catalog, press the right key to open ae left key to return to previous screen.
File Manager
If the file attribute is Read Only, it can not be deleted.
Method of opera
In all levels of thfile, and press th
Copy copy the current file to anotherdestination. Press L to select thisoperation, and display all filesunder the same root list. If you wishto copy the file in the same root list,press +/- to select the destination,then carry out Option operation; ifyou wish to copy the file from adifferent root list, press R Returnto select D:\ or E:\, then press Lto carry out Option operation.
Move move the current file to anotherdestination. Move is the same asCopy, but once Move is done, thefile will no longer be available in itsoriginal location.
Delete delete the current file.
Delete delete all files in the current catalog.
Sort select the sorting method of thecurrent files: By Name, By Type, ByTime, By Size, or select None.
Attribute set the attribute of the file On or Off.

Settings
On/Off four time settings to turn on/offEach time setting includes thetus (Disable or Enable), Power On
ce you have completed the timeone will turn on/off accordingly
s.
ted, because you cannot activate time.
to select a language for all menuigation key to browse the list and
ressing , or L.
ethodsnput methods in the mobile phone,ferred input method.
g Typeional chinese character encoding,
simplified chinese character
the time format as 12-hour or 24-r, or set the date format as YYYY--DD, MM DD,YYYY, DD-MM-Y, DD/MM/YYYY, MM/DD/YYYY,YYY/MM/DD.
44
12. SettingsIn the main menu, press the navigation keys to scrolland select Settings. Press L OK to enter the Settingsmenu. In this menu, you can configure your usagepreferences of the mobile phone. These include PhoneSetup, Call Setup, IP Number, Network Setup, Security Setupand Restore Factory Settings.
Phone Setup
Enter the Phone Setup . You can carry out the followingsettings:
Time and DateUse this menu to change the time and date displayedon your phone. Enter the Time and Date . You can carryout the following settings:
Time will remain unchanged when city is changed.
Schedule Power You can create up tothe mobile phone. following options: Staor Off and Time. Onsetting, the mobile phwhen the time arrive
Time cannot be repea2 settings at the same
LanguageThis menu allows youtexts. Use + and - navselect a language by p
Preferred Input MThere are 11 kinds of ichoose one as your pre
Default EncodinSelect BIG5, for traditselect GB2312 for
Set Home City select a city from 57 cities.
Set Time/Date set the current time and date of themobile phone according toestablished format. The mobilephone allows you to set a datebetween 2000 and 2030.
Set Format set houMMYYYor Y

45
and edit the greeting text of the
feature On or Off and set speed dial
and press L OK. You can enter and number from 2-9. In standbydial the number you have set by corresponding number key.
t whether or not to display the dated time in standby mode by turningn or Off.
you have set the name and number inone Book > Extra Number > Ownerumber menu, then the name will besplayed in standby mode. If you havet the number option only, then thember is displayed in standby modeote: When the wallpaper is set asalog Clock and Digital Clock, showner number will not be displayed).u can turn this option On or Off.
Settings
encoding. If certain characters cannot be displayed,please switch the encoding in order to view them.
Display Characteristics
Greeting TextTurn On or Off, phone.
Speed DialTurn Speed Dial numbers. Select Set Number select a speed dialmode, you can holding down the
Themes select menu colour: Blue, Green orOrange, then activate the currenttheme, and change the menu colour.
Wallpaper set the background image of mainscreen displayed in idle mode:Choose System to select thepredefined image or choose UserDefine to select the downloadedimage.
Screen Saver select Setting to set the status andwaiting time of the screen saver. EnterSelect to choose System or User Define.The operation of this function issimilar to Wallpaper.
Power On Display
allows you to set the image displayedwhen power on: Choose System toselect the predefined image or chooseUser Define to select the downloadedimage.
Power Off Display
the operation is the same as Power OnDisplay.
Show Date and Time
seanO
Show Owner Number
if PhNdisenu(NAnowYo

Settings
Dedicated key how to use this function, please contact your network
ork service allows you to divert,situations, certain incoming callsr designated by you. This service
support. Please contact your activate this service. You can incoming call divert function of
vate this function.
cel this function.
the status of this function.
ert all incoming calls. Theber of rings after which the call
l be diverted shall depend on thework.
ert all incoming calls when younot reachable due to some
work error or other reasons.
ert all incoming calls if they are answered.
46
You can edit the shortcut function of the navigationkeys +, -, < and > in standby mode.
ShortcutsYou can edit the shortcut menu, it can be found inExtra > shortcuts.
Call Setup
You can carry out the following settings:
Caller IDThis function provides the user with the ability tosend or hide his/her phone number from the otherparty when a call is initiated.
Call WaitingIf you have activated this function, the network willnotify you that there is a new incoming call when youalready have another call in progress. For details on
provider.
Call DivertThe call divert netwunder certain preset to a telephone numberequires network network provider toactivate or cancel theyour mobile phone.
Set By Network use the default value set by thenetwork; whereby showing/hiding ofphone number is determined by thenetwork.
Send Id owner number is shown to thecalled party.
Activate acti
Deactivate can
Query Status view
Divert All Voice Calls
divnumwilnet
Divert If Unreachable
divare net
Divert If No Answer
divnot

47
allows you to bar outgoing calls toother numbers. It includes: All Calls,which bars the user from makingany outgoing calls; International Calls,which prevents the user frommaking international calls only;International Except Home, whichprevents the user from makinginternational calls except to home.You can Activate, Deactivate or makea Query Status on the aboveoptions.When All Calls is activated,you can only dial the SOS number.
allows you to bar incoming callsfrom other numbers. It includes: AllCalls, which prevents the user fromreceiving all incoming calls; WhenRoaming, which prevents the userfrom receiving any incoming callwhen the user is out of the homenetwork. You can Activate, Deactivateor make a Query Status on the aboveoptions.
Settings
When you have selected one of the above modes, youmay carry out the following operations:
Call BarringThe Call Barring option allows you to bar incoming oroutgoing calls based on user defined conditions. A 4-digit Barring Password required to activate Call Barringservice is supplied by your network provider . Formore information regarding this feature, pleasecontact your network provider.
Divert If Busy divert all incoming calls when thereis at least one call in progress.
Divert All Data Calls
divert all data calls.
Cancel All Divert
deactivate all call diverts.
Activate activate this function.
Deactivate cancel this function.
Query Status view the status of this function.
Outgoing Calls
Incoming Calls

Settings
Auto Redial or off to activate or deactivate
upports IP call and allows up to number. Firstly, edit the IPtivate it. When you make an IP will be automatically added inmber. e following operations:
p
n allows you to select the networkoaming outside of your home
atically or manually.
vate this function.
t the IP Number.
h and connect to the firstable network automatically.
48
Call Time ReminderThis option enables you to remind yourself about theduration of a call. When this option is enabled, therewill be a short beep when the duration of a call exceedsthe reminder timer. It can be a single or periodicreminder.
If the input value is out of the range as describedabove, there will be a pop-up notification along withan error tone.
Call Time Display Turn this option on or off to display or hide the calltime.
Turn this option onauto redial.
IP Number
The mobile phone sthree groups of IPnumber, and then accall, the IP numberfront of the phone nuYou may carry out th
Network Setu
Network SelectioThis network serviceto be used while rnetwork, either autom
Cancel All cancel all barrings. You need toenter the barring password.
Change BarringPW
enter the old password, and set thenew password.
Off cancel this function.
Single a single reminder beeps only once, thetimes may range from 1 to 3000 secs.
Periodic beeps periodically each time thetimer expires; the times may rangefrom 30 to 60 secs.
Activate acti
Edit edi
Automatic searcavail
49
ction, and select When Needed connection or
tup
tup. Here you can set the securityour mobile phone to prevente of your mobile phone and the SIM
use the correct phone lock code toup.
ock is active, you must enter the PIN is supplied by the provider with thee code you enter is incorrect for three to enter PUK code (PIN unlocking code is used to unlock or change thee. If the PUK code is not offered ortact with the network provider.e, then press L. If the status of SIMn its status will be On, otherwise theff.
Settings
Preferred NetworksPreferred Networks is a list of networks alreadyconfigured and set by you. The preferred networkswill be stored in the SIM card.Press L OK to show a list of preferred networks.Select an item, then press L Option to enter it:
Band SelectionThis menu is used to select the band of network forcalls.
GPRS ConnePress L ChangeAlways connection.
Security Se
Enter Security Seoptions of yunauthorized uscard.
Note: You mustaccess Security Set
SIM LockWhen the SIM Lcode (PIN codeSIM card). If thtimes, you needcode). The PUKlocked PIN codlost, you can con• Enter PIN cod
Lock is Off, thestatus will be O
Manual manually select and connect to anetwork from a list of availablenetworks.
Add From List add a network from a pre-definedPLMN LIST. You can press +/- to setthe search priority.
Create New add a new network to the preferrednetworks list. You can also set thenetwork name and the priority.
ChangePriority
change the priority of the selectednetwork.
Delete delete the selected network from thePreferred Networks list.

Settings
You can select None to deactivate automatic keypad
d, the mobile phone will lockhone will unlock automaticallyider.
pports it, outgoing calls can benumbers. When this function isnly dial the numbers that are in or numbers that have the sameose in the fixed dialing list.e following settings:
ur PIN2 code to turn the Fixedn or off. Please contact your obtain the PIN2 code. After Dialing function, only numbers
r PIN2 code and turn fixed dialtion On or Off.
there are numbers in the fixedg list, you can carry out the desired
ations.If the list is empty, youress L Add to add and edit the
e and number of the fixed dial list.
50
If you enter an incorrect PIN number three times insuccession, your SIM card will be locked. At this time,you need the PUK number to unlock the SIM card.The PIN number and PUK number may have beenprovided to you together with the SIM card. If you donot have them, please contact your network provider.The default PIN number is usually 1234. You shouldchange it to your own code as soon as possible.
Phone LockPhone Lock can prevent unauthorized use of yourmobile phone. You can carry out the following operations:• If your phone lock protection is currently inactive,
select On to activate phone lock protection. Thenext time you turn on the phone, you will be askedto enter your phone lock code;
• If your handset lock protection is currently in use,select Off to turn off phone lock protection;
The default phone lock code is 0000. You shouldchange it to your own code as soon as possible.
Auto Keypad LockSelect a time from 5 sec, 30sec, 1min and 5min. Thekeypad will lock automatically when there are no keypresses within the set time when in standby mode.
lock.
If the slider is closeautomatically; the pwhen you open the sl
Fixed DialIf your SIM card surestricted to certain activated, you may othe fixed dialing list,initial numbers as thYou can carry out th
You need to enter yoDialing function onetwork provider toturning on the Fixed
Mode entefunc
Fixed Dial List whendialinopercan pnam

51
worded to change PIN code, PIN2 code andrd.
st contain at least 4 digits and aigits.
ctory Settings
Factory Settings. Here you can restoretings to the manufacturer’s default
nufacturer’s default settings requiresdset lock code to be entered. Somebe restored to the manufacturer’sntil the phone is restarted.
Settings
in the fixed dialing number list are displayed in thephone book.
Barred DialIf your SIM card supports it, certain numbers can bebarred. When this function is activated, you may onlydial the numbers that is in the barred dialing list.
You need to enter your PIN2 code to turn the BarredDialing function on or off. Please contact yournetwork provider to obtain the PIN2 code. After youhave turned on the Barred Dialing function, onlynumbers in the Barred dialing number list aredisplayed in the phone book.The barred dial numberlist is stored in the BDN file on the SIM card. If yourSIM card does not have a BDN file, a popup windowsshows SIM Card Not Support!.
Change PassThis menu is usPhone Lock Passwo
A password mumaximum of 8 d
Restore Fa
Enter the Restorethe relevant setsettings.
Restoring the mathe correct hansettings cannot default settings u
Mode enter PIN 2 code and turn barreddialing function On or Off.
Fixed Dial List when there are numbers in the barreddialing list, you can carry out thedesired operations.If the list is empty,you can press L Add to add and editthe name and number of the barreddial list.

User Profiles
e already been set and the defaultandby mode, press and hold # toode on or off; same with opening or.
d select the required profile, then
vate the selected profile.
your profile and select theresponding settings. Selecttomize, and press L OK tolay the following menu
ions:one Setup: customize differentng tones with different options,r example, cover open or close,
ower on or off, etc.olume: Two types of volume cane set: Ring Tone (includingcoming call, alarm, power on,
ower off, cover open, coverose, message tone) and Key Tonessociated with key presses).
52
13. User ProfilesYour mobile phone provides a number of user profiles foryou to set your mobile phone's ring tone, according tocondition and environment.From the main menu, press the navigation keys to scrolland select User Profiles. Press L to enter the UserProfiles menu, where you will be able to access thefollowing: General, Meeting, Outdoor, Indoor or Headset.
These five profiles havprofile is General. In stquickly turn silence mclosing of the vibrator
Press +/- to scroll anpress L Option:
General for use under general conditions.
Meeting for use in meetings. This requirespresetting (for example, set Alert Typeto Vibration Only).
Outdoor for use during outdoor activities.This requires presetting (forexample, you can set a higher ringvolume).
Indoor for use during indoor activities. Thisrequires presetting.
Headset for use during headset activities. Thismode will be activated when theearphone is inserted. This requirespresetting (for example, you can set alower ring volume).
Activate acti
Customize set corCusdispopt• T
rifop
• Vbinpcl(a

53
User Profiles• Alert Type: This option allowsyou to set the type of alert youwish to receive when there is anincoming call. You can selectonly one option from Ring,Vibration Only, Vibra and Ring orVibra Then Ring.
• Ring Type: This option allowsyou to set the ring mode, suchas Single, Repeat or Ascending.
• Extra Tone: You can turn on oroff the tone for Warning, Error,Camp on and Connect.
• Answer Mod: You can selectdifferent answering modes:Cover Answer, Any Key (except forthe Hang-up key, right soft key,side key) or Automatic (onlywhen the earphone is inserted).
• LCD Backlight: Set the time ofLCD Backlight: 5 Sec, 15 Sec,30 Sec and 45 Sec.
• Font Size: Set the size of the font:Theme Default, Small, Medium orLarge.
Services
Network support is necessary for WAP services. Please provider and/or service providerervice provider will also provides on how to use their service.press +/- to scroll and select WAPr the menu. The following menue: Homepage, Bookmarks, Recentervice Inbox and Settings.
enter the home page. Use thisr phone to the network, or loade wireless web service provider.ttings > Edit Profile. If you have noten the site will be set by the://wap.monternet.com.
arks list. Press +/- to select aess L Option to access the
nect to the address of thected bookmark.
t the Title and Address of thekmark.
54
14. ServicesIn the main menu, press the navigation keys to scrolland select Services. There are three submenus: STK,WAP and Data Account.
STK
Press +/- to scroll and select STK. Press L to enterthe STK menu. In this menu, you can use the value-added services provided by your network operator.Your mobile phone supports STK functions. Thisservice is provided by your network operator. If yourSIM card and network operator do not provide thisservice, then you will not be able to use this function.For more information, please contact your networkoperator.
WAP
Your mobile phone supports Wireless ApplicationProtocol (WAP) service. You can access a wide varietyof WAP services such as news, weather reports, flightinformation, etc. These services are especiallydesigned for mobile phones and maintained by WAPservice providers.
contact your networkof the service. The syou with instructionIn the Services menu, and press L to enteoptions are availablPages, Enter Address, S
HomepageSelect Homepage to menu to connect youthe home page of thHomepage is set in Seset a homepage, thmanufacturer as http
BookmarksDisplay the bookmbookmark, then prfollowing options:
Goto consele
Edit ediboo

55
display the edit profile list. Afteryou have edited and saved the list,select Activate Profile to activate it.
change the name of the profile.
change the homepage.
select GSM Data or GPRS dataaccount.
select Connection-oriented,Connectionless or HTTP connectiontype, depending on the gateway.Use +/- to make your selection.
set the user identity of APN Service.
set the user password of APNService.
set Timeout and Show Images
set a time limit, between 15 - 300seconds; if there is no data enteredor transferred beyond this timelimit, the service will automaticallyturn off.
Services
Recent PagesYou can visit the web sites you visited recently.
Enter AddressUse this menu to manually enter the URL address ofa website and access it. You can also access a websiteusing Bookmarks and Recent Pages menu.
If you wish to visit sina website, you just need to enterwap.sina.com.
Service InboxSelect Service Inbox to view service messages you havereceived.The mobile phone can receive service messages sent byyour service provider. For example, service messagesmay consist of notifications on news briefings, or a lineof a text message, or a WAP service address.
SettingsSelect Settings to enter settings for online browsing,including Edit Profile, Browser Options, Service MessageSettings, Clear Cache, Clear Cookies, Clear Recent Page Listand Trusted Certificates.
Delete delete the selected bookmark.
Add Bookmark edit the title and address of the newbookmark.
Edit Profile
Rename Profile
Homepage
Data Account
ConnectionType
Username
Password
BrowserOptions
Timeout

Services
WAP Online Directione functions service pages, you can press L
e following operations:
o the current selected connection.
rn to the WAP service homee.
nload the current page again.
lay all your saved bookmarks.ss L Option to go to the websitectly, edit the bookmark's name,
t the bookmark's address, orete the bookmark, etc.
lay the recent pages.
directly to a desired site byctly entering the specific URLress.
the current site as the WAPice home page.
the service message.
er settings for online browsing.
56
If you have attempted to access, or successfullyaccessed confidential information that require apassword (such as a bank account), please clear yourmobile phone's cache memory each time.
• How to use OnlinWhen browsing WAPOption to carry out th
Show Images select On or Off to show or hideimages.
ServiceMessageSettings
select to receive or not to receiveWAP service messages.
Clear Cache Data or services that you have visitedwill be saved in the cache memory ofyour mobile phone. Please promptlyclear these temporary files that recordyour online data.
Clear Cookies Data or services that you havevisited will be saved in the cookiesmemory of your mobile phone.Please clear these temporary filesthat record your online data.
Clear RecentPage List
clear the recent page list thatrecords your online data.
TrustedCertificates
display trusted certificate.
Goto got
Homepage retupag
Refresh dow
Bookmarks dispPredireedidel
Recent Pages disp
Enter Address go direadd
Set ashomepage
set serv
Service Inbox view
Settings ent

57
unt
e mobile phone will display a list ofunt. You can select and edit the GSM
specify a name for the account.
specify the phone number to dial forconnection to the account server.
set the user identification for login tothe account.
set the password for login to theaccount.
select Analogue or ISDN.
set the rate for transmission/receptionof data to/from the account server.The available options are 4.8Kbps,9.6Kbps and 14.4Kbps.
edit the DNS Address.
Services
When browsing a WAP page, you can press )at anytime to exit the WAP browser window, disconnect andreturn to standby mode.
• Explanation of the Mobile Phone Keys in theBrowser
Press +/- to move up/down and scroll through theWAP page.Press </> to move left/right and scroll through theWAP page.Press L Option to enter the option menu.Press the number keys from 0 to 9 to enter letters andnumbers.Press * to enter punctuation.Press # to switch input method.Press R to exit or cancel operation.
The function of your mobile phone's keys may differaccording to the WAP services. Please follow the textprompts on the screen of your mobile phone. For moreinformation, please contact your WAP service provider.
Data Acco
GSM DataIn this menu, thGSM Data accodata:
Exit exit the WAP browser window anddisconnect.
Save Image save a picture. This option will onlyappear when there is a picture in thecurrent page.
Account Name
Number
User Name
Password
Line Type
Speed
DNS

Services
GPRS
58
In this menu, the mobile phone will display a list ofGPRS Data account. You can select and edit theGPRS data:
Account Name specify a name for the account.
APN edit APN.
User Name set the user identification for loginto APN.
Password set the password for login to APN.
Auth.Type select Normal or Secure.

59
ion is available when the alarm is
epress L OK to jump to the selected
s you to manage all kinds of things ine. You can set the content, detailedf To do list.
ne can set up to three alarms. The even when the phone is turned off.
then set it to On or Off, then enter theepeat mode.
dit and amend the current task.
elete the current task.
elete all tasks.
Extra
15. ExtraIn the main menu interface, press the navigation keys toscroll to Extra and press L to enter the Extra menu.You can make use of some practical applications, suchas: Calendar, To Do List, Alarm, Calculator, Units Converter,Currency Converter and Shortcuts.
Calendar
When you enter the Calendar, the screen will display thecurrent month. To change date, use the navigation keys.
View TasksYou can enter View Tasks menu to set a new task andview the task list.
The repeat optturned on.
Jump To DatEnter the date, date.
To Do List
This menu helpyour work or liftime and alarm o
Alarm
The mobile phoalarm will soundSelect an alarm, time and select R
View view the current task.
Add add and edit taks as follows:
Date - set reminder date.
Time - set reminder time range.
Note - edit reminder text.
Alarm - turn the alarm on or off.
Repeat - set repeat periods with alarm.
Edit Task E
Delete Task D
Delete All D

Extra
Calculator Ounce. Enter the number in the frame and press Lult will be displayed on another
the operational item. Press </> ton from Km <-> Mile, M <-> Yard,<->Inch. Enter the number in the
OK; conversion result will beer frame.
rter, you can enter up to eightversion result can display up toinclude decimal point).
nverter
, then press L OK. Press +/- toal item, then press </> to select thete. Enter the number in the frameonversion result will be displayed
you to set shortcuts to the featurescess most frequently.
60
The calculator supports 4 basic arithmetic functionsto facilitate simple calculations.Enter the Calculator to display the operation interfaceof the calculator:• Use the number keys from 0 - 9 to enter
numbers, and use # to enter decimal point.• Press +/- and </> to enter the symbols for the four
mathematical operators +, -, x or /.• Press R Clear to delete the last entry or result,
press R Back to exit the calculator, press L or C,"=" to display the result.
The precision of this calculator is limited. Therefore,rounding errors may occur, especially in the case ofindivisibility.
Units Converter
Units Converter is an application that helps youconvert American units into metric units, and viceversa.• WeightPress +/- to select the operational item. Press </> toselect the conversion from KG <-> Pound and KG <->
OK; conversion resframe.• LengthPress +/- to select select the conversioM <-> Foot and Cmframe and press Ldisplayed on anoth
In the units convenumbers. The confourteen numbers (
Currency Co
First, enter the Rateselect the operationlocal and foreign raand press L OK; con another frame.
Shortcuts
This feature allows and options you ac

Input Methods 61
16. Input MethodsGeneral outline
This mobile phone supports English input and thefollowing input methods:Multitap ABC, Multitap abc, Numeric, Smart ABC,and Smart abc. Text entry functions permitted on thismobile phone are:• Inputting and editing of short messages• Inputting and editing of names in the phone book • Looking up a phone entry by name• Editing of greeting texts • Editing of MMS texts• Many more...
Keyboard values
Generally L indicates confirmation; R indicatesreturn or cancel.Navigation keys (+/- and </>): Generally used tomove the cursor or candidate characters during textentry.C: In the Smart English input method, press C to selectthe character for the candidate area; when editingshort messages, press C to select Option, complete theediting or enter EMS option menu.
#: To switch between different input methods. Number keys from 2 to 9: in the IntelligentEnglish input mode, enter the letters corresponding tothe keys.

62 Icons & symbols
Icons & symbolsIn standby mode, several symbols can be displayedsimultaneously on the main screen.
If the network symbol isn’t displayed, the network iscurrently not available. You may be in a bad receptionarea, moving to a different location may help.
GSM Network - Your phone is connected to aGSM network.
Reception quality - The more bars are shownthe better the reception is.
GPRS attach - Your phone is connected to theGPRS network.
Keyboard lock - Keyboard is locked.
Vibra - Your phone will vibrate whenreceiving a call.
Vibra and Ring - Your phone will vibrate andring when receiving a call.
Ring - Your phone will ring when receiving acall.
Vibra then ring - Your phone will vibrate thenring when receiving a call.
Roaming - Displayed when your phone isregistered to a network other than your own(especially when you’re abroad).
Automatic reception of MMS - Your phone isset to automatic reception of MMS.
MMS message - You have received a newmultimedia message.
SMS message - You have received a new SMSmessage.
Voice mail - You have received a new voicemail.
Record - Displayed when you are recording.
WAP message - You have received a messagein your WAP push inbox.
Alarm clock - Activated.
Call divert - Divert all voice calls is activated
Battery - The bars indicate the battery level (4 bars = full, 1bar = low).
Missed call - You have missed calls.
63
our phone in a safe place and keep itsmall children's reach.writing down your PIN code. Try tober it instead. one and remove the battery if you are
unused for a long time.N code after purchasing the phoneall restriction options.sign of your phone complies with allble laws and regulations. Howeverhone may cause interference withlectronic devices. Consequently youall local recommendations and
n using your cellular phone both at away. Regulations on the use of
s in vehicles and aircraft aregent.as been focused for some time on theisks for users of cellular phones. The on radio wave technology, includingology, has been reviewed and safetybeen drawn up to ensure protectionto radio wave energy. Your cellularies with all applicable safety standardsquipment and Telecommunications
ment Directive 1999/5/EC.
PrecautionsRadio Waves
Your cellular mobile phone is a low powerradio transmitter and receiver. When it isoperating, it sends and receives radio waves.The radio waves carry your voice or data
signal to a base station that is connected to thetelephone network. The network controls the powerat which the phone transmits.• Your phone transmits/receives radio waves in the
GSM frequency (900 / 1800 MHz).• The GSM network controls transmission power
(0.01 to 2 watts).• Your phone complies with all relevant safety
standards.• The CE mark on your phone shows compliancy
with European electromagnetic compatibility (Ref.89/336/EEC) and low voltage directives (Ref. 73/23/EEC).
Your cellular mobile phone is your responsibility. Toavoid damage to yourself, to others or to the phoneitself, read and follow all the safety instructions andmake them known to anyone borrowing your phone.Furthermore to prevent unauthorised use of yourphone:
Keep yout of Avoid remem
Switch off the phgoing to leave itChange your PIand to activate c
The deapplicayour pother e
should follow regulations whehome and whencellular phoneparticularly strinPublic concern hpossible health rcurrent researchthe GSM technstandards have from exposure telephone compland the Radio ETerminal Equip
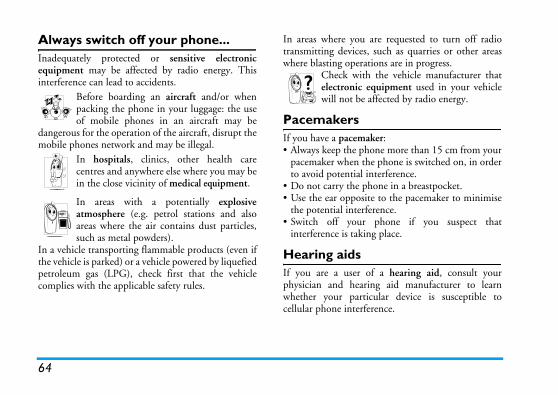
Always switch off your phone... In areas where you are requested to turn off radio such as quarries or other areastions are in progress. the vehicle manufacturer thatquipment used in your vehicle
affected by radio energy.
ker:one more than 15 cm from youre phone is switched on, in ordernterference.hone in a breastpocket.te to the pacemaker to minimiseerence.
phone if you suspect thatg place.
f a hearing aid, consult yourng aid manufacturer to learncular device is susceptible torence.
64
Inadequately protected or sensitive electronicequipment may be affected by radio energy. Thisinterference can lead to accidents.
Before boarding an aircraft and/or whenpacking the phone in your luggage: the useof mobile phones in an aircraft may be
dangerous for the operation of the aircraft, disrupt themobile phones network and may be illegal.
In hospitals, clinics, other health carecentres and anywhere else where you may bein the close vicinity of medical equipment.
In areas with a potentially explosiveatmosphere (e.g. petrol stations and alsoareas where the air contains dust particles,such as metal powders).
In a vehicle transporting flammable products (even ifthe vehicle is parked) or a vehicle powered by liquefiedpetroleum gas (LPG), check first that the vehiclecomplies with the applicable safety rules.
transmitting devices,where blasting opera
Check withelectronic ewill not be
PacemakersIf you have a pacema• Always keep the ph
pacemaker when thto avoid potential i
• Do not carry the p• Use the ear opposi
the potential interf• Switch off your
interference is takin
Hearing aidsIf you are a user ophysician and heariwhether your particellular phone interfe

65
will also help to save the battery’slonger phoning and stand-by
ormationpowered by a rechargeable battery.harger only.rate. or open the battery.metal objects (such as keys in yourrt circuit the battery contacts.re to excessive heat (>60° C orure or caustic environments.hould only use Philips authentic and accessories, as the use of anyccessories may damage your phoneay be dangerous, and will make alltees for your Philips phone null andf an incorrect type of battery may alson.
ged parts are replaced immediately byician and that they are replaced withreplacement parts.
Improved performanceIn order to improve the performance of your phone,reduce radio energy emission, reduce batteryconsumption and ensure safe operation adhere to thefollowing guidelines:
For the optimal and satisfactory operation ofthe phone you are recommended to use thephone in the normal operating position(when not using in hands-free mode or witha hands-free accessory).
• Do not expose your phone to extremetemperatures.
• Treat the phone with care. Any misuse will void theInternational Guarantee.
• Do not immerse the phone in any liquid; if yourphone is damp, switch it off, remove the batteryand let them dry for 24hrs before using them again.
• To clean the phone, wipe it with a soft cloth.• Placing and receiving calls consumes the same
amount of battery energy. However, the mobileconsumes less energy in idle screen when kept inthe same place. When in idle screen and while youare moving, your phone consumes energy totransmit updated location information to thenetwork. Setting the backlight for a shorter periodof time as well as avoiding unnecessary navigating
in the menusenergy for performances.
Battery inf• Your phone is • Use specified c• Do not incine• Do not deform• Do not allow
pocket) to sho• Avoid exposu
140° F), moistYou sbatteryother aand mguaran
void. The use ocause an explosioMake sure damaa qualified techngenuine Philips

Your mobile phone and your car Environmental careto observe the local regulationshe disposal of the packaging
xhausted batteries and old phoneromote their recycling.
the battery and packaging withsigned to promote the recyclingosal of your eventual waste.
ery should not be disposed oferal household waste.
elled packaging material ise.
ial contribution has been madeassociated national packagingand recycling system.
tic material is recyclable (also the type of plastic).
66
Studies have shown that speaking on thetelephone while driving lowers yourconcentration, which can be dangerous.Adhere to the following guidelines:
• Give your full attention to driving. Pull off the roadand park before using the phone.
• Respect the local regulations in countries where youdrive and use your GSM phone.
• If you want to use your phone in a vehicle, installthe hands-free car kit which is designed for thatpurpose.
• Ensure that your phone and car kit do not block anyair bags or other security devices fitted in your car.
The use of an alarm system to operate a vehicle's lightor horn to indicate incoming phone calls is prohibitedon public roads in some countries. Check localregulations.
EN 60950 NormIn hot weather or after prolonged exposure to the sun(e.g., behind a window or a windscreen), the temperatureof your phone's casing might increase, especially whenfeaturing a metallic finish. Be very careful in this casewhen picking up your phone and also avoid using it withan ambient temperature over 40° C.
Remember regarding tmaterials, eand please p
Philips has marked standard symbols deand appropriate disp
The battwith gen
The labrecyclabl
A financto the recovery
The plasidentifies

67
oesn�t respond (or the nds slowly) to key pressessponds more slowly at very lowhis is normal and does not affect the phone. Take the phone to a warmerin. In other cases please contact your
seems to over heatsing a charger that was not intendedMake sure you always use the Philipsry shipped with your phone.
oesn�t display the phone coming calls
etwork and subscription dependent.perator for detailed information on
d text messagesdon’t allow message exchanges with First check that you entered theSMS centre, or contact your operatorrmation on this subject.
TroubleshootingThe phone does not switch onRemove/reinstall the battery. Then charge the phoneuntil the battery icon stops scrolling. Unplug fromcharger and try to switch the mobile on.
Your phone doesn�t return to the idle screenLong press ) or switch off the phone, check that theSIM card and the battery are installed correctly andswitch it on again.
The network symbol is not displayedThe network connection is lost. Either you are in aradio shadow (in a tunnel or between tall buildings) oryou are outside the network coverage area. Try fromanother place, try to reconnect to the network(especially when abroad), check that the antenna is inplace if your mobile has an external antenna, orcontact your network operator for assistance/information.
The display ddisplay respoThe display retemperatures. Toperation of theplace and try agaphone supplier.
Your batteryYou might be ufor your phone. authentic accesso
Your phone dnumbers of inThis feature is nContact your othis subject.
You can�t senSome networks other networks.number of your for detailed info
You have the feeling that you miss some
68
callsCheck your call divert options.
The display shows SIM failureCheck that the SIM card has been inserted in the rightposition. If the problem remains, your SIM card maybe damaged. Contact your operator.
When attempting to use a feature in the menu, the mobile displays NOT ALLOWEDSome features are network dependent. They are onlyavailable, therefore, if the network or yoursubscription supports them. Contact your operatorfor detailed information on this subject.
The display shows INSERT SIMCheck that the SIM card has been inserted in the rightposition. If the problem remains, your SIM cardmight be damaged. Contact your operator.
Your phone is not chargingIf your battery is completely flat, it might take severalminutes of pre-charge (up to 5 minutes in some cases)before the charging icon is displayed on the screen.
69
Philips Authentic Accessories
Some accessories, such as battery and charger, areincluded as standard accessories in your mobile phonepackage. Additional accessories may also be providedor sold separately. Package contents may thereforevary.
To maximise the performance of your Philips mobilephone and not to void the warranty, always purchasePhilips Authentic Accessories that are speciallydesigned for use with your phone. Philips ConsumerElectronics cannot be held liable for any damages dueto use with non-authorised accessories.
ChargerCharges your battery in any AC outlet. Small enoughto carry in a briefcase/handbag.
USB cableThe USB cable enables high speed communicationbetween your phone and your computer. You canmanage the information stored in your phone such asimage, animation, photo, video and music. You canalso use the cable to charge battery (This chargingmode is fit for most PC).
HeadsetYour phone will activate headset mode automaticallywhen you plug in the earphone. And you can select"auto" option in answer mode. If this optionís statusis "on", your phone will automatically answer theincoming call in 5 or 10 seconds.
70 Specific Absorption Rate Information
Specific Absorption Rate InformationInternational standards
THIS MOBILE PHONE MEETS THE INTERNATIONAL RECOMMENDATIONS FOR EXPOSURE TO RADIO WAVES
Your mobile phone is a radio transmitter and receiver. It is designed and manufactured not to exceed the limits forexposure to radio frequency (RF) energy defined by the international standards. These recommendations have beenestablished by the International Commission on Non-Ionizing Radiation Protection (ICNIRP) and, the Instituteof Electrical and Electronics Engineers - Standards Associations (IEEE-SA) that forcast a substantial safety marginfor assuring the protection of all persons, regardless of age and health.
The exposure recommendations for mobile phones use a measurement unit known as the Specific Absorption Rate(SAR). The SAR limit recommended by the ICNIRP for the mobile phones used by the general public is 2,0 W/kg in 10g of tissue and, is 1,6W/kg in 1g of tissue by IEEE-SA (IEEE Std 1528) for the head.
Tests for SAR have been conducted using recommended operating positions with the mobile phone transmittingat its highest certified power level in all tested frequency bands. Although the SAR is determined at the highestcertified power level, the actual SAR levels of the mobile phone while operating are generally below the maximumSAR value. This is because the phone is designed to operate at multiple power levels so as to use only the powerrequired to reach the network. In general, the closer you are to a base station antenna, the lower the power output.
While there may be differences between the SAR levels of various phones and at various positions, they all meetthe international protection standards for exposure to radio waves.
The highest SAR value for this Philips S890 model phone when tested for compliance against the standard was0.21W/kg for ICNIRP recommendation and 0.302 W/kg for IEEE Standard. For limiting the radio waves exposure, it is recommended to reduce the mobile phone call duration or to use aheadset. The purpose of those precautions is to take the mobile phone away from the head and the body.

71
ip During The Limited Warranty
limited warranty period, Philips or itsservice representative will, at itsr repair or replace, without charge forour, a materially defective Productr refurbished parts or Product and repaired or replaced Product to thein working condition. Philips willtive parts, modules or equipment.
replaced Product will be covered by warranty for the balance of theited warranty period or ninety (90)the date of repair or replacement
is longer. Repair or replacement of Philips’ option is your exclusive
t Covered By This Limited Warranty?
warranty does not cover:
t that has been subjected to misuse,t, shipping or other physical damage,er installation, abnormal operationg, neglect, inundation, fire, water orquid intrusion; or
Limited warranty1. What Does This Limited Warranty Cover?
Philips warrants to the original retail purchaser(“Consumer” or “You”) that this Philips cellularproduct and all accessories originally provided byPhilips in the sales package (“Product”) are freefrom defects in materials, design andworkmanship under normal use in accordancewith the operating instructions and pursuant tothe following terms and conditions. This limitedwarranty extends only to the Consumer forProducts purchased and used in the originalcountry of purchase. The limited warranty isvalid only in Philips’ intended country of sales ofthe product.
2. How Long is The Limited Warranty Period?
The limited warranty period for the Productextends for ONE (1) YEAR from the date ofpurchase of the Product, documented by validproof of purchase. The limited warranty fororiginal Philips rechargeable battery extends forsix (6) months from the date of purchase.
3. What Will Philips Do if The Product is Not FreeFrom Material Defects in Materials and
WorkmanshPeriod?
During the authorized option eitheparts or labwith new oreturn suchConsumer retain defec
Repaired orthis limitedoriginal limdays from whichever Product, atremedy.
4. What is No
This limited
a) Producaccidenimprophandlinother li

b) Product that has been damaged due to b) The SIM card must be removed from theore it is given to Philips. Philips liability for damaged or loss ofd or the data contained therein.ct failure is not covered by this
ranty, or this limited warranty is, void or invalid due to anyconditions stated herein, the
will be charged for the cost oflacement of the Product and all
d cost incurred in repairing ore Product.NT - you are required to returnt together with a valid proof ofhich must identify the point ofate of purchase, Product modelt serial number clearly.
: This Warranty is The Entire
OR THE EXPRESS SET FORTH ABOVE ANDIED BY LAW AND WHICHEXCLUDED OR MODIFIEDNT, PHILIPS PROVIDES NOANTY WHETHER EXPRESS(WHETHER BY STATUTE,OPERATION OF LAW OR
AND SPECIALLY DISCLAIMS
72
repair, alteration, or modification by anyonenot authorized by Philips; or
c) Product that has reception or operationproblems caused by signal conditions,network reliability or cable or antennasystems; or
d) Product defects or problems caused by useswith non-Philips products or accessories; or
e) Product which warranty/quality stickers,product serial number or electronic serialnumber has been removed, altered orrendered illegible; or
f) Product purchased, used, serviced, orshipped for repair from outside the originalcountry of purchase, or used for commercialor institutional purposes (including but notlimited to Products used for rentalpurposes); or
g) Product returned without valid proof ofpurchase or which proof of purchase hasbeen altered or is illegible.
h) Normal wear and tear or Force Majeure.
5. How Do You Get Warranty Service?
a) Return the Product to an authorized servicecenter of Philips. You may contact the localPhilips office for the location of the nearestauthorized service center.
Product befassumes nothe SIM car
c) If the Produlimited warinapplicableterms and Consumer repair or repother relatereplacing th
d) IMPORTAthe Producpurchase wpurchase, dand Produc
6. Other LimitationAgreement.
EXCEPT FWARRANTIESTHOSE IMPLCANNOT BE BY AGREEMEOTHER WARROR IMPLIED UNDER THE OTHERWISE)

73
OF THE POSSIBILTY OF SUCH. THESE LIMITATIONS SHALLNOTWITHSTANDING THEOF THE ESSENTIAL PURPOSEIMITED REMEDY.
d warranty represents the completee agreement between the Consumer
with respect to this cellular Productrcedes all prior agreements between, oral or written, and all othertions between the parties relating tomatter of this limited warranty. Noiler, agent, dealer, employee, thereof,e of Philips is authorized to makens to this limited warranty and yourely on any such representation.
ed warranty does not affect the statutory rights under applicables in force.
ANY WARRANTY OF SATISFACTORYQUALITY MERCHANTABILITY ORFITNESS FOR A PARTICULAR PURPOSE.PHILIPS’ TOTAL LIABILITY FORDAMAGES RELATING TO OR ARISINGOUT OF THE PURCHASE OR USE OF THEPRODUCT, REGARDLESS OF THE TYPEOR CAUSE OF SUCH DAMAGE OR THEFORM OR CHARACTERISATION OF THECLAIM ASSERTED (E.G. CONTRACT ORTOPIT), SHALL NOT EXCEED THEORIGINAL PURCHASE PRICE PAID FORTHE PRODUCT.
HOWEVER IN NO EVENT SHALL PHILIPSBE LIABLE FOR ANY PUNITIVE, SPECIAL,INCIDENTAL, INDIRECT ORCONSEQUENTIAL DAMAGES (INCLUDINGBUT NOT LIMITED TO THE LOSS OFUSE, LOSS OF TIME, INCONVENIENCE,COMMERIAL LOSS, LOST PROFITS, LOSTBUSINESS OPPORTUNITIES, COST OFSUBSTITUTION OF GOODS ORSERVICES, INVESTMENTS, DAMAGE TOGOODWILL OR REPUTATION, OR LOSSOF DATA AND CLAIMS BY THIRDPARTIES) RESULTING FROM PURCHASEOR USE OF THE PRODUCT, TO THEFULLEST EXTENT ALLOWED BY LAW,WHETHER OR NOT PHILIPS HAS BEEN
ADVISED DAMAGESAPPLY FAILURE OF ANY L
This limiteand exclusivand Philipsand it supethe partiescommunicathe subject carrier, retaor employemodificatioshould not
This limitConsumer’snational law

Declaration of conformity
We, Philips (China) Investment Co., Ltd.BU Wireless China21F, Tower 1 Kerry Everbright City218 Tian Mu Xi RoadShanghai, P.R.C200010
declare under our sole responsibility that the productPhilips S890GSM/GPRS Dualband Digital Mobile PhoneTAC: 351727 01
to which this declaration relates, is in conformity withthe following Standards:
Safety: EN 60950/2001SAR: EN 50360:2001/EN 50361:2001R&TTE: EN301-511 V9.0.2EMC: EN301489-1 V1.5.1 and EN301489-7 V1.2.1
We hereby declare that all essential radio test suiteshave been carried out and that the above namedproduct is in conformity to all the essentialrequirements of Directive 1999/5/EC.The conformity assessment procedure referred to inArticle 10 and detailed in Annex III or IV of Directive1999/5/EC has been followed with the involvementof the following Notified Body: BABT, Belfour House, Churchfield Road, Walton-On-Thames, Surrey, KT12 2TD, UKIdentification mark: 0168
Aug 08th, 2006
Quality Manager