discovering microsoft word 2010€¦ · web viewchapter 2: home tab in word 2010. last update:...
TRANSCRIPT

Discovering Microsoft Word 2010
Chapter 2: Home Tab in Word 2010Last update: 6/26/2019
ESSENTIAL OUTCOMES
2) Analyze technical writing and apply Word skill sets (Home Tab) to real-life scenarios (project based).a. Analyze skills sets provided in the handout (Backstage View, Managing tabs, New Tab,
Save Feature, Save As Feature, Print Feature, Share Feature, Export Feature, Options, and Advanced feature)
b. Achieve industry-recognized certification through Microsoft.c. Apply terms in the chapter with application
The FocusIn Chapter 2, the focus is on learning the skill sets that are provided underneath each of the toolbar sections for the Home tab. If you notice, the Home tab focus is on the clipboard, fonts, paragraphs, styles and editing. This is important! If you pay attention to the ribbons for each tab, you will get a better idea where to find the different skill sets.
There are five ribbons listed (see image above) under the Home tab. Each ribbon has its own unique skill sets. The font ribbon has skill sets that allow you to change or alter the font on the page. Under each ribbon, you will find unique skill sets for each. NOTE: though there are a variety of ways to use different features, the MOS test focuses on whether you understand the language for those specific skill sets. Thus, is you do not do the appropriate skill set based on the language used by Microsoft, your answer will be marked as incorrect both in GMetrix and on the certification test even if it may appear to be the right answer.
1. Clipboard section2. Font section3. Paragraph section4. Styles section 5. Editing section
1
Discovering Microsoft Word 2010
Bookmarks
To find specific skill sets in this document, you can use the “Bookmark” feature located under the Insert tab. There are bookmarks set for each section; all you do is click on “Bookmark”, find the skill set you want, and then click on “Go To”. Use the hyperlinks to find the sections.
Clipboard Ribbon Toolbar Section
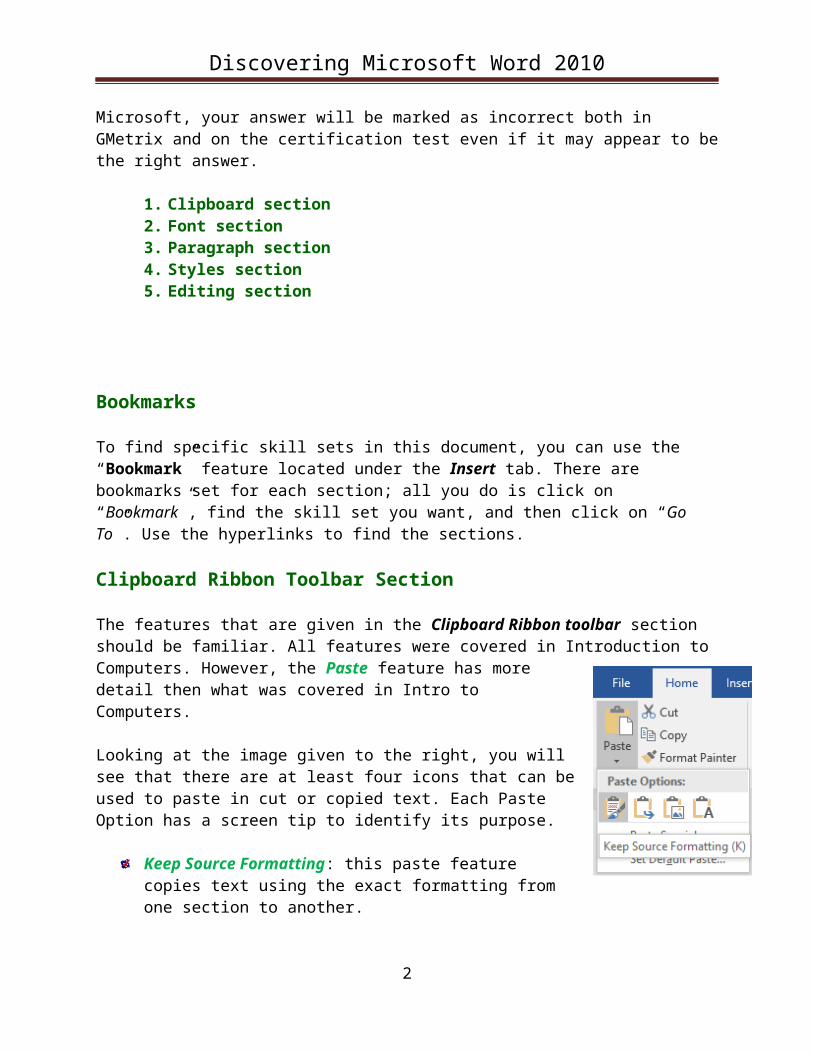
The features that are given in the Clipboard Ribbon toolbar section should be familiar. All features were covered in Introduction to Computers. However, the Paste feature has more detail then what was covered in Intro to Computers.
Looking at the image given to the right, you will see that there are at least four icons that can be used to paste in cut or copied text. Each Paste Option has a screen tip to identify its purpose.
Keep Source Formatting: this paste feature copies text using the exact formatting from one section to another.Merge Formatting: this paste feature copies the text but does not necessarily copy the formatting of the cut or copied material.Picture: pastes the cut or copied text as an image.Keep Text Only: does not include any formatting from a specific text or paragraph
Font Ribbon Toolbar Section
The font toolbar section is probably very familiar. It is the section that allows you to alter the appearance of your text on a page one step at a time (vs the Font Dialog box that allows you to add multiple changes to text). This section is undoubtedly the most utilized section under the Home tab.
The most known features are the font-family feature (Arial, Times New Roman, etc.); bold (Ctrl + B), italic (Ctrl + I), Underline (Ctrl + U)—(if you haven’t done so, click on the drop down arrow to the right of the Underline and you will find that you have additional underlining options), text highlighting feature and the font color (letter A) feature. Since these are well known feature, it is assumed that you know how to use these features.
Let’s look at some features that you might not be as accustomed to utilizing. These features are really considered short-cuts. All features below are displayed in the image to the right. You are to read each of the features below and then find it in the toolbar in this document. Match them up so you know your options.
Increase Font Size: this icon will let you increase the size of your text. Just click on it as many times as you want to increase the size of your text.
2

Discovering Microsoft Word 2010
Decrease Font Size: this icon will allow you to decrease the size of your text. Just click on it as many times as you want to decrease the size of your text.
Change Case: allows you to change the appearance of your text to lowercase, uppercase, toggle text, etc.
Clear All Formatting: this icon permits you to remove all formatting on a word, text, paragraph, etc.
Text Effects & Typography: this feature lets you change the features of a word, paragraph, etc. There are a variety of options. Just click on the drop-down arrow to the right of the Text Effects icon.
o Outline: add an outline to the text o Shadow: add a shadowo Reflection: add a reflectiono Glow: adds glow effect to texto Number Styles:o Ligatureso Stylistic Sets:
Paragraph Ribbon Toolbar Section:
The Paragraph Toolbar section has two layers. The first level focuses on bulleted and numbered lists, multi-level lists, the increase and decrease indents, sorting, and formatting marks.
The second level allows you to change the horizontal alignment for paragraphs (left, center, right, justify), adjust the line spacing (including adding and removing line spacing before and after paragraphs), shading and border.
To find additional options, just click on the drop-down arrow to the right of each icon. If you let your cursor hover each icon, it will give you a “screen tip” as to its identity.
First Level:
Bulleted List: click on the drop down for additional bullet options. You can also define a new bullet by selecting, “Define New Bullet.”
1) Click on the Define New Bullet” & the dialog box will open.
2) Click on “Symbol” if you want to use a symbol for a bullet.
3) If you want to add an image, click on the Picture icon. If you do not want to work online, click on the “Work
3

Discovering Microsoft Word 2010
Offline” icon. This will allow you to browse for an image saved on the computer/flash drive.
Numbered List: by clicking on the drop-down arrow, you will be able to change the type of numbered list you want to use. Each of the number list available will provide a screen type as to the name of each of the list.
Multilevel List: this feature allows you to set up your text more in outline fashion, with the tab key changing the types of lettering depending on whether you hit the increase or decrease icon.
Decrease Indent: this icon allows you to decrease the level of your bullets or numbered lists.
Increase Indent: this icon allows you to increase the level of your bulleted or numbered list.
Sort: this icon allows you to sort your text alphabetically. Show/Hide: this feature allows you to display or remove your formatting features.
These features appear on your page to help you with line and text spacing, but they do not print.
Second Level:
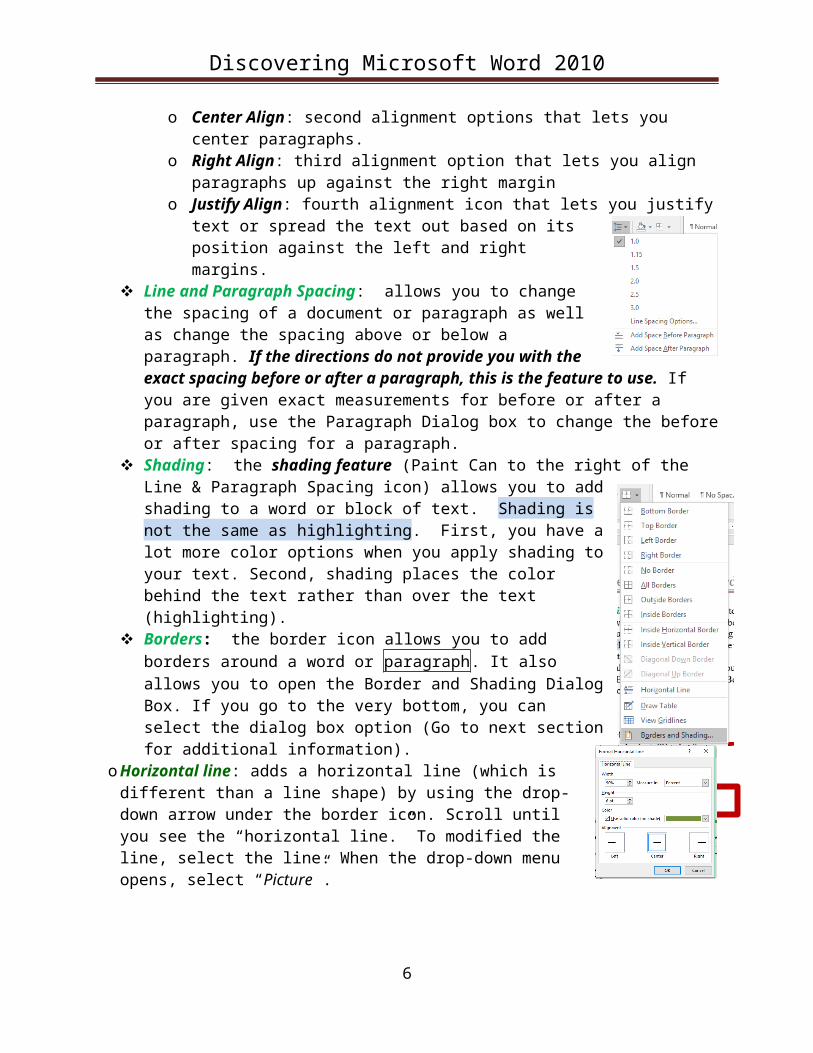
Alignment Icons:o Left Align: first alignment option that lets you align paragraphs up against the left
margino Center Align: second alignment options that lets you center paragraphs.o Right Align: third alignment option that lets you align paragraphs up against the
right margino Justify Align: fourth alignment icon that lets you justify text or spread the text out
based on its position against the left and right margins. Line and Paragraph Spacing: allows you to change the spacing of a
document or paragraph as well as change the spacing above or below a paragraph. If the directions do not provide you with the exact spacing before or after a paragraph, this is the feature to use. If you are given exact measurements for before or after a paragraph, use the Paragraph Dialog box to change the before or after spacing for a paragraph.
Shading: the shading feature (Paint Can to the right of the Line & Paragraph Spacing icon) allows you to add shading to a word or block of text. Shading is not the same as highlighting. First, you have a lot more color options when you apply shading to your text. Second, shading places the color behind the text rather than over the text (highlighting).
Borders: the border icon allows you to add borders around a word or paragraph. It also allows you to open the Border and Shading Dialog Box. If you go to the very bottom, you can select the dialog box option (Go to next section for additional information).
oHorizontal line: adds a horizontal line (which is different than a line shape) by using the drop-down arrow under the border icon. Scroll until
4

Discovering Microsoft Word 2010
you see the “horizontal line.” To modified the line, select the line. When the drop-down menu opens, select “Picture”.
Border & Shading Dialog Box
If you want more options for your borders, go to the bottom of the border icon drop down menu and select, “Border & Shading”. The dialog box to the right will open. There are three tabs at the top of the box:
Borders: allows you to change borders around words or paragraphs.
Page Border: Adds a page border to the document.
Shading: add shading to text.
When working with the Borders & Shading dialog box, note that there are a couple of other features to know:
Apply to: allows you to apply borders and shading to specific text or paragraphs. You will need to select the paragrah or text in order to have options.
Options (only on the first two tabs): The option box allows you to get mor specific. For example, the Options feature under the Page Border tab allows you to Measure the margin from the edge of the paper or from the text. It also allows you to change the margin allow the bordered text.
Styles Ribbon Toolbar Section
The Styles toolbar section is used to insert heading styles as well as to modify styles used in a document.
The Styles toolbar section allows you to change the text to a specific type of heading as well as change the style set, colors, fonts, and paragraph settings to text. These specific
headings are preformatted—in other words, they have a default setting that sets the size, color, and font that the heading will use throughout a document.
5
Discovering Microsoft Word 2010
These preformatted setting can be modified very easily. Matter of fact, in this document, the headings all have been modified so that I could set the size, font and color for each heading used.
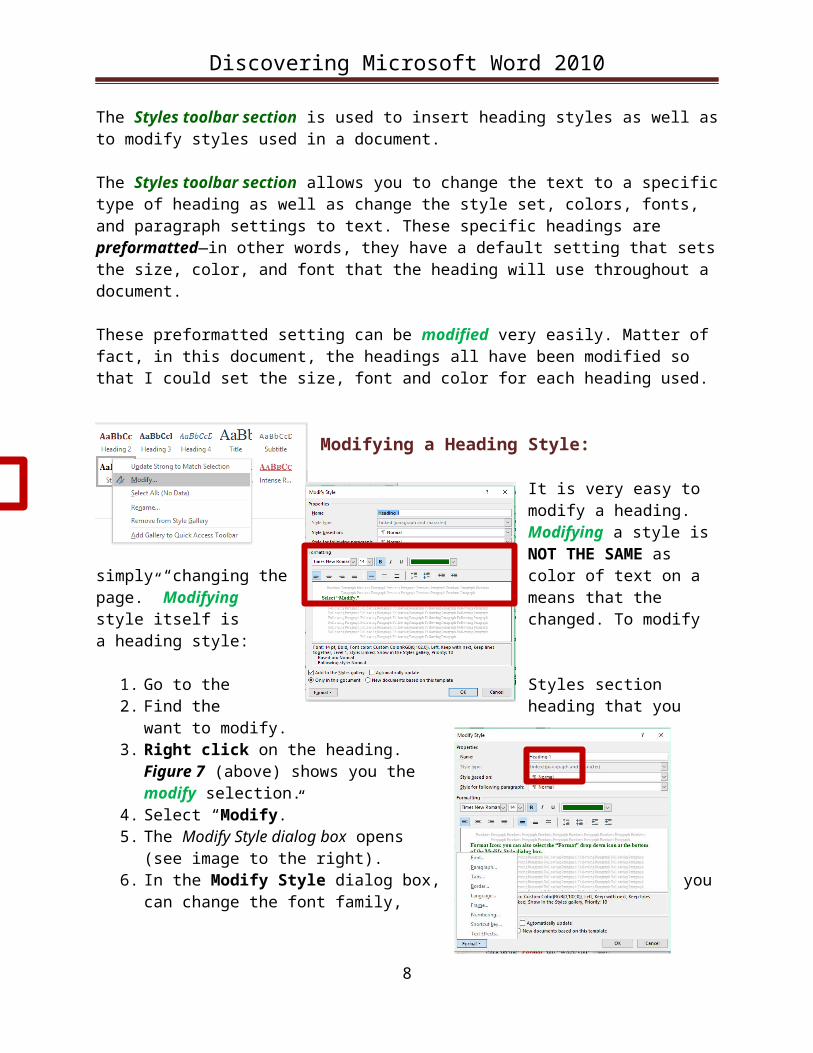
Modifying a Heading Style:
It is very easy to modify a heading. Modifying a style is NOT THE SAME as simply “changing the color of text on a page.” Modifying means
that the style itself is changed. To modify a heading style:
1. Go to the Styles section2. Find the heading that you
want to modify.3. Right click on the
heading. Figure 7 (above) shows you the modify selection.
4. Select “Modify.”5. The Modify Style dialog box opens (see image to
the right). 6. In the Modify Style dialog box, you can
change the font family, font size and color and more. Once you go in and modify the settings, Word will
7. Format Icon: you can also select the “Format” drop-down icon at the bottom of the Modify Style dialog box to modify additional features (see image below).
Live Preview: this feature allows you to preview changes to your document before you commit to finalizing those changes. So, when you want to change a heading style, if you hover your cursor over the specific heading style, Word will show you what the style will look like before you add it into your document.
Clear Formatting:
You can also “clear” the formatting for a style. To clear the style: You may also click on the “Clear All Formatting” icon in the Font ribbon toolbar section.
1. Select the style on the page.2. Then select the drop-down arrow for the Styles dialog box.3. At the bottom of the box, you will see the “Clear Formatting” feature. This will remove
the formatting on the page (see Figure 16).
6

Discovering Microsoft Word 2010
Editing Toolbar Section
Notice that the Editing Toolbar section does not have a dialog box. The Editing Toolbar section allows you to find or replace your text within a document. The Find Feature (Ctrl + F) allows you to find specific words within a document. You have used the Ctrl + F feature in Introduction to Computers, so we will not spend time here.
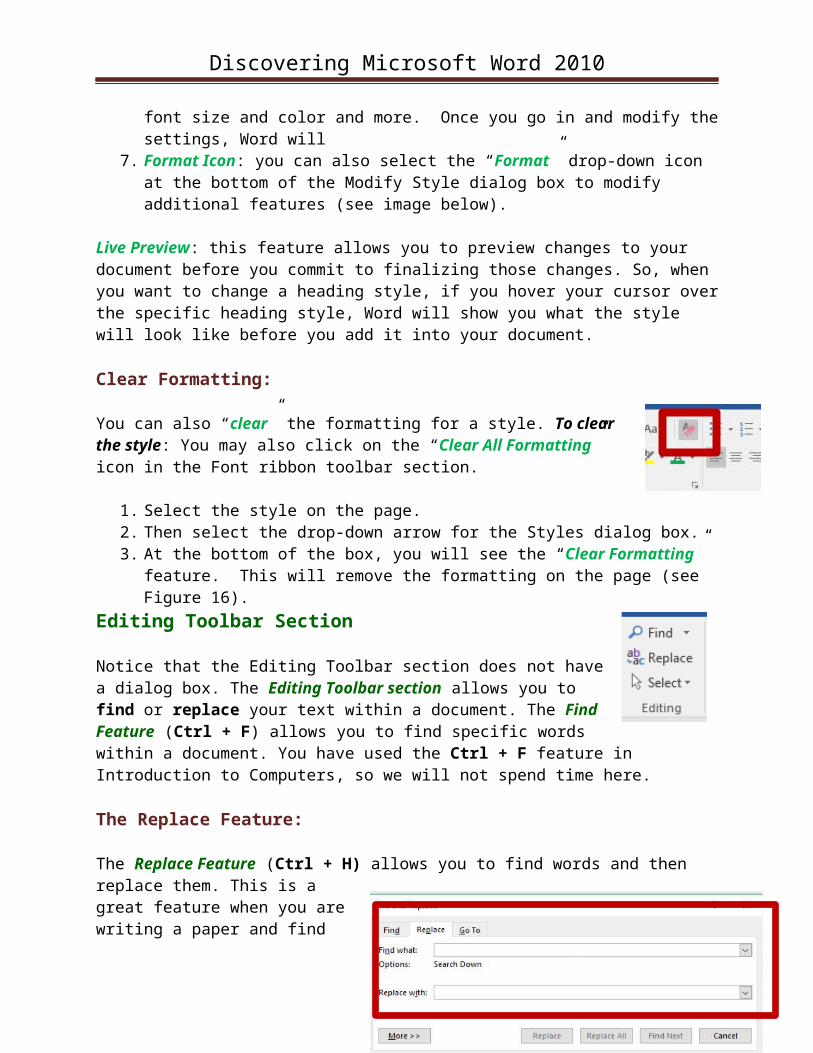
The Replace Feature:
The Replace Feature (Ctrl + H) allows you to find words and then replace them. This is a great feature when you are writing a paper and find yourself using the same words over and over. This Replace feature allows you to find repetitive words and replace them with similar words. For word synonyms use the Thesaurus feature located underneath the Review tab.
To use the Find and Replace Feature:
1. Find What: Type in the word that you want the computer to find.
2. Replace With: Type in the word that you want the computer to replace.
3. Replace: if you want to replace one word, click on “Replace”. If you want to find additional words throughout the document, click on “Find Next”. If you do not want to change that word, click on “Find Next”, otherwise, select the “Replace” option.
4. Replace All: if you want the computer to replace all words, then select “Replace All”.
Home Ribbon Dialog Boxes
On the Home ribbons, you will find four dialog boxes to the right of the ribbon name. The dialog box arrow is encased inside a small box. Each of these ribbons have its own dialog box that will open. Each of these boxes provide a variety of options for that specific ribbon.
The four names are as follows: Clipboard, Font, Paragraph and Styles dialog boxes (see image below).
7
cv
Discovering Microsoft Word 2010
The Clipboard dialog box (image to the right) houses the information copied while working in a document. To open the box, select the diagonal arrow that is located right across from the word, “Clipboard”.
Once you select the Clipboard dialog box, the clipboard on the right will open. If you have copied and pasted information within your document, the copied information will be provided here. If you review the image to the right, you will see that two images and some text were copied. If you want to reuse these images, all you do is click on the image or text in the clipboard and it will automatically be inserted into a document.
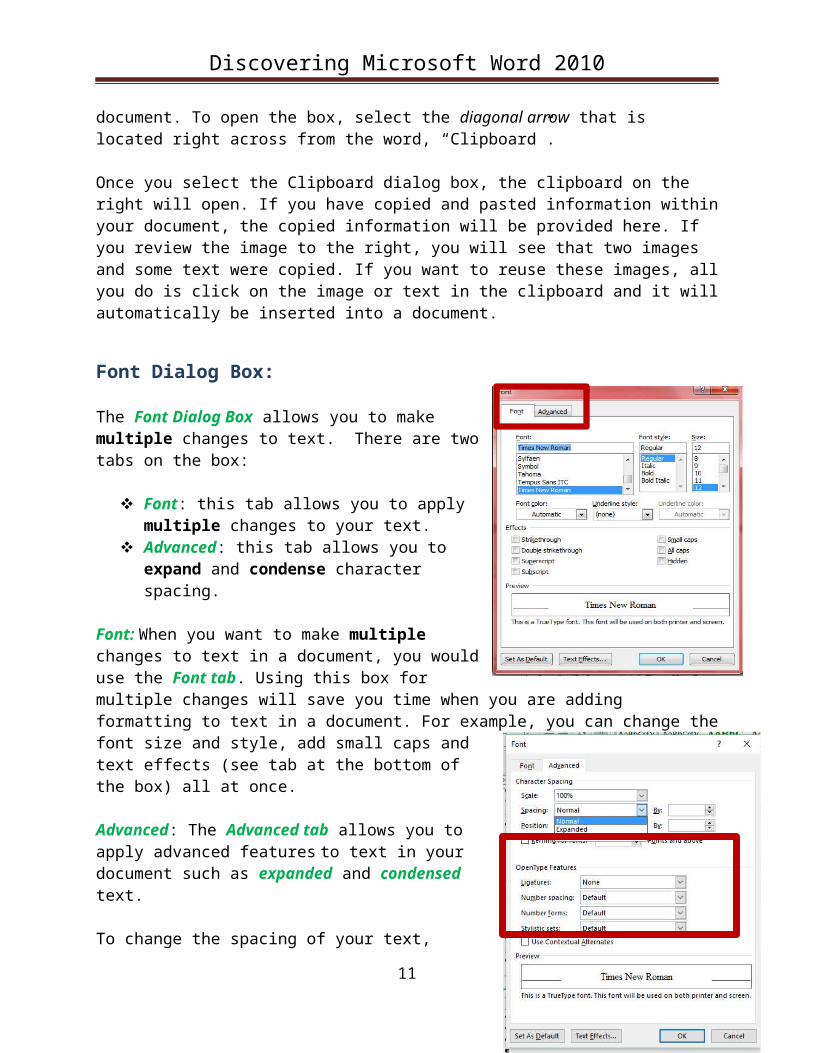
Font Dialog Box:
The Font Dialog Box allows you to make multiple changes to text. There are two tabs on the box:
Font: this tab allows you to apply multiple changes to your text.
Advanced: this tab allows you to expand and condense character spacing.
Font: When you want to make multiple changes to text in a document, you would use the Font tab. Using this box for multiple changes will save you time when you are adding formatting to text in a document. For example, you can change the font size and style, add small caps and text effects (see tab at the bottom of the box) all at once.
Advanced: The Advanced tab allows you to apply advanced features to text in your document such as expanded and condensed text.
To change the spacing of your text,
1. Click on the Advanced feature. 2. Then click on the drop-down arrow of the Spacing
option. 3. The By option drop down lets you change the spacing
distance. The word below has expanded spacing added.
E x p a n d e d C h a r a c t e r S p a c i n g
8
Discovering Microsoft Word 2010
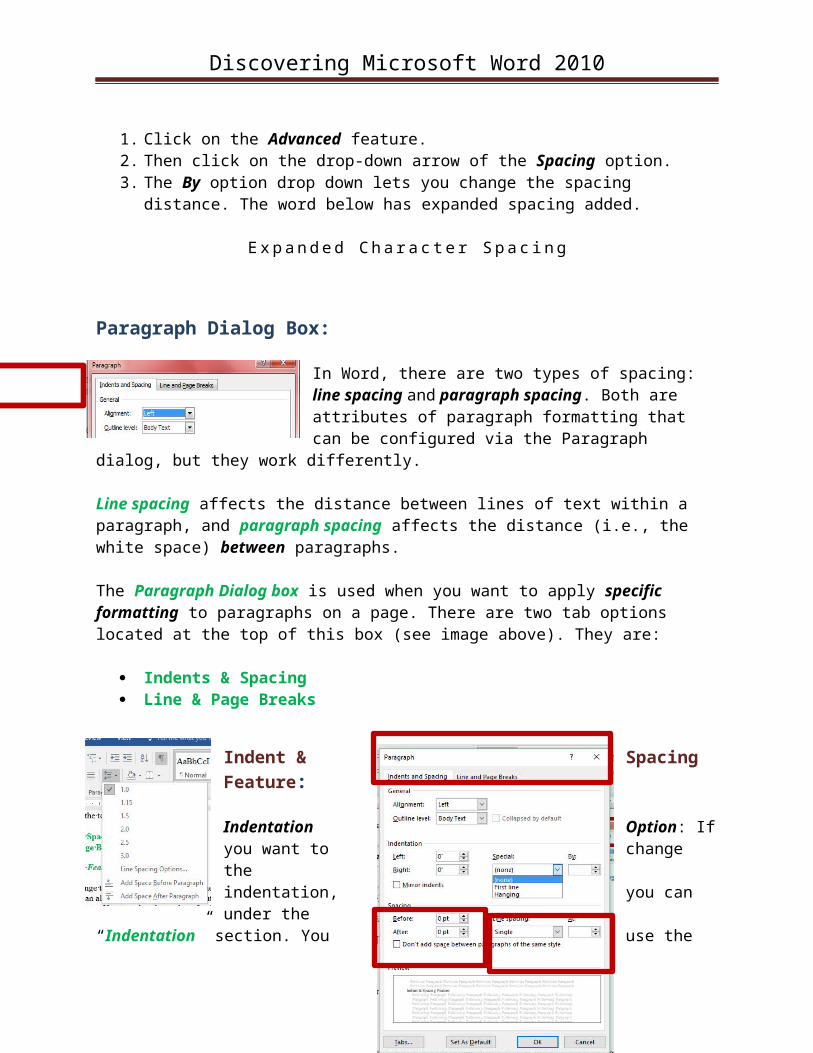
Paragraph Dialog Box:
In Word, there are two types of spacing: line spacing and paragraph spacing. Both are attributes of paragraph formatting that can be configured via the Paragraph dialog, but they work differently.
Line spacing affects the distance between lines of text within a paragraph, and paragraph spacing affects the distance (i.e., the white space) between paragraphs.
The Paragraph Dialog box is used when you want to apply specific formatting to paragraphs on a page. There are two tab options located at the top of this box (see image above). They are:
Indents & Spacing Line & Page Breaks
Indent & Spacing Feature:
Indentation Option: If you want to change the indentation, you can under the “Indentation” section. You use the Indentation option when you need to change both the left and right indentations of a paragraph.
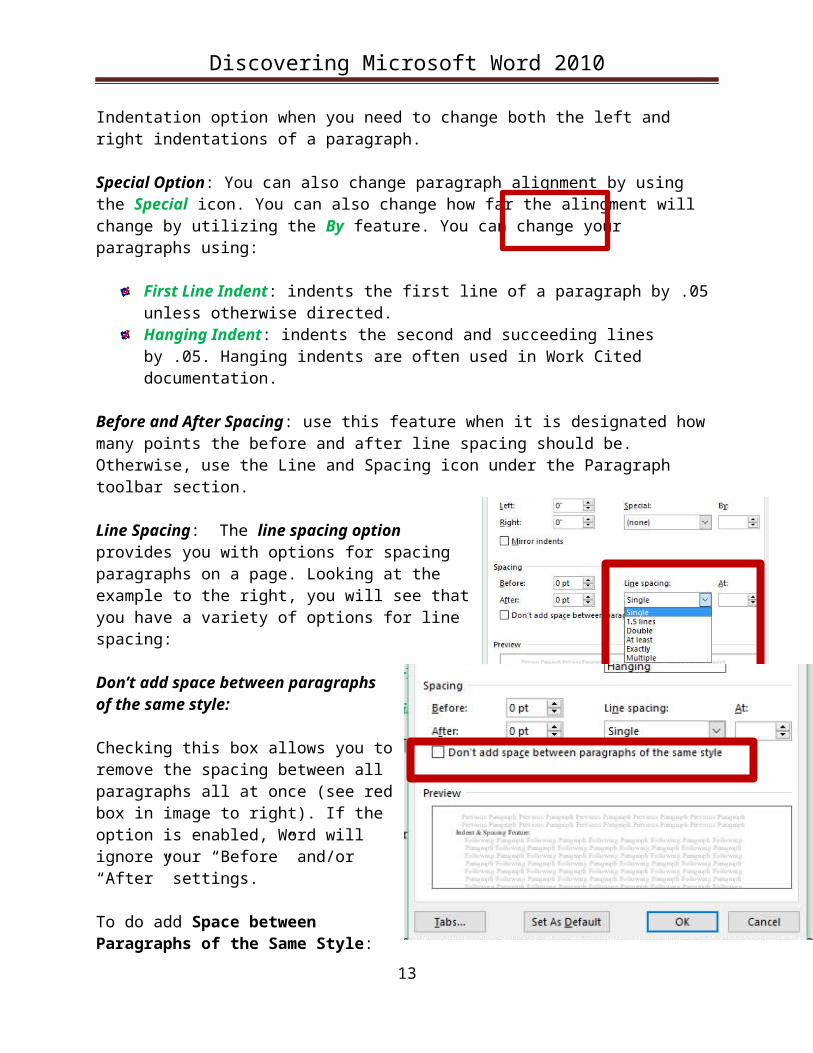
Special Option: You can also change paragraph alignment by using the Special icon. You can also change how far the alingment will change by utilizing the By feature. You can change your paragraphs using:
First Line Indent: indents the first line of a paragraph by .05 unless otherwise directed.Hanging Indent: indents the second and succeeding lines by .05. Hanging indents are often used in Work Cited documentation.
Before and After Spacing: use this feature when it is designated how many points the before and after line spacing should be. Otherwise, use the Line and Spacing icon under the Paragraph toolbar section.
Line Spacing: The line spacing option provides you with options for spacing paragraphs on a page. Looking at the example to the right, you will see that you have a variety of options for line spacing:
9

Discovering Microsoft Word 2010
Don’t add space between paragraphs of the same style:
Checking this box allows you to remove the spacing between all paragraphs all at once (see red box in image to right). If the option is enabled, Word will ignore your “Before” and/or “After” settings.
To do add Space between Paragraphs of the Same Style:
1. Select the entire document (Ctrl + A).2. Open the Paragraph Dialog box.3. Right below the Spacing option, you
will find the “Don’t add space between paragraphs of the same style”.4. Click on the box.5. Select OK.
Line and Page Breaks Tab
On the Line and Page Break tab, there is a section called, “Pagination”. Pagination deals with how you want the document and paragraph spacing to function on the page. There are four options: Widow/Orphan control, Keep with next, Keep lines together, and Page break before.
Widow/Orphan Control: A widow is the last line of a paragraph left by itself at the top of a page; an orphan is the first line of a paragraph left by itself at the bottom of a page. With “Widow/Orphan Control” enabled, Word will allow paragraphs to split across pages, but won’t permit a single line of a paragraph to dangle by itself at the top or bottom of a page. Instead, it moves the paragraph down so that either (1) the last two lines of the paragraph appear at the top of the following page or (2) the entire paragraph begins on a new page.
Keep lines together: tells Word to maintain the entire paragraph—all its lines—as one unit on a single page. In other words, you use this setting to avoid splitting a paragraph across pages. When the option is checked, if the whole paragraph won’t fit at the bottom of one page, Word bumps it to the next page.
Keep with next: This function also differs from “Keep lines together.” Whereas “Keep lines together” refers to the lines of a single paragraph, “Keep with next” refers to two successive paragraphs. That is, when “Keep with next” is enabled+, Word will attempt to keep the paragraph to which the setting has been applied to the subsequent paragraph,
10
Discovering Microsoft Word 2010
and if the subsequent paragraph is on the next page, Word will bump the current paragraph to the next page, as well.
Page break before: When this option is enabled, Word will insert a page break before the paragraph to which the setting has been applied. Of course, you can achieve a similar result by pressing Ctrl Enter (the keyboard shortcut for Page Break).
Setting Different Margins in a Document
When you want to have different margins on different pages, you will have to use the “Apply to:” feature. To set your margins for different pages:
1) Set your margin for the document. 2) Go to the second page, double click inside the header.3) Go to the Page Setup dialog box, and then re-set the margin. 4) Select the drop-down arrow in the “Apply to” section and
select “This point forward.”
See the image on the right. It is worth remembering here that the formatting options are part of the Paragraph dialog box. That means that each option applies to an entire paragraph.
Modifying the Styles Menu Ribbon Dialog Box
If you click on the dialog arrow to the right of the Styles ribbon, you will see all styles that are located inside a specific document (see image to the right).
You can also modify styles here as well by selecting the heading style you want to alter and then right clicking and selecting “Modify” (see image to the right).
When you open the “Modify Style” dialog box (image to the left), you will see a variety of ways you can modify the heading.
There are more options available if you look to the bottom, left hand side of the box under “Format”.
Under format, you will find options for formatting fonts, paragraphs, tabs, borders, etc. (see image to the right).
11
Discovering Microsoft Word 2010
Short Cut for Turning on the Ruler
The fastest way to turn on the ruler in Word 2016 is to go to the View tab and look under the “Show Ribbon” section.
The Hour Glass
The Hour Glass feature may be found on the left side of the page on the horizontal ruler. The hour glass can be broken up into section. The hour glass is normally ONLY USED to align paragraphs.
To
break the hour glass apart, let your cursor hover over each part: top part, middle part and bottom part. You will get a screen tip that will tell you the name of the parts.
First Line Indent: The top triangular part of the hour glass is the first line indent. This indents ONLY the first line of a paragraph. The first line indent’s normal default setting is .5.
Hanging Indent: The bottom triangular part of the hour glass is the hanging indent. This is an indent that is usually used for Work Cited pages. The handing indent’s normal default setting is .25.
Left Indent: The bottom, square section of the hour glass sets a left indent, or what is often referred to as a “block” indent. The left indent will set the left margin so that the entire paragraph is aligned in block style.
Right Indent
The right indent is located on the right side of the ruler, and is represented by an upside-down caveat. It is directly positioned below the Styles ribbon. If you want to move the indent 1”, you would slide it to the left to 5.5”.
Tabs
Tabs are normally used in Word to set specific columns or paragraphs at a certain point on the ruler. The tab icon can be found on the far, left hand side of the Word window. It is to the far left of the hour glass located on the ruler. The default setting for the tab icon is left.
To set a left tab, simply find the location on the ruler where you want the tab placed and then click on it. For example, you want to put a left tab at the 1” spot on the ruler. To do this, simply click on the 1” mark on the ruler.
12
Discovering Microsoft Word 2010
If you only want a highlighted section to have a tab, then, first select the highlighted section. Then click on the mark on the ruler (in this case it would be at the 1” mark).
Ribbon Display Option
In the top, right hand corner, you will find the Ribbon Display Option (see diagram on the right). Viewing the image, you can see that you have three options to how much or how little of the tabs and commands you want to display.
You can also collapse the ribbon by selecting the Collapse the Ribbon icon to the left of the Editing toolbar section, or directly above the right-side of the scroll bar (see diagram to the right).
13