docave 6 connector user guide · hitachi content platform, ibm spectrum scale object, ibm storwize...
TRANSCRIPT

DocAve® 6 Connector User Guide
Service Pack 11
Issued December 2018
The Enterprise-Class Management Platform for SharePoint® Governance

DocAve®
6 Connector 1
Table of Contents
What’s New in this Guide .......................................................................................................................................... 5
About DocAve Connector ......................................................................................................................................... 6
Complementary Products ............................................................................................................................................................ 6
Submitting Documentation Feedback to AvePoint .......................................................................................... 7
Before You Begin ......................................................................................................................................................... 8
AvePoint’s Testing Policy and Environment Support ........................................................................................................ 8
Supported Software Environments ..................................................................................................................................... 8
Supported Hardware ................................................................................................................................................................ 8
Supported Backup and Recovery ......................................................................................................................................... 9
Configuration .................................................................................................................................................................................... 9
Agents .................................................................................................................................................................................................. 9
Required Permissions ................................................................................................................................................................. 10
Agent Account Permissions ................................................................................................................................................ 10
File Share Permissions ........................................................................................................................................................... 11
Local System Permissions .................................................................................................................................................... 12
Health Analyzer ............................................................................................................................................................................. 14
Getting Started ........................................................................................................................................................... 15
Launching Connector .................................................................................................................................................................. 15
Navigating DocAve ...................................................................................................................................................................... 16
User Interface Overview ............................................................................................................................................................. 17
Selecting Farms and Nodes ...................................................................................................................................................... 18
Advanced Search ..................................................................................................................................................................... 19
Basic Steps for Configuring and Deploying Connector ............................................................................... 20
Configuring the BLOB Provider ............................................................................................................................. 21
BLOB Provider Recommendations ........................................................................................................................................ 22
Enabling the BLOB Provider ..................................................................................................................................................... 23
Deploying the Connector Solutions ................................................................................................................... 28
Activating the Connector Features ..................................................................................................................... 30
Activating Connector through SharePoint ......................................................................................................................... 30

DocAve®
6 Connector 2
Activating Connector through DocAve ............................................................................................................................... 31
Configuring Mapping Settings ............................................................................................................................. 32
Common Mapping....................................................................................................................................................................... 32
Property Mapping ........................................................................................................................................................................ 33
Security Mapping ......................................................................................................................................................................... 34
Configuring the Processing Pool ......................................................................................................................... 36
How Connector Works with SharePoint ............................................................................................................ 37
Creating a Connection between SharePoint and a Storage Path ............................................................. 38
Overview .......................................................................................................................................................................................... 38
Configuring the Connector Path ............................................................................................................................................ 39
Web Application, Site Collection, or Site Level ........................................................................................................... 39
Library Level............................................................................................................................................................................... 41
Configuring Sync Settings ........................................................................................................................................................ 49
Configuring Sync Settings for Content Database Level ........................................................................................... 51
Managing Inherited Connector Settings ............................................................................................................................. 52
Site Collection ........................................................................................................................................................................... 52
Site ................................................................................................................................................................................................ 53
Library .......................................................................................................................................................................................... 53
Adding Customized SharePoint Libraries to the Connector-Approved List of Templates ............................. 53
Removing Connector Settings ................................................................................................................................................ 54
Creating a Connector Library in SharePoint ...................................................................................................................... 55
Using a Connector Library ..................................................................................................................................... 57
Using the Files Tab ....................................................................................................................................................................... 57
Using the Connector Tab .......................................................................................................................................................... 61
Using the SYNC Feature ............................................................................................................................................................ 61
Specific Features in Connector Media Library ................................................................................................. 62
Specific Views for Media Library ............................................................................................................................................ 62
Viewing All Video Thumbnails ........................................................................................................................................... 62
Viewing All Video Details ..................................................................................................................................................... 63
Viewing All Video Slides ....................................................................................................................................................... 63
Using the Media Library on a Mobile Device .................................................................................................................... 64
Maintaining a Connector Library ......................................................................................................................... 65

DocAve®
6 Connector 3
Manually Synchronizing the Library with the Connected Path .................................................................................. 65
Manually Synchronizing an Individual File ......................................................................................................................... 66
Managing Orphan BLOBs.......................................................................................................................................................... 66
Clearing Up Orphan BLOBs by DocAve Manager ...................................................................................................... 66
Clearing Up Orphan BLOBs by Synchronization Job ................................................................................................. 68
Managing Stubs ............................................................................................................................................................................ 68
Converting Stubs to Content .............................................................................................................................................. 68
Updating DocAve 5 Stubs to DocAve 6 Format .......................................................................................................... 69
Converting EBS Stubs to RBS Stubs in DocAve 6 ....................................................................................................... 69
Checking Connector Job Status .............................................................................................................................................. 69
Generating Storage Reports .................................................................................................................................................... 71
Creating a Storage Report Profile and Configure the Report Settings .............................................................. 71
Managing Created Storage Report Profiles .................................................................................................................. 72
Viewing Collected Data Information for the Storage Report Profiles ................................................................ 73
Downloading Storage Report ............................................................................................................................................ 74
Configuring Export Location for Storing Storage Report ....................................................................................... 75
Generating Inventory Reports ................................................................................................................................................. 77
Using the Connector PowerShell to Generate Reports ................................................................................................. 77
Connector Tools ........................................................................................................................................................ 78
Connector Caveats ................................................................................................................................................... 80
Stub Database Inheritance ..................................................................................................................................... 81
Using Connector SDK and PowerShell .............................................................................................................. 84
Connector SDK .............................................................................................................................................................................. 84
Connector PowerShell ................................................................................................................................................................ 84
Adding the Registered Connector Snap-In................................................................................................................... 84
Obtaining a List of Connector Commands ................................................................................................................... 85
Getting Help Information ..................................................................................................................................................... 85
Excel Metadata Feature .......................................................................................................................................... 87
Commands for the Excel Metadata Feature ...................................................................................................................... 87
Command Parameters for the Excel Metadata Feature ........................................................................................... 88
Customizing the Metadata in Excel ....................................................................................................................................... 90
Appendix A: Support Tables.................................................................................................................................. 94
SharePoint Libraries that can Be Converted to Connector Libraries ........................................................................ 94
Multi-Browser Support ............................................................................................................................................................... 94

DocAve®
6 Connector 4
Video/Audio/Picture Files in Media Library ....................................................................................................................... 98
Displaying MP4 Files in Safari and Chrome in iOS ........................................................................................................ 100
Making MP4 Files Play Properly in iOS ......................................................................................................................... 101
Appendix B: Connector Configuration File ...................................................................................................... 102
Agent Configuration File ......................................................................................................................................................... 102
Manager Configuration File ................................................................................................................................................... 109
Appendix C: Enabling the BLOB Provider Using the Agent Tools ............................................................ 111
Enabling EBS ................................................................................................................................................................................. 111
Enabling RBS ................................................................................................................................................................................ 112
Appendix D: Synchronization Behavior ............................................................................................................ 113
Files That Do Not Synchronize from Storage Path to SharePoint .......................................................................... 113
Synchronization Mode Behaviors in SharePoint ............................................................................................................ 115
SharePoint to External Storage System Sync .................................................................................................................. 119
External Storage System to SharePoint Sync .................................................................................................................. 120
Appendix E: SharePoint Updates ........................................................................................................................ 122
Updating to SharePoint 2013 ................................................................................................................................................ 122
Updating a SharePoint 2010 Content Database with Connector Data to a SharePoint 2013 Database
...................................................................................................................................................................................................... 122
Updating to SharePoint 2016 ................................................................................................................................................ 125
Updating a SharePoint 2013 Content Database with Connector Data to a SharePoint 2016 Database
...................................................................................................................................................................................................... 125
Updating to SharePoint 2019 ................................................................................................................................................ 127
Updating a SharePoint 2016 Content Database with Connector Data to a SharePoint 2019 Database
...................................................................................................................................................................................................... 127
Notices and Copyright Information ................................................................................................................... 129

DocAve®
6 Connector 5
What’s New in this Guide • Support for SharePoint 2019
• Added the Amazon S3-Compatible Storage as the storage type for Connector
libraries.
DocAve®
6 Connector 6
About DocAve Connector Use DocAve Connector to collaborate upon network file shares and cloud storage resources
directly through SharePoint 2010, SharePoint 2013, SharePoint 2016, and SharePoint 2019 on-
premises without migration. Connected content appears as normal SharePoint content, and can
be leveraged exactly as if it were residing within a SharePoint document library. All of
SharePoint’s powerful document management functionality–including permissions
management, workflows, alerts, and versioning–can be applied to connected content.
In addition, Connector enables organizations to manage and present their audio and video files
through a dedicated SharePoint Media Library. All wmv, wma, mp3, flv, aac, vp6, mp4, mpeg,
mpg, avi, asf, aiff, au, cd, dat, divx, mov, mid, ogg, ra, rm, rmvb, qt, vqf, 3gp, m4v, mts, and wav
files stored in network file shares and cloud storage resources are streamed and presented via
SharePoint for fast delivery and reduced burden of storage. "Connected" media content is
managed with all of SharePoint's powerful document management functionality, including
permissions management, workflows, alerts, and versioning.
Complementary Products Many products and product suites on the DocAve 6 platform work in conjunction with one
another. The following products are recommended for use with Connector:
• DocAve Content Manager for SharePoint for restructuring or moving SharePoint
content.
• DocAve Replicator for SharePoint for copying SharePoint content within the same
SharePoint farm or from one SharePoint farm to another.
• DocAve Report Center for SharePoint to examine pain points in the SharePoint
infrastructure and report on SharePoint user behavior and changes.
• DocAve Data Protection for setting backup and recovery points prior to adjusting
SharePoint governance policies in this product.
• DocAve Preview for previewing Office files, PDF files, CAD files, and pictures in a
picture format. Refer to DocAve 6 Control Panel User Guide for more information.

DocAve®
6 Connector 7
Submitting Documentation Feedback to AvePoint AvePoint encourages customers to provide feedback regarding our product documentation. You
can Submit Your Feedback on our website.

DocAve®
6 Connector 8
Before You Begin Refer to the sections for system and farm requirements that must be in place prior to installing
and using DocAve Connector.
AvePoint’s Testing Policy and Environment Support
Supported Software Environments
AvePoint is committed to testing against all major versions and service packs of SharePoint as
well as the latest versions of Windows Server and SQL Server, as Microsoft announces support
and compatibility.
*Note: AvePoint does not recommend or support installing DocAve on client operating systems.
Supported Hardware
AvePoint is committed to maintaining a hardware agnostic platform to ensure that DocAve
operates on common Windows file sharing and virtualization platforms. To ensure that DocAve
is hardware agnostic, AvePoint tests hardware that is intended to support SharePoint and
DocAve infrastructure, storage targets, and hardware-based backup and recovery solutions, as
supported by AvePoint’s partnerships. AvePoint directly integrates with the following platforms:
any Net Share, FTP, Amazon S3, AT&T Synaptic, Box, Caringo Storage, Cleversafe, Amazon S3-
Compatible Storage, DELL DX Storage, Dropbox, EMC Atmos, EMC Centera, Google Drive, HDS
Hitachi Content Platform, IBM Spectrum Scale Object, IBM Storwize Family, Microsoft Azure
Storage, NetApp Data ONTAP, NFS, OneDrive, Rackspace Cloud Files, and TSM.
All other hardware platforms that support UNC addressable storage devices are supported.
*Note: AvePoint has ended the test and development for Caringo Storage and DELL DX Storage
in DocAve since DocAve 6 SP7 CU1, as the providers of these two platforms have stopped the
platform maintenance.
*Note: Due to changes in the IBM Tivoli Storage Manager API, DocAve 6 Service Pack 6 and
later versions require that TSM Client version 7.1.2 is installed on the Control Service and Media
Service servers.
*Note: Most of the hardware partnerships referenced in this guide are intended to make use of
advanced functionality (such as snapshot mirroring, BLOB snapshots, indexing, long-term
storage, WORM storage, etc.), and are not indications that any changes to the product are
required for basic support. In most cases, hardware can be supported with no change to the
product.

DocAve®
6 Connector 9
Supported Backup and Recovery
DocAve supports BLOB backup storage according to the list of hardware platforms above. BLOB
snapshot function, however, is currently only supported on OEM versions and NetApp hardware.
DocAve supports SQL content and Application database backups via the SharePoint Volume
Shadow Copy Service (VSS) on all Windows and SQL server platforms listed above. DocAve also
supports snapshot-based SharePoint VSS on all hardware listed above where the hardware
partner has certified support with Microsoft.
DocAve supports application and configuration server backups for all the supported software
environments listed above. DocAve 6 SP5 or later supports VM backup via Hyper-V/VMWare for
the following operating systems: Windows Server 2008 R2, Windows Server 2012, Windows
Server 2012 R2, and Microsoft Hyper–V Server 2012 R2.
Configuration In order to use DocAve Connector, the DocAve 6 platform must be installed and configured
properly on your farm. Connector will not function without DocAve 6 present on the farm. For
installation instructions, see the DocAve 6 Installation Guide.
Agents DocAve Agents are responsible for running DocAve jobs and interacting with the SharePoint
object model. DocAve Agents enable DocAve Manager to communicate with the respective
servers, allowing for Connector commands to function properly.
*Note: The use of system resources on a server increases when the installed Agent is performing
actions. This may affect server performance. However, if the Agent installed on a server is not
being used, the use of system resources is very low and, therefore, the effect on server
performance is negligible.
*Note: If the license for Cloud Connect has already been applied and is working when you
attempt to apply a license to Connector, the Agent must be restarted after applying the license
in order to immediately use Connector.
For instructions on installing the DocAve Platform, DocAve Manager, and DocAve Agents, see
the DocAve 6 Installation Guide.

DocAve®
6 Connector 10
Required Permissions Review the following sections for details on required Agent Account, File Share, and Local
System permissions.
Agent Account Permissions
To install and use Connector properly, ensure that the Agent account has the following
permissions:
1. Local System Permissions: These permissions are automatically configured by DocAve
during installation. Refer to Local System Permissions for a list of the permissions
automatically configured upon installation.
2. SharePoint Permissions: These permissions must be manually configured prior to using
DocAve 6 Connector; they are not automatically configured.
a. User is a member of the Farm Administrators group. Since Administrator works
across farms and on all SharePoint settings and configurations, this account is
needed in order to provide the best and most complete quality of service.
b. Full Control to all zones of all Web applications via User Policy for Web
Applications.
3. SQL Permissions: These permissions must be manually configured prior to using DocAve
6 Connector; they are not automatically configured.
• Member has the database role of db_owner for the SharePoint Content
Databases.
• Member has the database role of db_owner for the databases related to
SharePoint 2010, including Config Database, and Central Admin Database;
member has the database role of SharePoint_Shell_Access for the databases
related to SharePoint 2013, SharePoint 2016 and SharePoint 2019, including
Config Database, and Central Admin Database.
• Member has the database role of db_owner for all the DocAve stub databases.
• Member has the server role of dbcreator to SQL Server since it must create a
stub database before performing any Connector job.
*Note: The dbcreator role is only required for Windows Authentication.
• Member has the server role of securityadmin in SQL Server for enabling RBS.

DocAve®
6 Connector 11
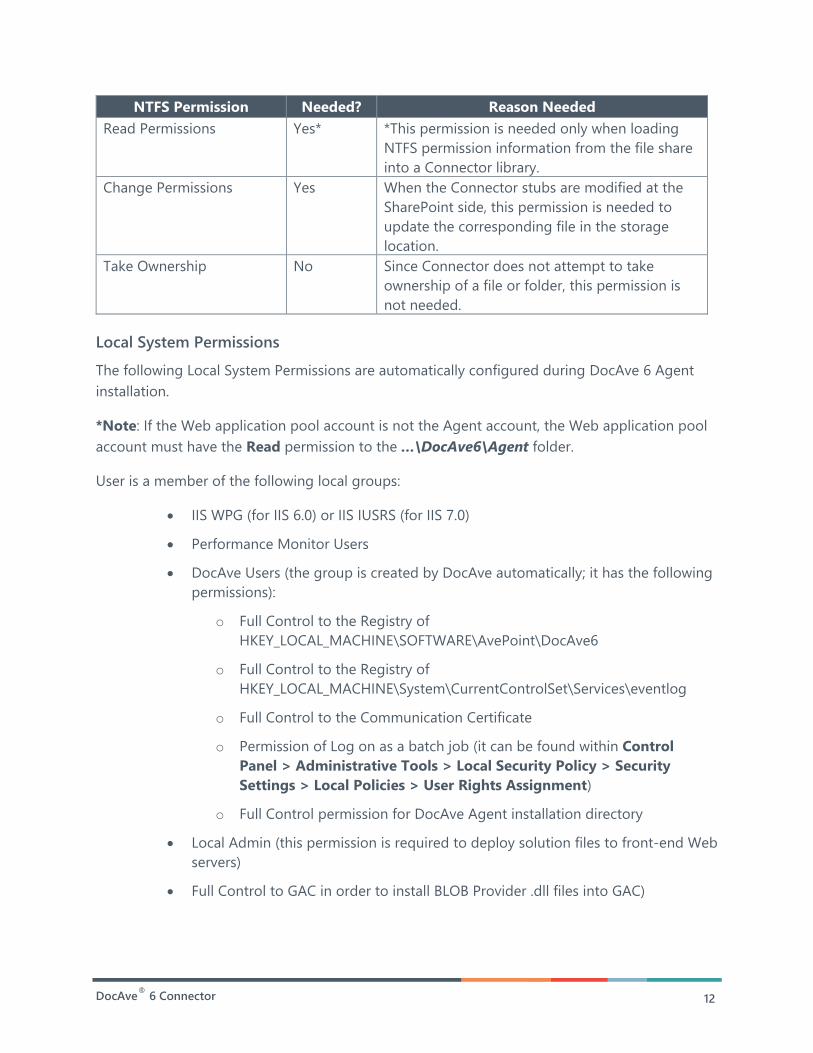
File Share Permissions
Ensure that the user account used by the Connector library to access the file share has the
following minimum permissions:
NTFS Permission Needed? Reason Needed
Full Control No
Traverse Folder/Execute
File
Yes Connector traverses the folder in order to access
the data within subdirectories. It also needs to
be able to open the file directly from the folder.
List Folder/Read Data Yes Connector must list all contents within the folder
in order to display them within SharePoint. It
also needs to read the data in order to provide
the binaries via SharePoint.
Read Attributes Yes SharePoint has a promotion and demotion
feature that reads Office file attributes and then
uses them as column data.
Read Extended Attributes Yes Office files have extended attributes as well as
custom attributes that are used in SharePoint
promotion and demotion processes.
Create Files/Write Data Yes This permission is needed to create files within
the file share when they are created within
SharePoint.
Create Folders/Append
Data
Yes This permission is required to create folders
within the file share when they are created in
SharePoint. Connector creates hidden folders
within the file share in order to store version
history and prevent other libraries from
connecting to the same file share.
Write Attributes Yes When SharePoint demotes column information
into Office files, the user account must have the
permission to write the file attributes into Office
files
Write Extended Attributes Yes Office files have extended attributes, as well as
custom attributes, that are used in SharePoint
promotion and demotion processes.
Delete Subfolders and Files Yes In order to synchronize deletion within
SharePoint into the file share, this permission is
needed.
Delete No Since Connector does not delete the root folder
that the data is connected to, this permission is
not needed.
DocAve®
6 Connector 12
NTFS Permission Needed? Reason Needed
Read Permissions Yes* *This permission is needed only when loading
NTFS permission information from the file share
into a Connector library.
Change Permissions Yes When the Connector stubs are modified at the
SharePoint side, this permission is needed to
update the corresponding file in the storage
location.
Take Ownership No Since Connector does not attempt to take
ownership of a file or folder, this permission is
not needed.
Local System Permissions
The following Local System Permissions are automatically configured during DocAve 6 Agent
installation.
*Note: If the Web application pool account is not the Agent account, the Web application pool
account must have the Read permission to the …\DocAve6\Agent folder.
User is a member of the following local groups:
• IIS WPG (for IIS 6.0) or IIS IUSRS (for IIS 7.0)
• Performance Monitor Users
• DocAve Users (the group is created by DocAve automatically; it has the following
permissions):
o Full Control to the Registry of
HKEY_LOCAL_MACHINE\SOFTWARE\AvePoint\DocAve6
o Full Control to the Registry of
HKEY_LOCAL_MACHINE\System\CurrentControlSet\Services\eventlog
o Full Control to the Communication Certificate
o Permission of Log on as a batch job (it can be found within Control
Panel > Administrative Tools > Local Security Policy > Security
Settings > Local Policies > User Rights Assignment)
o Full Control permission for DocAve Agent installation directory
• Local Admin (this permission is required to deploy solution files to front-end Web
servers)
• Full Control to GAC in order to install BLOB Provider .dll files into GAC)
DocAve®
6 Connector 13
• Full Control to Microsoft SQL Remote Blob Storage Folder to reconfigure
maintainer configuration file

DocAve®
6 Connector 14
Health Analyzer AvePoint recommends using Health Analyzer to check the prerequisites you need to correctly
use DocAve Connector.
*Note: Only the users in the DocAve Administrators group can use Health Analyzer.
For more information about Health Analyzer, refer to the DocAve 6 Installation Guide.

DocAve®
6 Connector 15
Getting Started Refer to the sections below for important information on getting started with Connector.
Launching Connector To launch Connector and access its functionality, complete the following steps:
1. Login to DocAve. If you are already in the software, click the DocAve tab. The DocAve
tab displays all modules on the left side of the window.
2. Click Storage Optimization to view the Storage Optimization modules.
3. Click Connector to launch this module.
Figure 1: DocAve module launch window.

DocAve®
6 Connector 16
Navigating DocAve DocAve mimics the look and feel of many Windows products, making for an intuitive and
familiar working environment. While there are many windows, pop-up displays, and messages
within DocAve products, they share similar features and are navigated in the same ways.
Below is a sample window in DocAve. It features a familiar, dynamic ribbon, and a searchable,
content list view.
Figure 2: Navigating DocAve.
1. Ribbon Panes – Allows users to access the functionality of the active DocAve module.
2. Manage columns ( ) – Allows users to manage which columns are displayed in the list.
Click the manage columns ( ) button, and then select the checkbox next to the column
name in the drop-down list.
3. Hide the column ( ) – Allows users to hide the selected column.
4. Search – Allows users to search the List View pane for a keyword or phrase. You can
select Search all pages or Search current page to define the search scope.
*Note: The search function is not case sensitive.
5. Management Pane – Displays the actionable content of the DocAve module.

DocAve®
6 Connector 17
User Interface Overview After clicking Connector, the Storage Optimization suite user interface launches with the
Connector tab active. This tab displays your farm environment and allows for quick access to all
of Connector’s features. The How to Use Connector area displays brief configurations and steps
about using Connector. The Dashboard displays the storage path and the synchronization
schedule configurations for the selected farm. Click View Details to view detailed information
about the configured path/synchronization schedule for the Web applications/site
collections/sites in the pop-up window. If you are away from the Dashboard page, click the
Connector Landing Page link at the bottom of your interface to go back to the Dashboard.
Figure 3: Dashboard interface.

DocAve®
6 Connector 18
Figure 4: Connector user interface.
1. The SharePoint tree (Scope panel) displays all content within your farms. Use this panel
to select the content that you wish to perform actions on.
2. The ribbon shows the available actions and wizards for the selected nodes. This content
is dynamic; it will often change depending on what is selected in the SharePoint tree.
3. The workspace shows all form-based content that is used during the configuration of
actions performed in DocAve products.
Selecting Farms and Nodes To select farms and nodes, complete the following steps:
1. From the Scope panel on the left, click the farm that contains the relevant SharePoint
content.
2. Select the relevant content from which you want to perform further operations by
selecting the radio button to the left of the content.
3. After selecting content, you will be able to perform the procedures described throughout
this guide.
DocAve®
6 Connector 19
Advanced Search
Advanced Search can narrow down the search criteria to display fewer nodes on your tree.
When the node you are about to expand has more than ten thousand child nodes, AvePoint
recommends using the Advanced Search.
To search the certain content on the tree, complete the following steps:
1. Right-click the node you are about to expand. A drop-down list appears.
2. Click Advanced Search in the drop-down list. The Advanced Search interface appears.
3. In the Advanced Search interface, click Add a Criterion to add a criterion which will be
used to search the child nodes. Configure the following settings:
• Rule – Select the rule for this search. You can use the URL rule for the Web
application level. You can also use the URL and Name rule for the Site Collection
node, the Sites node, the Lists node, and the Folders node.
• Condition – Select the condition for the rule.
• Value – Enter the value for the rule in the text box.
4. To add more criteria, click Add a Criterion, and repeat step 3. You can change the
logical relationships between the criteria by clicking the And or Or. The logical
relationship is set to And. And means that the child nodes that meet all of the criteria
will be included in the result. Or means that the child nodes that meet any criterion will
be included in the result. The Basic Filter Condition area displays the logic relationships
of filter criteria.
5. Click Search to start searching the child nodes.
6. The tree displays the child nodes that meet the search criteria. If the results exceed more
than ten thousand, a pop-up window will appear to recommend narrowing the search
criteria and try again.
*Note: The displayed child nodes do not include the Include New node.
If you select the current parent node to run a job, the child nodes under that parent node that
were excluded from the search will not be included in the search results.
To display all of the child nodes on the tree, select Refresh from the drop-down list after right-
clicking the current node.

DocAve®
6 Connector 20
Basic Steps for Configuring and Deploying Connector The following features and solutions need to be activated or configured in order to properly run
Connector. Click the link to jump to the corresponding section.
1. Configuring the BLOB Provider.
2. Enabling the BLOB Provider.
3. Deploying the Connector Solution.
4. Activating the Connector Features.
5. Configuring Mapping Settings. Configuring these settings is optional, as Connector
comes with default mapping settings.
6. Configuring the Processing Pool. Configuring these settings is optional, as Connector
comes with default Processing Pool settings.
7. Using Connector functionality:
• Creating a Connector Library in SharePoint (optional step; existing SharePoint
document libraries can be “connected” as well).
• Creating a Connection between SharePoint and a Storage Path.
8. Maintaining a Connector Library.

DocAve®
6 Connector 21
Configuring the BLOB Provider A binary large object (BLOB) is unstructured data (files, attachments, etc.) stored in SQL content
databases. Any file or attachment that is uploaded into SharePoint is stored as a BLOB in the
content database. By configuring the BLOB Provider, you are able to externalize BLOBs from a
content database to a user-specified external storage. The BLOB Provider feature intercepts
SharePoint database traffic and redirects all BLOB traffic to the external BLOB storage; what
remains in SharePoint is a stub of the data. In order to provide transparency to SharePoint users
and applications, Remote BLOB Storage (RBS) or External BLOB Storage (EBS) is used to expose
the storage contents through the SharePoint interface. EBS is an interface provided by Microsoft
SharePoint Server 2007 and 2010, while RBS is a set of standardized Advanced Programming
Interfaces (APIs) that are incorporated as an add-on feature pack for Microsoft SQL Server. In
order to use DocAve Connector, one of these two BLOB Providers must be enabled. AvePoint
recommends you use RBS as your BLOB Provider. In Connector, the BLOB Provider is used to
configure the storage of a SharePoint library’s files with a given file share. The BLOB Provider
also creates a stub database and enables the provider on the selected farm or node.
*Note: Since the DocAve RBS Provider is a third-party provider, SQL Server 2012 Enterprise
Edition or SQL Server 2008 R2 Enterprise Edition is required.
*Note: EBS is not supported in a SharePoint 2013/2016/2019 environment.
Feature RBS (for SharePoint
2010/SharePoint
2013/SharePoint
2016/SharePoint 2019)
EBS (Only in SharePoint
2010)
BLOB store scope RBS can be enabled at content
database, Web application and
farm levels. Each content
database can have its own BLOB
store. RBS is more flexible.
EBS can be enabled only at
the farm level.
Number of providers Multiple RBS providers can be in
the same SharePoint farm.
Only one EBS provider per
SharePoint farm.
Interface Managed.
RBS is a purely .NET-based
solution. From a technology
perspective, RBS fits in to .NET
quite nicely.
Unmanaged.
EBS relies on a legacy COM
interface.

DocAve®
6 Connector 22
Feature RBS (for SharePoint
2010/SharePoint
2013/SharePoint
2016/SharePoint 2019)
EBS (Only in SharePoint
2010)
Migrating BLOBs from
SQL Server stores to
BLOB stores and vice
versa
Windows PowerShell Custom
SharePoint interface SharePoint 2010 / SharePoint
2013 / SharePoint 2016 /
SharePoint 2019 ship with many
Windows PowerShell commands
that can be used to manage RBS
installation and configuration.
None
BLOB Provider Recommendations Before enabling your BLOB Provider, be sure to reference the following “dos and don’ts” to
BLOB Provider configurations.
You should:
• Start the wizard and verify RBS binaries (DocAve Agents) have been installed and
enabled on all Web front-ends in your farms, whether these Web front-ends are
user-facing or not.
• For best performance, choose a database server within the farm for your stub
database.
• Choose to manage all stubs (pointers) for EBS or RBS at the farm level – one stub
database per farm. Only when item counts of one million objects or greater are
expected per container should you apply lower-level settings.
• Consider inheritance if configuring stub databases at a lower level. See Stub
Database Inheritance for additional information on stub database inheritance.
• Configure a schedule for enabling RBS to ensure that you have planned for a
growing farm.
You should avoid:
• Missing servers when installing the Agents. Failing to install RBS/EBS on a Web
front-end (either user-facing or application-facing).

DocAve®
6 Connector 23
• Getting bogged down by your choice of EBS over RBS: pick what’s right for your
SQL Server version. We provide you the ability to update from EBS to RBS at a
later time. Refer to the DocAve 6 Control Panel Reference Guide for information
on updating from EBS to RBS.
• Making these configurations more granular than necessary. The goal is simplicity
in management: since this database will be included in your disaster recovery
plans for your farm, too many databases can make your failover more
complicated than it needs to be.
• Skipping the schedule configuration. Even as you grow your farm, new content
databases will be added and need to be enabled for use with the rest of the
storage optimization products.
For more information related to BLOB externalization best practices, refer to AvePoint’s
Optimize SharePoint Storage with BLOB Externalization white paper.
Enabling the BLOB Provider To enable the BLOB Provider on your servers, follow the instructions below.
*Note: In the event that you want to enable the RBS/EBS provider on Web front-ends that have
improperly installed Agents, use the standalone Agent tools. Refer to Appendix C: Enabling the
BLOB Provider Using the Agent Tools for information on enabling the BLOB Provider using these
tools.
1. To access the BLOB Provider, navigator to Connector > BLOB Provider in the General
Settings group. The BLOB Provider page appears.
2. Verify RBS binaries (DocAve Agents) have been installed and enabled on all SharePoint
servers that are running Web services in your farms. This also includes all application and
index servers.
*IMPORTANT: All these servers must have RBS binaries installed, or access to external
content (outside the database) will fail.
• The Install the BLOB Provider Binaries page displays information about all Web
front-end servers that have a DocAve Agent installed. By default, the BLOB
Provider is installed during the Agent installation.
• If the BLOB Provider is not installed on a particular server, Not Installed displays
in the server’s BLOB Provider Binaries column. If necessary, click Install to install
the corresponding BLOB Provider.
3. Click Next when finished. The Configure Stub Database page appears.

DocAve®
6 Connector 24
4. Choose the nodes you want to link to a stub database by selecting the checkbox to the
left of the node. AvePoint recommends you configure one stub database for the entire
farm.
5. After selecting which nodes you want to link to a stub database, click Configure in the
Manage group on the ribbon.
6. Choose a database server within the farm for your stub database. AvePoint
recommends you choose the default database server used by SharePoint Central Admin.
a. Configure Stub Database – Enter the Database Server and Database Name for
the stub database.
*Note: Once a stub database is configured and saved on a content database, the
configuration cannot be changed.
b. Authentication – Select the authentication method used to access the database.
o Windows authentication (recommended) – Use this method when you
want the user identity to be confirmed by Windows.
o SQL authentication – SQL server confirms the user identity according to
the configured account and password.
c. Connection String – Use this feature to create and configure stub databases
using command lines. Click Advanced to expand the advanced configuration.
Select Edit Connection String Directly to use Connection String method to
create and connect the Stub Database using Windows or SQL authentication.
*Note: If you select Edit Connection String Directly, configuration a and b
above will be unavailable.
To create a stub database using Windows authentication, input the following
information:
o Server – Enter the name of a SQL Server instance. The value must be
either the server’s name on the network, an IP address, or the name of a
Configuration Manager alias. To connect to the default instance on the
local server, refer to the following examples:
▪ Server=.;
▪ Server= IP Address;
▪ Server=localhost;
▪ Server=localDatabase\instancename;
DocAve®
6 Connector 25
o Database – Enter the database name. If a database is not specified, the
default database defined for the login is used. To connect to the
database, refer to the following example: Database=Database’s name.
o Trusted_Connection – Select the true value to use Windows
Authentication Mode for login validation.
o DataSource – Enter the instance’s name, the Hostname, or the IP address
of a SQL Server. If this field is not specified, a connection is made to the
default instance on the local computer.
o Failover Partner – Enter the name of the failover server used for database
mirroring.
o Initial Catalog – Enter the stub database’s name.
o Integrated Security – Select the true value to accept the value “SSPI” for
Windows Authentication.
To create a stub database using SQL authentication, input the following
information:
*Note: Each instruction’s key and value must be connected with “=”. The
instructions are separated using “;”.
o Server – Enter the name of a SQL Server instance. The value must be
either the server’s name on the network, an IP address, or the name of a
Configuration Manager alias. To connect to the default instance on the
local server, refer to the following examples:
▪ Server=.;
▪ Server=IP Address;
▪ Server=localhost;
▪ Server= localDatabase\instancename;
o Database – Enter the database name. If a database is not specified, the
default database defined for the login is used. To connect to the
database, refer to the following example: Database=Database’s name.
o Trusted_Connection – Select the False value to not use Windows
Authentication Mode for login validation. You can enter the credentials
that will be used to connect to the database.
o User ID – Enter the login name.
o Password – Enter the password.

DocAve®
6 Connector 26
o DataSource – Enter the instance’s name, the Hostname, or the IP address
of an SQL server. If not specified, a connection is made to the default
instance on the local computer.
o Failover Partner – Enter the name of the failover server used for database
mirroring.
o Initial Catalog – Enter the stub database’s name.
7. Click OK to proceed to the Enable BLOB Provider page. The Enable BLOB Provider
page shows the BLOB Provider Status of the farms that have DocAve Agents installed.
8. To enable the BLOB Provider, click Configure in the Action column and proceed with
the instructions below that are pertinent to the BLOB Provider you wish to enable. Note
that if you are using a SharePoint 2010 environment, AvePoint recommends that you
enable RBS for the farm. If you are using a SharePoint 2013 or SharePoint 2016 or
SharePoint 2019 environment, you can only enable RBS for the farm.
To enable RBS:
• Under Enable RBS for Farm, click the farm name to expand the tree. View the
RBS status and enable RBS on the selected content databases by selecting the
checkbox in the Enable column.
• Select Enable in the Include New Content Databases row to enable RBS for all
newly-added content databases. In order to use this function, a schedule must be
configured in the Schedule field.
• Configure a Schedule to check for newly-added content databases. According to
your configured schedule, Connector runs a search on your farm for new content
databases. If any new content databases are found, Connector enables RBS on
them.
*Note: The stub database rule is applied to a newly-added content database
immediately after the content database is added to the corresponding Web
application.
*Note: If both EBS and RBS are enabled, RBS is used.
9. After configuring the BLOB Provider, click OK to save the configuration. Then, click Next
to proceed to the Overview page.
10. The Overview page shows all stub database information for all farms.
• If desired, click Edit in the table heading row to edit the configuration.
• When satisfied with the configurations, click Finish and Run Now to save the
configuration and then enable/disable the corresponding BLOB Provider.

DocAve®
6 Connector 27
*Note: To enable the RBS Provider without using a schedule, you must click
Finish and Run Now to enable it immediately. Clicking Finish immediately
enables EBS, but only saves the RBS Provider configuration without enabling the
RBS BLOB Provider.

DocAve®
6 Connector 28
Deploying the Connector Solutions To use Connector in DocAve, you must first deploy the DocAve Connector solutions to your
SharePoint farm.
There are six Connector solutions that can be deployed: SP2010ConnectorContentLibrary.wsp
and SP2010ConnectorMediaLibrary.wsp are for SharePoint 2010;
SP2010ConnectorContentLibrary.wsp and SP2010ConnectorMediaLibrary.wsp are for
SharePoint 2013 with 2010 experience version; SP2013ConnectorContentLibrary.wsp and
SP2013ConnectorMediaLibrary.wsp are for SharePoint 2013 with 2013 experience version;
SP2016ConnectorContentLibrary.wsp and SP2016ConnectorMediaLibrary.wsp are for
SharePoint 2016; SP2019ConnectorContentLibrary.wsp and
SP2019ConnectorMediaLibrary.wsp are for SharePoint 2019. Once you install and deploy the
DocAve Connector solutions, the Connector feature will be listed in the Site Collection Feature
List. Choose the solution to deploy according to the Connector features you want to use.
• The SP2010ConnectorContentLibrary, SP2013ConnectorContentLibrary,
SP2016ConnectorContentLibrary, SP2019ConnectorContentLibrary solutions
include the DocAve Content Library feature, DocAve Connector Library
Converting feature, and MySite Libraries feature.
• The SP2010ConnectorMediaLibrary, SP2013ConnectorMediaLibrary,
SP2016ConnectorMediaLibrary, SP2019ConnectorMediaLibrary solutions
include the DocAve Media Library feature.
Follow the steps below to deploy DocAve Connector solutions.
1. Navigate to the DocAve > Control Panel > Solution Manager.
2. Select the target farm from the Farm drop-down list.
3. Check the following checkboxes: SP2010ConnectorContentLibrary.wsp and
SP2010ConnectorMediaLibrary.wsp for SharePoint 2010;
SP2010ConnectorContentLibrary.wsp and SP2010ConnectorMediaLibrary.wsp for
SharePoint 2013 with 2010 experience version; SP2013ConnectorContentLibrary.wsp
and SP2013ConnectorMediaLibrary.wsp for SharePoint 2013 with 2013 experience
version; SP2016ConnectorContentLibrary.wsp and
SP2016ConnectorMediaLibrary.wsp for SharePoint 2016;
SP2019ConnectorContentLibrary.wsp and SP2019ConnectorMediaLibrary.wsp for
SharePoint 2019. Click Install in the Actions group.
4. Once the solutions are installed on the SharePoint farm, select the checkboxes below:
SP2010ConnectorContentLibrary.wsp and SP2010ConnectorMediaLibrary.wsp for
SharePoint 2010, or SP2010ConnectorContentLibrary.wsp and

DocAve®
6 Connector 29
SP2010ConnectorMediaLibrary.wsp for SharePoint 2013 with 2010 experience version,
or SP2013ConnectorContentLibrary.wsp and SP2013ConnectorMediaLibrary.wsp for
SharePoint 2013 with 2013 experience version, or
SP2016ConnectorContentLibrary.wsp and SP2016ConnectorMediaLibrary.wsp for
SharePoint 2016, or SP2019ConnectorContentLibrary.wsp and
SP2019ConnectorMediaLibrary.wsp for SharePoint 2019. Click Deploy in the Actions
group.
5. After the solutions are deployed successfully, the status of the solutions is shown as
Deployed in the Status column.
Refer to the Solution Manager section of the DocAve 6 Control Panel Reference Guide for
information on performing more operations on the solutions.
*Note: For the SharePoint 2013 Site Collections which are created using the SharePoint 2010
template, you must install and deploy the Connector solutions designed for SharePoint 2010.

DocAve®
6 Connector 30
Activating the Connector Features Once the Connector solution is deployed, you can configure Connector settings for SharePoint
objects (including Web applications, site collections, sites, and libraries) through the DocAve
user interface.
If you want to configure Connector settings for the libraries through the SharePoint user
interface, the Connector features must be activated through DocAve or SharePoint after the
Connector solution is deployed. Activating Connector in DocAve allows a user to
activate/deactivate features for multiple site collections at once, while in SharePoint, a user must
activate/deactivate site collections one by one.
Choose the feature you want to use:
• DocAve Content Library – Creates a Content Library for documents and other files
in an external storage location. Synchronization jobs can be performed regularly
to keep the Content Library consistent with its connected storage location.
• DocAve Media Library – Creates a Media Library for video, music and multimedia
files in an external storage location. Media Libraries allow users to play videos
online. Synchronization jobs can be performed regularly to keep the Media
Library consistent with its connected storage location.
• DocAve Connector Library Converting – Coverts the SharePoint Document
Libraries, Picture Libraries and Form Libraries to Connector Content Libraries. In
addition, you can also convert Asset Libraries to Connector Content Libraries in
SharePoint 2010. The libraries that are converted to Connector Content Libraries
can have Connector settings applied to them. Content Libraries synchronize
updates between the storage location and SharePoint to maintain data
consistency.
• MySite Libraries – Automatically creates Content Libraries when new My Sites are
created. The created MySite library will inherit the configured storage path if the
parent Web application level has been configured with a storage path. This
feature is activated at the Web application level.
Activating Connector through SharePoint To activate the Connector features through SharePoint, complete the following steps:
1. In SharePoint 2013, SharePoint 2016 and SharePoint 2019, access the site collection for
which you want to activate Connector. Click the Settings ( ) icon and navigate to Site
settings > Site collection features. Or navigate to Site Actions > Site Settings > Site
Collection Features in SharePoint 2010. The Site Collection Features page appears.

DocAve®
6 Connector 31
2. Click Activate next to the DocAve Connector Library Converting, DocAve Content
Library, and DocAve Media Library Connector features.
After activating the Connector feature, the status of the feature reads Active in the
Status column.
As for the MySite Libraries feature, it is activated at the Web application level. After you
navigate to SharePoint Central Administration > Application Management > Manage Web
applications, select the desired Web application and click Manage Features on the ribbon. You
can activate the MySite Libraries feature for the selected Web application.
*Note: In a farm, the Manage Features on the ribbon is available only when the DocAve Agent
is installed on the machine where the Central Administration resides and the Microsoft
SharePoint Foundation Web Application service is enabled. Otherwise, you all have to activate
the MySite Libraries feature in DocAve.
Activating Connector through DocAve To activate the Connector features through DocAve, complete the following steps:
1. Navigate to Connector > Manage Feature in the Manage group. The Manage Feature
page appears.
2. Select the Connector feature (Content Library, Media Library, Library Converting, or
MySite Libraries) that you wish to activate in the View group. Configure the following
settings for the selected features:
a. Tree selection – Select the target destination on which you wish to activate the
Connector features.
b. Expand the SharePoint farm tree to the desired node and click Activate in the
Action column to activate the Connector feature. Or you can click Activate All
following the nodes you wish to activate the Connector feature.
*Note: If the MySite Libraries feature is activated on the selected Web
application, a Content library will be automatically created in the MySite when
this MySite is created. For the advanced configuration, refer to the
<MySiteAutoCreation></MySiteAutoCreation> node in Agent Configuration
File.
3. After activating the Connector features, the status of the features on the corresponding
site collection is changed from Inactive to Active in the Status column.

DocAve®
6 Connector 32
Configuring Mapping Settings Connector requires several configurations to file shares for use in SharePoint. Once RBS is
configured, you now need to resolve the discrepancies that exist between SharePoint and file
shares. Fundamentally, these are two different systems, with different default metadata styles,
security levels, and naming/path conventions.
Configured mapping settings determine how the synchronized files and folders (as well as their
metadata and security properties) are managed in SharePoint. Configuring these settings is
optional, as the Connector module contains default mapping settings.
Common Mapping SharePoint 2010 and SharePoint 2013 does not support file or folder names that are longer than
128 characters, or filenames that contain invalid characters (such as " # % & * : < > ? \ / { | } ~).
Files or folders with names longer than 128 characters are pruned to 128 characters after being
synchronized to SharePoint. For filenames that contain invalid characters, the characters are
replaced with an underscore (_) after being synchronized to SharePoint.
SharePoint 2016 has no limitation for the file or folder name length while the URL length
limitation is still 260 characters. SharePoint 2016 supports the following special characters in file
or folder names: ~ & { }.
SharePoint 2019 has no limitation for the file or folder name length while the URL length
limitation is 400 characters. SharePoint 2019 supports the following special characters in file or
folder names: ~ & { } % #.
DocAve applies a default common mapping named DefaultConnectorCommonSetting, which
cannot be edited or deleted. To set up a new Common Mapping:
1. Navigate to Connector>Common Mapping in the General Settings group. The
Common Mapping pop-up page appears.
2. To create a new mapping rule, click Create in the Manage group. The Create Common
Mapping page appears.
3. Configure the following settings for Common Mapping:
a. What would you like to call this common mapping? – Enter a name and an
optional description for the common mapping profile.
b. What is the maximum length for folder and file names? – Enter the maximum
length of the folder/filename displayed in the Connector Library. If the
folder/filename exceeds the length that is defined, the system automatically

DocAve®
6 Connector 33
prunes the extra characters and saves the name according to the length defined.
The folder/filename is pruned according to the following rules.
o Regarding filename pruning, the file extension characters are counted
towards the total number of characters. Only the filename itself is pruned.
For example, if the maximum length configured is 7, a file named
abcde.exe is pruned to abe.exe.
o DocAve starts pruning from the middle of the filename. In file systems,
versions of documents are commonly identified with characters at the
beginning (“Copy of”) and characters at the end (“version1” or “_1”). By
pruning characters from the middle of the filename, DocAve ensures that
these identifying characters remain intact.
o If there is already a file with the same name in SharePoint after DocAve
prunes the filename, a numerical suffix is added to the original name of
the file/folder after pruning.
c. How should invalid characters be replaced in SharePoint? – Replace illegal
characters in folder/filenames with legal characters when synchronizing content
to SharePoint. By default, all of the illegal characters are replaced with an
underscore (_).
SharePoint 2016 supports the following special characters in file or folder names:
~ & { } and SharePoint 2019 supports the following special characters in file or
folder names: ~ & { } # %. Therefore, it is recommended to remove the rules for
the corresponding characters when configuring illegal characters replacement
settings for SharePoint 2016/SharePoint 2019.
Property Mapping Files that are uploaded to SharePoint natively from a file system lose their metadata, but
Connector can read all the file system metadata and presents them to SharePoint in full-fidelity.
Property Mapping allows you to configure rules that map the file system properties to
SharePoint metadata, thereby preserving the metadata.
By default, DocAve applies a default common mapping named
DefaultConnectorPropertySetting, which cannot be edited or deleted. To set up a new
Property Mapping:
1. From the Connector tab, select Property Mapping in the General Settings group. The
Property Mapping pop-up page appears. Here, you can view all of the existing Property
Mapping profiles.
2. To create a new property rule, click Create in the Manage group. The Create Property
Mapping page appears in the workspace.

DocAve®
6 Connector 34
3. Configure the following settings for Property Mapping.
a. What would you like to call this property mapping? – Enter a name and an
optional description for the Property Mapping profile.
b. How should file system properties be mapped? – Map the file system
properties to SharePoint properties. Click either the Content Library or Media
Library tabs above the table to set the corresponding properties. The file system
properties are mapped to SharePoint properties with the original property names
unless manually configured.
Security Mapping Files that are uploaded natively to SharePoint from a file system lose their permission settings,
but Connector can read the document and file share level permissions and loads them into
SharePoint. Security Mapping allows you to configure rules that map the file system permissions
to SharePoint permissions.
While mapping for permissions can be configured, it’s important to remember that applying
unique object level permissions is not a recommended best practice in SharePoint.
By default, DocAve applies a default common mapping named
DefaultConnectorSecuritySetting, which cannot be edited or deleted. To set up a new Security
Mapping:
1. From the Connector tab, select Security Mapping in the General Settings group. The
Security Mapping pop-up page appears. Here, you can view all of the existing Security
Mapping profiles.
2. To create a new property rule, click Create in the Manage group. The Create Security
Mapping page appears in the workspace.
3. Configure the following settings for Security Mapping.
a. What would you like to call this security mapping? – Enter a name and
optional description for the Security Mapping profile.
b. How should file system permissions be mapped? – Map file system
permissions to SharePoint permissions. It provides you two modes for permission
mapping. Basic permissions mode enables you to configure the mappings of file
system permission levels to SharePoint Permission Levels. Advanced
permissions mode enables you to configure more detailed permission mappings
from file system to SharePoint. Select a SharePoint Permission from the drop-
down list to apply it to the corresponding File System Permission.
4. To create a new SharePoint permission level for the permission mapping, click New
SharePoint Permission Level. In the pop-up window, you can view the following

DocAve®
6 Connector 35
SharePoint permission levels: Contribute, Design, Full Control, None, Read, and View
Only. These SharePoint permission levels cannot be edited or deleted.
5. Click Create in the Manage group. The Manage SharePoint Permission Level page
appears. Configure the following settings to create a new permission level.
• What would you like to call this SharePoint permission level? – Enter a name
and optional description for the SharePoint permission level.
• What permissions would you like to include? – Select the detailed permissions
for the new SharePoint permission level by clicking the corresponding
checkboxes. Select Select All to include all permissions.
6. Click OK when finished. The newly-created SharePoint permission level is listed on the
Manage SharePoint Permission Level page and the SharePoint Permission drop-
down lists on the Create Security Mapping page.

DocAve®
6 Connector 36
Configuring the Processing Pool The Processing Pool feature allows you to control the maximum number of synchronization jobs
that can be run at the same time. Normally, a synchronization job is fairly resource intensive, so
running multiple synchronization jobs simultaneously may affect the performance of the server.
To avoid this condition, use the Processing Pool feature to limit the number of simultaneous
synchronization jobs.
Synchronization jobs that are added into the Processing Pool become threads. The number of
threads you allow in the processing pool is the maximum number of jobs that can be run
simultaneously. The remaining synchronization jobs are placed in a queue.
Each SharePoint farm has a default processing pools: DocAve_Farm(FarmName). The number
of threads set in that processing pool is 5.
To create a new Processing Pool, complete the following steps:
1. Navigate to Connector > Processing Pool in the General Settings group.
2. Click Create in Manage group on the Processing Pool tab. The Processing Pool page
appears.
3. Enter a Processing Pool Name and an optional Description.
4. Select the Farm from the drop-down list.
5. Select an Agent Group from the drop-down list. The Agents in the selected Agent group
are used by this Processing Pool to perform synchronization jobs. For more information
about creating Agent groups, refer to the DocAve 6 Control Panel Reference Guide.
6. Specify the Maximum Number of Jobs that will be used for the synchronization jobs.
For example, if you enter 8 in this field, then 8 synchronization jobs can be run at the
same time.
DocAve®
6 Connector 37
How Connector Works with SharePoint In Connector, there are two ways you can link with a file server.
One method is to create a library in SharePoint based on a Connector library template, which
DocAve installs out-of-the-box. You can customize this library, save the library as a template,
and reuse it. In this case, the template ID for the library remains the same, and is a “known and
approved” template for integration with Connector’s server API. For more information on this
method, refer to Creating a Connector Library in SharePoint.
With the second method, you can convert existing SharePoint libraries to Connector libraries
and move the content from SharePoint to file servers you configure through DocAve. In this
case, Connector references a known and tested list of templates. These are mostly out-of-the-
box SharePoint template IDs. For more information on this method, refer to Creating a
Connection between SharePoint and a Storage Path.
The common theme for both methods is the template ID for the library. This template ID is
important for two reasons:
• When Connector converts a library, a Connector Settings link is added to the
SharePoint library’s Settings page. Connector checks the library’s template ID
against a known and tested list of templates.
• Each library can be customized with different features that require Connector to
adapt the way it synchronizes content. For instance, a picture library requires that
Connector upload the content first to SharePoint in order to generate a
thumbnail, while slide libraries require Connector to split storage of each .ppt into
individual slides. For this reason, we have opted for a restricted model of
deployment, only allowing templates that we have verified to convert successfully
with all features enabled.
*Note: For a list of the SharePoint libraries that Connector supports for conversion, refer to
SharePoint Libraries that can Be Converted to Connector Libraries.
In some cases, you may have a highly customized library that Connector fails to convert. The
customized SharePoint library’s template ID is not on the “approved” conversion list. However,
there are steps you can take to add this template ID to the approved list. For more information,
refer to Adding Customized SharePoint Libraries to the Connector-Approved List of Templates.

DocAve®
6 Connector 38
Creating a Connection between SharePoint and a
Storage Path With DocAve Connector, you can create a connection between a SharePoint library and a file
share, or cloud storage path. In other words, you can “convert” an existing SharePoint
document/form/picture/asset library to a Connector library with a configured storage path. The
connection can be made at the Web application, site collection, site, or library level; however, it
is most common for end users to make this connection at the library level.
*Note: To directly connect the storage path content to a SharePoint library, configure a
Connector path on the Library Level. This is especially common when you’re looking to enable
team sites for users who already have an existing file share.
*Note: When connecting a Web Application, Site Collection, or Site Level or multiple libraries to
a file share, DocAve Connector creates subfolders in the file share that reflect the hierarchy of
the farm nodes selected. This is especially common when you’re looking to enable My Sites for
an enterprise Web application but maintain home drives or file shares underneath.
Regardless of the level that the connection is configured on, only DocAve Connector libraries
(Content Library/Media Library) and the four types of SharePoint libraries (Document
library/Form library/Picture library/Asset library) are actually connected to the storage path. In
some cases, you may want to convert an existing custom SharePoint library. DocAve references a
known and tested list of SharePoint templates available at the time of a release. These are
mostly out-of-the-box SharePoint template IDs. If you are attempting to convert a highly
customized SharePoint library, you will need to manually add the template ID to the “approved”
list. For more information, refer to Adding Customized SharePoint Libraries to the Connector-
Approved List of Templates.
Once the connection is made and a synchronization job is run, any content that is uploaded to
the SharePoint library is stored in the connected storage path (instead of in the SharePoint SQL
database). What exists in the SQL database is a stub, not the actual data. However, content in
the SharePoint library appears and functions normally, as though the actual data was still stored
in SQL.
Overview The Connector settings for the Web application, site collection, and site levels are divided into
two parts: Configure Path and Configure Sync Settings.
*Note: Only Configure Path is supported at the library level. Sync settings are not configurable
at the library level, so the Configure Sync Settings option is not available for libraries.

DocAve®
6 Connector 39
*Note: Connector supports synchronizing content on the content database level which means
all of the libraries (which have configured the path settings) in the site collections associated
with the selected content database can be synchronized. Sync Settings is configurable at the
content database level, refer to Configuring Sync Settings for Content Database Level for details;
Configure Path is not configurable at the library level, so the Configure Path option is not
available for libraries.
• In the Configure Path wizard, you can configure the storage path.
• In the Configure Sync Settings wizard, you can configure Sync settings such as
mapping settings and schedule settings.
Configuring the Connector Path To connect a SharePoint library to a storage path, complete the following steps:
1. From the Scope panel, select the object that you wish to connect to a storage path.
2. Click the Configure Path drop-down in the Action group and select Configure Path.
3. Refer to the appropriate section below depending upon the level you selected.
Web Application, Site Collection, or Site Level
*Note: The Web application, site collection, and site levels support only Net Share storage and
NetApp Data ONTAP. DocAve Connector also supports cloud storage, FTP, HDS Hitachi Content
Platform, IBM Storwize Family, NetApp Data ONTAP, Network File System and Net Share with
WMS (only for Media Library) storage on the Library Level, in addition to Net Share.
To configure the Connector settings on the Web application, site collection, or site level,
complete the following steps:
1. Follow the instructions in Configuring the Connector Path to select a node.
2. Configure Storage Path appears. Configure a physical storage path to connect to the
desired nodes in your SharePoint environment. For information regarding inheritance,
refer to Managing Inherited Connector Settings.
a. Should these settings apply only to specific managed paths? (Web
application level only) – Select the managed path where you want to configure
the Connector settings. The site collections and sites under the selected managed
path inherit the Connector settings from the Web application automatically. The
libraries under the selected managed path inherit the Connector settings from
the Web application automatically only when they are enabled in the Enable
Library step

DocAve®
6 Connector 40
After selecting a managed path, click the Add Selected Managed Path to add it.
You can add several managed paths.
b. What type of storage location would you like to connect? – Select the storage
device type. Only the Net Share storage and the NetApp Data ONTAP storage
are supported for the Web application, site collection, and site levels.
o Net Share – Enter the path whose content will be synchronized to the
Connector library. Enter the Username and Password. This path will be
the default root storage path for all the Connector Libraries created under
the selected node. The UNC path’s credentials will be automatically saved
as a managed account profile which enables you to apply the password
change to all settings using the same account. For more information, refer
to the DocAve 6 Control Panel User Guide. Clicking Advanced displays
the Extended Parameters option, and it allows you to manage the
advanced settings for the storage path. Refer to the Net Share section in
DocAve 6 Control Panel Reference Guide for information on the available
properties in the Extended Parameters option.
*Note: If you configure Extended Parameters for Net Share in Connector,
the device cannot be in Read Only mode since Connector needs to have
permission to write or delete data from the storage location. For more
detailed information about file share permissions, refer to File Share
Permissions.
o NetApp Data ONTAP – Select CIFS or NFS from the Data ONTAP drop-
down list and configure the other settings accordingly:
▪ CIFS Share – Specify a previously configured Storage system
profile that contains the connection information to your storage
system and select a Share to be the storage location from the
Share name drop-down list. You can specify the sub-folder path
in the Start folder text box. Ensure that this path does not start
with a forward slash (\). For example, if a full CIFS path is \\na7m-
a\blob\connector\site_files, the server name na7m-a is selected
in Storage system profile, and the CIFS share name blob is
selected from the Share name drop-down list. The user must
enter the value connector\site_files in the Start folder. Then,
enter the Username and Password to set up access to the Filer.
These credentials will be automatically saved as a managed
account profile, which enables you to apply the password change
to all settings using the same account. For more information, refer
to the DocAve 6 Control Panel User Guide. The Extended
parameters option is shown if the Advanced option is enabled.
The Extended parameters option allows you to add customized
properties to configure the advanced settings for the storage path.

DocAve®
6 Connector 41
▪ NFS – Select a previously configured Storage system profile that
contains the connection information to your storage system and
then select a Share from the Export drop-down menu to be the
storage location. You can specify the sub-folder path in the Start
folder text box. If the share path you selected does not allow
anonymous access, select the Use username mapping checkbox
to enter the Username and Password. If the share path allows
anonymous access, you can just leave the Use username
mapping deselected. The Extended parameters option is shown
if the Advanced option is enabled. The Extended parameters
option allows you to add customized properties to configure the
advanced settings for the storage path.
3. Click Next when finished. The Enable Library page appears.
4. Would you like to enable the Connector settings on child libraries? – Using the tree
to the right, navigate down to the library level. Select the libraries where you want to
enable the Connector settings. The checkboxes for the libraries that already have
Connector settings configured are not available in the tree.
5. When finished, click Next. The Overview page appears.
6. Review and edit the Connector settings in the Overview page. Click Back to modify your
configuration, click Finish to complete the configuration, or click Cancel to quit. After
clicking Finish, folders are generated in the storage path you entered in the UNC Path
field in the format UNC Path\Managed Path\Site URL Name\Library URL Name. The
content in each library is stored in the corresponding path/folder in the storage location.
Library Level
Most end users will configure a Connector storage path on the library level to directly connect
existing file share content to a SharePoint library. DocAve Connector supports cloud storage,
FTP, HDS Hitachi Content Platform, IBM Storwize Family, NetApp Data ONTAP, Network File
System and Net Share with WMS (only for Media Library) storage on the library level, in addition
to Net Share.
While mapping for permissions can be configured, it’s important to remember that applying
unique object level permissions is not a recommended best practice in SharePoint.
*Note: The only Connector option available at the library level is Configure Path. The
Configure Sync Settings option is not available for configurations made at the library level.
*Note: If connecting an existing SharePoint Document library, Form library, Picture library, or
Asset library to a storage path, all content in the existing SharePoint library is moved to the

DocAve®
6 Connector 42
storage path, even the content that was uploaded to the library prior to making the
“connection” to the storage path.
The Connector settings at the library level can also be configured from SharePoint. Refer to
Configuring Connector Library Settings using the SharePoint Interface for details.
To configure a Connector path on the library level in DocAve, complete the following steps:
1. Follow the instructions in Configuring the Connector Path to select a node. The Connect
to existing content outside of SharePoint page appears. Use path from parent is
selected if the storage path is already configured at the level higher than library level.
• If it is checked, the library inherits the storage path from its parent site. The UNC
Path and Username fields cannot be modified, but the Password is required.
The UNC path’s credentials will be automatically saved as a managed account
profile which enables you to apply the password change to all of the settings
using the same account. For more information, refer to the DocAve 6 Control
Panel User Guide.
• If unchecking this option, you can specify a unique storage path for the library. If
any of the parent objects including the site, site collection, and Web application
are not configured to any storage path, this option is not available in the library
configuration page.
For information regarding inheritance, refer to Managing Inherited Connector Settings.
2. Select a Storage Type from the drop-down list:
• Net Share – Enter the path you want to synchronize with this library, and then
enter the Username and Password to set up access to the path to which data
will be written. The UNC path’s credentials will be automatically saved as a
managed account profile which enables you to apply the password change to all
settings using the same account. For more information, refer to the DocAve 6
Control Panel User Guide. Clicking Advanced displays the Extended Parameters
option, and it allows you to manage the advanced settings for the storage path.
Refer to the Net Share section in DocAve 6 Control Panel Reference Guide for
information on the available properties in the Extended Parameters option.
*Note: If you configure Extended Parameters for Net Share in Connector, the
device cannot be in Read Only mode since Connector needs to have permission
to write or delete data from the storage location. For more detailed information
about file share permissions, refer to File Share Permissions.
• IBM Storwize Family – Enter the path you want to synchronize with this library,
and then enter the Username and Password to set up access to the storage
device. The UNC path’s credentials will be automatically saved as a managed
account profile which enables you to apply the password change to all of the

DocAve®
6 Connector 43
settings using the same account. For more information on the managed account
profile, refer to the DocAve 6 Control Panel User Guide. Clicking Advanced
displays the Extended Parameters option, and it allows you to manage the
advanced settings for the storage path. Refer to the IBM Storwize Family section
in DocAve 6 Control Panel Reference Guide for information on the available
properties in the Extended Parameters option.
*Note: If you configure Extended Parameters for IBM Storwize Family in
Connector, ensure that the device is not in Read Only mode since Connector
writes and deletes data from the storage location.
• FTP – Specify the path you want to synchronize with this library by entering the
Host, Port, and Root Folder. Then enter the Username and Password to set up
access to the path where the data will be written. Clicking Advanced displays the
Extended Parameters option, and it allows you to manage the advanced
settings for the storage path. Refer to the FTP section in the DocAve 6 Control
Panel Reference Guide for information on the available properties in the
Extended Parameters option.
• NetApp Data ONTAP – Select CIFS or NFS from the Data ONTAP drop-down list
and configure the other settings accordingly:
o CIFS Share – Specify a previously configured Storage system profile that
contains the connection information to your storage system, and select a
Share to be the storage location. You can specify the sub-folder path in
the Start folder text box. Ensure that this path does not start with a
forward slash (\). For example, if a full CIFS path is \\na7m-
a\blob\connector\library_files, the server name na7m-a is selected in
Storage system profile, and the CIFS share name blob is selected from
the Share name drop-down list. The user must enter the value
connector\library_files in the Start folder. Then, enter the Username
and Password to set up access to the Filer. These credentials will be
automatically saved as a managed account profile, which enables you to
apply the password change to all settings using the same account. For
more information, refer to the DocAve 6 Control Panel User Guide. The
Extended parameters option is shown if the Advanced option is
enabled. The Extended parameters option allows you to add customized
properties to configure the advanced settings for the storage path.
o NFS – Select a previously configured Storage system profile that
contains the connection information to your storage system and then
select a Share from the Export drop-down menu to be the storage
location. You can specify the sub-folder path in the Start folder text box.
If the share path you selected does not allow anonymous access, select
the Use username mapping checkbox to enter the Username and
Password. If the share path allows anonymous access, you can just leave

DocAve®
6 Connector 44
the Use username mapping deselected. The Extended parameters
option is shown if the Advanced option is enabled. The Extended
parameters option allows you to add customized properties to configure
the advanced settings for the storage path.
• Network File System – Enter the path you want to synchronize with this library,
and then enter the Username and Password to set up access to the path where
the data will be written. (Credentials are optional for anonymous access, therefore
if the path you entered allows anonymous access, you can leave the Username
and Password empty.) For more information, refer to the DocAve 6 Control Panel
User Guide. Clicking Advanced displays the Extended Parameters option, and it
allows you to manage the advanced settings for the storage path. Refer to the
Network File System section in DocAve 6 Control Panel Reference Guide for
information on the available properties in the Extended Parameters option.
*Note: If you configure Extended Parameters for Network File System in
Connector, the device cannot be in Read Only mode since Connector must have
permission to write or delete data from the storage location. For more detailed
information about file share permissions, refer to File Share Permissions.
*Note: The feature of Client for NFS must be installed on the local machine
where the DocAve Agent is installed to use Network File System as the storage
device. Otherwise, Network File System device will not be accessible.
*Note: Unix path format is not supported.
• HDS Hitachi Content Platform – Specify the primary Namespace Address and
an optional secondary Namespace Address where the data will be stored. Enter
a Root Folder to be the exact storage location. Then, enter the Username and
Password to set up access to the configured namespace. Clicking Advanced
displays the Extended Parameters option, which allows you to manage
additional settings. Refer to the HDS Hitachi Content Platform section in DocAve
6 Control Panel Reference Guide for information on the available properties in
the Extended Parameters option.
• Cloud Storage – Select a Cloud Type from the drop-down list. There are several
options: RackSpace Cloud Files, Microsoft Azure Storage, Amazon S3, EMC
Atmos, AT&T Synaptic, Amazon S3-Compatible Storage and Dropbox. Refer to
the RackSpace Cloud Files, Microsoft Azure Storage, Amazon S3, EMC Atmos,
AT&T Synaptic, Amazon S3-Compatible Storage or Dropbox sections in the
DocAve 6 Control Panel Reference Guide for information on the credentials and
the available properties in the Extended Parameters option.
If you are configuring a Media Library, there is one more option available for storage
type:
• Net Share with WMS – If you are configuring a Media Library, this option is
available to connect the videos stored in this path to the Windows Media Service.

DocAve®
6 Connector 45
Through the use of Net Share with WMS storage, videos can be played using
Windows Media Service.
*Note: The Windows Media Service must already be associated with the Net
Share path.
3. How should changes be synchronized? – Select the synchronization mode that will be
used:
*Note: To review the synchronization mode behaviors for certain actions in SharePoint
or a storage system, refer to the table in Synchronization Mode Behaviors in SharePoint.
*Note: This field was added in DocAve 6 SP2 CU1. When updating DocAve from one
version older than DocAve 6 SP2 CU1, meaning no synchronization mode has been
configured before the DocAve update, Sync changes made from SharePoint to the
storage path, existing files in the storage path to SharePoint, and load new files
from the storage path will be used after the DocAve update.
• Sync changes made from SharePoint to the storage path and existing files in
the storage path to SharePoint – Select this option if the files are only being
added, modified, or deleted through the SharePoint interface. Files added on the
file server will not be synchronized to SharePoint. Deletions and modifications on
the file server are not supported and could cause loss of data in SharePoint. Refer
to AvePoint’s Supplementary Tools User Guide for instructions on cleaning up
orphan stubs.
*Note: AvePoint strongly recommends that you choose Sync changes made
from SharePoint to the storage path and existing files in the storage path to
SharePoint as the synchronization mode. Microsoft insists that RBS storage
locations are not modified or accessed without risking possible inconsistencies
between SharePoint and the actual files.
• Sync changes made from SharePoint to the storage path, existing files in the
storage path to SharePoint, and load new files from the storage path –
Select this option if files are being added, modified, or deleted through the
SharePoint interface, and new files are regularly being added to the storage
location. When selecting this option, the changes made in SharePoint will be
synchronized to the storage path, and the newly added files in the storage path
will be synchronized to SharePoint.
4. Which permissions are required to run sync jobs? – Select the permission levels in
order to specify which end users can perform synchronization jobs. End users with at
least permission to Add, Edit and Delete items can perform a synchronization operation.

DocAve®
6 Connector 46
Note that unless manually configured, Full Control and Site Collection Administrator
are selected.
5. Would you like to apply file system permissions? – By default, the library inherits
permissions from its parent site. If you select this option, the library permissions
inherited from the parent site are broken. Instead, the storage path permissions are
synchronized to the library after running the synchronization job. This option is only for
Net Share, IBM Storwize Family and Net Share with WMS storage types.
*Note: The permissions can only be synchronized when the files or folders in the storage
location are being synchronized to SharePoint for the first time. If you want to reload the
following permission changes from storage to SharePoint, use the Sync-Folder
command through Connector PowerShell. For more help information on this command,
refer to Connector PowerShell.
• Load the root folder’s permissions only – If you select this option, the library
permissions inherited from the parent site are broken after the synchronization.
The library permissions are replaced with the root folder of the storage path’s
permissions (that is, the permissions of the storage path). The files and folders
under the library inherit the permissions from the library. The permissions can
only be applied during the first synchronization.
• Load and preserve all the items’ permissions from file system – If you select
this option, the library permissions inherited from the parent site are broken, and
the item (folder/file) permissions will be the same as the permissions in the file
system after the synchronization. The root folder and subfolder permissions in
the storage path are synchronized to the library. The permissions can only be
applied during the item’s first synchronization.
6. Would you like to load metadata from file system? – Specify whether to load
metadata from file system while loading the files and folders from it. This option is only
for the Net Share, IBM Storwize Family, Network File System, NetApp Data ONTAP, and
Net Share with WMS storage types.
*Note: The metadata can only be synchronized when files or folders in the storage
location are being synchronized to SharePoint for the first time.
If you want to reload the following metadata changes from storage to SharePoint, use
the Sync-File command through Connector PowerShell. For more help information on
this command, refer to Connector PowerShell.
If you want to load metadata from storage to SharePoint in the synchronization
whenever the modify time of a file is changed in the storage side, enable the feature
through the <EnableReloadMetadata>false</EnableReloadMetadata> node in the
Connector configuration file. Refer to Agent Configuration File for more details on
configuring this node.

DocAve®
6 Connector 47
7. How should file name changes be addressed? – Specify whether to keep the file
names in the storage path consistent with those in the Connector library when the file
names are modified due to invalid characters or file name length during the
synchronization job.
• Disabling this option means the files will be modified in SharePoint during
synchronization according to the Common Mapping rules. The filenames in the
storage path will not change.
• Enabling this option means the files will be consistent with the filenames in
SharePoint (after synchronization). If a file or folder name contains special
characters, enabling this option will result in the filenames in the storage path
being consistent with the filenames in SharePoint (after synchronization). The
folders’ names will not be affected.
8. Would you like to display UNC links? – Choose whether to display the UNC link of the
files with specific file types in the UNC Link column. The default file types are mdt,
accdb, and mdb. You can edit the Connector configuration file to modify or add more
file types. Refer to the <UNCLinkTypes>mdt,accdb,mdb</UNCLinkTypes> node in
Agent Configuration File for details.
9. Would you like to bypass SharePoint file limitations? – Select Allow uploading large
files (greater than current Web application maximum upload size) as links to allow
data that is larger than the current Web application’s maximum upload size to be linked
from the storage device and synchronized between the storage device and SharePoint.
Select Allow uploading blocked file types as links to allow data whose type is blocked
by SharePoint to be linked from the storage device and synchronized between the
storage device and SharePoint. The basic operations (including rename, copy, move,
delete, etc.) of Connector links in SharePoint will be synchronized to the storage location.
*Note: Make sure the user who uploads files that bypass SharePoint file limitations to
Connector libraries has the Add Items permission to the library and Add and Customize
Pages permission to the site where the library resides.
*Note: Due to SharePoint limitations, files that exceed the Web application maximum
upload size and files with blocked file types are uploaded as http links.
*Note: In order for users to upload files that bypass SharePoint file limitations, the “Add
List Items” and “Add and Customize Pages” list permissions are required.
*Note: Granular backup jobs will not capture linked content.
*Note: Connector Link to a Document and Connector Link to Multimedia content
types must exist in your sites and libraries in order to bypass SharePoint file limitations.
By default, these two content types are automatically added to your site and libraries

DocAve®
6 Connector 48
after deploying the Connector solutions. If the Connector Link to a Document and
Connector Link to Multimedia content types are unexpectedly missing from your
libraries, manually add them.
Connector supports versioning management for Connector Link files. Enabling this
feature requires the following two configurations:
• Enable Versioning settings in SharePoint Library Settings.
• Make sure the value of the
<EnableReUploadLinkFile>true</EnableReUploadLinkFile> node is True.
Connector supports Pause and Resume operations when downloading these linked files.
Connector link files can cause any of the following issues in SharePoint:
• When generating a version of a Connector link file in SharePoint, the version of
this linked file will not be generated in the connected path.
• Connector linked files are not included in the index during SharePoint crawls.
• Connector linked files’ extensions cannot be modified.
If configuring a Media Library, there are three more Connector settings to configure: Player,
Thumbnail Settings, and Rich Text Settings.
1. What player settings would you like to configure? – Configure the settings for the
media player.
• Player size – Customize the size of the player screen.
• Enable auto play – Enables the videos to play automatically once the video icon
is clicked.
2. Would you like to customize the thumbnail size? –Enter a size between 50 and 250
pixels.
3. Would you like to enable the rich text video player? – This feature allows you to add
a button in the column of Rich Text type to play videos. This provides a method to
enable the video for each item on the current site.
a. In the Media Library Settings page, select Enable video player in Rich Text for
the entire site. Click Save.
b. Access a list in the site in which you have enable the rich text video player and
create a column in the list. Select Multiple lines of text and Enhanced rich text
(Rich text with pictures, tables, and hyperlinks) in the Create Column page.
c. Select an item in the list and click Edit Item in the Manage group on Items page.
The Item Edit page appears. Click the column you just created and navigate to
Insert > Rich Text Settings when in SharePoint 2013/SharePoint

DocAve®
6 Connector 49
2016/SharePoint 2019 or navigate to Format Text > HTML > Rich Text Settings
when in SharePoint 2010. The Player Settings page appears.
d. Configure the Rich Text settings from this page, including Video Source URL,
Player Type, and the Player Size. If you want the video to be played
automatically, check the Enable Auto Play checkbox.
*Note: This column only exists for lists; it does not exist in libraries.
Configuring Connector Library Settings using the SharePoint Interface
It is possible to configure initial Connector settings for the library level from either the DocAve
GUI or from SharePoint. Other levels (such as Web application, site collection, and site) can only
be configurable from the DocAve GUI.
The Connector setting options for the library level are exactly the same on the DocAve GUI and
SharePoint. The Library Level section details how to configure Connector settings for the library
level from the DocAve GUI. The section below describes how to configure the library level from
SharePoint.
*Note: If a library contains configured Connector settings that were applied from the DocAve
GUI, you can edit these Connector settings from SharePoint.
To configure the Connector library from SharePoint:
1. Access the library that you will connect to your storage path.
2. Click the Library tab on Library page, and then click Library Settings in the Settings
group.
3. Select Connector Synchronization and Settings in the General Settings column for a
Document, Form, Picture, Asset, Content, or Media Library. The Connector
Synchronization and Settings page appears.
4. Configure the settings for a DocAve Connector library (Content Library/Media Library)
and a SharePoint Document, Form, Picture or Asset library from SharePoint. Refer to
Library Level for information on these settings.
*Note: If both Connector and Cloud Connect are enabled in your environment, all
storage types used by both will appear in the Storage type drop-down list in
SharePoint.
Configuring Sync Settings This section describes how to configure the synchronization settings for the selected node.

DocAve®
6 Connector 50
*Note: The default sync settings are used if you do not configure sync settings in the Configure
Sync Settings Wizard.
The Configure Sync Settings option is not available for configurations made at the library level.
*Note: If using a Hitachi Data System (HDS), ensure that no identical filenames or folder names
with different cases exist in the file share. If such files or folders do exist, Connector will not
synchronize them because SharePoint is not case-sensitive, while an HDS is case-sensitive.
*Note: Some files and folders may not be synchronized from the storage system to SharePoint
due to Windows API or SharePoint limitations. For more details on what kind of files are not
supported, refer to Files That Do Not Synchronize from Storage Path to SharePoint.
To configure sync settings, complete the following steps:
1. Click Configure Sync Settings in the Action group and select Configure Sync Settings.
2. Configure Sync Settings – Configure synchronization related settings for the selected
object.
• Select a Common Mapping from the corresponding drop-down list. There is a
default common mapping profile in the drop-down list. If desired, select New
Common Mapping from the drop-down list to create new common mapping
profiles. Refer to Common Mapping for more information.
• Select a Property Mapping from the corresponding drop-down list. There is a
default property mapping profile in the drop-down list. If desired, select New
Property Mapping from the drop-down list to create new property mapping
profiles. Refer to Property Mapping for more information.
• Select a Security Mapping from the corresponding drop-down list. There is a
default security mapping profile in the drop-down list. If desired, select New
Security Mapping from the drop-down list to create new security mapping
profiles. Refer to Security Mapping for more information.
• Which processing pool would you like to use? – Specify a processing pool for
the synchronization process. There is a default processing pool for each
SharePoint farm, DocAve_Farm(FarmName). If desired, create new processing
pools by selecting New Processing Pool from the drop-down menu. For more
information, refer to Configuring the Processing Pool.
• Would you like to configure a schedule? – Choose whether to synchronize the
content between the storage path and SharePoint periodically.
o No Schedule – Does not configure any schedule to synchronize the data.
If you select this option, you must run the synchronization job manually
from SharePoint.

DocAve®
6 Connector 51
o Configure the schedule myself – When you select this option, the
Schedule Settings option become available.
▪ Schedule Settings – Select the start time and interval for the
schedule. You can navigate to the Calendar View page by clicking
the calendar icon or Calendar View to view the interval in the
calendar. You can also specify the end time or how many times the
synchronization will run for the schedule.
• Who should receive e-mail notification? – Select a notification profile and click
View besides the drop-down list to configure the notification setting. You can
also click New Notification Profile to create a new notification profile.
3. Click OK to save the settings or click OK and Sync Now to save the sync settings and
run the synchronization job immediately.
Configuring Sync Settings for Content Database Level
To configure sync settings at the content database level, complete the following steps:
1. Select a content database under the Content Databases node on the tree.
2. Click Configure Sync Settings in the Action group and select Configure Sync Settings.
3. Configure Sync Settings – Configure synchronization related settings for the selected
content database.
• Which processing pool would you like to use? – Specify a processing pool for
the synchronization process. There is a default processing pool for each
SharePoint farm, DocAve_Farm(FarmName). If desired, create new processing
pools by selecting New Processing Pool from the drop-down menu. For more
information, refer to Configuring the Processing Pool.
• Would you like to configure a schedule? – Choose whether to synchronize the
content between the storage path and SharePoint periodically.
o No Schedule – Does not configure any schedule to synchronize the data.
If you select this option, you must run the synchronization job manually
from SharePoint.
o Configure the schedule myself – When you select this option, the
Schedule Settings option become available.
▪ Schedule Settings – Select the start time and interval for the
schedule. You can navigate to the Calendar View page by clicking
the calendar icon or Calendar View to view the interval in the
calendar. You can also specify the end time or how many times the
synchronization will run for the schedule.

DocAve®
6 Connector 52
• Who should receive e-mail notification? – Select a notification profile and click
View besides the drop-down list to configure the notification setting. You can
also click New Notification Profile to create a new notification profile.
4. Click OK to save the settings or click OK and Sync Now to save the sync settings and
run the synchronization job immediately.
Managing Inherited Connector Settings The site collection, site, and library levels automatically inherit Connector settings from their
parent nodes.
With regards to inherited Connector path settings, when setting up a connection between
SharePoint and a storage device, inheritance is just a recommendation. The connection between
SharePoint and the storage device is actually a connection between a SharePoint library and the
storage device, as the library is inheriting the settings configured on the parent node. Only
Connector settings on the library level have an effect on the connection relationship between
SharePoint and storage device.
If this default inheritance logic is acceptable, then it is not necessary to configure Connector
settings (such as Storage Path and Mapping Settings) at each level manually. Inheritance saves
time by only requiring the aforementioned settings to be configured once, as each library in a
particular node inherits the settings from its parent node.
If desired, you can break inheritance and configure unique Connector settings for each level. As
mentioned, only the Connector settings on the library level have an effect on the connection
relationship between SharePoint and the storage device.
If you want to break inheritance, select the child node beneath the configured parent node and
select Configure Path and Configure Sync Settings to configure unique setting for the
selected node.
Refer to the descriptions below for the inheritance details of each level.
Site Collection
If the upper-level Web application has Connector settings configured on it, the site collections
below it inherit the Connector settings.
• The right pane of the DocAve Connector interface displays the parent node the
current site collection inherits its path and sync settings. To break inheritance,
access the Configure Path and Configure Sync Settings in the Action group to
configure unique settings for the selected site collection.
DocAve®
6 Connector 53
• If the upper-level Web application does not have any Connector settings applied
to it, access Configure Path and Configure Sync Settings in the Action group
to configure Connector settings for the selected site collection.
*Note: Only when the managed path of a site collection is configured at the Web application
level do the site collections under the selected Web application inherit the Connector settings.
Site
If the upper-level site collection has configured Connector settings, the site inherits the
Connector settings from its parent site collection.
• The right pane of the DocAve Connector interface displays the parent node the
current site inherits its path and sync settings. To break inheritance, access
Configure Path and Configure Sync Settings to configure unique settings for
the selected site.
• If the upper-level site collection does not have any Connector settings applied to
it, click Configure Path and Configure Sync Settings to configure Connector
settings for the selected site.
Library
If the upper-level site has been configured Connector settings and no settings have been
configured for the library, the library inherits the Connector settings from its parent site.
*Note: The sync settings, including mapping settings and schedule settings, cannot be
configured at the library level. The library inherits sync settings from its parent automatically. But
if no Connector settings are configured at site level or above, the library uses the default
Common Mapping, Property Mapping, and Security Mapping. In addition, the library uses the
default schedule setting (No Schedule). In this case, it is necessary to run the synchronization
job from SharePoint manually.
Adding Customized SharePoint Libraries to the Connector-Approved
List of Templates The “approved” list that Connector ships with does not contain templates other than out-of-the
box approved templates. These template IDs are not universally unique for the entire SharePoint
ecosystem, and AvePoint does not unknowingly approving a template that has not been tested.
However, in anticipation of the need for converting custom libraries, Connector does provide a
way to manually add to the approved list. Before performing the steps below, it is
recommended that you archive a copy of the .config file before making changes to it. In
addition, AvePoint recommends that you test the library with all functions first (synchronization,
modifications, search, workflow, and other normal user activity) to ensure compatibility before
modifying this file in your production environment.

DocAve®
6 Connector 54
In terms of maintenance, be sure to back up the modified .config file so that you can leverage it
for all future versions of DocAve, ensuring that your list of known and tested templates is
maintained.
*Note: In the Control Load Balancing (CLB) environment, execute the following operations in
every server where the Control Service resides.
1. Open the Manager server.
2. Locate the ControlConnectorTemplates.config file in the following folder path:
\AvePoint\DocAve6\Manager\Control\Config\Connector.
3. Open the ControlConnectorTemplates.config file using Notepad.
4. For this example, assume that your template ID is 31000. Locate the following code in
the .config file, and add your library’s template ID to the list:
<ConnectorTemplates>
<Template value="109" />
<Template value="851" />
<Template value="115" />
<Template value="31000" />
</ConnectorTemplates>
5. Save the change and close the file.
After completing this configuration, you can configure further Connector settings for this library
through DocAve Manager.
Removing Connector Settings The storage path configuration and sync setting configuration can be removed from the Web
applications, site collections, sites, and libraries using the Remove Sync Settings feature.
Applying this feature removes the connection between SharePoint and the storage path.
*Note: To make sure the synchronization jobs configured at higher levels can run normally,
AvePoint recommends removing the storage path settings from a Connector library before
deleting the library. To delete the storage path settings for all of the Connector libraries inside a
specific site collection/site in bulk, AvePoint recommends using the Connector API. If there are
both Cloud Connect and Connector libraries in a site or site collection, the storage path settings
for both libraries will be deleted. For more information on Connector API functions, refer to
AgentCommonConnectorAPI.chm located in the DocAve Agent installation directory, which is
…\AvePoint\DocAve6\Agent\Documents\SDK\Connector.

DocAve®
6 Connector 55
To remove the storage path configuration: From the Connector tab, select the target node on
the farm tree, click Configure Path in the Action group, and select Remove Path. The
connected storage path is removed from the selected node.
To remove the sync setting configuration: From the Connector tab, select the target node on
the farm tree, click Configure Sync Settings in the Action group and select Remove Sync
Settings. The sync settings for the selected node are removed.
*Note: The Remove Sync Settings option is not available for the library level, as the library level
does not support configuration of sync settings.
Creating a Connector Library in SharePoint After activating the Connector features, you can specify a storage path in DocAve or SharePoint.
You can also create a Connector library in SharePoint. When a Connector library is created in
SharePoint, all files uploaded to the library are automatically externalized to the configured
storage device path rather than remaining in SQL storage.
While mapping for permissions can be configured, it’s important to remember that applying
unique object level permissions is not a recommended best practice in SharePoint. You can
make the determination at the time of creation whether a library will reuse file system security or
simply inherits from its SharePoint site, but we strongly recommend the latter.
The two types of Connector libraries are Content Library and Media Library. Neither library has
restrictions on the file types that can be uploaded to them, but the Media Library contains the
following special functionality:
• Media Libraries allow for the viewing of certain file type thumbnails. Refer to
Viewing All Video Thumbnails for more details.
• The play times of video files stored in the Media Library can be recorded in
SharePoint’s Audit Log. The video playing action is included in the Opening or
downloading documents, viewing items in lists, or viewing item properties
event. Ensure that this event option is selected on the Configure Audit Settings
page when you are configuring audit settings for recording play times of videos
in SharePoint.
• It is easy to locate the URL of a video file currently being played in the Media
Library. The file title on the top of the player is a link; click it to jump to a
webpage that will play the video file. The URL in the address bar of this webpage
is the URL of the video file being played.
• There is no size limitation to the media files that are played in the Media Library.
You can access the Media Library from a mobile device. For more information, refer to Using the
Media Library on a Mobile Device.

DocAve®
6 Connector 56
To create a Connector library (Content Library/Media Library) in SharePoint, complete the
following steps:
1. In SharePoint, access the site where the Connector feature is activated.
2. When in SharePoint 2013, SharePoint 2016 and SharePoint 2019, click the Settings ( )
icon on the upper-right corner of the page and select Site contents in the drop-down
list. The Site Contents page appears. Select the library you want to create. When in
SharePoint 2010, click Site Actions on the upper-left corner of the page and select More
Options in the drop-down list. Locate Content Library or Media Library under the
Libraries column. Select the library you want to create.
• Name and Description – Enter the name of the library and the optional
description.
• Navigation – Specify whether to display this library on the Quick Launch.
(SharePoint 2010 only)
• Document/Item Version History – Specify whether to create a version each
time you edit a file in this library.
• Document Template – Select from the Document Template drop-down list to
determine the default template for all new files created in this library.
For more information, including details on specifying a default path for Connector libraries
created in SharePoint, refer to Configuring the Connector Path.
*Note: If you have ever accessed DocAve 5 Connector libraries, you must clear your browser
cookies and cache before accessing DocAve 6 Connector libraries that were created in the same
site. This ensures proper functionality of the DocAve 6 Connector libraries.

DocAve®
6 Connector 57
Using a Connector Library After creating a Connector library and synchronizing the content, access the Library page and
manage your library. The following actions can be performed:
*Note: The actions under the Files (Documents in SharePoint 2010) and Library tabs contain
basic SharePoint Document library functions. The Connector tab is unique to DocAve Connector
libraries.
Using the Files Tab • New Document – Creates a new document in the library.
• Upload Document (the SharePoint built-in Upload Document feature)– Uploads
one or multiple files to the library (uploading multiple files at a time is only
available in SharePoint 2010).
*Note: In SharePoint 2010 and SharePoint 2013, there is only the file’s stub in the
SharePoint library, and the uploaded files are saved in the relevant folder in the
connected path. In SharePoint 2016 and SharePoint 2019, the uploaded files’
whose size are less than 2GB will reside in the library as stubs; the uploaded files’
whose size are greater than 2 GB and less than the current Web application’s
maximum upload size will reside in the library as real content. If you want to
upload the large files to the library as links, use the Upload Connector Links
feature.
• Upload Connector Links – Upload files to the library including the files whose
size is greater than the current Web application’s maximum upload size or whose
type is blocked by SharePoint. All uploaded files will be saved in the relevant
connected path and be displayed as stubs in the SharePoint library.
*Note: To use the Upload Connector Links feature properly, make sure Allow
uploading large files (greater than current Web application maximum
upload size: {0} MB) as links and Allow uploading blocked file types as links
options have been configured in Connector Settings. For more information on
configuring these settings, refer to Configuring Sync Settings.
*Note: Make sure the user who uploads files through the Upload Connector
Links feature to Connector libraries has the Add Items permission to the library
and Add and Customize Pages permission to the site where the library resides.
• New Folder – Creates a new folder in the library.
• Edit Document – Opens the selected document for editing.
• Check Out – The checked-out document becomes read only and cannot be
edited.

DocAve®
6 Connector 58
*Note: When you check out one file in the Connector library in SharePoint, the
attribute of the corresponding file stored in the Net Share storage is changed to
Read Only to make sure the corresponding file in the Net Share storage is also
locked for editing. After you check in the file, the original attribute of the file is
recovered in the Net Share storage.
• Check In – Checks in the document that you checked out and accepts the
changes made during the check-out.
• Discard Check Out – Checks in the document that you checked out and discards
the changes made during the check-out.
• View Properties – Views the selected file’s properties.
• Edit Properties – Edits the selected file’s properties.
• Preview – Previews files in image format. Office files, PDF files, CAD files, and
pictures are supported.
*Note: This feature is only available when SP2010PreviewGUI.wsp,
SP2013PreviewGUI.wsp, SP2016PreviewGUI.wsp, or SP2019PreviewGUI.wsp
is deployed on your farm. For detailed information about this feature, refer to the
Appendix C: Previewing Files in SharePoint Using the DocAve Preview Feature
section in the DocAve 6 Control Panel User Guide.
• Version History – Views and manages the version history of the selected file.
• Shared With (Document Permissions in SharePoint 2010) – Accesses Share
(Permission Tools in SharePoint 2010) to manage the selected file’s permissions.
• Delete Document – Deletes the selected file from the current library.
*Note: When a file is deleted in SharePoint, it is moved to the Recycle Bin. To
mimic SharePoint behavior, the corresponding file in the storage location will be
placed into a folder named _r under the .fsdl folder in the storage location after
synchronization. If you empty the SharePoint recycle bin, the deleted files will be
placed into a folder named _d under the .fsdl folder in the storage location.
• Share – Invites people to this document. (in SharePoint 2013, SharePoint 2016
and SharePoint 2019)
• Popularity Trends – Reviews popularity trends report, which provide insight into
how and what content is being accessed. (in SharePoint 2013, SharePoint 2016
and SharePoint 2019)
• E-mail a Link – E-mails a link to the selected file. (SharePoint 2010 only)
• Alert Me – Receives e-mail or mobile notification when things change.
(SharePoint 2010 only)

DocAve®
6 Connector 59
• Follow – Follows this document and gets updates in your newsfeed. (in
SharePoint 2013, SharePoint 2016 and SharePoint 2019)
• Download a Copy – Downloads a copy of the selected file to your computer.
• Send To
o Other Location – Moves or copies the selected file to another location.
o Create Document Workspace – Creates a Document Workspace for the
selected file.
• Manage Copies – Manages all linked copies of the selected file.
• Go To Source – Navigates to the source file that is linked to the selected file.
• Workflows – Brings you to the Workflows page to start a new workflow on the
selected document, or to view the status of a running or completed workflow.
• Publish – Publish a major version of the selected document.
• Unpublish –Unpublishes the current version of the selected document.
• Approve/Reject – Approves or rejects submissions to this library.
• Cancel Approval – Cancels approve/reject submission and unpublishes the
selected document.
• I Like It – Tags the selected item with “I Like It.”
• Tags & Notes – Adds tags to the selected item. Also, adds notes to the item to
help clarify the item. The notes are public.
Using the Library Tab
• View (Standard View in SharePoint 2010) – Views the items in the standard list
format.
• Quick Edit (Datasheet View in SharePoint 2010) – Views the items in the
datasheet list format.
• New Row – Adds a new row to this list. (SharePoint 2010 only)
• Show Task Pane – Opens a task pane to access additional commands.
(SharePoint 2010 only)
• Show Totals – Displays totals under each column. (SharePoint 2010 only)
• Refresh Data – Reloads the data to display changes made by other users.
(SharePoint 2010 only)
• Create View – Selects columns, filters, and other settings according to your
requirements to create a new view.
• Modify View – Modifies the existing views.

DocAve®
6 Connector 60
• Create Column – Adds a new column to store additional information about each
item in the current library.
• Navigate Up – Navigates to the parent folder of the current folder.
• Current View –Selects different views from the drop-down list. Click the triangles
next to the Current Page field to go to the next page or previous page.
• E-mail a Link – E-mails a link to the library.
• Alert Me – Receives e-mail or mobile notification when things change.
(SharePoint 2010 only)
• RSS Feed – Goes to the selected library’s RSS Feed page to view and subscribe to
its feed.
• Most Popular Items – Reviews popularity trends report, which provide insight
into how and what content is being accessed. (in SharePoint 2013, SharePoint
2016 and SharePoint 2019)
• Sync to SharePoint Workspace – Creates a synchronized copy of the library on
your computer using SharePoint Workspace. (SharePoint 2010 only)
• Connect to Office – Creates a shortcut to the library in the SharePoint Sites
folder of the favorites list in the Office Save As and Open dialog boxes. You can
conveniently access commonly-used libraries from a Microsoft Office program.
• Connect to Outlook – Synchronizes items and makes them available offline
using Microsoft Outlook.
• Export to Excel – Exports items in the library using Microsoft Excel.
• Open with Explorer – Opens the library as a standard Windows Explorer folder.
• Form Web Parts – Modifies the Web parts in the forms associated with this
library.
• Edit Library – Edits the current library in SharePoint Designer.
• New Quick Step – Creates your own Ribbon button to perform a custom action
on the items in the library.
• Library Settings – Configures the setting such as permissions, columns, and
views for current library.
• Shared With (Library Permissions in SharePoint 2010) – Manages permissions
for the current library.
• Workflow Settings – Modifies the settings of the workflows associated with this
library.

DocAve®
6 Connector 61
Using the Connector Tab • Synchronization Operations – Runs synchronization jobs for the current library.
o Synchronize Current Folder – Only synchronizes the current folder.
o Synchronize Current Folder and Subfolders – Synchronizes the current
folder and its subfolders.
• View Report – Downloads the library’s latest synchronization job report.
Using the SYNC Feature • SYNC – Click the SYNC button on the upper-right corner of a Connector library
page to create a synchronized copy of this document library on your computer
(only available in SharePoint 2013, SharePoint 2016 and SharePoint 2019).
*Note: The Sync a new library feature in the OneDrive for Business sync client is
not available for Connector libraries. Use the SYNC feature on the SharePoint
side to achieve this function for a Connector library.

DocAve®
6 Connector 62
Specific Features in Connector Media Library Connector Media Library not only has the same features as Connector Content Library, but it
also has some additional features such as All Video Thumbnails, All Video Details, All Video
Slides views. It also allows for use of the Media Library via mobile devices. See the following
sections for more details.
Specific Views for Media Library Media Library supports All Video Thumbnails, All Video Details, and All Video Slides views.
Click the following links to jump to the corresponding sections:
• Viewing All Video Thumbnails
• Viewing All Video Details
• Viewing All Video Slides
Viewing All Video Thumbnails
The Media Library allows you to view thumbnails for the following file types: videos, pictures,
and PPTs. Refer to Video/Audio/Picture Files in Media Library for more information on these file
types. To view video thumbnails, it is recommended to install ffmpeg and set the configuration
file or install the SMPlayer. For more information on installing and configuring ffmpeg or
SMPlayer, refer to ffmpeg or SMPlayer.
*Note: If you have not installed ffmpeg or SMPlayer before the synchronization job or you want
to reload the thumbnails of videos, use the Sync-Folder command through Connector
PowerShell. For more help information on this command, refer to Connector PowerShell.
In order to view thumbnails in the Media Library, first install and configure SMPlayer or ffmpeg.
ffmpeg
To install and configure ffmpeg on each Agent server, complete the following steps:
1. Download the ffmpeg.zip file from http://www.videohelp.com/tools/ffmpeg to the
desired location, and extract it.
2. Find the configuration file according to your SharePoint version. Locate the
SP2010SOConnector.config file in the following
path: …\AvePoint\DocAve6\Agent\data\SP2010\Connector, or locate the
SP2013SOConnector.config file in the following
path: …\AvePoint\DocAve6\Agent\data\SP2013\Connector, or locate the
SP2016SOConnector.config file in the following
DocAve®
6 Connector 63
path: …\AvePoint\DocAve6\Agent\data\SP2016\Connector or locate the
SP2019SOConnector.config file in the following
path: …\AvePoint\DocAve6\Agent\data\SP2019\Connector.
3. In the SP2010SOConnector.config file or the SP2013SOConnector.config file or the
SP2016SOConnector.config file or the SP2019SOConnector.config file, change the
value of the <FFMpegPath> element to the full path of the ffmpeg.exe file. For
example:
<FFMpegPath>C:\Program Files\ffmpeg\ffmpeg.exe</FFMpegPath>
4. Navigate to Start> All Programs> AvePoint DocAve 6> DocAve 6 Agent Tools, click
Agent Restart Service Tool, and restart the Agent Service in the pop-up window.
SMPlayer
To install and configure the SMPlayer, complete the following steps:
1. Download the SMPlayer installation package from
http://sourceforge.net/projects/smplayer/.
2. Choose English in the drop-down box when selecting the language.
3. Click Next and select I accept the terms of the License Agreement. Click Next.
4. Choose the Typical install type from the drop-down box and click Next.
5. Specify the destination folder, and then click Install.
6. When the installation process to completes, click Finish.
Be sure to set the Player metadata column to designate which player you want to use when
opening the file.
Viewing All Video Details
The Media Library allows you to view the files’ properties as well as their thumbnails.
In the All Video Details view, files can be opened directly by clicking the file name or the
thumbnail. To work with PDF files properly, Permissive must be selected for the Browser File
Handling option. Navigate to SharePoint Central Administration > Application
Management > Manage web applications > General Settings > General Settings to select
the Permissive radio button.
Viewing All Video Slides
The Media Library allows you to view all files as a slide show.
DocAve®
6 Connector 64
Using the Media Library on a Mobile Device Unlike SharePoint built-in libraries that only have the Simple View and Details View modes, a
Media Library on a mobile device also supports Thumbnail View. Files are displayed in the
Thumbnail View mode on a mobile device by default. However, only the files in MP4 format
with H264 video codec and AAC audio codec can be played on the mobile device. A yellow
play button is displayed on the thumbnail of these MP4 files. No button is displayed if the file
cannot be played.
On the mobile device, the video file does not require a plug-in be installed. You can skip to a
specific point in the file even if the download is already in progress. The file starts to be played
and downloaded immediately from the point where you skip to. Therefore, you can enjoy video
streaming conveniently and comfortably.
*Note: Due to SharePoint configurations, some mobile devices do not display the Upload
Document button. To upload a file onto the Media Library using a mobile device, you need to
modify the supportsFileUploadForSharePointMobile attribute in the SharePoint configuration
file.

DocAve®
6 Connector 65
Maintaining a Connector Library Now that your Connector or SharePoint library is connected to an external storage device, it is
important to maintain the health of your library by ensuring that it remains synched with
SharePoint. See the sections below for information on manually syncing, managing stubs, and
other maintenance actions.
Manually Synchronizing the Library with the Connected Path If you did not set up a schedule when configuring the sync settings for your connected library,
the library and storage path need to be manually synchronized. This ensures that the library
stubs are displaying the most current content that exists in the storage path. You can manually
synchronize the library with the connected path in either DocAve or SharePoint.
• Synchronize the library with the connected path in DocAve – Click
Synchronization on the ribbon of the Connector Home page to run the
synchronization job immediately.
• Synchronize the library with the connected path in SharePoint – There are two
ways to perform the synchronization in SharePoint:
o Access the Connector Synchronization and Settings page in SharePoint
to manually perform the synchronization operations.
▪ Synchronization – Synchronizes the current library with the
connected storage path.
▪ View Report – Downloads the current library’s latest
synchronization job report. This link will be shown after a
synchronization job is finished.
▪ Connector Settings – Returns to the Connector Synchronization
and Settings page, where you can edit the Connector settings for
the current library.
o Refer to Using the Connector Tab for performing the synchronization via
operations under the Connector tab.
After the synchronization completes, the stubs for the files and folders in the file system are
created or updated in the library.
*Note: If using a Hitachi Data System (HDS), ensure that no identical filenames or folder names
with different cases exist in the file share. If such files or folders do exist, Connector will not
synchronize them because SharePoint is not case-sensitive, while an HDS is case-sensitive.
DocAve®
6 Connector 66
Manually Synchronizing an Individual File The Sync file feature only allows for users to synchronize an individual file in a Connector library.
You do this by modifying the SP2010SOConnector.config or SP2013SOConnector.config or
SP2016SOConnector.config file. This will improve the efficiency since the synchronization of
libraries may take a long time. For more details about enabling this feature, refer to Agent
Configuration File.
Make sure the Sync File feature is enabled and the Connector library has configured the storage
path, then the Sync File option appears in the Callout menu. Select the file you want to perform
the synchronization, and click the menu to select Sync File to run the synchronization job.
Managing Orphan BLOBs If Connector stubs are removed from SharePoint, the BLOB content remains in the external
storage. There are two ways to remove the orphan BLOB content: clear up orphan BLOBs
through an independent job in DocAve Manager, or clear up orphan BLOBs through the
configuration file. This option in the configuration file is triggered by the synchronization job
automatically.
Clearing Up Orphan BLOBs by DocAve Manager
To configure the Clean Up Orphan BLOBs function in DocAve, complete the following steps:
1. Click Connector > Clean Up Orphan BLOBs in the Action group. The Clean Up Orphan
BLOBs tab appears.
2. Click the farm name to expand the tree and select the Web applications or the databases
where you want to configure the BLOB cleanup rules. After expanding the tree, you can
select the farm node to select all the displayed objects on the tree.
3. Click Configure. A message appears on the top of the screen displaying You can refer
to the Storage Report for more detailed information about the orphan BLOBs. Click
Storage Report in the message. You will be redirected to the Dashboard screen in
Storage Report. For more details, refer to Viewing Collected Data Information for the
Storage Report Profiles.
The Enable Clean Up Orphan BLOBs option appears. Selecting No disables the Clean
Up Orphan BLOBs function for the selected scope. Selecting Yes displays the following
options:
• Scope Definition – Select the Include new content databases checkbox to also
apply the configured BLOB cleanup policy to newly added content databases in
the selected Web applications.
• Large and Blocked Files – Select to delete the BLOBs for the large and blocked
files.

DocAve®
6 Connector 67
• Processing Pool – Select a processing pool from the drop-down list to manage
the Clean Up Orphan BLOBs job threads and Agent groups for selected nodes.
• Schedule – Configure a schedule for cleaning up orphan BLOBs.
o Start Time – Schedule a start time to begin the BLOB cleanup job. To
change the time zone, click the time zone under the Start time field.
o Interval – Set an interval for recurring rules based on a schedule using
the option of Day(s), Week(s) or Month(s).
o Click Calendar View to view all scheduled BLOB cleanup jobs in the pop-
up calendar by Day, Week, or Month.
• Advanced Settings – Set the duration for completely deleting the deleted files in
the storage location; the deletion can be delayed using the options Day(s),
Week(s) or Month(s).
The delay duration is 30 days by default. To mimic SharePoint behavior, files
deleted from SharePoint will be placed into a folder named _r under the .fsdl
folder in the storage location after a synchronization or Incremental
synchronization is performed. If deleting files from the SharePoint recycle bin
permanently, the deleted files will be placed into a folder named _d under
the .fsdl folder in the storage location after a synchronization or Incremental
synchronization is performed. After the delay duration is reached, the files are
deleted from the _d folder.
• Conflict Resolution – Select which action to perform when a selected node
already has BLOB cleanup settings configured.
o Overwrite – When a conflict occurs, Overwrite replaces the previous
settings with the newly saved settings.
o Skip – When a conflict occurs, Skip will keep the previous settings. The
newly configured settings will not replace the previously configured
settings and will not be applied on nodes that have applied settings. For
nodes that do not have previously configured settings, the newly
configured settings will be applied to them.
o Click View Conflict Items to view nodes of which the schedules, delayed
deletion settings and alternate file settings have already been configured.
4. Click OK to save the configuration or click Cancel to cancel the operation.
5. After saving the BLOB cleanup rule, the configured rule settings for the applicable nodes
display in the Schedule and Delay Deletion columns.

DocAve®
6 Connector 68
Clearing Up Orphan BLOBs by Synchronization Job
You can configure the ClearUpSwitch node in the configuration file to enable the Clear Up
Orphan BLOBs feature. This feature will be automatically triggered after each synchronization
job runs. Refer to Agent Configuration File for details on configuring the node.
To mimic SharePoint behavior, files deleted from SharePoint are placed into a folder named _r
under the .fsdl folder in the storage location. If deleting files from the SharePoint recycle bin
permanently, the deleted files are placed into a folder named _d under the .fsdl folder in the
storage location. After the delay duration is reached, the files are deleted from the _d folder.
By default, the delay duration is 30 days, which means after 30 days the files deleted from
SharePoint will be permanently deleted from the storage side.
Managing Stubs Refer to the sections below to manage the Connector stubs.
Converting Stubs to Content
After running a synchronization job, Connector moves the data to the storage path and creates
stubs in SharePoint in place of the original data. To convert these stubs back to data in
SharePoint’s SQL server, use the Convert Stubs to Content function.
*Note: Refer to How to Determine If the Data Is Stub or Real Content for information on
identifying stubs and content.
1. Navigate to Connector > Convert Stubs to Content in the Action group. The Convert
Stubs to Content tab appears.
2. In the pop-up window, select the scope where you want to perform the stub restore. If
desired, enter the criteria in the textbox and click the magnifier to search for the desired
object.
3. The tree can be expanded down to the item level. Click Items and all synchronized items’
stubs are displayed in the Stub Browser area.
4. Choose to convert the stubs immediately or select another time in the Schedule field,
and then configure the following settings.
• Convert now – Choose this option if you want to convert the stubs to real data
immediately.
• Configure the schedule myself – Choose this option to convert the stubs based
upon a configured schedule. If this option is selected, the following option will
appear and need to be configured:

DocAve®
6 Connector 69
o Schedule Settings – Specify the start time for the schedule. You can also
select a time zone for the schedule.
5. Click OK to start the conversion and convert the selected scope’s stubs to real data.
How to Determine If the Data Is Stub or Real Content
There are no identifying markers for Connector stubs in SharePoint. Refer to the methods below
to determine if the data is a stub or real content.
• If using the EBS Provider, navigate to the content database of the site collection
in Microsoft SQL Server Management Studio and locate the AllDocs table. If the
seventeenth bit of the binary number of the item’s value in the docflags column
is 1, then this item is stub. Otherwise, it is real content.
• If using the RBS Provider, navigate to the content database of the site collection
in Microsoft SQL Server Management Studio and locate the AllDocStreams table
(in the SharePoint 2013/SharePoint 2016/SharePoint 2019 environment, locate
the DocStreams table). If the value of the item in the Rbsld column is not Null,
and the value in the Content column is Null, then the item is a stub. If the value
of the item in the Content column is not null, the item is real content.
Updating DocAve 5 Stubs to DocAve 6 Format
DocAve 6 Service Pack 1 and later enables you to update the Connector stubs that were
generated in DocAve 5 to DocAve 6 format. The corresponding operations are all performed in
the Control Panel. Reference the Converting DocAve 5 Connector Stubs section in the DocAve
6 Control Panel Reference Guide for more information.
Converting EBS Stubs to RBS Stubs in DocAve 6
For more information on converting the EBS stubs to RBS stubs in DocAve 6, refer to
Converting EBS Stubs to RBS Stubs in DocAve 6 in the DocAve 6 Control Panel Reference
Guide.
Checking Connector Job Status In the Connector tab, click Job Monitor in the Statistics group to navigate to the Connector
module Job Monitor where Connector and Cloud Connect jobs reside. Here, you can view the
status of scheduled Connector synchronization jobs.
If you have made synchronization schedules for multiple nodes, Job Monitor helps to clearly
distinguish which plan is from which node. The SharePoint URL column displays the node for
which the synchronization plan runs, and the Level column shows the corresponding node level.
To monitor jobs or troubleshoot for errors, Job Monitor should be your first step. If a job fails,
click the Rerun with Debug Logging button to run the job again in the debug level. After the

DocAve®
6 Connector 70
debug level job completes, you can download the job log to view details. For detailed
information on Job Monitor, refer to DocAve 6 Job Monitor Reference Guide.
*Note: Only the scheduled Connector synchronization jobs are able to be monitored by Job
Monitor. For synchronization jobs run manually in SharePoint, check the status by referencing
the displayed progress bar.
Connector also generates a job report that contains detailed synchronization information for
each connector library in SharePoint after the synchronization job completes. Refer to Using the
Connector Tab and Manually Synchronizing the Library with the Connected Path for information
on how to download these job reports.

DocAve®
6 Connector 71
Generating Storage Reports Storage Report collects the data information from the content databases and shows the
collected data information in the storage report pane. You can also download the report to the
configured file system location. The data to be collected information from includes SQL data,
extended BLOB, orphan stubs and orphan BLOBs.
Creating a Storage Report Profile and Configure the Report Settings
The Report Profile Manager of Storage Report is where you configure a Storage Report profile,
which includes a data collection configuration. This allows you to instantly apply the data
collection configuration to multiple nodes, collect the corresponding data information and
display the information in DocAve or the downloaded report.
To create and configure a Storage Report profile, complete the following steps:
1. Click Storage Report in the Report group.
2. In the Storage Report page, click Report Profile Manager in the View group on the
ribbon. Then, click Create in the Manage group. The Create Profile configuration page
appears.
3. Configure the following settings:
• Farm – In the Scope pane, select a farm and click it to expand the farm tree.
Select one or multiple nodes on the farm tree and apply the Storage Report
configuration on the selected nodes.
• Profile Name – Enter the profile name, followed by an optional Description.
• Optimized Report Settings – Select one or multiple options to collect BLOB and
stub information from the SQL databases.
Include comparison of SQL data and optimized BLOBs – Select this
option to collect the information of SQL data that are stored in the SQL
databases and the information of BLOB data that are extended to the
configured file system location.
▪ Include stub reference details – Select this option to obtain the
detailed information of the stubs that are included in the data
collection information. The detailed information of the stubs will
be displayed in the downloaded Detail report.
o Retrieve orphan stub information – Select this option to collect the
orphan stubs information from the SQL databases on the selected nodes.
▪ Include orphan stub reference details– Select this option to
obtain the detailed information of the orphan stubs that are
included in the data collection information. The detailed

DocAve®
6 Connector 72
information of the orphan stubs displayed in the downloaded
Detail report.
▪ Select a notification profile to designate which DocAve user can
receive an orphan stub report. Click View beside the drop-down
list to view details of the notification profile or click New
Notification Profile from the drop-down list. For information on
creating a notification profile, see the DocAve 6 Control Panel
Reference Guide.
Retrieve orphan BLOB information – Select this option to collect the
orphan BLOBs information from the SQL databases on the selected nodes.
• Alternate File Report Settings – Select this option to collect the alternate file
information after starting the corresponding job.
Include reference details – Select this option to obtain the detailed
information of the alternate files that are included in the data collection
information.
• Report Schedule – Select when to collect the data information configured in
Report Settings.
No Schedule – Start running the job of the created storage report profile
immediately after finishing the configuration.
Configure the schedule myself – Configure a schedule yourself and run
the job of the created storage report profile according to the configured
start time and interval.
4. Click Save to save the configurations. In the Storage Report page, select the created
storage report displayed in this page and click Run Now in the Action group on the
ribbon. Or, click Save and Run Now to save and run the job immediately.
Managing Created Storage Report Profiles
Once created, the storage report profiles can be edited, viewed and deleted. See the sections
below for information on managing the storage report profiles.
Editing Existing Storage Report Profiles
Some storage report profiles’ settings can be modified using the Edit feature. The Profile
Name, Report Settings, Schedule, and the nodes on the farm tree can all be edited. To edit an
existing storage report profile, complete the following steps:
1. In the Storage Report page, click Report Profile Manager in the View group on the
ribbon.
2. Select an existing storage report profile displayed in the Storage Report page, and then
click Edit in the Manage group on the ribbon.

DocAve®
6 Connector 73
3. The Edit Profile page appears. You can view the settings for the storage report profile
from this page.
Viewing Existing Storage Report Profiles
Detailed information about the created storage report profiles can be viewed using the View
Details feature. To view an existing storage report profile, complete the following steps:
1. In the Storage Report page, click Report Profile Manager in the View group on the
ribbon.
2. Select an existing storage report profile displayed in the Storage Report page, and then
click View Details in the Manage group on the ribbon.
3. The View Details page appears. You can view the settings for the storage report profile,
or click Edit to edit this storage report profile.
Deleting Existing Storage Report Profiles
To delete an existing storage report profile, complete the following steps:
1. In the Storage Report page, click Report Profile Manager in the View group on the
ribbon.
2. Select one or multiple existing storage report profiles displayed in the Storage Report
page, and then click Delete in the Manage group on the ribbon.
3. Click OK to delete this selected profile permanently from DocAve or click Cancel to
cancel it.
Running Jobs of Existing Storage Report Profiles
When a storage report profile is created for the selected nodes in a SharePoint farm, complete
the following steps to run this profile:
1. In the Storage Report page, click Report Profile Manager in the View group on the
ribbon.
2. Select one or multiple existing storage report profiles displayed in the Storage Report
page, and then click Run Now in the Action group on the ribbon. Then, the
corresponding jobs for the selected profiles start and are displayed in Job Monitor.
Viewing Collected Data Information for the Storage Report Profiles
After the jobs of the corresponding storage report profile finish running, the data information
collected for the selected nodes configured in the saved profiles will be displayed in the Storage
Report page. The collected data information in this page is displayed in three sections (SQL and
Optimized Data Comparison, Orphan Stub Details and Orphan BLOB Details) according to
the storage profiles’ configuration and the Data Collection Time. The storage report records
the occupation percentage of each data block and gives a basic view of the optimized storage in
the SQL databases.

DocAve®
6 Connector 74
To view the collected data information, complete the following steps:
1. Click Storage Report in the Report group.
2. In the Storage Report page, click Dashboard in the View group on the ribbon. The data
information of the last storage report profile job will be displayed after you enter the
Dashboard interface.
3. Select an existing storage report profile from the Profile Name drop-down list and
select a job finishing time from the Data Collection Time drop-down list. Then, the data
information collected from the configured SQL databases for the nodes configured in
the selected profile will be loaded and displayed in this page.
• SQL and Optimized Data Comparison – Select this option tab to view the
information of the SQL data that is stored in the SQL databases and the BLOBs
that are extended from the SQL databases. Meanwhile, the type of the extended
BLOBs is recorded and displayed in this page.
• Orphan Stub Details – Select this option tab to view the information of the
orphan stubs that are kept in SharePoint. The bar graph shows the count of
orphan stubs that are stored in the corresponding SQL databases.
• Orphan BLOB Details – Select this option tab to view the information of the
orphan BLOBs that are kept in the file system location. From the Orphan BLOB
Details tab you can View by content database and View by physical device.
For View by content database, the bar graph shows the size of orphan BLOBs
that are extended from the specified SQL databases. For View by physical
device, the store locations of the orphan BLOBs can be viewed by clicking the
corresponding bar in the graph.
• Alternate File Details –Select this option tab to view the alternate file
information.
You can view the alternate file count, orphan alternate file count, and orphan
BLOB size information of each content database in the displayed table. By clicking
the Details link, you can view the Farm Name, Physical Device, Clean Up Orphan
BLOBs Schedule information and can view if the Clean Up Orphan BLOBs job
includes the alternate files.
Select View Orphan BLOB Information via Physical Device. A table displayed
showing the orphan file information in each physical device.
Downloading Storage Report
To view detailed information about the data information collected from the SQL databases
configured in the corresponding storage report profile, you can download the storage report to
the file system location.

DocAve®
6 Connector 75
To download a report for an existing storage profile, complete the following steps:
1. Click Storage Report in the Report group.
2. In the Storage Report page, click Dashboard in the View group on the ribbon.
3. Select an existing storage report profile from the Profile Name drop-down list and
select a job finishing time from the Data Collection Time drop-down list.
4. Click Export in the Action group on the ribbon to export the report for storage report
profile.
5. In the Export pop-up window, configure the following settings:
• Report Format – Select a report type from the drop-down list.
• Export Settings – Select an export location type for storing the report.
o Download a local copy – Select this option to export the report to the
local file system location of the currently used server.
o Export to a specific location – Select this option to export the report to
the location on the specified server. When selecting this option, the
Export Location field is displayed as the further configuration. Select an
existing export location from the drop-down box to store the report
before exporting. Select View beside the export location drop-down list.
The View Details window appears. Select Edit in the window to edit the
export location. For more information on the export location, refer to
Configuring Export Location for Storing Storage Report.
After the configuration of the settings above, click OK to start the export operation.
Configuring Export Location for Storing Storage Report
The report for a storage profile is supported exporting to a configured export location.
Creating an Export Location
To configure an export location, complete the following steps:
1. Click Storage Report in the Report group.
2. In the Storage Report page, click Dashboard in the View group on the ribbon.
3. Click Export Location in the Action group on the ribbon. The Export Location interface
appears.
4. Click Create in the Manage group on the ribbon. The Create window appears.
5. Configure the following settings:
• Name and Description – Enter a Name and an optional description for the
export location.

DocAve®
6 Connector 76
• Path – The export location can be a file share, storage area network (SAN), or
network-attached storage (NAS).
o Enter the UNC Path in the following format: \\admin-PC\c$\data or
\\admin-PC\shared folder.
o Select a managed account profile from the drop-down list or click New
Managed Account Profile, and then click Validation Test. DocAve tests
the path and user information to make sure it is valid. For more
information on the managed account profile, refer to the DocAve 6
Control Panel Reference Guide.
6. Click OK in the Create window to save the changes or click Cancel to return to the
Export Location interface without any changes.
Managing Created Export Locations
Once created, the export locations are listed in the Export Location interface. They can be
edited, viewed and deleted. See the sections below for information on managing the storage
report profiles.
Editing Existing Export Locations
To edit an existing export location, complete the following steps:
1. In the Export Location interface, select an export location that you want to edit.
2. Click Edit in the Manage group on the ribbon.
3. The Edit window appears. Edit the settings according to your requirement.
4. Click OK in the Edit window to save the changes or select Cancel to return to the Export
Location interface without any changes.
Viewing Existing Export Locations
To view an existing export location, complete the following steps:
1. In the Export Location interface, select an export location.
2. Click View Details in the Manage group on the ribbon.
3. The View Details window appears. You can view the settings for the export location or
click Edit to edit this export location.
Deleting Existing Export Locations
To delete an existing storage report profile, complete the following steps:
1. In the Export Location interface, select one or multiple existing export locations.
2. Click Delete in the Manage group on the ribbon.
3. A confirmation message appears. Click OK to delete this selected profile permanently
from DocAve or click Cancel.

DocAve®
6 Connector 77
Generating Inventory Reports Use the Inventory Report function to view various statistics about Connector and Cloud
Connect libraries that have been configured under each farm, Web application, site collection or
site. You can then download the detailed reports to another location.
1. From the Scope panel on the left, click the farm that contains the relevant SharePoint
content.
2. Expand the tree and select the desired farm/Web application/site collection/site from
which you want to perform further operations by selecting the radio button to the left of
the farm/Web application/site collection/site.
3. Click Run Report on the ribbon to collect the detailed information on the Connector and
Cloud Connect libraries configured inside the selected scope.
After the job finishes, the collected information from the Connector and Cloud Connect libraries
will be shown in the area on the right. Only the report of the current job will be displayed in the
area on the right. To view the historical reports, click the Job Monitor button on the ribbon.
Click Export on the ribbon, specify a desired report format, and click Export on the ribbon to
download the generated report in the configured format to the desired location.
Using the Connector PowerShell to Generate Reports Through the use of the Connector PowerShell, Connector is able to generate reports (in .csv
format) that details the mapping for each Connector library. These reports can be used to details
end user deployment, for example.
The information generated in the report includes Farm Name, Library Title, Solution Name,
Site Collection URL, Site URL, Storage Type, Web Application URL, Library URL, Connected
Path, Content Database and Library Type. Refer to Connector PowerShell for how to call the
Show-ConnectedLibraries command to generate such reports.

DocAve®
6 Connector 78
Connector Tools Some tools are provided with the Connector module. Refer to the DocAve 6 Supplementary
Tools User Guide for instructions on using these tools.
• AgentToolSP2010ConnectorCreateList Tool – Creates Connector libraries in
bulk by this tool and the libraries have the Connector paths and settings
configured according to the predefined configuration file. This tool is used for
SharePoint 2010.
• AgentToolSP2013ConnectorCreateList Tool – Creates Connector libraries in
bulk by this tool and the libraries have the Connector paths and settings
configured according to the predefined configuration file. This tool is used for
SharePoint 2013.
• AgentToolSP2016ConnectorCreateList Tool – Creates Connector libraries in
bulk by this tool and the libraries have the Connector paths and settings
configured according to the predefined configuration file. This tool is used for
SharePoint 2016.
• AgentToolSP2019ConnectorCreateList Tool – Creates Connector libraries in
bulk by this tool and the libraries have the Connector paths and settings
configured according to the predefined configuration file. This tool is used for
SharePoint 2019.
• AgentToolSP2010Connector Tool – Updates the Connector document versions
from DocAve 6.0 (including 6.0, 6.0.1, and 6.0.2) to DocAve 6 Service Pack 1 or
later versions and provides the encrypted password to connect to the file system
before creating any Connector libraries using the
AgentToolSP2010ConnectorCreateList tool and generates the report of the
stub status of files and folders within the selected scope.
• AgentToolSP2013Connector Tool – Updates the Connector document versions
from DocAve 6.0 (including 6.0, 6.0.1, and 6.0.2) to DocAve 6 Service Pack 1 or
later versions and provides the encrypted password to connect to the file system
before creating any Connector libraries using the
AgentToolSP2013ConnectorCreateList tool. It also generates the report of the
stub status of files and folders within the selected scope and updates the
Connector libraries to ensure they are available after updating SharePoint 2010 to
SharePoint 2013.
• AgentToolSP2016Connector Tool – Updates the Connector document versions
from DocAve 6.0 (including 6.0, 6.0.1, and 6.0.2) to DocAve 6 Service Pack 1 or
later versions, provides the encrypted password to connect to the file system
before creating any Connector libraries using the
AgentToolSP2016ConnectorCreateList tool. It also generates the report of the
stub status of files and folders within the selected scope and updates the

DocAve®
6 Connector 79
Connector libraries to ensure they are available after updating SharePoint 2013 to
SharePoint 2016.
• AgentToolSP2019Connector Tool – Updates the Connector document versions
from DocAve 6.0 (including 6.0, 6.0.1, and 6.0.2) to DocAve 6 Service Pack 1 or
later versions, provides the encrypted password to connect to the file system
before creating any Connector libraries using the
AgentToolSP2019ConnectorCreateList tool. It also generates the report of the
stub status of files and folders within the selected scope and updates the
Connector libraries to ensure they are available after updating SharePoint 2016 to
SharePoint 2019.
• AgentToolSP2010OrphanStubClean Tool – Cleans Connector orphan stubs
from SharePoint 2010.
• AgentToolSP2013OrphanStubClean Tool – Cleans Connector orphan stubs
from SharePoint 2013.
• AgentToolSP2016OrphanStubClean Tool – Cleans Connector orphan stubs
from SharePoint 2016.
• AgentToolSP2019OrphanStubClean Tool – Cleans Connector orphan stubs
from SharePoint 2019.
• AgentToolSP2010MoveStub Tool – Changes the existing stub database to
another one and copy all existing data from the old stub database to the new
one. It can also move a site collection from one content database to another
within the same Web application. This tool is used for SharePoint 2010.
• AgentToolSP2013MoveStub Tool – Changes the existing stub database to
another one and copy all existing data from the old stub database to the new
one. It can also move a site collection from one content database to another
within the same Web application. This tool is used for SharePoint 2013.
• AgentToolSP2016MoveStub Tool – Changes the existing stub database to
another one and copies all existing data from the old stub database to the new
one. It can also move a site collection from one content database to another
within the same Web application. This tool is used for SharePoint 2016.
• AgentToolSP2019MoveStub Tool – Changes the existing stub database to
another one and copies all existing data from the old stub database to the new
one. It can also move a site collection from one content database to another
within the same Web application. This tool is used for SharePoint 2019.

DocAve®
6 Connector 80
Connector Caveats • After the files are synchronized to a Content library/Media Library/Document
library/Form library/Picture library/Asset library:
o If the Load Metadata from File System function is enabled in Connector
settings, the Modified by attribute of the synchronized files loads the
value of the Last Saved by attribute.
o If the Load Metadata from File System function is not enabled in
Connector settings, the Modified by attribute of the synchronized files
loads the Agent Account as its value.
• In Media Library, it is recommended that you download AVI files in order to play
them.

DocAve®
6 Connector 81
Stub Database Inheritance In rare cases (records management, for example, where there will be millions of files), it may be
necessary to configure stub databases down to the Web application or content database level.
Should this be the case, refer to the information below.
Note the following stub database inheritance rules for newly-added Web applications and
content databases:
• By default, the stub database of the parent node will be used by the lower level.
• If there is no stub database configured for the parent node, the stub database of
the grandparent node will be used, and so on.
If the stub database is not configured for a certain object when running a Connector job, the
object’s stub database will also be automatically configured using the rules above. The stub
database configuration will then be saved and displayed in DocAve. The corresponding stub
database will be used in all of the later Connector jobs performed on the selected SharePoint
object.
For example, assume that you only configured a stub database for a Web application and set a
Connector rule on it. You did not configure the stub database for any of the content databases
under the Web application. When the Connector rule is triggered on a specified content
database in the Web application, the content database inherits the stub database of the Web
application. The stub database configuration is saved and is used in all of the later Connector
jobs performed on this content database.
The × in the table below indicates that the corresponding component remains not configured. If
you do not wish for a lower level to inherit the stub database of a higher level, expand the tree
to the desired level and configure a stub database for the lower level separately.
Selected
Nodes
Configuration Status of the Stub Database
Existing Web
Application
Existing
Content
Database
Newly-
Added Web
Application
Newly-Added
Content Database
Only the
Farm Node
× × Inherits the
farm’s stub
database.
Inherits the farm’s
stub database.
Only a
Web
Application
Node
Only the stub
database of the
selected Web
application node
is configured.
× × If the newly-
added content
database is in the
selected Web
application node, it

DocAve®
6 Connector 82
Selected
Nodes
Configuration Status of the Stub Database
Existing Web
Application
Existing
Content
Database
Newly-
Added Web
Application
Newly-Added
Content Database
inherits the Web
application’s stub
database. Otherwise,
it remains not
configured.
Only a
Content
Database
Node
× Only the
stub database
of the selected
content
database node
is configured.
× ×
Farm
Node and a
Web
Application
Node
Only the stub
database of the
farm node and
the selected
Web application
node is
configured.
× Inherits the
farm’s stub
database.
If the newly-
added content
database is in the
selected Web
application node, it
inherits the Web
application’s stub
database. Otherwise,
it inherits the farm’s
stub database.
Farm
Node and a
Content
Database
Node
× Only the
stub database
of the farm
node and the
selected
content
database node
are
configured.
Inherits the
farm’s stub
database.
Inherits the farm’s
stub database.
Web
Application
Node and a
Content
Only the stub
database of the
selected Web
application node
and content
Only the
stub database
of the selected
Web
application
× If the newly-
added content
database is in the
selected Web
application node, it
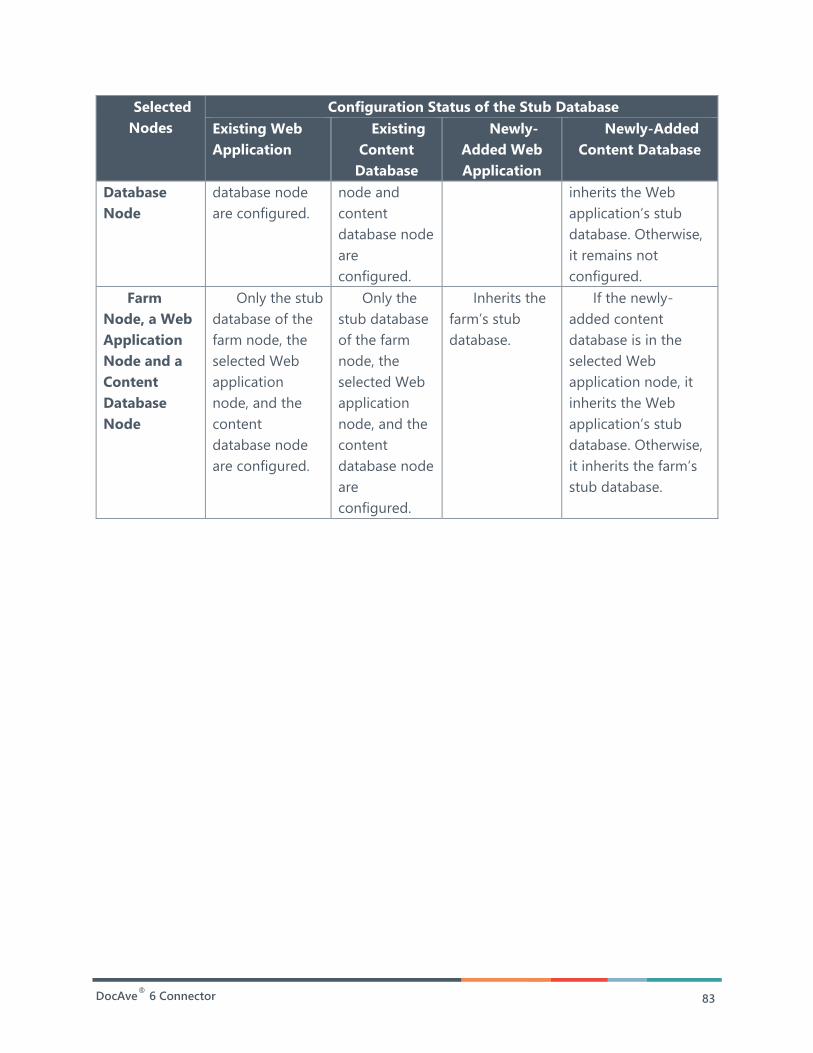
DocAve®
6 Connector 83
Selected
Nodes
Configuration Status of the Stub Database
Existing Web
Application
Existing
Content
Database
Newly-
Added Web
Application
Newly-Added
Content Database
Database
Node
database node
are configured.
node and
content
database node
are
configured.
inherits the Web
application’s stub
database. Otherwise,
it remains not
configured.
Farm
Node, a Web
Application
Node and a
Content
Database
Node
Only the stub
database of the
farm node, the
selected Web
application
node, and the
content
database node
are configured.
Only the
stub database
of the farm
node, the
selected Web
application
node, and the
content
database node
are
configured.
Inherits the
farm’s stub
database.
If the newly-
added content
database is in the
selected Web
application node, it
inherits the Web
application’s stub
database. Otherwise,
it inherits the farm’s
stub database.
DocAve®
6 Connector 84
Using Connector SDK and PowerShell
Connector SDK DocAve Connector implements a set of APIs that allow you to use Connector functionality by
calling Connector APIs. Refer to the Connector SDK Help file
AgentCommonConnectorAPI.chm (which is named SP2010ConnectorAPI.chm in DocAve
versions prior to SP2) for more information on using Connector APIs. This file is located in the
DocAve Agent installation path, which is …\AvePoint\DocAve6\Agent\Documents\SDK\Connector
by default.
Connector PowerShell DocAve Connector registers a Snap-In in Windows PowerShell that allows you to use certain
Connector functions by running the Connector command in Windows PowerShell. The
commands can only be run on servers that have DocAve Agent installed on them.
*Note: The account used to run Connector commands in Windows PowerShell must have the
following permissions:
• A member of local administrator.
• A member of farm administrator.
• Full Control to all zones of all Web applications via User Policy for Web
Applications.
• Member has a Database Role of db_owner for all databases related to SharePoint,
including Content Databases, SharePoint Configuration Database, and Central
Administration Content Database.
Adding the Registered Connector Snap-In
In order to run Connector commands in Windows PowerShell, the registered Connector Snap-In
must be added into Windows PowerShell first. Follow the steps below to add the Connector
Snap-In.
*Note: You must add the Connector Snap-In to Windows PowerShell each time before running
Connector commands in it.
1. Click Start on the server that has DocAve Agent installed.
2. Click Windows PowerShell
3. Enter the following command, and press Enter to import the Connector Snap-In:
Add-PSSnapin ConnectorSnapIn
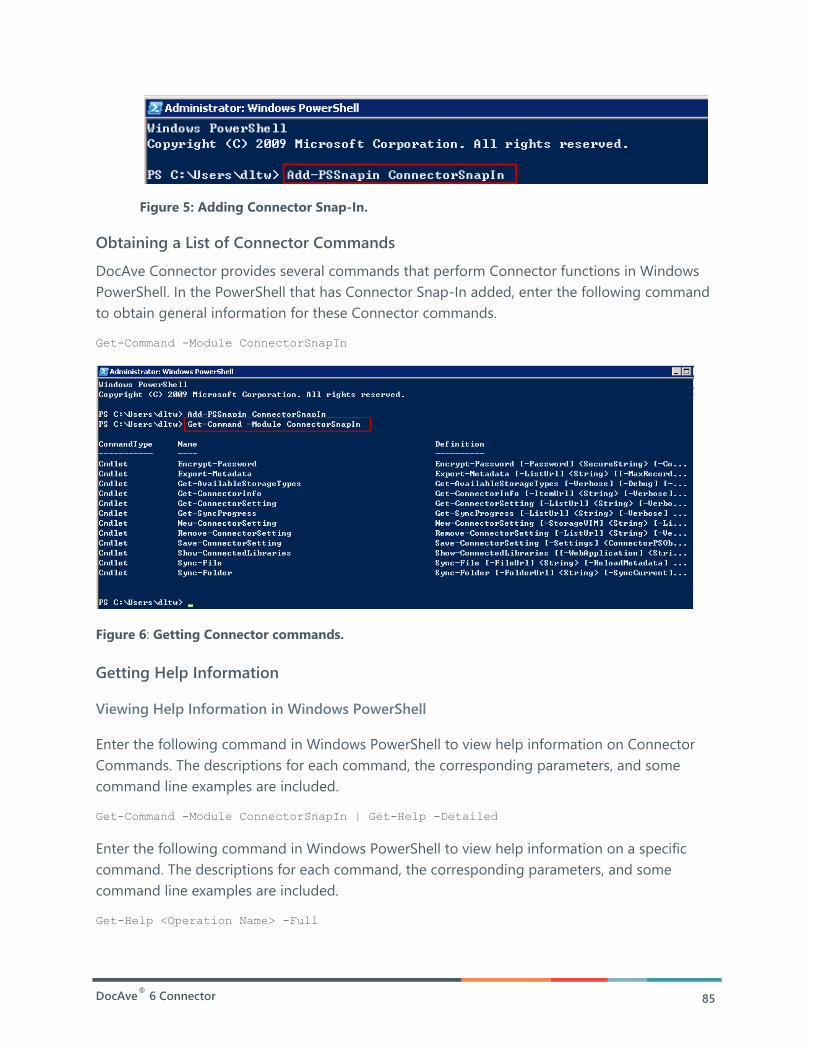
DocAve®
6 Connector 85
Figure 5: Adding Connector Snap-In.
Obtaining a List of Connector Commands
DocAve Connector provides several commands that perform Connector functions in Windows
PowerShell. In the PowerShell that has Connector Snap-In added, enter the following command
to obtain general information for these Connector commands.
Get-Command -Module ConnectorSnapIn
Figure 6: Getting Connector commands.
Getting Help Information
Viewing Help Information in Windows PowerShell
Enter the following command in Windows PowerShell to view help information on Connector
Commands. The descriptions for each command, the corresponding parameters, and some
command line examples are included.
Get-Command -Module ConnectorSnapIn | Get-Help -Detailed
Enter the following command in Windows PowerShell to view help information on a specific
command. The descriptions for each command, the corresponding parameters, and some
command line examples are included.
Get-Help <Operation Name> -Full

DocAve®
6 Connector 86
For example, Get-Help Sync-Folder –Full shows all the help information for the Sync-Folder
command.
Exporting Help Information to a .csv File
Enter the following command to export the help information to a .csv file and store it to the
local machine.
Get-Command -Module ConnectorSnapIn | Get-Help -Detailed | Out-File -FilePath
C:\Help.csv
A file with the name Help.csv is generated on the local machine after running this command.
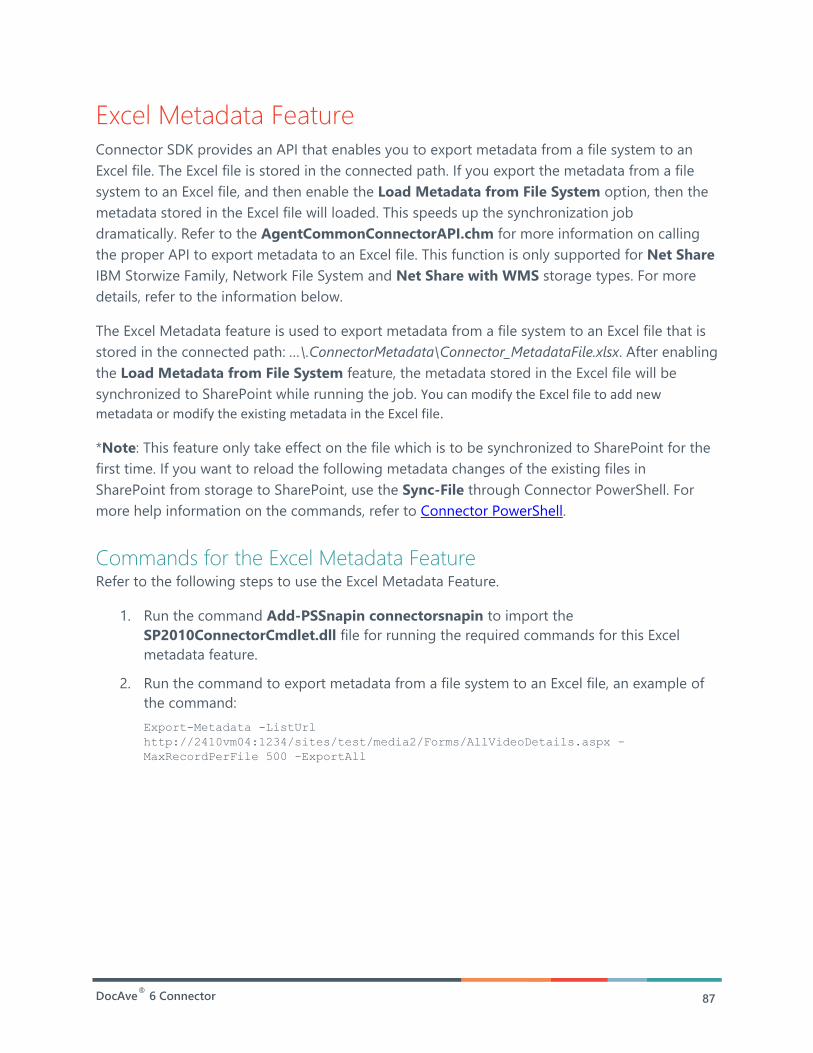
DocAve®
6 Connector 87
Excel Metadata Feature Connector SDK provides an API that enables you to export metadata from a file system to an
Excel file. The Excel file is stored in the connected path. If you export the metadata from a file
system to an Excel file, and then enable the Load Metadata from File System option, then the
metadata stored in the Excel file will loaded. This speeds up the synchronization job
dramatically. Refer to the AgentCommonConnectorAPI.chm for more information on calling
the proper API to export metadata to an Excel file. This function is only supported for Net Share
IBM Storwize Family, Network File System and Net Share with WMS storage types. For more
details, refer to the information below.
The Excel Metadata feature is used to export metadata from a file system to an Excel file that is
stored in the connected path: …\.ConnectorMetadata\Connector_MetadataFile.xlsx. After enabling
the Load Metadata from File System feature, the metadata stored in the Excel file will be
synchronized to SharePoint while running the job. You can modify the Excel file to add new
metadata or modify the existing metadata in the Excel file.
*Note: This feature only take effect on the file which is to be synchronized to SharePoint for the
first time. If you want to reload the following metadata changes of the existing files in
SharePoint from storage to SharePoint, use the Sync-File through Connector PowerShell. For
more help information on the commands, refer to Connector PowerShell.
Commands for the Excel Metadata Feature Refer to the following steps to use the Excel Metadata Feature.
1. Run the command Add-PSSnapin connectorsnapin to import the
SP2010ConnectorCmdlet.dll file for running the required commands for this Excel
metadata feature.
2. Run the command to export metadata from a file system to an Excel file, an example of
the command:
Export-Metadata -ListUrl
http://2410vm04:1234/sites/test/media2/Forms/AllVideoDetails.aspx -
MaxRecordPerFile 500 -ExportAll
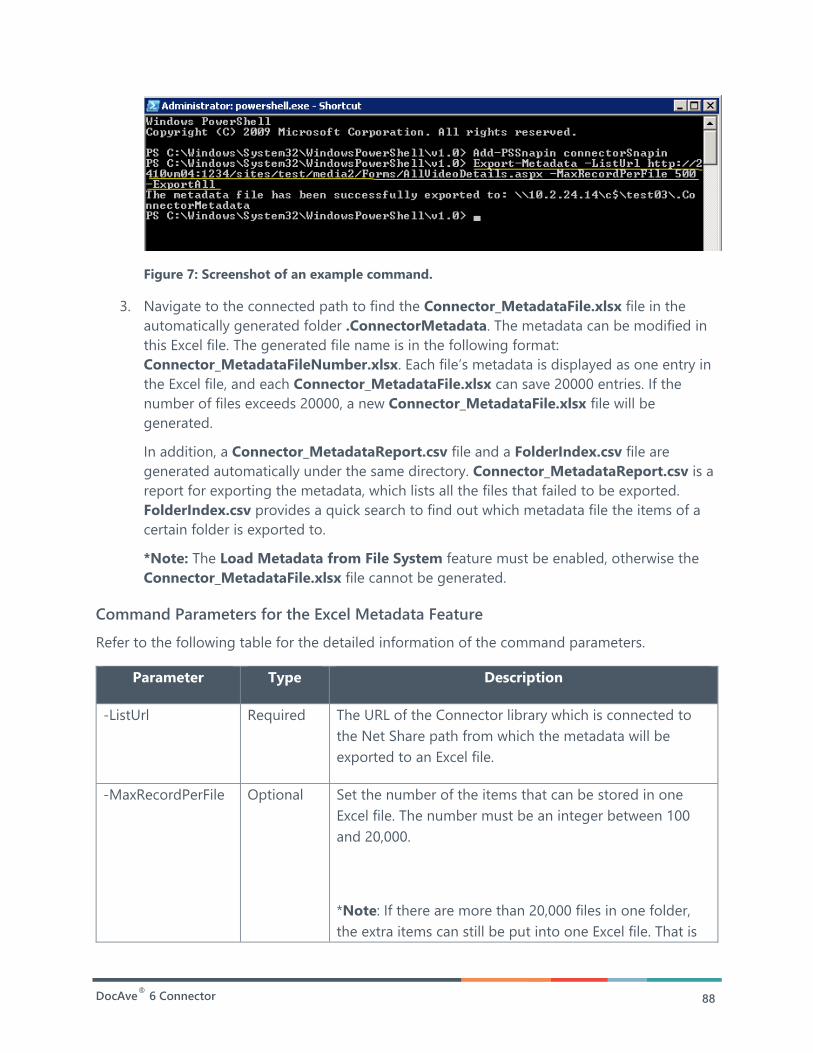
DocAve®
6 Connector 88
Figure 7: Screenshot of an example command.
3. Navigate to the connected path to find the Connector_MetadataFile.xlsx file in the
automatically generated folder .ConnectorMetadata. The metadata can be modified in
this Excel file. The generated file name is in the following format:
Connector_MetadataFileNumber.xlsx. Each file’s metadata is displayed as one entry in
the Excel file, and each Connector_MetadataFile.xlsx can save 20000 entries. If the
number of files exceeds 20000, a new Connector_MetadataFile.xlsx file will be
generated.
In addition, a Connector_MetadataReport.csv file and a FolderIndex.csv file are
generated automatically under the same directory. Connector_MetadataReport.csv is a
report for exporting the metadata, which lists all the files that failed to be exported.
FolderIndex.csv provides a quick search to find out which metadata file the items of a
certain folder is exported to.
*Note: The Load Metadata from File System feature must be enabled, otherwise the
Connector_MetadataFile.xlsx file cannot be generated.
Command Parameters for the Excel Metadata Feature
Refer to the following table for the detailed information of the command parameters.
Parameter Type Description
-ListUrl Required The URL of the Connector library which is connected to
the Net Share path from which the metadata will be
exported to an Excel file.
-MaxRecordPerFile Optional Set the number of the items that can be stored in one
Excel file. The number must be an integer between 100
and 20,000.
*Note: If there are more than 20,000 files in one folder,
the extra items can still be put into one Excel file. That is
DocAve®
6 Connector 89
Parameter Type Description
to say, one folder can only correspond to one Excel file,
but one Excel file can correspond to several folders when
the number of the items is in the selected scope.
-ExportAll Optional Export all of the metadata to the Excel file. Enter this
parameter to export all of the metadata; leave out this
parameter to export only the default metadata or the
configured metadata.
*Note: When –ExportAll is not used, only the default
metadata will be exported if the Property Mapping is not
used in the Connector library, and only the configured
metadata in the Property Mapping will be exported if the
Property Mapping is used in the Connector library.

DocAve®
6 Connector 90
Customizing the Metadata in Excel After exporting the metadata in Excel, you can customize this file before synchronizing the files
into SharePoint. You can add or delete columns, change the column type, or modify the
metadata values in bulk.
Refer the table below for more usage rules for customizing the metadata.
Type Column_Name:=Type Example of Content Format
Single line
of text
Column_name:=Text Random Character String, less
than 255 characters
Multiple
line of text
Column_name:=Note Random Character String
Choice_Ch
eckboxes
(allow
multiple)
Column_name:=CheckBoxChoice Random Character String
Choice_Dro
p-Down
Menu
Column_name:=DropDownChoice Random Character String
Choice_Ra
dio
Buttons
Column_name:=RadioChoice Random Character String
Number Column_name:=Number 10
Date and
Time_Date
Only
Column_name:=DateOnly 12/30/2013
Date and
Time_Date
& Time
Column_name:=DateAndTime 12/30/2013 5:34:27 AM
Yes/No Column_name:=Booleen Yes
Person or
Group
Column_name:=User Domain\User

DocAve®
6 Connector 91
Type Column_Name:=Type Example of Content Format
Managed
Metadata
Column_name:=Taxonomy(Group;TermSet
words;AllowMultipleValues)
TermLevel1|TermLevel1;TermLevel
2|TermLevel1;TermLevel2;TermLev
el3
Lookup Column_name:=Lookup(listUrl;columnName;
AllowMultipleValues)
value1 ;#value2 ;#value3
Currency Column_name:=CurrencyNumber $100.00 or 100
Hyperlink
or Picture
Column_name:=URL http://www.avepoint.com
• Single line of text – Allows random character strings less than 255 characters. If
you do not follow the corresponding column type format to customize the
specific column, the column values you have added in the metadata file will be
synchronized to SharePoint in the single line of text.
• Multiple lines of text – Allows random character strings.
• Choice_Checkboxes (allow multiple :) – Allows you to specify multiple values in
the column cell and these values will be synchronized to SharePoint as choices.
The format is aaa;#bbb;#ccc.
• Choice_Drop-Down Menu/Choice_Radio Buttons – Synchronizes the specified
values in the column cells as choices. The format is aaa.
• Number – The column value can be any number larger than 1 or equal to 1, such
as 1.1 or 11.
• Date and Time_Date Only/Date and Time_Date & Time – Make sure the value
is in the same format as that in SharePoint. The values in Date and Time_Date &
Time column, and Date and Time_Date Only column, will be automatically
converted into the corresponding time, according to the time zone that the
SharePoint Server is using.
• Yes/No – If you enter yes/true or any character as the column value into this
column, after the synchronization job, in the SharePoint side the value in the
file/folder’s Yes/No column is Yes. If you enter no/false into the column or you
do not enter any character into the column, in the SharePoint side the value in
the file/folder’s Yes/No column is No.
*Note: This column is not case-sensitive.
• Person or Group – Allows you to assign SharePoint users, SharePoint groups,
and domain groups for the file/folder.

DocAve®
6 Connector 92
• Managed Metadata – The field type is taxonomy which represents fixed
character strings. You are allowed to specify four values (group name, term name,
whether to allow multiple values, and the separator you want to use). If there is
already a column with the same name but in a different type existing in the
SharePoint, the assignment for this column will be invalid. The column must be
named in the following format:
Column_name:=taxonomy(Group;TermSet;AllowMultipleValues)
o Column_name – Indicates the name of the added column, also the name
of the Managed Metadata column displayed in the Connector library.
o Taxonomy – Indicates that this field is the managed metadata and
cannot be changed.
o Group – Indicates the name of the term group.
o TermSet – Indicates the name of the term set.
o AllowMultipleValues – Indicates whether multiple values can be set for
this column. It can be true or false.
Ensure that these parameters (Group, TermSet, and AllowMultipleValues) are
separated using a semicolon (;).
For example, MyManagedMetadata:=taxonomy(GroupA;TermSet01;true).
Ensure that multiple values for the managed metadata column are separated
using a vertical line (|).
For example,
TermLevel1|TermLevel1;TermLevel2|TermLevel1;TermLevel2;TermLevel3.
• Lookup – The field type is lookup which represents fixed character strings. You
are allowed to specify two values. The first one is the name of the list or library
where it gets information from. The second one is the name of column which it
points to. Note that the list or library and the corresponding values of this
column it points to must exist. The column must be named in the following
format:
Column_name:=Lookup(listUrl;columnName;AllowMultipleValues)
o Column_name – Indicates the name of the added column, also the name
of the Lookup column displayed in the Connector library.
o Lookup – Indicates that this field is the lookup and cannot be changed.
o listUrl – Indicates the URL of the list where it gets information from.
o columnName – Indicates the name of the column which it points to. This
parameter is case-sensitive.

DocAve®
6 Connector 93
o AllowMultipleValues – Indicates whether multiple values can be set for
this column. It can be true or false.
Ensure that these parameters (listUrl, columnName, and AllowMultipleValues) are
separated using a semicolon (;).
For example, MyLookup:=Lookup(http://AvePoint/sites/listA;listA;true).
Ensure that multiple values for the lookup column are separated using a
semicolon and a number sign (;#). For example, value1;#value2;#value3.
• Currency – The value can be any number or a number with a currency unit, such
as 100 or $100.
*Note: In the generated metadata file, the Full Path column is the first row. If you delete the
Full Path column or clear the values of the files in the Full Path column, the files’ metadata will
not be synchronized to SharePoint. In the following situations, the metadata will not be
synchronized to SharePoint:
• If the column value does not match the column type, the column value will not
be synchronized to SharePoint.
• If there is a column in SharePoint with the same column name but in a different
type the column will not be created.
• If there is no value in an entire column, this column will not be created in
SharePoint.

DocAve®
6 Connector 94
Appendix A: Support Tables The following sections list the supported tables for Connector, including SharePoint built-in
libraries, browsers, and file types in the Media Library.
SharePoint Libraries that can Be Converted to Connector Libraries With the exception of Connector libraries, DocAve Connector can convert certain SharePoint
libraries to Connector libraries and apply Connector settings to them.
√ means the library is able to be converted to Connector library.
× means the library is not able to be converted to Connector library.
SharePoint Library Converting to Connector Library
Document Library √
Form Library √
Picture Library √
Asset Library √ (not yet supported in SharePoint 2013 and
SharePoint 2016 and SharePoint 2019)
Wiki Page Library ×
Data Connection Library ×
Slide Library ×
Report Library ×
Multi-Browser Support DocAve Connector libraries support multi-browser access. Refer to the following table for more
information regarding the multi-browser support of different actions in a Connector library.
Actions in Connector
Library
IE Chrome Firefox Safari Opera
Create Library Supported Supported Supported Supported Supported

DocAve®
6 Connector 95
Actions in Connector
Library
IE Chrome Firefox Safari Opera
Synchronization Supported Supported Supported Partially
Supported
*Note:
When
using Safari
as your
browser,
the
webpage
loading will
stick when
you click
Synchroniz
ation in the
library.
Supported
New Document Supported Not
Supported
Not
Supported
Not
Supported
Not
Supported
New Folder Supported Supported Supported Supported Supported
Check Out/In Supported Supported Supported Supported Supported
Upload Document Supported Supported Supported Supported Supported
Upload Multiple
Documents
Supported Not
Supported
Not
Supported
Not
Supported
Not
Supported
Upload Connector Links Supported Supported Supported Not
Supported
Not
Supported
*Note:
Uploading
data
request
greater
than 360
KB cannot

DocAve®
6 Connector 96
Actions in Connector
Library
IE Chrome Firefox Safari Opera
be sent in
Opera.
Explorer View Supported Not
Supported
Not
Supported
Not
Supported
Not
Supported
Edit Content (Office Files) Supported Not
Supported
Not
Supported
Not
Supported
Not
Supported
Edit Properties Supported Supported Supported Supported Supported
Change Path Supported Supported Supported Supported Supported
View Report Supported Supported Supported Supported Supported
Play Video Supported Partially
Supported
*Note:
Real
Player
does not
support
playing
videos in
Chrome.
Supported Partially
Supported
*Note:
Safari does
not
support
Silverlight
Player in
Windows
system.
Partially
Supported
*Note:
Opera
does not
support
Silverlight
Player in
Windows
system.
Download Manager Partially
Supported
*Note: IE
limitations,
IE 9 or later
versions
are
supported.
Supported Supported Supported Partially
Supported
*Note:
Opera
limitations
about the
breakpoin
t
transmissi
on, Opera
12 or later
versions

DocAve®
6 Connector 97
Actions in Connector
Library
IE Chrome Firefox Safari Opera
are
supported
.
Slide View Supported Supported Supported Supported Supported
Mobile View Supported Supported Supported Supported Supported
*Note: The Opera 12.0 and earlier browsers do not support the pause and resume function
when downloading a file in the Connector library. Please update the Opera browser if needed.

DocAve®
6 Connector 98
Video/Audio/Picture Files in Media Library Refer to the following table for the video file formats that can be uploaded onto a Media Library
and the recommended player for each video format.
Format Recommended Player Does the File Have a Thumbnail?
WMV Windows Media Player Yes
FLV Flash Player Yes
AVI Windows Media Player Yes
RM Real Player Yes
RMVB Real Player Yes
DAT Windows Media Player Yes
MP4 HTML5 Yes
MOV QuickTime Player Yes
MPEG Windows Media Player Yes
MPG Windows Media Player Yes
M4V HTML5 Yes
DIVX Windows Media Player Yes
QT Quick Time Player Yes
VP6 Windows Media Player Yes
SWF Download to play. No
ASF Windows Media Player Yes
3GP Windows Media Player Yes
VOB Download to play. No
*Note: If you use Internet Explorer 8 as your browser, choose one of recommended video
players from the table above. If you use Internet Explorer 9 and above, Chrome, Safari, or Firefox,
HTML5 is recommended.
Refer to the following table for the audio file formats that can be uploaded onto Media Library
and the recommended player for each audio format.
Format Recommended Player Does the File Have a Thumbnail?
WAV Windows Media Player No
MID Windows Media Player No
WMA Windows Media Player No
MP3 Windows Media Player Yes
AAC Windows Media Player No
AIFF Windows Media Player No
AU Windows Media Player No
CD Windows Media Player Yes
QT Quick Time Player Yes

DocAve®
6 Connector 99
Format Recommended Player Does the File Have a Thumbnail?
RA Real Player No
OGG Windows Media Player No
VQF Windows Media Player No
FLAC Not Supported, but you can
download the file
No
APE Windows Media Player No
Refer to the following table for information related to picture file formats.
*Note: The thumbnail information works for both All Video Thumbnails view and All Video
Details view.
Format Does the File Have a
Thumbnail?
Can the File be Previewed in
the Preview Field?
BMP Yes Yes
EMF Yes No
GIF Yes Yes
JPEG/JPG Yes Yes
PNG Yes Yes
EXIF Yes No
ICO Yes No
TIFF Yes No
WMF Yes No
TIF Yes No
JPE Yes No
WDP Yes No
JFIF Yes No
DID Yes No
PCX No No
FPX No No
SVG No No
UFO No No
CDR No No
PCD No No
DXF No No
PSD No No

DocAve®
6 Connector 100
Displaying MP4 Files in Safari and Chrome in iOS Refer to the following table for the support of different browsers for playing MP4 files with H264
codec in iOS.
iOS
Version
Safari Chrome Mercury
iOS
6.1.6
Supported Supported Supported
iOS
7.1.1
Supported Not Supported Supported
iOS
8.1.2
Not Supported Not Supported Supported
Refer to the following table for the support of different browsers for playing MP4 files with AAC
codec in iOS.
iOS
Version
Safari Chrome Mercury
iOS
6.1.6
Supported Supported Supported
iOS
7.1.1
Not Supported Not Supported Not Supported
iOS
8.1.2
Not Supported Not Supported Not Supported
Refer to the following tables for the support of different browsers for playing the files that
converted into MP4 format.
*Note: The following table shows the support of playing files in Safari or Chrome after they are
converted into MP4 format.
iOS 7 M4V MOV MP4 MTS FLV WMV AVI
Safari Supported Supported Supported Supported Supported Supported Supported
Chrome Not
Supported
Not
Supported
Not
Supported
Not
Supported
Not
Supported
Not
Supported
Not
Supported
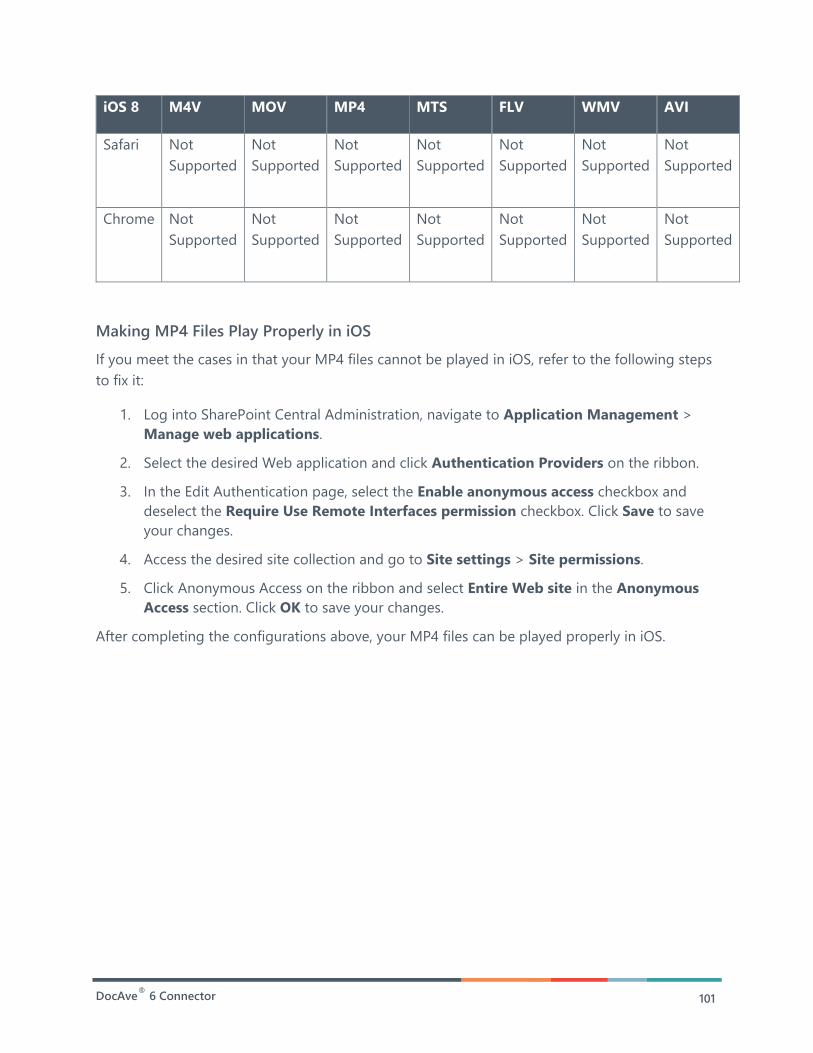
DocAve®
6 Connector 101
iOS 8 M4V MOV MP4 MTS FLV WMV AVI
Safari Not
Supported
Not
Supported
Not
Supported
Not
Supported
Not
Supported
Not
Supported
Not
Supported
Chrome Not
Supported
Not
Supported
Not
Supported
Not
Supported
Not
Supported
Not
Supported
Not
Supported
Making MP4 Files Play Properly in iOS
If you meet the cases in that your MP4 files cannot be played in iOS, refer to the following steps
to fix it:
1. Log into SharePoint Central Administration, navigate to Application Management >
Manage web applications.
2. Select the desired Web application and click Authentication Providers on the ribbon.
3. In the Edit Authentication page, select the Enable anonymous access checkbox and
deselect the Require Use Remote Interfaces permission checkbox. Click Save to save
your changes.
4. Access the desired site collection and go to Site settings > Site permissions.
5. Click Anonymous Access on the ribbon and select Entire Web site in the Anonymous
Access section. Click OK to save your changes.
After completing the configurations above, your MP4 files can be played properly in iOS.

DocAve®
6 Connector 102
Appendix B: Connector Configuration File
Agent Configuration File DocAve Connector provides configuration files named SP2010SOConnector.config,
SP2013SOConnector.config, SP2016SOConnector.config and SP2019SOConnector.config,
which allow you to customize Connector default settings by modifying elements in the
configuration file. These files reside in …\AvePoint\DocAve6\Agent\data\SP2010\Connector or
…\AvePoint\DocAve6\Agent\data\SP2013\Connector or
…\AvePoint\DocAve6\Agent\data\SP2016\Connector or
…\AvePoint\DocAve6\Agent\data\SP2019\Connector by default. Refer to the table below for
information on the functions of each element in SP2010SOConnector.config or
SP2013SOConnector.config or SP2016SOConnector.config or SP2019SOConnector.config.
Element Function Description
<FFMpegPath>C:\Program
Files\ffmpeg\ffmpeg.exe</FFMpegPath>
This is the default path where the ffmpeg.exe
file is stored. This file is required for viewing
video thumbnails in a Media Library. If you
modify this path, be sure to place the
ffmpeg.exe file that you downloaded into
the new path.
<VideoTypes>wmv,wma,mp3,flv,aac,mp4,vp6,a
vi,asf,aiff,au,cd,dat,divx,mpeg,mpg,mov,mid,ogg
,ra,rm,rmvb,qt,vqf,wav,3gp,m4v,mts</VideoTyp
es>
This element contains the supported video
types for generating thumbnails in a Media
Library. You can add new video types with
extension names or remove any existing video
types from this element.
<ImageTypes>bmp,emf,exif,gif,jpeg,jpg,png,tiff,
ico,wmf,tif,jpe,wdp,jfif,dib</ImageTypes>
This element contains the supported image
types for generating thumbnails in a Media
Library. You can add new image types with
extension names or remove any existing
image types from this element.
<RealFileTypes></RealFileTypes> This element is used to specify the file types
that will be converted to real contents.
<ConnectorProcessorReserveTime>300</Conn
ectorProcessorReserveTime>
This element is used to control the idle time
of the Connector process
SP2010ConnectorProcessor.exe or
SP2013ConnectorProcessor.exe or

DocAve®
6 Connector 103
Element Function Description
SP2016ConnectorProcessor.exe or
SP2019ConnectorProcessor.exe. This
process starts up when you configure any
Connector-related settings in the DocAve
Manager GUI. If there is no action being
triggered after 300 seconds since the last
action, this process ends automatically. You
can change the reserve time to any positive
integer. The unit is in seconds.
<ExcludedProcessNames>SP2010ConnectorPro
cessor,SP2010StorageOptimizationService,SP20
10ConnectorISync</ExcludedProcessNames>
<ExcludedProcessNames>SP2013ConnectorPro
cessor,SP2013StorageOptimizationService,SP20
13ConnectorISync</ExcludedProcessNames>
<ExcludedProcessNames>SP2016ConnectorPro
cessor,SP2016StorageOptimizationService,SP20
16ConnectorISync,AgentToolSP2016Connector
CreateList</ExcludedProcessNames>
<ExcludedProcessNames>SP2019ConnectorPro
cessor,SP2019StorageOptimizationService,SP20
19ConnectorISync,AgentToolSP2019Connector
CreateList</ExcludedProcessNames>
The processes added in this node do not
trigger Connector Event Handler when they
are activated.
<EnableEventHandlerFlag>true</EnableEventH
andlerFlag>
This element controls whether to enable the
Event Handler while running Connector
synchronization jobs. False means that the
Event Handler is not enabled while running
the synchronization job, while True enables
the Event Handler. The default value is True.
<DeleteVersionsWhenDeleteSetting>false</Del
eteVersionsWhenDeleteSetting>
This element controls whether to delete the
version files stored in the storage path’s .fsdl
folder when you remove the Connector
settings from a library.

DocAve®
6 Connector 104
Element Function Description
<EnableCloudThumbnail>true</EnableCloudTh
umbnail>
This element controls whether to generate
thumbnails in the Media Library when running
synchronization jobs on cloud storage. The
default value is true.
<SizeofTempFile>2</SizeofTempFile> This element controls the size of the temp file
that is downloaded from the Cloud storage
and used to get the thumbnails. The unit is
MB, and the default size is 2 MB. This element
only takes effect when the value of the
<EnableCloudThumbnail></EnableCloudT
humbnail> node is true.
<MaxScheduleJobThread>5</MaxScheduleJob
Thread>
This element controls the maximum number
of threads used to perform the Connector
synchronization job. The default value is 5. It
means that at most 5 Connector libraries can
be synchronized at the same time.
<IncrementalSync>
<Enabled>true</Enabled>
<Interval>5</Interval>
<ThreadCount>3</ThreadCount>
<WorkingThreadTimeOut>30</WorkingThread
TimeOut>
<MaximumMovingTimes>20</MaximumMovin
gTimes>
</IncrementalSync>
This whole node is used to configure the
Connector incremental synchronization job
settings. After configuring this setting, the
incremental synchronization jobs will be
performed automatically by Connector. There
are five sub nodes in the IncrementalSync
node:
• Enable or disable the Connector
incremental synchronization job
function.
• The interval of two incremental jobs.
The unit is minutes. You can change
the interval time to any positive
integer.
• The maximum number of threads that
can be used by an incremental job.
The value of this element must be a
positive number. There is no upper
limit for the value of this element;
however, a warning message appears

DocAve®
6 Connector 105
Element Function Description
in the Agent Log if the value is larger
than 100.
• The working threads of running
incremental jobs time out if they have
no response for over 30 minutes. You
can change this value to any positive
integer. The unit is minutes.
• The maximum number of the retry
operation when moving one file/folder
from its original location to the new
location in the storage path. The
file/folder is moved in the storage
path because the corresponding
file/folder has been moved to another
location in SharePoint.
<CleanUpSwitch>
<Enabled>false</Enabled>
<DelayDays>30</DelayDays>
</CleanUpSwitch>
This node controls whether to enable the
Clear Up Orphan BLOBs feature through
synchronization jobs. After configuring this
feature, the files deleted from SharePoint will
be completely deleted from the storage
location after the DelayDays is reached.
• Enabled – true means enable this
feature, and false means disable this
feature.
• DealyDays – Set the duration to keep
files deleted from SharePoint in the
storage location. When the duration is
reached, the files will be deleted
permanently. The duration unit is day.
<MySiteAutoCreation>
<MySiteLibraryName></MySiteLibraryName>
<MySiteLibraryUrl></MySiteLibraryUrl>
<MySiteAutoSync>false</MySiteAutoSync>
This whole node specifies the advanced
settings to be used when the MySite Libraries
feature is enabled.
• The name of the automatically created
Content library. By default, it is My
Library.

DocAve®
6 Connector 106
Element Function Description
</MySiteAutoCreation> • The relative URL to be used by the
automatically created Content library.
For example, mycontentlibrary.
• If true, DocAve will perform a full
synchronization job after saving the
Connector library settings to the
automatically created Content library.
Otherwise, false.
<SyncReport>
<Enabled>false</Enabled>
<UserName></UserName>
<PassWord></PassWord>
<ReportPath></ReportPath>
</SyncReport>
This whole node specifies whether to save the
report of a Connector library’s
synchronization operations in the configured
location. There are four sub nodes in the
SyncReport node:
• Enable or disable saving the report of
a Connector library’s synchronization
operations in the configured location.
• The username of the user accessing
the configured report location. For
example, domain\user1.
• The password of the user accessing
the configured report location. This
password must be one password
encrypted using the
AgentToolSP2010Connector tool or
AgentToolSP2013Connector tool or
AgentToolSP2016Connector tool or
AgentToolSP2019Connector tool.
For more information on using the
tools, refer to the DocAve 6
Supplementary Tools user guide.
• The path where you want to save the
report of a Connector library’s
synchronization operations. Both local
paths and UNC paths are supported.
Once this function is enabled, a report will be
generated each time a Connector library is
synchronized and the generated report will be
saved to the report location. If this function is

DocAve®
6 Connector 107
Element Function Description
disabled, the report will also be generated
each time a Connector library is synchronized
and the generated report will be saved to
the .fsdl folder in the storage location of the
Connector library.
<StorageLog>
<Enabled>true</Enabled>
<MaxFileSize>5</MaxFileSize>
<MaxFileCount>100</MaxFileCount>
</StorageLog>
This whole node controls whether to record
the changes on the corresponding files in the
connected storage path when the files in
SharePoint are processed. There are three sub
nodes in the StorageLog node:
• Enable or disable to record the
changes on the corresponding files in
the storage location when the files in
SharePoint are processed.
• The maximum size of the log file
which records the changes. The value
of this element must be a positive
number. The default value is 5 MB,
which means when the size of the log
file exceeds 5 MB, another log file will
be generated.
• The maximum number of the log files.
The default value is 100, which means
when the hundredth log file reaches
the maximum file size specified in the
<MaxFileSize></MaxFileSize>
node, the most earliest generated log
file will be deleted to generate the
hundred and first log file.
<EnablePerformanceTest>false</EnablePerfor
manceTest>
This node controls whether to generate the
report of synchronization performance. The
default value is false.
<EnableExceedQuota>false</EnableExceedQuo
ta>
This node specifies whether one file can be
uploaded to SharePoint when its size exceeds
the remaining free space of the storage
location. By default, the value of this node is

DocAve®
6 Connector 108
Element Function Description
false. It means that the files mentioned above
can be uploaded to SharePoint normally, and
the corresponding files will be stored in the
content database. If you do not want the files
mentioned above to be uploaded to
SharePoint, configure the value of this node
to true.
<TwoWayEnabled>false</TwoWayEnabled> This node controls whether the Two-Way
Sync mode will be displayed in the Connector
Setting page or not. The default value is false.
<ConnectorJobSendDetailInterval>5</Connect
orJobSendDetailInterval>
This node is used to specify the interval at
which the job details will be sent to the
manager while running a synchronization job.
The default value is 5 minutes.
<EnableAddSyncButtonToECB>false</EnableA
ddSyncButtonToECB>
This node controls whether to enable the
Sync File feature. False means that the Sync
File feature is not displayed in the Callout
menu, while True enables the Sync File
feature.
*Note: The Sync File feature only appears in
the Connector library’s Callout menu when
the value of EnableAddSyncButtonToECB is
True and the Connector library has configured
the storage path.
<UNCLinkTypes>mdt,accdb,mdb</UNCLinkTyp
es>
This node is used to configure the types of
files whose UNC link can be displayed in the
UNC Link column.
The default file types are mdt, accdb, and
mdb. Add more file types by using a comma
as the separator.
<WorkFlowsName></WorkFlowsName> This node allows triggering the configured
workflows in Connector libraries when

DocAve®
6 Connector 109
Element Function Description
synchronizing files to SharePoint or uploading
files through Upload Connector Links.
Enter the workflow names in this node, and
separate multiple names by a comma (,).
<EnableReloadMetadata>false</EnableReload
Metadata>
This node controls whether or not to load
metadata from the file system to SharePoint
in the synchronization job whenever the
modify time of a file is changed in the storage
side.
• True – Synchronize metadata during
the synchronization job whenever the
modify time of the file is changed.
• False – Only synchronize the metadata
when files or folders in the storage
location are being synchronized to
SharePoint for the first time.
<EnableReUploadLinkFile>false</EnableReUplo
adLinkFile>
This node controls the conflict resolution for
uploading Link files with the same name and
enabling the Versioning feature for Connector
Link files.
• True – Allow to upload a Link file with
the same name and overwrite the
existing Link file.
If enabling the SharePoint built-in
Versioning settings for files, True will
enable the Versioning feature for Link files
and add a new version for the Link file
with the same name.
• False – Cannot upload a Link file with
the same name.
Manager Configuration File For large environments where one site collection contains many libraries, Connector allows you
to split the number of nodes in the sub jobs and limit the number of concurrently running sub
jobs to improve job performance. By default, the number of library nodes is 20 in one sub job,

DocAve®
6 Connector 110
and the maximum number of concurrently running jobs is 5. Follow the steps below to
customize the parameters:
1. On the server where DocAve Manager is installed, navigate
to …\DocAve6\Manager\Control\Config\Connector.
2. Find the ControlConnectorSettings.config file and open it with Notepad.
3. Locate the Configuration node and configure the following settings.
• SubJobNodeCount – Represents the number of library nodes that will be
synchronized in one sub job.
• SubJobMaxCount – Represents the maximum number of concurrently running
sub jobs. AvePoint recommends you not specifying a large number for this
attribute, otherwise, the job performance will be low or the job might get stuck.
4. Save your changes and close the file.

DocAve®
6 Connector 111
Appendix C: Enabling the BLOB Provider Using the
Agent Tools In the event that you encounter errors when attempting to install EBS or RBS on your farm
through the DocAve GUI, this tool can assist you in making sure this vital step can be
accomplished.
This section describes the steps required to enable EBS or RBS using the .exe tools. Refer to
Configuring the BLOB Provider for more information on BLOB Providers.
It is recommended that you use the Agent Account to run the corresponding .exe tools. Refer to
Required Permissions to review the permissions needed to run the following two .exe tools.
Enabling EBS To enable EBS using the tool, follow the steps below.
*Note: The EBS .dll files are reloaded when you enable EBS, so an IIS restart is required.
1. Access the installation path of DocAve Agent. The default path
is …\AvePoint\DocAve6\Agent\bin.
2. Locate AgentToolSP2010StorageEBS.exe, right-click on it, and select Run as
administrator.
3. The following buttons are shown in the tool:
• In the Check EBS Status field:
o Check EBS – Checks if EBS is enabled on the farm.
o Enable EBS – Enables EBS on the farm. You can choose to restart the IIS
now or later in the pop-up.
o Disable EBS – Disables EBS on the farm. You can choose to restart the IIS
now or later in the pop-up.
• In the Install Blob Com field:
o Install – Installs BLOB Com on the farm. You can choose to restart the IIS
now or later in the pop-up.
o Uninstall – Uninstalls BLOB Com from the farm. You can choose to restart
the IIS now or later in the pop-up.
• In the Check whether the Blob Com has been installed correctly field:
o Check – Checks the status of the items listed in the left field.

DocAve®
6 Connector 112
Enabling RBS To enable RBS using the tool, complete the steps below:
1. Access the installation path of DocAve Agent. The default path
is …\AvePoint\DocAve6\Agent\bin.
2. Locate AgentToolSP2010StorageRBS.exe or AgentToolSP2013StorageRBS.exe or
AgentToolSP2016StorageRBS.exe or AgentToolSP2019StorageRBS.exe, right-click
on it, and select Run as administrator.
3. The following buttons are shown in the tool.
• In the Remote Blob Storage Installation Status field:
o Check – Checks the installation status of RBS in this farm.
o Install – Installs RBS on the farm.
o Uninstall – Uninstalls RBS from the farm.
• After verifying the RBS installation status using the options above, you can
perform the following actions in the Remote Blob Storage Enable Status field:
o Browse – Generates a tree structure of the farm. The tree is detailed down
to the content database level.
o Check – Select some SharePoint nodes on the tree and click Check to
check whether RBS is enabled on the selected nodes.
o Enable – Enables RBS on the selected nodes.
o Disable – Disables RBS on the selected nodes.

DocAve®
6 Connector 113
Appendix D: Synchronization Behavior
Files That Do Not Synchronize from Storage Path to SharePoint Some files and folders cannot be synchronized from the storage path to SharePoint due to
Windows API or SharePoint limitations.
Error Message File Type Reason
The file is a system file.
Or
The folder is a system folder.
File, Folder The system files are usually generated
automatically by the system, which does
not belong to the user’s data.
The file is hidden.
Or
The folder is hidden.
File, Folder Connector does not synchronize hidden
files or folders for privacy protection.
There may be the system
folder with the same name
"_t" or "_w" in SharePoint.
Folder -t and _w folder are used to store the
thumbnail pictures and previewed pictures
for Media library, Picture library and Asset
library. This folder belongs to SharePoint
system file.
The file's URL is too long to
add to SharePoint.
Or
The folder's URL is too long
to add to SharePoint.
File, Folder This is a SharePoint limitation, if the file or
folder name length exceeds the SharePoint
limit or the length of the file or folder URL
exceeds the SharePoint limit, the file or
folder cannot be uploaded to SharePoint.
The file is 0 KB. File This is a SharePoint limitation, 0 KB file
cannot be uploaded to SharePoint.
The file is read-only. File Connector requires Full control permission
for a file to perform the synchronization.
Read-Only files do not have sufficient
permissions, so it cannot be uploaded to
SharePoint.

DocAve®
6 Connector 114
Error Message File Type Reason
The file size exceeds the
SharePoint limitation.
File This is a SharePoint limitation, if the file size
exceeds SharePoint limitation, the file
cannot be uploaded to SharePoint.
The file has been blocked by
the SharePoint administrator.
File This is a SharePoint limitation, if uploading
a file whose type is blocked by SharePoint,
the file cannot be uploaded to SharePoint.
*Note: When prompting The file size exceeds the SharePoint limitation or The file has been
blocked by the SharePoint administrator, use the Would you like to bypass SharePoint file
limitations? feature to break the limitations during configuring the library level path. For more
details, refer to Library Level.

DocAve®
6 Connector 115
Synchronization Mode Behaviors in SharePoint The table below displays the behaviors of each synchronization mode for certain actions in SharePoint (SP).
Action Sync Changes Made from SharePoint to
the Storage Path and Existing Files in
the Storage Path to SharePoint
Sync Changes Made from SharePoint to
the Storage Path, Existing Files in the
Storage Path to SharePoint, and Load
New Files from the Storage Path
Timing
New files added to
SharePoint
BLOB written with the filename to storage
and a stub living in SharePoint.
BLOB written with the filename to storage
and a stub living in SharePoint.
Real-Time
Files updated to
SharePoint
BLOB written with the filename to storage
and a stub living in SharePoint. If
versioning is turned on, the previous
version is saved to a hidden folder. If
versioning is turned off, then the file
remains in the _d folder under the .fsdl
folder in the storage location until the
configured Delay Deletion period elapses.
BLOB written with the filename to storage
and a stub living in SharePoint. If versioning
is turned on, the previous version is saved
to a hidden folder. If versioning is turned
off, then the file remains in the _d folder
under the .fsdl folder in the storage
location until the configured Delay Deletion
period elapses.
Real-Time for
SharePoint
2010,
SharePoint 2016
and SharePoint
2019;
Synchronization
Job for
SharePoint 2013
*Note: Files will
be synchronized
to destination
automatically in
SharePoint
2010,
SharePoint 2016
and SharePoint

DocAve®
6 Connector 116
Action Sync Changes Made from SharePoint to
the Storage Path and Existing Files in
the Storage Path to SharePoint
Sync Changes Made from SharePoint to
the Storage Path, Existing Files in the
Storage Path to SharePoint, and Load
New Files from the Storage Path
Timing
2019, while on
SharePoint
2013, the file
requires a
synchronization
job.
Rename
files/folders in
SharePoint
The file/folder is renamed according to
the modification in SharePoint.
The file/folder is renamed according to the
modification in SharePoint.
Synchronization
Job /
Incremental
Synchronization
Job (configured
in the
SP2010SOCon
nector.config
or
SP2013SOCon
nector.config
or
SP2016SOCon
nector.config
file or
SP2019SOCon

DocAve®
6 Connector 117
Action Sync Changes Made from SharePoint to
the Storage Path and Existing Files in
the Storage Path to SharePoint
Sync Changes Made from SharePoint to
the Storage Path, Existing Files in the
Storage Path to SharePoint, and Load
New Files from the Storage Path
Timing
nector.config
file)
Files and folders
deleted in
SharePoint; Recycle
Bin not emptied
BLOB remains in the _r folder under
the .fsdl folder in the storage location.
BLOB remains in the _r folder under
the .fsdl folder in the storage location.
Synchronization
Job/Incremental
Synchronization
Files and folders
restored from
Recycle Bin
BLOB will be moved from _r folder under
the .fsdl folder to the storage.
BLOB will be moved from _r folder under
the .fsdl folder to the storage.
Synchronization
Job/Incremental
Synchronization
Files and folders
deleted in
SharePoint; Recycle
Bin emptied
BLOB remains in the _d folder under
the .fsdl folder in the storage location
until the configured Delay Deletion period
elapses.
BLOB remains in the _d folder under
the .fsdl folder in the storage location until
the configured Delay Deletion period
elapses.
Synchronization
Job
New files added to
storage
N/A New items are created with the same name
that point to existing BLOB.
Synchronization
Job
Files updated from
storage (not
recommended)
The existing item is updated to reflect the
size of the updated file.
The existing item is updated to reflect the
size of the updated file.
Synchronization
Job

DocAve®
6 Connector 118
Action Sync Changes Made from SharePoint to
the Storage Path and Existing Files in
the Storage Path to SharePoint
Sync Changes Made from SharePoint to
the Storage Path, Existing Files in the
Storage Path to SharePoint, and Load
New Files from the Storage Path
Timing
Rename files or
folders in storage
(not recommend)
The existing SharePoint stub will become
an orphan stub and the renamed file or
folder will not be synchronized to
SharePoint.
The existing SharePoint stub will become an
orphan stub and the renamed file or folder
will be synchronized to SharePoint as a
separate link.
Synchronization
Job
Files and folders
deleted in storage
(not recommended)
N/A N/A Synchronization
Job

DocAve®
6 Connector 119
SharePoint to External Storage System Sync The table below displays the data types that are supported and unsupported when synchronizing from SharePoint to an external
storage system.
Sync from
SharePoint
Library to
External
Storage
Net Share Net Share
with WMS
HDS Hitachi
Content
Platform
Network
File System
IBM Storwize
Family
Cloud
Storage
Comment
File Supported Supported Supported Supported Supported Supported
Folder Supported Supported Supported Supported Supported Supported
Metadata Partially
Supported
Partially
Supported
Unsupported Partially
Supported
Partially
Supported
Unsupported The metadata of Office
files is contained in the
file content. Therefore,
the metadata of Office
files is able to be
synchronized to an
external storage
system. For the files
with metadata
separated from the file
content, metadata is
not able to be
synchronized to an

DocAve®
6 Connector 120
Sync from
SharePoint
Library to
External
Storage
Net Share Net Share
with WMS
HDS Hitachi
Content
Platform
Network
File System
IBM Storwize
Family
Cloud
Storage
Comment
external storage
system.
Permission Unsupported Unsupported Unsupported Unsupported Unsupported Unsupported
External Storage System to SharePoint Sync The table below displays the data types that are supported and unsupported when synchronizing from an external storage system to
SharePoint.
Note that the metadata and permissions of a file and folder can only be synchronized to SharePoint when the file or folder is first
synchronized to SharePoint. If and when you modify the metadata or permissions, either in SharePoint or in a storage path, the
metadata and permission are not synchronized during the synchronization jobs. If you want to reload the following permission or
metadata changes from storage to SharePoint, use the Sync-Folder command for permissions and the Sync-File for metadata
through Connector PowerShell. For more help information on the commands, refer to Connector PowerShell.

DocAve®
6 Connector 121
Sync from
External
Storage to
SharePoint
Library
Net Share Net Share
with WMS
HDS Hitachi
Content
Platform
Network
File System
IBM
Storwize
Family
Cloud
Storage
Comment
File Supported Supported Supported Supported Supported Supported
Folder Supported Supported Supported Supported Supported Supported
Metadata Supported Supported Unsupported Partially
Supported
Supported Unsupported The synchronization speed is
seriously impacted when
synchronizing any Office file
metadata other than the four
default metadata (Data
Created, Data Modified, Last
Saved By and Owner). As such,
only the four default metadata
properties are selected in
Connector Property Mapping.
Permission Supported Supported Unsupported Supported Supported Unsupported

DocAve®
6 Connector 122
Appendix E: SharePoint Updates
Updating to SharePoint 2013 If you are running Connector with SharePoint 2010 and plan on updating to SharePoint 2013,
take the following information into consideration when planning your update:
• Customers who have deployed EBS for SharePoint 2010 will not be able to
update their databases to SharePoint 2013. Because Microsoft no longer supports
EBS, databases marked as having externalized content in EBS will not be able to
connect. Customers using EBS must update first to RBS using the Converting EBS
Stub to RBS Stub functionality in the Control Panel. Refer to DocAve Control
Panel Reference User Guide for more details. In cases where the database server
does not support RBS, users will also need to update the database server to
Enterprise Edition (or other compatible versions of SQL Server).
• Customers who have deployed Connector to their SharePoint 2010 environments
using RBS will be able to update to SharePoint 2013:
o Customers will need to install DocAve Agents in the SharePoint 2013 farm
prior to attaching any SharePoint 2010 RBS databases.
o Customers will need to configure the RBS provider for the SharePoint
2013 environment.
o Customers will need to deploy the new SharePoint 2013 Connector
solutions prior to being able to update the connected libraries.
o When an old SharePoint 2010 content database is attached and updated
in a new SharePoint 2013 farm, the user will only need to enable RBS for
the updated content database and assign (or copy) the previous stub
database to the new content database. This can be accomplished directly
via the stub database configuration wizard in the product.
*Important: Microsoft’s best practices recommend setting the 2010 environment to a read-only
state prior to updating to 2013. The reason this is imperative for an RBS update is that the 2010
and 2013 farm will both leverage the same underlying BLOB storage layer. You MUST follow this
step to prevent corrupting data (that is, updating storage locations, running garbage collection,
or tampering with BLOBs without updating the stub and content databases).
Updating a SharePoint 2010 Content Database with Connector Data to a SharePoint
2013 Database
*IMPORTANT: Before continuing with the following steps, make sure your SharePoint 2010
content databases contain the Connector libraries. Otherwise, please follow the Upgrade

DocAve®
6 Connector 123
databases from SharePoint 2010 to SharePoint 2013 article provided by Microsoft when
updating your SharePoint 2010 to SharePoint 2013.
Prerequisites
1. DocAve 6 SP2 or a later version is required. If you are running a previous version of
DocAve, update your DocAve version to SP2 or a later version first.
2. If the SharePoint 2010 content databases contain EBS stubs, those content databases
cannot be updated to SharePoint 2013. This is because SharePoint 2013 does not
support the EBS provider.
3. The SharePoint 2010 farm and SharePoint 2013 farm must use the same DocAve Control
Server.
4. After the update, make sure the updated content databases still use the same stub
databases. Otherwise, the stubs cannot be accessed after the update.
5. Before the update, DocAve Agents must be installed in the SharePoint 2013 farm and the
Connector solutions must be deployed in the SharePoint 2013 farm.
6. If you want to use the SharePoint 2010 style sites after the update,
SP2010ConnectorContentLibrary.wsp, SP2010ConnectorMediaLibrary.wsp,
SP2013ConnectorContentLibrary.wsp and SP2013ConnectorMediaLibrary.wsp must
be deployed and the corresponding features must be activated. Otherwise, you only
need to deploy SP2013ConnectorContentLibrary.wsp and
SP2013ConnectorMediaLibrary.wsp and activate the corresponding features. For the
detailed steps on deploying the Connector solutions and activate the corresponding
features, refer to Deploying the Connector Solution and Activating the Connector
Features.
Detailed Update Steps
1. Attach the SharePoint 2010 content databases to the SQL Server of the SharePoint 2013
environment. For more information, refer to Attach a Database.
2. Mount the attached content databases to a selected Web application using the
PowerShell command Mount-SPContentDatabase.
For example, Mount-SPContentDatabase “MyDatabase” -DatabaseServer "MyServer" -
WebApplication http://webapplicationurl.
*Note: For more information on step 1 and step 2, refer to Upgrade databases from
SharePoint 2010 to SharePoint 2013.
3. If the customers need to update the UI style of SharePoint 2010 site collections in the
attached content database to the SharePoint 2013 UI style, run the Upgrade-SPSite
command. Otherwise, please neglect this step and the step below.
For example, Upgrade-SPSite http://<site name>/sites/testsite –VersionUpgrade

DocAve®
6 Connector 124
4. Run the AgentToolSP2013Connector.exe tool to update the Connector libraries in the
specified site collection.
For example, AgentToolSP2013Connector.exe -o UpgradeConnectedLibrary -url http://server/site
For more information, refer to the Operation –o UpgradeConnectedLibrary (SharePoint
2013 Only) section in the DocAve Supplementary Tools User Guide.
*Note: If the customers continue to use the SharePoint 2010 style sites after the update, please
do not run the AgentToolSP2013Connector.exe tool. However, when the customers decide to
update the UI style of SharePoint 2010 site collections, step 3 and step 4 must be performed
accordingly.

DocAve®
6 Connector 125
Updating to SharePoint 2016 If you are running Connector with SharePoint 2013 and plan on updating to SharePoint 2016,
take the following information into consideration when planning your update:
• Customers will need to install DocAve Agents in the SharePoint 2016 farm prior
to attaching any SharePoint 2013 RBS databases.
• Customers will need to configure the RBS provider for the SharePoint 2016
environment.
• Customers will need to deploy the new SharePoint 2016 Connector solutions
prior to being able to update the connected libraries.
• When an old SharePoint 2013 content database is attached and updated in a new
SharePoint 2016 farm, the user will only need to enable RBS for the updated
content database and assign (or copy) the previous stub database to the new
content database. This can be accomplished directly via the stub database
configuration wizard in the product.
*Important: Microsoft’s best practices recommend setting the 2013 environment to a read-only
state prior to updating to 2016. The reason this is imperative for an RBS update is that the 2013
and 2016 farm will both leverage the same underlying BLOB storage layer. You MUST follow this
step to prevent corrupting data (that is, updating storage locations, running garbage collection,
or tampering with BLOBs without updating the stub and content databases).
Updating a SharePoint 2013 Content Database with Connector Data to a SharePoint
2016 Database
*IMPORTANT: Before continuing with the following steps, make sure your SharePoint 2013
content databases contain the Connector libraries. Otherwise, please follow the Upgrade
databases from SharePoint 2013 to SharePoint 2016 article provided by Microsoft when
updating your SharePoint 2013 to SharePoint 2016.
Prerequisites
1. DocAve 6 SP2 or a later version is required. If you are running a previous version of
DocAve, update your DocAve version to SP2 or a later version first.
2. The SharePoint 2013 farm and SharePoint 2016 farm must use the same DocAve Control
Server.
3. After the update, make sure the updated content databases still use the same stub
databases. Otherwise, the stubs cannot be accessed after the update.
4. Before the update, DocAve Agents must be installed in the SharePoint 2016 farm and the
Connector solutions must be deployed in the SharePoint 2016 farm.

DocAve®
6 Connector 126
Detailed Update Steps
*Note: Due to a SharePoint 2016 update bug, you must disable the RBS settings on the
SharePoint 2013 environment before updating it to SharePoint 2016; otherwise, you must install
the following two SharePoint 2016 updates before the database update:
https://support.microsoft.com/en-us/kb/3118289 and https://support.microsoft.com/en-
us/kb/3118295.
1. Attach the SharePoint 2013 content databases to the SQL Server of the SharePoint 2016
environment. For more information, refer to Attach a Database.
2. Mount the attached content databases to a selected Web application using the
PowerShell command Mount-SPContentDatabase.
For example, Mount-SPContentDatabase “MyDatabase” -DatabaseServer "MyServer" -
WebApplication http://webapplicationurl.
*Note: As SharePoint 2016 does not support SharePoint 2010 mode site collections, you must
upgrade all SharePoint 2010 mode sites to SharePoint 2013 mode on the existing 2013 farm
before you mount the database on the new SharePoint 2016 farm.

DocAve®
6 Connector 127
Updating to SharePoint 2019 If you are running Connector with SharePoint 2016 and plan on updating to SharePoint 2019,
take the following information into consideration when planning your update:
• Customers will need to install DocAve Agents in the SharePoint 2019 farm prior
to attaching any SharePoint 2019 RBS databases.
• Customers will need to configure the RBS provider for the SharePoint 2019
environment.
• Customers will need to deploy the new SharePoint 2019 Connector solutions
prior to being able to update the connected libraries.
• When an old SharePoint 2016 content database is attached and updated in a new
SharePoint 2019 farm, the user will only need to enable RBS for the updated
content database and assign (or copy) the previous stub database to the new
content database. This can be accomplished directly via the stub database
configuration wizard in the product.
*Important: Microsoft’s best practices recommend setting the SharePoint 2016 environment to
a read-only state prior to updating to SharePoint 2019. The reason this is imperative for an RBS
update is that the 2016 and 2019 farms will both leverage the same underlying BLOB storage
layer. You MUST follow this step to prevent corrupting data (that is, updating storage locations,
running garbage collection, or tampering with BLOBs without updating the stub and content
databases).
Updating a SharePoint 2016 Content Database with Connector Data to a SharePoint
2019 Database
*IMPORTANT: Before continuing with the following steps, make sure your SharePoint 2016
content databases contain the Connector libraries. Otherwise, please follow the Upgrade
databases from SharePoint 2016 to SharePoint 2019 article provided by Microsoft when
updating your SharePoint 2016 to SharePoint 2019.
Prerequisites
1. DocAve 6 SP2 or a later version is required. If you are running a previous version of
DocAve, update your DocAve version to SP2 or a later version first.
2. The SharePoint 2016 farm and SharePoint 2019 farm must use the same DocAve Control
Server.
3. After the update, make sure the updated content databases still use the same stub
databases. Otherwise, the stubs cannot be accessed after the update.
4. Before the update, DocAve Agents must be installed in the SharePoint 2019 farm and the
Connector solutions must be deployed in the SharePoint 2019 farm.

DocAve®
6 Connector 128
Detailed Update Steps
1. Attach the SharePoint 2016 content databases to the SQL Server of the SharePoint 2019
environment. For more information, refer to Attach a Database.
2. Mount the attached content databases to a selected Web application using the
PowerShell command Mount-SPContentDatabase.
For example, Mount-SPContentDatabase “MyDatabase” -DatabaseServer "MyServer" -
WebApplication http://webapplicationurl.

DocAve®
6 Connector 129
Notices and Copyright Information Notice
The materials contained in this publication are owned or provided by AvePoint, Inc. and are the property
of AvePoint or its licensors, and are protected by copyright, trademark and other intellectual property
laws. No trademark or copyright notice in this publication may be removed or altered in any way.
Copyright
Copyright © 2012-2018 AvePoint, Inc. All rights reserved. All materials contained in this publication are
protected by United States and international copyright laws and no part of this publication may be
reproduced, modified, displayed, stored in a retrieval system, or transmitted in any form or by any means,
electronic, mechanical, photocopying, recording or otherwise, without the prior written consent of
AvePoint, 525 Washington Blvd, Suite 1400, Jersey City, NJ 07310, USA or, in the case of materials in this
publication owned by third parties, without such third party’s consent. Notwithstanding the foregoing, to
the extent any AvePoint material in this publication is reproduced or modified in any way (including
derivative works and transformative works), by you or on your behalf, then such reproduced or modified
materials shall be automatically assigned to AvePoint without any further act and you agree on behalf of
yourself and your successors, assigns, heirs, beneficiaries, and executors, to promptly do all things and
sign all documents to confirm the transfer of such reproduced or modified materials to AvePoint.
Trademarks
AvePoint®, DocAve®, the AvePoint logo, and the AvePoint Pyramid logo are registered trademarks of
AvePoint, Inc. with the United States Patent and Trademark Office. These registered trademarks, along
with all other trademarks of AvePoint used in this publication are the exclusive property of AvePoint and
may not be used without prior written consent.
Microsoft, MS-DOS, Internet Explorer, Office, Office 365, SharePoint, Windows PowerShell, SQL Server,
Outlook, Windows Server, Active Directory, and Dynamics CRM 2013 are either registered trademarks or
trademarks of Microsoft Corporation in the United States and/or other countries.
Adobe Acrobat and Acrobat Reader are trademarks of Adobe Systems, Inc.
All other trademarks contained in this publication are the property of their respective owners and may not
be used without such party’s consent.
Changes
The material in this publication is for information purposes only and is subject to change without notice.
While reasonable efforts have been made in the preparation of this publication to ensure its accuracy,
AvePoint makes no representation or warranty, expressed or implied, as to its completeness, accuracy, or
suitability, and assumes no liability resulting from errors or omissions in this publication or from the use of
the information contained herein. AvePoint reserves the right to make changes in the Graphical User
Interface of the AvePoint software without reservation and without notification to its users.
AvePoint, Inc.
525 Washington Blvd
Suite 1400
Jersey City, NJ 07310
USA