documentation template · web viewthe functions are similar to a tool such as word. ... vincent...
TRANSCRIPT

__________________________________________________________________________________________________
Terminal Four (T4) Content Management System – v8Terminal Four (T4) content management system (CMS) is a Web-based application that allows users to create and edit Web pages through a Web browser. It is a WYSIWYG (What You See Is What You Get) program, which means that you can edit Web pages like you would in a word processing program. Since the CMS uses a set of templates to create pages on the Loyola site, it also ensures that pages conform to the Web design standards set by the university. While there is room for some variation between sites, the Loyola site will present a coherent style to readers.
Logging in to T4T4 can be used with any web browser, but is generally best with Firefox. You will only be able to access T4 from a networked computer on-campus, or if you have VPN access from home.
1. Enter http://www.luc.edu/t4 in the Address” field of your browser window. (This page will be used for announcements and system alerts for the system)
2. Click on T4 Login button :
3. Type your Loyola network ID and password in the appropriate areas. 4. Click Login or press Enter.
1
When you log into T4, you will see the basic Site Structure. To get to your school or department’s web pages:
1. If needed, click on the plus sign next to Loyola University to expand the tree2. Click on the plus sign to the left of your department’s pages
To return to the Site Structure either click on the "TERMINALFOUR" in the upper left, or the site structure icon on the upper right.
2
Navigating the Site Structure

Folder Icon Meanings:
The folders are known as Sections. Below is a key to what the folders mean. Sections and Sub-Sections can have multiple pieces of content. We will go over how do add content later on in
the training.
Icon Name Description
Root section This is your website’s homepage
Normal section An interior page on your website
Hidden section A page that is not included in the navigation
Pending section A page that is not ready to be published
Inactive section A deleted page
Internal link section A page that redirects to another page on your website
External link section A page that redirects to a page external to your website
Mirrored section A page that is a mirrored copy of another page on your website
Edit and existing documentMaking editorial changes to existing content can be done from within TERMINALFOUR Site structure. Unless you are
3

already working in a section, you have a choice of two starting points. The method you choose is whatever method is most comfortable for you.
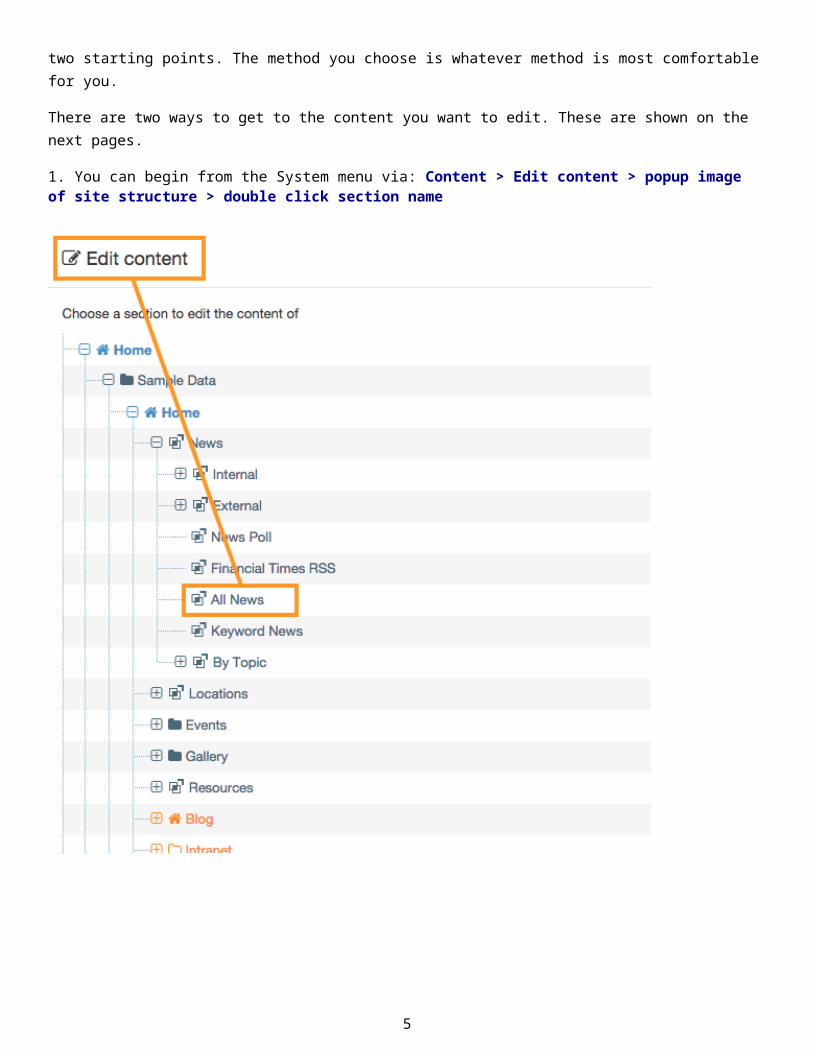
There are two ways to get to the content you want to edit. These are shown on the next pages.
1. You can begin from the System menu via: Content > Edit content > popup image of site structure > double click section name
2. From (Home) Site structure via: In the corresponding Section name > Actions (button) drop-down menu > Edit content
4
1. A screen with this section's content will appear. 2. You can either select Edit from the Actions button, or double click on the blue link name of the content.3. Click on the Content tab and then the peice of content.4. A WYSIWYG area will appear, and you can edit your content. The functions are similar to a tool such as Word.
However, some of the functions are in the dropdowns at the top. 5. When you are finished modifying your content, you have three options:
a. Click Save Changes. This option will save your changes but your page will not deploy. Note that when the page
refreshes, you content will have an orange Pending flag next to it. It will remain Pending until it is approved. b. Click from the down arrow - Save and Approve. This option will also publish your changes and your changes will go out on the next automatic deploy set. Notice that when the page refreshes, there is a green Approved flag next to your content. c. Click from the down arrow - Save as Draft. This option will create a page that will not deploy and can only be edited by you. When the page refreshes, you will see a gray Draft flag next to your content.
Adding a Section
1. If you are not already on the Site Structure screen, click the site structure icon. 2. Locate the Section in which you want the new page to appear.
3. Click the actions menu and select Create Section. 4. Enter the relevant information to create a section. At a minimum, the Name must be filled in. All other default
options are explained below.5. Enter a name for the section and click Save Changes.
SECTION INFORMATION
Sections are pages of your website and displayed in the Site Structure. When creating sections, the only required
5

element is Name. The elements are all described below:
1. Name: this is the name of your section and is typically also used directly in the menu navigation.
2. Status: select Approved, Pending or Inactive.
-- Approved sections will publish if they contain approved content.
-- Pending sections will not publish.
-- Inactive sections are marked for deletion and can be permanently deleted by an administrator.
Section options:
1. Check Mark as link section, if the web page is a link elsewhere;
6

2. Show in navigation is checked by default- if unchecked, the section will not appear in navigation and will be displayed in the site structure with a clear folder icon;
3. Archive section— if content is no longer updated, a section can be set as an archive. This will save publish time, as the section will not be reviewed each time a publish is run.
Output file name: enables you to specify a file name. If left blank, the default file name set in the channel is used. Output File Name results in a published page as follows: parent/filename.shtml.
MOVE AND REORDER SECTIONSSections can easily be moved, and the order in which they appear in navigation will change to reflect this.
You can move one of your sections, using the drag and drop method. You can reorder your sub-sections using either the automatic ordering or moving them manually.
1. To MOVE a section, drag it with your mouse and drop it to the new location.2. Click confirm to save the change to the site structure.
1. To REORDER sections, click the site structure icon.2. From the Actions menu, select edit section.
o Select the more tab subsections
o If you wish to use automatic ordering, slide the box to the check position and select a method. By default, all sections are locked. Unlock the sections you wish to apply automatic ordering to. To do this, use the unlock option in the actions menu.
o If you wish to manually move the sections, use the move arrows to move sections around.o Click save changes before navigating away from this screen, as the changes will otherwise not be saved.
7

ADDING CONTENT
1. Select Create Content from the Actions menu beside the section you wish to add content to.2. If only one content type is enabled, this will open straight away. Alternatively, you need to select the content
type you want to use.3. The * next to the element identifies that the element is required.4. Enter a name for the content. This will not be displayed on the published page, but simply act as a name within
TERMINALFOUR.5. Using the WYSIWYG, you can create text as you would in Word. In version 8, fewer functions are shown by
default, but you can use the dropdowns to access the typical Ord-style functionality.6. Preview to ensure you are happy with the result. Click on the Preview button to see how it will appear on the
Web. You can verify that links are working in the Preview mode as well.
7. Click save changes to save the content once complete, or expand your options by clicking on the icon next to save changes to reveal options Save & Approve and Save as Draft. The drop-down menu options may vary depending on configuration.
CONTENT TYPESContent is added to a section by using Content Types.
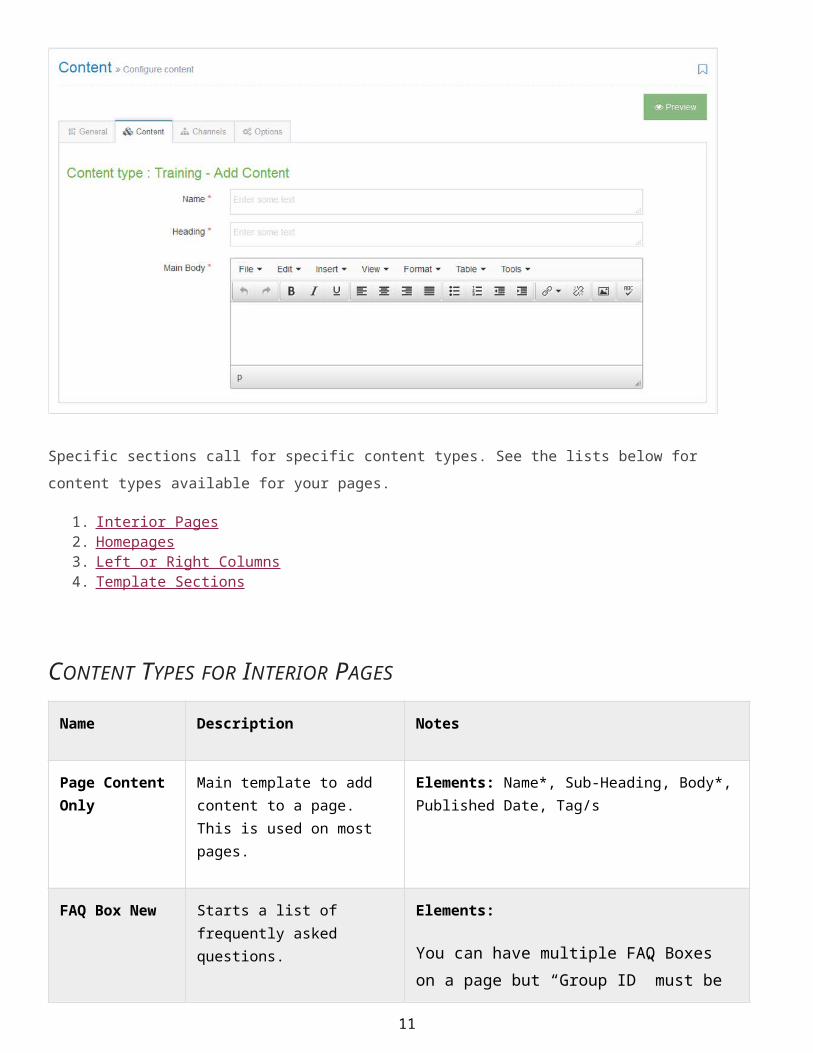
Specific sections call for specific content types. See the lists below for content types available for your pages.
1. Interior Pages 2. Homepages 3. Left or Right Columns 4. Template Sections
8

CONTENT TYPES FOR INTERIOR PAGES
Name Description Notes
Page Content Only
Main template to add content to a page. This is used on most pages.
Elements: Name*, Sub-Heading, Body*, Published Date, Tag/s
FAQ Box New Starts a list of frequently asked questions.
Elements:
You can have multiple FAQ Boxes on a page but
“Group ID” must be defined in order to group
FAQ Items.
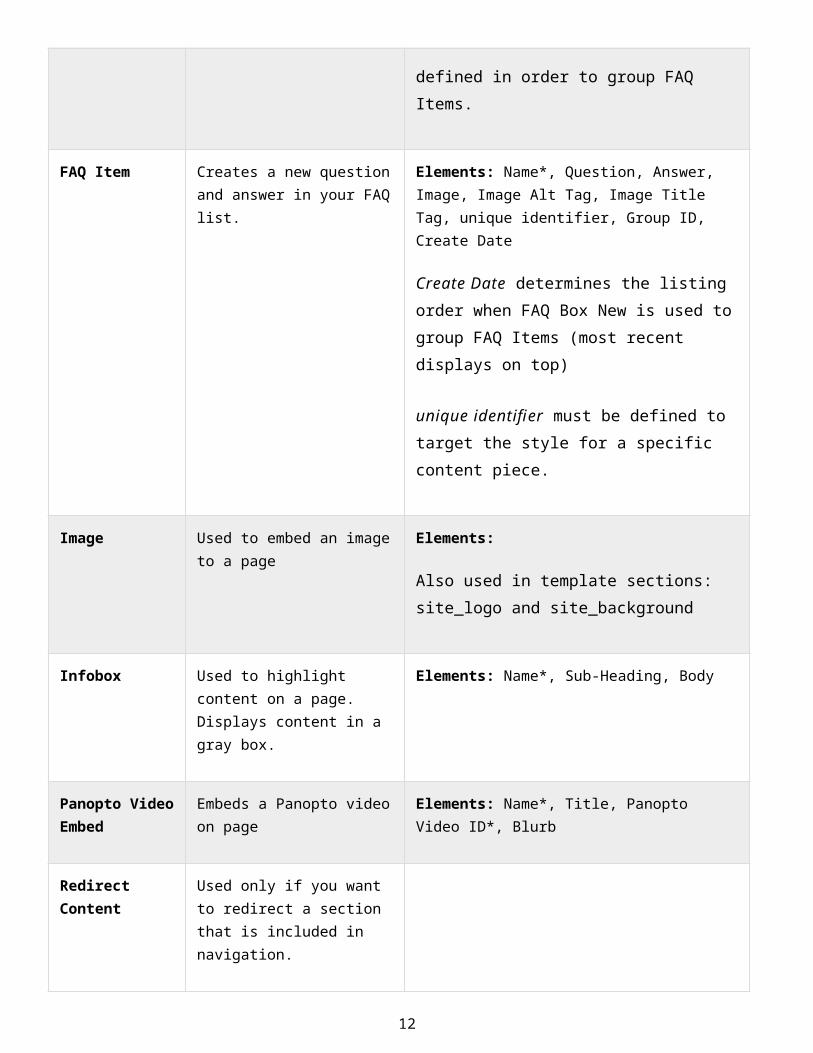
FAQ Item Creates a new question and answer in your FAQ list.
Elements: Name*, Question, Answer, Image, Image Alt Tag, Image Title Tag, unique identifier, Group ID, Create Date
Create Date determines the listing order when
FAQ Box New is used to group FAQ Items (most
recent displays on top)
unique identifier must be defined to target the
style for a specific content piece.
Image Used to embed an image to a page
Elements:
Also used in template sections: site_logo and
site_background
Infobox Used to highlight content on a page. Displays content in a gray box.
Elements: Name*, Sub-Heading, Body
Panopto Video Embeds a Panopto video on Elements: Name*, Title, Panopto Video ID*, Blurb
9

Embed page
Redirect Content Used only if you want to redirect a section that is included in navigation.
YouTube Video Embed
Embeds a YouTube Video on page.
Elements: Name*, YouTube Video ID*, Blurb, Label, Image
CONTENT TYPES FOR HOMEPAGES
Name Description Notes
announcements Displays content in maroon bar on top of the site’s homepage
Elements: (Name*, Title, Blurb, Link, External URL) limit Blurb to 240 characters
Used in section = home_announcement
Feature Link Elements:
Used in sections
= home_news, home_top, home_center
Feature Story Elements:
Used in sections
= home_news, home_top, home_center
Feature Blog Post Elements:
Used in section = home_news
10
Feature Content Elements:
Used in section = home_news
Feature Profile Elements:
Used in section = home_news
Feature Video Elements:
Used in section = home_news
CONTENT TYPES FOR LEFT OR RIGHT COLUMNS
The following content types can be used in sections = home_left, interior_left, home_right, and right_column
Name Description Notes
Feature Link Elements:
Feature Story Elements:
Feature Blog Post Elements:
Feature Content Elements:
Feature Multiple Links Elements:
Feature Photo Gallery Elements:
Feature Profile Elements:
11
Feature Video Elements:
Recruitment Links Elements:
Social Networking Feeds New
Elements:
Social Networking Links Displays social media icons with links for Facebook, Twitter, and other Social Networking Accounts.
Elements:
CONTENT TYPES FOR TEMPLATE SECTIONS
Name Description Notes
Image Displays the Site Name when used in section = site_logo
Sets the background image for the
section when used in section
= site_background
Elements: Name*, Select Image, Select Link/Custom Link Text, External URL, Sub Head, Alt Tag
Site background image files are located
in: Media Library » Categorised »
site backgrounds
Organization Information
Displays the site’s footer information. Elements: Name*, Email Address, URL, Street Address, City, State, Country, Postal Code, Phone Number
Used in: section = footer
ADD LINKS
1. External Link: e.g. http://luc.edu a. Type the text you wish to use as your link text; e.g. TERMINALFOUR.b. Highlight the text; then select Insert external link from the WYSIWYG.c. The Insert/Edit Link Window opens; complete the details as required.
i. URL: enter the URL of the site you wish to link to.ii. Text to display: enter the link text here.iii. Title: enter information about where the link will send the user; this will aid user accessibility.
12

iv. Target: select how the link should open, e.g. within the same window or in a new window.
2. Section Link: e.g. to one of your other sections.a. Type and highlight the text you wish to use as the link text or simply place your mouse where you want the
link inserted. Select Insert Section Link from the WYSIWYG. b. A window will pop up displaying the Site Structure; navigate to the section you wish to link to and click on it.
13

3. Content Link: e.g. to another attendee’s "Writing for the Web" content.a. Type and highlight the text you wish to use as the link text or simply place your mouse where you want the link
inserted. Select Insert Content Link from the WYSIWYG.b. A window will pop up displaying the Site Structure; click on the section that contains the content you wish to
link to; a list of content will be displayed.4. Click Save changes to save the content once complete.5. Preview your content to test your links.
14

CREATING TABLESTables are sometimes used to arrange information within your content to make it easier to read. You can create a piece of content in one of your empty sections or create a table similar to the one below.
CREATING TABLES
1. From the Site Structure screen, select Create content from the Actions menu beside the section you wish to add content to.
2. If only one content type is enabled, this will open straight away. Alternatively, you need to select which content type you wish to use.
3. Enter a Name for the content. This will not be displayed on the published page, but simply act as a name within TERMINALFOUR.
4. In the Main body, click Table from the WYSIWYG and create a table.5. When finished, click Save changes to save your work.
THE MEDIA LIBRARY
The Media library is a repository within TERMINALFOUR used to store media files.Media files are defined as:
images text documents PDF files audio video
To get started, go to Site Structure Screen > Content > Media library. This screen appears:
15

Here is a closer view:
16

It is possible to:
Hide categories Click to expand/reduce categories. Categories can expand to full page size.
Edit category, Create sub-category and Delete category.
ADD A CATEGORY1. To add a Category, go to Content and select Media library.2. The Media Library opens.
3. Expand the tree structure to find the "Training" category and click on the actions menu 4. Click Create sub-category.5. Enter your new category name and click save changes.6. Click on your new category.
ADD MEDIA
17

1. To add media to your category, click Add media (the use of Name and Description is dependent on your Media Layouts):
a. Media file: click to select the relevant image.b. Media type: this will be automatically detected where possible. If an incorrect type is selected, select the media
type from the list.c. Upload an image or other media to your category
ADDING AN IMAGE TO YOUR PAGE1. From the Site Structure screen, select Edit content from the Actions menu beside the section
containing the example content "Writing for the Web".2. Place your mouse where you wish to insert the image within the main body of the content; then select
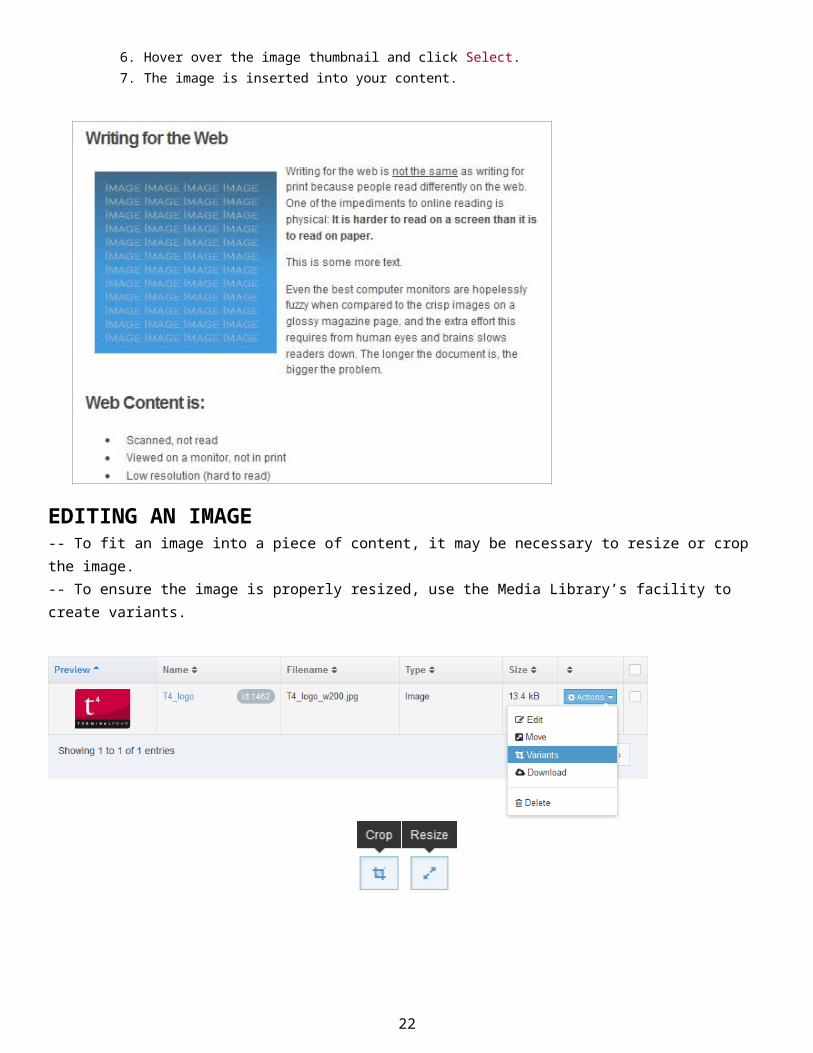
Insert from Media from the toolbar.3. Click on the content's name to open it.4. The Media Library opens.5. Navigate to the category where you uploaded the image earlier.6. Hover over the image thumbnail and click Select.7. The image is inserted into your content.
18

EDITING AN IMAGE -- To fit an image into a piece of content, it may be necessary to resize or crop the image. -- To ensure the image is properly resized, use the Media Library’s facility to create variants.
19

1. From your content, click Insert Media 2. Locate the image in the Media Library, click the Actions button Variants.3. From here you can either Crop or Resize the image.4. Enter a Variant name and a Description.5. Click Create variant.6. Add additional variants if needed.7. Once you have added the necessary variants, click Save changes to save.8. To use a variant in content; click on your logo and any variants associated to the image will be displayed.9. Click Select to add the image variant to your content.10. The variant is inserted in to your content.
Edit Image Attributes-- You may want to specify where on the page an image should appear and how text is placed around this image. Set the Media Attributes which will let you specify Margin, Float, etc.
1. The image (or image variant) has been inserted in your content. If your Media Layout for images contains style options, you can set those from the content.
20
Double-click on an image to set media attributes

2. Double-click on the image to open the Media Attributes.3. Specify the values you wish to set. 4. Click Ok to return to the content screen.5. Preview your content to ensure you are happy with the result.6. Click Save changes to save the changes made to the content.
USING MEDIA ITEMS - PDF DOCUMENTS-- You can upload PDFs as media content as you would images.
1. From the Site Structure screen, locate the section you added your content to earlier.2. Click the Actions menu and select Edit content.3. In the Main Body of your content, place the mouse where you want to insert the link to the PDF; then click Insert
Media 4. The Media Library opens. Locate the Category you wish to add the PDF to and click on it.5. To add media to your category, click Add media (the use of Name and Description is dependent on your Media
Layouts):a. Media file: click to select the relevant image.b. Media type: this will be automatically detected where possible. If an incorrect type is selected, select the media
type from the list.c. Name: enter a name for your Image. By default, this is not output on the site, but is used only as a name in the
Media Library to allow easy identification. d. Description: by default, this is not required for PDF documents .e. Syntax highlighting language: for non-binary files you can select what syntax highlighting to use (if any).This
does not apply to images, PDFs, etc.f. Media Language Dependence:
i. Fully independent: the media is the same in all languages and can hence not be translated.ii. Independent media file: the file and thumbnail exist independent of language. Other elements can
21
be modified based on language.iii. Fully dependent: all elements depend on language and can be translated.
6. Click Save changes.7. The PDF is ready to be inserted in your content; click on the PDF’s name to insert it into your content.8. The PDF has been inserted in your content9. If you do not wish to use the PDF’s Name as the link text, double-click on the PDF link text to open the Media
Attributes.10. In the empty Name element, enter the new link text.11. Click Ok to return to the content screen.12. Preview your content to ensure you are happy with the result.13. Click Save changes to save the changes made to the content.
APPROVING/SAVING YOUR CONTENT
22