wordpress guide - baylor universitybusiness.baylor.edu/.../wordpress/wordpress_guide.docx · web...
TRANSCRIPT

Introductory WordPress GuideMIS1305
G. Green
What is WordPress?....................................................................................................................................2
Login to your account..................................................................................................................................4
The Edublogs Interface................................................................................................................................5
Admin Bar................................................................................................................................................5
Navigation Menu.....................................................................................................................................6
Dashboard...............................................................................................................................................6
Edit Profile...................................................................................................................................................7
Settings........................................................................................................................................................7
Appearance.................................................................................................................................................8
Themes....................................................................................................................................................8
Header.....................................................................................................................................................8
Background..............................................................................................................................................9
Widgets...................................................................................................................................................9
Content Items............................................................................................................................................10
Posts......................................................................................................................................................10
Categories..............................................................................................................................................11
Pages.....................................................................................................................................................11
Define a Static “Front Page”..................................................................................................................12
Menus....................................................................................................................................................13
Media....................................................................................................................................................14
Links.......................................................................................................................................................17
Forms.....................................................................................................................................................18
Formatting Toolbar....................................................................................................................................20
Editing Modes........................................................................................................................................20
Standard Formatting Toolbar.................................................................................................................20
Advanced Formatting Toolbar...............................................................................................................20

MIS 1305 WordPress Guide
What is WordPress?
WordPress is a tool that allows one to design a blog (i.e. web log) or an entire e-portfolio. Baylor University uses a WordPress-based blogging service which is hosted by Edublogs, a company that specializes in large-scale WordPress implementations for colleges and universities. This platform allows you to select themes, plug-ins, headers, and widgets to personalize your WordPress site.
A blog is a contraction of “web log”. Blogs can be started and maintained free of charge, or can by sponsored financially by the blogger, a university, a corporation, or a group. A blog allows everyone a chance to promote, research, write articles, build links (blogrolls), exchange ideas and best practices, and interact with others on personal, professional, corporate, political, and social issues and topics. The opening page is called the front page.
Blogs mainly consists of two items:
Pages Posts designed for content that rarely
changes do not have a timestamp
Others don’t update Blogs/websites may have many pages
cannot be assigned categories or tags
designed for content that varies often
have a timestamp; automatically arranged in reverse chronological order
others can contribute content blogs have many posts but only
one “post” page can be assigned categories or tags
blogs.baylor.edu/yourloginname
Developing your WordPress Site, go to:blogs.baylor.edu
Viewing your Wordpress Site, go to:blogs.baylor.edu/yourloginname
Page 2 of 22

MIS 1305 WordPress Guide
Sample “Theme”
Sample “Page”
Sample “Post”
Page 3 of 22
Header
Content Sidebar
Widgets: Search Text Calendar Categories Etc…
Menu
Footer

MIS 1305 WordPress Guide
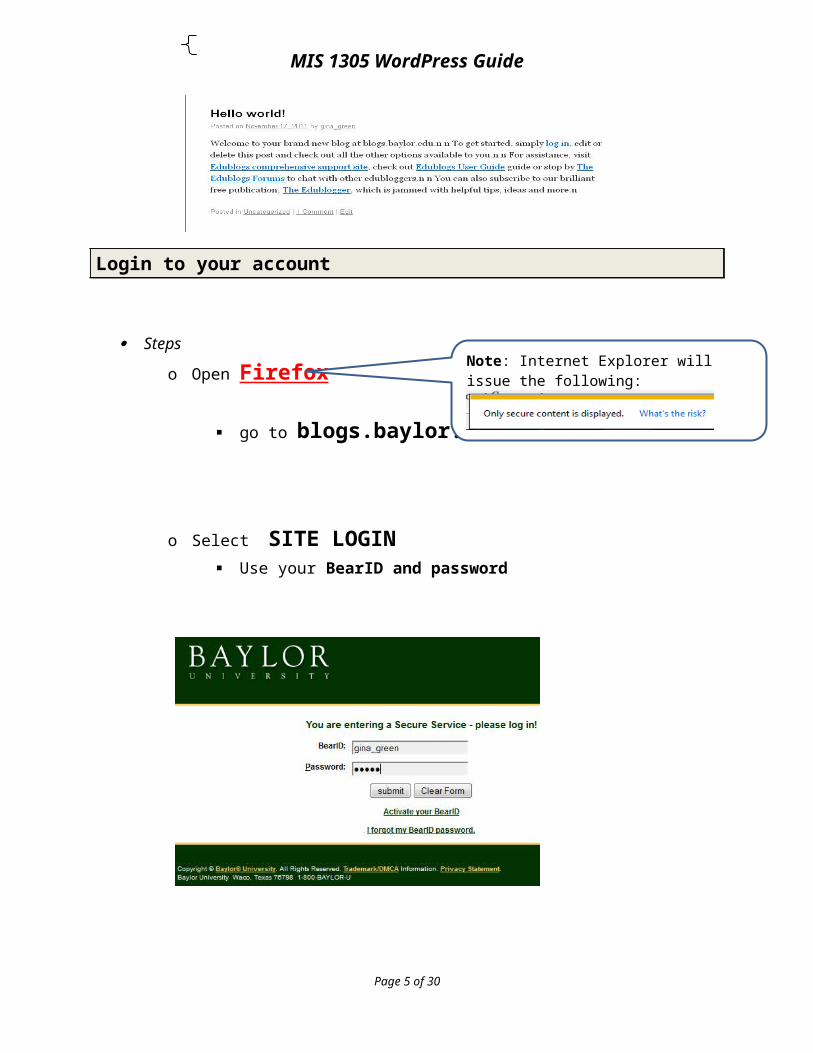
Login to your account
Steps
o Open Firefox
go to blogs.baylor.edu
o Select SITE LOGIN Use your BearID and password
Page 4 of 22
Note: Internet Explorer will issue the following:
MIS 1305 WordPress Guide
The Edublogs Interface
Admin Bar
My Sites – click here to select the website you want to work with Current Site – click here to view the front page of your current website as it appears now
(Comments) – view comments made to your site that require your moderation, and respond to them if you wish
+ New – use as a quick way to add a new Post, Page, Media, or Link Howdy, your name – used to Edit your profile, or Log out
Page 5 of 22

MIS 1305 WordPress Guide
Navigation Menu
Dashboard home returns you to the Dashboard
Content Items Posts Media Links Pages Comments
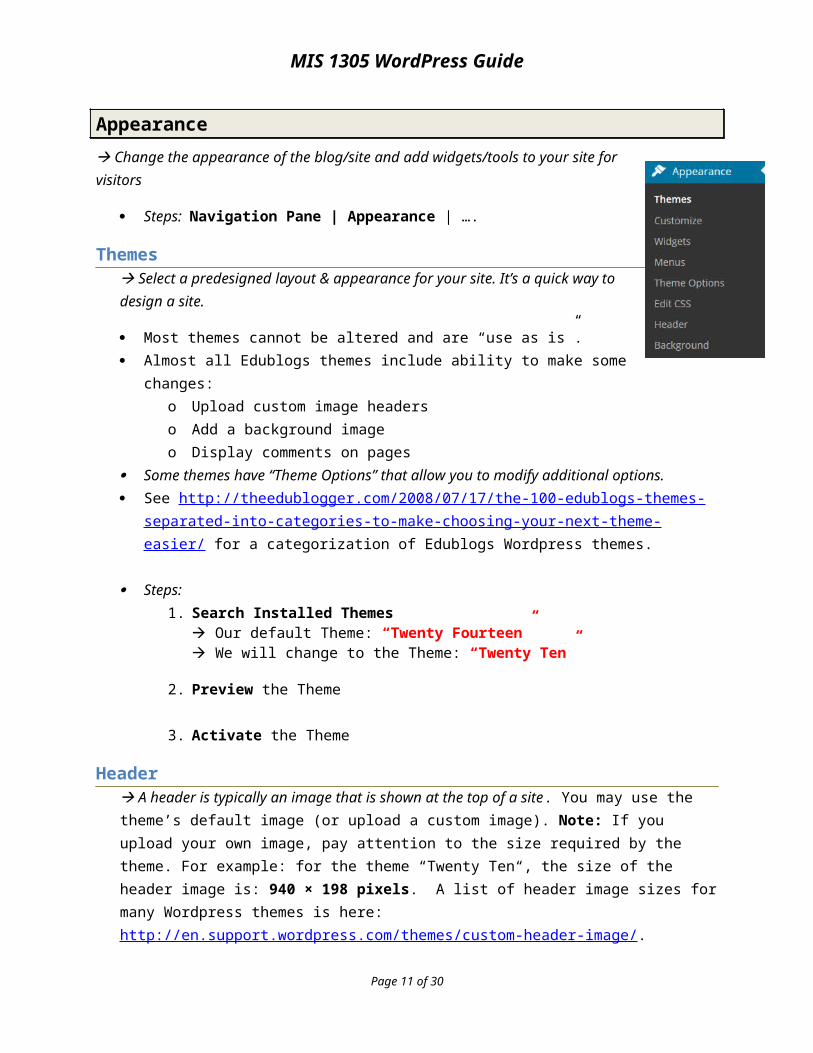
Site Management Appearance – themes, widgets, menus, background, header Plugins Users Tools Settings
Other features Forums Stats Subscriptions Inbox
DashboardA Dashboard is a behind-the-scene screen where you can adjust your Wordpress settings, view recent comments to your existing blog posts, and create new blog posts. When you log in to your blog/website, you get the Dashboard screen.
This Blog module – overview of your website Activity module - most recent blog comments ; hover to respond to the comment My Account module – quick view of your Edublogs account/profile settings Customizing the Dashboard
o Screen Options button – upper right corner; used to (de-)select Dashboard modules
Page 6 of 22

MIS 1305 WordPress Guide
o Note: Each module can be: Moved, Collapsed/expanded
Edit Profile
Change your personal information (name, biographical info, contact info)
Steps: Admin Bar | select your name | Edit My Profileo Update your information (if necessary)
First name & last name Website - http://blogs.baylor.edu/ yourusername Biographical info
o Change your password (if necessary)o Select “Update Profile”
Settings
Change the blog/site’s settings
Steps: Navigation Pane | Settings | ….
General Site Title – add a descriptive title to your site Tagline – state the website’s purpose Email Address – your preferred email Time – time zone (Chicago is in our time zone) Select “Save Changes”!
Writing - review & make your own choices Reading - review & make your own choices Discussion - review & make your own choices Privacy - review & make your own choices
Page 7 of 22

MIS 1305 WordPress Guide
Appearance
Change the appearance of the blog/site and add widgets/tools to your site for visitors
Steps: Navigation Pane | Appearance | ….
Themes Select a predesigned layout & appearance for your site. It’s a quick way to design a site.
Most themes cannot be altered and are “use as is”. Almost all Edublogs themes include ability to make some changes:
o Upload custom image headerso Add a background imageo Display comments on pages
Some themes have “Theme Options” that allow you to modify additional options. See http://theedublogger.com/2008/07/17/the-100-edublogs-themes-separated-into-
categories-to-make-choosing-your-next-theme-easier/ for a categorization of Edublogs Wordpress themes.
Steps:1. Search Installed Themes
Our default Theme: “Twenty Fourteen” We will change to the Theme: “Twenty Ten”
2. Preview the Theme
3. Activate the Theme
Header A header is typically an image that is shown at the top of a site. You may use the theme’s default image (or upload a custom image). Note: If you upload your own image, pay attention to the size required by the theme. For example: for the theme “Twenty Ten“, the size of the header image is: 940 × 198 pixels. A list of header image sizes for many Wordpress themes is here: http://en.support.wordpress.com/themes/custom-header-image/.
Steps: 1. Select the header image
Use a single Default image (or select Random), or Upload a single image or multiple images (and run Random)
Can design in PhotoShop or even PowerPoint (save as *.png) Crop & Publish
2. Save Changes!
Page 8 of 22

MIS 1305 WordPress Guide
Background Select a background color or image. You can upload your own image and edit it as you like.
Steps: 1. Make changes by selecting either of the following options:
Select “Select a Color” to use the color picker, or Select “Browse” to upload an image
2. Save Changes!
Widgets Customize the sidebar with visual, interactive tools that provide useful information to the reader.
Search widget allows your visitors to type in a keyword and then find information quickly on your blog site.
Text widget allows you to place any text (e.g. welcome message) on the sidebar. You may add more than one text widget on a side bar.
Calendar widget displays a calendar on the sidebar; you can access blog posts by date
Categories widget displays your posts by categories (i.e. major topics)
Tag Cloud widget displays your posts by tags (i.e. keywords)
Links widget displays URLs to the websites you choose in the Links item in your Dashboard. These can be personalized to your favorites.
Google: blog widgets
Steps: 1. To activate a widget , drag the widget to the right side bar2. To deactivate a widget , drag it left to either of the following areas:
“Available Widgets” –this area deletes the widget’s settings. “Inactive widgets” – this area keeps the widget’s settings.
3. Save Changes!
Page 9 of 22

MIS 1305 WordPress Guide
Content Items
Posts Write an entry to be published in your blog/site.
Steps: Navigation Pane | Post | Add New - Enter a title- Type & format your content- Determine your Discussion settings for “Allow
Comments” and “Allow trackbacks & pingbacks” If these two options are not visible, click Screen Options and ensure the
Discussion and Comments boxes are checked.
- Pick your categories & tags. Note: You may add new categories in this window. Categories chapters ; Tags keywords in an index
- Preview or Publish!
Adding & Formatting Content See the “Formatting Toolbar” section of this document
Making Bulk Changes 1. Select more than one post2. Change “Bulk Actions” to “Edit” (or “Move to Trash”)3. Click “Apply” button!!4. Make changes | Select “Update” button
Page 10 of 22
MIS 1305 WordPress Guide
Categories The “Category” feature is used to assign keywords to a Post.
Steps to create a new Category:- Navigation Pane | Posts |
Categories
- Type the category name | select “Add New Category” button
- Now, you can open a Post and add assign it to specific categories.
- Also, you should add the “Categories” Widget so the user can select a Category to view.
Note: Post summaries viewed through category links will always be clean and stripped of inline styles.
Pages Design a page that contains content that will rarely change.
Steps: Navigation Pane | Page | Add New - Enter a title- Type & format your content- Determine your Discussion setting for “Allow Comments”
and “Allow trackbacks & pingbacks” If these two options are not visible, click Screen Options FOR THIS CLASS you should UNCHECK the Discussion and Comments boxes for
all web Pages
- Preview or Publish!
Page 11 of 22

MIS 1305 WordPress Guide
Define a Static “Front Page” Your front page may be either a dynamic page containing a list of all of your latest posts OR a static page containing information that rarely changes (e.g. introducing your site).
For this class, we will use a “Static Front Page” Steps:
- Make sure you have created your front page, typically called “Home”
- Make sure you have created a blank page to hold all of your posts. Sample names include “Blog” or “Posts”.
- Define your pages:o Navigation Pane | Settings | Reading o Set the “Front page displays” settings
Select “A static page” Set Front Page: Home (assuming this is the name of your front page) Set Posts page: Blog (assuming this is the name of your blank page) Save Changes!
Page 12 of 22

MIS 1305 WordPress Guide
Page 13 of 22

MIS 1305 WordPress Guide
Menus Create your own Custom Menu by adding menu items to the menu bar. It gives users quick access to your content.
Note: Ensure you previously created a few Content Items before creating a menu.
Menu items may be:o Pages static pageso The “Posts page” a single page displaying
all postso Categories of posts display all posts in a
categoryo Custom Links to specific websites displays any urls that you specify
Steps: 1. If the Menu Window is grayed out:
type a new Menu Name: Main Menu | click “Create Menu”.
2. On the left pane, set your “Primary Navigation” to Main Menu | click “Save”
3. Add items to the Menu bar Select any Pages you want to include | click “Add to
Menu” May add any Custom Links (i.e. web
addresses) to any external pages you want to include
May also add Categories this will create an item that displays all posts in that category.
4. To create a submenu, demote a menu item by dragging the item to the right until it is indented
5. Tip: The Course item below was created via a custom link with a real url because it will require one. However, once I added it, I then removed the url so that it wouldn’t actually do anything when it’s clicked.
Page 14 of 22

MIS 1305 WordPress Guide
Media Create a media library by uploading your files (e.g. images, video, audio, documents, etc.) to edublogs.
Uploading Items to the Media Library1. Navigation Pane | Media | Add New 2. “Select Files” button 3. Locate media files on your computer to upload; Open
Inserting Individual Media Items on a Page or PostInserting media items individually allows you to control the placement of media items on the page/post.
1. Open a Post or Page2. Click “Add Media” button3. Select appropriate tab--select “Media Library” tab if you previously
stored your media item in the library; otherwise select “Upload Files” 4. Select the media item that you want to use by clicking and ensuring the
check mark appears5. Change settings on right-hand side (title, alignment, alternate text, etc)
a. If you want text wrapping, select an Alignment option6. Click “Insert into Post” (or page) button
Inserting Multiple Media Items: Gallery
Galleries are one or more media items inserted and organized into a Page or Post. There is one gallery of media items per page/post. NOTE: Creating multiple galleries requires a plug-in that is available via Wordpress but not in eduBlogs.
1. Open a Post or Page2. Position cursor where you want to place multiple pictures3. Click the “Add Media” button 4. Click the “Create Gallery” button5. Choose existing images from the Media Library OR go to the Upload Files tab to either drag
and drop files from your computer into the box, or to click the Select Files button to locate files to upload.
6. Ensure the images you want in the gallery are selected via check marks; if they are not selected, click on the images to select/check them
7. When done choosing all images, click the Create a new Gallery button
Page 15 of 22

MIS 1305 WordPress Guide
8. Modify any Gallery Settings as desired9. Click the “Insert gallery” button
Creating a Slide Show
1. Go to Plugins, then “All” and ensure the Slideshow Gallery plugin is activated (i.e., checked)2. Go to Slideshow in the Navigation area, then Manage Slides3. Click Add New to add a picture to your slide show4. Fill in a Title (e.g., Galveston Beach) and a Description (e.g., 2013 Vacation) of the picture 5. Click the Browse… button and upload the picture file6. Click Save Slide7. Repeat above steps for each picture you want to add to the slideshow.8. On the webpage that you want the slideshow to appear on,
click on the Insert a Slideshow icon on the Visual tab in the position you want the slideshow to appear; choose Custom Added Slides, then click Insert (or OK).
9. Save your webpage and view it.
Adding Audio or Video
NOTE: Uploading video into edublogs requires that your video be less than 10mb in size.
1. Open a Post or Page2. Position cursor where you want to place the audio clip3. Click the “Add Media” button 4. If you have not already uploaded the audio file to Wordpress,
a. click the Upload Files tabb. Drag and drop files from your computer into the box, OR click the Select Files
button to locate files to upload5. On the Media Library tab, click on the audio file you want to be played on your webpage
and ensure the check mark appears.6. On the right-hand side, set details as appropriate. I suggest leaving the default “Embed
Media Player” in the Attachment Display Settings Embed or Link box.7. Click the Insert into page button. By default, the audio must be manually started, and the
audio will not loop. To change these settings, update the HTML:a. To autoplay, add autoplay=”on” after the file name portion of the audio tag b. To loop the audio, add loop=”on” after the file name portion of the audio tag
Page 16 of 22

MIS 1305 WordPress Guide
Adding Audio Playlist (one or more audio files in same position)
1. Open a Post or Page2. Position cursor where you want to place the audio clip3. Click the “Add Media” button 4. Click the Create Audio Playlist link5. If you have not already uploaded the audio file to Wordpress,
a. click the Upload Files tabb. Drag and drop files from your computer into the box, OR click the Select Files
button to locate files to upload6. On the Media Library tab, click on the audio file you want to be played on your webpage
and ensure the check mark appears.7. On the right-hand side, set details as appropriate. I suggest leaving the default “Embed
Media Player” in the Attachment Display Settings Embed or Link box.8. Click the “Add to audio playlist” button. By default, the audio must be manually started,
and the audio will not loop. To change these settings, update the HTML:a. To autoplay, add autoplay=”on” after the file name portion of the audio tag b. To loop the audio, add loop=”on” after the file name portion of the audio tag
Adding YouTube Video
1. Go to YouTube and locate the video you want to place on your pagea. Click the Share linkb. Click the Embed linkc. Copy the HTML code that is displayed
2. Open your Wordpress Post or Page in HTML view3. Position cursor where you want to place the video clip4. Paste the HTML code that you copied from YouTube
Adding Video from your Own Web-Accessible Storage (using Box as an example)
1. Go to Box and locate the video you want to place on your pagea. Click on the Share linkb. Click the Embed optionc. Copy the HTML code that is displayed
2. Open your Wordpress Post or Page in HTML view3. Position cursor where you want to place the video clip4. Paste the HTML code that you copied from Box
Page 17 of 22

MIS 1305 WordPress Guide
Links Used to add external links to your site. The links are automatically displayed in your blogroll, a list of links in your sidebar.
1. Type the link name2. Enter the web address (don’t forget the http://)3. Set the Target option
o may need to scroll down to find it
4. If you do not want the link to be visible to users, be sure to check “Keep this link private”5. After creating links, you can add the “Links” Widget (aka…blogroll) so users can see and select
your non-private links to view.
Order of LinksThere is a 2-step process to change the order of your links.
1. Edit each Link. Scroll to the bottom and change the “Rating” option. If you have 6 pages and you want your favorite link on top, make it a 6. The 2nd favorite one should be set to a 5, and so on.
Page 18 of 22

MIS 1305 WordPress Guide
2. Open the Links Widget. Change the “Sort By” option from “Link Title” to “Link Rating”.
Forms Used to receive structured user data.
1. Go to Plugins | Installed Plugins | Click Activate link for the Formidable plugin2. In Navigation area go to Formidable | Forms | Add New 3. Choose a Pre-Built form as a starter if desired and click Create, OR
Create a Blank Form
4. Edit the form as desired, then click Create
Page 19 of 22

MIS 1305 WordPress Guide
5. After the form is created, Add a New Page to the website which will contain your form. Click on the Add Formidable Form icon.
6. Click on the dropdown to select the form you created. You may also want to check the Display form description box. Click the Insert Form button. This will place a link to the form on the webpage.
7. Before publishing the page, be sure to Uncheck the Allow Comments and Allow trackbacks and pingbacks boxes.
8. Be sure to add this new page to your Menu.
Page 20 of 22

MIS 1305 WordPress Guide
To view form submissions, go to Formidable | Form Entries | Reports | Go | Entries. You should also be notified via email of submissions.
Page 21 of 22

MIS 1305 WordPress Guide
Formatting Toolbar
Editing Modes Visual Editing mode - uses WYSIWYG (What You See Is What You Get)
- Highlight the text you want to format, then click appropriate button Text (i.e. HTML) mode – change the HTML code or add your own
Standard Formatting Toolbar Kitchen Sink button – show/hide; last button on top, right – displays the Advanced toolbar Bold, italics, strikethrough Lists – ordered & unordered Blockquote Alignment buttons Link or Un-link Toggle Full Screen Mode
Advanced Formatting Toolbar Format – Paragraph, H1, H2, etc. Underline Align full Select Text Color
Tip: If you apply a color change to text but it doesn’t seem to have applied the change, save your change and check out the actual page in the browser. It should have made that change.
Paste as Plain Text Paste from Word Remove Formatting Insert Custom Character Indent, Outdent buttons Undo (Ctrl+Z), Redo (Ctrl+Y) Help
Page 22 of 22