dog house - habitat for humanity · pdf fileplywood: the doghouse should be built from...
TRANSCRIPT
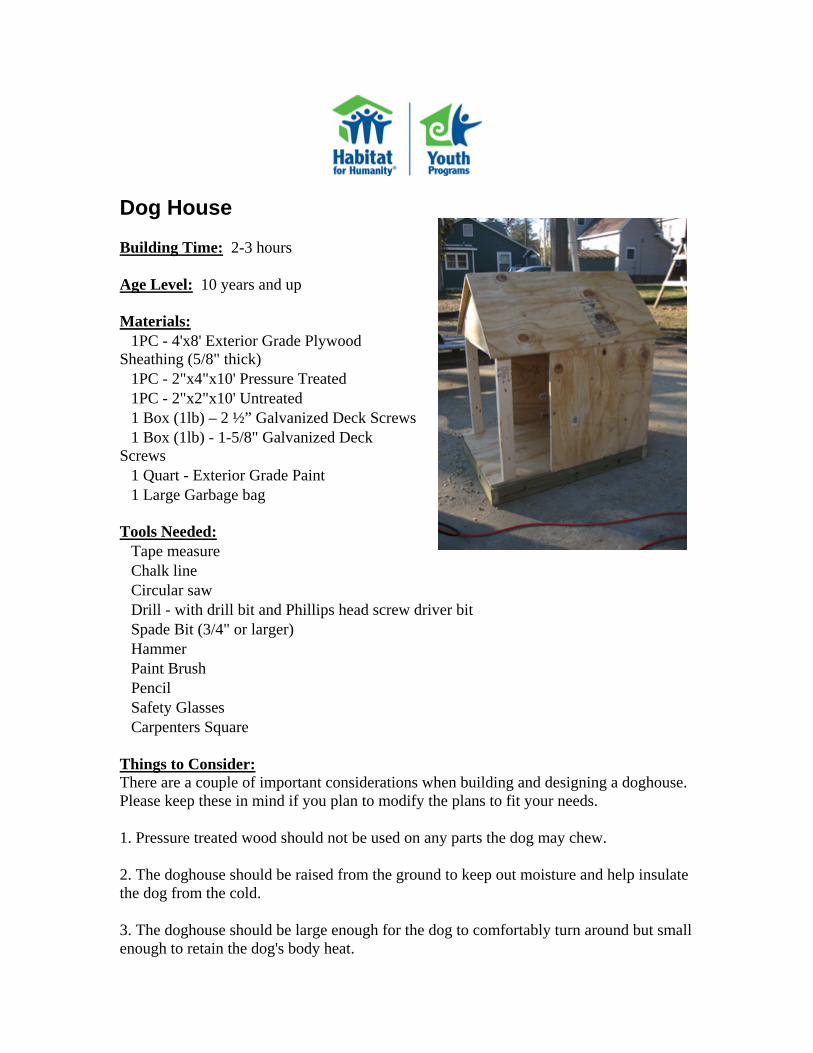
Dog House
Building Time: 2-3 hours
Age Level: 10 years and up Materials:• 1PC - 4'x8' Exterior Grade Plywood Sheathing (5/8" thick) • 1PC - 2"x4"x10' Pressure Treated • 1PC - 2"x2"x10' Untreated • 1 Box (1lb) – 2 ½” Galvanized Deck Screws • 1 Box (1lb) - 1-5/8" Galvanized Deck Screws • 1 Quart - Exterior Grade Paint • 1 Large Garbage bag Tools Needed:• Tape measure • Chalk line • Circular saw • Drill - with drill bit and Phillips head screw driver bit • Spade Bit (3/4" or larger) • Hammer • Paint Brush • Pencil • Safety Glasses • Carpenters Square
Things to Consider:There are a couple of important considerations when building and designing a doghouse. Please keep these in mind if you plan to modify the plans to fit your needs.
1. Pressure treated wood should not be used on any parts the dog may chew.
2. The doghouse should be raised from the ground to keep out moisture and help insulate the dog from the cold.
3. The doghouse should be large enough for the dog to comfortably turn around but small enough to retain the dog's body heat.

Plywood: The doghouse should be built from exterior grade plywood. Most of the plywood you will find at your local hardware store is not exterior grade. Exterior grade plywoods have special glues that prevent the layers from coming apart when they get wet. The best material to use is exterior plywood sheathing. This wood is designed to be used on the outside of a home. It has a "rough cut" surface, sometimes with grooves cut into the surface for decoration.
Foundation: Because the foundation of the doghouse will sit on the ground, we used pressure treated 2"x4"s. It is unlikely that the dog will chew these boards. If you think your dog may gnaw on them, however, you may want to use untreated wood and paint it. We also drilled 1" holes in all sides of the base to allow ground moisture to evaporate and prevent rotting.
Roof: The roof to this doghouse is designed to be removable. This will allow for easy cleaning of the interior.
Procedure:
Cutting Plywood Key to diagrams: Green= Figure title Black= The piece being worked with; numbers in black are measurements Red= Measurements for cuts Blue= Label for each piece 1. Begin with the sheet of plywood. Measure up from the shorter (4’) side 24”. Make a mark there with your pencil. Go to the other side of the sheet and do the same. Pull the chalk line from one measurement to the other, pull tight, and snap the line. You should have a rectangle that is or 48” by 24”. [Fig. 1] 2. Cut this out of the sheet. When cutting, make sure the blade is on the side that you are not currently concerned with. In this case, your blade should be on the 48”x 72” side of the line. This helps make sure all measurements are exact. * On the diagrams the shaded area is the side of the line that your blade should be on. *Ear plugs are suggested while saw is in use. 3. Take your 48”x 24” piece and cut it in half. (When doing this measure 24” from one side, snap a line with your chalk, and in this case cut right down the middle of the line.) Write “side” on each of these pieces. [Fig. 2] 4. Cut the 48”x72” leftover in half. To do this, measure 36” (3 ft) up from the short side and do the same on the other. Snap a line and make your cut. [Fig. 3] 5. Take the 48”x 36” section and measure 22 7/8” from a short side and snap a line. Make your cut, and then measure 24 1/8” from a short side of the same sheet and snap a

line, then make another cut. Label one of these pieces “bottom” and the other “back.” [Fig. 4]
6. Take the “back” and measure up the long side 24”. Make pencil marks at each 24”, but do not snap a line. 7. Measure 11 7/8” on the shorter side of “back” and make a mark with your pencil. 8. Snap a line from one of the 24” marks on “back” to the 11 7/8” mark. Do it with the other measurement. [Fig. 5] 9. Cut both lines on the waste side of your line. You should have a pentagon when done. [Fig. 5] 10. Take your remaining 48”x 36” section. Measure 18” from a 36” side. Snap a line, and make your cut. [Fig. 6] 11. Measure 12” up from the 36” side of the remaining piece, and cut that. You should have two 18”x 36” pieces and a 12” x 36” piece. Write “roof” on each of the 18”x 36” pieces. [Fig. 6] 12. Take the 12”x 36” piece and measure 11 7/16” on one 36” side, and 22 7/8” on the other. Snap a line from the 22 7/8” to the 11 7/16” and cut. Snap a line from the 11 7/16” mark to the corner, and cut that. You should have a triangle when complete. Label this “porch” [Fig. 7] 13. With the last piece, snap a line from the right angle to the 135 degree angle, and cut. [Fig. 8] 14. Using your tape, measure up 6” from the long side of the triangle. Move your tape until it hits the outside of the triangle. Doing this on both sides will give you 6” up. Snap a line, and cut. You should have a trapezoid with measurements of 24” and 12”. Write “brace” on that piece. [Fig. 9] You are done with plywood cutting! Cutting pressure treated 2”x4”x10’ 1. Measure from one side up to 33”. Make a mark with your pencil, and then use your square to make a straight line. (Push the big part of the square against the 2x4 so that it is tight and the straight part is next to your mark. [Fig. 1]
2. Do this again. (Tip: You can measure from each side and make your lines, then cut both.) Cut these pieces out and label them A. 3. On the remaining piece measure up 24” on both sides, and cut those. Label these pieces B. [Fig. 2]

Make sure you label each piece cut with its assigned letter. Untreated 2”x2”x10’ 1. Measure from one side 22 7/8”. Mark and cut. Label it C. [Fig. 3] 2. Measure 22 1/2” from one side, mark, and cut. Do this again. Label these pieces D. [Fig. 4] 3. Measure 10 5/8” from one side, and 31” from the other. Mark and cut. Label these F and E respectively. [Fig. 5]
Make sure you label each piece cut with its assigned letter. Assembly Key to diagrams: Green= Figure title Black= The piece being worked with; numbers in black are measurements Blue= Label for each piece Red= Where your screws should go 1. Begin with your 2x2 untreated wood. Take piece C and measure 10 3/4” from each side of it and make a mark. This will create a 1 1/2” space for you to line up piece F. [Fig. 1] 2. Place piece F in between the marks, and screw together with one 2” screw. (It may be helpful to use a small drill bit and make a pilot hole first. This will prevent the wood from splitting.) [Fig. 1] 3. Next line up both D pieces on the ends of C. Screw these together. [Fig. 2] 4. Taking the “bottom” piece of plywood, mark 2 ½” from one of the short sides with your pencil. Make sure to do this on the smoothest side of the plywood, because this will be the floor for your dog. Do the same on the parallel side. [Fig. 3] 5. Place your 2x2 frame so that the outside edge lines up with these lines. [Fig. 4] 6. Screw in 2x2s with 2” screws from below “bottom.” 7. Take one of your “sides,” and line it up with the corner of the “bottom” opposite the side of the 2x2 frame. Screw 1 5/8” screws in from the “side” into the “bottom.” (Again pilot holes may be useful.) Use 4, about 8” apart. [Fig. 5] 8. Do the same with the opposite “side.” [Fig. 6]

9. Take the “back” and have the three square sides lined up with the “bottom” and each “side.” Screw these together every 8” or so. [Fig. 7] 10. Take one B and place it on the ground with the 1 ½” side touching the ground. Place one A at each end so that they are coming off of B making a U that is 24”x 34 ½.” Screw these together from B into the A’s with 2 of the 2 ½” screws. Take the last B and screw it into place in the same way. You should have a 24”x 36” box. [Fig. 8] 11. Take your trash bag and cover the box frame. You might have to cut it down the seams to make it larger. It should overlap the frame. This provides a moisture barrier and more insulation for your dog. 12. Pick up the sides and bottom and place the bottom on top of that framed box. Make sure it lines up with the outsides as close as possible. Using 1 5/8” screws every 8” or so fasten the bottom to that frame from inside the doghouse. You might have to go in at an angle to do this. [Fig. 9]
13. Cut off any excess plastic. 14. Put your ¾” spade (paddle) bit into the drill. Make 2-4 holes in each side of the frame. This helps to release any condensation from below the doghouse. 15. Measure from the tip of the “back” down ¾” and make a mark. Take E and put it between your mark and F. Line the top of E up with that mark and the top of F. Screw E in so that it is secured with 2 ½” screws. This creates a support beam for the roof. [Fig. 10] 16. Take “porch” to the front of the dog house. Screw it to F with 2 of the 1 5/8” screws going into the support piece. The tip of the porch piece should be ¾” higher than the top of F. [Fig. 11] 17. Measure both roof pieces. One should be slightly shorter than the other. Put them together so that two 36” sides are matching in a right angle. Screw in from the larger piece, into the shorter. It should look like a right angle, but if you flip it over it will sit so that the peak of the roof is the 90 degree angle. [Fig. 12] 18. If you do not want your roof to be removable you can screw it into the “back” using 1 5/8” screws, and into “porch.” You may also use “brace.” To do that measure 18” in from “back” on both sides of the roof. Then crawl inside the house and position the “brace” against the inside of the roof. You might have to trim the “brace” a little bit. Have someone put in a screw or two in that 18” mark. (It works to let the screw head poke through just a little bit, then line up the brace and have them finish it off.) [Fig. 13] 19. Paint your dog house, and let your dog make it a home!


