door controldoor control ts 959ts 959 - gfa- · pdf file6 2222 technical datatechnical data...
TRANSCRIPT

eeeennnn
Installation instructionsInstallation instructionsInstallation instructionsInstallation instructions
Door controlDoor controlDoor controlDoor control TS 959TS 959TS 959TS 959
51171547_b_03_2013

2
GfA - Gesellschaft für Antriebstechnik GmbH Wiesenstraße 81 D-40549 Düsseldorf www.gfa-elektromaten.de

3
Table of contents 1111 General safety informationGeneral safety informationGeneral safety informationGeneral safety information ................................................................................................................................................................................................................................................................................................................................................................................ 5555
2222 Technical dataTechnical dataTechnical dataTechnical data ........................................................................................................................................................................................................................................................................................................................................................................................................................................................ 6666
3333 Mechanical installationMechanical installationMechanical installationMechanical installation ........................................................................................................................................................................................................................................................................................................................................................................................................ 7777
4444 Electrical installationElectrical installationElectrical installationElectrical installation .................................................................................................................................................................................................................................................................................................................................................................................................................... 8888
Cable connection overview ............................................................................................... 9
Carrying out the electrical installation .............................................................................. 10
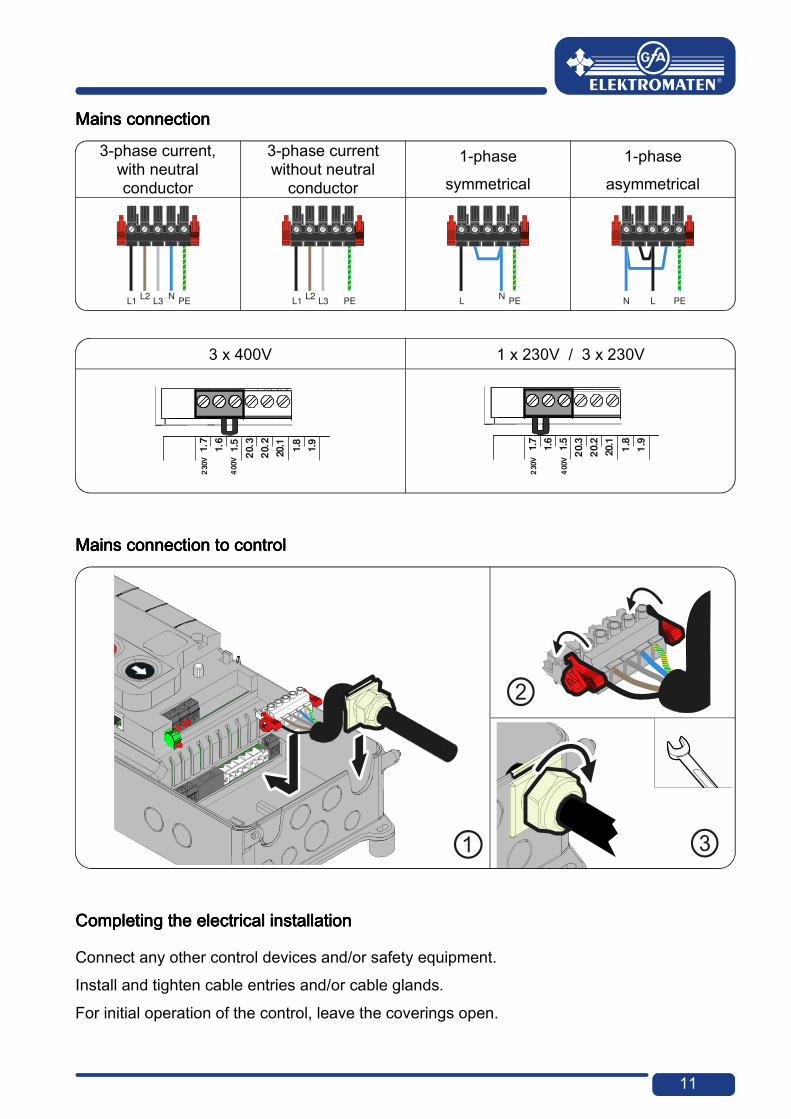
Mains connection ............................................................................................................ 11
Mains connection to control ............................................................................................ 11
Completing the electrical installation ............................................................................... 11
Overview of control panel ................................................................................................ 12
5555 Initial operation of the controlInitial operation of the controlInitial operation of the controlInitial operation of the control ........................................................................................................................................................................................................................................................................................................................................................ 13131313
DES: Rapid adjustment of final limit positions ................................................................. 13
NES: rapid adjustment final limit positions ...................................................................... 14
6666 Advanced electrical installationAdvanced electrical installationAdvanced electrical installationAdvanced electrical installation................................................................................................................................................................................................................................................................................................................................................ 15151515
External supply X1 .......................................................................................................... 15
Emergency stop X3 ......................................................................................................... 15
Relay contact X20 ........................................................................................................... 15
Control device X5 ............................................................................................................ 15
Spiral cable connection ................................................................................................... 15
7777 Programming the controlProgramming the controlProgramming the controlProgramming the control .................................................................................................................................................................................................................................................................................................................................................................................... 16161616
8888 Table of menusTable of menusTable of menusTable of menus ............................................................................................................................................................................................................................................................................................................................................................................................................................................ 17171717
Operating mode .............................................................................................................. 17
Door positions ................................................................................................................. 17
Door function ................................................................................................................... 18
Safety functions .............................................................................................................. 18
Maintenance cycle counter ............................................................................................. 19
Readout of information store ........................................................................................... 20
Deleting all adjustments .................................................................................................. 20
9999 Safety devicesSafety devicesSafety devicesSafety devices ................................................................................................................................................................................................................................................................................................................................................................................................................................................ 21212121
X2: Input, door safety switch ........................................................................................... 21
X3: Input, emergency stop .............................................................................................. 21
10101010 Functional descriptionFunctional descriptionFunctional descriptionFunctional description .................................................................................................................................................................................................................................................................................................................................................................................................... 22222222
X1: Mains supply line for control and external supply ..................................................... 22

4
X5: Input, control device .................................................................................................. 23
Advanced hold-to-run function ........................................................................................ 23
X20 floating relay contact ................................................................................................ 24
Force monitoring (DES only) ........................................................................................... 24
Travel time monitoring (NES only)................................................................................... 25
Maintenance cycle counter .............................................................................................. 26
Short-circuit/Overload display ......................................................................................... 26
Standby function ............................................................................................................. 26
11111111 Status displayStatus displayStatus displayStatus display .................................................................................................................................................................................................................................................................................................................................................................................................................................................... 27272727
12121212 Explanation of symbolsExplanation of symbolsExplanation of symbolsExplanation of symbols ............................................................................................................................................................................................................................................................................................................................................................................................ 31313131
13131313 Declaration of IncorporationDeclaration of IncorporationDeclaration of IncorporationDeclaration of Incorporation/Declaration of Conformity/Declaration of Conformity/Declaration of Conformity/Declaration of Conformity ................................................................................................................................................................................................ 33333333
SymbolsSymbolsSymbolsSymbols
Warning - Risk of injury or danger to life!
Warning - Danger to life through electrical current!
Note - Important information!
▶▶▶▶ Request - Required action!
Illustrations show example products. Deviations from the delivered product are possible.

5
1111 General safety informationGeneral safety informationGeneral safety informationGeneral safety information
Specified normal useSpecified normal useSpecified normal useSpecified normal use The door control is intended for a power-operated door with a drive unit. The safe operation is only guaranteed with normal specified use. The drive unit is to be protected from rain, moisture and aggressive ambient conditions. No liability for damage caused by other applications or non-observance of the information in the manual. Modifications are only permitted with the agreement of the manufacturer. Otherwise the Manufacturer’s Declaration shall be rendered null and void. Safety informationSafety informationSafety informationSafety information Installation and initial operation tasks are to be performed by trained, skilled fitters only. Only trained electrical craftsmen are permitted to work on electrical equipment. They must assess the tasks assigned to them, recognise potential danger zones and be able to take appropriate safety measures. Installation work is only to be carried out with the supply off. Observe the applicable regulations and standards. Coverings and safety devicesCoverings and safety devicesCoverings and safety devicesCoverings and safety devices Do not operate unless corresponding coverings and safety devices are fitted/installed. Ensure that gaskets are correctly positioned and cable glands are correctly tightened. Spare partsSpare partsSpare partsSpare parts Use only original spare parts.

6
2222 Technical dataTechnical dataTechnical dataTechnical data
Series TS 959
Dimensions W x H x D 155 x 380 x 80 mm
Assembly vertical
Vibration Assembly free of vibration
Operating frequency 50/60 Hz
Supply voltage 1 N~220 V, PE 3 N~220-400 V, PE 3~220-400 V, PE
Output power for drive unit, maximum 3 kW
Backup fuse per phase, on-site 10-16 A
External mains supply: (internal electronic backup fuse)
24 V DC
0.35 A
External mains supply: X1/L, X1/N (backup fuse via F1 micro-fuse)
1 N~230 V
1.6 A time-lag
Control inputs 24 V DC
type 10 mA
Type relay contact floating changeover contacts
Loading of relay contacts, ohmic/inductive
230 V AC
1 A
Control power consumption 10 VA
Temperature range Operation: -5..+40 Storage: +0..+50 C°
Humidity up to 93 % non-condensing
Class of protection of housing IP65
Compatible GfA limit switch NES; DES

7
3333 Mechanical installationMechanical installationMechanical installationMechanical installation
Control Control Control Control installation!installation!installation!installation! • Only use indoors • Mounting only on a level ground free of vibration • Only vertical mounting position permissible • Door must be visible from the assembly site
PrerequisitesPrerequisitesPrerequisitesPrerequisites The permissible loads of walls, mountings, connecting and transmission elements must not be exceeded.
MountingMountingMountingMounting
The control is mounted via 4 elongated holes

8
4444 Electrical installationElectrical installationElectrical installationElectrical installation
Warning Warning Warning Warning ---- Risk of electrocution!Risk of electrocution!Risk of electrocution!Risk of electrocution! • Disconnect the cables and check that they are de-energised • Observe the applicable regulations and standards • Make a proper electrical connection • Use suitable tools
OnOnOnOn----site backup fuse and disconnector unit!site backup fuse and disconnector unit!site backup fuse and disconnector unit!site backup fuse and disconnector unit! • Connection to the indoor installation via all-pole disconnector unit ≥ 10 A as per
EN 12453 (e.g. CEE plug connector, main switch)
Read the drive installation instructions!Read the drive installation instructions!Read the drive installation instructions!Read the drive installation instructions!

9
Cable connection overviewCable connection overviewCable connection overviewCable connection overview
DES and NESDES and NESDES and NESDES and NES motor connection cablemotor connection cablemotor connection cablemotor connection cable DES connection cable for limit switchDES connection cable for limit switchDES connection cable for limit switchDES connection cable for limit switch
MOTMOTMOTMOT X13X13X13X13 Motor plug DESDESDESDES X12X12X12X12 Limit switch plug Pin Core Term. Pin Core Term. 1111 3 WWWW Phase W 1111 5/wh 1111 +24 V safety circuit 2222 2 VVVV Phase V 2222 6/bn 2222 Channel B (RS485) 3333 1 UUUU Phase U 3333 7/gn 3333 Earth 4444 4 NNNN Neutral conductor (N) 4444 8/ye 4444 Channel A (RS485) 5555 PE PEPEPEPE 5555 9/gy 5555 Safety circuit 6666 10/pk 6666 8-VDC mains supply
CamCamCamCam----limit connecting cablelimit connecting cablelimit connecting cablelimit connecting cable
NESNESNESNES X12X12X12X12 Limit switch plug Pin Core Term. 1111 5/wh 11111111 Limit switch potential +24 V, jumper on X12 5, 7, 9, 11, 14 2222 6/bn 12121212 S5 additional limit switch, testing or safety edge function 3333 7/gn 6666 S3, “Open” limit switch 4444 8/ye 15151515 S6 additional limit switch, relay function 5555 9/gy 8888 S4, “Close” limit switch 6666 10/pk 4444 Safety circuit

10
Carrying out the electrical installationCarrying out the electrical installationCarrying out the electrical installationCarrying out the electrical installation ▶ Remove coverings. ▶ Open cable entry ① or ②.
▶ Insert and connect control – drive connection cable in the open cable entry ① (from below) or ② (from above).
▶ Tighten cable gland.
Caution Caution Caution Caution –––– Damage of components!Damage of components!Damage of components!Damage of components! • Open cable conduit with suitable tool • Install cable entries and/or cable glands
11
Mains connectionMains connectionMains connectionMains connection
3-phase current, with neutral conductor
3-phase current without neutral
conductor
1-phase symmetrical
1-phase asymmetrical
3 x 400V 1 x 230V / 3 x 230V
Mains connection to controlMains connection to controlMains connection to controlMains connection to control
Completing the electrical installationCompleting the electrical installationCompleting the electrical installationCompleting the electrical installation
Connect any other control devices and/or safety equipment. Install and tighten cable entries and/or cable glands. For initial operation of the control, leave the coverings open.
L1L2
L3N
PE L1L2
L3 PE LN
PE LN PE
20.1
1.5
1.8
1.9
20.2
1.6
20.3
1.7
230V
400V
20.1
1.5
1.8
1.9
20.2
1.6
20.3
1.7
230V
400V
3

12
Overview of control panelOverview of control panelOverview of control panelOverview of control panel
DES/DES/DES/DES/ NESNESNESNES DES or NES limit switch socket
X1X1X1X1 Mains supply X2X2X2X2 Door safety switch F1F1F1F1 1.6-A micro-fuse with time delay X3X3X3X3 Emergency stop button MOTMOTMOTMOT Motor socket X5X5X5X5 Control device, external three push button SSSS Selector switch X20X20X20X20 Floating relay contact S11S11S11S11 “Open” button S12S12S12S12 “Stop” button S13S13S13S13 “Close” button V1V1V1V1 Display
20.
1
1.5
1.8
1.9
20.
2
1.6
20.
3
1.7
F1 = 1,6A t23
0V
40
0V
MOTDES/
NES
S11
S12
X20
X3
2.1
2.2
3.1 5.15.25.3 5.43.2959
X2 X5
S
F1
V1S13
X1X1X1X1

13
5555 Initial operation of the controlInitial operation of the controlInitial operation of the controlInitial operation of the control
▶ Plug in or switch on mains supply line
DES: Rapid adjustment of final limit positionsDES: Rapid adjustment of final limit positionsDES: Rapid adjustment of final limit positionsDES: Rapid adjustment of final limit positions
1. Check rotating direction1. Check rotating direction1. Check rotating direction1. Check rotating direction
2. Start OPEN final limit position2. Start OPEN final limit position2. Start OPEN final limit position2. Start OPEN final limit position 3. Save OPEN final limit position3. Save OPEN final limit position3. Save OPEN final limit position3. Save OPEN final limit position
4. Start CLOSE final limit position4. Start CLOSE final limit position4. Start CLOSE final limit position4. Start CLOSE final limit position 5. Save CLOSE final limit position5. Save CLOSE final limit position5. Save CLOSE final limit position5. Save CLOSE final limit position
Note!Note!Note!Note! • Rapid adjustment is complete, "Hold-to-run" door operating mode active • Change of OPEN/CLOSE final limit positions under menus "1.1" to "1.4"

14
Read the drive unit mounting manual!Read the drive unit mounting manual!Read the drive unit mounting manual!Read the drive unit mounting manual! • Adjust the cam limit switch, see drive unit mounting manual
NES: rapid adjustment final limit positionsNES: rapid adjustment final limit positionsNES: rapid adjustment final limit positionsNES: rapid adjustment final limit positions
1. Check rotating direction1. Check rotating direction1. Check rotating direction1. Check rotating direction
2. Move to OPEN final limit position and adjust S3 OPEN limit switch2. Move to OPEN final limit position and adjust S3 OPEN limit switch2. Move to OPEN final limit position and adjust S3 OPEN limit switch2. Move to OPEN final limit position and adjust S3 OPEN limit switch
3. Move to 5 cm in front of the CLOSED final limit position and set S5 pre3. Move to 5 cm in front of the CLOSED final limit position and set S5 pre3. Move to 5 cm in front of the CLOSED final limit position and set S5 pre3. Move to 5 cm in front of the CLOSED final limit position and set S5 pre----limitlimitlimitlimit
4. Move to CLOSED final limit position and set S4 CLOSED limit switch4. Move to CLOSED final limit position and set S4 CLOSED limit switch4. Move to CLOSED final limit position and set S4 CLOSED limit switch4. Move to CLOSED final limit position and set S4 CLOSED limit switch

15
6666 Advanced electrical installationAdvanced electrical installationAdvanced electrical installationAdvanced electrical installation External supply X1 Emer gency stop X3 Relay contact X20
External supply X1External supply X1External supply X1External supply X1 Emergency stop X3Emergency stop X3Emergency stop X3Emergency stop X3 Relay contact X20Relay contact X20Relay contact X20Relay contact X20
A1A1A1A1 External device A2A2A2A2 Control device A16A16A16A16 Relay Emergency stop
Control device X5
Control device Control device Control device Control device X5X5X5X5
A4A4A4A4 Key-switch A6A6A6A6 Three push button Open/Close locked
Spiral cabl e connecti on
Spiral cable connectionSpiral cable connectionSpiral cable connectionSpiral cable connection Door safety switchDoor safety switchDoor safety switchDoor safety switch
A20A20A20A20 Junction box switch S30 Pass door switch (NC) S31 Slack-rope switch (NC)
X1
A1
X3
A2 2
1
S15
X20
20.1
20.2
20.3
A16
X5
P
1
S172
A4
X5
4
3
2
1S14
4
3
2
1
S16
2
1
S15
A6
X5
ST+
ST
A20
2
1
S30/S31
12
2.1
2.2
X2
1
2

16
7777 Programming the control Programming the control Programming the control Programming the control
1. Only program after rapid adjustment of final limit positions!1. Only program after rapid adjustment of final limit positions!1. Only program after rapid adjustment of final limit positions!1. Only program after rapid adjustment of final limit positions!
2. Select and confirm the menu2. Select and confirm the menu2. Select and confirm the menu2. Select and confirm the menu
3.a) Set and store 3.a) Set and store 3.a) Set and store 3.a) Set and store functionsfunctionsfunctionsfunctions
3.b) Set3.b) Set3.b) Set3.b) Set and save (DES) positionsand save (DES) positionsand save (DES) positionsand save (DES) positions
4. Exit programming4. Exit programming4. Exit programming4. Exit programming

17
8888 Table of menusTable of menusTable of menusTable of menus Operati ng mode
Operating modeOperating modeOperating modeOperating mode
Door operating modeDoor operating modeDoor operating modeDoor operating mode
OPEN CLOSE
Hold-to-run Hold-to-run
OPEN CLOSE
Self hold Hold-to-run
Extended hold-to-run control
Turning directionTurning directionTurning directionTurning direction
Maintain turning direction
Change turning direction
Door positions
Door positionsDoor positionsDoor positionsDoor positions
OPEN final limit position coarse correctionOPEN final limit position coarse correctionOPEN final limit position coarse correctionOPEN final limit position coarse correction
OPEN/CLOSE door movements
CLOSE final limit position coarse correctionCLOSE final limit position coarse correctionCLOSE final limit position coarse correctionCLOSE final limit position coarse correction
OPEN/CLOSE door movements
OPEN final limit position fineOPEN final limit position fineOPEN final limit position fineOPEN final limit position fine----correctioncorrectioncorrectioncorrection
Without door movements, [ + ] correct in OPEN [ – ] correct in CLOSE
CLOSE final limit position fineCLOSE final limit position fineCLOSE final limit position fineCLOSE final limit position fine----correctioncorrectioncorrectioncorrection
Without door movements, [ + ] correct in OPEN [ – ] correct in CLOSE
Position Relay 1 switching pointPosition Relay 1 switching pointPosition Relay 1 switching pointPosition Relay 1 switching point Select relay function via menu 2.7
OPEN/CLOSE door movements With NES: Set additional limit switch

18
Door functi on
Door functionDoor functionDoor functionDoor function
Relay function on X20Relay function on X20Relay function on X20Relay function on X20 Teach-in door positions via menu 1.7 (DES only)
Off
Impulse signal for 1 second
Permanent signal
Red lamp, permanent light during door movements OPEN final limit position 3 seconds permanent light CLOSE final limit position 3 seconds permanent light
Red lamp, permanent light during door movements OPEN final limit position 3 seconds permanent light CLOSE final limit position Off
Clearance dock leveller Active at OPEN final limit position only
Safety functions
Safety functionsSafety functionsSafety functionsSafety functions
Force monitoring (DES)Force monitoring (DES)Force monitoring (DES)Force monitoring (DES)
0 = Off adjustable from 2 % to 10 % overload
Travel time monitoring (NES)Travel time monitoring (NES)Travel time monitoring (NES)Travel time monitoring (NES)
0 = Off 0 to 90 seconds

19
Maintenance cycle counter
Maintenance cycle counterMaintenance cycle counterMaintenance cycle counterMaintenance cycle counter
Maintenance cycle preselectionMaintenance cycle preselectionMaintenance cycle preselectionMaintenance cycle preselection
01-99 corresponds to 1,000 to 99,000 cycles Cycles are counted down
Reaction on reaching zeroReaction on reaching zeroReaction on reaching zeroReaction on reaching zero
"CS" display with set value of maintenance cycle
Changeover to hold-to-run and "CS" display with set value of maintenance cycle
Changeover to hold-to-run and "CS" display with set value of maintenance cycle with reset option for 500 cycles and activation by 3-second stop button
20
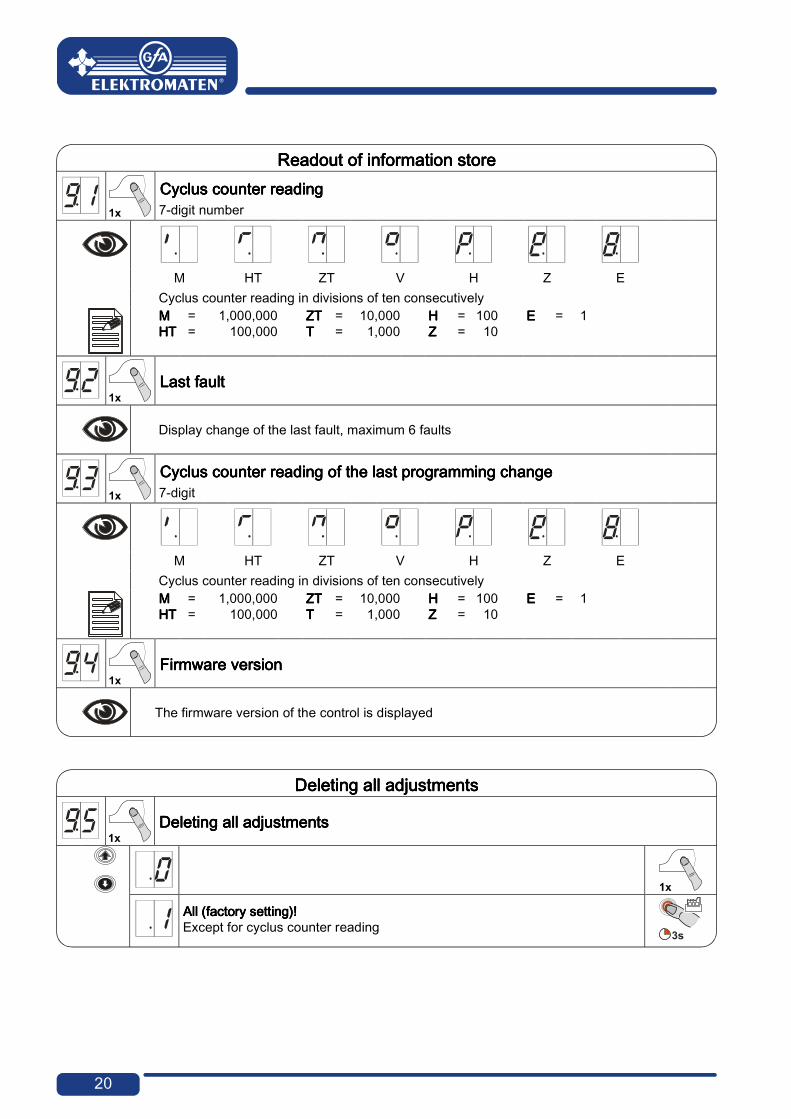
Readout of i nformati on store
Readout of information storeReadout of information storeReadout of information storeReadout of information store
Cyclus counter readingCyclus counter readingCyclus counter readingCyclus counter reading 7-digit number
M HT ZT V H Z E Cyclus counter reading in divisions of ten consecutively
MMMM HTHTHTHT
= =
1,000,000100,000
ZTZTZTZT TTTT
= =
10,0001,000
HHHH ZZZZ
= =
10010
EEEE = 1
Last faultLast faultLast faultLast fault
Display change of the last fault, maximum 6 faults
Cyclus counter reading Cyclus counter reading Cyclus counter reading Cyclus counter reading of the last programming changeof the last programming changeof the last programming changeof the last programming change 7-digit
M HT ZT V H Z E Cyclus counter reading in divisions of ten consecutively
MMMM HTHTHTHT
= =
1,000,000100,000
ZTZTZTZT TTTT
= =
10,0001,000
HHHH ZZZZ
= =
10010
EEEE = 1
Firmware versionFirmware versionFirmware versionFirmware version
The firmware version of the control is displayed
Deleti ng all adjus tments
Deleting all adjustmentsDeleting all adjustmentsDeleting all adjustmentsDeleting all adjustments
Deleting all adjustmentsDeleting all adjustmentsDeleting all adjustmentsDeleting all adjustments
All (factory setting)!All (factory setting)!All (factory setting)!All (factory setting)! Except for cyclus counter reading

21
9999 Safety devicesSafety devicesSafety devicesSafety devices
X2: Input, door safety switchX2: Input, door safety switchX2: Input, door safety switchX2: Input, door safety switch
The door safety switch is installed on the door and connected to the door control via the spiral cable.
Function typeFunction typeFunction typeFunction type Reaction upon activationReaction upon activationReaction upon activationReaction upon activation
Slack-rope/Pass door
Switching contact broken: door is stopped
Switching contact closed: door is ready for operation
SlackSlackSlackSlack----rope/Pass doorrope/Pass doorrope/Pass doorrope/Pass door With the switch open and simultaneous move command from the final limit positions, the "F1.2" error indication is displayed. If activated during the door movement, immediate stop and error indication "F1.2".
Pass door switch: entry sensePass door switch: entry sensePass door switch: entry sensePass door switch: entry sense The switch tested to safety category 2 acc. to EN 13849-1 is monitored by the door control. With the switch open and simultaneous move command from the final limit positions, the "F1.2" error indication is displayed. If activated during the door movement, immediate stop and error indication "F1.2". The magnetic contacts in the switch are switched by a magnet. The door control “assesses” the switching status of the contacts independently of each other. The “F1.7” fault indication appears if there is a failure.
X3: Input, emergency stopX3: Input, emergency stopX3: Input, emergency stopX3: Input, emergency stop
Connection of an emergency stop control device as per EN 13850 or an evaluation unit for safety device against entrapment. If activated, error indication "F1.4" appears.

22
10101010 Functional descriptionFunctional descriptionFunctional descriptionFunctional description
X1: Mains supply line for control and external supplyX1: Mains supply line for control and external supplyX1: Mains supply line for control and external supplyX1: Mains supply line for control and external supply
Mains supply Mains supply Mains supply Mains supply line for controlline for controlline for controlline for control Connection via terminals X1/1.1 to X1/1.4 and PE Various mains supply connections: 3 N~, 3~, 1 N~ for symmetric and asymmetric motors. 400V mains = 1.5 - 1.6 wire link 230V mains = 1.6 - 1.7 wire link
Note!Note!Note!Note! ▶ Heed "Mains supply connection" and "Mains supply connection to control"
descriptions
External supplyExternal supplyExternal supplyExternal supply Connection of external devices for 230 V, such as traffic light, lighting, relay, etc., via terminals X1/1.8 and X1/1.9.
Note!Note!Note!Note! • Supply of external devices 3 N~400 V or 1 N~230 V, symmetrical • Protection via F1, 1.5-A micro-fuse with time delay

23
X5: Input, control deviceX5: Input, control deviceX5: Input, control deviceX5: Input, control device
Warning!Warning!Warning!Warning! • "Hold-to-run" door operating mode:
The door must be fully visible from the operating point.
Note!Note!Note!Note! ▶ Wire links X5.1 to X5.2 for using the control device without stop button ▶ Note “X5 control device” description
Advanced holdAdvanced holdAdvanced holdAdvanced hold----totototo----run functionrun functionrun functionrun function
Menu: "0.1", function type: ".5". For the advanced hold-to-run function, the CLOSE button must remain pressed until the CLOSE door final position has been reached. If the CLOSE button is released prematurely, the door will automatically move in the UP direction.
Note!Note!Note!Note!
If NES is used ▶ It is not possible to close the door, unless the S5 limit switch has been set to just
before CLOSE for the advanced hold-to-run function.

24
X20 floating relay contactX20 floating relay contactX20 floating relay contactX20 floating relay contact
The relay functions can be found in the "Table of programs" section under menu "2.7".
Caution Caution Caution Caution –––– Damage of components!Damage of components!Damage of components!Damage of components! • Maximum current at 230 V AC 1 A and at 24 V DC 0.4 A • We recommend using LED lamps • When using lamps: maximum 40 W, shock-proof
Force monitoring (DES only)Force monitoring (DES only)Force monitoring (DES only)Force monitoring (DES only)
Menu "3.1": The force monitoring should detect persons who travel with the door.
Warning!Warning!Warning!Warning! • Force monitoring is no substitute for safety measures in providing protection
against the trapping hazard.
Function typeFunction typeFunction typeFunction type Force monitoringForce monitoringForce monitoringForce monitoring
"0" Off
"2" - "10" 2 - low limit value 10 - high limit value
Important!Important!Important!Important! • Force monitoring for doors with spring balance only • Environmental factors such as temperature or wind load can lead to inadvertent
triggering of the force monitoring

25
After exiting the programming, the door must carry out a complete opening and closing operation in self-hold. The force monitoring is a self-learning system which is effective from a opening width of 5 cm to approx. 2 m. Slow progressive changes, e.g. reduction of the spring torsion, are compensated automatically. If force monitoring is released, only the "hold-to-run" door operating mode is possible and error indication "F4.1" is displayed. Reset occurs with reaching a door final position.
Travel time monitoring (NES only)Travel time monitoring (NES only)Travel time monitoring (NES only)Travel time monitoring (NES only)
Menu "3.3": The set travel time is automatically compared with the time measured for movement between the final limit positions. If the travel time is exceeded, error indication "F5.6" is displayed Error indication "F5.6" is reset by closing the door.
Note!Note!Note!Note! • The travel time is factory-set to 90 seconds • Recommended setting: door travel time + 7 seconds

26
Maintenance cycle counterMaintenance cycle counterMaintenance cycle counterMaintenance cycle counter
Menu "8.5": A maintenance cycle can be set between "0" and "99,000" cycles; the adjustment is made in steps of one thousand. The maintenance cycle counter reduces by one each time the Open final limit position is reached. If the maintenance cycle has reached zero, a specific function is carried out. Various functions can be set in menu "8.6" after reaching the preselected maintenance cycle.
ShortShortShortShort----circuit/Overload displaycircuit/Overload displaycircuit/Overload displaycircuit/Overload display
If there is a short-circuit or an overload of the 24 V DC supply voltage, the red point between the two 7-digit displays goes out. If the display is completely dark, check fuse F1.
Standby functionStandby functionStandby functionStandby function
Provided there is no fault or command pending, the control switches the display to "Standby". Standby is active if the automatic closing is greater than 60 seconds. Only the middle point, or with active "WSD" both points, is/are displayed.
The Standby function is stopped with a command or by activation of the "S" selector switch.
27
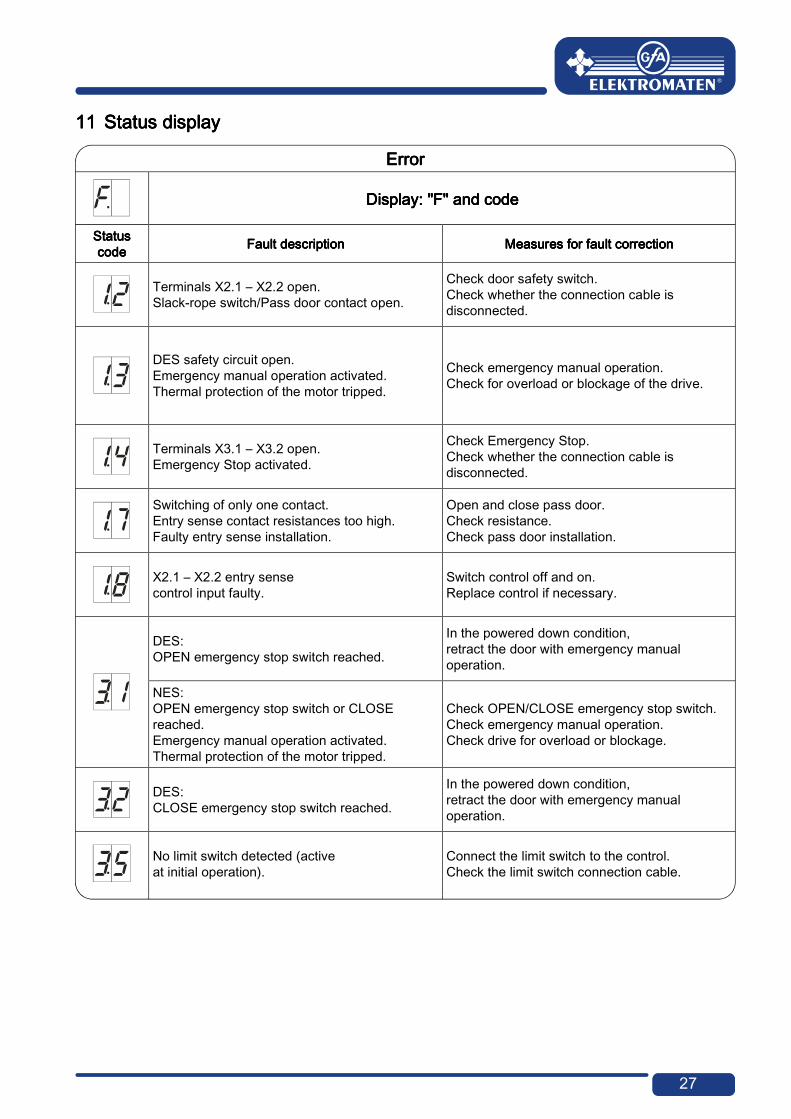
11111111 Status displayStatus displayStatus displayStatus display ErrorErrorErrorError
Display: "F" and codeDisplay: "F" and codeDisplay: "F" and codeDisplay: "F" and code
StatusStatusStatusStatus codecodecodecode Fault descriptionFault descriptionFault descriptionFault description Measures for faultMeasures for faultMeasures for faultMeasures for fault correctioncorrectioncorrectioncorrection
Terminals X2.1 – X2.2 open. Slack-rope switch/Pass door contact open.
Check door safety switch. Check whether the connection cable is disconnected.
DES safety circuit open. Emergency manual operation activated. Thermal protection of the motor tripped.
Check emergency manual operation. Check for overload or blockage of the drive.
Terminals X3.1 – X3.2 open. Emergency Stop activated.
Check Emergency Stop. Check whether the connection cable is disconnected.
Switching of only one contact. Entry sense contact resistances too high. Faulty entry sense installation.
Open and close pass door. Check resistance. Check pass door installation.
X2.1 – X2.2 entry sense control input faulty.
Switch control off and on. Replace control if necessary.
DES: OPEN emergency stop switch reached.
In the powered down condition, retract the door with emergency manual operation.
NES: OPEN emergency stop switch or CLOSE reached. Emergency manual operation activated. Thermal protection of the motor tripped.
Check OPEN/CLOSE emergency stop switch. Check emergency manual operation. Check drive for overload or blockage.
DES: CLOSE emergency stop switch reached.
In the powered down condition, retract the door with emergency manual operation.
No limit switch detected (active at initial operation).
Connect the limit switch to the control. Check the limit switch connection cable.

28
ErrorErrorErrorError
Display: "F" and codeDisplay: "F" and codeDisplay: "F" and codeDisplay: "F" and code
StatusStatusStatusStatus codecodecodecode Fault descriptionFault descriptionFault descriptionFault description Measures for fault correctionMeasures for fault correctionMeasures for fault correctionMeasures for fault correction
Limit switch system has been changed without reset of the control Reset the control via program "9.5".
Internal plausibility error. Error acknowledgement by next command.
Triggering of the force monitoring. Check the mechanics of the doors for stiffness.
ROM error. Switch control off and on.
Replace control if necessary.
CPU error. Switch control off and on.
Replace control if necessary.
RAM error. Switch control off and on.
Replace control if necessary.
Internal control error. Switch control off and on.
Replace control if necessary.
Digital limit switch error (DES). Check DES connector and connection cable.
Switch control off and on.
Error in the door movement.
Check the mechanics of the doors for stiffness. Check the limit switch turn. Switch control off and on.
Turning direction error (DES). Change turning direction via program "0.2".
Minimum travel path not reached at initial operation (DES). Move the door for at least 1 second.

29
CommandsCommandsCommandsCommands
Display: "E" and codeDisplay: "E" and codeDisplay: "E" and codeDisplay: "E" and code
CodeCodeCodeCode Command descriptionCommand descriptionCommand descriptionCommand description
An Open command is present. X5.3 control inputs
A Stop command is present. X5.2 control inputs
A Close command is present. X5.4 control inputs

30
Status indicationsStatus indicationsStatus indicationsStatus indications
StatusStatusStatusStatus displaydisplaydisplaydisplay DescriptionDescriptionDescriptionDescription
Preset value for maintenance cycle counter status reached.
Point on left-hand side is not lit: Control circuit short-circuit or overloaded.
Change of rotating direction activated at initial operation. Menu "0.2".
Change of rotating direction carried out at initial operation. Menu "0.2".
Flashing
Teach-in Open final limit position.
Flashing
Teach-in Close final limit position.
Flashing
Opening operation active.
Flashing
Closing operation active.
Stop between the set final limit positions.
Stop in the Open final limit position.
Stop in the Close final limit position.

31
12121212 Explanation of symbolsExplanation of symbolsExplanation of symbolsExplanation of symbols
SymbolSymbolSymbolSymbol ExplanationExplanationExplanationExplanation
Request: Read mounting manual
Request: Check
Request: Note
Request: Note the setting of the menu below
Default adjustment of the menu
Default adjustment of the menu, value on the right
Default adjustment of the minimum limit, dependent on drive
Default adjustment of the maximum limit, dependent on drive
Setting range
Request: Chose menu or value, turn selector switch left or right
Request: View menu, activate selector switch once
Request: Store, press selector switch once

32
SymbolSymbolSymbolSymbol ExplanationExplanationExplanationExplanation
Request: Adjustment via built in push button OPEN/CLOSE, OPEN push button upwards; CLOSE push button downwards
Request: Press STOP button once via built in push-button
Request: Save, press stop-button once via built in push-button
Request: Save, press STOP-button for three seconds via built in push-button
Request: Reset the control, press stop-button for three seconds via built in push-button
Request: Start door positions
Request: Start door positions for OPEN final limit position
Request: Start pre-limit
Request: Start door position for CLOSE final limit position

33
13131313 D eclar ati on of Incorporati onD eclar ati on of Incorporati onD eclar ati on of Incorporati onD eclar ati on of Incorporati on /Declar ation of Confor mity/Declar ation of Confor mity/Declar ation of Confor mity/Declar ation of Confor mity
Declaration of Incorporation
pursuant to Machinery Directive 2006/42/EC for a partly completed machine Appendix II Part B GfA - Gesellschaft für Antriebstechnik
Dr.-Ing Hammann GmbH & Co KGWiesenstraße 81
40549 DüsseldorfDeclaration of Conformity pursuant to EMC Directive 2004/108/EC We,
GfA GfA GfA GfA –––– Gesellschaft für Antriebstechnik, Gesellschaft für Antriebstechnik, Gesellschaft für Antriebstechnik, Gesellschaft für Antriebstechnik, hereby declare that the product specified in the following complies with the above-mentioned EU
Directive and is only intended for installation in a door system.
TS 959TS 959TS 959TS 959 Applied standards DIN EN 12453DIN EN 12453DIN EN 12453DIN EN 12453 DIN EN 12978DIN EN 12978DIN EN 12978DIN EN 12978 DIN EN 60335DIN EN 60335DIN EN 60335DIN EN 60335----1111 DIN EN 61000DIN EN 61000DIN EN 61000DIN EN 61000----6666----2222 DIN EN 61000DIN EN 61000DIN EN 61000DIN EN 61000----6666----3333
Industrial, commercial and garage doors and gates Safety devices for power operated doors Safety of household and similar electrical appliances – Part 1: General Requirements Electromagnetic compatibility (EMC) - Part 6-2 Generic standards - Immunity for industrial environments Electromagnetic compatibility (EMC) - Part 6-3 Generic standards - transient emission for residential, commercial and light-industrial environments
We undertake to transmit, in response to a reasoned request by the authorities, the special documents for this partly completed machine.
Authorised representative for theAuthorised representative for theAuthorised representative for theAuthorised representative for the compilation of the technical documentationcompilation of the technical documentationcompilation of the technical documentationcompilation of the technical documentation
(EU address in the company)
Dipl. Ing. Bernd Synowsky Documentation representative
Partly completed machinery according to EC Directive 2006/42/EC is only intended to be installed in, or combined with, other machinery (or other partly completed machinery/systems) in order to form a completed machine pursuant to the Directive. This product must therefore only be put into operation when it has been determined that the complete machine/system in which it has been
installed complies with the provisions of the above-mentioned directives.
Düsseldorf 15.08.2012 Stephan KleineStephan KleineStephan KleineStephan Kleine Managing Director Signature