double data entry (dde)cri.uchicago.edu/.../08/redcap-double-data-entry.pdf · reviewer – data...
TRANSCRIPT

© 2019 Vanderbilt University
Double Data Entry
(DDE)

What is the Double Data Entry (DDE) Module?
• This module allows two project users to be set as Data Entry Person #1 and Data Entry Person #2 (using the User Rights page), and allows them to create records with the same Record ID and enter data for the same record without seeing one another's data.
• Typically, only one person at a time can be set as Person #1 or Person #2. All other users are considered Reviewers.
• Reviewers have the ability to merge a record created by Person #1 and Person #2 after viewing differences and adjudicating those differences using the Data Comparison Tool, thus creating a third record in the set.

How do I enable DDE for my project?
• The Double Data Entry (DDE) module that needs to be enabled by a REDCap Administrator prior to any data is collected in the project.
• Contact your local REDCap Administrator by clicking on the blue contact button in the lower-left hand corner of your project and ask that DDE be enabled for your project.
• DDE should be enabled BEFORE you begin any data entry in the project.
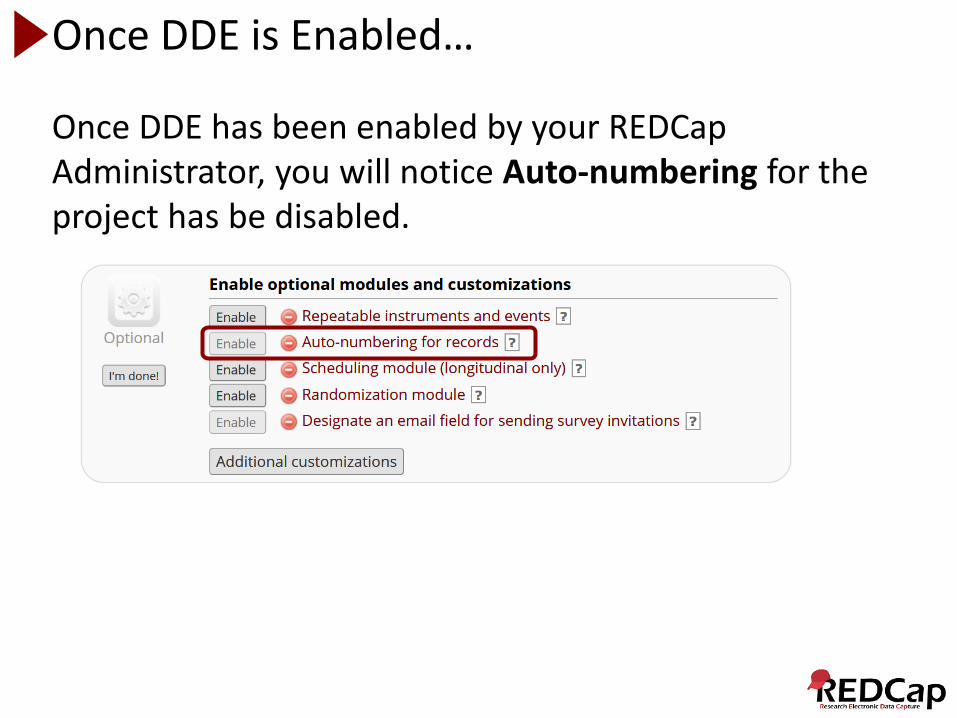
Once DDE is Enabled…
Once DDE has been enabled by your REDCap Administrator, you will notice Auto-numbering for the project has be disabled.

How do I set up DDE User Rights?
Go to your User Rights page:

How do I set up DDE User Rights?
• Click on your username and you will see the Reviewer user rights has already been assigned to you:
• As a Reviewer, you have rights to assign data entry Person #1 and Person #2.

How do I set up DDE User Rights? • To assign data entry Person #1, click on the user’s name
and click Edit user privileges:
• Then assign the user Person #1 user rights.
• Repeat the steps for Person #2 for the other user • Any remaining users on the projects will be Reviewers.

Person #1 – Data Entry Person #1 can now log in and begin data entry:

Person #1 – Dashboard This is how the Record Status Dashboard will appear for Person #1 after entering their first record.

Person #2 – Data Entry Person #2 can now log in and begin data entry:

Person #2 – Dashboard • This is how the Record Status Dashboard will appear
for Person #2 after entering their first record. • Notice, they don’t see Person #1’s record.
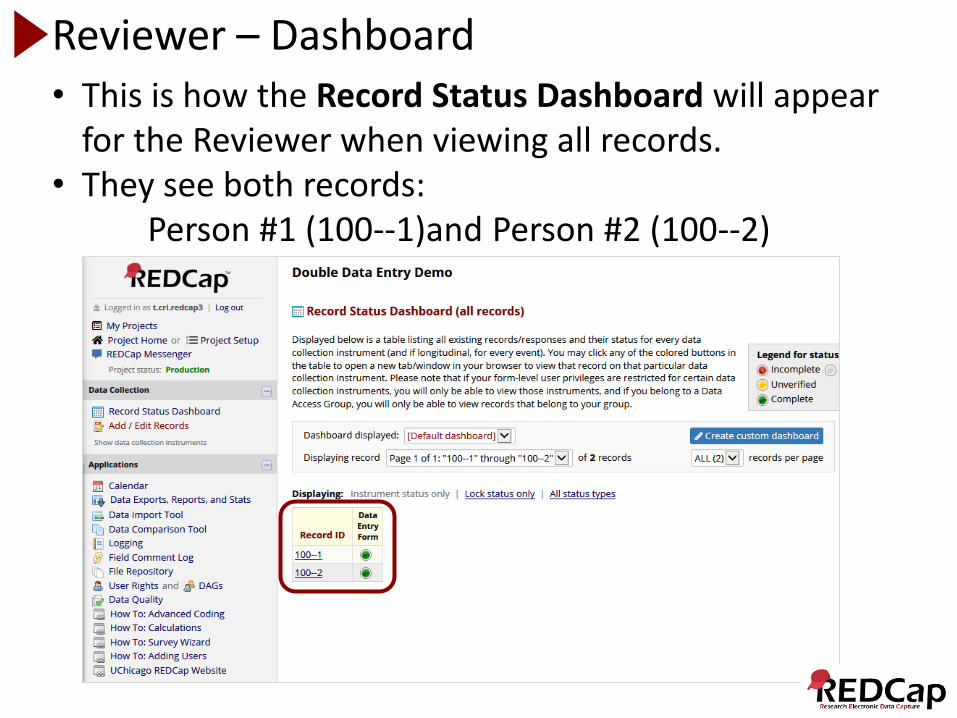
Reviewer – Dashboard • This is how the Record Status Dashboard will appear
for the Reviewer when viewing all records. • They see both records:
Person #1 (100--1)and Person #2 (100--2)

Reviewer – Data Comparison Tool
• The Data Comparison Tool is located under Applications on the left hand menu of the project.
• This tool may be used for comparing records that have been entered by data entry Persons #1 and #2.
• Select a record from the list and click the 'Compare' button.
• A comparison table will then be displayed showing the differences between the records.
• Only records that have been entered by both data entry persons will be displayed in the selection box.
• If only one data entry person has entered their record, the table will not display that single record.

Reviewer – Data Comparison Tool Results • Below are the Data Comparison Tool results for
record 100:
• All records can be compared at once too.

Reviewer – Data Comparison Tool Results • The table compared the two records named 100--1
and 100--2. • Only the fields that have differing values are listed. • If you need to correct or change the value of one of
the records below, simply click on the data displayed in red, and it will take you to that form for that particular record.

Reviewer – Merging Records To merge the records, click on the merge link:

Reviewer – Merging Records Two differences were found: last name and zipcode.

• We will merge the record choosing Marin and 60606.
• Once merged, a new record 100 will be created.
Reviewer – Merging Records

Reviewer – Dashboard • This is how the Record Status Dashboard will appear
for the Reviewer after merging the record. • They see all three records:
1. Merged Record (100) 2. Person #1 (100--1) 3. Person #2 (100--2)

Person #1 – Dashboard • However, this is how the Record Status Dashboard
will appear for Person #1 after merging the record. • They see still only see their one record: 100

Person #2 – Dashboard • However, this is how the Record Status Dashboard
will appear for Person #2 after merging the record. • They see still only see their one record: 100

Record Compare After Merging
• REDCap gives no indication to Person #1 and #2 that their records were merged by the Reviewer.
• Even though the merged record 100 has the correct data, records 100--1 and 100--2 still have the old data.
• Changing the data in 100--1 and 100--2 will not update the data in 100. They are considered 3 separate and distinct records in the project.
Person #1 Person #2 Reviewer
The following pages cover FAQs (frequently asked questions) related to DDE.

How do I export only the merged records in a DDE project?
• When exporting records (or viewing a report) from a Double Data Entry (DDE) project, the exported record set will, by default, include three records for every merged record (the first user's entry, the second user's entry, and the merged record).
• To limit the exported (viewed) records to only the final merged version of each record, follow these steps:
1. Create a filter. 2. Switch to Advanced Logic: 3. Add this code: not_contain([record_id], "--") • Note, change [record_id] to whatever field you are using as the record
identifier.

In a project using DDE, can I make changes in one of the merged records?
• A record can be merged only once. For example records "AA--1" and "AA--2" merge to create record "AA".
• After merging, the user in role data entry Person #1 can still make changes and only record "AA--1" will be changed.
• The person in role data entry Person #2 can make changes and only record "AA--2" will be changed.
• A person in role Reviewer can view all three records that can be edited like any record in a database. The Reviewer can use the Data Comparison Tool to see discrepancies in the three versions. The Reviewer may then access the merged record and add data. What they add in the "AA" record will not be added to either "AA--1" or "AA--2" unless they open those records and make the addition. Reviewers can see, and make manual changes, but cannot use "merge" again. An alternative is to delete the merged version "AA", let the Data Entry people make changes themselves and then merge the records again.

As a DDE Reviewer, how can I make sure the data entry personnel do not modify their records after I create a final merged record?
• If you do not want data entry personnel to update records after a review and merge, you can enable the User Right > Lock/Unlock Records for the Reviewers.
• The Reviewers can then lock any records prior to a merge.
• The data entry personnel without this right will not be able to make updates to the locked record without first contacting the Reviewer.

What if data entry has begun by one data entry person, and then I decide to bring on another data entry person so that I can use DDE?
• Ask you Administrator to enable DDE for your project.
• Assign the original data entry person Person #1 User Rights.
• Assign the new data entry person Person #2 User Rights.
• Rename all the records entered by Person #1 (before DDE was enabled) to have the suffix --1 (i.e. record 200 rename to 200--1).
• As Person #2 begins entering records, REDCap will add the suffix --2 to their records (but only the Reviewer will see the suffix).
• The Reviewer can then use the Data Comparison Tool to compare and merge the 2 records from Person #1 and Person #2, provided each record to be compared has their corresponding suffix (--1 and --2).

What if I have more that two people entering data for the same records?
• It is sometimes recommended to use the Data Access Groups (DAGs) over the actual DDE module to implement a form of double data entry.
• The advantages of using DAGs include allowing an unlimited number of users to be in a group and enter data, to utilize the Data Import Tool, and to access all Applications pages.
• Discrepancies between double-entered records can be resolved by a Reviewer (i.e. someone not in a group) using the Data Comparison Tool.
• However, two records can ONLY be merged together when using the DDE module. So if it is necessary for a third party Reviewer to merge the two records into a third record, then in that case the DDE module would be advantageous over using DAGs.

Are repeating forms compatible with DDE?
• No, you can only compare the first instance of repeating forms with DDE.
• The Data Comparison Tool does not support the Repeating Instruments and Events feature.
• Data can be compared and merged with the Data Comparison Tool but it will only allow comparison and merging of Instance #1 of a repeating instrument or repeating event.
• All non-repeating data in non-repeating forms can be compared and merged.

Can I use DDE only on certain instruments in my project?
• No, DDE applies to the entire project.
• It should not be used with projects where you just wish to do double data entry on some forms; it must be done on all forms.