download pdf: akvis oilpaint
TRANSCRIPT
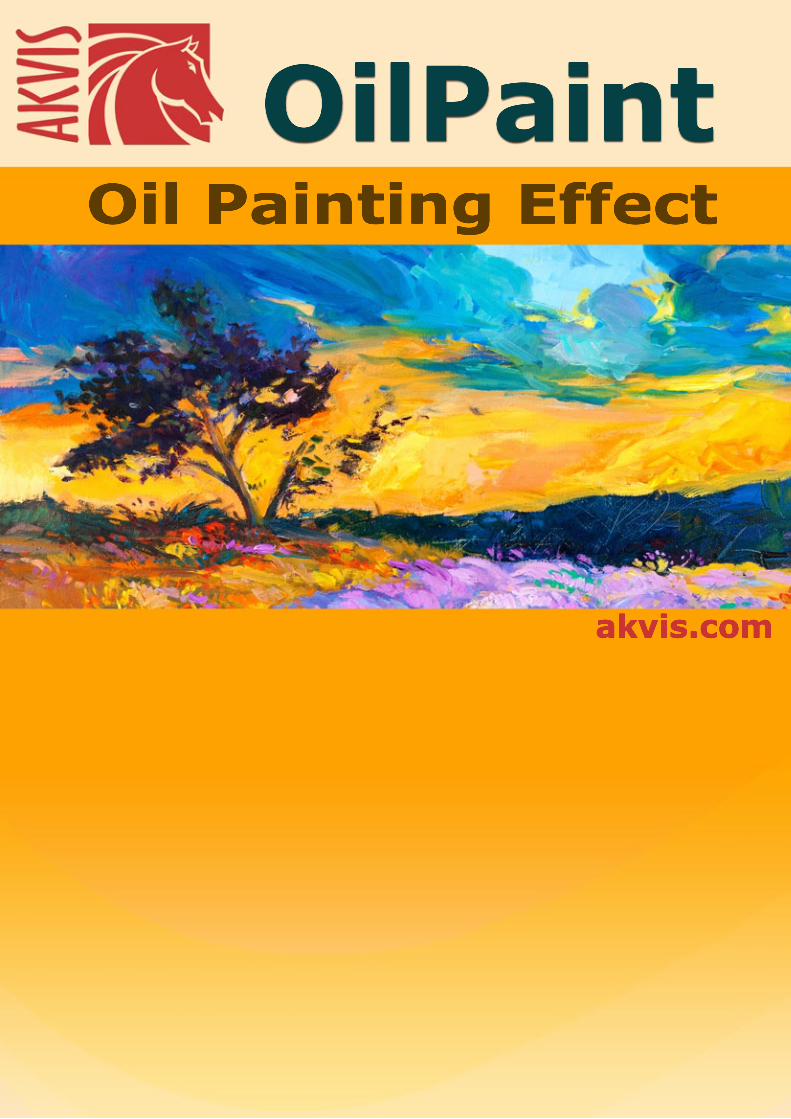
OilPaintOil Painting Effect
akvis.com

CONTENTS
Field of ApplicationInstallation on WindowsInstallation on MacActivationLicense ComparisonWorkspaceUsing the ProgramTools & BrushesOil Painting EffectAbstract ArtCanvasFramesText & WatermarkPresetsPreferencesBatch ProcessingPrint ImageGirl on the SeaAutumn RomanceAKVIS Programs
AKVIS OilPaint
2
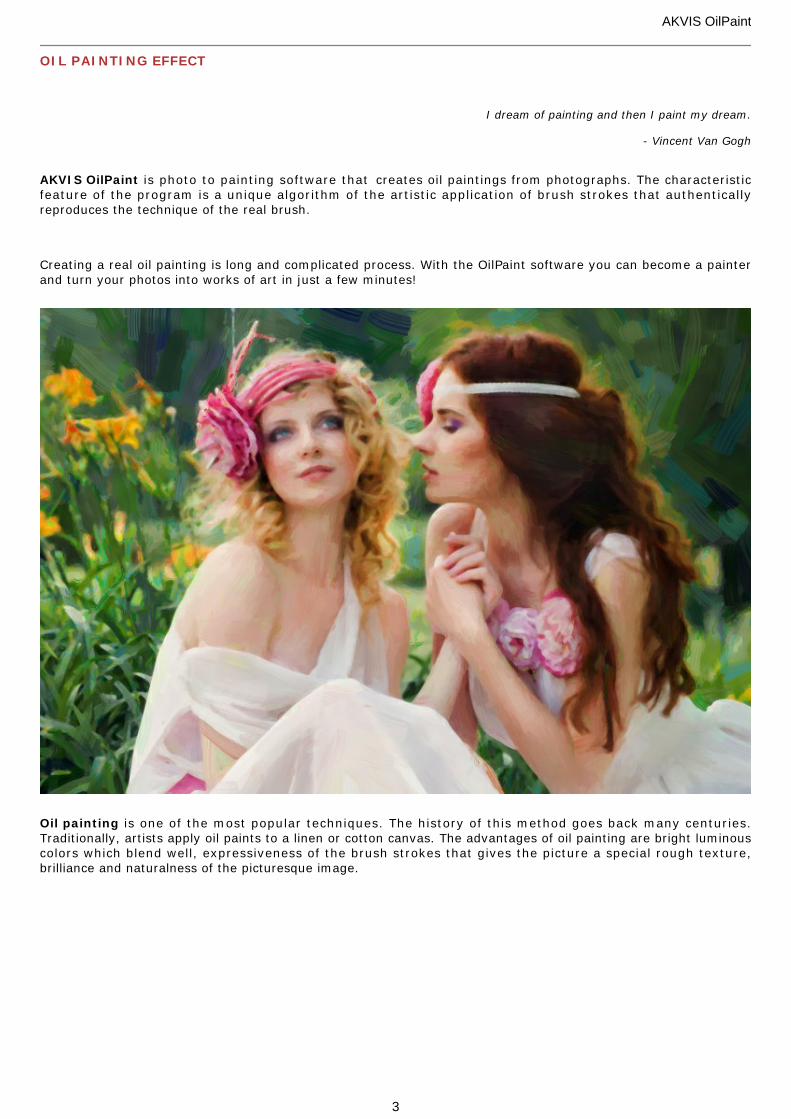
OIL PAINTING EFFECT
I dream of painting and then I paint my dream.
- Vincent Van Gogh
AKVIS OilPaint is photo to painting software that creates oil paintings from photographs. The characteristicfeature of the program is a unique algorithm of the artistic application of brush strokes that authenticallyreproduces the technique of the real brush.
Creating a real oil painting is long and complicated process. With the OilPaint software you can become a painterand turn your photos into works of art in just a few minutes!
Oil painting is one of the most popular techniques. The history of this method goes back many centuries.Traditionally, artists apply oil paints to a linen or cotton canvas. The advantages of oil painting are bright luminouscolors which blend well, expressiveness of the brush strokes that gives the picture a special rough texture,brilliance and naturalness of the picturesque image.
AKVIS OilPaint
3
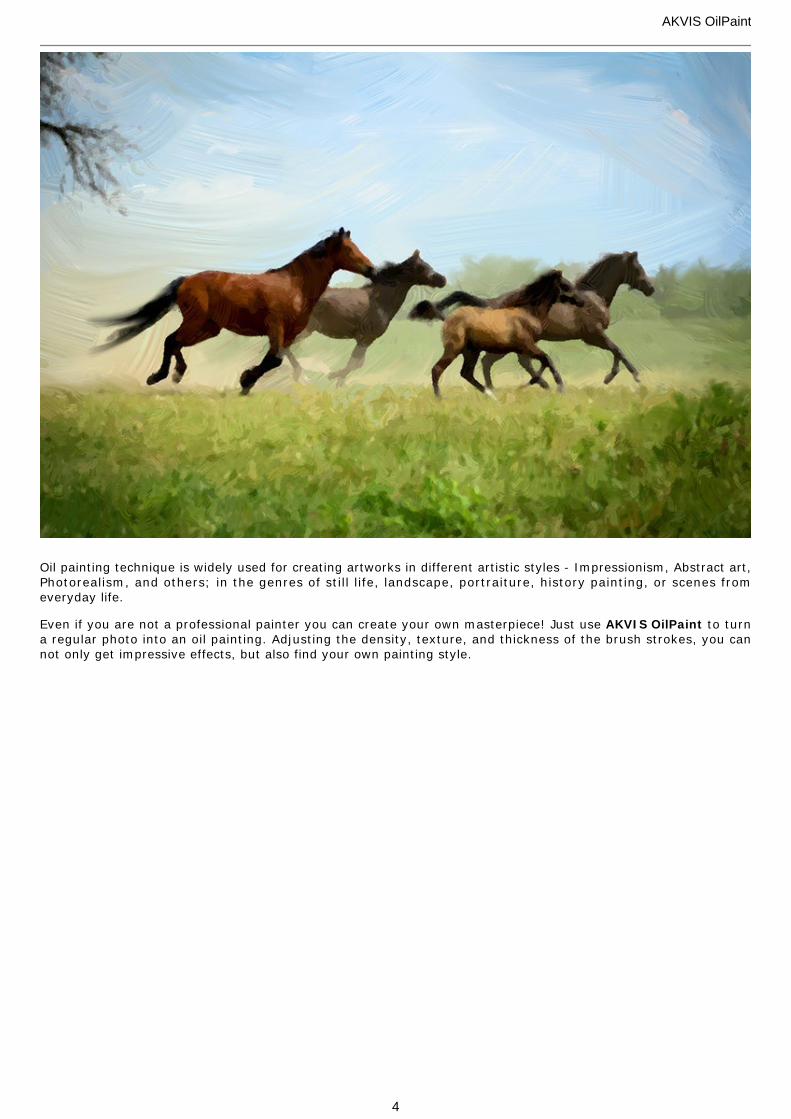
Oil painting technique is widely used for creating artworks in different artistic styles - Impressionism, Abstract art,Photorealism, and others; in the genres of still life, landscape, portraiture, history painting, or scenes fromeveryday life.
Even if you are not a professional painter you can create your own masterpiece! Just use AKVIS OilPaint to turna regular photo into an oil painting. Adjusting the density, texture, and thickness of the brush strokes, you cannot only get impressive effects, but also find your own painting style.
AKVIS OilPaint
4
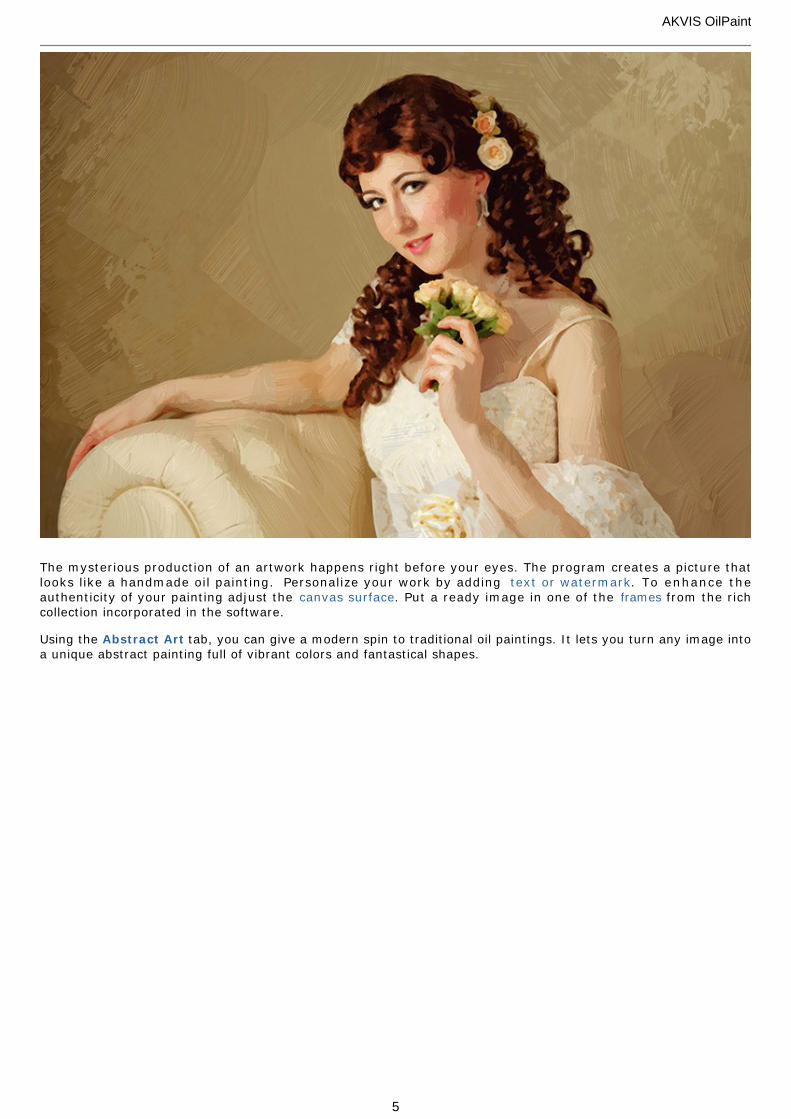
The mysterious production of an artwork happens right before your eyes. The program creates a picture thatlooks like a handmade oil painting. Personalize your work by adding text or watermark. To enhance theauthenticity of your painting adjust the canvas surface. Put a ready image in one of the frames from the richcollection incorporated in the software.
Using the Abstract Art tab, you can give a modern spin to traditional oil paintings. It lets you turn any image intoa unique abstract painting full of vibrant colors and fantastical shapes.
AKVIS OilPaint
5
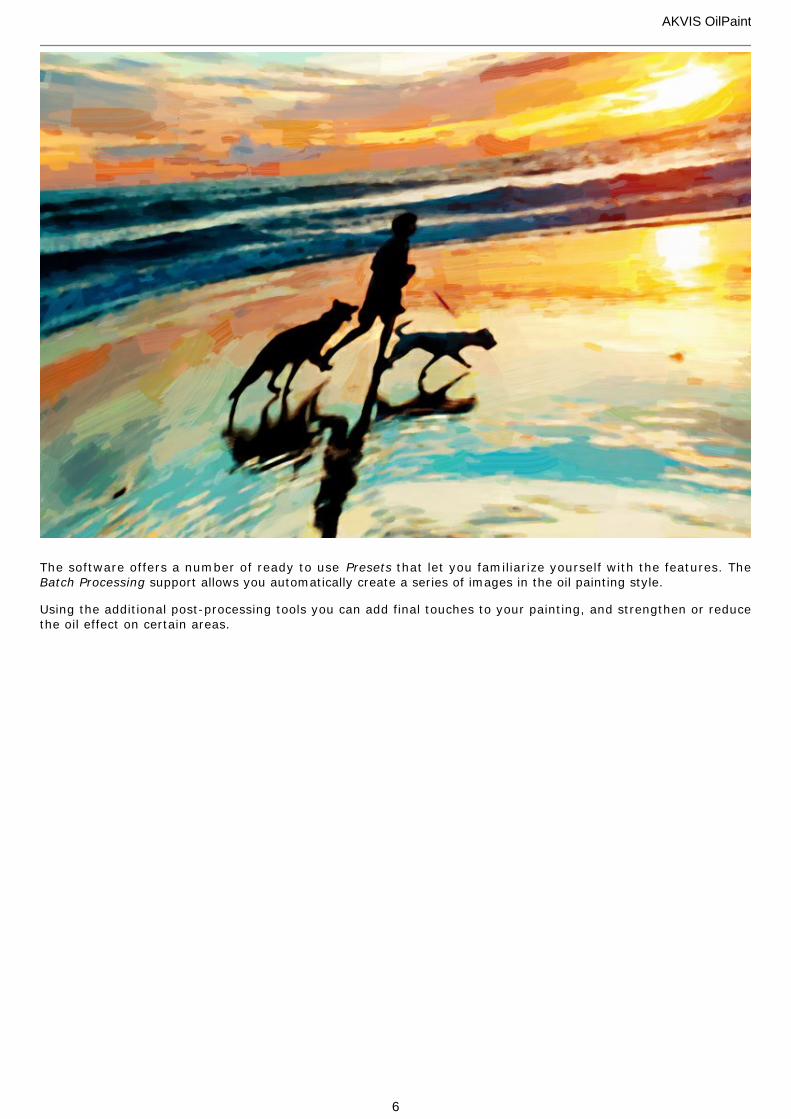
The software offers a number of ready to use Presets that let you familiarize yourself with the features. TheBatch Processing support allows you automatically create a series of images in the oil painting style.
Using the additional post-processing tools you can add final touches to your painting, and strengthen or reducethe oil effect on certain areas.
AKVIS OilPaint
6
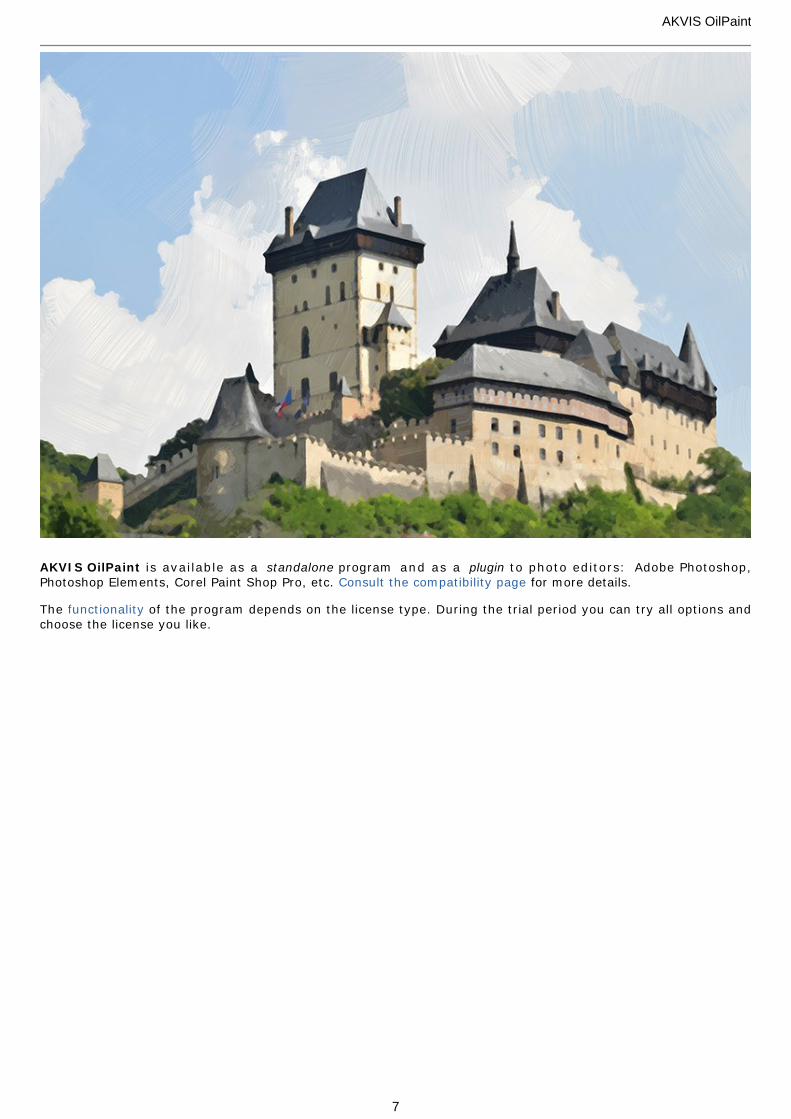
AKVIS OilPaint is available as a standalone program and as a plugin to photo editors: Adobe Photoshop,Photoshop Elements, Corel Paint Shop Pro, etc. Consult the compatibility page for more details.
The functionality of the program depends on the license type. During the trial period you can try all options andchoose the license you like.
AKVIS OilPaint
7
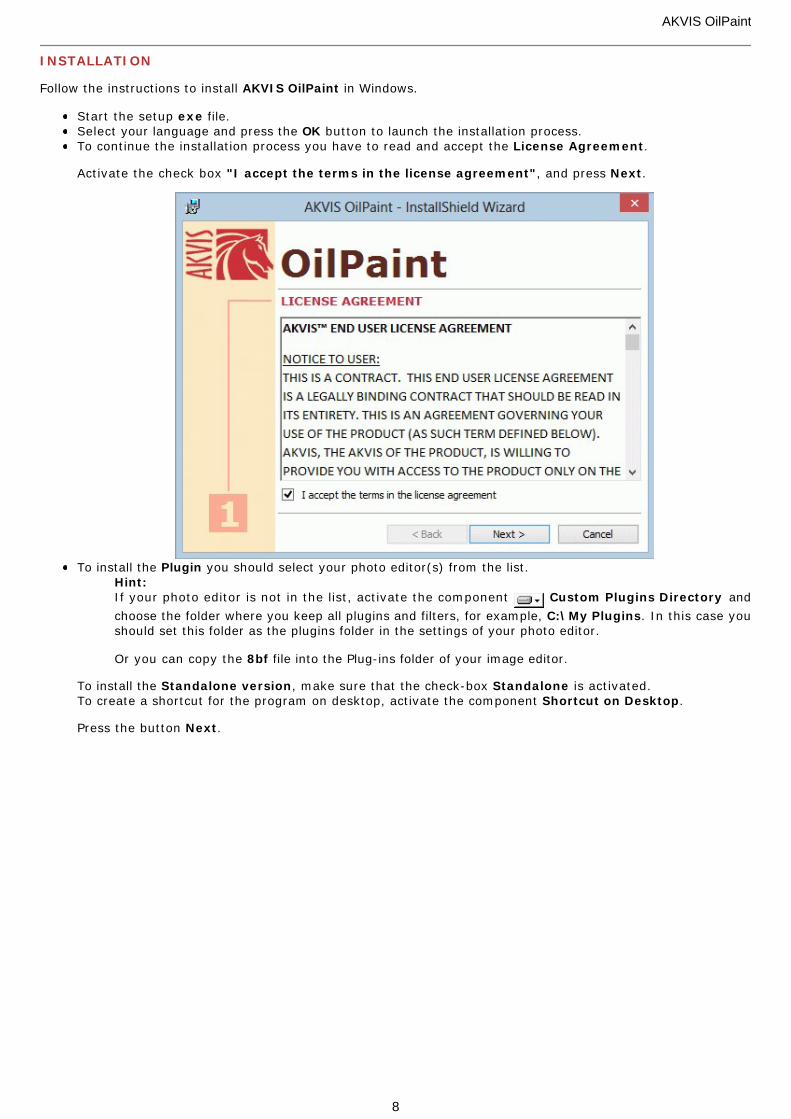
INSTALLATION
Follow the instructions to install AKVIS OilPaint in Windows.
Start the setup exe file.Select your language and press the OK button to launch the installation process.To continue the installation process you have to read and accept the License Agreement.
Activate the check box "I accept the terms in the license agreement", and press Next.
To install the Plugin you should select your photo editor(s) from the list.Hint: If your photo editor is not in the list, activate the component Custom Plugins Directory and
choose the folder where you keep all plugins and filters, for example, C:\My Plugins. In this case youshould set this folder as the plugins folder in the settings of your photo editor.
Or you can copy the 8bf file into the Plug-ins folder of your image editor.
To install the Standalone version, make sure that the check-box Standalone is activated. To create a shortcut for the program on desktop, activate the component Shortcut on Desktop.
Press the button Next.
AKVIS OilPaint
8
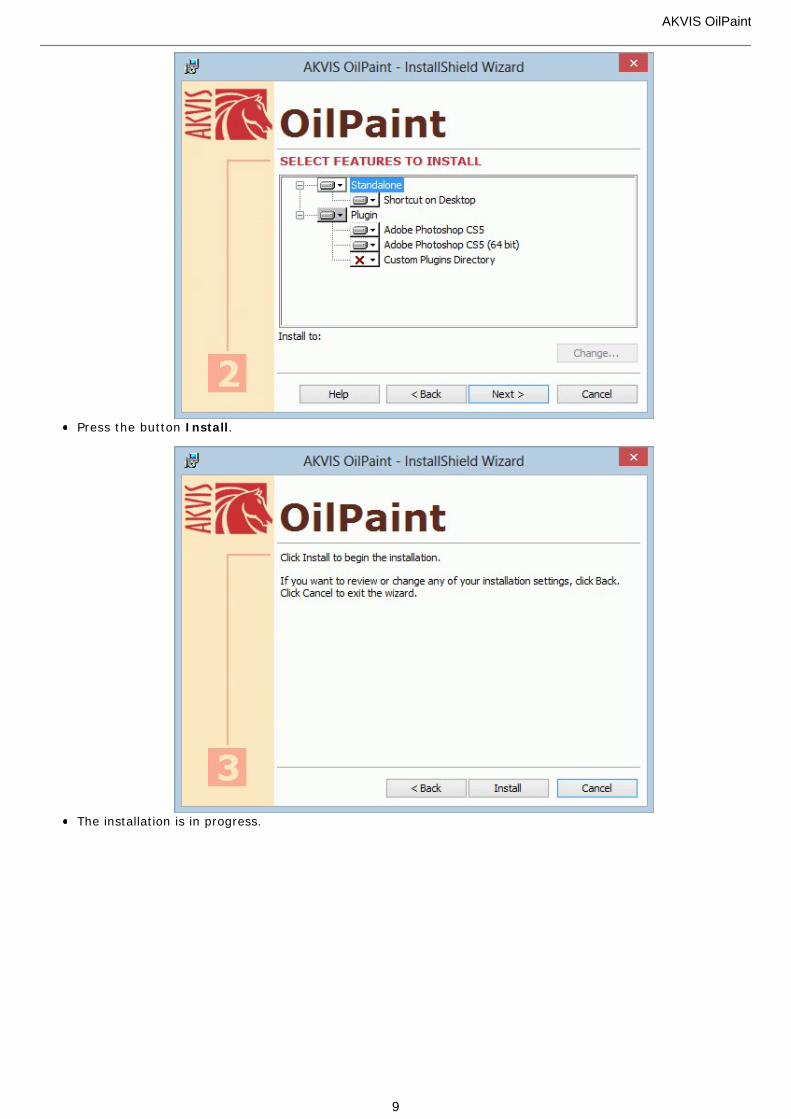
Press the button Install.
The installation is in progress.
AKVIS OilPaint
9
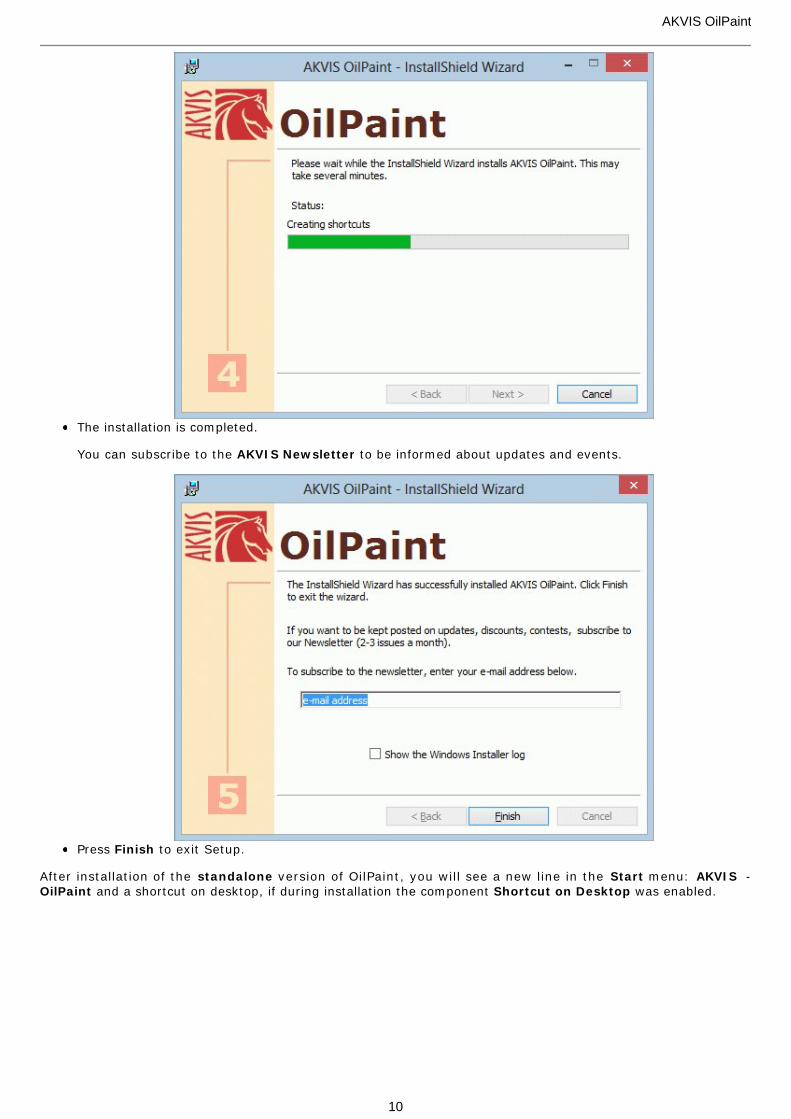
The installation is completed.
You can subscribe to the AKVIS Newsletter to be informed about updates and events.
Press Finish to exit Setup.
After installation of the standalone version of OilPaint, you will see a new line in the Start menu: AKVIS -OilPaint and a shortcut on desktop, if during installation the component Shortcut on Desktop was enabled.
AKVIS OilPaint
10

After installation of the OilPaint plugin you will see a new item in the Filter/Effects menu of your photo editor. Forexample in Photoshop: Filter -> AKVIS –> OilPaint. Please use this command to launch the plugin in the editor.
AKVIS OilPaint
11
INSTALLATION
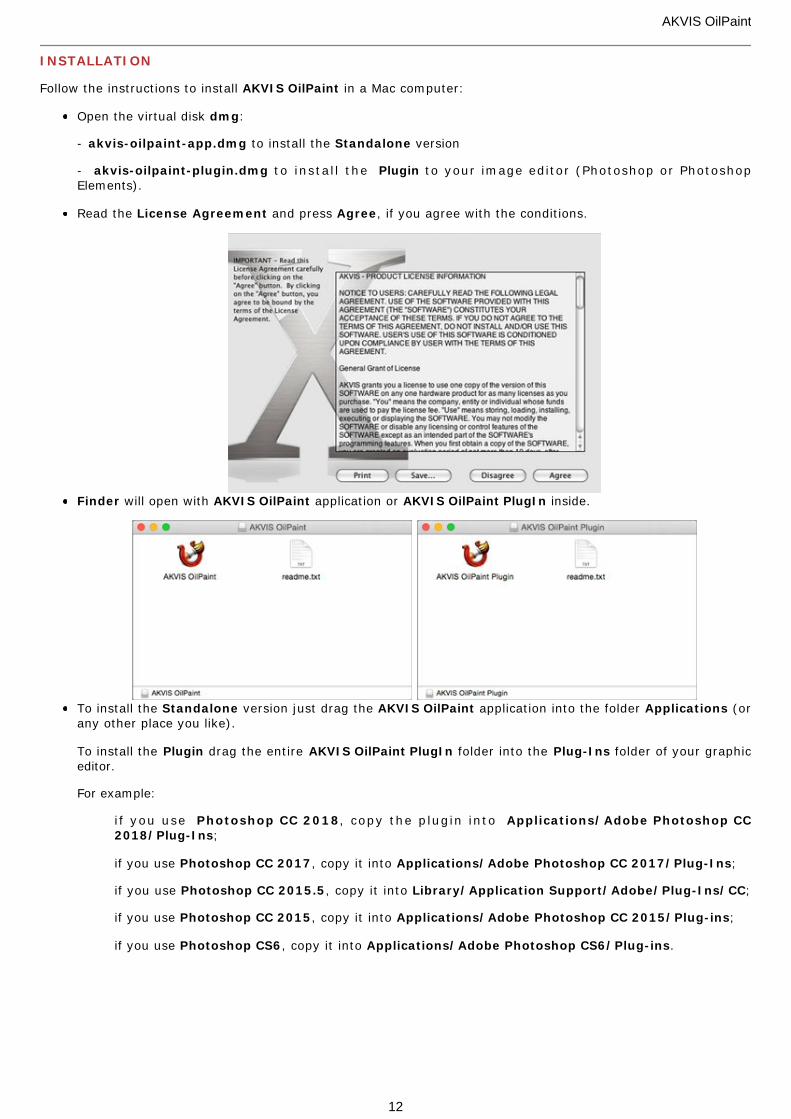
Follow the instructions to install AKVIS OilPaint in a Mac computer:
Open the virtual disk dmg:
- akvis-oilpaint-app.dmg to install the Standalone version
- akvis-oilpaint-plugin.dmg to instal l the Plugin to your image editor (Photoshop or PhotoshopElements).
Read the License Agreement and press Agree, if you agree with the conditions.
Finder will open with AKVIS OilPaint application or AKVIS OilPaint PlugIn inside.
To install the Standalone version just drag the AKVIS OilPaint application into the folder Applications (orany other place you like).
To install the Plugin drag the entire AKVIS OilPaint PlugIn folder into the Plug-Ins folder of your graphiceditor.
For example:
if you use Photoshop CC 2018, copy the plugin into Applications/Adobe Photoshop CC2018/Plug-Ins;
if you use Photoshop CC 2017, copy it into Applications/Adobe Photoshop CC 2017/Plug-Ins;
if you use Photoshop CC 2015.5, copy it into Library/Application Support/Adobe/Plug-Ins/CC;
if you use Photoshop CC 2015, copy it into Applications/Adobe Photoshop CC 2015/Plug-ins;
if you use Photoshop CS6, copy it into Applications/Adobe Photoshop CS6/Plug-ins.
AKVIS OilPaint
12
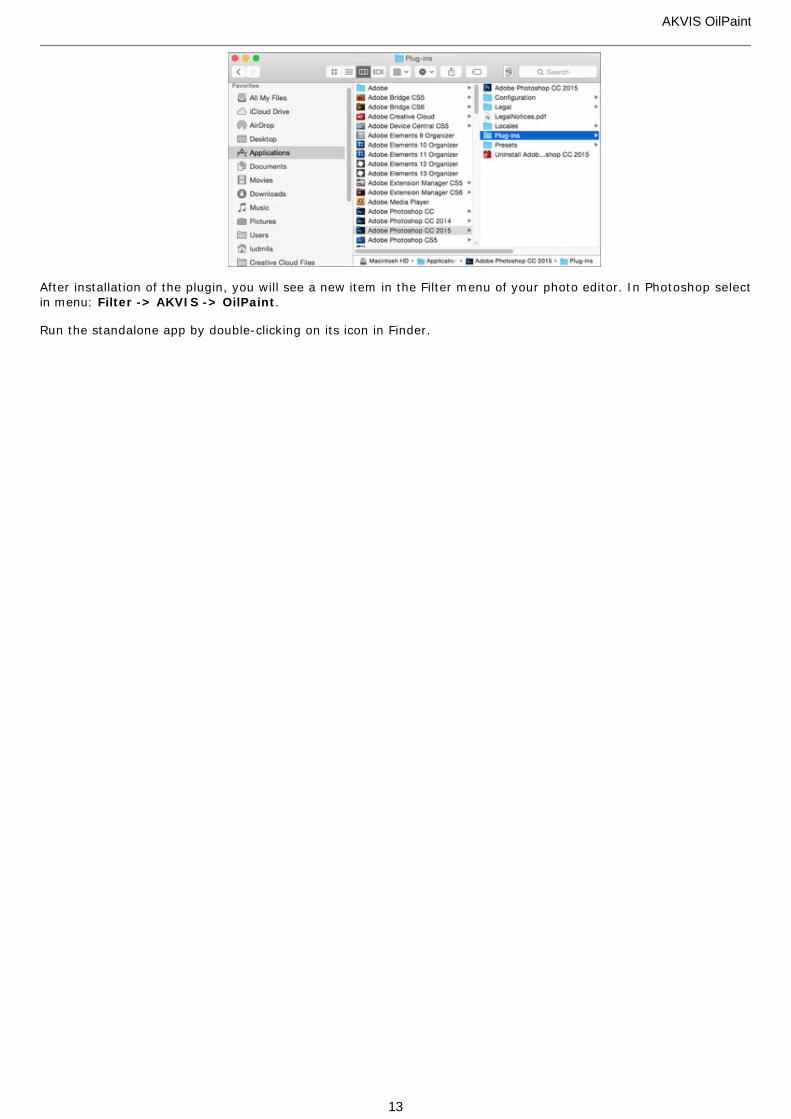
After installation of the plugin, you will see a new item in the Filter menu of your photo editor. In Photoshop selectin menu: Filter -> AKVIS -> OilPaint.
Run the standalone app by double-clicking on its icon in Finder.
AKVIS OilPaint
13
HOW TO ACTIVATE AKVIS SOFTWARE
Attention! During the activation process your computer must be connected to Internet.
If it is not possible, we offer you an alternative way (see below for Offline Activation).
Download AKVIS OilPaint and install the program. Read the Installation Instruction here.
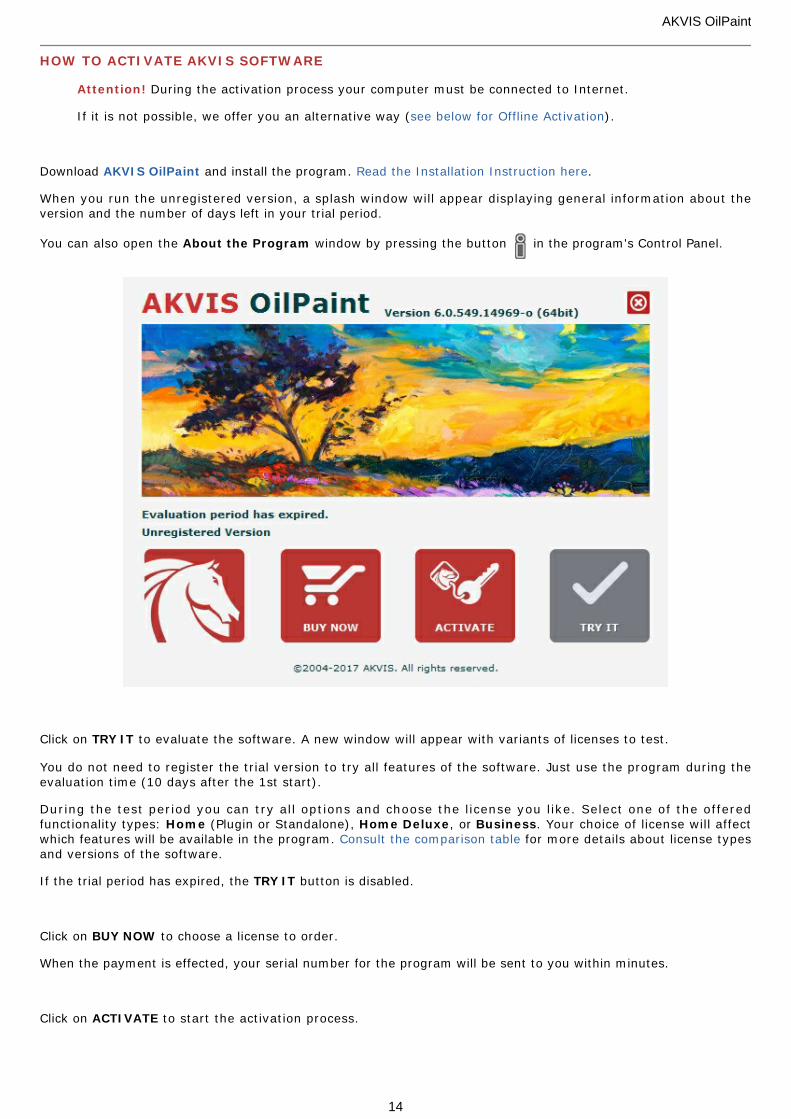
When you run the unregistered version, a splash window will appear displaying general information about theversion and the number of days left in your trial period.
You can also open the About the Program window by pressing the button in the program's Control Panel.
Click on TRY IT to evaluate the software. A new window will appear with variants of licenses to test.
You do not need to register the trial version to try all features of the software. Just use the program during theevaluation time (10 days after the 1st start).
During the test period you can try all options and choose the license you like. Select one of the offeredfunctionality types: Home (Plugin or Standalone), Home Deluxe, or Business. Your choice of license will affectwhich features will be available in the program. Consult the comparison table for more details about license typesand versions of the software.
If the trial period has expired, the TRY IT button is disabled.
Click on BUY NOW to choose a license to order.
When the payment is effected, your serial number for the program will be sent to you within minutes.
Click on ACTIVATE to start the activation process.
AKVIS OilPaint
14
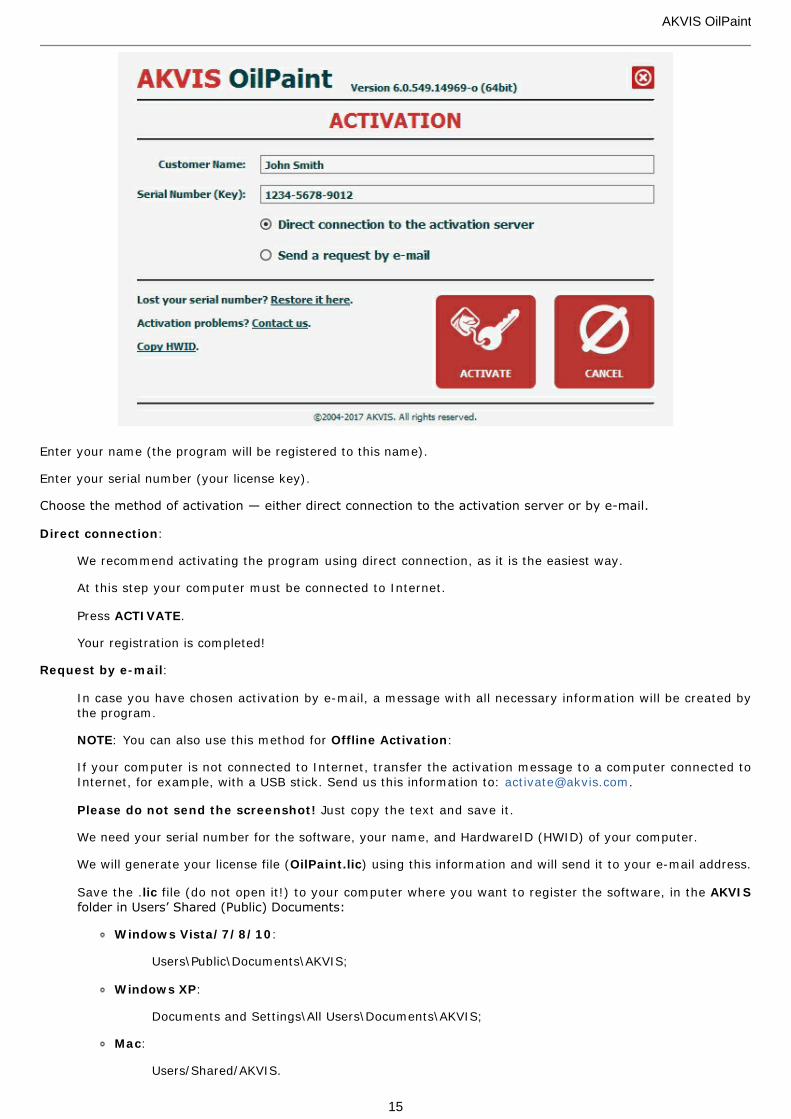
Enter your name (the program will be registered to this name).
Enter your serial number (your license key).
Choose the method of activation — either direct connection to the activation server or by e-mail.
Direct connection:
We recommend activating the program using direct connection, as it is the easiest way.
At this step your computer must be connected to Internet.
Press ACTIVATE.
Your registration is completed!
Request by e-mail:
In case you have chosen activation by e-mail, a message with all necessary information will be created bythe program.
NOTE: You can also use this method for Offline Activation:
If your computer is not connected to Internet, transfer the activation message to a computer connected toInternet, for example, with a USB stick. Send us this information to: [email protected].
Please do not send the screenshot! Just copy the text and save it.
We need your serial number for the software, your name, and HardwareID (HWID) of your computer.
We will generate your license file (OilPaint.lic) using this information and will send it to your e-mail address.
Save the .lic file (do not open it!) to your computer where you want to register the software, in the AKVISfolder in Users’ Shared (Public) Documents:
Windows Vista/7/8/10:
Users\Public\Documents\AKVIS;
Windows XP:
Documents and Settings\All Users\Documents\AKVIS;
Mac:
Users/Shared/AKVIS.
AKVIS OilPaint
15
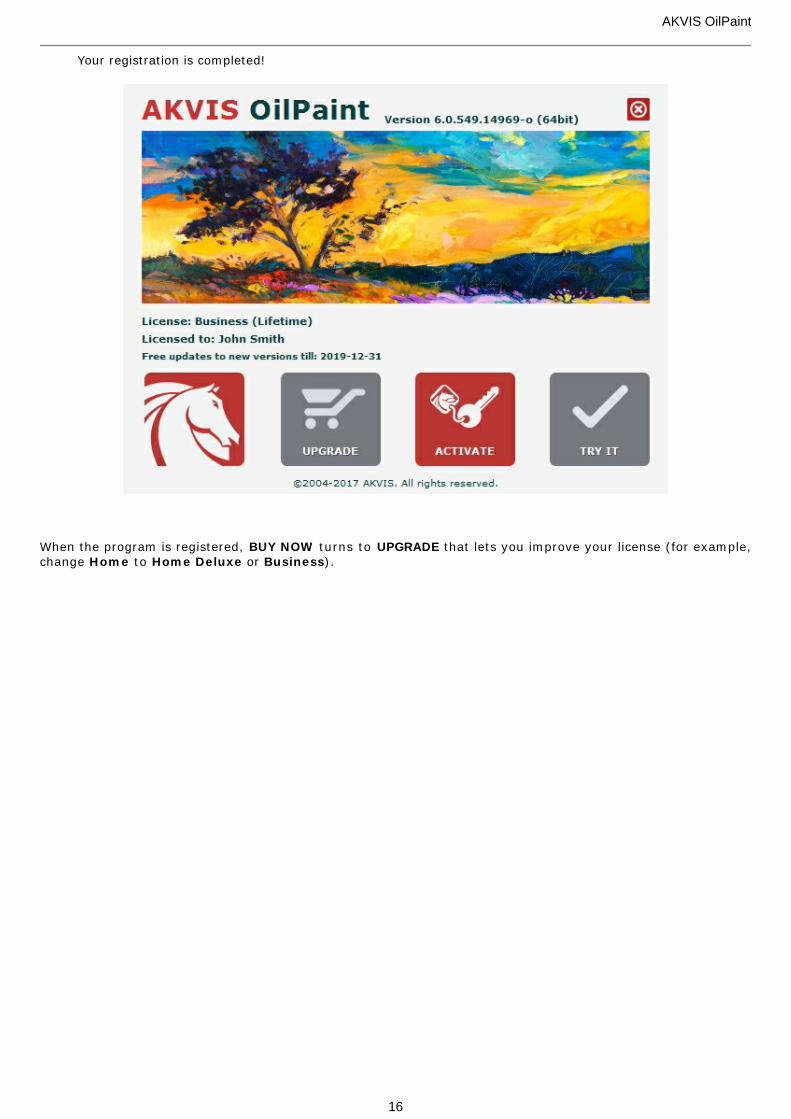
Your registration is completed!
When the program is registered, BUY NOW turns to UPGRADE that lets you improve your license (for example,change Home to Home Deluxe or Business).
AKVIS OilPaint
16
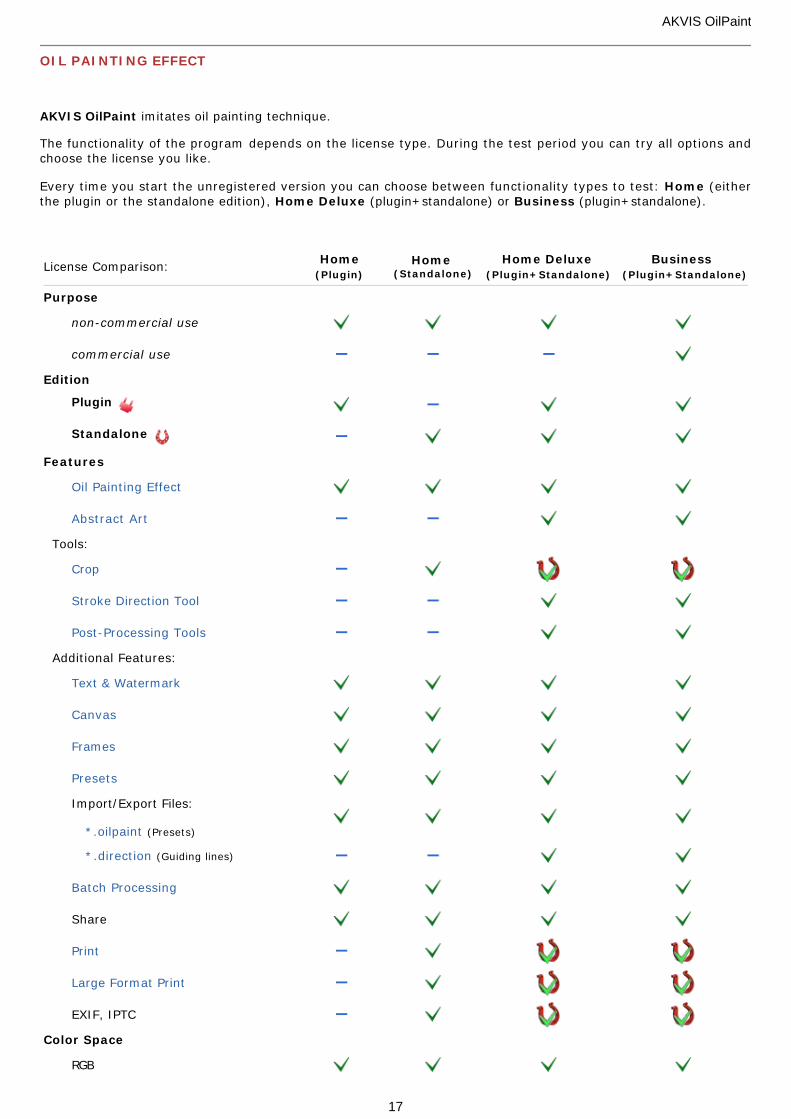
OIL PAINTING EFFECT
AKVIS OilPaint imitates oil painting technique.
The functionality of the program depends on the license type. During the test period you can try all options andchoose the license you like.
Every time you start the unregistered version you can choose between functionality types to test: Home (eitherthe plugin or the standalone edition), Home Deluxe (plugin+standalone) or Business (plugin+standalone).
License Comparison:Home
(Plugin) Home
(Standalone)
Home Deluxe (Plugin+Standalone)
Business (Plugin+Standalone)
Purpose
non-commercial use
commercial use
Edition
Plugin
Standalone
Features
Oil Painting Effect
Abstract Art
Tools:
Crop
Stroke Direction Tool
Post-Processing Tools
Additional Features:
Text & Watermark
Canvas
Frames
Presets
Import/Export Files:
*.oilpaint (Presets)
*.direction (Guiding lines)
Batch Processing
Share
Large Format Print
EXIF, IPTC
Color Space
RGB
AKVIS OilPaint
17
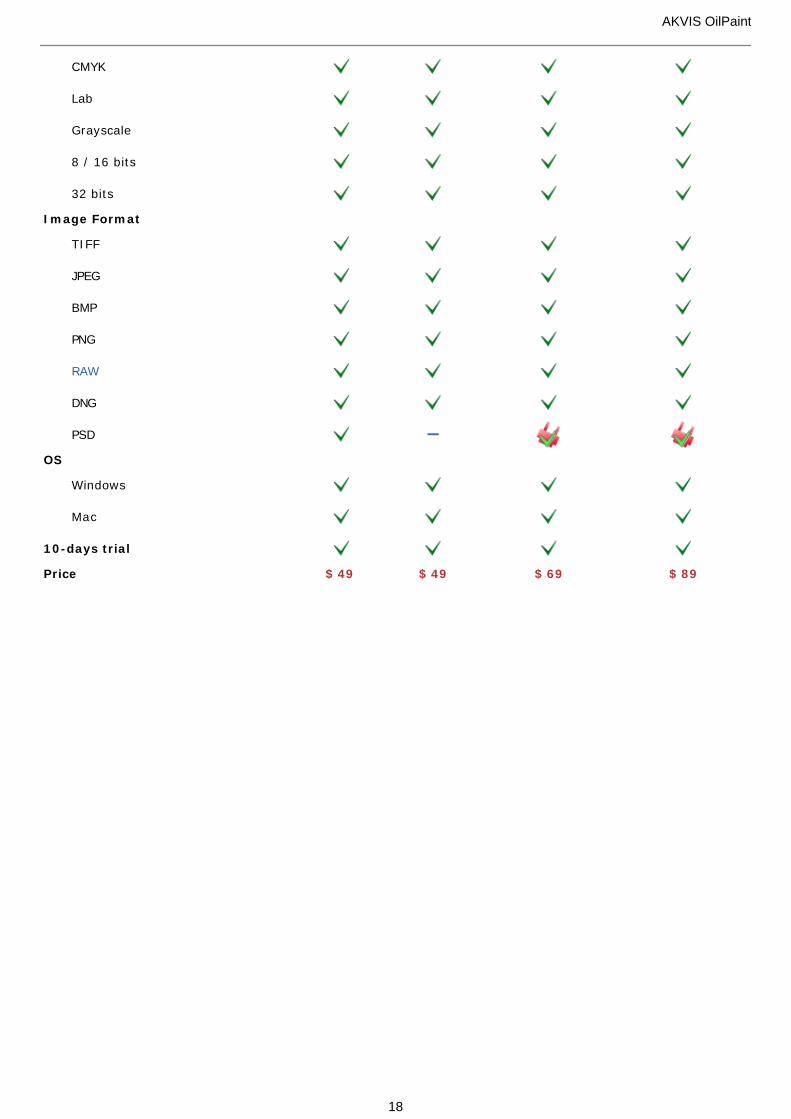
CMYK
Lab
Grayscale
8 / 16 bits
32 bits
Image Format
TIFF
JPEG
BMP
PNG
RAW
DNG
PSD
OS
Windows
Mac
10-days trial
Price $ 49 $ 49 $ 69 $ 89
WORKSPACE
AKVIS OilPaint
18
WORKSPACE
AKVIS OilPaint can work independently as a standalone program as well as a plugin to a photo editor.
Standalone is an independent program; you can open it by clicking on the program's icon.
To launch the standalone version, run the program directly:
On a Windows computer - select it from the Start menu or use the program's shortcut.
On a Mac computer - launch the app from the Application folder.
Plugin is an add-on for a photo editor, for example for Photoshop.
To call the plugin, select it from filters of your image editing program.
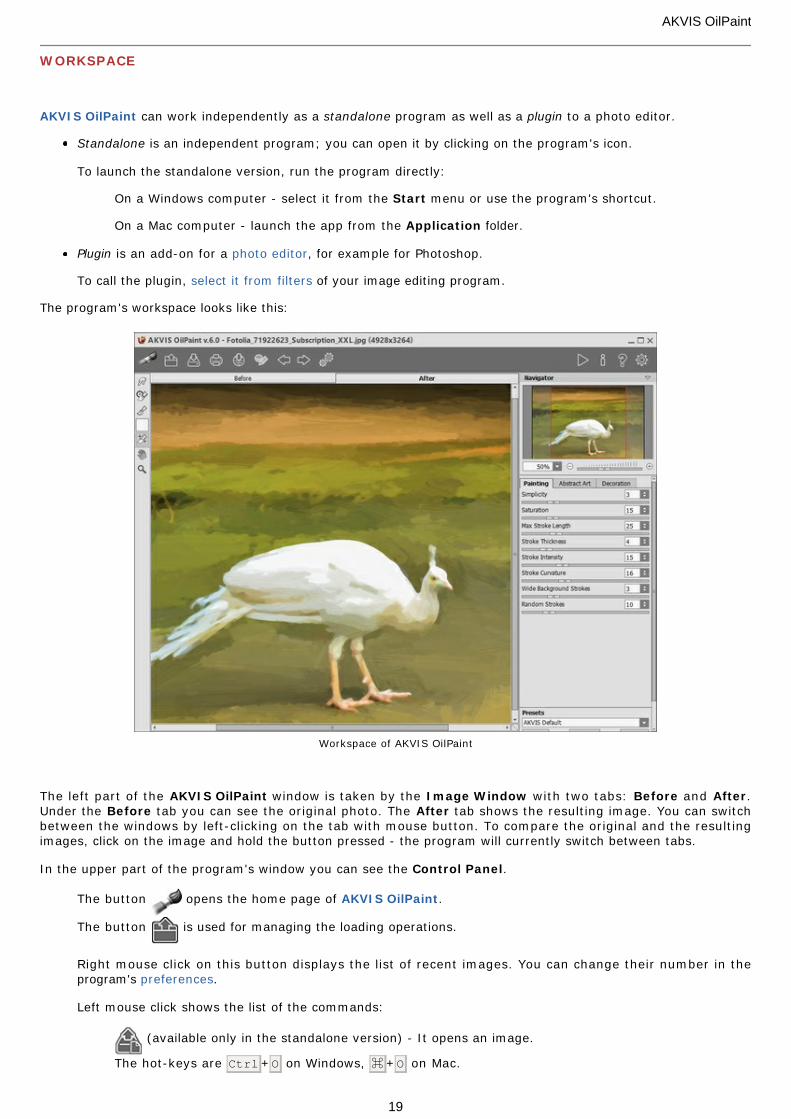
The program's workspace looks like this:
Workspace of AKVIS OilPaint
The left part of the AKVIS OilPaint window is taken by the Image Window with two tabs: Before and After.Under the Before tab you can see the original photo. The After tab shows the resulting image. You can switchbetween the windows by left-clicking on the tab with mouse button. To compare the original and the resultingimages, click on the image and hold the button pressed - the program will currently switch between tabs.
In the upper part of the program's window you can see the Control Panel.
The button opens the home page of AKVIS OilPaint.
The button is used for managing the loading operations.
Right mouse click on this button displays the list of recent images. You can change their number in theprogram's preferences.
Left mouse click shows the list of the commands:
(available only in the standalone version) - It opens an image.
The hot-keys are Ctrl+O on Windows, ⌘ +O on Mac.
AKVIS OilPaint
19
- It loads a list of presets (.oilpaint file).
- It loads saved guiding lines (.direction file).
The button shows the list of the saving commands:
(available only in the standalone version) - It saves the image in the chosen format.
The hot-keys are Ctrl+S on Windows, ⌘ +S on Mac.
- It saves user presets to a file with the .oilpaint extension.
- It saves the guiding lines to a .direction file.
The button (only in the standalone version) calls the Print dialog box. The hot-keys are Ctrl+P on
Windows, ⌘ +P on Mac.
The button lets posting pictures from the program to the social networks: Twitter, Flickr, Tumblr,
Google+.
The button / shows/hides the guiding lines.
The button cancels the last operation (with the tools). It is possible to cancel several operations in a
row. The hotkeys are Ctrl+Z on Windows, ⌘ +Z on Mac.
The button returns the last cancelled operation. It is possible to return several operations in a row.
The hotkeys are Ctrl+Y on Windows, ⌘ +Y on Mac.
The button (only in the standalone version) opens the Batch Processing dialog to automatically
process a series of images.
The button initiates image processing with the current settings. The resulting image is shown in the
After tab.
The button (only in the plugin version) applies the result to the image and closes the plugin.
The button shows information about the program: version, trial period, license.
The button calls the Help files. The hot-key is F1 .
The button calls the Preferences dialog box for changing the program's options.
To the left of the Image Window there is the Toolbar. Different tools appear on the Before/After tabs.
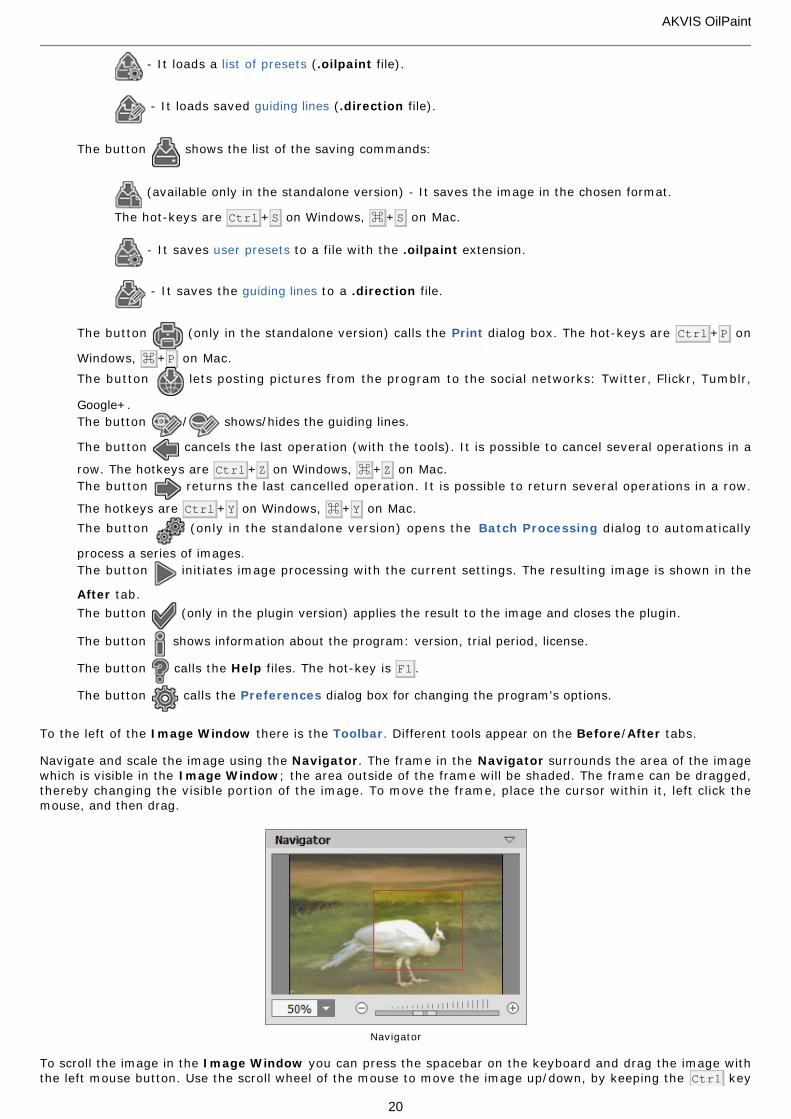
Navigate and scale the image using the Navigator. The frame in the Navigator surrounds the area of the imagewhich is visible in the Image Window; the area outside of the frame will be shaded. The frame can be dragged,thereby changing the visible portion of the image. To move the frame, place the cursor within it, left click themouse, and then drag.
Navigator
To scroll the image in the Image Window you can press the spacebar on the keyboard and drag the image withthe left mouse button. Use the scroll wheel of the mouse to move the image up/down, by keeping the Ctrl key
AKVIS OilPaint
20
pressed – to the left/to the right, by keeping the Alt key pressed − scale the image. Right-click on the scroll barto activate the quick navigation menu.
Use the slider or the buttons and , to scale the image in the Image Window. When you click on the
button or move the slider to the right, the image scale increases. When you click on the button or move the
slider to the left, the image scale reduces.
You can also change the image scale by entering a new coefficient into the scale field. The fall-down menu showssome frequently used coefficients.
You can use hot-keys to change the image scale + and Ctrl++ (⌘ ++ in Mac) to increase the image scale and
- and Ctrl+- (⌘ +- in Mac) to reduce the scale.
Under the Navigator there is the Settings Panel with the Painting, Abstract Art, and Decoration tabs:
Painting: Here you can adjust the parameters for photo to painting conversion.Abstract Art: Create colorful artworks with whimsical and fantastic shapes.Decoration: You can add text to your image, adjust the canvas, and apply a frame.
Below, in the Presets field you can save the current settings as a preset to use them in the future. The currentsettings can be saved, edited, deleted. When you launch the program, it uses the settings of the last usedpreset.
Under the Settings Panel you can see Hints for the parameters and buttons when you hover over them with thecursor. You can choose where the hints will be shown or hide them in the program's Preferences.
AKVIS OilPaint
21
HOW TO USE THE PROGRAM
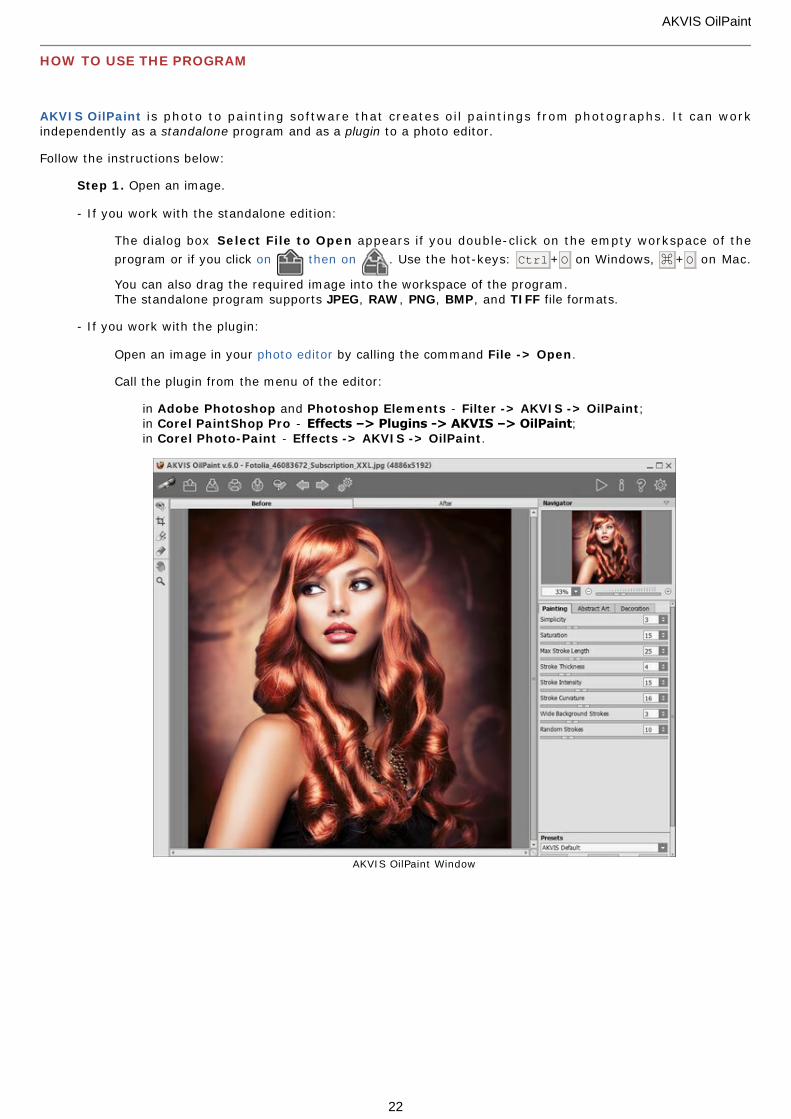
AKVIS OilPaint is photo to painting software that creates oil paintings from photographs. It can workindependently as a standalone program and as a plugin to a photo editor.
Follow the instructions below:
Step 1. Open an image.
- If you work with the standalone edition:
The dialog box Select File to Open appears if you double-click on the empty workspace of the
program or if you click on then on . Use the hot-keys: Ctrl+O on Windows, ⌘ +O on Mac.
You can also drag the required image into the workspace of the program.The standalone program supports JPEG, RAW, PNG, BMP, and TIFF file formats.
- If you work with the plugin:
Open an image in your photo editor by calling the command File -> Open.
Call the plugin from the menu of the editor:
in Adobe Photoshop and Photoshop Elements - Filter -> AKVIS -> OilPaint;in Corel PaintShop Pro - Effects –> Plugins -> AKVIS –> OilPaint; in Corel Photo-Paint - Effects -> AKVIS -> OilPaint.
AKVIS OilPaint Window
AKVIS OilPaint
22
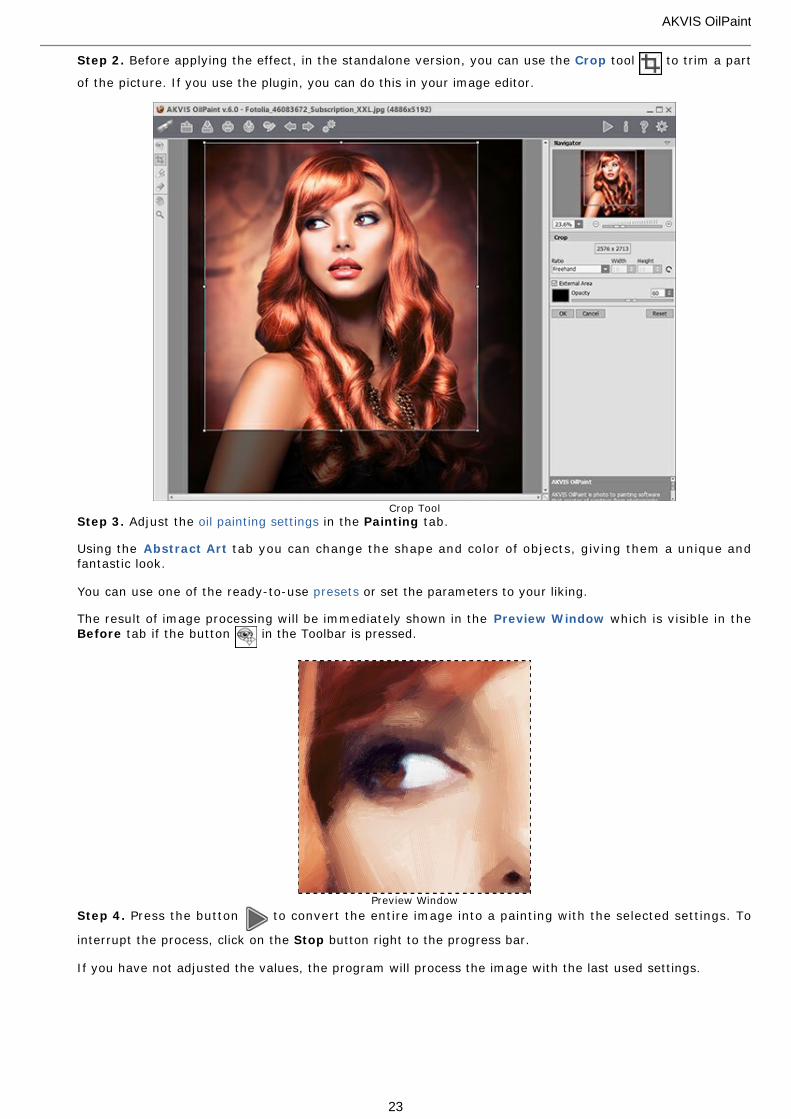
Step 2. Before applying the effect, in the standalone version, you can use the Crop tool to trim a part
of the picture. If you use the plugin, you can do this in your image editor.
Crop Tool
Step 3. Adjust the oil painting settings in the Painting tab.
Using the Abstract Art tab you can change the shape and color of objects, giving them a unique andfantastic look.
You can use one of the ready-to-use presets or set the parameters to your liking.
The result of image processing will be immediately shown in the Preview Window which is visible in theBefore tab if the button in the Toolbar is pressed.
Preview Window
Step 4. Press the button to convert the entire image into a painting with the selected settings. To
interrupt the process, click on the Stop button right to the progress bar.
If you have not adjusted the values, the program will process the image with the last used settings.
AKVIS OilPaint
23
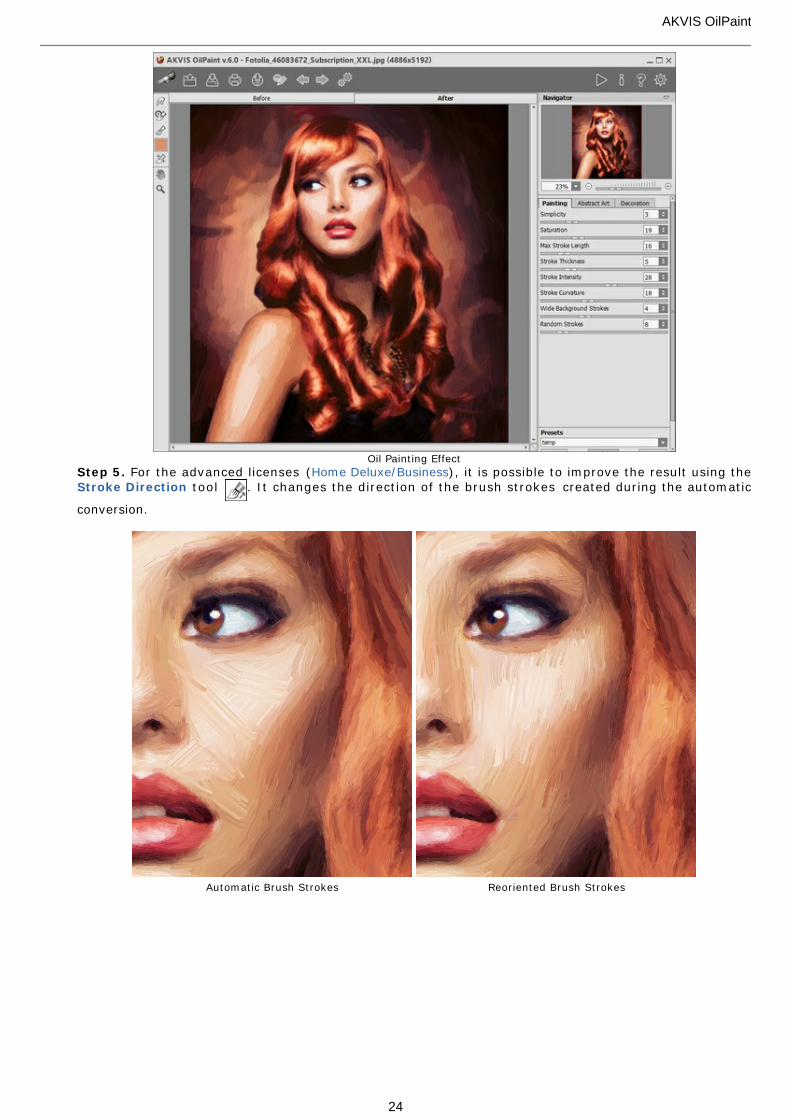
Oil Painting Effect
Step 5. For the advanced licenses (Home Deluxe/Business), it is possible to improve the result using theStroke Direction tool . It changes the direction of the brush strokes created during the automatic
conversion.
Automatic Brush Strokes Reoriented Brush Strokes
AKVIS OilPaint
24
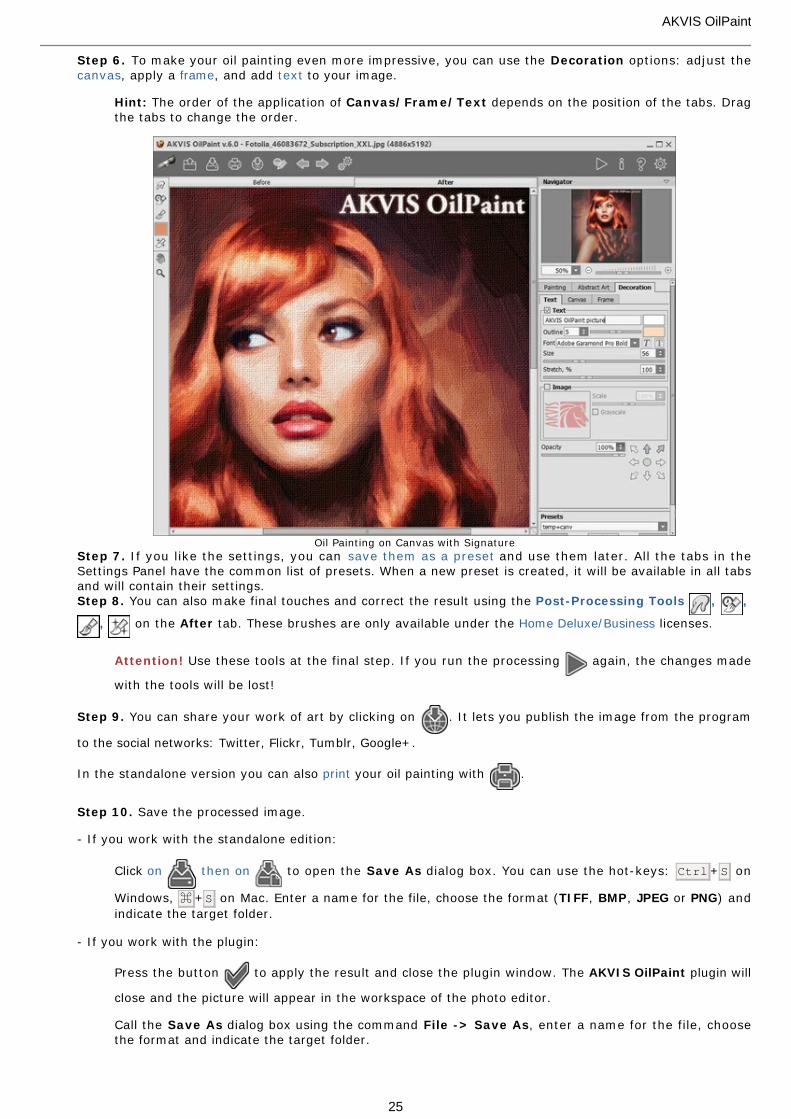
Step 6. To make your oil painting even more impressive, you can use the Decoration options: adjust thecanvas, apply a frame, and add text to your image.
Hint: The order of the application of Canvas/Frame/Text depends on the position of the tabs. Dragthe tabs to change the order.
Oil Painting on Canvas with Signature
Step 7. If you like the settings, you can save them as a preset and use them later. All the tabs in theSettings Panel have the common list of presets. When a new preset is created, it will be available in all tabsand will contain their settings.Step 8. You can also make final touches and correct the result using the Post-Processing Tools , ,
, on the After tab. These brushes are only available under the Home Deluxe/Business licenses.
Attention! Use these tools at the final step. If you run the processing again, the changes made
with the tools will be lost!
Step 9. You can share your work of art by clicking on . It lets you publish the image from the program
to the social networks: Twitter, Flickr, Tumblr, Google+.
In the standalone version you can also print your oil painting with .
Step 10. Save the processed image.
- If you work with the standalone edition:
Click on then on to open the Save As dialog box. You can use the hot-keys: Ctrl+S on
Windows, ⌘ +S on Mac. Enter a name for the file, choose the format (TIFF, BMP, JPEG or PNG) and
indicate the target folder.
- If you work with the plugin:
Press the button to apply the result and close the plugin window. The AKVIS OilPaint plugin will
close and the picture will appear in the workspace of the photo editor.
Call the Save As dialog box using the command File -> Save As, enter a name for the file, choosethe format and indicate the target folder.
AKVIS OilPaint
25
TOOLS AND THEIR OPTIONS
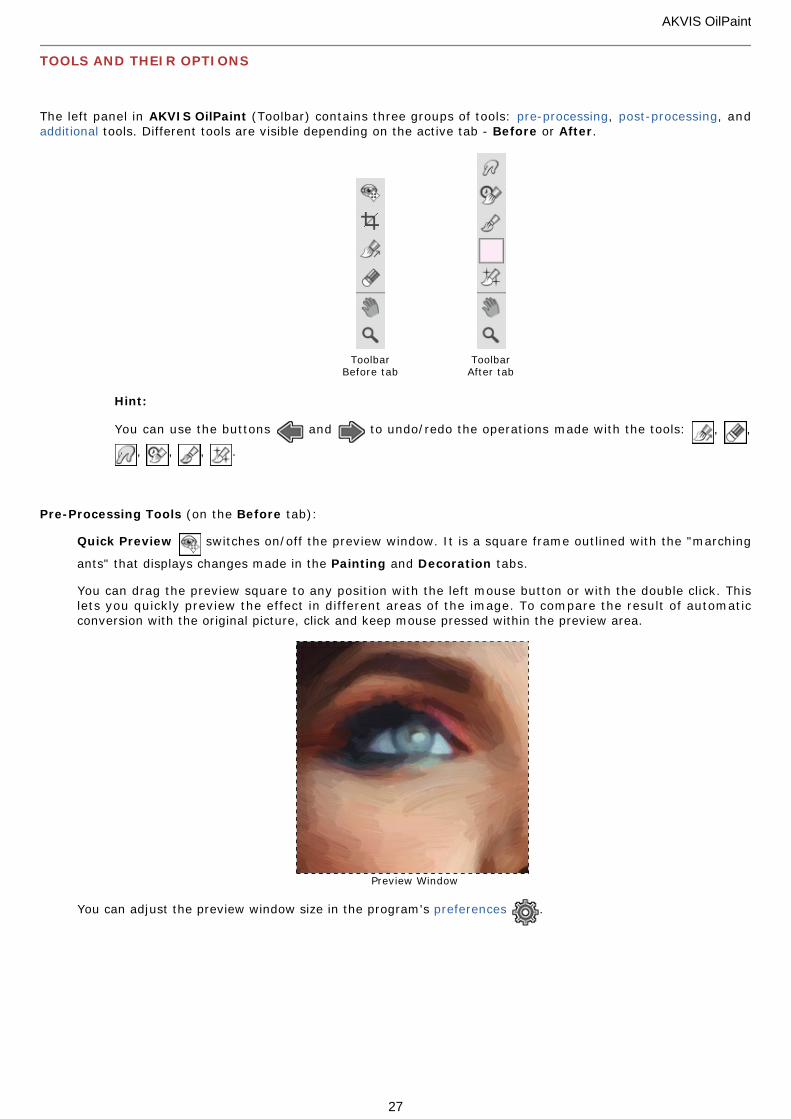
The left panel in AKVIS OilPaint (Toolbar) contains three groups of tools: pre-processing, post-processing, andadditional tools. Different tools are visible depending on the active tab - Before or After.
ToolbarBefore tab
ToolbarAfter tab
Hint:
You can use the buttons and to undo/redo the operations made with the tools: , ,
, , , .
Pre-Processing Tools (on the Before tab):
Quick Preview switches on/off the preview window. It is a square frame outlined with the "marching
ants" that displays changes made in the Painting and Decoration tabs.
You can drag the preview square to any position with the left mouse button or with the double click. Thislets you quickly preview the effect in different areas of the image. To compare the result of automaticconversion with the original picture, click and keep mouse pressed within the preview area.
Preview Window
You can adjust the preview window size in the program's preferences .
AKVIS OilPaint
27
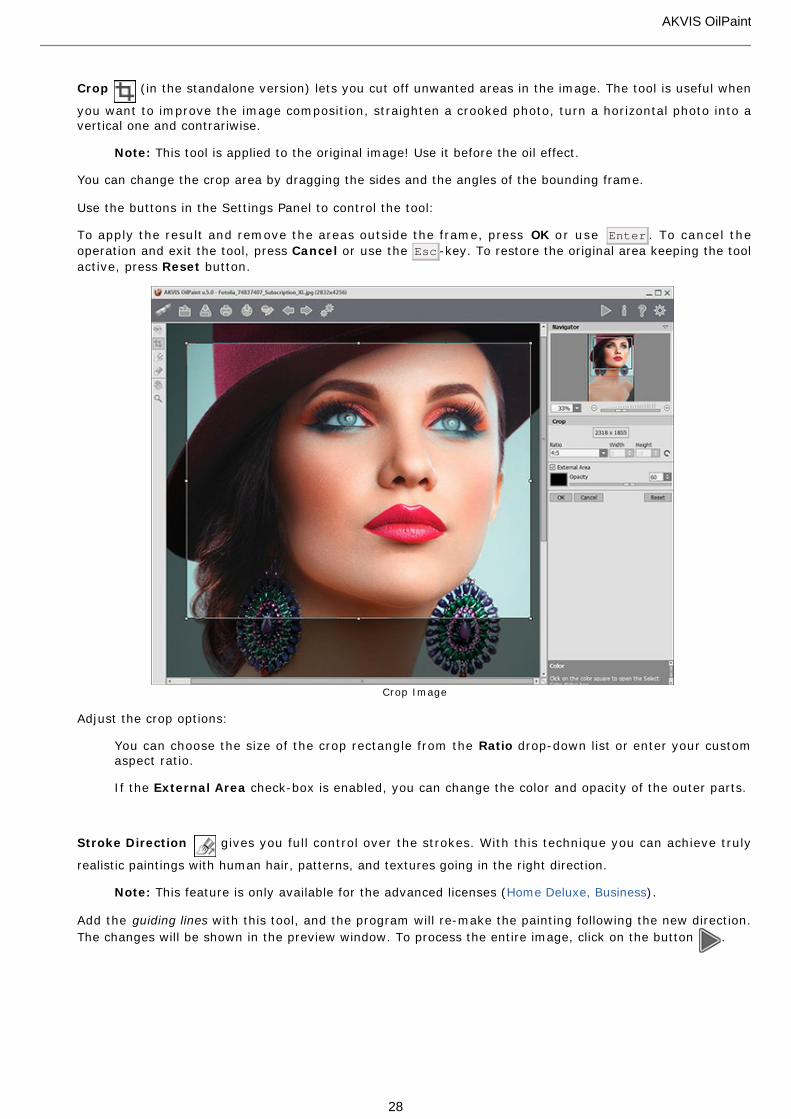
Crop (in the standalone version) lets you cut off unwanted areas in the image. The tool is useful when
you want to improve the image composition, straighten a crooked photo, turn a horizontal photo into avertical one and contrariwise.
Note: This tool is applied to the original image! Use it before the oil effect.
You can change the crop area by dragging the sides and the angles of the bounding frame.
Use the buttons in the Settings Panel to control the tool:
To apply the result and remove the areas outside the frame, press OK or use Enter . To cancel the
operation and exit the tool, press Cancel or use the Esc -key. To restore the original area keeping the tool
active, press Reset button.
Crop Image
Adjust the crop options:
You can choose the size of the crop rectangle from the Ratio drop-down list or enter your customaspect ratio.
If the External Area check-box is enabled, you can change the color and opacity of the outer parts.
Stroke Direction gives you full control over the strokes. With this technique you can achieve truly
realistic paintings with human hair, patterns, and textures going in the right direction.
Note: This feature is only available for the advanced licenses (Home Deluxe, Business).
Add the guiding lines with this tool, and the program will re-make the painting following the new direction.
The changes will be shown in the preview window. To process the entire image, click on the button .
AKVIS OilPaint
28
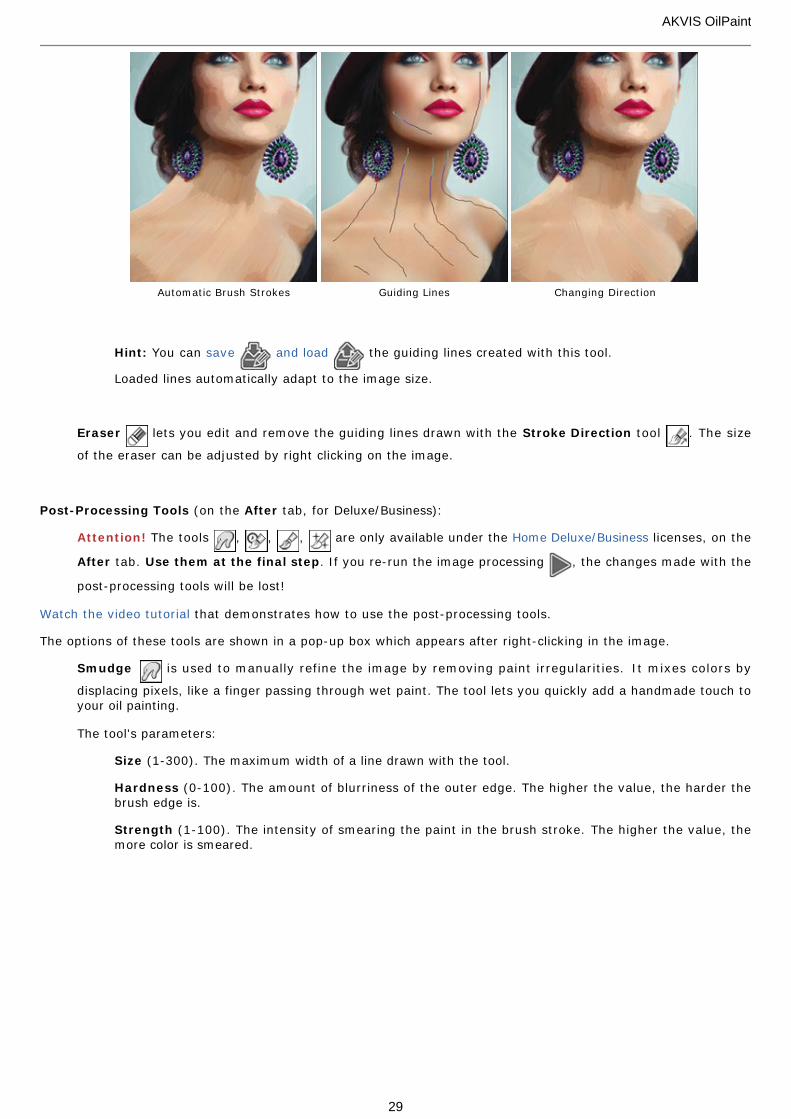
Automatic Brush Strokes Guiding Lines Changing Direction
Hint: You can save and load the guiding lines created with this tool.
Loaded lines automatically adapt to the image size.
Eraser lets you edit and remove the guiding lines drawn with the Stroke Direction tool . The size
of the eraser can be adjusted by right clicking on the image.
Post-Processing Tools (on the After tab, for Deluxe/Business):
Attention! The tools , , , are only available under the Home Deluxe/Business licenses, on the
After tab. Use them at the final step. If you re-run the image processing , the changes made with the
post-processing tools will be lost!
Watch the video tutorial that demonstrates how to use the post-processing tools.
The options of these tools are shown in a pop-up box which appears after right-clicking in the image.
Smudge is used to manually refine the image by removing paint irregularities. It mixes colors by
displacing pixels, like a finger passing through wet paint. The tool lets you quickly add a handmade touch toyour oil painting.
The tool's parameters:
Size (1-300). The maximum width of a line drawn with the tool.
Hardness (0-100). The amount of blurriness of the outer edge. The higher the value, the harder thebrush edge is.
Strength (1-100). The intensity of smearing the paint in the brush stroke. The higher the value, themore color is smeared.
AKVIS OilPaint
29
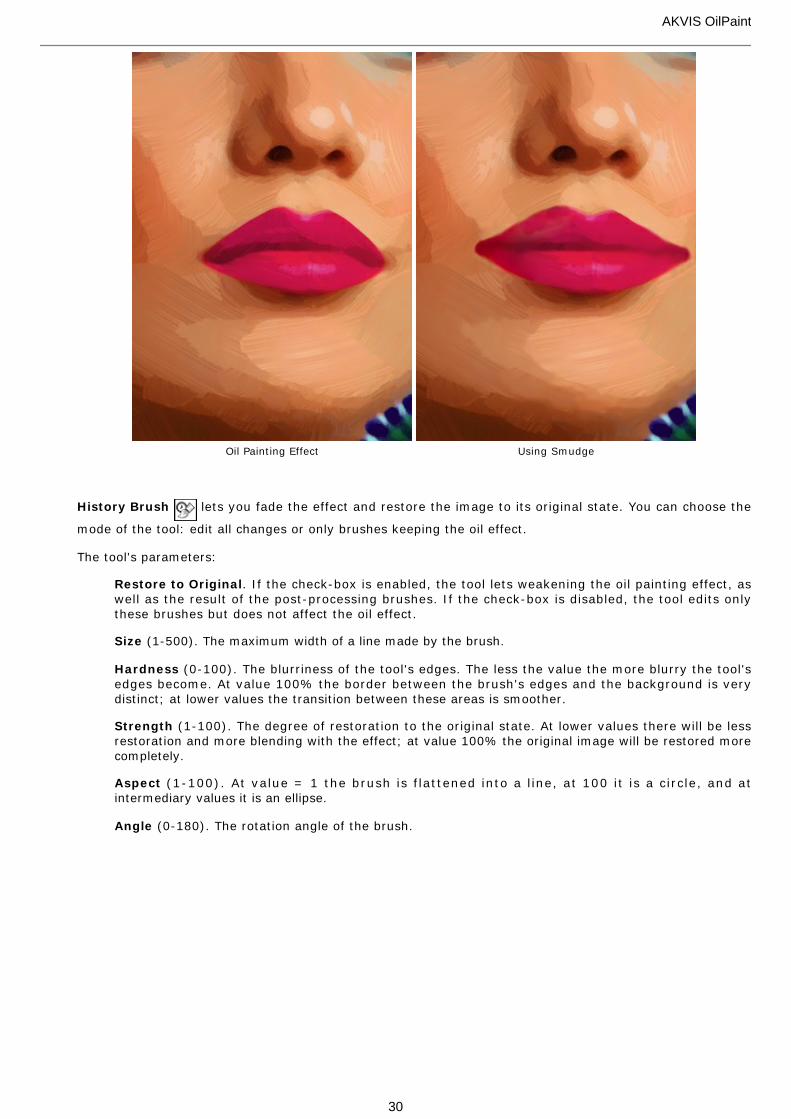
Oil Painting Effect Using Smudge
History Brush lets you fade the effect and restore the image to its original state. You can choose the
mode of the tool: edit all changes or only brushes keeping the oil effect.
The tool's parameters:
Restore to Original. If the check-box is enabled, the tool lets weakening the oil painting effect, aswell as the result of the post-processing brushes. If the check-box is disabled, the tool edits onlythese brushes but does not affect the oil effect.
Size (1-500). The maximum width of a line made by the brush.
Hardness (0-100). The blurriness of the tool's edges. The less the value the more blurry the tool'sedges become. At value 100% the border between the brush's edges and the background is verydistinct; at lower values the transition between these areas is smoother.
Strength (1-100). The degree of restoration to the original state. At lower values there will be lessrestoration and more blending with the effect; at value 100% the original image will be restored morecompletely.
Aspect (1-100). At value = 1 the brush is flattened into a line, at 100 it is a circle, and atintermediary values it is an ellipse.
Angle (0-180). The rotation angle of the brush.
AKVIS OilPaint
30
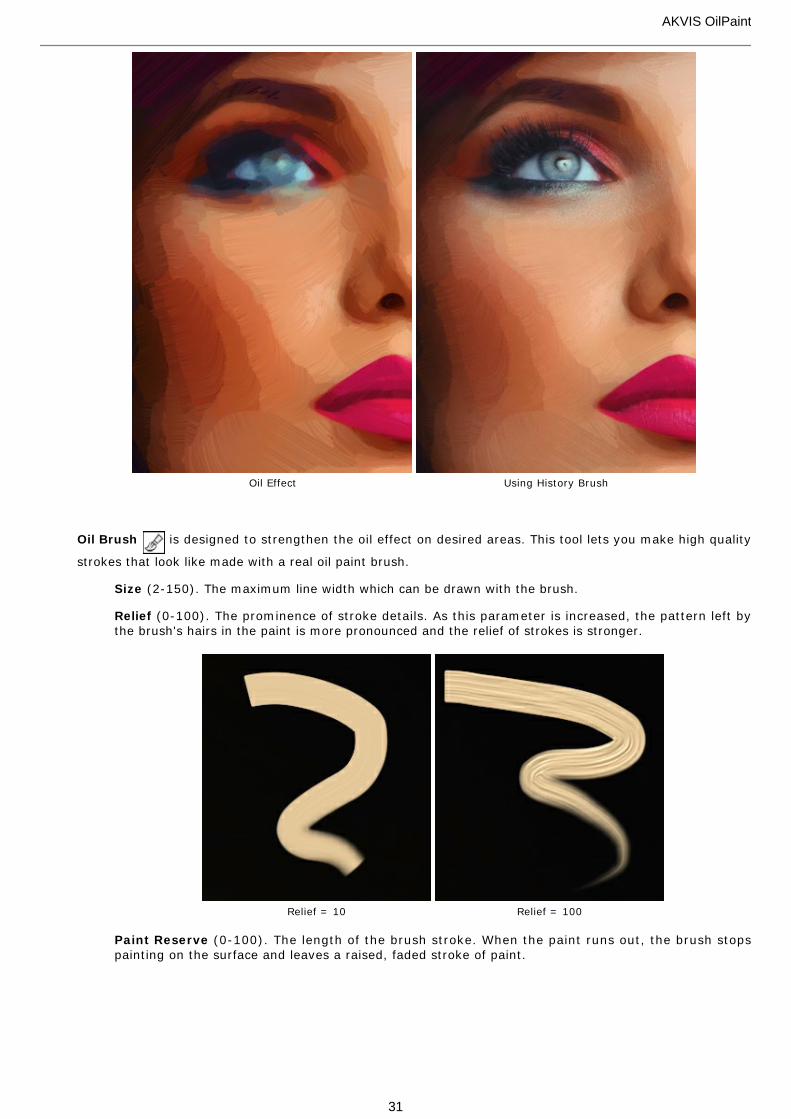
Oil Effect Using History Brush
Oil Brush is designed to strengthen the oil effect on desired areas. This tool lets you make high quality
strokes that look like made with a real oil paint brush.
Size (2-150). The maximum line width which can be drawn with the brush.
Relief (0-100). The prominence of stroke details. As this parameter is increased, the pattern left bythe brush's hairs in the paint is more pronounced and the relief of strokes is stronger.
Relief = 10 Relief = 100
Paint Reserve (0-100). The length of the brush stroke. When the paint runs out, the brush stopspainting on the surface and leaves a raised, faded stroke of paint.
AKVIS OilPaint
31
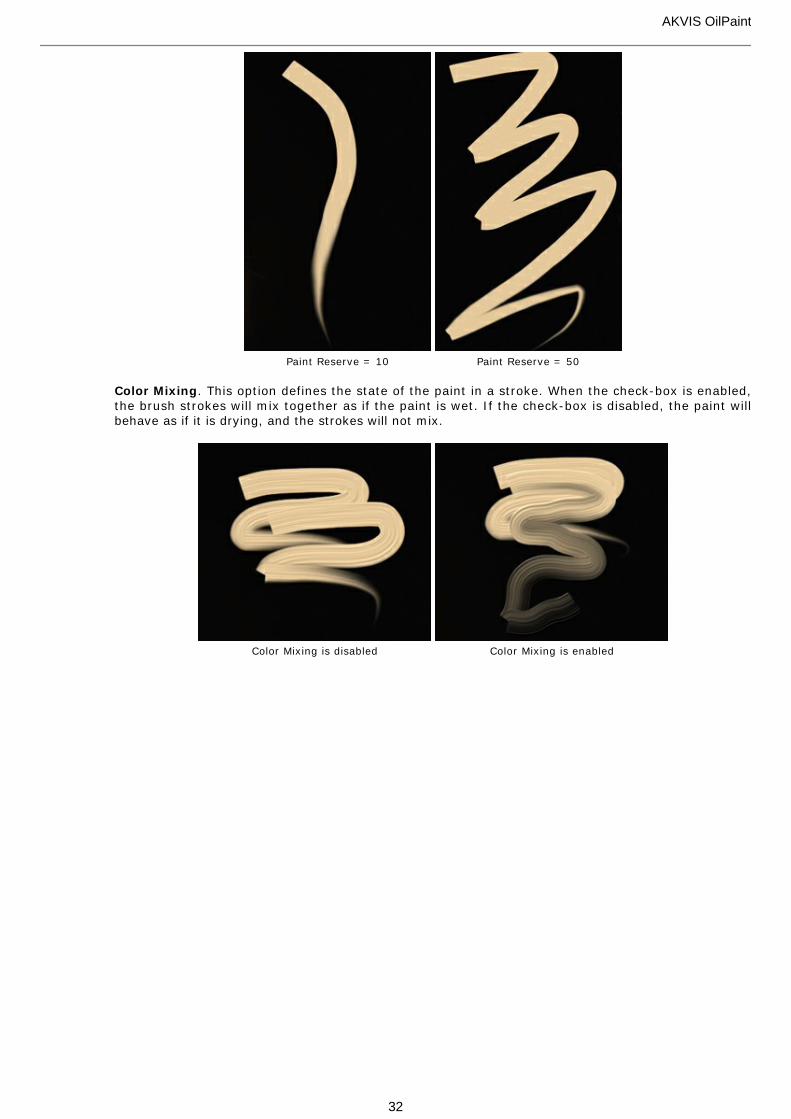
Paint Reserve = 10 Paint Reserve = 50
Color Mixing. This option defines the state of the paint in a stroke. When the check-box is enabled,the brush strokes will mix together as if the paint is wet. If the check-box is disabled, the paint willbehave as if it is drying, and the strokes will not mix.
Color Mixing is disabled Color Mixing is enabled
Cleaning. This option works only if Color Mixing is active. If the check-box is enabled, the brush will
AKVIS OilPaint
32
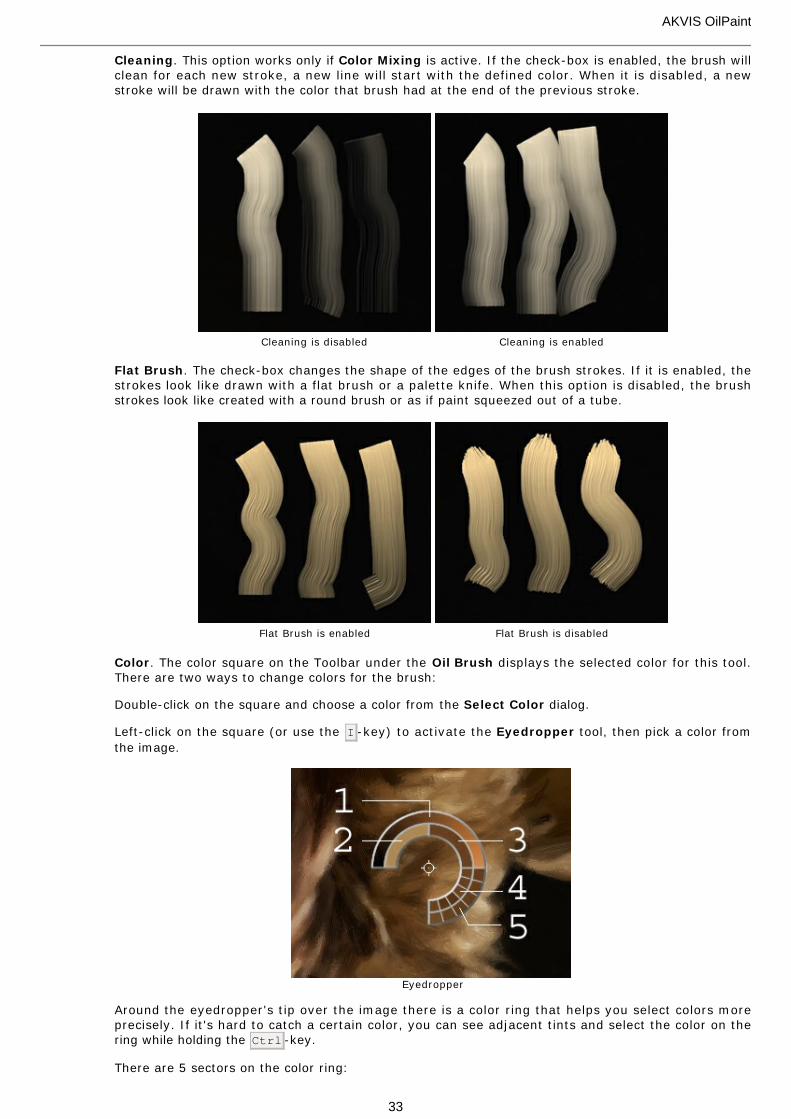
Cleaning. This option works only if Color Mixing is active. If the check-box is enabled, the brush willclean for each new stroke, a new line will start with the defined color. When it is disabled, a newstroke will be drawn with the color that brush had at the end of the previous stroke.
Cleaning is disabled Cleaning is enabled
Flat Brush. The check-box changes the shape of the edges of the brush strokes. If it is enabled, thestrokes look like drawn with a flat brush or a palette knife. When this option is disabled, the brushstrokes look like created with a round brush or as if paint squeezed out of a tube.
Flat Brush is enabled Flat Brush is disabled
Color. The color square on the Toolbar under the Oil Brush displays the selected color for this tool.There are two ways to change colors for the brush:
Double-click on the square and choose a color from the Select Color dialog.
Left-click on the square (or use the I -key) to activate the Eyedropper tool, then pick a color from
the image.
Eyedropper
Around the eyedropper's tip over the image there is a color ring that helps you select colors moreprecisely. If it's hard to catch a certain color, you can see adjacent tints and select the color on thering while holding the Ctrl -key.
There are 5 sectors on the color ring:
AKVIS OilPaint
33
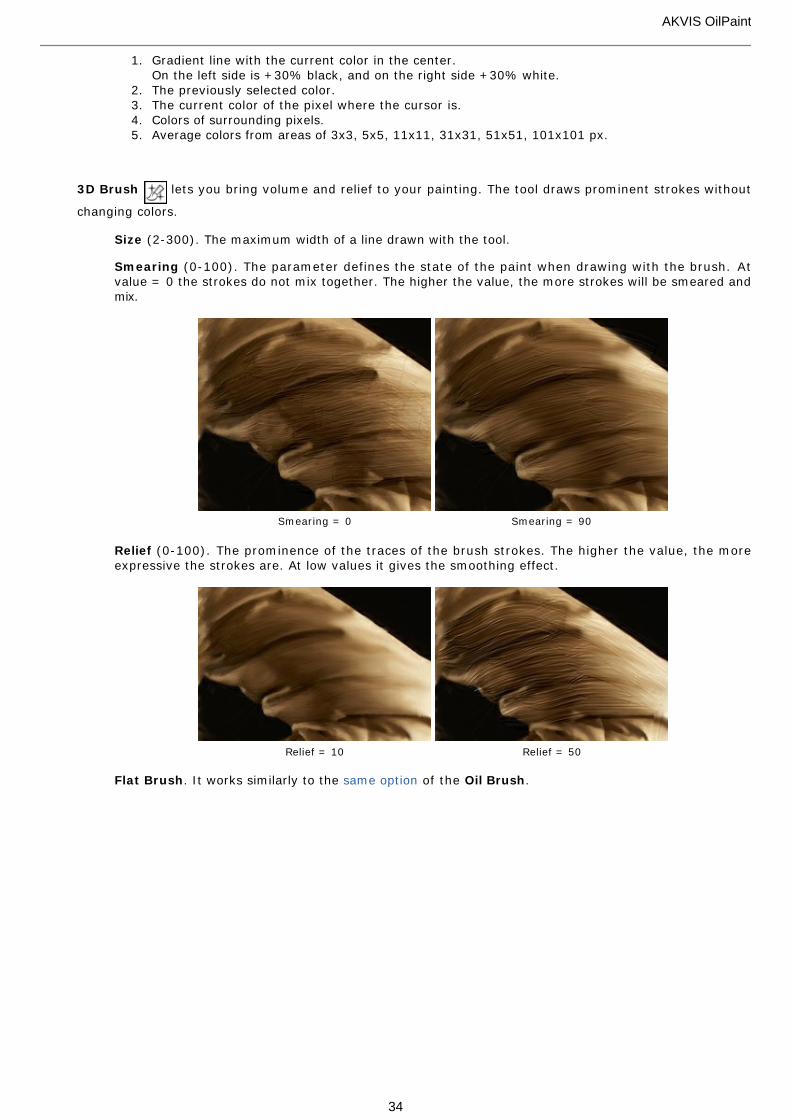
1. Gradient line with the current color in the center. On the left side is +30% black, and on the right side +30% white.
2. The previously selected color.3. The current color of the pixel where the cursor is.4. Colors of surrounding pixels.5. Average colors from areas of 3x3, 5x5, 11x11, 31x31, 51x51, 101x101 px.
3D Brush lets you bring volume and relief to your painting. The tool draws prominent strokes without
changing colors.
Size (2-300). The maximum width of a line drawn with the tool.
Smearing (0-100). The parameter defines the state of the paint when drawing with the brush. Atvalue = 0 the strokes do not mix together. The higher the value, the more strokes will be smeared andmix.
Smearing = 0 Smearing = 90
Relief (0-100). The prominence of the traces of the brush strokes. The higher the value, the moreexpressive the strokes are. At low values it gives the smoothing effect.
Relief = 10 Relief = 50
Flat Brush. It works similarly to the same option of the Oil Brush.
AKVIS OilPaint
34
Additional Tools (available on both tabs, for all licenses):
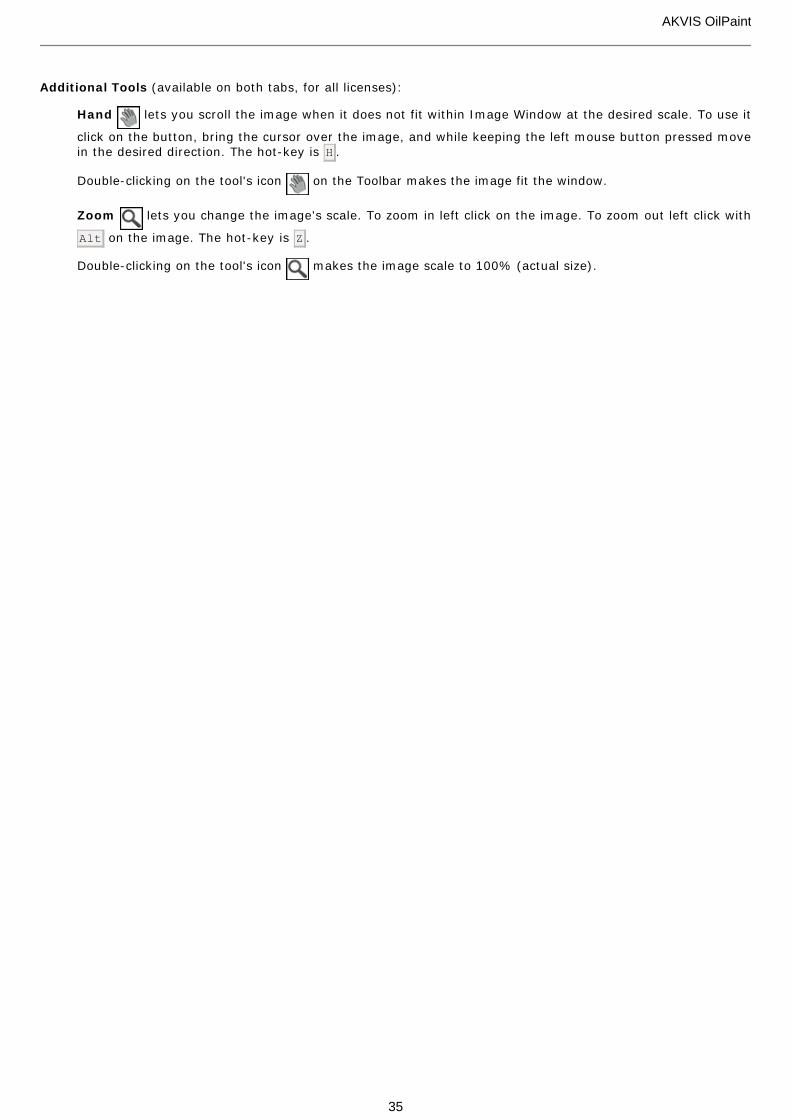
Hand lets you scroll the image when it does not fit within Image Window at the desired scale. To use it
click on the button, bring the cursor over the image, and while keeping the left mouse button pressed movein the desired direction. The hot-key is H .
Double-clicking on the tool's icon on the Toolbar makes the image fit the window.
Zoom lets you change the image's scale. To zoom in left click on the image. To zoom out left click with
Alt on the image. The hot-key is Z .
Double-clicking on the tool's icon makes the image scale to 100% (actual size).
AKVIS OilPaint
35
OIL PAINTING EFFECT
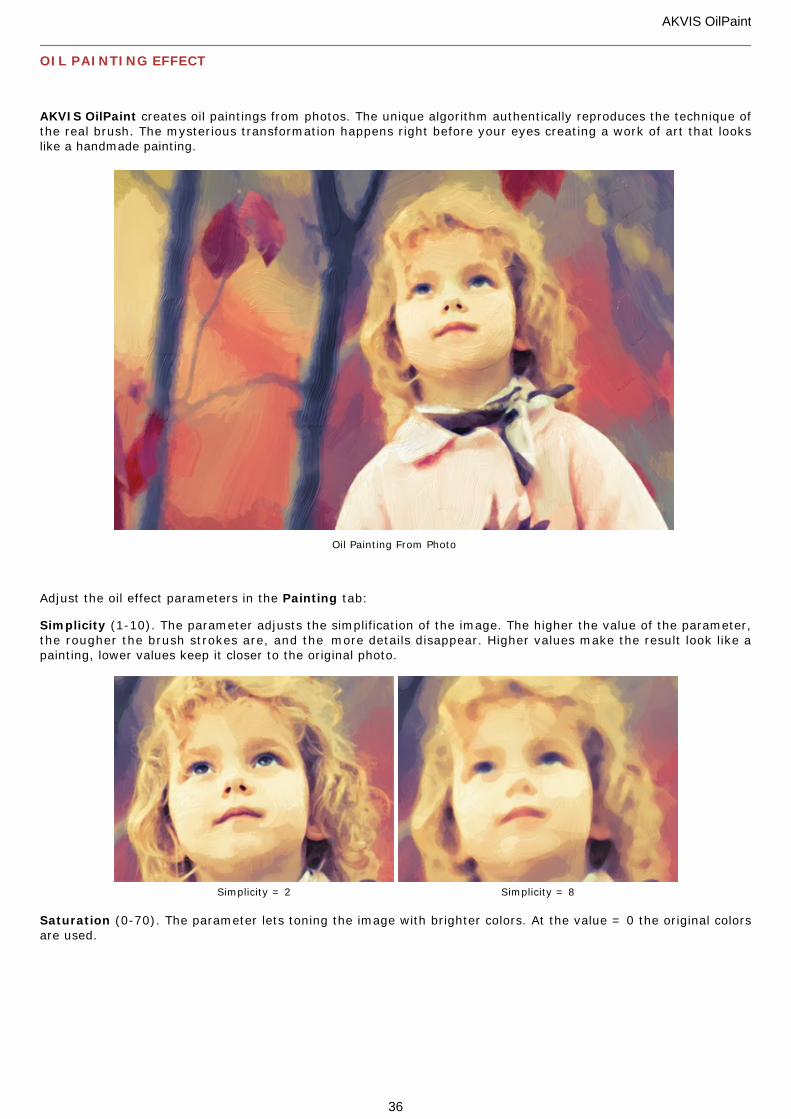
AKVIS OilPaint creates oil paintings from photos. The unique algorithm authentically reproduces the technique ofthe real brush. The mysterious transformation happens right before your eyes creating a work of art that lookslike a handmade painting.
Oil Painting From Photo
Adjust the oil effect parameters in the Painting tab:
Simplicity (1-10). The parameter adjusts the simplification of the image. The higher the value of the parameter,the rougher the brush strokes are, and the more details disappear. Higher values make the result look like apainting, lower values keep it closer to the original photo.
Simplicity = 2 Simplicity = 8
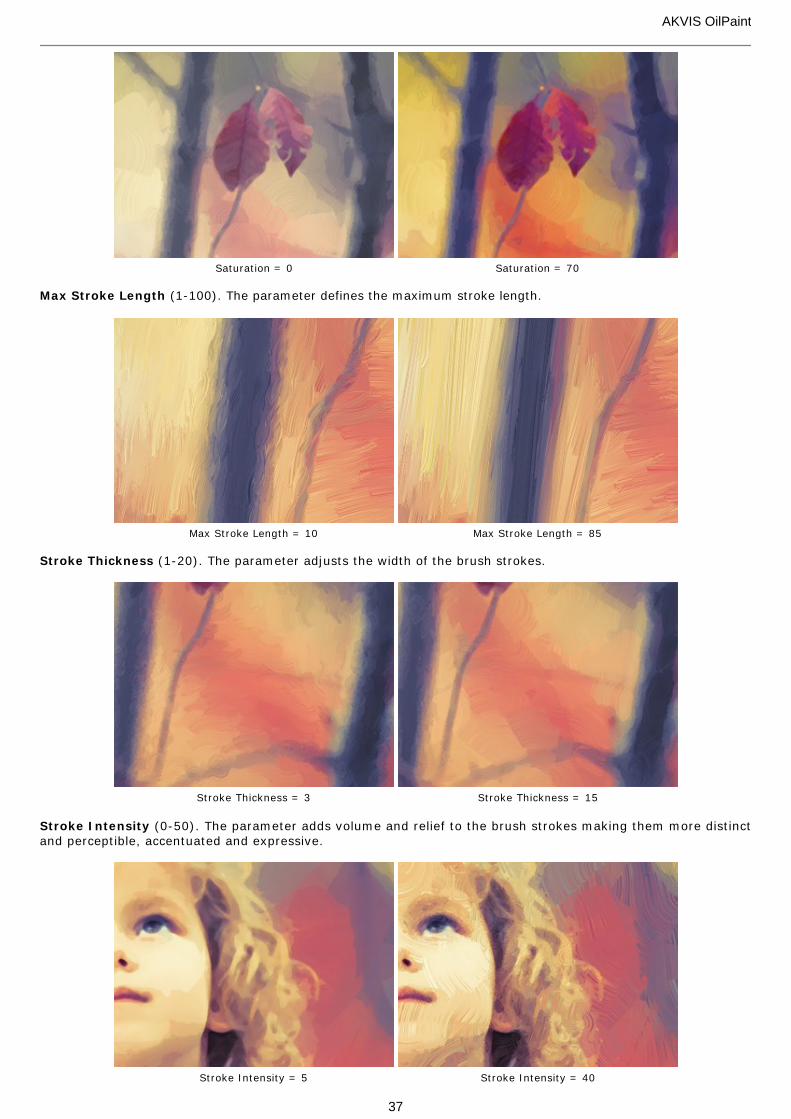
Saturation (0-70). The parameter lets toning the image with brighter colors. At the value = 0 the original colorsare used.
AKVIS OilPaint
36
Saturation = 0 Saturation = 70
Max Stroke Length (1-100). The parameter defines the maximum stroke length.
Max Stroke Length = 10 Max Stroke Length = 85
Stroke Thickness (1-20). The parameter adjusts the width of the brush strokes.
Stroke Thickness = 3 Stroke Thickness = 15
Stroke Intensity (0-50). The parameter adds volume and relief to the brush strokes making them more distinctand perceptible, accentuated and expressive.
Stroke Intensity = 5 Stroke Intensity = 40
AKVIS OilPaint
37
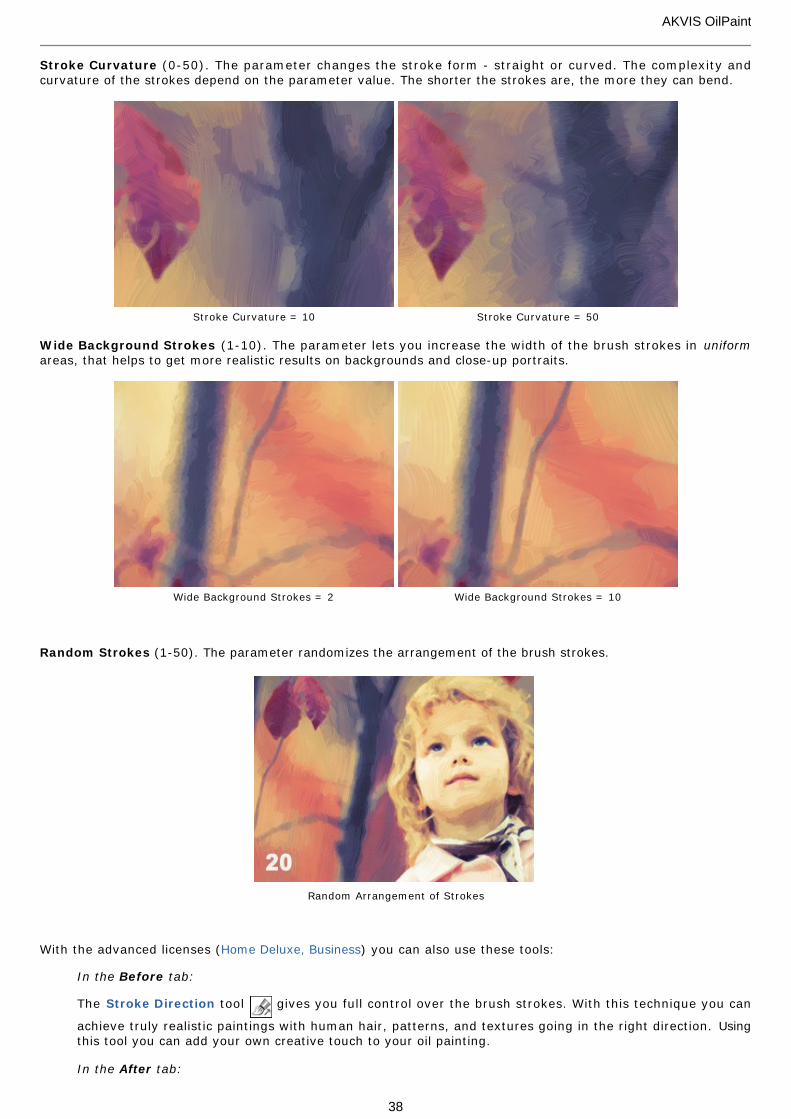
Stroke Curvature (0-50). The parameter changes the stroke form - straight or curved. The complexity andcurvature of the strokes depend on the parameter value. The shorter the strokes are, the more they can bend.
Stroke Curvature = 10 Stroke Curvature = 50
Wide Background Strokes (1-10). The parameter lets you increase the width of the brush strokes in uniformareas, that helps to get more realistic results on backgrounds and close-up portraits.
Wide Background Strokes = 2 Wide Background Strokes = 10
Random Strokes (1-50). The parameter randomizes the arrangement of the brush strokes.
Random Arrangement of Strokes
With the advanced licenses (Home Deluxe, Business) you can also use these tools:
In the Before tab:
The Stroke Direction tool gives you full control over the brush strokes. With this technique you can
achieve truly realistic paintings with human hair, patterns, and textures going in the right direction. Usingthis tool you can add your own creative touch to your oil painting.
In the After tab:
AKVIS OilPaint
38

You can use the post-processing tools , , , to manually edit the result.
Use these tools at the final step! If you re-run the processing, the changes made with these brushes will belost!
AKVIS OilPaint
39
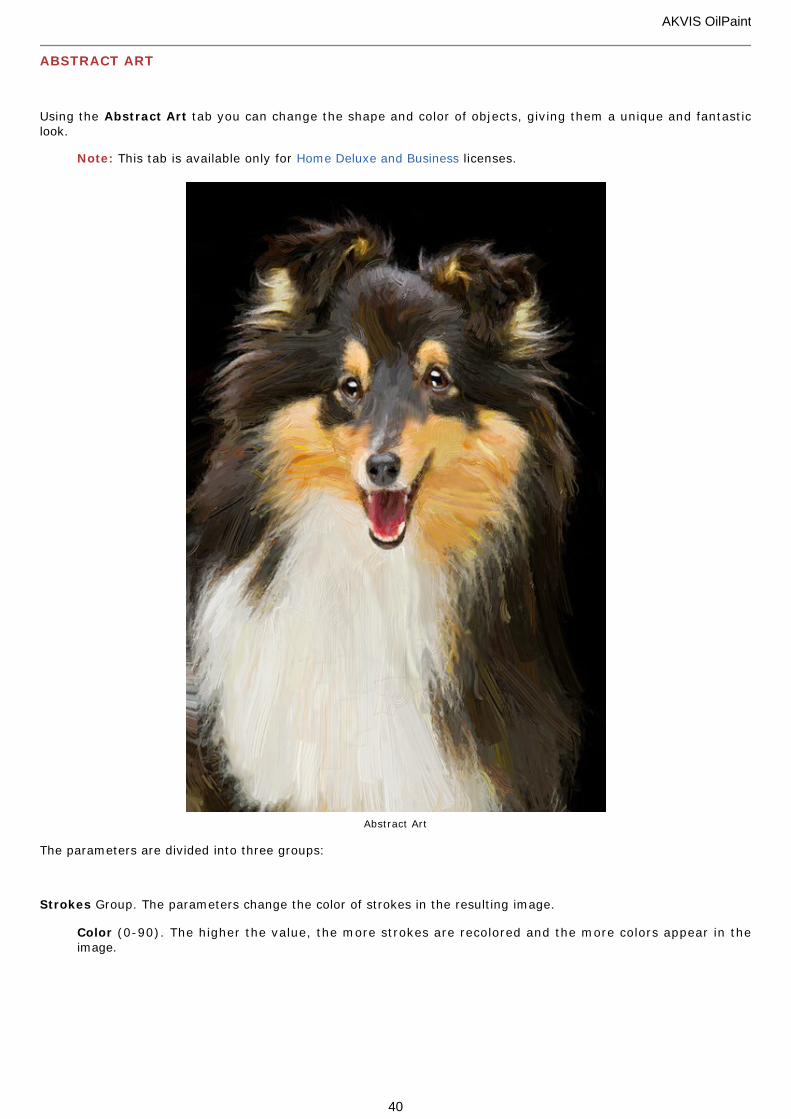
ABSTRACT ART
Using the Abstract Art tab you can change the shape and color of objects, giving them a unique and fantasticlook.
Note: This tab is available only for Home Deluxe and Business licenses.
Abstract Art
The parameters are divided into three groups:
Strokes Group. The parameters change the color of strokes in the resulting image.
Color (0-90). The higher the value, the more strokes are recolored and the more colors appear in theimage.
AKVIS OilPaint
40
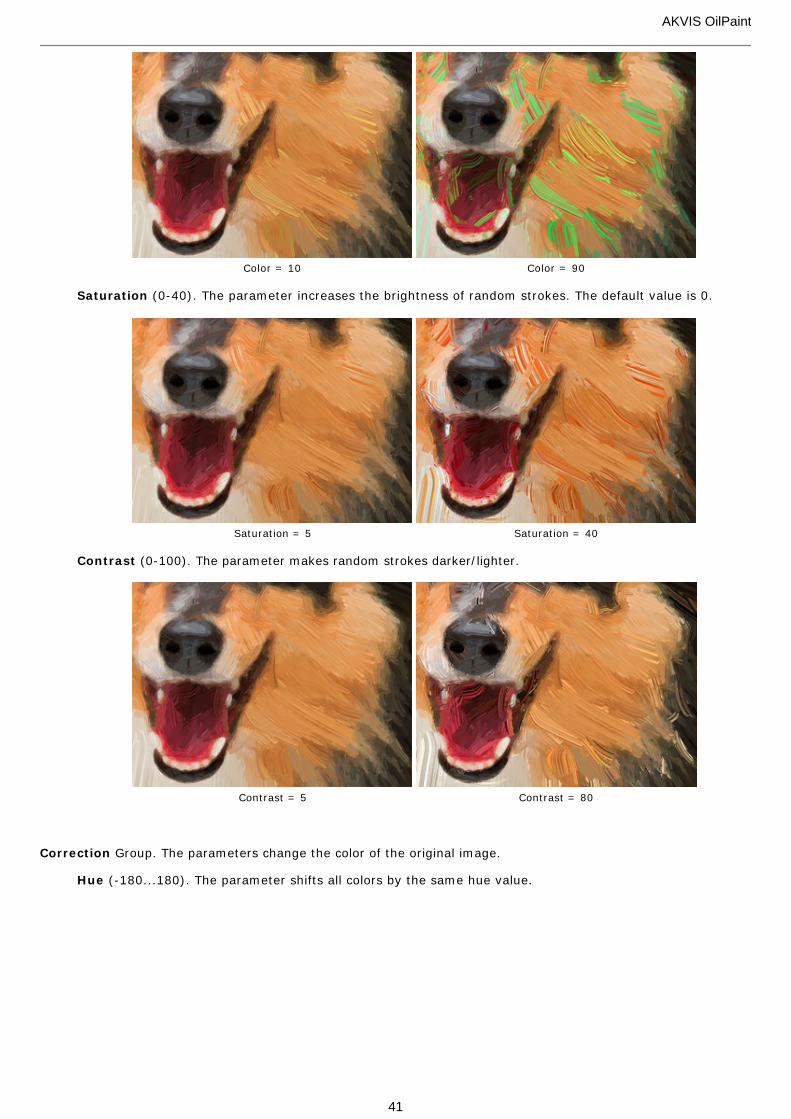
Color = 10 Color = 90
Saturation (0-40). The parameter increases the brightness of random strokes. The default value is 0.
Saturation = 5 Saturation = 40
Contrast (0-100). The parameter makes random strokes darker/lighter.
Contrast = 5 Contrast = 80
Correction Group. The parameters change the color of the original image.
Hue (-180...180). The parameter shifts all colors by the same hue value.
AKVIS OilPaint
41
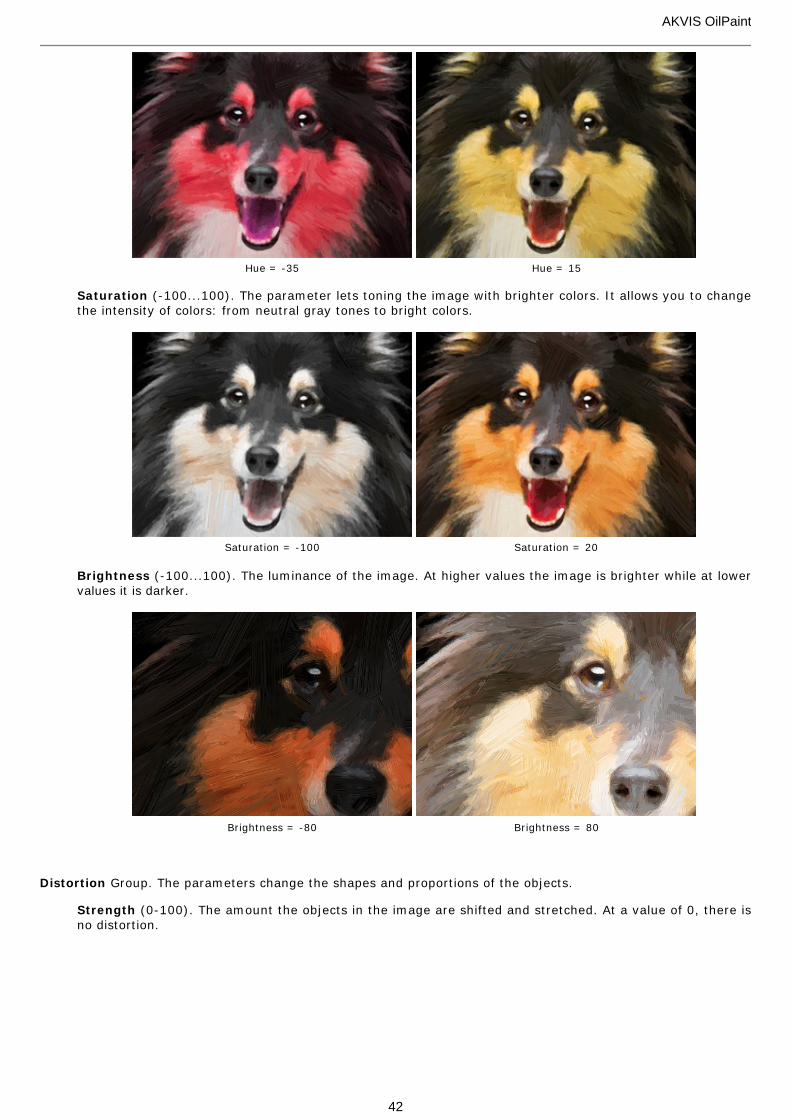
Hue = -35 Hue = 15
Saturation (-100...100). The parameter lets toning the image with brighter colors. It allows you to changethe intensity of colors: from neutral gray tones to bright colors.
Saturation = -100 Saturation = 20
Brightness (-100...100). The luminance of the image. At higher values the image is brighter while at lowervalues it is darker.
Brightness = -80 Brightness = 80
Distortion Group. The parameters change the shapes and proportions of the objects.
Strength (0-100). The amount the objects in the image are shifted and stretched. At a value of 0, there isno distortion.
AKVIS OilPaint
42
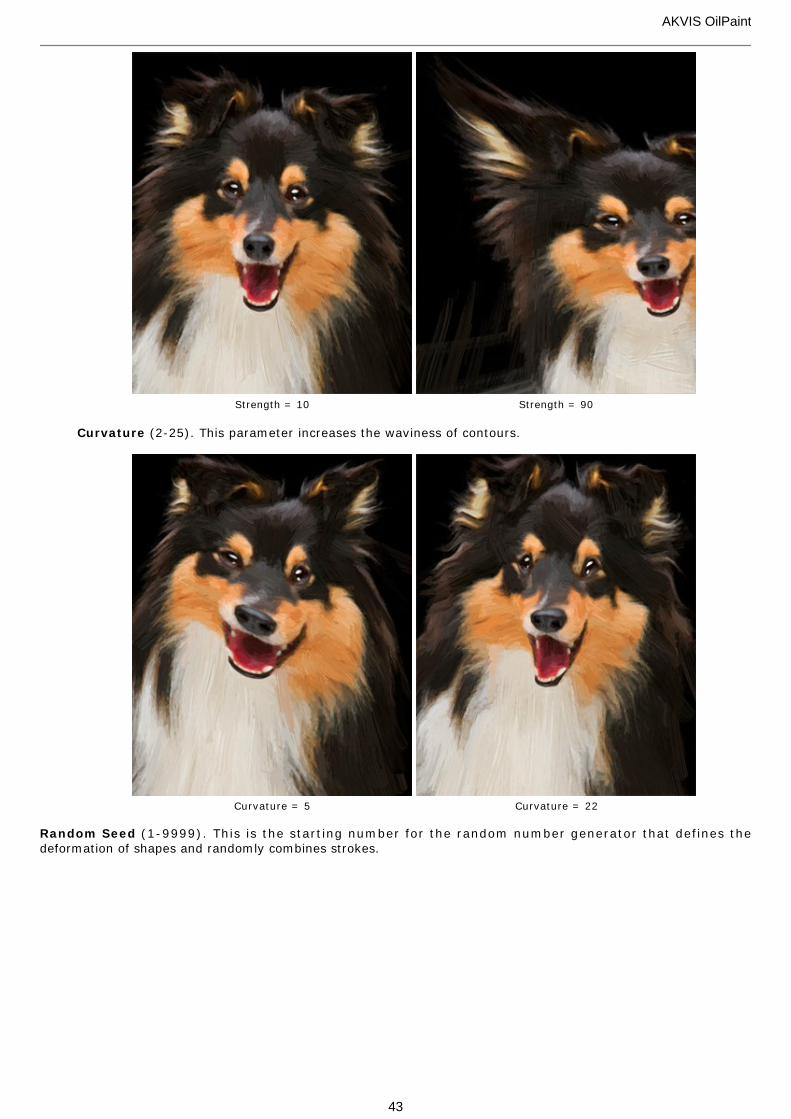
Strength = 10 Strength = 90
Curvature (2-25). This parameter increases the waviness of contours.
Curvature = 5 Curvature = 22
Random Seed (1-9999). This is the starting number for the random number generator that defines thedeformation of shapes and randomly combines strokes.
AKVIS OilPaint
43
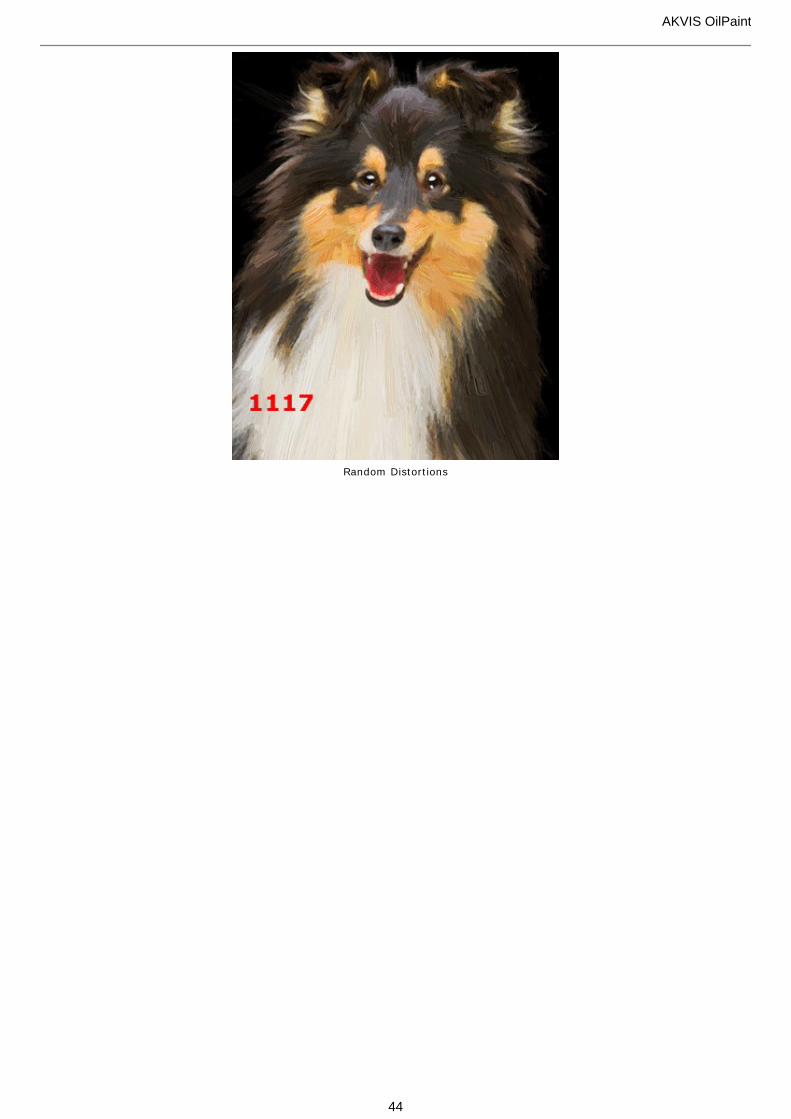
Random Distortions
AKVIS OilPaint
44
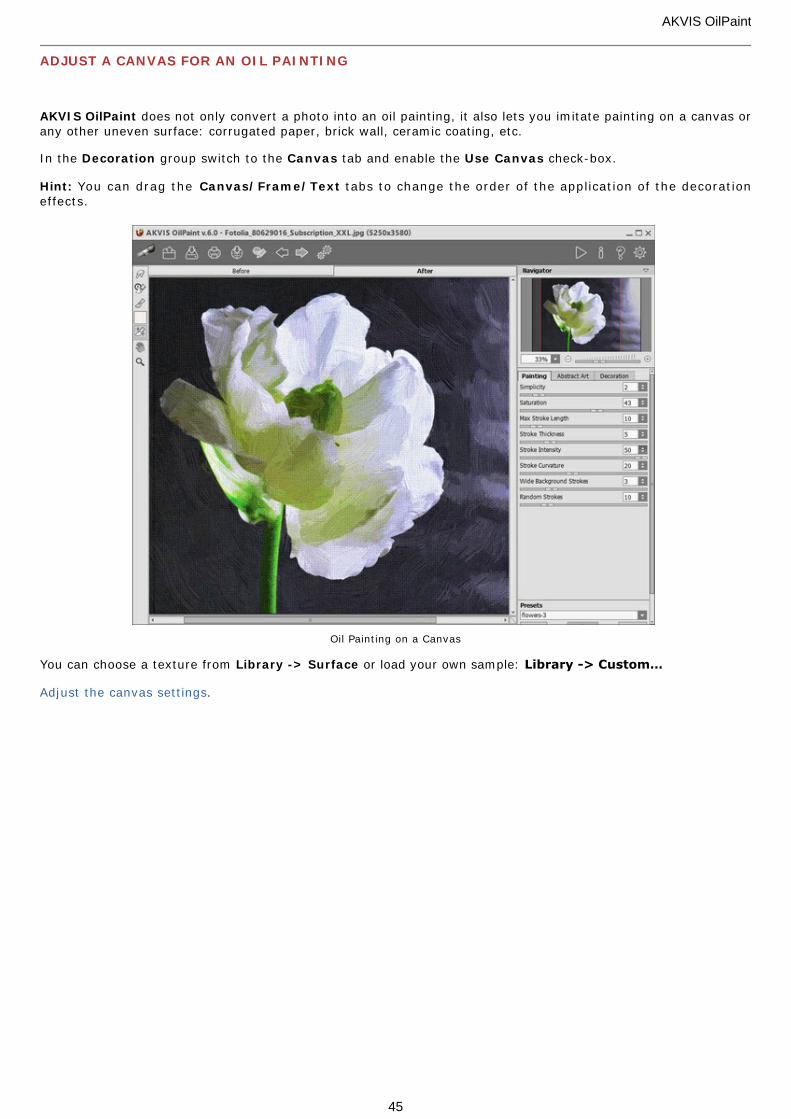
ADJUST A CANVAS FOR AN OIL PAINTING
AKVIS OilPaint does not only convert a photo into an oil painting, it also lets you imitate painting on a canvas orany other uneven surface: corrugated paper, brick wall, ceramic coating, etc.
In the Decoration group switch to the Canvas tab and enable the Use Canvas check-box.
Hint: You can drag the Canvas/Frame/Text tabs to change the order of the application of the decorationeffects.
Oil Painting on a Canvas
You can choose a texture from Library -> Surface or load your own sample: Library -> Custom…
Adjust the canvas settings.
AKVIS OilPaint
45
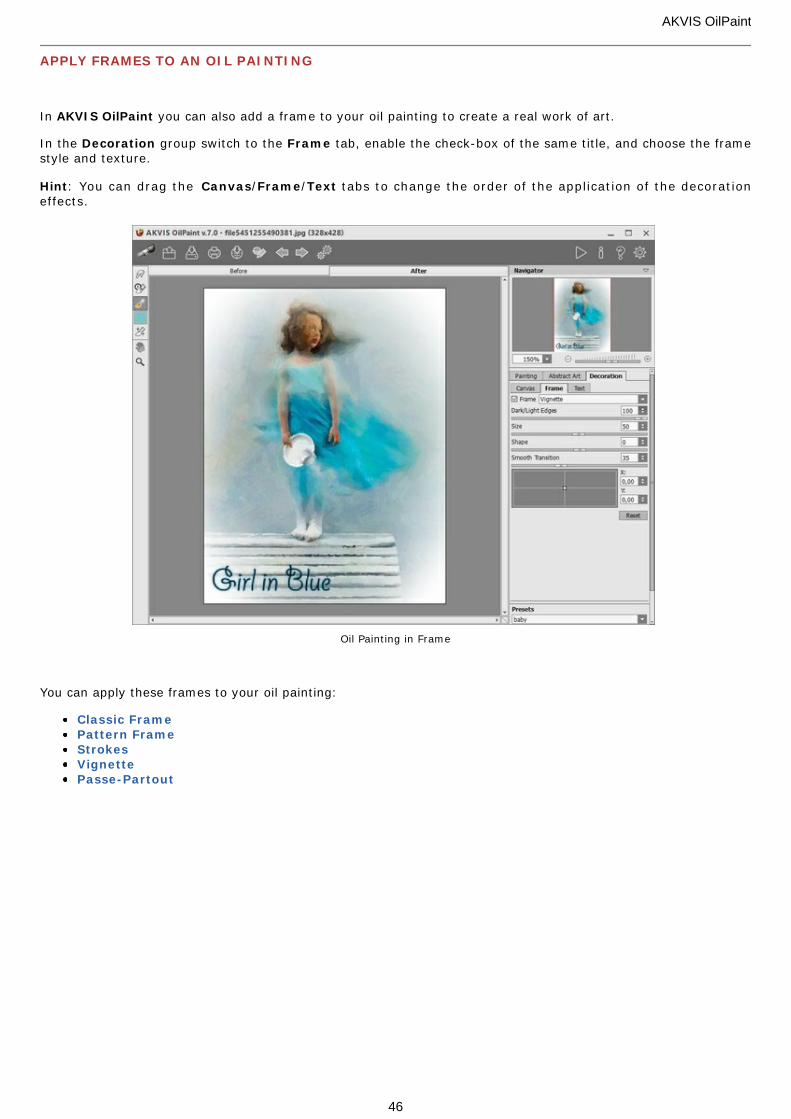
APPLY FRAMES TO AN OIL PAINTING
In AKVIS OilPaint you can also add a frame to your oil painting to create a real work of art.
In the Decoration group switch to the Frame tab, enable the check-box of the same title, and choose the framestyle and texture.
Hint: You can drag the Canvas/Frame/Text tabs to change the order of the application of the decorationeffects.
Oil Painting in Frame
You can apply these frames to your oil painting:
Classic FramePattern FrameStrokesVignettePasse-Partout
AKVIS OilPaint
46
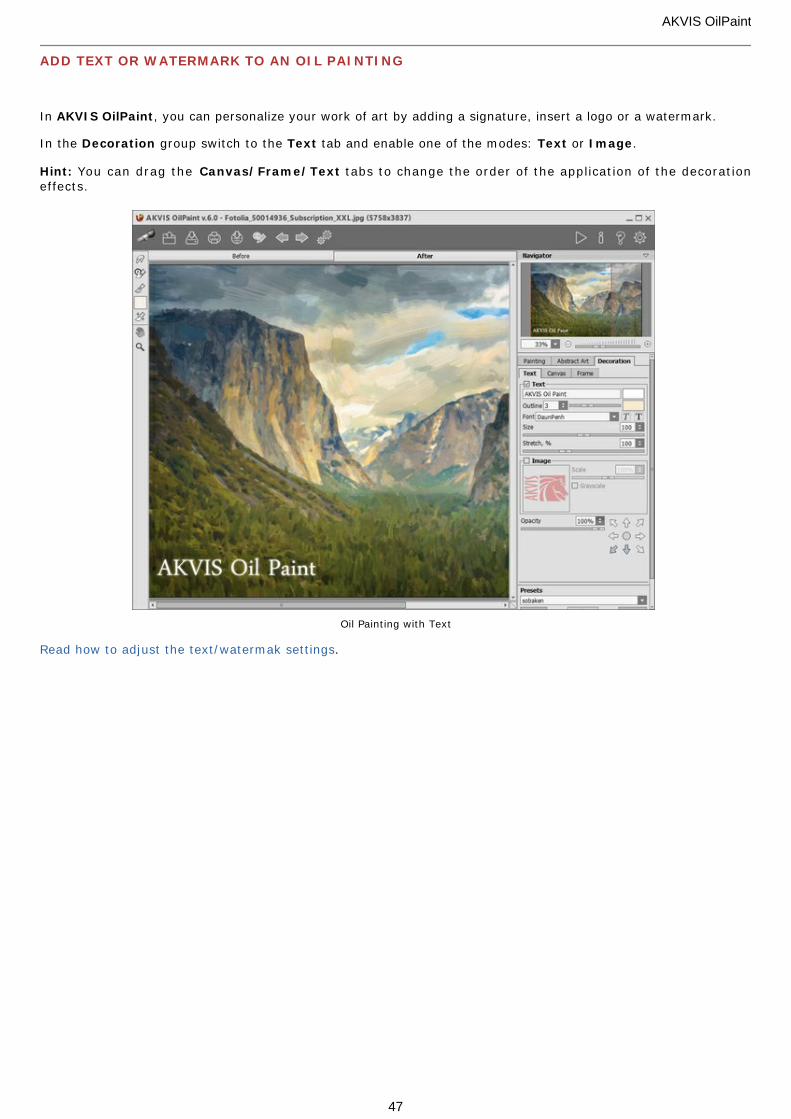
ADD TEXT OR WATERMARK TO AN OIL PAINTING
In AKVIS OilPaint, you can personalize your work of art by adding a signature, insert a logo or a watermark.
In the Decoration group switch to the Text tab and enable one of the modes: Text or Image.
Hint: You can drag the Canvas/Frame/Text tabs to change the order of the application of the decorationeffects.
Oil Painting with Text
Read how to adjust the text/watermak settings.
AKVIS OilPaint
47

WORKING WITH PRESETS
AKVIS OilPaint includes a number of ready to use presets (settings combinations) for the effect which help youstart working. When moving a cursor over a preset in the drop-down list, the sample appears in the small windowon the left side of the list.
A preset contains the settings of all tabs.
You can apply one of the AKVIS presets or modify the parameters to achieve the desired result.
To create your own preset, type a name for the preset into the field and press Save.
To return to the default settings of the selected preset, press Reset.
To delete your preset, choose it from the drop-down list and press Delete.
The AKVIS built-in presets cannot be removed.
You can save your presets to a .oilpaint file with . To load presets from the file use .
Read more how to import and export user presets.
AKVIS OilPaint
48
PROGRAM PREFERENCES
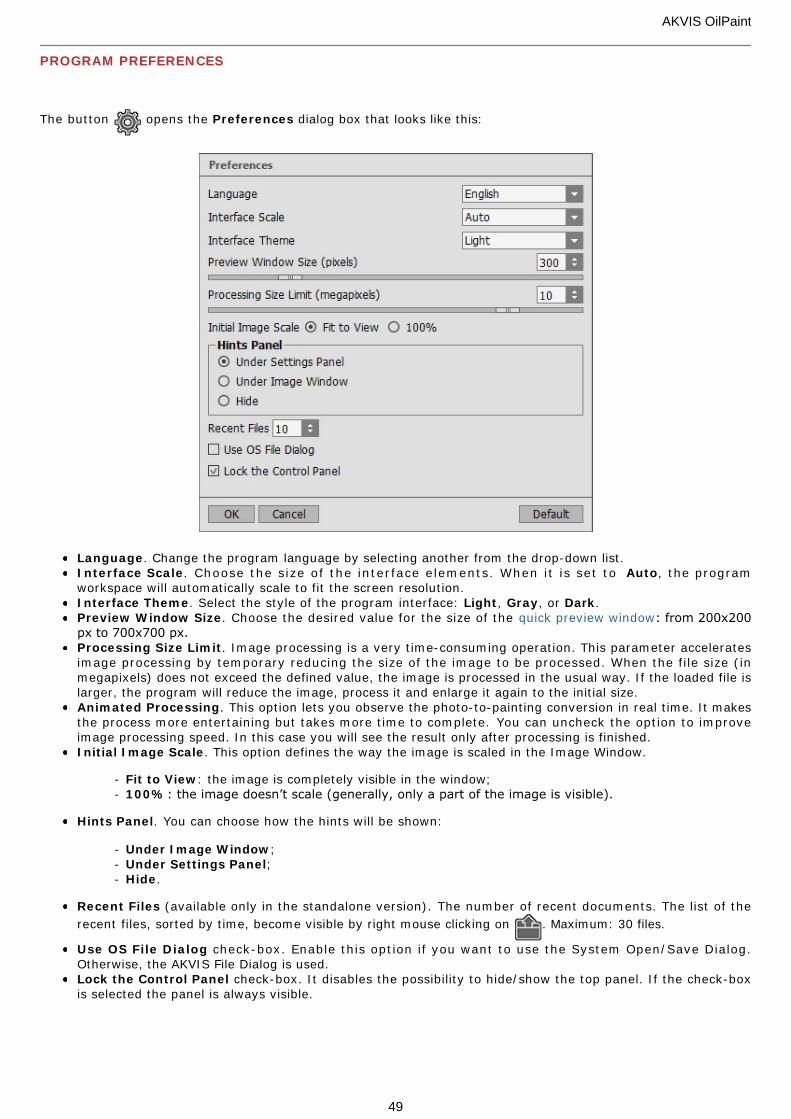
The button opens the Preferences dialog box that looks like this:
Language. Change the program language by selecting another from the drop-down list.Interface Scale. Choose the size of the interface elements. When it is set to Auto, the programworkspace will automatically scale to fit the screen resolution.Interface Theme. Select the style of the program interface: Light, Gray, or Dark.Preview Window Size. Choose the desired value for the size of the quick preview window: from 200х200px to 700х700 px.Processing Size Limit. Image processing is a very time-consuming operation. This parameter acceleratesimage processing by temporary reducing the size of the image to be processed. When the file size (inmegapixels) does not exceed the defined value, the image is processed in the usual way. If the loaded file islarger, the program will reduce the image, process it and enlarge it again to the initial size.Animated Processing. This option lets you observe the photo-to-painting conversion in real time. It makesthe process more entertaining but takes more time to complete. You can uncheck the option to improveimage processing speed. In this case you will see the result only after processing is finished.Initial Image Scale. This option defines the way the image is scaled in the Image Window.
- Fit to View: the image is completely visible in the window;- 100%: the image doesn’t scale (generally, only a part of the image is visible).
Hints Panel. You can choose how the hints will be shown:
- Under Image Window;- Under Settings Panel;- Hide.
Recent Files (available only in the standalone version). The number of recent documents. The list of the
recent files, sorted by time, become visible by right mouse clicking on . Maximum: 30 files.
Use OS File Dialog check-box. Enable this option if you want to use the System Open/Save Dialog.Otherwise, the AKVIS File Dialog is used.Lock the Control Panel check-box. It disables the possibility to hide/show the top panel. If the check-boxis selected the panel is always visible.
AKVIS OilPaint
49

To save changes made in the Preferences window press OK.
If you need, click on the button Default to return to the default settings.
AKVIS OilPaint
50
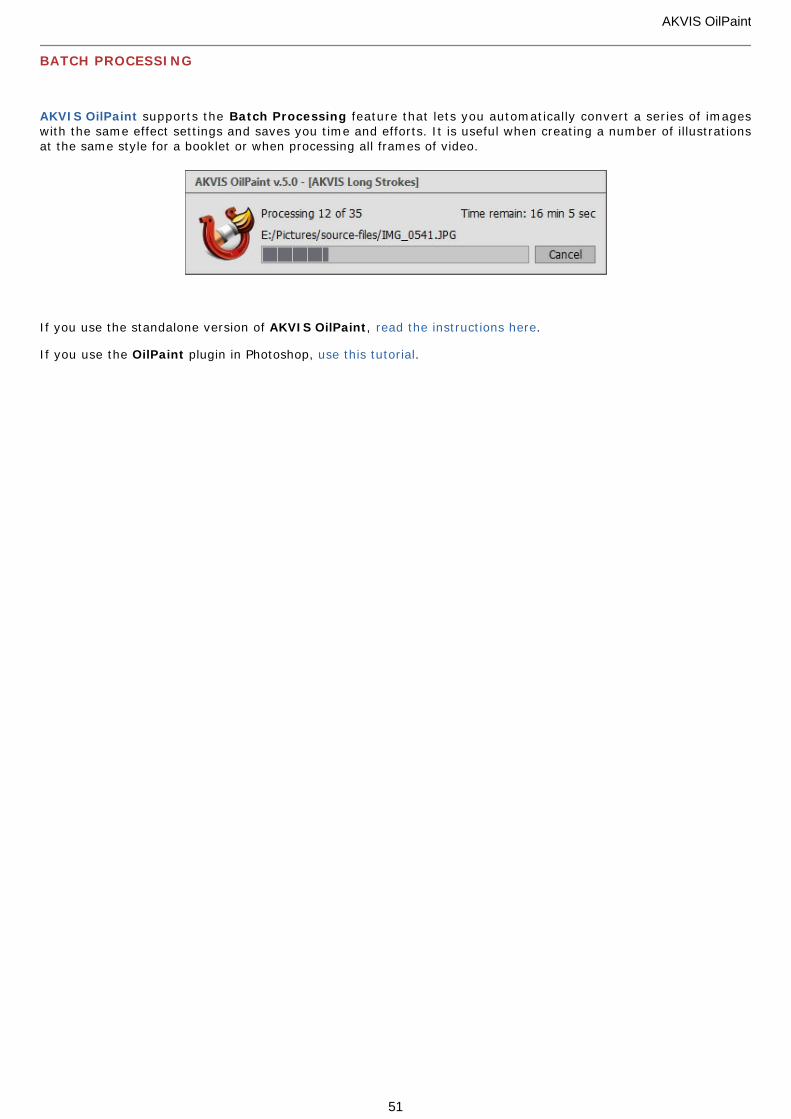
BATCH PROCESSING
AKVIS OilPaint supports the Batch Processing feature that lets you automatically convert a series of imageswith the same effect settings and saves you time and efforts. It is useful when creating a number of illustrationsat the same style for a booklet or when processing all frames of video.
If you use the standalone version of AKVIS OilPaint, read the instructions here.
If you use the OilPaint plugin in Photoshop, use this tutorial.
AKVIS OilPaint
51
PRINT IMAGES IN AKVIS OILPAINT
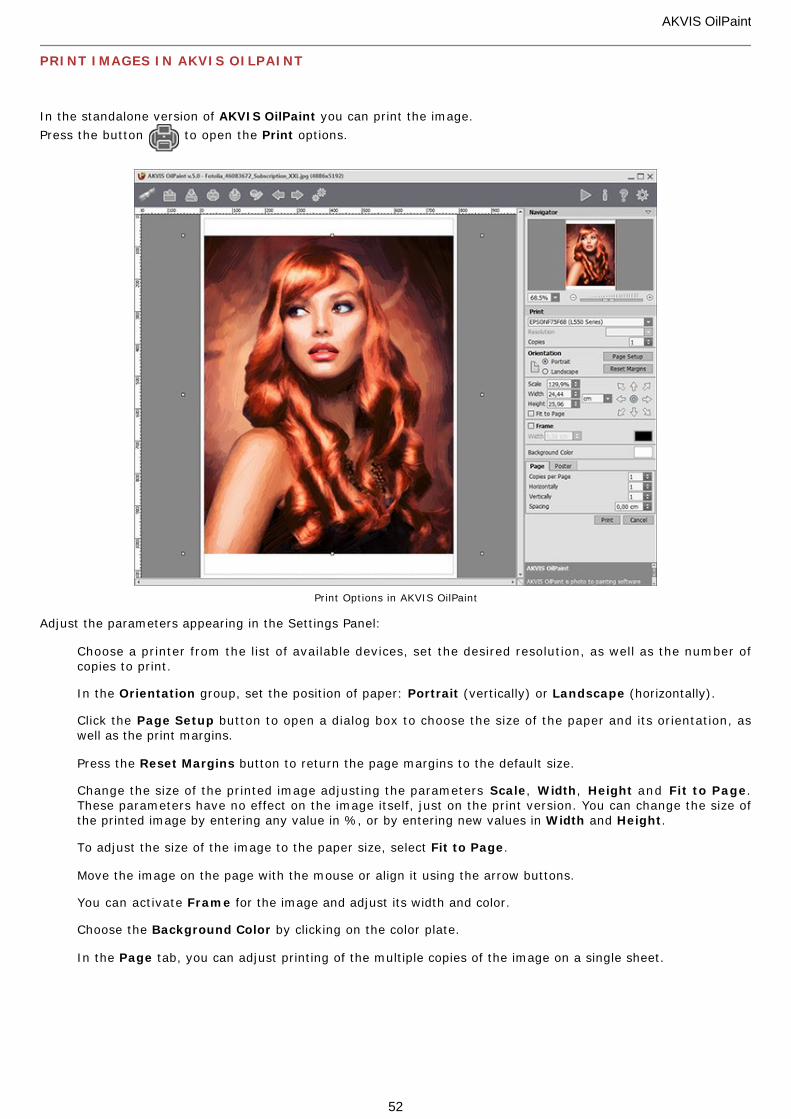
In the standalone version of AKVIS OilPaint you can print the image.
Press the button to open the Print options.
Print Options in AKVIS OilPaint
Adjust the parameters appearing in the Settings Panel:
Choose a printer from the list of available devices, set the desired resolution, as well as the number ofcopies to print.
In the Orientation group, set the position of paper: Portrait (vertically) or Landscape (horizontally).
Click the Page Setup button to open a dialog box to choose the size of the paper and its orientation, aswell as the print margins.
Press the Reset Margins button to return the page margins to the default size.
Change the size of the printed image adjusting the parameters Scale, Width, Height and Fit to Page.These parameters have no effect on the image itself, just on the print version. You can change the size ofthe printed image by entering any value in %, or by entering new values in Width and Height.
To adjust the size of the image to the paper size, select Fit to Page.
Move the image on the page with the mouse or align it using the arrow buttons.
You can activate Frame for the image and adjust its width and color.
Choose the Background Color by clicking on the color plate.
In the Page tab, you can adjust printing of the multiple copies of the image on a single sheet.
AKVIS OilPaint
52
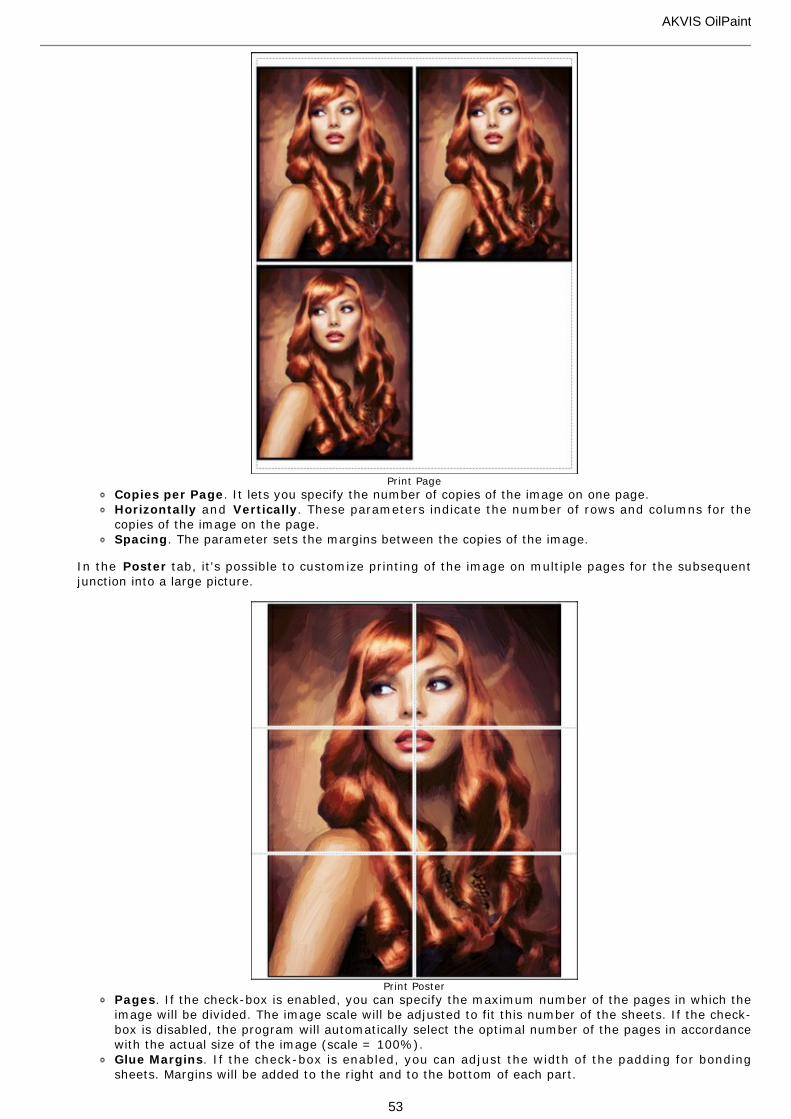
Print Page
Copies per Page. It lets you specify the number of copies of the image on one page.Horizontally and Vertically. These parameters indicate the number of rows and columns for thecopies of the image on the page.Spacing. The parameter sets the margins between the copies of the image.
In the Poster tab, it's possible to customize printing of the image on multiple pages for the subsequentjunction into a large picture.
Print Poster
Pages. If the check-box is enabled, you can specify the maximum number of the pages in which theimage will be divided. The image scale will be adjusted to fit this number of the sheets. If the check-box is disabled, the program will automatically select the optimal number of the pages in accordancewith the actual size of the image (scale = 100%).Glue Margins. If the check-box is enabled, you can adjust the width of the padding for bondingsheets. Margins will be added to the right and to the bottom of each part.
AKVIS OilPaint
53

Lines of Cut. Activate the check-box to display the cut marks in the margins.Show Numbers. With the enabled check-box, a sequence number of each part, by a column and arow, will be printed in the margins.
To print the image with the chosen parameters, press the Print button. To cancel and close the printing options click on Cancel.
Click the Properties... button to open a system dialog box that enables you to access the advanced settingsand send the document to print.
AKVIS OilPaint
54
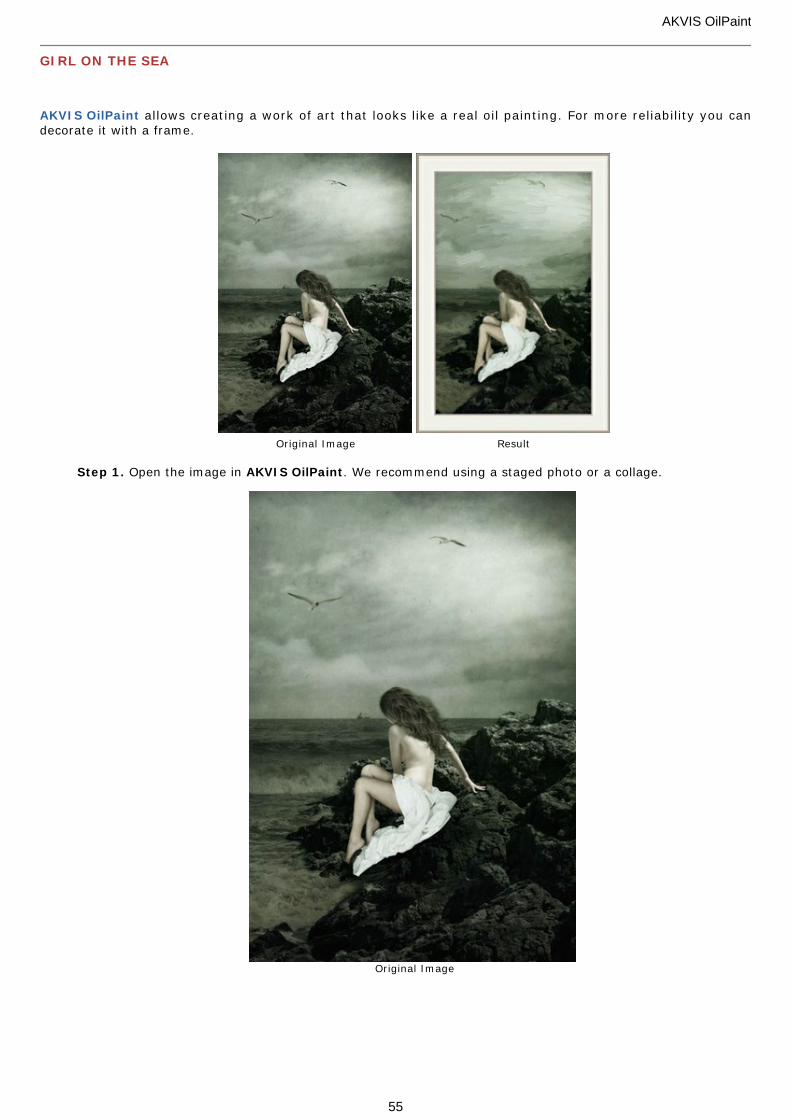
GIRL ON THE SEA
AKVIS OilPaint allows creating a work of art that looks like a real oil painting. For more reliability you candecorate it with a frame.
Original Image Result
Step 1. Open the image in AKVIS OilPaint. We recommend using a staged photo or a collage.
Original Image
AKVIS OilPaint
55
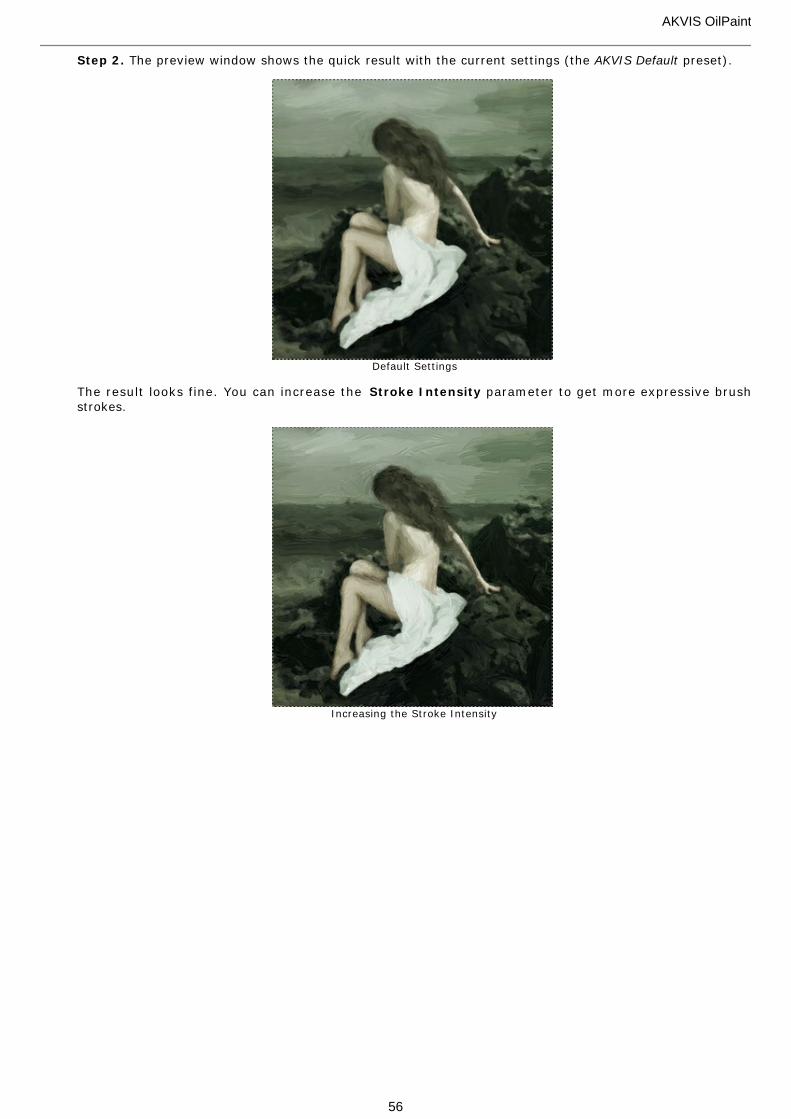
Step 2. The preview window shows the quick result with the current settings (the AKVIS Default preset).
Default Settings
The result looks fine. You can increase the Stroke Intensity parameter to get more expressive brushstrokes.
Increasing the Stroke Intensity
AKVIS OilPaint
56
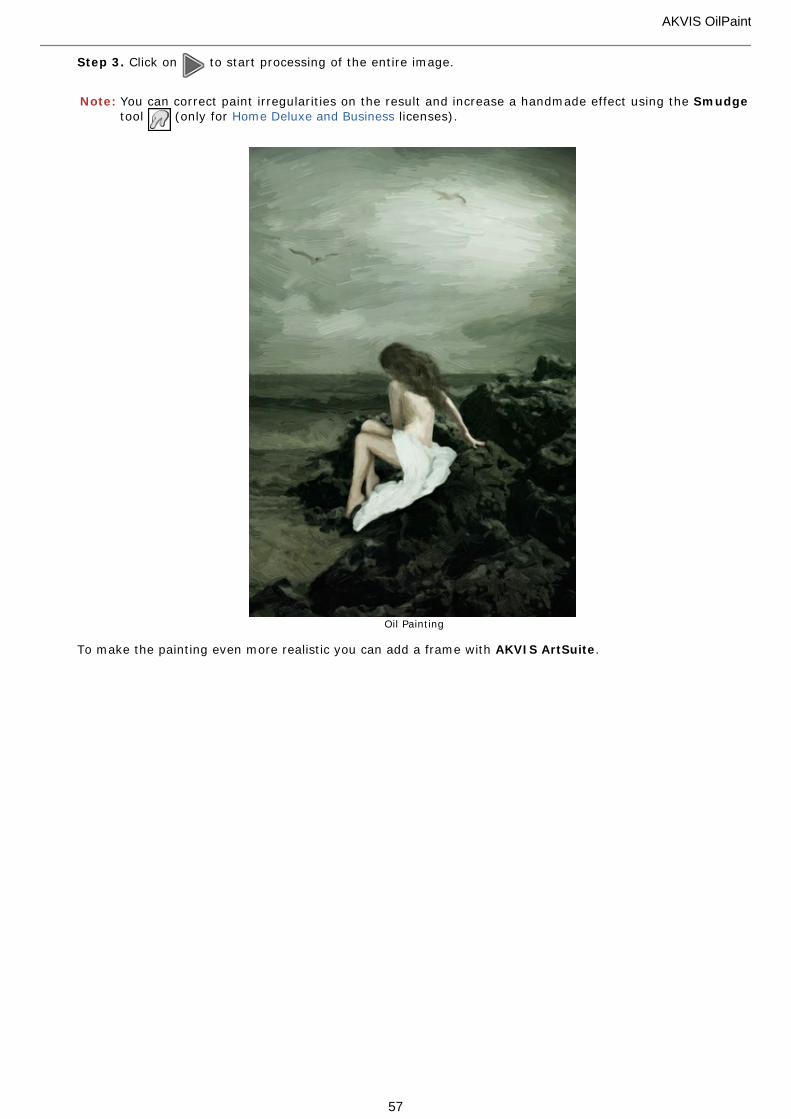
Step 3. Click on to start processing of the entire image.
Note: You can correct paint irregularities on the result and increase a handmade effect using the Smudgetool (only for Home Deluxe and Business licenses).
Oil Painting
To make the painting even more realistic you can add a frame with AKVIS ArtSuite.
AKVIS OilPaint
57
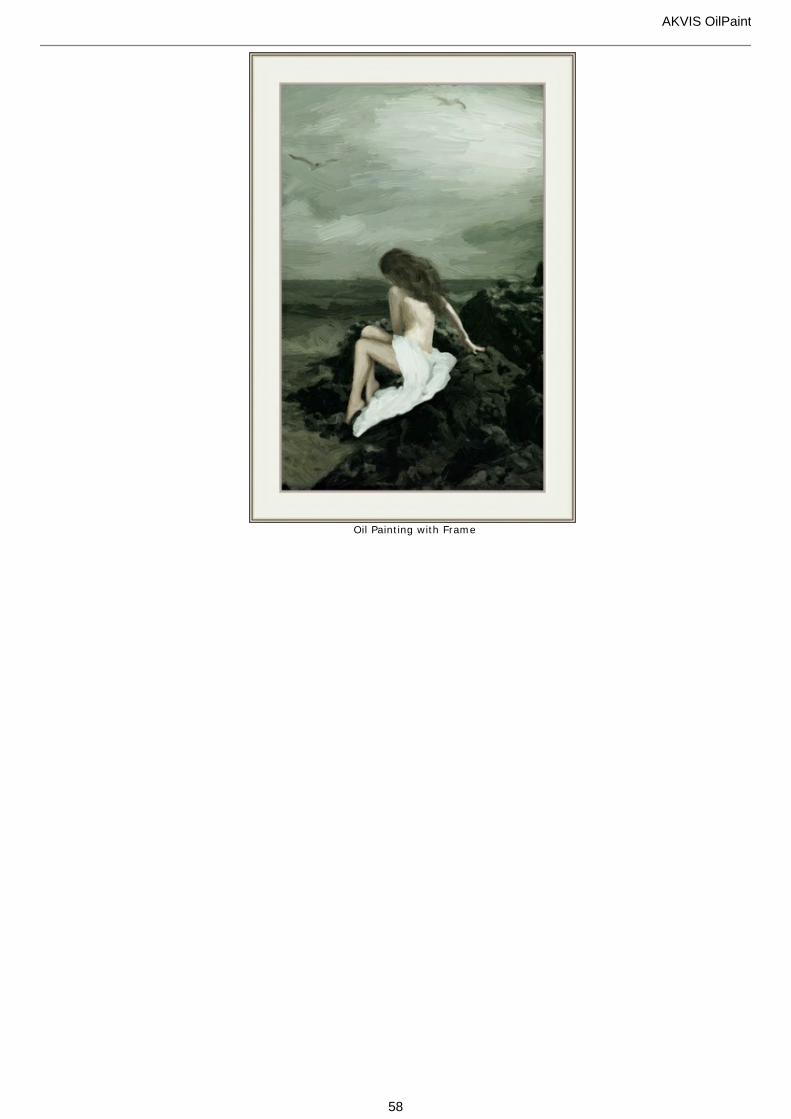
Oil Painting with Frame
AKVIS OilPaint
58
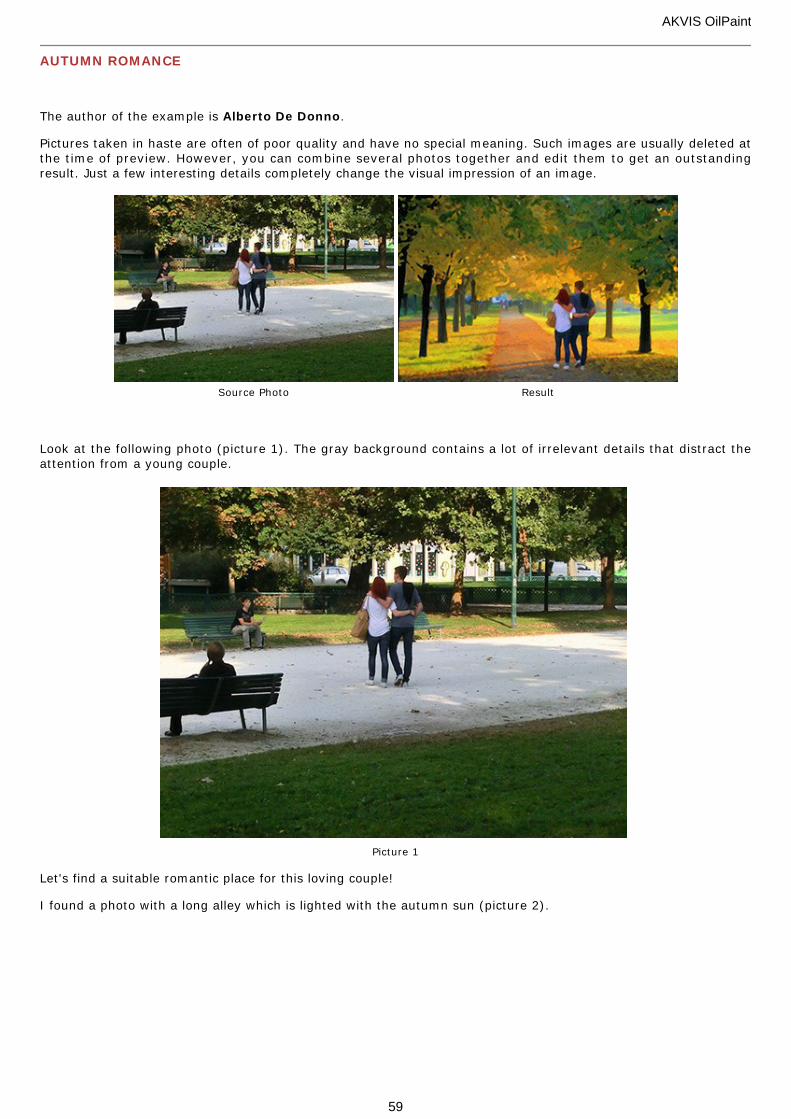
AUTUMN ROMANCE
The author of the example is Alberto De Donno.
Pictures taken in haste are often of poor quality and have no special meaning. Such images are usually deleted atthe time of preview. However, you can combine several photos together and edit them to get an outstandingresult. Just a few interesting details completely change the visual impression of an image.
Source Photo Result
Look at the following photo (picture 1). The gray background contains a lot of irrelevant details that distract theattention from a young couple.
Picture 1
Let's find a suitable romantic place for this loving couple!
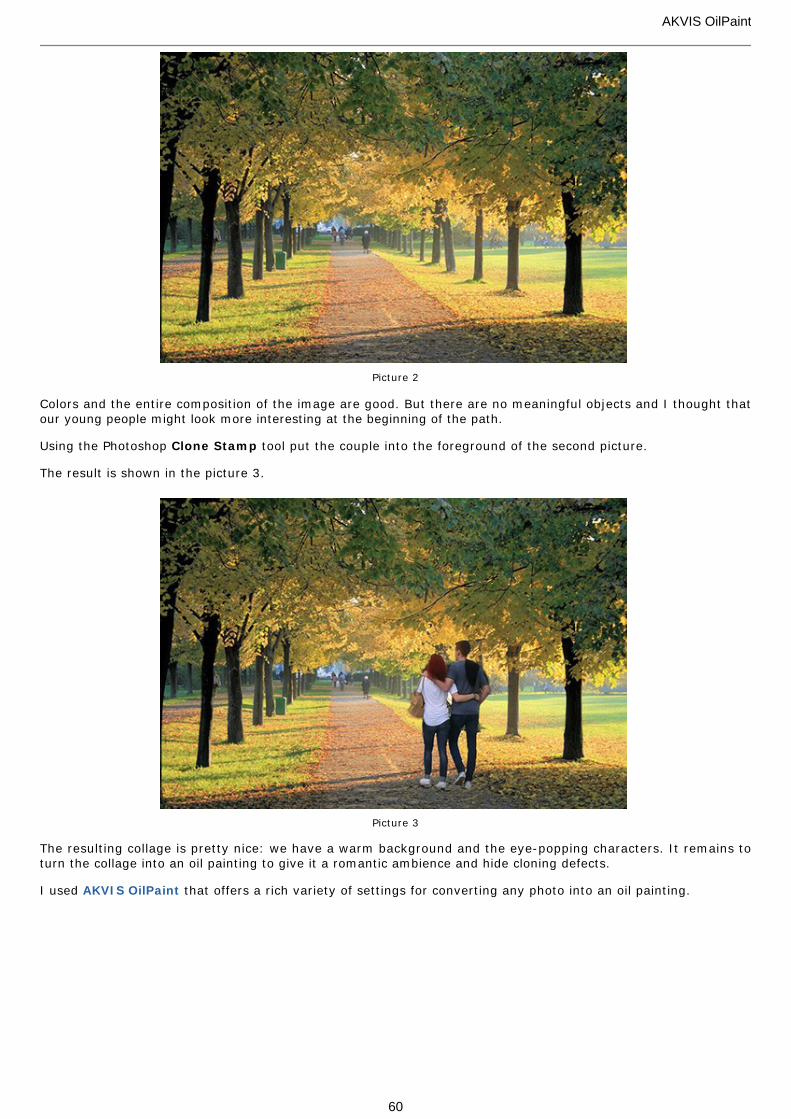
I found a photo with a long alley which is lighted with the autumn sun (picture 2).
AKVIS OilPaint
59
Picture 2
Colors and the entire composition of the image are good. But there are no meaningful objects and I thought thatour young people might look more interesting at the beginning of the path.
Using the Photoshop Clone Stamp tool put the couple into the foreground of the second picture.
The result is shown in the picture 3.
Picture 3
The resulting collage is pretty nice: we have a warm background and the eye-popping characters. It remains toturn the collage into an oil painting to give it a romantic ambience and hide cloning defects.
I used AKVIS OilPaint that offers a rich variety of settings for converting any photo into an oil painting.
AKVIS OilPaint
60
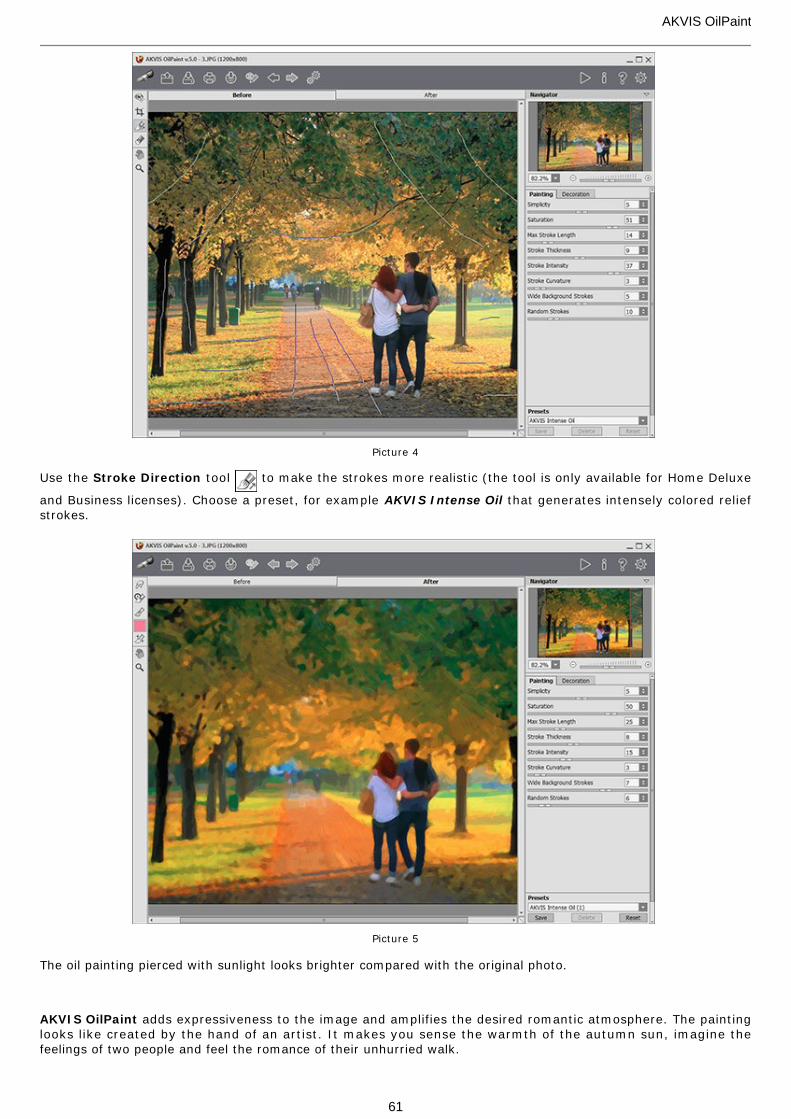
Picture 4
Use the Stroke Direction tool to make the strokes more realistic (the tool is only available for Home Deluxe
and Business licenses). Choose a preset, for example AKVIS Intense Oil that generates intensely colored reliefstrokes.
Picture 5
The oil painting pierced with sunlight looks brighter compared with the original photo.
AKVIS OilPaint adds expressiveness to the image and amplifies the desired romantic atmosphere. The paintinglooks like created by the hand of an artist. It makes you sense the warmth of the autumn sun, imagine thefeelings of two people and feel the romance of their unhurried walk.
AKVIS OilPaint
61

Picture 6
The quickest and easiest way to learn the features of the programs is to experiment with them. It can triggeryour imagination as well.
Add the Canvas effect or a text; use different painting styles by selecting presets or adjusting parametersettings.
Make sure that the processing result correctly reflects your feelings and corresponds with your artistic intention.
We wish you much success and happy experimenting!
AKVIS OilPaint
62
AKVIS PROGRAMS
AKVIS Sketch Video — Convert Video to Cartoon
(Windows | Mac)
AKVIS Sketch Video is an After Effects and Premiere Pro plugin for converting videos into animated cartoons,both black and white and color. Apply cartoon effects easily with the Sketch Video plugin! More…
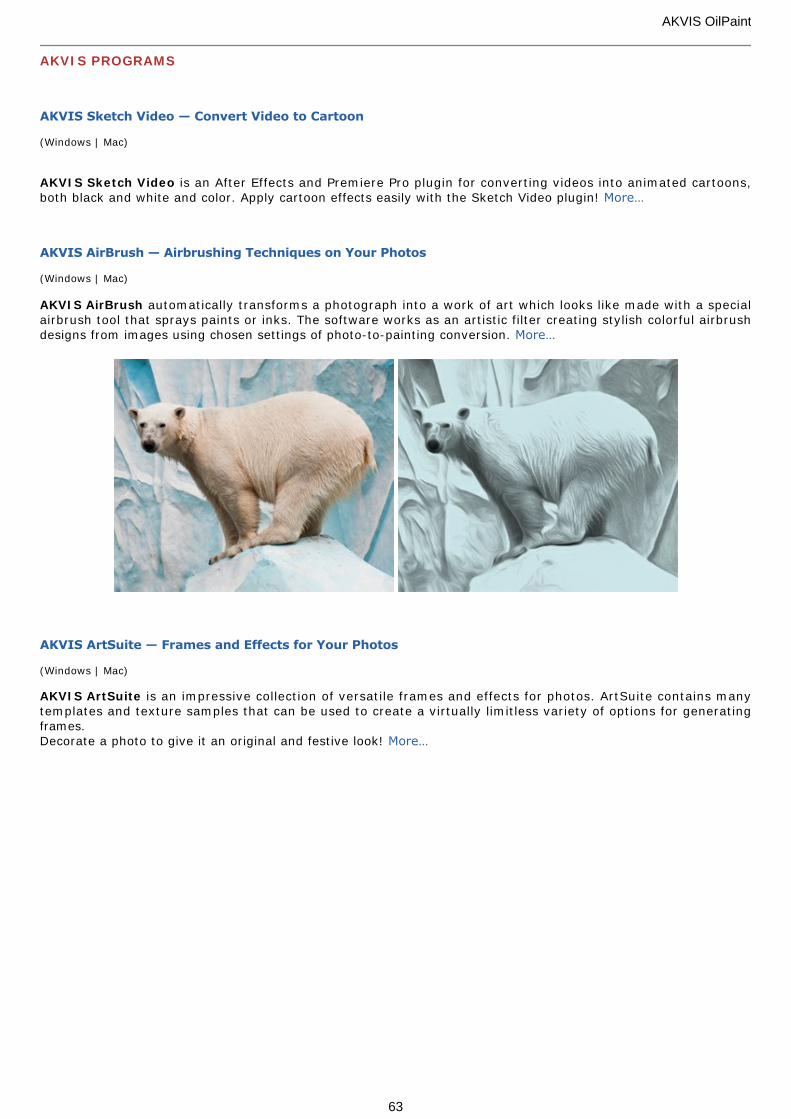
AKVIS AirBrush — Airbrushing Techniques on Your Photos
(Windows | Mac)
AKVIS AirBrush automatically transforms a photograph into a work of art which looks like made with a specialairbrush tool that sprays paints or inks. The software works as an artistic filter creating stylish colorful airbrushdesigns from images using chosen settings of photo-to-painting conversion. More…
AKVIS ArtSuite — Frames and Effects for Your Photos
(Windows | Mac)
AKVIS ArtSuite is an impressive collection of versatile frames and effects for photos. ArtSuite contains manytemplates and texture samples that can be used to create a virtually limitless variety of options for generatingframes.Decorate a photo to give it an original and festive look! More…
AKVIS OilPaint
63
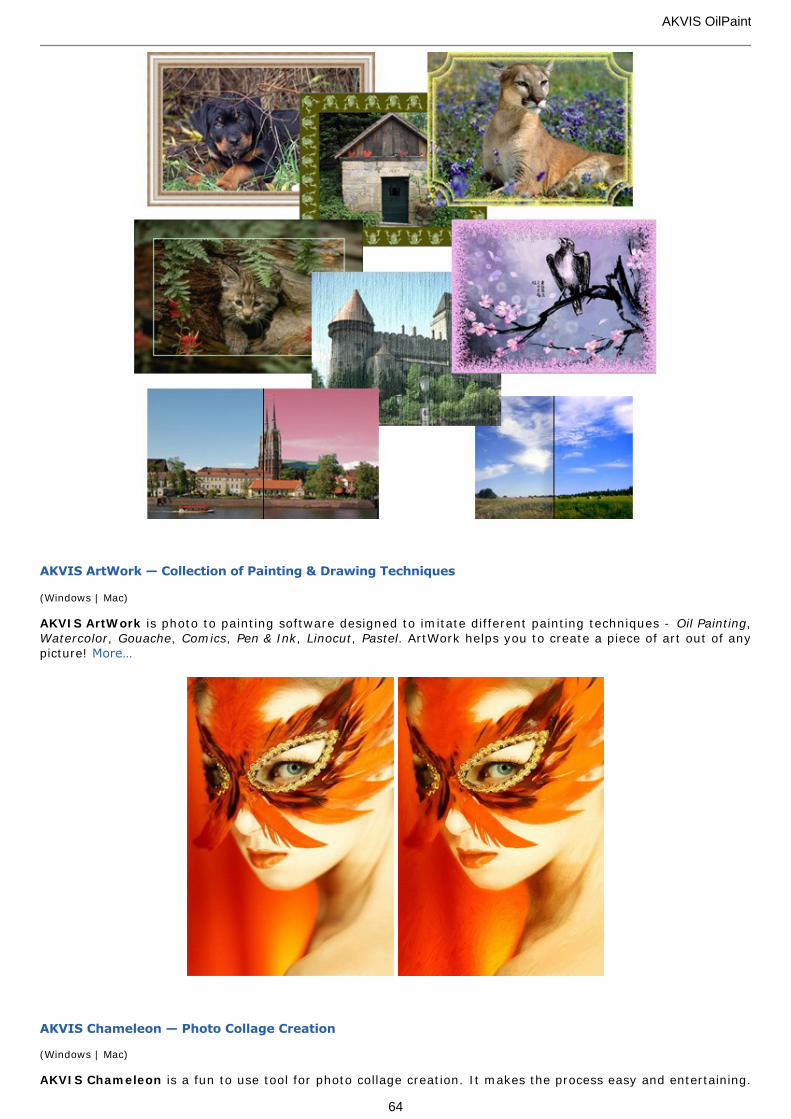
AKVIS ArtWork — Collection of Painting & Drawing Techniques
(Windows | Mac)
AKVIS ArtWork is photo to painting software designed to imitate different painting techniques - Oil Painting,Watercolor, Gouache, Comics, Pen & Ink, Linocut, Pastel. ArtWork helps you to create a piece of art out of anypicture! More…
AKVIS Chameleon — Photo Collage Creation
(Windows | Mac)
AKVIS Chameleon is a fun to use tool for photo collage creation. It makes the process easy and entertaining.
AKVIS OilPaint
64
The tool is very easy to handle as it does not require precise selection of objects.Using the software you can quickly create your own photo collages. More…
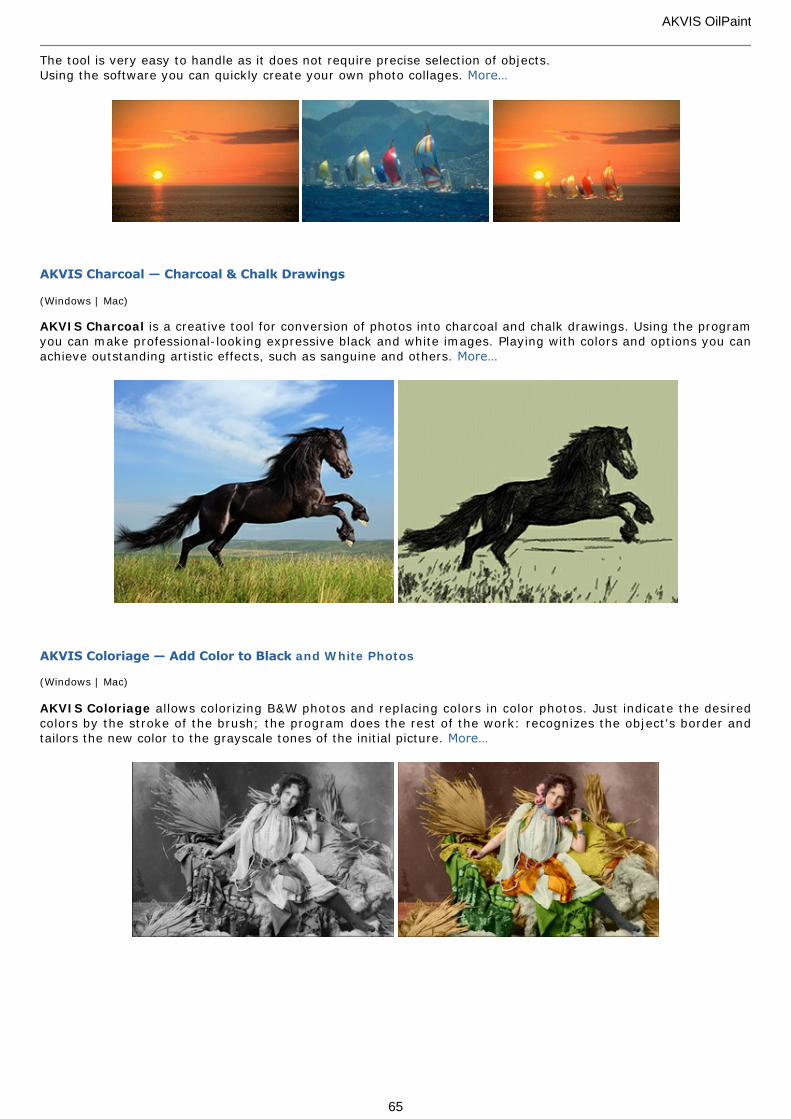
AKVIS Charcoal — Charcoal & Chalk Drawings
(Windows | Mac)
AKVIS Charcoal is a creative tool for conversion of photos into charcoal and chalk drawings. Using the programyou can make professional-looking expressive black and white images. Playing with colors and options you canachieve outstanding artistic effects, such as sanguine and others. More…
AKVIS Coloriage — Add Color to Black and White Photos
(Windows | Mac)
AKVIS Coloriage allows colorizing B&W photos and replacing colors in color photos. Just indicate the desiredcolors by the stroke of the brush; the program does the rest of the work: recognizes the object's border andtailors the new color to the grayscale tones of the initial picture. More…
AKVIS OilPaint
65

AKVIS Decorator — Resurface and Recolor
(Windows | Mac)
AKVIS Decorator lets you change the surface of an object in a realistic manner. The program puts on a texturekeeping the volume of an object, following its folds and creases. The new pattern looks absolutely natural andmakes you see things differently. Recoloring is also made easy. More…
AKVIS Draw — Hand-made Pencil Drawing Effect
(Windows | Mac)
AKVIS Draw converts your photos into hand made pencil drawings. The software creates realistic looking line artillustrations, produces both B&W and color drawings. Add a hand-drawn look to your pictures! More…
AKVIS Enhancer — Bring Detail To Your Pictures
(Windows | Mac)
AKVIS Enhancer is image enhancement software that detects detail in underexposed, overexposed and mid tone
AKVIS OilPaint
66
areas of a photo with uneven exposure. Enhancer improves every part of the image! The software works in threemodes: Improve Detail, Prepress, and Tone Correction. The program offers a fast method to fix a dark photo, addcontrast and brightness to a picture, it lets you improve color and adjust tones. More…
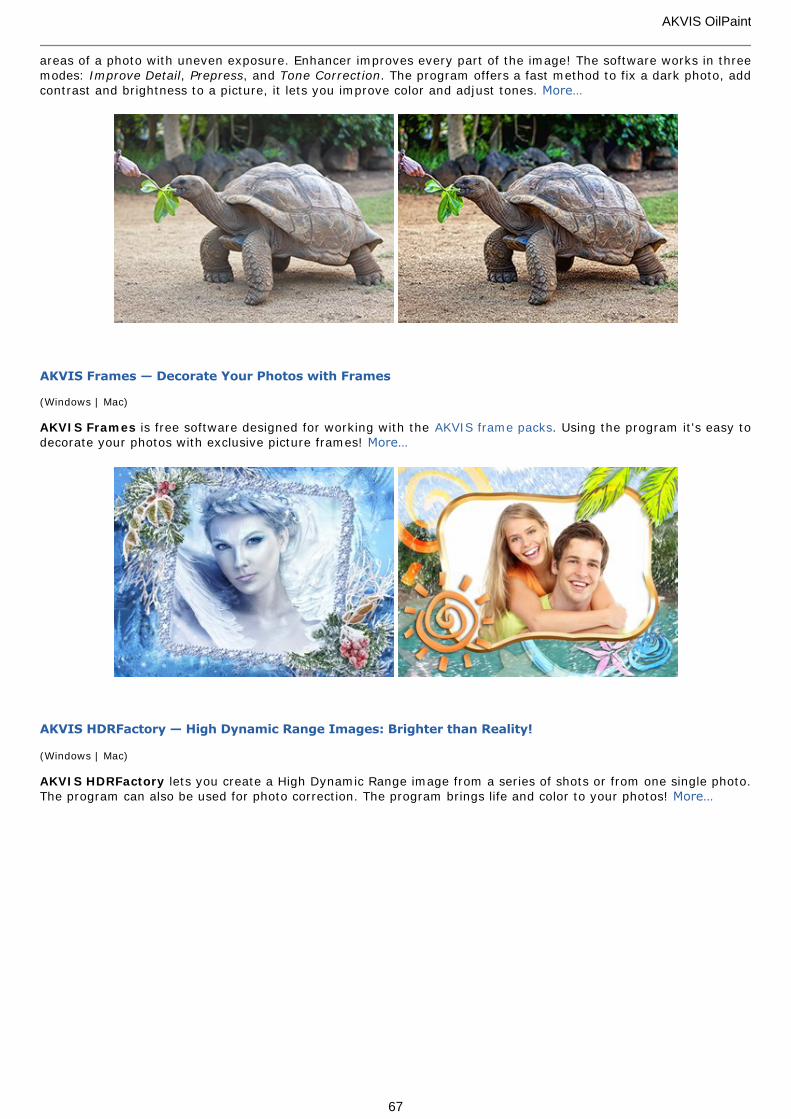
AKVIS Frames — Decorate Your Photos with Frames
(Windows | Mac)
AKVIS Frames is free software designed for working with the AKVIS frame packs. Using the program it's easy todecorate your photos with exclusive picture frames! More…
AKVIS HDRFactory — High Dynamic Range Images: Brighter than Reality!
(Windows | Mac)
AKVIS HDRFactory lets you create a High Dynamic Range image from a series of shots or from one single photo.The program can also be used for photo correction. The program brings life and color to your photos! More…
AKVIS OilPaint
67
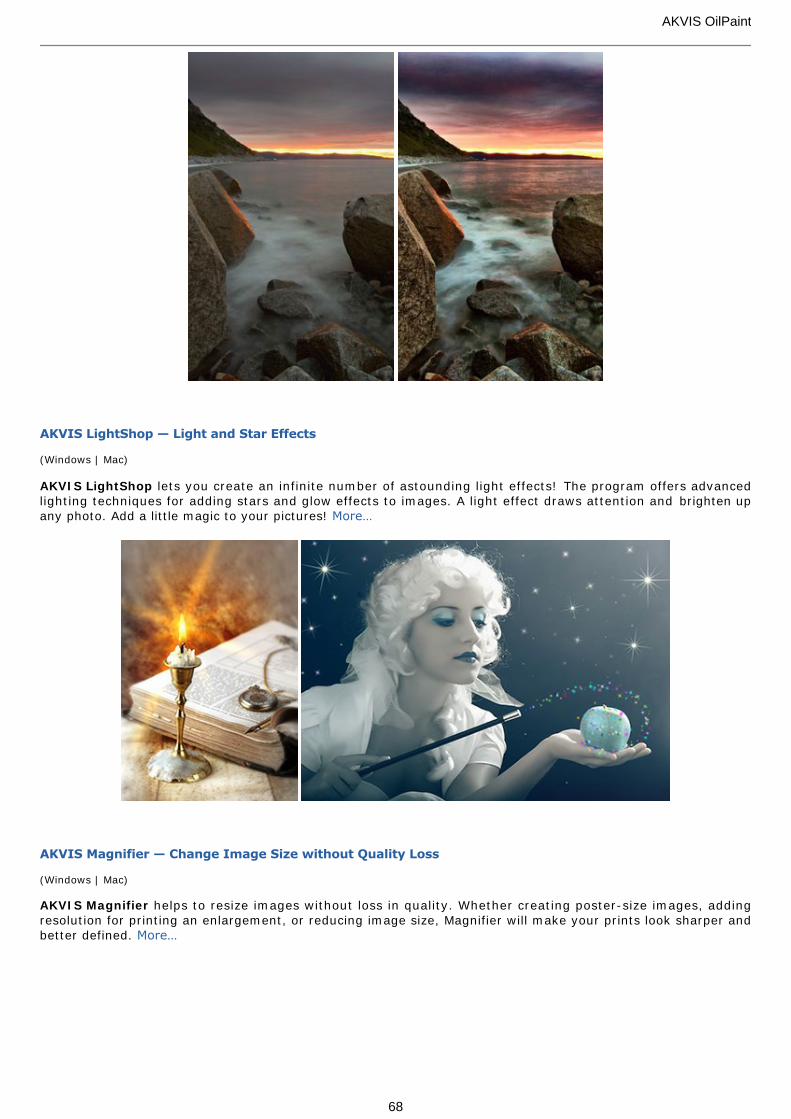
AKVIS LightShop — Light and Star Effects
(Windows | Mac)
AKVIS LightShop lets you create an infinite number of astounding light effects! The program offers advancedlighting techniques for adding stars and glow effects to images. A light effect draws attention and brighten upany photo. Add a little magic to your pictures! More…
AKVIS Magnifier — Change Image Size without Quality Loss
(Windows | Mac)
AKVIS Magnifier helps to resize images without loss in quality. Whether creating poster-size images, addingresolution for printing an enlargement, or reducing image size, Magnifier will make your prints look sharper andbetter defined. More…
AKVIS OilPaint
68

AKVIS MakeUp — Retouch Your Portrait Photos!
(Windows | Mac)
AKVIS MakeUp improves your portraits giving them a professional look. The software retouches facialimperfections making your skin radiant, beautiful, pure and even. The program adds glamour to your pictures andcreates a high key effect. Look your best in every photo with AKVIS MakeUp! More…
AKVIS NatureArt — Bring Nature to Your Photos
(Windows | Mac)
AKVIS NatureArt is an excellent tool for imitating the magnificence of natural phenomena on your photos. Adddramatic nature effects to your photo, change the weather on it! With NatureArt you can become a wizard!More…
AKVIS OilPaint
69
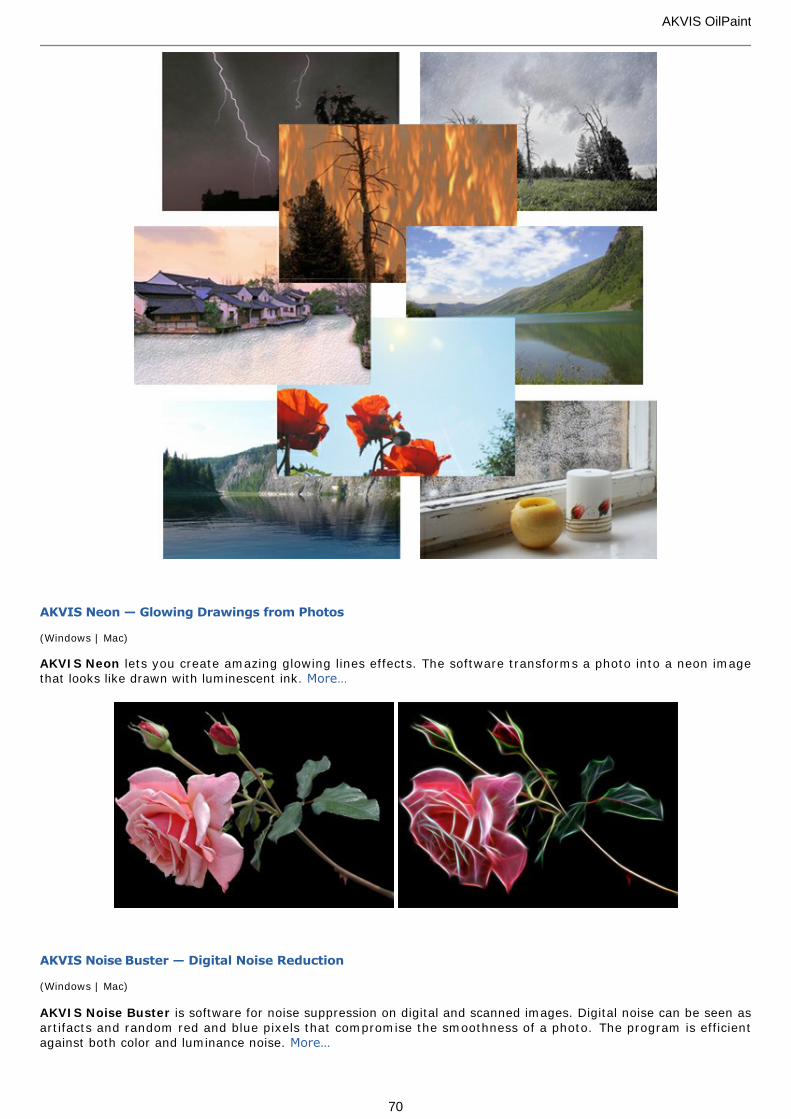
AKVIS Neon — Glowing Drawings from Photos
(Windows | Mac)
AKVIS Neon lets you create amazing glowing lines effects. The software transforms a photo into a neon imagethat looks like drawn with luminescent ink. More…
AKVIS Noise Buster — Digital Noise Reduction
(Windows | Mac)
AKVIS Noise Buster is software for noise suppression on digital and scanned images. Digital noise can be seen asartifacts and random red and blue pixels that compromise the smoothness of a photo. The program is efficientagainst both color and luminance noise. More…
AKVIS OilPaint
70
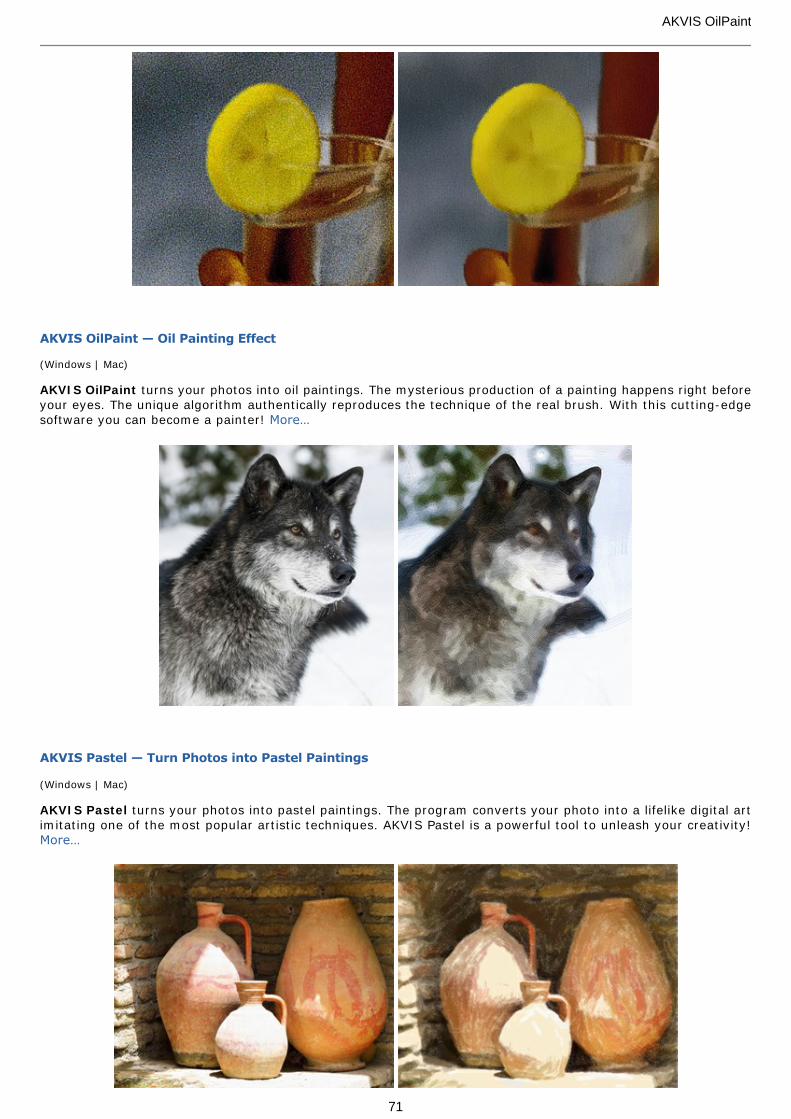
AKVIS OilPaint — Oil Painting Effect
(Windows | Mac)
AKVIS OilPaint turns your photos into oil paintings. The mysterious production of a painting happens right beforeyour eyes. The unique algorithm authentically reproduces the technique of the real brush. With this cutting-edgesoftware you can become a painter! More…
AKVIS Pastel — Turn Photos into Pastel Paintings
(Windows | Mac)
AKVIS Pastel turns your photos into pastel paintings. The program converts your photo into a lifelike digital artimitating one of the most popular artistic techniques. AKVIS Pastel is a powerful tool to unleash your creativity!More…
AKVIS OilPaint
71

AKVIS Points — Apply Pointillism Effect to Your Photos
(Windows | Mac)
AKVIS Points lets you transform your photos into paintings using one of the most exciting artistic techniques -pointillism. With the software you can easily create gorgeous works of art in a pointillist manner. Discover theworld of bright colors! More…
AKVIS Refocus — Focus Improvement & Blur Effects
(Windows | Mac)
AKVIS Refocus improves sharpness of out of focus images. The program can process the entire photo or bringinto focus only the selected part to make the subject stand out against the background. It's also possible to addbokeh and lens blur effects to your photos. The software works in five modes: Refocus, Tilt-Shift, Iris Blur, Motion Blur, and Radial Blur. More…
AKVIS Retoucher — Image Restoration Software
(Windows | Mac)
AKVIS Retoucher is an efficient program for photo restoration and photo retouching. The software removes dust,scratches, stains, and other defects that appear on damaged photos. It intelligently reconstructs the missingparts of the photo using the information of the surrounding areas. More…
AKVIS OilPaint
72
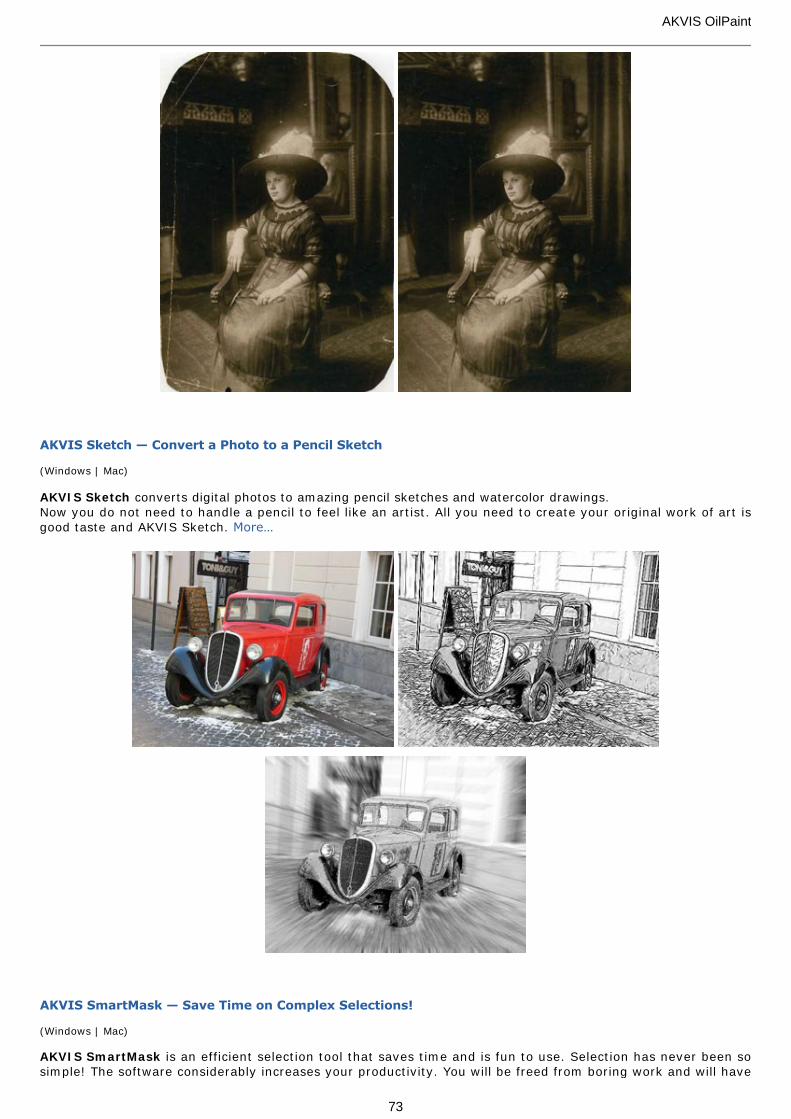
AKVIS Sketch — Convert a Photo to a Pencil Sketch
(Windows | Mac)
AKVIS Sketch converts digital photos to amazing pencil sketches and watercolor drawings. Now you do not need to handle a pencil to feel like an artist. All you need to create your original work of art isgood taste and AKVIS Sketch. More…
AKVIS SmartMask — Save Time on Complex Selections!
(Windows | Mac)
AKVIS SmartMask is an efficient selection tool that saves time and is fun to use. Selection has never been sosimple! The software considerably increases your productivity. You will be freed from boring work and will have
AKVIS OilPaint
73
more room for creativity and realization of your ideas. More…
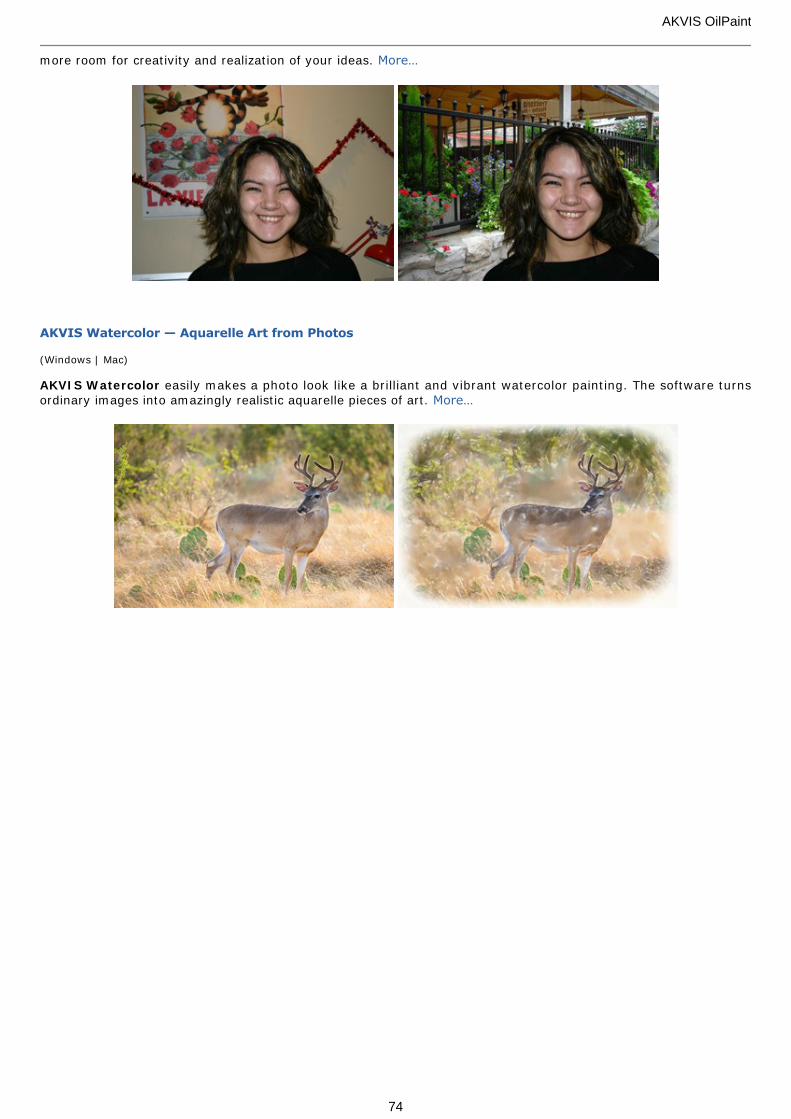
AKVIS Watercolor — Aquarelle Art from Photos
(Windows | Mac)
AKVIS Watercolor easily makes a photo look like a brilliant and vibrant watercolor painting. The software turnsordinary images into amazingly realistic aquarelle pieces of art. More…
AKVIS OilPaint
74