Download - 162190569 Demantra Demantra EBS Integration

EBS-Demantra Integration Installation Overview and Diagram (Doc ID 434991.1)
Modified: Jul 17, 2012 Type: TROUBLESHOOTING Status: PUBLISHED Priority: 3
In this Document
Purpose
Purpose
Troubleshooting Steps
EBS-Demantra Integration Installation Diagram
EBS-Demantra Installation Overview
Detailed Installation Steps
1. Install OracleAS 10.1.4 Infrastructure / Identity Management Instance
2. Install OracleAS 10.1.3 Application Server Middle Tier Instance
3. Install Demantra 7.1.1
4. Create and Deploy demantra.war file to OracleAS 10.1.3 Middle Tier
5. Upgrade EBS/APS 11i (11.5.10.2) applications to J2SE 1.5
6. Upgrade EBS/APS 11i (11.5.10.2) applications Dev6i to Patch 18 or newer
7. Install Latest ASCP Collections and Engine Patches on EBS/APS
8. Install EBS Demantra Integration Patch
9. Implement EBS/APS with SSO/OID on the 10g OracleAS Infrastructure
10. Register Demantra with SSO/OID on the 10g OracleAS Infrastructure
Table of Documents
References
APPLIES TO:
Oracle Demantra Demand Management - Version 11.5.10.2 to 11.5.10.2 [Release 11.5]Information in this document applies to any platform.Information in this document applies to any platform.
PURPOSE
Purpose
The purpose of this document is to provide an overview of the Oracle Demantra Demand Management product installation and integration with Oracle E-Business Suite 11.5.10.2 and Advanced Planning suite applications11.5.10.2, including the OracleAS 10g 10.1.4 Identity Management Infrastructure, and OracleAS 10g 10.1.3 Application Server Middle Tier.
This document is specifically written based on the environment in the diagram below. It is based on the 11.5.10.2 EBS and APS applications instances. It is specific to the Linux Operating System. There may besignificant other patching and implementation steps not mentioned directly here. Please use the reference documentation links as appropriate for the specific environment being implemented.
TROUBLESHOOTING STEPS
EBS-Demantra Integration Installation Diagram

EBS-Demantra Installation Overview
1. Install OracleAS 10.1.4 Infrastructure / Identity Management Instance
2. Install OracleAS 10.1.3 Application Server Middle Tier Instance
3. Install Demantra 7.1.1
4. Create and Deploy demantra.war file to OAS 10.1.3 Middle Tier
5. Upgrade EBS/APS 11i (11.5.10.2) applications to J2SE 1.5.0.12
6. Upgrade EBS/APS 11i (11.5.10.2) applications Dev6i to Patch 18 or newer
7. Install Latest ASCP Collections and Engine Patches on EBS/APS
8. Install EBS Demantra Integration Patch
9. Implement EBS/APS with SSO on the 10g OracleAS Infrastructure
10. Implement Demantra with SSO on the 10g OracleAS Infrastructure
Detailed Installation Steps
1. Install OracleAS 10.1.4 Infrastructure / Identity Management Instance
Note 233436.1 Installing Oracle Application Server 10g with Oracle E-Business Suite Release 11i
OracleAS 10g Infrastructure Documents
Oracle Identity Management 10g (10.1.4) Documentation LibraryOracle Identity Management 10g (10.1.4.0.1) Installation GuideOracle Identity Management 10g (10.1.4.0.1) Administrator Guide
Please note: If there are questions or issues related to the Oracle AS 10g Applications Server installation and requirements, please log an appropriate SR with the ATG Support Group that supports thatproduct. The ASCP/Demantra support team does not have the expertise to resolve OAS issues.
Demantra's Java Web App requires Oracle AS 10g (10.1.3) Middle Tier Installation. The Oracle AS 10g (10.1.3) Middle Tier REQUIRES the Oracle AS 10g (10.1.4) Infrastructure Tier regardless if usingOID/SSO features or not.
A. Prepare/Setup for Installation
1). setup kernel
sysctl -a -- lists all settingssysctl -p -- applies the changes of sysctl.conf realtime
Added the following to /etc/sysctl.conf
kernel.core_uses_pid = 1kernel.shmmax=2147483648
kernel.sem=256 32000 100 142fs.file-max=131072net.ipv4.ip_local_port_range=1024 65000kernel.msgmni=2878kernel.msgmax=8192kernel.msgmnb=65535
Added the following to /etc/pam.d/login
session required /lib/security/pam_limits.so
Added the following lines to /etc/security/limits.conf file:
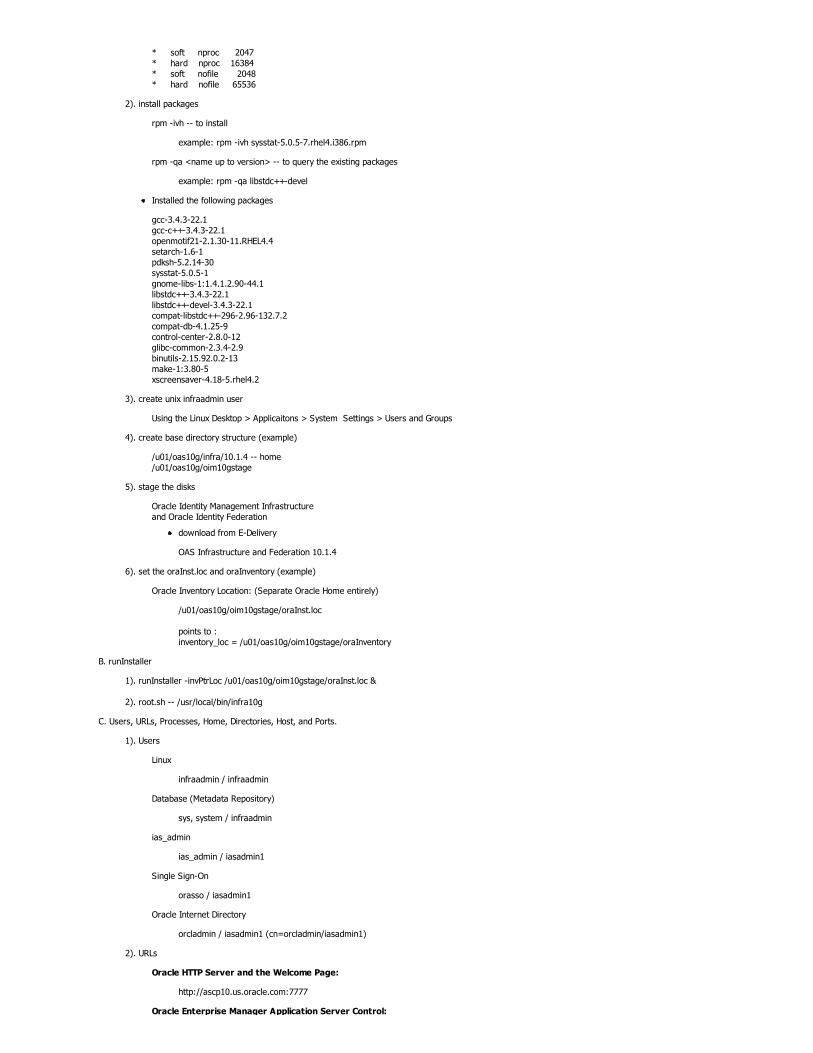
* soft nproc 2047* hard nproc 16384* soft nofile 2048* hard nofile 65536
2). install packages
rpm -ivh -- to install
example: rpm -ivh sysstat-5.0.5-7.rhel4.i386.rpm
rpm -qa <name up to version> -- to query the existing packages
example: rpm -qa libstdc++-devel
Installed the following packages
gcc-3.4.3-22.1 gcc-c++-3.4.3-22.1 openmotif21-2.1.30-11.RHEL4.4 setarch-1.6-1 pdksh-5.2.14-30 sysstat-5.0.5-1 gnome-libs-1:1.4.1.2.90-44.1 libstdc++-3.4.3-22.1 libstdc++-devel-3.4.3-22.1 compat-libstdc++-296-2.96-132.7.2compat-db-4.1.25-9control-center-2.8.0-12 glibc-common-2.3.4-2.9 binutils-2.15.92.0.2-13 make-1:3.80-5 xscreensaver-4.18-5.rhel4.2
3). create unix infraadmin user
Using the Linux Desktop > Applicaitons > System Settings > Users and Groups
4). create base directory structure (example)
/u01/oas10g/infra/10.1.4 -- home/u01/oas10g/oim10gstage
5). stage the disks
Oracle Identity Management Infrastructure and Oracle Identity Federation
download from E-Delivery
OAS Infrastructure and Federation 10.1.4
6). set the oraInst.loc and oraInventory (example)
Oracle Inventory Location: (Separate Oracle Home entirely)
/u01/oas10g/oim10gstage/oraInst.loc
points to :inventory_loc = /u01/oas10g/oim10gstage/oraInventory
B. runInstaller
1). runInstaller -invPtrLoc /u01/oas10g/oim10gstage/oraInst.loc &
2). root.sh -- /usr/local/bin/infra10g
C. Users, URLs, Processes, Home, Directories, Host, and Ports.
1). Users
Linux
infraadmin / infraadmin
Database (Metadata Repository)
sys, system / infraadmin
ias_admin
ias_admin / iasadmin1
Single Sign-On
orasso / iasadmin1
Oracle Internet Directory
orcladmin / iasadmin1 (cn=orcladmin/iasadmin1)
2). URLs
Oracle HTTP Server and the Welcome Page:
http://ascp10.us.oracle.com:7777
Oracle Enterprise Manager Application Server Control:

Oracle Enterprise Manager Application Server Control:
http://ascp10.us.oracle.com:1156
Oracle Enterprise Manager (OEM):
http://ascp10.us.oracle.com:5500/em
Oracle Internet Directory Delegated Administration Services:
http://ascp10.us.oracle.com:13060/oiddas
Oracle Single Sign On:
http://ascp10.us.oracle.com:????
3). Processes or script
Database Listener
$ORACLE_HOME/bin/lsnrctl stop/start
Database (Metadata Repository)
sqlplus "/ as sysdba"startup / shutdown
Application Server Control Console
$ORACLE_HOME/bin/emctl stop/start iasconsole
Enterprise Manager Console
$ORACLE_HOME/bin/emctl stop/start dbconsole
Process Manager and Notification Server and processes
$ORACLE_HOME/opmn/bin/opmnctl stopall/startall
4). Home
Oracle Home Name :INFRA_ASCP10
Instance Name : infra10g
SID : infra10g
5). Directories
stage : /u01/oas10g/oim10gstage/home : /u01/oas10g/infra/10.1.4/oraInventory : /u01/oas10g/oim10gstage/oraInventory
6). Host
hostname: ascp10.us.oracle.com
7). Ports List Location:
Directory : /u01/oas10g/infra/10.1.4/portlist.txt
[infraadmin@ascp10 install]# more portlist.ini
;OracleAS Components reserve the following ports at install time.;As a post-installation step, you can reconfigure a component to use a different port.;Those changes will not be visible in this file.
[System]Host Name = ascp10.us.oracle.com
[Ports]
Oracle HTTP Server port = 7777
Oracle HTTP Server Listen port = 7777
Oracle HTTP Server SSL port = 4443
Oracle HTTP Server Listen (SSL) port = 4443
Oracle Notification Server Request port = 6003
Oracle Notification Server Local port = 6101
Oracle Notification Server Remote port = 6200
ASG port = 7890
Oracle HTTP Server Diagnostic port = 7200
Log Loader port = 44000
Java Object Cache port = 7000
DCM Discovery port = 7100
Application Server Control RMI port = 1850
Oracle Management Agent Port = 1157
Application Server Control port = 1156

Oracle Internet Directory port = 13060
Oracle Internet Directory (SSL) port = 13130
Enterprise Manager Console HTTP Port (infra10g) = 5500
Enterprise Manager Agent Port (infra10g) = 1830
2. Install OracleAS 10.1.3 Application Server Middle Tier Instance
Note 233436.1 Installing Oracle Application Server 10g with Oracle E-Business Suite Release 11i
OracleAS 10g Middle Tier Documents
Oracle Application Server 10g Release 3 (10.1.3.2.0) Documentation LibraryOracle Application Server 10g Release 3 (10.1.3.2.0) Installation GuideOracle Application Server 10g Release 3 (10.1.3.2.0) Administrator Guide
Please note: For questions or issues with the Oracle AS 10g 10.1.3 Middle Tier requirements, Please log the appropriate SR with the ATG Support Group.
Demantra's Java Web App requires Oracle AS 10g (10.1.3) Middle Tier Installation. The Oracle AS 10g (10.1.3) Middle Tier REQUIRES the Oracle AS 10g (10.1.4) Infrastructure Tier regardlessif using OID/SSO features or not.
A. Prepare/Setup for Installation
1.) setup kernel (as per OracleAS Infrastructure noted above)
2.) install packages (as per OracleAS Infrastructure noted above)
3). Check that RHEL 4 Update 4 is installed:
# cat /etc/redhat-release
Red Hat Enterprise Linux AS release 4 (Nahant Update 3)
else, there is a requirement to install additional packagesinstall will error during checks
installActions2007-05-28_08-07-55PM.log:
Checking for compat-libstdc++-devel-7.3-2.96.128; found Not found. Failed <<<<Checking for compat-libstdc++-7.3-2.96.128; found Not found. Failed <<<<
Update the file /etc/redhat-release
Change "Update 3" to "Update 4"
to get past those c++ 7.x files
4). create unix oasadmin user
Using the Linux Desktop > Applicaitons > System Settings > Users and Groups
5). create base directory structure (example)
/u01/oas10g/product/10.1.3 -- home/u01/oas10g/oas10gstage
6). stage the disks
Oracle Application Server 10.1.3
download from E-Delivery
OracleAS Application Server 10.1.3
7). set the oraInst.loc and oraInventory
Oracle Inventory Location: (Separate Oracle Home entirely)
/u01/oas10g/oas10gstage/oraInst.loc
points to :inventory_loc = /u01/oas10g/oas10gstage/oraInventory
B. runInstaller
1). runInstaller -invPtrLoc /u01/oas10g/oas10gstage/oraInst.loc &
2). root.sh -- /usr/local/bin/oas_ascp10
C. Users, URLs, Processes, Homes, and Directories and Host
1). Users
linux : oasadmin / oasadmin
ias_admin : oc4jadmin / oc4jadmin
2). URLs

Access the Oracle HTTP Server with the following URL:
http://ascp10.us.oracle.com:7778/
Access the Oracle Enterprise Manager 10g Application Server Control via the following URL:
http://ascp10.us.oracle.com:7778/em
3). Processes or script
Application Server Control Console
$ORACLE_HOME/bin/emctl stop/start iasconsole
Enterprise Manager Console
$ORACLE_HOME/bin/emctl stop/start dbconsole
Process Manager and Notification Server and processes
$ORACLE_HOME/opmn/bin/opmnctl stopall/startall
You can view the status of the server with the following command:
/u01/oas10g/product/10.1.3/oas_ascp10/opmn/bin/opmnctl status
4). Home
Home Name : OASMT_ASCP10 (oracleas1 - default)
Uses the OracleAS 10g infrastructure repository Instance Name : infra10gUses the OracleAS 10g infrastructure repository SID : infra10g
5). Directories
stage = /u01/oas10g/oim10gstage/home = /u01/oas10g/product/10.1.3/oas_ascp10oraInventory = /u01/oas10g/oas10gstage/oraInventory
6). Host
hostname: ascp10.us.oracle.com
3. Install Demantra 7.1.1
On Windows 2000 / NT / XP / 2003(Standard not Business)
Note 428495.1 Oracle Demantra Installation for Release 7.1.1Note 438292.1 EBS – Demantra Integration Installation DB Client and Demantra Installation and Configuration - A GuideNote 443969.1 Oracle Demantra Demand Management Documentation Library
Please review the above documents for further details of the Demantra Installation. Note 438292.1 has the screenshots of the installation.
If Decentralized EBS/APS, Ensure to install the Demantra Database Schema into the APS Server.
A. Install Oracle 9i or 10g client as related to the EBS/APS Server Database version.
if EBS/APS server has 10g database,install 10g client
if EBS/APS server has 9i database,install 9i client
B. Parameters during install
Demantra Spectrum : On Windows
directory = D:\Demantra Spectrum
Choose Database Type:
Oracle
DBA User Name
SYSTEM
Password
MANAGER
TNS Name
APS
our APS Oracle 11i Applications Database SID/Instance Name
Specify the database user that will store Demantra data
Demantra Schema is installed against the APS Applications Instance Database in a decentralized environment.
User
MSDEM
Demantra Schema name for EBS/APS = MSDEM or MSDM or MSDDM or DEMANTRA or DEMANTRA_TEMPLATE

This is a User Defined Schema name during the Demantra 7.1.1 installation process.
It is recommended to use one of the above or something similar for the EBS-Demantra Integration as to keep it limited for easier understandingand research/diagnostics by Support.
Password
MSDEM
JDBC Connection (to APS Applications 11i)
Host Machine (DNS or IP)
aps.us.oracle.com
Port Number
1521
Oracle SID
APS
If TNSNAMES.ORA entry is not correct,
the install will fail at this point.
Tablespace for Demantra tables
APPS_TS_TX_DATA
DefaultTemporarySalesSimulationSales_Data_Engine
APPS_TX_TX_IDX
IndexSimulation IndexSales_Data_Engine Index
Specify Web Address
This is the web address to the OracleAS 10.1.3 Middle Tierwhere the demantra.war file will be deployed
Root Address:
http://ascp10.us.oracle.com:7778
Virtual Directory:
demantra
Your URL:
http://ascp10.us.oracle.com:7778/demantra
Demantra Direct Login URL:
http://ascp10.us.oracle.com:7778/demantra/portal/loginpage.jsp
Client Plug-in Download
leave NULL
demantra will then use the Plug-in found on the OracleAS 10.1.3 and/or from the Oracle 11i applications as upgraded in Step 5 below
Administrator Account Email.
Complete the Install.
C. After the Demantra Installation and EBS-Demantra Integration Patch,
Please ensure to set the profile MSD_DEM: Host URL on APS Suite Apps instance to value as noted above in the Your URL section
MSD_DEM: Host URL
http://ascp10.us.oracle.com:7778/demantra
Notes---------------
Oracle 9i Client (9.2.0) : On Windows
directory = D:\Oracle\product\9.2.0\Eracle9ibin = D:\Oracle\product\9.2.0\Eracle9i\bin -- where sqlplus.exe livestnsnames.ora = D:\Oracle\product\9.2.0\Eracle9i\network\ADMIN
Because our APS instance database is a 9.2.0.6 database,we required the 9.2.0.x Oracle 9i Client software.
Demantra uses the 9i Client to connect to the APS databasejust a sqldeveloper, jdeveloper, or TOAD, or any other client sidedatabase utility would connect to the database.

database utility would connect to the database.
Demantra pulls the data it requires from the APS Database into the DemantraAnalytical Engine through that sql connection via sqlnet and tnsnames. It insertsit back into the APS database tables as required through the same mechanism.
During Our Installation, we encountered the error due to having a 10g client installedon the windows server
ERROR====================================IMP-00003: ORACLE error 2248 encounteredORA-02248: invalid option for ALTER SESSIONIMP-00000: Import terminated unsuccessfully
DIAGNOSTIC====================================From the Windows Server, Login to the APS Database using SQLPLUS
pick any relatively small table
create table XX_MRP_SUGG_REP_SCHEDULES as select * from MRP.MRP_SUGG_REP_SCHEDULES;
on the command line in ORACLE_HOME/bin on windows,
exp apps/apps@APS TABLES=APPS.XX_MRP_SUGG_REP_SCHEDULES FILE=XX_MRP_SUGG_REP_SCHEDULES.dmp
imp apps/apps@APS TABLES=XX_MRP_SUGG_REP_SCHEDULES FILE=XX_MRP_SUGG_REP_SCHEDULES.dmp
If the above fails, then demantra will also fail for the same.
CAUSE====================================Using 10g Client with 9.2.0.6 Database
SOLUTION====================================Deinstall 10g Client, Install 9i Client.Retest the export/import again.
create table XX_MRP_SUGG_REP_SCHEDULES as select * from MRP.MRP_SUGG_REP_SCHEDULES;
exp apps/apps@APS TABLES=APPS.XX_MRP_SUGG_REP_SCHEDULES FILE=XX_MRP_SUGG_REP_SCHEDULES.dmp
imp apps/apps@APS TABLES=XX_MRP_SUGG_REP_SCHEDULES FILE=XX_MRP_SUGG_REP_SCHEDULES.dmp
Once that works, the Demantra install importing the Demantra schema will also work.
4. Create and Deploy demantra.war file to OracleAS 10.1.3 Middle Tier
Note 428495.1 Oracle Demantra Installation for Release 7.1.1
The note has the full details to create and deploy the *.war file to OracleAS 10g Middle TierSection: Deploying the Oracle Demantra Web Application on Oracle Application Server 10.3
The deployment process loads the demantra.war file to the following directory on the OAS 10g MT
After the deployment, the following is found in the OAS 10g MT server
$ORACLE_HOME/j2ee/home/applications/demantra
Connected to ascp10.
Escape character is '̂ ]'.
Red Hat Enterprise Linux AS release 4 (Nahant Update 3)
Kernel 2.6.9-34.EL on an i686
login: oasadmin
Password:
[oasadmin@ascp10 ~]$ cd $ORACLE_HOME/j2ee/home/applications/
[oasadmin@ascp10 applications]$ ls
admin_ejb.jar ascontrol BC4J.ear demantra.ear dms.war jmsrouter-ejb.jar JMXSoapAdapter-web
admin_web.war ascontrol.ear demantra dms jmsrouter jmsrouter.war JMXSoapAdapter-web.war
[oasadmin@ascp10 applications]$ ls demantra
demantra demantra.war META-INF
[oasadmin@ascp10 applications]$ ls demantra/demantra
admin create_war.bat edit web xml.bat META-INF portal tools
common edit appserver properties.bat integration optimization Run Data Loader.bat WEB-INF
conf edit config.xml.bat logs plugin shortcut workflow
5. Upgrade EBS/APS 11i (11.5.10.2) applications to J2SE 1.5
A. Upgrade Java to JDK 5.0 Update 12

Note 304099.1 Upgrading Sun J2SE with Oracle Applications 11i
1.) Downloaded jdk-1_5_0_12-linux-i586.bin Linux self-extracting file from sun site.
http://java.sun.com/j2se/1.5.0/download.jsp
a.) moved that to $COMMON_TOP/util/j2se50b.) launched itc.) it unzipped and installedd.) JDK50_TOP = /u01/aps/applmgr/apscomn/util/j2se50/jdk1.5.0_12
2.) Installed Patch 4372996 J2SE 5.0 CONSOLIDATED PATCH FOR USE WITH ORACLE EBS 11I
3.) Ran this script
txkrun.pl -script=SetJDKCfg -contextfile=$CONTEXT_FILE -runautoconfig=Yes -appspass=apps -jdktop=/u01/aps/applmgr/apscomn/util/j2se50/jdk1.5.0_12
4.) Re Source the environment file
. $APPL_TOP/APPS$CONTEXT_NAME.env
5.) Run adadmin > "Generate Applications Files" > "Generate Product JAR Files"
6.) Done.
B. Upgrade client side Jinitiator to Sun JRE1.5.0.12 Plug-in
Note 290807.1 Upgrading Sun J2SE with Oracle Applications 11iJRE 1.5.0_12 is now certifed for Oracle Apps 11i
Please install the Certified version of Sun JRE Plug-in 1.5.0_12
resolves a focus-related issue that has existed in all prior JRE releases.
1.) Downloaded the Java Runtime Environment (JRE) 5.0 Update 12 Plugin
http://java.sun.com/j2se/1.5.0/download.jspWindows Offline Installation, Multi-language
jre-1_5_0_12-windows-i586-p.exe
2.) Renamed jre-1_5_0_12-windows-i586-p.exe to j2se15011.exe
3.) Moved the file j2se15012.exe to the $COMMON_TOP/util/jinitiator directory
4.) Installed 11i Integration patch 6137466 APPLICATIONS 11i INTEROPERABILITY PATCH FOR THE JRE 1.5.0.x PLUGIN
5.) Ran this script txkSetPlugin.sh
/u01/patch/4377566/fnd/bin
unix$ txkSetPlugin.sh 15012
Example:
installed with 1.5.0.11 as that was available at time of writing.
[applmgr@aps bin]$ txkSetPlugin.sh 15011
/u01/aps/applmgr/apsappl/fnd/11.5.0/bin
Starting interoperability upgrade script...
Enter the complete path including the filename to the Application context file [/u01/aps/applmgr/apsappl/admin/APS_aps.xml]:
Using APPLSYS file /u01/aps/applmgr/apsappl/APPSAPS_aps.env
Sending logfile output to:
/u01/aps/applmgr/apsappl/admin/log/txkSetPlugin.log
Enter the password for the Oracle database APPS user [APPS] :
Using /u01/aps/applmgr/apscomn/util/j2se50/jdk1.5.0_11/bin/java to execute java programs
Getting J2SE parameter values...
Copy oajinit.exe to html dir...
Copying /u01/aps/applmgr/apscomn/util/jinitiator/j2se15011.exe to /u01/aps/applmgr/apscomn/html/oajinit.exe ...
Copy oajinit.exe to the disco jinit dir...
Copying /u01/aps/applmgr/apscomn/html/oajinit.exe to /u01/aps/applmgr/apsora/iAS/Apache/Apache/htdocs/discwb4/jinit/oajinit.exe ...
Backing up XML file...
Backing up /u01/aps/applmgr/apsappl/admin/APS_aps.xml to /u01/aps/applmgr/apsappl/admin/APS_aps.prej2se15011
Backing up the appsweb file...
Backing up /u01/aps/applmgr/apscomn/html/bin/appsweb_APS_aps.cfg to /u01/aps/applmgr/apscomn/html/bin/appsweb_APS_aps.cfg.prej2se150
11
Updating XML context file with new JInitiator parameters...
Updated Plug-in type to jdk
Updated JInitiator version name to 1.5.0_11
Updated JInitiator mimetype to 1.5.0_11
Updated JInitiator classid to CAFEEFAC-0015-0000-0011-ABCDEFFEDCBA
Updated J2SE mimetype to 1.5.0_11
Updated J2SE Classid to CAFEEFAC-0015-0000-0011-ABCDEFFEDCBA
AutoConfig is configuring the Applications environment...
AutoConfig will consider the custom templates if present.
Using APPL_TOP location : /u01/aps/applmgr/apsappl
Classpath : /u01/aps/applmgr/apscomn/util/j2se50/jdk1.5.0_11/jre/lib/rt.jar:/u01/aps/applmgr/apscomn/util/

Classpath : /u01/aps/applmgr/apscomn/util/j2se50/jdk1.5.0_11/jre/lib/rt.jar:/u01/aps/applmgr/apscomn/util/
j2se50/jdk1.5.0_11/lib/dt.jar:/u01/aps/applmgr/apscomn/util/j2se50/jdk1.5.0_11/lib/tools.jar:/u01/aps/applmgr/apscomn/java/appsborg2
.zip:/u01/aps/applmgr/apscomn/java
Using Context file : /u01/aps/applmgr/apsappl/admin/APS_aps.xml
Context Value Management will now update the Context file
Updating Context file...COMPLETED
Attempting upload of Context file and templates to database...COMPLETED
Configuring templates from all of the product tops...
Configuring AD_TOP........
Configuring FND_TOP.......COMPLETED
Configuring ICX_TOP.......COMPLETED
Configuring IEO_TOP.......COMPLETED
Configuring ABM_TOP.......COMPLETED
Configuring ECX_TOP.......COMPLETED
Configuring BIS_TOP.......COMPLETED
Configuring GL_TOP........COMPLETED
Configuring AMS_TOP.......COMPLETED
Configuring CCT_TOP.......COMPLETED
Configuring WSH_TOP.......COMPLETED
Configuring CLN_TOP.......COMPLETED
Configuring OKE_TOP.......COMPLETED
Configuring OKL_TOP.......COMPLETED
Configuring OKS_TOP.......COMPLETED
Configuring CSF_TOP.......COMPLETED
Configuring XNC_TOP.......COMPLETED
Configuring IGS_TOP.......COMPLETED
Configuring IBY_TOP.......COMPLETED
Configuring PA_TOP........COMPLETED
Configuring JTF_TOP.......COMPLETED
Configuring MWA_TOP.......COMPLETED
Configuring CN_TOP........COMPLETED
Configuring CSI_TOP.......COMPLETED
Configuring WIP_TOP.......COMPLETED
Configuring CSE_TOP.......COMPLETED
Configuring EAM_TOP.......COMPLETED
Configuring IMT_TOP.......COMPLETED
Configuring FTE_TOP.......COMPLETED
Configuring ONT_TOP.......COMPLETED
Configuring AR_TOP........COMPLETED
Configuring AHL_TOP.......COMPLETED
Configuring OZF_TOP.......COMPLETED
Configuring IES_TOP.......COMPLETED
Configuring CSD_TOP.......COMPLETED
Configuring IGC_TOP.......COMPLETED
AutoConfig completed successfully.
The log file for this session is located at: /u01/aps/applmgr/apsappl/admin/APS_aps/log/06210202/adconfig.log
Upgrading j2se15011 for Oracle Workflow...
Oracle Workflow upgraded successfully...
Done
6. Upgrade EBS/APS 11i (11.5.10.2) applications Dev6i to Patch 18 or newer
Note 125767.1 Upgrading Developer 6i with Oracle Applications 11i
Oracle Apps use the 806 home.The 806 home is typically sourced by unix applmgr user.
A. Patches to be installed.
Patch 4948577 -- dev6iPatch 4888294 -- interop
Patch 5713544 -- add'l post reqPatch 4261542 -- add'l post reqPatch 5216496 -- add'l post reqPatch 5753922 -- add'l post reqPatch 5355158 -- add'l post req
Patch 3830807 -- add'l linuxPatch 4586086 -- add'l linux
B. Download Patch 4948577 Dev6i Patch 18
a. unzip patch.b. cd $PATCH_TOP/developer6i_patch18c. make sure you have read/write permissions.d. run this to install
./patch_install.sh 2>&1 | tee patch_install_p18.log
C. Relink Tools Executables.
cd $ORACLE_HOME/procbuilder60/lib; make -f ins_procbuilder.mk installcd $ORACLE_HOME/forms60/lib; make -f ins_forms60w.mk installcd $ORACLE_HOME/graphics60/lib; make -f ins_graphics60w.mk installcd $ORACLE_HOME/reports60/lib; make -f ins_reports60w.mk install
D. Done - with Dev6i Patch 18.
E. Download Patch 4888294 Apps Interop

Owner Object Type
a. unzip patchb. apply with adpatch
F. Apply remaining patches
read all the readme'sunzip the patchcd to that directory
Patch 5713544
% cd 5713544% sh patch.sh
Patch 4261542
Complete the commands in the readme.
Patch 5216496
# % cd 5216496# % sh patch.sh
Patch 5753922
# % cd 5753922# % sh patch.sh
Patch 5355158
Complete the commands in the readme.
Patch 3830807 -- add'l linux
# % ./patch.sh
Patch 4586086 -- add'l linux
Complete the commands in the readme.
Post Patch(s) steps
SPECIAL NOTE :_ _ _ _ _ _ _ _
Note: If you are an Oracle Applications customer, please also run adrelink.
% adrelink.sh force=y "fnd f60webmx"
Run adadmin administration utility.
In AD Administration (adadmin)
Select the "Maintain Files" optionthen the "Generate JAR Files".
Relink all Applications executables.
In AD Administration (adadmin)
choose "Relink Applications programs" from the "Generate Applications Files" menu.
Restart the web listeners.
$COMMON_TOP/admin/scripts/SID_host/
adstpall.sh apps/apps adstrall.sh apps/apps
7. Install Latest ASCP Collections and Engine Patches on EBS/APS
Note 223026.1 APS Product Suite High Priority Patches
ASCP Collections RUP #18 Patch 5844110ASCP Engine RUP #22 Patch 5931065
8. Install EBS Demantra Integration Patch
Patch 5997112 EBS-Demantra Integration Patch
If Decentralized,
Install on both EBS and APS Applications Instances.
Use Oracle 11i Applications adpatch utility
The Integration Patch installs these MSD_DEM_XXXXXX objects into the APS Database Demand Planning MSD Schema.

Owner Object Type
MSD MSD_DEM_APP_INSTANCE_ORGS TABLE
MSD MSD_DEM_APP_INSTANCE_ORGS_U1 INDEX
MSD MSD_DEM_CALENDARS TABLE
APPS MSD_DEM_COLLECT_CURRENCY PACKAGE
APPS MSD_DEM_COLLECT_CURRENCY PACAKGE BODY
APPS MSD_DEM_COLLECT_HISTORY_DATA PACKAGE
APPS MSD_DEM_COLLECT_HISTORY_DATA PACAKGE BODY
APPS MSD_DEM_COLLECT_LEVEL_TYPES PACKAGE
APPS MSD_DEM_COLLECT_LEVEL_TYPES PACAKGE BODY
APPS MSD_DEM_COLLECT_PRICE_LISTS PACKAGE
APPS MSD_DEM_COLLECT_PRICE_LISTS PACAKGE BODY
APPS MSD_DEM_COLLECT_RETURN_HISTORY PACKAGE
APPS MSD_DEM_COLLECT_RETURN_HISTORY PACAKGE BODY
APPS MSD_DEM_COLLECT_UOMS PACKAGE
APPS MSD_DEM_COLLECT_UOMS PACAKGE BODY
APPS MSD_DEM_COMMON_UTILITIES PACKAGE
APPS MSD_DEM_COMMON_UTILITIES PACAKGE BODY
APPS MSD_DEM_CREATE_DEM_SEED PACKAGE
APPS MSD_DEM_CREATE_DEM_SEED PACAKGE BODY
APPS MSD_DEM_CUSTOM_HOOKS PACKAGE
APPS MSD_DEM_CUSTOM_HOOKS PACAKGE BODY
MSD MSD_DEM_DATES TABLE
MSD MSD_DEM_DATES_U1 INDEX
MSD MSD_DEM_ENTITIES_INUSE TABLE
MSD MSD_DEM_ENTITIES_INUSE_U1 INDEX
MSD MSD_DEM_ENTITY_QUERIES TABLE
MSD MSD_DEM_ENTITY_QUERIES_U1 INDEX
APPS MSD_DEM_EVENT PACKAGE

APPS MSD_DEM_EVENT PACAKGE BODY
MSD MSD_DEM_GROUP_TABLES TABLE
MSD MSD_DEM_ITEMS_GTT TABLE
MSD MSD_DEM_LOCATIONS_GTT TABLE
MSD MSD_DEM_NEW_ITEMS TABLE
MSD MSD_DEM_NEW_ITEMS_N1 INDEX
MSD MSD_DEM_NEW_ITEMS_V1 VIEW
APPS MSD_DEM_ORG_GROUPS_V VIEW
MSD MSD_DEM_PRICE_LISTS TABLE
MSD MSD_DEM_PRICE_LISTS_GTT TABLE
MSD MSD_DEM_PRICE_LISTS_GTT_N1 INDEX
APPS MSD_DEM_PRICE_LISTS_V1 VIEW
APPS MSD_DEM_PROCESS_SALES_DATA PACKAGE
APPS MSD_DEM_PROCESS_SALES_DATA PACKAGE BODY
APPS MSD_DEM_PUSH_SETUP_PARAMETERS PACKAGE
APPS MSD_DEM_PUSH_SETUP_PARAMETERS PACKAGE BODY
MSD MSD_DEM_QUERIES TABLE
MSD MSD_DEM_QUERIES_U1 INDEX
APPS MSD_DEM_QUERY_UTILITIES PACKAGE
APPS MSD_DEM_QUERY_UTILITIES PACKAGE BODY
MSD MSD_DEM_RMA_TYPE TABLE
MSD MSD_DEM_SERIES TABLE
MSD MSD_DEM_SETUP_PARAMETERS TABLE
MSD MSD_DEM_SETUP_PARAMETERS_U1 INDEX
APPS MSD_DEM_SR_CATEGORY_SETS_V VIEW
APPS MSD_DEM_SR_UTIL PACKAGE
APPS MSD_DEM_SR_UTIL PACKAGE BODY
APPS MSD_DEM_SSL_RS PACKAGE

APPS MSD_DEM_SSL_RS PACKAGE BODY
MSD MSD_DEM_TIME TABLE
APPS MSD_DEM_TIME_DATA PACKAGE
APPS MSD_DEM_TIME_DATA PACKAGE BODY
MSD MSD_DEM_TRANSFER_LIST TABLE
MSD MSD_DEM_TRANSFER_QUERY TABLE
MSD MSD_DEM_TRANSFER_QUERY_LEVELS TABLE
MSD MSD_DEM_UOM_CONVERSIONS_GTT TABLE
APPS MSD_DEM_UPDATE_LEVEL_CODES PACKAGE
APPS MSD_DEM_UPDATE_LEVEL_CODES PACKAGE BODY
APPS MSD_DEM_UPLOAD_FORECAST PACKAGE
APPS MSD_DEM_UPLOAD_FORECAST PACKAGE BODY

9. Implement EBS/APS with SSO/OID on the 10g OracleAS Infrastructure
Note 261914.1 Integrating Oracle E-Business Suite Release 11i with Oracle Internet Directory and Oracle Single Sign-On
sso user = orcladminpassword=iasadmin1
sso url:
A. On EBS/APS Apply Patch 5674941 11i.ATG_PF.H RUP5 SSO 10g Integration
1.) Source Environment file (applmgr user)
. $APPL_TOP/APPS$CONTEXT_NAME.env
2.) run adpatch on Patch 5674941
$ adpatch options=prereq
a. Following results of using options=prereq

[ Running UMS analysis engine with the following parameters:
p_appl_top_id = 2070
appl_top_name = aps
applications_system_name = APS
p_release_name = 11i
p_bug_numbers = 5674941:US
p_mode = NORMAL
! 3218526 BNE: Patch 11i.BNE.D
! 4206794 FRM: Patch 11i.FRM.H
! 4712852 AD: Minipack 11i.AD.I.4
! 5473858 ATG_PF: 11i.ATG_PF.H.RUP5
- 5674941 FND: 11i.ATG_PF.H RUP5 SSO 10g Integration]
Note: Every installation may have different pre-req requirements. Please review and install all that are required for your environment.
b. Downloaded and merged all 4 pre-req patches into atg_sso_merged file using OAM Application Manager.
c. Notes on the Required Pre-Reqs
Please read and confirm all pre-requisite patches listed when applying a patch with options=prereq. Read the related Aboutdocumentation for detailed requirements.
Patch 3218526 BNE: Patch 11i.BNE.D
Note 287080.1 About Web Applications Desktop Integrator Mini-pack 11i.BNE.D
Patch 4206794 FRM: Patch 11i.FRM.H
Note 378338.1 About Oracle Report Manager Minipack 11i.H (FRM.H)
Patch 4712852 AD: Minipack 11i.AD.I.4
Note 233044.1 About Oracle Applications DBA Minipack 11i.AD.Istates to apply AD.I.5 Patch 5161676 as it is the most current.
Patch 5473858 ATG_PF: 11i.ATG_PF.H.RUP5
Note 375682.1 About Oracle Applications Technology ATG_PF.H Rollup 5Customers using AutoConfig must apply patch 5658489 (TXK).
d. Run the adgrants.sql script as a user that can connect as SYSDBA to grant privileges to selected SYS objects and create PL/SQL profiler objects.
1. Create $ORACLE_HOME/appsutil/admin on the database server.
2. Copy adgrants.sql (UNIX) from $APPL_TOP/admin to $ORACLE_HOME/appsutil/admin.
3. Set the environment to point to ORACLE_HOME on the database server.
4. Use SQL*Plus to run the script:
UNIX:
$ sqlplus /nologSQL> connect / as sysdbaSQL> @$ORACLE_HOME/appsutil/admin/adgrants.sql <APPLSYS schema name>
3.) Apply the Merged Pre-Req patches.
a. echo $APPLRGF
[applmgr@aps bin]$ echo $APPLRGF/u01/aps/applmgr/apscomn/rgf/APS_aps
b. echo $APPLTMP
[applmgr@aps bin]$ echo $APPLTMP/u01/aps/applmgr/apscomn/temp
c. Run the Technology Stack Validation Utility
PATCH_TOP/<patch>/fnd/patch/115/binchmod 777 txkprepatchcheck.pl
./txkprepatchcheck.pl -script=ValidateRollup -outfile=$APPLTMP/txkValidateRollup.html -appspass=apps
[applmgr@aps bin]$ ./txkprepatchcheck.pl -script=ValidateRollup -outfile=$APPLTMP/txkValidateRollup.html -
appspass=apps
*** ALL THE FOLLOWING FILES ARE REQUIRED FOR RESOLVING RUNTIME ERRORS
*** STDOUT = /u01/aps/applmgr/apscomn/rgf/APS_aps/TXK/txkValidateRollup_Fri_Jun_29_19_16_00_2007_stdout.log
Reportfile /u01/aps/applmgr/apscomn/temp/txkValidateRollup.html generated successfully.
Retreive the output $APPLTMP/txkValidateRollup.html
Review the details and correct as necessary
d. apply merged patch
adpatch

adpatch driver = u_atg_sso_merged.drv
e. run autoconfig as per Note 165195.1
$COMMON_TOP/admin/scripts/$CONTEXT_NAME/
Linux Functionality Command
Start Applications processes
adstrtal.sh <APPSuser/APPSpwd>
Stop Appliations processes
adstpall.sh <APPSuser/APPSpwd>
Run AutoConfig
adautocfg.sh
5.) Apply the Patch 5674941 11i.ATG_PF.H RUP5 SSO 10g Integration
6.) Bounce everything
7.) Gather Schema Statistics All Schemas
B. On EBS/APS Apply post-req Patch 5589902
C. Gather Parameters
infra hostname : ascp10.us.oracle.com
infra db port : 1521
infra db sid : infra10g
infra ldap oid port : 13060 (default 3060)
ebs apps password : APPS
infra orasso password : iasadmin1
ebs system password : MANAGER
ebs ssosdk password : ssosdk
infra oid orcladmin password : iasadmin1
ebs master oid password : apsadmin1
user defined at script run timei chose apsadmin1 as aps is our ebs/aps database sid
bidirectional template : $FND_TOP/admin/template/ProvBiDirection.tmp
D. Run the Registration script
Run Default (simple) registration -- uses bidirectional template
txkrun.pl -script=SetSSOReg
Answer these prompts
* Enter the host name where Oracle iAS Infrastructure database is installed ?* Enter the Oracle iAS Infrastructure database port number ?* Enter the Oracle iAS Infrastructure database SID ?* Enter the LDAP Port on Oracle Internet Directory server ?* Enter Oracle E-Business apps database user password ?* Enter Oracle iAS Infrastructure database ORASSO schema password ?* Enter Oracle E-Business SYSTEM database user password ?* Enter E-Business Suite existing SSOSDK schema password or choose a password to use with the new SSOSDK schema if the schema does not exist ?* Enter the Oracle Internet Directory Administrator (orcladmin) Bind password ?* Enter the password that you would like to register this E-Business instance with ?
Example:
[applmgr@aps bin]$ txkrun.pl -script=SetSSOReg
Enter the host name where Oracle iAS Infrastructure database is installed ? ascp10.us.oracle.com
Enter the Oracle iAS Infrastructure database port number ? 1521
Enter the Oracle iAS Infrastructure database SID ? infra10g
Enter the LDAP Port on Oracle Internet Directory server ? 13060
Enter Oracle E-Business apps database user password ? APPS
Enter Oracle iAS Infrastructure database ORASSO schema password ? iasadmin1
Enter Oracle E-Business SYSTEM database user password ? manager
Enter E-
Business Suite existing SSOSDK schema password or choose a password to use with the new SSOSDK schema if the schema does not
exist ? ssosdk
Enter the Oracle Internet Directory Administrator (orcladmin) Bind password ? iasadmin1
Enter the instance password that you would like to register this application instance with ? apsadmin1
*** ALL THE FOLLOWING FILES ARE REQUIRED FOR RESOLVING RUNTIME ERRORS
*** Log File = /u01/aps/applmgr/apscomn/rgf/APS_aps/sso/txkSetSSOReg_Tue_Jul_10_22_16_21_2007.log
Program : /u01/aps/applmgr/apsappl/fnd/11.5.0/patch/115/bin/txkSetSSOReg.pl started @ Tue Jul 10 22:17:14 2007
*** Log File = /u01/aps/applmgr/apscomn/rgf/APS_aps/sso/txkSetSSOReg_Tue_Jul_10_22_16_21_2007.log
######################## WARNING ########################################
This application works with SSOSDK version 9.0.2 or higher. If lower version
(3.0.9) of SSOSDK was installed in your system and you have a registered

(3.0.9) of SSOSDK was installed in your system and you have a registered
partner application, this process will remove the 3.0.9 version of the SSOSDK
schema and install the 9.0.2 version.
######################## WARNING ########################################
Beginning input parameter validation for SSO registration.
Beginning loading SSO SDK into database if necessary.
Loading of SSO SDK into database completed successfully.
Input parameter validation for SSO registration completed.
Beginning input parameter validation for OID registration.
*** Warning: This step will delete following number of rows from WF_ENTITY_CHANGES table : 132
Input parameters validation for OID registration completed.
BEGIN SSO REGISTRATION:
Beginning to register partner application.
Partner application has been registered successfully.
Single Sign-On partner application registered successfully.
BEGIN OID REGISTRATION:
Beginning to register Application and Service containers if necessary.
Application and Service containers were created successfully.
Beginning to register application in Oracle Internet Directory.
Registration of application in Oracle Internet Directory completed successfully.
Beginning to register instance password in Oracle Internet Directory.
Registration of instance password in Oracle Internet Directory completed successfully.
Beginning to test application registration in Oracle Internet Directory.
Testing of application registration in Oracle Internet Directory completed successfully.
Beginning to register provisioning profile in Oracle Internet Directory.
Registration of provisioning profile in Oracle Internet Directory completed successfully.
Application is now registered successfully with provisioning in Oracle Internet Directory.
End of /u01/aps/applmgr/apsappl/fnd/11.5.0/patch/115/bin/txkSetSSOReg.pl : No Errors encountered
[applmgr@aps bin]$
E. Bounce EBS/APS Apps Apache
F. Verify it works ... it Worked!!!
10. Register Demantra with SSO/OID on the 10g OracleAS Infrastructure
Need to reveiw Patch 5997112 details about the demantra registration
POST INSTALLATION NOTES=======================
1. Configure OID/OIM/SSO Infrastructure with EBS/Demantra/OAS Middle tier apps
2. Setup/configure Demantra
3. Setup/configure/verify EBS/APS Profiles
MSD_DEM: Host URL = http://ascp10.us.oracle.com:7778/demantraothers ...
4. Setup and Run ASCP Collections
5. Associate EBS.APS User to Demantra Responsibilities
6. Login to DM responsibility and login to the workbench
Upon first login to Demantra,the Oracle Apps User (RBEVANS) is copied to demantra java component
UserName: RBEVANS Default Password : demantra
this will be the user that gets SSO with Demantra integration in Step 10 above
Table of Documents
<end of doc>
REFERENCES


