
A PRIMER ON COLOR PRINTING FOR THOSE WHO FEAR THE MAKING OF COLOR PRINTS
NO CHARTS, NO MATH, NO FORMULAS
How to do color printing in your darkroom, from negatives and slides. With an
assignment to help you figure all of this out.
Written by:
Terry Staler Fine-Art Photographer
© 1996 Terry Staler
Slight revision: August 2005
This manual is intended for use by those who have a working knowledge of
darkroom techniques, probably those acquired from black and white work. No
experience with color processing is assumed. This manual will help you learn
the basics of color printing,

2
TABLE OF CONTENTS
INTRODUCTION ………………………………………………………….PG 1
FIRST EXPOSURE ........ YA GOTTA HAVE THE RIGHT STUFF…..PG 2
SECOND EXPOSURE....COLOR REALLY IS SIMPLE
(BUT FRUSTRATING)…………………………………………………….PG 5
THIRD EXPOSURE ....... TROUBLE SHOOTING …………………….PG 13
EXPOSURE CARD ……………………………………………………….PG 14
APPENDIX A ................. EQUIPMENT/CHEMICAL LISTS …………PG 15
APPENDIX B ................. FURTHER READING………………………PG 17
APPENDIX C ................. NOTES ………………………………………PG 18
APPENDIX D ...............PROCESSING STEPS AND TIMES………..PG 19
3
INTRODUCTION
If you can produce black and white prints in your darkroom, you can make color prints. That's it. One need say no more. Its that simple! This manual will show you just how simple it really is. The new class of chemicals and papers that are available (referred to as RA-4 for negatives and R-3000 for slides, make the entire process so simple and relatively foolproof that you will be able to spend most of your time concentrating on the actual ART of color printing.* That is not to say that the TECHNIQUE of color printing is a snap; in the beginning, when most of your prints are a unique greenish/magenta shade, you might be terribly frustrated. But perseverance will eventually pay off in the mastery and pride in your new capabilities, not to mention in the quality of your own hand-made color prints. The main thrust of this manual will be towards printing from negatives. Doing so is a bit easier then from slides, and the results are a bit easier to control. But if printing from slides is your goal, fear not; you will be able to do so by the time you are done reading this. You will just have to work a bit harder. (NOTE 1 ) As with any endeavor, it is important to make sure that you have, at least, the minimum equipment required. A list of what you will need is included. It is arranged in a manner to allow you to decide the level of sophistication you want, I.E., how much money you want to spend!. Color printing can be real cheap (you may not have to buy anything new for your darkroom) to shockingly expensive (some of the "toys" out there are magnificently cool and costly). You have the choice. ABOVE ALL ELSE, BE PATIENT. YOUR INITIAL RESULTS MAY HORRIFY YOU, BUT YOU WILL SLOWLY BEGIN TO "GET IT". PERSEVERANCE IS THE GAME!!
*Another popular process for prints from slides is Ilfochrome (formally Cibachrome). However, this
process is very expensive and is not recommended for a beginner. It is not covered in this manual.

4
FIRST EXPOSURE... Ya Gotta Have The Right Stuff
The photograph is bom of light, and all visual experience exists through light Photographers
as a breed feel the power and wonder of light in their bones,
Barbara Morgan
As with any endeavor, you must have the essential equipment. Without such
equipment, your talents will be for naught. This does not imply that you must
buy the best of everything; only that you must have the minimum items.
"STUFF" THAT YOU WILL NEED
The following list will help you decide what you really "should" buy, or what you
may "want" to buy. You may not need to buy anything.
What you MUST have:
1. An enlarger. You will need an enlarger that can do (or can be convinced to
do) color. If you have an enlarger with a dichroic color head, you are set. If
your enlarger has no filters for color printing, you can buy a set for about
$20.00. If you have a cold light head on your enlarger, you will have to change
it to a regular bulb source and add filters.
2. Something in which to develop the prints. You can use trays. With room
temperature chemicals, doing so is a snap. You may also use tubes, which
allow you to work with the lights on, but require more effort.
3. The proper chemicals and paper. You must choose either room temperature
or high temperature processing. There are advantages and disadvantages to
both. You can always change your process as your skills and needs change.
You will find that the paper is very inexpensive and that the chemicals ARE

5
expensive. But there are SECRETS (NOTE 7) to extending the useful life of
the chemicals, especially while you are in "the learning phase".
4. A good negative or slide, preferably one with middle gray tones, I.E., a gray
card. (NOTE 2)
5. Viewing filters, to aid in color correction decisions.
6. If you decide to NOT use room temperature chemicals, a heater for
controlling the temperature of the chemicals you decide to use.
7. A special exposure card. Instructions for making one are located later in this
manual.
Now we will discuss what you MIGHT like to add to the above list, I.E., let's
spend money!
1. If you would like to buy a new enlarger anyway, even if you probably will
only do black and white, get one with a dichroic color head. Just about every
manufacturer offers one. You do not need to spend a fortune on one; they
range in price from about $400.00 to infinite.
2. Jobo makes several basic color processors, ranging from their new NOVA
series of vertical "trays" to their top of the line rotary processors. Depending on
your budget and volume, you may be interested in investing in such a
processor. For high volume work, you might invest in an in-line processing
system, where you put in the exposed sheet of paper in one end, and out
comes a finished, dry print 2 minutes later.
3. A color-checker chart. Macbeth makes a very good, expensive, one. Kodak
makes a good color test strip that is less expensive.
6
Here is what you should do right now, assuming that you have the proper
equipment:
1. Buy a chemical kit. You will want RA-4 for negatives, R-3000 (R-3) for
slides. Buy a small kit, usually 1 or 2 liters, or 1 gallon sizes. Kits include all of
the chemicals that you will need except for stop bath. You can use the same
stop bath you use for black and white.
2. Buy paper. All of the "BIG GUYS" make color paper. Buy high quality, fresh,
REFRIGERATED paper; do not buy surplus paper. If there is something wrong
with the paper, you will waste a lot of time trying to get it to work. Several
surfaces are available; glossy, high gloss, luster, and mat. High gloss is VERY
expensive, and is not recommended for learning. Gloss and luster are very
nice. Several of the papers are available in different contrast grades. Choose
one in the middle to start. It is recommended that you start with 25 sheet
packages; if you then decide to switch papers, you will not have a serious
investment in paper stock sitting in the 'fridge, never to be used. By the way,
store paper in the refrigerator. Allow several hours for the package to reach
room temperature before opening it (the night before a printing session would
be perfect).
(See APPENDIX A for a list of suppliers and equipment)

7
SECOND EXPOSURE... Color really is simple (but frustrating)
We usually get more out of ourselves by demanding more
V~lliam Feather
SECTION 1: THE BASIC COLOR PROCESS
Before getting into the details, let's take a quick look at the steps required to
make a color print:
NOTE: Copies of Kodak's recommended processing times and temperatures
are included in APPENDIX D. Use the actual numbers supplied with the
chemicals you have purchased.
1. Expose the sheet of paper.
If you have done black and white, you know exactly how to do this. The major
difference: you must provide a precise amount of color filtering to correct for
differences in film types.
2. Presoak the paper.
This does several things: it removes any color correction coatings from the
paper, brings the paper up to processing temperature, and softens the
emulsion.
3. Develop the paper.
Again, its just like black and white, only you MUST do it in the dark, I.E. no
safelight. This is where a processing tube comes in handy. Once it is loaded,
the room lights can go on.
4. For negatives only, a quick stop-bath rinse.
Use the same stop-bath you would for black and white work.

8
5. A water rinse.
6. For slides only, a chemical reversal step followed by a water rinse.
Just another chemical run and rinse.
7. Bleach and fix the print.
This is actually one bleach/fix step, often referred to as "blix". This is just like
the fixing step in black and white.
8. Wash and dry.
Since color papers are RC, wash and dry times are measured in minutes.
A WARNING HERE:
NEVER JUDGE THE EXPOSURE AND COLOR OF A WET PRINT; WET
PRINTS ARE ALWAYS UGLY. ALWAYS DRY THE PRINT BEFORE
COMING TO ANY CONCLUSIONS ABOUT ITS
QUALITIES (OR LACK THEREOF). A HAIR DRYER IS
PERFECT FOR A QUICK DRY.
COLOR BALANCE
Color balance is the TRICKIEST part of the entire color process. The other
parts of the process are cut and dried; a certain chemical temperature for a
certain amount of time. If you are even close to the proper time and
temperature, you will get decent results. However, if color balance is even
SLIGHTLY off, you will know it immediately.
WHAT IS COLOR BALANCE AND WHY IS IT NEEDED?
9
You never know what you have, that's why! Negative film-base is orange, slide
film is actual color, and printing paper can have a color cast. Additionally, there
are differences between each manufacturer. And just to make sure that this is
as complicated as possible, there are different types of enlarger bulbs, and a
bulb will change its color composition as it ages. So it is important to set
everything up for printing, AND THEN NOT CHANGE ANYTHING, at least, not
while you are learning. Choose a film type, and stick with it. Do the same for
paper, chemicals, temperature, processing times and methods, etc. After you
understand the entire process, you can begin to move away from the
"BASELINE" you have established, and know what to do to get back to
normalcy.
Generally, you will start with a basic filter setup. Usually, you will add or
subtract some magenta, yellow, or cyan from the light path. Your first
assignment will, in fact, be to determine this basic filter setup. Once you have
this setup, you will only have to make minor changes to it as long as you do not
make other major changes in the process.
UNDERSTANDING THE CONCEPT OF "FILTERS"
It is very important to understand how filters work. If you do-not understand
them, you will not be able to get rid of that slight but annoying magenta or
yellow tint that all of your prints have.
Here is what you must remember:
1. For printing from negatives, if you want to GET RID OF A TINT, use MORE
of the filter. For example, to get rid of a bit of magenta, ADD some magenta
filtering. Additionally, INCREASING the paper's exposure will make the image
DARKER.

10
2. For printing from slides, if you want to GET RID OF A TINT, use LESS of
the filter. In the above example, you would SUBTRACT some magenta
filtering. Additionally, INCREASING the paper's exposure will make the image
LIGHTER.
God help you if you print from both mediums; it is very easy to get the filter
changes backwards and make a print worse!
Let's go directly to the assignment. It is assumed that you have the proper
equipment and supplies, and that all chemicals have been mixed to the
manufacturers specification and are heated to the proper temperature, if
required.
THE ASSIGNMENT-DETERMINING THE BASIC FILTER SETUP
In this assignment, you will determine your basic filter setup. This is probably
one of the most important steps in guaranteeing successful color printing.
A - GETTING THE EXPOSURE CORRECT
1. Choose a color negative or slide that has a large area of gray in it. If you
can, use images of an actual gray card taken in sunlight. If you cannot find an
image with gray in it, choose one with good skin tones.
2. Put this image in your enlarger, set the height and focus for the print size
you wish to make. It is suggested that you start with paper no larger than 8X10.
3. Set the lens on your enlarger to the f-stop you would normally use,
4. Set the filtration to 60 units of magenta and 100 units of yellow. (NOTE3)
5. Set you enlarger timer to 2 seconds.

11
6. Make a typical test strip, just as you would for black and white. Try to get up
to 10 seconds, although this will depend on the f-stop you have selected.
(NOTE 4)
7. Process the print. Use the instructions supplied with your chemicals.
8. After the print is washed and dried, view it under a light similar to what the
print would normally be viewed under. Try to avoid fluorescence; they tend to
shift the color of a print towards magenta.
Hopefully, you have before you a print showing strips of varying print density,
ranging from very light to very dark. (If not, repeat the test strip, using either a
larger or smaller aperture, as necessary).
Select a strip that has a descent exposure value. The color is probably wrong,
but don't worry about that now.
9. Make another test strip. This time, however, expose the entire piece of
paper for 2 seconds less than the one which you chose as having the best
exposure value from the first strip. For instance, if the best strip was 6
seconds, expose this sheet of paper for 4 seconds.
10. Reset the enlarger timer for 1 second. Make additional exposures on this
same sheet of paper, including one area that receives no additional exposure.
For example, and to continue with the above numbers, you will end up with a
test strip showing (at least) 4, 5, 6, 7, and 8 seconds.
11. Process, wash, and dry this print.
Now you have a print from which you can choose a strip that has precisely the

12
exposure you want. The color may still be off. That's OK; we will address this
soon.
12. Expose a sheet of paper for the time you have determined from the last
test strip.
13. Process, wash, and dry this sheet.
You should now have a perfectly exposed print, probably with awful colors.
This is normal at this point-REALLY! Do not despair.
Go relax for a bit in your easy chair. Take the print with you. Look at it very
carefully. Pay particular attention to the gray (or flesh) areas. Do they look just
like the original article. (If they do, you are blessed. But read on, for someday,
you too, shall have to color correct). Or do you detect a subtle (or maybe a
gross) color shift? Maybe just a bit of magenta. Or maybe a lot of yellow. Now
comes the hard part; figuring out how to get the colors back to normal.
B - GETTING THE COLOR CORRECT
Remember, for negatives, you must ADD the offending color to the print. For
slides, you must SUBTRACT it. The question is, how much ?
For a slight color shift, you would change the filtration (by either adding or
subtracting, as appropriate) a small amount, about 5 to 10cc's. For larger color
shifts, more of a change will be required, perhaps 25cc's or more. (NOTE 5)
This is the reason you are sifting in your easy chair, with a good light over your
shoulder. What color is the shift, and how bad is it? Let's assume a light
magenta tint. Let's fix it.
13
14. Set the enlarger and timer up to make a test print with the values used for
the last print (assuming the last print came out OK). You are going to make
another test strip using the special exposure card, but this time you will be
changing the filtering instead of the exposure. (NOTE 6)
15. Expose the first strip at the previously used time and filtering (for example
let's say 6 seconds with 60 magenta and 100 yellow).
16. Now, cover the first strip, and open the second. Re-adjust the proper filter
IN THE PROPER DIRECTION, by 5cc's (for a slight tint) or 10cc's (for a
heavier tint). Make the exposure.
17. Cover the second strip, and open the third. Set the filtration to lOcc's or
20cc's from the original values (again, depending on the strength of the tint).
Make the exposure.
18. Continue as above, making changes to the filtration by 5cc or lOcc
increments until you run out of strips (or until you know that you have gone way
beyond reasonable filtration changes).
19. Process, wash, and dry this print.
Back to the easy chair. From these strips, chose the one that has the best
color. This strip represents the proper color setup for the film, paper, and
chemicals that you are using.
If you wish, and if you feel it necessary (or desirable), you can make another test strip with smaller incremental changes, say 1 or 2cc's at a time, to achieve a perfect setup. You may also need to adjust the exposure slightly since adding or subtracting filters will vary the amount of light reaching the paper. C - MAKING THE FINAL PRINT
14
Using the exposure time and filtration determined in Steps A and B above, make a full size print (without using the special exposure card). After processing and drying, return to that easy chair, and the high-quality lighting, and contemplate your results. Questions to ask yourself are: 1. Is the exposure truly adequate? Are the colors washed out or too dense ? 2. Is the color balance correct? Before you go back into the darkroom and make 25 additional copies, REALLY check for a slight color shift. Magenta, for instance, can be insidious. The print will look acceptable today, and tomorrow, it will look ghastly. 3. Is there any streaking evident on the print? If so, this may be the result of uneven chemical coverage within the processing tube. Make sure that the tube is level and that enough chemical is introduced into the tube to completely cover the paper as it rotates. Make sure that the stop bath used with color negatives is of sufficient strength. Well, that's about it. At this point you should have a fairly decent print. You may have to make a few more, adjusting the exposure or filtering slightly until you get that perfect, glowing print. Once you become proficient at printing, feel free to experiment: you will have the experience to correct for changes in exposure and/or filtering and to get back to that perfect print.
15
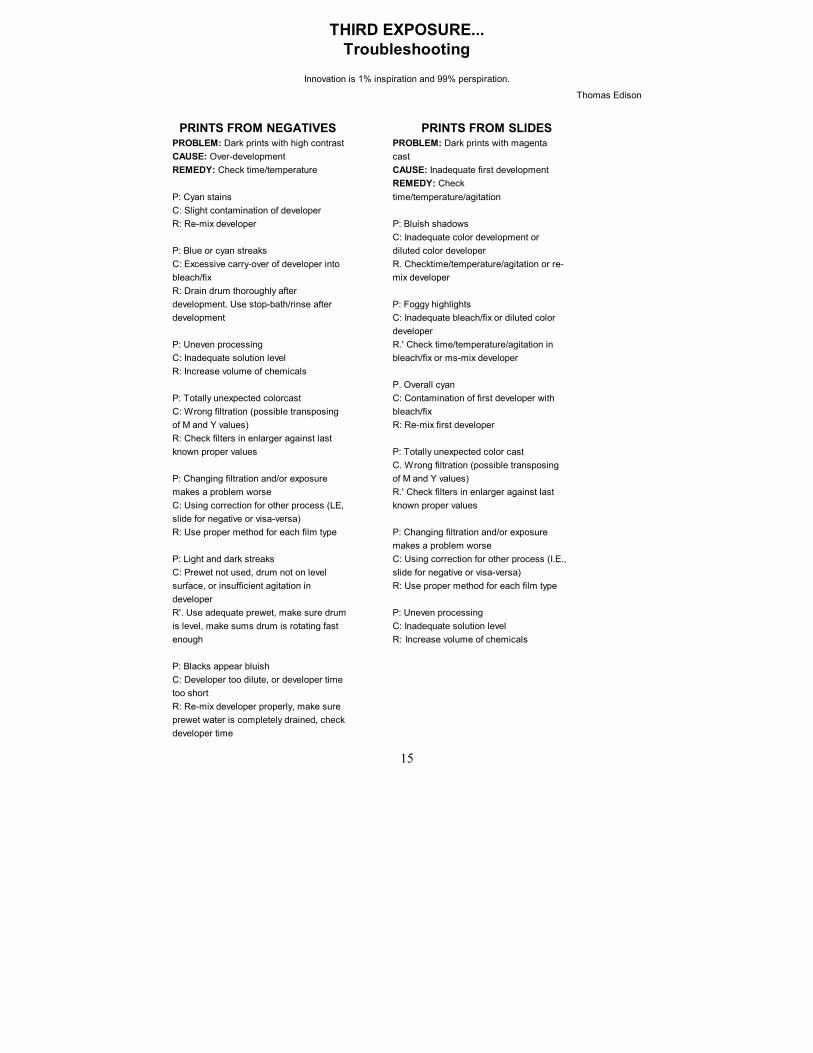
THIRD EXPOSURE... Troubleshooting
Innovation is 1% inspiration and 99% perspiration.
Thomas Edison
PRINTS FROM NEGATIVES PRINTS FROM SLIDES PROBLEM: Dark prints with high contrast PROBLEM: Dark prints with magenta CAUSE: Over-development cast REMEDY: Check time/temperature CAUSE: Inadequate first development REMEDY: Check P: Cyan stains time/temperature/agitation C: Slight contamination of developer R: Re-mix developer P: Bluish shadows C: Inadequate color development or P: Blue or cyan streaks diluted color developer C: Excessive carry-over of developer into R. Checktime/temperature/agitation or re- bleach/fix mix developer R: Drain drum thoroughly after development. Use stop-bath/rinse after P: Foggy highlights development C: Inadequate bleach/fix or diluted color developer P: Uneven processing R.' Check time/temperature/agitation in C: Inadequate solution level bleach/fix or ms-mix developer R: Increase volume of chemicals P. Overall cyan P: Totally unexpected colorcast C: Contamination of first developer with C: Wrong filtration (possible transposing bleach/fix of M and Y values) R: Re-mix first developer R: Check filters in enlarger against last known proper values P: Totally unexpected color cast C. Wrong filtration (possible transposing P: Changing filtration and/or exposure of M and Y values) makes a problem worse R.' Check filters in enlarger against last C: Using correction for other process (LE, known proper values slide for negative or visa-versa) R: Use proper method for each film type P: Changing filtration and/or exposure makes a problem worse P: Light and dark streaks C: Using correction for other process (I.E., C: Prewet not used, drum not on level slide for negative or visa-versa) surface, or insufficient agitation in R: Use proper method for each film type developer R'. Use adequate prewet, make sure drum P: Uneven processing is level, make sums drum is rotating fast C: Inadequate solution level enough R: Increase volume of chemicals P: Blacks appear bluish C: Developer too dilute, or developer time too short R: Re-mix developer properly, make sure prewet water is completely drained, check developer time

16

17
INSTRUCTIONS FOR MAKING/USING THE EXPOSURE CARD
1. Cut black mat board as shown above. You may adjust the size for the size of paper you will be using. The above
is for 8 X 10 paper.
2. Apply tape (black duct tape works very well) to the top of each flap where it meets the top piece.
3. After setting up the enlarger and negative/slide to make a print, place the exposure card on top of the paper in
the enlarger easel. You may want to tape the exposure card to the easel to keep it from moving.
4. Lift the leftmost flap and make the first exposure. Lower this flap
5. Change the filtration in the desired amount and direction.
6. Lift the second flap and make another exposure. Lower the flap.
7. Continue as above until you have made sufficient color corrections.
8. Develop the print. When dry, find the strip with the proper color balance Use the filtration from this strip to make
the final print.
EXPOSURE CARD FOR COLOR CORRECTIONUSE 4-PLY BLACK MAT BOARD
1 EACH, 3” X 10”
FLEXIBLETAPE
6 EACH, 1.25” X 8”
18
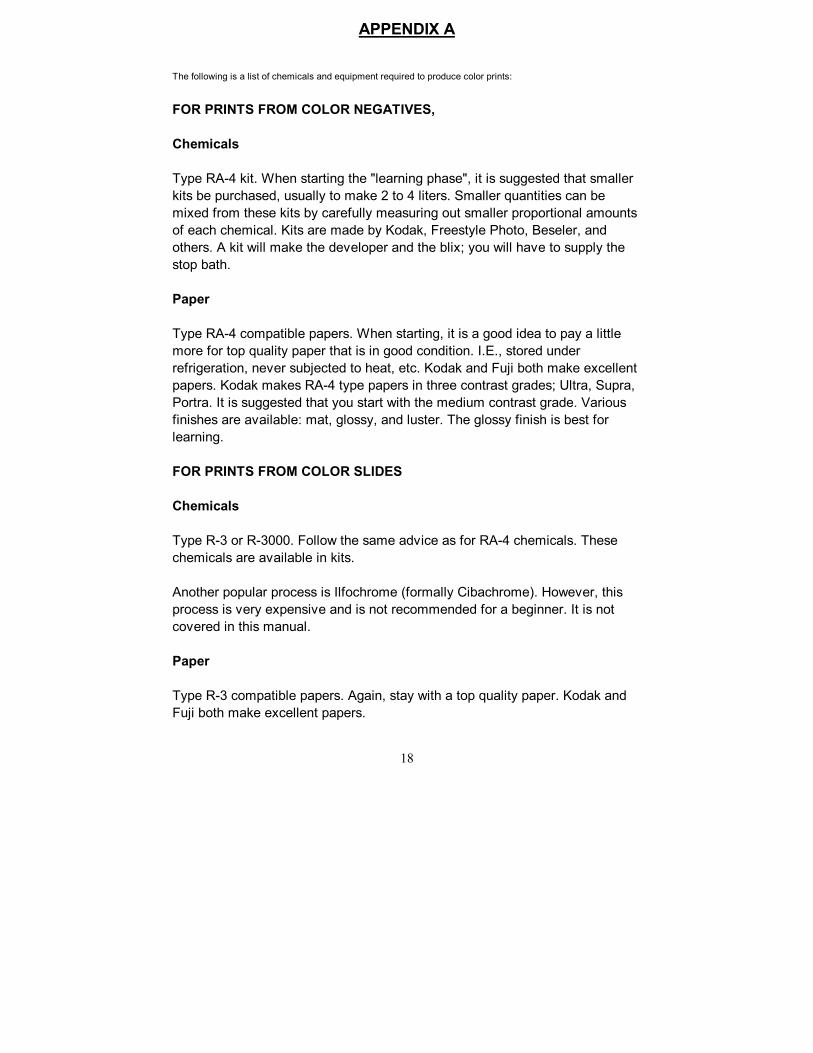
APPENDIX A
The following is a list of chemicals and equipment required to produce color prints:
FOR PRINTS FROM COLOR NEGATIVES, Chemicals Type RA-4 kit. When starting the "learning phase", it is suggested that smaller kits be purchased, usually to make 2 to 4 liters. Smaller quantities can be mixed from these kits by carefully measuring out smaller proportional amounts of each chemical. Kits are made by Kodak, Freestyle Photo, Beseler, and others. A kit will make the developer and the blix; you will have to supply the stop bath. Paper Type RA-4 compatible papers. When starting, it is a good idea to pay a little more for top quality paper that is in good condition. I.E., stored under refrigeration, never subjected to heat, etc. Kodak and Fuji both make excellent papers. Kodak makes RA-4 type papers in three contrast grades; Ultra, Supra, Portra. It is suggested that you start with the medium contrast grade. Various finishes are available: mat, glossy, and luster. The glossy finish is best for learning. FOR PRINTS FROM COLOR SLIDES Chemicals Type R-3 or R-3000. Follow the same advice as for RA-4 chemicals. These chemicals are available in kits. Another popular process is Ilfochrome (formally Cibachrome). However, this process is very expensive and is not recommended for a beginner. It is not covered in this manual. Paper Type R-3 compatible papers. Again, stay with a top quality paper. Kodak and Fuji both make excellent papers.

19
EQUIPMENT
Processing drum Tray processing is difficult, especially while learning. A drum will allow you to do most of the work with the lights turned on. A simple drum/rotating base can be found for less than $100. Constant temperature water bath Color processing is very temperature sensitive. A large change in processing temperature can cause a noticeable color shift. It is therefore necessary to provide a constant-temperature water bath to keep the chemicals at the proper operating temperature. This can be achieved with an inexpensive submersible water heater placed in a large tray of water, into which the processing chemical containers are kept. Temperature control is not required with room temperature chemicals. Measuring/dispensing containers and trays or tubes for chemicals It would be a good idea to have separate items for color and black and white, assuming you do both. It is very easy to contaminate the developers used in color printing, and you do not want the added headaches associated with such. SUPPLIERS All of the following companies have great mail-order catalogs that will help you find the materials you need. Local camera stores in major cities may also carry the necessary materials. PORTERS CAMERA SUPPLY SAMY'S CAMERA P.O. Box 628 200 S. La Brea Cedar Falls, IA 50613 Los Angeles, CA 90036 800 553-2001 213 857-9915 B&H PHOTO FREESTYLE 119 West 17th St. 5124 Sunset Blvd. New York, NY 10011 L=A., CA 90027 800 947-9942 213 660-3460 CALUMET 890 Supreme Dr. Bensenville, IL 60106 800 225-8638

20
APPENDIX B Suggested further reading.
COLOR BAT LAB PRO
A monthly technical journal, (717) 872-2183
(This publication contains very useful "Task Sheets" that deal in detail with
very specific items. There are sheets specifically for RA-4, R-3000, and
Ilfochrome).
EXPLORING COLOR PHOTOGRAPHY, Second Edition
Robert Hirsch, Brown and Benchmark, 1993
(This book has an excellent color chart and gray scale included. They are very
useful for making a test shot to test color balance when printing).
THE ART OF COLOR PHOTOGRAPHY
John Hedgecoe, Simon and Schuster, 1983
BASIC TECHNIQUES OF PHOTOGRAPHY, AN ANSEL ADAMS GUIDE
John P. Schaefer, Little, Brown and Company, 1992
KODAK PUBLICATIONS
Kodak has a very large selection of technical publications dealing with all
aspects of photography. Some are free; most are very inexpensive. Call Kodak
in your area to request a copy of their Photographic Publications Catalog.
KODAK EKTACOLOR PAPERS PUB. E-140, E-141, E-142
TRAY, DRUM, AND ROTARY TUBE PROCESSING PUB. J-39
APPENDIX C

21
NOTES:
1. Slides have a much narrower exposure range than negatives. The result is usually a print that is very
contrasty. Contrast control is done using a mask. It is beyond the scope of the manual to explain this
procedure. However, several books listed in APPENDIX B may be of help
2. Gray cards are useful for color printing because they will show the slightest color imbalance. It is also
very easy to hold the gray card next to your print and immediately see if something is wrong.
3. Why 60 units magenta and 100 units yellow? Most films and papers will need color correction
approaching these values: its a good starting point. Adjusting from these values will get you to the
proper color balance sooner.
4. Unlike black and white printing, changing the exposure time will cause a shift in print color.
(Great...and you thought you were just getting the hang of this!!) Therefore, if you have made a perfect
print with an exposure time of 10 seconds, and you then wish to increase this time to 25 seconds (to
make dodging or burning easier, for example), the color balance may shift and you will have to make a
correction. It is relatively important to choose an exposure time and try to stick with it, or to know the
amount of color correction you will need to dial-in when making an exposure change. And, of course,
the very act of dodging and burning will cause a color shift.
The good news....these color shifts can be very slight and you may not have to worry about it.
5. "CC" stands for Kodak's Color Correction filters.
6. Adding filtration cuts down on the amount of light to which the paper is exposed. Alternatively,
subtracting filtration increases exposure. You can use a lightmeter (handheld or in-camera) to measure
the light falling on the enlarger's baseboard. You can then determine a correction factor for each 10cc's
or 25cc's of changed filtration. For example, on a Saunders LPL enlarger with the dichroic color head,
25cc of magenta results in a change of light intensity of 1/4 stop.
7. THE SECRETS OF LONGER CHEMICAL LIFE
You can get significantly more use out of chemicals by following these procedures:
A. Mix only the amount of chemicals you need. Store the remaining unmixed chemicals in bottles with
all of the air removed and in the refrigerator.* They can last indefinitely it stored this way.
B. If you have leftover, unused chemicals, store these in bottles with the air removed in the refrigerator.

22
They may last for up to several months.**
C. When making prints in a drum, you can re-use the chemicals several times before any
replenishment is needed. After a couple of runs, either replenish or replace 1/3 of the chemical volume
with fresh chemicals. This is a good trick for get~ing close to proper exposure and color balance. Once
you are satisfied with the results, use a fresh batch of chemicals for the final print.
*PLEASE MAKE SURE THAT NO ONE CAN MISTAKE THESE CHEMICALS FOR SOMETHING
TO DRINK. IF YOU HAVE A SEPARATE REFRIGERATOR FOR PHOTO SUPPLIES, PUT A LOCK
ON IT, ESPECIALLY IF THERE ARE KIDS PRESENT. LABEL THE BO'I-]'LES CLEARLY DO NOT
USE ICED TEA OR SODA BOTTLES; THESE CAN BE EASILY MISTAKEN FOR BEVERAGES
** If the chemicals begin to crystallize, heat them slightly for 20 or 30 seconds in a micro-wave (make
sure the top is loose) and stir to make the crystals go back into solution
23
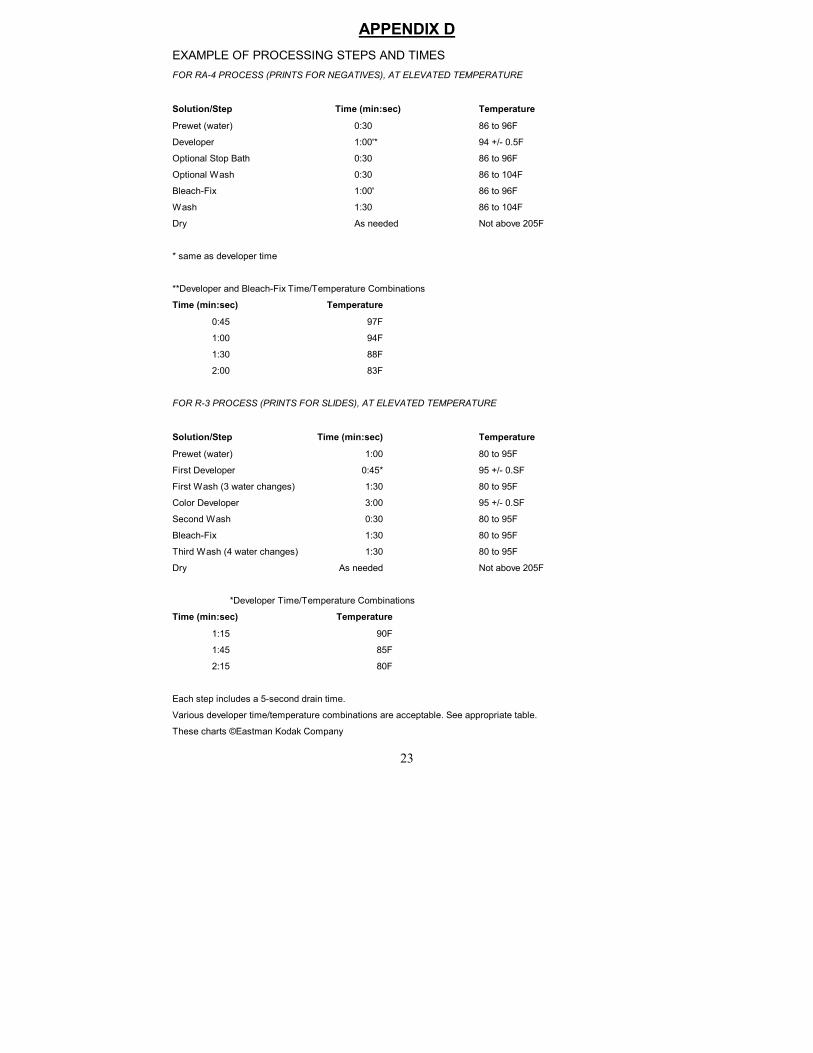
APPENDIX D EXAMPLE OF PROCESSING STEPS AND TIMES FOR RA-4 PROCESS (PRINTS FOR NEGATIVES), AT ELEVATED TEMPERATURE
Solution/Step Time (min:sec) Temperature
Prewet (water) 0:30 86 to 96F
Developer 1:00'* 94 +/- 0.5F
Optional Stop Bath 0:30 86 to 96F
Optional Wash 0:30 86 to 104F
Bleach-Fix 1:00' 86 to 96F
Wash 1:30 86 to 104F
Dry As needed Not above 205F
* same as developer time
**Developer and Bleach-Fix Time/Temperature Combinations
Time (min:sec) Temperature
0:45 97F
1:00 94F
1:30 88F
2:00 83F
FOR R-3 PROCESS (PRINTS FOR SLIDES), AT ELEVATED TEMPERATURE
Solution/Step Time (min:sec) Temperature
Prewet (water) 1:00 80 to 95F
First Developer 0:45* 95 +/- 0.SF
First Wash (3 water changes) 1:30 80 to 95F
Color Developer 3:00 95 +/- 0.SF
Second Wash 0:30 80 to 95F
Bleach-Fix 1:30 80 to 95F
Third Wash (4 water changes) 1:30 80 to 95F
Dry As needed Not above 205F
*Developer Time/Temperature Combinations
Time (min:sec) Temperature
1:15 90F
1:45 85F
2:15 80F
Each step includes a 5-second drain time.
Various developer time/temperature combinations are acceptable. See appropriate table.
These charts ©Eastman Kodak Company

24
THIS ENTIRE DOCUMENT COPYRIGHT TERRY STALER 1996
TERRY STALER - FINE ART PHOTOGRAPHER
EARTH SCENICS
P.O. BOX 3512
Thousand Oaks, CA 91359
E-MAIL: [email protected]
INTERNET: http://www.onlinephotography.com
08-30-98


