_ MC; Reviewed:
SPOC 03/25/2014
Solution & Interoperability Test Lab Application Notes
©2014 Avaya Inc. All Rights Reserved.
1 of 22
2N_VB_SM63_SIP
Avaya Solution & Interoperability Test Lab
Application Notes for Configuring 2N® VoiceBlue Next 1.17
with Avaya Aura® Communication Manager 6.3 Using a SIP
Trunk - Issue 1.0
Abstract
These Application Notes describe the configuration steps required for Avaya Aura®
Communication Manager 6.3 with 2N® VoiceBlue Next using a SIP trunk.
Information in these Application Notes has been obtained through DevConnect compliance
testing and additional technical discussions. Testing was conducted via the DevConnect
Program at the Avaya Solution and Interoperability Test Lab.
_ MC; Reviewed:
SPOC 03/25/2014
Solution & Interoperability Test Lab Application Notes
©2014 Avaya Inc. All Rights Reserved.
2 of 22
2N_VB_SM63_SIP
1. Introduction 2N
® VoiceBlue Next from 2N Telekomunikace is a GSM/UMTS gateway using a VoIP
interface. The 2N® VoiceBlue Next is designed to maximize cost savings on GSM/UMTS calls.
This is ensured by an automated saving solution able to route calls according to time, pre-code or
free minutes. A CallBack service is able to reduce roaming fees on trips abroad. The PBX can be
configured to use the 2N®
VoiceBlue Next to route calls when the primary PSTN access (i.e. PRI
or SIP) is not available.
2. General Test Approach and Test Results The general test approach was to configure the 2N
® VoiceBlue Next (2N VoiceBlue) to
communicate with the Avaya Aura® Communication Manager (Communication Manager) as
implemented on a customer’s premises. Testing focused on verifying that calls could be routed
via the 2N VoiceBlue from the communication Manager to the Public switched Telephone
Network (PSTN) and vice versa. Various call scenarios were performed to simulate real call
types as would be observed on a customer premises including the use of H323 and SIP
telephones on the Communication Manager. See Figure 1 for a network diagram. The
interoperability compliance test included both feature functionality and serviceability tests.
DevConnect Compliance Testing is conducted jointly by Avaya and DevConnect members. The
jointly-defined test plan focuses on exercising APIs and/or standards-based interfaces pertinent
to the interoperability of the tested products and their functionalities. DevConnect Compliance
Testing is not intended to substitute full product performance or feature testing performed by
DevConnect members, nor is it to be construed as an endorsement by Avaya of the suitability or
completeness of a DevConnect member’s solution.
2.1. Interoperability Compliance Testing
The testing included:
Verification of the Module status of the 2N VoiceBlue
Calls to the PSTN from Communication Manager, including Busy numbers
Calls to Communication Manager from the PSTN, including Busy numbers
Ensuring proper disconnects
Observing DTMF
Hold/Unhold
Long Call Duration (one hour +)
Restarting the 2N VoiceBlue
2.2. Test Results
Tests were performed to insure interoperability between 2N®
VoiceBlue Next and
Communication Manager. The tests were all functional in nature and performance testing was
not included. All the test cases passed successfully.
_ MC; Reviewed:
SPOC 03/25/2014
Solution & Interoperability Test Lab Application Notes
©2014 Avaya Inc. All Rights Reserved.
3 of 22
2N_VB_SM63_SIP
2.3. Support
Technical support from 2N Telekomunikace can be obtained through the following:
Phone: +420 261 301 111
E-mail: [email protected]
Web: http://support.2n.cz/ (Account required)
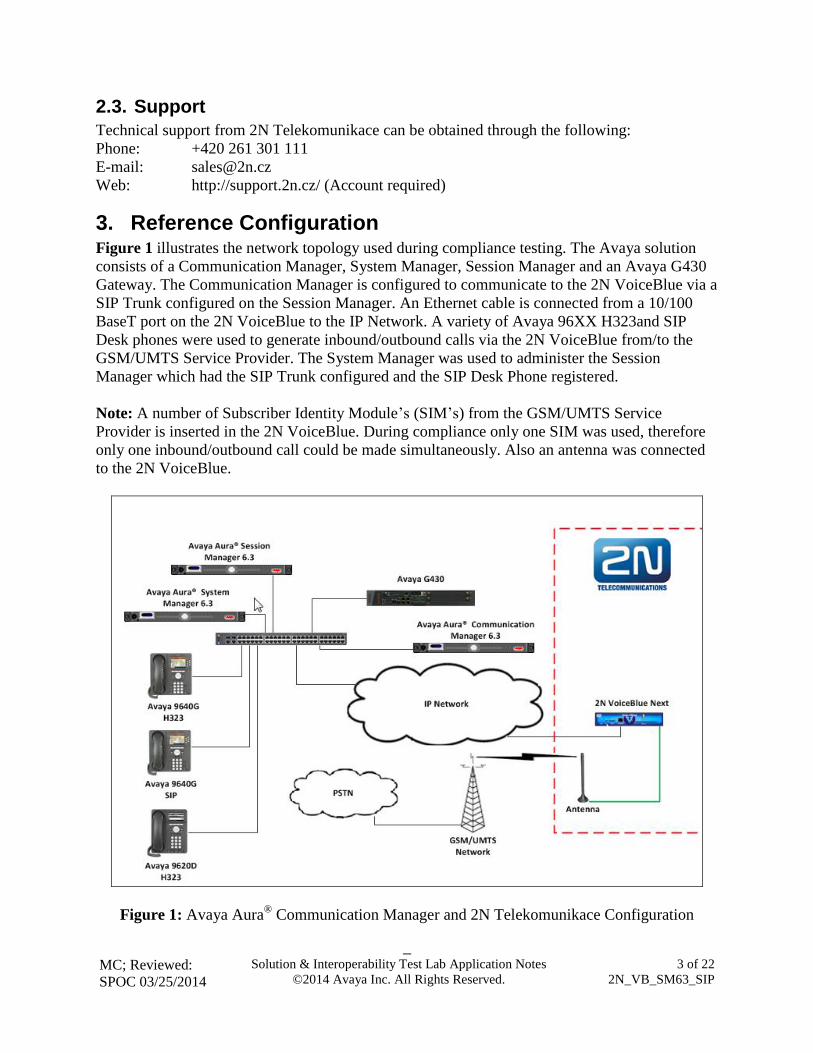
3. Reference Configuration Figure 1 illustrates the network topology used during compliance testing. The Avaya solution
consists of a Communication Manager, System Manager, Session Manager and an Avaya G430
Gateway. The Communication Manager is configured to communicate to the 2N VoiceBlue via a
SIP Trunk configured on the Session Manager. An Ethernet cable is connected from a 10/100
BaseT port on the 2N VoiceBlue to the IP Network. A variety of Avaya 96XX H323and SIP
Desk phones were used to generate inbound/outbound calls via the 2N VoiceBlue from/to the
GSM/UMTS Service Provider. The System Manager was used to administer the Session
Manager which had the SIP Trunk configured and the SIP Desk Phone registered.
Note: A number of Subscriber Identity Module’s (SIM’s) from the GSM/UMTS Service
Provider is inserted in the 2N VoiceBlue. During compliance only one SIM was used, therefore
only one inbound/outbound call could be made simultaneously. Also an antenna was connected
to the 2N VoiceBlue.
Figure 1: Avaya Aura® Communication Manager and 2N Telekomunikace Configuration

_ MC; Reviewed:
SPOC 03/25/2014
Solution & Interoperability Test Lab Application Notes
©2014 Avaya Inc. All Rights Reserved.
4 of 22
2N_VB_SM63_SIP
4. Equipment and Software Validated The following equipment and software were used for the sample configuration provided:
Avaya Equipment Software / Firmware Version
Avaya Aura® Communication Manager R6.3 Build R016x.03.0.124.0
Update 03.0.124.0-20850
Avaya Aura® System Manager R6.3 Build 6.3.0.8.5682-6.3.8.1814
Update 6.3.3.5.1719
Avaya Aura® Session Manager R6.3 Build 6.3.3.0.633004
Avaya 96xx Deskphones
- H323 9620D
- H323 9640G
- SIP 9640D
3.101S
3.105S
2.6.10.1
2N Telekomunikace Equipment Software / Firmware Version
2N®VoiceBlue Next Firmware version 1.17.0.20.2
Bootware version 1.20
5. Configure Avaya Aura® Communication Manager Configuration and verification operations on the Communication Manager illustrated in this
section were all performed using Communication Manager’s SAT administration interface. The
information provided in this section describes the configuration of the Communication Manager
for this solution. It is implied a working system is already in place including a Node for the
Session manager and procr. For all other provisioning information such as initial installation and
configuration, please refer to the product documentation in Section 10. The configuration
operations described in this section can be summarized as follows: (Note: during Compliance
Testing all inputs not highlighted in Bold were left as Default)
Configure signaling-group
Configure Trunk Group

_ MC; Reviewed:
SPOC 03/25/2014
Solution & Interoperability Test Lab Application Notes
©2014 Avaya Inc. All Rights Reserved.
5 of 22
2N_VB_SM63_SIP
5.1. Configure signaling-group
A signalling group is required before a trunk-group can be configured. Use the add signaling-
group command followed by next available signaling-group number to configure the following:
Group Type: Enter sip
Transport Method: Enter tcp
Near-end Node Name: Enter procr
Far-end Node Name: Enter SM63RPSIG (this is the Node of the
Session Manager)
Near-end Listen Port: Enter 5060
Far-end Listen Port: Enter 5060
Far-end Domain: Enter devconnect.local (This is the domain
configured on the Session Manager)
add signaling-group 1 Page 1 of 2
SIGNALING GROUP
Group Number: 1 Group Type: sip
IMS Enabled? n Transport Method: tcp
Q-SIP? n
IP Video? n Enforce SIPS URI for SRTP? y
Peer Detection Enabled? y Peer Server: SM
Prepend '+' to Outgoing Calling/Alerting/Diverting/Connected Public Numbers? y
Remove '+' from Incoming Called/Calling/Alerting/Diverting/Connected Numbers? n
Near-end Node Name: procr Far-end Node Name: SM63RPSIG
Near-end Listen Port: 5060 Far-end Listen Port: 5060
Far-end Network Region: 1
Far-end Domain: devconnect.local
Bypass If IP Threshold Exceeded? n
Incoming Dialog Loopbacks: eliminate RFC 3389 Comfort Noise? n
DTMF over IP: rtp-payload Direct IP-IP Audio Connections? y
Session Establishment Timer(min): 3 IP Audio Hairpinning? n
Enable Layer 3 Test? y Initial IP-IP Direct Media? n
H.323 Station Outgoing Direct Media? n Alternate Route Timer(sec): 6
_ MC; Reviewed:
SPOC 03/25/2014
Solution & Interoperability Test Lab Application Notes
©2014 Avaya Inc. All Rights Reserved.
6 of 22
2N_VB_SM63_SIP
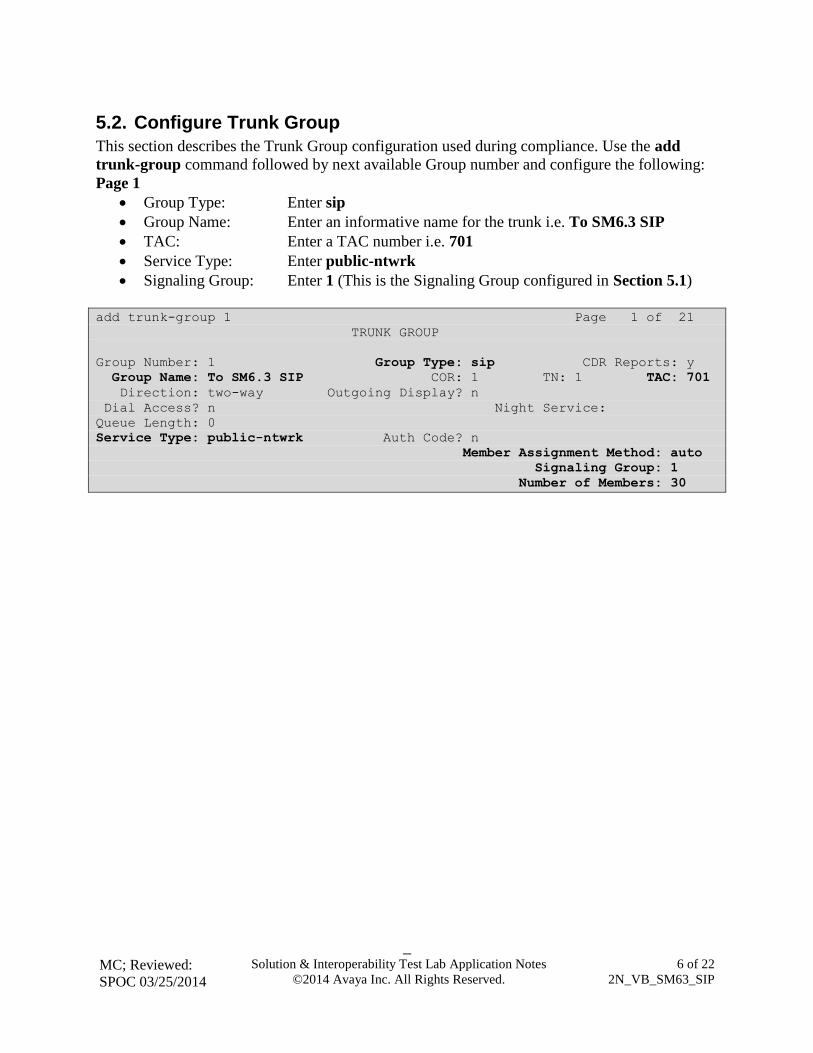
5.2. Configure Trunk Group
This section describes the Trunk Group configuration used during compliance. Use the add
trunk-group command followed by next available Group number and configure the following:
Page 1
Group Type: Enter sip
Group Name: Enter an informative name for the trunk i.e. To SM6.3 SIP
TAC: Enter a TAC number i.e. 701
Service Type: Enter public-ntwrk
Signaling Group: Enter 1 (This is the Signaling Group configured in Section 5.1)
add trunk-group 1 Page 1 of 21
TRUNK GROUP
Group Number: 1 Group Type: sip CDR Reports: y
Group Name: To SM6.3 SIP COR: 1 TN: 1 TAC: 701
Direction: two-way Outgoing Display? n
Dial Access? n Night Service:
Queue Length: 0
Service Type: public-ntwrk Auth Code? n
Member Assignment Method: auto
Signaling Group: 1
Number of Members: 30

_ MC; Reviewed:
SPOC 03/25/2014
Solution & Interoperability Test Lab Application Notes
©2014 Avaya Inc. All Rights Reserved.
7 of 22
2N_VB_SM63_SIP
6. Configuring Avaya Aura® Session Manager
A number of configurations are required to enable the Session Manager to route calls between
the Communication Manager and 2N VoiceBlue. All configurations of the Session Manager are
performed using System Manager. The configuration operations described in this section can be
summarized as follows:
Logging on to System Manager
Create 2N VoiceBlue Next as a SIP Entity
Create an Entity Link for 2N VoiceBlue Next
Create a Routing Policy for 2N VoiceBlue Next
Create a Dial Pattern for 2N VoiceBlue Next
Note: It is implied a working system is already in place. During Compliance testing a SIP Entity
and an Entity Link for the Communication Manager were created. Also a Routing Policy and a
Dial Pattern to route calls to the Communication Manager were created and are outside the scope
of this Application Note.
6.1. Logging on to Avaya Aura® System Manager
Log on by accessing the browser-based GUI of System Manager, using the URL
“http://<fqdn>/SMGR” or “http://<ip-address>/SMGR”, where:
“<fqdn> is the fully qualified domain name of the Avaya Aura® System Manager or
the“<ipaddress>” is the IP address of Avaya Aura® System Manager.
Once the System Manager Web page opens Log in with the appropriate credentials and click on
the Log on button.
_ MC; Reviewed:
SPOC 03/25/2014
Solution & Interoperability Test Lab Application Notes
©2014 Avaya Inc. All Rights Reserved.
8 of 22
2N_VB_SM63_SIP
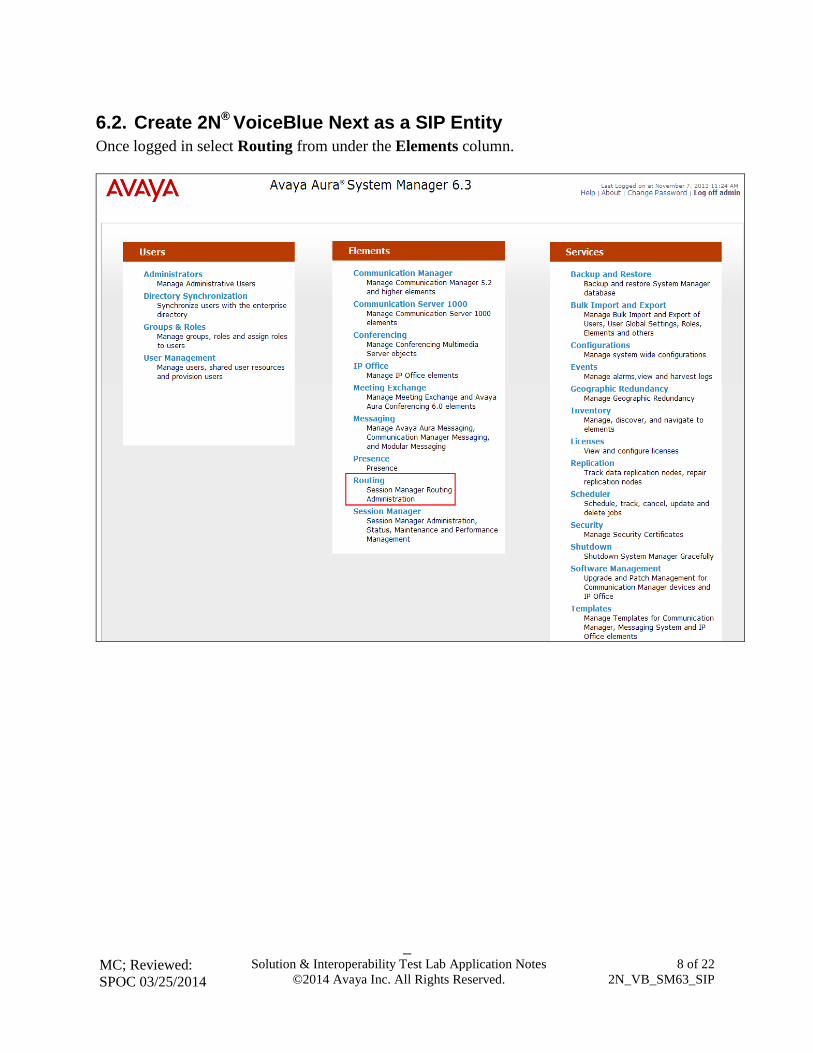
6.2. Create 2N® VoiceBlue Next as a SIP Entity
Once logged in select Routing from under the Elements column.

_ MC; Reviewed:
SPOC 03/25/2014
Solution & Interoperability Test Lab Application Notes
©2014 Avaya Inc. All Rights Reserved.
9 of 22
2N_VB_SM63_SIP
A SIP Entity must be added for the 2N VoiceBlue. To add a SIP Entity, select SIP Entities on
the left panel menu and then click on the New button (not shown).
Note: A SIP Entity was already configured for the Communication Manager and was called
CM63.
Enter the following for 2N VoiceBlue SIP Entity:
Under General:
Name Enter an informative name (e.g., 2N VoiceBlue)
FQDN or IP Address enter the IP address of the signalling interface of the 2N
VoiceBlue
Type Select SIP Trunk from the dropdown box
Location Select location from the dropdown box, during compliance
testing DevConnectRP was used.
Time Zone Select Time Zone for this location from the dropdown box
SIP Timer Enter 4
Once the correct information is entered click the Commit Button.
Note: During compliance testing Adaptation was left blank.

_ MC; Reviewed:
SPOC 03/25/2014
Solution & Interoperability Test Lab Application Notes
©2014 Avaya Inc. All Rights Reserved.
10 of 22
2N_VB_SM63_SIP
6.3. Create an Entity Link for 2N® VoiceBlue Next
The SIP trunk between the Session Manager and the 2N VoiceBlue requires an Entity Link.
To add an Entity Link, select Entity Links on the left panel menu and click on the New button
(Not shown) Enter the following:
Name An informative name, (e.g. VoiceBlue_5060_TCP).
SIP Entity 1 Select SM63 from the SIP Entity 1 dropdown box.
Protocol Select TCP from the Protocol drop down box
Port Enter 5060
SIP Entity 2 Select 2N VoiceBlue from the SIP Entity 2 dropdown box
(configured in Section 6.2)
Port Enter 5060 as the Port.
Connection Policy Check the Trusted check box.
Click Commit to save changes. The following screen shows the Entity Links used.

_ MC; Reviewed:
SPOC 03/25/2014
Solution & Interoperability Test Lab Application Notes
©2014 Avaya Inc. All Rights Reserved.
11 of 22
2N_VB_SM63_SIP
6.4. Create a Routing Policy for 2N® VoiceBlue Next
Create routing policies to direct calls to the 2N VoiceBlue via the Session Manager. To add a
routing policy, select Routing Policies on the left panel menu and then click on the New button
(not shown). In Routing Policy Details enter an informative name in the Name field (example,
To GSM) and enter 0 in the Retries field. In SIP Entity as Destination, click the Select button.
A Routing Policy was also configured to direct calls to the Communication Manager, but is
outside the scope of this Application Note.
_ MC; Reviewed:
SPOC 03/25/2014
Solution & Interoperability Test Lab Application Notes
©2014 Avaya Inc. All Rights Reserved.
12 of 22
2N_VB_SM63_SIP
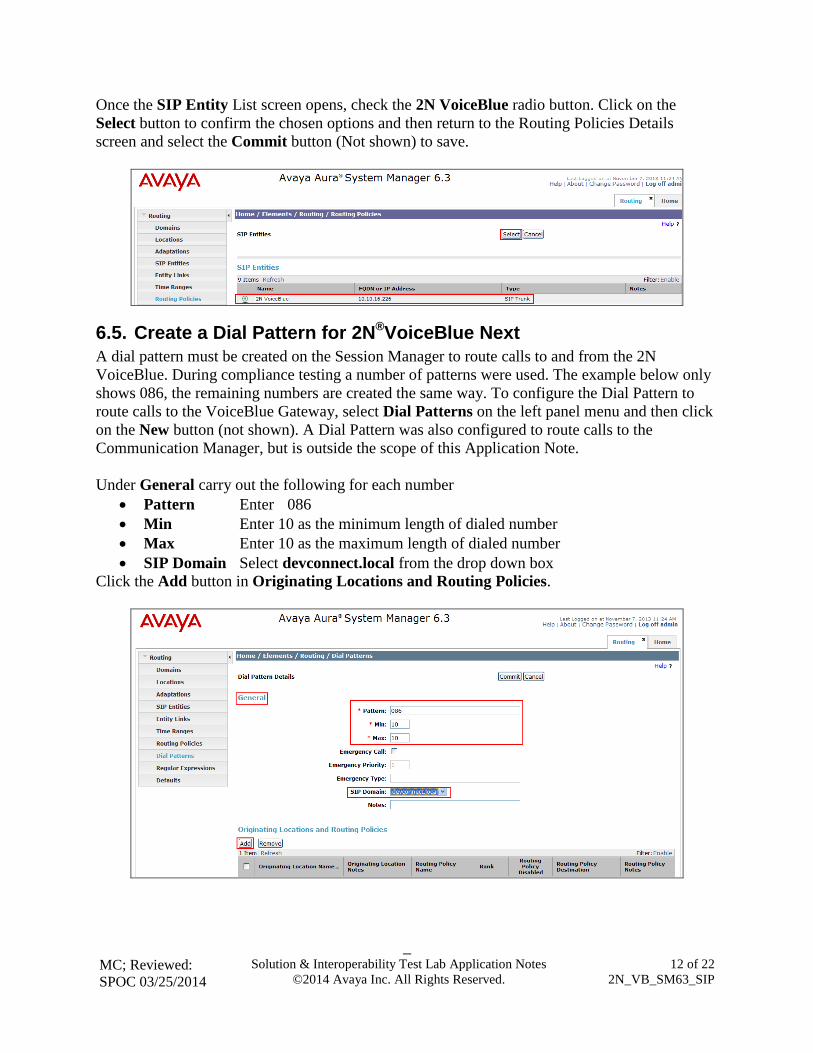
Once the SIP Entity List screen opens, check the 2N VoiceBlue radio button. Click on the
Select button to confirm the chosen options and then return to the Routing Policies Details
screen and select the Commit button (Not shown) to save.
6.5. Create a Dial Pattern for 2N®VoiceBlue Next
A dial pattern must be created on the Session Manager to route calls to and from the 2N
VoiceBlue. During compliance testing a number of patterns were used. The example below only
shows 086, the remaining numbers are created the same way. To configure the Dial Pattern to
route calls to the VoiceBlue Gateway, select Dial Patterns on the left panel menu and then click
on the New button (not shown). A Dial Pattern was also configured to route calls to the
Communication Manager, but is outside the scope of this Application Note.
Under General carry out the following for each number
Pattern Enter 086
Min Enter 10 as the minimum length of dialed number
Max Enter 10 as the maximum length of dialed number
SIP Domain Select devconnect.local from the drop down box
Click the Add button in Originating Locations and Routing Policies.
_ MC; Reviewed:
SPOC 03/25/2014
Solution & Interoperability Test Lab Application Notes
©2014 Avaya Inc. All Rights Reserved.
13 of 22
2N_VB_SM63_SIP
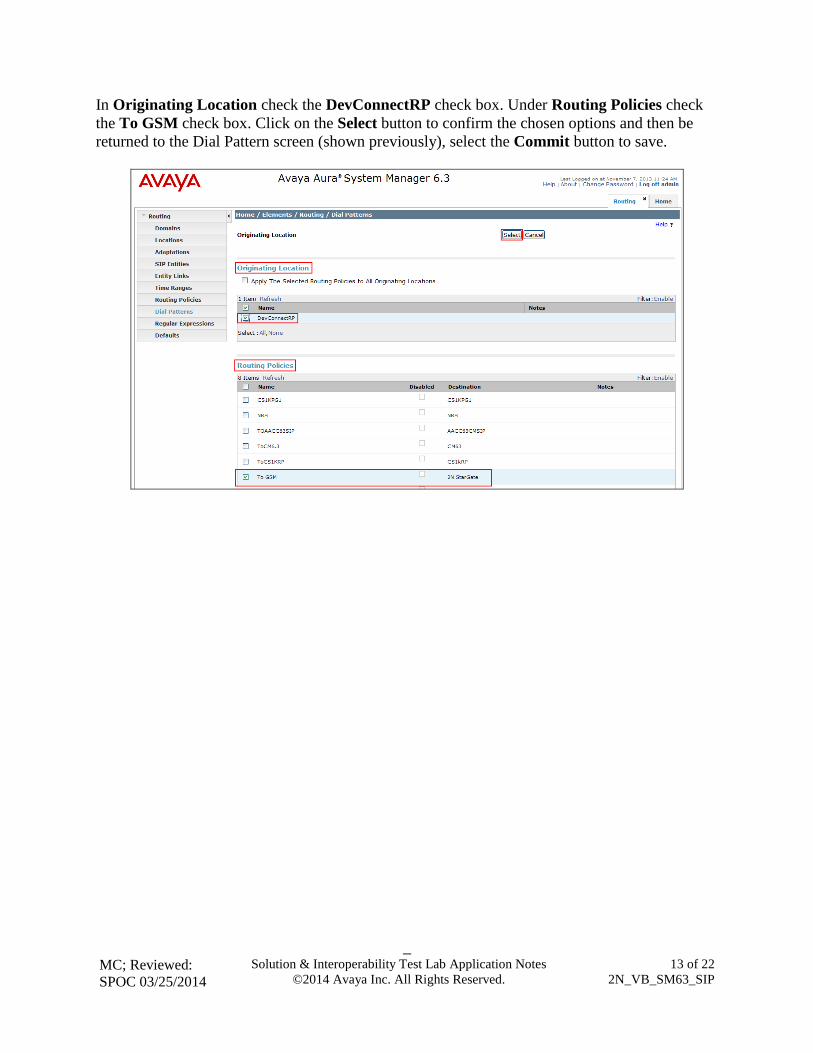
In Originating Location check the DevConnectRP check box. Under Routing Policies check
the To GSM check box. Click on the Select button to confirm the chosen options and then be
returned to the Dial Pattern screen (shown previously), select the Commit button to save.

_ MC; Reviewed:
SPOC 03/25/2014
Solution & Interoperability Test Lab Application Notes
©2014 Avaya Inc. All Rights Reserved.
14 of 22
2N_VB_SM63_SIP
7. 2N®
VoiceBlue Next configuration To access the 2N VoiceBlue, open a web browser and navigate to http://<IP address of the 2N
VoiceBlue> and log in using the appropriate credentials and click on the login button.
Once logged in, click on Gateway configuration.

_ MC; Reviewed:
SPOC 03/25/2014
Solution & Interoperability Test Lab Application Notes
©2014 Avaya Inc. All Rights Reserved.
15 of 22
2N_VB_SM63_SIP
When the System parameters page opens, enter the following:
Using the scroll bar on the right side of the page scroll down to Others section.
_ MC; Reviewed:
SPOC 03/25/2014
Solution & Interoperability Test Lab Application Notes
©2014 Avaya Inc. All Rights Reserved.
16 of 22
2N_VB_SM63_SIP
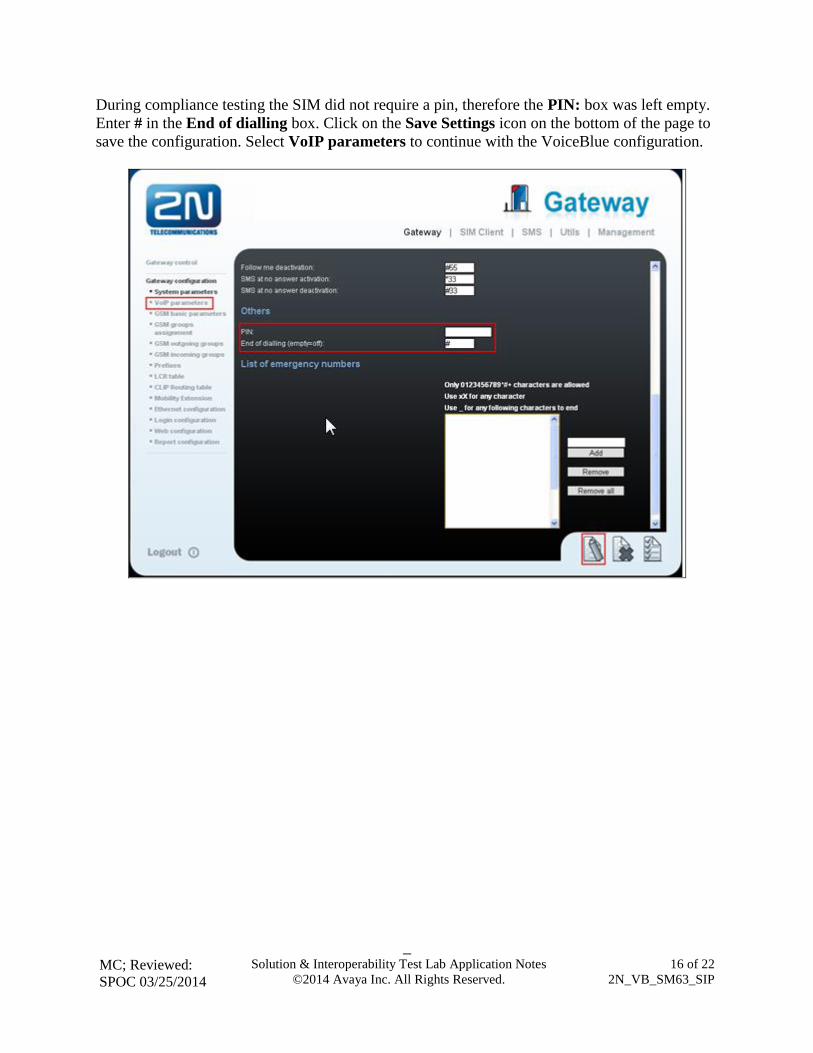
During compliance testing the SIM did not require a pin, therefore the PIN: box was left empty.
Enter # in the End of dialling box. Click on the Save Settings icon on the bottom of the page to
save the configuration. Select VoIP parameters to continue with the VoiceBlue configuration.

_ MC; Reviewed:
SPOC 03/25/2014
Solution & Interoperability Test Lab Application Notes
©2014 Avaya Inc. All Rights Reserved.
17 of 22
2N_VB_SM63_SIP
When the VoIP parameters page opens, enter the following in the SIP protocol settings
section:
Use CLIP from INVITE field Select Contact from the dropdown box
Use DIAL from INVITE field Select INVITE from the dropdown box
USE SIP over TCP for calls Check the Check box
Using the scroll bar on the right side of the page, scroll down to the Codec Priority section.
_ MC; Reviewed:
SPOC 03/25/2014
Solution & Interoperability Test Lab Application Notes
©2014 Avaya Inc. All Rights Reserved.
18 of 22
2N_VB_SM63_SIP
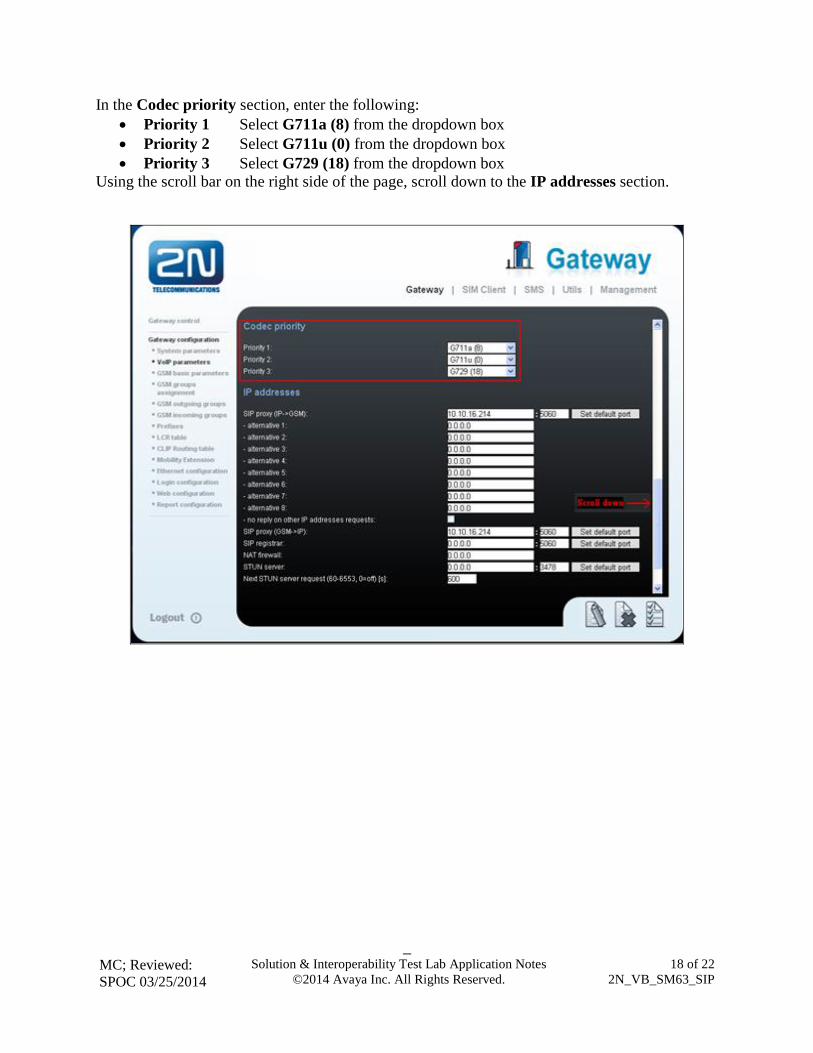
In the Codec priority section, enter the following:
Priority 1 Select G711a (8) from the dropdown box
Priority 2 Select G711u (0) from the dropdown box
Priority 3 Select G729 (18) from the dropdown box
Using the scroll bar on the right side of the page, scroll down to the IP addresses section.
_ MC; Reviewed:
SPOC 03/25/2014
Solution & Interoperability Test Lab Application Notes
©2014 Avaya Inc. All Rights Reserved.
19 of 22
2N_VB_SM63_SIP
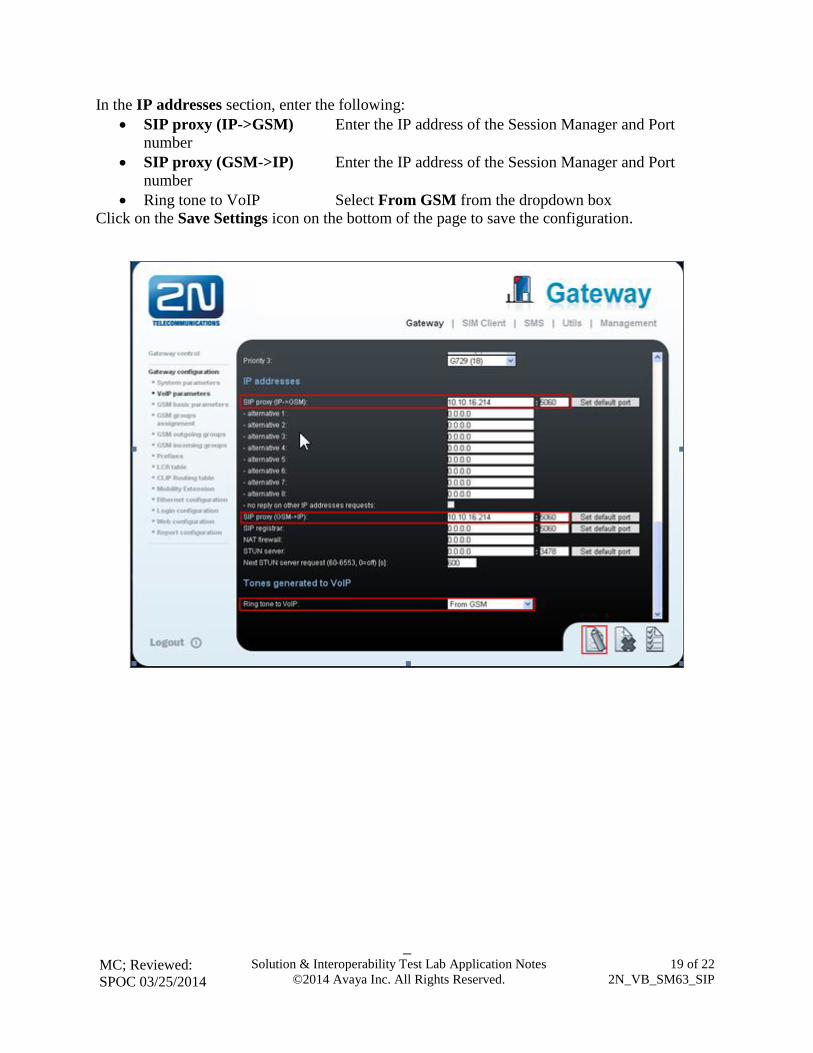
In the IP addresses section, enter the following:
SIP proxy (IP->GSM) Enter the IP address of the Session Manager and Port
number
SIP proxy (GSM->IP) Enter the IP address of the Session Manager and Port
number
Ring tone to VoIP Select From GSM from the dropdown box
Click on the Save Settings icon on the bottom of the page to save the configuration.

_ MC; Reviewed:
SPOC 03/25/2014
Solution & Interoperability Test Lab Application Notes
©2014 Avaya Inc. All Rights Reserved.
20 of 22
2N_VB_SM63_SIP
8. Verification Steps This section provides tests that can be performed to verify correct configuration of the Avaya
and 2N VoiceBlue solution.
8.1. Verify 2N®VoiceBlue Next activity
Log in to the Gateway and click on Modules status and verify that something similar to the
screen shot below is seen. During compliance testing, only one SIM was used. The following
screen shows that module 01 was used and has signal strength of -85 dBm.
8.2. Verify Calls via the 2N® VoiceBlue Next
Place a call from a Desk Phone on the Communication Manager via the 2N VoiceBlue to an
external number, ensure the call is completed and verify two-way audio is heard.
Place a call from an external number via the 2N VoiceBlue to a Desk Phone on the
Communication Manager, ensure the call is completed and verify two-way audio is heard.
_ MC; Reviewed:
SPOC 03/25/2014
Solution & Interoperability Test Lab Application Notes
©2014 Avaya Inc. All Rights Reserved.
21 of 22
2N_VB_SM63_SIP
9. Conclusion A full and comprehensive set of feature functional test cases were performed during Compliance
testing. 2N® VoiceBlue Next is considered compliant with Avaya Aura
® Communication
Manager 6.3. All test cases have passed and met the objectives outlined in Section 2.1.
10. Additional References These documents form part of the Avaya official technical reference documentation suite.
Further information may be had from http://support.avaya.com or from your Avaya
representative.
[1] Administering Avaya Aura® Communication Manager, Release 6.3, October 2013,
Document Number 03-300509, Issue 9.0.
[2] Avaya Aura® Communication Manager Feature Description and Implementation,
Release 6.3, May 2013, Document Number 555-245-205, Issue 10.0.
[3] Administering Avaya Aura® Session Manager, Release 6.3, Issue 3 October 2013
[4] Administering Avaya Aura® System Manager, Release 6.3, Issue 3, October, 2013
Product Documentation for VoiceBlue can be obtained from 2N Telekomunikace at
http://www.2n.cz/

_ MC; Reviewed:
SPOC 03/25/2014
Solution & Interoperability Test Lab Application Notes
©2014 Avaya Inc. All Rights Reserved.
22 of 22
2N_VB_SM63_SIP
©2014 Avaya Inc. All Rights Reserved.
Avaya and the Avaya Logo are trademarks of Avaya Inc. All trademarks identified by ® and
™ are registered trademarks or trademarks, respectively, of Avaya Inc. All other trademarks
are the property of their respective owners. The information provided in these Application
Notes is subject to change without notice. The configurations, technical data, and
recommendations provided in these Application Notes are believed to be accurate and
dependable, but are presented without express or implied warranty. Users are responsible for
their application of any products specified in these Application Notes.
Please e-mail any questions or comments pertaining to these Application Notes along with the
full title name and filename, located in the lower right corner, directly to the Avaya
DevConnect Program at [email protected].


