Inglobe Technologies © 2008/2013
AR-media™ Player v2.3
INSTALLATION & USER GUIDE (February, 2013)
(Windows XP/Vista/7)

AR-media™ Player v2.3
Inglobe Technologies © 2008/2013
Copyright
Copyright © 2008/2013 Inglobe Technologies S.r.l. All rights reserved. No part of this publication may be reproduced, transmitted, transcribed, stored in a retrieval system, or translated into any language or computer language, in any form or by any means, electronic, mechanical, magnetic, optical, chemical, manual or otherwise, without the prior written permission of Inglobe Technologies S.r.l.
AR-media™ Player v2.3
Inglobe Technologies © 2008/2013
Contents
Foreword 1
Requirements 1
Hardware 1
Software 1
Introduction 1
Augmented Reality 1
AR-media™ Platform 1
AR-media™ Player 1
Installation 4
Configuration 4
Configuration Options 4
Usage 5
Supported Models 5
Execution 5
Visualization Management Mode 6
Object/Scene Interaction Mode 6
Animation Management Mode 6
Sound Management Mode 6
Layers/Sequences Management Mode 6
Clipping/Sectioning Management Mode 6
Tracking Management Mode 7
Lighting Management Mode 7
Commands and Interactions’ Summary 8
Lighting Debug Mode 12
Customizations 13
Licensing 13
Support 13

AR-media™ Player v2.3
Inglobe Technologies © 2008/2013 1
Foreword
AR-media™ Player allows you to display 3D models1 in Augmented Reality easily and quickly. No
configuration required, once installed just double click an AR-media™ Resource File and enjoy.
The player allows you to visualize any model in Augmented Reality and experience a totally new
way to interact with digital content.
Requirements
Hardware
Minimum Hardware: 1 GHz Processor, 512 MB Ram, 100% Compliant OpenGL Video Card with
128 MB Ram, 50 MB of available Hard Disk space, USB 2.0 Webcam.
Recommended Hardware: 2 GHz Processor, 2 GB Ram, 100% Compliant OpenGL Video Card
with 512 MB Ram, 50 MB of available Hard Disk space, USB 2.0 Webcam with 30FPS @
640x480 resolution.
Software
Required Software: Microsoft Windows® XP/Vista/7, Latest Video Drivers, Apple QuickTime™2,
DirectX103 or later.
Introduction
Augmented Reality
Augmented Reality refers to the real-time view of the physical world whose elements are
augmented by computer generated items. Thanks to Augmented Reality, users can interact with 3D
content directly in the environment where they live and work, by means of a suitable computer
interface. Augmented Reality helps users to put any virtual content in context thus assisting them in
solving real world tasks in a completely new way.
AR-media™ Platform
AR-media™ is the Augmented Reality Platform behind the line of products by Inglobe
Technologies that goes under the name “AR-media™ Plugin”. AR-media™ is a general purpose
platform for the development of advanced Augmented Reality applications and solutions. It allows
to create solutions ranging from stand alone, web and mobile as well as custom solutions targeted to
meet complex requirements in a wide range of applications scenarios. It supports distinct tracking
techniques and software technologies that are at the basis of any Augmented Reality solution
designed and deployed by Inglobe Technologies.
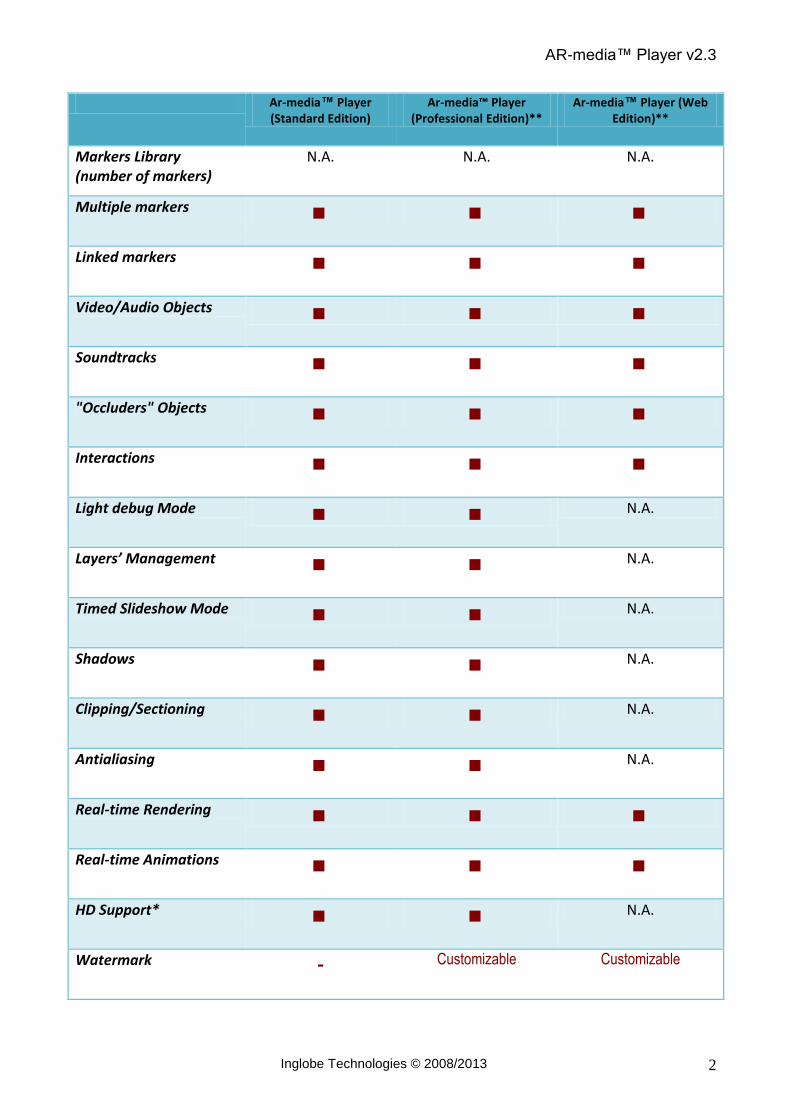
AR-media™ Player
The player implements only some of the features of the AR-media™ platform. No programming
skills are required. Using the AR-media™ Player you can view complex and high quality
Augmented Reality scenes leveraging on the main features illustrated in the Product Sheet below.
Additionally, AR-media™ Player can be used to preview contents created for the ARPlayer for
iOS.
1 3D content has to be produced by any of AR-media™ authoring tools (such as any of AR-media™ Exporters that are
bundled in AR-media™ Plugin available for many digital content creation software). 2 Required for video textures’ visualization.
3 DirectSound Required for audio support.
AR-media™ Player v2.3
Inglobe Technologies © 2008/2013 2
Ar-media™ Player (Standard Edition)
Ar-media™ Player (Professional Edition)**
Ar-media™ Player (Web Edition)**
Markers Library (number of markers)
N.A. N.A. N.A.
Multiple markers ■ ■ ■
Linked markers ■ ■ ■
Video/Audio Objects ■ ■ ■
Soundtracks ■ ■ ■
"Occluders" Objects ■ ■ ■
Interactions ■ ■ ■
Light debug Mode ■ ■ N.A.
Layers’ Management ■ ■ N.A.
Timed Slideshow Mode ■ ■ N.A.
Shadows ■ ■ N.A.
Clipping/Sectioning ■ ■ N.A.
Antialiasing ■ ■ N.A.
Real-time Rendering ■ ■ ■
Real-time Animations ■ ■ ■
HD Support* ■ ■ N.A.
Watermark
- Customizable Customizable
AR-media™ Player v2.3
Inglobe Technologies © 2008/2013 3
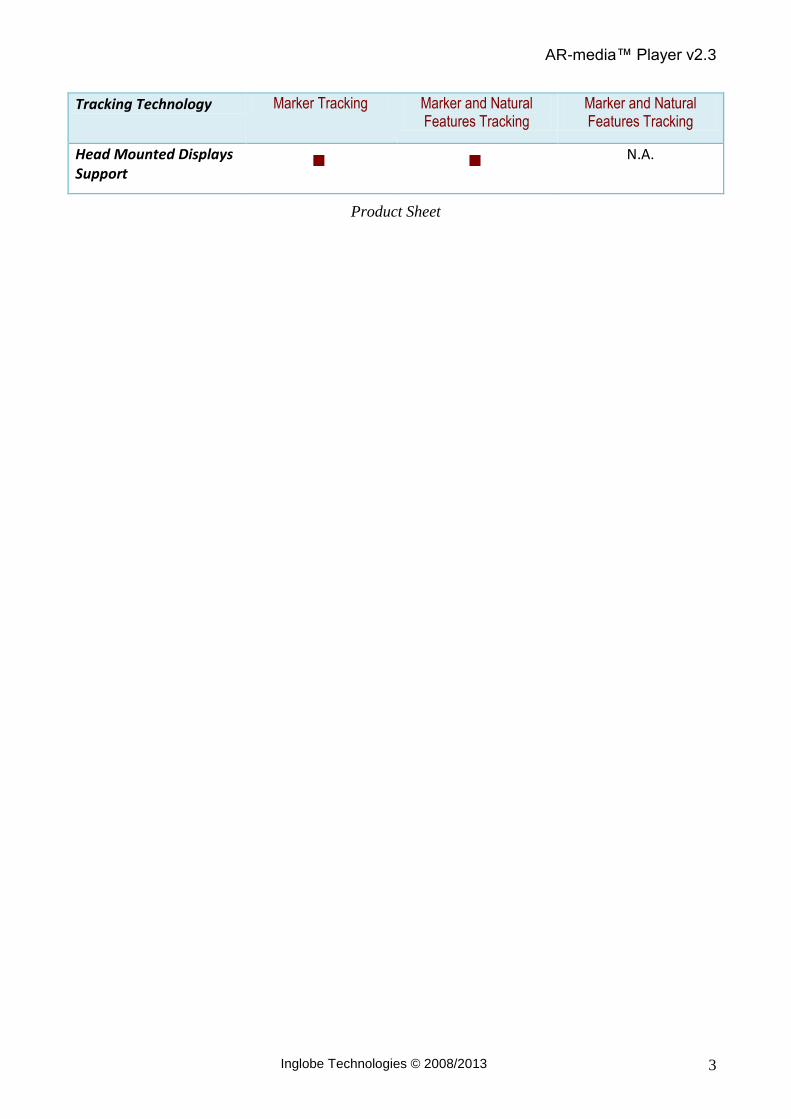
Tracking Technology Marker Tracking Marker and Natural Features Tracking
Marker and Natural Features Tracking
Head Mounted Displays Support
■ ■ N.A.
Product Sheet
AR-media™ Player v2.3
Inglobe Technologies © 2008/2013 4
Installation
The installation procedure requires full administrative rights, so be sure to have the required
privileges before trying to install the software. The installation process will install the following
components:
AR-media™ Player
AR-media™ Configuration Utility
Help and Documentation files
AR-media™ Marker
To start the installation process, execute the AR-media™ Player setup and follow on screen
instructions from the installation wizard.
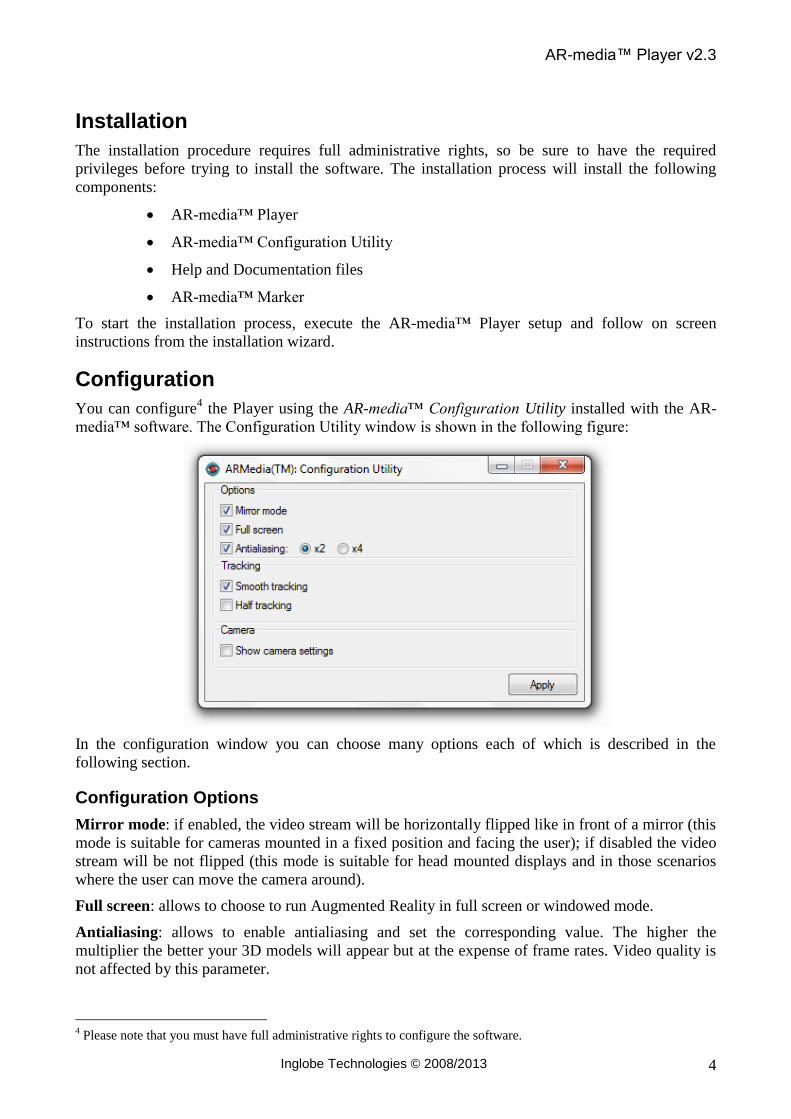
Configuration
You can configure4 the Player using the AR-media™ Configuration Utility installed with the AR-
media™ software. The Configuration Utility window is shown in the following figure:
In the configuration window you can choose many options each of which is described in the
following section.
Configuration Options
Mirror mode: if enabled, the video stream will be horizontally flipped like in front of a mirror (this
mode is suitable for cameras mounted in a fixed position and facing the user); if disabled the video
stream will be not flipped (this mode is suitable for head mounted displays and in those scenarios
where the user can move the camera around).
Full screen: allows to choose to run Augmented Reality in full screen or windowed mode.
Antialiasing: allows to enable antialiasing and set the corresponding value. The higher the
multiplier the better your 3D models will appear but at the expense of frame rates. Video quality is
not affected by this parameter.
4 Please note that you must have full administrative rights to configure the software.
AR-media™ Player v2.3
Inglobe Technologies © 2008/2013 5
Smooth tracking: allows to configure the tracker for using either a smooth or precise technique; if
smooth tracking is enabled then objects will follow the marker in a soft manner and with a little
delay, if smooth tracking is disabled then objects will be glued to the marker.
Half tracking: allows to configure the tracker for tracking a video with half the resolution of the
video from the camera. This mode is useful especially when tracking high resolution images to
improve the frame rate (but at the expense of a lower tracking quality).
Show camera settings: allows to adjust camera’s parameters before starting the Augmented Reality
experience.
When you click the Apply button any change you’ve made will be applied.
Usage
Supported Models
The AR-media™ Player allows you to display AR-media™ models in Augmented Reality, such
kind of models have the .armedia file extension. You can get AR-media™ models in two ways:
1. by creating models by means of tools provided by AR-media™ platform
2. by receiving models created by third parties by means of AR-media™ platform
The AR-media™ platform includes authoring tools and utilities for the creation of files suitable for
the player, such tools may be any of the AR-media™ Exporters that are bundled in Professional
editions of AR-media™ Plugin available for most digital content creation software.
Execution
To experience Augmented Reality with AR-media™ Player you’ll need to print one or more
markers and possibly fix them on a rigid, flat surface. You can print the provided AR-media™
marker from the AR-media™ Player program group by opening the “Markers” sub-group where the
file “Marker.pdf” is available for printing.
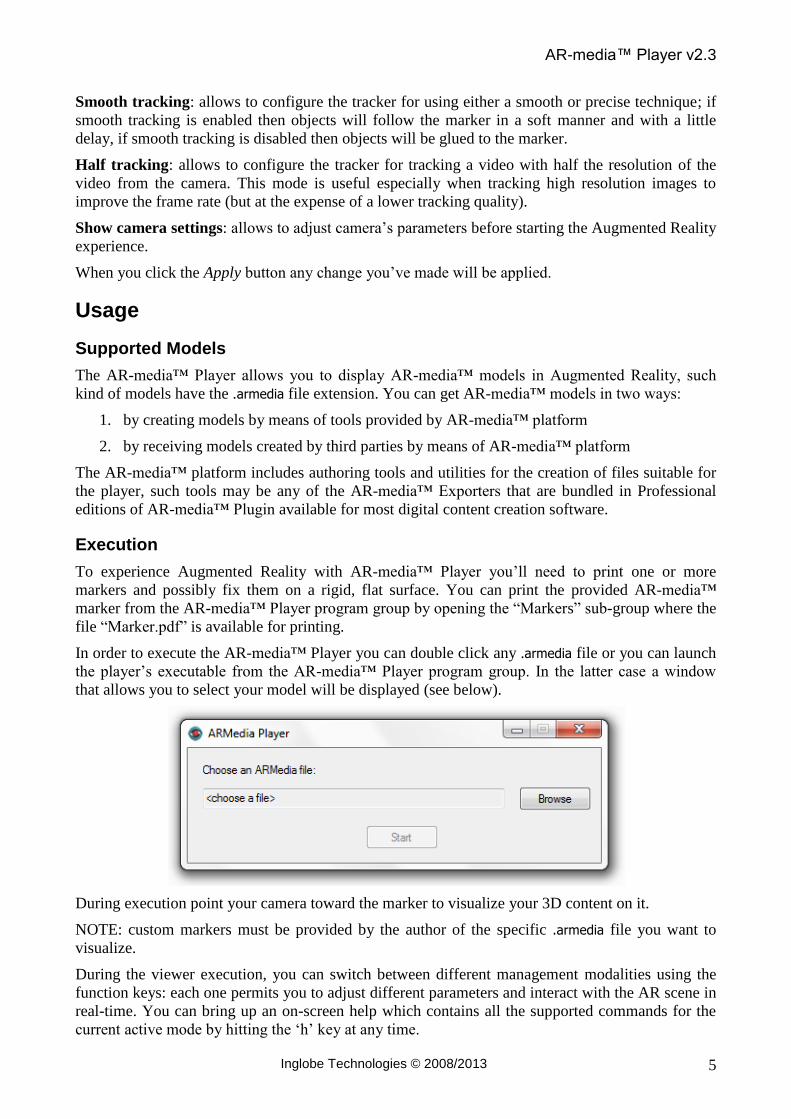
In order to execute the AR-media™ Player you can double click any .armedia file or you can launch
the player’s executable from the AR-media™ Player program group. In the latter case a window
that allows you to select your model will be displayed (see below).
During execution point your camera toward the marker to visualize your 3D content on it.
NOTE: custom markers must be provided by the author of the specific .armedia file you want to
visualize.
During the viewer execution, you can switch between different management modalities using the
function keys: each one permits you to adjust different parameters and interact with the AR scene in
real-time. You can bring up an on-screen help which contains all the supported commands for the
current active mode by hitting the ‘h’ key at any time.
AR-media™ Player v2.3
Inglobe Technologies © 2008/2013 6
The following sections will offer a brief description of each mode and then a summary table of all
supported commands.
Visualization Management Mode
This mode permits you to adjust the visualization parameters regardless of AR content that will be
displayed. All operations performed in this mode will affect the global scene and all the 3D objects.
This mode is especially useful when you want to adjust to different camera and monitor
configurations like in-built webcams and projectors (which are sometimes set up to flip the image
output vertically).
Note that this is the initial mode in which the Viewer will be every time is started.
Object/Scene Interaction Mode
This mode permits you to configure the global scene with respect to the markers. This mode is
useful for demonstration reasons, to quickly change the global display of a model in real-time.
In fact, you can scale the whole model up or down to emphasize the details of 3D objects.
You can also highlight (reveal) occluder objects to quickly adjust them into the real environment.
Animation Management Mode
This mode permits you to interact with the animations of each object in the scene.
You can manage all 3D objects’ animations by incrementing their speed or stopping them.
Note that this mode will not affect the video texture playback of Video Objects. However, you can
interact with them as discussed in the previous sections of this guide.
Sound Management Mode
This mode permits you to interact with the soundtrack which has been previously configured.
You can cycle between selected tracks or pause/restore the audio playback in real-time in order to
smoothly adapt to different scenarios.
Layers/Sequences Management Mode
This mode permits you to manage layers and timed slideshows. You can switch between two
different modes:
- Layers: this is the “classic” display mode, in which all layers are visible at the same time.
You can then toggle layers’ visibility by using the respective numbers’ keys.
- Sequence: this mode displays each layer for a selected amount of time, then it hides the
current layer and displays the next one. You can pause/restore this “slideshow” visualization
by simply hitting the Spacebar.
Note that if you did not manually set specific layers for your 3D objects, they will be automatically
placed in the base layer (the 0 layer). In this situation you can hide/show the whole model by hitting
the ‘0’ key.
Clipping/Sectioning Management Mode
This mode permits you to show and interact with the clipping planes of the 3D objects in the scene
to perform real-time sectioning. By sectioning your models you can look inside them and
interactively move the section as you wish. Note that in order to start the sectioning command one
and only one marker must be visible because clipping planes are bound to the currently visible
AR-media™ Player v2.3
Inglobe Technologies © 2008/2013 7
marker (the default position of these planes are placed on the faces of a cube whose bottom face is
over the marker and whose side is 80.0 units wide).
Note: in order to perform all the actions described below, clipping/sectioning must be ‘enabled’ by
using the corresponding key (refer to the table below for details).
Tracking Management Mode
This mode permits you to adjust some parameters that will help you to improve tracking
performances.
For instance, modifying the lighting threshold will allow you to recognize the marker even in bad
lighting conditions (too dark or too lit environments) and it is useful if used in combination with the
lighting debug mode (see below for details).
You can also modify the tracking smoothness factor: this parameter is what modifies the way 3D
objects follow the marker movements on the screen.
A low factor will make 3D objects appear to have “inertia”: they will tend to remain to their
position despite marker movements. This is useful when the marker is not moved much and in a
slow way during the Augmented Reality visualization, so the objects will appear more stable and
especially in those cases when you experience jittering because of bad lighting conditions.
Instead, a high factor will make 3D objects strictly follow the marker movements. Remember that a
very high factor will magnify all the little movements of the markers (even the ones that are due to
the camera adjustments to the lighting conditions), so it may result in 3D objects which appear
unstable.
Lighting Management Mode
This mode permits to manage the light source eventually available in the AR scene and the shadows
casted and received by the 3D objects.
You can freely move and rotate the light source in the 3D space during the Augmented Reality
visualization in order to display different light configurations.
Since shadows are computed in real-time, there are two accuracy modatilities available:
- Fastest accuracy: this mode permits to gain more speed during the shadows calculation and
display. This may result in a more responsive interaction with the model, especially in older
computers’ configurations.
- Highest accuracy5: this mode permits to have a better shadows’ visualization, at the cost of
more processing power.
You can also switch between two shadows mode:
- Simple shadows: this mode displays shadows as they are calculated from the 3D
environment. This mode results in edgy and precise shadows, just like the ones that comes
from a direct light.
Soft shadows: this mode will soften the shadows’ edges. Please note that since this mode requires
more processing power than the other one, you may want to switch to the ‘Fastest’ shadows
visualization’s accuracy to obtain good performances.
Note: this mode is only available when a light which cast shadows is available in the AR scene.
5 Please note that some textures may not be displayed in the desired way if this mode is active.
AR-media™ Player v2.3
Inglobe Technologies © 2008/2013 8
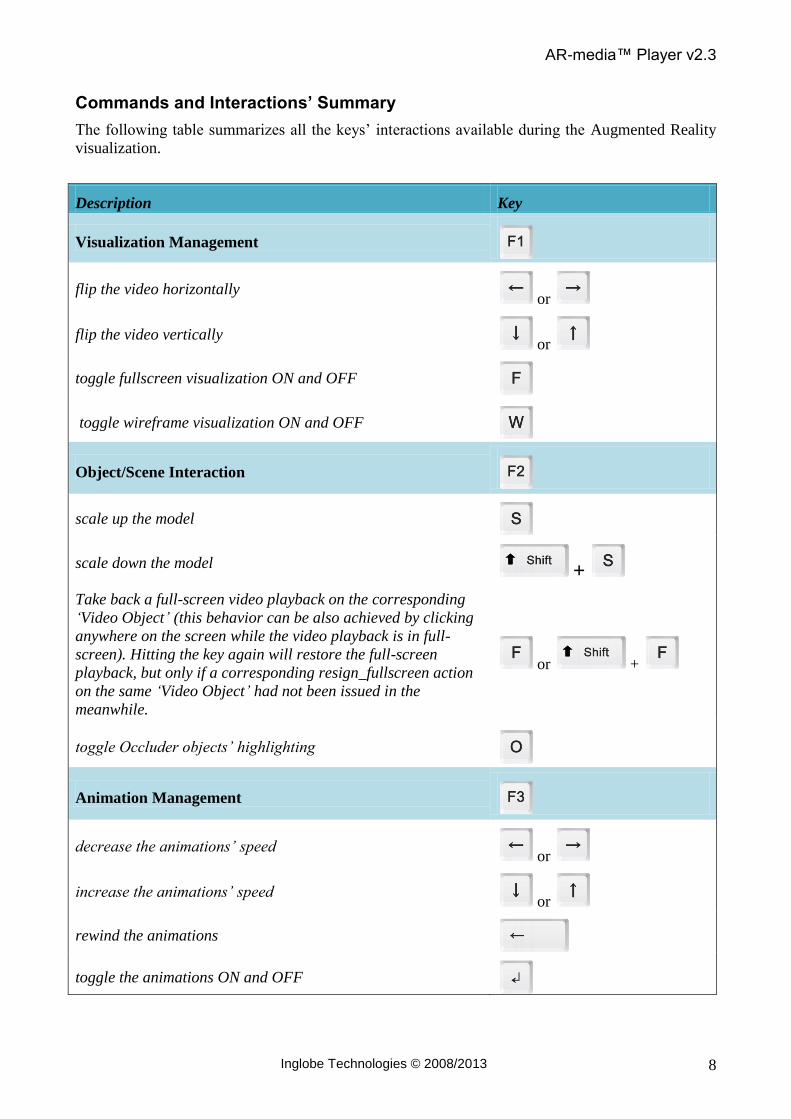
Commands and Interactions’ Summary
The following table summarizes all the keys’ interactions available during the Augmented Reality
visualization.
Description Key
Visualization Management
flip the video horizontally or
flip the video vertically or
toggle fullscreen visualization ON and OFF
toggle wireframe visualization ON and OFF
Object/Scene Interaction
scale up the model
scale down the model +
Take back a full-screen video playback on the corresponding
‘Video Object’ (this behavior can be also achieved by clicking
anywhere on the screen while the video playback is in full-
screen). Hitting the key again will restore the full-screen
playback, but only if a corresponding resign_fullscreen action
on the same ‘Video Object’ had not been issued in the
meanwhile.
or +
toggle Occluder objects’ highlighting
Animation Management
decrease the animations’ speed or
increase the animations’ speed or
rewind the animations
toggle the animations ON and OFF
AR-media™ Player v2.3
Inglobe Technologies © 2008/2013 9
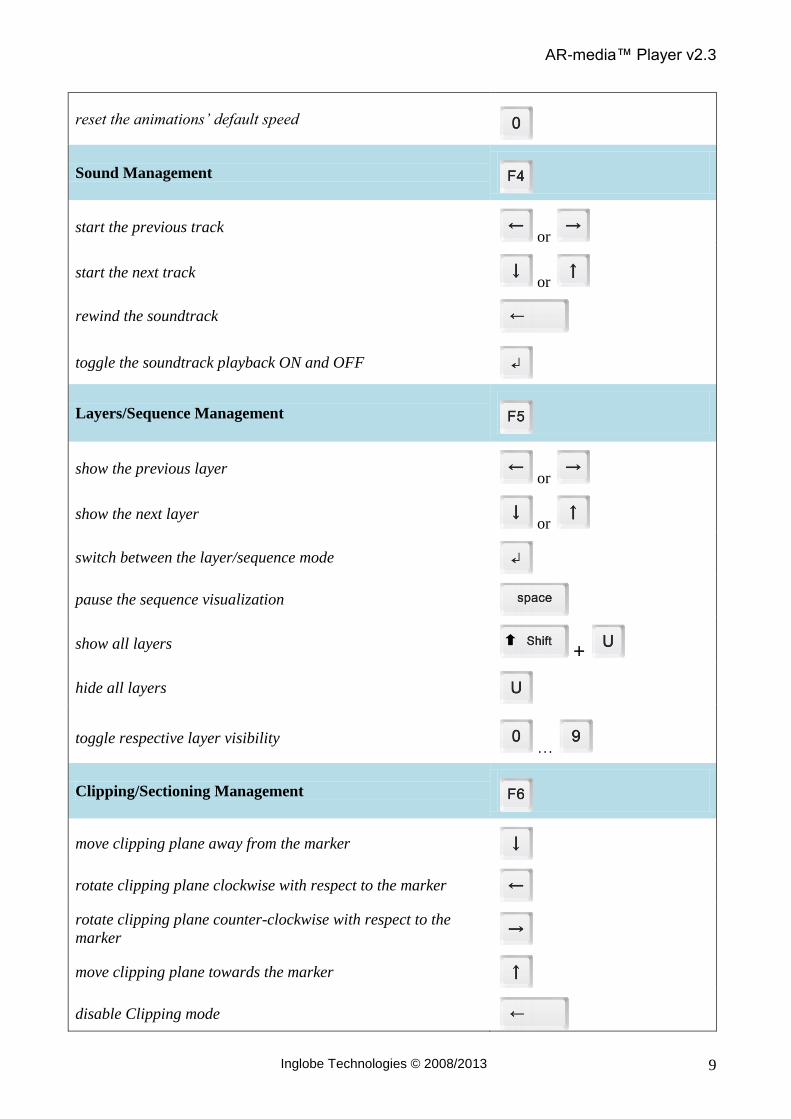
reset the animations’ default speed
Sound Management
start the previous track or
start the next track or
rewind the soundtrack
toggle the soundtrack playback ON and OFF
Layers/Sequence Management
show the previous layer or
show the next layer or
switch between the layer/sequence mode
pause the sequence visualization
show all layers +
hide all layers
toggle respective layer visibility …
Clipping/Sectioning Management
move clipping plane away from the marker
rotate clipping plane clockwise with respect to the marker
rotate clipping plane counter-clockwise with respect to the
marker
move clipping plane towards the marker
disable Clipping mode
AR-media™ Player v2.3
Inglobe Technologies © 2008/2013 10
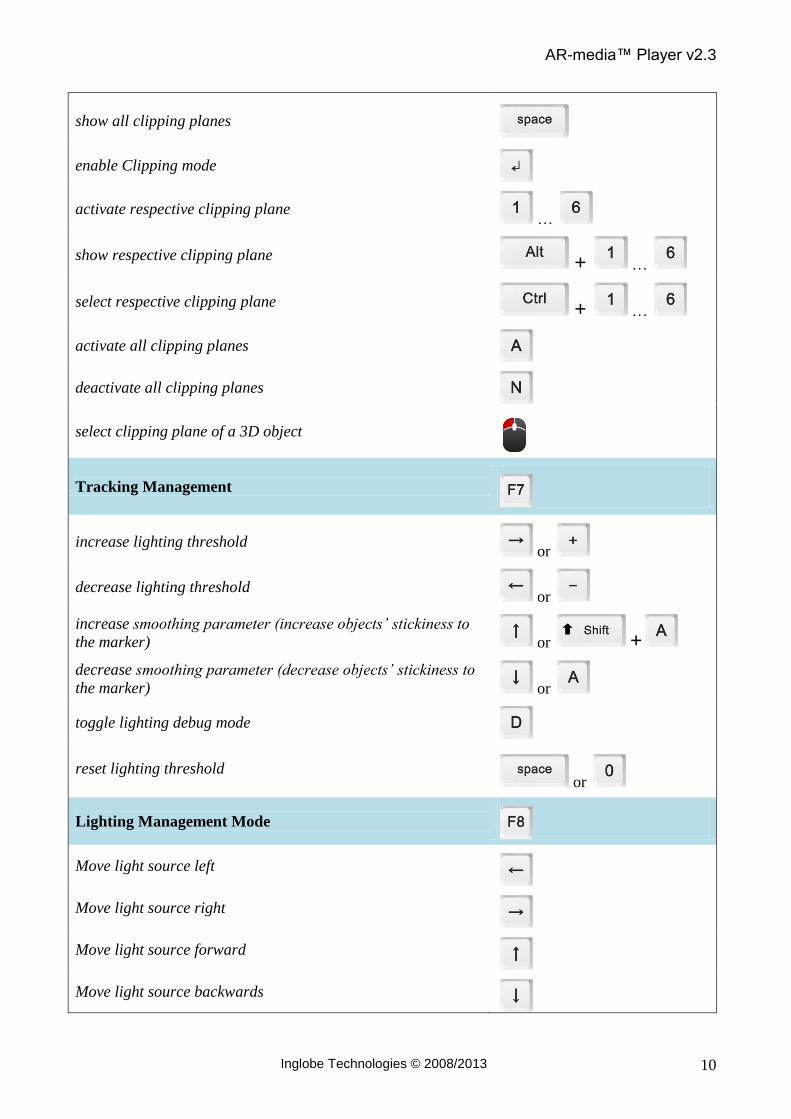
show all clipping planes
enable Clipping mode
activate respective clipping plane …
show respective clipping plane + …
select respective clipping plane + …
activate all clipping planes
deactivate all clipping planes
select clipping plane of a 3D object
Tracking Management
increase lighting threshold or
decrease lighting threshold or
increase smoothing parameter (increase objects’ stickiness to
the marker) or +
decrease smoothing parameter (decrease objects’ stickiness to
the marker) or
toggle lighting debug mode
reset lighting threshold or
Lighting Management Mode
Move light source left
Move light source right
Move light source forward
Move light source backwards
AR-media™ Player v2.3
Inglobe Technologies © 2008/2013 11
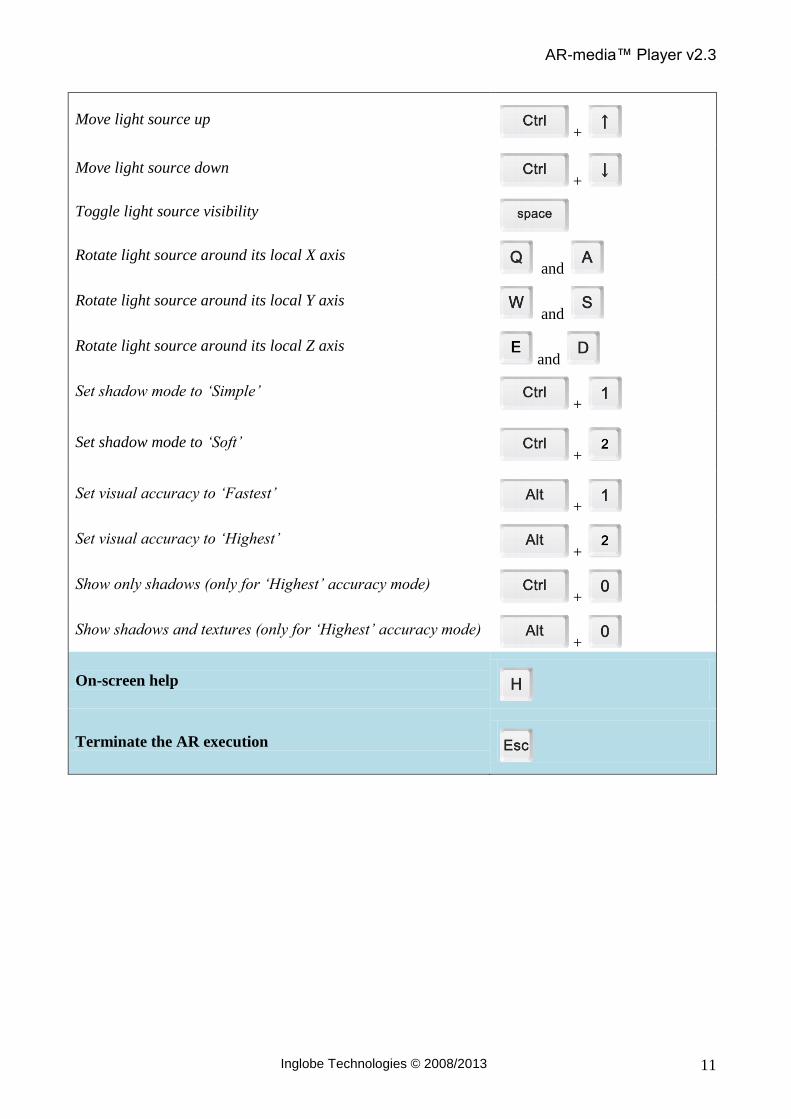
Move light source up +
Move light source down +
Toggle light source visibility
Rotate light source around its local X axis and
Rotate light source around its local Y axis and
Rotate light source around its local Z axis and
Set shadow mode to ‘Simple’ +
Set shadow mode to ‘Soft’ +
Set visual accuracy to ‘Fastest’ +
Set visual accuracy to ‘Highest’ +
Show only shadows (only for ‘Highest’ accuracy mode) +
Show shadows and textures (only for ‘Highest’ accuracy mode) +
On-screen help
Terminate the AR execution
AR-media™ Player v2.3
Inglobe Technologies © 2008/2013 12
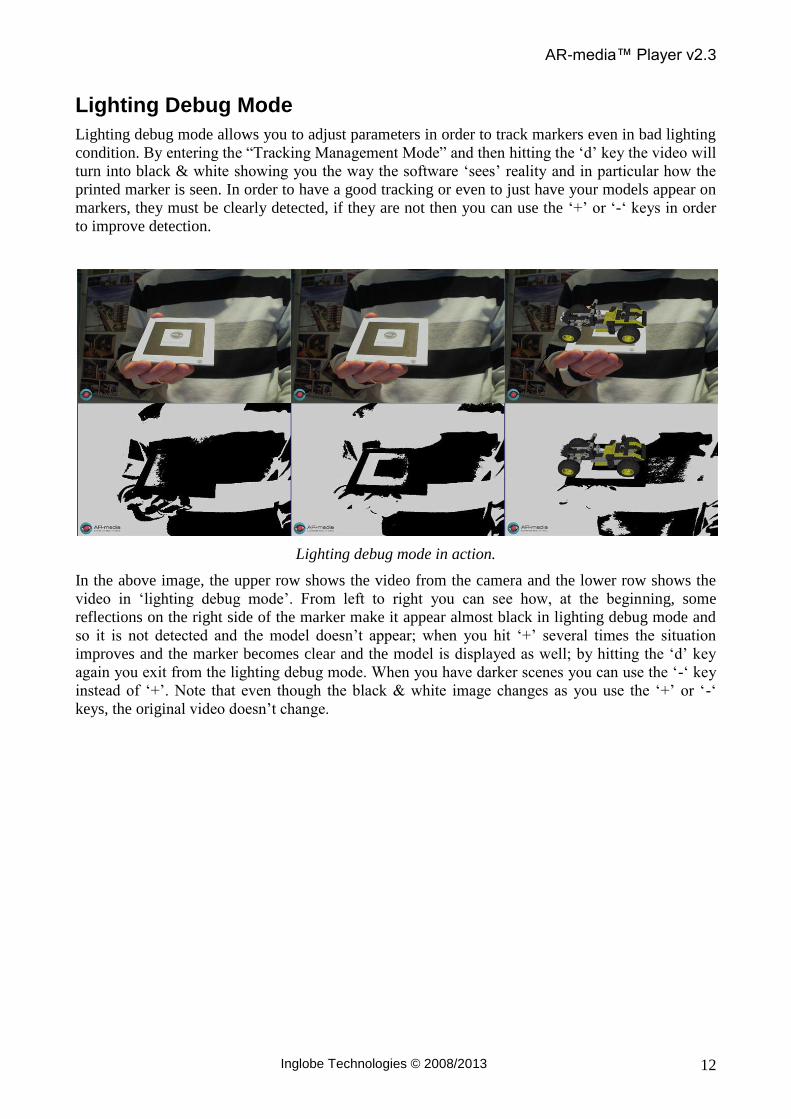
Lighting Debug Mode
Lighting debug mode allows you to adjust parameters in order to track markers even in bad lighting
condition. By entering the “Tracking Management Mode” and then hitting the ‘d’ key the video will
turn into black & white showing you the way the software ‘sees’ reality and in particular how the
printed marker is seen. In order to have a good tracking or even to just have your models appear on
markers, they must be clearly detected, if they are not then you can use the ‘+’ or ‘-‘ keys in order
to improve detection.
Lighting debug mode in action.
In the above image, the upper row shows the video from the camera and the lower row shows the
video in ‘lighting debug mode’. From left to right you can see how, at the beginning, some
reflections on the right side of the marker make it appear almost black in lighting debug mode and
so it is not detected and the model doesn’t appear; when you hit ‘+’ several times the situation
improves and the marker becomes clear and the model is displayed as well; by hitting the ‘d’ key
again you exit from the lighting debug mode. When you have darker scenes you can use the ‘-‘ key
instead of ‘+’. Note that even though the black & white image changes as you use the ‘+’ or ‘-‘
keys, the original video doesn’t change.
AR-media™ Player v2.3
Inglobe Technologies © 2008/2013 13
Customizations A customization service is available in order to tailor the AR-media™ Player’s features to fit your
needs. Please contact our team for details: [email protected].
Licensing
The AR-media™ Player is available for free but in no cases it can be used for commercial purposes
or included in any other product. For details refer to the accompanying license file. You can also
refer to the Inglobe Technologies licensing service through the following email address:
Support
For any problem or question you can write to: [email protected].


