
Version 2 Last Updated 12 October 2017
ab133113 – PPAR (alpha, delta, gamma) Transcription Factor Assay Kit
Instructions for Use
For the detection of specific transcription factor DNA binding activity in nuclear extracts and whole cell lysates.
This product is for research use only and is not intended for diagnostic use.

1

Table of Contents
1. Overview 3
2. Background 5
3. Components and Storage 6
4. Pre-Assay Preparation 9
5. Assay Protocol 13
6. Data Analysis 22
7. Appendix – Sample Preparation 25
8. Troubleshooting 30
2

1. Overview
ab133113 is a non-radioactive, sensitive method for detecting
specific transcription factor DNA binding activity in nuclear extracts
and whole cell lysates. A 96-well enzyme-linked immunosorbent
assay (ELISA) replaces the cumbersome radioactive electrophoretic
mobility shift assay (EMSA). A specific double stranded DNA
(dsDNA) sequence containing the PPAR response element is
immobilized onto the bottom of wells of a 96-well plate (see Figure
1). PPARs contained in a nuclear extract, bind specifically to the
PPAR response element. PPAR alpha, delta, or gamma are
detected by addition of specific primary antibodies directed against
the individual PPARs. A secondary antibody conjugated to HRP is
added to provide a sensitive colorimetric readout at 450 nm.
ab133113 comes with a single plate that measures all three isoforms
of PPAR alpha, delta, and gamma. There are enough reagents for
one-third of a plate for each isoform.
3

Figure 1. Schematic of the Transcription Factor Binding Assay
4
2. Background
Peroxisome Proliferator-activated Receptors (PPARs) are ligand-
activated transcription factors belonging to the large superfamily of
nuclear receptors. They are activated by a variety of fatty acids and
fatty acid derivatives such as prostaglandins and leukotrienes.
PPARs play pivotal roles in the regulation of lipid metabolism and
homeostasis and are important indirect as well as direct regulators of
cellular insulin sensitivity. There are three major PPAR isotypes;
PPAR alpha, PPAR gamma, and PPAR delta/beta which all bind to
PPAR responsive elements (PPRE’s) as heterodimers with RXR,
another member of the nuclear receptor superfamily. PPAR alpha
primarily activates genes encoding proteins involved in fatty acid
oxidation, while PPAR gamma primarily activates genes directly
involved in lipogenic pathway and insulin signaling. Members of the
PPAR family are important direct targets of many antidiabetic and
hypolipidemic drugs.
5

3. Components and Storage
Kit components may be stored at -20°C prior to use. For long-term
storage, the positive control should be thawed on ice, aliquoted at
20 µl/vial, and stored at -80°C. After use we recommend each kit
component be stored according to the temperature listed below.
Item Quantity Storage
Transcription Factor Binding Assay Buffer (4X)
1 vial 4°C
Transcription Factor Reagent A 1 vial -20°C
Transcription Factor Complete PPAR alpha Positive Control
1 vial -80°C
Transcription Factor Complete PPAR delta Positive Control
1 vial -80°C
Transcription Factor Complete PPAR gamma Positive Control
1 vial -80°C
Transcription Factor Antibody Binding Buffer (10X)
1 vial 4°C
Transcription Factor Complete PPAR alpha Primary Antibody
1 vial -20°C
6

Item Quantity Storage
Transcription Factor Complete PPAR delta Primary Antibody
1 vial -20°C
Transcription Factor Complete PPAR gamma Primary Antibody
1 vial -20°C
Wash Buffer Concentrate (400X) 1 vial 4°C
Polysorbate 20 1 vial RT
Transcription Factor PPAR Competitor dsDNA
1 vial -20°C
Transcription Factor Goat Anti-Rabbit HRP Conjugate
1 vial -20°C
Transcription Factor PPAR 96-Well Strip Plate
1 plate 4°C
96-Well Cover Sheet 1 cover RT
Transcription Factor Developing Solution 1 vial 4°C
Transcription Factor Stop Solution 1 vial 4°C
7

Materials Needed But Not Supplied
A plate reader capable of measuring absorbance at 450 nm.
Adjustable pipettes and a repeat pipettor.
A source of UltraPure water or HPLC-grade water are
acceptable.
300 mM dithiothreitol (DTT).
Nuclear Extraction Kit or buffers for preparation of nuclear
extracts. We recommend Nuclear Extraction Kit (ab113474).
Note: The components in each kit lot have been quality tested.
4. Pre-Assay Preparation
A. Purification of Cellular Nuclear Extracts
Harvest cells following the procedure described in Nuclear
Extraction Kit (ab113474).
Alternatively, follow the procedure described in Appendix
(Section 7).
Keep a small aliquot of the nuclear extract to quantitate the
protein concentration.
8

B. Reagent Preparation
Transcription Factor Antibody Binding Buffer (10X)
One vial contains 3 ml of a 10X stock of Transcription Factor
Antibody Binding Buffer (ABB) to be used for diluting the
primary and secondary antibodies. To prepare 1X ABB,
dilute 1:10 by adding 27 ml of UltraPure water. Store at 4°C
for up to six months.
Wash Buffer Concentrate (400X)
One vial contains 5 ml of 400X Wash Buffer. Dilute the
contents of the vial to a total volume of 2 liters with UltraPure
water and add 1 ml of Polysorbate 20. NOTE: Polysorbate
20 is a viscous liquid and cannot be measured by a pipette.
A positive displacement device such as a syringe should be
used to deliver small quantities accurately.
A smaller volume of Wash Buffer Concentrate can be
prepared by diluting the Wash Buffer Concentrate 1:400 and
adding Polysorbate 20 (0.5 ml/liter of Wash Buffer). Store at
4°C for up to two months.
Transcription Factor Binding Assay Buffer (4X)
One vial contains 3 ml of a 4X stock of Transcription Factor
Binding Assay Buffer (TFB). Prepare Complete Transcription
Factor Binding Assay Buffer (CTFB) immediately prior to use
9
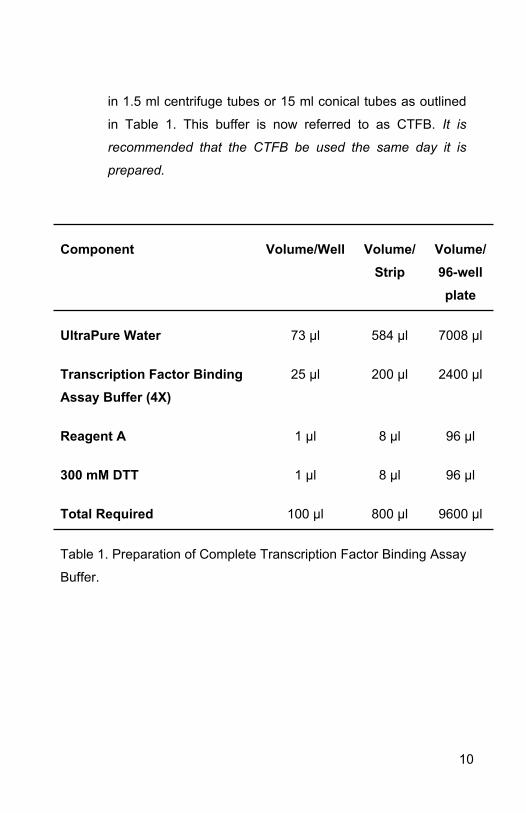
in 1.5 ml centrifuge tubes or 15 ml conical tubes as outlined
in Table 1. This buffer is now referred to as CTFB. It is
recommended that the CTFB be used the same day it is
prepared.
Component Volume/Well Volume/Strip
Volume/96-well plate
UltraPure Water 73 µl 584 µl 7008 µl
Transcription Factor Binding Assay Buffer (4X)
25 µl 200 µl 2400 µl
Reagent A 1 µl 8 µl 96 µl
300 mM DTT 1 µl 8 µl 96 µl
Total Required 100 µl 800 µl 9600 µl
Table 1. Preparation of Complete Transcription Factor Binding Assay
Buffer.
10

Transcription Factor PPAR alpha, delta, gamma Positive Controls
One vial contains 50 μl of clarified cell lysate. These lysates
serve as a positive control for PPAR alpha, delta, and gamma,
respectively; it is not intended for plate to plate comparisons.
The Positive Control provided is sufficient for 5 reactions and will
provide a strong signal (>0.5 AU at 450 nm) when used at 10
μl/well. When using this Positive Control, a decrease in signal
may occur with repeated freeze/thaw cycles. It is recommended
that the Positive Control be aliquoted at 25 μl per vial and stored
at -80°C to avoid loss in signal from repeated freeze/thaw
cycles.
11

5. Assay Protocol
A. SummaryNote: This procedure is provided as a quick reference for
experienced users. Follow the detailed procedure when initially
performing the assay.
Prepare CTFB as directed in the Pre-Assay Preparation
section.
Add CTFB to Blk and NSB wells.
Add Competitor dsDNA (optional) to appropriate wells.
Add positive control to appropriate wells.
Add sample containing PPAR alpha, delta, and/or gamma to
appropriate wells.
12

Incubate overnight at 4°C without agitation.
Wash each well 5 times with 1X wash buffer.
Add diluted PPAR alpha, delta, and/or gamma Primary
Antibody to each well (except blk wells).
Incubate at RT without agitation.
Wash each well 5 times with 1X Wash Buffer.
Add diluted Goat Anti-Mouse HRP Conjugate (except Blk
wells).
Incubate at RT without agitation.
13

Wash each well 5 times with 1X Wash Buffer.
Add Developing Solution to wells.
Incubate 15 to 45 minutes with gentle agitation.
Add Stop Solution to wells.
Measure the absorbance.
B. Plate Setup
There is no specific pattern for using the wells on the plate. A
typical layout of PPAR Positive Control (PC), Competitor dsDNA
(C1), and samples of nuclear extracts (S1-S44) to be measured
in duplicate is given below in Figure 2.
14

S1-S44 – Sample WellsNSB – Non-specific Binding WellsPC – Positive Control WellsBlk – Blank WellsC1 – Competitor dsDNA Wells
Figure 2. Sample plate format
15

Pipetting Hints:
Use different tips to pipette each reagent.
Before pipetting each reagent, equilibrate the pipette tip
in that reagent (i.e., slowly fill the tip and gently expel the
contents, repeat several times).
Do not expose the pipette tip to the reagent(s) already in
the well.
General Information:
It is not necessary to use all the wells on the plate at one
time; however a Positive Control should be run every
time.
For each plate or set of strips it is recommended that
two Blk, two Non-Specific Binding (NSB), and two PC
wells be included
C. Performing the Assay
Binding of active PPAR alpha, delta, and/or gamma to the consensus sequence
1. Equilibrate the plate and buffers to room temperature prior to
opening. Remove the plate from the foil and select the
16
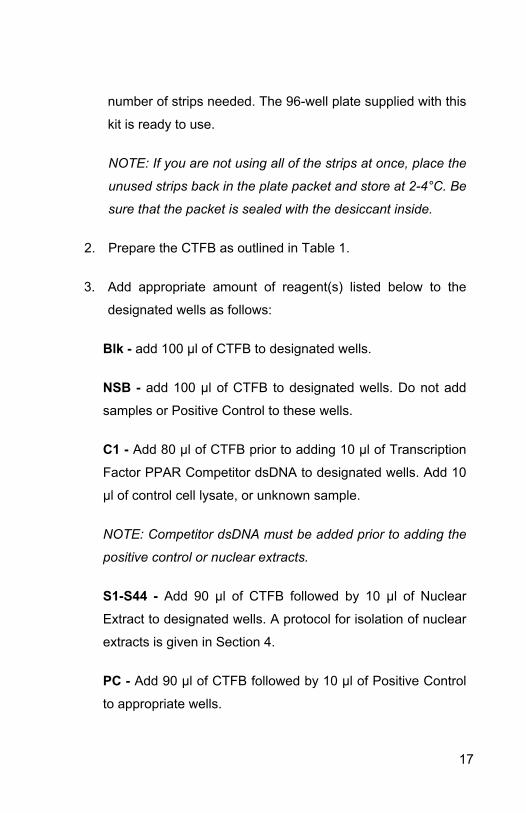
number of strips needed. The 96-well plate supplied with this
kit is ready to use.
NOTE: If you are not using all of the strips at once, place the
unused strips back in the plate packet and store at 2-4°C. Be
sure that the packet is sealed with the desiccant inside.
2. Prepare the CTFB as outlined in Table 1.
3. Add appropriate amount of reagent(s) listed below to the
designated wells as follows:
Blk - add 100 μl of CTFB to designated wells.
NSB - add 100 μl of CTFB to designated wells. Do not add
samples or Positive Control to these wells.
C1 - Add 80 μl of CTFB prior to adding 10 μl of Transcription
Factor PPAR Competitor dsDNA to designated wells. Add 10
μl of control cell lysate, or unknown sample.
NOTE: Competitor dsDNA must be added prior to adding the
positive control or nuclear extracts.
S1-S44 - Add 90 μl of CTFB followed by 10 μl of Nuclear
Extract to designated wells. A protocol for isolation of nuclear
extracts is given in Section 4.
PC - Add 90 μl of CTFB followed by 10 μl of Positive Control
to appropriate wells.
17

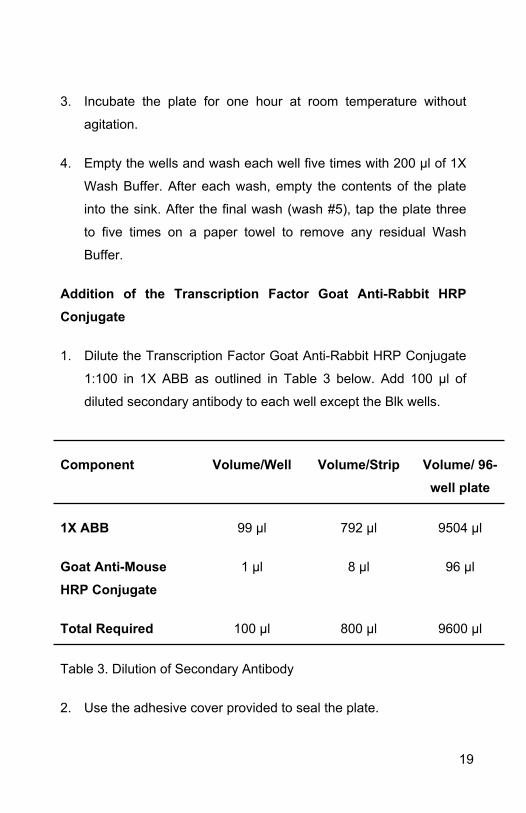
4. Use the cover provided to seal the plate. Incubate overnight
at 4°C or one hour at room temperature without agitation
(incubation for one hour will result in a less sensitive assay).
5. Empty the wells and wash five times with 200 μl of 1X Wash
Buffer. After each wash empty the wells in the sink.
After the final wash (wash #5), tap the plate on a paper towel
to remove any residual Wash Buffer.
Addition of Transcription Factor PPAR Primary Antibody
1. Dilute the Transcription Factor PPAR Primary Antibody 1:100 in
1X ABB as outlined in Table 2. Add 100 μl of diluted PPAR
Primary Antibodies to each well except the Blk wells.
Component Volume/Well Volume/Strip Volume/ 96-well plate
1X ABB 99 µl 792 µl 9504 µl
PPAR Primary Antibody 1 µl 8 µl 96 µl
Total Required 100 µl 800 µl 9600 µl
Table 2. Dilution of Primary Antibody.
2. Use the adhesive cover provided to seal the plate.
18
3. Incubate the plate for one hour at room temperature without
agitation.
4. Empty the wells and wash each well five times with 200 μl of 1X
Wash Buffer. After each wash, empty the contents of the plate
into the sink. After the final wash (wash #5), tap the plate three
to five times on a paper towel to remove any residual Wash
Buffer.
Addition of the Transcription Factor Goat Anti-Rabbit HRP Conjugate
1. Dilute the Transcription Factor Goat Anti-Rabbit HRP Conjugate
1:100 in 1X ABB as outlined in Table 3 below. Add 100 μl of
diluted secondary antibody to each well except the Blk wells.
Component Volume/Well Volume/Strip Volume/ 96-well plate
1X ABB 99 µl 792 µl 9504 µl
Goat Anti-Mouse HRP Conjugate
1 µl 8 µl 96 µl
Total Required 100 µl 800 µl 9600 µl
Table 3. Dilution of Secondary Antibody
2. Use the adhesive cover provided to seal the plate.
19
3. Incubate for one hour at room temperature without agitation.
4. Empty the wells and wash five times with 200 μl of 1X Wash
Buffer. After each wash, empty the contents of the plate into the
sink. After the final wash (wash #5), tap the plate three to five
times on a paper towel to remove any residual Wash Buffer.
Develop and Read the Plate:
1. To each well being used add 100 μl of Transcription Factor
Developing Solution which has been equilibrated to room
temperature.
2. Incubate the plate for 15 to 45 minutes at room temperature
with gentle agitation protected from light. Allow the wells to turn
medium to dark blue prior to adding Transcription Factor Stop
Solution. (This reaction can be monitored by taking absorbance
measurements at 655 nm prior to stopping the reactions; An
OD655 of 0.4-0.5 yields an OD450 of approximately 1). Monitor
development of sample wells to ensure adequate color
development prior to stopping the reaction. NOTE: Do not
overdevelop; however Positive Control wells may need to
overdevelop to allow adequate color development in sample
wells.
3. Add 100 μl of Stop Solution per well being used. The solution
within the wells will change from blue to yellow after adding the
Stop Solution.
20

4. Read absorbance at 450 nm within five minutes of adding the
Stop Solution. Blank the plate reader according to the
manufacturer’s requirements using the blank wells.
6. Data Analysis
A. Performance Characteristics
21

22

Figure 3. Schematic of the Transcription Factor Binding Assay.
Increasing amounts of positive control (total lysate) are assayed for
PPAR alpha, delta, and gamma DNA-binding activity using
ab133113.
B. Interferences
The following reagents were tested for interference in the assay.
Reagent Will Interfere (Yes or No)
EGTA (≤ mM) No
EDTA (≤0.5 mM) No
ZnCl (any concentration) Yes
DTT (between 1 and 5 mM) No
Dimethylsulfoxide (≤1.5%) No
23

7. Appendix – Sample Preparation
Sample Buffer Preparation
PBS (10X)
Dissolve 80 g NaCl, 2.0 g KCl, 14.4 g Na2HPO4, and 2.4 g
KH2PO4 in 800 ml distilled H20. Adjust pH to 7.4 with HCl. Adjust
volume to 1 L with H2O
PBS (1X)
Dilute 100 ml of 10X stock with 900 ml distilled H2O
Nuclear Extraction Phosphatase Inhibitor Cocktail (50X)
1 M NaF, 0.05 M β-glycerophosphate, and 0.05 M Na3OV4. Store
at -80°C
PBS/Phosphatase Inhibitor Solution
Add 200 μl of 50X Phosphatase Inhibitor Solution to 10 ml of 1X
PBS, mix well, and keep on ice. Make fresh daily.
Nuclear Extraction Protease Inhibitor Cocktail (100X)
10 mM AEBSF, 0.5 mM Bestatin, 0.2 mM Leupeptin Hemisulfate
Salt, 0.15 mM E-64, 0.1 mM Pepstatin A, 0.008 mM Aprotinin
from Bovine Lung Made in DMSO, store at -80°C.
24

Nuclear Extraction Hypotonic Buffer (10X)
100 mM HEPES, pH 7.5, containing 40 mM NaF, 100 μM
Na2MoO4, and 1 mM EDTA. Store at 4°C.
Complete Extraction Hypotonic Buffer (1X)
Prepare as outlined in Table 1. The phosphatase and protease
inhibitors lose activity shortly after dilution; therefore any unused
1X Complete Extraction Hypotonic Buffer should be discarded.
Complete Extraction Hypotonic Buffer (1X)
Prepare as outlined in Table 4.
Reagent 150 mm plate ~1.5 x 10⁷ cells
Hypotonic Buffer (10X) 100 µl
Phosphatase Inhibitors (50X) 20 µl
Protease Inhibitors (100X) 10 µl
Distilled Water 870 µl
Total Volume 1000 µl
Table 4. Preparation of Complete Extraction Hypotonic Buffer.
25

Nonidet P-40 Assay Reagent (10%)
Nonidet P-40 or suitable substitute at a concentration of 10%
(v/v) in H2O. Store at room temperature
Nuclear Extraction Buffer (2X)
20 mM HEPES, pH 7.9, containing, 0.2 mM EDTA, 3 mM
MgCl2, 840 mM NaCl, and 20% glycerol (v/v). Store at 4°C
Complete Nuclear Extraction Buffer (1X)
Prepare as outlined in Table 5. Some of the phosphatase
and protease inhibitors lose activity shortly after dilution;
therefore any remaining 1X Extraction Buffer should be
discarded.
26

Reagent 150 mm plate ~1.5 x 10⁷ cells
Nuclear Extraction Buffer (2X) 75 µl
Protease Inhibitors (100X) 1.5 µl
Phosphatase Inhibitors (50X) 3.0 µl
DTT (10 mM) 15 µl
Distilled Water 55.5 µl
Total Volume 150 µl
Table 5. Preparation of Complete Nuclear Extraction Buffer
Purification of Cellular Nuclear Extracts
The procedure described below can be used for a 15 ml cell
suspension grown in a T75 flask or adherent cells (100 mm
dish 80-90% confluent) where 107 cells yields approximately
50 μg of nuclear protein.
1. Collect ~107 cells in pre-chilled 15 ml tubes.
2. Centrifuge suspended cells at 300 x g for five minutes at
4°C.
27

3. Discard the supernatant. Resuspend cell pellet in 5 ml of
ice-cold PBS/Phosphatase Inhibitor Solution and
centrifuge at 300 x g for five minutes at 4°C. Repeat one
time.
4. Discard the supernatant. Add 500 μl ice-cold 1X
Hypotonic buffer. Mix gently by pipetting and transfer
resuspended pellet to a pre-chilled 1.5 ml
microcentrifuge tube.
5. Incubate cells on ice for 15 minutes allowing cells to
swell.
6. Add 100 μl of 10% Nonidet P-40 (or suitable substitute).
Mix gently by pipetting.
7. Centrifuge for 30 seconds (pulse spin) at 4°C in a
microcentrifuge. Transfer the supernatant which
contains the cytosolic fraction to a new tube and store at
-80°C.
8. Resuspend the pellet in 100 μl ice-cold Complete
Nuclear Extraction Buffer (1X) (with protease and
phosphatase inhibitors). Vortex 15 seconds at highest
setting then gently rock the tube on ice for 15 minutes
using a shaking platform. Vortex sample for 30 seconds
at highest setting and gently rock for an additional 15
minutes.
28

9. Centrifuge at 14,000 x g for 10 minutes at 4°C. The
supernatant contains the nuclear fraction. Aliquot to
clean chilled tubes, flash freeze and store at -80°C.
Avoid freeze/ thaw cycles. The extracts are ready to use
in the assay.
8. Troubleshooting
Problem Possible Causes Recommended Solutions
29

No signal or weak signal in all wells
A. Omission of key reagent
B. Plate reader settings not correct
C. Reagent/reagents expired
D. Salt concentrations affected binding between DNA and protein
E. Developing reagent not added to correct volume
A. Check that all reagents have been added and in the correct order. Perform the assay using the positive control.
B. Check wavelength setting on plate reader and change to 450 nm.
C. Check expiration date on reagents.
D. Reduce the amount of nuclear extract used in the assay, or reduce the amount of salt in the nuclear extracts (alternatively can perform buffer exchange)
E. Pre-warm the Developing Solution to room temperature prior to use
F. Check pipettes to ensure correct amount of developing solution was added to wells
30

High signal in all wells
A. Incorrect dilution of antibody (too high)
B. Improper/inadequate washing of wells
C. Over-developing
A. Check antibody dilutions and use amounts outlined in instructions
B. Follow the protocol for washing wells using the correct number of times and volumes
C. Decrease the incubation time when using the developing reagent.
High background (NSB)
Incorrect dilution of antibody (too high)
Check antibody dilutions and use amounts outlined in the instructions
31

Weak signal in sample wells
A. Sample concentration is too low
B. Incorrect dilution of antibody
C. Salt concentrations affecting binding between DNA and protein
A. Increase the amount of nuclear extract used. Loss of signal can occur with multiple freeze/thaw cycles of the sample. Prepare fresh nuclear extracts and aliquot as outlined in product insert
B. Check antibody dilutions and use amounts outlined in the instructions
C. Reduce the amount of nuclear extract used in the assay or reduce the amount of salt in the nuclear extracts (alternatively can perform buffer exchange)
32

UK, EU and ROWEmail: [email protected] | Tel: +44-(0)1223-696000
AustriaEmail: [email protected] | Tel: 019-288-259
FranceEmail: [email protected] | Tel: 01-46-94-62-96 GermanyEmail: [email protected] | Tel: 030-896-779-154 SpainEmail: [email protected] | Tel: 911-146-554 SwitzerlandEmail: [email protected] Tel (Deutsch): 0435-016-424 | Tel (Français): 0615-000-530
US and Latin AmericaEmail: [email protected] | Tel: 888-77-ABCAM (22226)
CanadaEmail: [email protected] | Tel: 877-749-8807
China and Asia Pacific Email: [email protected] | Tel: 108008523689 (中國聯通) JapanEmail: [email protected] | Tel: +81-(0)3-6231-0940
www.abcam.com | www.abcam.cn | www.abcam.co.jp
33
Copyright © 2015 Abcam, All Rights Reserved. The Abcam logo is a registered trademark.
All information / detail is correct at time of going to print.


