
2801 Buford Highway | Druid Chase, Suite 100 | Atlanta, Georgia 30329 | (404) 633-8660 | (800) 969-6753 | www.asti.com
Page 1 of 12
Autodesk A360 Collaboration for Revit (C4R) and BIM 360 Team – Whitepaper
Autodesk’s A360 Collaboration for Revit, combined with BIM 360 Team address historical challenges with
collaboration and communication that were, for many years, major “pain points” for Revit users needing to
collaborate with other users in the same model that were not on the same LAN (Local Area Network) or even
the same WAN (Wide Area Network). For users needing to collaborate with other users in the same organization
but in different offices, solutions like Revit Server and 3rd party WAN accelerators were developed, but they
typically involved a significant hardware expense and IT resources to set up and manage. For users needing to
collaborate with people outside of their organization (and therefore outside of their WAN), the issues were even
more complex and expensive to resolve.
BIM 360 Team and A360 Collaboration for Revit solve both issues, involve absolutely zero additional hardware
expenses and minimal to no IT involvement. All that is necessary is a Revit license, a broadband internet
connection and entitlement to A360 Collaboration for Revit, which includes access to BIM3 60 Team. Both are
easy to use and easy to set up, however the documentation is spotty and sometimes hard to find. This
whitepaper will attempt to clarify what, specifically, A360 Collaboration for Revit is and what BIM 360 Team is,
how they work together, how they are obtained and installed, how to install and set them up and finally how to
work with and manage A360 Collaboration for Revit (referred to from this point as “C4R”) projects.
C4R and BIM 360 Team – What Are They? C4R and BIM 360 Team are different, but complementary. Both are cloud services. BIM 360 Team can be utilized
by itself, without C4R, and is accessed through a browser – currently Google Chrome seems to work best for this
particular service. Using BIM 360 Team, organizations can create any number of projects. Users can then be
invited to collaborate in those projects. Documents of any type can be uploaded to a project and shared
amongst the various project members. Autodesk formats like DWG, DWF and RVT files are viewable in BIM 360
Team, which also includes basic markup capabilities. BIM 360 Team, however, does not allow for direct editing
of the documents. Using BIM 360 Team alone, users must first download any document they want to edit, then
upload the edited copy when finished.
C4R includes a plugin for Revit that allows users to initiate Revit worksharing in the cloud, utilizing the BIM 360
Team Project as the repository of the Central file(s) that are created by C4R. For that reason, when a user is
assigned (or granted entitlement to) the C4R service, they automatically have access to BIM 360 Team. When
C4R is purchased, however, while access to BIM 360 Team is included the full BIM 360 Team entitlement is not.
The significance of this difference will be made clear later in this document. Using C4R, users can perform
normal Revit worksharing operations (synchronize, reload latest) to a Central File that is stored in the cloud, on
the BIM360 Team site, allowing for real-time collaboration across a WAN and between users in different
organizations and WANs.
Obtaining C4R and A360 Team Typically, an organization has various Autodesk products under a subscription contract. There is a Contract
Manager and a Software Coordinator, both employees of that organization, who manage users and
software/cloud service access. The Contract Manager assigns employees their A360 account credentials. Usually
the user name is the person’s email address. Either the Contract Manager or Software Coordinator can then
allocate appropriate products and services that the organization has purchased under their subscription to
specific users. As mentioned above, if a user is assigned an entitlement to C4R, access to BIM 360 Team is
automatically included.
2801 Buford Highway | Druid Chase, Suite 100 | Atlanta, Georgia 30329 | (404) 633-8660 | (800) 969-6753 | www.asti.com
Page 2 of 12
How Do I Set up C4R and Start a Project? Setup is relatively straightforward. To create a BIM 360 Team “Hub”, at least one user will need a full
entitlement of BIM 360 Team, whether they already have an entitlement for C4R or not. A user with a BIM 360
Team entitlement can set up the organizations BIM 360 Team “Hub”. If you have already been invited to
another organization’s Team Hub, your C4R entititlement alone will be enough for access to any of their projects
for which you are a member. Team Hubs can host any number of projects. Once the Team Hub is set up and at
least one Project created, users can use C4R to begin uploading worksharing-enabled projects.
BIM 360 Team Hub Setup
If you are setting up a Team Hub for your organization for the first time, the process is fairly simple:
1. Your Contract Manager or Software Coordinator must first assign an entitlement of BIM 360 Team to
you.
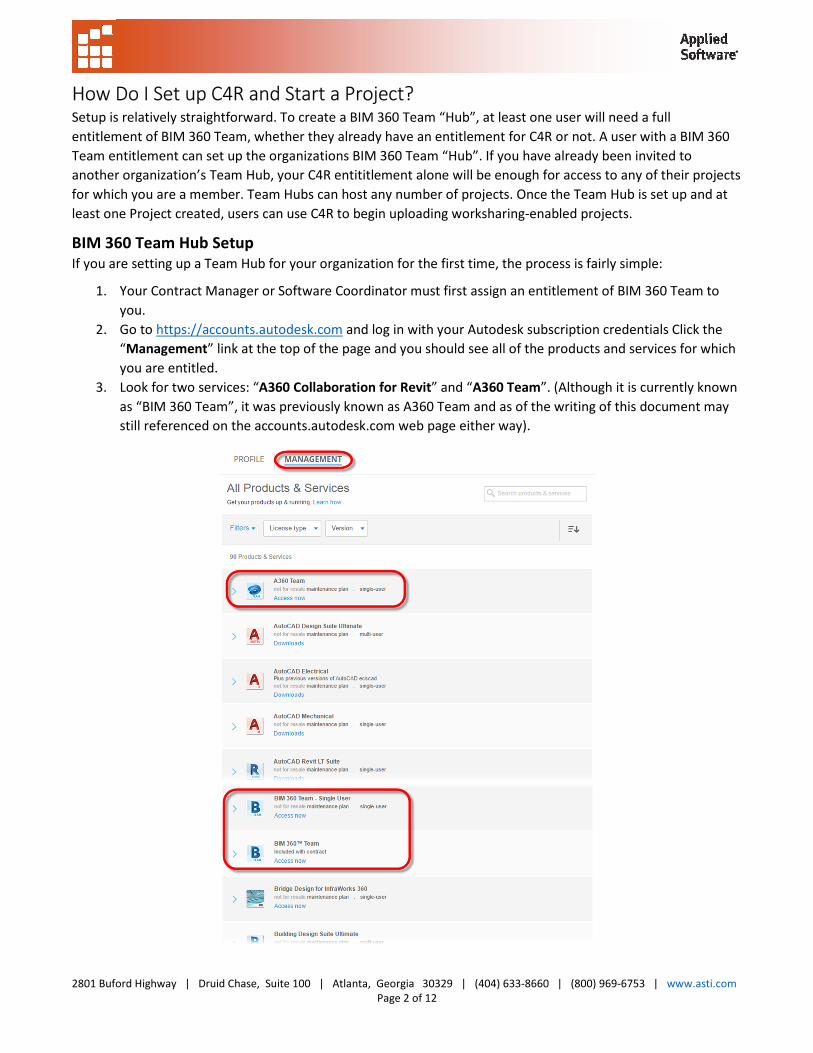
2. Go to https://accounts.autodesk.com and log in with your Autodesk subscription credentials Click the
“Management” link at the top of the page and you should see all of the products and services for which
you are entitled.
3. Look for two services: “A360 Collaboration for Revit” and “A360 Team”. (Although it is currently known
as “BIM 360 Team”, it was previously known as A360 Team and as of the writing of this document may
still referenced on the accounts.autodesk.com web page either way).
2801 Buford Highway | Druid Chase, Suite 100 | Atlanta, Georgia 30329 | (404) 633-8660 | (800) 969-6753 | www.asti.com
Page 3 of 12
4. Click the “Access now” option under “A360 Team” or “BIM 360 Team”. This will allow you to set up your
Team Hub. Initially depending on whether this is the first Team Hub that has been established for your
firm, it may be a trial hub, good for 30 days. In that case, in order to make it permanent you will need to
contact your Contract Manager with the Hub URL so that they can associate it with the subscription
contract that the BIM 360 Team entitlement was purchased under. You can continue to work, invite
users, publish files, etc. however, in the normal fashion while that is in progress.
Project Setup
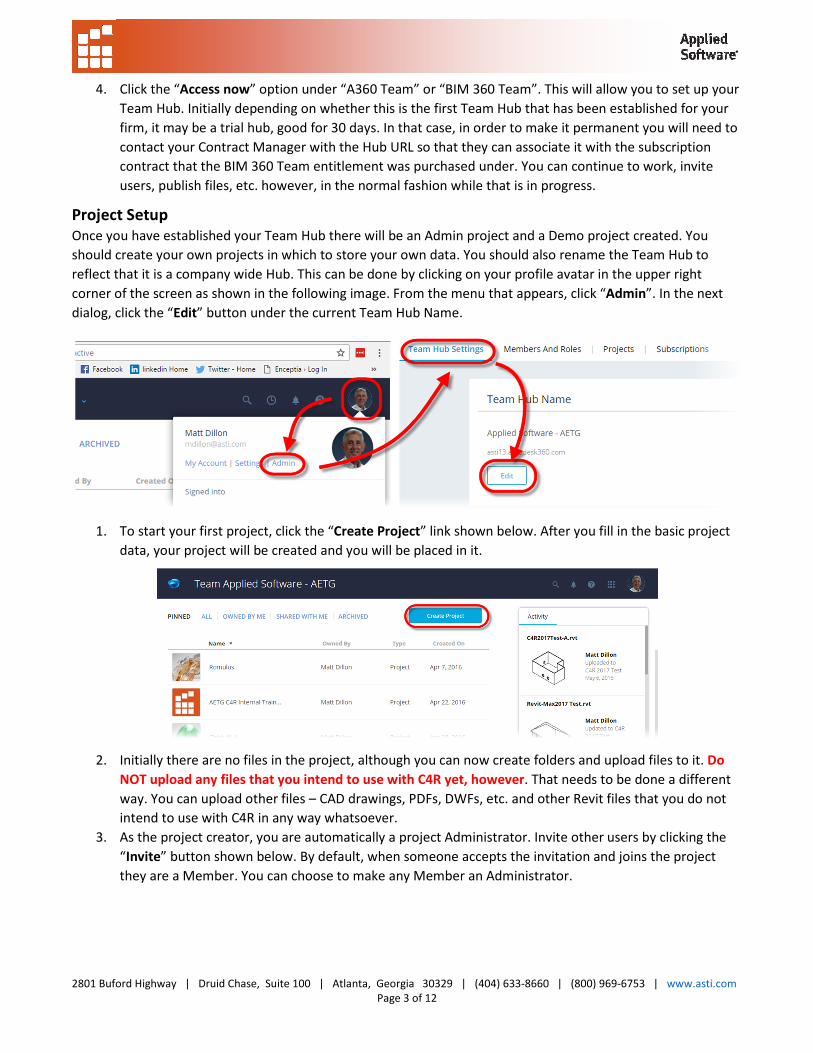
Once you have established your Team Hub there will be an Admin project and a Demo project created. You
should create your own projects in which to store your own data. You should also rename the Team Hub to
reflect that it is a company wide Hub. This can be done by clicking on your profile avatar in the upper right
corner of the screen as shown in the following image. From the menu that appears, click “Admin”. In the next
dialog, click the “Edit” button under the current Team Hub Name.
1. To start your first project, click the “Create Project” link shown below. After you fill in the basic project
data, your project will be created and you will be placed in it.
2. Initially there are no files in the project, although you can now create folders and upload files to it. Do
NOT upload any files that you intend to use with C4R yet, however. That needs to be done a different
way. You can upload other files – CAD drawings, PDFs, DWFs, etc. and other Revit files that you do not
intend to use with C4R in any way whatsoever.
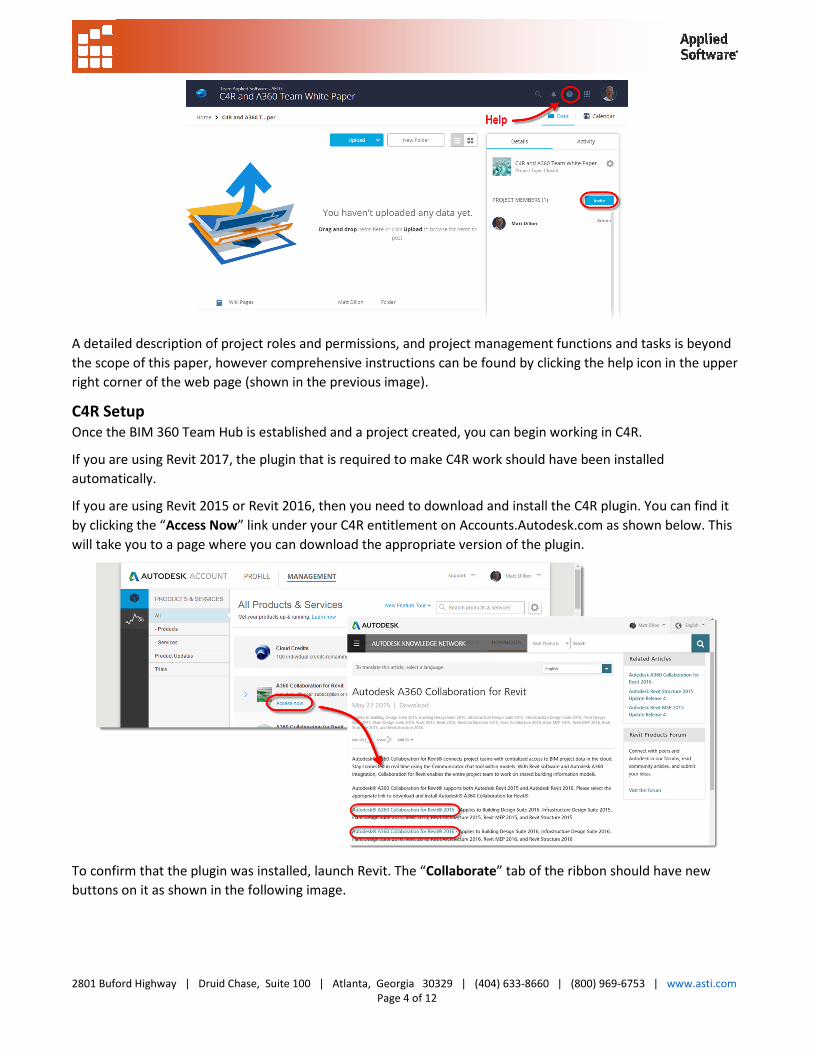
3. As the project creator, you are automatically a project Administrator. Invite other users by clicking the
“Invite” button shown below. By default, when someone accepts the invitation and joins the project
they are a Member. You can choose to make any Member an Administrator.
2801 Buford Highway | Druid Chase, Suite 100 | Atlanta, Georgia 30329 | (404) 633-8660 | (800) 969-6753 | www.asti.com
Page 4 of 12
A detailed description of project roles and permissions, and project management functions and tasks is beyond
the scope of this paper, however comprehensive instructions can be found by clicking the help icon in the upper
right corner of the web page (shown in the previous image).
C4R Setup
Once the BIM 360 Team Hub is established and a project created, you can begin working in C4R.
If you are using Revit 2017, the plugin that is required to make C4R work should have been installed
automatically.
If you are using Revit 2015 or Revit 2016, then you need to download and install the C4R plugin. You can find it
by clicking the “Access Now” link under your C4R entitlement on Accounts.Autodesk.com as shown below. This
will take you to a page where you can download the appropriate version of the plugin.
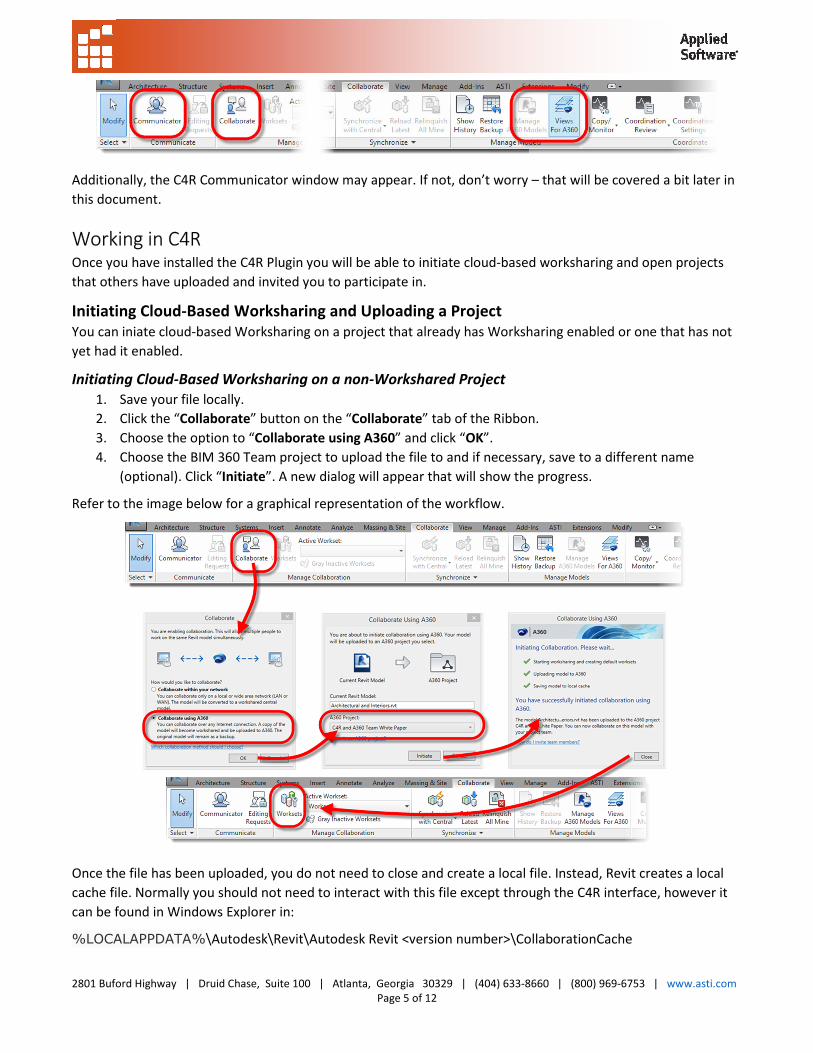
To confirm that the plugin was installed, launch Revit. The “Collaborate” tab of the ribbon should have new
buttons on it as shown in the following image.
2801 Buford Highway | Druid Chase, Suite 100 | Atlanta, Georgia 30329 | (404) 633-8660 | (800) 969-6753 | www.asti.com
Page 5 of 12
Additionally, the C4R Communicator window may appear. If not, don’t worry – that will be covered a bit later in
this document.
Working in C4R Once you have installed the C4R Plugin you will be able to initiate cloud-based worksharing and open projects
that others have uploaded and invited you to participate in.
Initiating Cloud-Based Worksharing and Uploading a Project
You can iniate cloud-based Worksharing on a project that already has Worksharing enabled or one that has not
yet had it enabled.
Initiating Cloud-Based Worksharing on a non-Workshared Project
1. Save your file locally.
2. Click the “Collaborate” button on the “Collaborate” tab of the Ribbon.
3. Choose the option to “Collaborate using A360” and click “OK”.
4. Choose the BIM 360 Team project to upload the file to and if necessary, save to a different name
(optional). Click “Initiate”. A new dialog will appear that will show the progress.
Refer to the image below for a graphical representation of the workflow.
Once the file has been uploaded, you do not need to close and create a local file. Instead, Revit creates a local
cache file. Normally you should not need to interact with this file except through the C4R interface, however it
can be found in Windows Explorer in:
%LOCALAPPDATA%\Autodesk\Revit\Autodesk Revit <version number>\CollaborationCache
2801 Buford Highway | Druid Chase, Suite 100 | Atlanta, Georgia 30329 | (404) 633-8660 | (800) 969-6753 | www.asti.com
Page 6 of 12
Again, however, there should be no real need for you to access this file outside of C4R, and you should only do
so in situations where you are troubleshooting any issues with C4R, and only after making sure that all of your
work to date has been safely backed up elsewhere.
Once you have uploaded the file, you can begin working, or you can create your Worksets as you would
normally do with traditional Worksharing.
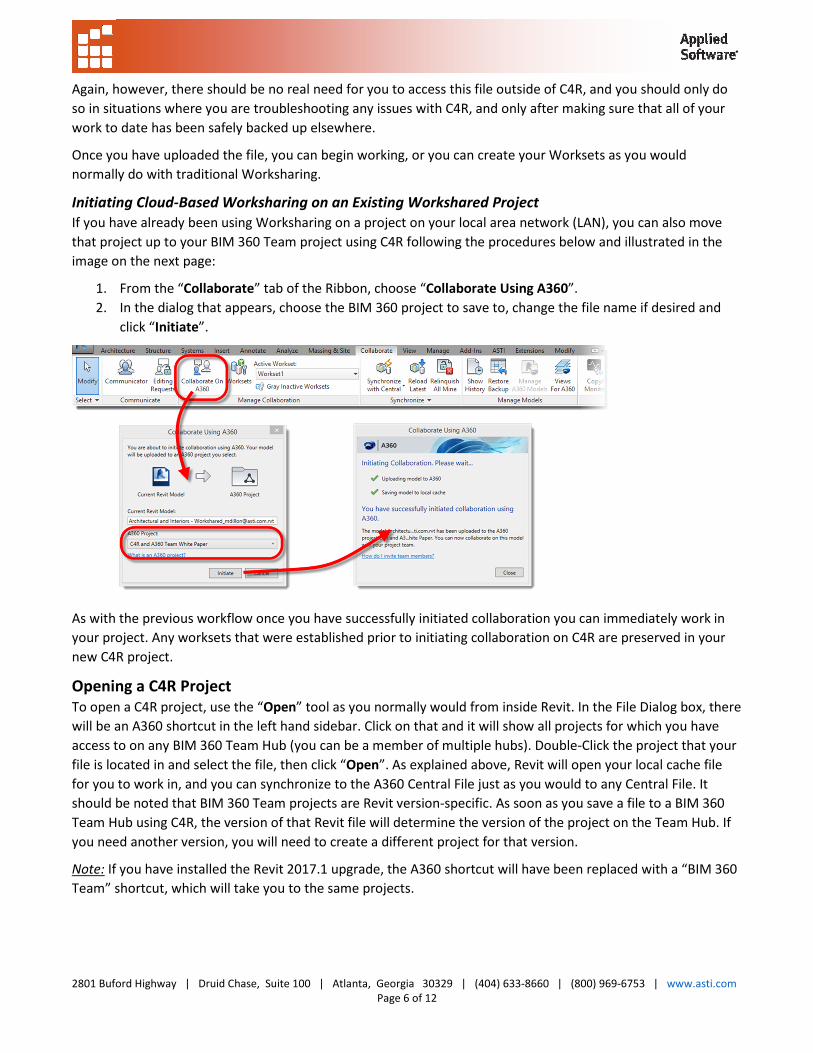
Initiating Cloud-Based Worksharing on an Existing Workshared Project
If you have already been using Worksharing on a project on your local area network (LAN), you can also move
that project up to your BIM 360 Team project using C4R following the procedures below and illustrated in the
image on the next page:
1. From the “Collaborate” tab of the Ribbon, choose “Collaborate Using A360”.
2. In the dialog that appears, choose the BIM 360 project to save to, change the file name if desired and
click “Initiate”.
As with the previous workflow once you have successfully initiated collaboration you can immediately work in
your project. Any worksets that were established prior to initiating collaboration on C4R are preserved in your
new C4R project.
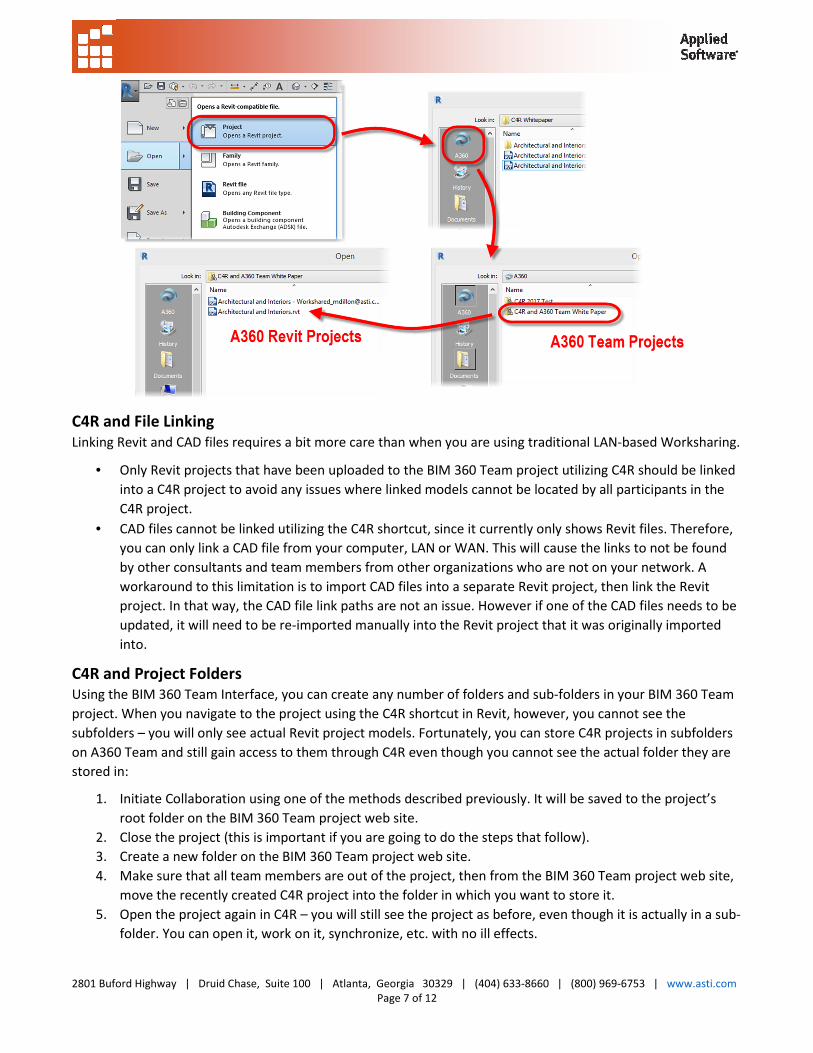
Opening a C4R Project
To open a C4R project, use the “Open” tool as you normally would from inside Revit. In the File Dialog box, there
will be an A360 shortcut in the left hand sidebar. Click on that and it will show all projects for which you have
access to on any BIM 360 Team Hub (you can be a member of multiple hubs). Double-Click the project that your
file is located in and select the file, then click “Open”. As explained above, Revit will open your local cache file
for you to work in, and you can synchronize to the A360 Central File just as you would to any Central File. It
should be noted that BIM 360 Team projects are Revit version-specific. As soon as you save a file to a BIM 360
Team Hub using C4R, the version of that Revit file will determine the version of the project on the Team Hub. If
you need another version, you will need to create a different project for that version.
Note: If you have installed the Revit 2017.1 upgrade, the A360 shortcut will have been replaced with a “BIM 360
Team” shortcut, which will take you to the same projects.
2801 Buford Highway | Druid Chase, Suite 100 | Atlanta, Georgia 30329 | (404) 633-8660 | (800) 969-6753 | www.asti.com
Page 7 of 12
C4R and File Linking
Linking Revit and CAD files requires a bit more care than when you are using traditional LAN-based Worksharing.
• Only Revit projects that have been uploaded to the BIM 360 Team project utilizing C4R should be linked
into a C4R project to avoid any issues where linked models cannot be located by all participants in the
C4R project.
• CAD files cannot be linked utilizing the C4R shortcut, since it currently only shows Revit files. Therefore,
you can only link a CAD file from your computer, LAN or WAN. This will cause the links to not be found
by other consultants and team members from other organizations who are not on your network. A
workaround to this limitation is to import CAD files into a separate Revit project, then link the Revit
project. In that way, the CAD file link paths are not an issue. However if one of the CAD files needs to be
updated, it will need to be re-imported manually into the Revit project that it was originally imported
into.
C4R and Project Folders
Using the BIM 360 Team Interface, you can create any number of folders and sub-folders in your BIM 360 Team
project. When you navigate to the project using the C4R shortcut in Revit, however, you cannot see the
subfolders – you will only see actual Revit project models. Fortunately, you can store C4R projects in subfolders
on A360 Team and still gain access to them through C4R even though you cannot see the actual folder they are
stored in:
1. Initiate Collaboration using one of the methods described previously. It will be saved to the project’s
root folder on the BIM 360 Team project web site.
2. Close the project (this is important if you are going to do the steps that follow).
3. Create a new folder on the BIM 360 Team project web site.
4. Make sure that all team members are out of the project, then from the BIM 360 Team project web site,
move the recently created C4R project into the folder in which you want to store it.
5. Open the project again in C4R – you will still see the project as before, even though it is actually in a sub-
folder. You can open it, work on it, synchronize, etc. with no ill effects.
2801 Buford Highway | Druid Chase, Suite 100 | Atlanta, Georgia 30329 | (404) 633-8660 | (800) 969-6753 | www.asti.com
Page 8 of 12
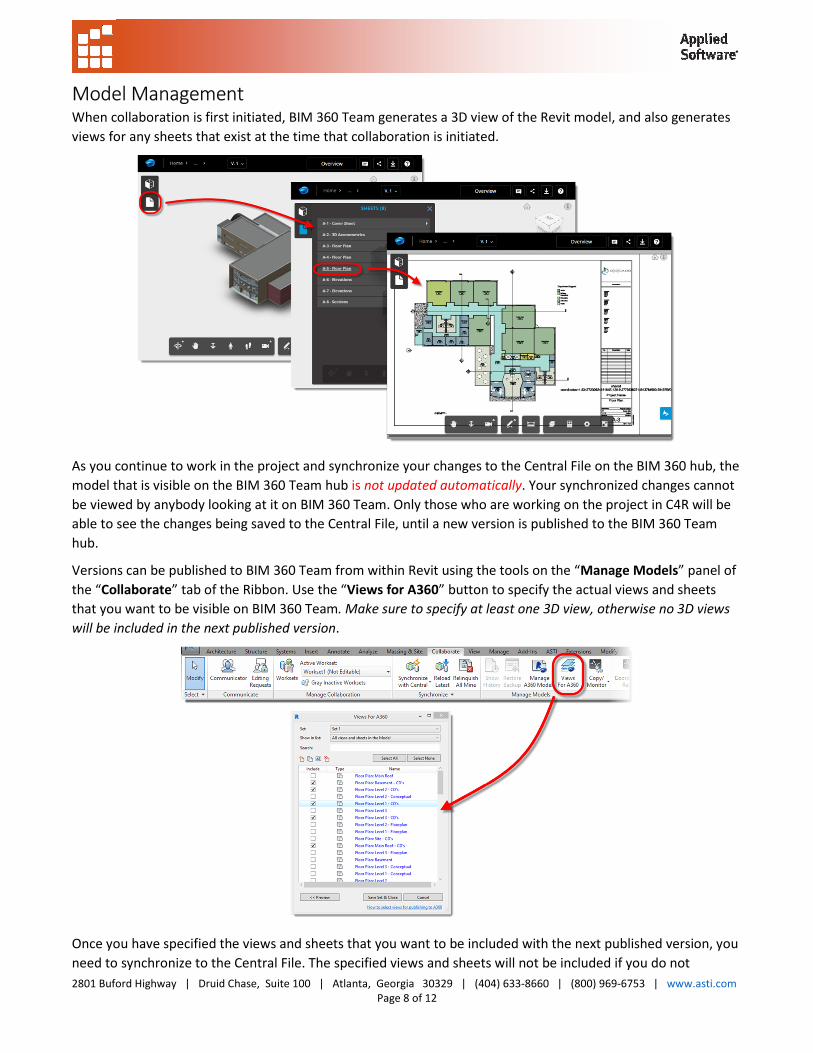
Model Management When collaboration is first initiated, BIM 360 Team generates a 3D view of the Revit model, and also generates
views for any sheets that exist at the time that collaboration is initiated.
As you continue to work in the project and synchronize your changes to the Central File on the BIM 360 hub, the
model that is visible on the BIM 360 Team hub is not updated automatically. Your synchronized changes cannot
be viewed by anybody looking at it on BIM 360 Team. Only those who are working on the project in C4R will be
able to see the changes being saved to the Central File, until a new version is published to the BIM 360 Team
hub.
Versions can be published to BIM 360 Team from within Revit using the tools on the “Manage Models” panel of
the “Collaborate” tab of the Ribbon. Use the “Views for A360” button to specify the actual views and sheets
that you want to be visible on BIM 360 Team. Make sure to specify at least one 3D view, otherwise no 3D views
will be included in the next published version.
Once you have specified the views and sheets that you want to be included with the next published version, you
need to synchronize to the Central File. The specified views and sheets will not be included if you do not
2801 Buford Highway | Druid Chase, Suite 100 | Atlanta, Georgia 30329 | (404) 633-8660 | (800) 969-6753 | www.asti.com
Page 9 of 12
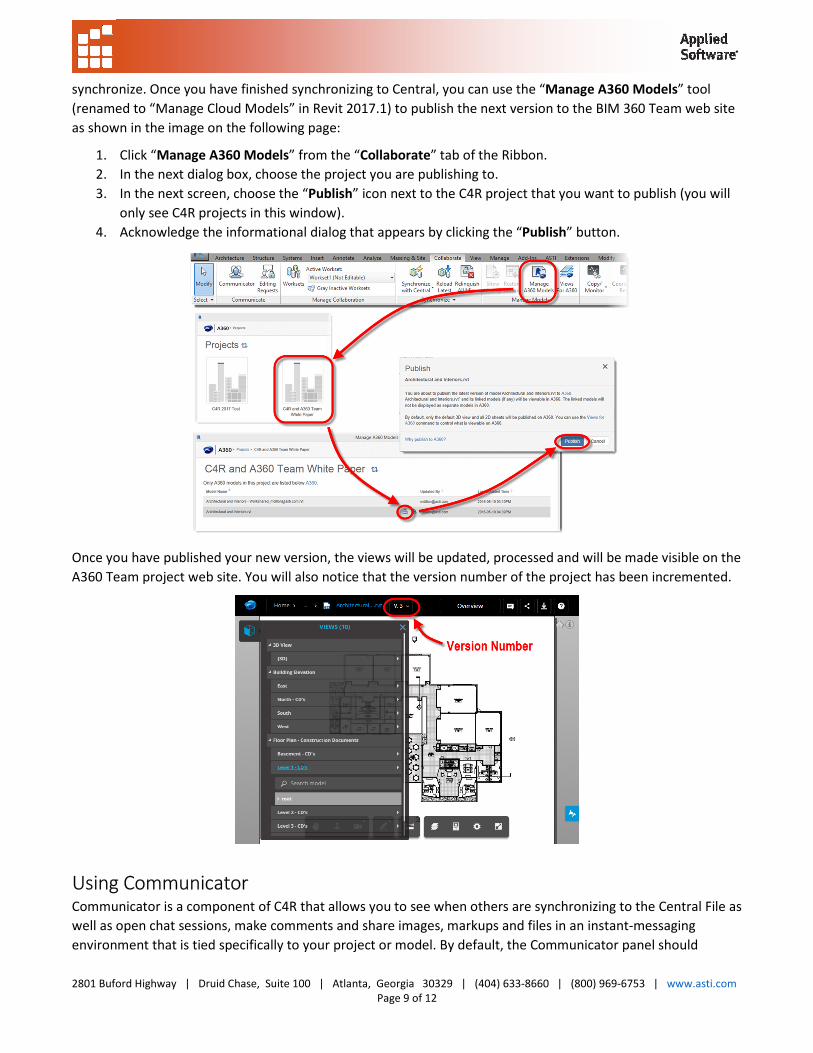
synchronize. Once you have finished synchronizing to Central, you can use the “Manage A360 Models” tool
(renamed to “Manage Cloud Models” in Revit 2017.1) to publish the next version to the BIM 360 Team web site
as shown in the image on the following page:
1. Click “Manage A360 Models” from the “Collaborate” tab of the Ribbon.
2. In the next dialog box, choose the project you are publishing to.
3. In the next screen, choose the “Publish” icon next to the C4R project that you want to publish (you will
only see C4R projects in this window).
4. Acknowledge the informational dialog that appears by clicking the “Publish” button.
Once you have published your new version, the views will be updated, processed and will be made visible on the
A360 Team project web site. You will also notice that the version number of the project has been incremented.
Using Communicator Communicator is a component of C4R that allows you to see when others are synchronizing to the Central File as
well as open chat sessions, make comments and share images, markups and files in an instant-messaging
environment that is tied specifically to your project or model. By default, the Communicator panel should

2801 Buford Highway | Druid Chase, Suite 100 | Atlanta, Georgia 30329 | (404) 633-8660 | (800) 969-6753 | www.asti.com
Page 10 of 12
appear whenever you open a C4R project. You can also turn it on or off using the “Communicator” tool on the
“Collaborate” ribbon.
Communicator Components
There are several components to the C4R Communicator panel, depending upon whether you are dealing with
your current model or your current project. An in depth discussion of each of them is outside the scope of this
document, however some of the high points are worthwhile reviewing. First, the toolbar along the top of the
Communicator Panel toggles you through several modes, and also gives you access to your Communicator
settings.
My Projects
This button will show you the team members of your current active project. You can also toggle to all projects
that you have access to and from the resulting panel, send an email to all members of a given project, send an
instant message to the project, or launch the A360 Team web page for the project. Double-clicking on the
project places you in the chat stream of the project. Double-clicking on a team member will place you in a chat
window with that team member.
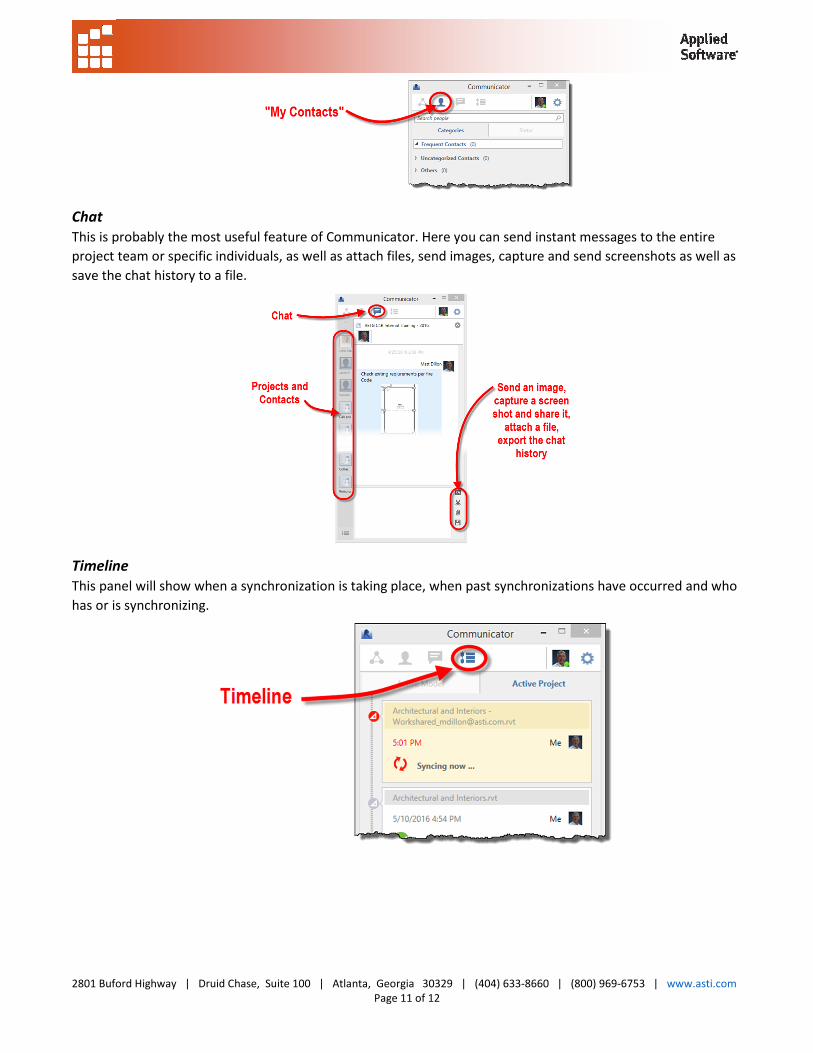
My Contacts
This button will show you a list of all contacts that have the same project, goal or interests.
2801 Buford Highway | Druid Chase, Suite 100 | Atlanta, Georgia 30329 | (404) 633-8660 | (800) 969-6753 | www.asti.com
Page 11 of 12
Chat
This is probably the most useful feature of Communicator. Here you can send instant messages to the entire
project team or specific individuals, as well as attach files, send images, capture and send screenshots as well as
save the chat history to a file.
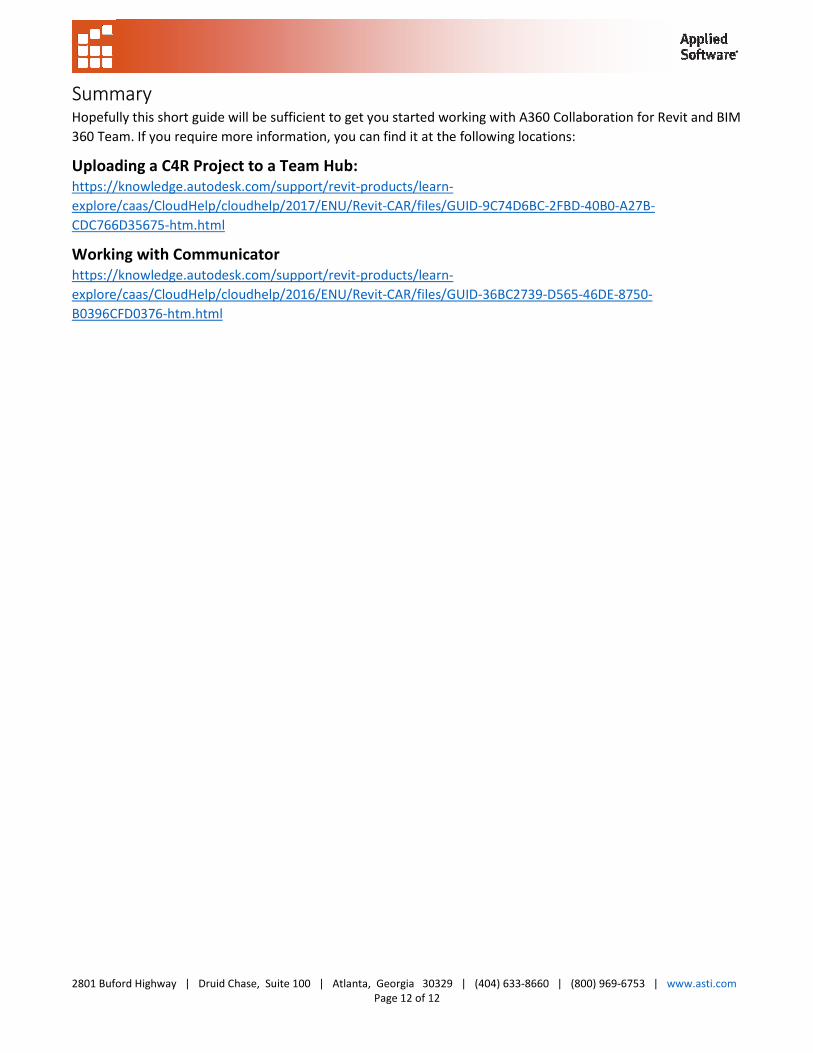
Timeline
This panel will show when a synchronization is taking place, when past synchronizations have occurred and who
has or is synchronizing.
2801 Buford Highway | Druid Chase, Suite 100 | Atlanta, Georgia 30329 | (404) 633-8660 | (800) 969-6753 | www.asti.com
Page 12 of 12
Summary Hopefully this short guide will be sufficient to get you started working with A360 Collaboration for Revit and BIM
360 Team. If you require more information, you can find it at the following locations:
Uploading a C4R Project to a Team Hub:
https://knowledge.autodesk.com/support/revit-products/learn-
explore/caas/CloudHelp/cloudhelp/2017/ENU/Revit-CAR/files/GUID-9C74D6BC-2FBD-40B0-A27B-
CDC766D35675-htm.html
Working with Communicator
https://knowledge.autodesk.com/support/revit-products/learn-
explore/caas/CloudHelp/cloudhelp/2016/ENU/Revit-CAR/files/GUID-36BC2739-D565-46DE-8750-
B0396CFD0376-htm.html


