
2
Aut
odes
k A
utoC
AD
Cer
tifie
d U
ser S
kills
2
AutoCAD® Certified User and Autodesk Inventor® Certified User certifications align both academic and industry requirements into one attainable certification specifically designed for students. The exams combine multiple-choice and performance-based exam questions to ensure students can effectively use Autodesk software.
Autodesk Certified User certification confirms students have the skills necessary to continue their design careers—whether they attend college, enter the workforce or work toward additional levels of industry certification after graduation.
By partnering with Certiport, the leading provider of industry certification exams, schools become Certiport® Testing Centers, provide Autodesk certification exams in their classrooms and certify student design software skills with recognized, industry certifications. Classroom license options allow schools to conduct unlimited online testing for an affordable annual fee that simplifies budgeting by eliminating per-test costs. To learn more visit www.certiport.com/autodesk or sign-up to become a Certiport Center at www.certiport.com/go. Contact Certiport at [email protected].
3
Aut
odes
k A
utoC
AD
Cer
tifie
d U
ser S
kills
Introduction
Welcome to the Autodesk® AutoCAD® Certified User Skills. This document was designed to help educators and educational institutions teach AutoCAD ® software skills. Created using valuable input from respected educators and designers, it sets forth important skill standards for developing a high-quality user certification exam and curriculum resources.
The AutoCAD Certified User Skills serves to standardize the core competencies for fundamental -level instruction with AutoCAD for a two-semester class and provides a content framework and reference guide for the Autodesk® AutoCAD Certified User exam.
TIP: Although this document is designed to facilitate teacher-led courses and lessons, it may also be referenced for self-paced learning through the use of the Autodesk Education Secondary Curriculum and the Autodesk® AutoCAD® Certified User Digital Study Packet.
Using This Document
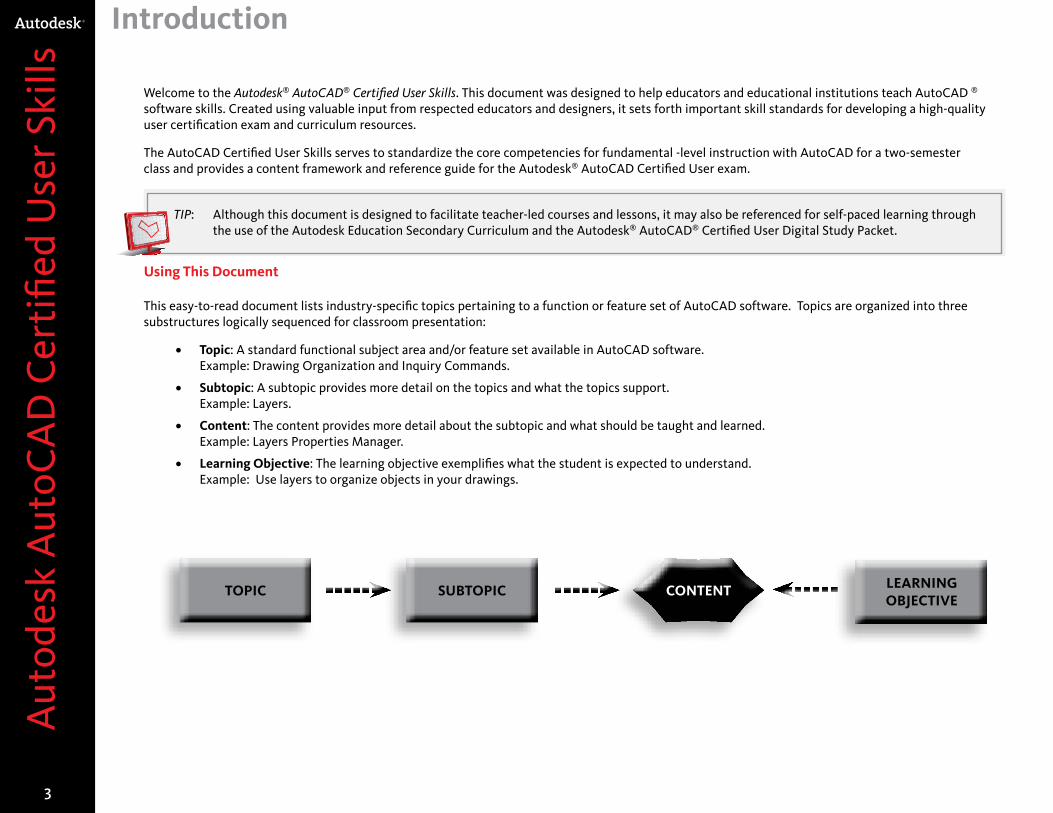
This easy-to-read document lists industry-specific topics pertaining to a function or feature set of AutoCAD software. Topics are organized into three substructures logically sequenced for classroom presentation:
• Topic: A standard functional subject area and/or feature set available in AutoCAD software. Example: Drawing Organization and Inquiry Commands.
• Subtopic: A subtopic provides more detail on the topics and what the topics support. Example: Layers.
• Content: The content provides more detail about the subtopic and what should be taught and learned. Example: Layers Properties Manager.
• Learning Objective: The learning objective exemplifies what the student is expected to understand. Example: Use layers to organize objects in your drawings.
LEARNING OBJECTIVE
TOPIC SUBTOPIC CONTENT

4
Aut
odes
k A
utoC
AD
Cer
tifie
d U
ser S
kills
Introduction
AutoCAD Certified User Digital Study Packet
The AutocAD Certified User Digital Study Packet is a digital learning resource that provides students with a library of short videos based on the AutocAD Certified User Digital Study Packet. The study packet covers the basic techniques required to become familiar with the software and get hands-on quickly.
TIP: Teachers can leverage the study packets in conjunction with the Autodesk Education Secondary Curriculum or their own curriculum to help their students build their software skills and prepare for the certification exam. The AutoCAD Certified User Digital Study Packet will be available in 2011.
Autodesk Education Secondary Curriculum
The Autodesk Education Secondary Curriculum provides teachers and students with a highly visual story-based curriculum created to promote design innovation and creative problem-solving through science, technology, engineering, arts, and math (STEAM). The curriculum is structured as a framework for learning software through project-based content based on engaging real-world industry projects that build gradually in difficulty, offering students a chance to achieve small successes as they build their technical skills. The Autodesk Education Secondary Curriculum will be available in 2011.
TIP: Using the AutoCAD Certified User Skills as benchmarks, teachers can measure a student’s progress towards certification as they work through the skills-building projects offered in the Autodesk Education Secondary Curriculum.
Feedback
We welcome your feedback on the AutoCAD Certified User Skills. Please email us at [email protected].

Aut
odes
k A
utoC
AD
Cer
tifie
d U
ser S
kills
Image courtesy of Autodesk Gallery
6
Aut
odes
k A
utoC
AD
Cer
tifie
d U
ser S
kills
6
Industry Specific Topic
Sub-Topic Content Examples of Learning Objective
Reference
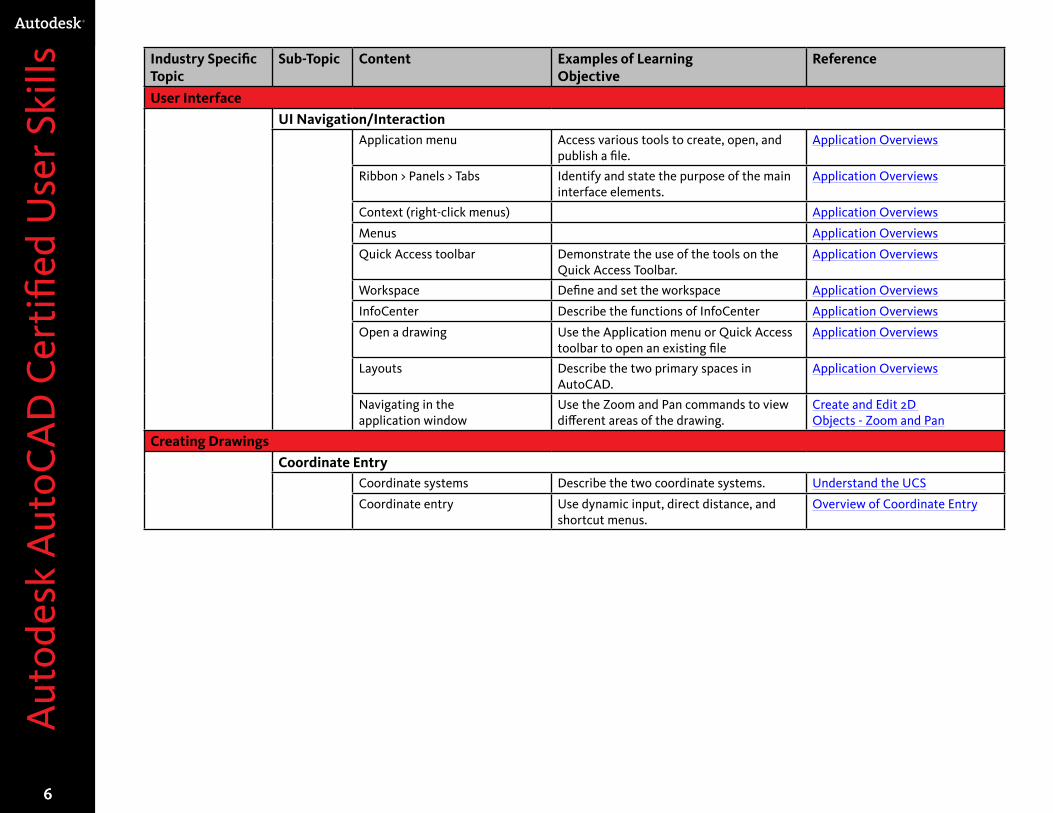
User InterfaceUI Navigation/Interaction
Application menu Access various tools to create, open, and publish a file.
Application Overviews
Ribbon > Panels > Tabs Identify and state the purpose of the main interface elements.
Application Overviews
Context (right-click menus) Application Overviews
Menus Application Overviews
Quick Access toolbar Demonstrate the use of the tools on the Quick Access Toolbar.
Application Overviews
Workspace Define and set the workspace Application Overviews
InfoCenter Describe the functions of InfoCenter Application Overviews
Open a drawing Use the Application menu or Quick Access toolbar to open an existing file
Application Overviews
Layouts Describe the two primary spaces in AutoCAD.
Application Overviews
Navigating in the application window
Use the Zoom and Pan commands to view different areas of the drawing.
Create and Edit 2D Objects - Zoom and Pan
Creating DrawingsCoordinate Entry
Coordinate systems Describe the two coordinate systems. Understand the UCS
Coordinate entry Use dynamic input, direct distance, and shortcut menus.
Overview of Coordinate Entry

7
Aut
odes
k A
utoC
AD
Cer
tifie
d U
ser S
kills
7
Industry Specific Topic
Sub-Topic Content Examples of Learning Objective
Reference
Creating Drawings
Draw Tools and Settings
Draw tools: Line Use the Line, Circle, Arc, Erase, Rectangle, and Polygon commands to create and erase geometry in the drawing.
Create and Edit 2D Objects - Line
Draw tools: Circle Draw Circles
Draw tools: Arc Draw Arcs
Draw tools: Erase Erase Objects
Draw tools: Rectangle Draw Rectangles and Polygons
Draw tools: Polygon Draw Rectangles and Polygons
Object snaps Use object snaps to accurately place and create objects in the drawing.
Create and Edit 2D Objects - Object Snaps
Polar Tracking and PolarSnap Activate and use the Polar Tracking and PolarSnap modes to more accurately create geometry at different angles in the drawing.
Use Polar Tracking and Polar Snap
Object Snap tracking Explain, enable, and use object snap tracking to position geometry in the drawing.
Object Snap Tracking
Drawing Units Describe the process of setting Length and Angle units
Drawing Units Dialog Box
Drafting Settings Describe the Snap and Grid, Polar Tracking, and Object Snap settings.
Drawing Settings Dialog Box
Manipulating ObjectsGrips
Grip editing Use Grip modes to stretch, move, scale, rotate, or mirror an object.
Grips

8
Aut
odes
k A
utoC
AD
Cer
tifie
d U
ser S
kills
8
Industry Specific Topic
Sub-Topic Content Examples of Learning Objective
Reference
Manipulating Objects
Object Selection
Select objects individually
Use single clicks to add and remove objects from a selection set.
Create and Edit 2D Objects - Select and remove objects
Window selection Use a window to select only objects that are entirely enclosed by the rectangular area.
Create and Edit 2D Objects - Window Selection
Crossing selection Use a window to select objects that the rectangular window encloses or crosses.
Create and Edit 2D Objects - Crossing Selection
Move Objects
Object Snaps, Object Tracking, and Coordinate Entry
Use coordinates, grid snap, object snaps, and other tools to move objects with precision.
Move Objects
Drawing Organization and Inquiry Commands
LayersLayer Properties Manager Use layers to organize objects in your
drawing.Create and Edit 2D Objects - Layers
Object PropertiesQuick Properties palette Use the Quick Properties palette to display
and change the most commonly used properties.
Display and Change the Properties of Objects
Properties palette Use the Properties palette to display and change the properties of the selected object or set of objects.
Display and Change the Properties of Objects
Match Properties Use the Match Properties command to apply the properties from a source object to destination objects.
Copy Properties Between Objects
9
Aut
odes
k A
utoC
AD
Cer
tifie
d U
ser S
kills
9
Industry Specific Topic
Sub-Topic Content Examples of Learning Objective
Reference
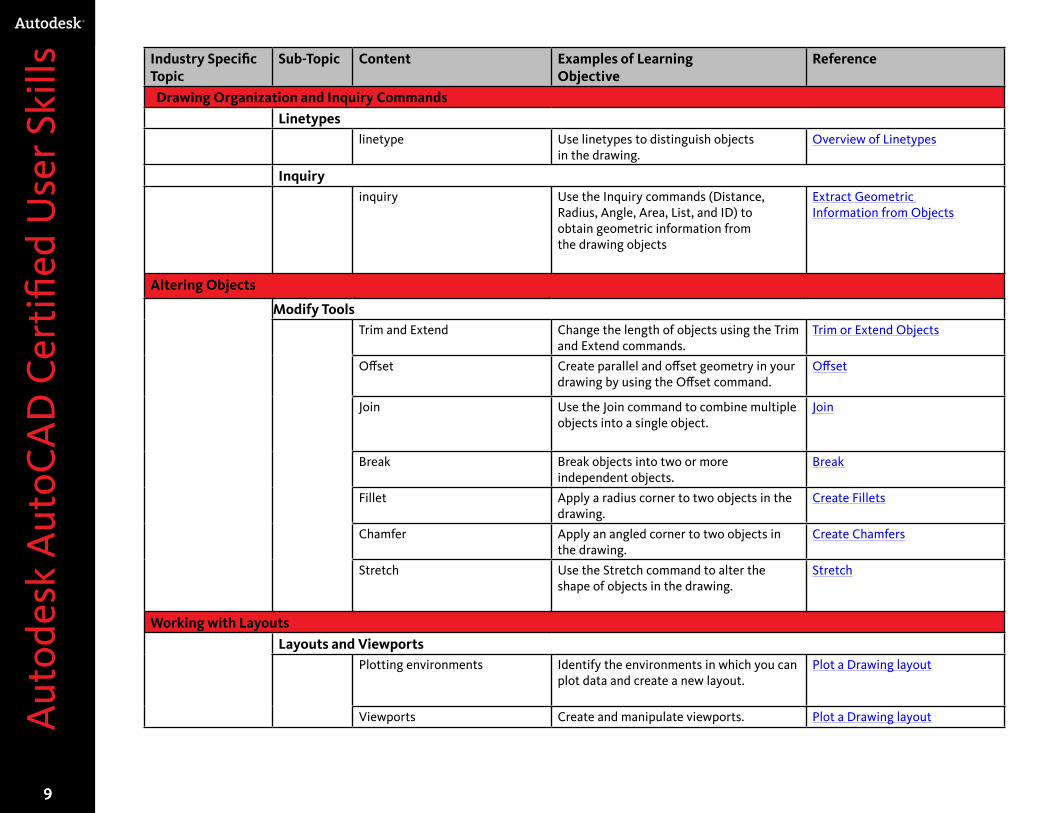
Drawing Organization and Inquiry CommandsLinetypes
linetype Use linetypes to distinguish objects in the drawing.
Overview of Linetypes
Inquiryinquiry Use the Inquiry commands (Distance,
Radius, Angle, Area, List, and ID) to obtain geometric information from the drawing objects
Extract Geometric Information from Objects
Altering Objects
Modify ToolsTrim and Extend Change the length of objects using the Trim
and Extend commands.Trim or Extend Objects
Offset Create parallel and offset geometry in your drawing by using the Offset command.
Offset
Join Use the Join command to combine multiple objects into a single object.
Join
Break Break objects into two or more independent objects.
Break
Fillet Apply a radius corner to two objects in the drawing.
Create Fillets
Chamfer Apply an angled corner to two objects in the drawing.
Create Chamfers
Stretch Use the Stretch command to alter the shape of objects in the drawing.
Stretch
Working with LayoutsLayouts and Viewports
Plotting environments Identify the environments in which you can plot data and create a new layout.
Plot a Drawing layout
Viewports Create and manipulate viewports. Plot a Drawing layout
10
Aut
odes
k A
utoC
AD
Cer
tifie
d U
ser S
kills
10
Industry Specific Topic
Sub-Topic Content Examples of Learning Objective
Reference
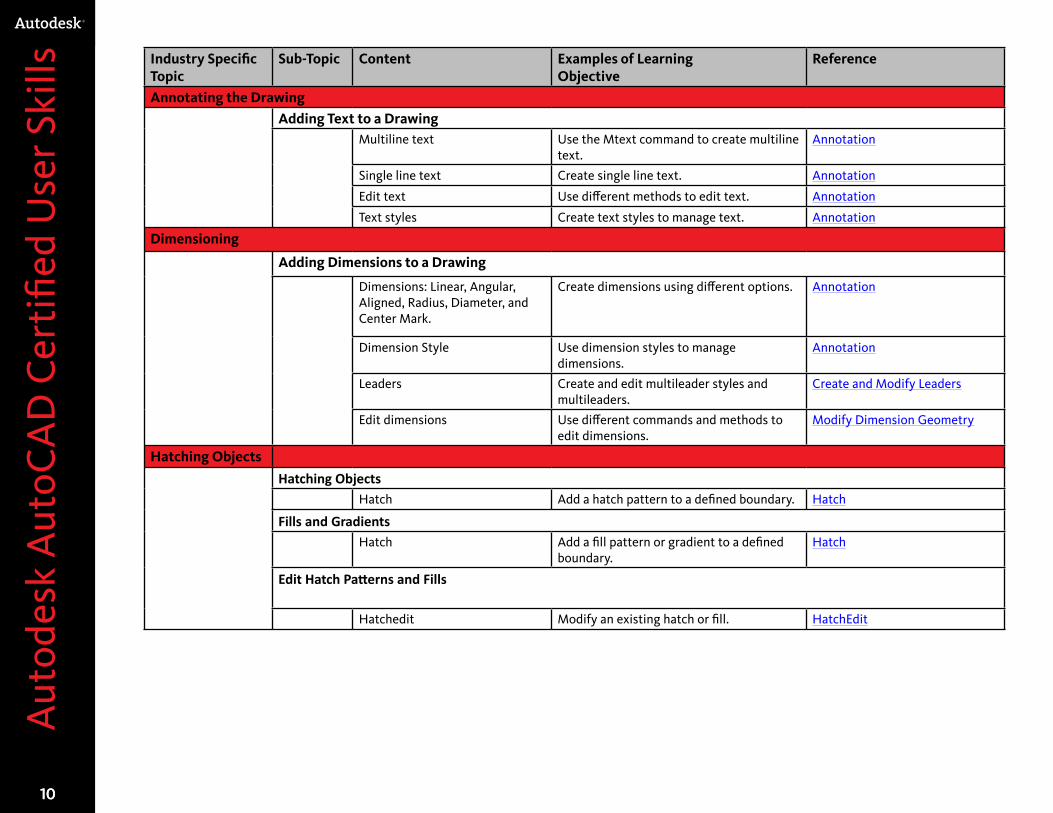
Annotating the DrawingAdding Text to a Drawing
Multiline text Use the Mtext command to create multiline text.
Annotation
Single line text Create single line text. Annotation
Edit text Use different methods to edit text. Annotation
Text styles Create text styles to manage text. Annotation
Dimensioning
Adding Dimensions to a Drawing
Dimensions: Linear, Angular, Aligned, Radius, Diameter, and Center Mark.
Create dimensions using different options. Annotation
Dimension Style Use dimension styles to manage dimensions.
Annotation
Leaders Create and edit multileader styles and multileaders.
Create and Modify Leaders
Edit dimensions Use different commands and methods to edit dimensions.
Modify Dimension Geometry
Hatching Objects
Hatching ObjectsHatch Add a hatch pattern to a defined boundary. Hatch
Fills and GradientsHatch Add a fill pattern or gradient to a defined
boundary.Hatch
Edit Hatch Patterns and Fills
Hatchedit Modify an existing hatch or fill. HatchEdit
11
Aut
odes
k A
utoC
AD
Cer
tifie
d U
ser S
kills
11
Industry Specific Topic
Sub-Topic Content Examples of Learning Objective
Reference
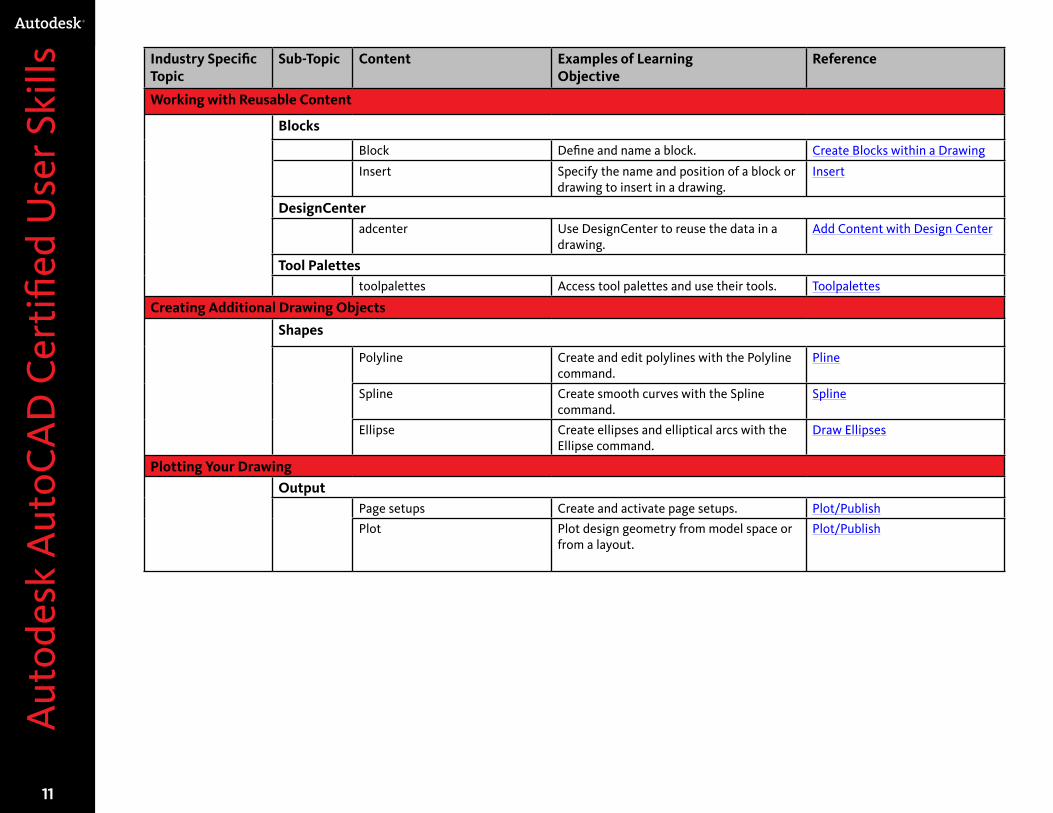
Working with Reusable Content
Blocks
Block Define and name a block. Create Blocks within a Drawing
Insert Specify the name and position of a block or drawing to insert in a drawing.
Insert
DesignCenteradcenter Use DesignCenter to reuse the data in a
drawing.Add Content with Design Center
Tool Palettestoolpalettes Access tool palettes and use their tools. Toolpalettes
Creating Additional Drawing Objects
Shapes
Polyline Create and edit polylines with the Polyline command.
Pline
Spline Create smooth curves with the Spline command.
Spline
Ellipse Create ellipses and elliptical arcs with the Ellipse command.
Draw Ellipses
Plotting Your DrawingOutput
Page setups Create and activate page setups. Plot/Publish
Plot Plot design geometry from model space or from a layout.
Plot/Publish

12
Aut
odes
k A
utoC
AD
Cer
tifie
d U
ser S
kills
12
Acknowledgements
Production design / layout:Diane Erlich
Editorial services:Jessica Bendy
Additional editorial services:Diane Erlich
Primary authors:Phil Dolan
Producer:Linda Selhem
© 2010 Autodesk®. All rights reserved.
No part of this publication may be edited or reproduced in any form or by any means, electronic or mechanical, without permission in writing from the publisher.
Notices Knowledge and best practice in this field are constantly changing. As new research and experience broaden our understanding, changes in research methods, professional practices, or medical treatment may become necessary.
Practitioners and researchers must always rely on their own experience and knowledge in evaluating and using any information, methods, compounds, or experiments described herein. In using such information or methods they should be mindful of their own safety and the safety of others, including parties for whom they have a professional responsibility.
To the fullest extent of the law, neither the Publisher nor the authors, contributors, or editors, assume any liability for any injury and/or damage to persons or property as a matter of products liability, negligence or otherwise, or from any use or operation of any methods, products, instructions, or ideas contained in the material herein.


