Backlink Energizer User Guide & Manual
Copyright © 2010, All Rights Reserved – Steve Aylor – Backlink-Energizer.com
Contents Contents Introduction .................................................................................................................................................. 3
What will I learn in this manual? .............................................................................................................. 3
What is an index cluster? .......................................................................................................................... 3
What is Backlink Energizer? ...................................................................................................................... 4
Before Installing ........................................................................................................................................ 5
Resources .................................................................................................................................................. 6
Installation .................................................................................................................................................... 7
Registering web 2.0 Accounts ..................................................................................................................... 11
WordPress.com – http://wordpress.com/signup/ ................................................................................. 15
TypePad.com - http://www.typepad.com/micro/ ................................................................................. 18
Blogger.com - https://www.blogger.com/signup.g ................................................................................ 21
LiveJournal.com - https://www.livejournal.com/create.bml ................................................................. 25
Tumblr.com – http://www.tumblr.com ................................................................................................. 29
Multiply.com - http://multiply.com/ ...................................................................................................... 32
Xanga.com - http://www.xanga.com/register.aspx ............................................................................... 35
Posterous.com - https://posterous.com/main/register ......................................................................... 39
Import Cluster ............................................................................................................................................. 41
Self Hosted WordPress (SHWP) .................................................................................................................. 43
Test post ...................................................................................................................................................... 48
Setting up a CRON JOB ................................................................................................................................ 50
Using Backlink Energizer ............................................................................................................................. 55
Status Report .............................................................................................................................................. 61

Copyright © 2010, All Rights Reserved – Steve Aylor – Backlink-Energizer.com
Introduction What will I learn in this manual?
This easy to follow user guide was written to guide you through the process of installing,
activating, configuring and using the Backlink Energizer WordPress Plugin.
Backlink Energizer was written for novice and advanced users in mind. Whether you are a
WordPress genius or you have never installed or used a WordPress Plugin before, this guide will
show you in an easy to follow, step-by-step format, how to get the most out of this powerful
software.
What is an index cluster?
A cluster is a group of web 2.0 sites (or your own WordPress blogs) which link back to a page you
want to get indexed.
If you’ve spent any time learning about Internet marketing, you will already know that you need
backlinks. Without them, you’re practically invisible to Google.
The problem most people face is that when they build backlinks, it can take months for Google
to index them, if at all. While your backlink is hidden away from Google, your site will not
benefit from better rankings that increased backlinks can deliver.
For example: If you’re building profile backlinks (a popular method of creating message board
profiles with links back to your own website), your profile could be one of thousands on that
particular message board. It could take Google months to index your profile page. That’s a LOT
of time to wait for just ONE backlink to be indexed.
Copyright © 2010, All Rights Reserved – Steve Aylor – Backlink-Energizer.com
What is Backlink Energizer?
Backlink Energizer is a simple to use WordPress plugin which helps to increase the visibility of
your backlinks. It combines the power of link-wheels and the automation of autoblogging into
one push-button process that turbo-charges your backlinking efforts.
In a nutshell, Backlink Energizer builds backlinks to your backlinks – in doing so, it increases their
visibility and helps to get them indexed faster. The quicker your backlinks are indexed, the more
“link juice” your money site has. Which in turn means higher rankings.
Copyright © 2010, All Rights Reserved – Steve Aylor – Backlink-Energizer.com
Before Installing
It is important to note that Backlink Energizer is not designed to work with other WordPress plugins.
Backlink Energizer is a standalone solution, designed to improve the power of your backlinks.
You should install Backlink Energizer on a fresh WordPress blog which is hidden from search engines.
This blog can be on its own domain and hosting, on a subdomain, or in a subfolder.
This new WordPress blog is essentially used as an admin panel for energizing your backlinking
campaigns – there will be no posts, pages or other information on your WordPress blog.

Copyright © 2010, All Rights Reserved – Steve Aylor – Backlink-Energizer.com
Resources
Here are a few helpful links to assist you.
Support Desk: www.backlink-energizer.com/support/
Video Tutorials: www.backlink-energizer.com/energizervids/
Backlinks Forum Threads: http://backlinksforum.com/backlinking-tools-software-backlink-
boosting/1588-backlink-energizer-q-thread.html
Energizer FAQ: www.backlink-energizer.com/energizerfaq/
Download The Latest Backlink Energizer Manual: www.backlink-energizer.com/energizer-guide/
Copyright © 2010, All Rights Reserved – Steve Aylor – Backlink-Energizer.com
Installation We're starting the installation process with the understanding that you have
installed a fresh, new, never before used, wordpress blog on your hosting account
[free Wordpress.com sites won't work ]. We recommend for cost savings, to
install a fresh new blog into a subfolder of an existing domain, however; if you
have existing dormant domains you want to use - you are free to use those as
well.
For steps on setting up new wordpress blog installs in subfolders and / or
subdomains - please refer to the video tutorials at the following link
http://www.backlink-energizer.com/energizervids/
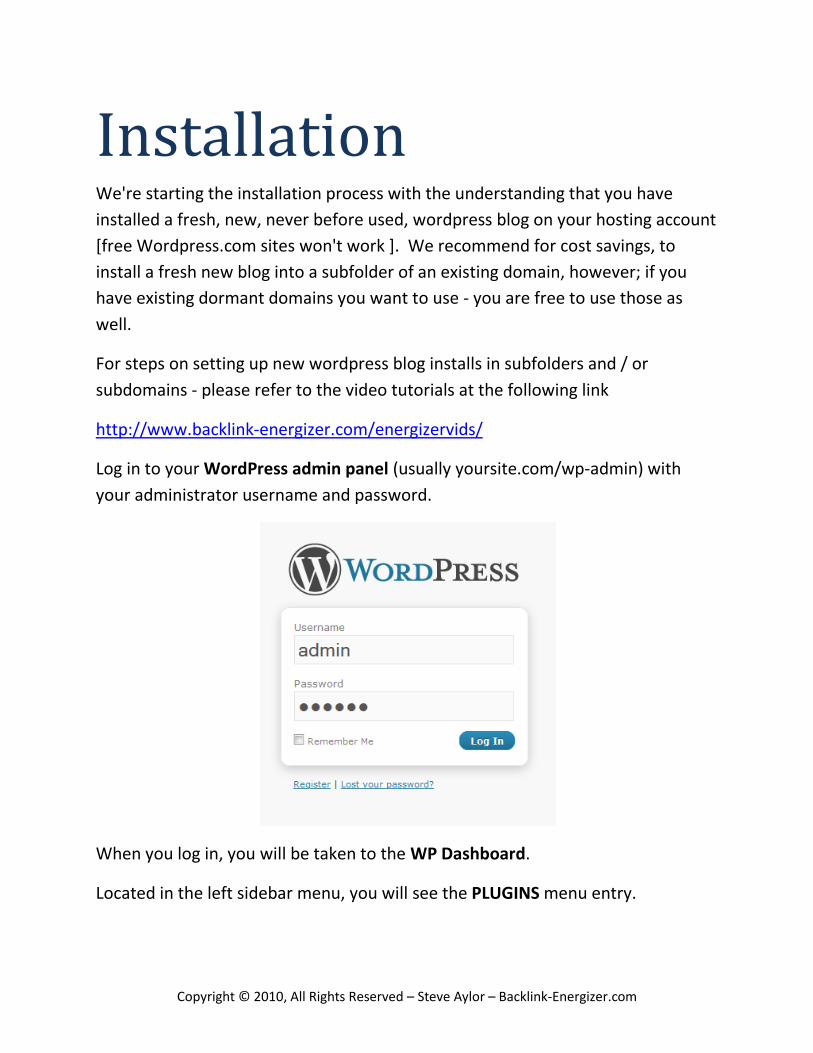
Log in to your WordPress admin panel (usually yoursite.com/wp-admin) with
your administrator username and password.
When you log in, you will be taken to the WP Dashboard.
Located in the left sidebar menu, you will see the PLUGINS menu entry.

Copyright © 2010, All Rights Reserved – Steve Aylor – Backlink-Energizer.com
Click the downward arrow to expand the PLUGINS menu.
Click ADD NEW, this will take you to the Install Plugins page which looks like this:
Towards the top of the page, you will see 6 links: Search, Upload, Featured,
Popular, Newest & Recently Updated.
Click UPLOAD, the page will now look like this:
Click BROWSE, this will open a “File Upload” window. Locate the plugin zip file on
your computer’s hard drive and click OPEN
Copyright © 2010, All Rights Reserved – Steve Aylor – Backlink-Energizer.com
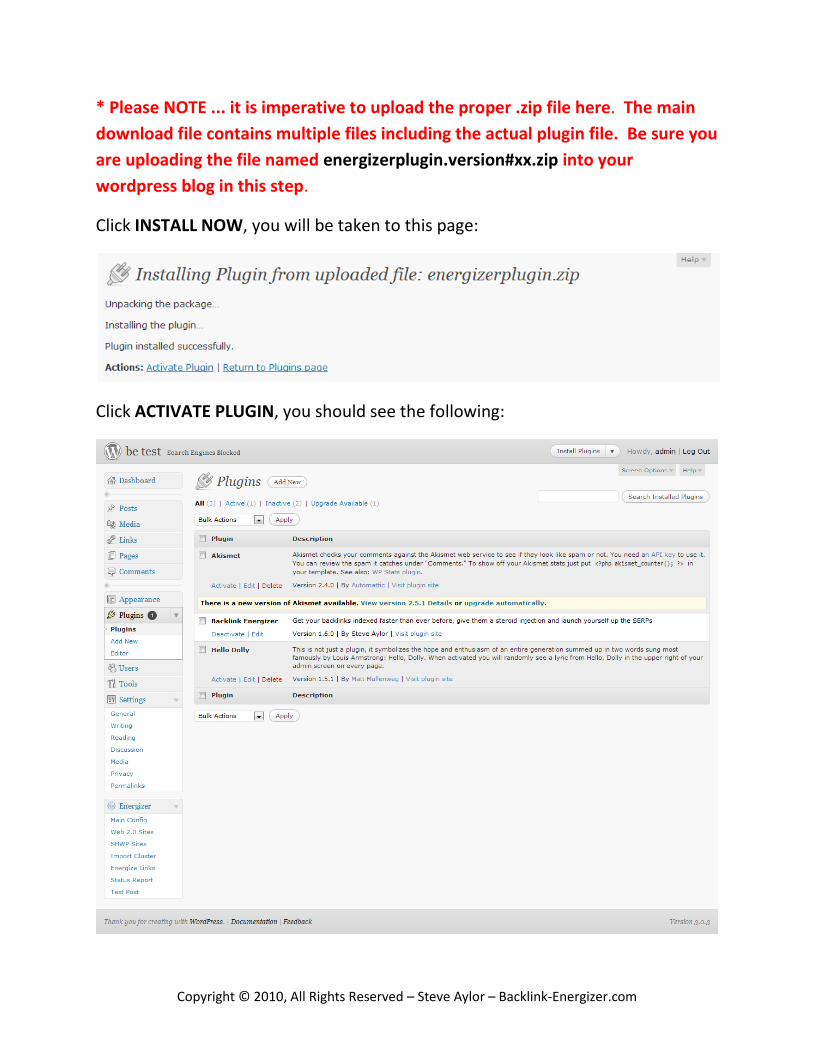
* Please NOTE ... it is imperative to upload the proper .zip file here. The main
download file contains multiple files including the actual plugin file. Be sure you
are uploading the file named energizerplugin.version#xx.zip into your
wordpress blog in this step.
Click INSTALL NOW, you will be taken to this page:
Click ACTIVATE PLUGIN, you should see the following:

Copyright © 2010, All Rights Reserved – Steve Aylor – Backlink-Energizer.com
Congratulations, you have successfully installed Backlink Energizer – in the next
step, you will sign up to some web 2.0 sites, ready to start Energizing your
backlinks.
To UPGRADE from a previous version of the Backlink Energizer plugin, locate the
plugin from the Plugins page (shown above). Check the box next to Backlink
Energizer and click DELETE. Once the plugin is deleted, install the new version as
detailed above.
Please visit the video tutorials for the Upgrade / Update steps if you need a
visual aid for this process.
http://www.backlink-energizer.com/energizervids [ Video #4 ]

Copyright © 2010, All Rights Reserved – Steve Aylor – Backlink-Energizer.com
Registering web 2.0
Accounts Before you start using the plugin, you will need to sign up to a few web 2.0 sites –
Backlink Energizer is compatible with the following web 2.0 sites:
- WordPress.com
- TypePad.com
- Blogger.com
- LiveJournal.com
- Tumblr.com
- Multiply.com
- Xanga.com
- Posterous.com
If you bought BLISS Cluster Paks, we have done all the hard work for you – there
will be no need to register for each web 2.0 site manually. You can skip this
section and all the hard work ... and go right to the Import Cluster section.
If you haven’t yet purchased your BLISS Cluster Paks, you can do so at this link:
www.backlink-energizer.com/bliss2/
If you’d prefer to sign up for each web 2.0 site yourself, you may do so –
instructions are included in this section.
However; before you do we really think you should watch the video on the
cluster site import feature and see if creating those web 2.0 sites and accounts
is worth all the effort - when you can do it all in a few clicks! Watch the video
labeled Cluster Site Import.
Link to Videos: http://www.backlink-energizer.com/energizervids/
Copyright © 2010, All Rights Reserved – Steve Aylor – Backlink-Energizer.com
It is not essential to register for all web 2.0 sites in order for Backlink Energizer to
work – providing there is one or more web 2.0 account (including your own self
hosted WordPress sites) for Backlink Energizer to post to.
Once you have registered, and entered the necessary details to give the plugin
access to these accounts – building backlinks is a simple as pushing a button.
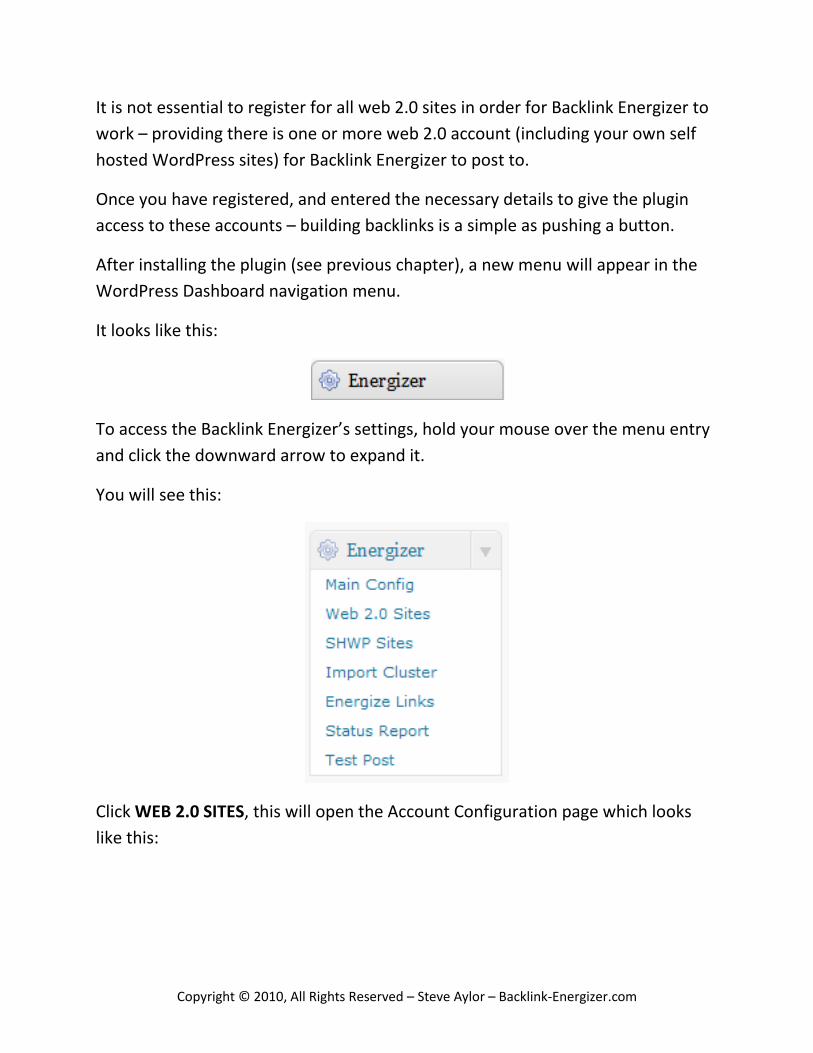
After installing the plugin (see previous chapter), a new menu will appear in the
WordPress Dashboard navigation menu.
It looks like this:
To access the Backlink Energizer’s settings, hold your mouse over the menu entry
and click the downward arrow to expand it.
You will see this:
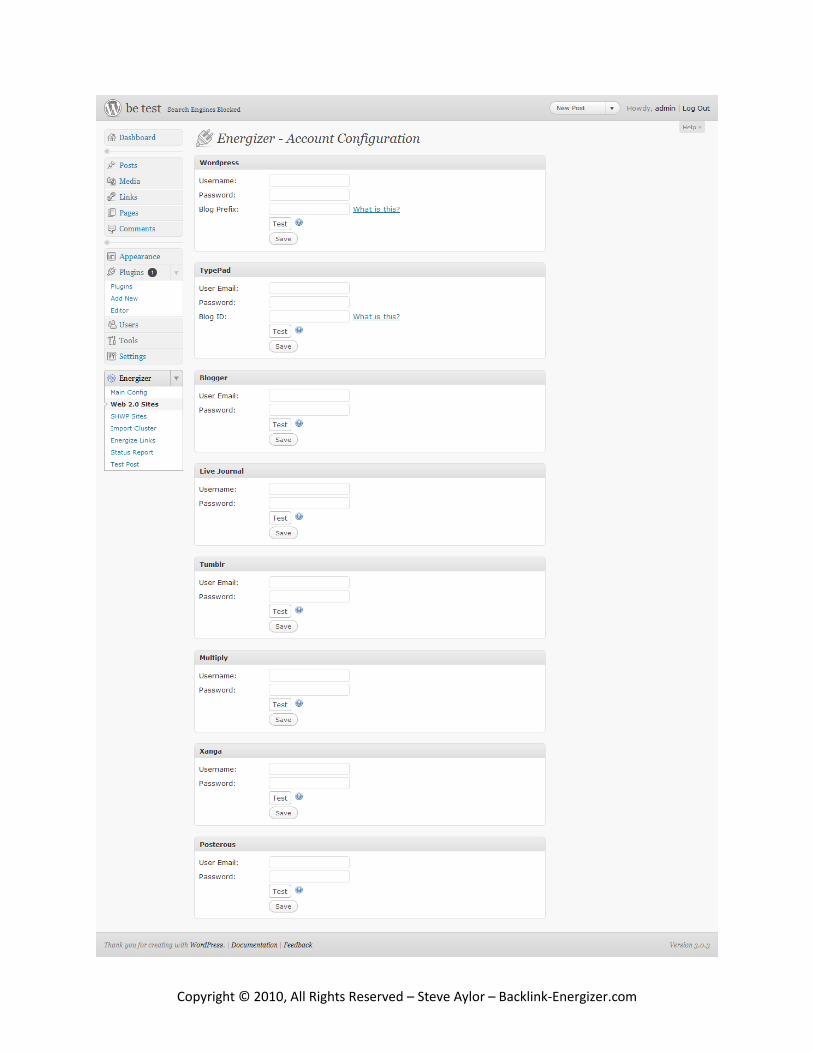
Click WEB 2.0 SITES, this will open the Account Configuration page which looks
like this:
Copyright © 2010, All Rights Reserved – Steve Aylor – Backlink-Energizer.com

Copyright © 2010, All Rights Reserved – Steve Aylor – Backlink-Energizer.com
If your web browser supports tabbed browsing, it is a good idea to keep this page
open whilst signing up to the various web 2.0 sites in another tab. This will allow
you to copy/paste the information between the tabs.
Signing up to all the web 2.0 sites is relatively simple, however, we will detail the
process for each. There will be certain information from the registration process
that you will need to enter on the Account Configuration page. Remember to
keep a note of the email addresses, usernames and passwords associated with
these accounts as you will to use them later – to make it easier, we will mark this
information with (make a note of this)

Copyright © 2010, All Rights Reserved – Steve Aylor – Backlink-Energizer.com
WordPress.com – http://wordpress.com/signup/
To sign up to WordPress, click the link above or type it into your browser. You will
see the following sign up form:
Enter the following details:
Username: This will be the name you use to log in to your blog on WordPress.com
(make a note of this)
Password: Choose a secure password you will remember, you will need to enter it
twice (make a note of this)
Copyright © 2010, All Rights Reserved – Steve Aylor – Backlink-Energizer.com
E-mail address: Enter a valid email address as you will be sent a confirmation
Click the Legal Flotsam checkbox to confirm you agree to the terms of service.
Make sure “Gimme a blog!” is selected
Click Next
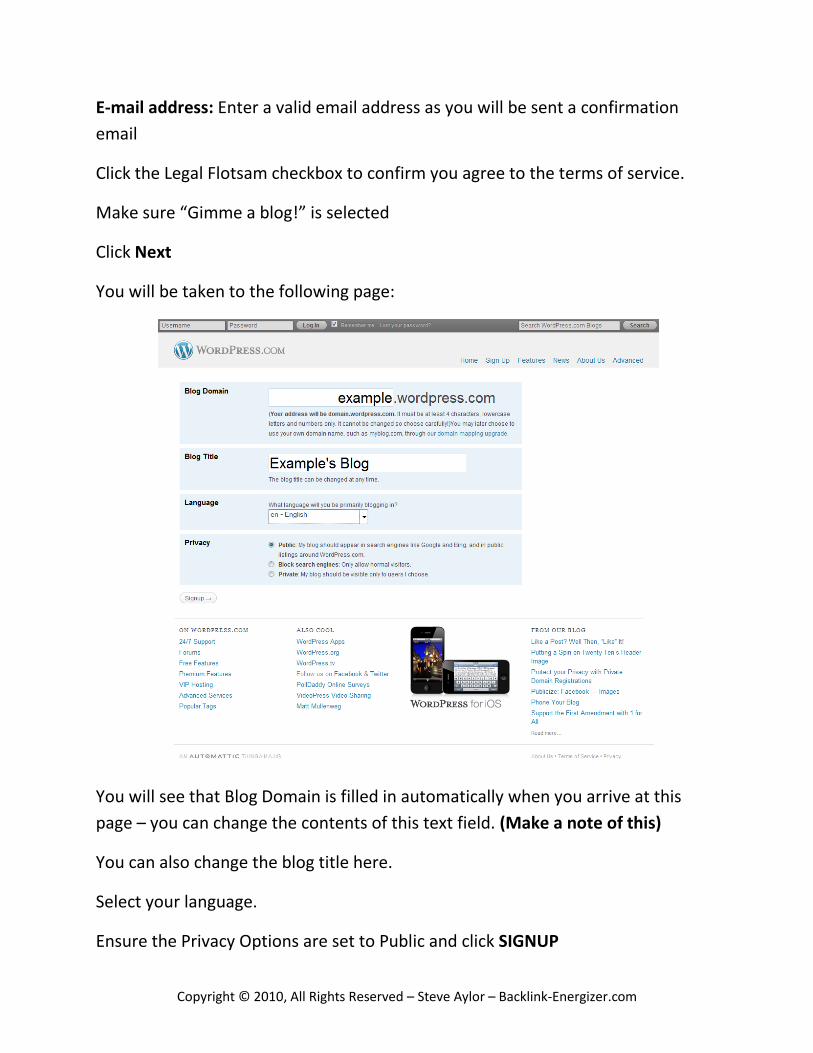
You will be taken to the following page:
You will see that Blog Domain is filled in automatically when you arrive at this
page – you can change the contents of this text field. (Make a note of this)
You can also change the blog title here.
Select your language.
Ensure the Privacy Options are set to Public and click SIGNUP

Copyright © 2010, All Rights Reserved – Steve Aylor – Backlink-Energizer.com
A confirmation email will be sent to the email address you used to sign up with –
click the confirmation link in the email to activate your account. You will now be
able to log in to your account at WordPress.com with your username and
password.
You can now enter the necessary details on the plugin’s Account Configuration
page:
Enter the USERNAME, PASSWORD and BLOG PREFIX (blog domain) from the
previous step.
Click TEST.
A green check mark will appear if you have entered the details correctly,
alternately a red exclamation mark will appear if you have not.
Click SAVE.
Copyright © 2010, All Rights Reserved – Steve Aylor – Backlink-Energizer.com
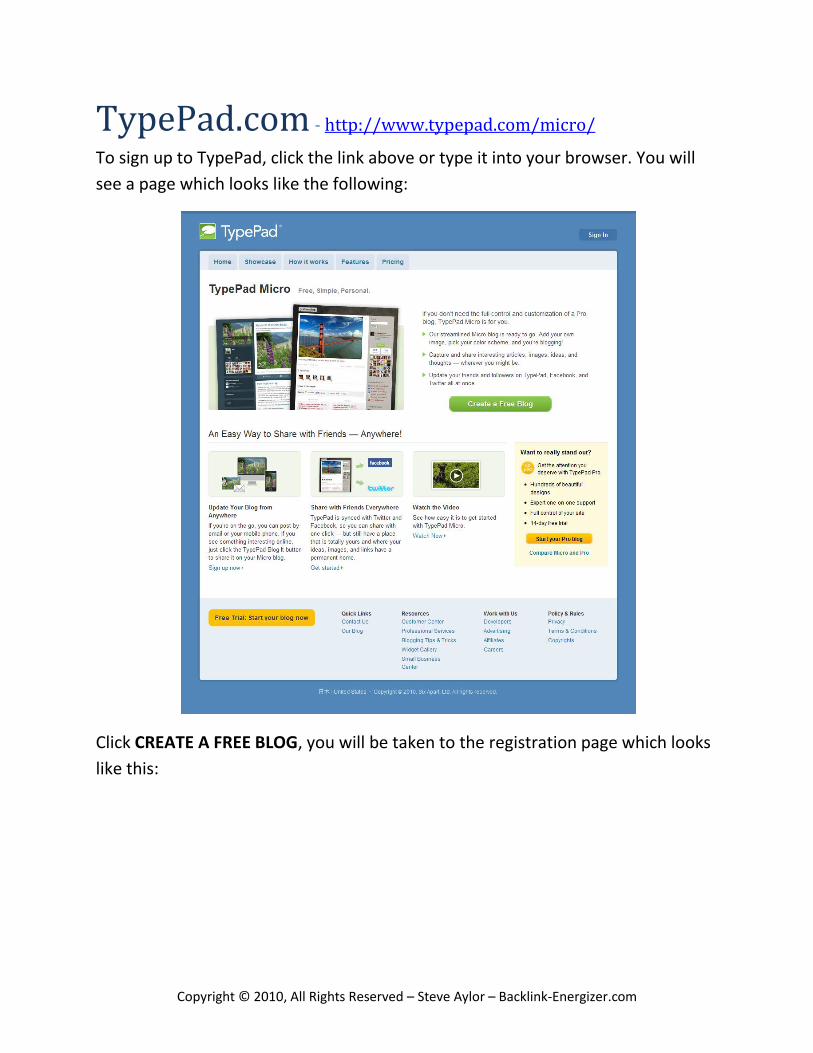
TypePad.com - http://www.typepad.com/micro/
To sign up to TypePad, click the link above or type it into your browser. You will
see a page which looks like the following:
Click CREATE A FREE BLOG, you will be taken to the registration page which looks
like this:

Copyright © 2010, All Rights Reserved – Steve Aylor – Backlink-Energizer.com
Enter the following details:
Name: Enter your name here
E-mail address: Enter a valid email address as any correspondence will be sent
here (password reset etc.), this will also be used to log in (make a note of this)
Password: Choose a secure password you will remember (make a note of this)
Click CREATE MY ACCOUNT.
You will be automatically logged in and taken to the TypePad Dashboard.
Additionally, you will be sent a welcome email, confirmation is not required.
There is one more piece of information you will need for the plugin Account
Configuration page.
From the TypePad Dashboard (top navigation menu), click BLOGS. Then select
your new blog from the drop down menu. Pay attention to the browser’s address
bar – you will notice a long number in the url, this is the Blog ID (make a note of
this). It may be easier to copy and paste this directly into the correct box on the
Account Configuration page.

Copyright © 2010, All Rights Reserved – Steve Aylor – Backlink-Energizer.com
You can now enter the necessary details on the plugin’s Account Configuration
page:
Enter the USER EMAIL, PASSWORD and BLOG ID from the previous step.
Click TEST.
A green check mark will appear if you have entered the details correctly,
alternately a red exclamation mark will appear if you have not.
Click SAVE.
Copyright © 2010, All Rights Reserved – Steve Aylor – Backlink-Energizer.com
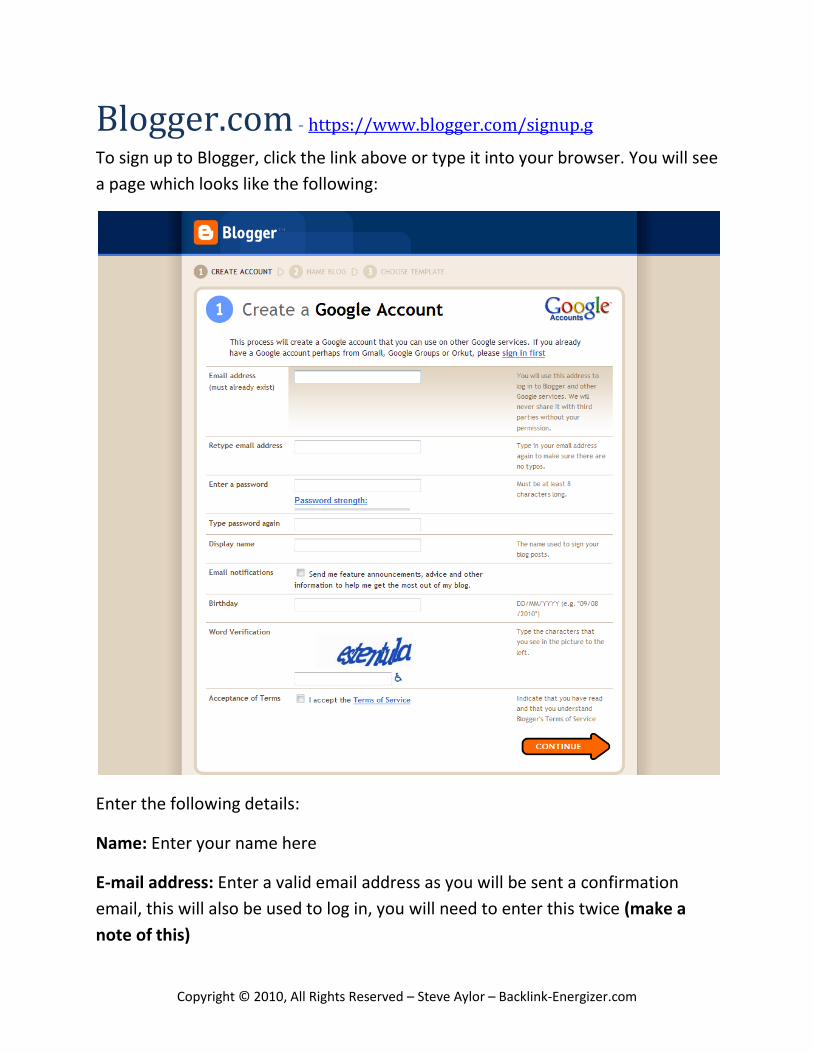
Blogger.com - https://www.blogger.com/signup.g
To sign up to Blogger, click the link above or type it into your browser. You will see
a page which looks like the following:
Enter the following details:
Name: Enter your name here
E-mail address: Enter a valid email address as you will be sent a confirmation
email, this will also be used to log in, you will need to enter this twice (make a
note of this)

Copyright © 2010, All Rights Reserved – Steve Aylor – Backlink-Energizer.com
Password: Choose a secure password you will remember, you will need to enter
this twice (make a note of this)
Display name: This will be used in your posts.
Email notification: You can leave this unchecked.
Birthday: Enter your date of birth here
Word verification: This is used to protect Blogger against automatic sign-ups, type
the characters you see in the image.
Acceptance of terms: Check this box to confirm you agree to the terms of service.
Click CONTINUE.
You will be taken to the following page:
Enter the following details:
Blog title: Choose a name for your blog
Blog address (URL): This will form part of the address that web visitors use to visit
your blog.

Copyright © 2010, All Rights Reserved – Steve Aylor – Backlink-Energizer.com
Click CONTINUE.
You will be taken to the following page:
Choose a template and click CONTINUE.
You will be taken to the following page:

Copyright © 2010, All Rights Reserved – Steve Aylor – Backlink-Energizer.com
During the process, you will receive an email from Google, you will need to click
the confirmation link inside.
You can now enter the necessary details on the plugin’s Account Configuration
page:
Enter the USER EMAIL and PASSWORD from the previous step.
Click TEST.
A green check mark will appear if you have entered the details correctly,
alternately a red exclamation mark will appear if you have not.
Click SAVE.

Copyright © 2010, All Rights Reserved – Steve Aylor – Backlink-Energizer.com
LiveJournal.com - https://www.livejournal.com/create.bml
To sign up to Live Journal, click the link above or type it into your browser. You
will see a page which looks like the following:
Enter the following details:
Username: This will be the name you use to log in to your blog (make a note of
this)
E-mail address: Enter a valid email address as you will be sent a confirmation

Copyright © 2010, All Rights Reserved – Steve Aylor – Backlink-Energizer.com
Password: Choose a secure password you will remember, you will need to enter
this twice (make a note of this)
Gender: Select Male, Female or Unspecified/Other
Birthdate: Enter your date of birth here
Prove You’re Human: This is used to protect Live Journal against automatic sign-
ups, type the two words you see in the image.
Click CREATE ACCOUNT.
You will be taken to the following page:
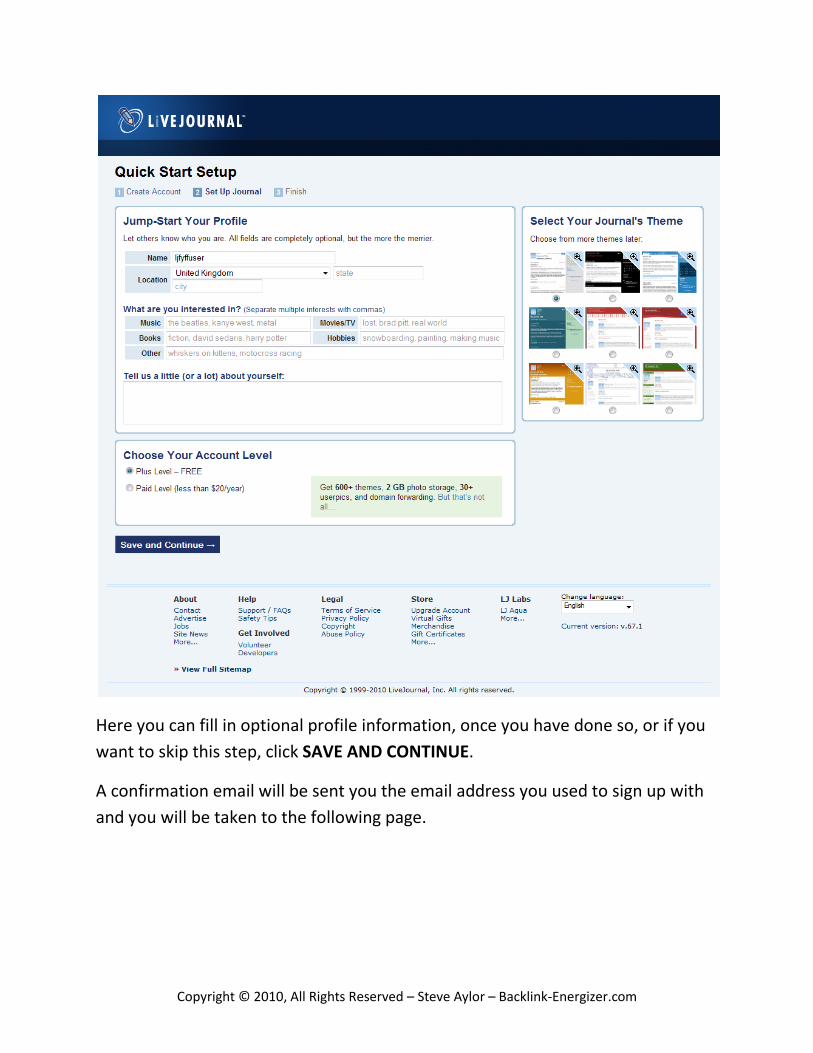
Copyright © 2010, All Rights Reserved – Steve Aylor – Backlink-Energizer.com
Here you can fill in optional profile information, once you have done so, or if you
want to skip this step, click SAVE AND CONTINUE.
A confirmation email will be sent you the email address you used to sign up with
and you will be taken to the following page.

Copyright © 2010, All Rights Reserved – Steve Aylor – Backlink-Energizer.com
A confirmation email will be sent to the email address you used to sign up with –
click the confirmation link in the email to activate your account.
You can now enter the necessary details on the plugin’s Account Configuration
page:
Enter the USERNAME and PASSWORD from the previous step.
Click TEST.
A green check mark will appear if you have entered the details correctly,
alternately a red exclamation mark will appear if you have not.
Click SAVE.

Copyright © 2010, All Rights Reserved – Steve Aylor – Backlink-Energizer.com
Tumblr.com – http://www.tumblr.com
To sign up to Tumblr, click the link above or type it into your browser. You will see
a page which looks like the following:
Enter the following details:
E-mail address: Enter a valid email address this will be used for correspondence
(password reset etc.), this will also be used to log in (make a note of this)
Password: Choose a secure password you will remember (make a note of this)
URL: This will form part of the address that web visitors use to visit your blog.

Copyright © 2010, All Rights Reserved – Steve Aylor – Backlink-Energizer.com
Click SIGN UP AND START POSTING
You will be taken to the following page:
This is used to protect Tumblr against automatic sign-ups, type the two words you
see in the image.
Click I’M HUMAN!
You will be logged in automatically and taken to the Tumblr Dashboard.
You can now enter the necessary details on the plugin’s Account Configuration
page:

Copyright © 2010, All Rights Reserved – Steve Aylor – Backlink-Energizer.com
Enter the USER EMAIL and PASSWORD from the previous step.
Click TEST.
A green check mark will appear if you have entered the details correctly,
alternately a red exclamation mark will appear if you have not.
Click SAVE.

Copyright © 2010, All Rights Reserved – Steve Aylor – Backlink-Energizer.com
Multiply.com - http://multiply.com/
To sign up to Multiply, click the link above or type it into your browser. You will
see a page which looks like the following:
Enter the following details:
User ID: This will form part of the address that web visitors use to visit your blog
(make a note of this)
Password: Choose a secure password you will remember (make a note of this)
First Name: Enter your first name
Last Name: Enter your last name

Copyright © 2010, All Rights Reserved – Steve Aylor – Backlink-Energizer.com
E-mail address: Enter a valid email address as you will be sent a confirmation
Date of Birth: Enter your date of birth here
Gender: Select Male or Female
Click REGISTER
You will be taken to the following page:
This is used to protect Multiply against automatic sign-ups, type the characters
you see in the image.
Click FINISH
You will be logged in and taken to the following page:

Copyright © 2010, All Rights Reserved – Steve Aylor – Backlink-Energizer.com
During this process you will be sent a confirmation email, click the confirmation
link.
You can now enter the necessary details on the plugin’s Account Configuration
page:
Enter the USER EMAIL (user ID) and PASSWORD from the previous step.
Click TEST.
A green check mark will appear if you have entered the details correctly,
alternately a red exclamation mark will appear if you have not.
Click SAVE.

Copyright © 2010, All Rights Reserved – Steve Aylor – Backlink-Energizer.com
Xanga.com - http://www.xanga.com/register.aspx
To sign up to Xanga, click the link above or type it into your browser. You will see
a page which looks like the following:
Enter the following details:
Username: This will be displayed on your profile. (make a note of this)
Password: Choose a secure password you will remember, you will need to enter
this twice (make a note of this)
Copyright © 2010, All Rights Reserved – Steve Aylor – Backlink-Energizer.com
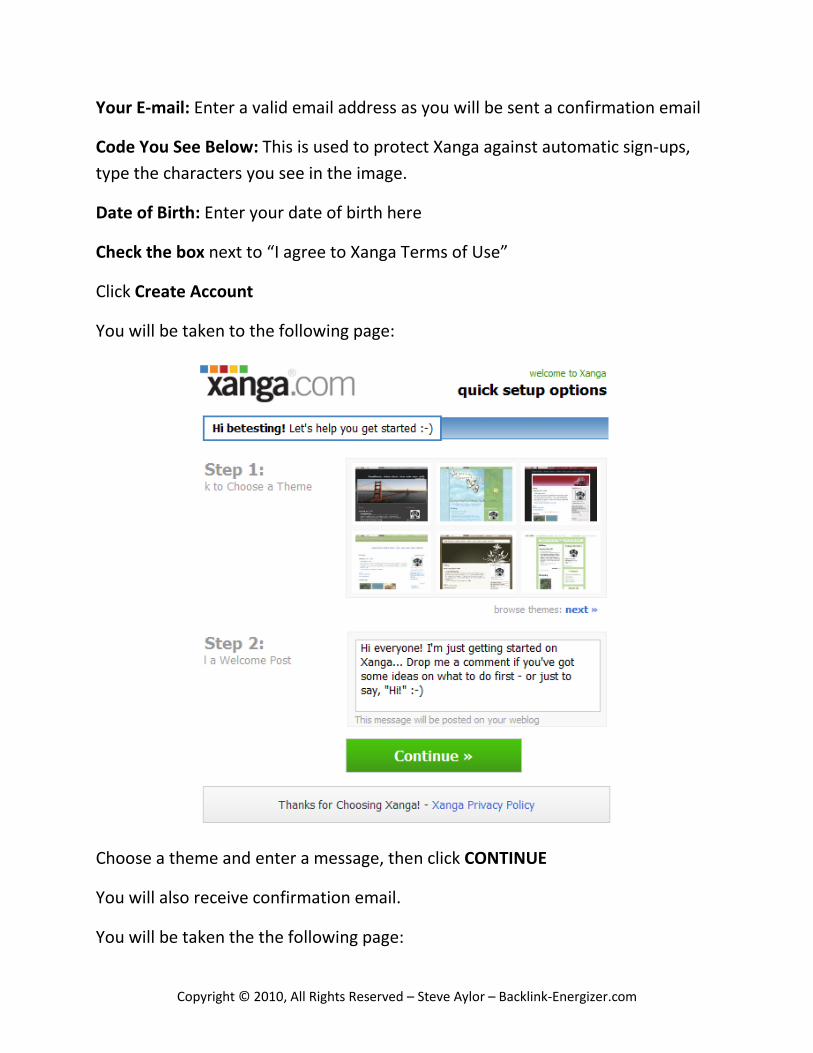
Your E-mail: Enter a valid email address as you will be sent a confirmation email
Code You See Below: This is used to protect Xanga against automatic sign-ups,
type the characters you see in the image.
Date of Birth: Enter your date of birth here
Check the box next to “I agree to Xanga Terms of Use”
Click Create Account
You will be taken to the following page:
Choose a theme and enter a message, then click CONTINUE
You will also receive confirmation email.
You will be taken the the following page:

Copyright © 2010, All Rights Reserved – Steve Aylor – Backlink-Energizer.com

Copyright © 2010, All Rights Reserved – Steve Aylor – Backlink-Energizer.com
You can now enter the necessary details on the plugin’s Account Configuration
page:
Enter the USERNAME and PASSWORD from the previous step.
Click TEST.
A green check mark will appear if you have entered the details correctly,
alternately a red exclamation mark will appear if you have not.
Click SAVE.

Copyright © 2010, All Rights Reserved – Steve Aylor – Backlink-Energizer.com
Posterous.com - https://posterous.com/main/register
To sign up to Posterous, click the link above or type it into your browser. You will
see a page which looks like the following:
Enter the following details:
E-mail address: Enter a valid email address as you will be sent a confirmation
Password: Choose a secure password you will remember
Site Address: This will form part of the address that web visitors use to visit your
blog
Click START POSTING
You can now enter the necessary details on the plugin’s Account Configuration
page:

Copyright © 2010, All Rights Reserved – Steve Aylor – Backlink-Energizer.com
Enter the EMAIL and PASSWORD from the previous step.
Click TEST.
A green check mark will appear if you have entered the details correctly,
alternately a red exclamation mark will appear if you have not.
Click SAVE.

Copyright © 2010, All Rights Reserved – Steve Aylor – Backlink-Energizer.com
Import Cluster To save you time, we offer a service where we create BLISS Clusters for you. To
find out more about our BLISS Cluster Paks click the following link: www.backlink-
energizer.com/bliss2/
Once you have your cluster.txt file, importing is easy.
In the WP Admin Dashboard, locate the Energizer plugin settings menu
Click IMPORT CLUSTER
You will be taken to the following page:
Click BROWSE, this will open a “File Upload” window. Locate the cluster.txt file on
your computer’s hard drive and click OPEN

Copyright © 2010, All Rights Reserved – Steve Aylor – Backlink-Energizer.com
Click IMPORT
Backlink Energizer will automatically import the cluster file and populate the
database with a set of web 2.0 accounts. We install the URLs to the blogs we're
posting to – so there is no need to keep a spreadsheet of URLs and passwords.

Copyright © 2010, All Rights Reserved – Steve Aylor – Backlink-Energizer.com
Self Hosted
WordPress (SHWP) Backlink Energizer allows you to automatically post content on one or even up to
10, of your own hosted WordPress blogs. You can choose to post ONLY to SHWP
blogs without using any web 2.0s, or a combination of SHWP and Web 2.0's, or
just Web 2.0s. Maximum flexibility.
First, you will need to enable remote posting on the destination blog.
You can view a video on setting up Self Hosted WordPress sites here:
http://www.backlink-energizer.com/blenergizertutvids.html alternatively, read on
for full details.
Log in to the destination blog’s WordPress admin panel (usually
yoursite.com/wp-admin) with your administrator username and password.
When you log in, you will be taken to the WP Dashboard.
Copyright © 2010, All Rights Reserved – Steve Aylor – Backlink-Energizer.com
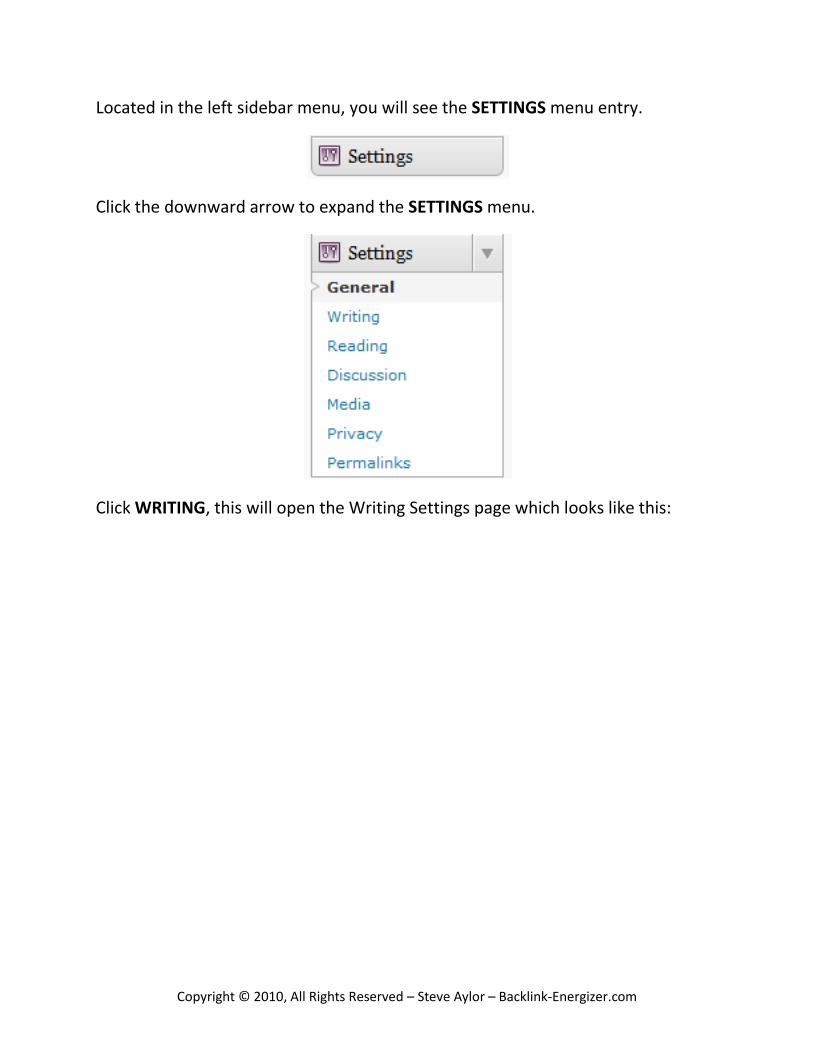
Located in the left sidebar menu, you will see the SETTINGS menu entry.
Click the downward arrow to expand the SETTINGS menu.
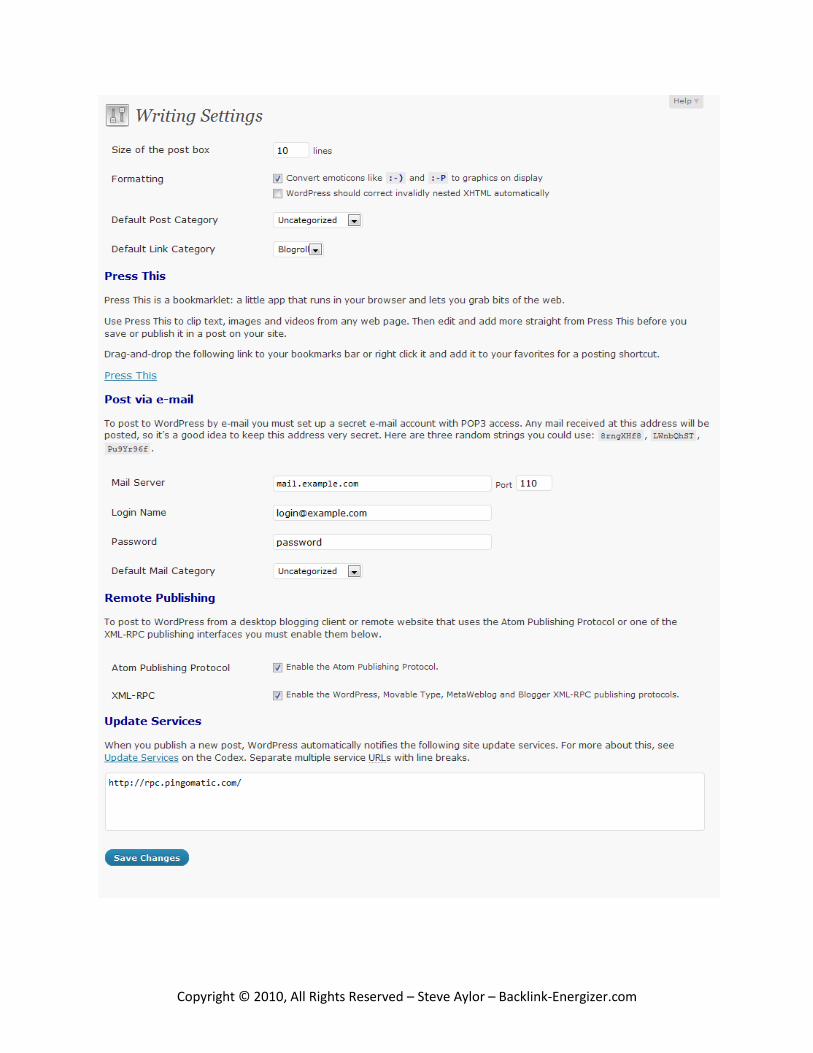
Click WRITING, this will open the Writing Settings page which looks like this:
Copyright © 2010, All Rights Reserved – Steve Aylor – Backlink-Energizer.com
Copyright © 2010, All Rights Reserved – Steve Aylor – Backlink-Energizer.com
Place a checkmark next to XML-RPC, this will allow the Backlink Energizer to post
to the destination blog.
Click SAVE CHANGES
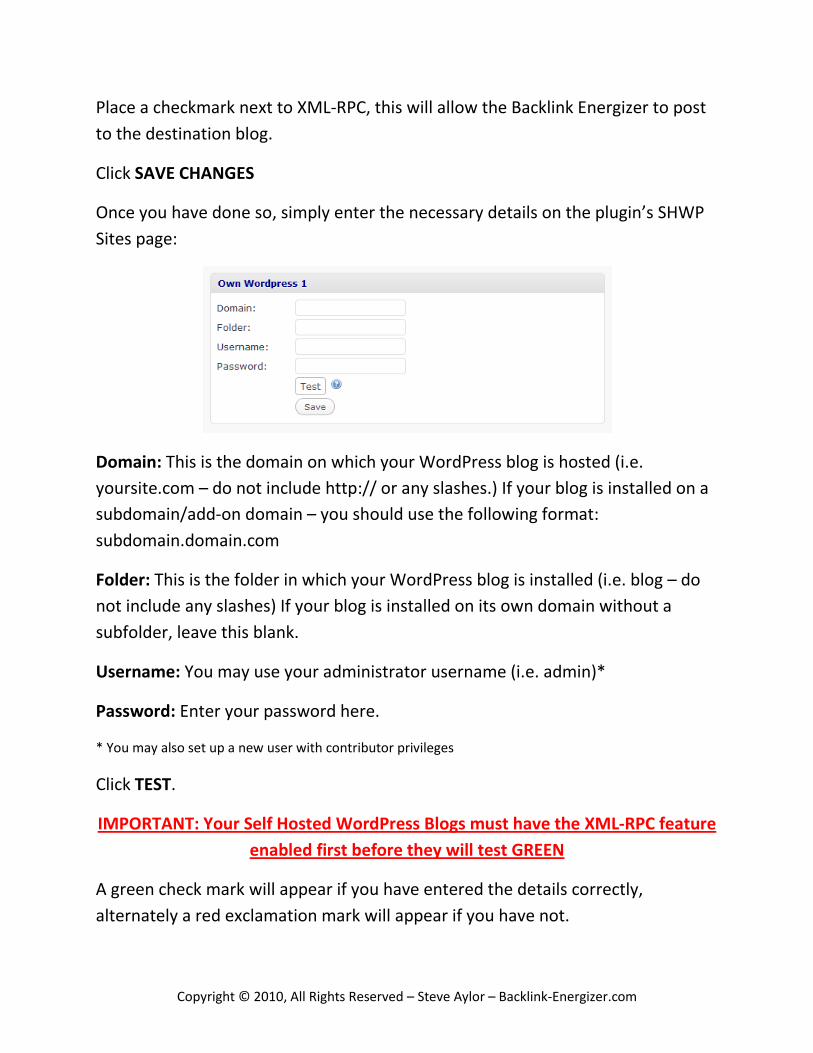
Once you have done so, simply enter the necessary details on the plugin’s SHWP
Sites page:
Domain: This is the domain on which your WordPress blog is hosted (i.e.
yoursite.com – do not include http:// or any slashes.) If your blog is installed on a
subdomain/add-on domain – you should use the following format:
subdomain.domain.com
Folder: This is the folder in which your WordPress blog is installed (i.e. blog – do
not include any slashes) If your blog is installed on its own domain without a
subfolder, leave this blank.
Username: You may use your administrator username (i.e. admin)*
Password: Enter your password here.
* You may also set up a new user with contributor privileges
Click TEST.
IMPORTANT: Your Self Hosted WordPress Blogs must have the XML-RPC feature
enabled first before they will test GREEN
A green check mark will appear if you have entered the details correctly,
alternately a red exclamation mark will appear if you have not.

Copyright © 2010, All Rights Reserved – Steve Aylor – Backlink-Energizer.com
Click SAVE.
TIP: You should turn off commenting on your Self Hosted WordPress blogs
TIP: Your Self Hosted WordPress blogs should be visible to search engines.
Screenshot below.
Copyright © 2010, All Rights Reserved – Steve Aylor – Backlink-Energizer.com
Test post Now that you have configured the plugin, it is a good idea to create a test post.
This will be the first post on each of the accounts – and will ensure they are
configured correctly.
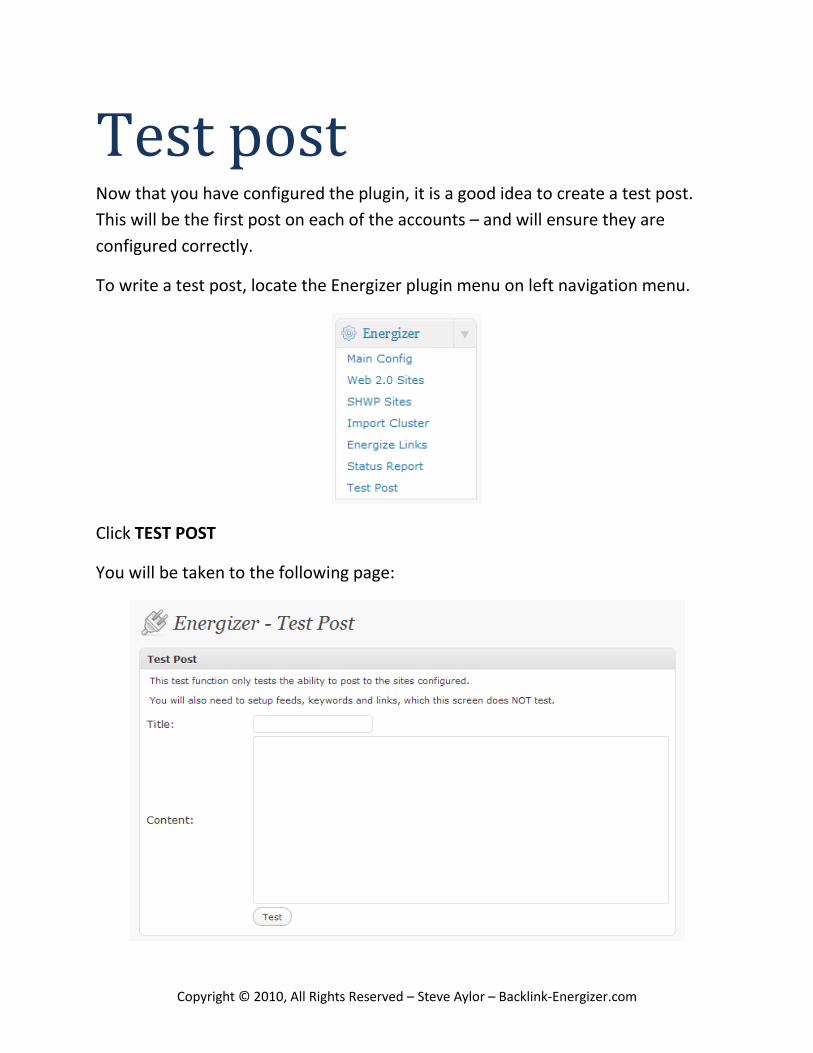
To write a test post, locate the Energizer plugin menu on left navigation menu.
Click TEST POST
You will be taken to the following page:

Copyright © 2010, All Rights Reserved – Steve Aylor – Backlink-Energizer.com
Enter a title for your test post and write a couple of paragraphs.
Click TEST
It may take a few moments for the test post to appear on all your web 2.0 sites.
Check each account to ensure the test post was successful.
IMPORTANT NOTE: CRON is not used when creating a test post, therefore the
test post will not place any backlinks on your web 2.0 sites. Test Post is used
simply to test the posting and connectivity between the web 2.0 and SHWP sites
installed to make sure we can get content on the sites properly.
ADVANCED TIP: If you want to create a test post with backlinks included, you
can do so by manually running the Cron Job – video details here:
http://www.backlink-energizer.com/blenergizertutvids.html
Now that you have configured and tested the Backlink Energizer plugin with your
web 2.0 site, there is one last step you need to take before you are ready to begin
using it to build backlinks.

Copyright © 2010, All Rights Reserved – Steve Aylor – Backlink-Energizer.com
Setting up a CRON JOB A cron job is a server process which enables users to schedule scripts to run
automatically at a certain time or date. The Backlink Energizer plugin uses cron
jobs to automatically post posts and backlinks to your web 2.0 sites.
To set up a cron job, locate the Energizer plugin menu on left navigation menu.
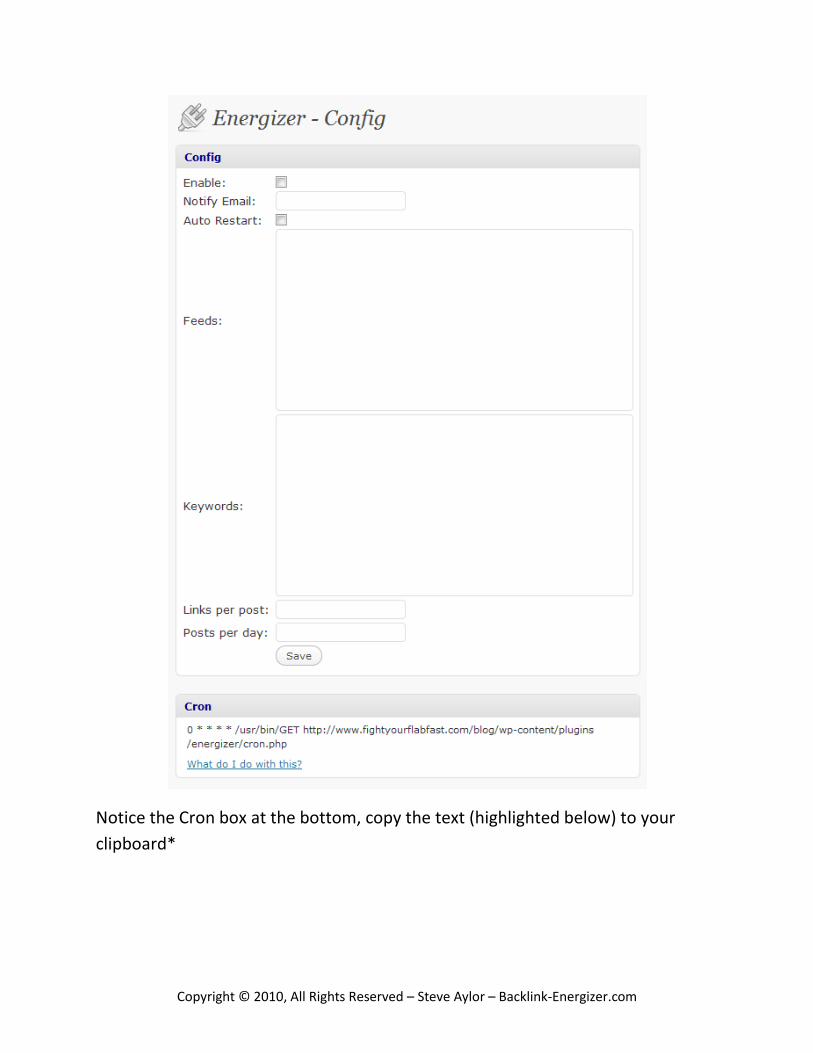
Click MAIN CONFIG
You will be taken to the following page:
Copyright © 2010, All Rights Reserved – Steve Aylor – Backlink-Energizer.com
Notice the Cron box at the bottom, copy the text (highlighted below) to your
clipboard*
Copyright © 2010, All Rights Reserved – Steve Aylor – Backlink-Energizer.com
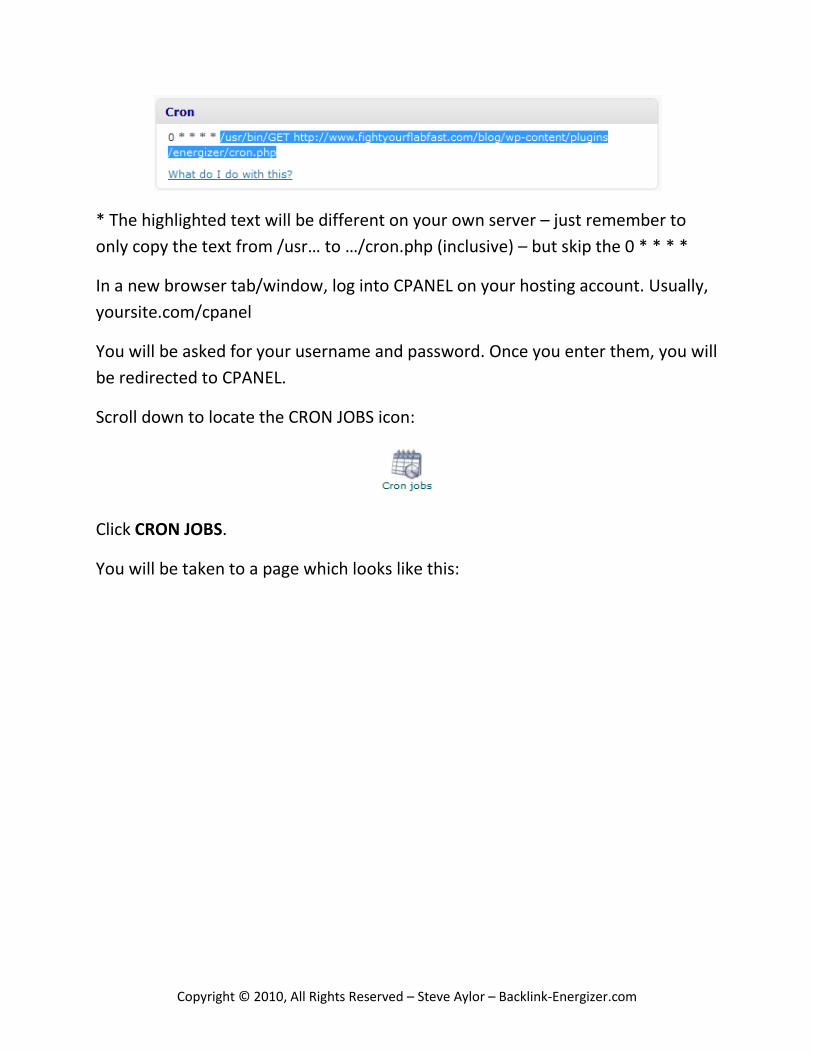
* The highlighted text will be different on your own server – just remember to
only copy the text from /usr… to …/cron.php (inclusive) – but skip the 0 * * * *
In a new browser tab/window, log into CPANEL on your hosting account. Usually,
yoursite.com/cpanel
You will be asked for your username and password. Once you enter them, you will
be redirected to CPANEL.
Scroll down to locate the CRON JOBS icon:
Click CRON JOBS.
You will be taken to a page which looks like this:

Copyright © 2010, All Rights Reserved – Steve Aylor – Backlink-Energizer.com
There are only two settings you need to change.
Common Settings: Select “Once an hour”
Command: Paste the text you copied from the cron box earlier here
Click ADD NEW CRON JOB
You can now log out of CPANEL
ADVANCED TIP: If you have multiple blogs, and in turn multiple cron jobs
running – we recommend using http://www.setcronjob.com to manage them.

Copyright © 2010, All Rights Reserved – Steve Aylor – Backlink-Energizer.com
Full details can be found on our tutorial videos page here: http://www.backlink-
energizer.com/blenergizertutvids.html
Copyright © 2010, All Rights Reserved – Steve Aylor – Backlink-Energizer.com
Using Backlink
Energizer Now that you have configured the plugin and set up your cron job, you are ready
to begin using the plugin to begin building your backlinks.
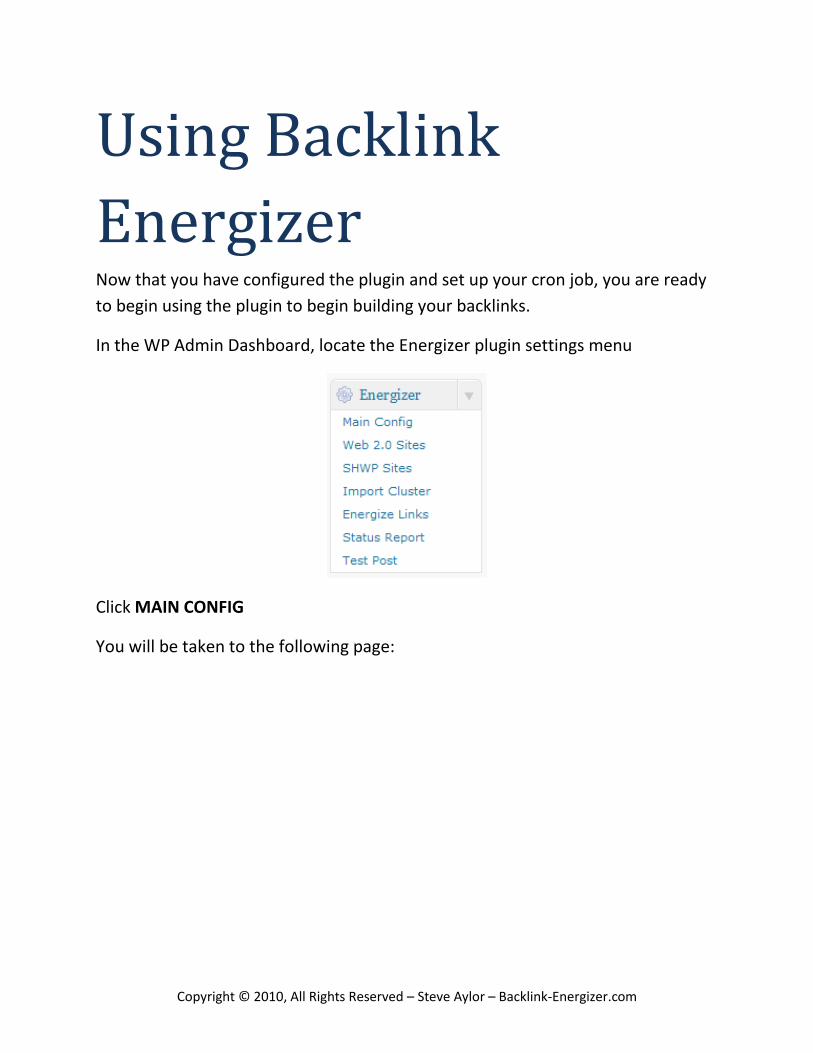
In the WP Admin Dashboard, locate the Energizer plugin settings menu
Click MAIN CONFIG
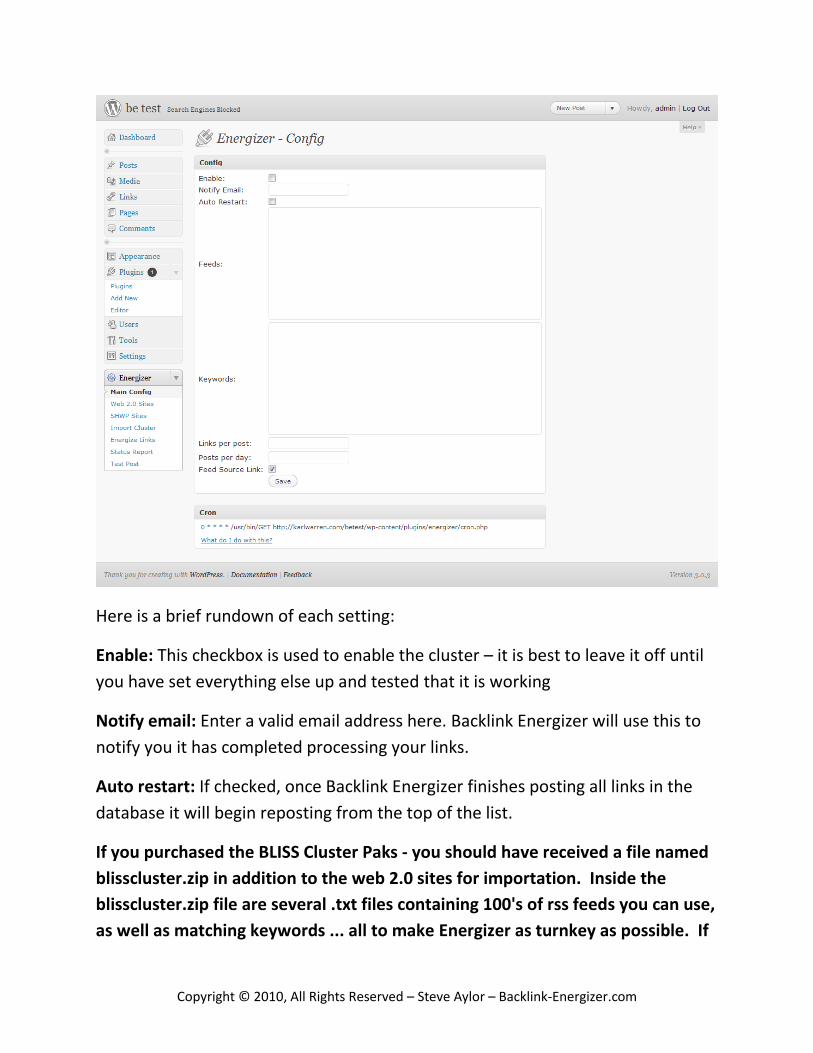
You will be taken to the following page:
Copyright © 2010, All Rights Reserved – Steve Aylor – Backlink-Energizer.com
Here is a brief rundown of each setting:
Enable: This checkbox is used to enable the cluster – it is best to leave it off until
you have set everything else up and tested that it is working
Notify email: Enter a valid email address here. Backlink Energizer will use this to
notify you it has completed processing your links.
Auto restart: If checked, once Backlink Energizer finishes posting all links in the
database it will begin reposting from the top of the list.
If you purchased the BLISS Cluster Paks - you should have received a file named
blisscluster.zip in addition to the web 2.0 sites for importation. Inside the
blisscluster.zip file are several .txt files containing 100's of rss feeds you can use,
as well as matching keywords ... all to make Energizer as turnkey as possible. If

Copyright © 2010, All Rights Reserved – Steve Aylor – Backlink-Energizer.com
you don't already have the BLISS Cluster Paks - save hours of time and hassle
and go here to gets yours now.
http://www.backlink-energizer.com/bliss2/
Feeds: Paste 10-15 FULL TEXT RSS feeds in this box - these are used to generate
post content. For best results, ensure the feeds are on the same topic. When
pasting feeds, ensure each feed is on a new line – the posts generated will appear
on the web 2.0 sites complete with backlinks. You should not use YOUR
Commercial Intent $$$ Niche related rss feeds [ supplied as bonus items in Bliss
Paks ]
Keywords: Enter keywords related to the topic of the feeds (one per line). You
should NOT user your Commercial Intent $$$ sites keywords here - use as many
as you can but < 250 [ supplied as bonus items in Bliss Paks ]
Links per post: This determines how many links Backlink Energizer will attach to
the bottom of each post (max 5 recommended when posting to web 2.0 sites -
higher maximums are possible if posting ONLY to your SHWP blog networks.)
Posts per day: This determines how many times Backlink Energizer should post
per day* (max 12 recommended when posting to web 2.0 sites - higher
maximums are possible if posting ONLY to your SHWP blog networks.)
* The maximum number of posts per day possible is 24, however, it is
recommended you do not exceed 12 posts per day.
Feed Source Url: When checked, Backlink Energizer places a link back to the
source of the RSS feed content – this setting may help you comply with the TOS of
certain RSS Feeds - Recommended ON/Checked
Once you have filled in each section, click SAVE
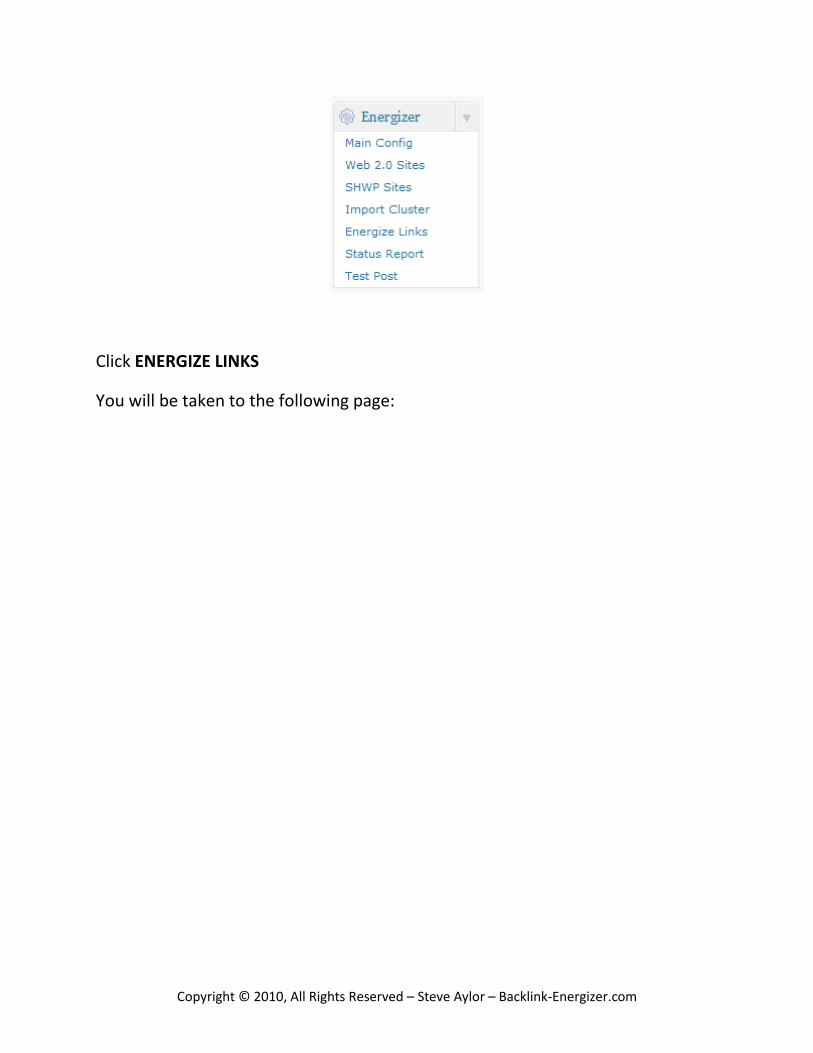
Next, in the WP Admin Dashboard, locate the Energizer plugin settings menu
Copyright © 2010, All Rights Reserved – Steve Aylor – Backlink-Energizer.com
Click ENERGIZE LINKS
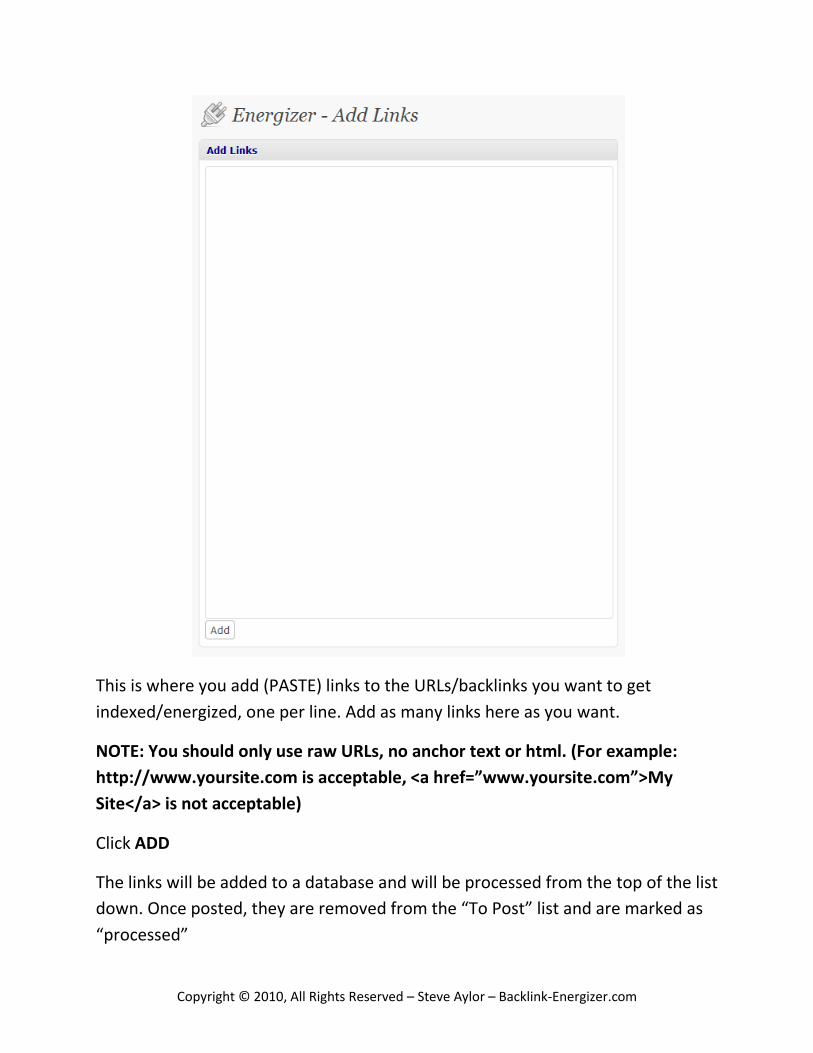
You will be taken to the following page:
Copyright © 2010, All Rights Reserved – Steve Aylor – Backlink-Energizer.com
This is where you add (PASTE) links to the URLs/backlinks you want to get
indexed/energized, one per line. Add as many links here as you want.
NOTE: You should only use raw URLs, no anchor text or html. (For example:
http://www.yoursite.com is acceptable, <a href=”www.yoursite.com”>My
Site</a> is not acceptable)
Click ADD
The links will be added to a database and will be processed from the top of the list
down. Once posted, they are removed from the “To Post” list and are marked as
“processed”

Copyright © 2010, All Rights Reserved – Steve Aylor – Backlink-Energizer.com
That’s it, once you’re happy that you’ve completed the process above – go back
to the Config screen and ensure that ENABLE is checked. This will start the
process and populate your web 2.0 sites with automatically generated content
from the RSS feeds, complete with the backlinks you added on the links page.
ADVANCED TIP: As you begin to add more backlinks to the system, it is
recommended that you randomize your lists. For example, if you are scaling up
your list of backlinks to over 500 links per day, it makes sense to randomize. We
have found http://www.random.org/lists/?mode=advanced to be very useful.
Paste your list of backlinks into the text box and use the As Bare-bones text
document option to randomize your list of backlinks.

Copyright © 2010, All Rights Reserved – Steve Aylor – Backlink-Energizer.com
Status Report The last feature of the Backlink Energizer plugin is the status report page which is
accessible by clicking STATUS REPORT on the Energizer settings menu
The page looks like this:
This section is for information only, it is not possible to re-order or edit the list of
pending/posted links from this section. You can copy-paste from this page for
your own records, for tracking and for re-ordering your backlinks via the Energize
Links page.
Links added: This is the number of links you have added on the LINKS page, yet to
be processed
Links complete: This is the number of links which have been processed

Copyright © 2010, All Rights Reserved – Steve Aylor – Backlink-Energizer.com
WARNING: Clear links will clear all the statistics and links in the system
permanently. If you click this button, you will have to re-add your backlinks.
Before clicking this button, make sure you copy and paste your links into a text
file. We are not responsible for saving your backlinks lists.


