
CoSN
Drupal User Manual
August 20, 2013
Carolyn Pierce Tate, Senior Project Manager
COSN: DRUPAL USER MANUAL
2 8136 Old Keene Mill Road, Suite A-207, Springfield, VA 22152 | 703.451.8675 | www.balanceinteractive.com
Table of Contents
Introduction ........................................................................................................................................................... 6
Drupal Defined ........................................................................................................................................................... 6
Drupal Workspace ...................................................................................................................................................... 6
Drupal Menu .......................................................................................................................................................... 6
Editing Tabs ............................................................................................................................................................ 6
My Workbench ...................................................................................................................................................... 7
Navigation ................................................................................................................................................................. 7
WYSIWYG Editor......................................................................................................................................................... 7
Search ........................................................................................................................................................................ 7
Ways of Displaying Content ....................................................................................................................................... 7
Nodes ..................................................................................................................................................................... 7
Views...................................................................................................................................................................... 7
Nodequeues........................................................................................................................................................... 8
Using Drupal .......................................................................................................................................................... 9
Logging In .................................................................................................................................................................. 9
Editing and Deleting Content ............................................................................................................................... 10
Finding and Editing Content ..................................................................................................................................... 10
Browsing .............................................................................................................................................................. 10
Content List .......................................................................................................................................................... 10
Remove Existing Content ......................................................................................................................................... 10
Delete Content ..................................................................................................................................................... 10
Unpublish Content ............................................................................................................................................... 10
Reverting to Previous Version .................................................................................................................................. 11
Edit Content Blocks .................................................................................................................................................. 11
Edit Individual Items ................................................................................................................................................ 11
Editing the Home Page ......................................................................................................................................... 12
1 – Homepage Slide (Nodequeue) ....................................................................................................................... 12
2 – Events (View) ................................................................................................................................................. 13
3 – News (View) ................................................................................................................................................... 13
4 – Featured Sponsors (View) .............................................................................................................................. 13
5 – Recent Blog Posts (View) ................................................................................................................................ 13

COSN: DRUPAL USER MANUAL
3 8136 Old Keene Mill Road, Suite A-207, Springfield, VA 22152 | 703.451.8675 | www.balanceinteractive.com
6 – Featured Report (Nodequeue) ....................................................................................................................... 13
7 – Featured Focus Area (Nodequeue) ................................................................................................................ 13
8 – CoSN in Photos (Content Block) ..................................................................................................................... 13
9 – Twitter (View)................................................................................................................................................. 13
10 – About CoSN (Content Block) ........................................................................................................................ 13
11 – Footer: Contact/ Copyright (Content Block) ................................................................................................ 13
Editing Blocks on the Home Page ............................................................................................................................ 14
To edit content in a block ..................................................................................................................................... 14
To add or delete a block ....................................................................................................................................... 14
Creating Content .................................................................................................................................................. 15
Types of Content ...................................................................................................................................................... 15
Notes about Adding Content.................................................................................................................................... 16
Add New Pages .................................................................................................................................................... 16
Summary Text ...................................................................................................................................................... 16
Notes on Additional Tabs ..................................................................................................................................... 16
Notes on Required Fields ..................................................................................................................................... 17
Notes on Images .................................................................................................................................................. 17
Add an Award .......................................................................................................................................................... 18
Add a Blog entry ...................................................................................................................................................... 19
Add a Callout ........................................................................................................................................................... 19
Add an Event ............................................................................................................................................................ 19
Add Focus Area ........................................................................................................................................................ 20
Add a Member Spotlight .......................................................................................................................................... 21
Add a Page ............................................................................................................................................................... 21
Add a Press Release ................................................................................................................................................. 22
Add a resource ......................................................................................................................................................... 23
Add a Slide ............................................................................................................................................................... 24
Add a Sponsor Profile ............................................................................................................................................... 25
Add a Staff Bio ......................................................................................................................................................... 25
Add State Chapter .................................................................................................................................................... 26
Add a Webform ........................................................................................................................................................ 27
Additional Webform Info ..................................................................................................................................... 28
Add a Webinar ......................................................................................................................................................... 28

COSN: DRUPAL USER MANUAL
4 8136 Old Keene Mill Road, Suite A-207, Springfield, VA 22152 | 703.451.8675 | www.balanceinteractive.com
Using the WYSIWYG Editor .................................................................................................................................. 30
Moving Content from Other Documents .................................................................................................................. 30
Apply Formatting and Styles .................................................................................................................................... 31
Make Links to Other Websites ................................................................................................................................. 31
Make Links to Other Pages on the Site..................................................................................................................... 31
Style Tables .............................................................................................................................................................. 32
Apply styles in Firefox .......................................................................................................................................... 32
Apply Styles in Internet Explorer and Chrome ..................................................................................................... 32
Upload and Insert Images ........................................................................................................................................ 33
Upload and Link to PDFs .......................................................................................................................................... 33
Advanced Functionality ....................................................................................................................................... 35
Navigation Menus.................................................................................................................................................... 35
Reorder Links in the Navigation ........................................................................................................................... 35
Add New Item to the Menu ................................................................................................................................. 35
Add Menu Item in Additional Locations .............................................................................................................. 36
Add Menu Item to External Site........................................................................................................................... 36
Managing Blocks ..................................................................................................................................................... 36
Adding or Deleting a Block from a Region ........................................................................................................... 36
Removing a Block from a Particular Page ............................................................................................................ 37
Manage Comments ................................................................................................................................................. 37
Approve Comments ............................................................................................................................................. 37
Edit or Remove Comments .................................................................................................................................. 38
Editing Taxonomy ..................................................................................................................................................... 38
Add to a Taxonomy Term ..................................................................................................................................... 38
To Edit a Taxonomy Term ..................................................................................................................................... 38
To Remove a Term from a Taxonomy ................................................................................................................... 39
Views ........................................................................................................................................................................ 39
URL Redirects ........................................................................................................................................................... 40
Style Sheets .............................................................................................................................................................. 40
Users ........................................................................................................................................................................ 41
Add/Delete Users ................................................................................................................................................. 41
Defined Roles ....................................................................................................................................................... 41
Add a Role ............................................................................................................................................................ 41
Reports ..................................................................................................................................................................... 41
COSN: DRUPAL USER MANUAL
5 8136 Old Keene Mill Road, Suite A-207, Springfield, VA 22152 | 703.451.8675 | www.balanceinteractive.com
Google Analytics .................................................................................................................................................. 43
Accessing Google Analytics ...................................................................................................................................... 43
Viewing Reports ....................................................................................................................................................... 43
Adding, Editing & Deleting Filters ............................................................................................................................ 44
Managing Users ....................................................................................................................................................... 45
Managing Profiles .................................................................................................................................................... 45
Help .......................................................................................................................................................................... 46

COSN: DRUPAL USER MANUAL
6 8136 Old Keene Mill Road, Suite A-207, Springfield, VA 22152 | 703.451.8675 | www.balanceinteractive.com
Introduction
DRUPAL DEFINED
Drupal is a content management system (CMS). Its goal is to help users compose and publish website content
such as publications, announcements, events, and other product information.
The content on a Drupal-based site is stored in a database. When visitors view a page, Drupal gets the relevant
bits of content from the database and places all of the right components on the page template. This makes it
easy to quickly for someone to add or change content, without knowledge of HTML or other web technologies.
There are two views of the content in the database:
A public view of the site with all the design elements applied and no option to edit
A back-end view of the site. Content editors and publishers must be logged in to view the back-end.
When logged in, they have permissions to edit, add, and publish content.
DRUPAL WORKSPACE
Drupal Menu
Items in the main menu bar will let a Drupal user perform all tasks and actions necessary to make changes to
the site.
Editing Tabs
When logged into Drupal, tabs will appear at the top of each content area. Some pages have more than one
content area. Be sure to have the correct piece of content displayed to edit it. Some tabs are:
View – default view displaying the page as it appears to the public
Edit – opens the current draft in edit mode, displaying fields which can be edited
Nodequeue – list of items manually selected to appear. Refer to Nodequeues section for more
information
An example of what these tabs look like is displayed below.

COSN: DRUPAL USER MANUAL
7 8136 Old Keene Mill Road, Suite A-207, Springfield, VA 22152 | 703.451.8675 | www.balanceinteractive.com
My Workbench
My Workbench, accessed via the Drupal menu, provides an easy to use interface for creating and managing
your content.
NAVIGATION
Navigation is based on the approved site map. The top-level navigation items appear in the website’s
navigation bar. First and second level navigation appear on the left-hand side of interior pages. Breadcrumbs
display the entire path assigned to a page. Be sure to assign the proper location when creating a page. (See
Add New Pages in Creating Content.)
WYSIWYG EDITOR
The WYSIWYG (What You See Is What You Get) editor allows the Drupal user to enter, paste, and format text
without using any HTML coding. See Using the WYSIWYG Editor for more details.
SEARCH
This site includes search and advanced search functionality to allow users to locate content on the site.
WAYS OF DISPLAYING CONTENT
Nodes
Drupal refers to a full display page as a “node.” This is made up of a variety of items, including the design
template, menu, and other associated content pieces. Each part of a node can be updated by editing the
various content types of the node.
Views
Some pages provide a dynamic display of content type defined in a “View.” Editing views requires advanced
knowledge of Drupal.

COSN: DRUPAL USER MANUAL
8 8136 Old Keene Mill Road, Suite A-207, Springfield, VA 22152 | 703.451.8675 | www.balanceinteractive.com
Nodequeues
The nodequeue module is an easy way of creating arbitrarily ordered lists of content items. This list can then
be manually ordered. Slides are added to the Homepage Slideshow via Nodequeue.
To edit the items in a nodequeue:
1. Go to an item that appears or that should appear in the nodequeue.
2. Click Nodequeue tab.
3. Click Add to queue in the appropriate row.
To change the order of nodes:
1. Go to an item that appears or that should appear in the nodequeue.
2. Click Nodequeue tab.
3. Click the name of a nodequeue. This action opens the Subqueue.
4. Click the up or down arrow in the page’s row to move it in the queue (red text indicates a change).
5. Click Save.
In addition to the above method, a full list of nodequeues is available at Structure > Nodequeues.
Note: Standard nodequeues have just one subqueue. Nodes put into a queue are added to the back of the
queue; when a node is added to a full queue, the node in the front of the queue will be removed to make room.
The maximum number of nodes that will appear in the queue varies. Currently, the maximum number of
items that can be added to the nodequeues are as follows:
Featured Focus Area- 1
Featured Report - 1
Homepage Slideshow – 4
Staff List - Infinite

COSN: DRUPAL USER MANUAL
9 8136 Old Keene Mill Road, Suite A-207, Springfield, VA 22152 | 703.451.8675 | www.balanceinteractive.com
Using Drupal
LOGGING IN
To login to administer content on the CoSN site:
Development (before going live): http://192.237.165.187/user
In the popup window enter these credentials:
user: balance
password: C0Sn3@425
Live: www.cosn.org/user
Enter your Drupal username and password.
On the default screen (i.e. when no page has been selected), click the Edit tab (under username) to
change the username, email address, or password. Do not change any other settings. For more
information refer to Users.
For administrators the Drupal Menu will appear at the top of the screen (black bar with white type).
Select My Workbench to create content, view drafts and content that needs review.

COSN: DRUPAL USER MANUAL
10 8136 Old Keene Mill Road, Suite A-207, Springfield, VA 22152 | 703.451.8675 | www.balanceinteractive.com
Editing and Deleting Content
Note: Some options will vary, depending on user roles.
FINDING AND EDITING CONTENT
There are two ways to find and edit existing content: browse to it or view the list of content.
Browsing
1. Navigate to the page to edit.
2. In the Editing Tabs Menu click the Edit tab.
3. Change the text and settings.
4. Click Save at the bottom of the page.
Content List
When signed in as administrator, access the Drupal menu at the top of the screen and:
1. Select Content. The default listing is by most recently updated. To narrow the list, filter by status (e.g.
published, unpublished, etc.) or by content type.
2. Find the piece of content to edit and click the corresponding Edit link.
3. Make the changes.
4. Click Save at the bottom of the page.
REMOVE EXISTING CONTENT
Content may be deleted or unpublished. When content is deleted, it is removed from the site completely.
When content is unpublished, it is removed from the site but remains in the database and can be viewed in
the back-end and re-published if desired.
Delete Content
1. Navigate to the page to delete.
2. In the Editing Tabs Menu click the Edit tab.
3. Click Delete at the bottom of the page and confirm deletion.
OR
1. In the Drupal Menu, select Content. The default listing is by most recent update. To narrow the list,
filter by content type, or by status.
2. Click on the checkbox next to the content item(s) to delete.
3. Select Delete in the Update drop-down menu.
4. Click Update.
Unpublish Content
1. In the Drupal Menu, select Content. The default listing is by most recent update. To narrow the list,

COSN: DRUPAL USER MANUAL
11 8136 Old Keene Mill Road, Suite A-207, Springfield, VA 22152 | 703.451.8675 | www.balanceinteractive.com
filter by content type, or by status.
2. Click on the checkbox next to the content item(s) to unpublish.
3. Select Unpublish in the Update drop-down menu.
4. Click Update.
REVERTING TO PREVIOUS VERSION
Most content types save revisions of previously saved content. For content that has the Revisions tab
available, use the following instructions to revert to a previous version as the published node.
1. Navigate to the page to change.
2. Click on the Revisions tab.
3. Click on the desired date to view the content of a previous version.
4. Click the Revert link in the row of the desired version. That version will become the “current
revision” and will appear at the top of the list.
EDIT CONTENT BLOCKS
Certain areas of the site use content blocks that are directly editable on the page. For information on adding
and removing the blocks themselves, refer to Administrator & Advanced Functionality: Managing Blocks.
1. Click Gear icon that appears in upper right near the content to be edited.
2. A menu will appear. Select Edit.
3. Update the Body text, as appropriate.
4. Click Save at the bottom of the screen.
EDIT INDIVIDUAL ITEMS
The following content types are not displayed as individual pages and can be accessed only from the Content
List:
Event
Resource
Slide
Sponsor Profile
State Chapter
1. In the Drupal Menu, select Content Management>Content>List
2. OR
In the left User menu select Content List.
3. Filter by type to find the piece of content you want to edit
4. Click the Edit link in the corresponding row
5. Make changes as desired
6. Click Save at the bottom of the screen
COSN: DRUPAL USER MANUAL
12 8136 Old Keene Mill Road, Suite A-207, Springfield, VA 22152 | 703.451.8675 | www.balanceinteractive.com
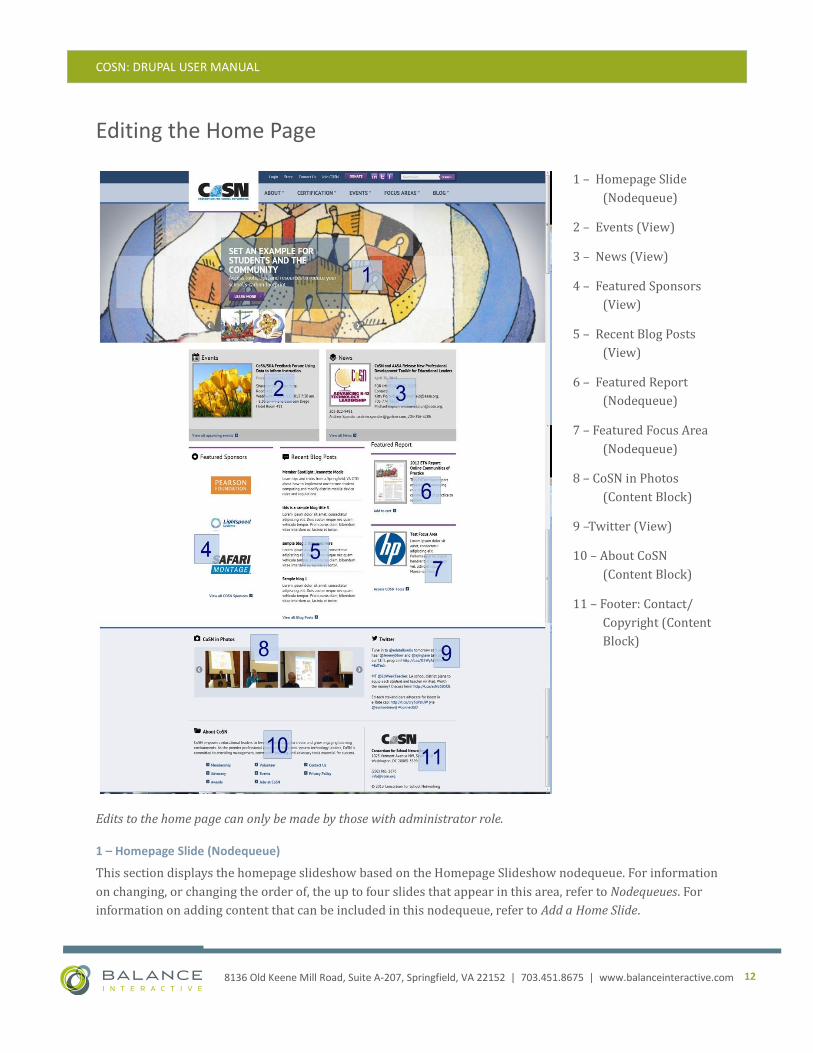
Editing the Home Page
1 – Homepage Slide
(Nodequeue)
2 – Events (View)
3 – News (View)
4 – Featured Sponsors
(View)
5 – Recent Blog Posts
(View)
6 – Featured Report
(Nodequeue)
7 – Featured Focus Area
(Nodequeue)
8 – CoSN in Photos
(Content Block)
9 –Twitter (View)
10 – About CoSN
(Content Block)
11 – Footer: Contact/
Copyright (Content
Block)
Edits to the home page can only be made by those with administrator role.
1 – Homepage Slide (Nodequeue)
This section displays the homepage slideshow based on the Homepage Slideshow nodequeue. For information
on changing, or changing the order of, the up to four slides that appear in this area, refer to Nodequeues. For
information on adding content that can be included in this nodequeue, refer to Add a Home Slide.

COSN: DRUPAL USER MANUAL
13 8136 Old Keene Mill Road, Suite A-207, Springfield, VA 22152 | 703.451.8675 | www.balanceinteractive.com
2 – Events (View)
This section displays upcoming event item based on event date. Refer to the Add Events section for more
information.
3 – News (View)
This section displays the most recent press release based on post date. Refer to the Add Press Release section
for more information.
4 – Featured Sponsors (View)
This section displays three featured Sponsor Profiles at random on page load. Refer to the Add Sponsor Profiles
section for more information.
5 – Recent Blog Posts (View)
This section displays the four most recent blog postings based on post date. Refer to the Add Blog section for
more information.
6 – Featured Report (Nodequeue)
This section displays the Report/Resource based on the Featured Report nodequeue. For information on
changing the Report that appears in this area, refer to Nodequeues. For information on adding content that can
be included in this nodequeue, refer to Add a Resource section.
7 – Featured Focus Area (Nodequeue)
This section displays the Focus Area based on the Featured Focus Area nodequeue. For information on
changing the Focus Area that appear this area, refer to Nodequeues. For information on adding content that
can be included in this nodequeue, refer to Add a Focus Area section.
8 – CoSN in Photos (Content Block)
This area displays the Flickr Recent Photos content block. Edits are done at
/admin/structure/block/manage/flickr/3/configure. Here you can edit the Flickr User Id, how many photos
to show, and size of the photos. Refer to the Editing Blocks on the Home Page section for more information.
9 – Twitter (View)
This section displays the three most recent @CoSN Twitter feed tweets.
10 – About CoSN (Content Block)
This area displays the Footer Bottom Left content block. Refer to the Editing Blocks on the Home Page section
for more information.
11 – Footer: Contact/ Copyright (Content Block)
This area displays the Footer Bottom Right content block. Refer to the Editing Blocks on the Home Page section
for more information.

COSN: DRUPAL USER MANUAL
14 8136 Old Keene Mill Road, Suite A-207, Springfield, VA 22152 | 703.451.8675 | www.balanceinteractive.com
EDITING BLOCKS ON THE HOME PAGE
To edit content in a block
1. Click the Gear Icon that appears in the upper right near the content to be edited. A menu will drop
displaying the Configure option. Select Edit.
2. Update the Body text (see Using WYSIWYG Editor) and/ or Title.
3. Click Save at the bottom of the screen
To add or delete a block
Refer to Administrator & Advanced Functionality: Managing Blocks.
Note: The site theme is setup with the blocks necessary for implementation of the site design; deleting blocks
should be done with extreme caution. Some blocks contain code that could break current site functionality if
modified.

COSN: DRUPAL USER MANUAL
15 8136 Old Keene Mill Road, Suite A-207, Springfield, VA 22152 | 703.451.8675 | www.balanceinteractive.com
Creating Content
Regardless of type, the process for adding content follows a basic structure.
1. Select Content from the Drupal menu at the top of the screen.
2. Select + Add Content at the top of the page. This will open a list of available content types.
3. Select the type of content to create and complete the fields.
4. Click Save when finished.
Note: Most pages also have a Preview button to preview the content as it would appear on the live site prior
to saving.
TYPES OF CONTENT
The CoSN website is made up of 14 content types, each of which has a specific function:
Award - Listed on the awards page
Blog – Use to create a blog posting.
Callout – Used for Sidebar blocks, can be chosen per page. Can be reused throughout site.
Event – General Event content type for events that will take place in a physical location.
Focus Area - Topic landing page. Can be parent topic or child topic
Page – Use for the general website pages.
Press Release – Use for news items.
Resource - CoSN Publications. Link over to Avectra for downloading/purchasing
Slide – Use for images and slide details for the homepage slideshow.
Sponsor Profile – Used to populate the list of sponsors and sponsor highlight block on the homepage. Should
have content highlighting how the sponsor has helped CoSN to encourage new sponsors.
Staff Bio – One for each staff member, referenced in the blog content type.
State Chapter - Used to populate the list of state chapters.
Webform – Use to create a new form or questionnaire accessible to users. Submission results and statistics
are recorded and accessible to privileged users.
Webinar - Online Events that do not have a location.
COSN: DRUPAL USER MANUAL
16 8136 Old Keene Mill Road, Suite A-207, Springfield, VA 22152 | 703.451.8675 | www.balanceinteractive.com
NOTES ABOUT ADDING CONTENT
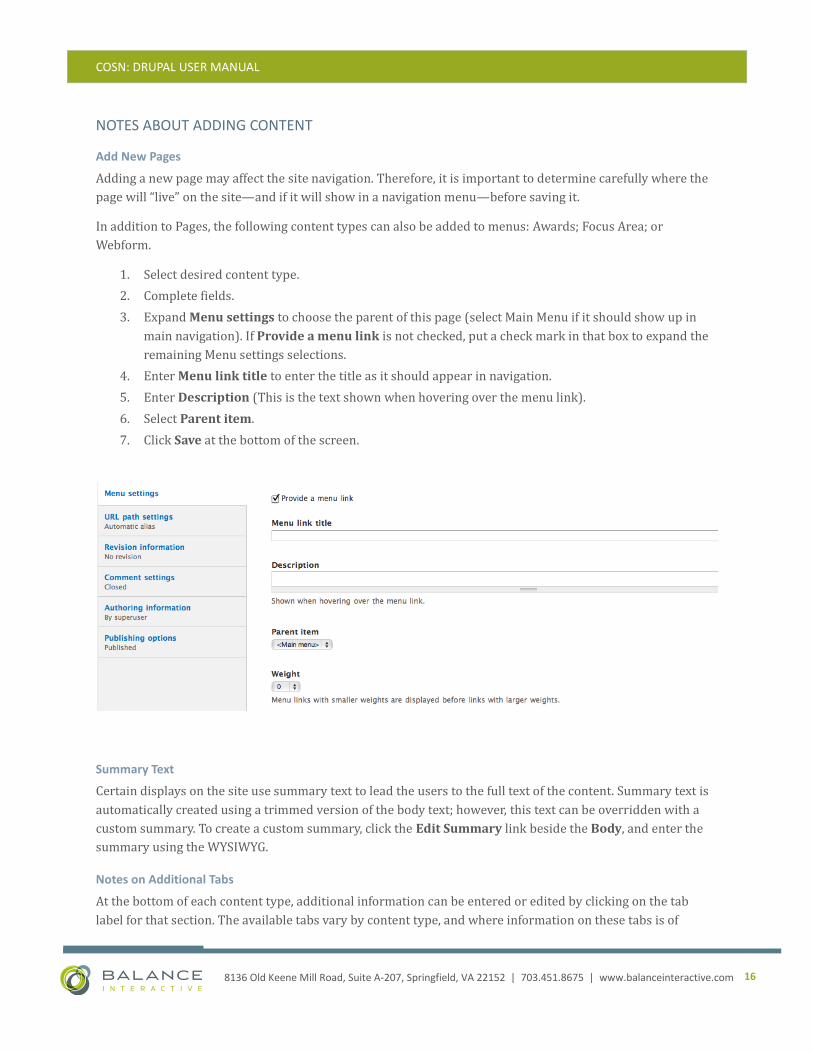
Add New Pages
Adding a new page may affect the site navigation. Therefore, it is important to determine carefully where the
page will “live” on the site—and if it will show in a navigation menu—before saving it.
In addition to Pages, the following content types can also be added to menus: Awards; Focus Area; or
Webform.
1. Select desired content type.
2. Complete fields.
3. Expand Menu settings to choose the parent of this page (select Main Menu if it should show up in
main navigation). If Provide a menu link is not checked, put a check mark in that box to expand the
remaining Menu settings selections.
4. Enter Menu link title to enter the title as it should appear in navigation.
5. Enter Description (This is the text shown when hovering over the menu link).
6. Select Parent item.
7. Click Save at the bottom of the screen.
Summary Text
Certain displays on the site use summary text to lead the users to the full text of the content. Summary text is
automatically created using a trimmed version of the body text; however, this text can be overridden with a
custom summary. To create a custom summary, click the Edit Summary link beside the Body, and enter the
summary using the WYSIWYG.
Notes on Additional Tabs
At the bottom of each content type, additional information can be entered or edited by clicking on the tab
label for that section. The available tabs vary by content type, and where information on these tabs is of

COSN: DRUPAL USER MANUAL
17 8136 Old Keene Mill Road, Suite A-207, Springfield, VA 22152 | 703.451.8675 | www.balanceinteractive.com
special importance, that information is highlighted in the instructions for that content type. For many of these
tabs, the defaults appropriate to the site are already set, and no further input is needed.
Menu Settings – Used to add and arrange the Page, Awards, Focus Area or Webform in the menus on the site.
Refer to the section Add New Pages above, or the specific content type in Create Content for more information.
Rabbit Hole Settings – Used to determine the behavior of what should happen when someone tries to view
the content on its own page. Options are to use the Bundle Default, Display the Page, deliver an Access Denied
page, deliver a Page Not Found page, or issue a Page Redirect to the front page or a defined redirect path.
URL Path Settings – Automatic alias will be generated using the settings defined for the site. To override the
alias to be used, uncheck this option and enter the new alias. If entering an alternative URL, use a relative path
and do not use the trailing slash.
Meta Tags – Used to enter metatag information some of which is used by search engines.
Revision Information – Used to enter a log message to include when this content is revised. An explanation
of the additions or updates being made can help other authors understand the reasons for the change that
was made.
Comment Settings – Radio button selection for enabling of user comments on this content. Available choices
are open or closed. The default value varies by content type as appropriate for the design.
Authoring Information – Used to enter the author and authoring date and time for the content. Author
defaults to the user making the change, but this information may be changed or left blank for “anonymous.” If
author date/time is left blank the time of form submission will be used.
Publishing Options – Used to set publishing settings. Published defaults to checked (published immediately),
and Promoted to Front Page defaults to checked for certain content types as appropriate. To save without
publishing, uncheck Published before saving the content.
Note: Some options will vary, depending on user roles.
Notes on Required Fields
Required fields are noted on-screen by a red asterisk *. These fields must be completed before the record can
be saved.
Notes on Images
Images can be added individually for use throughout the site. Directions for attaching images are in each
content type.

COSN: DRUPAL USER MANUAL
18 8136 Old Keene Mill Road, Suite A-207, Springfield, VA 22152 | 703.451.8675 | www.balanceinteractive.com
Note on image sizes:
Homepage carousel Image = 1070 x 492
Sidebar image - Member Spotlight = 131 x 124
Sidebar image - Video = 290 x 177
Intro Image (This is the image under the title on every interior page) = 260 x 316
Flickr Feed Image = 130 x 130
Homepage featured content image (seen in the events and news blocks) = 214 x 185
Thumbnails (For Report Covers or the Member Spotlight and the homepage right side callouts for
example) = 131 x 124
MegaMenu image= 260 x 113
Sponsor Logo = no wider than 172px
ADD AN AWARD
1. Select Content from the Drupal menu.
2. Click on the +Add Content link at the top of the page.
3. Select Award from the list of content types.
4. Enter Title.
5. Click Select Media
To upload a new logo
a. Click the Upload button
b. Click Browse to locate and open the image on the hard drive.
c. Then click Upload to add the image. Images must be less than 50 MB and must be one of the
following formats: png, gif, jpg, or jpeg.
d. Select the Submit button.
To add an existing logo:
a. Click the Library button.
b. Click on the desired file from the library. Use the scroll bar on the right to see more of the
library.
c. Select the Submit button.
6. Enter text in Body (See Using the WYSIWYG Editor and Formatting Tips below).
7. Enter text in Sidebar Text
8. If page is to appear in the menu expand Menu settings. If Provide a menu link is not checked, put a
check mark in that box to expand the Menu settings selections.
a. Enter Menu link title to enter the title as it should appear in navigation.
b. Enter Description (This is the text shown when hovering over the menu link).
c. Select Parent item.
9. Complete the remaining tabs at the bottom of the screen as needed. Refer to Notes on Additional Tabs
above for more information.
10. Click Save.

COSN: DRUPAL USER MANUAL
19 8136 Old Keene Mill Road, Suite A-207, Springfield, VA 22152 | 703.451.8675 | www.balanceinteractive.com
ADD A BLOG ENTRY
CoSN staff authors may enter blog posts. Once a blog post is live, any registered visitor to the site may
comment, and administrators can moderate these comments. Blog is also used to create a Member Spotlight.
1. Select Content from the Drupal menu.
2. Click on the +Add Content link at the top of the page.
3. Select Blog from the list of content types.
4. Enter the Title.
5. Enter the Author Title and URL to link to author bio page on this website, or to another website.
6. If Author has existing bio page on CoSN site, select it from Staff Bio drop-down menu.
7. Select from the list of available Categories. A list of Categories is featured on the Blog pages, linked to
a view of blogs using that term.
To create a Member Spotlight select the Member Spotlight category.
8. Select from the list of available Tags. CTRL + click to select more than one tag.
9. Enter the blog text in Body (See Using the WYSIWYG Editor and Formatting Tips below).
10. On the Comment settings tab, be sure Open is selected.
11. To change the author and/or authoring date and time for the content select Authoring Information.
Author defaults to the user making the change, but this information may be changed or left blank for
“anonymous.” If author date/time is left blank the time of form submission will be used.
12. Click Save at the bottom of the screen.
ADD A CALLOUT
1. Select Content from the Drupal menu.
2. Click on the +Add Content link at the top of the page.
3. Select Callout from the list of content types.
4. Enter the Title.
5. Select the Icon from the drop-down menu.
6. Enter the URL in Link.
7. Enter the text in Body (See Using the WYSIWYG Editor and Formatting Tips below).
8. Click Save.
ADD AN EVENT
1. Select Content from the Drupal menu.
2. Click on the +Add Content link at the top of the page.
3. Select Event from the list of content types.
4. Click Select Media
To upload a new file:
a. Click the Upload button
b. Click Browse to locate and open the image on the hard drive.
c. Then click Upload to add the image. Images must be less than 50 MB and must be one of the

COSN: DRUPAL USER MANUAL
20 8136 Old Keene Mill Road, Suite A-207, Springfield, VA 22152 | 703.451.8675 | www.balanceinteractive.com
following formats: png, gif, jpg, or jpeg.
d. Select the Submit button.
To add an existing image:
a. Click the Library button.
b. Click on the desired file from the library. Use the scroll bar on the right to see more of the
library.
c. Select the Submit button.
5. Select the Event Type.
6. Enter the appropriate information in the Event Title, Topic, Date, and Avectra Register Link fields.
7. Enter content in Body, Location, Directions, Speakers, and Sponsors fields. (See Using the
WYSIWYG Editor and Formatting Tips below).
8. Select State Chapter Sponsor.
9. Click Save.
ADD FOCUS AREA
To create topic landing page (tabbed pages of content) for each of the Focus areas. Can be parent topic or child
topic.
1. Select Content from the Drupal menu.
2. Click on the +Add Content link at the top of the page.
3. Select Focus Area from the list of content types.
4. Enter the Focus Area.
5. Select Focus Area in the drop-down menu.
6. Enter Tab Titles and Body text for each desired Tab.
7. Enter the text in Intro (See Using the WYSIWYG Editor and Formatting Tips below).
8. Click Select Media
To upload a new file:
a. Click the Upload button
b. Click Browse to locate and open the image on the hard drive.
c. Then click Upload to add the image. Images must be less than 50 MB and must be one of the
following formats: png, gif, jpg, or jpeg.
d. Select the Submit button.
To add an existing image:
a. Click the Library button.
b. Click on the desired file from the library. Use the scroll bar on the right to see more of the
library.
c. Select the Submit button.
9. Select Featured Resources. CTRL + click to select more than one Resource. Limited to three.
(Resources must be added to the site using the Resource content type before they will appear on this
list. See Add a Resource below.)

COSN: DRUPAL USER MANUAL
21 8136 Old Keene Mill Road, Suite A-207, Springfield, VA 22152 | 703.451.8675 | www.balanceinteractive.com
10. Select Action Callout. CTRL + click to select more than one Action Callout. Limited to three.
11. If desired select Sidebar Media.
12. Expand Menu settings. If Provide a menu link is not checked, put a check mark in that box to
expand the Menu settings selections.
a. Enter Menu link title to enter the title as it should appear in navigation.
b. Enter Description (This is the text shown when hovering over the menu link).
c. Select Parent item.
13. Complete the remaining tabs at the bottom of the screen as needed. Refer to Notes on Additional Tabs
above for more information.
14. Click Save.
ADD A MEMBER SPOTLIGHT
A Member Spotlight is created using the Blog content type and selecting the Category: Member Spotlight.
(See Add Blog entry above.)
ADD A PAGE
1. Select Content from the Drupal menu.
2. Click on the +Add Content link at the top of the page.
3. Select Page from the list of content types.
4. Enter Title.
5. Enter the text in Intro (required) (See Using the WYSIWYG Editor and Formatting Tips below).
6. To add the intro image (required) click Select Media.
To upload a new file:
a. Click the Upload button
b. Click Browse to locate and open the image on the hard drive.
c. Then click Upload to add the image. Images must be less than 50 MB and must be one of the
following formats: png, gif, jpg, or jpeg.
d. Select the Submit button.
To add a video or Flickr image:
a. Click the Web button.
b. Enter the URL or Embed code.
c. Select the Submit button.
To add an existing image:
a. Click the Library button.
b. Click on the desired file from the library. Use the scroll bar on the right to see more of the
library.
c. Select the Submit button.
7. Enter the text in Body (See Using the WYSIWYG Editor and Formatting Tips below).
8. Select desired Right Sidebar Callouts
9. Select Sidebar Media. For more information on adding a video to this list, refer to Add a Video.
To add a video or Flickr image:

COSN: DRUPAL USER MANUAL
22 8136 Old Keene Mill Road, Suite A-207, Springfield, VA 22152 | 703.451.8675 | www.balanceinteractive.com
a. Click the Web button.
b. Enter the URL or Embed code.
c. Select the Submit button.
10. If page is to appear in the menu expand Menu settings. If Provide a menu link is not checked, put a
check mark in that box to expand the Menu settings selections.
a. Enter Menu link title to enter the title as it should appear in navigation.
b. Enter Description (This is the text shown when hovering over the menu link).
c. Select Parent item.
11. Complete the remaining tabs at the bottom of the screen as needed. Refer to Notes on Additional Tabs
above for more information.
12. Click Save.
ADD A PRESS RELEASE
1. Select Content from the Drupal menu.
2. Click on the +Add Content link at the top of the page.
3. Select Press Release from the list of content types.
4. Enter the appropriate text in the Title, Subheading, Location and Date fields.
5. Enter the text in Body (See Using the WYSIWYG Editor and Formatting Tips below).
6. Select desired Tags and Focus Area. CTRL + click to select more than one.
7. To add an image click Select Media.
To upload a new file:
a. Click the Upload button
b. Click Browse to locate and open the image on the hard drive.
c. Then click Upload to add the image. Images must be less than 50 MB and must be one of the
following formats: png, gif, jpg, or jpeg.
d. Select the Submit button.
To add a video or Flickr image:
a. Click the Web button.
b. Enter the URL or Embed code.
c. Select the Submit button.
To add an existing image:
a. Click the Library button.
b. Click on the desired file from the library. Use the scroll bar on the right to see more of the
library.
c. Select the Submit button.
8. Complete the remaining tabs at the bottom of the screen as needed. Refer to Notes on Additional Tabs
for more information.
9. Click Save.

COSN: DRUPAL USER MANUAL
23 8136 Old Keene Mill Road, Suite A-207, Springfield, VA 22152 | 703.451.8675 | www.balanceinteractive.com
ADD A RESOURCE
1. Select Content from the Drupal menu.
2. Click on the +Add Content link at the top of the page.
3. Select Resource from the list of content types.
4. Enter the Resource Title.
5. Enter text in Body and Summary fields. (See Using the WYSIWYG Editor and Formatting Tips below).
6. Select the Report Type.
7. Enter the Avectra Link information: report Title and URL.
8. To add an image click Select Media.
To upload a new file:
a. Click the Upload button
b. Click Browse to locate and open the image on the hard drive.
c. Then click Upload to add the image. Images must be less than 50 MB and must be one of the
following formats: png, gif, jpg, or jpeg.
d. Select the Submit button.
To add a video or Flickr image:
a. Click the Web button.
b. Enter the URL or Embed code.
c. Select the Submit button.
To add an existing image:
a. Click the Library button.
b. Click on the desired file from the library. Use the scroll bar on the right to see more of the
library.
c. Select the Submit button.
9. Select Focus Area. CTRL + click to select more than one.
10. Click Save.
To add a Resource to the Featured Report nodequeue:
1. Click Nodequeue tab.
2. Click Add to queue in the appropriate row.
Only one node can appear in this queue at a time. Nodes put into a queue are added to the back of the queue;
when a node is added to a full queue, the node in the front of the queue will be removed to make room.
To remove a Resource from the Featured Report nodequeue:
1. In the Drupal Menu, select Content. Filter by content type Resource.
2. Go to the item that currently appears in the nodequeue. Click Edit.
3. Click Nodequeue tab.
4. Click Remove from Queue.

COSN: DRUPAL USER MANUAL
24 8136 Old Keene Mill Road, Suite A-207, Springfield, VA 22152 | 703.451.8675 | www.balanceinteractive.com
ADD A SLIDE
Homepage Slide images should be sized 1070px X 492px. The title text should be no more than 60 characters
and the body text should be no more than 95 characters.
1. Select Content from the Drupal menu.
2. Click on the +Add Content link at the top of the page.
3. Select Slide from the list of content types.
4. Enter the Slide Title. (should be no more than 60 characters)
5. To upload the slide image click Select Media
To upload a new file:
a. Click the Upload button
b. Click Browse to locate and open the image on the hard drive.
c. Then click Upload to add the image. Images must be less than 50 MB and must be one of the
following formats: png, gif, jpg, or jpeg.
d. Select the Submit button.
To add an existing image:
a. Click the Library button.
b. Click on the desired file from the library. Use the scroll bar on the right to see more of the
library.
c. Select the Submit button.
6. Enter the Slide Link Title and URL.
7. Enter the text in Body (should be no more than 95 characters).
8. Click Save.
To add a Slide to the Homepage Slideshow nodequeue:
1. Click Nodequeue tab.
2. Click Add to queue in the appropriate row.
To change the order of slides in the nodequeue:
1. Click Nodequeue tab.
2. Click Homepage Slideshow. This action opens the Subqueue.
3. Click the up or down arrow in the page’s row to move it in the queue (red text indicates a
change).
4. Click Save.
COSN: DRUPAL USER MANUAL
25 8136 Old Keene Mill Road, Suite A-207, Springfield, VA 22152 | 703.451.8675 | www.balanceinteractive.com
ADD A SPONSOR PROFILE
Used to populate the list of sponsors and sponsor highlight block on the homepage.
1. Select Content from the Drupal menu.
2. Click on the +Add Content link at the top of the page.
3. Select Sponsor Profile from the list of content types.
4. Enter the Sponsor Name.
5. To add logo click Select Media
To upload a new file:
a. Click the Upload button
b. Click Browse to locate and open the image on the hard drive.
c. Then click Upload to add the image. Images must be less than 50 MB and must be one of the
following formats: png, gif, jpg, or jpeg.
d. Select the Submit button.
To add an existing image:
a. Click the Library button.
b. Click on the desired file from the library. Use the scroll bar on the right to see more of the
library.
c. Select the Submit button.
6. Enter the Website URL.
7. Select Sponsor Level.
8. Enter content in the Body and Edit Summary fields. (See Using the WYSIWYG Editor and Formatting
Tips below).
9. Click Save.
ADD A STAFF BIO
Staff Bios appear on the About > Staff page. They are also used to populate the author information for blogs.
1. Select Content from the Drupal menu.
2. Click on the +Add Content link at the top of the page.
3. Select Staff Bio from the list of content types.
4. Enter Full Name, Certification.
5. Click Select Media
To upload a new image
a. Click the Upload button
b. Click Browse to locate and open the image on the hard drive.
c. Then click Upload to add the image. Images must be less than 50 MB and must be one of the
following formats: png, gif, jpg, or jpeg.
d. Select the Submit button.
To select an existing image:

COSN: DRUPAL USER MANUAL
26 8136 Old Keene Mill Road, Suite A-207, Springfield, VA 22152 | 703.451.8675 | www.balanceinteractive.com
a. Click the Library button.
b. Click on the desired file from the library. Use the scroll bar on the right to see more of the
library.
c. Select the Submit button.
6. Enter appropriate text in Job Title, Email, Phone Number, Linked In and Twitter fields.
7. Enter text in Summary and Body fields (See Using the WYSIWYG Editor and Formatting Tips below).
8. Complete the remaining tabs at the bottom of the screen as needed. Refer to Notes on Additional Tabs
above for more information.
9. Click Save.
To add a Staff Bio to the Staff List nodequeue:
1. Click Nodequeue tab.
2. Click Add to queue in the appropriate row.
To change the order of slides in the nodequeue:
1. Click Nodequeue tab.
2. In the Staff List row click View. This action opens the Subqueue.
3. Click the up or down arrow in the page’s row to move it in the queue (red text indicates a
change).
4. Click Save.
ADD STATE CHAPTER
Used to populate the list of state chapters.
1. Select Content from the Drupal menu.
2. Click on the +Add Content link at the top of the page.
3. Select State Chapter from the list of content types.
4. Enter the State.
5. Enter Chapter Name.
6. To add a logo click Select Media.
To upload a new file:
a. Click the Upload button
b. Click Browse to locate and open the image on the hard drive.
c. Then click Upload to add the image. Images must be less than 50 MB and must be one of the
following formats: png, gif, jpg, or jpeg.
d. Select the Submit button.
To add an existing image:
a. Click the Library button.
b. Click on the desired file from the library. Use the scroll bar on the right to see more of the
library.
c. Select the Submit button.
COSN: DRUPAL USER MANUAL
27 8136 Old Keene Mill Road, Suite A-207, Springfield, VA 22152 | 703.451.8675 | www.balanceinteractive.com
7. Enter the Website URL.
8. Enter text in Chapter Information and Officers fields. (See Using the WYSIWYG Editor and
Formatting Tips below).
9. Click Save.
ADD A WEBFORM
Use the Webform to create an online form that will be submitted via the web.
1. Select Content from the Drupal menu.
2. Click on the +Add Content link at the top of the page.
3. Select Webform from the list of content types.
4. Enter the Title.
5. Enter the Body using the WYSIWYG editor. For more information refer to Using the WYSIWYG Editor.
6. If page is to appear in the menu expand Menu settings. If Provide a menu link is not checked, put a
check mark in that box to expand the Menu settings selections.
a. Enter Menu link title to enter the title as it should appear in navigation.
b. Enter Description (This is the text shown when hovering over the menu link).
c. Select Parent item.
7. Complete the remaining tabs at the bottom of the screen as needed. Refer to Notes on Additional Tabs
above for more information.
8. Click Save.
Once form is saved, a new tab “Webform” will appear at the top of the screen, click this tab.
1. Click Form Components to add fields to the form.
2. Enter fields as desired.
a. Enter the field Label.
b. Select the field Type from the drop-down list of available types. The types are date, email,
field set, file, grid, hidden, markup, page break, select option, text area, text field, and time.
c. Click to check the box under Mandatory if this is a required field.
3. Click Add to save the field and add additional information about this field.
a. Default value is text that will appear in the textfield of the form when the page is loaded and
is intended to be overwritten by the user.
b. Mandatory defines if the form field is required to be completed by the user before
submitting the form.
c. Unique requires that the input into the field be unique to the system of record in order for
the user’s submission to be accepted.
d. Maxlength controls maximum number of characters allowed.
e. Width controls width of text field.
f. Labels define the text to appear before or after form element.

COSN: DRUPAL USER MANUAL
28 8136 Old Keene Mill Road, Suite A-207, Springfield, VA 22152 | 703.451.8675 | www.balanceinteractive.com
g. Disabled ensures the field is non-editable.
h. Private fields are shown only to users with results access.
4. Click Save Component.
5. Click E-mails to define for Drupal the email address to which the form fields should be submitted.
6. Click Form Settings to define the confirmation message that is sent once form is submitted, the
redirect URL once the form is submitted, submission limit per user, and roles who can submit this
form
i. Click Advanced Settings to define if the form should be shown in the teaser display for this
node, if users can save a draft of the form before submission, to enable previous submission
notification if the user has previously submitted the form, and to define button text if the
label to override the default text of “submit”.
Additional Webform Info
To view a list of fields for an existing form, go to Content to display the content list and click edit next to
the name of the form in the table.
To delete a form, go to Content to display the content list and click Delete next to the form name in the
table.
To view results in various formats, click the Results tab.
To download form results, click Download and select which Export format to use, as well as any
options, forms components, or range options and click Download button.
To view all submissions, click Submissions or Table.
To view an analysis of what was submitted by form element, click Analysis.
Clear function will clear all form results.
To change the font of the CAPTCHA code:
o In the Drupal Menu, select Configuration > People > CAPTCHA > Image CAPTCHA.
o Under Font Settings, select the desired font. The PHP Built-in Font is not recommended.
o Click Save Configuration.
o Logout to see what it looks like on the form.
To change the email address for form submissions:
o Browse to the webform to edit.
o Click on the Edit tab.
o Make the changes in E-mails.
o Click Save button on the bottom of the page.
ADD A WEBINAR
1. Select Content from the Drupal menu.
2. Click on the +Add Content link at the top of the page.
3. Select Webinar from the list of content types.
4. Enter the Webinar Title.
5. To add an image click Select Media.
COSN: DRUPAL USER MANUAL
29 8136 Old Keene Mill Road, Suite A-207, Springfield, VA 22152 | 703.451.8675 | www.balanceinteractive.com
To upload a new file:
a. Click the Upload button
b. Click Browse to locate and open the image on the hard drive.
c. Then click Upload to add the image. Images must be less than 50 MB and must be one of the
following formats: png, gif, jpg, or jpeg.
d. Select the Submit button.
To add a video or Flickr image:
a. Click the Web button.
b. Enter the URL or Embed code.
c. Select the Submit button.
To add an existing image:
a. Click the Library button.
b. Click on the desired file from the library. Use the scroll bar on the right to see more of the
library.
c. Select the Submit button.
6. Enter the appropriate information in the Date and Register Link fields.
7. Enter content in Body, Moderator, and Presenters fields. (See Using the WYSIWYG Editor and
Formatting Tips below).
8. Enter the Download Link (This will be filled in after the webinar and used in the webinar archives.)
9. Click Save.
COSN: DRUPAL USER MANUAL
30 8136 Old Keene Mill Road, Suite A-207, Springfield, VA 22152 | 703.451.8675 | www.balanceinteractive.com
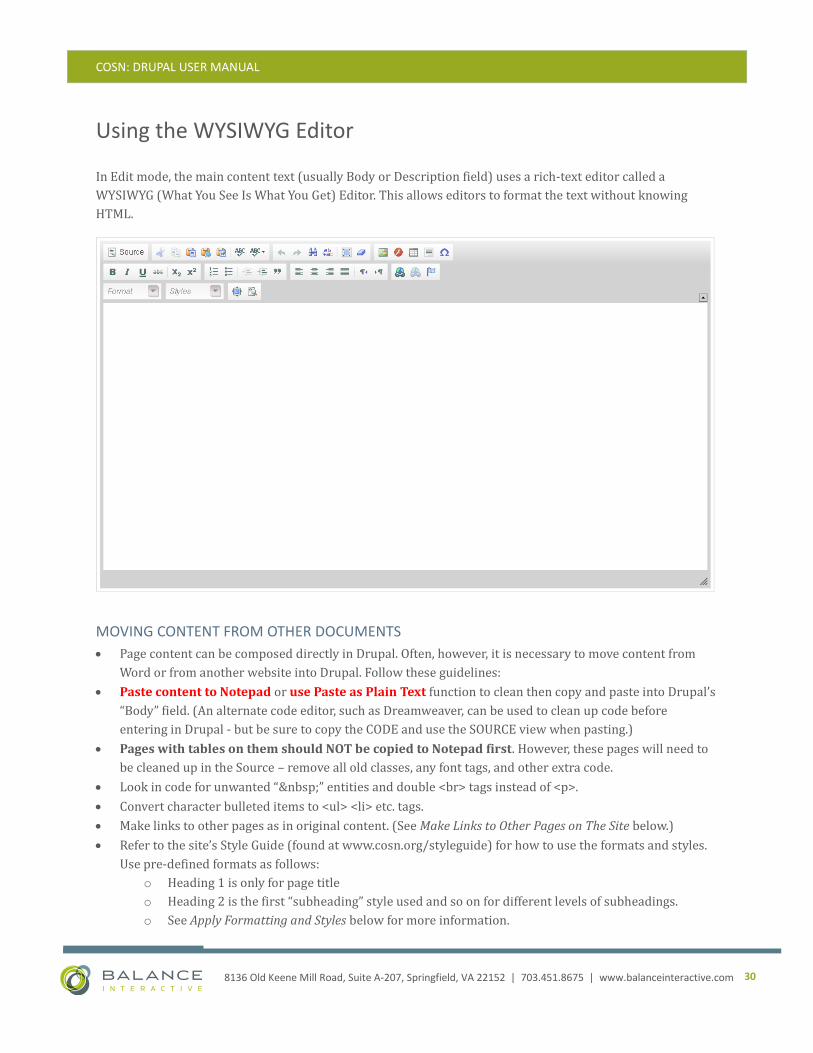
Using the WYSIWYG Editor
In Edit mode, the main content text (usually Body or Description field) uses a rich-text editor called a
WYSIWYG (What You See Is What You Get) Editor. This allows editors to format the text without knowing
HTML.
MOVING CONTENT FROM OTHER DOCUMENTS
Page content can be composed directly in Drupal. Often, however, it is necessary to move content from
Word or from another website into Drupal. Follow these guidelines:
Paste content to Notepad or use Paste as Plain Text function to clean then copy and paste into Drupal’s
“Body” field. (An alternate code editor, such as Dreamweaver, can be used to clean up code before
entering in Drupal - but be sure to copy the CODE and use the SOURCE view when pasting.)
Pages with tables on them should NOT be copied to Notepad first. However, these pages will need to
be cleaned up in the Source – remove all old classes, any font tags, and other extra code.
Look in code for unwanted “ ” entities and double <br> tags instead of <p>.
Convert character bulleted items to <ul> <li> etc. tags.
Make links to other pages as in original content. (See Make Links to Other Pages on The Site below.)
Refer to the site’s Style Guide (found at www.cosn.org/styleguide) for how to use the formats and styles.
Use pre-defined formats as follows:
o Heading 1 is only for page title
o Heading 2 is the first “subheading” style used and so on for different levels of subheadings.
o See Apply Formatting and Styles below for more information.

COSN: DRUPAL USER MANUAL
31 8136 Old Keene Mill Road, Suite A-207, Springfield, VA 22152 | 703.451.8675 | www.balanceinteractive.com
o Save any photos or images to the local computer. Upload to Drupal (see Upload and Insert Images
instructions below).
o If there was an image on the page that had an alt tag, that text will be transferred with the rest of
the content. Remove that text. See Add an Image for specifics on images.
APPLY FORMATTING AND STYLES
All fonts are set with a cascading style sheet (CSS) file. This allows the formatting to be consistent throughout
the site as well as changed once and applied everywhere it is used. The CSS file applies the font, size, color,
and weight (bold or regular) to the text that is assigned a style. Use the styles that have been set up for the site
as follows:
To make text a subheading, highlight the text (whole paragraphs only) and select the appropriate
item in the Format drop-down list. Note: Heading 1 is used for the Page Title, which is part of the
template and should not be used in the body field. Therefore, Heading 2 should be the first level of
headings on a page.
To assign style to text or an image, highlight the text or image and select the appropriate item in the
Style drop-down list. This will change the appearance of that text or the location of and spacing
around the image.
Images should have a style applied to them. After adding an image to the Body, select it and pick a
Style from the list, depending on where the image is to appear in relation to the text. Selecting an
alignment for the image will wrap the text of the related paragraph around the image. Be sure
to place the image directly before the text that it should cause to wrap.
See http://192.237.165.187/styleguide (or www.cosn.org/styleguide once the site is launched) for the
appearance of all site styles and guidance in using them.
MAKE LINKS TO OTHER WEBSITES
1. Select text to be the link.
2. Click Insert/Edit Link icon.
3. Enter the URL for the site.
4. To open the link in a new browser window or tab, select the Target tab and pick New Window
(_blank) from the Target drop-down menu.
5. Click OK.
MAKE LINKS TO OTHER PAGES ON THE SITE
Open a second tab or window to the site to get the URL for the page to which to link. Because the link is within
the same site, the full URL is not needed. This is called relative linking and keeps links working should the
domain name for the website ever change. Example:
YES: test-item-two (whatever is after www.domain.com/)

COSN: DRUPAL USER MANUAL
32 8136 Old Keene Mill Road, Suite A-207, Springfield, VA 22152 | 703.451.8675 | www.balanceinteractive.com
Note: do not begin the relative link with “/”. Instead start after the “/”.
NO: www.domain.com/test-item-two
STYLE TABLES
Tables need to be styled to display correctly, according to the style guide. Different techniques are used in
different browsers. You must switch Text Format to Full HTML.
First create a table if one is not already there.
1. Put cursor where the table will be inserted.
2. Click Table icon.
3. Select the right number of Rows and Columns; delete number in Width field; set padding, border
and spacing to 0; Click OK.
Apply styles in Firefox
1. Click anywhere on the table.
2. Select the table tag at the bottom of the editor.
3. Select Table in the Styles menu – this applies the class “data” to the
table and table will display a thin-line border.
4. To make the first row a heading (with applicable styles), change the first
<tr> tag to <th> in the source.
5. To shade a row, put cursor in the row to be shaded; select the tr tag at
the bottom of the editor.
6. Select Shaded Row in Styles menu.
7. Enter or edit any other text.
8. Click Save.
Apply Styles in Internet Explorer and Chrome
1. Highlight entire table (be sure not to select content that is below or above the table).
2. Select Table in the Styles menu – this applies the class “data” to the table and table will display a
thin-line border.
3. To make the first row a heading (with applicable styles), change the first <tr> tag to <th> in the
source.
4. To shade a row, highlight entire row to be shaded.
5. Select Shaded Row in Styles menu.
6. Enter or edit any other text.
7. Click Save.

COSN: DRUPAL USER MANUAL
33 8136 Old Keene Mill Road, Suite A-207, Springfield, VA 22152 | 703.451.8675 | www.balanceinteractive.com
UPLOAD AND INSERT IMAGES
Images can be inserted directly into the main content area through the WYSIWYG editor insert image
functionality.
1. Place cursor where the image will go.
2. Click Image icon - Image Properties box appears.
3. Click Browse server button.
4. If image is not on the server (skip this step if
image is already on the server)
a. Select the images folder in the
navigation menu on the left.
b. Click Upload (on left of top bar).
c. Click Browse… to find the image on the computer.
d. Click Upload when image selected.
e. Click on small black X in upper right of box to close small upload window.
5. Select image from list and click Insert file.
6. Add Alternative Text.
7. Click Advanced tab.
8. Enter text for Advisory Title (text seen by screen readers and on mouse hover).
9. To make the image link to another site or page, select Link tab and enter the URL according to
directions for Make Links.
10. Click OK.
11. Click on image to select it. Then from Style drop-down menu select to align the image to the left or
right, depending on whether the image will be to the left or right of the text.
Note: If the image is already at the site, Drupal will not overwrite the image but will add a number to the end of
the new upload. If replacing an existing image, delete it first.
UPLOAD AND LINK TO PDFS
1. Highlight text to link.
2. Click Link icon.
3. Select Browse Server.
4. Select the <root>/pdf folder in the
navigation menu on the left
5. If the PDF is already uploaded to the site, select it in the list and click on Insert file.
6. If this is a new PDF
a. Select the <root>/pdf folder in the navigation menu on the left.
COSN: DRUPAL USER MANUAL
34 8136 Old Keene Mill Road, Suite A-207, Springfield, VA 22152 | 703.451.8675 | www.balanceinteractive.com
b. Click Upload.
c. Click Browse… to find the PDF on the computer.
d. Click Upload when PDF is selected.
7. Select the PDF from the list and click Insert file.
8. Click Target tab.
9. Select New Window (_blank) in Target drop-down list.
10. Click OK.
Note: If the PDF is already at the site, Drupal will not overwrite the PDF, but will add a number to the end of
a new upload. If replacing an existing PDF, delete it first.
If you just need the URL, and don't want the link in the Body, then just copy the URL from the link dialog.
COSN: DRUPAL USER MANUAL
35 8136 Old Keene Mill Road, Suite A-207, Springfield, VA 22152 | 703.451.8675 | www.balanceinteractive.com
Advanced Functionality
NAVIGATION MENUS
There are several navigation menus in place at the website. To change the order of a menu item (or to add a
menu item), navigate to Structure > Menus.
All of the menus for the CoSN site are managed from this menu administration. Please use caution
when editing menus.
A list of the site’s menus will be generated. The main menu contains the bulk of the site’s content. To see
which items are contained in a particular menu, select List links.
1. Development – Development links. Do not modify.
2. Features – Not used.
3. Footer Menu – Not used.
4. Header Menu – The links in the dark blue bar at the top.
5. Main Menu – Contains the links intended for site visitors. Appears below the dark blue bar at the top
of the site.
6. Management – The Management menu contains links for Administrative tasks.
7. Navigation – The Navigation Menu contains links intended for site visitors that are automatically
added by some modules.
8. User Menu - The User menu contains links related to the user's account, as well as the Log out link.
Reorder Links in the Navigation
1. To change the order of a menu item or to add a menu item, navigate to Structure > Menus.
2. The list of menus will display. To see which items are contained in a particular menu, select List links
beside that item. Each link has an arrow pointing in 4 directions next to the title. Click on the arrow
next to the link to move/reorder it and while holding mouse down, move link to its new location.
Click on Save Configuration to save the reordered menu structure.
3. To edit the menu text and settings, select Edit menu, make desired changes, and click on Save.
Add New Item to the Menu
1. When creating a page, fill in the fields under Menu Settings and link page to whatever is immediately
above it in the site map outline.
2. Now new page should be shown on the left side in that section.
3. Go to Structure > Menus.
4. Click on the menu to be edited.
5. Click Add Link.
6. Menu Link Title – enter title of the link.
7. Path – enter the path to new page.
8. Click Save.
9. The page that lists all links from “Primary Links” will appear.
10. Locate the new link and reorder as described in Reorder Links in the Navigation.
COSN: DRUPAL USER MANUAL
36 8136 Old Keene Mill Road, Suite A-207, Springfield, VA 22152 | 703.451.8675 | www.balanceinteractive.com
Add Menu Item in Additional Locations
To add an item to a menu that also appears in another menu on the site:
1. In Drupal Menu, go to Structure > Menus.
2. Select the menu in which the page should appear.
3. Select Add Link.
4. Enter the page name in Menu link title.
5. Enter the URL (starting with the / after the domain) in Path.
6. Enter Description (The text shown when hovering over the menu link.)
7. Select the Parent link (be sure it is enabled).
8. Click Save.
Add Menu Item to External Site
To add an item that links to an external site:
1. In Drupal Menu, go to Structure > Menus.
2. Select the menu in which the page should appear.
3. Select Add Link.
4. Enter the page name in Menu link title.
5. Enter the complete URL in Path.
6. Enter Description (The text shown when hovering over the menu link.)
7. Select the Parent link (be sure it is enabled).
8. Click Save.
MANAGING BLOCKS
To manage content blocks, navigate to Structure > Context. Note: All blocks are enabled through Context
only. This allows conditions and sections to be set for portions of the site. The Block admin interface is not
used to manage blocks in this implementation.
Adding or Deleting a Block from a Region
1. Select Structure > Context.
2. A list of context names will appear. Each context represents an area of the site. Search and/or filter to
narrow the list of selections displayed.
3. Select the Edit link beside the context to be edited.
4. Click on Blocks (at the bottom of the page) to expand the listing of blocks. These are shown grouped
by region.
5. To add a block to a region
6. Select the checkbox beside the block or blocks to add, from the list of blocks to the right.
7. Click +Add beside the region(s) to which to add the block.
8. To delete a block from a region, select the X beside the block to delete from the region where it is
currently listed. Caution: This will remove the block from everywhere that region applies in the site.
9. Click the Save button to save changes.

COSN: DRUPAL USER MANUAL
37 8136 Old Keene Mill Road, Suite A-207, Springfield, VA 22152 | 703.451.8675 | www.balanceinteractive.com
Removing a Block from a Particular Page
In order to remove a block from a page, it will need to be excluded from the context it is currently in and then
a new context will need to be created for that page, and all of the elements (that were in the original context)
placed into the new one. The result will be the original context with the particular page excluded, and a new
context for just the page that is different.
1. Select Structure > Context.
2. A list of context names will appear. Each context represents an area of the site. Use search and filter to
narrow the list of selections displayed.
3. Select the Edit link beside the context from which a page should be excluded.
4. Under the Conditions section, select Path from the <Add a condition> drop-down menu. A text box for
entering path will appear.
5. Use the ~ character, followed by the path name to exclude that path from this context. To exclude
more than one path, put each path on a separate line.
6. Click the Save button to save changes.
7. Return to Structure > Context.
8. Select the + Add link at the top of the page.
9. Enter the Name of this new context.
10. Enter the Tag for grouping this context with others.
11. Enter a Description of this context.
12. Select all Conditions and Reactions settings as they appeared in the original context with the
following exceptions:
13. Use the condition of path and enter the path(s) of the page or pages excluded in Step 5 above.
14. Add only the Blocks that apply to this particular page(s).
15. Click the Save button to save changes.
MANAGE COMMENTS
The Administrator’s comments notification address will receive an email when a comment has been
submitted. Comments must be approved to be displayed.
Approve Comments
To see the list of comments awaiting approval
1. Go to Content > Comments > Unapproved Comments (button).
2. Select Publish the selected comments or Delete the selected comments as desired in the Update
Options drop-down box.
3. Click on the checkbox next to the comment(s) to be approved or deleted.
4. To edit a comment prior to approval:
a. Select the Edit operation beside the comment to edit.
b. Edit the Comment Title.
c. Enter the Comment using the WYSIWYG editor. For more information refer to Using the
WYSIWYG Editor.
d. Click Preview and Save.

COSN: DRUPAL USER MANUAL
38 8136 Old Keene Mill Road, Suite A-207, Springfield, VA 22152 | 703.451.8675 | www.balanceinteractive.com
5. Click Update button (Next to the Update Options drop-down box).
Edit or Remove Comments
To see the list of comments awaiting approval
1. Go to Content > Comments (tab) > Unapproved Comments (button).
2. To edit a comment:
a. Select the Edit operation beside the comment to edit.
b. Edit the Comment Title.
c. Enter the Comment using the WYSIWYG editor. For more information refer to Using the
WYSIWYG Editor.
d. Click Preview and Save.
3. To remove a comment:
a. Select Unpublish the selected comments or Delete the selected comments as desired in
the Update Options drop-down box.
b. Click on the checkbox next to the comment(s) to be approved or deleted.
4. Click Update button (Next to the Update Options drop-down box).
EDITING TAXONOMY
A taxonomy classifies a group of like items. On the CoSN website, taxonomies are used to assign a piece of
content to a certain area of the site. Each taxonomy has a defined vocabulary (set of terms). Currently, the
following are edited from the taxonomy menu:
Focus Areas
Tags
Add to a Taxonomy Term
1. In the Drupal Menu, select Structure > Taxonomy.
2. Click Add terms in the row of the taxonomy to be edited.
3. Enter a term name.
4. Enter a Description (optional).
5. Click Save.
To Edit a Taxonomy Term
1. In the Drupal Menu, select Structure> Taxonomy.
2. Click list terms in the row of the vocabulary name that the term you want to edit is in.
3. Click edit in the row of the term to be edited.
4. Make changes to taxonomy name or description.
5. Click Save.
COSN: DRUPAL USER MANUAL
39 8136 Old Keene Mill Road, Suite A-207, Springfield, VA 22152 | 703.451.8675 | www.balanceinteractive.com
To Remove a Term from a Taxonomy
1. In the Drupal Menu, select Structure> Taxonomy.
2. Click list terms in the row of the vocabulary name that the term you want to edit is in.
3. Click edit in the row of the term to be removed.
4. Click Delete at the bottom of the page and confirm deletion.
VIEWS
Some pages or page elements are generated dynamically by pulling in certain entries that fit specified
variables. Edit the views to change how information is displayed on the page where it appears.
Editing views requires advanced knowledge of Drupal.
1. In the Drupal Menu, select Structure > Views.
2. Click Edit in the row of the view to edit.
Notes about what can be changed in the View:
1. Defaults displays the default settings of a view.
2. Block displays the settings of the view as a block. If view is rendered as a block, the title can be
controlled in the block section. In the view editing mode, Block shows the list of options for the block.
3. If view is rendered as “Page,” a Page tab will be available. If the view is set up as page, additional Page
Settings will be available below Basic Settings:
Path controls the path to the page.
Menu option controls whether the page is linked to menu, title of the link, etc.
Items per page controls number of items to display for that particular block/page.
Access function allows restriction of access to particular block or page depending on roles
and permissions.
Header/Footer functions allows addition of content in HTML format in the top or bottom
area of the block or page.
Empty text feature is useful when the view is set up as a page and there is no content
available yet. This feature allows the addition of text in case the view returns no results.
4. Relations allows for filtering of content based on relationship to another user, node, content type,
etc. This is especially useful when needing to include data from an object that is not directly available
inside a listing of content. A relationship allows for retrieval of object information that is related to
the listed content.
5. Fields allows the administrator to set up fields to show inside a block or page. Regular fields include
title of the node/page, body shown as a teaser or in full, thumbnails, etc. This depends on each
content type in particular.
6. Sort Criteria is used for sorting based on various criteria. It can be sorted based on title, post date,
content type, the date the node was last updated, author, node id, fields, etc.
7. Filters allows filtering of content based on certain criteria.

COSN: DRUPAL USER MANUAL
40 8136 Old Keene Mill Road, Suite A-207, Springfield, VA 22152 | 703.451.8675 | www.balanceinteractive.com
URL REDIRECTS
The URL redirect tool allows you to redirect from any URL to another. This tool can also be used if content is
moved from one location to another at the Drupal website.
1. To access the URL Redirect tool, use the Drupal Menu: Configuration » Search and metadata » URL
redirects (This will list all current redirects in the system.)
2. To add a new redirect, select Add Redirect
For example: The current site has a url of http://www.cosn.org/media, the new url should be
http://www.cosn.org/newsroom. When putting in the redirect just the path after the domain name should be
used and no preceding or trailing slashes. The module will already account for the domain name and slashes.
For this example:
Correct:
Old url: media
New url: newsroom
Not:
Old url: /media
New url: /newsroom
Not:
Old url: media/
New url: newsroom/
STYLE SHEETS
Style sheets need to be edited outside of Drupal via FTP in the directory:
sites/all/themes/cosn/css
Main style sheet is at: /sites/all/themes/cosn/css/master.css
The other style sheets used on the site are:
Ckeditor.css: styles for CKeditor
ckeditor.styles.js: styles for Ckeditor
COSN: DRUPAL USER MANUAL
41 8136 Old Keene Mill Road, Suite A-207, Springfield, VA 22152 | 703.451.8675 | www.balanceinteractive.com
USERS
Only registered users can add or edit content on the site. To change access for these accounts, use the Drupal
Menu: People.
Add/Delete Users
Select People in the Drupal Menu. The list that displays may be filtered by role, permission, and
status.
To edit the settings of an existing user, select edit.
To delete the user, select the checkbox to the left of that user in the list. From the Update Options
drop-down list, select Cancel the Selected User Accounts and click Update to delete the user. Other
actions, such as blocking or adding or removing roles for users may be done using the other update
options available in this drop-down list.
To add a user, click the + Add User link located at the top of the page and enter the information for
this user.
Defined Roles
Roles are used to define a group of users who all have the same level of permissions. Individual users are then
assigned a role to grant them the permissions associated with that role.
Currently, the following roles are defined:
Anonymous User – anyone who does not have an account or is not authenticated.
Authenticated User – anyone who has a user account.
Administrator – grants all rights to manage the site.
Add a Role
1. Select People > Permissions (tab) > Roles (button) in the Drupal Menu.
2. To add a role, type the name of the new role, and select Add Role.
3. This role must be granted permissions in order to access the site. Select Edit Permissions and check
all permissions that will apply to this role.
4. Select Save Permissions.
For an “at a glance” comparison of the specific permissions assigned to each role, use the Drupal Menu: People
> Permissions.
REPORTS
The site includes a variety of reports useful for understanding and managing the site. To access these reports,
in the Drupal Menu, select Reports and then select the desired report.
Available reports provide information on recent log entries, access denied and page not found errors, top
search phrases used within the site, site status reports, field lists, and module update information.
The module update information report will run a comparison of the installed Drupal modules used for the site
versus the most recently available modules. When new versions of certain modules, such as security modules,
are available the site may place warnings at the top of pages when viewing the site as an administrator.
COSN: DRUPAL USER MANUAL
42 8136 Old Keene Mill Road, Suite A-207, Springfield, VA 22152 | 703.451.8675 | www.balanceinteractive.com
Balance Interactive recommends that modules only be updated periodically (grouping the updates of modules
to perform monthly or bi-monthly). Balance Interactive is available to consult regarding possible impact of
applying any new versions of modules.

COSN: DRUPAL USER MANUAL
43 8136 Old Keene Mill Road, Suite A-207, Springfield, VA 22152 | 703.451.8675 | www.balanceinteractive.com
Google Analytics
ACCESSING GOOGLE ANALYTICS
To access the Google Analytics data, go to www.google.com/analytics.
1. To log into Google Analytics, click on Access Analytics.
2. Sign into the Google Analytics account by entering email and password.
3. If there are multiple GA accounts under the same email address, click on the arrows next to My
Analytics Account to select the name of the account to view.
4. This will bring up the site’s Google Analytics Settings page. From this page:
View reports
Add, edit, and delete filters
Manage users
Manage profiles
VIEWING REPORTS
1. To view the data, select View Report next to the applicable website profile on the Settings page.
2. This will bring up the Dashboard.
3. Data can be viewed by selecting View Report in any of the overview sections in the center of the
page, or by navigating using the sections on the left side of the page.
Intelligence Reports [beta] scans the reports and provides alerts for any unusual trends in
traffic patterns.
Visitors tells who came to the site.

COSN: DRUPAL USER MANUAL
44 8136 Old Keene Mill Road, Suite A-207, Springfield, VA 22152 | 703.451.8675 | www.balanceinteractive.com
Traffic Sources explains how visitors got to the site.
Content tells what the visitors looked at on the site.
Goals explains whether the visitors completed the defined goals.
4. Each main report section contains an overview, as well as detailed reports. Reports can also be
customized for easier and faster data access. To do this select Custom Reporting > Manage Custom
Reports and choose the variables to include.
5. Top Reports include:
Visitors-->Overview
Visitors-->Benchmarking
Visitors-->New vs. Returning
Traffic Sources-->Overview
Traffic Sources-->Adwords (if applicable)
Traffic Sources-->Keywords
Traffic Sources-->Campaigns (if applicable)
Content-->Overview
Content-->Top Content
Content-->Top Landing Pages
Content-->Top Exit Pages
Content-->Site Overlay (for a visual of what visitors are clicking on)
Site Search-->Overview (if applicable)
Goals-->Overview
Goals-->Funnel Visualization
ADDING, EDITING & DELETING FILTERS
A filter allows customization of the way data is displayed in the reports. This includes filtering out the office’s
IP address, including traffic from a subdomain or subdirectory, or creating custom filters. For instance, to
track only a particular section of the site, create a custom filter.
To add a specific filter
1. Select Filter Manager from the Settings page.
2. From the list, select Add Filter.
3. Enter a unique Filter Name.
4. From the filter type drop-down list, choose Include only traffic from a subdirectory.
5. In the Subdirectory field, replace mydir with the subdirectory to track. For example, to report on
www.example.com/motorcycles, enter: ^/motorcycles/
6. Select the Available Website Profile to which to apply this filter and click Add.
7. Click Finish to create and apply this filter or Cancel to exit without saving.

COSN: DRUPAL USER MANUAL
45 8136 Old Keene Mill Road, Suite A-207, Springfield, VA 22152 | 703.451.8675 | www.balanceinteractive.com
To delete a filter
1. Select Filter Manager.
2. Find the filter to delete and select Delete.
3. Click OK to delete or Cancel to exit without deleting.
To edit a filter
1. Select Filter Manager.
2. Find the filter to edit and select Edit.
3. Make necessary changes and select Save Changes.
MANAGING USERS
Use the User manager to add and delete users, as well as edit user privileges. To manage users:
1. Select User Management from the settings page.
2. To add a user
a. Click Add User.
b. Enter the user’s email address.
c. Select the Access type for this user: View reports only, or Account Administrator, which
allows the user to edit account settings. The Account Administrator has access to all files within
an account.
d. Highlight the website profile to which this user should have access.
e. Click Add to move these profiles into the Selected Website Profiles list to give the user access.
f. Click Finish to create the new user.
3. To delete a user
a. Find the user to delete.
b. Select Delete.
c. Select OK to delete or Cancel to exit without deleting.
4. To edit a user’s settings
a. Find the user to edit.
b. Select Edit.
c. Make necessary changes & select Save.
MANAGING PROFILES
A profile is a set of rules that define the reports displayed for the site. Generally, a profile corresponds with a
domain, so there will be one profile per domain. The only reason to access this section is in order to add a
profile, i.e. if adding a blog or other domain to track, a profile would need to be added. To add a website
profile:

COSN: DRUPAL USER MANUAL
46 8136 Old Keene Mill Road, Suite A-207, Springfield, VA 22152 | 703.451.8675 | www.balanceinteractive.com
1. Select Add Website Profile from the Settings Page.
2. Decide whether to Add a profile for a new domain or Add a profile for an existing domain (most
likely this will be adding a profile for a new domain).
3. Provide the URL for the site to track (e.g. www.mywebsite.com).
4. Choose the Country from the drop-down list.
5. Choose the Time Zone from the drop-down list.
6. Select Finish or Cancel to exit without saving.
7. The tracking code will be generated. Follow Google’s instructions for copying the code onto the site.
HELP
For assistance with any aspect of Google Analytics, access the Resources section of the Settings page. For
general assistance, select Help. Google also offers specialized help with coding the site and their customized
features.
Balance Interactive is available to answer specific Google Analytics questions as well. For problems with
Google Analytics or questions on its use, contact us for individualized assistance.


