
Black & White Graphic Novel Guide
So You’re WorkiNG oN a Black & White Graphic Novel?
Great! This guide is designed to help you prepare your print-ready PDF for submission. If you have any
questions about these instructions, please be sure to contact your Check-In Coordinator.
• Book SizeS
We offer two sizes for black & white graphic novels: 6 x 9 and 8.25 x 11
inches. Both book sizes are only offered with portrait-orientation. This
means that the book will be bound on the longer side. We do not offer
the option for landscape-oriented books.
• paGe couNt & Book BiNdiNG
All of our books are softcover with perfect binding and can contain as few as 48 pages and as many as
200 pages.
perfect Binding – This type of binding is the traditional style in which the pages are glued along the
edge. It requires that we leave 1/8 inch of blank gutter space on the inside edge of all pages, as the glue
will not stick well to ink. This will also ensure that none of your illustrations will be lost in the gutter of
your book.
Our printer requires that we end all books on a blank, left-facing page and that the page count be divisible
by two. It is possible that as many as two blank pages will need to be added to the end of your book to
meet our printing requirements.
6 x 9 8.25 x 11

creating a print-ready File for a Black & White Graphic Novel
Special NoteS reGardiNG pdF FileS
Please note that the file you submit will need to meet the printer requirements. Submitting a print-
ready file means that the exact design you submit will be sent to the printer. Since the file is meant to be
“ready for printing,” we will not design your graphic novel. We will add a copyright page and, if necessary,
insert blank pages at the end of the manuscript to meet our printer’s requirements. These are the only
adjustments that will be made to your file by our designers. If you want design elements such as page
numbers, headers, or a table of contents to appear in your book, then these elements will need to be
included in the PDF file that you submit.
Because of the specific file requirements for creating e-books, we cannot guarantee that graphic novels
will meet the requirements of all e-book vendors.
imaGeS iN pdF FileS
Please be sure images meet the following requirements:
• All images need to have a resolution of at least 300 DPI/PPI (Dots Per Inch/Pixels Per Inch). Images
with a resolution of less than 300 DPI may appear distorted and blurry when printed.
• All images must fit within the printer margins of your book.
• If you are using any images or text that you did not create yourself, you will need to obtain written
permission from the copyright holder to include the material in your book.
text color iN pdF FileS
All text in the file should be 100% black. Any other color of text can
result in a faded look when the book is printed. To change the color of
text, select the text and choose the new color in the font menu. The
correct color can be seen in the image to the right (note: “Automatic”
black is the correct color as long as the page background is set to
white or “no color”).

creatiNG Your pdF
These instructions were prepared using Microsoft Word 2007 and show a book that is set up with the
proper margins. If you are using a different version of Microsoft Word, some screens may differ from the
diagrams. If you are using another word processing application (such as WordPerfect or OpenOffice) or
professional layout software (such as QuarkXPress), you can refer to your product’s documentation for
instructions on adjusting these settings. If you are using InDesign and would like a template, please ask
your Check In Coordinator.
First, you will need to set the page size and margins in your Word document to match the size of your
final book. To begin, open your manuscript in Word.
1. On the toolbar, go to page layout. Once there, choose margins, and finally, custom margins.

2. Once the set-up window opens, choose paper, then paper Size and select custom size. This is where
you will enter the trim size of your book in the Width and height sections.
3. Still in the set-up window, choose margins. At this point you will need to enter the margin
specifications for your trim size by referencing the list below:
page Setup: marginstop Bottom inside outside Gutter.75 .75 .5 .5 .13
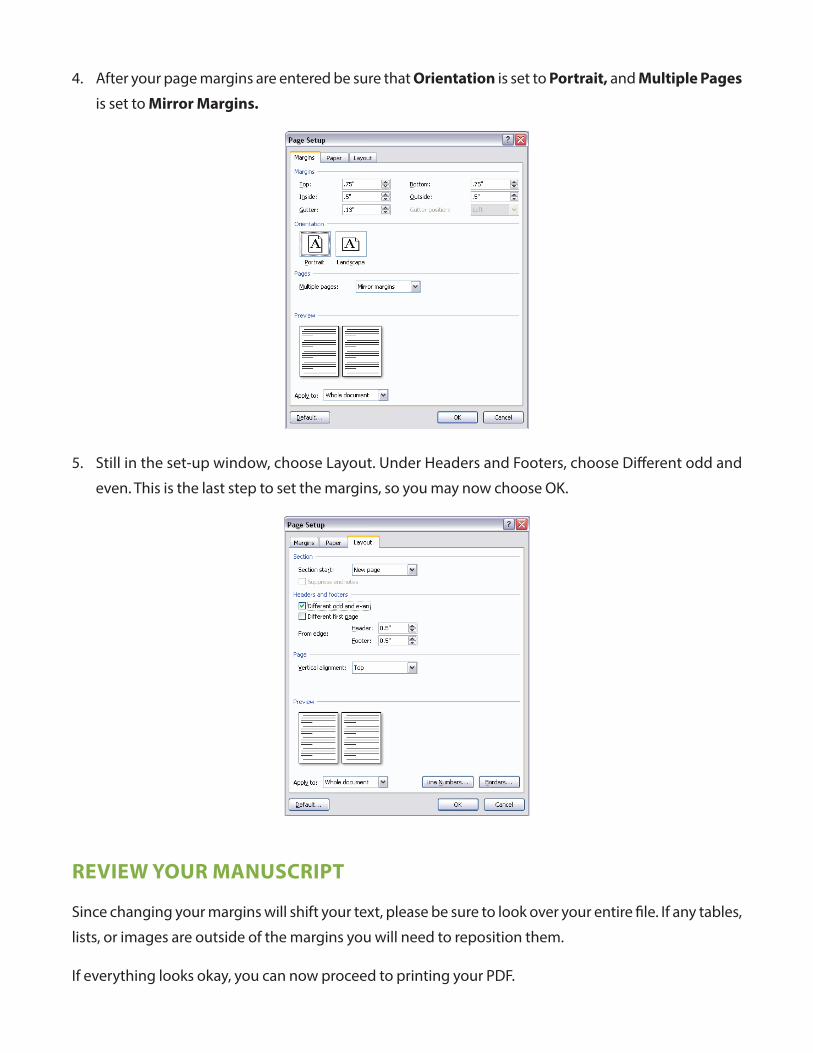
4. After your page margins are entered be sure that orientation is set to portrait, and multiple pages
is set to mirror margins.
5. Still in the set-up window, choose Layout. Under Headers and Footers, choose Different odd and
even. This is the last step to set the margins, so you may now choose OK.
revieW Your maNuScript
Since changing your margins will shift your text, please be sure to look over your entire file. If any tables,
lists, or images are outside of the margins you will need to reposition them.
If everything looks okay, you can now proceed to printing your PDF.
priNt Your pdF
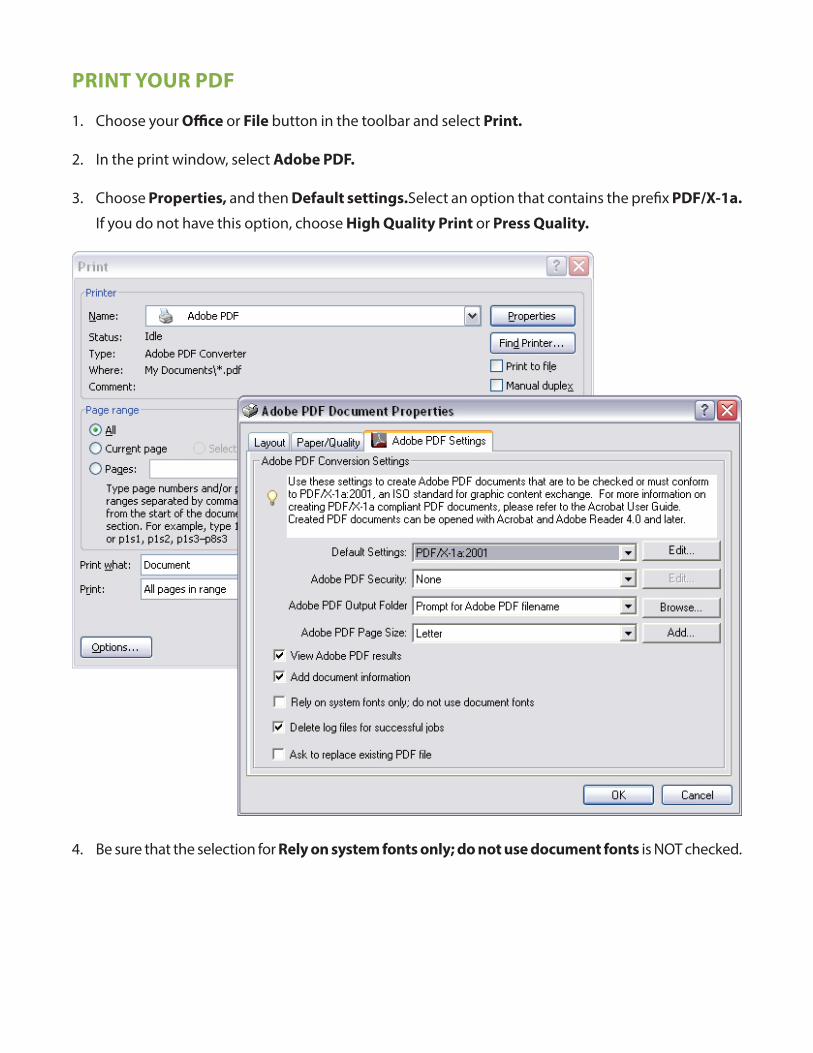
1. Choose your office or File button in the toolbar and select print.
2. In the print window, select adobe pdF.
3. Choose properties, and then default settings.Select an option that contains the prefix pdF/x-1a.
If you do not have this option, choose high Quality print or press Quality.
4. Be sure that the selection for rely on system fonts only; do not use document fonts is NOT checked.

5. Choose paper Quality, and then Black & White.
6. Select okay and decide the best place for you to save your PDF file.
BeFore You SuBmit
Before submitting your final file, review your PDF again. To view the PDF as it will appear printed, go to
View, then select Two-up Continuous and Show Cover Page During Two-up. This will ensure that you are
seeing the layout of your book as if you were looking at an open book.
5/14/14


