
fineDoc Number: EDCS-<XXXXX>
Last Revision Date: December 10, 2010
Created by: Dave McFarland
Template Ver. Number: EDCS-781852 Rev 3
CAE 1.4.1 UCS LDAP and Multiple Authentication Server
Configuration

TABLE OF CONTENTS
......................................................................................................................................................... 1
......................................................................................................................................................... 1
......................................................................................................................................................... 1
1 INTRODUCTION .................................................................................................................. 3
1.1 What Cisco Provides ....................................................................................................... 3 1.2 What the Field Site Must Provide .................................................................................. 3 1.3 Configure the AD server and collect information ........................................................ 3 1.4 Configuring LDAP on UCS ............................................................................................ 9
1.6 Removing LDAP configuration on UCS ...................................................................... 20

1 Introduction
This White Paper will guide the user through the configuration and verification LDAP to an AD
server
1.1 What Cisco Provides
Software
- UCS 1.4.1 Image
1.2 What the Field Site Must Provide
Hardware Requirements
o UCS system
o LDAP Server
1.3 Configure the AD server and collect information
Example AD configurations for the UCS LDAP configuration
1) Create or use an existing non-admin account to allow UCS to bind to the AD server.
2) For this example, the user ucsbind with password Nbv12345 has been created

3) Create a group folder containing the roles you will be linking to UCS. The roles in this
example are:
A) ucsaaa
B) ucsadmin
C) ucsnetwork
D) ucsoperation
E) ucssecurity
F) ucsstorage
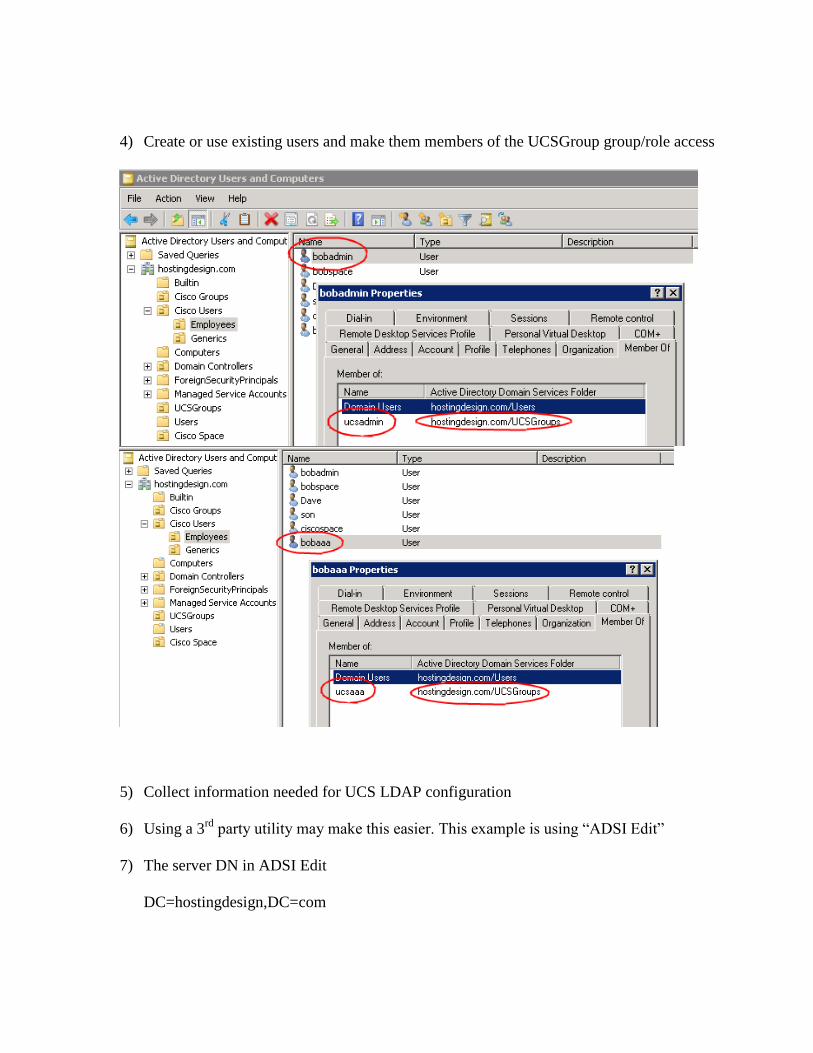
4) Create or use existing users and make them members of the UCSGroup group/role access
5) Collect information needed for UCS LDAP configuration
6) Using a 3rd
party utility may make this easier. This example is using “ADSI Edit”
7) The server DN in ADSI Edit
DC=hostingdesign,DC=com

8) LDAP groups can be obtained in the same fashion. e.g. ucsadmin DN
CN=ucsadmin,OU=UCSGroups,DC=hostingdesign,DC=com

9) The bind Distinguished name can be found by navigating to the bind account that was
created and examining the account Properties and the Distinguished Name String
CN=ucsbind,OU=Generics,OU=Cisco Users,DC=hostingdesign,DC=com

10) The name filter attribute can be found by looking at any user
sAMAccountName
11) Summary of AD values: a) BaseDN: DC=hostingdesign,DC=com b) BindDN: CN=ucsbind,OU=Generics,OU=Cisco Users,DC=hostingdesign,DC=com c) BindDN password: Nbv12345
c) Filter: sAMAccountName=$userid
d) Roles:
1) ucsadmin CN=ucsadmin,OU=UCSGroups,DC=hostingdesign,DC=com
2) ucsaaa CN=ucsaaa,OU=UCSGroups,DC=hostingdesign,DC=com
3) ucsnetwork CN=ucsnetwork,OU=UCSGroups,DC=hostingdesign,DC=com
4) ucsoperations CN=ucsoperations,OU=UCSGroups,DC=hostingdesign,DC=com
5) ucssecurity CN=ucssecurity,OU=UCSGroups,DC=hostingdesign,DC=com
6) ucsstorage CN=ucsstorage,OU=UCSGroups,DC=hostingdesign,DC=com
12) Users Create in AD all passwords Nbv12345 a) bobadmin (admin role) b) bobaaa (aaa role)

c) bobnetwork (network role) d) bobsecurity (server-security role)
1.4 Configuring LDAP on UCS
Create LDAP access to UCS
Important notes:
a) Make sure you are logged in as an admin user to the 6100 console port. This will prevent
you from being locked out and un-doing incorrect configurations. Otherwise, you’ll be
making a trip to the Data Center with a serial cable.
b) You can create a “local” Authentication Domain (shown later). Again, to give you a
method to gain access to UCS to correct invalid configuration. This is not necessary, as a
“Native” account is created by default. This allows you to get to UCS via local
authentication in the event your AD credentials are mis-configured. But, I like to have a
known back-door in case I mis-configure AD. Once AD is validated you can remove the
local account.
1) Create the local Authentication Domain. This is to give you access just in case.

cae-sj-ca3-A# scope security
cae-sj-ca3-A /security # create auth-domain local
cae-sj-ca3-A /security/auth-domain* # create default-auth
cae-sj-ca3-A /security/auth-domain/default-auth* # commit-buffer
cae-sj-ca3-A /security # show auth-domain local detail
Authentication domain:
Authentication domain name: local
Default Realm: Local
Authentication server group:
2) The LDAP tabs help define the workflow. Work right to left
3) The General Tab is where you can input Global settings. If you have different BaseDNs
for different AD servers do not enter into this Global setting area.

4) Add the BaseDN and filter derived in the previous section. The filter is made generic by
adding “=$userid”
cae-sj-ca3-A /security/ldap #
cae-sj-ca3-A /security/ldap # set basedn DC=hostingdesign,DC=com
cae-sj-ca3-A /security/ldap* # set filter sAMAccountName=$userid
cae-sj-ca3-A /security/ldap* # commit-buffer
cae-sj-ca3-A /security/ldap # show detail
LDAP:
Timeout: 30
Basedn: DC=hostingdesign,DC=com
Filter: sAMAccountName=$userid
User profile attribute:
Current Task:
5) Fill in the LDAP Provider dialog using the previously derived values.
a) Do not forget to apply the bind user’s password
b) If you are using a DNS entry, test it by pinging the DNS value at the CLI connect local-
management prompt

6) The only indication you’ve set some password
cae-sj-ca3-A /security/ldap #
cae-sj-ca3-A /security/ldap # create server
cae-sj-ca3-A /security/ldap # create server 10.29.96.77
cae-sj-ca3-A /security/ldap/server* # set binddn "CN=ucsbind,OU=Generics,OU=Cisco
cae-sj-ca3-A /security/ldap/server* # set binddn "CN=ucsbind,OU=Generics,OU=Cisco
Users,DC=hostingdesign,DC=com"
cae-sj-ca3-A /security/ldap/server* # set basedn DC=hostingdesign,DC=com
cae-sj-ca3-A /security/ldap/server* # set filter sAMAccountName=$userid

cae-sj-ca3-A /security/ldap/server* # set password
Enter the password: <PASSWORD>
Confirm the password: <PASSWORD>
cae-sj-ca3-A /security/ldap/server* # commit-buffer
cae-sj-ca3-A /security/ldap/server # show detail
LDAP server:
Hostname or IP address: 10.29.96.77
Order: 1
DN to search and read: CN=ucsbind,OU=Generics,OU=Cisco
Users,DC=hostingdesign,DC=com
Password: ****
Port: 389
SSL: No
Basedn: DC=hostingdesign,DC=com
User profile attribute:
Filter: sAMAccountName=$userid
7) Enable group authorization
cae-sj-ca3-A /security/ldap # scope server 10.29.96.77
cae-sj-ca3-A /security/ldap/server # scope ldap-group-rule
cae-sj-ca3-A /security/ldap/server/ldap-group-rule # set authorization enable
cae-sj-ca3-A /security/ldap/server/ldap-group-rule # show detail
Ldap group rules:
Group traversal: Recursive
Check user's ldap group: Enable
attribute holding parent DNs: memberOf

8) Results
9) LDAP Provider Group. Create your drop down identifier and connect it to your LDAP
Provider

10) Results
cae-sj-ca3-A /security/ldap # create auth-server-group CAE-LDAP-1
cae-sj-ca3-A /security/ldap/auth-server-group* # create server-ref 10.29.96.77
cae-sj-ca3-A /security/ldap/auth-server-group/server-ref* # commit-buffer
cae-sj-ca3-A /security/ldap/auth-server-group/server-ref # exit
cae-sj-ca3-A /security/ldap/auth-server-group # show detail
Authentication server group:
Authentication server group: CAE-LDAP-1
cae-sj-ca3-A /security/ldap/auth-server-group # show server-ref detail
Reference of already configured server:
Hostname or IP address: 10.29.96.77
Order: 1

11) Last tab is LDAP Group Maps
cae-sj-ca3-A /security/ldap # create ldap-group
CN=ucsadmin,OU=UCSGroups,DC=hostingdesign,DC=com
cae-sj-ca3-A /security/ldap/ldap-group* # create role admin
cocae-sj-ca3-A /security/ldap/ldap-group* # commit-buffer
cae-sj-ca3-A /security/ldap/ldap-group # exit
cae-sj-ca3-A /security/ldap # show ldap-group detail
Ldap group CN=ucsadmin,OU=UCSGroups,DC=hostingdesign,DC=com
Roles:
Name: admin
12) Repeat for the remaining roles you want to test.
13) Create your LDAP authentication Domain

14) Results

cae-sj-ca3-A /security # create auth-domain CAE-LDAP-1
cae-sj-ca3-A /security/auth-domain* # create default-auth
cae-sj-ca3-A /security/auth-domain/default-auth* # set realm ldap
cae-sj-ca3-A /security/auth-domain/default-auth* # set auth-server-group CAE-LDAP-1
cae-sj-ca3-A /security/auth-domain/default-auth* # commit-buffer
cae-sj-ca3-A /security/auth-domain/default-auth # exit
cae-sj-ca3-A /security/auth-domain # exit
cae-sj-ca3-A /security # show auth-domain CAE-LDAP-1 detail
Authentication domain:
Authentication domain name: CAE-LDAP-1
Default Realm: Ldap
Authentication server group: CAE-LDAP-1
15) Test using the CLI. Make sure you see the correct role. If not there is an error in the
configuration, typo, missing keyword, group enable, binduser password you will get the
following result.
cae-sj-ca3-A(nxos)# test aaa server ldap 10.29.96.77 bobadmin Nbv12345
user has been authenticated
Attributes downloaded from remote server:
User Groups:
CN=ucsadmin,OU=UCSGroups,DC=hostingdesign,DC=com
Roles:
admin
cae-sj-ca3-A(nxos)# test aaa server ldap 10.29.96.77 bobaaa Nbv12345
user has been authenticated
Attributes downloaded from remote server:
User Groups:
CN=ucsaaa,OU=UCSGroups,DC=hostingdesign,DC=com
Roles:
aaa

16) Now it is safe to test the GUI
Linux-shell>ssh –l ucs-<Domain-name>\\<username>@<hostname> Putty: Login as:ucs-<Domain-name>\<username>

1.6 Removing LDAP configuration on UCS
Sequence to remove LDAP configuration on UCS
Important notes:
There is a sequence to easily back out of a LDAP configuration. If done out of sequence,
errors will occur and require you to go back a few steps. Nothing critical, but good to know.
If you use the GUI workflow, it will help guide you.
1) Start by setting the Authentication Domain to <not set>
cae-sj-ca3-A /security # scope auth-domain CAE-LDAP-1

cae-sj-ca3-A /security/auth-domain # scope default-auth
cae-sj-ca3-A /security/auth-domain/default-auth # set auth-server-group ""
cae-sj-ca3-A /security/auth-domain/default-auth* # commit-buffer
2) Then set it to local
cae-sj-ca3-A /security # scope auth-domain CAE-LDAP-1
cae-sj-ca3-A /security/auth-domain # scope default-auth
cae-sj-ca3-A /security/auth-domain/default-auth # set realm local
cae-sj-ca3-A /security/auth-domain/default-auth* # commit-buffer
3) Make sure all Authentication is set to local

cae-sj-ca3-A /security # show auth-domain detail
Authentication domain:
Authentication domain name: CAE-LDAP-1
Default Realm: Local
Authentication server group:
Authentication domain name: local
Default Realm: Local
Authentication server group:
4) Next clear out the LDAP General configuration

cae-sj-ca3-A /security/ldap # show detail
LDAP:
Timeout: 30
Basedn: DC=hostingdesign,DC=com
Filter: sAMAccountName=$userid
User profile attribute:
Current Task:
cae-sj-ca3-A /security/ldap # set basedn ""
cae-sj-ca3-A /security/ldap* # set filter ""
cae-sj-ca3-A /security/ldap* # commit-buffer
cae-sj-ca3-A /security/ldap # show detail
LDAP:
Timeout: 30
Basedn:
Filter:
User profile attribute:
Current Task:
5) Skip to the LDAP Provider Groups tab , delete all LDAP Group providers

cae-sj-ca3-A /security/ldap # delete auth-server-group CAE-LDAP-1
cae-sj-ca3-A /security/ldap* # commit-buffer
6) Back to the LDAP Providers and delete all LDAP Providers
cae-sj-ca3-A /security/ldap # delete ldap-group "CN=ucsadmin,OU=UCSGroups,
DC=hostingdesign,DC=com"
cae-sj-ca3-A /security/ldap* # commit-buffer
7) Then delete the Authentication Domains

cae-sj-ca3-A /security # delete auth-domain CAE-LDAP-1
cae-sj-ca3-A /security* # delete auth-domain local
cae-sj-ca3-A /security* # commit-buffer


