
CareerTech Information Management System
(CTIMS)
Technology Center Business Master
Guidebook
February 2021

1
Table of Contents Logging in to CTIMS ............................................................................................. 1
Help and Troubleshooting .................................................................................. 2
Accessing Business Master Module .................................................................. 3
Searching Business Master ................................................................................. 4
Requesting New Business Codes ...................................................................... 7
Change Request ................................................................................................... 11
Viewing Your Requests ..................................................................................... 14

2
CTIMS Support
If you have questions about submitting information in CTIMS, please contact CTIMS Support at [email protected] , or contact:
Rebecca Thacker Technical Support Specialist Office: (405) 743-5134
Email: [email protected]
Kerri Watkins Manager, Information Management Division Office: (405) 743-6882
Email: [email protected]
Carol Hall Performance Data/Analysis Coordinator Office: (405) 743-5125
Email: [email protected]
Andra Beyer Data Quality Coordinator Office: (405) 743-5403
Email: [email protected]
Mika Hickman Administrative Assistant Office: (405) 743-5124
Email: [email protected]

3
Help and Troubleshooting
If you do not have a CTIMS account set up or are having trouble with the
navigation or software, contact [email protected]. Send a
message describing your problem. Include your school name and your
telephone number and we will contact you.
If you have forgotten your password, click the Forgot your password? link to
reset.
For helpful tips, see the CTIMS Helpful Hints section of this document.
IMPORTANT: Please log into CTIMS using Mozilla Firefox, Google
Chrome, or Microsoft Edge .
Internet Explorer is currently not compatible with CTIMS. CTIMS Customer Support Contact Rebecca Thacker Phone: 405-743-5134 [email protected]

4
Logging into CTIMS
Sign in using your school email and CTIMS password at
https://ctims.okcareertech.org/CTBDSWeb
Or,
Go to http://www.okcareertech.org/ and select CTIMS in the red bar at the
top of the page. Do not select the ODCTE Staff Login selection in the red
bar. This is not the CTIMS login.
On the CTIMS website, select the green CTIMS Login button.

5
Accessing the Business Master Module
The Business Master Module is used to search for business names, business codes and request new business codes.
The Business Master module is accessed with the roles of Full-Time Submitter, BIS Submitter, or EDI Local Initiative Coordinator.
If your role does not automatically come up as one of the above roles, you will need to change your role in the top right corner after you log in to CTIMS.
Access the Business Master module by selecting Organizations in the left navigation column by clicking on the +(plus).
If you have one of the above roles, but do not have the Organization tab, please email [email protected] for assistance.
6
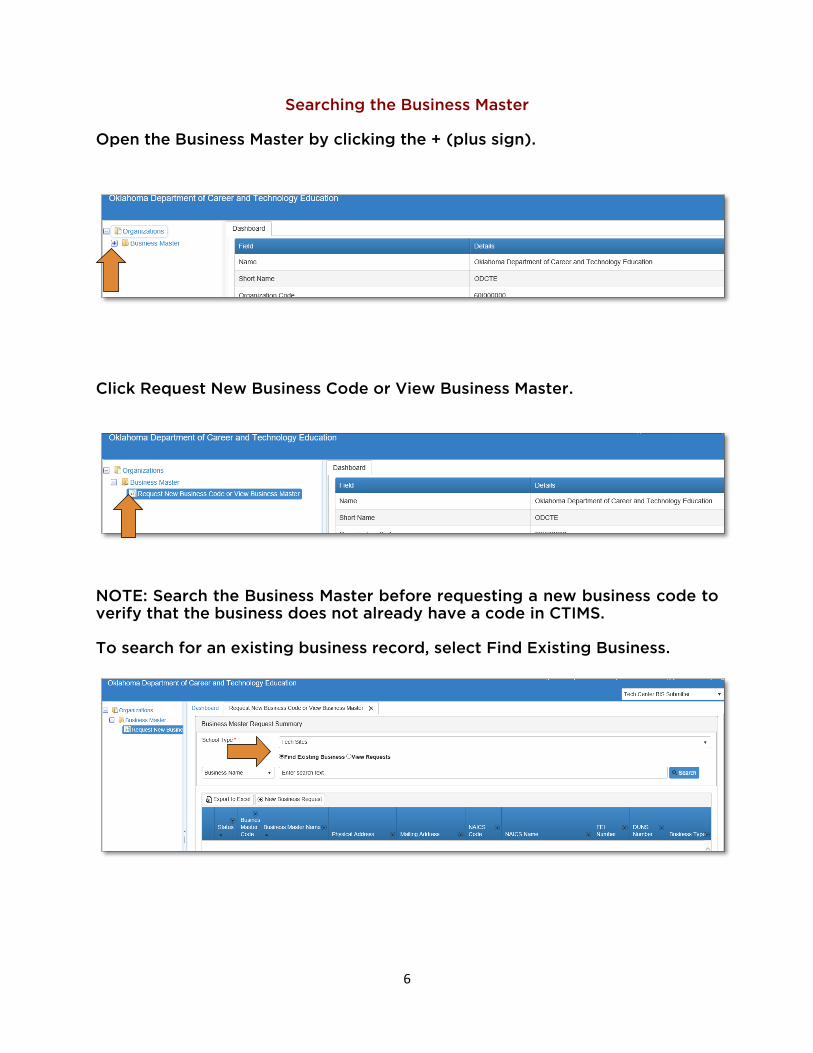
Searching the Business Master
Open the Business Master by clicking the + (plus sign).
Click Request New Business Code or View Business Master.
NOTE: Search the Business Master before requesting a new business code to verify that the business does not already have a code in CTIMS. To search for an existing business record, select Find Existing Business.

7
Click on the down arrow on the Business Name box to select different
search options.
You can search by Business Name, Business Code, City, or All.
If you choose Business Name, Business Code, or City, type at least one
character in the Enter Search Text box, then select the Search button.
If you select ALL and do not enter in any criteria, all records will be
displayed.
There may be more than one business with the same name. Match your
business name with the address. Also, the same business name could have
hyphens or be one word. If a business name has hyphens, try searching with
and without the hyphens.
8
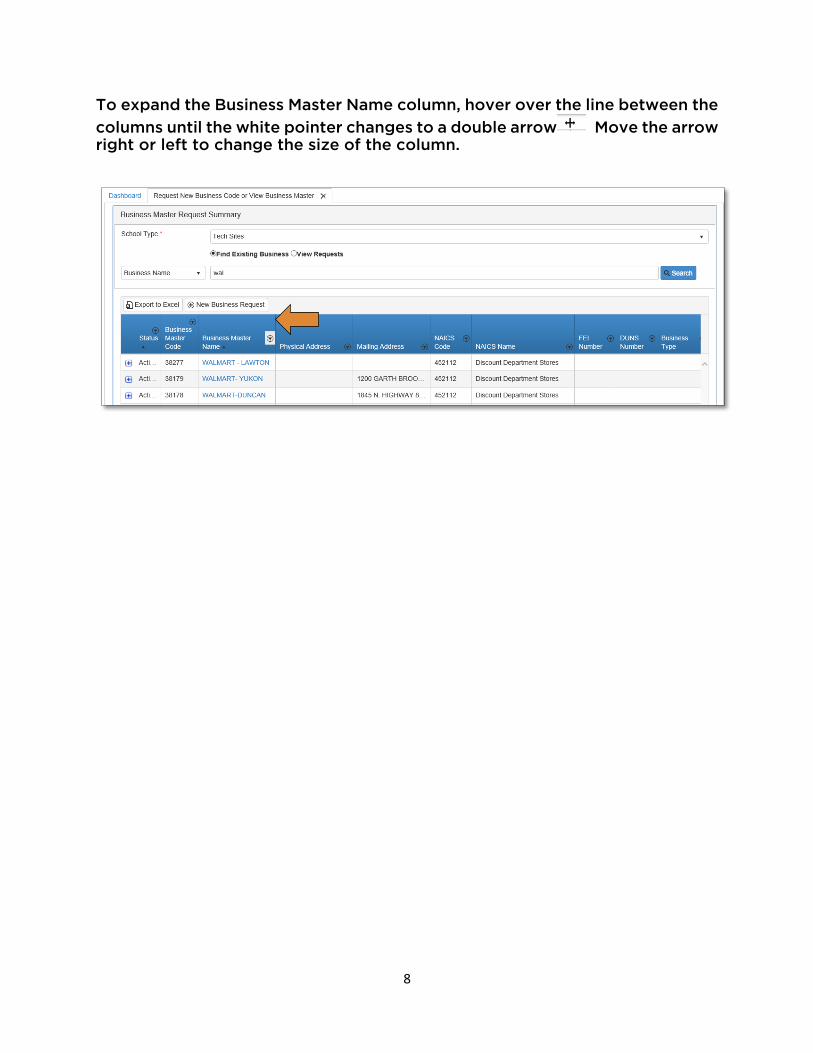
To expand the Business Master Name column, hover over the line between the
columns until the white pointer changes to a double arrow Move the arrow right or left to change the size of the column.

9
Requesting a New Business Code
If the business is not found, request a new business code by clicking on the New Business Request button. You will be directed to a new screen.
In the box beside Business Name, enter the name of the business. The
business name must be unique. If the business is a chain or the name already
exists, you will need to add a unique identifier, such as a town name or store
number to define it. Click Save & Next. You will be directed to a new screen.
10
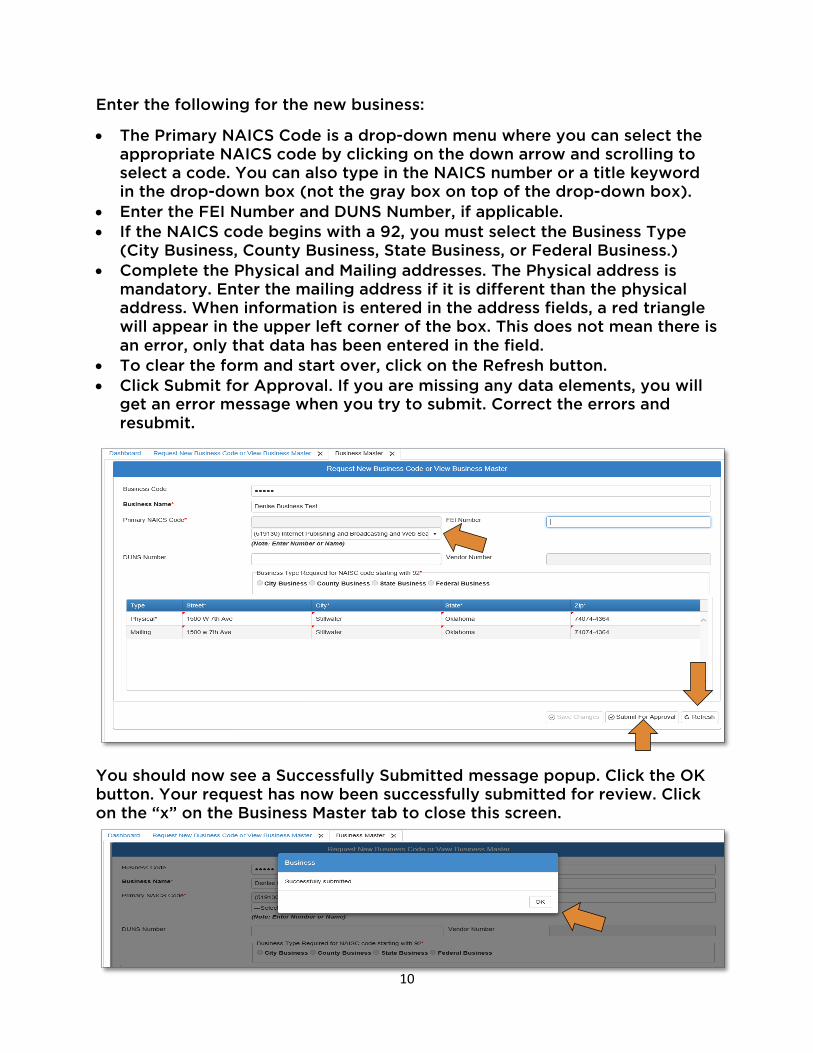
Enter the following for the new business:
The Primary NAICS Code is a drop-down menu where you can select the
appropriate NAICS code by clicking on the down arrow and scrolling to
select a code. You can also type in the NAICS number or a title keyword
in the drop-down box (not the gray box on top of the drop-down box).
Enter the FEI Number and DUNS Number, if applicable.
If the NAICS code begins with a 92, you must select the Business Type
(City Business, County Business, State Business, or Federal Business.)
Complete the Physical and Mailing addresses. The Physical address is
mandatory. Enter the mailing address if it is different than the physical
address. When information is entered in the address fields, a red triangle
will appear in the upper left corner of the box. This does not mean there is
an error, only that data has been entered in the field.
To clear the form and start over, click on the Refresh button.
Click Submit for Approval. If you are missing any data elements, you will
get an error message when you try to submit. Correct the errors and
resubmit.
You should now see a Successfully Submitted message popup. Click the OK
button. Your request has now been successfully submitted for review. Click
on the “x” on the Business Master tab to close this screen.

11
You will receive an email from [email protected] indicating that
your request was successfully submitted. No additional action is required
from you at this point.
The Information Management Division staff will review the request. You will
receive another email indicating that the request was approved or rejected.
See below for examples of these emails. If the request is approved the
Business Code will be on the first line of the e-mail.

12
If your Business Code request is rejected, you will get an email stating that
your Approval Status is Rejected. The reason for the rejection will be listed in
the Approval Process Note in the rejection email. See instructions for the
Change Request process to make corrections and resubmit your request.

13
Change Request
If changes need to be made after submitting a Business Code request, but
before it is fully approved, or if your request is rejected, you will need to go
through the change request process to make changes.
Select the View Requests radio button. To see only the requests submitted
by your site, clear the check mark beside All Sites. Type the first 3 letters of
your school name in the School Name(s) box and select your school. Click on
the Search button.
Select the request you wish to change by clicking on the blue Business
Master Name hyperlink.
Click the Change Request button.

14
You will get a popup indicating you are going to cancel the approval process
and initiate the change request process. Click OK.
Make the necessary changes to your request. Click on Submit for Approval.

15
Click OK on the popup screen. You will be directed to another screen.
Click on the Approve button if you are ready to finalize your changes.

16
Viewing Your Requests
View the business requests that you have submitted by returning to the
screen with the tab entitled Request New Business Code or View Business
Master. Select the radio button beside View Requests. To see only the
requests submitted by your site, clear the check mark beside All Sites. Type
the first 3 letters of your school name in the School Name(s) box and select
your school. Click on the Search button.
This will bring up the list of requests. To see the status of the request, click
on the + (plus) sign at the beginning of the line.

17
You can view the details of the business request as it moves through the
approval process.


