Citrix XenDesktop™
Provisioning & Machine Creation Deep Dive
Exploring Citrix XenDesktop™ v7.1 Provisioning & Machine Creation on VMware vSphere™ 5.1 and Tintri VMstore™
TECHNICAL WHITE PAPER, Revision 0.3, April 2014 May 5, 2014
Contents
Tintri Citrix XenDesktop v7.1 - Provisioning & Machine Creation Deep Dive | Page i
Contents
Executive Summary 1Introduction – Why Tintri for XenDesktop? 2
Consolidated list of practices . . . . . . . . . . . . . . . . . . . . . . . . . . . . . . . . . . . . . . . . . 3
Prerequisites 5Overview of Provisioning Methods 7
Citrix Machine Creation Services (MCS) . . . . . . . . . . . . . . . . . . . . . . . . . . . . . . . . . 7Citrix Provisioning Services (PVS) . . . . . . . . . . . . . . . . . . . . . . . . . . . . . . . . . . . . . . 7
What is PVS and how does it work? . . . . . . . . . . . . . . . . . . . . . . . . . . . . . . . . . . . . . . . 7Tintri Native Clones using VAAI plugin . . . . . . . . . . . . . . . . . . . . . . . . . . . . . . . . . . 8Mix ‘N Match! . . . . . . . . . . . . . . . . . . . . . . . . . . . . . . . . . . . . . . . . . . . . . . . . . . . . . . 9
Consideration Factors 11
Performance . . . . . . . . . . . . . . . . . . . . . . . . . . . . . . . . . . . . . . . . . . . . . . . . . . . . . .11Host Resources – CPU & Memory . . . . . . . . . . . . . . . . . . . . . . . . . . . . . . . . . . . . . . . . 11Login VSI . . . . . . . . . . . . . . . . . . . . . . . . . . . . . . . . . . . . . . . . . . . . . . . . . . . . . . . . . . . . 12
Space Utilization & Capacity Considerations . . . . . . . . . . . . . . . . . . . . . . . . . . . .12VM Swap Files . . . . . . . . . . . . . . . . . . . . . . . . . . . . . . . . . . . . . . . . . . . . . . . . . . . . . . . . 13
Persistence . . . . . . . . . . . . . . . . . . . . . . . . . . . . . . . . . . . . . . . . . . . . . . . . . . . . . . .14User Profiles . . . . . . . . . . . . . . . . . . . . . . . . . . . . . . . . . . . . . . . . . . . . . . . . . . . . . .14OS Optimizations . . . . . . . . . . . . . . . . . . . . . . . . . . . . . . . . . . . . . . . . . . . . . . . . . .15Audit & Compliance . . . . . . . . . . . . . . . . . . . . . . . . . . . . . . . . . . . . . . . . . . . . . . . .15
Management & Housekeeping 16
Scaling . . . . . . . . . . . . . . . . . . . . . . . . . . . . . . . . . . . . . . . . . . . . . . . . . . . . . . . . . . .16Adding additional VMs to a Machine Catalog . . . . . . . . . . . . . . . . . . . . . . . . . . .16Image Updates – Keeping the Master Image Current . . . . . . . . . . . . . . . . . . . . .17Session Limits . . . . . . . . . . . . . . . . . . . . . . . . . . . . . . . . . . . . . . . . . . . . . . . . . . . . .17Change control . . . . . . . . . . . . . . . . . . . . . . . . . . . . . . . . . . . . . . . . . . . . . . . . . . . .18
Introducing New Images to Production . . . . . . . . . . . . . . . . . . . . . . . . . . . . . . . . . . . 18Enhancement Suggestions . . . . . . . . . . . . . . . . . . . . . . . . . . . . . . . . . . . . . . . . . . . . . . 21
Contents
Tintri Citrix XenDesktop v7.1 - Provisioning & Machine Creation Deep Dive | Page ii
Exceptions . . . . . . . . . . . . . . . . . . . . . . . . . . . . . . . . . . . . . . . . . . . . . . . . . . . . . . . . . . . 22Rolling back . . . . . . . . . . . . . . . . . . . . . . . . . . . . . . . . . . . . . . . . . . . . . . . . . . . . . . . . . . 23
One size does not fit all: Multiple master images . . . . . . . . . . . . . . . . . . . . . . . . 23Third Party Software . . . . . . . . . . . . . . . . . . . . . . . . . . . . . . . . . . . . . . . . . . . . . . . 23Bloated Images and Working Set Size . . . . . . . . . . . . . . . . . . . . . . . . . . . . . . . . . . 24Environmental Changes to the VMware Infrastructure . . . . . . . . . . . . . . . . . . .24
The Ghost of Christmas Past–Aging Master Images 26Data Protection & Disaster Recovery (DR) Overview 27
Backup - XenDesktop Infrastructure Servers . . . . . . . . . . . . . . . . . . . . . . . . . . . . 27DR - XenDesktop Infrastructure Servers . . . . . . . . . . . . . . . . . . . . . . . . . . . . . . . . 28
Pop the hood! – Exploring Typical Scenarios 29
DDoS - Distributed Disasters of Scheduling . . . . . . . . . . . . . . . . . . . . . . . . . . . . . 29Das Bootin – The PVS Boot-up Process . . . . . . . . . . . . . . . . . . . . . . . . . . . . . . . . . 31PVS and MCS: Network Resources vs Storage Resources . . . . . . . . . . . . . . . . . .31Filler up! . . . . . . . . . . . . . . . . . . . . . . . . . . . . . . . . . . . . . . . . . . . . . . . . . . . . . . . . . 33
Background . . . . . . . . . . . . . . . . . . . . . . . . . . . . . . . . . . . . . . . . . . . . . . . . . . . . . . . . . . 33Troubleshooting Steps: . . . . . . . . . . . . . . . . . . . . . . . . . . . . . . . . . . . . . . . . . . . . . . . . . 33From Bad to Worse: The Plot Thickens . . . . . . . . . . . . . . . . . . . . . . . . . . . . . . . . . . . . 34Light Bulb Moment . . . . . . . . . . . . . . . . . . . . . . . . . . . . . . . . . . . . . . . . . . . . . . . . . . . . 35Tintri VMstore UI to the Rescue! . . . . . . . . . . . . . . . . . . . . . . . . . . . . . . . . . . . . . . . . . 35Lessons learned . . . . . . . . . . . . . . . . . . . . . . . . . . . . . . . . . . . . . . . . . . . . . . . . . . . . . . 37
Playing Catch-up – Assessing the impact of a dated image . . . . . . . . . . . . . . . .37
Conclusion 39Additional Resources – Reference URLs 40
Tintri Links . . . . . . . . . . . . . . . . . . . . . . . . . . . . . . . . . . . . . . . . . . . . . . . . . . . . . . . . 40Citrix Links . . . . . . . . . . . . . . . . . . . . . . . . . . . . . . . . . . . . . . . . . . . . . . . . . . . . . . . . 40Other . . . . . . . . . . . . . . . . . . . . . . . . . . . . . . . . . . . . . . . . . . . . . . . . . . . . . . . . . . . . 40
Appendix A – Environment Details 41

Executive Summary
Tintri Citrix XenDesktop v7.1 - Provisioning & Machine Creation Deep Dive | Page 1
Executive Summary
This paper explores machine creation & provisioning technologies in Citrix XenDesktop 7.1 deployed on Tintri VM-aware storage. The target audience includes IT admins, architects, and other technical roles that already have some experience with XenDesktop, vSphere and stor-age. If you do not have any experience with XenDesktop yet, we strongly suggest you follow our XenDesktop 7.1 Quick Start Guide to get a functional XenDesktop environment in place, and then continue reading this paper.There are three methods available to provision XenDesktop virtual desktops:
• Citrix Provisioning Services (PVS). • Machine Creation Services (MCS). • Tintri Native space and performance efficient VAAI Clones.
All three methods are all fully supported and work very well on Tintri VMstore systems. Decid-ing which method(s) to use for your organization depends on many factors, and the goal of this paper is to give you more insight into each technology to help you make a well-informed deci-sion for your enterprise.We recommend you try each of the methods covered in this paper for yourself to discover what works best for you and IT team. Because the technologies described are software-based, nothing is set in stone and you can easily change direction down the road. This paper provides insight into alternative approaches to illustrate how Tintri storage is best suited to build large scale VDI infrastructure starting from pilot deployments. Without further ado, let’s dive in!
Introduction
Tintri Citrix XenDesktop v7.1 - Provisioning & Machine Creation Deep Dive | Page 2
Introduction – Why Tintri for XenDesktop?
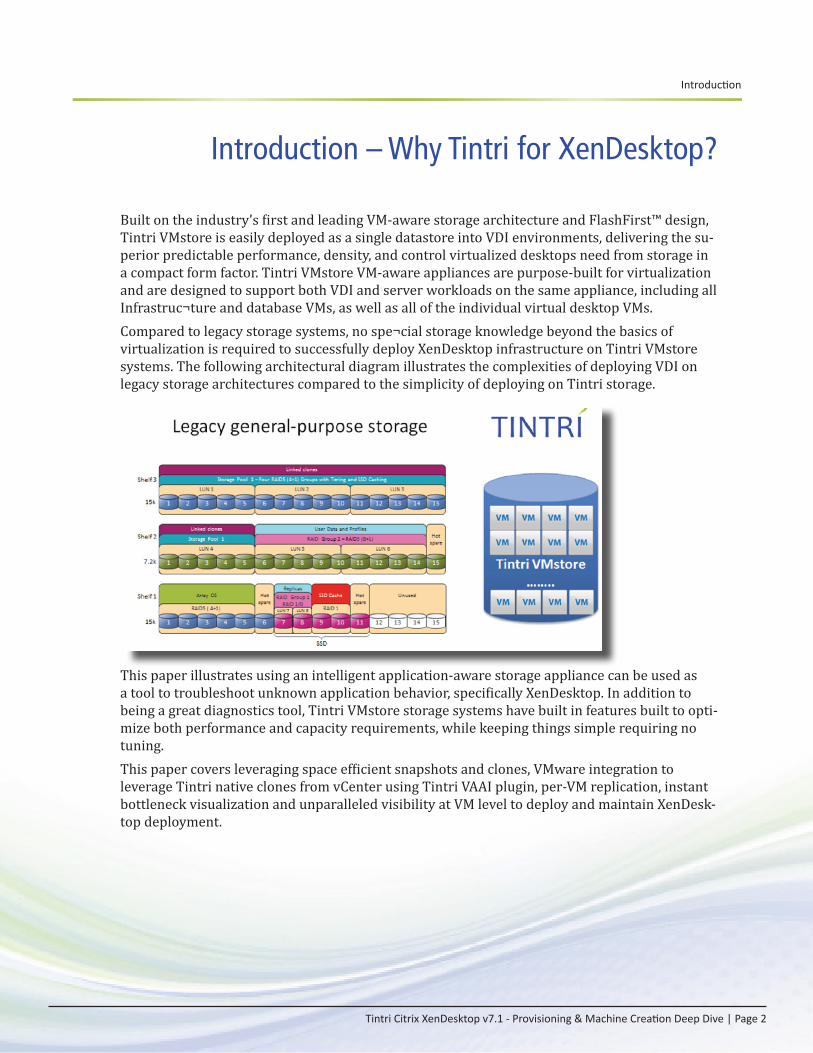
Built on the industry’s first and leading VM-aware storage architecture and FlashFirst™ design, Tintri VMstore is easily deployed as a single datastore into VDI environments, delivering the su-perior predictable performance, density, and control virtualized desktops need from storage in a compact form factor. Tintri VMstore VM-aware appliances are purpose-built for virtualization and are designed to support both VDI and server workloads on the same appliance, including all Infrastruc¬ture and database VMs, as well as all of the individual virtual desktop VMs. Compared to legacy storage systems, no spe¬cial storage knowledge beyond the basics of virtualization is required to successfully deploy XenDesktop infrastructure on Tintri VMstore systems. The following architectural diagram illustrates the complexities of deploying VDI on legacy storage architectures compared to the simplicity of deploying on Tintri storage.
This paper illustrates using an intelligent application-aware storage appliance can be used as a tool to troubleshoot unknown application behavior, specifically XenDesktop. In addition to being a great diagnostics tool, Tintri VMstore storage systems have built in features built to opti-mize both performance and capacity requirements, while keeping things simple requiring no tuning. This paper covers leveraging space efficient snapshots and clones, VMware integration to leverage Tintri native clones from vCenter using Tintri VAAI plugin, per-VM replication, instant bottleneck visualization and unparalleled visibility at VM level to deploy and maintain XenDesk-top deployment.
Introduction
Tintri Citrix XenDesktop v7.1 - Provisioning & Machine Creation Deep Dive | Page 3
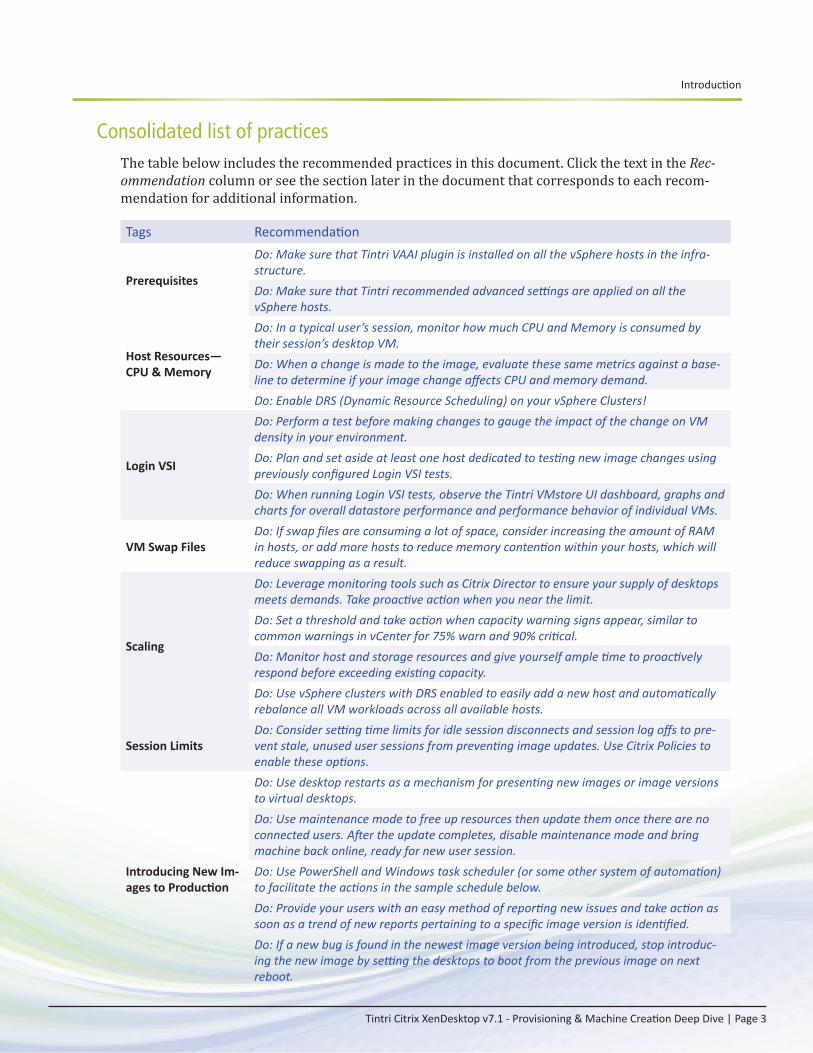
Consolidated list of practicesThe table below includes the recommended practices in this document. Click the text in the Rec-ommendation column or see the section later in the document that corresponds to each recom-mendation for additional information.
Tags Recommendation
Prerequisites
Do: Make sure that Tintri VAAI plugin is installed on all the vSphere hosts in the infra-structure.Do: Make sure that Tintri recommended advanced settings are applied on all the vSphere hosts.
Host Resources— CPU & Memory
Do: In a typical user’s session, monitor how much CPU and Memory is consumed by their session’s desktop VM.Do: When a change is made to the image, evaluate these same metrics against a base-line to determine if your image change affects CPU and memory demand. Do: Enable DRS (Dynamic Resource Scheduling) on your vSphere Clusters!
Login VSI
Do: Perform a test before making changes to gauge the impact of the change on VM density in your environment.Do: Plan and set aside at least one host dedicated to testing new image changes using previously configured Login VSI tests. Do: When running Login VSI tests, observe the Tintri VMstore UI dashboard, graphs and charts for overall datastore performance and performance behavior of individual VMs.
VM Swap FilesDo: If swap files are consuming a lot of space, consider increasing the amount of RAM in hosts, or add more hosts to reduce memory contention within your hosts, which will reduce swapping as a result.
Scaling
Do: Leverage monitoring tools such as Citrix Director to ensure your supply of desktops meets demands. Take proactive action when you near the limit.Do: Set a threshold and take action when capacity warning signs appear, similar to common warnings in vCenter for 75% warn and 90% critical. Do: Monitor host and storage resources and give yourself ample time to proactively respond before exceeding existing capacity.Do: Use vSphere clusters with DRS enabled to easily add a new host and automatically rebalance all VM workloads across all available hosts.
Session LimitsDo: Consider setting time limits for idle session disconnects and session log offs to pre-vent stale, unused user sessions from preventing image updates. Use Citrix Policies to enable these options.
Introducing New Im-ages to Production
Do: Use desktop restarts as a mechanism for presenting new images or image versions to virtual desktops.Do: Use maintenance mode to free up resources then update them once there are no connected users. After the update completes, disable maintenance mode and bring machine back online, ready for new user session.Do: Use PowerShell and Windows task scheduler (or some other system of automation) to facilitate the actions in the sample schedule below.Do: Provide your users with an easy method of reporting new issues and take action as soon as a trend of new reports pertaining to a specific image version is identified.Do: If a new bug is found in the newest image version being introduced, stop introduc-ing the new image by setting the desktops to boot from the previous image on next reboot.
Introduction
Tintri Citrix XenDesktop v7.1 - Provisioning & Machine Creation Deep Dive | Page 4
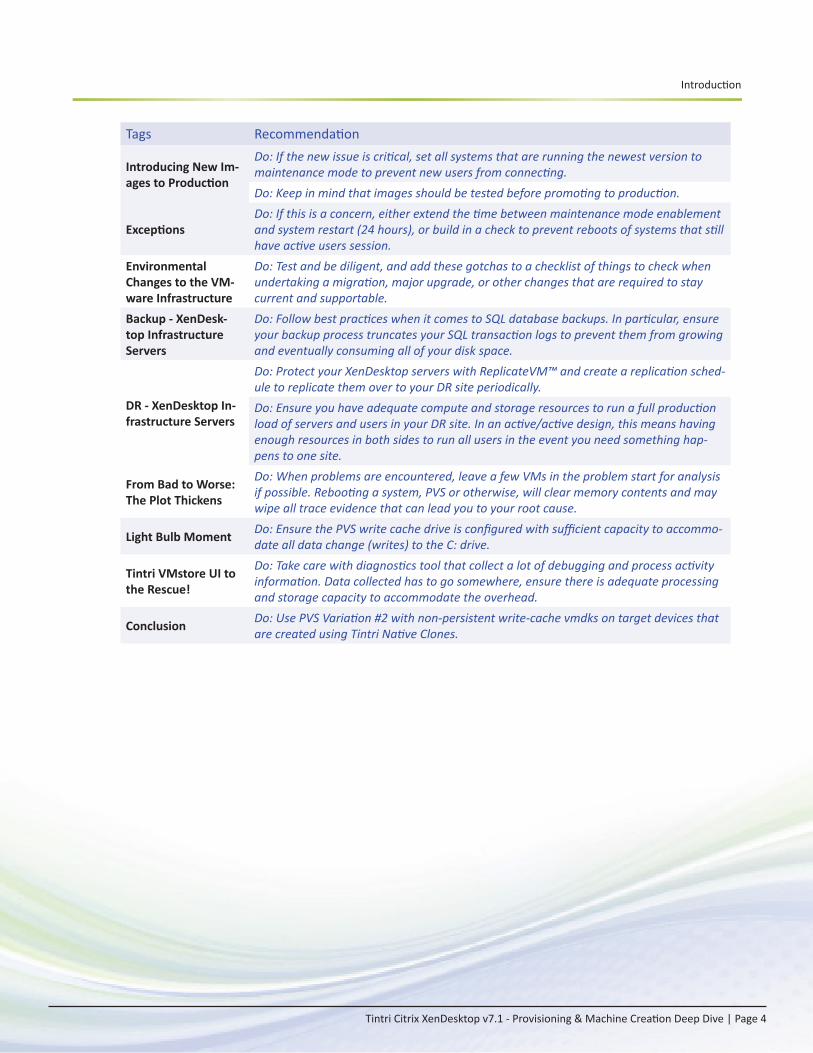
Tags Recommendation
Introducing New Im-ages to Production
Do: If the new issue is critical, set all systems that are running the newest version to maintenance mode to prevent new users from connecting.Do: Keep in mind that images should be tested before promoting to production.
ExceptionsDo: If this is a concern, either extend the time between maintenance mode enablement and system restart (24 hours), or build in a check to prevent reboots of systems that still have active users session.
Environmental Changes to the VM-ware Infrastructure
Do: Test and be diligent, and add these gotchas to a checklist of things to check when undertaking a migration, major upgrade, or other changes that are required to stay current and supportable.
Backup - XenDesk-top Infrastructure Servers
Do: Follow best practices when it comes to SQL database backups. In particular, ensure your backup process truncates your SQL transaction logs to prevent them from growing and eventually consuming all of your disk space.
DR - XenDesktop In-frastructure Servers
Do: Protect your XenDesktop servers with ReplicateVM™ and create a replication sched-ule to replicate them over to your DR site periodically. Do: Ensure you have adequate compute and storage resources to run a full production load of servers and users in your DR site. In an active/active design, this means having enough resources in both sides to run all users in the event you need something hap-pens to one site.
From Bad to Worse: The Plot Thickens
Do: When problems are encountered, leave a few VMs in the problem start for analysis if possible. Rebooting a system, PVS or otherwise, will clear memory contents and may wipe all trace evidence that can lead you to your root cause.
Light Bulb Moment Do: Ensure the PVS write cache drive is configured with sufficient capacity to accommo-date all data change (writes) to the C: drive.
Tintri VMstore UI to the Rescue!
Do: Take care with diagnostics tool that collect a lot of debugging and process activity information. Data collected has to go somewhere, ensure there is adequate processing and storage capacity to accommodate the overhead.
Conclusion Do: Use PVS Variation #2 with non-persistent write-cache vmdks on target devices that are created using Tintri Native Clones.

Prerequisites
Tintri Citrix XenDesktop v7.1 - Provisioning & Machine Creation Deep Dive | Page 5
Prerequisites
Please review the latest NFS Best Practices guide available in the Tintri Support portal to be sure your environment is correctly configured and optimized for your Tintri VMstore.Most importantly, it is critical that the Tintri VAAI plugin is installed on each of your vSphere Hosts. This can be easily achieved using VUM (VMware Update Manager) to scan and remediate your hosts to the latest version of the Tintri VAAI plugin, downloadable from the support portal.
Do: Make sure that Tintri VAAI plugin is installed on all the vSphere hosts in the infrastructure.
In addition to having the VAAI plugin installed, your host Advanced Configuration settings should match those listed in the NFS Best Practices guide. Tintri vSphere Web Client plugin comes in very handy to quickly check and configure recommended settings across all of your hosts in a few quick clicks. With the web client plugin installed and your VMstore configured, change to the datastore view and right-click on your Tintri VMstore. Select “All Tintri Actions” – “Apply Best Practices”, as shown here:
The Best Practices dialog will appear with a list of our hosts connected to the datastore you selected and the configured settings for each:

Prerequisites
Tintri Citrix XenDesktop v7.1 - Provisioning & Machine Creation Deep Dive | Page 6
Values can be modified manually within the grid or simply click “Set best practices values” to change all values that do not already match to those settings we recommend. Click on Save to apply the settings to your hosts.
Do: Make sure that Tintri recommended advanced settings are applied on all the vSphere hosts.

Overview of Provisioning Methods
Tintri Citrix XenDesktop v7.1 - Provisioning & Machine Creation Deep Dive | Page 7
Overview of Provisioning Methods
In the paper, we’ll be testing and discussing the following deployment methods: • Citrix Machine Creation Services (MCS) • Citrix Provisioning Services (PVS) • Tintri Native Clones using VAAI plugin
Citrix Machine Creation Services (MCS)Citrix MCS provides the simplest means of creating a machine catalog. MCS tools and services are baked into a default XenDesktop install ready for immediate use after install and the basic configuration steps of adding a VMware vCenter server and host resources to your XD deploy-ment. A high level view of MCS is illustrated in the follow-ing picture:Detailed information about MCS can be found in XenDesktop 7.1 Machine Creation Services (MCS) Deep Dive, another paper in this Deep Dive series that is dedicated specifically to exploring MCS on Tintri.
Citrix Provisioning Services (PVS)Citrix PVS is an alternative method for creating and deploying large numbers of clones. PVS works with XenDesktop, as well as XenApp. The technology, which was originally developed for physical desk-top systems, has been adapted for use with virtual desktops. Detailed information about this provisioning method can be found in XenDesktop 7.1 Provisioning Services (PVS) Deep Dive, another paper in this Deep Dive series that is dedicated specifically to explor-ing PVS on Tintri.
What is PVS and how does it work? PVS has additional Infrastructure requirements and additional components need to be installed than those included with XenDesktop. Similar to the XenDesktop infrastructure server VMs, PVS server VMs can also sit in the same Tintri VMstore as all of the virtual desktops VMs. At a minimum, one server VM can be used for PVS, which will hold the roles of streaming server and database. In a nutshell, “target” systems (Virtual Machines that don’t have an OS disk) are configured to boot from the network (PXE). A PVS streaming server(s) provides a PXE bootstrap which instructs the machines to request a vDisk from one of the PVS streaming servers to boot off. The PVS Servers hold a record of all preconfigured “targets”, identifiable by MAC address. When the

Overview of Provisioning Methods
Tintri Citrix XenDesktop v7.1 - Provisioning & Machine Creation Deep Dive | Page 8
requesting MAC address is found in the backend database of all targets, a vDisk is streamed to the target, along with unique personalization (machine name, SID, domain computer account password, etc.) injected in. The streamed OS disk (C: drive) is appears as a Citrix Virtual Disk from within the guest.
Tintri Native Clones using VAAI plugin VMware vStorage APIs for Array Integration, or VAAI as it is more commonly referred to, is a power-ful VMware technology baked into every Tintri VMstore. In a nutshell, VAAI offloads some tasks from the vSphere host to the storage device to leverage efficiencies built into an array. Tasks common to a XenDesktop environment that are improved through the use of VAAI include copy-ing of disks (.vmdk files) and cloning entire VMs.

Overview of Provisioning Methods
Tintri Citrix XenDesktop v7.1 - Provisioning & Machine Creation Deep Dive | Page 9
To create our Machine Catalog of Tintri Native Clones, using the Tintri UI, clone the Master Im-age VM, specify how many clones you want and be sure to apply a guest customization specifica-tion. If you do not have a guest customization spec, create one in vCenter using the vSphere Web Client.
Detailed information about this provisioning method can be found in the XenDesktop 7.1 Tintri Native Clones Deep Dive, another paper in this Deep Dive series that is dedicated specifically to exploring the use of Tintri Native Clones.
Mix ‘N Match!Any given environment may need to be able to mix and match the best of all solutions for an optimized deployment. The simple Tintri Native Clones method is not optimal if you desire to be able to manage a single image. VMs will be prone to drift from their original image, just as physical desktops do. The beauty of having non-persistent desktops (PVS & MCS) is the ability to essentially re-image them back to a clean master template in about as long as it takes to reboot or power cycle the VM. The drawback to this is the catch-up required if you have an old image (which we will cover in more detail later).
Overview of Provisioning Methods
Tintri Citrix XenDesktop v7.1 - Provisioning & Machine Creation Deep Dive | Page 10
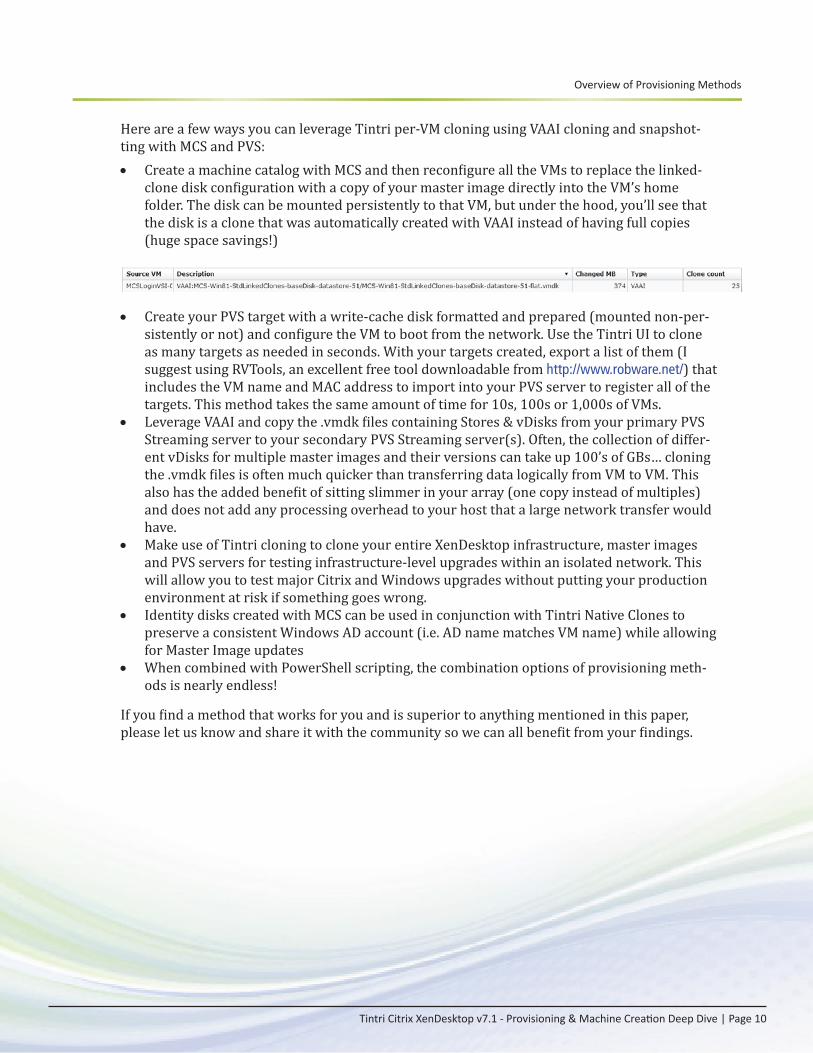
Here are a few ways you can leverage Tintri per-VM cloning using VAAI cloning and snapshot-ting with MCS and PVS:
• Create a machine catalog with MCS and then reconfigure all the VMs to replace the linked-clone disk configuration with a copy of your master image directly into the VM’s home folder. The disk can be mounted persistently to that VM, but under the hood, you’ll see that the disk is a clone that was automatically created with VAAI instead of having full copies (huge space savings!)
• Create your PVS target with a write-cache disk formatted and prepared (mounted non-per-sistently or not) and configure the VM to boot from the network. Use the Tintri UI to clone as many targets as needed in seconds. With your targets created, export a list of them (I suggest using RVTools, an excellent free tool downloadable from http://www.robware.net/) that includes the VM name and MAC address to import into your PVS server to register all of the targets. This method takes the same amount of time for 10s, 100s or 1,000s of VMs.
• Leverage VAAI and copy the .vmdk files containing Stores & vDisks from your primary PVS Streaming server to your secondary PVS Streaming server(s). Often, the collection of differ-ent vDisks for multiple master images and their versions can take up 100’s of GBs… cloning the .vmdk files is often much quicker than transferring data logically from VM to VM. This also has the added benefit of sitting slimmer in your array (one copy instead of multiples) and does not add any processing overhead to your host that a large network transfer would have.
• Make use of Tintri cloning to clone your entire XenDesktop infrastructure, master images and PVS servers for testing infrastructure-level upgrades within an isolated network. This will allow you to test major Citrix and Windows upgrades without putting your production environment at risk if something goes wrong.
• Identity disks created with MCS can be used in conjunction with Tintri Native Clones to preserve a consistent Windows AD account (i.e. AD name matches VM name) while allowing for Master Image updates
• When combined with PowerShell scripting, the combination options of provisioning meth-ods is nearly endless!
If you find a method that works for you and is superior to anything mentioned in this paper, please let us know and share it with the community so we can all benefit from your findings.

Consideration Factors
Tintri Citrix XenDesktop v7.1 - Provisioning & Machine Creation Deep Dive | Page 11
Consideration Factors
Now that you’re very familiar with machine creation and the various provisioning methods available, which method will you choose for your organization? This section will help you de-cide by providing you with many consideration factors for an optimal deployment. Keep these in mind while evaluating how best to run your XenDesktop infrastructure. Consideration factors unique to each of the three (3) provisioning are covered in more detail in each respective individual deep dive papers:
• PVS Deep Dive • MCS Deep Dive • Tintri Native Clones Deep Dive
PerformanceThe performance and user experience of XenDesktop VMs can vary broadly based on the con-figuration of Windows and other software installed within each master image. Dependencies for applications within a given virtual desktop to database servers, file servers, and other sources of data can also greatly vary performance. When evaluating performance, pay particularly close attention to these areas:
Host Resources – CPU & Memory
Do: In a typical user’s session, monitor how much CPU and Memory is consumed by their ses-sion’s desktop VM.Do: When a change is made to the image, evaluate these same metrics against a baseline to de-termine if your image change affects CPU and memory demand.
Seemingly small changes could have a dramatic impact of CPU and memory usage. An example configuration change worth evaluating is installing an additional browser into your master im-age.Small increase or decrease in one VM resource consumption after a change are amplified when applied to 100’s or 1,000’s of VM. A 5% change increase in CPU usage for a specific task may not seem like much, but it could be the difference of needing to add more hosts to your cluster(s), a consequence that has real financial impact.When evaluating performance all of your VMs, you will have some that peak at very high utiliza-tion rates, and others that are near idle. If all the heaviest users happened to randomly connect to desktops all on the same host, all the users on the host would be negatively impacted. Be sure to enable DRS on your clusters and allow your VM workloads to distribute themselves evenly across all hosts to better tolerate heavy-use VMs and average out the load. This feature is only available in vSphere Enterprise, Enterprise Plus and vSphere Desktop (licensed per User in-stead of per CPU socket).
Do: Enable DRS (Dynamic Resource Scheduling) on your vSphere Clusters!

Consideration Factors
Tintri Citrix XenDesktop v7.1 - Provisioning & Machine Creation Deep Dive | Page 12
Login VSILogin VSI (http://www.loginvsi.com/) is a very powerful tool that can allow you to generate load simulations in a VDI environment. A “VSI Max” score can help you determine how many user sessions a particular host or cluster can handle before the user experience becomes unac-ceptable. Login VSI tests can be customized to perform custom workload simulations that are tailored to the kind of work your users will do in their XenDesktop VMs. This is very useful in the planning process to determine how a custom in-house application will perform in virtual desktop determine how much stress it will place on your hosts when running in a large scale deployment.
Do: Perform a test before making changes to gauge the impact of the change on VM density in your environment.Do: Plan and set aside at least one host dedicated to testing new image changes using previously configured Login VSI tests.
The test results can help you determine if a proposed change to your master image is going to dramatically impact your current VM densities, and may also help you to tweak and tune your images to increase your VM densities across hosts.
Do: When running Login VSI tests, observe the Tintri VMstore UI dashboard, graphs and charts for overall datastore performance and performance behavior of individual VMs.
Record this behavior to compare your Login VSI tests against the actual production loads. If the Login VSI tests don’t accurately model reality, adjust your Login VSI tests to find something that does better simulate real load, and then use these tests to model new proposed master image changes. Login VSI is not only useful for modelling proposed image changes, but it can also be used to compare provisioning methods. Run the same set of tests against the same master image, first provisioned one way and then provisioned using an alternative method (example – MCS then PVS). How do the VSI Max stores compare? You may find that are able to dramatically increase VM density (number of VM per Host) by changing to a different provisioning method for your desktops. The information you can gain from Tintri and Login VSI together can be used to drive very im-pressive results that will benefit your users’ experience, keeping them happy while minimizing surprises.
Space Utilization & Capacity ConsiderationsThe Tintri UI makes space consumption easy to determine. The main dashboard shows a space gauge, giving a breakdown of how space is consumed. The screenshot below shows the addi-tional information that pops up when you mouse-over each section, edited to display all stats in a single static image for the purposes of this document.

Consideration Factors
Tintri Citrix XenDesktop v7.1 - Provisioning & Machine Creation Deep Dive | Page 13
Each provisioning method will consume a certain amount of space when first deployed, but overtime some methods stay leaner while others tend to bloat. Summaries of each, leanest first, are:
• Non-persistent methods (PVS Variation #2 and MCS) do not consume additional space over-time and all operational space is reclaimed when a VM is powered off.
• PVS Variation #1 is non-persistent from the guest OS perspective (i.e. changes don’t survive a reboot), however blocks on the write-cache disk get dirtied as the write-cache file un-thins the underlying disk. The write-cache file is deleted on reboot and space is reclaimed within the guest OS, however a data high-water mark exists in each VM’s hard disk that has been designated for the write-cache file. This picture depicts the high-water mark, and is explored further in the Citrix Provisioning Services (PVS) Deep Dive paper.
• Tintri Native Clones, while very efficient on deployment, will grow over time, which is to be expected from a persistent method.
Aside from space considerations unique to each method of machine creation, there are capacity considerations that are common to all machine catalogs, regardless of which provisioning mechanism you use.
VM Swap FilesOne component common to all VMs is the swap file. Swap files are created when a VM is powered on and is created as the same size as the amount of RAM allocated to VM (minus any memory reservations assigned to a VM). Assuming each VM has 2 GB of RAM allocated, and there are 500 VMs in a catalog, 1 TB of space would be required for swap files.On a Tintri VMstore, the swap files are thin provisioned and do not consume additional space unless data is written to them. And as long as there is sufficient host memory available, VM swapping show be minimal. How much space are you losing to swap files? An easy way to check is with the Virtual Machines - Virtual Disks view in the Tintri UI, as shown in the image below. If you want to see all swap space used across the entire VMstore, apply a filter to the Virtual Disk column to show only Swap, and then consider sorting by the Used GiB column to find the big-gest offenders. You’ll notice that Provisioned GiB is equal to the amount of RAM assigned to VM (minus memory reservation).
Consideration Factors
Tintri Citrix XenDesktop v7.1 - Provisioning & Machine Creation Deep Dive | Page 14
Once space is consumed by swap, can it be reclaimed? Yes, quite easily! Simply power-off a VM and the swap file disappears. The VMstore automatically reclaims this space and re-uses in the global pool of available capacity. Power the VM back on, and a new swap file is created, freshly thinned.
Do: If swap files are consuming a lot of space, consider increasing the amount of RAM in hosts, or add more hosts to reduce memory contention within your hosts, which will reduce swapping as a result.
PersistenceThe provisioning techniques in this paper have covered mainly stateless, non-persistent desk-tops configured in delivery groups as random pools. In all techniques discussed, the identity of the VM does persist (i.e. same logical name and computer account used on the network). If desktops in your environment require persistence across reboots and power cycles, deter-mine if it’s your whole desktop state (data & configuration) that needs to be persisted, or just user’s profile (covered in the next section). If persistence is important to your organization use the Tintri Native clones method. Another means of providing persistence is through the use of Citrix Personal vDisks, which are out of scope of this paper.
User ProfilesUser Profiles management is out of scope of this paper, but is critical to a successful VDI deploy-ment. In order to provide users a consistent experience, you need to ensure that user profile data is seamlessly applied to their desktops and preserved when they re-connect to another desktop. We won’t get into user profiles in any great depth as it is a HUGE topic to cover, but we will give you a few suggestions and highlight some profile elements you will want to take into consideration for your XenDesktop environment.Favorites, Internet browser preferences, and application customizations are all part of a user’s profile. Will you maintain their changes and allow your users to customize their environments in a way they feel makes them most productive? To your users, losing seemingly small custom-izations such as Outlook views, customized toolbars and document margin preferences can put you at odds with your user population and create a HUGE hurdle to overcome if you are trying to transition Virtual Desktops from traditional physical desktops (one per user).Citrix Universal Profiles are a great tool for this and can improve upon some of the challenges and limitations of Windows roaming profiles, especially if multiple concurrent logons are re-quired, as well as coping with accidental user disconnects. Redirected folders can also aid you in providing some persistence to what your user perceives as “their desktop”. Most users may not even need to be aware that they are being reconnected to a different desktop every time they log on. And that data they saved to “their” C: drive during the last session? It’s probably gone; another victim to the great Bit-Bin in the sky, as is the rest of the virtual desktop they last worked on. Redirecting important folders such as “My Docu-ments” and “Desktop” to a persistent network file share is a good way to give the illusion of persistence, while maintaining control of where data is saved and accessed.

Consideration Factors
Tintri Citrix XenDesktop v7.1 - Provisioning & Machine Creation Deep Dive | Page 15
OS OptimizationsMany settings in Windows are designed for traditional desktops and don’t take virtualization into account. Some optimizations that are configured by default in Windows 8.1, such as disk optimization (scheduled defrags) are great for maintaining performance on physical worksta-tions. In a virtual environment, this default setting may have the exact opposite impact than the intended effect, and do you much more harm than good, especially on a large scale. The defrag process will rearrange data and dirty up blocks. This can lead to wasted storage capacity and a heavy performance hit, especially if multiple VMs are scheduled to defrag at the same time. Regardless of which deployment method you use, the altered data for each VM has to be written back to disk somewhere, and as more data changes relative to the master image, in some respects you end up partially unlinking it. This is true for changed data being written to a Write Cache vdisk, a REDO file (the snapshot created when a disk is mounted non-persistently, such as a linked clone (MCS), or a Tintri Native Clone, which leverages VAAI. With VAAI, the underlying disks may not readily report accurate space usage in vCenter, but this can be found in the Tintri UI. Although space may be reclaimed when non-persistent data is purged, it will change again when the system comes back up, and the running state will always contain a high watermark of changed data Refer to the section on Space Utilization for more detail on how data change impacts overall storage capacity.The defrag process is just one example of many settings that can be applied within the guest OS. Defragging the disk may be very helpful, but defrag your master image, and leave the clones alone. When updating your master image, it makes sense to occasionally re-defrag it, as the ad-dition and deletion of data may have scrambled bits across the disk.Citrix provides an OS Optimization tool within the XenDesktop VDA install, which can be run within the master image. The tweaks are out of scope of this paper, but the point being made here is that the change of a single bit (DEFRAG=ON versus DEFRAG=OFF) can have a huge impact and all changes should be carefully considered. Not only does this apply to changes, but also to defaults and the accidental act of not making a change. Aside for optimizations recommended by Citrix (automatically using their tool AND manu-ally, as documented in their blogs & white papers), VMware also has a VM optimization tool in their VMware Flings tools: https://labs.vmware.com/flings/vmware-os-optimization-tool. At the time of writing, these optimizations were geared towards Windows 7, but many apply to Win 8 and an updated version may already include them. Search the Internet and you’ll find many optimiza-tion suggestions; with this whitepaper as your guide, you should have the tools and knowledge necessary to identify the impact of change with your own sets of tests.
Audit & ComplianceEnvironments with strict audit and change control may need to provide evidence for certain ad-ministrative activities. PVS has a comprehensive audit trail, but it is not on by default, so it must be enabled. MCS also has audit logging built in, which is enabled by default. Does activity within your desktops need to be maintained for security or compliance purposes? If so, you can’t depend on the event logs of stateless systems as all traces of guest activity is lost on reboot or power cycle. DO: If the Event logs or other monitoring software within the guest require retention, consider a centralized logging solution to record and maintain yours logs outside of your desktops VMs.

Management & Housekeeping
Tintri Citrix XenDesktop v7.1 - Provisioning & Machine Creation Deep Dive | Page 16
Management & Housekeeping
“The Only Thing That Is Constant Is Change” – Heraclitus
You don’t need to be in IT very long to appreciate this quote! IT environments constantly change; staying on top of the changes is critical. This section is dedicated to raising awareness to some of the overall support & management costs.
ScalingWe live in an always-on, always-connected world and your users have grown to expect this from IT. Their ability to work and achieve what they need to is dependent on having the tools they need, when they need them. At the core of their needs is ensuring there’s an available desktop for them to log onto.
Do: Leverage monitoring tools such as Citrix Director to ensure your supply of desktops meets demands. Take proactive action when you near the limit.
When a pool of desktops nears a threshold of utilization, it’s time to scale and add more desk-tops.
Do: Set a threshold and take action when capacity warning signs appear, similar to common warn-ings in vCenter for 75% warn and 90% critical. Do: Monitor host and storage resources and give yourself ample time to proactively respond before exceeding existing capacity.
Adding more desktops to keep up with user demand when you have sufficient storage and com-pute resources can be resolved fairly quickly. However, ordering hardware, configuring it, and installing it requires times, so be keep an eye on all usage levels, not just the user session usage of XenDesktop pools.
Do: Use vSphere clusters with DRS enabled to easily add a new host and automatically rebalance all VM workloads across all available hosts.
Adding additional VMs to a Machine CatalogAdding additional VMs to a Machine Catalog ranges in how much effort is involved. Evaluating effort involved in adding additional VMs should be considered for two scenarios: Adding a few VMs, or adding a large number of VMs. For just a few VMs, MCS is simplest, followed closely by Tintri Native Clones. Adding additional PVS targets for a small number has quite a few steps, making it cumbersome when done on a small scale.On a large scale, Tintri Native Clones and PVS are superior. MCS is still simple, but it takes longer to process an addition of large numbers of VMs than it does with the other methods.

Management & Housekeeping
Tintri Citrix XenDesktop v7.1 - Provisioning & Machine Creation Deep Dive | Page 17
When adding additional VMs, consider adding many, far more than you need. If additional VMs do not run idle, unnecessarily consuming resources, and consume no incremental storage ca-pacity, think of it as you would thin disks. Go ahead and over-provision, but monitor usage and add additional resources as necessary. Just because there are 200 extra, unused desktop VMs in the inventory doesn’t mean you have capacity to add 200 more concurrent users without seri-ous performance repercussions.
Image Updates – Keeping the Master Image CurrentIn a stateless environment, keeping the master image current is very important. The fewer changes required to bring a desktop up to current during and directly after boot up, the better. Up-to-date anti-virus definitions, software patches, windows patches, security hotfixes, browser upgrades, java upgrades, etc. This list of updates also include all configuration changes applied via GPO and/or SCCM (System Center Configuration Manager) to make an image compliant and the installation of additional software. Benefits of a master image: huge processing & storage savings by storing & altering data once. Example: A full virus scan might take 20 minutes to complete on a single VM. Performing this might consume one (1) core of CPU at 100% for the duration of the scan. Alternatively, do it once in a master image, and replace the master image on all machines in the catalog. No need to schedule a scan on each VM, which could take many hours or even days CPU usage to essentially scan the same thing in every VM. The process of updating the master image and subsequent version updates is covered in the individual deep dive papers for PVS and MCS. When comparing the effort involved in updating images, changing versions, and monitoring which versions any given VM is running, PVS excels beyond all others.
With every update to the master comes the risk that something might break or new bugs can be introduced. The “Change Control” section below explores ways to prevent this. Unfortunately, there are risks involved in NOT updating your master, which is explored later in this paper as well, in the section that deals with “Impact of Aging Master”.
Session LimitsOften, users don’t log out of their virtual desktops when they finish working for the day and instead disconnect, which leaves their session (and desktop) in use. This can get in the way of updating images on desktops because the desktops appear to be in use. You do want a user to be able to disconnect and reconnect to an existing session so that they can continue working without losing any unsaved work. For example, momentary drop in network connection or a move from one physical client device to another, such as from their personal laptop to a work thin client or PC.
Do: Consider setting time limits for idle session disconnects and session log offs to prevent stale, unused user sessions from preventing image updates. Use Citrix Policies to enable these options.
If you’re unsure what to set the limits to, start with 3 hours to change an “active” idle session to disconnected state, and 3 hours from disconnected to log off. Logging a user off gracefully will minimize loss of unsaved work or changes to user profiles that may otherwise occur if the VM was unexpectedly shutdown. This will help with regular image updates, as we’ll discuss in the next section.

Management & Housekeeping
Tintri Citrix XenDesktop v7.1 - Provisioning & Machine Creation Deep Dive | Page 18
Change controlMost IT environments have some form of change control. The degree of change management ranges from loosely logging only the most major of changes on one end of the spectrum, to very tightly-controlled and heavily scrutinized approval processes on the other. Audit & Compliance requirements generally influence how rigid the process is. Established processes ensure maxi-mum uptime and availability of your systems while minimizing security and operational risk associated with documented and undocumented environmental change. Changes to desktops configuration may not be held to the same standards that servers tradi-tionally have been, but given the high impact to productivity when a desktop change hits every user immediately, they should be. In this section, we’ll provide some suggestions on processes to update your desktops that reduce risk, but also allow you to progress quickly with image updates and react quickly if necessary.
Introducing New Images to ProductionBefore introducing changes to your master images, those changes should be well tested. In some cases, the risk of not pushing out a specific change outweighs the risk of having it go wrong. And in others, there are insufficient human resources (IT and select business users) to dedicate to testing every potential scenario. We’ll describe a methodology of rolling out updates that can reduce the testing time and minimize the chances of wide-spread disruption.First, both MCS and PVS have an option to update desktops on next reboot, so leverage this mechanism. With MCS, it’s handled in the “Update Machines” wizard (shown below and covered in detail in the MCS deep dive), and with PVS, it’s handled automatically when VMs boot based on which version is configured for production machines to use.
Do: Use desktop restarts as a mechanism for presenting new images or image versions to virtual desktops.
Citrix XenDesktop and XenApp have a “maintenance mode” option for machines in a catalog. When maintenance mode is enabled, it prevents users from being able to establish new sessions to those desktops (or applications). Users with existing sessions are uninterrupted when main-tenance mode is enabled. Once a user logs off a desktop (or application), their session on that
Management & Housekeeping
Tintri Citrix XenDesktop v7.1 - Provisioning & Machine Creation Deep Dive | Page 19
resource terminates. When users want to reconnect, desktops and application from a delivery group have a pool of machines (i.e. machine catalogs) available to accept new sessions. As long as there is a system available that accepts new sessions, a user can connect. Whether or not it is the same resource (i.e. underlying VM) a user used previously or not should not matter. The user experience should be consistent regardless which system accepts their logon, assum-ing user profiles are correctly configured.
Do: Use maintenance mode to free up resources then update them once there are no connected users. After the update completes, disable maintenance mode and bring machine back online, ready for new user session.
If a user does not log off of a resource that is in maintenance mode, it will remain in that state and prevent other users from using that resource. To prevent stale sessions, implement session limits, as recommend in the previous section. Once a system is in maintenance mode (MM), let’s assume there won’t be any user sessions left on it after 24 hours have passed since enabling MM. Even in a 24x7 environment of global users connecting from different time zones from around the world, a system with MM enabled should not have any connected users after 24 hours. There are rare exceptions to our assumption that you may choose to mitigate by customizing the update process we suggest; these exceptions are covered in the “Exceptions” section further down. To update our desktops, we’ll configure a series of automated maintenance mode enables and scheduled rolling reboots. We’ll introduce updates to our users 7% at a time, over the course of two weeks (14 days). We’ve chosen 28 schedulable days to simplify scheduling when months vary between 28 days and 31 by only scheduling activity on days 1 through 28.
Do: Use PowerShell and Windows task scheduler (or some other system of automation) to facili-tate the actions in the sample schedule below.
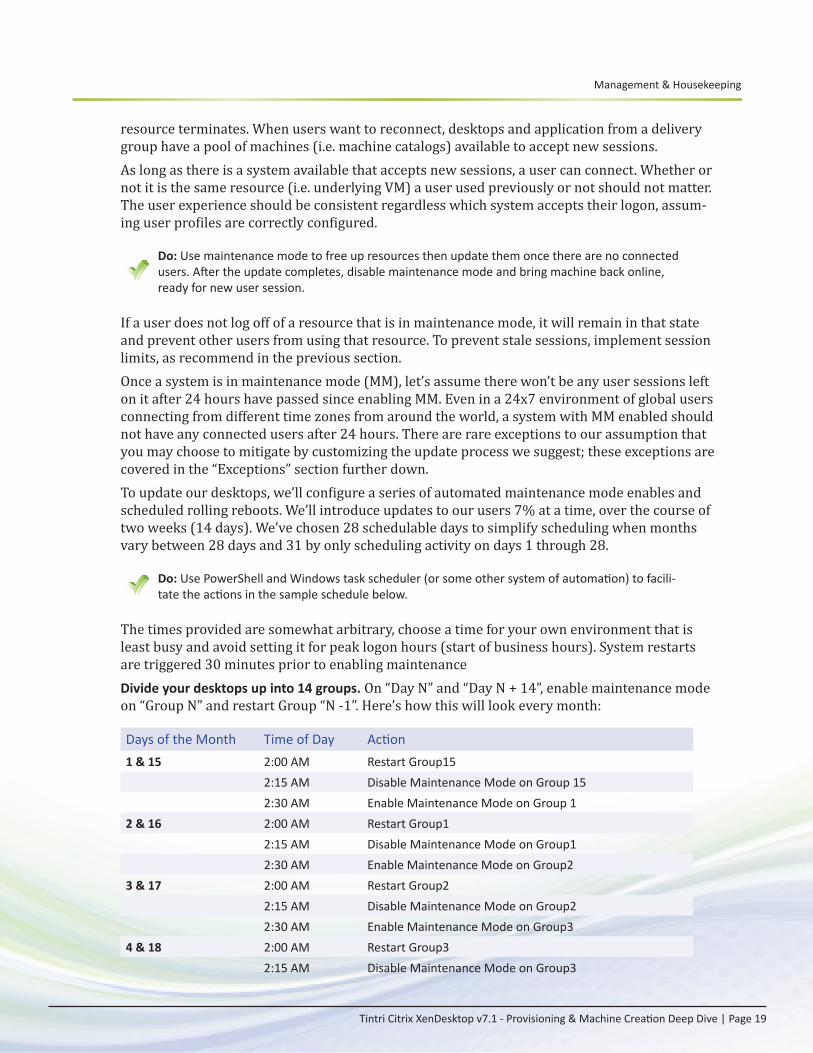
The times provided are somewhat arbitrary, choose a time for your own environment that is least busy and avoid setting it for peak logon hours (start of business hours). System restarts are triggered 30 minutes prior to enabling maintenanceDivide your desktops up into 14 groups. On “Day N” and “Day N + 14”, enable maintenance mode on “Group N” and restart Group “N -1”. Here’s how this will look every month:
Days of the Month Time of Day Action1 & 15 2:00 AM Restart Group15 2:15 AM Disable Maintenance Mode on Group 15 2:30 AM Enable Maintenance Mode on Group 12 & 16 2:00 AM Restart Group1 2:15 AM Disable Maintenance Mode on Group1 2:30 AM Enable Maintenance Mode on Group23 & 17 2:00 AM Restart Group2 2:15 AM Disable Maintenance Mode on Group2 2:30 AM Enable Maintenance Mode on Group34 & 18 2:00 AM Restart Group3 2:15 AM Disable Maintenance Mode on Group3

Management & Housekeeping
Tintri Citrix XenDesktop v7.1 - Provisioning & Machine Creation Deep Dive | Page 20
Days of the Month Time of Day Action 2:30 AM Enable Maintenance Mode on Group45 & 19 2:00 AM Restart Group4 2:15 AM Disable Maintenance Mode on Group4 2:30 AM Enable Maintenance Mode on Group56 & 20 2:00 AM Restart Group5 2:15 AM Disable Maintenance Mode on Group5 2:30 AM Enable Maintenance Mode on Group67 & 21 2:00 AM Restart Group6 2:15 AM Disable Maintenance Mode on Group6 2:30 AM Enable Maintenance Mode on Group78 & 22 2:00 AM Restart Group7 2:15 AM Disable Maintenance Mode on Group7 2:30 AM Enable Maintenance Mode on Group89 & 23 2:00 AM Restart Group8 2:15 AM Disable Maintenance Mode on Group8 2:30 AM Enable Maintenance Mode on Group910 & 24 2:00 AM Restart Group9 2:15 AM Disable Maintenance Mode on Group9 2:30 AM Enable Maintenance Mode on Group1011 & 25 2:00 AM Restart Group10 2:15 AM Disable Maintenance Mode on Group10 2:30 AM Enable maintenance Mode on Group1112 & 26 2:00 AM Restart Group11 2:15 AM Disable Maintenance Mode on Group11 2:30 AM Enable Maintenance Mode on Group1213 & 27 2:00 AM Restart Group12 2:15 AM Disable Maintenance Mode on Group12 2:30 AM Enable Maintenance Mode on Group1314 & 28 2:00 AM Restart Group13 2:15 AM Disable Maintenance Mode on Group13 2:30 AM Enable Maintenance Mode on Group14
After a new image has been tested and approved for promotion to production, apply the image update to the machine catalog (or device collection in PVS) so that it will be used on the next system restart. The schedule configured above will always be running and will pick up your updates anywhere within the cycle. If you have a lot of updates to introduce, you do not need to let the full cycle of rolling reboots (14 days) complete before making another version update. In these cases, instead of systems updating to “Version N + 1”, they will update to “Version N +2”. In order for this staggered update approach to work, your users need a means of reporting problems they’ve detected. Depending on the size of the environment, this process likely in-volves the user opening a ticket with helpdesk. Help desk should record what desktop the issue

Management & Housekeeping
Tintri Citrix XenDesktop v7.1 - Provisioning & Machine Creation Deep Dive | Page 21
occurred on and determine if it’s running a new image or not and whether others have reported the same. Escalate and investigate.
Do: Provide your users with an easy method of reporting new issues and take action as soon as a trend of new reports pertaining to a specific image version is identified.Do: If a new bug is found in the newest image version being introduced, stop introducing the new image by setting the desktops to boot from the previous image on next reboot.
See “Rolling back” on page 23 for more details on how to do this. There’s no need to stop the rolling reboot schedule, just make sure on the next reboot, systems get a good image, not the new one with flaws detected in it.
Do: If the new issue is critical, set all systems that are running the newest version to maintenance mode to prevent new users from connecting.
Manually reboot the systems or wait for the rolling reboot cycle to catch back up to them and remediate them. If you caught the problem within the first 3 – 4 days, approx. 7% - 21% of all desktops are affected; however 79% - 93% are unaffected.
Do: Keep in mind that images should be tested before promoting to production.
Without a staggered promotion system, 100% of users would have been affected, and rolling back may not be possible without asking users to log out. If the issue is not critical, just leave the affected images running as-is, correct the image, then promote to production as a new version and the affected desktops will resolve themselves in ~ 2 weeks when the cycle repeats.Investigate the issue and either rollback the image and start a new version repeating the chang-es you previously made MINUS the change that caused the issue or correct issue in the new version and then re-release it. The rolling reboots will start to introduce it to the next systems being rebooted.Although you could roll out your new images faster by restarting all remaining systems using periods of low or no usage (such as weekends), the updates are intentionally rolled out slowly and incrementally to catch any issues that may have gone unnoticed during testing and prevent these issues from impacting 100% of your user base that is susceptible to the issue.
Enhancement Suggestions • In very large XenDesktop deployments, 7% of desktops may represent hundreds or thou-
sands of desktops whose reboots may adversely impact the environment. Instead restarting 7% of desktops (1 out of 14 groups) every 24 hours, restart 3.5% of desktops (1 out of 28 groups) every 12 hours. Or decrease the size of the groups further with more groups sched-uled more frequently.
• Mondays may double the potential number of impacted users exposed to an issue associ-ated with a new image update if updates continue on a daily basis over the weekend and there are very few users logged in on Saturdays and Sundays to report a new issue. The first business day following a long weekend (holidays) will increase risk. If this adds additional risk that you are not comfortable with, enhance the rolling reboot schedule to not include weekends in your schedule, or avoid deploying new images on a Friday. Keep in mind that if there are no pending updates, these are only reboots of known-good images and should

Management & Housekeeping
Tintri Citrix XenDesktop v7.1 - Provisioning & Machine Creation Deep Dive | Page 22
not cause problems. Mondays midway through the cycle are less likely to be affected by this because issues should have been caught already and the pending update would be rolled back to a known good.
• The method described above of rolling reboots may require an excess of up to 7% (1 / 14) more desktops than the peak period of concurrent user sessions to account for lag between when a system is set to MM and the system restart. To reduce this, customize the process by checking for user session state changes in systems with maintenance mode enabled and restart them immediately following user logoffs.
• The maximum amount of time for an image to be fully deployed may be as long as 17 days for months with 31 days. Using a more complex scheduling pattern can rectify this if the timeframe is too long.
• Automate the process of users reporting problems to make it easy for them to identify a problem and record which system they are on and what version of your image they are running. When many new bug reports come in and the image version is common to all (and happens to be a new image you’ve pushed), you’ll want to halt pushing out that image to ad-ditional desktops as soon as possible and set all affected desktops with the new version into to maintenance mode.
• There may be critical updates that can’t wait two weeks to be rolled out, or others updates that need to be coordinated with other changes, such as an application update on the client and a database update on the server. In these cases, use traditional methods (example: GPO or SCCM) of pushing updates to all running, online systems. Make sure the update is in the latest master image configured for boot time to prevent reinstalling via GPO after every reboot because a system is running an older version that does not include your latest criti-cal update. See “Third Party Software” on page 23 section below for other suggestions for handling a scenario like this.
• Use multiple machine catalogs and delivery groups to deliver desktops and applications differently to different users based on their department, sensitivity to risk, technical knowl-edge, or some other determining factor. One group (pilot users) may get updates more aggressively than the other group. Even in these cases, consider staggering updates to both groups to give your IT teams time to react in the event a problem is found that goes unre-ported at first or only affects a limited group of users which may not be considered for early adoption piloting.
• When choosing a time for enabling maintenance mode and reboots, pick the time of day that has the lowest number of concurrent users. Leave a gap between setting maintenance mode and issuing restart commands.
• Incorporate logging into your process to simplify troubleshooting it in the event something goes wrong.
• Configuring some sort of monitoring and alerting to notify admins if the rolling updates aren’t running.
ExceptionsIn the rare case that a user is legitimately working for more than 24 straight hours, the likeli-hood that the user would be impacted by the suggested update schedule is minimal.
Do: If this is a concern, either extend the time between maintenance mode enablement and sys-tem restart (24 hours), or build in a check to prevent reboots of systems that still have active users session.
If the scenario above occurs often, it is much more likely that your session limit is not properly
Management & Housekeeping
Tintri Citrix XenDesktop v7.1 - Provisioning & Machine Creation Deep Dive | Page 23
enforcing disconnects and log offs than it is that your users are still working for over 24 hours. If the session limit does not disconnect a user and they are able to reconnect the follow day to their active session, it is possible their session will be unexpectedly interrupted when the desk-top they are on restarts.
Rolling backNo matter how well you test the latest changes to a master image, sooner or later, something may slip through the cracks and negatively impact your users. In these cases, you’ll want to roll back to your previous last known good build. More thorough and higher quality testing will certainly reduce the need to rollback, but is unlikely to eliminate it altogether, so rolling back changes needs to be considered when deciding upon which deployment method to choose.What happens when a change goes wrong and needs to be rolled back? How many users are im-pacted? Will there be any downtime as a result? The answers to these questions go back to how you introduce your updates in the first place and your overall change control procedures. From a technical perspective, there is no performance concern related to rolling back to an older version as a result of Tintri’s self-learning FlashFirst™ architecture.
One size does not fit all: Multiple master imagesFrom time to time, requests may come in to make a change to the image that only a small num-ber of users require, but having a single master image means rolling the change out to everyone. The change itself is likely a request to have a particular piece of software installed. For licensing reasons, you may not be able to roll the change to everyone. Or perhaps it’s a resource-intensive application that would greatly impact your overall capacity if it were made available to every-one.In these cases, you may consider creating a 2nd image, or many additional images… one per department or business unit. Do not make this decision lightly! Try to keep in mind how much effort may go into routine patches and fixes for all software and the base OS in your image. For every additional master image, that maintenance and support process needs to be repeated on each. While this may not have been much of an issue in a physical desktop world where soft-ware configuration persisted between reboots, it can have a huge impact on your XenDesktop deployment due to the stateless behavior of your VMs.If you do require multiple Master Images, you can still benefit from some of the capacity sav-ings associated with VAAI and thin disks. And from a performance perspective, most of the data blocks common between images will be deduped so that they only consume SSD capacity once, giving you near 100% flash hits for all images with consuming much incremental SSD capacity.
Third Party Software In the scenario above where a refresh of desktops needs to be coordinated with a refresh of server-side upgrades (i.e. a database upgrade), 3rd party software may help avoid downtime or the full impact of a boot storm. One new company in particular, FS Logix develops software that may be especially useful in these situations by allowing a new version to be added to your master image in advance. By staging the update in advance, your new image can be rolled out gradually until all systems have the new data incorporated in the build, and then a coordinated change can be made to all systems at once to cutover to your new application. Because the data itself remains at rest and logical pointers to the data are the only things that change, there is no storage impact. And what happens to the old version that remains in your
Management & Housekeeping
Tintri Citrix XenDesktop v7.1 - Provisioning & Machine Creation Deep Dive | Page 24
master image? You can either delete in a future change to the master image to reclaim/reuse the space once you are certain you no longer need it for rollback, or just leave it. If you leave it, you may end up with large and bloated images, which is not a problem as you’ll see in the next section.
Bloated Images and Working Set SizeYou might be wondering how the size of your master image impacts performance and/or capac-ity. In all of the methods described in this paper, we’re making intelligent copies of the master image in order to reduce the total disk capacity required. For example, assume a base image of 40GB, thinly provisioned. Of that, assume only 20 GB is used, which accounts for the guest OS and all applications and data we’ve added to our image. If 1,000 VMs are linked to this master image, the total capacity used will be 20GB for the base image, plus an incremental amount of storage required for each VM: swap space equivalent to memory assigned and deltas to capture data change (REDO files on non-persistent disks) or write-cache vDisks.Further, whether the size of the base image is 20 GB or 200 GB should be of minimal conse-quence regardless of how many VMs are linked to it. The flash in a VMstore is managed intel-ligently and only the most “popular” data within the entire array is stored in flash after granular deduplication and compression. Bytes within the master image that are accessed frequently (i.e. working set size) will remain in flash. What about the unused bytes present in the master image (i.e. the bloat)? For that matter, what about the many GBs of that can accumulate with full copies of previous versions of master im-ages? That data was very popular as all of your XenDesktop VMs referenced those bytes at some point in time, but have since been updated to look at a new master image (or a new version in PVS). Do you have to worry about that consuming all of your precious flash capacity? Fortunate-ly for you, the answer is no! That aspect of storage management handled by the Tintri array and is one of the great features that simplify management. As time goes on, the unused data will decrease in popularity (i.e. no VMs request those blocks anymore), and will get evicted from SSD to free up the SSD blocks for more popular data. Tintri VMstores adjust dynamically to changing workloads, and only the working set is optimized, which is how Tintri is able to make the full capacity of the array perform as if it was all SSD and deliver 99% IO from flash at consistent latencies, which is important for a great user experience.
Environmental Changes to the VMware InfrastructureDo you have dependencies hard-linked between your XenDesktop infrastructure and the virtual environment it is running on? Most likely, the answer is yes! This is something to keep in mind to avoid problems in your XenDesktop environment that are caused by seemingly innocent changes to the environment. MCS doesn’t handle changes well: cluster names, datastore names, network name changes can all “break” the MCS environment. In short, in order to be able to rename a VMware datastore successfully (and still have a fully functional XD deployment) we need to delete the hosting re-sources and re-add them. Easier said than done - there are dependencies from Delivery groups that prevent deletion of the resource. In order to remove the dependencies, the MCS machine catalogs needed to be removed first, but can’t be removed if they are in use (i.e. shutdown all your virtual desktops!). If you’ve already renamed your datastore, you won’t be able to delete the machine catalog un-
Management & Housekeeping
Tintri Citrix XenDesktop v7.1 - Provisioning & Machine Creation Deep Dive | Page 25
less the old datastore name is found in order to complete the process. Once all dependencies are off the original storage resource, it can be removed. Once removed, you can rename your datas-tore and then re-add a storage resource back under Configuration – Hosting and then setup up Machine Catalogs again on the new resource.Similar gotchas apply to changing vCenter name and/or SSL certificates associated with it. We won’t dive deep into these gotchas, but at least you now know they exist to do further research on the ones that may apply to you. I am sure there is a much easier way to update resource settings through direct manipulation of database content, which is not a task you would want to undertake on your own without the assistance (and blessing) from Citrix Sup-port. Armed with knowledge and a broader awareness, hopefully your XenDesktop environment won’t be “that legacy app” dependency that prevents you from upgrading and enhancing the rest of your environment.
Do: Test and be diligent, and add these gotchas to a checklist of things to check when undertaking a migration, major upgrade, or other changes that are required to stay current and supportable.

The Ghost of Christmas Past – Aging Master Images
Tintri Citrix XenDesktop v7.1 - Provisioning & Machine Creation Deep Dive | Page 26
The Ghost of Christmas Past–Aging Master Images
Old images will consume increased CPU, memory and storage in order to catch up and become current with the latest:
• AV updates • WSUS • GPO updates • Software installs via GPO, SCCM, or other method
If updates require a restart, PVS images will lose all changes on reboot and start updating all over again after the policies/updates try to re-apply. This will continue in a never ending cycle, consuming a large amount of compute resources unnecessarily and without any benefit.Update your images often and keep them current to avoid this. To see how negatively this can affect your environment, an example of an old image with outdated antivirus definitions is de-scribed in the section: “Playing Catch-up – Impact assessment of a dated image.”

Data Protection & Disaster Recovery (DR) Overview
Tintri Citrix XenDesktop v7.1 - Provisioning & Machine Creation Deep Dive | Page 27
Data Protection & Disaster Recovery (DR) Overview
Backup and DR for XenDesktop environments need to consider more than simply ensuring good copy of data is available somewhere, such as a backup tape or offsite location. Desktops aren’t often backed up for their unique data, but are instead the tools (OS + Applications + Configura-tion) that allow users to access their data (databases, email, application-specific files, etc.). A full and comprehensive DR strategy is out of scope for this paper, but this section provides some direction on what should be considered for backups.XenDesktop infrastructure consists of 3 major components:
• XenDesktop Infrastructure Servers (covered in this paper). • XenDesktop Machine Catalogs – The virtual workstation VMs. • Dependencies – User profiles, redirected folders, data, and the rest of the corporate infra-
structure (i.e. the goods that users access their virtual desktops to access).
In the paper, we’ll look only at protecting the XenDesktop Infrastructure Servers: XenDesktop Con-trollers, StoreFront, SQL servers, etc. For information on protecting XenDesktop Machine Cata-logs, refer to each deep dive write for the 3 types of machine catalogs we discussed: PVS Deep Dive, MCS Deep Dive, and Tintri Native Clones Deep Dive. The 3rd major component, dependencies, are out of scope other than mentioning them so they are not overlooked.A comprehensive data protection plan of XenDesktop Infrastructure servers is out of scope of this paper, but we’ll give you some tips for how to leverage Tintri technology to protect your servers and data. Refer to Citrix documentation for complete details backups, restores and DR.
Backup - XenDesktop Infrastructure ServersAny backup software that can backup VMs can be used to make backups of your XenDesktop infrastructure servers. At least one of the XenDesktop infrastructure servers includes a SQL Server component and needs to be backed up with application-level processing.
Do: Follow best practices when it comes to SQL database backups. In particular, ensure your backup process truncates your SQL transaction logs to prevent them from growing and eventually consuming all of your disk space.
Depending on the frequency of your backups and ease of restore offered by the backup technol-ogy you’ve deployed in your environment, consider implementing Tintri Scheduled Snapshots on your XenDesktop Infrastructure VMs. Snapshots can be used for quick roll-backs in the event of problems within a VM. Snapshots are also useful for creating quick point-in-time clones for adhoc troubleshooting using isolated networks (non-routable VLANs). Tintri Snapshots are required for ReplicateVM™, which is covered in the next section on DR.When restoring XenDesktop servers, keep in mind that some machine catalogs are sensitive to VMware environmental issues, such as the names of hosts, clusters, vCenter servers, datastores and virtual networks. MCS in particular is sensitive to VMware environment name changes.XenDesktop integrates with Active Directory, be sure to have good backups of your Domain controllers and AD. XenDesktop infrastructure has a lot of dependencies and moving parts. Take backups and test
Data Protection & Disaster Recovery (DR) Overview
Tintri Citrix XenDesktop v7.1 - Provisioning & Machine Creation Deep Dive | Page 28
your restore methodology occasionally to be sure you can recover in the event a disaster. Di-sasters come in many forms, ranging from an admin accidentally deleting one or more VMs to a catastrophic smoking hole that used to be your datacenter.
DR - XenDesktop Infrastructure ServersA Disaster Recovery plan is one element of a comprehensive Business Continuity Plan. XenDesk-top and VDI environments are much easier to protect and recover from than traditional PCs when planning to protect against a disaster of one or more offices where users work from. Keep this in mind in overall Business continuity planning as you may want to use XenDesktop as a failover plan in the event physical damage to an office or in cases where the office is not acces-sible to users (power outage, natural disasters such as earthquake, quarantine, etc).XenDesktop may not be the primary desktops for all users in your organization and you may still use traditional PCs in your environment for the majority of your users. Sometimes XenDesk-top is deployed to a smaller percentage of your staff, perhaps only remote employees. But when you look at a comprehensive Business Continuity Plan, you may want to consider increasing your XenDesktop footprint for DR reasons alone.One of the first things you need to determine is whether you will operate your sites as Active/Active or Active/Passive. If you have a dedicated DR site that is used failover only, an active/pas-sive design may be easiest to implement and maintain. This would involve replicating servers from your production site to a DR site, and in the event of disaster where the production site is unavailable, restore copies of the production site in the DR site using all the same logical names and network identities of your production site.
Do: Protect your XenDesktop servers with ReplicateVM™ and create a replication schedule to replicate them over to your DR site periodically.
If you are using an Active/Active approach (2 or more sites logically configured in XenDesktop), refer to Citrix documentation for best practices. Depending on your choice of provisioning and machine creation, you may need to manage two or more sets of servers across multiple loca-tions.
Do: Ensure you have adequate compute and storage resources to run a full production load of servers and users in your DR site. In an active/active design, this means having enough resources in both sides to run all users in the event you need something happens to one site.

Pop the hood! – Exploring Typical Scenarios
Tintri Citrix XenDesktop v7.1 - Provisioning & Machine Creation Deep Dive | Page 29
Pop the hood! – Exploring Typical Scenarios
Storage has commonly been seen as a black box where a lot of voodoo and magic happens. At Tintri, we’re trying to add transparency to that mysterious black box and give you the tools to take the guess work out of how your application is interacting with its data in storage. While there’s still plenty of voodoo and magic happening inside your Tintri array, the only mystery should be how you could have ever operated so blindly before owning a VMstore!We’ve discussed some of the pros and cons of PVS, MCS and Native Tintri Clones and general best practices related to XenDesktop (and VDI in general), but how does all that apply to your XenDesktop deployment? This section is dedicated to making observations on some typical troubleshooting scenarios you may encounter in your environment. The examples shown will help compare and contrast behavior between deployment types, as well as provide additional ways to use your VMstore UI as a rich analysis tool to further help you on your way to becoming the Zen Master of XenDesktop.
DDoS - Distributed Disasters of SchedulingScheduled tasks, on a large scale, can be very disruptive, even if they are targeted during main-tenance windows. The systems we operate today rarely go completely unused by users, even during maintenance windows, so wouldn’t it be great to identify scheduled behavior? By leveraging Tintri’s VM-awareness, the historical graphs provide a very powerful tool that ends far beyond simply trying to find a culprit during a reported outage. Here’s a look at the past 1 day on a T540. The below screenshot captures the boot-up of MCS VMs (x25) that was demonstrated in a previous section.
All we need to do is click on one of the peaks that we are interested in, and the contributor data will appear on the right. Mouse-over the contributor data to find out more information, such as the accumulation of IOPS relative to the total IOPS observed within the peak.Using this same 24 hour period, let’s investigate another section of the graph (screenshot be-

Pop the hood! – Exploring Typical Scenarios
Tintri Citrix XenDesktop v7.1 - Provisioning & Machine Creation Deep Dive | Page 30
low). See that flat stretch in the middle? This is what 75 desktops look like when they are sitting idle. So what brings them out of idle? Normally, it would be users logging in within a specific time zone to start their day. However, since this T540 VMstore is in a lab environment, there are no users logging in, so what is making the bump?
By clicking on data points within the bump and looking at contributors, we can see the contrib-utors are again all XenDesktop workstations. Knowing this, we can investigate the logs within the guest to determine what they are doing at this time. Although we’ve mainly focused on the impact of distributed schedules on storage, there is more to a virtual environment than just storage. For the same 24 hour period as displayed in the screenshot of the Tintri UI above, the below screenshot displays a view of compute resources from within vCenter.
The cluster used for these examples above is comprised of two Cisco UCS blades. In the 24 hour period shown, the cluster is running the 75 desktop VMs demonstrated, plus four (4) additional
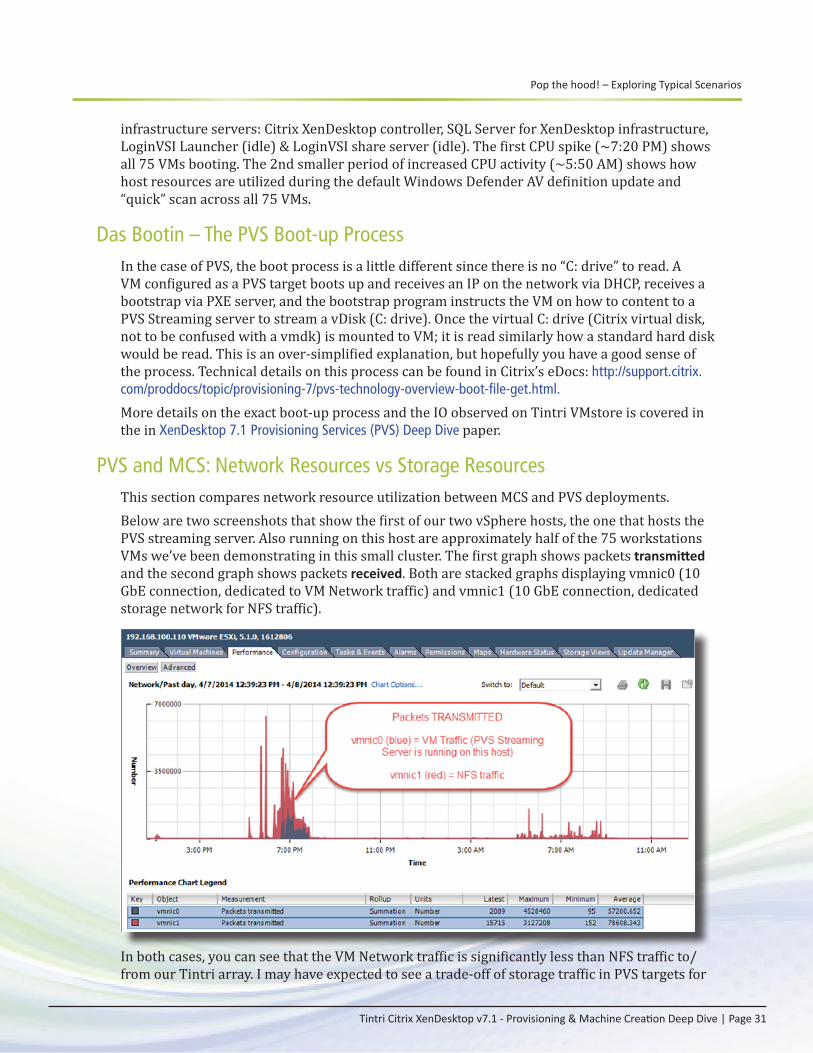
Pop the hood! – Exploring Typical Scenarios
Tintri Citrix XenDesktop v7.1 - Provisioning & Machine Creation Deep Dive | Page 31
infrastructure servers: Citrix XenDesktop controller, SQL Server for XenDesktop infrastructure, LoginVSI Launcher (idle) & LoginVSI share server (idle). The first CPU spike (~7:20 PM) shows all 75 VMs booting. The 2nd smaller period of increased CPU activity (~5:50 AM) shows how host resources are utilized during the default Windows Defender AV definition update and “quick” scan across all 75 VMs.
Das Bootin – The PVS Boot-up ProcessIn the case of PVS, the boot process is a little different since there is no “C: drive” to read. A VM configured as a PVS target boots up and receives an IP on the network via DHCP, receives a bootstrap via PXE server, and the bootstrap program instructs the VM on how to content to a PVS Streaming server to stream a vDisk (C: drive). Once the virtual C: drive (Citrix virtual disk, not to be confused with a vmdk) is mounted to VM; it is read similarly how a standard hard disk would be read. This is an over-simplified explanation, but hopefully you have a good sense of the process. Technical details on this process can be found in Citrix’s eDocs: http://support.citrix.com/proddocs/topic/provisioning-7/pvs-technology-overview-boot-file-get.html.
More details on the exact boot-up process and the IO observed on Tintri VMstore is covered in the in XenDesktop 7.1 Provisioning Services (PVS) Deep Dive paper.
PVS and MCS: Network Resources vs Storage ResourcesThis section compares network resource utilization between MCS and PVS deployments. Below are two screenshots that show the first of our two vSphere hosts, the one that hosts the PVS streaming server. Also running on this host are approximately half of the 75 workstations VMs we’ve been demonstrating in this small cluster. The first graph shows packets transmitted and the second graph shows packets received. Both are stacked graphs displaying vmnic0 (10 GbE connection, dedicated to VM Network traffic) and vmnic1 (10 GbE connection, dedicated storage network for NFS traffic).
In both cases, you can see that the VM Network traffic is significantly less than NFS traffic to/from our Tintri array. I may have expected to see a trade-off of storage traffic in PVS targets for

Pop the hood! – Exploring Typical Scenarios
Tintri Citrix XenDesktop v7.1 - Provisioning & Machine Creation Deep Dive | Page 32
VM Network traffic, but this is not evident in the case shown above, nor has it been found in any other tests. Consistently, NFS traffic has displayed more.
In a larger deployment, the same may not hold as true as it has in this small two host deploy-ment. Why not? Consider the network traffic between PVS targets and the PVS streaming server held on the same host. Would we see any traffic generated on vmnic0, the physical network in-terface that uplinks the VM Network to the rest of the network? No, because inter-VM traffic on the same host in the same port group will communicate within RAM and never needs to touch the physical network interface, except in cases where port monitoring may be implemented to support network shark/capture device or some other network diagnostics.To give a more complete view of the scenario, here are graphs of the same period showing network activity on the host that does NOT have the PVS Streaming Server running on it, but does host PVS targets. In this case, all PVS traffic does need to traverse through the physical NIC on the host. Packet receives indicate a target reading data from the PVS streaming server (for example, booting up or scanning the C: drive for viruses).
The packets received shown on this host are identical to the packets transmitted by the other host that contains the PVS streaming server, and are attributable to PVS traffic. Packets trans-mitted were not shown for this host because there are no writes from a PVS target to the PVS
Pop the hood! – Exploring Typical Scenarios
Tintri Citrix XenDesktop v7.1 - Provisioning & Machine Creation Deep Dive | Page 33
server; all writes for PVS targets are written to their write-cache on their .vmdks, which is con-nected to the vSphere host via NFS (vmnic1).
Filler up!What happens if we fill our C: drive to the max on a PVS target? Or perhaps we fill our write cache disk before we max out the C: drive? Thanks to the wonderful per-VM information in the Tintri UI, we were able to diagnose the situation, see the impact, and come up with a new disk recommendation as a result.The following is a typical scenario that admins face from time to time. The details may not be exactly the same in all the cases, but the overall process of observing unusual behavior due to an unknown cause, making changes to increase diagnostics to identify and understand the situa-tion, and having those diagnostic steps cause issues in an unexpected way is common.
Background • While testing different provisioning methods, PVS desktop VMs started going bonkers (tech-
nical description!) approximately 10 minutes after boot. In each VM, one core of CPU would spike to 100%, sustained for approx. 20 minutes, and then drop down to idle.
• This behavior wasn’t always the case and it appeared to just start happening for some un-known reason. Performance logs for the prior week confirmed that the behavior was in fact new and did not happen previously. In other words, this was not something that had always been there, but was only now being noticed.
• The environment is an isolated lab environment that does not have real users generating load, ruling out new user logon activity as a suspect/cause.
Troubleshooting Steps: • Guest-based troubleshooting & monitoring tools (ex. Task Manager) were futile in under-
standing the problem. The act of logging into the guest via RDP or VMware console im-mediately dropped CPU activity to normal levels, halting whatever process was driving CPU demand. This made it impossible to interactively diagnose what guest processes were responsible for the CPU activity.
• Process Monitor (procmon.exe), available from sysinternals.com, has an option to enable boot log-ging.
• Normally, boot logging can be enabled so all process activity during the boot would be recorded to a log file.
• Logging would continue after the boot process until halted by the user, or a pre-config-ured limit of activity is reached.
• The non-persistent nature of a PVS target prevents boot-logging from working. Rebooting erases the configuration to launch the program that hooks processes and enables logging.
• Generally, this non-persistent behavior is a desirable trait of PVS targets, which pro-vides increased security and compliance by virtually eliminating the threat of malware, viruses, or rootkits that would infiltrate a system on reboot, burrowing the processes deep into the kernel to prevent detection of their presence.
• To overcome this, a new vDisk version was created in PVS. The change to the image was a tiny one: Enable Procmon Boot Logging to trace all process activity and log it to D:\BootLog.pml. This would record the process activity and identify the culprit!
Pop the hood! – Exploring Typical Scenarios
Tintri Citrix XenDesktop v7.1 - Provisioning & Machine Creation Deep Dive | Page 34
• D: drive is a vmdk allocated to each target VM to hold the write-caching file. The drive is persistent across reboot and power cycles.
• The “tiny”, seemingly harmless change caused major issues, re-enforcing the need for solid change control and a good roll-back mechanism.
After modifying the vDisk, all PVS targets were rebooted. Approximately 10 minutes later, the hosts in the cluster entered an alarm state due to high CPU and memory usage. All PVS targets were consuming 100% CPU, which is exactly what we had hoped to see! After a few minutes of allowing CPU to run at 100% in a VM, I was certain I would have a ton of logged activity, making it easy to pinpoint the offending process. I logged into one of the VMs and quickly found my culprit: Windows Defender! More information on this is covered in the next section: “Playing Catch-up”. Not only that, around 5AM CPU usage & disk activity usage would increase, and then drop to normal. This is seen in screenshots in the previous section “DDoS - Distributed Disasters of Scheduling” on page 29. This turned out to be Windows Defender as well; configuration defaults scheduled a download and install of AV definition updates, and “quick” scan was performed using the latest anti-malware definitions.
From Bad to Worse: The Plot ThickensSeveral days later, the XenDesktop PVS desktops were unavailable for login. vCenter showed them all sitting at idle. The beauty of PVS is that I could reboot my targets and any all my prob-lems would disappear, a fresh master image is used streamed from a PVS server, and I would be able to log in without any trace of problems caused in previous sessions prior to reboot.
Do: When problems are encountered, leave a few VMs in the problem start for analysis if possible. Rebooting a system, PVS or otherwise, will clear memory contents and may wipe all trace evi-dence that can lead you to your root cause.
After logging in locally to a VM using the VMware console, it was observed that C: drive was full and D: drive was nearing full with ~1 GB free! The procmon was still logging! But, it was not those log files as there was no D:\Bootlog.pml file. Instead, D:\.vdiskcache, over 20 GB!
To troubleshoot usage on C: drive, temp files from C: were deleted to clear some working space. However, most of the space was consumed by C:\windows\temp\procmon.pml, which was ap-prox. 20 GB in size. Could it be that ProcMon instead of logging to D:\Bootlog.pml is logging to C:\windows\temp\procmon.pml? Once boot logging was stopped in procmon.exe, it tried to copy the temp procmon.pml file from C: drive to the location I had chosen on the D: drive - D:\Boot-log.pml. At this point, the VM locked up on me and froze. Upon reboot all traces were gone.
D: drive was nearing full, consumed by the PVS write cache file (D:\.vdiskcache). The file con-tained all the data that had been written to C: drive, which only exists virtually, and doesn’t actu-ally accept writes as it is streamed read-only from the PVS server. Included in this write cache would be the huge 20 GB procmon temporary log file. Once the D: drive on the VM used for troubleshooting was extended from 22 GB to 100 GB, overkill to be on the safe side, but enough to ensure I could continue my analysis uninterrupted. Once the logging was stopped, the 20 GB procmon temp log file started copying itself to D:\Bootlog.pml. With enough free space to accommodate it, the copy complete and space was freed up on C: drive (over 20GB!). On D: drive, the write cache (D:\.vdiskcache) was still over 20GB, and there was another 20GB consumed by D:\Bootlog.pml, the file originally expected to accu-mulate all of the logging activity.
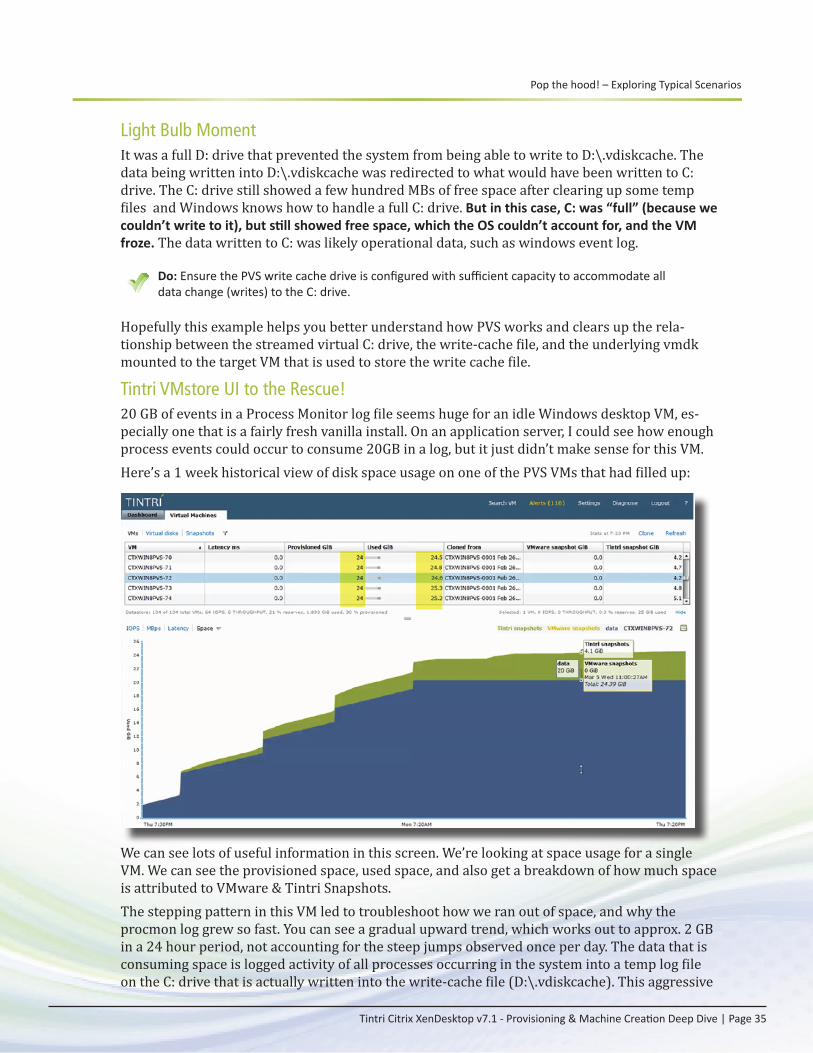
Pop the hood! – Exploring Typical Scenarios
Tintri Citrix XenDesktop v7.1 - Provisioning & Machine Creation Deep Dive | Page 35
Light Bulb MomentIt was a full D: drive that prevented the system from being able to write to D:\.vdiskcache. The data being written into D:\.vdiskcache was redirected to what would have been written to C: drive. The C: drive still showed a few hundred MBs of free space after clearing up some temp files and Windows knows how to handle a full C: drive. But in this case, C: was “full” (because we couldn’t write to it), but still showed free space, which the OS couldn’t account for, and the VM froze. The data written to C: was likely operational data, such as windows event log.
Do: Ensure the PVS write cache drive is configured with sufficient capacity to accommodate all data change (writes) to the C: drive.
Hopefully this example helps you better understand how PVS works and clears up the rela-tionship between the streamed virtual C: drive, the write-cache file, and the underlying vmdk mounted to the target VM that is used to store the write cache file.
Tintri VMstore UI to the Rescue!20 GB of events in a Process Monitor log file seems huge for an idle Windows desktop VM, es-pecially one that is a fairly fresh vanilla install. On an application server, I could see how enough process events could occur to consume 20GB in a log, but it just didn’t make sense for this VM. Here’s a 1 week historical view of disk space usage on one of the PVS VMs that had filled up:
We can see lots of useful information in this screen. We’re looking at space usage for a single VM. We can see the provisioned space, used space, and also get a breakdown of how much space is attributed to VMware & Tintri Snapshots.The stepping pattern in this VM led to troubleshoot how we ran out of space, and why the procmon log grew so fast. You can see a gradual upward trend, which works out to approx. 2 GB in a 24 hour period, not accounting for the steep jumps observed once per day. The data that is consuming space is logged activity of all processes occurring in the system into a temp log file on the C: drive that is actually written into the write-cache file (D:\.vdiskcache). This aggressive
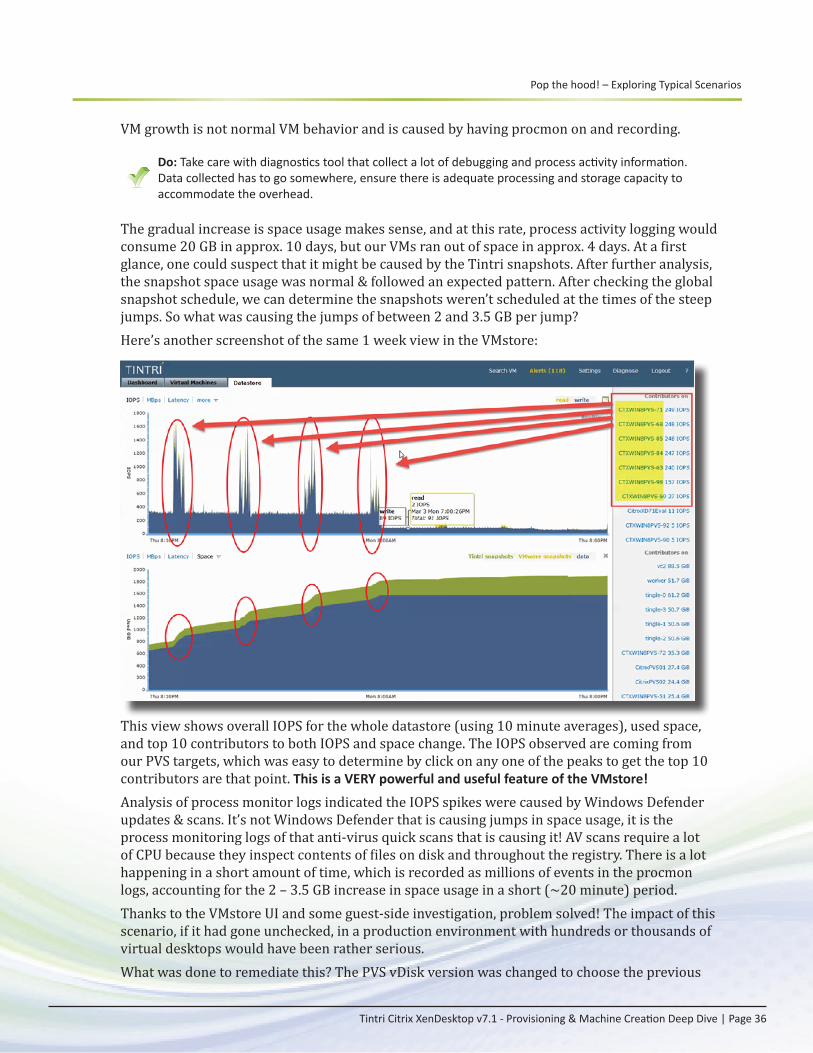
Pop the hood! – Exploring Typical Scenarios
Tintri Citrix XenDesktop v7.1 - Provisioning & Machine Creation Deep Dive | Page 36
VM growth is not normal VM behavior and is caused by having procmon on and recording.
Do: Take care with diagnostics tool that collect a lot of debugging and process activity information. Data collected has to go somewhere, ensure there is adequate processing and storage capacity to accommodate the overhead.
The gradual increase is space usage makes sense, and at this rate, process activity logging would consume 20 GB in approx. 10 days, but our VMs ran out of space in approx. 4 days. At a first glance, one could suspect that it might be caused by the Tintri snapshots. After further analysis, the snapshot space usage was normal & followed an expected pattern. After checking the global snapshot schedule, we can determine the snapshots weren’t scheduled at the times of the steep jumps. So what was causing the jumps of between 2 and 3.5 GB per jump? Here’s another screenshot of the same 1 week view in the VMstore:
This view shows overall IOPS for the whole datastore (using 10 minute averages), used space, and top 10 contributors to both IOPS and space change. The IOPS observed are coming from our PVS targets, which was easy to determine by click on any one of the peaks to get the top 10 contributors are that point. This is a VERY powerful and useful feature of the VMstore!
Analysis of process monitor logs indicated the IOPS spikes were caused by Windows Defender updates & scans. It’s not Windows Defender that is causing jumps in space usage, it is the process monitoring logs of that anti-virus quick scans that is causing it! AV scans require a lot of CPU because they inspect contents of files on disk and throughout the registry. There is a lot happening in a short amount of time, which is recorded as millions of events in the procmon logs, accounting for the 2 – 3.5 GB increase in space usage in a short (~20 minute) period. Thanks to the VMstore UI and some guest-side investigation, problem solved! The impact of this scenario, if it had gone unchecked, in a production environment with hundreds or thousands of virtual desktops would have been rather serious. What was done to remediate this? The PVS vDisk version was changed to choose the previous

Pop the hood! – Exploring Typical Scenarios
Tintri Citrix XenDesktop v7.1 - Provisioning & Machine Creation Deep Dive | Page 37
version instead of “Newest Released”. The PVS targets were rebooted and procmon boot-logging was no longer present in the master image.
Lessons learned • Use PVS vDisk versions for easy roll-back. • Recognize patterns of schedules and explore. Configuration defaults in Windows and other
applications should be understand and changed to suit your environment. • Question everything! There are always answers available if you’re willing to look for them. • Treat diagnostics tools with caution! • Tintri snapshot global defaults can consume a lot of space on VMs with high data change of
unique data that can’t be deduped (i.e. procmon logs!). In most cases, you wouldn’t want to take snapshots of your PVS targets. If snapshots are enabled with a global schedule, unpro-tect specific VMs (XenDesktop machine catalog VMs).
• Thin disks grow when data is written – Even though logical space is reclaimed in D: drive when D:\.vdiskcache was deleted on reboot, underlying vmdks still contain dirty btyes and space is not reclaimed. Recognizing that my logs had filled each disk to > 20 GB each led me to the idea of PVS Variation #2, using non-persistent write cache disks. In the case of the scenario above, a power cycle of the VMs would reclaim all space had been consumed for temporary write-cache data.
Playing Catch-up – Assessing the impact of a dated imageUsing the same 24 hour period as the example above, let’s investigate some other interesting activity: the largest spike.
This spike was comprised of 75 XenDesktop VMs being booted up around the same time and then left idle. Approximately 10 minutes after boot, the anti-virus process gets an update and runs a “quick scan”. In this case, our AV product is the built-in Windows Defender using default settings. AV updates & a full system scan were performed when the image was last updated, ap-proximately two weeks prior to this.

Pop the hood! – Exploring Typical Scenarios
Tintri Citrix XenDesktop v7.1 - Provisioning & Machine Creation Deep Dive | Page 38
By evaluating behavior of routine tasks, such as booting up a number of systems and letting them sit, it was identified that the further an image is out of date from the time it has been sealed, the more impactful the “catch-up” period is. In this case, there are no group policies ap-plying other updates, only the default behavior of Windows Defender. After running AV updates and a full scan, and then updating the master image, this behavior did not occur when all of the desktops were booted up with a fresh image. Windows Defender behavior and thresholds for different update & scan behavior is out of scope of this paper; however this provided a great example to show how powerful the Tintri UI can be in identifying specific behavior to inspire further investigation & diagnosis within the Guest VMs.In the screenshot above, Windows updates were disabled to be handled by the master image. If not, the example above would be even more impactful if WSUS updates were required as well. PVS desktops are all stateless, losing all changes within the guest on a reboot. If Windows Up-dates were not disabled in the image, this would be an even bigger problem. Shortly after boot-up, the Windows update process would identify that the guest is out of date, download, and then install updates. With PVS, all of this activity would all be discarded on reboot and each VM would boot right back up to where it was, and repeat the process in an endless and very impact-ful cycle. Fortunately, this cycle should be easily identifiable in the Tintri UI. In a weekly view, you may find this to happen on Tuesdays, which is Microsoft’s default release of new patches.

Conclusion
Tintri Citrix XenDesktop v7.1 - Provisioning & Machine Creation Deep Dive | Page 39
Conclusion
While there is no “right” or “wrong” method to use for your XenDesktop deployment, there are pros and cons associated with each. We’d love to be able to give you a single one-size fits all recommendation on the best method to use, but it really depends on many factors, including IT organization size and change control requirements, how the users with use the desktops, what is in the virtual desktops.As a catch-all, best of breed solution that allows for frequent master image updates, is most space efficient, relatively easy to manage and would fit change control & test requirements for most organizations, here’s our recommendation:
Do: Use PVS Variation #2 with non-persistent write-cache vmdks on target devices that are cre-ated using Tintri Native Clones.
Tintri VM-Aware storage gives you deep insight into how VMs are interacting with storage. In-stead of viewing storage as a necessary evil required to run applications on and store data, use it as a powerful tool for observation and troubleshooting. We strongly encourage you to ques-tion what you observe. Ask yourself “Should a given process within a VM result in the behavior we’re seeing? Does a software vendor’s or internal developer’s description of a given process match what is actually taking place in reality?” In most cases, it’s up to you to figure out what is actually taking place, and using Tintri for your storage is a very powerful tool to give you more insight than ever before. Take screenshots occasionally of known and unknown (yet to be identified) activity as baseline info to compare future graphs against. Save your screenshots in a central repository as they may come in handy for future uses that have yet to be identified. Having a record for your own refer-ence (and sanity!) can be very helpful down the road to decide if things are getting better or worse based on changing user demands and continual updates and changes within your master images over time. As an added bonus, these screenshots also make great teaching material to mentor future hires!We hope that you have found this deep dive useful and inspiring.
Additional Resources – Reference URLs
Tintri Citrix XenDesktop v7.1 - Provisioning & Machine Creation Deep Dive | Page 40
Additional Resources – Reference URLs
Tintri Links • XenDesktop 7.1 Quick Start Guide – Covers all the perquisite tasks required to get a XenDesktop
environment up and running on Tintri storage. • XenDesktop 7.1 Provisioning Services (PVS) Deep Dive – A continuation in the XenDesktop Deep
Dive Series – this paper focuses on PVS for provisioning virtual desktops. • XenDesktop 7.1 Machine Creation Services (MCS) Deep Dive – A continuation in the XenDesktop
Deep Dive Series – this paper focuses on MCS for provisioning virtual desktops. • XenDesktop 7.1 Tintri Native Clones Deep Dive – A continuation in the XenDesktop Deep Dive
Series – this paper focuses on using Tintri Native Clones as an alternative method of provi-sioning virtual desktops.
• XenDesktop Best Practices white paper. • NFS Best Practices. • Additional resources.
Citrix Links • Citrix XenDesktop eDocs. • Citrix Blog series that focus on image management:
• Part 1: PVS - The myths and tales of image management. • Part 2: MCS - The myths and tales of image management. • Part 3: MCS vs View Composer.
Other • VMware FAQ for VAAI. • vSphere Desktop Edition – Enterprise Plus functionality for use with VDI, license by User, not
socket, regardless of how many hosts you have. • Login VSI – Load Testing tool for VDI environments. • Windows Sysinternals Suite – An amazing (and free!) suite of tools available from Microsoft
that belong in every windows admin’s toolbelt. If you’re unfamiliar with these tools, check out our favorites and consider adding them to all your virtual desktop images for easy ac-cess: Autoruns, BGInfo, Diskview, Procexp, Procmon, PSGetSid, and TCPView.exe.
• FSLogix – Offers solutions to greatly reduce the number of master images required for your desktops and compliments XenDesktop provisioning methods.
• WinDirStat – A great disk space analysis utility for windows.
Appendix A – Environment Details
Tintri Citrix XenDesktop v7.1 - Provisioning & Machine Creation Deep Dive | Page 41
Appendix A – Environment Details
This guide was written to be applicable to any server hardware and all supported versions of VMware vSphere. In case your own results vary from what you’ve seen in this paper, here is a high-level overview of the lab equipment used:
HardwareStorage: Tintri VMstore T540 running Tintri OS v2.1.2.1 Servers: Cisco UCS B22-M3 blades
SoftwareVMware vSphere 5.1 U2 – Build 1612806Tintri vSphere Web Plugin v1.0.0.1 (includes the Best Practices Analyzer tool)Server OS: Windows Server 2012 R2 – Datacenter EditionDesktop OS: Windows 8.1Citrix XenDesktop 7.1 Citrix PVS Provisioning Services 7.1


