
Owner's Manualfor OnboardComputer

The onboard computer offers you an array of functions designed to foster safety while simultaneously enhancing your driving pleasure.
The GPS navigation system frees you from the burden of reading maps or looking for road signs. It will guide you to any destination recorded on your map CD/DVD.
The radio, with its superb reception quality, joins the cassette and CD players in providing optimal sound to satisfy every taste while serving up entertainment to make every trip seem short.
The computer calculates vital operating data – including average fuel consumption, cruising range on the remaining fuel and the estimated time of arrival. It provides additional safety before driving – for example, with entry of a code number for the engine immobilizer – and during driving – for example, with an acoustic warning tone so that you do not drive faster than you intend to.
We wish you an enjoyable driving experience.
BMW AG
Vorwort
Contents
The onboard cglance 8
The radio conglance 10
Functions at aScreen displaControl conceExplanation o
selection 1Safety noticeSettings 19
ddress book
reating address book 39electing an address 40eleting an address 40
dditional functions
urrent position 41ordmatch principle 42
roubleshooting
hat to do if ... 43
Ove
rvie
w
omputer at atrols at a
glance 12ys at a glance 14pt 16f function 819
To activate the systemSafety 22GPS 22Map CD/DVD 22Starting GPS navigation 23
Selecting a destinationSelection options 23Destination entry 23Manual destination entry 24Map-supported destination
selection 27Selecting destination in
information 29Recent destinations 30Returning to the starting
Nav
igat
ion
© 2002 Bayerische Motoren WerkeAktiengesellschaftMunich, GermanyReprinting, including excerpts, only with the written consent of BMW AG, Munich. Order no. 01 41 0 157 006US English VIII/02Printed in GermanyPrinted on environmentally friendly paper –bleached without chlorine, suitable for recycling.
Selecting route 32
Destination guidance systemStarting the destination guid-
ance system 33Displaying route 34Changing route 36Voice messages 37Continuing guidance 38Terminating/interrupting active
guidance 38
ACSD
ACW
TW
point 31

3n
Over
view
Nav
igat
ion
men
t
Everything from A to Z 76
Switching radio on and off 46Varying volume 46Tone control 47
Radio receptionSelecting the frequency band 48Selecting radio stations 48Program type (PTY) 51Storing radio stations 52Calling up a station 53
Playing recorded mediaStarting and stopping the
cassette 54Mode displays 54Noise suppression 55
Starting computer 64Range 64Outside temperature 64Time of arrival 65Fuel consumption 65Average speed 65Speed limit 66Distance 67Stopwatch 68Remote control 68
CodeChoosing and activating
code 69Deactivating code 70
En
tert
ain
me
Co
mp
ut
Ente
rtai
nCo
mpu
ter
Inde
x
Starting and stopping the CD 57Mode displays 58Using the buttons to search for
music tracks 58Menu-guided track search 59
DSP sound systemSwitching on and off 61Selecting sound pattern 61Individual tone control
memory 62Calling up tone control
memory 62
Switching direct mode on/off 72
Ind
ex
Radio controls Computernter
Music track search 55CD changer 56
Auxiliary ventilationSetting timer 71

4n
A separate manual has also been provided for the "Emergency"
functions.
<
A list explaining all of the abbreviations that appear on the computer screen can be found in the glossary at the end of the manual.
Should the day arrive when you wish to sell your BMW, please remember to hand this Owner's Manual to the next owner – it is an important part of the vehicle.
Information on care
For complete information on the care of
Notes on the Owner's ManualTo start using your onboard computer right away, consult the overview of con-trols and displays and the concise operating instructions in the first chapter.
In addition, you will find
>all the essentials you will need to adjust the screen and care for your computer in the "Overview" chapter
>all information on using the GPS nav-igation system in the "Navigation" chapter
>all the essentials on radio use and broadcast reception, combined with
> information on how you can use the computer to calculate various data related to vehicle operation in the "Computer" chapter.This chapter also contains informa-tion on the engine immobilizer code and the settings for the auxiliary heat-ing*/-ventilation.
The fastest way to find information on any specific topic is by turning to the index.
Because the control options for the mobile phone also include
provisions for using it without the onboard computer, the operating
cassettes, CDs, DVDs and the device, please refer to the caring for your vehicle brochure.
instructions on how to use the cas-sette and compact disc* (CD) players in the "Entertainment" chapter. This chapter also contains information on the "Digital Sound Processing* (DSP)" sound system
instructions have been compiled in a separate manual.<
HinweiseSymboleIhr individuelles Fahrzeug

5n
Over
view
Nav
igat
ion
inm
ent
-
Software release version
When you select the "Set" menu the version number of your onboard com-puter appears at the upper right of the screen.
"SW 4-1/XX" means:
>
4: Generation 4
>
1: Top Navigation
>
XX: Current version.
The information in this Owner's Manual is based on the following software ver-sion: 1.0.
Please contact your BMW center if you have any questions regard-
ing the software version.
<
Symbols used
Indicates precautions that must be followed precisely in order to
avoid the possibility of personal injury and serious damage to the vehicle or the onboard computer.<
Contains information that will assist you in gaining the optimum
benefit from your onboard computer and enable you to care more effectively for your onboard computer.<
< Marks the end of a specific item of information.
Editorial noticeTo ensure that our accessories and in-vehicle equipment continue to com-bine advanced technology with unex-celled levels of quality, we at BMW pursue a policy of continuous, ongoing development embracing every aspect of design. It is therefore possible that some of your own vehicle's equipmentand features may vary from those described in this manual. We are also unable to guarantee that all of the descriptions and illustrations containedin the manual will be completely accu-rate in all respects. We must therefore request your understanding for the factthat we are unable to recognize legal
Ente
rta
Com
pute
rIn
dex
r
Aktualität bei Drucklegung
* Indicates special equipment, country-specific equipment and optional extras.
If you have additional questions, please consult your BMW center for informa-tion and advice.
claims based on the data, descriptionsand illustrations in this manual and youown vehicle's equipment.
Zu Ihrer eigenen Sicherheit

6n

7n
Over
view
Nav
igat
ion
ent
Overview
Navigation
Entertainment
Ente
rtai
nmCo
mpu
ter
ndex
Computer
Index
I
Overview

8n
The onboard computer at a glance

9n
Over
view
Nav
igat
ion
Ente
rtai
nmen
tCo
mpu
ter
The onboard computer at a glance
r
Inde
x
Displays and controls1 Display screen>Function displays
2 Indicator lamps for phone* mode>Yellow:
Call is being routed through alternate network
>Green:Call is connected
>Red:Phone not available
>Flashes:Phone is not registered with a ser-vice provider
Please consult the separate
6 Using onboard computer 16>Turn: highlight function or adjust
setting>Press: confirm selection or save
setting
7 Indicator lamp for operation of the auxiliary heating*/ventilation>Red:
Timer activated>Flashes:
Direct operation activated
8 Switch display to>Radio functions>Onboard computer functions
Radio display and control ele-
manual for instructions on oper-ating the telephone.<3 Receiver symbol>Dial telephone number>End call
4 Clock symbol>Display the time when the ignition
is off (ignition key in position 0 or removed from the ignition lock)
5 MENU>Select top menu 16
ments, refer to page 10.<
You can retrofit your onboard monitor with an AUX socket for
connecting a third unit, such as a CD oMP3 player.

10n
The radio controls at a glance

11n
Over
view
Nav
igat
ion
Ente
rtai
nmen
tCo
mpu
ter
The radio controls at a glance
If your vehicle is equipped with a multifunction steering wheel
*
, you se its integrated controls to te the functions of the radio, the anger
*
and the telephone
*
, refer vehicle Owner's Manual for addi- information.
<
can uoperaCD chto thetional
Inde
x
Displays and controls1 INFO>Activating RDS functions 49>Activating PTY functions 51
2 Waveband/Memory level>FM (FM1/FM2/FMA) 48, 52>AM (AM/AMA) 48, 52
3 Buttons for>Station selection for radio 52>CD selection for CD changer 58
4 Display screen>Function displays
5 Changing tape side 54
6 Lower cover, eject cassette 54
8 Station/track search>Station scan 50>Tape forward/Tape rewind 55>Music search
Cassette 55CD changer* 58
9 TONE>Selecting sound settings 47
10 Indicator lamp for radio mode
11 Switch display to>Onboard computer functions>Radio functions
12 Operating the radio>Press: turn radio on/off>Turn: adjust volume for radio and
7 SELECT>Selecting station scan functions
Manual station selection 49Sample station 50Scan sensitivity level 50
>Dolby control 55>Menu-guided search for music
tracks 59
information on navigation
13 MODESwitching sound source to>Radio>Cassette>CD changer*
14 Cassette slot

12n
Functions at a glance

13n
Over
view
Nav
igat
ion
inm
ent
Functions at a glance
Settings
>
Screen display mode selection 19
>
Date and time display mode selection 19
>
Audio guidance volume adjustment 19
>
Screen color pattern selection 19
>
Language selection 19
>
Unit selection 19
>
Switching Memo on/off 19
Current time
rs
11
12
Ente
rta
Com
pute
rIn
dex
n
69
1 Computer>Cruising range display 64>Outside temperature display 64>Time of arrival display 65>Starting fuel consumption
calculations 65>Starting calculations of average
speed 65>Setting speed limit 66>Setting/displaying distance 67>Switching stopwatch on/off 68
2 GPS-Navigation>Changing the map CD/DVD 22>Selecting the destination 23>Route selection 32>Guidance to destination 33>Displaying route 34
4 Auxiliary heating*/ventilation>Entering and storing starting
times 71>Switching heating or ventilation
on/off 72
5 Screen deactivation
6 Current date
7 Selectable settings, e.g.:> "Memo" function activated via
"Set" 19
8 EmergencyContacting emergency call cente
Please consult the separatemanual for instructions on
operation and use.<
>Address book entries and access 39
>Current location display 41
3 DSP* (Digital Sound Processing)>Selecting sound pattern 61>Changing tone control
individually 62>Calling up tone control memory 62
9 Mobile phone*Please consult the separatephone manual for informatio
on operation and use.<
10 Code>Choosing and activating code>Deactivating code 70

14n
Screen displays at a glance
15n
Over
view
Nav
igat
ion
Ente
rtai
nmen
t
Screen displays at a glance
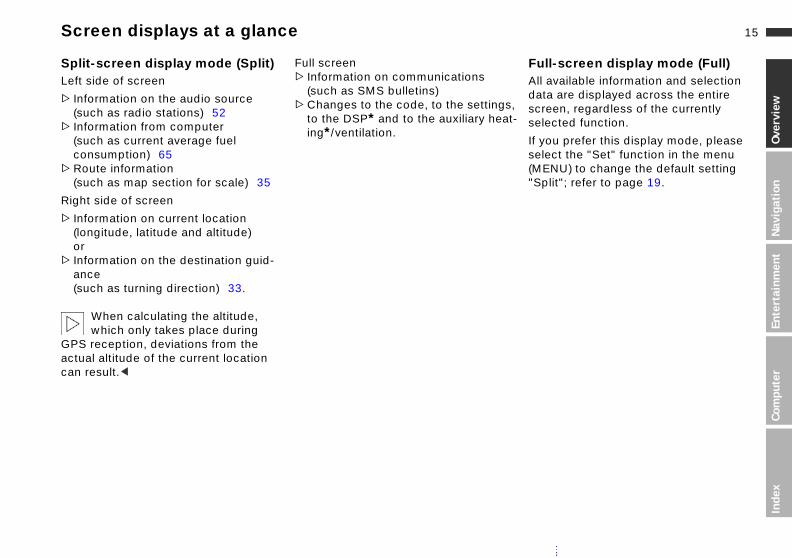
l-screen display mode (Full)
available information and selection a are displayed across the entire een, regardless of the currently cted function.
u prefer this display mode, please ct the "Set" function in the menu NU) to change the default setting lit"; refer to page 19.
s, at-
FulAll datscrsele
If yosele(ME"Sp
Com
pute
rIn
dex
Split-screen display mode (Split)Left side of screen
> Information on the audio source(such as radio stations) 52
> Information from computer (such as current average fuel consumption) 65
>Route information (such as map section for scale) 35
Right side of screen
> Information on current location (longitude, latitude and altitude) or
> Information on the destination guid-ance (such as turning direction) 33.
Full screen> Information on communications
(such as SMS bulletins)>Changes to the code, to the setting
to the DSP* and to the auxiliary heing*/ventilation.
When calculating the altitude, which only takes place during
GPS reception, deviations from the actual altitude of the current location can result.<

16n
Control concept
tional functions
ional functions can be displayed the symbol.
AddiAdditusing
the right-hand rotary button d the corresponding symbol. Now an proceed to mark and select f the functions in the display, refer lecting functions".
Depending on the range of avail-able functions, it may take a few ds until all additional functions
ar on the screen.<
You can only select those menu entries or functions that are dis-d on the screen in white letters.<
Turn towaryou cone oto "Se
seconappe
playe
MENU selectionThe onboard computer integrates an extensive range of functions. Select the top menu (MENU) for a list of the various functions, refer to page 12.
Select "MENU"
When you select a function from the MENU, a list of selection options or of submenus will appear in the display:
>For information on selecting func-tions, refer to "Selecting function"
>For information on how to request a display of additional functions, refer
Selecting functionsTo select a function, use the right-handrotary button to complete the two following steps:
to the section on "Additional func-tions"
>For information on settings for menu selection, refer to "Resetting history" on page 17
>To return to the higher menu level, refer to the "Selecting return symbol" section on page 17
>For a display of additional entries in lists, refer to "Scrolling forward and back" on page 17.
To return to the main MENU from any other menu/any other function:
1. Mark the function
Turn the right-hand rotary button until the desired function is high-lighted
2. Confirm your selection
Press the right-hand rotary button.
On the following pages these two stepsare summarized as:
Select "Function“.

17n
Over
view
Nav
igat
ion
inm
ent
Control concept
rolling forward and back
en one of the above symbols ears on the screen, this indicates
t further entries are available for
-ScWhapptha
Ente
rta
Com
pute
rIn
dex
ing in the current list.
described in the "Selecting func-s" section, you can also highlight symbol with the right-hand rotary ton before proceeding to confirm r entry by presssing the button.
le n
view
As tionthisbutyou
Resetting historyThis function makes it easier for you to access previously viewed information or an edited function after switching off
Selecting return symbolTo return to a previous menu or function, proceed as follows:
Select .
the onboard computer or changing the menu.If you switch on the onboard computer again or select the corresponding func-tion again under "MENU", you will auto-matically enter the menu level previ-ously used.
To interrupt this function to return to the initial menu level:
Briefly press twice in a row.
As described in the section on "Selecting functions", it is also possibto use the right-hand rotary button tohighlight the "Return" symbol and theselect it by pressing.

18n
Explanation of function selection
ss the right-hand rotary button to e
t and then save the month and day h the same procedure.
e system adopts the selected set-s for the date
lect .
u exit the date entry mode once complete this final step.
an also select the order in which ements of the date will be dis-d: you can display the days (dd) nd then the months (mm) – or you ave them displayed in the oppo-rder.
To exit a function or a selection mode accidentally selected, e reselect it again. Then you can
7. Presav
8. Sewit
Thting
9. Se
Yoyou
You cthe elplayefirst acan hsite o
pleas
t any desired function.< selecTo help you get oriented as quickly as possible, the individual selection proce-dures are provided immediately below each menu option.
Individual control and entry processes may include the following elements:
>Buttons that you press>Functions that you select using the
right-hand rotary button. "Selecting functions", refer to page 16
>The right-hand rotary button appears with arrows for control procedures in which it is pressed or turned only.
Individual steps are separated by the symbol.
An example: setting the dateHere setting the date serves as an example to illustrate the control concept:
1. Select "MENU"
2. Select "Set"
3. Select "Date"
4. Select "Set"
5. Select the year
6. Turn the right-hand rotary button to set the year
19n
Over
view
Nav
igat
ion
inm
ent
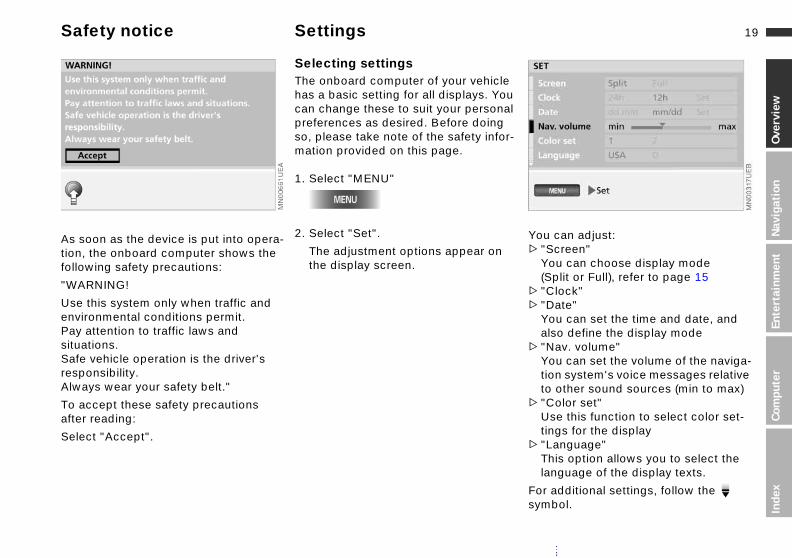
Safety notice Settings
can adjust:
Screen"ou can choose display modeplit or Full), refer to page 15
Clock"
le ou al r-
You> "
Y(S
> "
Ente
rta
Com
pute
rIn
dex
Date"ou can set the time and date, and lso define the display modeNav. volume"ou can set the volume of the naviga-on system's voice messages relative other sound sources (min to max)
Color set"se this function to select color set-ngs for the displayLanguage" his option allows you to select the nguage of the display texts.
additional settings, follow the bol.
> "Ya
> "Ytito
> "Uti
> "Tla
Forsym
As soon as the device is put into opera-tion, the onboard computer shows the following safety precautions:
"WARNING!
Selecting settingsThe onboard computer of your vehichas a basic setting for all displays. Ycan change these to suit your personpreferences as desired. Before doingso, please take note of the safety infomation provided on this page.
1. Select "MENU"
2. Select "Set".
The adjustment options appear onthe display screen.
Use this system only when traffic and environmental conditions permit.Pay attention to traffic laws and situations.Safe vehicle operation is the driver's responsibility.Always wear your safety belt."
To accept these safety precautions after reading:
Select "Accept".

20n
Settings
Your options include:> "Distance" in miles or km> "Consumpt." (l/100 km, mpg or km/l)> "Temperature" (6 or 7)
You can specify the units for distance, fuel consumption and temperature
> "Memo"You can set a signal to sound at the full hour; related symbol
> "Brightness"You can set the brightness (min to max).
For information on how to enter these selection options, refer to
page 18.<

Overview
Navigation
Entertainment
21n
Over
view
Nav
igat
ion
ent
Computer
Index
Ente
rtai
nmCo
mpu
ter
ndex
I
Enter-
22n
ging the map CD/DVD
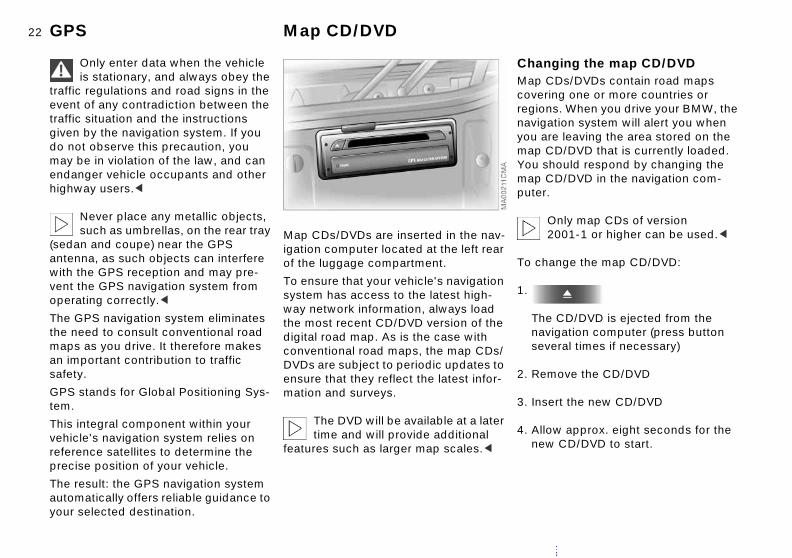
CDs/DVDs contain road maps ing one or more countries or ns. When you drive your BMW, the ation system will alert you when re leaving the area stored on the D/DVD that is currently loaded.
hould respond by changing the D/DVD in the navigation com-
.
Only map CDs of version 2001-1 or higher can be used.
<
ange the map CD/DVD:
GPS Map CD/DVD
Only enter data when the vehicle is stationary, and always obey the
traffic regulations and road signs in the event of any contradiction between the traffic situation and the instructions given by the navigation system. If you do not observe this precaution, you may be in violation of the law, and can endanger vehicle occupants and other highway users.<
Never place any metallic objects, such as umbrellas, on the rear tray
(sedan and coupe) near the GPS antenna, as such objects can interfere with the GPS reception and may pre-
Map CDs/DVDs are inserted in the nav-igation computer located at the left rear of the luggage compartment.
To ensure that your vehicle's navigation
e CD/DVD is ejected from the igation computer (press button eral times if necessary)
move the CD/DVD
ert the new CD/DVD
ow approx. eight seconds for the CD/DVD to start.
vent the GPS navigation system from operating correctly.<
The GPS navigation system eliminates the need to consult conventional road maps as you drive. It therefore makes an important contribution to traffic safety.
GPS stands for Global Positioning Sys-tem.
This integral component within your vehicle's navigation system relies on reference satellites to determine the precise position of your vehicle.
The result: the GPS navigation system automatically offers reliable guidance to your selected destination.
system has access to the latest high-way network information, always load the most recent CD/DVD version of the digital road map. As is the case with conventional road maps, the map CDs/DVDs are subject to periodic updates to ensure that they reflect the latest infor-mation and surveys.
The DVD will be available at a later time and will provide additional
features such as larger map scales.<
ChanMap coverregionavigyou amap CYou smap Cputer
To ch
1.
Thnavsev
2. Re
3. Ins
4. Allnew

23n
Over
view
Nav
igat
ion
inm
ent
Starting GPS navigation Selection options Destination entry
example shows how to use the S navigation system to find the wing destination:
N Rexford Drive, Beverly Hills
Only enter data when the vehicle is stationary, and always obey the
fic regulations and road signs in the nt of any contradiction between the fic situation and the instructions n by the navigation system. If you
not observe this precaution, you y be in violation of the law, and can anger vehicle occupants and other
hway users.<
fer
a-a-
na-
TheGPfollo
455
trafevetrafgivedo maendhig
Ente
rta
Com
pute
rIn
dex
1. Select "MENU"
2. Select "GPS-Navigation".
To exit the GPS navigation system, press the button again:
When entering your destination, you can select from among the followingoptions:>Destination entry and selection>To select destination from map, re
to page 27>To select the destination via inform
tion on the destination, current loction or country, refer to page 29
>To select from among recent destitions, refer to page 30
>To return to initial location, refer topage 31
>To select destination from addressbook, refer to page 40.
After selecting your destination, you can proceed to activate the guidance
function, refer to page 33.
24nDestination entry Manual destination entry
ss the right-hand rotary button on right.
ist of the available countries is played
2. Prethe
A ldis
lect "United States".
e system adopts your selection as destination entry.
If you wish to retain your current entries without change, you can he entry of a country or city of ation.<
3. Se
Ththe
skip tdestin
Note the following special features:>Use to correct your last entry.
Maintain pressure on the right-hand rotary button to delete the entire entry line
>The system relies on a wordmatch principle to make it easier for you to enter names. It supports various spellings as well as automatic name completion, refer to page 42
>The selection of a country, a town or city or a street can be canceled at any time by selecting
> If entries in a selection menu (sub menu) are not made within eight sec-onds, you will need to repeat the pro-
Enter destination countryIf the name of a country appears on thescreen in white letters, data for more than one country may be stored on the
cedure.map CD/DVD.To select a destination country, e.g. when traveling to a foreign country:
1. Turn the right-hand rotary button until the current country name is highlighted.
"Country ?" appears in the display

25n
Over
view
Nav
igat
ion
inm
ent
Manual destination entry
ering streetreet ?" is highlighted.
ress the right-hand rotary button to
,
f
Ent"St
1. P
Ente
rta
Com
pute
rIn
dex
tart your entry
elect "R".
he selected letter is highlighted in he display
ontinue to select letters from Rexford Drive" until the system esponds with positive recognition of our destination by highlighting the ntry in the list
elect "Rexford Dr N".
he system adopts the street name.
is ity m
i-he
,
f
s
2. S
Tt
3. C"rye
4. S
T
Entering destination"City ?" is highlighted.
1. Press the right-hand rotary button to
4. Select "Beverly Hills, Los AngelesCA".
The computer registers your city odestination.
start your entry
2. Select "B".
The selected letter is highlighted in the display
3. Use the same procedure to select remaining letters in "Beverly Hills" to ensure positive recognition of your destination, which the system will then signal by highlighting the entry in the list
If the city name or its spellingnot exactly known, then the c
concerned can also be selected frothe list after entering a first letter.Some map CDs/DVDs also list addtional cities or parts of a city with tcity name you have selected.<
5. Here you can select "Beverly HillsCA" from the list (CA = California).
The computer registers your city odestination.

26nManual destination entry
Availability of the house number selection function for specific s varies from one map CD/DVD to
ext. If no house numbers are d for a particular street on your nt CD/DVD, no display for numeri-try will appear on the screen. In ase an intersection can be ted – if present. The destination nce then ends the next time the usly selected street is sed.<
t
streetthe nstorecurrecal enthis cselecguidaprevioacces
If the street name or its spelling is not exactly known, then the
street concerned can also be selected from the list after entering a
Entering house number or intersectionAfter entering the street, you can seleca house number or intersection, such
first letter.<
5. In our example you would now select "Rexford Dr N" from the list.
The system adopts the street name.
If you do not select a street, the guidance system will only take
you as far as the town or city limits.<
as "455".
1. Select "No./Intersection ?"
2. Select "House number"
3. Select "4"
4. Select the remaining digits in the number
5. Select "Enter".
The system adopts the house number.

27n
Over
view
Nav
igat
ion
Ente
rtai
nmen
tCo
mpu
ter
Map-supported destination selection
ocalize the destination with the arget cursor:
Turn the right-hand rotary button to mark the desired change in direc-tion with the cursorPress and hold down the right-hand rotary button until the map has been moved in the desired direction below the target cursorRelease the right-hand rotary button to fix the changeSelect another "Cursor" as neces-saryPress and hold down the right-hand rotary button to move the map in the other direction
,
n
len
n
Lt
>
>
>
>
>
Inde
x
Release it to fix the change.
A few seconds may pass until the new section of the map is
isplayed.<
>
d
You know the town or city, but only the general location of the street, and not its name. The system offers you maps on which you can identify your destina-tion with a target cursor for subsequent
5. If necessary, change the scale:>Turn the right-hand rotary button
continuing until the map scale ishighlighted
>Press the right-hand rotary butto
transfer to the guidance system.1. To enter the destination, refer to page 25
2. Select "Map"
3. Press right-hand rotary button.
A selection menu appears on the screen
4. Select "Dest. Input Map"
to select the map scale>Turn the right-hand rotary button
again to set the desired map sca>Press the right-hand rotary butto
to store the scale.
The "Save Dest." function caonly be selected if the map
scale is less than 1 mile or 2 km.<
After the resolution scale is changed, a few seconds may
pass until the map is displayed.<

28nMap-supported destination selection
6. To enter in guidance system:Select "Save Dest.".
You can also use the destina-tion entry map without
specifying a town or city name. To select a destination in this way, start by specifying the desired map scale.<
If you would like information on the cur-rent position on the map, then select "Position" with the right-hand rotary button, refer to page 41.
29n
Over
view
Nav
igat
ion
Ente
rtai
nmen
tom
pute
r
Selecting destination in information
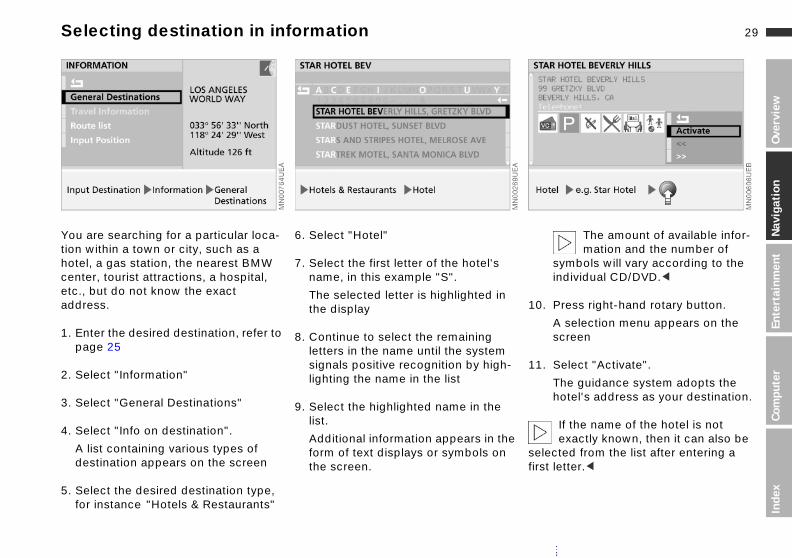
The amount of available infor-mation and the number of
symbols will vary according to the individual CD/DVD.<
Press right-hand rotary button.
A selection menu appears on the screen
Select "Activate".
The guidance system adopts the hotel's address as your destination.
n
h-
10.
11.
CIn
dex
If the name of the hotel is not exactly known, then it can also be
cted from the list after entering a t letter.<
he n sele
firs
You are searching for a particular loca-tion within a town or city, such as a hotel, a gas station, the nearest BMW center, tourist attractions, a hospital, etc., but do not know the exact
6. Select "Hotel"
7. Select the first letter of the hotel'sname, in this example "S".
address.
1. Enter the desired destination, refer to page 25
2. Select "Information"
3. Select "General Destinations"
4. Select "Info on destination".
A list containing various types of destination appears on the screen
5. Select the desired destination type, for instance "Hotels & Restaurants"
The selected letter is highlighted ithe display
8. Continue to select the remaining letters in the name until the systemsignals positive recognition by higlighting the name in the list
9. Select the highlighted name in thelist.
Additional information appears in tform of text displays or symbols othe screen.
30nSelecting destination in information Recent destinations
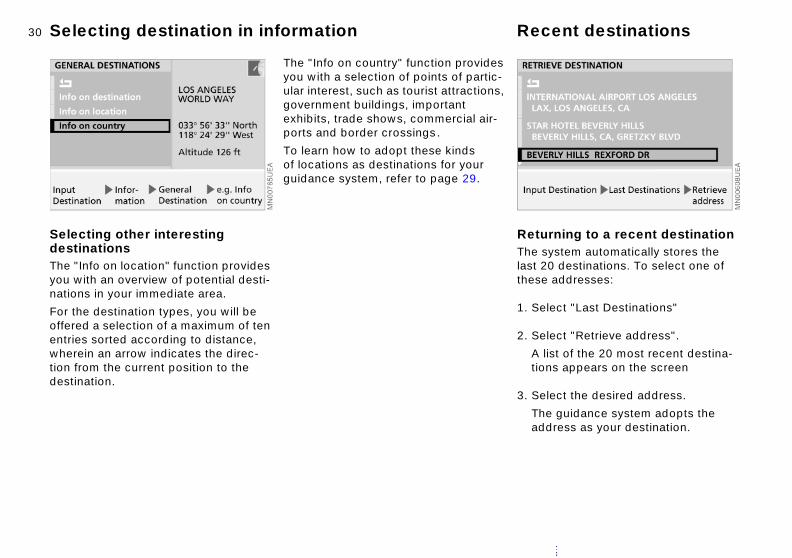
rning to a recent destinationystem automatically stores the 0 destinations. To select one of addresses:
lect "Last Destinations"
lect "Retrieve address".
ist of the 20 most recent destina-ns appears on the screen
lect the desired address.
e guidance system adopts the
,
RetuThe slast 2these
1. Se
2. Se
A ltio
3. Se
Th
address as your destination.Selecting other interesting destinationsThe "Info on location" function provides you with an overview of potential desti-
The "Info on country" function providesyou with a selection of points of partic-ular interest, such as tourist attractionsgovernment buildings, important exhibits, trade shows, commercial air-ports and border crossings.
To learn how to adopt these kinds of locations as destinations for your guidance system, refer to page 29.
nations in your immediate area.
For the destination types, you will be offered a selection of a maximum of ten entries sorted according to distance, wherein an arrow indicates the direc-tion from the current position to the destination.

31n
Over
view
Nav
igat
ion
inm
ent
Recent destinations Returning to the starting point
elect "Enter".
he address for the location is stored n the address book.
return to your starting point later on,
4. S
Ti
To
Ente
rta
Com
pute
rIn
dex
ou now have to do is select the ress from the address book as the tination for the guidance system, r to page 40.
If you used the GPS navigation system to reach your current loca-
, then it will already be registered in "Last Destinations" list. You can sfer entries from this list directly to
guidance system, refer to e 30.<
n
e .
all yadddesrefe
tionthetranthepag
Deleting destination addressesYou can delete any of the addresses contained in the list of your 20 most recent destinations:
1. Select "Last Destinations"
2. Select "Delete address".
A list with your 20 most recent desti-nations appears on the screen
3. Select desired address.
"Delete address ?" appears on the screen
4. Select "yes".
You can make it easier to enter the destination for your return trip by storing the address of your initial location before starting off:
The address is deleted.
To delete all of the addresses, use the right-hand rotary button to highlight "Delete address" and then maintain pressure on it for at least one second.
1. Select "Address Book"
2. Select "Memorize veh. position".
The address appears on the screeto allow you to add supplementaryinformation
3. Select "Name ?" if necessary.
You can enter a designation for thaddress, e.g. "Los Angeles office"
Confirm with "Enter"

32nSelecting route
To revise the route preference while underway with the guidance m, refer to page 36.<
systeThe GPS navigation system allows you to choose from among various available routes. This feature allows you to define the system's priorities in selecting from
You can change the selected route as often as you like, both when entering your destination and at any time while the system is guiding you to it – the
individual travel options:> "via highway"> "avoid highway"> "fastest route"> "shortest route"> "avoid tolls".
The GPS navigation system relies on specific logical structures to
determine suggested travel routes. These vary according to the different kinds of roads stored on the map CD/DVD. As a result, the routes recom-mended by the navigation system may not always be the same ones that you would choose based on personal experience.<
system revises its recommendations accordingly:
1. Select "Route Preference ?"
2. Select the priorities for use in calcu-lating your route.
The corresponding symbol is highlighted
3. Select .
Your route preference appears on the screen, and is adopted by the system for use in determining the best route.

33n
Over
view
Nav
igat
ion
Ente
rtai
nmen
tCo
mpu
ter
Starting the destination guidance system
he lower right half of the screen estimated time of arrival and the ance to the destination will also tinue to be displayed (Distance, r to page 67).
The system continues to provide active guidance to your destina-
, even if you then select one of the oard computer's other functions, h as the radio or the computer. ce messages combine with the dis-y on the screen to inform you of oming turns well before you arrive
ntersections.<
s is th
.
ou
g nt
In tthedistconrefe
tiononbsucVoiplaupcat i
Inde
x
Once you have entered or selected the complete destination address, the city or town will appear on the screen, along with the street and house num-ber; "Directions" is highlighted.
Once the computer has completed itcalculations a route map appears onthe left side of the display screen; thisaccompanied by arrows indicating boyour general direction and true north
Press the right-hand rotary button to start active guidance.
When you select the split-screen option (Split), the estimated time of arrival and the distance to your destination appear in the lower right half of the screen after the destination guidance system is started, while the navigation computer calculates the best travel route.
The calculation of a new route, its display and the display of the
exact value for the distance to the destination can take up to one minute.<
On the right side of the split screen ywill see the name of the street whereyou will make your next turn (in the direction indicated by the arrow) alonwith the distance to the intersection,your direction of travel and your curreposition.
In addition, you will also be providedwith voice messages that can be repeated, refer to page 37.

34nDisplaying route
ing direction display you select a scale of less than or 2 km, you have the option of
ng the map to orient it either to the
AlterWhen1 milerotati
or to your direction of travel.
ss the right-hand rotary button.
election menu appears, also refer page 23
lect "Map positioning".
other selection menu appears on screen
lect the desired directional orien-ion.
After changing the directional orientation, it may take a few ds until the route map is shown.<
north
1. Pre
A sto
2. Se
Anthe
3. Setat
secon
Viewing the route mapProvided that you have selected the undivided display mode (Full), you can display a map showing the planned
Revising the scaleRegardless of which display mode youhave selected (Split/Full), you always have the option of selecting the scale
route while the system is guiding you to your destination.
1. Press the right-hand rotary button.
A selection menu appears, also refer to page 23
2. Select "Route map".
The route map appears on the screen.
To change to directional display, select .<
that best suits your personal prefer-ences.
1. Turn the right-hand rotary button to mark the field with the specified scale
2. Turn the right-hand rotary button again to set the desired map scale
3. Do not move the rotary button for a few seconds or press it to save the map scale.
The map scale will change after a few seconds.

35n
Over
view
Nav
igat
ion
Ente
rtai
nmen
tCo
mpu
ter
Displaying route
elect "Route list".
he route list appears on the screen
urn the right-hand rotary button to croll through the list
ou can now select an entry from the ist to obtain more detailed informa-ion
o exit this information mode, elect .
d er st
ed
ti-
.
fer
3. S
T
4. Ts
5. Ylt
6. Ts
Inde
x
The directional orientation of the route map affects the screen display as fol-lows:>With a northern directional orienta-
tion, the map is continuously moved slightly below the direction of travel symbol
>The map is redisplayed for each directional orientation in the direction of travel when the direction of the travel symbol reaches the edge of the map section.
The respective map adjustment to the direction of travel can take a
few seconds.<
Route list displayYou can access a listing of streets antowns or cities on your route whenevthe guidance system is active. This li
is based on the GPS navigation sys-tem's suggested travel route.The distances remaining to be travelon each individual road are also dis-played.
To display the route list while the desnation guidance system is active:
1. Press the right-hand rotary button
A selection menu appears, also reto page 23
2. Select "Information"

36nChanging route
ss the right-hand rotary button to e the desired distance.
e system will start to guide you ng the new route as soon as pos-
4. Presav
Thalo
le.
r
sib
Revising route preferenceYou have the option of revising your route preferences by active destination.
Revising route sectionDuring active system guidance you canprogram the navigation system to avoidindividual sections of the recommended
1. Press the right-hand rotary button.
A selection menu appears on the screen
2. Select "Route Preference"
3. Select your priorities for the route selection process
4. Select .
The system bases its subsequent recommendations on the new route preference entry.
The calculation of the new route and its display can take up to one
minute.<
travel route. You simply enter the num-ber of miles (kilometers) you want to drive before returning to the original route.
1. Press the right-hand rotary button.
A selection menu appears, also refeto page 23
2. Select "New route"
3. Turn the right-hand rotary button to select the desired distance.
You can select distances ranging from 1 to 10 miles (km)

37n
Over
view
Nav
igat
ion
inm
ent
Voice messages
ge:
Ente
rta
Com
pute
rIn
dex
.
h
,
d
te
Varying volumeYou can raise or lower the volume of the navigation system's voice mes-sages relative to that of other sound
Repeating or interrupting voicemessagesTo repeat the last audio voice messa
sources.
Should you have also reduced the vol-ume of all sound sources to zero with the left knob, then the navigation instructions are output at a minimum volume.
For instructions on how to adjust the minimum volume, refer to page 46.
1. Press the right-hand rotary button
A selection menu appears in whic"Instruction" is already highlighted
2. Press the right-hand rotary buttonbriefly.
The last audio voice message is repeated.
To interrupt the audio voice messagepress and hold the right-hand rotary button for a longer time in the seconstep.
Select "Instruction" again to reactivathe voice output.

38nContinuing guidance Terminating/interrupting active guidance
want to reactivate the destination nce system at a later time with the specifications:
lect "MENU"
lect "GPS-Navigation"
lect "Directions".
e destination guidance system is tarted.
Steps 1 and 2 are not necessary if the "GPS-Navigation" menu has
-
r
If youguidasame
1. Se
2. Se
3. Se
Thres
een exited.<
not bAfter stopping (for instance, to refuel) you can decide whether to continue using the guidance system to remain on your previous route.
To terminate or interrupt the active destination guidance system:
1. Press the right-hand rotary button.
A selection menu appears, also refeto page 23
2. Highlight "Input Destination" with theright-hand rotary button.
The display changes to "Terminate guidance ?"
3. Press the right-hand rotary button.
The destination guidance system is ended.
Select "yes".
The GPS navigation system resumes active guidance along your original route.
39n
Over
view
Nav
igat
ion
inm
ent
Creating address book
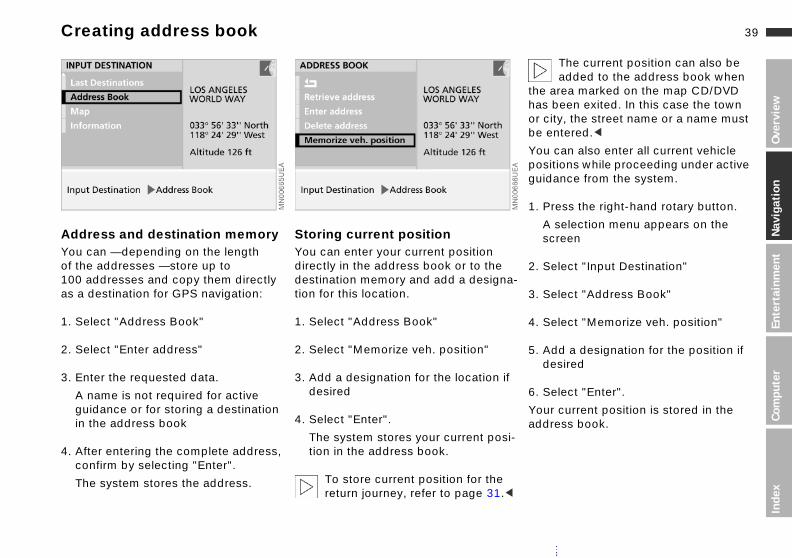
The current position can also be added to the address book when
area marked on the map CD/DVD been exited. In this case the town ity, the street name or a name must
entered.<
can also enter all current vehicle itions while proceeding under active
dance from the system.
ress the right-hand rotary button.
selection menu appears on the creen
elect "Input Destination"
na-thehasor cbe
Youposgui
1. P
As
2. S
Ente
rta
Com
pute
rIn
dex
elect "Address Book"
elect "Memorize veh. position"
dd a designation for the position if esired
elect "Enter".
r current position is stored in the ress book.
if
si-
.<
3. S
4. S
5. Ad
6. S
Youadd
Address and destination memoryYou can — depending on the length of the addresses — store up to 100 addresses and copy them directly
Storing current positionYou can enter your current position directly in the address book or to thedestination memory and add a desig
as a destination for GPS navigation:
1. Select "Address Book"
2. Select "Enter address"
3. Enter the requested data.
A name is not required for active guidance or for storing a destination in the address book
4. After entering the complete address, confirm by selecting "Enter".
The system stores the address.
tion for this location.
1. Select "Address Book"
2. Select "Memorize veh. position"
3. Add a designation for the locationdesired
4. Select "Enter".
The system stores your current potion in the address book.
To store current position for thereturn journey, refer to page 31

40nSelecting an address Deleting an address
t
You can use the direct access feature to select destinations from the address book.
You can delete addresses from the address book either individually or all aonce.
1. Select "Address Book"
2. Select "Retrieve address".
An alphabetical listing containing all stored addresses and destinations appears on the screen
3. Select desired address.
The guidance system adopts the address as your destination.
1. Select "Address Book"
2. Select "Delete address"
3. Select desired address.
"Delete address?" appears on the screen
4. Select "yes".
The address is deleted.
To delete all addresses at once, use theright-hand rotary button to select "Delete address", then maintain pres-sure on the button for at least one second.

41n
Over
view
Nav
igat
ion
inm
ent
Current position
tering the current positionorrection of the position is only rec-mended in exceptional cases ause the GPS receiver only requires w minutes to find the position, for mple, after the vehicle is transported a car-carrying train.
enter your current position:
elect "Information"
elect "Input Position"
elect city and street if desired.
nter your current position with the ame procedure used to enter desti-
.
EnA combeca feexawith
To
1. S
2. S
3. S
Es
Ente
rta
Com
pute
rIn
dex
ations, refer to page 24
elect "Intersection ?".
he information "Crossing intersec-ion" is output and the current posi-ion is copied from the navigation ystem.
If the GPS navigation system was able to determine the current
ition itself, this will be copied to the tem.<
d ur-
is
le
n
n
4. S
Ttts
possys
Current position displayBefore starting off, you would like to have a look at the map to determine your current position.
To view this map:
Select "Map".
The current position of your vehicle is indicated on the map.
To store this position:
1. Press the right-hand rotary button
A selection menu appears on the
screen2. Select "Dest. Input Map".
A map showing current position andestination appears along with a csor
3. Select "Position".
The current position of your vehicleindicated on the map.
If the display is set to a scale of 1 mior 2 km or less, you can use "Save dest." to enter your current position ithe address book, refer to page 39.
42nWordmatch principle
system only accepts name ries beginning with letters that are red on the map CD/DVD. This kes it impossible to enter an incor-t name or address.
>Theentstomarec
Your GPS navigation system features a "wordmatch" system designed to make it easier for you to enter names. The system runs ongoing checks, compar-ing your destination entries with the data stored on the map CD/DVD as the basis for instant response. The user benefits include:>When you make an entry that
consists of more than one word, the system can identify the name regard-less of the sequence in which you enter the individual words.
Example:
Official version:J.F. Kennedy Square
>Names of specific locations can alsovary from the official versions, provided that the spelling of the entrycorresponds to a standard form usedin another country
>When you are entering the names ofcities and streets the system will complete them automatically as soonas enough letters are available to ensure unambiguous identification.
Example:
You want to drive to Rexford Drive inBeverly Hills; as soon as you enter the letter "x", the system has enoughinformation for positive identificationand can then finish the entry
Possible entries:Kennedy Square J.F.
or:Square J.F. Kennedy
automatically

43n
Over
view
Nav
igat
ion
inm
ent
What to do if ...
ou are driving in an area that has ot yet been completely recorded on he map CD/DVD. The output route rrow points in the direction of the ext point already recorded or the estination already recorded,rou have left the recommended route nd the system requires a few econds to calculate a new recom-ended route
e route map automatically appears hile you are being guided to your estination (full screen mode)?ou are driving in an area that has not et been recorded on the map CD/VD. The guidance system cannot
/he to s e, ng
t
nly
Yntandoyasm
> thwdYyD
Ente
rta
Com
pute
rIn
dex
perate under these conditions. owever, you will see the current osition of your BMW in the map dis-lay to help you orient yourselfe battery has been disconnected?
will take approx. 15 minutes for the ystem to resume operation.
f an
oHpp
> thIts
What to do if …>you request the current position of
your vehicle, but do not receive a precise display?The system is unable to receive enough GPS signals at your current position owing to obstructions, your position is not yet available on your CD/DVD, or the system is in the pro-cess of calculating your position. Please try again later
> the GPS logo disappears from the screen?Reception is interrupted; a building or similar obstruction may be the cause
> the guidance system fails to adopt an address from the address book as its
>you wish to enter a destination address into the guidance system,but the letters for it cannot be selected?The address is not on the map CDDVD currently in use. In this case, tsystem will not offer you any letterschoose from. Choose an address aclose as possible to the original onif necessary using the map for savidestinations
>you attempt to enter a destination address using the target cursor, buthe guidance system refuses to accept your entry?Your current scale does not offer adequate resolution. The system o
destination?The address is not on the map CD/DVD currently in use. Choose an address as close as possible to the original one, using the map for saving destinations as necessary
> the guidance system does not adopt an address without the street?No specified center is defined for the selected city or town on your CD/DVD. Enter any street, or a destina-tion such as the railway station, for the town or city, then start the guid-ance system
accepts destinations from scales oup to 1 mile or 2 km ("Save dest." cbe highlighted)
> the system stops furnishing direc-tions on which way to turn as you approach intersections?

44n

45n
Overview
Navigation
Entertainment
Over
view
Nav
igat
ion
ent
Computer
Index
Ente
rtai
nmCo
mpu
ter
ndex
I
Computer
46n
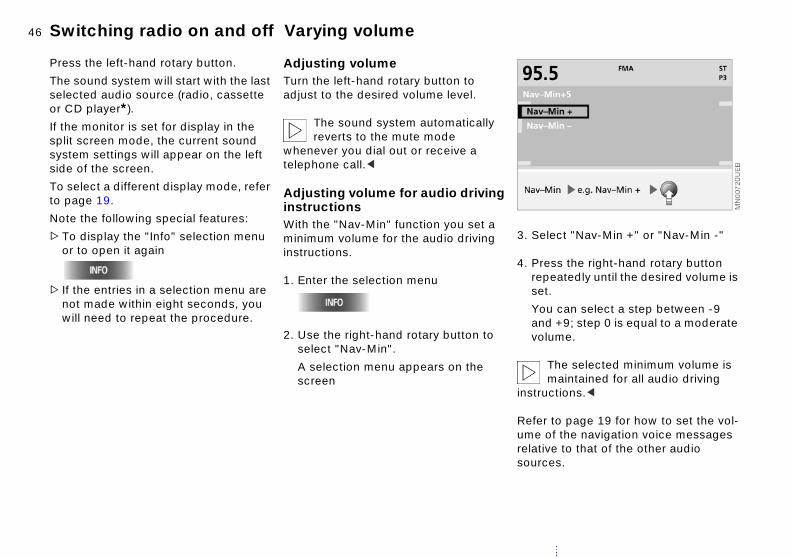
lect "Nav-Min +" or "Nav-Min -"
ss the right-hand rotary button eatedly until the desired volume is
Switching radio on and off Varying volume
Press the left-hand rotary button.
The sound system will start with the last selected audio source (radio, cassette or CD player*).
If the monitor is set for display in the split screen mode, the current sound system settings will appear on the left side of the screen.
To select a different display mode, refer to page 19.
Note the following special features:
>To display the "Info" selection menu or to open it again
Adjusting volumeTurn the left-hand rotary button to adjust to the desired volume level.
The sound system automatically reverts to the mute mode
whenever you dial out or receive a telephone call.<
Adjusting volume for audio driving instructionsWith the "Nav-Min" function you set a minimum volume for the audio driving instructions.
1. Enter the selection menu
.u can select a step between -9 +9; step 0 is equal to a moderate
ume.
The selected minimum volume is maintained for all audio driving ctions.<
to page 19 for how to set the vol-f the navigation voice messages e to that of the other audio es.
> If the entries in a selection menu are not made within eight seconds, you will need to repeat the procedure.
2. Use the right-hand rotary button to select "Nav-Min".
A selection menu appears on the screen
3. Se
4. Prerep
setYoandvol
instru
Referume orelativsourc

47n
Over
view
Nav
igat
ion
inm
ent
Tone control
setting the tone adjustment can reset all settings for radio, sette or CD changer* to standard ls.
d down for longer than two onds.
ReYoucasleve
Holsec
Ente
rta
Com
pute
rIn
dex
o
ht
Playing audio recordingsYou can choose from the following settings:
> "Right"/"Left" volume distribution ("Balance"):On the left or right, louder/softer
> "Front"/"Rear" volume control ("Fader"):Front or rear, high/low volume
> "Treble":Amplify or reduce high frequencies
> "Bass":Amplify or reduce low frequencies.
The treble and bass setting is source-dependent, i.e. can be
Tone adjustment
1. Select tone adjustment
adjusted separately for the radio, cas-sette and CD changer*. When you then select a new sound source the system automatically adopts your settings.<
2. Select desired tone settings
3. Turn the right-hand rotary button tadjust to the desired level.
The display disappears approx. eigseconds after the last adjustment.The modified settings are stored automatically.

48nSelecting the frequency band Selecting radio stations
– Radio Broadcast Data m
ially designed systems offer ved sound quality by compensat-r the inherent limitations of mobile tion:
adio Broadcast Data System ) transmits supplementary infor-n in the FM range. RDS stations e the following services:
ing reception from stations broad-ting on more than one frequency, radio automatically changes to frequency with the best reception lity receiver processes the RDS sig-
s and provides the name of station on the screenitional information can be indi-
f
-
RDSSysteSpecimproing forecep
The R(RDSmatioprovid
>Durcasthethequa
>Thenalthe
>Add
ed or called up in the display (such text bulletins from the station).mber that reception of RDS data y possible under favorable recep-onditions. If reception is poor or erence is present, there may be a before the station's name ars on the display screen.
catas
Remeis onltion cinterfdelayappe
Your car radio is designed for the reception of the FM and AM reception bands.
Selecting the frequency band
Information displayInformation on your current settings is provided in the upper left section of thesplit screen display. For example, in theFM frequency band:
>95.5Frequency of the current station or, ian RDS signal has been received, thestation name
>FMAFM frequency band, automatic data storage (Autostore), refer to page 52
>STThe current station is received in stereo quality
>P3
Your current selection appears in the display screen.
The reception range buttons are multiply assigned with the various
memory levels. Each time FM is touched, the radio switches between FM1, FM2 and FMA.Each time AM is touched, the radio switches between AM and AMA. Refer to Automatic storage, page 53.<
Station key, number of memory location, refer to page 53.

49n
Over
view
Nav
igat
ion
inm
ent
Selecting radio stations
nual station selection are looking for a particular station, g either the name or the broadcast uency.
rs
MaYouusinfreq
Ente
rta
Com
pute
rIn
dex
nter the selection menu
se the right-hand rotary button to elect "m Manual station tune"
elect a station
ress, maintain pressure,
r
urn the right-hand rotary button until he desired station appears in the isplay.
1. E
2. Us
3. S
P
o
ttd
Switching RDS on/offSwitch on RDS when you want to dis-play the names of the stations in the FM reception range.
3. Use the right-hand rotary button toselect "RDS".
A highlighted selection box appeanext to the letters "RDS".
1. Enter the selection menu
2. Use the right-hand rotary button to select "RDS".
A selection menu appears, also refer to page 46

50nSelecting radio stations
station
in either direction:earch mode scans for the next n.
"
Next
PressThe sstatio
l
Sampling and selecting (Scan)You can use the automatic SCAN feature to sample stations offering good reception one after the other.
1. Enter the selection menu
2. Use the right-hand rotary button to select "SCAN Station sample".
The receiver starts to scan
3. Select a station
ScanYou have the option of using the scan feature in either one of two modes:
> "I Search non sensitive" scans the waveband for stations with strong broadcast signals
> "II Search sensitive" scans for all stations, including those with limitedreception quality.
1. Enter the selection menu
2. Use the right-hand rotary button to select either "I Search non sensitive
This interrupts the SCAN function, and the radio remains set to the selected station.
or
"II Search sensitive"
3.
or
turn the right-hand rotary button untiyou hear the station you require.
If the receiver is unable to detect anystations during the "I Search non sensitive" scan, it will start a secondscan in which it also searches for weaker broadcast signals.

51n
Over
view
Nav
igat
ion
inm
ent
Program type (PTY)*
fer
rs
Ente
rta
Com
pute
rIn
dex
You can also base the selection of a station on the program type (PTY).
Via RDS (Radio Broadcast Data Sys-tem) some stations transmit short infor-mation that is briefly displayed on the screen when the corresponding fre-quency is selected, and which provides information on the type of program being received: news (NEWS), sports (SPORTS), pop (POP MUSIC), culture (CULTURE), etc.
If reception is poor or interference is present, there may be a delay before PTY is available.
PTY can also provide information
Selecting program type
1. Enter the selection menu
2. Use the right-hand rotary button toselect "RDS".
A selection menu appears, also reto page 46
3. Use the right-hand rotary button toselect "PTY".
A highlighted selection box appeanext to the letters "PTY".
on emergencies and natural disasters. If the station transmits emergency PTY information, "ALERT" appears on the screen.<

52nStoring radio stations
matic storageutomatic storage (Autostore) is tageous when you want to have
access to the currently strongest ns of the FM and AM reception s during long-distance driving.
e FMA and AMA memory levels spective six strongest stations utomatically be saved.
The stations already stored in this reception range are deleted as as you activate automatic stor-
select FMA memory level, press
eatedly until the desired memory a is displayed
store:
ss and hold the button.
atic storage for the AMA memory
AutoThe aadvanquickstatiorange
On ththe recan a
soon age.<
1. To
repare
2. To
Pre
Autom
is carried out in the same way.level
Memory locationsYour radio can store 30 stations:
> In the FM reception range you can
Due to the various memory levels, the station buttons are multiply assigned.
Select the desired waveband
Each time the button is touched, you switch within the FM and AM memory level.The selected memory level is displayedin the upper status line of the Radio screen view.
Storing stations with buttons
1. Select the waveband
store twelve stations of your choice and in the AM reception range you can store six stations of your choice (buttons 1...6)
> In addition, the radio also automati-cally stores the respective six stron-gest stations in the FMA and AMA reception range, refer to the following page.
The memory locations of the indi-vidual reception ranges are
distributed among the FM1, FM2 and FMA or AM and AMA memory levels.<
Each time the button is touched, youswitch within the FM and AM memory level
2. To select a radio station, refer to page 49
3. Store station
Maintain pressure on the left or rightof the desired button (1…6) until youagain hear the station after a brief interruption.

53n
Over
view
Nav
igat
ion
inm
ent
Storing radio stations Calling up a station
ou
Ente
rta
Com
pute
rIn
dex
The radio automatically switches over to the FMA or AMA memory level. The six currently strongest stations are automatically stored and the station stored under station button 1 is selected.
If you do not want to use this func-tion, you can store six additional
stations of your choice on both the FMA and AMA memory levels, refer to page 52.<
Calling up a station stored in memory
1. Select the waveband
Each time the button is touched, yswitch within the FM and AM memory level
2. Select the stored station
Press the desired button (1…6) onthe left or right
or
use the right-hand rotary button toselect the desired station.

54nStarting and stopping the cassette Mode displays
ERRORape in the inserted cassette has d playing.
er to avoid damage, press
he cassette is ejected; then ve the cassette from the slot.
tape is loose, you can insert a pen side of the winding mechanism
urn it to retension the tape.
the cassette in the slot again, use the "fast forward" and nd" functions to run the tape to the f its travel in both directions; this es that the tape is evenly wound.
warning display reappears in the y panel, you should not attempt the tape again.
CLEANabout 50 hours of operation, this display will appear twice in a n two successive occasions
you insert a cassette. This display
TAPEThe tseize
In ord
until tremo
If the in oneand t
Insertthen "rewiend oensur
If thedisplato use
TAPEAfter statusrow, owhen
ds you to clean the player at the mended intervals. Cassette care,
to the Caring for your vehicle bro-.
reminrecomrefer chure
Starting
1. Switch on radio, refer to page 11 or page 46
2.
The cassette module is lowered
3. Insert the cassette all the way into the slot, ensuring that the exposed tape side is on the right.
The cassette module automatically returns to its original position. "TAPE 1" appears in the display panel.
Stopping
The cassette module is lowered and thecassette is ejected from its slot
or
switch off the radio, refer to page 46
or
press
until the desired audio source (radio orCD changer*) appears in the display panel.
The cassette module is equipped with integral finger protection. It
immediately stops retracting if it encounters any kind of obstacle.<
If a cassette is already in the cassette slot:
Start play by pressing
until "TAPE 1" appears in the display.
Select side 1 or 2 as desired
The sound output changes
>directly to radio reception, refer to page 46
> to CD operation when the CD maga-zine is filled, refer to page 56.

55n
Over
view
Nav
igat
ion
inm
ent
Noise suppression Music track search
sic track searchThe music track search function will only work when there is a
se of at least four seconds between sic selections on the tape.<
use music track search
tape winds forward to the next sic selection. The player automati-y switches to the other side when it ches the end of the tape.
stop the fast forward mode:
er
he
Mu
paumu
To
Themucallrea
To
Ente
rta
Com
pute
rIn
dex
ss once briefly.
PreDolby B and C suppress noise during playback of audio cassettes.
They amplify high frequencies during recording, and reduce their intensity during playback. Because background noise consists primarily of high fre-quencies generated during play, this strategy results in lower levels of back-ground noise.
Dolby and the symbol are registered trademarks of the Dolby Laboratories Licensing Corporation.
Turning Dolby on/offUse this feature only with cassettes that have been
Fast forward/rewindSelect the direction
Press twice briefly or once for a longperiod.
When it reaches the end of the tape,the player automatically switches to tother side.
To interrupt fast forward/rewind:
Press once briefly.
recorded with Dolby B or Dolby C, as use with standard cassettes results in reduced sound quality.<
Press
until you obtain the best sound repro-duction. The system progresses one step through a sequence consisting of Dolby B, Dolby C and Dolby off each time you press the button.
The display " B" or " C" shows the current level of noise suppression.

56nCD changer*
ting the CD magazine
e the cover to the right
ss the CD magazine all the way the changer by pressing in the
ection indicated by the arrow
-
Inser
1. Slid
2. Preintodir
se the cover.
,
3. Clo
LocationThe BMW CD changer for 6 CDs is located at the left rear of the luggage compartment.
Removing the CD magazineYou must remove the CD magazine from the changer to add or remove CDs.
1. Slide the cover to the right
Reloading/unloading CD magazine
When inserting and removing CDsyou should always grasp them by
their edges, being sure to avoid all contact between your fingers and the reflective data side of the disc.<
2. Press the button
The magazine slides out for removal.
The CD compartments in the changer have the same numbers as the CD selector buttons on the radio.
To load:Insert the CD in its slot with the label side on top.
To unload:Pull out the drawer and remove the CDas shown in the illustration.
We recommend that you refrain from using the changer to play
single-track CDs with the aid of an adapter. The CD or the adapter could jam. Suitable magazines for single-track CDs are commercially available.<

57n
Over
view
Nav
igat
ion
inm
ent
CD changer* Starting and stopping the CD
sound output changesirectly to radio reception, refer to age 46 cassette operation if cassette has
een inserted, refer to page 54.
If you play self-recorded CDs, faults may occur (e.g. drop-
s).<
To prevent CDs from being copied illegally, they are often provided
copy protection by the manufac-r. Please observe the information
your CD. These CDs differ from the Book CD audio standard, on the is of which all CD players and
rs.
e
o
The>d
p> to
b
out
withtureon Redbas
Ente
rta
Com
pute
rIn
dex
ngers are designed. Under certain umstances this can prevent or trict the playing of CDs on your CD yer. In this case please contact the dealer or manufacturer.
.<
or l.
chacircresplaCD
Operating temperaturesYou should not use the CD changer at less than 5 7 (–15 6)
or over 140 7 (+60 6), as the unit may malfunction when operated at extreme temperatures.Even when switched off, the unit should never be exposed to temperatures out-side a range extending from –13 7 (–25 6) to 185 7 (+85 6).<
Atmospheric humidityHigh levels of humidity inside the player can condense on the laser's scan lens and prevent it from reading the CD.
Starting
1. Switch on radio, refer to pages 11and 46
2. Press
until the CD control display appea
After a few seconds, play will resumat the point where the CD stoppedearlier.
If the CD magazine has been reloaded, the system will start t
play the first track on the CD in the
Precautions when using laser equipmentThe BMW CD changer is a "Class 1" laser product.Never remove the cover from the housing. Do not operate the unit if
the cover is damaged. Operation without the cover can lead to serious eye injury from invisible laser beams.Have all repair and maintenance operations carried out by qualified technicians only.<
lowest loaded slot, i.e. CD 1, track 1
StoppingSwitch off radio, refer to page 46
or
press
until the desired audio source (radio cassette) appears in the display pane

58nMode displays Using the buttons to search for music tracks
forward/reverse
lect the direction
ss and hold the button. The cks can be heard, but the sound is torted
interrupt fast forward/reverse, ease the button.
e CD will start playing at the point ected.
t
Fast
1. Se
Pretradis
2. Torel
Thsel
NO DISCThere is no CD in the slot, or the CD has been inserted incorrectly.
NO DISCSThe magazine is empty.
NO MAGAZINENo magazine has been inserted.
CD CHECKThe unit is scanning the loaded CDs.
HIGH TEMPOperating temperature is too high.Play will begin again automatically as soon as the temperature falls to within the normal operating range.
CD selection
Press the button on the left or right forthe desired CD number (1...6).
The number of the selected CD appearsin the display panel. The unit starts to play the first track. At the end of the lastrack, the next CD will be selected.
Title searchSelect a direction
Keep pressing until you get to the desired title.
The CD will start playing at the title selected.

59n
Over
view
Nav
igat
ion
Ente
rtai
nmen
tut
er
Menu-guided track search
ndom play system plays the tracks on the CD random sequence.
he selection menu appears on the creen
ress repeatedly
r
urn the right-hand rotary button until RANDOM Random generator" is ighlighted
tart play in the random mode
terminate play in the random mode:
ect another function or select
e
-
RaThein a
1.
Ts
2.
P
o
t"h
3. S
To
Sel
Com
pIn
dex
"RANDOM Random generator" again.
Fast forward/reverse
1.
The selection menu appears. "<< >>
Sampling and selecting (Scan)The system plays a brief sample fromeach CD track.
1.
The selection menu appears on thscreen
2.
or
turn the right-hand rotary button, continuing until "SCAN Track sample" is highlighted
Fast forward/reverse" is highlighted
2. Select the direction
Press and hold the button. The tracks can be heard, but the sound is distorted
3. To interrupt fast forward/reverse, release the button.
The CD will start play at the point selected.
3. Start track
4. Select track
The scan function is interrupted. Play resumes at the same point on the CD.

60nMenu-guided track search
Track search
1.
The selection menu appears on the screen
2.
Press repeatedly
or
turn the right-hand rotary button until "< > Music search" is highlighted
3. Select a direction
Keep pressing until you get to the desired title.
The CD will start playing at the title selected.

61n
Over
view
Nav
igat
ion
inm
ent
DSP sound system*
lecting sound pattern
elect "Demo".
he pre-defined sound patterns,
Se
1. S
T
Ente
rta
Com
pute
rIn
dex
oncert Hall, Jazz Club and Cathe-ral, are activated one after the other
or the music currently playing
ress the right-hand rotary button.
he presentation of the sound atterns is interrupted. The previous attern is reactivated.
activate one of the preset sound terns or one of the sound patterns have created, refer to the following e.
g
Cdf
2. P
Tpp
To patyoupag
Digital Sound Processing (DSP) assures an optimum level of audio reproduction quality by means of spatial simulation and also by providing equalizer func-tions.
You can choose from the following settings:
> "Demo":Sound pattern
> "Memo":Selection between three specified and three individually settable sound patterns with influence on the 3D sound and Hall effect
> "On / Off":Resets sound settings to midrange
Switching on and off
1. Select "MENU"
values.
The functions "Room/Echo" and "Set" are only available, if an indi-
vidual sound memory is selected (memory 1 – 3).<
2. Select "DSP"
3. Select "On / Off".
Setting "Off" sets the sound settinto a mean value.
To exit DSP, press again:
You can use this menu to access theDSP functions described in the following section.

62nDSP sound system*
ng up tone control memory
lect "Memo".
election menu appears on the een
lect the desired memory.
e corresponding sound pattern is red.
Calli
1. Se
A sscr
2. Se
Thsto
.
Individual tone control memoryTone control memories 1 to 3 can be adjusted individually:
6. Select
7. Select "Room/Echo"
1. Select "Memo".A selection menu appears on the screen
2. Select the desired memory.
Previous sound pattern is displayed
3. Select "Set"
4. Select the aspect to be changed
5. Turn the right-hand rotary button to set the change variable and press to store your entry
8. Select desired room control
9. Turn the right-hand rotary button toset the room control and press to store your entry
10. Select .The new sound pattern is assignedto the memory previously selected
Concert Hall, Jazz Club and Cathedral are preset sound
patterns and cannot be modified.<

63n
Overview
Navigation
Entertainment
Over
view
Nav
igat
ion
ent
Computer
Index
Ente
rtai
nmCo
mpu
ter
ndex
I
Index

64n
Out. temp." function provides you display of the outside tempera-
The "Out. temp." function consists of a passive display provided in gree scale that you have selected t", refer to page 19.<
Starting computer Range Outside temperature
You can use the computer to access the following information:>Range>Outside temperature>Time of arrival, refer to page 65>Fuel consumption, refer to page 65>Average speed, refer to page 65>Speed limit, refer to page 66>Distance, refer to page 67>Stopwatch (timer), refer to page 68.
1. Select "MENU"
2. Select "Computer".
The "Range" function provides an esti-mate of the distance that you can travel on your remaining fuel based on your rate of average fuel consumption in the
Press again to exit from the computer mode:
You can use this menu to access the computer functions described in the following section.
period immediately preceding your data request.
The "Range" function consists exclusively of a passive display
provided in the units of distance you have previously selected using "Set", refer to page 19.<
During refueling, more than 1.1 gallons (4 liters) of fuel must
flow into the tank before it will be registered by the computer.<
The "with ature.
the dein "Se
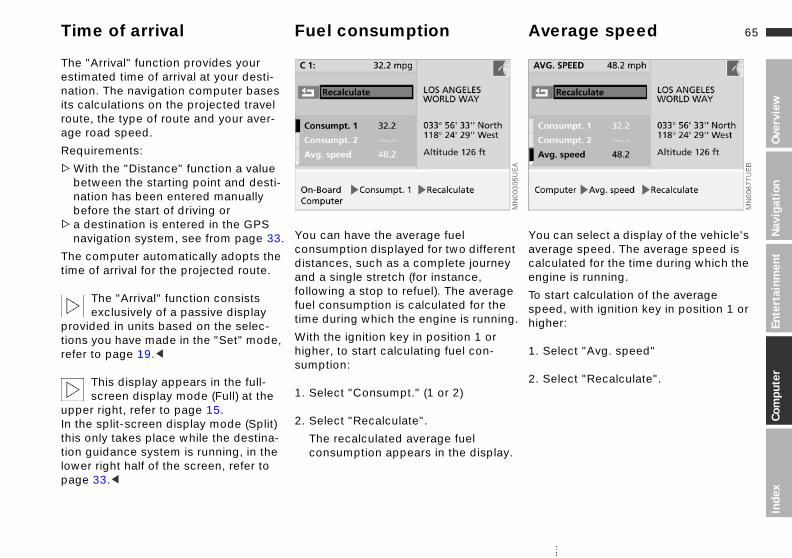
65n
Over
view
Nav
igat
ion
inm
ent
can select a display of the vehicle's rage speed. The average speed is ulated for the time during which the ine is running.
Time of arrival Fuel consumption Average speed
The "Arrival" function provides your estimated time of arrival at your desti-nation. The navigation computer bases its calculations on the projected travel route, the type of route and your aver-age road speed.
Requirements:
>With the "Distance" function a value between the starting point and desti-nation has been entered manually before the start of driving or
>a destination is entered in the GPS navigation system, see from page 33.
The computer automatically adopts the time of arrival for the projected route.
You can have the average fuel consumption displayed for two differendistances, such as a complete journey and a single stretch (for instance, following a stop to refuel). The average
Ente
rta
Com
pute
rIn
dex
tart calculation of the average ed, with ignition key in position 1 or her:
elect "Avg. speed"
elect "Recalculate".
The "Arrival" function consists exclusively of a passive display
provided in units based on the selec-tions you have made in the "Set" mode, refer to page 19.<
This display appears in the full-screen display mode (Full) at the
upper right, refer to page 15.In the split-screen display mode (Split) this only takes place while the destina-tion guidance system is running, in the lower right half of the screen, refer to page 33.<
fuel consumption is calculated for the time during which the engine is running
With the ignition key in position 1 or higher, to start calculating fuel con-sumption:
1. Select "Consumpt." (1 or 2)
2. Select "Recalculate".
The recalculated average fuel consumption appears in the display.
t
Youavecalceng
.
To sspehig
1. S
2. S

66nSpeed limit
n you reach the limitignal tone sounds.
peed limit reminder will only be ted if you drop below the limit by than 2 mph (approx. 5 km/h) e speeding up again.
tivating or reactivating the functionould like to deactivate the active limit reminder while still retaining peed entry for later use.
lect "Limit"
lect
Whe>A s
The srepeamorebefor
Deaclimit You wspeedyour s
1. Se
2. Se
e selection box is no longer hlighted
lect .
activate the stored speed, select gain.
Thhig
3. Se
To re a
Assume that you do not want to exceed 50 mph on a stretch of freeway, and want to know when you reach this speed (limit).
Setting the speed limit
1. Select "Limit"
2. Select
3. Turn the right-hand rotary button until the desired speed appears in the display panel (50 mph in the example)
4. Press the right-hand rotary button tostore this value.
The selection box is highlighted in the display
5. Select .
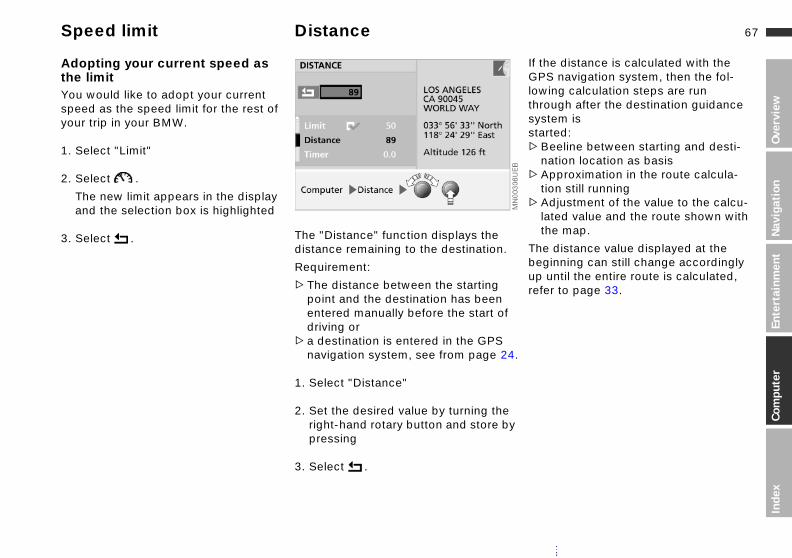
67n
Over
view
Nav
igat
ion
inm
ent
Speed limit Distance
e distance is calculated with the S navigation system, then the fol-ing calculation steps are run ugh after the destination guidance
tem is ted:eeline between starting and desti-ation location as basispproximation in the route calcula-on still runningdjustment of the value to the calcu-ted value and the route shown with e map.
distance value displayed at the inning can still change accordingly
until the entire route is calculated, r to page 33.
.
If thGPlowthrosysstar>B
n>A
ti>A
lath
Thebegup refe
Ente
rta
Com
pute
rIn
dex
f
24.
e by
Adopting your current speed as the limitYou would like to adopt your current speed as the speed limit for the rest of your trip in your BMW.
1. Select "Limit"
2. Select .
The new limit appears in the display and the selection box is highlighted
3. Select . The "Distance" function displays the distance remaining to the destination
Requirement:
>The distance between the starting
point and the destination has beenentered manually before the start odriving or>a destination is entered in the GPSnavigation system, see from page
1. Select "Distance"
2. Set the desired value by turning thright-hand rotary button and store pressing
3. Select .

68nStopwatch Remote control
isplay can include:erage fuel consumption (1 and 2)geittancee of arrivalrage speedepwatch.
The d>Tim>Ave>Ran>Lim>Dis>Tim>Ave>Dat>Sto
Starting and stoppingYou want to measure the time between the starting point and the destination.
With the ignition key in position 1 and higher, you can access information from the computer for display using thebutton integrated within the turn signal
1. Select "Timer"
2. Select .
The stopwatch is started and the marking changes to .
The passing time is displayed next to the "Timer" function.
To stop the time, select the marked stop symbol.
Taking an interim time readingSelect .
The interim time is shown on the right. The stopwatch continues running.
lever. Each time the button is pressed toward the steering column, another function is displayed in accordance with the selected settings of the com-puter.
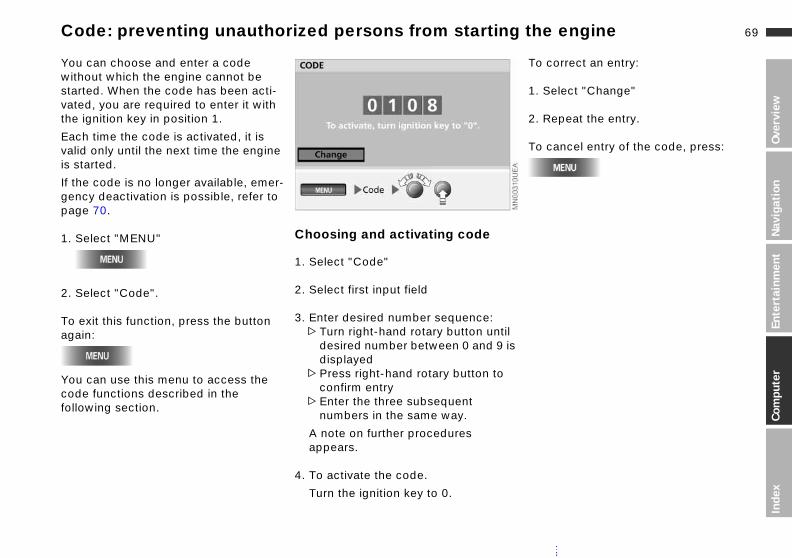
69n
Over
view
Nav
igat
ion
Ente
rtai
nmen
tCo
mpu
ter
Inde
x
Code: preventing unauthorized persons from starting the engine
correct an entry:
elect "Change"
epeat the entry.
cancel entry of the code, press:
til is
To
1. S
2. R
To
You can choose and enter a code without which the engine cannot be started. When the code has been acti-vated, you are required to enter it with the ignition key in position 1.
Each time the code is activated, it is valid only until the next time the engine is started.
If the code is no longer available, emer-gency deactivation is possible, refer to page 70.
1. Select "MENU" Choosing and activating code
1. Select "Code"
2. Select first input field
2. Select "Code".To exit this function, press the button again:
You can use this menu to access the code functions described in the following section.
3. Enter desired number sequence:>Turn right-hand rotary button un
desired number between 0 and 9displayed
>Press right-hand rotary button toconfirm entry
>Enter the three subsequent numbers in the same way.
A note on further procedures appears.
4. To activate the code.
Turn the ignition key to 0.

70nCode: preventing unauthorized persons from starting the engine
Deactivating codeWhen you are required to enter the code (ignition key position 1):
Emergency deactivationEmergency deactivation can also be carried out before the three attempts tostart the engine or three incorrect codeentries have been made and the alarmsounded.
1. Disconnect the battery and wait about 5 minutes before reconnectingit; refer to Owner's Manual for Vehi-cle
2. Turn the ignition key to position 1.
A ten-minute countdown appears onthe screen.
1. Enter the code
2. Select "Deactivate".
To correct an entry:
Select "Change" and repeat the code entry.
After three incorrect code entries or after three attempts to start the
engine without a code entry, an alarm sounds for 30 seconds; refer also to Emergency deactivation.<
After the ten minutes have elapsed, youcan start the engine.
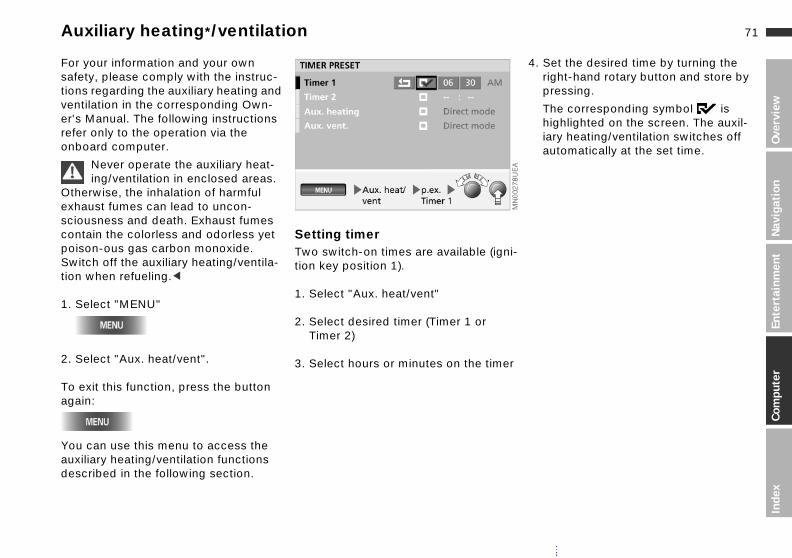
71n
Over
view
Nav
igat
ion
Ente
rtai
nmen
tpu
ter
Auxiliary heating*/ventilation
et the desired time by turning the ight-hand rotary button and store by ressing.
he corresponding symbol is ighlighted on the screen. The auxil-
ary heating/ventilation switches off utomatically at the set time.
ni-
er
4. Srp
Thia
Com
Inde
x
For your information and your own safety, please comply with the instruc-tions regarding the auxiliary heating and ventilation in the corresponding Own-er's Manual. The following instructions refer only to the operation via the onboard computer.
Never operate the auxiliary heat-ing/ventilation in enclosed areas.
Otherwise, the inhalation of harmful exhaust fumes can lead to uncon-sciousness and death. Exhaust fumes contain the colorless and odorless yet poison-ous gas carbon monoxide. Switch off the auxiliary heating/ventila-tion when refueling.<
Setting timerTwo switch-on times are available (igtion key position 1).
1. Select "MENU"
2. Select "Aux. heat/vent".
To exit this function, press the button again:
You can use this menu to access the auxiliary heating/ventilation functions described in the following section.
1. Select "Aux. heat/vent"
2. Select desired timer (Timer 1 or Timer 2)
3. Select hours or minutes on the tim
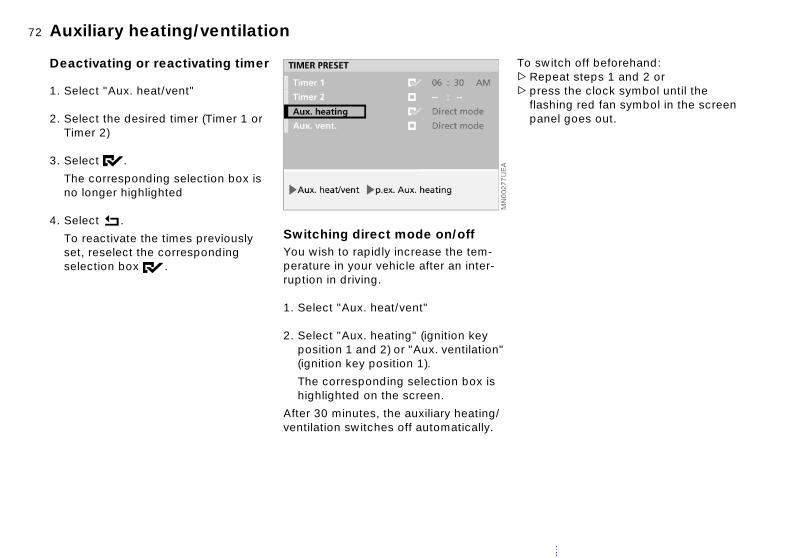
72nAuxiliary heating/ventilation
itch off beforehand:eat steps 1 and 2 or
ss the clock symbol until the hing red fan symbol in the screen el goes out.
"
To sw>Rep>pre
flaspan
Deactivating or reactivating timer
1. Select "Aux. heat/vent"
2. Select the desired timer (Timer 1 or Timer 2)
3. Select .
The corresponding selection box is no longer highlighted
4. Select .
To reactivate the times previously set, reselect the corresponding selection box .
Switching direct mode on/offYou wish to rapidly increase the tem-perature in your vehicle after an inter-ruption in driving.
1. Select "Aux. heat/vent"
2. Select "Aux. heating" (ignition key position 1 and 2) or "Aux. ventilation(ignition key position 1).
The corresponding selection box is highlighted on the screen.
After 30 minutes, the auxiliary heating/ventilation switches off automatically.

73n
Over
view
Nav
igat
ion
inm
ent
Ente
rta
Com
pute
rIn
dex

74n

75n
Overview
Navigation
Entertainment
Over
view
Nav
igat
ion
ent
Computer
Index
Ente
rtai
nmCo
mpu
ter
ndex
I
Stichworte

Everything from A to Z
56 58
8
Code choosing and activating 69 deactivating 70 emergency deactivation 70
Color set 19 Consumption 19, 65 Control concept 16 Controls
at a glance 8 in summary 10
A Abbreviations 81 Address
deleting 40 entry 23 memory 39 storing 39
Adjusting navigation volume 19
Adjustments 19 ALARM 51 Arrival 65
C Calling up an address 40 Care, refer to the Caring for
your vehicle brochure Cassette
Dolby B/C 55 eject button 11 ejecting 54 fast forward 55 music scan 55 noise suppression 55 rewind 55
HIGH TEMP 58 installation locationmusic track searchNO DISC 58 NO DISCS 58 NO MAGAZINE 5operating temperatures 57 random 59 random play 59 reverse 58, 59 safety 57
57 , 60
57
onboard computer 9 radio 11
Copyright 2 Current position 41
correcting 41 display 41 storing 39
Current position, refer to Position 39
Current speed 67 Cursor 27
Audio directions 33, 37 instructions 37 output 46
Autoreverse, refer to Fast forward/rewind 55
Autostore 52 Auxiliary heating/
ventilation 71 switching direct mode on/off 72 timer 71
selecting 11 side selection 54 slot 11 starting 54 stopping 54 TAPE CLEAN 54 TAPE ERROR 54 track search 55 track selection 54
Cassette care, refer to the Caring for your vehicle brochure
SCAN 59 selecting 11 selecting a CD 58self-recorded CDskipping tracks 58starting 57 stopping 57 temperature range
CD CHECK 58 Changing the time
display 19 City
one
Caring ochure
D Date
display mode 19 setting 18
Default settings 47 Deleting the entry 24
A-Z
Average fuel consumption, units 20
Average speed 65
B Balance 47 Bass 47
CD care, refer to the Caring for your vehicle brochure
CD changer 56 atmospheric humidity 57 audio sampling 59 CD CHECK 58 copy protection 57 fast forward 58, 59
center 43 limits 26 multiple entries forname 25 selection 25
Cleaning, refer to thefor your vehicle br
Clock, setting 19

Everything from A to Z 77n
Over
view
avig
atio
n
System
oning
9 stem 2
L List
country 24 Locations with the same
name 25
M Main highways 32 Manual station search 49 Map
destination entry 41 destination input 27
Map CD
Destination entering 25 entry map 41 input map 27 manual entry 23 selection options 23 storing 27
Destination address, deleting 31
Destination guidance system, launching 33
Destination memory, creating 39
Dolby B/C 55 DSP sound system 61
calling up tone control memory 62 demo 61 equalizer functions 61 individual tone control memory 62 sound pattern 61 sound simulation 61 switching on and off 61
E
G Global Positioning
(GPS) 22 GPS (Global Positi
System) 22 logo 43
GPS navigation 1GPS navigation sy
map CD/DVD 2reception 22 safety 22 starting 23
Guidance system
NEntert
ainm
ent
mpu
ter
country name 25 Map CD/DVD
changing 22 country name 25 house number 26 location 22 stored sector 22 street name 26
Map positioning, altering 34 Map scale,
changing 27, 34 Memory, radio 52
Destination selection with information 29 map 27
Device cleaning, refer to the Caring for your vehicle brochure
Device, display 10 Directional orientation
in direction of travel 34 in northern direction 34
Display 8
Editorial notice 5 Eject button 11 Emergency deactivation 70 Entering destination
country 24 Entry map for position and
destination 41
F Fader 47 Fahrenheit 19 Fast forward
interrupting 38 terminating 38
H HIGH TEMP 58
I Indicator lamps
phone 9 radio mode 11
Information on location 30
CoIn
dex
n 29 n
MENU 16 Menu or function level,
returning 17 Menu selection
menu 16
texts 19 Display elements
onboard computer 8 radio 10
Distance unit of measure 20
Distance to destination 67
cassette 55 CD 58
Fastest route 32 Fuel consumption 65 Full screen 34
display 15 Functions
at a glance 12
on the destinatioInstallation locatio
CD changer 56
K Keys 8, 10
Everything from A to Z
st Data
Route display 34 instruction 37 listing 35 map 34 selection 32
Route list, traffic information 35
Route preference, changing 36
Route selection 32 Route, changing 36
Modifying route preference 36 route section 36
Monitor mode, split screen 33
Multifunction steering wheel, refer to vehicle Owner's Manual
Music scan 55 Music track search, using
buttons 58 Music track, random
Operation via turn signal lever 68
Outside temperature 64 Overview
functions 12 onboard computer controls 8 radio controls 10 screen displays 14
P Position
Radio Data System (RDS) 48
Radio station audio sampling 50scan 50
RANDOM 59 Random CD track
selection 59 RANDOM sequence
generator 59 Range 64 RDS (Radio Broadca
30
8
vel 17 t 31
S Safety
CD changer 57 emergency deactivation 70 navigations system 22
Safety notice 19 audio source 19 computer 66 onboard computer 19
Sampling function
sequence 59
N Navigation computer 22 Navigation system GPS
reception 22 safety 22
New route 36 NO DISC 58 NO DISCS 58 NO MAGAZINE 58 Noise suppression 55
display 41 Preventing unauthorized
persons from starting the engine 69
Q Quality of sound
reproduction 55
R Radio
automatic storage 52
System) activating 49, 51
Recent destinationsRemote control 68 Resume guidance 3Return symbol
selection 17 Returning
menu or function leto the starting poin
Reverse, CD 58 Rewind, cassette 55
O Oper
ranOper
viawhOw
CD 58 menu-guided 59
Satellite 22 Scale, changing 27, 34 Scan
cassette 55 radio station 50
ating temperature ge, CD changer 57 ation multifunction steering eel, refer to vehicle ner's Manual
SCAN audio sampling 50 selecting 11 station selection 53 storing frequencies 52 storing stations 52 switching off 46 switching on 46 volume 46
Road map 34 Rotary button
onboard computeroperation 8 radio operation 10
Everything from A to Z 79n
Over
view
avig
atio
n
1
ua
fer to
o
SCAN audio sampling CD 59 radio 50
Screen display mode full screen 15, 34 selection 19 split screen 15
Screen displays, at a glance 14
Search, CD 58 Secondary roads 32 Selecting
audio source 11
Stopwatch 68 interim time reading 68 starting and stopping 68
Stored sector, map CD 22 Storing stations, radio 52 Street entry 25 Symbol
additional functions 16 navigation 29 Owner’s Manual 5 scrolling back 17 scrolling forward 17
U Unit
distance 19 fuel consumptionportrayal 8 temperature 19
Using the Owner's Man
V Vehicle position, re
Position 39 Viewing screen, tw
NEnte
rtai
nmen
tm
pute
r
7
function 16 language 19 preset stations 53 route 32Selection from map 27 return symbol 17
Shortest distance 32 Software status 5 Sound system, adjustment
options 47 Sound, center positions 47
T TAPE CLEAN 54 TAPE ERROR 54 Temperature
resetting display 20 unit of measure 19
Text information, navigation 29
Time of arrival 65 Time, display mode 19 Timer 68
setting 71
sections 33 Voice messages 3Volume
audio driving instructions 46 navigation 37 radio 46
Volume control front/rear 47 right/left 47
W
CoIn
dex
le, input
Speedaverage 65 limit 66
Speed limit 66 Split screen 15, 33 Station keys 52 Status at time of printing 5
TONE 47 Track search
cassette 55 CD 59
Track, sampling 59 Traffic information, route
list 35 Treble 47
Waveband 48 Wordmatch princip
name 42
9
l 4

tem after destination input
Abbreviations
Screen display Meaning AM Amplitude Modulation — AM waveband/AM memory modeAux. heat/vent Auxiliary heating/ventilationAvg. speed Average speedBC ComputerCD Compact DiscConsumpt. Fuel consumption 1 and 2Dest. guide Destination guidance system — start of destination guidancDest. input map Destination input map — destination input via mapDestin. DestinationDirect. of travel Direction of travel
B/ C Dolby B/Dolby C — noise suppressionDSP Digital Sound Processing
DVD Digital Versatile DiscFM Frequency Modulation — FM waveband/FM memory modeGPS Global Positioning System — navigation systemmin – max Minimum to maximumNavi. volume Navigation volume – adjustment optionNo./Intersection House number or intersection — destination inputOut. temp. Outside temperatureP 1…6 Station number on the FM and AM wavebandsPTY Program type (news, sports, pop, etc.) in FM wavebandRDS Radio Broadcast Data System in FM wavebandSave dest. Save destination – destination input via mape sys

01
41
01
57
00
6ue
Bo
rdm
onito
r m
it N
avig
atio
n
More about BMW
bmwusa.comThe Ultimate
Driving Machine


