
Creating Your
Glogster Poster

edu.glogster.com

Login Instructions
first name first initial of last name 18 **additional number for students with
same login samf18 = samf118 keep login and password
STEP 1

Click on Create a New Glog
Click Here to Start a new Glog
STEP 2

Use the “Magnet Tool” to create your Glog
Magnet Tool
STEP 3

Delete default graphics
Click thepicture, then
Click the pink Trash canicon above
each picture to
delete graphic
STEP 4

Click on the “Wall Tab” to choose a background
Use the Gallery or upload your own picture
Click Use It toAdd it to your
Glog.
Click “x’ to close
STEP 5

Click the Text Tab to Add Titles, Stickers, and Bubbles to your Glog
Click Use It toAdd it to your
Glog.
Click “x’ to close
Click on Titles and choose a style for your title.
STEP 6

Click Edit to change the Title
Click here to change text
Click here to Format text
Click Ok to apply the changes
STEP 7

Other Text FeaturesOther Title Options: change
the color of the graphic, Format text, add a link, and
add effects to your text.
Repeat Step 6 and 7 to add Stickers and/or Bubbles to your Glog
STEP 8

Click on the Graphics Tab to add pictures to enhance your Glog.
STEP 9
Choose some graphics to Add to your Glog. Click Use It to
Add it to yourGlog.
Click “x’ to close

Click the Image Tab to add images to your Glog
Upload a saved image from your computer to Glogster, then click use it
You can also link or Grab images from the web. Remember to cite sources as you go.
STEP 10
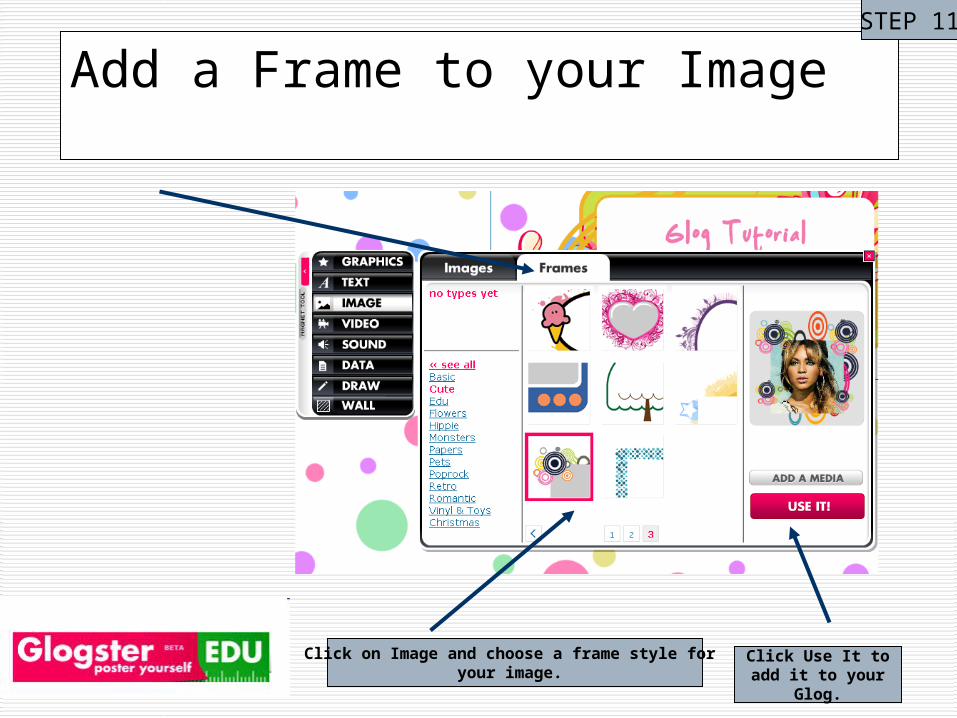
Add a Frame to your Image
Click Use It toadd it to your
Glog.
Click on Image and choose a frame style for your image.
STEP 11

Click the Video Tab add videos to your Glog
Upload a saved video from your computer to Glogster, then click use it
You can download videos from Discovery Education then upload them.
SchoolTube videos are not working. Use Discovery Education instead.
Sorry!
Click Players Tabto add a cool player
STEP 12

Click on sound to add music or your voice to your Glog
Upload a saved song from your computer to Glogster, then click use it
You can also Link or Grab Video from the web.
Click Players Tabto add a cool player
STEP 13

Click on data to attach your Works Cited to your Glog
Point file selector to the file location where your Works Citedis saved. Highlight it, then click “Use It!”
STEP 14
Click “Data,” then “Upload”
to locate & select your Works Cited file.

Save or Publish Your Glog
Name It
Tag It
STEP 15


