
E
The Nikon Guide to Digital Photography with the
DIGITAL CAMERA
COOLPIX885 (E) 01.10.22 5:58 PM Page 1

Product Documentation
32
The documentation for this product includes the manuals listed below. Please besure to read all instructions thoroughly to get the most from your camera.
Quick-Start GuideThe Quick-Start Guide takes you through the process of unpacking and settingup your Nikon digital camera, taking your first pictures, and transferring them toyour computer.
Guide to Digital PhotographyThe Guide to Digital Photography (this manual) provides complete operatinginstructions for your camera.
Nikon View Reference ManualThe Nikon View Reference Manual can be found in electronic format on thereference CD provided with your camera. For information on viewing theReference Manual, see "Reference: Connections" in this manual.
COOLPIX885 (E) 01.10.22 5:58 PM Page 2

5
To prevent damage to your Nikon product or injury to yourself or toothers, read the following safety precautions in their entirety beforeusing this equipment. Keep these safety instructions where all thosewho use the product will read them.
The consequences that could result from failure to observe theprecautions listed in this section are indicated by the followingsymbols:
Do not look at the sun through the viewfinderViewing the sun or other strong light source through the viewfinder couldcause permanent visual impairment.
Turn off immediately in the event of malfunctionShould you notice smoke or an unusual smell coming from the equipment orfrom the AC adapter (available separately), unplug the AC adapter and removethe battery immediately, taking care to avoid burns. Continued operation couldresult in injury. After removing the battery, take the equipment to a Nikon-authorized service center for inspection.
Do not use in the presence of flammable gasDo not use electronic equipment in the presence of flammable gas, as thiscould result in explosion or fire.
Do not place strap around neckPlacing the camera strap around your neck could result in strangulation.Special care should be taken to avoid placing the strap around the neck of aninfant or child.
For Your Safety Caring for the Camera and Battery
4
Do not disassembleTouching the product's internal parts could result in injury. In the event of amalfunction, the product should be repaired only by a qualified technician.Should the product break open as the result of a fall or other accident, removethe battery and/or AC adapter and then take the product to a Nikon-authorized service center for inspection.
Observe proper precautions when handling batteriesBatteries may leak or explode if improperly handled. Observe the followingprecautions when handling batteries for use in this product:• Be sure the product is off before replacing the battery. If you are using an AC
adapter, be sure it is unplugged.• Use only the Nikon EN-EL1 lithium-ion battery or a 6V 2CR5 (DL245) lithium
battery.• When inserting the battery, do not attempt to insert it upside down or
backwards.• Do not short or disassemble the battery.• Do not expose the battery to flame or to excessive heat.• Do not immerse in or expose to water.• Do not transport or store with metal objects such as necklaces or hairpins.• Batteries are prone to leakage when fully discharged. To avoid damage to
the product, be sure to remove the battery when no charge remains.• When the battery is not in use, attach the terminal cover and store in a cool
place.• Immediately after use, or when the product is used on battery power for an
extended period, the battery may become hot. Before removing the battery,turn the camera off and allow the battery to cool.
• When used with a 2CR5 (DL245) lithium battery, the camera grip maybecome noticeably warm, but this does not indicate a malfunction.
• Discontinue use immediately should you notice any changes in the battery,such as discoloration or deformation.
This icon marks warnings,information that should beread before using your Nikonproduct to prevent possibleinjury.
This icon marks cautions,information that should beread before using your Nikonproduct to prevent damage tothe equipment.
WARNINGS
COOLPIX885 (E) 01.10.22 5:58 PM Page 4
76
Use appropriate cablesWhen connecting cables to the input and output jacks, use only the cablesprovided or sold by Nikon for the purpose, to maintain compliance withproduct regulations.
Keep out of reach of childrenParticular care should be taken to prevent infants from putting the battery orother small parts into their mouths.
Removing memory cardsMemory cards may become hot during use. Observe due caution whenremoving memory cards from the camera.
CD-ROMsThe CD-ROMs on which the software and manuals are distributed should notbe played back on audio CD equipment. Playing CD-ROMs on an audio CDplayer could cause hearing loss or damage the equipment.
Observe caution when operating the flashUsing the flash close to your subject's eyes could cause temporary visualimpairment. Particular care should be observed if photographing infants, whenthe flash should be no less than one meter (3.3 ft.) from the subject.
When using the viewfinderWhen operating the mode dial and the zoom button with your eye to theviewfinder, care should be taken not to put your finger in your eye accidentally.
Avoid contact with liquid crystalShould the monitor break, care should be taken to avoid injury due to brokenglass and to prevent liquid crystal from the monitor touching the skin orentering the eyes or mouth.
Keep dryThis product is not waterproof, and may malfunction if immersed in water orexposed to high levels of humidity. Rusting of the internal mechanism cancause irreparable damage.
Keep free of salt, sand, and dustAfter using your camera at the beach or seaside, wipe off any sand or saltwith a lightly dampened cloth and then dry your camera thoroughly.
Do not touch the lens with your fingersThe proper procedure for cleaning the lens is described in "Technical Notes:Caring for Your Camera."
Handle the lens and all moving parts with careDo not apply force to the lens or to the battery, card, or connector. Theseparts are especially susceptible to damage.
Turn the product off before removing the battery or unpluggingthe AC adapterDo not unplug the product or remove the battery while the product is on, orwhile images are being recorded or deleted from memory. Forcibly cuttingpower to the product in these circumstances could result in loss of data or indamage to the internal circuitry or memory. To prevent an accidentalinterruption of power, avoid carrying the product from one location to anotherwhile the AC adapter is connected.
Do not dropThe product may malfunction if subjected to strong shocks or vibration.
CAUTIONS
COOLPIX885 (E) 01.10.22 5:58 PM Page 6

98
Keep away from strong magnetic fieldsDo not use or store this device in the vicinity of equipment that generatesstrong electromagnetic radiation or magnetic fields. Strong static charges orthe magnetic fields produced by equipment such as radio transmitters couldinterfere with the monitor, damage data stored on the memory card, or affectthe product's internal circuitry.
Avoid sudden changes in temperatureSudden changes in temperature, such as occur when entering or leaving aheated building on a cold day, can cause condensation inside the device. Toprevent condensation, place the device in a carrying case or a plastic bagbefore exposing it to sudden changes in temperature.
Notes on the Monitor• The monitor may contain a few pixels that are always lit or that do not light.
This is a characteristic common to all TFT LCD monitors and does notindicate a malfunction. Images recorded with the product will not beaffected.
• Images in the monitor may be difficult to see in a bright light.• The monitor is lit by a fluorescent backlight. Should the monitor begin to dim
or flicker, contact your Nikon service representative.• Do not apply pressure to the monitor, as this could cause damage or
malfunction. Dust or lint adhering to the monitor can be removed with ablower brush. Stains can be removed by rubbing the surface lightly with asoft cloth or chamois leather.
• Should the monitor break, care should be taken to avoid injury due tobroken glass and to prevent the liquid crystal from the monitor touching theskin or entering the eyes or mouth.
Batteries• When you turn the device on, check the battery-level displayed in the
monitor to determine whether the battery needs to be replaced. The batteryneeds to be replaced when the battery-level indicator appears.
• Ready a spare battery and keep it fully charged when taking pictures onimportant occasions. Depending on your location, you may find it difficult topurchase replacement batteries on short notice.
• On cold days, the capacity of batteries tends to decrease. Be sure thebattery is fully charged before taking pictures outside in cold weather. Keepa spare battery in a warm place and exchange the two as necessary. Oncewarmed, a cold battery may recover some of its charge.
• Should the battery terminals become dirty, wipe them off with a clean, drycloth before use.
Memory cards• Turn the power off before inserting or removing memory cards. Inserting or
removing cards with the power on could render them unusable.• Insert memory cards as shown in the illustration at
right. Inserting cards upside down or backwardscould damage the camera or the card.
Storage• To prevent mold or mildew, store the camera in a dry, well-ventilated area. If
you will not be using the product for a long period of time, remove thebattery to prevent leakage and store the camera in a plastic bag containing adesiccant. Do not, however, store the camera case in a plastic bag, as thismay cause the material to deteriorate. Note that desiccant gradually loses itscapacity to absorb moisture and should be replaced at regular intervals.
• Do not store the camera with naphtha or camphor moth balls, close toequipment that produces strong magnetic fields, or in areas subject toextremes of temperature, for example near a space heater or in a closedvehicle on a hot day.
• To prevent mold or mildew, take the camera out of storage at least once amonth. Turn the camera on and release the shutter a few times beforeputting the camera away again.
• Store the battery in a cool, dry place.
COOLPIX885 (E) 01.10.22 5:58 PM Page 8

Notice for customers in the U.S.A.Federal Communications Commission (FCC) Radio Frequency InterferenceStatementThis equipment has been tested and found tocomply with the limits for a Class B digitaldevice, pursuant to Part 15 of the FCC rules.These limits are designed to provide reasonableprotection against harmful interference in aresidential installation. This equipment generates, uses, and can radiate radiofrequency energy and, if not installed and used in accordance with the instructions,may cause harmful interference to radio communications. However, there is noguarantee that interference will not occur in a particular installation. If thisequipment does cause harmful interference to radio or television reception, whichcan be determined by turning the equipment off and on, the user is encouraged totry to correct the interference by one or more of the following measures:• Reorient or relocate the receiving antenna.• Increase the separation between the equipment and receiver.• Connect the equipment into an outlet on a circuit different from that to which the
receiver is connected.• Consult the dealer or an experienced radio/television technician for help.
CAUTIONSModificationsThe FCC requires the user to be notified that any changes or modifications madeto this device that are not expressly approved by Nikon Corporation may void theuser's authority to operate the equipment.
Interface CablesUse the interface cables sold or provided by Nikon for your equipment. Using otherinterface cables may exceed the limits of Class B Part 15 of the FCC rules.
Nikon Inc.,1300 Walt Whitman Road, Melville, New York11747-3064, U.S.A.Tel.: 631-547-4200
Notices
10 11
E885
FOR HOME OR OFFICE USE
Tested To ComplyWith FCC Standards
• No part of the manuals included with this product may be reproduced,transmitted, transcribed, stored in a retrieval system, or translated into anylanguage in any form, by any means, without Nikon's prior written permission.
• Nikon reserves the right to change the specifications of the hardware andsoftware described in these manuals at any time and without prior notice.
• Nikon will not be held liable for any damages resulting from the use of thisproduct.
• While every effort has been made to ensure that the information in these manualsis accurate and complete, we would appreciate it were you to bring any errors oromissions to the attention of the Nikon representative in your area (addressprovided separately).
Notice for customers in Canada
CAUTIONThis class B digital apparatus meets all requirements of the Canadian InterferenceCausing Equipment Regulations.
ATTENTIONCet appareil numérique de la classe B respecte toutes les exigences du Règlementsur le matériel brouilleur du Canada.
COOLPIX885 (E) 01.10.22 5:58 PM Page 10

1312
Notice Concerning Prohibition of Copying or ReproductionNote that simply being in possession of material that has been digitallycopied or reproduced by means of a scanner, digital camera or otherdevice is punishable by law.
• Items prohibited by law from being copied or reproducedDo not copy or reproduce paper money, coins, securities, government bonds, orlocal government bonds, even if such copies or reproductions are stamped"Sample."
The copying or reproduction of paper money, coins, or securities which arecirculated in a foreign country is prohibited.
Unless the prior permission of the government has been obtained, the copyingor reproduction of unused postage stamps or post cards issued by thegovernment is prohibited.
The copying or reproduction of stamps issued by the government and ofcertified documents stipulated by law is prohibited.
• Cautions on certain copies and reproductionsThe government has issued cautions on copies or reproductions of securitiesissued by private companies (shares, bills, checks, gift certificates, etc.),commuter passes, or coupon tickets, except when a minimum of necessarycopies are to be provided for business use by a company. Also, do not copy orreproduce passports issued by the government, licenses issued by publicagencies and private groups, ID cards, and tickets, such as passes and mealcoupons.
• Comply with copyright noticesThe copying or reproduction of copyrighted creative works such as books,music, paintings, woodcut prints, maps, drawings, movies, and photographs isprohibited except when it is done for personal use at home or for similarrestricted and non-commercial use.
Trademark InformationApple, the Apple logo, Macintosh, Mac OS, Power Macintosh, PowerBook, andQuickTime are registered trademarks of Apple Computer, Inc. Finder, Macintosh PCExchange, Power Mac, iMac, and iBook are trademarks of Apple Computer, Inc.IBM and IBM PC/AT are registered trademarks of International Business MachinesCorporation. PowerPC is a trademark of International Business MachinesCorporation, used under license. Microsoft is a registered trademark, andWindows, MS-Windows and Windows NT trademarks, of Microsoft Corporation.Internet Explorer is a product of Microsoft Corporation. Pentium and i486 aretrademarks of Intel Corporation. Internet is a trademark of Digital EquipmentCorporation. Netscape and Netscape Navigator are registered trademarks ofNetscape Communications Corporation. CompactFlash is a trademark of SanDiskCorporation. Lexar Media is a trademark of Lexar Media Corporation. Adobe andAcrobat are registered trademarks of Adobe Systems Inc. Zip is a registeredtrademark of Iomega Corporation in the U.S. and other countries. All other tradenames mentioned in this manual or the other documentation provided with yourNikon product are trademarks or registered trademarks of their respective holders.
A Note on Electronically Controlled CamerasIn extremely rare instances, unusual characters may appear in the monitor andthe camera may stop functioning. In most cases, this phenomenon is caused bya strong external static charge. Turn the camera off, remove and replace thebattery, and turn the camera on again. If you are using an AC adapter,disconnect and reconnect the adapter, and turn the camera on again. If thecamera continues to malfunction after performing the above operation, contactretailer or Nikon representative. Note that performing the above operation mayeliminate data not recorded to the CF memory card at the time the camerastopped functioning. Data already recorded to the CF memory card will not beaffected.
COOLPIX885 (E) 01.10.22 5:58 PM Page 12
15
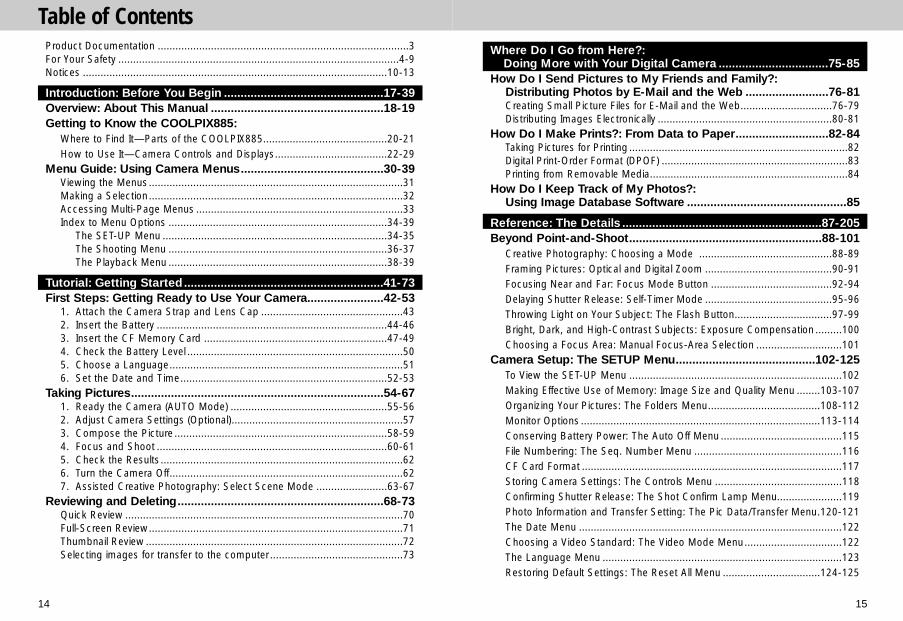
Table of ContentsProduct Documentation .....................................................................................3For Your Safety ...............................................................................................4-9Notices .......................................................................................................10-13
Introduction: Before You Begin ................................................17-39Overview: About This Manual ....................................................18-19Getting to Know the COOLPIX885:
Where to Find It—Parts of the COOLPIX885..........................................20-21How to Use It—Camera Controls and Displays......................................22-29
Menu Guide: Using Camera Menus...........................................30-39Viewing the Menus......................................................................................31Making a Selection......................................................................................32Accessing Multi-Page Menus ......................................................................33Index to Menu Options ..........................................................................34-39
The SET-UP Menu ............................................................................34-35The Shooting Menu ..........................................................................36-37The Playback Menu ..........................................................................38-39
Tutorial: Getting Started ............................................................41-73First Steps: Getting Ready to Use Your Camera.......................42-53
1. Attach the Camera Strap and Lens Cap ................................................432. Insert the Battery ..............................................................................44-463. Insert the CF Memory Card ..............................................................47-494. Check the Battery Level .........................................................................505. Choose a Language...............................................................................516. Set the Date and Time......................................................................52-53
Taking Pictures............................................................................54-671. Ready the Camera (AUTO Mode) .....................................................55-562. Adjust Camera Settings (Optional)..........................................................573. Compose the Picture ........................................................................58-594. Focus and Shoot ..............................................................................60-615. Check the Results..................................................................................626. Turn the Camera Off...............................................................................627. Assisted Creative Photography: Select Scene Mode ........................63-67
Reviewing and Deleting..............................................................68-73Quick Review ..............................................................................................70Full-Screen Review......................................................................................71Thumbnail Review .......................................................................................72Selecting images for transfer to the computer .............................................73
Where Do I Go from Here?: Doing More with Your Digital Camera .................................75-85
How Do I Send Pictures to My Friends and Family?: Distributing Photos by E-Mail and the Web .........................76-81Creating Small Picture Files for E-Mail and the Web...............................76-79Distributing Images Electronically ...........................................................80-81
How Do I Make Prints?: From Data to Paper............................82-84Taking Pictures for Printing ..........................................................................82Digital Print-Order Format (DPOF) ...............................................................83Printing from Removable Media...................................................................84
How Do I Keep Track of My Photos?: Using Image Database Software ................................................85
Reference: The Details ............................................................87-205Beyond Point-and-Shoot..........................................................88-101
Creative Photography: Choosing a Mode .............................................88-89Framing Pictures: Optical and Digital Zoom ...........................................90-91Focusing Near and Far: Focus Mode Button .........................................92-94Delaying Shutter Release: Self-Timer Mode ...........................................95-96Throwing Light on Your Subject: The Flash Button.................................97-99Bright, Dark, and High-Contrast Subjects: Exposure Compensation .........100Choosing a Focus Area: Manual Focus-Area Selection .............................101
Camera Setup: The SETUP Menu..........................................102-125To View the SET-UP Menu ........................................................................102Making Effective Use of Memory: Image Size and Quality Menu ........103-107Organizing Your Pictures: The Folders Menu......................................108-112Monitor Options .................................................................................113-114Conserving Battery Power: The Auto Off Menu .........................................115File Numbering: The Seq. Number Menu ..................................................116CF Card Format ........................................................................................117Storing Camera Settings: The Controls Menu ...........................................118Confirming Shutter Release: The Shot Confirm Lamp Menu......................119Photo Information and Transfer Setting: The Pic Data/Transfer Menu.120-121The Date Menu .........................................................................................122Choosing a Video Standard: The Video Mode Menu.................................122The Language Menu .................................................................................123Restoring Default Settings: The Reset All Menu .................................124-125
14
COOLPIX885 (E) 01.10.22 5:58 PM Page 14

1716
Introduction
This chapter is divided into the followingsections:
OverviewRead this section for a description of how thismanual is organized and for an explanation ofthe symbols and conventions used.
Parts of the COOLPIX885Bookmark this section and refer to it as you readthrough the manual for information on the namesand functions of camera parts.
Menu GuideRefer to this section for instructions on using themenus that control some aspects of cameraoperation. This section also contains an index ofmenu options.
Advanced Photography: CSM Shooting Mode .....................126-154Adjusting Exposure Manually: Manual Exposure Mode ......................127-129Reacting Faster to Light: Sensitivity (ISO Equivalency) .......................130-131Focusing at a Preset Distance: Manual Focus....................................132-133Using CSM Shooting Menu Options .............................................134-154Keeping Colors True: The White Balance Menu .................................135-136Measuring Light: The Metering Menu.................................................137-138Taking Pictures in a Sequence: The Continuous Menu.......................139-140Getting Sharper Pictures: The BSS (Best-Shot Selector) Menu .................141Contrast, Brightness and Image Type: The Image Adjustment Menu .142-143Making Edges More Distinct: The Image Sharpening Menu.......................144Setting for Optional Lens Converters: The Lens Menu .......................145-146Modifying Sensitivity from a Menu: The Sensitivity Menu ...........................147Exposure Options ..............................................................................148-149Focus Options ...................................................................................150-151Auto Bracketing .................................................................................152-153Noise Reduction........................................................................................154
Playing Images Back: Playback Mode ..................................155-177Basic Playback ..................................................................................156-162The Playback Menu ...........................................................................163-175Television Playback: Connecting Your Camera to a Video Device ......176-177
Connections: Your Camera and Your Computer ...................178-186Before Your Begin: Installing Nikon View ............................................179-180Getting Connected: Connecting to Your Computer............................181-184Reading Pictures from CF Memory Cards..........................................185-186
Technical Notes: Camera Care, Options and Resources .....187-205Caring for Your Camera.............................................................................188Optional Accessories.................................................................................189Web Resources.........................................................................................190Troubleshooting .................................................................................191-193Error Messages..................................................................................194-196Specifications.....................................................................................197-201
Index ........................................................................................202-205
Overviewpp. 18-19
Parts of theCOOLPIX885
pp. 20-33
Menu Guidepp. 34-39
Before You Begin
COOLPIX885 (E) 01.10.22 5:58 PM Page 16

1918
Introduction—Overview
Overview About This Manual
Thank you for your purchase of a COOLPIX885 digital camera. Thismanual has been written to help you enjoy taking digital pictures withyour COOLPIX885. As you read through it, you will find explanationsnot only of how the camera works but also of why certain featureshave been included, and how they may be used to take pictures inmany different situations.
The Introduction (this section) provides a quick overview of cameraparts and menus that can be referred to later as you read through theremainder of the manual.
The Introduction is followed by a "Tutorial" that gives you enoughinformation for simple "point-and-shoot" photography when you firststart using your camera. This section may be all you need to read ifyou want to take advantage of the simplicity and immediacy of digitalphotography.
Once you have taken a few pictures, "Where Do I Go from Here?"outlines how to send copies to your friends and relatives by e-mail,how to order prints using digital "print orders" that you create with thecamera, and how to keep track of your photos using image databasesoftware. It also provides some tips on how to take pictures forelectronic distribution and for printing on a personal color printer.
Finally, the "Reference" section provides a comprehensive guide to allaspects of digital photography with the COOLPIX885, includingcreative photography in the camera’s custom shooting modes, flashand close-up photography, taking movies, and manual control ofexposure, tone, and sharpness. The "Reference" section also includesinformation on caring for your camera, troubleshooting, and optionalaccessories.
Life-Long LearningAs part of Nikon’s “Life-Long Learning” commitment to ongoing productsupport and education, continually-updated information is available on-line atthe following sites:• For users in the U.S.A.: http://www.nikonusa.com/• For users in Europe: http://www.nikon-euro.com/• For users in Asia, Oceania, the Middle East, and Africa:
http://www.nikon-asia.com/
Visit these sites to keep up-to-date with the latest product information, tips,answers to frequently-asked questions (FAQs), and general advice on digitalimaging and photography. Additional information may be available from theNikon representative in your area. See the URL below for contact information:
http://www.nikon-image.com/eng/
COOLPIX885 (E) 01.10.22 5:59 PM Page 18

2120
1 Red-eye reduction/Self-timer lamp.........................p. 98/952 Built-in Speedlight .......................................................p. 973 Battery chamber cover................................................p. 444 Battery chamber cover latch .......................................p. 445 Viewfinder ...................................................................p. 586 Lens..........................................................................p. 1977 Video output connector ............................................p. 1768 Tripod socket9 Red light .....................................................................p. 22
10 Green light ..................................................................p. 2211 Camera strap eyelet....................................................p. 4312 DC-in connector/USB connector cover................p. 46/17613 Memory card slot cover ..............................................p. 47
A Viewfinder ..................................................................p. 22B Monitor.......................................................................p. 23C Power switch .............................................................p. 24D Shutter release button ...............................................p. 24E Mode dial ...................................................................p. 25F Multi selector .............................................................p. 26G Zoom button ..............................................................p. 27H TRANSFER button.....................................................p. 27I QUICK p button......................................................p. 28J 1/5 button ............................................................p. 28K 2/6 button.......................................................p. 29L 3/7 button..........................................................p. 29
M MENU button.............................................................p. 29
Introduction—Getting to Know
the COOLPIX885
Take a few moments to familiarize yourself with camera controls anddisplays. You may find it helpful to bookmark this section an refer to itas you read through the rest of the manual.
Where to Find It—Parts of the COOLPIX885The parts of the camera are identified below. For more information on the functionof each part, refer to the page number that follows it.
The functions of the controls and displays that are labeled with a letter of thealphabet are outlined in the following section.
Getting to Know the COOLPIX885The Parts of the Camera and Their Functions
COOLPIX885 (E) 01.10.22 5:59 PM Page 20
2322
1 Scene.......................................p. 632 Self-timer ..................................p. 953 Zoom........................................p. 904 Digital zoom..............................p. 905 “Date not set” icon*1.................p. 526 Manual focus distance............p. 1327 Flash mode...............................p. 988 Current Folder name*2 ............p. 1089 Lens converter setting ............p. 145
10 Best Shot Selector .................p. 14111 Exposure lock (Auto exposure lock/
White balance lock) ................p. 14812 Exposure bracketing/White balance
bracketing ..............................p. 15213 Continuous setting..................p. 13914 Battery level indicator*3.............p. 50
15 Spot exposure metering area/Focus area ......................p. 137/101
16 Image sharpening ...................p. 14417 White balance.........................p. 13518 Sensitivity (ISO equivalency)....p. 13019 Image adjustment/Black-and-white
...............................................p. 14220 Image size ..............................p. 10621 Image quality ..........................p. 10422 Metering method ....................p. 13723 Exposure mode ......................p. 14824 Shutter speed.........................p. 12825 Exposure display (manual exposure
mode) .....................................p. 12826 Aperture .................................p. 12727 Exposure Compensation ........p. 10028 Number of exposures remaining/
Movie duration...................p. 56/160
23
14
15
16
17
18
19
20
21
8
9
10
1
11
2
12
13
3 4 5 6 7
22 23 24 25 26 27 28
Introduction—Getting to Know
the COOLPIX885
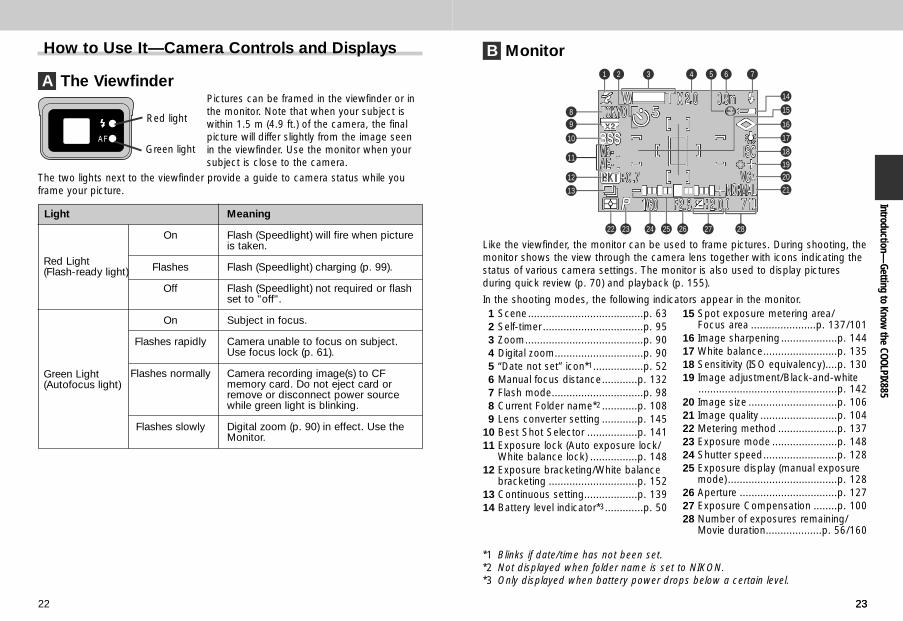
Pictures can be framed in the viewfinder or inthe monitor. Note that when your subject iswithin 1.5 m (4.9 ft.) of the camera, the finalpicture will differ slightly from the image seenin the viewfinder. Use the monitor when yoursubject is close to the camera.
The two lights next to the viewfinder provide a guide to camera status while youframe your picture.
Light Meaning
On Flash (Speedlight) will fire when pictureis taken.
Flashes Flash (Speedlight) charging (p. 99).
Off Flash (Speedlight) not required or flashset to "off".
On Subject in focus.
Flashes rapidly Camera unable to focus on subject.Use focus lock (p. 61).
Flashes normally Camera recording image(s) to CFmemory card. Do not eject card orremove or disconnect power sourcewhile green light is blinking.
Flashes slowly Digital zoom (p. 90) in effect. Use theMonitor.
How to Use It—Camera Controls and Displays
A The Viewfinder
B Monitor
Like the viewfinder, the monitor can be used to frame pictures. During shooting, themonitor shows the view through the camera lens together with icons indicating thestatus of various camera settings. The monitor is also used to display picturesduring quick review (p. 70) and playback (p. 155).
In the shooting modes, the following indicators appear in the monitor.
*1 Blinks if date/time has not been set.*2 Not displayed when folder name is set to NIKON.*3 Only displayed when battery power drops below a certain level.
Red Light (Flash-ready light)
Green Light (Autofocus light)
Green light
Red light
COOLPIX885 (E) 01.10.22 5:59 PM Page 22

2524
Introduction—Getting to Know
the COOLPIX885
The power switch turns the camera on and off. When the camera is turned on, thegreen light next to the viewfinder will turn on and the lens will zoom out in shootingmode. The lens retracts automatically when the camera is turned off.
C Power switch
The COOLPIX885 has a two-stage shutter release button.
Press the shutter release button halfway to focus ⁄. The green light next to theviewfinder will come on when the camera has focused on the subject. Focus willremain fixed while the button is held in this position (focus lock).
Press the shutter release button all the way down to take a picture ¤.
D Shutter release button
1 2
E The Mode dial
Icon Mode
a Auto
i Scene
CSM Custom
m Movie
SETUP Setup
p Playback
Description
An automatic mode for simple, “point-and-shoot” snapshot pictures.
This mode offers a choice of settings forspecific scenes.Each of the 12 modes optimizes the camerafor scenes of specific type, such as sunsetsor portraits.
Gives you complete control of all settings,including exposure mode.
In this mode, you can record silent movies upto forty seconds in length.
This mode lets you configure the camera’sbasic settings such as date, time etc.
This mode is used to play back and deletepictures.
Page
55
63
126
89
102
155
COOLPIX885 (E) 01.10.22 5:59 PM Page 24
2726
Introduction—Getting to Know
the COOLPIX885
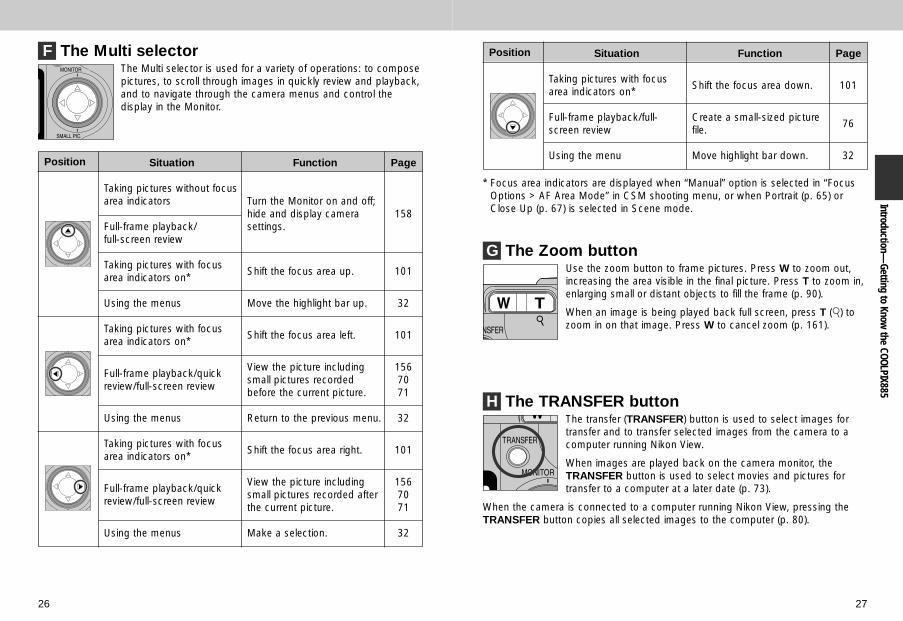
The Multi selector is used for a variety of operations: to composepictures, to scroll through images in quickly review and playback,and to navigate through the camera menus and control thedisplay in the Monitor.
Position Situation
Taking pictures without focusarea indicators
Full-frame playback/full-screen review
Taking pictures with focusarea indicators on*
Using the menus
Taking pictures with focusarea indicators on*
Full-frame playback/quickreview/full-screen review
Using the menus
Taking pictures with focusarea indicators on*
Full-frame playback/quickreview/full-screen review
Using the menus
Function
Turn the Monitor on and off;hide and display camerasettings.
Shift the focus area up.
Move the highlight bar up.
Shift the focus area left.
View the picture includingsmall pictures recordedbefore the current picture.
Return to the previous menu.
Shift the focus area right.
View the picture includingsmall pictures recorded afterthe current picture.
Make a selection.
Page
158
101
32
101
1567071
32
101
1567071
32
Position Situation
Taking pictures with focusarea indicators on*
Full-frame playback/full-screen review
Using the menu
Function
Shift the focus area down.
Create a small-sized picturefile.
Move highlight bar down.
Page
101
76
32
The transfer (TRANSFER) button is used to select images fortransfer and to transfer selected images from the camera to acomputer running Nikon View.
When images are played back on the camera monitor, theTRANSFER button is used to select movies and pictures fortransfer to a computer at a later date (p. 73).
When the camera is connected to a computer running Nikon View, pressing theTRANSFER button copies all selected images to the computer (p. 80).
Use the zoom button to frame pictures. Press W to zoom out,increasing the area visible in the final picture. Press T to zoom in,enlarging small or distant objects to fill the frame (p. 90).
When an image is being played back full screen, press T (T) tozoom in on that image. Press W to cancel zoom (p. 161).
G The Zoom button
H The TRANSFER button
F The Multi selector
* Focus area indicators are displayed when “Manual” option is selected in “FocusOptions > AF Area Mode” in CSM shooting menu, or when Portrait (p. 65) orClose Up (p. 67) is selected in Scene mode.
COOLPIX885 (E) 01.10.22 5:59 PM Page 26
2928
Introduction—Getting to Know
the COOLPIX885
When taking pictures, the quick review (QUICK p) button is usedto view the results of earlier pictures while setting up the nextshot (p. 70).
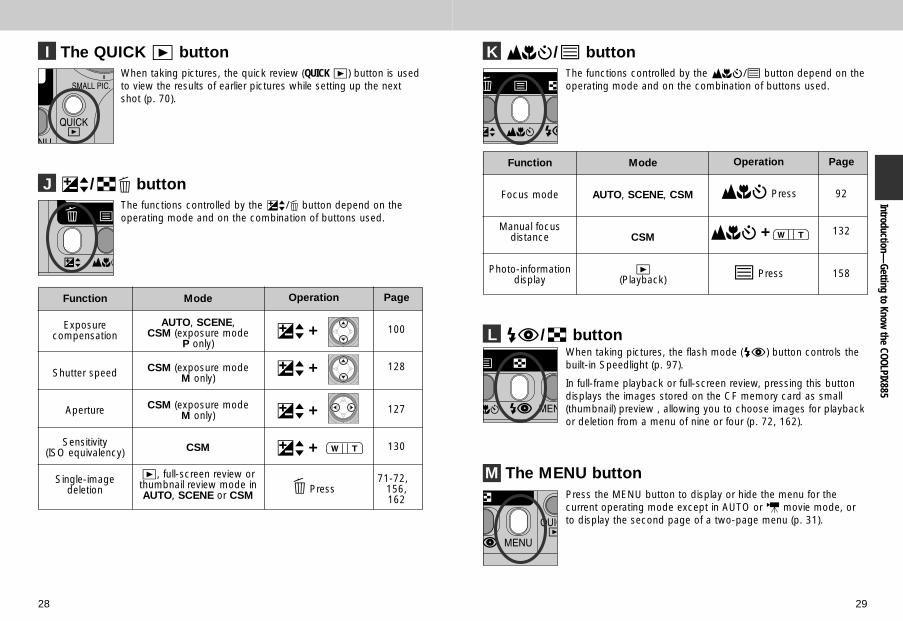
I The QUICK p button
The functions controlled by the 1/5 button depend on theoperating mode and on the combination of buttons used.
J 1/75 button
Operation Page
1 + 100
1 + 128
1 + 127
1 + 130
71-72,5 Press 156,
162
Function
Exposurecompensation
Shutter speed
Aperture
Sensitivity (ISO equivalency)
Single-imagedeletion
Mode
AUTO, SCENE, CSM (exposure mode
P only)
CSM (exposure mode M only)
CSM (exposure mode M only)
CSM
p, full-screen review orthumbnail review mode inAUTO, SCENE or CSM
The functions controlled by the 2/6 button depend on theoperating mode and on the combination of buttons used.
K 2/6 button
Operation Page
2 Press 92
2 + 132
6 Press 158
Function
Focus mode
Manual focusdistance
Photo-informationdisplay
Mode
AUTO, SCENE, CSM
CSM
p(Playback)
When taking pictures, the flash mode (3) button controls thebuilt-in Speedlight (p. 97).
In full-frame playback or full-screen review, pressing this buttondisplays the images stored on the CF memory card as small(thumbnail) preview , allowing you to choose images for playbackor deletion from a menu of nine or four (p. 72, 162).
L 3/7 button
Press the MENU button to display or hide the menu for thecurrent operating mode except in AUTO or m movie mode, orto display the second page of a two-page menu (p. 31).
M The MENU button
COOLPIX885 (E) 01.10.22 5:59 PM Page 28
3130
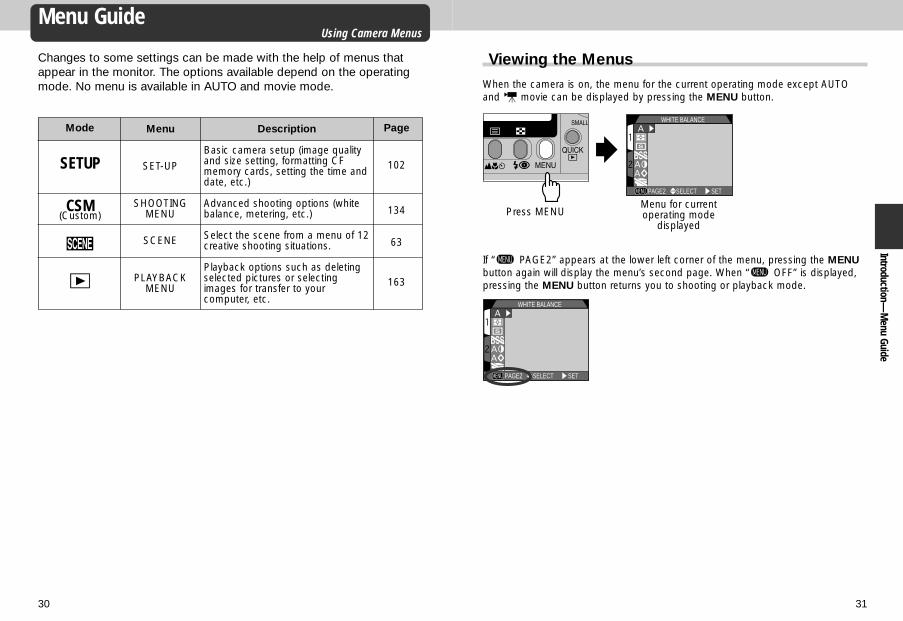
Changes to some settings can be made with the help of menus thatappear in the monitor. The options available depend on the operatingmode. No menu is available in AUTO and movie mode.
Introduction—M
enu GuideMenu Guide
Using Camera Menus
Mode Page
SETUP 102
CSM(Custom) 134
i 63
p 163
Menu
SET-UP
SHOOTINGMENU
SCENE
PLAYBACKMENU
Description
Basic camera setup (image qualityand size setting, formatting CFmemory cards, setting the time anddate, etc.)
Advanced shooting options (whitebalance, metering, etc.)
Select the scene from a menu of 12creative shooting situations.
Playback options such as deletingselected pictures or selectingimages for transfer to yourcomputer, etc.
Viewing the MenusWhen the camera is on, the menu for the current operating mode except AUTOand m movie can be displayed by pressing the MENU button.
WHITE BALANCE
PAGE2 SELECT SET
Menu for currentoperating mode
displayedPress MENU
WHITE BALANCE
PAGE2 SELECT SET
If “ PAGE2” appears at the lower left corner of the menu, pressing the MENUbutton again will display the menu’s second page. When “ OFF” is displayed,pressing the MENU button returns you to shooting or playback mode.
COOLPIX885 (E) 01.10.22 5:59 PM Page 30
3332
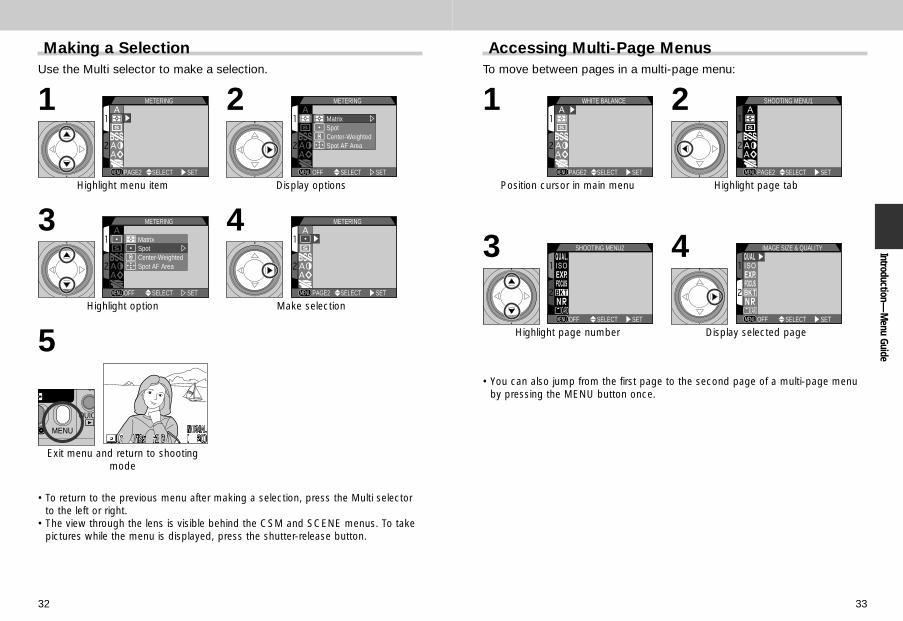
• To return to the previous menu after making a selection, press the Multi selectorto the left or right.
• The view through the lens is visible behind the CSM and SCENE menus. To takepictures while the menu is displayed, press the shutter-release button.
METERING
PAGE2 SELECT SET
Highlight menu item
Introduction—M
enu Guide
Making a SelectionUse the Multi selector to make a selection.
1 METERING
OFF SELECT SET
MatrixSpotCenter-WeightedSpot AF Area
Display options
2
METERING
OFF SELECT SET
MatrixSpotCenter-WeightedSpot AF Area
Highlight option
3 METERING
PAGE2 SELECT SET
Make selection
4
• You can also jump from the first page to the second page of a multi-page menuby pressing the MENU button once.
WHITE BALANCE
PAGE2 SELECT SET
Position cursor in main menu
Accessing Multi-Page MenusTo move between pages in a multi-page menu:
1 SHOOTING MENU1
PAGE2 SELECT SET
Highlight page tab
2
SHOOTING MENU2
OFF SELECT SET
Highlight page number
3 IMAGE SIZE & QUALITY
OFF SELECT SET
Display selected page
4
Exit menu and return to shootingmode
5
COOLPIX885 (E) 01.10.22 5:59 PM Page 32

3534
Introduction—M
enu Guide
SET-UP2ControlsShot Confirm LampPic data/ConfirmDateVideo ModeLanguageReset All
PAGE1 SELECT SET
CONTROLS
save save saveDigital ZoomDone
SELECT SETBK
SHOT CONFIRMControlsShot Confirm LamPic data/ConfirmDateVideo ModeLanguageReset All
Off On
SELECT SET
PIC DATA/TRANSFERControlsShot Confirm LamPic data/TransferDateVideo ModeLanguageReset All
info txtAuto Transfer
SELECT SET
DATE
Y M D
2001. 01. 01
0 0 0 0
SELECT SET
VIDEO MODEControlsShot Confirm LampPic data/ConfirmDateVideo ModeLanguageReset All
NTSCPAL
SELECT SET
LANGUAGEControlsShot Confirm LampPic data/ConfirmDateVideo ModeLanguageReset All
DEFJS
SELECT SET
OFF
RESET ALL
Reset all settingto default values
NoYes
SELECT SET
ControlsSet camera to “remember”settings in effect when cam-era is turned off Turn digital zoom on or off (p. 118)
Shot Confirm LampControl visual shutter releaseconfirmation (p. 119)
Pic Data/TransferSave photo information in textformat; turn transfer markingon or off (p. 120)
DateSet date and time (p. 122)
Video ModeSelect the video standard touse for playback on TV (p. 122)
LanguageSelect language for menu andmessage display (p. 123)
Reset AllReset all settings to defaultvalues (p. 124)
NTSC
PAL
DEFJS
Year/Month/Day/Hour/ Minute
Display order
info. txt
Auto Transfer
Off
On
On/OffOn/OffOn/OffOn/Off
3 save2 save! saveDigital Zoom
No
Yes
SET-UP1Image QualityImage SizeFoldersMonitor OptionsAuto OffSeq. NumbersCF Card Format
PAGE2 SELECT SET
IMAGE QUALITYImage QualityImage SizeFoldersMonitor OptionsAuto OffSeq. NumbersCF Card Format
FINENORMALBASIC
SELECT SET
IMAGE SIZEImage QualityImage SizeFoldersMonitor OptionsAuto OffSeq. NumbersCF Card Format
FULLXGAVGA
SELECT SET
FOLDERSImage QualityImage SizeFoldersMonitor OptionsAuto OffSeq. NumbersCF Card Format
OptionsN I K O N
SELECT SET
MONITOR OPTIONSImage QualityImage SizeFoldersMonitor OptionsAuto OffSeq. NumbersCF Card Format
Display ModeBrightnessHue
SELECT SET
AUTO OFFImage QualityImage SizeFoldersMonitor OptionsAuto OffSeq. NumbersCF Card Format
30S
1M5M
30MSELECT SET
SEQ. NUMBERSImage QualityImage SizeFoldersMonitor OptionsAuto OffSeq. NumbersCF Card Format
OnOffReset
SELECT SET
CF CARD FORMAT
WARNING !All images willbe deleted !
NoFormat
SELECT SET
Set Mode dial toSETUP.
SET-UP 1
Image QualitySelect the image quality(except HI) used for all modes (p. 103)
Image SizeChoose image size used for allmodes (p. 103)
FoldersCreate, rename or delete fold-ers; choose folder to record to(p. 108)
Monitor OptionsAdjust monitor brightness andhue (p. 113)
Auto OffSet time delay for Auto-Offfunction (p. 115)
Seq. NumbersReset Seq. Number function;turn file numbering on or off(p. 116)
CF Card FormatFormat CF memory card (p. 117)
30 S1 M5 M30 M
On
Off
Reset
Display Mode
Brightness Hue
Options
NIKON(Folder name)
New/Rename/Delete
FULLXGAVGA
FINENORMALBASIC
WARNING!All images willbe deleted!
No/Format
Monitor On/Review Only/Preview Only/Monitor Off(5 levels)(11 levels)
Index to Menu Options
SET-UP menucontains two pagesof options.
SET-UP 2
On/Off
On/Off
Press the MENU button orMulti selector to switchbetween SET-UP menu 1and 2.
COOLPIX885 (E) 01.10.22 5:59 PM Page 34

3736
IMAGE SIZE & QUALITY
OFF SELECT SET
IMAGE SIZE & QUALITYImage QualityImage Size
OFF SELECT SET
SENSITIVITY
AUTO100200400
OFF SELECT SET
EXPOSURE OPTIONS
Exposure ModeAE LockEXP. +/–
OFF SELECT SET
FOCUS OPTIONS
AF Area ModeAuto-Focus ModeFocus ConfirmationDistance UnitsOFF SELECT SET
SELECT SET
AUTO BRACKETING
OffOnWB BracketingOFF
SELECT SET
NOISE REDUCTION
OnOffOFF
CF CARD FORMAT
WARNING !All images willbe deleted !
NoFormat
SELECT SET
Shooting Menu 2 (CSM)
Image Quality and SizeSet image quality and sizeused for all modes (p. 103)
SensitivityAdjust sensitivity setting forcurrent mode (mirrors settingmade with 1 button) (p. 147)
Exposure OptionsSet exposure mode, turn AELock and Auto Bracketing onor off, set exposure compen-sation (p. 148)
Focus OptionsSelect AF Area, changeAutofocus mode, confirmfocus, distance unit displayed(p. 150)
Auto BracketingSet Auto Bracketing (on or off)or White Balance Bracketing(p. 152)
Noise ReductionTurn Noise Reduction on or off(p. 154)
CF Card FormatFormat CF memory card (p. 117)
OffOn
WB Bracketing
On
Off
3, ±0.3/3, ±0.7/3, ±1.0/5, ±0.3/5, ±0.7/5, ±1.0
Exposure mode
AE Lock
EXP. +/–
AF Area ModeAuto-Focus ModeFocus ConfirmationDistance Units
Auto/Manual/OffContinuous AF/Single AFMF/On/Offm/ft
AUTO100200400
WARNING!All images will bedeleted!
No
Format
P/M
Off/On/Reset
+2.0 to –2.0
WHITE BALANCE
PAGE2 SELECT SET
WHITE BALANCE
SELECT SETOFF
AutoWhite Bal PresetFineIncandescentFluorescentCloudySpeed l i ght
AutoWhite Bal PresetFineIncandescentFluorescentCloudySpeed l i ght
METERING
OFF SELECT SET
MatrixSpotCenter-WeightedSpot AF Area
CONTINUOUS
SingleContinuousMulti-shot 16VGA SequenceUltra HS
OFF SELECT SET
BEST SHOT SELECTOR
OffOn
OFF SELECT SET
IMAGE ADJUSTMENTAutoNormalMore ContrastLess ContrastLighten ImageDarken ImageBlack&Whine
OFF SELECT SET
IMAGE SHARPENING
AutoHighNormalLowOff
OFF SELECT SET
NormalWide AdapterTelephoto 1Telephoto 2FisheyeSlide Copy Adptr
LENS
OFF SELECT SET
Set Mode dial toCSM.Press the MENUbutton to select.
Press the MENUbutton or Multi selectorto switch between theShooting menus.
Shooting Menu 1 (CSM)
White BalanceSelect the white balance tomatch lighting conditions (p. 135)
MeteringSelect metering mode (p. 137)
ContinuousSelect Shooting mode (p. 139)
Best-Shot SelectorTurn best shot selection on oroff (p. 141)
Image AdjustmentAdjust brightness or contrastof image (p. 142)
Image SharpeningSelect the level of imagesharpening to be performed(p. 144)
LensSelect type of optional lensconverter or Slide CopyAdapter (p. 145)
AUTONormalMore ContrastLess Contrast
AutoHighNormalLow
Lighten ImageDarken ImageBlack & White
OffBSS On
SingleContinuousMulti-shot 16VGA Sequence
Ultra HS
FluorescentCloudySpeedlight
MatrixSpotCenter-WeightedSpot AF Area
A AutoWhite Bal PresetFineIncandescent
Off
NormalWide AdapterTelephoto 1Telephoto 2
Fisheye 1Slide Copy Adptr
Introduction—M
enu Guide
Shootingmenucontains twopages ofoptions.
Image Quality
Image Size
HI/FINE/NORMAL/BASICFULL/XGA/VGA
COOLPIX885 (E) 01.10.22 5:59 PM Page 36

3938
PLAY BACK MENU
TransferSmall Pic.Auto Off
6 4 030S
OFF SELECT SET
AUTO TRANSFER
TransferSmall Pic.Auto Off
6 4 030S
OFF SELECT SET
All ONAll OFF
SETSELECT
SMALL PIC.
OFF
TransferSmall Pic.Auto Off
6 4 030S 640X480
320X240160X120 96X72
SETSELECT
AUTO OFF
OFF
TransferSmall Pic.Auto Off
6 4 030S 30 S
1 M 5 M30 M
Small Pic.Set a Small Picture image sizesuitable for e-mail and Webdistribution (p. 175)
640 x 480320 x 240160 x 12096 x 72
Playback Menu 2
TransferMark all pictures for transferor remove marks from all pic-tures (p. 174)
All ON
All OFF
Auto OffSet time delay for Auto-Offfunction (p. 115)
30 S1 M5 M30 M
DONESELECT SET
PLAY BACK MENUDeleteFoldersSlide ShowProtectHide ImagePrint Set
OFF SELECT SET
OFF
DELETE
Selected ImagesAll imagesPrint Set
SELECT SET
OFF
FOLDERS
Options
All FoldersN I K O NT O K Y OO S A K A
SELECT SET
OFF
SLIDE SHOW
(Pause )
StartFrame Intvl
SELECT SET
PROTECT
DONESELECT SET
DONESELECT SET
HIDE IMAGE
DeleteDelete selected images usingthumbnail display; delete allimages or the settings ofPrint-order files (p. 164)
FoldersCreate, rename or delete fold-ers; choose folder to record to(p. 167)
Slide ShowStart slide show for images ina single folder; set frameinterval from as 2, 3, 5 or 10sec. (p. 168)
ProtectProtect selected images fromthumbnail display (p. 170)
Hide ImageHide selected images fromthumbnail display (p. 171)
Print SetSelect images for printingfrom thumbnail display (p.172)
(Select image and set Protect)
(Select image and set Hide Image)
(Select image and set number of prints)
Start
Frame Intvl
(Pause –> 7)2S/3S/5S/10S
OptionsAll FoldersNIKON(Folder name)
Selected Images
All Images
Print Set
Playback Menu 1
New/Rename/Delete
Introduction—M
enu Guide
Set Mode dial top.Press the MENUbutton to select.
Press the MENUbutton or Multi selectorto switch between thePlayback menus.
Playbackmenucontains twopages ofoptions.
COOLPIX885 (E) 01.10.22 5:59 PM Page 38

4140
Tutorial
This chapter is divided into three sections:
First StepsThis section details the steps you will takebefore using your camera for the first time.
Taking PicturesRead this section for a step-by-step guide to thebasics of taking pictures with the COOLPIX885.
Reviewing and DeletingLearn how to review and delete pictures whilesetting up your next shot.
First Stepspp. 42-53
Taking Picturespp. 54-67
Reviewing andDeletingpp. 68-73
Getting Started
COOLPIX885 (E) 01.10.22 5:59 PM Page 40

4342
Tutorial—First Steps
Before using your camera for the first time, you will need to completethe steps shown below. Additional information on the topics covered inthis section may be found on the pages listed in the rightmost column.
First StepsGetting Ready to Use Your Camera
Step Page
Attach the Camera Strap and Step 1 Lens Cap 43
Step 2 Insert the Battery 44-46
Insert the CF Memory Card Step 3 Formatting the CF Memory Card 47-49
Step 4 Check the Battery Level 50
Step 5 Choose a Language 51
Step 6 Set the Date and Time 52-53
Step 1—Attach the Camera Strap and Lens Cap
Camera Strap
Lens cap
• Attach the strap as shown.
• Press the tabs on the lens cap to attach/detach it.• We recommend attaching the lens cap to the strap loop with the supplied cord to
prevent it from being misplaced.
COOLPIX885 (E) 01.10.22 5:59 PM Page 42

4544
4 Close the battery-chamber cover
3 Insert the battery
Step 2—Insert the BatteryYour camera is powered by a single rechargeable Nikon EN-EL1lithium-ion battery or a non-rechargeable 2CR5 (DL245) lithium battery.Note that either the Nikon EN-EL1 lithium-ion battery or 2CR5 (DL245)lithium battery may be supplied with your camera, depending on thearea of purchase.
1 Turn the camera off
2 Open the battery-chamber cover
Tutorial—First Steps
Read Battery WarningsRead and follow all warnings and instructions supplied by the batterymanufacturer.
Charge the rechargeable Nikon EN-EL1 lithium-ion batteryWe recommend that you use the battery charger to charge the EN-EL1 batterybefore use since the EN-EL1 battery is not fully charged at shipment.Instructions for charging the battery may be found in the instruction manualsupplied with the charger. Note that the 2CR5 (DL245) lithium battery is notrechargeable.
Caution Regarding Battery Use• In some cases the “WARNING!! BATTERY EXHAUSTED” message may not
appear in the monitor if an exhausted battery is re-inserted into the camera.• The rechargeable Nikon EN-EL1 lithium-ion battery should be removed and
recharged as soon as the message “WARNING!! BATTERY EXHAUSTED”appears in the monitor. Turning the camera on and off with an exhaustedbattery in place may shorten the life of the battery.
• If the camera is on a tripod, remove it from thetripod before proceeding to the next step.
• Pressing the battery-chamber cover latch ⁄, slidethe battery-chamber cover out ¤ and flip it open‹.
• Close the battery chamber cover (1) and slide it tothe closed position (2). To prevent the battery beingdislodged during operation, be sure that the batterychamber cover is properly latched.
• Insert a rechargeable Nikon EN-EL1 lithium-ion battery or 2CR5 (DL245)lithium battery as shown.
EN-EL1 2CR5 (DL245)
COOLPIX885 (E) 01.10.22 5:59 PM Page 44

4746
1 Turn the camera off
2 Insert the CF memory card
Removing CF Memory CardsCF Memory cards can be removed without loss of datawhen the camera is off. To remove memory cards, turn thecamera off and open the card-slot cover ⁄. Press theeject button to partially eject the card ¤ and then removethe card by hand.
Tutorial—First Steps
Removing the BatteryThe battery can be removed without affecting pictures stored on the CFmemory card.
Alternative Power SourcesAlthough the COOLPIX885 can be used with non-rechargeable 2CR5 (DL245)lithium batteries, available at a variety of retail outlets, we recommend therechargeable Nikon EN-EL1 Li-ion battery. This lithium-ion battery, for useexclusively with COOLPIX885, 775, 880, and 995 digital cameras, can berecharged in the exclusive battery charger for the EN-EL1. To power yourcamera continuously for extended playback or similar tasks, you can use theEH-21 (available separately), an AC adapter that doubles as a battery chargerfor the EN-EL1.
Connecting the camera to the AC adapter EH-21The COOLPIX885 can be connected to your householdmains electricity supply (100 AV) via the AC adapter EH-21.Connect the adapter’s DC plug to the COOLPIX885 DC-inconnector, then connect the adapter to the mains socket.When connecting the camera as described above, bewareof the following points:• Turn the camera off before disconnecting the DC plug
from the camera.• Do not plug any appliances other than the EH-21 AC
adapter into the DC-in connector.• The camera and the adapter may both become warm when connected for an
extended period of time, but this does not indicate a malfunction.• The EN-EL1 Li-ion battery cannot be recharged while inserted into the
camera. It must be removed and placed in the AC adapter/battery charger.
Step 3—Insert the CF Memory CardIn place of film, your Nikon digital camera uses CompactFlash™ (CF)memory cards to store pictures. This step provides instructions oninserting CF memory card.
See p. 189 for more information on approved CF memory cards.
• Slide the card-slot cover out ⁄ and flip it open ¤. Hold the card with thearrow (s) facing towards you and insert it in the direction of the arrow ‹,sliding it in until it is firmly in place and the eject button pops up. Close thecard slot cover ›.
COOLPIX885 (E) 01.10.22 5:59 PM Page 46

4948
Formatting CF Memory CardsWhile the CF memory card provided with your camera is formatted at shipment,other CF memory cards must be formatted before first use. To format a CFmemory card:
SET-UP1Image QualityImage SizeFoldersMonitor OptionsAuto OffSeq. NumbersCF Card Format
PAGE2 SELECT SET
2 Highlight “CF Card Format”.
Tutorial—First Steps
1 Set the Mode dial to SETUP and turn camera on.
CF CARD FORMAT
WARNING !All images willbe deleted !NoFormat
SELECT SET
3 Confirmation dialog displayed
CF CARD FORMAT
WARNING !All images willbe deleted !NoFormat
SELECT SET
4 Highlight “Format”
During FormattingDo not remove the CF memory card, remove the battery or unplug the ACadapter (available separately) while formatting is in progress.
Before FormattingFormatting permanently deletes all data on the CF memory card. Be sure totransfer any images you would like to keep to a computer before formatting.
5 Press > to start formatting
• CF memory cards can also beformatted in shooting menu 2 (CSM).
• To exit without formatting card,highlight “No” and press >.
• Formatting begins immediately.• While formatting is in progress, the
message shown will be displayed.
COOLPIX885 (E) 01.10.22 5:59 PM Page 48
5150
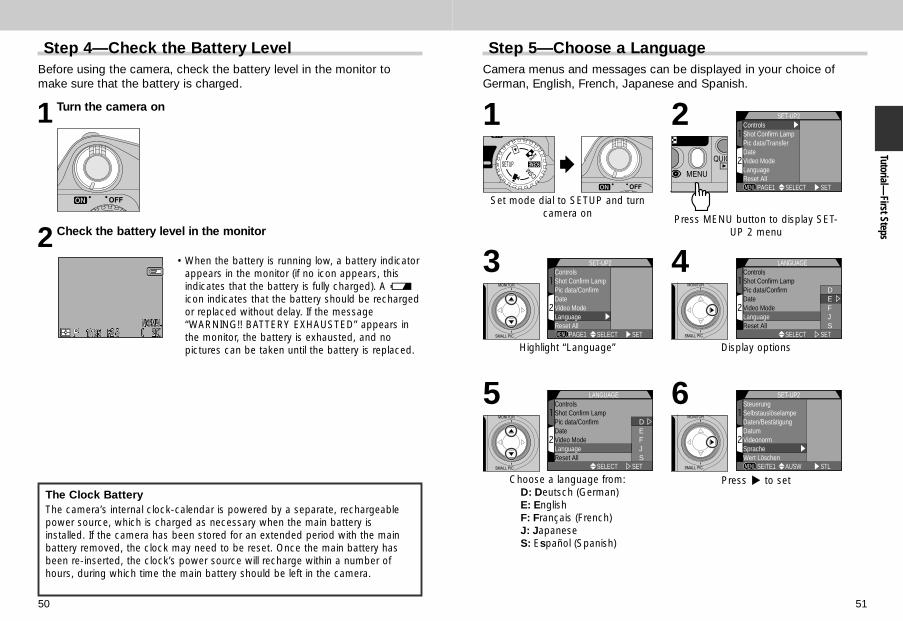
The Clock BatteryThe camera’s internal clock-calendar is powered by a separate, rechargeablepower source, which is charged as necessary when the main battery isinstalled. If the camera has been stored for an extended period with the mainbattery removed, the clock may need to be reset. Once the main battery hasbeen re-inserted, the clock’s power source will recharge within a number ofhours, during which time the main battery should be left in the camera.
1 Turn the camera on
2 Check the battery level in the monitor
Tutorial—First Steps
Step 4—Check the Battery LevelBefore using the camera, check the battery level in the monitor tomake sure that the battery is charged.
• When the battery is running low, a battery indicatorappears in the monitor (if no icon appears, thisindicates that the battery is fully charged). A Micon indicates that the battery should be rechargedor replaced without delay. If the message“WARNING!! BATTERY EXHAUSTED” appears inthe monitor, the battery is exhausted, and nopictures can be taken until the battery is replaced.
Step 5—Choose a LanguageCamera menus and messages can be displayed in your choice ofGerman, English, French, Japanese and Spanish.
Set mode dial to SETUP and turncamera on
1 SET-UP2ControlsShot Confirm LampPic data/TransferDateVideo ModeLanguageReset All
PAGE1 SELECT SET
Press MENU button to display SET-UP 2 menu
2
SET-UP2ControlsShot Confirm LampPic data/ConfirmDateVideo ModeLanguageReset All
PAGE1 SELECT SET
Highlight “Language”
3
LANGUAGEControlsShot Confirm LampPic data/ConfirmDateVideo ModeLanguageReset All
DEFJS
SELECT SET
Choose a language from:D: Deutsch (German)E: EnglishF: Français (French)J: JapaneseS: Español (Spanish)
5 SET-UP2SteuerungSelbstauslöselampeDaten/BestätigungDatumVideonormSpracheWert Löschen
SEITE1 AUSW STL
Press > to set
6
LANGUAGEControlsShot Confirm LampPic data/ConfirmDateVideo ModeLanguageReset All
DEFJS
SELECT SET
Display options
4
COOLPIX885 (E) 01.10.22 5:59 PM Page 50
5352
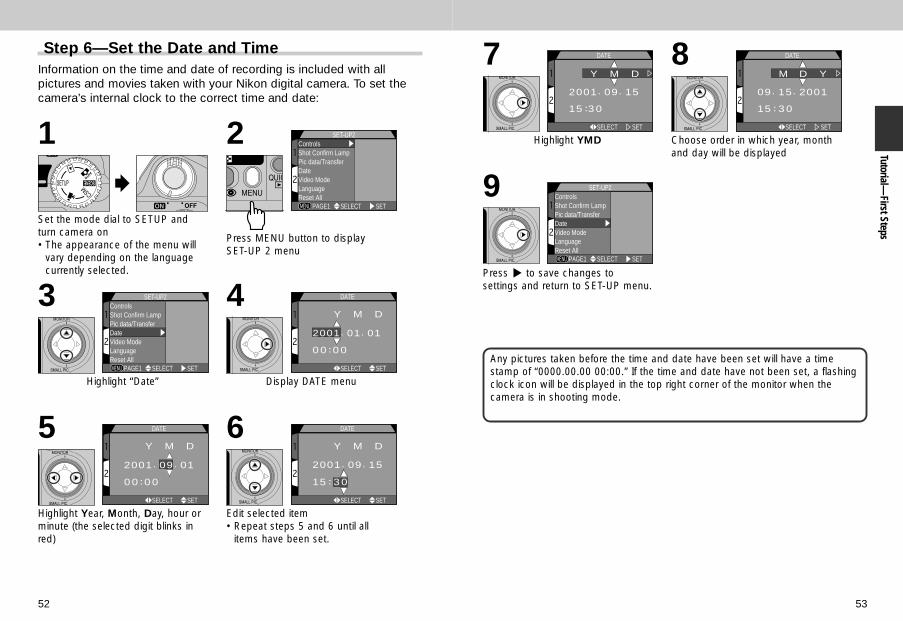
Step 6—Set the Date and TimeInformation on the time and date of recording is included with allpictures and movies taken with your Nikon digital camera. To set thecamera’s internal clock to the correct time and date:
Set the mode dial to SETUP andturn camera on• The appearance of the menu will
vary depending on the languagecurrently selected.
1 SET-UP2ControlsShot Confirm LampPic data/TransferDateVideo ModeLanguageReset All
PAGE1 SELECT SET
Press MENU button to display SET-UP 2 menu
2
SET-UP2ControlsShot Confirm LampPic data/TransferDateVideo ModeLanguageReset All
PAGE1 SELECT SET
Highlight “Date”
3
DATE
Y M D
2001. 09. 01
0 0 0 0
SELECT SET
Highlight Year, Month, Day, hour orminute (the selected digit blinks inred)
5 DATE
Y M D
2001. 09. 15
15 3 0
SELECT SET
Edit selected item• Repeat steps 5 and 6 until all
items have been set.
6
DATE
Y M D
2001. 01. 01
0 0 0 0
SELECT SET
Display DATE menu
4
Any pictures taken before the time and date have been set will have a timestamp of “0000.00.00 00:00.” If the time and date have not been set, a flashingclock icon will be displayed in the top right corner of the monitor when thecamera is in shooting mode.
DATE
Y M D
2001. 09. 15
15 3 0
SELECT SET
Highlight YMD
7
SET-UP2ControlsShot Confirm LampPic data/TransferDateVideo ModeLanguageReset All
PAGE1 SELECT SET
Press > to save changes tosettings and return to SET-UP menu.
9
DATE
M D Y
09. 15. 2001
15 3 0
SELECT SET
Choose order in which year, monthand day will be displayed
8Tutorial—
First Steps
COOLPIX885 (E) 01.10.22 6:00 PM Page 52

5554
This section details the basic steps involved in taking pictures in AUTOand SCENE modes. In these automatic, “point-and-shoot” modes, themajority of settings are controlled by the camera in response to lightingconditions and focus distance, producing the best possible results.
Taking PicturesThe Basics
Step Page
Step 1 Ready the Camera 55-56
Step 2 Adjust Camera Settings (Optional) 57
Step 3 Compose the Picture 58-59
Step 4 Focus and Shoot 60-61
Step 5 Check the Results 62
Step 6 Turn the Camera Off 62
Assisted Creative Photography:Step 7 Select Scene Mode 63-67
Step 1—Ready the Camera (Auto Mode)Before using your camera, complete the following steps:
1 Remove the lens cap
• If you turn the camera on with the lens cap in place and the mode dial set toAUTO, SCENE, CSM or m, an error message will appear in the monitor. Toclear this message from the display, turn the camera off and remove the lenscap.
2 Turn the mode dial to a
3 Turn the camera on
• The lens zooms out when the camera is turned onand the green light next to the viewfinder will turn onfor a few seconds. After a short pause, the viewthrough the lens and camera settings will appear inthe monitor.
Tutorial—Taking Pictures
COOLPIX885 (E) 01.10.22 6:00 PM Page 54

5756
4 Check indicators in the monitor
• Before taking pictures, be sure that the batterypower is sufficient and that enough memory isavailable on the memory card. If the battery is low, aM icon (A) will appear in the monitor, indicatingthat the battery should be recharged or replacedwithout delay. If the message “WARNING!!BATTERY EXHAUSTED” appears in the monitor, thebattery is exhausted, and no pictures can be takenuntil the battery has been recharged or replaced (p. 44).
A
B
• The monitor also shows the number of exposures remaining, or in other wordsthe number of photos that can be taken at current settings (B). When this numberreaches zero, you will need to insert a new memory card or delete some pictures(p. 164) before more images can be recorded. It may be possible to record morepictures at a different image quality or size (p 103).
Tutorial—Taking Pictures
Step 2—Adjust Camera Settings (Optional)In AUTO mode, you can use the buttons and menus to control thesettings listed the following table. The first time you use the camera,these settings will be set to the default values shown below. Thesesettings are adequate for most situations, and the description in thissection assumes that the defaults are used. For information on makingchanges to the settings listed below, refer to the page numbers in therightmost column.
Setting
Focus mode/self-timer
Flash mode
Image quality
Image size
Description
Camera focuses automatically atdistances over 30 cm/1 ft.(widest angle) or 60 cm/2 ft.(telephoto); self-timer off
Flash fires automatically whenlighting is poor
Images compressed for abalance between quality and filesize that is ideal for snapshots
Images are 2048 x 1536 pixels.When image quality is set toNORMAL and image size toFULL, about twenty images canbe stored on one 16 MB CFmemory card
Default
Autofocus
Auto
NORMAL
FULL
Control
2
3
SET-UPmenu
SET-UPmenu
Page
92-9495-96
97-99
103-105
103106107
COOLPIX885 (E) 01.10.22 6:00 PM Page 56

5958
Tutorial—Taking Pictures
Step 3— Compose the PictureAfter adjusting camera settings, you are ready to frame your picture.
1 Ready the camera.
• To prevent blurred picturescaused by unsteady hands(camera shake), hold thecamera steadily in bothhands. Pictures can beframed in the monitor (A) orviewfinder (B).
2 Frame your subject.
• Frame your subject using the zoom button. Pressthe W to zoom out from your subject, increasing thearea visible in the frame. Press the T to zoom in onyour subject so that it fills a larger area of the frame.
• When the camera is zoomed all the way in to the T(Telephoto) side of the zoom indicator, holding the Tdown activates digital zoom, which can be used tomagnify your subject even further (p. 90).
Indicator in monitordisplays amount of
zoom while either Wor T is pressed.
Zoom out Zoom in
Don’t Block the ShotTo avoid dark or partially obscured pictures, keep your fingers and other objectsaway from the lens and flash window.
Move That Camera!Although zoom is a useful tool for composing pictures, remember that originalcompositions can be created just by moving the camera to another position. Ifyou have time, try framing your subject from a number of different angles—including from below and above—to find the one that produces the best shot.
Monitor or Viewfinder?Use the monitor to confirm camera settings at a glance while at the same timeviewing an image that shows how the final picture will appear. This is particularlyimportant when the image in the viewfinder does not accurately reflect what willappear in the final picture, for example when:• macro close-up is used (p. 93)• your subject is within 1.5 m (4.9 ft.) of the camera• you are using digital zoom (p. 90)• you are using an optional lens converter for wide-angle or telephoto
photography (p. 145)Using the viewfinder allows you to save power by turning the monitor off (seebelow). The viewfinder can also be used when bright ambient lighting conditionsmake the display in the monitor difficult to see.
Controlling the MonitorThe ≤ on the Multi selector controls the monitor display in AUTO, SCENE, CSMand p mode. Press ≤ to cycle through monitor settings as shown at below.
Monitor showscamera settings
and viewthrough lens
Monitor showsview through
lens only
Monitor off
COOLPIX885 (E) 01.10.22 6:00 PM Page 58
6160
Tutorial—Taking Pictures
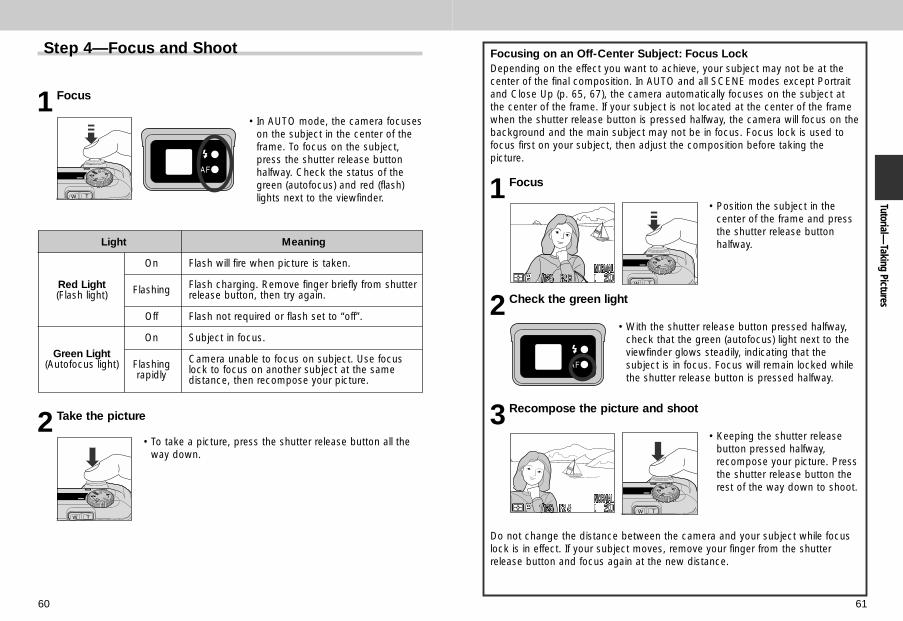
Step 4—Focus and Shoot
1 Focus
• In AUTO mode, the camera focuseson the subject in the center of theframe. To focus on the subject,press the shutter release buttonhalfway. Check the status of thegreen (autofocus) and red (flash)lights next to the viewfinder.
2 Take the picture
• To take a picture, press the shutter release button all theway down.
Light
On
Red Light (Flash light) Flashing
Off
On
Green Light (Autofocus light) Flashing
rapidly
Meaning
Flash will fire when picture is taken.
Flash charging. Remove finger briefly from shutterrelease button, then try again.
Flash not required or flash set to “off”.
Subject in focus.
Camera unable to focus on subject. Use focuslock to focus on another subject at the samedistance, then recompose your picture.
Focusing on an Off-Center Subject: Focus LockDepending on the effect you want to achieve, your subject may not be at thecenter of the final composition. In AUTO and all SCENE modes except Portraitand Close Up (p. 65, 67), the camera automatically focuses on the subject atthe center of the frame. If your subject is not located at the center of the framewhen the shutter release button is pressed halfway, the camera will focus on thebackground and the main subject may not be in focus. Focus lock is used tofocus first on your subject, then adjust the composition before taking thepicture.
1 Focus
• Position the subject in thecenter of the frame and pressthe shutter release buttonhalfway.
2 Check the green light
• With the shutter release button pressed halfway,check that the green (autofocus) light next to theviewfinder glows steadily, indicating that thesubject is in focus. Focus will remain locked whilethe shutter release button is pressed halfway.
3 Recompose the picture and shoot
• Keeping the shutter releasebutton pressed halfway,recompose your picture. Pressthe shutter release button therest of the way down to shoot.
Do not change the distance between the camera and your subject while focuslock is in effect. If your subject moves, remove your finger from the shutterrelease button and focus again at the new distance.
COOLPIX885 (E) 01.10.22 6:00 PM Page 60

6362
Step 5—Check the ResultsAfter each shot, the green light will blink as thepicture is recorded to the CF memory card. If themonitor is on, the shot you have just taken will bedisplayed briefly in the monitor. Any additionalshots you take while earlier pictures are beingsaved will be stored in a temporary memory buffer
before being saved to the CF memory card. Pictures can be taken untilthe buffer is full (the buffer can hold about eight full-sized, normal-quality images). When the buffer is full, an hourglass icon (W) will bedisplayed and the shutter release will be disabled. Additional picturescan be taken as soon as enough memory is available in the buffer andthe W icon is no longer displayed.
Step 6—Turn the Camera OffWhen you have finished using the camera, turn thecamera off to save battery power.
During RecordingWhile pictures are recorded to the CF memory card, the green light will blink. Donot eject the CF memory card, or remove or disconnect the power source untilthe light has stopped blinking. Removing the card or cutting power in thesecircumstances could result in loss of data.
Step 7—Assisted Creative Photography: Select Scene Mode
Although the AUTO mode is suited to a widevariety of situations, some compositions call forspecial combinations of settings. In SCENE mode,you select the scene from a menu of creativeshooting situations, and the camera automaticallyadjusts settings to produce the best possibleresults.
Shooting in Scene Mode
Turn the power switch on and checkthe number of available exposures
1
Turn the mode dial to SCENE
2
SCENE 1
OFF SELECT DONE
Party/IndoorParty/IndoorNight PortraitNight PortraitBeach/SnowBeach/SnowLnadscapeLnadscapeSunsetSunset
PortraitParty/IndoorNight PortraitBeach/SnowLandscapeSunset
Press the MENU button to displaythe SCENE mode menu
3 SCENE 1
OFF SELECT DONE
PortraitPortraitParty/IndoorParty/IndoorNight Night
LandscapeLandscapeSunsetSunset
PortraitParty/IndoorNight Beach/SnowLandscapeSunset
Press ≤/≥ to highlight the desiredcomposition type
4
Tutorial—Taking Pictures
SCENE 1
OFF SELECT DONE
Party/IndoorParty/IndoorNight PortraitNight PortraitBeach/SnowBeach/SnowLnadscapeLnadscapeSunsetSunset
PortraitParty/IndoorNight PortraitBeach/SnowLandscapeSunset
SELECTOFF DONE
SCENE 2
MuseumMuseumFireworks ShowFireworks ShowClose UpClose UpCopyCopyBack LightBack Light
Night LandscapeMuseumFireworks ShowClose UpCopyBack Light
COOLPIX885 (E) 01.10.22 6:00 PM Page 62
6564
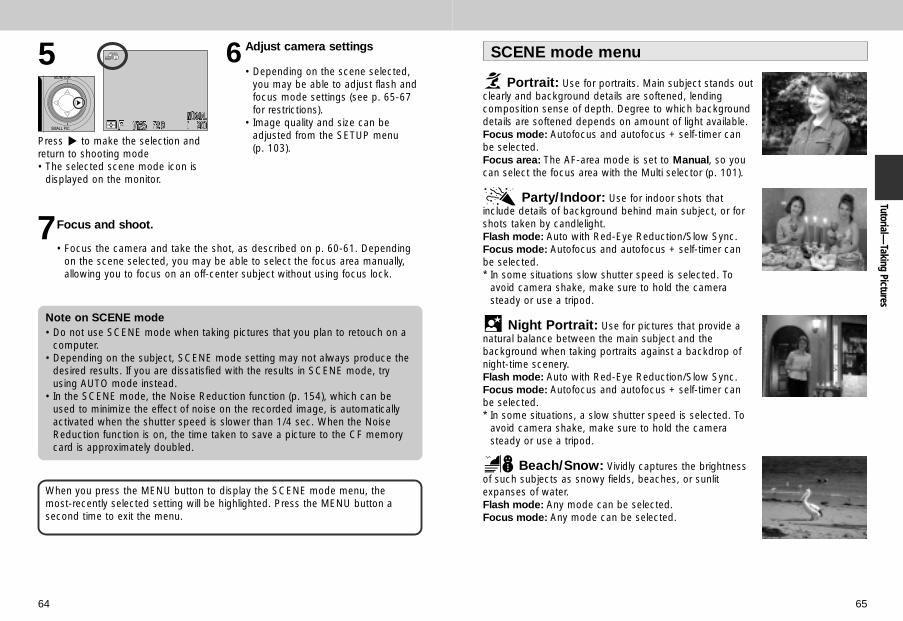
7Focus and shoot.
• Focus the camera and take the shot, as described on p. 60-61. Dependingon the scene selected, you may be able to select the focus area manually,allowing you to focus on an off-center subject without using focus lock.
Note on SCENE mode• Do not use SCENE mode when taking pictures that you plan to retouch on a
computer.• Depending on the subject, SCENE mode setting may not always produce the
desired results. If you are dissatisfied with the results in SCENE mode, tryusing AUTO mode instead.
• In the SCENE mode, the Noise Reduction function (p. 154), which can beused to minimize the effect of noise on the recorded image, is automaticallyactivated when the shutter speed is slower than 1/4 sec. When the NoiseReduction function is on, the time taken to save a picture to the CF memorycard is approximately doubled.
When you press the MENU button to display the SCENE mode menu, themost-recently selected setting will be highlighted. Press the MENU button asecond time to exit the menu.
s Portrait: Use for portraits. Main subject stands outclearly and background details are softened, lendingcomposition sense of depth. Degree to which backgrounddetails are softened depends on amount of light available.Focus mode: Autofocus and autofocus + self-timer canbe selected.Focus area: The AF-area mode is set to Manual, so youcan select the focus area with the Multi selector (p. 101).
d Party/Indoor: Use for indoor shots thatinclude details of background behind main subject, or forshots taken by candlelight.Flash mode: Auto with Red-Eye Reduction/Slow Sync.Focus mode: Autofocus and autofocus + self-timer canbe selected.* In some situations slow shutter speed is selected. To
avoid camera shake, make sure to hold the camerasteady or use a tripod.
f Night Portrait: Use for pictures that provide anatural balance between the main subject and thebackground when taking portraits against a backdrop ofnight-time scenery.Flash mode: Auto with Red-Eye Reduction/Slow Sync.Focus mode: Autofocus and autofocus + self-timer canbe selected.* In some situations, a slow shutter speed is selected. To
avoid camera shake, make sure to hold the camerasteady or use a tripod.
g Beach/Snow: Vividly captures the brightnessof such subjects as snowy fields, beaches, or sunlitexpanses of water.Flash mode: Any mode can be selected.Focus mode: Any mode can be selected.
Tutorial—Taking Pictures
Press > to make the selection andreturn to shooting mode• The selected scene mode icon is
displayed on the monitor.
5 6 Adjust camera settings
• Depending on the scene selected,you may be able to adjust flash andfocus mode settings (see p. 65-67for restrictions).
• Image quality and size can beadjusted from the SETUP menu (p. 103).
SCENE mode menu
COOLPIX885 (E) 01.10.22 6:00 PM Page 64

66 67
h Landscape: Use for vivid landscape photos thatenhance outlines, colors, and contrast in such subjects asskyscapes and forests.Flash mode: Flash CancelFocus mode: Infinity and infinity + self-timer can beselected
j Sunset: Captures the beautiful reds in sunsetsor sunrises exactly as you see them.Flash mode: Flash CancelFocus mode: Autofocus, autofocus + self-timer andinfinity can be selected.
k Night Landscape: Use for pictures that employslow shutter speeds to produce stunning nightlandscapes.Flash mode: Flash CancelFocus mode: Infinity and infinity + self-timer can beselected* Slow shutter speed is selected. To avoid camera shake,
place the camera on a flat surface or use a tripod.• Note that when the shutter speed is slower than 1/4 sec., Noise Reduction
(p. 154) is automatically activated and the time taken to save a picture to the CFmemory card is approximately doubled.
v Museum: Use for taking pictures in indoor locations such as museumswhere use of a flash is prohibited. Enables a clear pictureto be taken without using the flash.Flash mode: Flash CancelFocus mode: Autofocus and autofocus + self-timer,macro close-up, macro close-up + self-timer can beselected.* In some situations, a slow shutter speed is selected. To
avoid camera shake, be sure to hold the camera steady or use a tripod.
l Fireworks Show: Use when photographingfireworks displays. The camera responds more rapidly tothe shutter release button, to ensure that the firework isphotographed at the correct moment.Flash mode: Flash CancelFocus mode: Infinity* Slow shutter speed is selected. To avoid camera shake,
use a tripod.• Note that when the shutter speed is slower than 1/4 sec., Noise Reduction
(p. 154) is automatically activated and the time taken to save a picture to the CFmemory card is approximately doubled.
z Close Up: Use to take up-close pictures ofsubjects such as flowers or insects, with an artisticallyblurred background.
Flash mode: Flash CancelFocus mode: Macro close-up and macro close-up + self-timer can be selected.Focus area: The AF-area mode is set to Manual, so youcan select the focus area with the Multi selector (p. 101).* In some situations, a slow shutter speed is selected. To avoid camera shake, be
sure to hold the camera steady or use a tripod.
x Copy: Use to obtain clear pictures of text ordrawings on a white board, business card, or in printedmatter. To shoot a close subject, set the camera to Macroclose-up mode (p. 93).Flash mode: Any mode can be selected.Focus mode: Any mode can be selected.* Colored text or drawings may be reproduced faintly
difficult to see.
c Back Light: Use when light is coming frombehind your subject, throwing their features into shadow,or when your subject is in the shade but the background isbrightly lit. The flash will fire automatically to illuminate (“fillin”) shadows.Flash mode: Anytime FlashFocus mode: Autofocus and autofocus + self-timer canbe selected.Note that in some museums or exhibitions, it is prohibited to take pictures, even
without flash. Be sure to obtain permission before taking any pictures.
Tutorial—Taking Pictures
COOLPIX885 (E) 01.10.22 6:00 PM Page 66

6968
With a film camera, only when the film was developed would you knowwhether your pictures had turned out as you had hoped. Using thequick review function on your Nikon digital camera, on the other hand,you can view the results of earlier attempts while setting up the nextshot, and use what you see to change camera settings or to choose abetter angle. Was your last picture too dark? Take your finger off theflash window and try again. Does the brilliant white sand of the beachlook dingy and grey? Raise exposure compensation (p. 100) and tryagain. Are the flowers in that close-up shot blurred? Turn on Best-ShotSelection (p. 141) and try again. Once you have the shot you want, youcan delete your failures instantly to make room for more shots on thememory card.
Reviewing and Deleting
Playback Mode (p. 155)The review function described in this section allows you to view photos andmovies without leaving shooting mode. Your Nikon digital camera is alsoequipped with a full playback mode, which can be accessed by turning themode dial to p. In playback mode, not only can you view pictures full frame oras thumbnails, view movies, and delete individual images, but you also haveaccess to a menu of playback options that allow you to delete multiple images,protect images from deletion, view slide shows, select images for transfer to acomputer, and prepare digital “print orders” for printing pictures directly from theCF memory card.
To use quick review, the camera must be in shooting mode. Press the QUICK pbutton once to display existing pictures at the top left corner of the monitor, twiceto display pictures full screen. Pressing the button a third time returns you toshooting mode.
> >
Shooting Mode Quick ReviewPhotos on the CFmemory card aredisplayed in the topleft corner of themonitor, allowing youto view the results ofprevious images whilesetting up your nextshot.
Full-Screen ReviewPhotos on the CFmemory card aredisplayed full screen orin menus of four ornine “thumbnail”images. You can playback movies, viewphoto information,delete images one at atime and create smallpictures (p. 76).
Tutorial—Review
ing and Deleting
COOLPIX885 (E) 01.10.22 6:00 PM Page 68

7170
Quick ReviewWhen you press the QUICK p button to enterquick review mode, the most recent picture on theCF memory card will be displayed at the top leftcorner of the monitor.
The following operations can be performed:
Press
QUICK p
Shutter release button
To
View otherpictures (includingsmall pictures)
View currentpicture full screen
End review andtake more pictures
Description
Press < to view images recorded beforethe current picture or > for picturesrecorded after. Hold it down to scrollrapidly to the desired picture.
Enter full-screen review (see next page)with the current pictures displayed fullscreen.
Press the shutter release button halfway toend review and focus. Press all the waydown to end review and take a picture.
* All other camera controls function as they do in shooting mode.
Full-Screen ReviewFrom quick review, press the QUICK p button toenter full-screen review. The picture displayed inquick-review mode will be displayed full screen.
The following operations can be performed:
Press
5(1)
6
(2)
7
(3)
TRANSFERbutton
Shutter release/
QUICK pbutton
To
View otherpictures(including smallpictures)
Hide pictureinformation/turn monitor off
Create smallpicture
Delete currentpicture
View photoinformation
View multipleimages
Select currentpicture fortransfer tocomputer
End review andtake morepictures
Description
Press < to view images recorded before thecurrent picture, and > for images recorded after.Hold it down to scroll rapidly to desired picture. Ifthere are small picture files, the small pictures willbe displayed with a grey frame.
Hide and display camera settings; turn themonitor on and off.
Press ≥ to create a small picture of the currentpicture.
A confirmation dialog will be displayed. Press≤/≥ on the Multi selector to highlight theoption and > to select.• Select "Yes" to delete picture• Select "No" to keep picture
Press the 6 button to display next page ofphoto information (p. 158)
Press the 7 button to display a set of up tonine thumbnail images (see next page).
Images marked for transfer to a computer areindicated by a D icon. To select the currentimage for transfer, press the TRANSFER button.If the current image is already selected fortransfer, pressing TRANSFER will deselect it.
Press the QUICK p button to end reviewreadying the camera for the next shot.To end review and focus, press the shutterrelease button halfway. To end review and take apicture, press the shutter release button all theway down.
Tutorial—Review
ing and Deleting
COOLPIX885 (E) 01.10.22 6:00 PM Page 70

7372
Thumbnail ReviewPressing the 7 button in full-screen reviewdisplays a menu of nine thumbnail images. Thefollowing operations can be performed whilethumbnails are displayed:
Press
7
5
TRANSFERbutton
Shutter release/ QUICK p
button
To
Highlight images
View highlightedimage at a largersize
Delete highlightedpicture
Select highlightedpicture for transferto computer
End review andtake more pictures
Description
Press ≤/≥/</> on the Multi selector tohighlight a thumbnail
With nine thumbnails displayed, press the7 button once to view a menu of fourthumbnail images. Press again to viewhighlighted thumbnail full screen. Smallpictures are displayed with a grey frame.
A confirmation dialog will be displayed.Press ≤/≥ on the Multi selector tohighlight the option and > to select.• Select "Yes" to delete picture• Select "No" to keep picture
Images marked for transfer to a computerare indicated by a D icon. To select thecurrent image for transfer, press theTRANSFER button. If the current image isalready selected for transfer, pressingTRANSFER will deselect it.
Press the QUICK p button to end reviewreadying the camera for the next shot.To end review and focus, press the shutterrelease button halfway. To end review andtake a picture, press the shutter releasebutton all the way down.
Selecting images for transfer to the computerIn full-screen review mode and thumbnail review mode, images tobe transferred to the computer can be selected and deselectedusing the TRANSFER button.
Tutorial—Review
ing and Deleting
• Images marked for transfer to the computer are shown by the D icon. Ifyou select an unmarked image and press the TRANSFER button, the Dicon will appear and the image will be marked for transfer.
• If you select and image that is already marked for transfer and press theTRANSFER button, the D icon will disappear and the image will nolonger be marked for transfer.
• Images can also be marked for transfer when the mode dial is turn to pand the camera is in playback (either single-image playback or thumbnailplayback) mode (p. 156, 162).
Full-Screen ReviewMode
Thumbnail ReviewMode
TRANSFER button
COOLPIX885 (E) 01.10.22 6:00 PM Page 72
7574
Where Do I Gofrom Here?
When they have finished shooting, users ofconventional film cameras typically take the filmto be developed. But what do you do withpictures you have taken with a digital camera?This chapter offers some tips on how you canaccomplish the following common tasks:
How Do I Send Pictures to My Friends andFamily?Read this section for advice on distributing yourpictures via e-mail and the Web.
How Do I Make Prints?Learn about Digital Print-Order Format (DPOF)and how to take photos for printing.
How Do I Keep Track of My Photos?This section provides an overview of how imagedatabase software can be used to view andorganize your photos.
How Do I Send Pictures toMy Friends and Family?
pp. 76-81
How Do I MakePrints?
pp. 82-84
How Do I Keep Trackof My Photos?
p. 85
Doing More withYour Digital Camera
COOLPIX885 (E) 01.10.22 6:00 PM Page 74
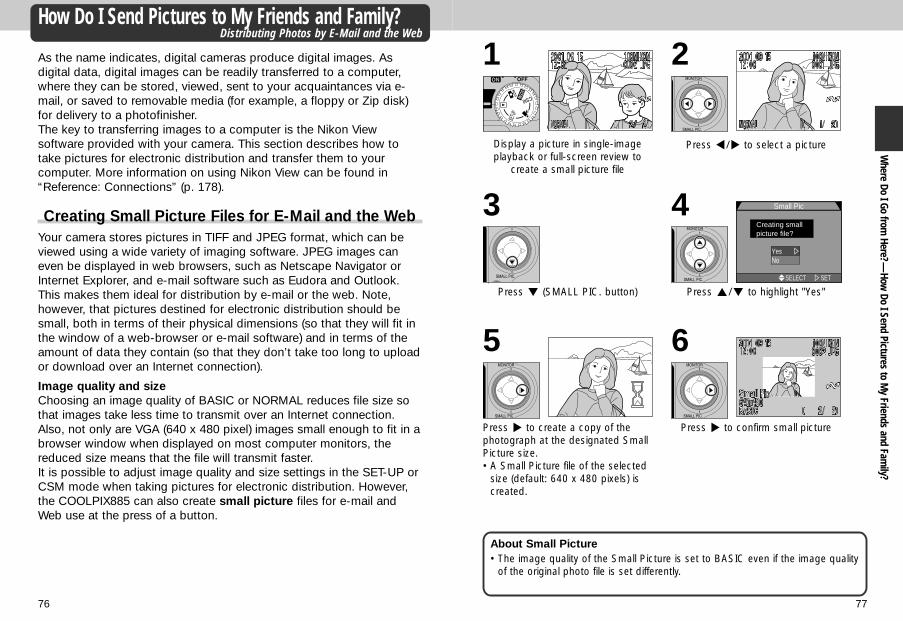
7776
As the name indicates, digital cameras produce digital images. Asdigital data, digital images can be readily transferred to a computer,where they can be stored, viewed, sent to your acquaintances via e-mail, or saved to removable media (for example, a floppy or Zip disk)for delivery to a photofinisher.The key to transferring images to a computer is the Nikon Viewsoftware provided with your camera. This section describes how totake pictures for electronic distribution and transfer them to yourcomputer. More information on using Nikon View can be found in“Reference: Connections” (p. 178).
Creating Small Picture Files for E-Mail and the WebYour camera stores pictures in TIFF and JPEG format, which can beviewed using a wide variety of imaging software. JPEG images caneven be displayed in web browsers, such as Netscape Navigator orInternet Explorer, and e-mail software such as Eudora and Outlook.This makes them ideal for distribution by e-mail or the web. Note,however, that pictures destined for electronic distribution should besmall, both in terms of their physical dimensions (so that they will fit inthe window of a web-browser or e-mail software) and in terms of theamount of data they contain (so that they don’t take too long to uploador download over an Internet connection).
Image quality and sizeChoosing an image quality of BASIC or NORMAL reduces file size sothat images take less time to transmit over an Internet connection.Also, not only are VGA (640 x 480 pixel) images small enough to fit in abrowser window when displayed on most computer monitors, thereduced size means that the file will transmit faster.It is possible to adjust image quality and size settings in the SET-UP orCSM mode when taking pictures for electronic distribution. However,the COOLPIX885 can also create small picture files for e-mail andWeb use at the press of a button.
How Do I Send Pictures to My Friends and Family?Distributing Photos by E-Mail and the Web
Where Do I Go from
Here?—How
Do I Send Pictures to My Friends and Fam
ily?
Display a picture in single-imageplayback or full-screen review to
create a small picture file
1
Press </> to select a picture
2
Press ≥ (SMALL PIC. button)
3 Small Pic
Creating small picture file?
YesNo
SELECT SET
Press ≤/≥ to highlight "Yes"
4
Press > to create a copy of thephotograph at the designated SmallPicture size.• A Small Picture file of the selected
size (default: 640 x 480 pixels) iscreated.
5
Press > to confirm small picture
6
About Small Picture• The image quality of the Small Picture is set to BASIC even if the image quality
of the original photo file is set differently.
COOLPIX885 (E) 01.10.22 6:01 PM Page 76

7978
About Small Picture• Small pictures created by the COOLPIX885 have names of the form of
“SSCNnnnn.jpg”, where nnnn is a four-digit number assigned automatically bythe camera (e.g., “SSCN0002.jpg”).
• The default Small Picture size can be set with the "Playback menu: Small Pic."menu option.
• In full-screen review or playback p mode, Small Picture files are displayed atapprox. 1/4 of full-frame size, centered with a grey frame. In thumbnail reviewor thumbnail playback, small picture is displayed with a grey frame.
• Small Pictures cannot be played back full-screen.• Small Pictures are not displayed in Slide Show (p. 168).• The Transfer marking setting of the small picture will be set to match those of
the original photo file. • The Protect, Print Set and hide image settings of the original photo file are not
set automatically for the Small Picture file. Notes on creating a Small Picture Small Pictures cannot be created in the following conditions:• When an image file, “DSCN9999.jpg”, is present in a folder• When 200 image files are present in a folder• When a Small Picture is being displayed in the monitor• With an image file of HI image quality• With Ultra HS or movie files• When there is insufficient memory in the CF memory card to create a Small
Picture• In quick review, thumbnail review and thumbnail playback
Notes on Small Picture• When using Nikon View Ver. 4, small picture files can be displayed in
thumbnail; however, they may not be displayed or printed properly with thebuilt-in viewer.
• When small pictures created with the COOLPIX885 are used with a digitalcamera other than the COOLPIX885, small pictures may not be displayed ortransferred to the computer properly.
• COOLPIX885’s small picture function is not guaranteed for pictures taken withother digital cameras.
Notes on deleting Small Pictures • When a Small Picture is deleted, the original photo is left untouched.• The Small Picture is left untouched even if its original photo file is deleted.
Set mode dial to p
1
Press MENU button to displayplayback menu
2
Highlight "Small Pic."
3
SETSELECT
SMALL PIC.
OFF
Auto TransferSmall Pic.Auto Off
6 4 030S 640X480
320X240160X120 96X72
Display options
4
SETSELECT
SMALL PIC.
OFF
Auto TransferSmall Pic.Auto Off
32030S 640X480
320X240160X120 96X72
Choose a small picture size
5 PLAY BACK MENU
Auto TransferSmall Pic.Auto Off
32030S
OFF SELECT SET
Press > to set
6
PLAY BACK MENUDeleteFoldersSlide ShowProtectHide ImagePrint Set
PAGE2 SELECT SET
PLAY BACK MENU
Auto TransferSmall Pic.Auto Off
6 4 030S
OFF SELECT SET
Where Do I Go from
Here?—How
Do I Send Pictures to My Friends and Fam
ily?
Changing the Small Picture sizeSelect option available in “Small Pic.” menu in the playback menu (p. 175).The Small Picture size can be changed to one of four sizes: 640 x 480, 320 x 240,160 x 120 and 96 x 72 pixels.
COOLPIX885 (E) 01.10.22 6:01 PM Page 78

80 81
Where Do I Go from
Here?—How
Do I Send Pictures to My Friends and Fam
ily?
Distributing Images ElectronicallyOnce you have created the images you want to send, you can transferthem to your computer for distribution via e-mail.
1 Install Nikon View
• Install Nikon View and the image database software provided your camera asinstructed in “Reference: Connections” (p. 178).
2 Select the images to be transferred
• After turning the mode dial to p, turn the camera on and press the 7button to display a page of thumbnail images (p. 162). Check that the imagesyou want to transfer are marked with a D icon. To select unmarkedpictures for transfer or to deselect pictures already marked for transfer,highlight the picture and press the TRANSFER button.
• If the original picture file is marked for transfer, small picture file create fromthat file is also marked for transfer. However, unmarking transfer setting ofeither the original or small picture files does not affect the transfer status ofthe other.
3 Connect the camera to the computer
• Turn the computer on and connect your camera as described in “Reference:Connections” (p. 178). When the camera is connected and turned on, NikonView will start automatically.
4 Transfer marked images
• Press the TRANSFER button on the camera to copyall images marked for transfer to the computer. Themessage “PREPARING TO TRANSFER” will appearin the camera monitor. After a brief pause, transferwill begin, and the message “TRANSFERRINGIMAGE TO COMPUTER” will be displayed.
5 Disconnect the camera
• When all selected images have been transferred, themonitor will show “TRANSFER COMPLETED”. Oncethe “TRANSFER COMPLETED” message hasappeared, click the “Unplug or Eject Hardware” iconand select Stop USB disk (Windows MillenniumEdition, Windows 2000), or double click MyComputer, select the removable disk correspondingto the camera, open the File menu and select Eject(Windows 98, Windows 98 SE) or drag the untitledvolume corresponding to the camera into the Trash(Macintosh). Then turn the camera off and unplugthe USB cable (p. 178). The images (especially SmallPictures) that have been copied to your computercan be appended to e-mail messages (see thedocumentation provided with your e-mail applicationfor details) or uploaded to your personal home page.
PREPARING TO TRANSFER
TRANSFERRINGIMAGE TOCOMPUTER
TRANSFER COMPLETED
Image Database SoftwareDepending on where you purchased your camera, the COOLPIX885 comeswith Canto Cumulus, iView Media Pro, or Fotostation Easy. The documentationon the Nikon View 4 reference CD included with your camera providesinstructions for installing these applications (p. 179). If you will be using Cumulusor iView Media Pro, remember to install the image database software beforeinstalling Nikon View. If you will be using Fotostation Easy, install Nikon View 4first, and then install Fotostation Easy.
• See p. 121 for more information on selecting images for transfer as they aretaken.
• See p. 174 for more information on selecting images for transfer after they aretaken.
Caution regarding image transferDo not carry out any of the following operations while images are beingtransferred to the computer after TRANSFER button has been pressed.• Remove the CF memory card• Turn the camera off• Disconnect the USB cable
Note on Connecting to Your ComputerWhen the camera is connected to the computer and camera is turned on, thelens extends out. Make sure to remove the lens cap of the camera beforeconnecting the camera to the computer.
COOLPIX885 (E) 01.10.22 6:01 PM Page 80
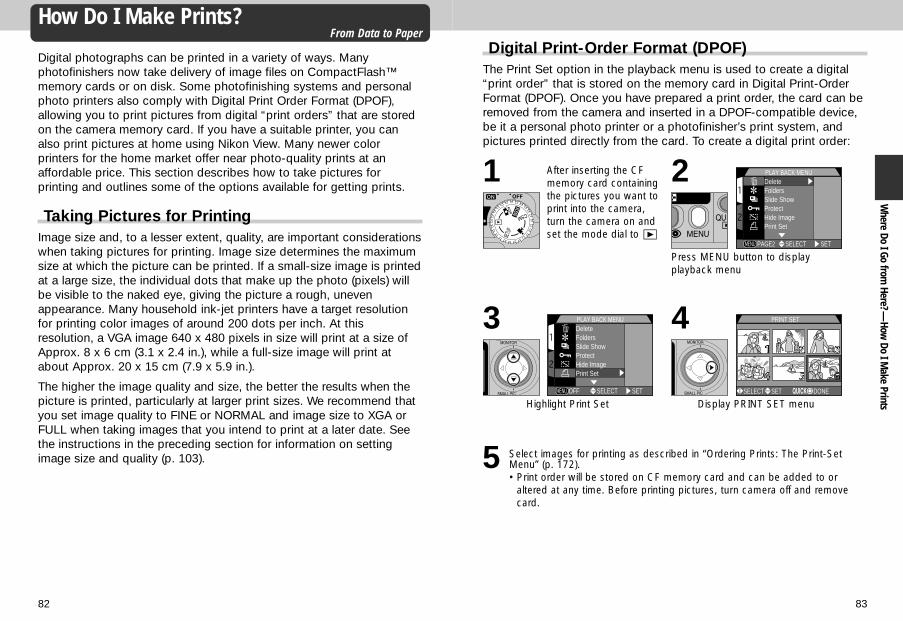
8382
Digital photographs can be printed in a variety of ways. Manyphotofinishers now take delivery of image files on CompactFlash™memory cards or on disk. Some photofinishing systems and personalphoto printers also comply with Digital Print Order Format (DPOF),allowing you to print pictures from digital “print orders” that are storedon the camera memory card. If you have a suitable printer, you canalso print pictures at home using Nikon View. Many newer colorprinters for the home market offer near photo-quality prints at anaffordable price. This section describes how to take pictures forprinting and outlines some of the options available for getting prints.
Taking Pictures for PrintingImage size and, to a lesser extent, quality, are important considerationswhen taking pictures for printing. Image size determines the maximumsize at which the picture can be printed. If a small-size image is printedat a large size, the individual dots that make up the photo (pixels) willbe visible to the naked eye, giving the picture a rough, unevenappearance. Many household ink-jet printers have a target resolutionfor printing color images of around 200 dots per inch. At thisresolution, a VGA image 640 x 480 pixels in size will print at a size ofApprox. 8 x 6 cm (3.1 x 2.4 in.), while a full-size image will print atabout Approx. 20 x 15 cm (7.9 x 5.9 in.).
The higher the image quality and size, the better the results when thepicture is printed, particularly at larger print sizes. We recommend thatyou set image quality to FINE or NORMAL and image size to XGA orFULL when taking images that you intend to print at a later date. Seethe instructions in the preceding section for information on settingimage size and quality (p. 103).
How Do I Make Prints?From Data to Paper
Where Do I Go from
Here?—How
Do I Make Prints
Digital Print-Order Format (DPOF)The Print Set option in the playback menu is used to create a digital“print order” that is stored on the memory card in Digital Print-OrderFormat (DPOF). Once you have prepared a print order, the card can beremoved from the camera and inserted in a DPOF-compatible device,be it a personal photo printer or a photofinisher’s print system, andpictures printed directly from the card. To create a digital print order:
1 PLAY BACK MENUDeleteFoldersSlide ShowProtectHide ImagePrint Set
PAGE2 SELECT SET
Press MENU button to displayplayback menu
2
PLAY BACK MENUDeleteFoldersSlide ShowProtectHide ImagePrint Set
OFF SELECT SET
Highlight Print Set
3 PRINT SET
DONESELECT SET
Display PRINT SET menu
4
After inserting the CFmemory card containingthe pictures you want toprint into the camera,turn the camera on andset the mode dial to p
5 Select images for printing as described in “Ordering Prints: The Print-SetMenu” (p. 172).• Print order will be stored on CF memory card and can be added to or
altered at any time. Before printing pictures, turn camera off and removecard.
COOLPIX885 (E) 01.10.22 6:01 PM Page 82
8584
Where Do I Go from
Here?—How
Do I Keep Track of My Photos?
Printing from Removable MediaEven if your photofinisher does not offer support for DPOF, you maystill be able to get professional prints made by copying the picturesyou want to print to a floppy disk or other removable media and takingthe disk to your photofinisher (check with your photofinisher first forinformation on pricing and the types of disks and file formatssupported). Pictures can be copied to disk using Nikon View. Forinformation on the operations that can be performed while the camerais connected to your computer, see the Nikon View Reference Manual.
Once you have transferred large numbers of photos to your computer,you may have trouble finding that picture you took of your aunt “amonth or two ago” should you suddenly decide you want extra prints.The image database software included with your camera can make iteasier for you to find the photo you want by organizing pictures intocategories. Image database software can also be used to preview thepictures stored in your computer and to open them in your favoriteimaging application. For details, see the documentation provided withthe image database software.
How Do I Keep Track of My Photos?Using Image Database Software
Image Database SoftwareDepending on where you purchased your camera, the COOLPIX885 comeswith Canto Cumulus, iView Media Pro, or Fotostation Easy. The documentationon the Nikon View 4 reference CD included with your camera providesinstructions for installing these applications (p. 179). If you will be using Cumulusor iView Media Pro, remember to install the image database software beforeinstalling Nikon View. If you will be using Fotostation Easy, install Nikon View 4first, and then install Fotostation Easy.
COOLPIX885 (E) 01.10.22 6:01 PM Page 84
8786
ReferenceThis chapter is divided into the following sections:
Beyond Point-and-ShootRead this section for information on cameracontrols such as zoom, flash, focus, andoperating mode.
Camera SetupLearn how to configure the camera using theoptions available in the SET-UP menu.
Advanced PhotographyThis section details the options available in theCSM shooting mode.
Playing Images BackRead this section for a detailed description ofplayback mode.
ConnectionsHow to connect your camera to a computer andtransfer images using Nikon View.
Technical NotesThis section describes how to care for cameraand what to do when it does not function asexpected. It also lists camera specifications andoptional accessories available for theCOOLPIX885.
IndexAn alphabetical index to the topics covered in thismanual.
Beyond Point-and-Shoot
pp. 88-101
Camera Setuppp. 102-125
AdvancedPhotographypp. 126-154
Playing ImagesBack
pp. 155-175
Connectionspp. 178-186
Technical Notespp. 187-205
Indexpp. 202-205
The Details
COOLPIX885 (E) 01.10.22 6:01 PM Page 86

8988
This section covers operations that can be performed in auto (AUTO),scene, CSM and movie modes using the mode dial and the buttons onthe back of the camera.
Creative Photography: Choosing a ModeAlthough Auto Mode is suited to almost any situation, some commoncompositions, such as portraits or landscapes, require specialcombinations of settings that apply to any scene of the same type.Rather than adjusting settings one-by-one to suit the composition, youcan simply choose the appropriate scene from the Scene Mode menu,and let the camera adjust settings automatically to produce the bestpossible results.
In addition to the Auto and Scene mode, some camera controls areonly available in CSM Mode.
This section describes when to use each of the Modes. To choose aMode, turn the mode dial to the appropriate position (and select theappropriate composition type from the Scene Mode menu). When oneof the Scene Modes is chosen, an icon corresponding to the currentmode will be shown in the top left corner of the monitor. The moviemode icon appears in the bottom left corner of the monitor. No icon isdisplayed in Auto and CSM Modes.
Beyond Point-and-ShootCamera Controls
Reference—Beyond Point-and-Shoot
Scene SettingsDepending on the subject, scene modes may not always produce the desiredresults. If you are dissatisfied with pictures taken in one of the scene modes, setthe mode dial to AUTO and try again.
The table below illustrates when to use each of the shooting modes.The icons in the “Flash Mode” (p. 98) and “Focus Mode” (p. 93)columns show the flash and focus-mode settings that can be selectedin each operating mode. Where more than one option is listed, the usercan choose which setting to use.
Mode Flash Mode Focus Mode
aAUTO Any Any
iSCENE * *
CSMCustom Any Any
m AutoMovie P @
™
When to Use It
An automatic mode for simple,“point-and-shoot” photography.Use for snapshots. Auto mode isalso recommended for pictures thatwill later be retouched on acomputer.
In this mode, most camera settingsare automatically adjusted to suitthe chosen scene. Twelve choicesof scene are available. See p. 65for the details and restrictions oneach scene.
In CSM shooting mode, varioussetting can be adjusted one-by-oneto suit the composition.
Record silent movies 320 x 240pixels in size (QVGA). Recordingbegins when shutter release buttonis pressed all the way down andends when shutter release button isfully pressed a second time. Inplace of number of exposuresremaining, exposure counts displayin monitor shows length of moviethat can be recorded. Movies endautomatically after 40 sec. or whenno more space is available on CFmemory card. Movies are stored asQuick Time movie files with namesending in “.MOV”.
* Depending on the scene selected, you may be able to adjust flash and focusmode settings (see p. 65-67 for restrictions).
COOLPIX885 (E) 01.10.22 6:01 PM Page 88

9190
Framing Pictures: Optical and Digital ZoomYour Nikon digital camera offers two kinds of zoom: optical zoom, inwhich the camera’s telescoping lens can be used to magnify thesubject up to 3X, and digital zoom, in which digital processing is usedto further magnify the image up to 4X
Optical ZoomPictures can be framed in the viewfinder or monitor using the zoom button.
Indicator in monitor displaysamount of zoom while either Wor T is pressed.
Zoom out Zoom in
Digital ZoomAt the maximum zoom position, holding the T down for two seconds triggers digitalzoom.
Zoom factordisplayed inmonitor
Maximum opticalzoom position
Hold for 2 sec. Green light blinksslowly to show thatpictures can not beaccurately framed inviewfinder
While digital zoom is in effect, the zoom factor increases each time the T ispressed, to a maximum of 4X. Pressing the W decreases the zoom factor. Tocancel digital zoom, press the W button until the zoom indicator disappears.
Optical vs. Digital ZoomIn digital zoom, data from the camera’s image sensor are processeddigitally, enlarging the center portion of the image to fill the frame.Unlike optical zoom, digital zoom does not increase the amount ofdetail visible in the picture. Instead, details visible at maximum zoomare enlarged, producing a slightly “grainy” image. Digital zoom alsodiffers from optical zoom in that its effects are visible only in themonitor, not the viewfinder, meaning that the monitor must be onbefore digital zoom can be used.
Restrictions on Digital ZoomAs noted above, digital zoom can only be used when the monitor is on. Digitalzoom is not available in movie mode.
Reference—Beyond Point-and-Shoot
COOLPIX885 (E) 01.10.22 6:01 PM Page 90

9392
Reference—Beyond Point-and-Shoot
Focusing Near and Far: Focus Mode ButtonBy default, the camera adjusts focus automatically for subjects 30 cm/1 ft. (at widest angle), 60 cm/2 ft. (at telephoto) or more from the lens,which is ideal for snapshots. Under some circumstances, however, youmay want to force the camera to focus on distant objects rather thanon the closest object visible in the center of the frame—for example,when photographing a distant landscape through a screen of branchesor when taking a shot through a window. Or you may want the camerato focus on something closer than 30 cm—for example, to create aclose-up of a flower or business card. Your Nikon digital camera offersfocus modes for both situations. Some focus modes can be combinedwith a timer to delay shutter release, either to keep the camera fromshaking or to allow you to appear in your own photographs.
To select the focus mode, press the 2 button, which may befound below the monitor on the back of the camera.
1 Press
2 Confirm focus mode setting in monitor
The following settings are available (restrictions may apply depending on the modeselected).
Setting
No iconAutofocus
0Autofocus +
self-timer
@Infinity
™Macro close-up
0™Macro close-up +
self-timer
How It Works
Camera automaticallyadjusts focus according todistance to subject.
Combines autofocus withself-timer duration of 10 or3 sec.
Focus is fixed at infinity.Flash is disabled.
Camera can focus onobjects as close as 4 cm(1.6 in.) <at widest angle> or30 cm (1 ft) <at telephoto>,(measure from lens)
Combines macro close-upwith shutter-release delay of10 or 3 sec.
When to Use It
Use with subjects 30 cm (1 ft.) <at widest angle>, 60 cm (2 ft.) <at telephoto>or more from lens.
Use for self-portrait orprevent pictures fromblurring when shutterrelease button is pressed.
Use when photographingdistant scenes throughforeground objects suchas a window.
Use for close-ups.
Use for close-ups toprevent pictures fromblurring when shutterrelease button is pressed.
Macro Close-UpTo take pictures of subjects within 30 cm (11.8 in.) or closer in macro close-upmode, set the zoom position to widest angle; you can focus as close as 4 cm(1.6 in.) from the lens. At zoom position where ™ is displayed in yellow, you canfocus as close as 10 cm (3.9 in.) from the lens.• We recommend that you frame pictures in the monitor when using macro
close-up. • While the flash can be used in macro close-up mode, it may sometimes be
unable to light the entire subject. Take a test picture and verify the results inthe monitor.
COOLPIX885 (E) 01.10.22 6:01 PM Page 92
9594
Reference—Beyond Point-and-Shoot
Autofocus modeThe autofocus system operates in one of two modes, depending on whether themonitor is on or off.
AF mode
Continuous AF(monitor on)
Single AF(monitor off)
How It Works
Camera adjusts focuscontinuously.Focus can be locked bypressing the shutter releasebutton halfway.
Camera focuses only whenshutter release button ispressed halfway
Pros and cons
Pro:• Minimizes time needed for
camera to focus, allowing youto react quickly whenpresented with a suddenopportunity to capture theperfect shot.
Con:• Pictures can be taken when
camera is not in focus; checkgreen light before shooting.
Pros:• Pictures can be taken only
when camera is in focus.• Saves batteryCon:• Slight delay before camera
focuses.
Getting Good Results with AutofocusAutofocus performs best when:• There is contrast between the subject and the background. For example,
autofocus may not perform well on subjects that are the same color as thebackground.
• The subject is evenly lit.Autofocus doe not perform well when:• You attempt to focus simultaneously on two or more objects at different
distances from the camera. For example, autofocus may not perform wellwhen photographing an object inside a cage, because the bars of the cagewill be closer to the camera than the main subject, and both the bars and themain subject will be in focus area at the center of the frame.
• The subject is very dark (the subject should not, however, be too muchbrighter than the background).
• The subject is moving rapidly.
If the camera is unable to focus using autofocus, use focus lock (p. 61) to focuson another subject at the same distance.
Delaying Shutter Release: Self-Timer ModeWhen the self-timer is used, the camera will not take a picture until tenor three seconds after the shutter-release button is pressed. The ten-second timer is generally used for pictures in which you wish to appearyourself, when it gives you time to position yourself in front of thecamera after pressing the shutter-release button. The three-secondtimer prevents pictures from being blurred by camera movement thatoccurs when the shutter-release button is pressed. This feature is mostuseful when taking low light or close-up shots with the flash turned off.
To use the self-timer:
1 Position the camera
• Mount the camera on a tripod (recommended) or rest it on a flat, stablesurface.
2 Select a self-timer mode
• Press the 2 button until either0 (autofocus + self-timer, forpictures at ranges of 30 cm/1 ft. ormore at widest angle or 60 cm/2 ft.or more at telephoto) or ™0(macro close-up + self-timer, forpictures at ranges of 4 cm/1.6 in. ormore at widest angle or 30 cm/1 ft.or more at telephoto) appears in themonitor.
Press Self-timer icondisplayed in monitor
COOLPIX885 (E) 01.10.22 6:01 PM Page 94
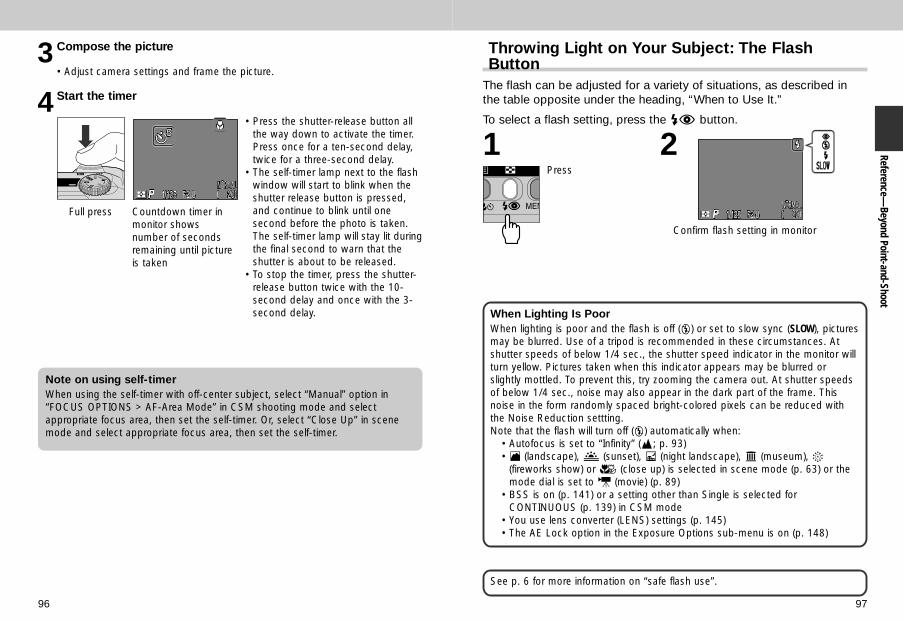
9796
3 Compose the picture
• Adjust camera settings and frame the picture.
4 Start the timer
• Press the shutter-release button allthe way down to activate the timer.Press once for a ten-second delay,twice for a three-second delay.
• The self-timer lamp next to the flashwindow will start to blink when theshutter release button is pressed,and continue to blink until onesecond before the photo is taken.The self-timer lamp will stay lit duringthe final second to warn that theshutter is about to be released.
• To stop the timer, press the shutter-release button twice with the 10-second delay and once with the 3-second delay.
Full press Countdown timer inmonitor showsnumber of secondsremaining until pictureis taken
Note on using self-timerWhen using the self-timer with off-center subject, select “Manual” option in“FOCUS OPTIONS > AF-Area Mode” in CSM shooting mode and selectappropriate focus area, then set the self-timer. Or, select “Close Up” in scenemode and select appropriate focus area, then set the self-timer.
Reference—Beyond Point-and-Shoot
Throwing Light on Your Subject: The FlashButton
The flash can be adjusted for a variety of situations, as described inthe table opposite under the heading, “When to Use It.”
To select a flash setting, press the 3 button.
When Lighting Is PoorWhen lighting is poor and the flash is off (P) or set to slow sync (SLOW), picturesmay be blurred. Use of a tripod is recommended in these circumstances. Atshutter speeds of below 1/4 sec., the shutter speed indicator in the monitor willturn yellow. Pictures taken when this indicator appears may be blurred orslightly mottled. To prevent this, try zooming the camera out. At shutter speedsof below 1/4 sec., noise may also appear in the dark part of the frame. Thisnoise in the form randomly spaced bright-colored pixels can be reduced withthe Noise Reduction settting.Note that the flash will turn off (P) automatically when:
• Autofocus is set to “Infinity” (@; p. 93)• h (landscape), j (sunset), k (night landscape), v (museum), l
(fireworks show) or z (close up) is selected in scene mode (p. 63) or themode dial is set to m (movie) (p. 89)
• BSS is on (p. 141) or a setting other than Single is selected forCONTINUOUS (p. 139) in CSM mode
• You use lens converter (LENS) settings (p. 145)• The AE Lock option in the Exposure Options sub-menu is on (p. 148)
1
Confirm flash setting in monitor
2Press
See p. 6 for more information on “safe flash use”.
COOLPIX885 (E) 01.10.22 6:01 PM Page 96

9998
Reference—Beyond Point-and-Shoot
The following settings are available (restrictions may apply depending on the modeselected):
Setting
No iconAuto
PFlash Cancel
#Auto with red-eye
reduction
OAnytime Flash
(fill-flash)
SLOWSlow Sync
How It Works
Flash fires whenlighting is poor.
Flash will not fire evenwhen lighting is poor.
Pre-flash lamp lightsbefore main flash.This causes subject’spupils to contractbefore main flashfires, minimizing “red-eye” effect caused byflash reflecting fromretina.
Flash fires wheneverpicture is taken.
Auto flash combinedwith slow shutterspeed.
When to Use It
Best choice in most circumstances.
Use when subject is outside range offlash, to capture natural lighting underdim light, or where use of a flash isprohibited. Use of a tripod isrecommended to prevent blurring.
Use for portraits (works best whensubjects are well within range of flashand looking at pre-flash lamp).Between your pressing shutter-releasebutton and the picture being taken,there is a slight delay to allow the pre-flash lamp to take effect, andconsequently red-eye reduction is notrecommended with subjects that aremoving erratically or in other situationsin which you want the camera to reactquickly.
Used to “fill-in” (illuminate) shadowsand backlit subjects.
Use to capture both subject andbackground at night or under dimlight. Use of a tripod is recommendedto prevent blurring.
The Flash-Ready LightA short pause is required between exposures for the flash system to charge. Ifthe shutter release button is pressed halfway while the flash is charging, the redlight next to the viewfinder will blink. Remove your finger briefly from the shutterrelease button and try again.
Keep the Flash Window ClearKeep your fingers and other objects away from the flash window when usingthe flash. If a shot seems dark even though the flash fired, this may indicate thatyou accidentally blocked the flash window; check that the flash is unobstructedand try again.
COOLPIX885 (E) 01.10.22 6:01 PM Page 98
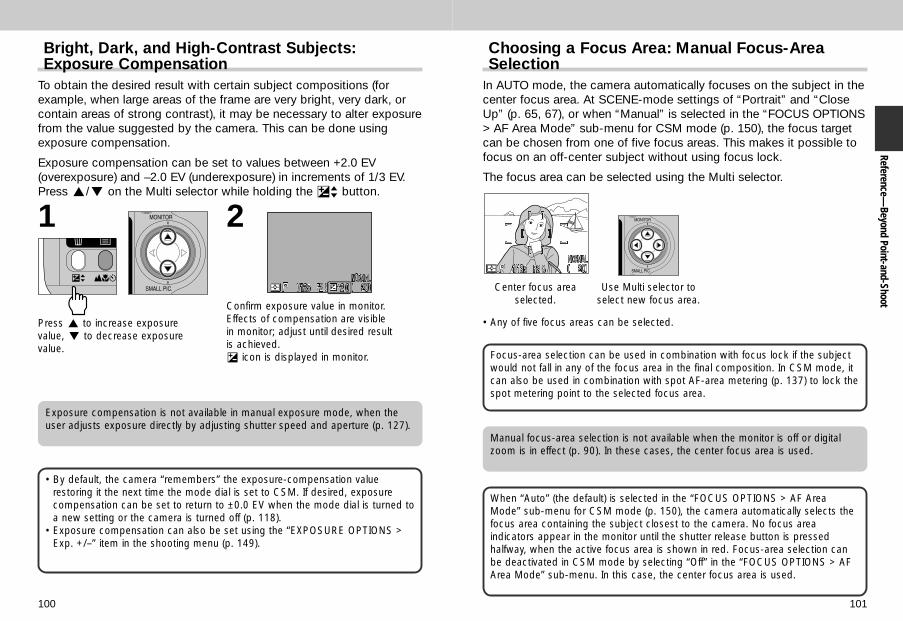
101100
Reference—Beyond Point-and-Shoot
Bright, Dark, and High-Contrast Subjects:Exposure Compensation
To obtain the desired result with certain subject compositions (forexample, when large areas of the frame are very bright, very dark, orcontain areas of strong contrast), it may be necessary to alter exposurefrom the value suggested by the camera. This can be done usingexposure compensation.
Exposure compensation can be set to values between +2.0 EV(overexposure) and –2.0 EV (underexposure) in increments of 1/3 EV.Press ≤/≥ on the Multi selector while holding the 1 button.
• By default, the camera “remembers” the exposure-compensation valuerestoring it the next time the mode dial is set to CSM. If desired, exposurecompensation can be set to return to ±0.0 EV when the mode dial is turned toa new setting or the camera is turned off (p. 118).
• Exposure compensation can also be set using the “EXPOSURE OPTIONS >Exp. +/–” item in the shooting menu (p. 149).
Exposure compensation is not available in manual exposure mode, when theuser adjusts exposure directly by adjusting shutter speed and aperture (p. 127).
Manual focus-area selection is not available when the monitor is off or digitalzoom is in effect (p. 90). In these cases, the center focus area is used.
1
Confirm exposure value in monitor.Effects of compensation are visiblein monitor; adjust until desired resultis achieved.! icon is displayed in monitor.
Press ≤ to increase exposurevalue, ≥ to decrease exposurevalue.
2
Choosing a Focus Area: Manual Focus-AreaSelection
In AUTO mode, the camera automatically focuses on the subject in thecenter focus area. At SCENE-mode settings of “Portrait” and “CloseUp” (p. 65, 67), or when “Manual” is selected in the “FOCUS OPTIONS> AF Area Mode” sub-menu for CSM mode (p. 150), the focus targetcan be chosen from one of five focus areas. This makes it possible tofocus on an off-center subject without using focus lock.
The focus area can be selected using the Multi selector.
Center focus areaselected.
Use Multi selector toselect new focus area.
• Any of five focus areas can be selected.
Focus-area selection can be used in combination with focus lock if the subjectwould not fall in any of the focus area in the final composition. In CSM mode, itcan also be used in combination with spot AF-area metering (p. 137) to lock thespot metering point to the selected focus area.
When “Auto” (the default) is selected in the “FOCUS OPTIONS > AF AreaMode” sub-menu for CSM mode (p. 150), the camera automatically selects thefocus area containing the subject closest to the camera. No focus areaindicators appear in the monitor until the shutter release button is pressedhalfway, when the active focus area is shown in red. Focus-area selection canbe deactivated in CSM mode by selecting “Off” in the “FOCUS OPTIONS > AFArea Mode” sub-menu. In this case, the center focus area is used.
COOLPIX885 (E) 01.10.22 6:01 PM Page 100

103102
Reference—Cam
era Setup
This section details the options available in the SET-UP menu, whereyou make changes to basic camera settings, and perform such tasksas formatting CF memory cards. The SET-UP menu can also be usedto set image quality and size and choose a folder for storing imagesand for playback. Some of the options in the setup menu can also beaccessed from the CSM and playback menu.
To view the SET-UP menu:The SET-UP menu is displayed automatically when the mode dial isturned to SETUP.To end display of the SET-UP menu, set the mode dial other thanSETUP or turn the camera off.
The setup menu contains two pages of options:
Camera SetupThe SET-UP Menu
Image Quality P. 103-107
Image Size P. 103-107
Folders P. 108-112
Monitor Options P. 113-114
Auto Off P. 115
Seq. Number P. 116
CF Card Format P. 117
SET-UP 1 menu
Controls P. 118
Shot Confirm Lamp P. 119
Pic data/Transfer P. 120-121
Date P. 122
Video Mode P. 122
Language P. 123
Reset All P. 124-125
SET-UP 2 menu
Making Effective Use of Memory: The Image Size & Quality Menu
Together, image quality and size determine how much space eachpicture occupies on the CF memory card. This in turn determines thetotal number of pictures that can be stored. To get an idea of howdifferent settings for image size and quality affect the number ofimages that can be stored on a CF memory card, view the followingtable, which shows the approximate number of pictures that can bestored on 8 MB, 16 MB, 32 MB, and 64 MB cards at differentcombinations of image size and quality.
Note that the number of pictures that can be stored at each combination alsovaries according to their composition (detail, number or colors).
8 MB Card 16 MB Card
FULL XGA VGA FULL XGA VGA
HI 0 — — 1 —
FINE 5 19 48 10 39 97
NORMAL 10 37 88 20 76 177
BASIC 19 71 161 39 144 324
32 MB Card 64 MB Card
FULL XGA VGA FULL XGA VGA
HI 3 — — 6 — —
FINE 20 79 195 40 159 390
NORMAL 40 152 354 81 309 725
BASIC 79 288 650 159 588 1300
SET-UP1Image QualityImage SizeFoldersMonitor OptionsAuto OffSeq. NumbersCF Card Format
PAGE2 SELECT SET
SET-UP2ControlsShot Confirm LampPic data/TransferDateVideo ModeLanguageReset All
PAGE1 SELECT SET
COOLPIX885 (E) 01.10.22 6:01 PM Page 102

105104
Reference—Cam
era Setup
Image QualityTo reduce the amount of memory that eachpicture occupies, images are compressed usingJPEG compression. JPEG compression analyzesimages in blocks eight pixels on a side andselectively reduces detail within each block. Themore the image is compressed, the smaller theresulting file and the less space it occupies on theCF memory card. Compressing the image to make a very small file,however, may cause the block pattern to become visible, and theremay be noticeable loss of detail. The actual effect depends on the sizeof the image when printed or displayed and on the type of subject.
You can control the amount of compression using the image qualitysub-menu. Image quality settings can be accessed from the SET-UPmenu and the “Image Size & Quality” sub-menu in the CSM shootingmenu (p. 134). Changes to image quality in any of these menus applyto all modes. Note, however, that image quality setting of “HI” cannotbe selected with the SETUP menu and “HI” becomes “FINE” in AUTOand SCENE modes, reverting to “HI” when the mode dial is turn toCSM.
The image quality menu contains the following options:
IMAGE QUALITYImage QualityImage SizeFoldersMonitor OptionsAuto OffSeq. NumbersCF Card Format
FINENORMALBASIC
SELECT SET
Option File format Description
HI TIFF Best-quality image, with no compression. Use whenquality or authenticity is of paramount importance.
FINE JPEGFine image quality, suitable for enlargements or high-quality prints. File size reduced to roughly 1/4 oforiginal.
NORMAL JPEG Normal image quality, suited to most applications. Filesize reduced to roughly 1/8 of original.
BASIC JPEGBasic image quality, suitable for pictures that will bedistributed by e-mail or used in web pages. File sizereduced to roughly 1/16 of original.
While setting of “NORMAL” represents the best trade-off between filesize and image quality in most cases, a setting of “BASIC” can beused to save memory or create smaller files suitable for electronicdistribution. Setting of “HI” or “FINE” are suitable for pictures that willbe enlarged or printed at high resolution.
JPEG“JPEG” (pronounced “jay-peg”) stands for “Joint Photographic Experts Group,”the organization which developed the JPEG compression standard.
Viewing the Current Image Quality and SizeThe current image quality and size (except for full size)settings are displayed in the monitor as shown at right.
COOLPIX885 (E) 01.10.22 6:01 PM Page 104

107106
Reference—Cam
era Setup
Image SizeThe image-size menu controls the physicaldimensions of the image, measured in pixels.Smaller sizes require less space to store, makingthem suited to distribution by e-mail and the web.Conversely, the larger the image, the larger thesize at which it can be printed without becomingnoticeably “grainy.” Choose an image size according to the spaceavailable on the CF memory card and the task at hand.
Image size can be adjusted from the SET-UP menu and the “ImageSize & Quality” sub-menu in the CSM shooting menu (p. 134). Changesto image size in any of these menus apply to all modes.
The image-size menu contains the following options:
Option Size (pixels) Application
FULL 2048 x 1536 For high quality prints of up to A4 without additionaltreatment.
XGA 1024 x 768Suited to printing at smaller sizes (for example, as anillustration in a letter or report), or to display onmonitors 17 in. or larger.
VGA 640 x 480 Can be displayed full screen on 13 in. monitors. Suitedto distribution by e-mail or the web.
Small PicturesWith COOLPIX885 digital camera, Small Pictures, 640 x 480, 320 x 240, 160 x120 or 96 x 72 pixels in size, for e-mail and the web can easily be created withthe SMALL PIC. button. See p. 76
Print SizeThe size of images when printed depends on the resolution of the printer (thehigher the resolution, the smaller the final print size). The following table shows howimages of different sizes will print at a resolution of 200 dpi (supported by mosthousehold inkjet printers).
Print Size Dimensions When Printed at 200 dpi
FULL Approx. 26 x 20 cm (10.2 x 7.9 in.)
XGA Approx. 13 x 10 cm (5.1 x 3.9 in.)
VGA Approx. 8 x 6 cm (3.1 x 2.4 in.)
• See p. 175 for more information on choosing an image size for electronicdistribution.
• See p. 107 for more information on choosing an image size for printing.
IMAGE SIZEImage QualityImage SizeFoldersMonitor OptionsAuto OffSeq. NumbersCF Card Format
FULLXGAVGA
SELECT SET
COOLPIX885 (E) 01.10.22 6:01 PM Page 106

109108
Reference—Cam
era Setup
Organizing Your Pictures: The Folders MenuBy default, pictures are stored on the CF memorycard in a folder labeled NIKON. To make it easierto locate pictures during playback, you can createadditional folders and organize pictures by theme.The “Folders” sub-menu is used to create,rename and delete folders and to select the folderin which subsequent pictures will be stored or from which pictures areplayed back.
The camera file system conforms to the Design Rule for Camera File System(DCF). Under this system, folder names consist of a three-digit folder numberfollowed by the folder name (e.g., “100NIKON”). Each folder can hold amaximum of 200 images (it may hold less, depending on the size of the CFmemory card and other factors). Should a folder fill up, another folder willautomatically be created with the same name but a different folder number (e.g.,“101NIKON”). For most purposes, the folder number can be ignored—whenviewed from the camera, folders with the same name but different foldernumbers are the same folder. For example, the camera shows the folders“100NIKON” and “101NIKON” as the single folder “NIKON” with no foldernumber. When the CF memory card is viewed on a computer, however, folderswith the same name but different folder numbers will be treated as separatefolders (see the “Nikon View Reference Manual” for details). If you have troublelocating a photo on a computer, you can play it back on the camera, where thefolder number and name are shown in the photo-information display.
OPTIONS
New
Rename
Delete
SELECT SET
Highlight “New”
1 NEWLM
OP
N I K O N
SELECT SET
Press >
2
NEWLM
OP
N I K O N
SELECT SET
Press </> to highlight letter
3
SET-UP1Image QualityImage SizeFoldersMonitor OptionsAuto OffSeq. NumbersCF Card Format
PAGE2 SELECT SET
Highlight last letter and press > tocreate new folder.
5
NEWNM
PQ
T O K Y O
SELECT SET
Press ≤/≥ to edit selected letter• Folder name can include
uppercase letters (“A”-“Z”),numbers and spaces.Repeat steps 3 and 4 to createnew five-letter folder name.
4
Creating, Renaming and Deleting Folders: The Folder Options MenuThe folder options menu can be used to create, rename or deletefolders.
— Creating New Folders —
FOLDERSImage QualityImage SizeFoldersMonitor OptionsAuto OffSeq. NumbersCF Card Format
OptionsN I K O N
SELECT SET
Until a different folder is selected from the “Folders” menu, all subsequentpictures will be stored in the new folder.
COOLPIX885 (E) 01.10.22 6:01 PM Page 108
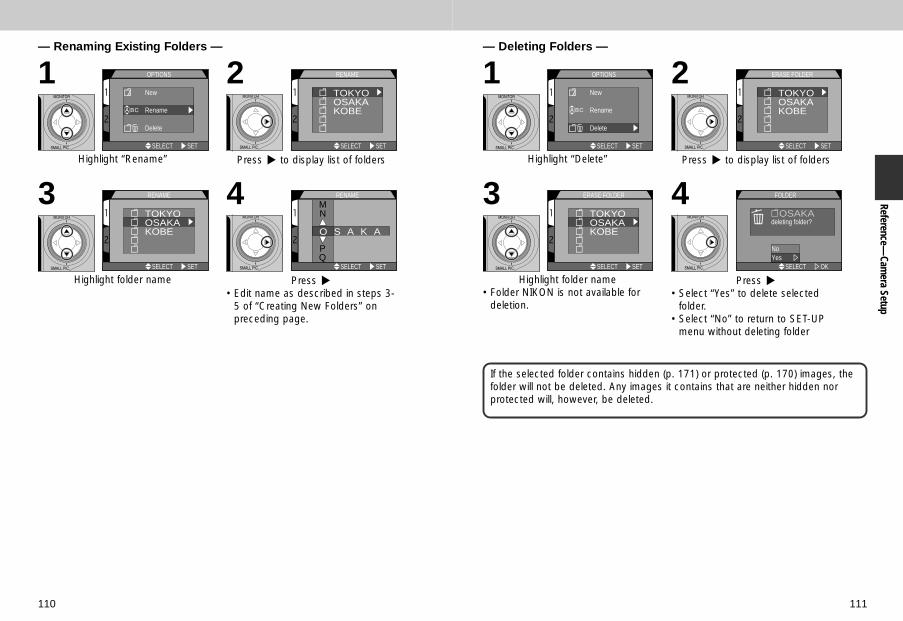
111110
Reference—Cam
era Setup
OPTIONS
New
Rename
Delete
SELECT SET
Highlight “Rename”
1 RENAME
TOKYOOSAKAKOBE
SELECT SET
Press > to display list of folders
2
RENAME
TOKYOOSAKAKOBE
SELECT SET
Highlight folder name
3 MN
PQ
O S A K A
RENAME
SELECT SET
Press >• Edit name as described in steps 3-
5 of “Creating New Folders” onpreceding page.
4
— Renaming Existing Folders —
OPTIONS
New
Rename
Delete
SELECT SET
Highlight “Delete”
1 ERASE FOLDER
TOKYOOSAKAKOBE
SELECT SET
Press > to display list of folders
2
ERASE FOLDER
TOKYOOSAKAKOBE
SELECT SET
Highlight folder name• Folder NIKON is not available for
deletion.
3
SELECT OK
FOLDER
OSAKAdeleting folder?
NoYes
Press >• Select “Yes” to delete selected
folder.• Select “No” to return to SET-UP
menu without deleting folder
4
— Deleting Folders —
If the selected folder contains hidden (p. 171) or protected (p. 170) images, thefolder will not be deleted. Any images it contains that are neither hidden norprotected will, however, be deleted.
COOLPIX885 (E) 01.10.22 6:01 PM Page 110

113112
Reference—Cam
era Setup
— Choosing a Folder —Once additional folders have been created, you can select the folder that will beused for playback or to store pictures in all modes. The folder can be chosen usingthe “Folders” sub-menu in SETUP mode or “Folders” item in the playback menu.Until a new folder is selected, all subsequent images will be stored in this folder,which will also be used for playback.
FOLDERSImage QualityImage SizeFoldersMonitor OptionsAuto OffSeq. NumbersCF Card Format
PAGE2 SELECT SET
OptionsN I K O NT O K Y OO S A K A
Highlight folder name.
1
FOLDERSImage QualityImage SizeFoldersMonitor OptionsAuto OffSeq. NumbersCF Card Format
PAGE2 SELECT SET
OptionsN I K O NT O K Y OO S A K A
Press >• Folder name is shown in monitor. (No folder name is
displayed when NIKON is selected.)
2
Each series of seventy pictures taken at a setting of “Ultra HS” is stored in aseparate folder with a name consisting of “N_” followed by a three-digit numberassigned by the camera. The “Folders” menu can be used to select the folderfor playback or to delete the entire folder and all images it contains. Note,however, that such folders cannot be used to store pictures take after the folderwas created.
Monitor OptionsThe “Monitor Options” sub-menu is used tospecify when the monitor will turn onautomatically and to set monitor brightness andhue (tone).
Controlling the Monitor: The Display Mode MenuThis option is used to specify the conditions under whichthe monitor will turn on automatically, and to specifywhether or not pictures are displayed in the monitor aftershooting.
Option Description
Monitor On Monitor turns on at start-up; pictures are displayed in monitorafter shooting.
Review Only Monitor turns on only to display pictures immediately aftershooting. Choose this option to save batteries.
Preview Only Monitor turns on at start-up, but pictures are not displayed inmonitor after shooting.
Monitor Off Monitor remains off at all times. This option is the mosteffective for saving batteries.
MONITOR OPTIONSImage QualityImage SizeFoldersMonitor OptionsAuto OffSeq. NumbersCF Card Format
Display ModeBrightnessHue
SELECT SET
SELECT SET
DISPLAY MODE
Monitor OnReview OnlyPreview OnlyMonitor Off
COOLPIX885 (E) 01.10.22 6:01 PM Page 112

115114
Reference—Cam
era Setup
Adjusting Monitor Brightness: The Brightness MenuThis option controls monitor brightness. Press ≤/≥ on the Multi selector toincrease or decrease the brightness of the monitor bymoving the arrow at the right side of the display up ordown. Once you have adjusted brightness to yoursatisfaction, press > on the Multi selector to put thechange into effect.
Increasing monitor brightness also increases the brightness of images output ona television set when the camera is connected to a television or VCR. Undernormal conditions, this may make the image on the television slightly too bright.
SELECT SET
BRIGHTNESS
Adjusting Monitor Tone: The Hue MenuThis option controls the hue (tone) of the monitor. Press≤/≥ on the Multi selector to alter the hue by moving thearrow at the right side of the display up or down. Onceyou have adjusted hue to your satisfaction, press > onthe Multi selector to put the change into effect.
SELECT SET
HUE
Conserving Battery Power: The Auto Off MenuWhen operated on battery power, the camera willenter sleep mode if no operations are performedfor thirty seconds (or three minutes when menusare displayed). The time limit for sleep mode canbe chosen from thirty seconds, one minute, fiveminutes, and thirty minutes using the “Auto Off”menu.
AUTO OFFImage QualityImage SizeFoldersMonitor OptionsAuto OffSeq. NumbersCF Card Format
30S
1M5M
30MSELECT SET
Using a 2CR5 (DL245) BatteryWhen powered by a six-volt 2CR5 (DL245) lithium battery, the camera maybecome hot if left on for an extended period. We recommend that you set “AutoOff” to five minutes or less when using a 2CR5 (DL245) lithium battery.
Using an AC AdapterWhen the camera is powered by the EH-21 AC adapter/battery charger(available separately), the camera will remain on for thirty minutes if nooperations are performed, regardless of the setting in the “Auto Off” menu. If thecamera is connected to a video device, video output will continue indefinitelyafter the monitor has turned off.
Sleep ModeIn sleep mode, all camera functions are deactivated and the camera itself iseffectively off, consuming almost no power. The camera can be reactivated bypressing the Multi selector or any other buttons on the camera back (exceptTRANSFER button), by rotating the mode dial, or by pressing the shutter releasebutton halfway. When the camera is reactivated, the green light next to theviewfinder will light, and the monitor will then turn on after a short pause.
COOLPIX885 (E) 01.10.22 6:01 PM Page 114
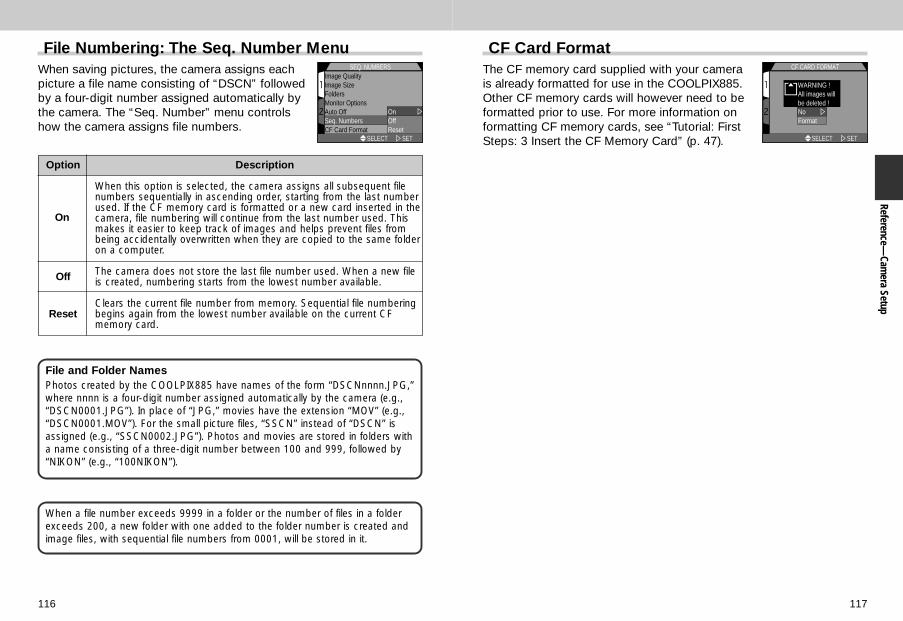
117116
Reference—Cam
era Setup
File Numbering: The Seq. Number MenuWhen saving pictures, the camera assigns eachpicture a file name consisting of “DSCN” followedby a four-digit number assigned automatically bythe camera. The “Seq. Number” menu controlshow the camera assigns file numbers.
Option Description
When this option is selected, the camera assigns all subsequent filenumbers sequentially in ascending order, starting from the last numberused. If the CF memory card is formatted or a new card inserted in thecamera, file numbering will continue from the last number used. Thismakes it easier to keep track of images and helps prevent files frombeing accidentally overwritten when they are copied to the same folderon a computer.
Off The camera does not store the last file number used. When a new fileis created, numbering starts from the lowest number available.
ResetClears the current file number from memory. Sequential file numberingbegins again from the lowest number available on the current CFmemory card.
SEQ. NUMBERSImage QualityImage SizeFoldersMonitor OptionsAuto OffSeq. NumbersCF Card Format
OnOffReset
SELECT SET
On
File and Folder NamesPhotos created by the COOLPIX885 have names of the form “DSCNnnnn.JPG,”where nnnn is a four-digit number assigned automatically by the camera (e.g.,“DSCN0001.JPG”). In place of “JPG,” movies have the extension “MOV” (e.g.,“DSCN0001.MOV”). For the small picture files, “SSCN” instead of “DSCN” isassigned (e.g., “SSCN0002.JPG”). Photos and movies are stored in folders witha name consisting of a three-digit number between 100 and 999, followed by“NIKON” (e.g., “100NIKON”).
When a file number exceeds 9999 in a folder or the number of files in a folderexceeds 200, a new folder with one added to the folder number is created andimage files, with sequential file numbers from 0001, will be stored in it.
CF Card FormatThe CF memory card supplied with your camerais already formatted for use in the COOLPIX885.Other CF memory cards will however need to beformatted prior to use. For more information onformatting CF memory cards, see “Tutorial: FirstSteps: 3 Insert the CF Memory Card” (p. 47).
CF CARD FORMAT
WARNING !All images willbe deleted !NoFormat
SELECT SET
COOLPIX885 (E) 01.10.22 6:01 PM Page 116

119118
Reference—Cam
era Setup
Storing Camera Settings: The Controls MenuIn CSM mode, the first three items in the“Controls” menu determine what camera settingsremain in effect when the camera is turned off. Ifan item is checked, the setting in effect at thetime the camera was turned off will be restoredthe next time the camera is turned on. Any itemsthat are not checked will be restored to default settings when thecamera is turned on.
CONTROLS
save save saveDigital ZoomDone
SELECT SETBK
Option Setting Affected Default
3 save Flash setting Auto
2 save Focus mode Autofocus
! save Exposure compensation ±0.0
Digital Zoom Digital zoom On
The fourth item, “Digital Zoom”, is used to turn digital zoom on and off in ATUO,SCENE and CSM mode. If it is checked, digital zoom functions normally (p. 90). Ifthis item is not checked, digital zoom cannot be used, and pressing the T zoombutton at the maximum optical-zoom position has no effect.
To check an item, or remove the check mark from an item that has already beenchecked, highlight the item and press > on the Multi selector. Highlight “Done”and press > on the Multi selector to put the changes into effect.
Confirming Shutter Release: The Shot Confirm Lamp Menu
If desired, the red-eye reduction lamp next to theviewfinder window can be used to let yoursubjects know that the shutter has been released.This can be useful when taking portraits withoutthe flash. Shot confirmation can be turned on oroff in the “Shot Confirm Lamp” sub-menu.
SHOT CONFIRM LAMPControlsShot Confirm LamPic data/ConfirmDateVideo ModeLanguageReset All
Off On
SELECT SET
Option Description
Off Red-eye reduction lamp does not light when shutter is released(default).
On Red-eye reduction lamp lights when shutter is released.
COOLPIX885 (E) 01.10.22 6:01 PM Page 118

121120
Reference—Cam
era Setup
Photo Information and Transfer Setting: The Pic Data/Transfer Menu
The “Pic Data/Transfer” sub-menu containsoptions for storing information about the camerastatus at the time when the picture was taken asa text file and for turning on/off the transfer markassociated with pictures and movies as they aretaken.
PIC DATA/TRANSFERControlsShot Confirm LamPic data/TransferDateVideo ModeLanguageReset All
info txtAuto Transfer
SELECT SET
Recording Photo Information: The info. txt Sub-MenuWhen “On” is selected in the “info. txt” sub-menu, a textfile (“info. txt”) will be created on the CF memory card inthe camera to store picture information for all subsequentimages. When the contents of the CF memory card areviewed form a computer, this file, which may be found inthe same folder where the images are stored, can be readwith a text editor or word processor such as Simple Textor Notepad. The default setting for “info. txt” is “Off”.
PIC DATA/TRANSFERControlsShot Confirm LamPic data/TransferDateVideo ModeLanguageReset All
info txtAuto Transfer
SELECT SET
Off On
Option Description
Off Text-format picture information not recorded (does not affectplayback photo-information display).
On Picture information recorded in text format.
The info. txt file gives the following information about the camera settingsrelevant to each image in the folder:• File number and type • Camera type and firmware version• Metering mode • Exposure mode• Shutter speed • Aperture• Exposure compensation • Focal length and digital zoom factor• Image adjustment • Sensitivity (ISO equivalency)• White balance • Sharpening• Date of recording • Image size and qualityImages are listed in the order recorded, separated by a blank line.
Making Pictures for Transfer: The Auto Transfer Sub-MenuWhen you connect the camera to a computer runningNikon View and press the TRANSFER button, any imagesthat have been marked for transfer will automatically becopied to the computer. The transfer menu controlswhether images are marked for transfer as they are taken.The following options are available:
PIC DATA/TRANSFERControlsShot Confirm LamPic data/TransferDateVideo ModeLanguageReset All
info txtAuto Transfer
SELECT SET
Off On
Option Description
Off Pictures and movies are not marked for transfer.
On (Default setting) Pictures and movies are marked for transfer as they aretaken.
Changing Transfer StatusImages already recorded to the CF memory card can be selected for transfer bypressing the TRANSFER button when the image is displayed in Full-Screenreview (p. 71) or in playback mode (p. 156), or when the image is highlighted inthumbnail review or thumbnail playback. If the image is already marked fortransfer, pressing the TRANSFER button will turn transfer marking off. The“Transfer” option in the playback menu can be used to select all images on theCF memory card for transfer, or to remove transfer marking from all images (p. 174).
Marking image files for transferUp to 999 images on a CF memory card can be marked for transfer. Image filesof any file number can be transferred. To transfer 1000 or more images, use oneof the following methods:1) Transfer the images using Nikon View 4, not the TRANSFER button.2) Transfer 999 images using the TRANSFER button, and unmark the images
once they have been transferred. The mark the remaining images for transferand press the TRANSFER button once again.
COOLPIX885 (E) 01.10.22 6:01 PM Page 120

123122
Reference—Cam
era Setup
The Date MenuThe Date option is used to set the camera to thecurrent date and time. For more information, see“Tutorial: First Steps: 5 Set the Date and Time” (p. 52).
DATE
Y M D
2001. 01. 01
0 0 0 0
SELECT SET
Choosing a Video Standard: The Video Mode MenuThe “Video Mode” menu is used to select thestandard used for video output. Adjust this settingto match the standard used in any video device towhich you connect the camera.
Option Description
NTSC Use when connecting the camera to NTSC devices.
PALUse when connecting the camera to PAL devices. If the videocable is connected to the camera at this setting, the monitor willturn off.
VIDEO MODEControlsShot Confirm LampPic data/ConfirmDateVideo ModeLanguageReset All
NTSCPAL
SELECT SET
See p. 176 for more information on connecting the camera to a TV or VCR.
The Language MenuThis option is used to choose the language inwhich camera menus and messages aredisplayed. For more information, see “Tutorial:First Steps: 5 Choose a Language” (p. 51).
LANGUAGEControlsShot Confirm LampPic data/ConfirmDateVideo ModeLanguageReset All
DEFJS
SELECT SET
COOLPIX885 (E) 01.10.22 6:01 PM Page 122

124 125
Reference—Cam
era Setup
Restoring Default Settings: The Reset All MenuThe “Reset All” option in the SET-UP menu isused to restore settings for all modes to theirdefault values.
The “Reset All” menu contains the followingoptions:
Option Description
No Exist menu leaving settings unchanged.
Yes Restore settings to default values.
RESET ALL
Reset all settingto default values
NoYes
SELECT SET
Setting Default
SCENE mode Portrait
White Balance Auto
Metering Matrix
Continuous Single
BSS Off
Image Adjustment Normal
Image Sharpening Auto
Lens Normal
Image Size Full
Image Quality Normal
Sensitivity Auto
Exposure Mode P
AE Lock Off
Exposure Compensation 0
Choosing “Yes” restores the following options to their default values:
Setting Default
AF Area Mode Auto
Auto-Focus Mode Continuous AF
Focus Confirmation MF
Auto Bracketing Off
Noise Reduction On
Folders NIKON
Display Mode On
Brightness 3
Hue 6
Auto Off 30 S
Seq. Numbers On
Controls All options on
Shot Confirm Lamp Off
info. txt Off
Auto Transfer On
Frame Interval (Slide Show) 3 S
Transfer On
Small Picture 640 x 480
All other settings are unaffected.
COOLPIX885 (E) 01.10.22 6:01 PM Page 124
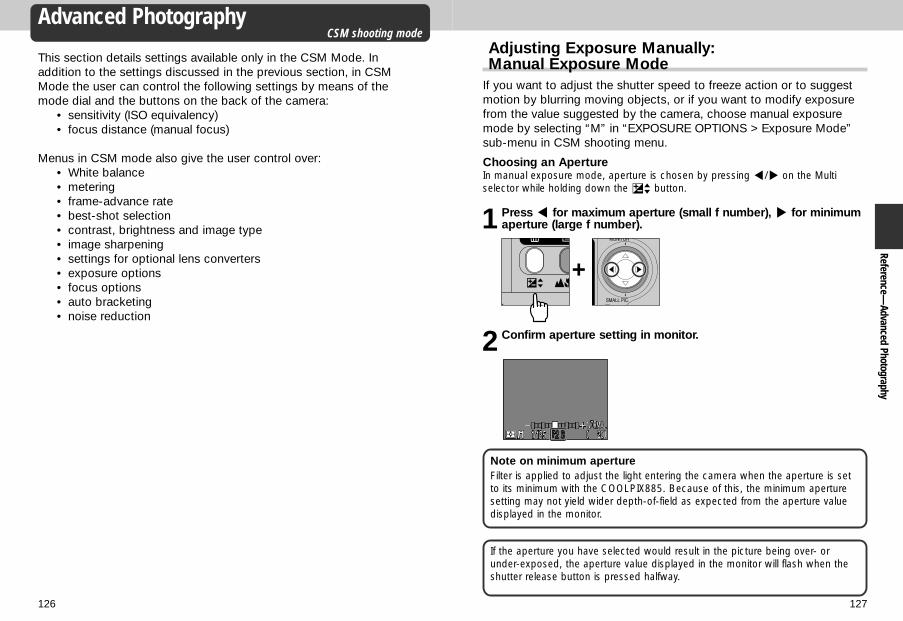
127126
This section details settings available only in the CSM Mode. Inaddition to the settings discussed in the previous section, in CSMMode the user can control the following settings by means of themode dial and the buttons on the back of the camera:
• sensitivity (ISO equivalency)• focus distance (manual focus)
Menus in CSM mode also give the user control over:• White balance• metering• frame-advance rate• best-shot selection• contrast, brightness and image type• image sharpening• settings for optional lens converters• exposure options• focus options• auto bracketing• noise reduction
Advanced PhotographyCSM shooting mode
Reference—Advanced Photography
Adjusting Exposure Manually: Manual Exposure Mode
If you want to adjust the shutter speed to freeze action or to suggestmotion by blurring moving objects, or if you want to modify exposurefrom the value suggested by the camera, choose manual exposuremode by selecting “M” in “EXPOSURE OPTIONS > Exposure Mode”sub-menu in CSM shooting menu.
Choosing an ApertureIn manual exposure mode, aperture is chosen by pressing </> on the Multiselector while holding down the 1 button.
1 Press < for maximum aperture (small f number), > for minimumaperture (large f number).
2 Confirm aperture setting in monitor.
Note on minimum apertureFilter is applied to adjust the light entering the camera when the aperture is setto its minimum with the COOLPIX885. Because of this, the minimum aperturesetting may not yield wider depth-of-field as expected from the aperture valuedisplayed in the monitor.
If the aperture you have selected would result in the picture being over- orunder-exposed, the aperture value displayed in the monitor will flash when theshutter release button is pressed halfway.
+
COOLPIX885 (E) 01.10.22 6:01 PM Page 126
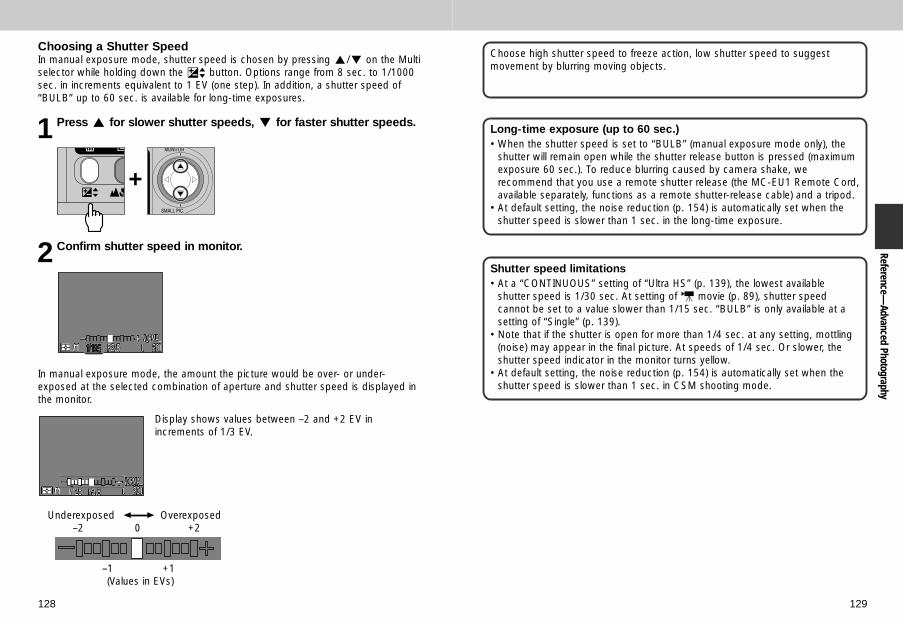
129128
Reference—Advanced Photography
Choosing a Shutter SpeedIn manual exposure mode, shutter speed is chosen by pressing ≤/≥ on the Multiselector while holding down the 1 button. Options range from 8 sec. to 1/1000sec. in increments equivalent to 1 EV (one step). In addition, a shutter speed of“BULB” up to 60 sec. is available for long-time exposures.
1 Press ≤ for slower shutter speeds, ≥ for faster shutter speeds.
2 Confirm shutter speed in monitor.
Long-time exposure (up to 60 sec.)• When the shutter speed is set to “BULB” (manual exposure mode only), the
shutter will remain open while the shutter release button is pressed (maximumexposure 60 sec.). To reduce blurring caused by camera shake, werecommend that you use a remote shutter release (the MC-EU1 Remote Cord,available separately, functions as a remote shutter-release cable) and a tripod.
• At default setting, the noise reduction (p. 154) is automatically set when theshutter speed is slower than 1 sec. in the long-time exposure.
Shutter speed limitations• At a “CONTINUOUS” setting of “Ultra HS” (p. 139), the lowest available
shutter speed is 1/30 sec. At setting of m movie (p. 89), shutter speedcannot be set to a value slower than 1/15 sec. “BULB” is only available at asetting of “Single” (p. 139).
• Note that if the shutter is open for more than 1/4 sec. at any setting, mottling(noise) may appear in the final picture. At speeds of 1/4 sec. Or slower, theshutter speed indicator in the monitor turns yellow.
• At default setting, the noise reduction (p. 154) is automatically set when theshutter speed is slower than 1 sec. in CSM shooting mode.
Choose high shutter speed to freeze action, low shutter speed to suggestmovement by blurring moving objects.
In manual exposure mode, the amount the picture would be over- or under-exposed at the selected combination of aperture and shutter speed is displayed inthe monitor.
Display shows values between –2 and +2 EV inincrements of 1/3 EV.
Underexposed Overexposed–2 0 +2
–1 +1(Values in EVs)
+
COOLPIX885 (E) 01.10.22 6:01 PM Page 128

131130
Reference—Advanced Photography
Reacting Faster to Light: Sensitivity (ISO Equivalency)
“Sensitivity” is a measure of how quickly your camera reacts to light.The higher the sensitivity, the less light needed to make an exposure,allowing the same exposure to be achieved with faster shutter speedsor smaller apertures. In a film camera, sensitivity is a characteristic ofthe film, not the camera. The ISO ratings you see on packages of filmare a measure of their sensitivity—the higher the ISO rating, the moresensitive the film. Higher sensitivity is achieved by altering the chemicalcomposition of the film, causing a random pattern called “grain”, toappear in the final picture. In a digital camera, increased sensitivity hasa similar effect: higher sensitivities allow higher shutter speeds, at theexpense of mottling, or “noise” (the digital equivalent of film “grain”)appearing in the final image.
Adjusting SensitivityIn AUTO mode, the camera sets sensitivity automatically in response tolighting conditions. When the mode dial is set to CSM, you can choosea fixed value for sensitivity from four possible settings. Sensitivity is setby pressing the zoom button while holding down the 1 button.
1 Press T for increased sensitivity, W for decreased sensitivity; Atsetting of 400, press T to select setting of AUTO
+
2 Sensitivity displayed in monitor
The following settings are available
Setting Description
Equivalent to setting of 100 under normal conditions; when AUTO lighting is poor, however, camera automatically raises sensitivity
(default) to compensate. ISO icon appears in monitor only when sensitivityraised above 100.
100 Approximately equivalent to ISO rating of 100.
200 Approximately equivalent to ISO rating of 200.
400 Approximately equivalent to ISO rating of 400.
• A slight amount of mottling (noise) may appear in pictures taken at settingsother than 100.
• Changes to sensitivity have no effect in AUTO or SCENE operating modes.
Sensitivity can also be set using the “ISO” item in the CSM shooting menus (p. 147).
COOLPIX885 (E) 01.10.22 6:01 PM Page 130

133132
Reference—Advanced Photography
Focusing at a Preset Distance: Manual FocusIn CSM mode, manual focus can be used in place of autofocus forsituations in which you know the distance to the subject. Focusdistance can be selected from forty-nine preset distances, rangingfrom 0.03 m (0.10 ft.) to infinity at widest angle, by pressing the zoombuttons while holding down the 2 button.
1 Press T to increase the focus distance to maximum of infinity(InF), W to decrease.
+
2 Focus distance is displayed in monitor.
The value displayed for manual focus-distance is the approximate distance fromthe front of the lens. The actual focus distance may differ slightly from the valueshown; check focus in the monitor before shooting.
The focus distances available depend on the focus mode setting (p. 92). Notethat the focus distances of 0.03-0.3 m (0.10-1 ft.) are only available at ™(macro close-up) and ™0 (macro close-up + self-timer) at widest angle.
• Manual focus can be canceled by pressing the 2 button.
Tips on manual focus• To use the self-timer in combination with manual focus, select a focus mode
of 0 (autofocus + self-timer) or ™0 (macro close-up + self-timer) beforechoosing the focus distance.
• The flash can be used while manual focus is in effect. This makes it possibleto combine the flash with a focus setting of infinity.
• The units used for manual focus ban be selected from meters or feet using the“Distance Units” sub-menu in the SETUP menu (p. 151).
COOLPIX885 (E) 01.10.22 6:01 PM Page 132

135134
Reference—Advanced Photography
Using CSM Shooting Menu OptionsIn CSM shooting mode, adjustments to some shooting options aremade from the camera menus (no menu is available in AUTO, SCENEand movie mode). The CSM shooting menu can be used to adjustcamera settings for specific subjects or situations—for example, whenphotographing very bright subjects, or when taking pictures underfluorescent lighting.
To view the CSM shooting menu:
See p. 30 for more information on “Using Camera Menus”.
WHITE BALANCE P. 135-136
METERING P. 137-138
CONTINUOUS P. 139-140
BEST SHOT SELECTOR P. 141
IMAGE ADJUSTMENT P. 142-143
IMAGE SHARPENING P. 144
LENS P. 145-146
SHOOTING MENU 1
IMAGE SIZE & QUALITY P. 103-107
SENSITIVITY P. 147
EXPOSURE OPTIONS P. 148-149
FOCUS OPTIONS P. 150-151
AUTO BRACKETING P. 152-153
NOISE REDUCTION P. 154
CF CARD FORMAT P. 117
SHOOTING MENU 2
The Shooting menu contains two pages of advanced shooting options:
Keeping Colors True: The White-Balance Menu
What is “White Balance”?The color of the light reflected by an object depends on the color ofthe light source. The human brain is able to detect and compensate forsuch changes in color, with the result that a white object will look whiteto humans whether viewed in sunlight, under overcast skies, or indoorsunder incandescent or fluorescent lighting. To a camera, however, the“whites” produced by these different sources of light vary in color,some being slightly blue and others yellow or red. A digital camera canadjust colors according to lighting so that colors that appear white tothe human eye also appear white when viewed in the final picture. Thisadjustment is called “white balance.”
Choosing a White Balance SettingIn CSM shooting mode, white balance can bechosen from the white-balance menu (in othermodes, white balance is adjusted automaticallyaccording to the type of scene). The followingoptions are available:
Option Description
A Auto White balance automatically adjusted to suit lightingconditions. Best choice in most circumstances.
White Bal Preset White object used as reference to set white balanceunder unusual lighting conditions.
Fine White balance adjusted for direct sunlight.
Incandescent Use when taking pictures indoors under incandescentlight.
Fluorescent Use when taking pictures indoors under fluorescent light.
Cloudy Use for pictures taken outdoors under overcast skies.
Speedlight White balance adjusted to match light produced byflash.
WHITE BALANCE
SELECT SETOFF
AutoWhite Bal PresetWhite Bal PresetFineFineIncandescentIncandescentFluorescentFluorescentCloudyCloudySpeedSpeed l i ghtght
AutoWhite Bal PresetFineIncandescentFluorescentCloudySpeed l i ght
Select CSM (CSMshooting menu).
1Press MENU button todisplay CSM shootingmenu.
2
WHITE BALANCE
PAGE2 SELECT SET
IMAGE SIZE & QUALITY
OFF SELECT SET
COOLPIX885 (E) 01.10.22 6:02 PM Page 134

137136
Reference—Advanced Photography
Fine-Tuning White BalanceAt settings other than “A” (auto) and (preset), whitebalance can be “fine-tuned” by highlighting the desiredsetting and selecting an adjustment from a sub-menu. Aadjustments can be made in the range of +3 to –3 or, inthe case of (fluorescent), by selecting the type of bulbfrom the following sub-menu:
F L 1
F L 2
F L 3OFF SELECT SET
WHITE BALANCEAutoAutoWhite Bal PresetWhite Bal PresetFineFineIncandescentIncandescentFluorescentCloudyCloudySpeedSpeed l i ghtght
AutoWhite Bal PresetFineIncandescentFluorescentCloudySpeed l i ght
Option Description
FL1 W (default)
FL2 N
FL3 D
Raising white balance gives images a blue, “cold” cast; lowering white balancemakes pictures appear “warmer”—that is, slightly yellow or red. After selecting thedesired adjustment, press > on the Multi selector to put your choice into effect.
— Preset White Balance —Preset white balance is used to adjust white balance whenshooting under mixed lighting or to compensate for lightsources with a strong color cast (for example, to makepictures taken under a lamp with a red shade look asthough they had been taken under white light). When (White Bal Preset) is selected from the white-balancemenu, the camera will zoom in and the menu shown atright will be displayed in the monitor.
Option Description
Cancel Recalls the most recent setting for preset white balance frommemory and sets white balance to this value.
To measure a new value for white balance, place a white object,such as a piece of paper, under the lighting that will be used inthe final picture. Frame this object so that it fills the square in thecenter of the menu shown above. Highlight “Measure” and pressthe Multi selector to the right to measure a new value for presetwhite balance (camera will zoom out and shutter will be released,but no picture will be recorded).
Measure
WHITE BALANCE PRESET
CancelMeasure
OFF SELECT SET
At setting other than AUTO, the current white-balance setting is indicated by an icon in themonitor.
Measuring Light: The Metering MenuThe “metering method” is the method yourcamera uses to measure light when determiningexposure. In CSM shooting mode, “METERING”menu offers a choice of four metering methods:
METERING
OFF SELECT SET
MatrixSpotCenter-WeightedSpot AF Area
Method
qMatrix
eSpot
wCenter-Weighted
rSpot AF Area
How It Works
Exposure calculated bycomparing measurementsfrom 256 areas of framewith library of typicalcompositions, producingbest possible setting forentire frame.
Camera measures light inarea in center of frameoccupying roughly 1/32 oftotal, shown by square incenter of monitor.
Camera measures light inentire frame but assignsweight of 80% to area incenter of frame occupyingroughly 1/4 of total.
Camera measures light incurrent focus area only.
When to Use It
Best choice in mostcircumstances.
Ensures that subject inmetering target will becorrectly exposed even whenbackground very bright or verydark. Can be used incombination with AE hold (p. 148).
Classic meter for portraits;preserves background detailswhile letting lighting conditionsat center of frame determineexposure. Selectedautomatically when digitalzoom (p. 90) is used. Can beused in combination with AEhold (p. 148).
Use to link spot metering tocurrectly selected focus areawhen manual or auto focus-area selection is in effect.Equivalent to “Matrix” whenfocus-area selection (p. 150) isoff; equivalent to “Spot” whenmanual focus (p. 151) is used.
COOLPIX885 (E) 01.10.22 6:02 PM Page 136

139138
Reference—Advanced Photography
The metering method is shown by icons in themonitor.
Auto Exposure holdSpot or center-weighted metering sets exposure for the subject in the center focusarea when the shutter release button is pressed halfway. If your subject is not in thecenter focus area, exposure will be set for an object in the background, with theresult that your main subject may be over- or under-exposed. Using AE hold, youcan meter your main subject and then adjust the composition before taking thepicture.
1 Set metering to e (spot) or w (center-weighted).
2 Position the subject in the center of the frame and press theshutter release button halfway to lock focus (p. 61) and exposure.
3 Keeping the shutter release button held halfway, recompose yourpicture; press the shutter release button the rest of the way downto shoot.
Spot AF Area metering can be used in combination with focus-area selection (p. 150) to measure lighting in one of five focus areas, allowing you to meter anoff-center subject without using auto exposure lock.
Taking Pictures in a Sequence: The Continuous MenuThe “Continuous” menu determines whether thecamera takes one picture each time the shutterrelease button is pressed, or records a continuoussequence of pictures while the shutter releasebutton is held down.
CONTINUOUS
SingleContinuousMulti-shot 16VGA SequenceUltra HS
OFF SELECT SET
Option
Single
Continuous
Multi-shot 16
VGA Sequence
Ultra HS
Description
Camera records one picture each time the shutter releasebutton is pressed all the way down.
Camera records pictures at a rate of about three photosevery two seconds while the shutter release button is heldall the way down. This setting can be used to capturefleeting expressions on a portrait subject, or tophotograph a subject that is moving unpredictably. Notavailable at image quality setting of HI.
Camera takes sixteen consecutive “thumbnail” imagesand combines them into a collage. This option is onlyavailable when image size is set to FULL.
Camera takes series of pictures 640 x 480 pixels in size.Image quality (p. 104) is set to NORMAL, allowingpictures to be taken at approximately two frames persecond while shutter release button is held down.
Camera takes seventy pictures 320 x 240 pixels in size(QVGA) each time shutter release button is pressed.Image quality (p. 104) is set to NORMAL allowing picturesto be taken at approximately thirty frames per second.Each sequence of pictures is saved in separate folderautomatically created by camera. Folder name iscomposed of “N_” followed by three-digit numberassigned in ascending order by camera.
• At settings other than Single, the flash is set to “Off” (P) and will not fire evenwhen lighting is poor (p. 98).
• At settings other than Single, the focus, exposure and white-balance settingsused for the first image apply to all other images in the same series.
• Setting of “Ultra HS” only takes effect when the monitor is on. If the monitor isturned off, the camera will revert to a setting of “Single” until the monitor isturned on.
COOLPIX885 (E) 01.10.22 6:02 PM Page 138
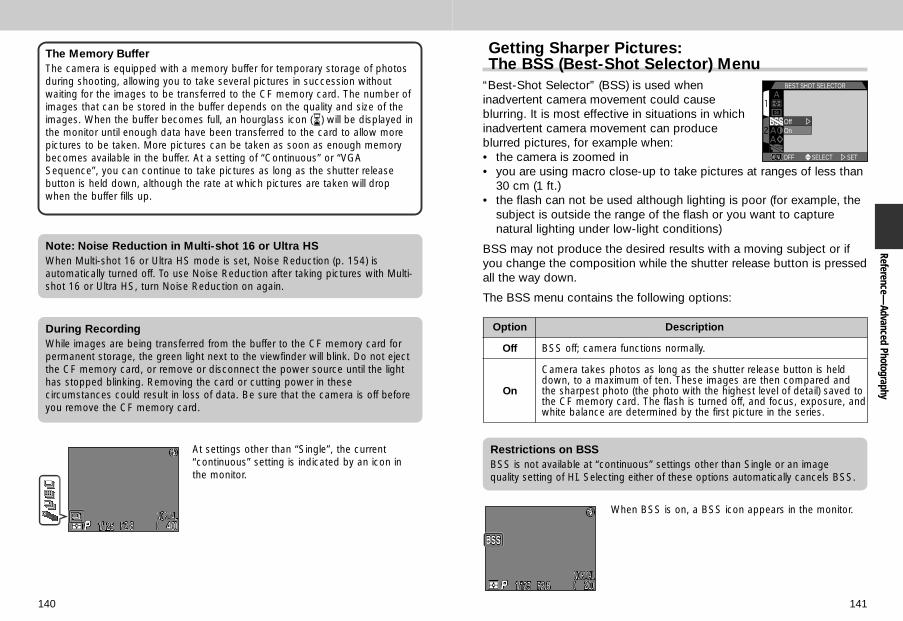
141140
Reference—Advanced Photography
The Memory BufferThe camera is equipped with a memory buffer for temporary storage of photosduring shooting, allowing you to take several pictures in succession withoutwaiting for the images to be transferred to the CF memory card. The number ofimages that can be stored in the buffer depends on the quality and size of theimages. When the buffer becomes full, an hourglass icon (W) will be displayed inthe monitor until enough data have been transferred to the card to allow morepictures to be taken. More pictures can be taken as soon as enough memorybecomes available in the buffer. At a setting of “Continuous” or “VGASequence”, you can continue to take pictures as long as the shutter releasebutton is held down, although the rate at which pictures are taken will dropwhen the buffer fills up.
During RecordingWhile images are being transferred from the buffer to the CF memory card forpermanent storage, the green light next to the viewfinder will blink. Do not ejectthe CF memory card, or remove or disconnect the power source until the lighthas stopped blinking. Removing the card or cutting power in thesecircumstances could result in loss of data. Be sure that the camera is off beforeyou remove the CF memory card.
Note: Noise Reduction in Multi-shot 16 or Ultra HSWhen Multi-shot 16 or Ultra HS mode is set, Noise Reduction (p. 154) isautomatically turned off. To use Noise Reduction after taking pictures with Multi-shot 16 or Ultra HS, turn Noise Reduction on again.
At settings other than “Single”, the current“continuous” setting is indicated by an icon inthe monitor.
Getting Sharper Pictures: The BSS (Best-Shot Selector) Menu
“Best-Shot Selector” (BSS) is used wheninadvertent camera movement could causeblurring. It is most effective in situations in whichinadvertent camera movement can produceblurred pictures, for example when:• the camera is zoomed in• you are using macro close-up to take pictures at ranges of less than
30 cm (1 ft.)• the flash can not be used although lighting is poor (for example, the
subject is outside the range of the flash or you want to capturenatural lighting under low-light conditions)
BSS may not produce the desired results with a moving subject or ifyou change the composition while the shutter release button is pressedall the way down.
The BSS menu contains the following options:
BEST SHOT SELECTOR
OffOn
OFF SELECT SET
Option Description
Off BSS off; camera functions normally.
On
Camera takes photos as long as the shutter release button is helddown, to a maximum of ten. These images are then compared andthe sharpest photo (the photo with the highest level of detail) saved tothe CF memory card. The flash is turned off, and focus, exposure, andwhite balance are determined by the first picture in the series.
Restrictions on BSSBSS is not available at “continuous” settings other than Single or an imagequality setting of HI. Selecting either of these options automatically cancels BSS.
When BSS is on, a BSS icon appears in the monitor.
COOLPIX885 (E) 01.10.22 6:02 PM Page 140

143142
Reference—Advanced Photography
Contrast, Brightness and Image Type: The Image Adjustment Menu
When you take a picture, the cameraautomatically performs image compensation foroptimal brightness and contrast before recordingthe picture to the CF memory card. The image-adjustment sub-menu gives you control over thisimage compensation operation, allowing you tocontrol not only brightness and contrast, but also to producemonochrome images. The following options are available:
IMAGE ADJUSTMENTAutoNormalMore ContrastLess ContrastLighten ImageDarken ImageBlack&Whine
OFF SELECT SET
Option
Auto
Normal
More Contrast
Less Contrast
Lighten Image
Darken Image
Black & White
Description
Camera adjusts brightness and contrast for optimalresults; adjustment performed differs from image to image(this setting is automatically selected in AUTO mode).
Camera performs same standard brightness and contrastadjustment on all images (default setting). This setting isrecommended for images that will later be retouched on acomputer.
Image processed to increase difference between light anddark areas.
Image processed to reduce difference between light anddark areas.
Increase brightness of mid-tones in image, withoutaffecting detail in highlights or shadows. This setting canbe used on images that will be output on computermonitor or printer if device tends to produce images thatare too dark.
Decreases brightness of mid-tones in image, withoutaffecting detail in highlights or shadows. This setting canbe used on images that will be output on computermonitor or printer if device tends to produce images thatare too bright.
Image converted to black and white. Black-and-whiteimages require same amount of memory as color images,but show higher level of detail. When this option is ineffect, view through lens shown in monitor is in black andwhite. White-balance settings (p. 135) and digital zoom (p. 90) cannot be used while this option is in effect.
An image-adjustment icon appears in the monitorat settings other than “Normal” and “Auto”.
• Only one image adjustment setting can be used at a time. Selecting a newimage-adjustment option cancels the previous setting.
• The effects of adjustments to brightness and contrast are not visible in themonitor.
COOLPIX885 (E) 01.10.22 6:02 PM Page 142
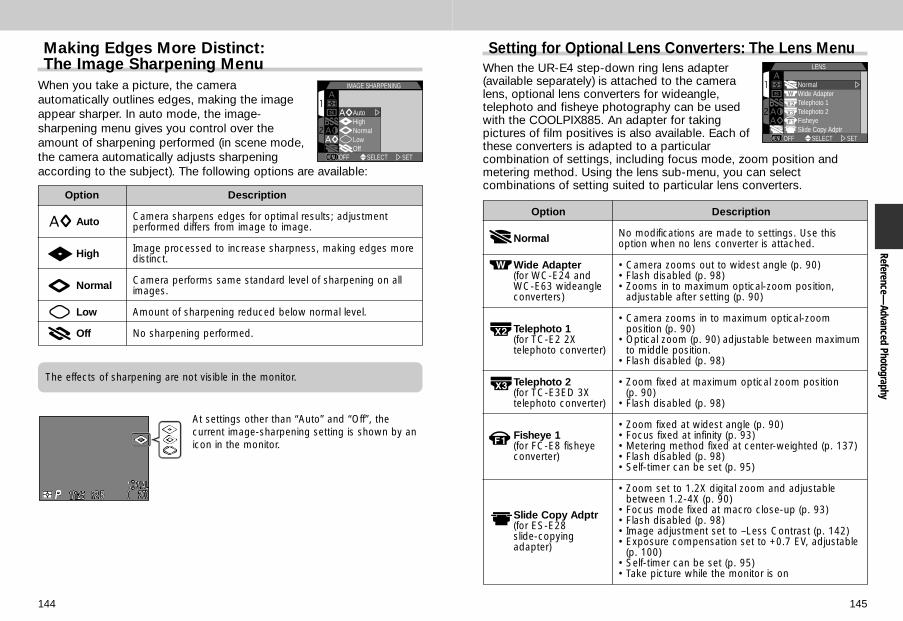
145144
Reference—Advanced Photography
Making Edges More Distinct: The Image Sharpening Menu
When you take a picture, the cameraautomatically outlines edges, making the imageappear sharper. In auto mode, the image-sharpening menu gives you control over theamount of sharpening performed (in scene mode,the camera automatically adjusts sharpeningaccording to the subject). The following options are available:
Option Description
Auto Camera sharpens edges for optimal results; adjustmentperformed differs from image to image.
High Image processed to increase sharpness, making edges moredistinct.
Normal Camera performs same standard level of sharpening on allimages.
Low Amount of sharpening reduced below normal level.
Off No sharpening performed.
At settings other than “Auto” and “Off”, thecurrent image-sharpening setting is shown by anicon in the monitor.
The effects of sharpening are not visible in the monitor.
Setting for Optional Lens Converters: The Lens MenuWhen the UR-E4 step-down ring lens adapter(available separately) is attached to the cameralens, optional lens converters for wideangle,telephoto and fisheye photography can be usedwith the COOLPIX885. An adapter for takingpictures of film positives is also available. Each ofthese converters is adapted to a particularcombination of settings, including focus mode, zoom position andmetering method. Using the lens sub-menu, you can selectcombinations of setting suited to particular lens converters.
Option
Normal
Wide Adapter (for WC-E24 and WC-E63 wideangle converters)
Telephoto 1 (for TC-E2 2X telephoto converter)
Telephoto 2 (for TC-E3ED 3X telephoto converter)
Fisheye 1(for FC-E8 fisheye converter)
Slide Copy Adptr (for ES-E28 slide-copying adapter)
Description
No modifications are made to settings. Use thisoption when no lens converter is attached.
• Camera zooms out to widest angle (p. 90)• Flash disabled (p. 98)• Zooms in to maximum optical-zoom position,
adjustable after setting (p. 90)
• Camera zooms in to maximum optical-zoomposition (p. 90)
• Optical zoom (p. 90) adjustable between maximumto middle position.
• Flash disabled (p. 98)
• Zoom fixed at maximum optical zoom position (p. 90)
• Flash disabled (p. 98)
• Zoom fixed at widest angle (p. 90)• Focus fixed at infinity (p. 93)• Metering method fixed at center-weighted (p. 137)• Flash disabled (p. 98)• Self-timer can be set (p. 95)
• Zoom set to 1.2X digital zoom and adjustablebetween 1.2-4X (p. 90)
• Focus mode fixed at macro close-up (p. 93)• Flash disabled (p. 98)• Image adjustment set to –Less Contrast (p. 142)• Exposure compensation set to +0.7 EV, adjustable
(p. 100)• Self-timer can be set (p. 95)• Take picture while the monitor is on
IMAGE SHARPENING
AutoHighNormalLowOff
OFF SELECT SET
NormalWide AdapterTelephoto 1Telephoto 2FisheyeSlide Copy Adptr
LENS
OFF SELECT SET
COOLPIX885 (E) 01.10.22 6:02 PM Page 144
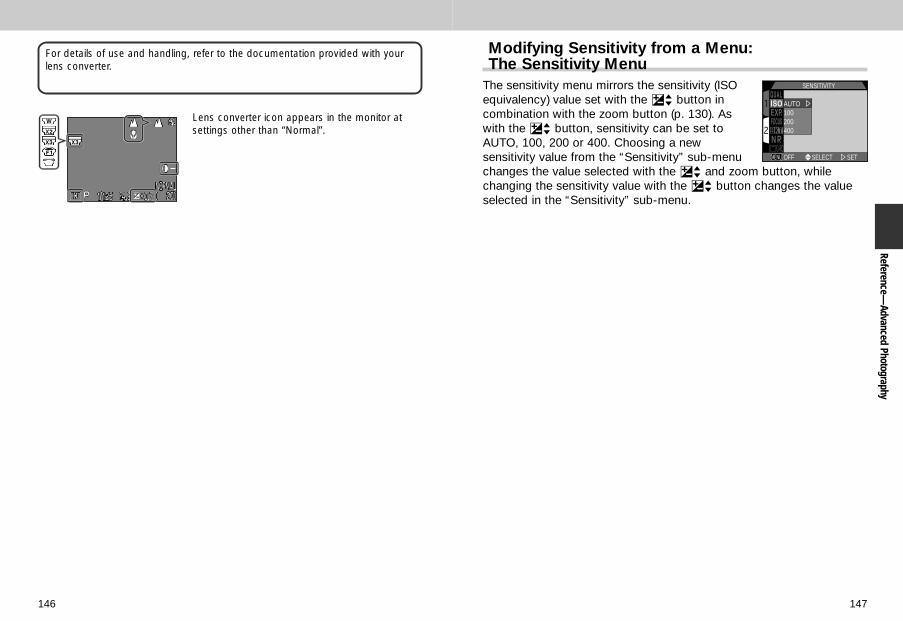
147146
For details of use and handling, refer to the documentation provided with yourlens converter.
Lens converter icon appears in the monitor atsettings other than “Normal”.
Reference—Advanced Photography
Modifying Sensitivity from a Menu: The Sensitivity Menu
The sensitivity menu mirrors the sensitivity (ISOequivalency) value set with the 1 button incombination with the zoom button (p. 130). Aswith the 1 button, sensitivity can be set toAUTO, 100, 200 or 400. Choosing a newsensitivity value from the “Sensitivity” sub-menuchanges the value selected with the 1 and zoom button, whilechanging the sensitivity value with the 1 button changes the valueselected in the “Sensitivity” sub-menu.
SENSITIVITY
AUTO100200400
OFF SELECT SET
COOLPIX885 (E) 01.10.22 6:02 PM Page 146

149148
Reference—Advanced Photography
Exposure OptionsThe exposure options sub-menu provides controlover exposure.
— Exposure Mode —When the mode dial is set to CSM, you can choose theexposure mode, either “P” or “M”, from the “ExposureMode” sub-menu. For more information on M mode, see“Adjusting Exposure Manually: Manual Exposure Mode” (p. 127).
— Taking Multiple Pictures with the Same Exposure: AE Lock —When taking a series of pictures that you will later join intoa single image (for example, when taking shots that willlater be joined to form a panorama or 360° virtual-realityimage), you will need to use the same exposure, sensitivity,and white-balance settings for each of the images in theseries. This is possible using the AE-lock menu.
Option Description
Off Restores normal exposure, sensitivity and white balance.
On
First picture taken after “On” is selected sets exposure for allsubsequent pictures. If white balance is set to “A” (auto), whitebalance for first picture applies to all other pictures in series. While AElock is in effect, flash will be set to “Off” (P).
ResetClears existing exposure, sensitivity and white balance settings. Firstpicture taken after this option is selected sets exposure, sensitivity andauto white balance for all subsequent pictures.
While AE lock is in effect, “AE-L” (AE Lock) and “WB-L” (White-Balance Lock)icons appear in the monitor. If “Reset” is chosen or white balance, focus mode,shutter speed or aperture adjusted, these icons will turn yellow to indicated thatexposure will be reset with the next shot.
— Modifying Exposure Compensation from a Menu: Exp. +/– —The “Exp. +/–” item in the EXPOSURE OPTIONS menumirrors the exposure compensation value set with the 1button and Multi selector (p. 100). As with the 1 button,exposure compensation can be set to values between+2.0 EV and –2.0 EV in increments of 1/3 EV. Choosing anew exposure compensation value from the “Exp. +/–”sub-menu changes the value selected with the 1button, while changing exposure compensation with the 1 button changes thevalue selected in the “Exp. +/–” sub-menu.
SELECT SET
EXP. +/–
Exposure ModeAE LockEXP. +/–
+0.3
0
–0.3OFF
EXPOSURE OPTIONS
Exposure ModeAE LockEXP. +/–
OFF SELECT SET
PM
SELECT SET
EXPOSURE MODE
Exposure ModeAE LockEXP. +/–
OFF
OffOnReset
SELECT SET
AE LOCK
Exposure ModeAE LockEXP. +/–
OFF
COOLPIX885 (E) 01.10.22 6:02 PM Page 148

151150
Reference—Advanced Photography
Focus OptionsThe focus options sub-menu provides controlover focus settings.
— Focus-Area Selection: AF Area Mode —This setting determines how the camera will choose thefocus area in CSM mode. The following options take effectwhile the monitor is on (when the monitor is off or digitalzoom is activated, AF Area Mode is automatically set toOff):
FOCUS OPTIONS
AF Area ModeAuto-Focus ModeFocus ConfirmationDistance UnitsOFF SELECT SET
SELECT SET
AF AREA MODE
AF Area ModeAuto-Focus ModeFocus ConfirmationDistance UnitsOFF
AutoManualOff
Option Description
Auto
Camera automatically selects focus area containing subject closest tocamera. Active focus area displayed in red when shutter release buttonpressed halfway. This setting is useful when you have little time tocompose pictures.
Manual User selects focus area manually (p. 101). This option can be used inplace of focus lock when subject is not at center of final composition.
OffCenter focus area is used. No focus areas appear in monitor. Thisoption can be used in combination with focus lock to focus on off-center subject (p. 61).
— Auto-Focus Mode —In CSM mode, you can choose the autofocus mode usedwhen the monitor is on (when the monitor is off, singleautofocus is used, regardless of the setting in theautofocus mode sub-menu). See “Beyond Point andShoot: Focusing Near and Far” for more information onautofocus (p. 92).
SELECT SET
AUTO-FOCUS MODE
AF Area ModeAuto-Focus ModeFocus ConfirmationDistance UnitsOFF
Continuous AFSingle AF
Option Description
Continuous AFCamera adjusts focus continuously; focus is locked whenshutter release button is pressed halfway and remains locked aslong as it is held in this position (p. 61).
Single AFCamera focuses when shutter release button is pressedhalfway; focus is locked as long as shutter release button is heldin this position. Choose this option to save battery power.
— Focus Confirmation —Use focus confirmation when you want to know exactlywhat areas of the frame will be in focus before you takethe final picture. Focus confirmation affects only the viewthrough the lens shown in the monitor; no indicators offocus appear in the final picture.
SELECT SET
FOCUS CONFIRMATION
AF Area ModeAuto-Focus ModeFocus ConfirmationDistance UnitsOFF
MFOnOff
— Distance Units —In this sub-menu, you can choose the units used whendisplaying manual focus distance (p.132). The optionsavailable are meters (m) or feet (ft).
SELECT SET
DISTANCE UNITS
AF Area ModeAuto-Focus ModeFocus ConfirmationDistance UnitsOFF
mft
Option Description
MF Objects that are in focus will be sharply outlined in monitor when (Manual Focus) manual focus is used (p. 132).
On Objects that are in focus will be sharply outlined in monitor in allfocus modes.
Off No indication of focus is given.
COOLPIX885 (E) 01.10.22 6:02 PM Page 150
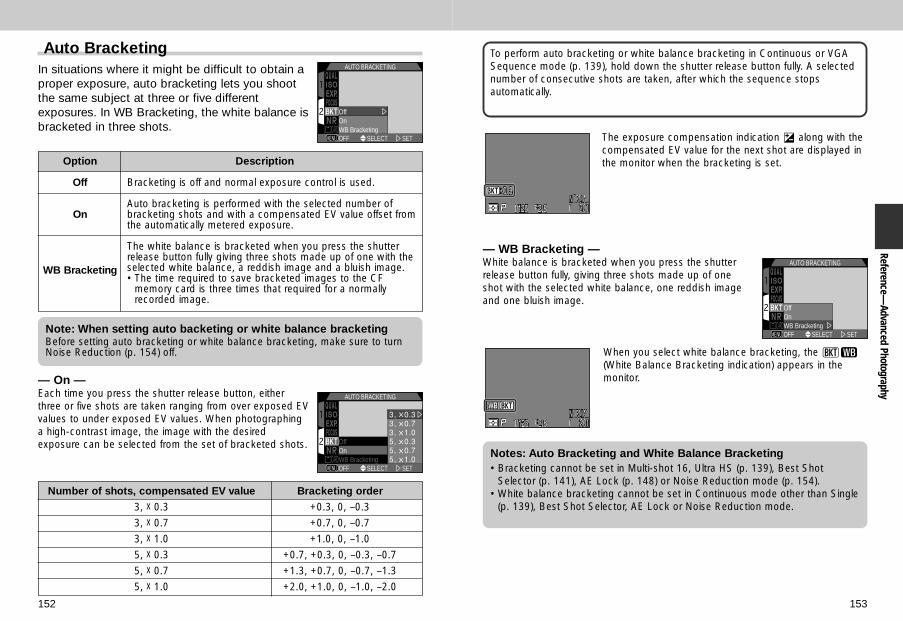
153152
Reference—Advanced Photography
Auto BracketingIn situations where it might be difficult to obtain aproper exposure, auto bracketing lets you shootthe same subject at three or five differentexposures. In WB Bracketing, the white balance isbracketed in three shots.
SELECT SET
AUTO BRACKETING
OffOnWB BracketingOFF
Option Description
Off Bracketing is off and normal exposure control is used.
OnAuto bracketing is performed with the selected number ofbracketing shots and with a compensated EV value offset fromthe automatically metered exposure.
WB Bracketing
The white balance is bracketed when you press the shutterrelease button fully giving three shots made up of one with theselected white balance, a reddish image and a bluish image.• The time required to save bracketed images to the CF
memory card is three times that required for a normallyrecorded image.
— On —Each time you press the shutter release button, eitherthree or five shots are taken ranging from over exposed EVvalues to under exposed EV values. When photographinga high-contrast image, the image with the desiredexposure can be selected from the set of bracketed shots.
Number of shots, compensated EV value Bracketing order
3, X 0.3 +0.3, 0, –0.3
3, X 0.7 +0.7, 0, –0.7
3, X 1.0 +1.0, 0, –1.0
5, X 0.3 +0.7, +0.3, 0, –0.3, –0.7
5, X 0.7 +1.3, +0.7, 0, –0.7, –1.3
5, X 1.0 +2.0, +1.0, 0, –1.0, –2.0
To perform auto bracketing or white balance bracketing in Continuous or VGASequence mode (p. 139), hold down the shutter release button fully. A selectednumber of consecutive shots are taken, after which the sequence stopsautomatically.
Notes: Auto Bracketing and White Balance Bracketing• Bracketing cannot be set in Multi-shot 16, Ultra HS (p. 139), Best Shot
Selector (p. 141), AE Lock (p. 148) or Noise Reduction mode (p. 154).• White balance bracketing cannot be set in Continuous mode other than Single
(p. 139), Best Shot Selector, AE Lock or Noise Reduction mode.
Note: When setting auto backeting or white balance bracketingBefore setting auto bracketing or white balance bracketing, make sure to turnNoise Reduction (p. 154) off.
The exposure compensation indication ! along with thecompensated EV value for the next shot are displayed inthe monitor when the bracketing is set.
SELECT SET
AUTO BRACKETING
OffOnWB BracketingOFF
— WB Bracketing —White balance is bracketed when you press the shutterrelease button fully, giving three shots made up of oneshot with the selected white balance, one reddish imageand one bluish image.
SELECT SET
AUTO BRACKETING
OffOnWB BracketingOFF
When you select white balance bracketing, the bn(White Balance Bracketing indication) appears in themonitor.
COOLPIX885 (E) 01.10.22 6:02 PM Page 152

155154
Reference—Playing Im
ages Back
Noise ReductionWhen the camera is set for long time exposures,noise in the form randomly spaced bright-coloredpixels will appear. The longer the exposure, themore this effect is apparent. The noise reductionsetting can be used to minimize this effect.
SELECT SET
NOISE REDUCTION
OnOffOFF
Option Description
On The effect of noise on the recorded image is minimized.
Off Noise reduction is canceled and normal exposure control is used.
Note: Time taken to save an image to the CF memory cardWhen the noise reduction function is on, the time taken to save a picture to theCF memory card is approximately doubled.
This section details the operations that can be performed when themode dial is set to p. It is divided into the following three sub-sections shown:
Basic Playback ............................................................... pp. 156-162This section covers operations that can be performed using the Multiselector and the buttons on the back of the camera, including:• playback of pictures stored on the CF memory card, whether singly
or in “contact sheets” of nine or four thumbnail images• movie playback• deleting individual pictures• zooming in on images for enlarged views that show fine details• marking individual images for transfer to a computer• playback of Small Pictures
The Playback Menu........................................................ pp. 163-175Read this section for a description of the operations that can beperformed in the playback menu:• deleting multiple pictures• selecting a folder for playback• “slide shows,” or automatic sequential playback of the pictures
stored on the CF memory card• protecting pictures from being deleted• hiding images• creating electronic “print orders” in Digital Print Order Format
(DPOF)• marking all pictures for transfer to a computer• selecting the Small Picture size
Television Playback ...........................................................p. 176-177Learn how to connect your camera to a video device for playback ona television set.
Playing Images BackPlayback Mode
At default setting, the noise reduction is automatically set when:• the shutter speed is slower than 1/4 sec. in scene mode• the shutter speed is slower than 1 sec. in CSM shooting mode• the shutter speed is slower than 1 sec. in the long time exposure
Note: Multi-shot 16 and Ultra HS modeWhen Multi-shot 16 or Ultra HS mode is set (p. 139), Noise Reduction isautomatically turned off.
COOLPIX885 (E) 01.10.22 6:02 PM Page 154

To Press
Delete current picture 5
View multiple 7images (p. 162) (3)
Zoom in on current Tpicture (p. 161) (T )
Display playback menu (p. 163) MENU
View picture 6information (p.158) (2)
157156
When the mode dial is turned to p, the camera enters playbackmode with the most recent picture displayed in the monitor. Thissection covers the operations that can be performed in playback modeusing the Multi selector and buttons on the back of the camera.
Single-Image PlaybackIn single-image playback, you can perform the following operations:
To Press
View other pictures
Hide picture information/turn
monitor off (p. 158)
Create a Small Picture (p. 77)
Play movie (p, 160) QUICK p
Select current picture for transfer TRANSFER
to computer
Description
Press < to view images recorded before thecurrent picture or small picture, and > forimages recorded after or small picture. Holdit down to scroll rapidly to desired picture.
Press ≤ to hide picture information. Pressagain to turn off the monitor display. Pressyet again to display picture information.
Press ≥ to create Small Pictures fordistribution by e-mail and the Web.
If the current image is marked with a micon to show that it is a movie, pressing theQUICK p button starts movie playback.Press again to pause playback.
Images marked for transfer to a computerare indicated by a D icon. To select thecurrent image for transfer, press theTRANSFER button. If the current image isalready selected for transfer, pressing theTRANSFER will deselect it.
Description
A confirmation dialog will be displayed. Press≤/≥ on the Multi selector to highlight theoption and > to select.• Select "Yes" to delete photo• Select "No" to keep photo without deleting
Press the 7 button to display a set of up tonine thumbnail images.
Press the T button to magnify center ofpicture to fill monitor (note that zoom cannotbe used with movies). While photo iszoomed in, use the Multi selector to viewother parts of the image. To cancel zoom,press W button.
Press the MENU button to display or hidethe playback menu.
Press the 6 button to display pictureinformation.
Playback TipsIn single-image playback, pictures are displayed briefly at low resolution whilebeing read from the CF memory card. This makes it possible to scroll rapidlythrough the pictures in memory without waiting for each image to be displayedat full resolution.To scroll quickly to a particular frame number without viewing the interveningpictures, press and hold </> on the Multi selector. The picture displayed willnot change, but the frame number displayed at the bottom right corner of themonitor will increase or decrease rapidly. Release the Multi selector when thedesired frame number is reached.The first and last pictures in memory are linked. Pressing < on the Multiselector when the first picture in memory is displayed will take you to the lastpicture. Pressing > on the Multi selector when the last picture is displayedtakes you to the first picture.
Reference—Playing Im
ages BackBasic Playback
COOLPIX885 (E) 01.10.22 6:02 PM Page 156

159158
Monitor showsplayback image
and pictureinformation
Monitor showsplayback image
only
Monitor off
Viewing Photo InformationPhoto information superimposed on pictures displayed in single-imageplayback. There is a total of five pages of information for each photo.Press the 6 (2) button to cycle through picture information asfollows:Page 1 —> Page 2 —> Page 3 —> Page 4 —> Page 5 —> Page 1.
1 Date of recording2 Time of recording3 Image size4 Image quality5 Folder6 File number and type7 Transfer icon8 Print-order icon9 Protect icon10 Frame number/total
number of frames visiblein current folder
Page 1
• Camera type• Firmware version• Metering method• Exposure mode• Shutter speed• Aperture• Exposure compensation• Focal length• Focus mode or manual
focus distance
Page 2
• Flash status• Image adjustment• Sensitivity (ISO
equivalent)• White balance• Sharpening• Digital zoom• Lens-converter status• File size (kilobytes)
Page 312
34
56
7
98
10
1 Thumbnail preview (flashing bordermarks image highlights, or brightestareas of image)
2 Histogram (shows distribution of tonesin image: horizontal axis gives pixelbrightness, with dark tones to left andbright tones to right, while vertical axisshows number of pixels of eachbrightness in image)
3 File number and type4 Metering method5 Shutter speed6 Aperture7 Exposure compensation8 Sensitivity (ISO equivalent)
Page 4 (histogram)
1 File number and type2 Focal length3 Shutter speed4 Aperture5 Focus mode or manual
focus distance6 Noise reduction7 Focus confirmation
(portions of image infocus sharply outlined;active focus area shownin red)
Page 5 (focus confirmation)
1
2
3
45
76
7
8
123456
Reference—Playing Im
ages Back
Hide Picture Information and Turning Monitor Off
COOLPIX885 (E) 01.10.22 6:02 PM Page 158
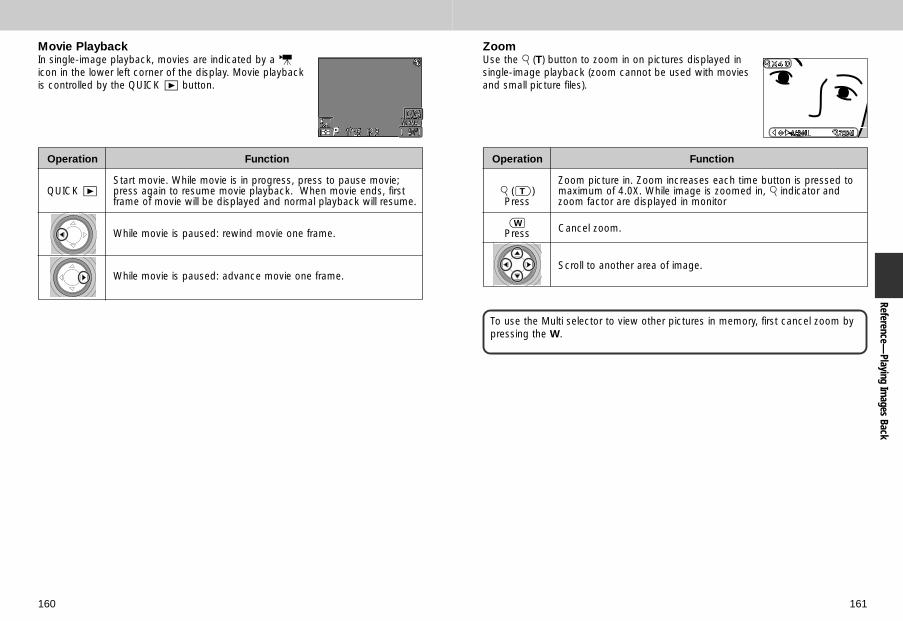
161160
Movie PlaybackIn single-image playback, movies are indicated by a micon in the lower left corner of the display. Movie playbackis controlled by the QUICK p button.
Operation
QUICK p
Function
Start movie. While movie is in progress, press to pause movie;press again to resume movie playback. When movie ends, firstframe of movie will be displayed and normal playback will resume.
While movie is paused: rewind movie one frame.
While movie is paused: advance movie one frame.
ZoomUse the T (T) button to zoom in on pictures displayed insingle-image playback (zoom cannot be used with moviesand small picture files).
Operation
T (t)Press
yPress
Function
Zoom picture in. Zoom increases each time button is pressed tomaximum of 4.0X. While image is zoomed in, T indicator andzoom factor are displayed in monitor
Cancel zoom.
Scroll to another area of image.
To use the Multi selector to view other pictures in memory, first cancel zoom bypressing the W.
Reference—Playing Im
ages Back
COOLPIX885 (E) 01.10.22 6:02 PM Page 160

163162
Viewing Multiple Images: Thumbnail PlaybackPressing the 7 button in single-image playback displaysa menu of nine thumbnail images, where you can selectpictures or movies for viewing, delete images, and markimages for transfer to a computer.
To Press
Highlight images
View highlighted image at a larger 7
size
Delete highlighted picture 5
Select highlighted photo for transfer TRANSFER
to computer
Description
Press ≤/≥/</> on the Multi selector tohighlight a thumbnail.
Press the 7 button once to view a menu offour thumbnail images. Press again to viewhighlighted thumbnail full screen.Small pictures are displayed with a greyframe.
A confirmation dialog will be displayed. Press≤/≥ on Multi selector to highlight option,press > to select.• Select “Yes” to delete picture• Select “No” to return to thumbnail playback
screen without deleting the picture
Images marked for transfer to a computerare shown by a D icon. To select thecurrent image for transfer, press theTRANSFER button. If the current image isalready selected for transfer, pressing theTRANSFER button will remove transfermarking.
The playback menu contains options for deleting images and print-orders, for protecting images from deletion, and for playing imagesback one after the other in automatic “slide shows.” You can alsocreate a digital “print order” for printing photographs on any devicecompatible with the Digital Print Order Format (DPOF), and select allimages on the CF memory card for transfer to a computer.
To view the playback menu:
Playback menu 1
Playback menu 2
1Press MENU button todisplay playback menu
Select p
2
Delete P. 164
Folders P. 167
Slide Show P. 168
Protect P. 170
Hide Image P. 171
Print Set P. 172
Transfer P. 174
640 Small Picture P. 175
30S Auto Off P. 115
PLAY BACK MENUDeleteFoldersSlide ShowProtectHide ImagePrint Set
PAGE2 SELECT SET
PLAY BACK MENU
TransferSmall Pic.Auto Off
6 4 030S
OFF SELECT SET
See p. 30 for more information on using camera menus.
Reference—Playing Im
ages BackThe Playback Menu
COOLPIX885 (E) 01.10.22 6:02 PM Page 162
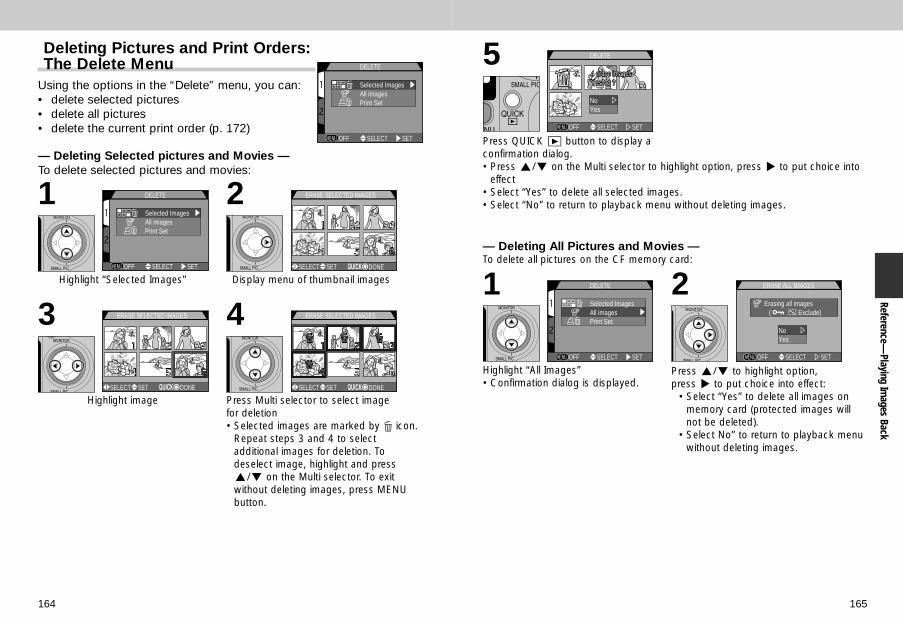
165164
Deleting Pictures and Print Orders: The Delete Menu
Using the options in the “Delete” menu, you can:• delete selected pictures• delete all pictures• delete the current print order (p. 172)
OFF
DELETE
Selected ImagesAll imagesPrint Set
SELECT SET
— Deleting Selected pictures and Movies —To delete selected pictures and movies:
OFF
DELETE
Selected ImagesAll imagesPrint Set
SELECT SET
Highlight “Selected Images”
1 ERASE SELECTED IMAGES
SELECT SET DONE
Display menu of thumbnail images
2
ERASE SELECTED IMAGES
SELECT SET DONE
Highlight image
3 ERASE SELECTED IMAGES
SELECT SET DONE
Press Multi selector to select imagefor deletion• Selected images are marked by 5 icon.
Repeat steps 3 and 4 to selectadditional images for deletion. Todeselect image, highlight and press≤/≥ on the Multi selector. To exitwithout deleting images, press MENUbutton.
4
DELETE
NoYes
OFF SELECT SET
4 erase images4 erase imagesYes/No ?Yes/No ?4 erase imagesYes/No ?
Press QUICK p button to display aconfirmation dialog.• Press ≤/≥ on the Multi selector to highlight option, press > to put choice into
effect• Select “Yes” to delete all selected images.• Select “No” to return to playback menu without deleting images.
5
— Deleting All Pictures and Movies —To delete all pictures on the CF memory card:
OFF
DELETE
Selected ImagesAll imagesPrint Set
SELECT SET
Highlight “All Images”• Confirmation dialog is displayed.
1
OFF
ERASE ALL IMAGES
NoYes
SELECT SET
Erasing all images ( Exclude)
Press ≤/≥ to highlight option,press > to put choice into effect:
• Select “Yes” to delete all images onmemory card (protected images willnot be deleted).
• Select No” to return to playback menuwithout deleting images.
2
Reference—Playing Im
ages Back
COOLPIX885 (E) 01.10.22 6:02 PM Page 164

167166
OFF
DELETE
Selected ImagesAll imagesPrint Set
SELECT SET
Highlight “Print Set”
1DONE
Press >
2— Deleting the Current Print Order —To delete print-order set in “Print Set” menu in the playback menu:
Marking Movie Files for TransferPlease note that the transfer icon will be removed from movie files marked fortransfer when the Print Set is deleted by selecting Print Set from the Deleteoption within the playback menu. Transfer settings for movie files must then bereset.
Before Deleting Pictures Once deleted, pictures can not be recovered. Be sure that any pictures youwould like to keep have been transferred to your computer.
Protected and Hide Images• Images marked with a F icon are protected and can not be selected for
deletion.• Pictures hidden with the “Hide Image” option are not displayed in the
thumbnail menu and cannot be deleted.
Reference—Playing Im
ages Back
Selecting a Folder for Playback: The Folders Menu
The “Folders” item in the playback menu can beused to select images in all folders for playback orimages in a selected folder.
1 Highlight desired folder
• To view images in all folders, select “All Folders”.
OFF
FOLDERS
Options
All FoldersN I K O NT O K Y OO S A K A
SELECT SET
OFF
FOLDERS
Options
All FoldersN I K O NT O K Y OO S A K A
SELECT SET
2 Press >
• The most recent picture in the selected folder is displayed.
Each series of seventy pictures taken at a setting of “Ultra HS” is stored in aseparate folder with a name consisting of “N_” followed by a three-digit numberassigned by the camera. To view pictures taken at this setting, select theappropriate folder from the “Folders” menu.
See p. 109 for more information on “Folder Options”.
COOLPIX885 (E) 01.10.22 6:03 PM Page 166
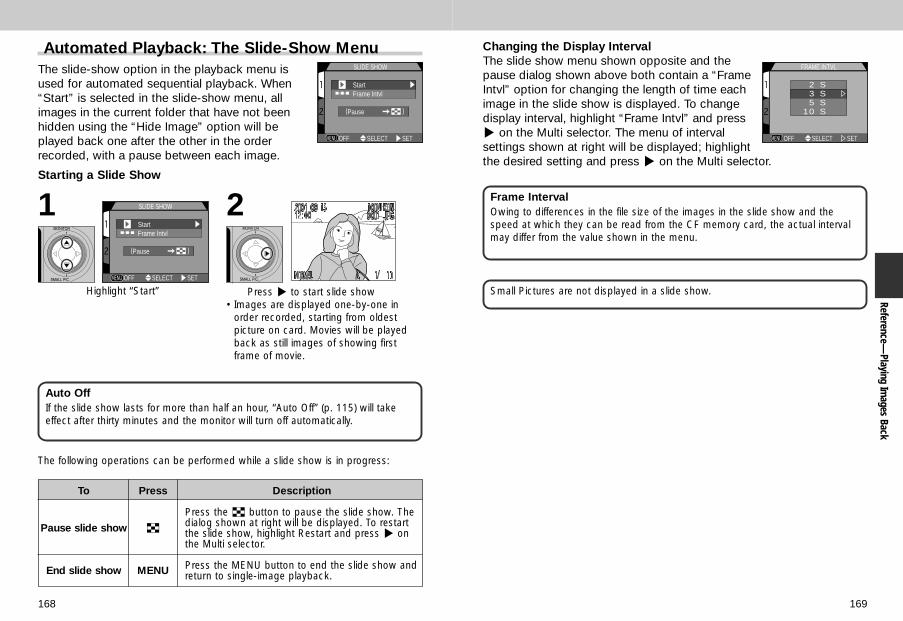
169168
Reference—Playing Im
ages Back
Automated Playback: The Slide-Show MenuThe slide-show option in the playback menu isused for automated sequential playback. When“Start” is selected in the slide-show menu, allimages in the current folder that have not beenhidden using the “Hide Image” option will beplayed back one after the other in the orderrecorded, with a pause between each image.
Starting a Slide Show
OFF
SLIDE SHOW
(Pause )
StartFrame Intvl
SELECT SET
Auto OffIf the slide show lasts for more than half an hour, “Auto Off” (p. 115) will takeeffect after thirty minutes and the monitor will turn off automatically.
Frame IntervalOwing to differences in the file size of the images in the slide show and thespeed at which they can be read from the CF memory card, the actual intervalmay differ from the value shown in the menu.
OFF
SLIDE SHOW
(Pause )
StartFrame Intvl
SELECT SET
Highlight “Start”
1
Press > to start slide show• Images are displayed one-by-one in
order recorded, starting from oldestpicture on card. Movies will be playedback as still images of showing firstframe of movie.
2
The following operations can be performed while a slide show is in progress:
To Press
Pause slide show 7
End slide show MENU
Description
Press the 7 button to pause the slide show. Thedialog shown at right will be displayed. To restartthe slide show, highlight Restart and press > onthe Multi selector.
Press the MENU button to end the slide show andreturn to single-image playback.
Changing the Display IntervalThe slide show menu shown opposite and thepause dialog shown above both contain a “FrameIntvl” option for changing the length of time eachimage in the slide show is displayed. To changedisplay interval, highlight “Frame Intvl” and press> on the Multi selector. The menu of intervalsettings shown at right will be displayed; highlightthe desired setting and press > on the Multi selector.
Small Pictures are not displayed in a slide show.
OFF SELECT SET
FRAME INTVL
2 S3 S5 S
10 S
COOLPIX885 (E) 01.10.22 6:03 PM Page 168

171170
Reference—Playing Im
ages Back
Safeguarding Valuable Images: The Protect MenuSelecting “Protect” from the playback menudisplays the menu shown at right, where you canselect images to protect from accidental deletion.Protected files can not be deleted in review,single-image playback, or from the delete sub-menu. Note, however, that protected images willbe deleted when a CF memory card is formatted.
1 Highlight image
2 Press ≤/≥ to select image
• Selected images are marked by F icon. Repeat steps 1 and 2 to selectadditional images. To deselect image, highlight and press ≤/≥ on the Multiselector.
3 Press QUICK p button to complete operation
• To exit “Protect” menu without changing protected status of images, pressMENU button.
PROTECT
DONESELECT SET
PROTECT
DONESELECT SET
PROTECT
DONESELECT SET
DONE
Hiding Images During Playback: The Hide Image MenuWhen creating a slide show or showing picturesto an audience, you may want to use the “HideImage” option to hide some of the pictures in thecurrent folder. Hidden images are only visible inthe “Hide Image” menu. They cannot be deletedin single-image playback or from the “Delete”sub-menu.
1 Press </> to highlight desired thumbnail
2 Press ≤/≥ to select image to be hidden
• Selected images are marked by H icon. Repeat steps 1 and 2 to selectmore images.
• To deselect, highlight and press ≤/≥ on the Multi selector.
3 Press QUICK p button to complete operation
• To exit “Hide Image” menu without changing protected status of images,press MENU button.
DONESELECT SET
HIDE IMAGE
HIDE IMAGE
DONESELECT SET
HIDE IMAGE
DONESELECT SET
DONE
COOLPIX885 (E) 01.10.22 6:03 PM Page 170
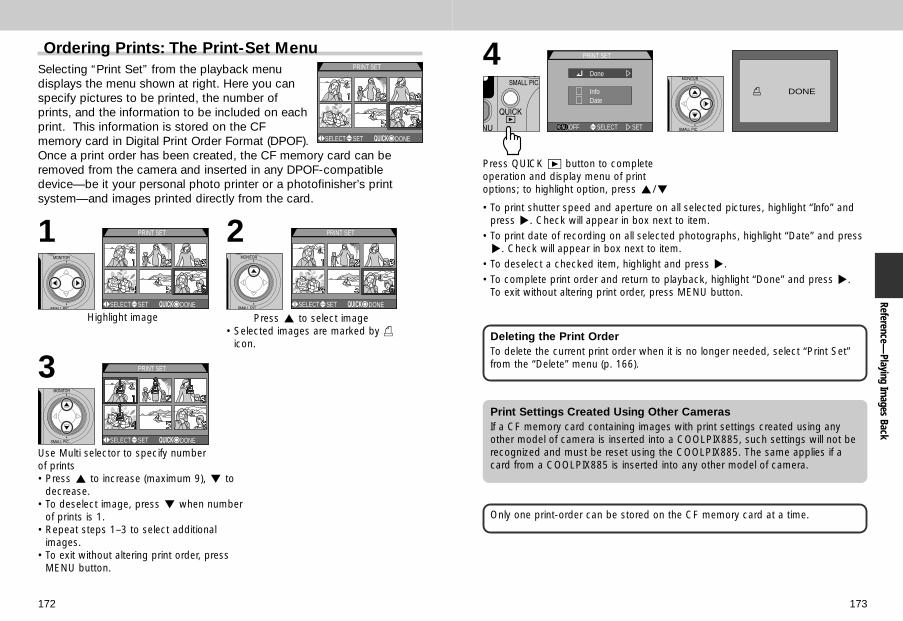
173172
Reference—Playing Im
ages Back
Ordering Prints: The Print-Set MenuSelecting “Print Set” from the playback menudisplays the menu shown at right. Here you canspecify pictures to be printed, the number ofprints, and the information to be included on eachprint. This information is stored on the CFmemory card in Digital Print Order Format (DPOF).Once a print order has been created, the CF memory card can beremoved from the camera and inserted in any DPOF-compatibledevice—be it your personal photo printer or a photofinisher’s printsystem—and images printed directly from the card.
PRINT SET
SELECT SET DONE
Highlight image
1 PRINT SET
SELECT SET DONE
PRINT SET
SELECT SET DONE
Press ≤ to select image• Selected images are marked by G
icon.
2
PRINT SET
SELECT SET DONE
Use Multi selector to specify numberof prints• Press ≤ to increase (maximum 9), ≥ to
decrease.• To deselect image, press ≥ when number
of prints is 1.• Repeat steps 1–3 to select additional
images.• To exit without altering print order, press
MENU button.
3
OFF
PRINT SET
InfoDate
Done
SELECT SET
DONE
Press QUICK p button to completeoperation and display menu of printoptions; to highlight option, press ≤/≥
• To print shutter speed and aperture on all selected pictures, highlight “Info” andpress >. Check will appear in box next to item.
• To print date of recording on all selected photographs, highlight “Date” and press>. Check will appear in box next to item.
• To deselect a checked item, highlight and press >.• To complete print order and return to playback, highlight “Done” and press >.
To exit without altering print order, press MENU button.
4
Deleting the Print OrderTo delete the current print order when it is no longer needed, select “Print Set”from the “Delete” menu (p. 166).
Print Settings Created Using Other CamerasIf a CF memory card containing images with print settings created using anyother model of camera is inserted into a COOLPIX885, such settings will not berecognized and must be reset using the COOLPIX885. The same applies if acard from a COOLPIX885 is inserted into any other model of camera.
Only one print-order can be stored on the CF memory card at a time.
COOLPIX885 (E) 01.10.22 6:03 PM Page 172

175174
Reference—Playing Im
ages Back
Marking All Images for Transfer: The Transfer MenuSelecting “Transfer” from the playback menudisplays the menu shown at right. By default,photos and movies are automatically marked fortransfer when they are recorded. The playback“Transfer” option is used when you want toremove transfer marking from all images, or toselect all images for transfer after turning transfer marking off.
AUTO TRANSFER
Auto TransferSmall Pic.Auto Off
6 4 030S
OFF SELECT SET
All ONAll OFF
Option Description
All ON Mark all images on the CF memory card for transfer to a computer.
All OFF Remove transfer marking from all images on the CF memory card.
Marking image files for transferUp to 999 images on a CF memory card can be marked for transfer. Image filesof any file number can be transferred. To transfer 1000 or more images, use oneof the following methods:1) Transfer the images using Nikon View 4, not the TRANSFER button.2) Transfer 999 images using the TRANSFER button, and unmark the images
once they have been transferred. Then mark the remaining images fortransfer and press the TRANSFER button once again.
Transfer Settings Created Using Other Models of Nikon CamerasIf a CF memory card containing images with transfer settings created using anyother model of Nikon camera is inserted into a COOLPIX885, such settings willnot be recognized and must be reset using the COOLPIX885. The same appliesif a card from a COOLPIX885 is inserted into any other model of Nikon camera.
Selecting Small Picture Size: The Small Pic. MenuImage size of the Small Pictures can be set to 640x 480, 320 x 240, 160 x 120 or 96 x 72 pixels.Choosing a new Small Picture size from the“Small Pic.” sub-menu changes the size of thesmall picture created by pressing the ≥ SMALLPIC. button of the Multi selector, and the size ofsmall pictures created there after will be recorded in the newly selectedsize.
SETSELECT
SMALL PIC.
OFF
Auto TransferSmall Pic.Auto Off
6 4 030S 640X480
320X240160X120 96X72
See p. 76 for more information on creating Small Pictures
Image size
Large
Small
Small Picture size (pixels)
640 x 480
320 x 240
160 x 120
96 x 72
• Smaller the image size, faster the time it takes to distribute the images by e-mailand the web.
• The image quality of the Small Picture is set to BASIC.
COOLPIX885 (E) 01.10.22 6:03 PM Page 174

177176
Reference—Playing Im
ages BackTelevision Playback: Connecting Your Camera to a Video DeviceUsing the EG-900 video cable provided with your camera, you canconnect the COOLPIX885 to a television or VCR. The video device willshow the same picture as is displayed in the camera monitor.
1 Connect the video cable to the camera
• Insert the black plug on the EG-900 into the camera’s interface connector.
2 Connect the video cable to the video device
• Connect the yellow plug to the video-in jack on the television or VCR.
3 Tune the television to the video channel
4 Turn the camera on
• The television will mirror the image in the camera monitor.
Use an AC AdapterTo prevent the display in the television from turning off whenever the cameraenters sleep mode, connect the camera to an EH-21 AC adapter/batterycharger (available separately). Note, however, that camera settings and pictureinfo will not be displayed on the television screen when the camera monitor isoff.
Choosing a Video Mode (p. 122)The Video Mode item in the SETUP menu offers a choice of NTSC and PALstandards for video output. Be sure that the standard selected matches that ofany video device to which you connect the camera.
PAL Video Mode (p. 122)At a setting of PAL, the monitor will turn off when a video cable is connected. Inmovie mode, however, the monitor will turn on and output to the video devicewill be suspended.
COOLPIX885 (E) 01.10.22 6:03 PM Page 176

179178
By connecting your Nikon digital camera to a computer running NikonView, you unleash its full potential. Images can be transferred to yourcomputer and from there distributed electronically to family andfriends. Selected images can be copied to a floppy disk directly fromthe camera’s CF memory card, then delivered to a photofinisher, or youcan save copies to your hard disk and use your favorite imagingsoftware to retouch images or print copies on a color printer.
This section describes how to connect your camera to a computerrunning Nikon View using the UC-E1 Universal Serial Bus (USB) cablesupplied with your camera. Users whose computers are not equippedwith a USB interface can insert the camera CF memory card in a cardreader or card slot, as described in this section.
ConnectionsYour Camera and Your Computer
Reference—Connections
Already Have Nikon View?In order to transfer images to your computer using the UC-E1 USB cable, theCOOLPIX885 requires the version of Nikon View 4 provided with the camera. Ifyou have a version of Nikon View that was included with another Nikon digitalcamera, you will need to upgrade to the version provided with the COOLPIX885as described in the Nikon View Reference Manual (on CD).
Image Database SoftwareDepending on where you purchased your camera, the COOLPIX885 comeswith Canto Cumulus, iView Media Pro, or Fotostation Easy image databasesoftware. See the reference CD for information on installing these applications. Ifyou will be using Cumulus or iView Media Pro, remember to install the imagedatabase software before installing Nikon View. If you will be using FotostationEasy, install Nikon View 4 first, and then install Fotostation Easy.
Before You Begin: Installing Nikon ViewThe first step to using Nikon View is to read the directions forinstallation. These are included on the reference CD provided with yourcamera.
INDEX.pdf icon in the reference CD
1 Insert the reference CD in a CD-ROMdrive• After turning your computer on and waiting
for the operating system to start up, placethe reference CD in a CD-ROM drive.
• If you are using a Macintosh computer, thereference CD window will open automaticallyon the desktop. Windows users will needfirst to double-click the “My Computer” iconand then the “Nikon” icon to open thereference CD window.
6MTS5004
Nikon View 4.1
Reference Manual
En De FrEs Nl It
JpMacintosh and Windows
Version 4.0
COOLPIX885 (E) 01.10.22 6:03 PM Page 178
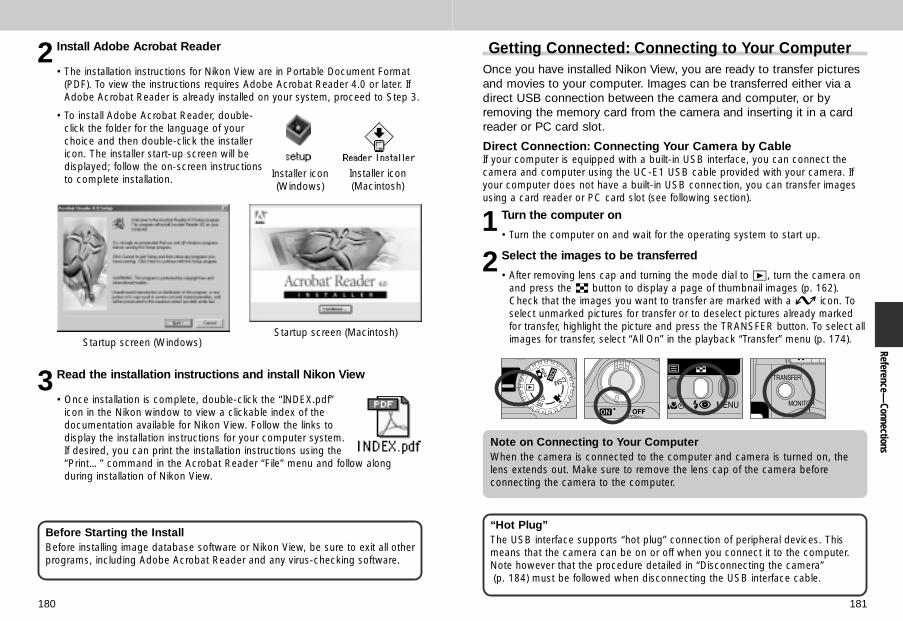
181180
2 Install Adobe Acrobat Reader
• The installation instructions for Nikon View are in Portable Document Format(PDF). To view the instructions requires Adobe Acrobat Reader 4.0 or later. IfAdobe Acrobat Reader is already installed on your system, proceed to Step 3.
• To install Adobe Acrobat Reader, double-click the folder for the language of yourchoice and then double-click the installericon. The installer start-up screen will bedisplayed; follow the on-screen instructionsto complete installation. Installer icon
(Windows)Installer icon(Macintosh)
3 Read the installation instructions and install Nikon View
• Once installation is complete, double-click the “INDEX.pdf”icon in the Nikon window to view a clickable index of thedocumentation available for Nikon View. Follow the links todisplay the installation instructions for your computer system.If desired, you can print the installation instructions using the“Print…” command in the Acrobat Reader “File” menu and follow alongduring installation of Nikon View.
Startup screen (Windows)Startup screen (Macintosh)
Before Starting the InstallBefore installing image database software or Nikon View, be sure to exit all otherprograms, including Adobe Acrobat Reader and any virus-checking software.
Getting Connected: Connecting to Your ComputerOnce you have installed Nikon View, you are ready to transfer picturesand movies to your computer. Images can be transferred either via adirect USB connection between the camera and computer, or byremoving the memory card from the camera and inserting it in a cardreader or PC card slot.
Direct Connection: Connecting Your Camera by CableIf your computer is equipped with a built-in USB interface, you can connect thecamera and computer using the UC-E1 USB cable provided with your camera. Ifyour computer does not have a built-in USB connection, you can transfer imagesusing a card reader or PC card slot (see following section).
1 Turn the computer on
• Turn the computer on and wait for the operating system to start up.
2 Select the images to be transferred
• After removing lens cap and turning the mode dial to p, turn the camera onand press the 7 button to display a page of thumbnail images (p. 162).Check that the images you want to transfer are marked with a D icon. Toselect unmarked pictures for transfer or to deselect pictures already markedfor transfer, highlight the picture and press the TRANSFER button. To select allimages for transfer, select “All On” in the playback “Transfer” menu (p. 174).
Note on Connecting to Your ComputerWhen the camera is connected to the computer and camera is turned on, thelens extends out. Make sure to remove the lens cap of the camera beforeconnecting the camera to the computer.
“Hot Plug”The USB interface supports “hot plug” connection of peripheral devices. Thismeans that the camera can be on or off when you connect it to the computer.Note however that the procedure detailed in “Disconnecting the camera”(p. 184) must be followed when disconnecting the USB interface cable.
Reference—Connections
COOLPIX885 (E) 01.10.22 6:03 PM Page 180

183182
3 Connect the interface cable to the computer
• Connect the other end of the cable to the computeras shown at right.
4 Connect the interface cable to the camera
• Connect the UC-E1 USB cable to the camera’sinterface connector. While the interface cable isconnected, the monitor will be off and all controlsexcept the power switch and TRANSFER buttondisabled.
Connect the Camera Directly to the ComputerThe camera may not function as expected when connected via a USB hub orkeyboard.
Register the Camera with the System (Windows)The first time the camera is connected to a Windows computer, the cameramust be “registered” with the system so that the computer will know how tocommunicate with the camera. If you are using Windows Millennium Edition(Me) or Windows 2000, the computer will register the camera automatically thefirst time the camera is connected. The files needed to register the camera withWindows 98/98 Second Edition (SE) is contained on the Nikon View installerCD. Be sure the CD is inserted in the drive when you first connect your camera.Other versions of Windows do not support USB. More information onregistering your camera can be found in Nikon View Reference Manual.
Use a Reliable Power SourceWhen transferring data between the camera and the computer, we recommendthat you use an EH-21 AC adapter/battery charger (available separately) toensure a reliable power supply. If the camera is running on battery power, besure that the battery is charged. If possible, have spare batteries on hand. If thebattery runs low, turn the camera off and replace the battery after verifying thatthe image transfer dialog is not displayed in the computer monitor.
5 Press the TRANSFER button
• Once the camera is turned on, Nikon View willautomatically detect the camera. After Nikon Viewhas started, press the TRANSFER button on thecamera to copy all marked images from the CFmemory card to the computer. The message“PREPARING TO TRANSFER” will appear in thecamera monitor. After a brief pause, transfer willbegin, and the message “TRANSFERRING IMAGETO COMPUTER” will be displayed.
6 Disconnect the camera
• When all marked images have been transferred,the monitor will show “TRANSFER COMPLETED.”Before disconnecting the cable or turning thecamera off, you must remove the camera from thesystem as described below.
PREPARING TO TRANSFER
TRANSFERRINGIMAGE TOCOMPUTER
TRANSFER COMPLETED
Interrupting TransferTo end transfer before all marked pictures have been copied to the computer,click the “Cancel” button in the Nikon View transfer progress dialog. Themessage “TRANSFER CANCELLED” will appear in the camera monitor. Eventhough the message, “TRANSFER COMPLETED” may appear after transfer hasbeen cancelled, transfer has not been successfully completed.
Reference—Connections
Transfer TimeNote that when large numbers of images are selected, some time will berequired for transfer.
• See p. 121 for more information on selecting images for transfer as they aretaken.
• See p. 174 for more information on selecting images for transfer after they aretaken.
COOLPIX885 (E) 01.10.22 6:03 PM Page 182

185184
Disconnecting the CameraWhen you want to disconnect the camera from the computer, follow theinstructions below before turning the camera off or disconnecting the USBcable.
• Windows Millennium Edition/Windows 2000Click the “Unplug or Eject Hardware” icon in the taskbar and select “StopUSB Disk” from the menu that appears. If this step is not performed beforethe camera is disconnected or turned off, a warning will be displayed. Click“OK” to clear the warning from the screen.
• Windows 98/Windows 98SEDouble click My Computer icon, and right-click the removable diskcorresponding to the camera. Select Eject from the menu that appears.
• MacintoshDrag the “untitled” volume representing the camera into the Trash.
When a transfer error occurs, messages such as “TRANSFER ERROR” or“COMMUNICATION ERROR” will appear in the monitor. The error messagemay be followed by the message “TRANSFER COMPLETED”, although notethat transfer is NOT complete when an error occurs. Remember to follow theabove disconnection procedure when disconnecting the camera after atransfer error.
Formatting CF memory cardsIf a CF memory card inserted into the camera is formatted using Explorer or MyComputer (Windows), or Erase Disk is selected from the Special menu(Macintosh), all images on the card will be deleted.
Disconnecting the Camera During Image TransferConfirm that image transfer is completed and the message “TRANSFERCOMPLETED” is displayed in the camera monitor, before performing any of theabove operations.Do not turn the camera off, disconnect the cable or remove the CF memorycard while the transfer progress meter is displayed in the computer monitor.
Reference—Connections
Reading Pictures from CF Memory CardsIf you have a CompactFlash™ card reader or your computer isequipped with a PC card slot, you can transfer images directly from thememory card. Before inserting the CF memory card in a card reader orcard slot, turn the camera off and remove the card from the camera.
Using a CompactFlash™ Card ReaderBefore using your card reader, be sure to read all documentation provided by themanufacturer. Then follow the steps below to transfer images from the CF memorycard using the card reader.
1 Turn the computer on
• Turn the computer on and wait for the operating system to start up.
2 Insert the CF memory card into the card reader
• If Nikon View has already been installed, and theCF memory card is from a Nikon Digital Camera,Nikon View will automatically detect the card. Seethe Nikon View Reference Manual for informationon transferring images to your computer.
“CompactFlash™ Card Reader”A CompactFlash™ (CF) card reader is a device that allows your computer toread memory cards of the type used in your camera. CF card readers come inmany varieties, ranging from inexpensive USB card readers to the built-inreaders found on some newer computers.
Viewing the Nikon View Reference ManualThe Nikon View Reference Manual is stored in Portable Document Format (PDF)on the reference CD provided with your camera. To view the Reference Manual,double-click the “INDEX.pdf” icon in the root directory of the reference CD (p. 179).
“PC Card Slot”Commonly found on laptop computers, PC card slots take “PCMCIA” (PersonalComputer Memory Card International Association) cards, which are larger thanthe CompactFlash™ memory cards used in your camera. To readCompactFlash™ memory cards using a PC card slot, you will require an EC-AD1 PC-card adapter, available separately from Nikon.
CompactFlash Card TM
EC-16CF
MB
CompactFlash Card TM
EC-AD1
ADAPTER
COOLPIX885 (E) 01.10.22 6:03 PM Page 184
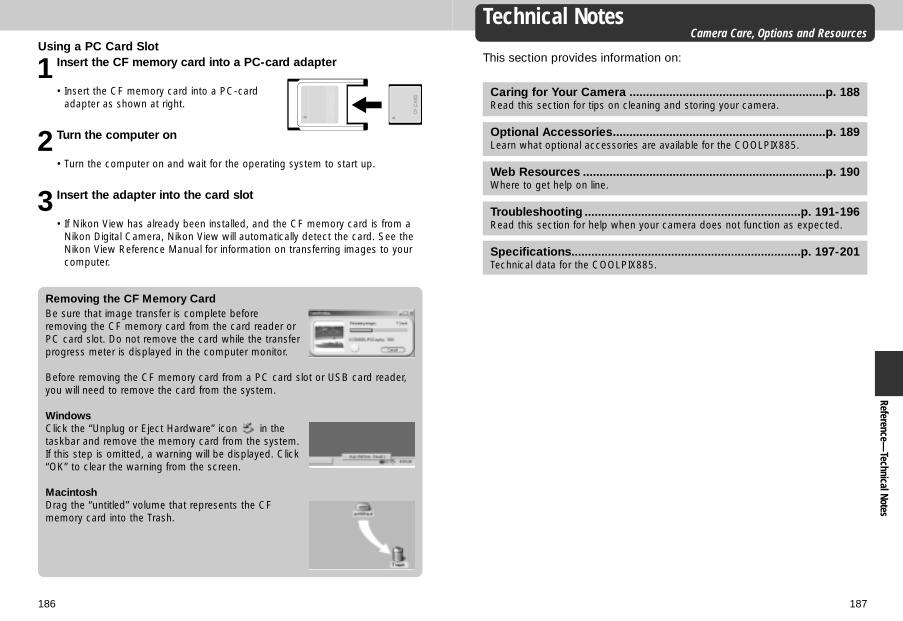
187186
Reference—Technical Notes
Using a PC Card Slot
1 Insert the CF memory card into a PC-card adapter
• Insert the CF memory card into a PC-cardadapter as shown at right.
2 Turn the computer on
• Turn the computer on and wait for the operating system to start up.
3 Insert the adapter into the card slot
• If Nikon View has already been installed, and the CF memory card is from aNikon Digital Camera, Nikon View will automatically detect the card. See theNikon View Reference Manual for information on transferring images to yourcomputer.
Removing the CF Memory CardBe sure that image transfer is complete beforeremoving the CF memory card from the card reader orPC card slot. Do not remove the card while the transferprogress meter is displayed in the computer monitor.
Before removing the CF memory card from a PC card slot or USB card reader,you will need to remove the card from the system.
WindowsClick the “Unplug or Eject Hardware” icon in thetaskbar and remove the memory card from the system.If this step is omitted, a warning will be displayed. Click“OK” to clear the warning from the screen.
MacintoshDrag the “untitled” volume that represents the CFmemory card into the Trash.
Technical NotesCamera Care, Options and Resources
This section provides information on:
Caring for Your Camera ...........................................................p. 188Read this section for tips on cleaning and storing your camera.
Optional Accessories................................................................p. 189Learn what optional accessories are available for the COOLPIX885.
Web Resources .........................................................................p. 190Where to get help on line.
Troubleshooting .................................................................p. 191-196Read this section for help when your camera does not function as expected.
Specifications.....................................................................p. 197-201Technical data for the COOLPIX885.
COOLPIX885 (E) 01.10.22 6:03 PM Page 186

188 189
Reference—Technical Notes
Caring for Your CameraCleaning
Lens/Viewfinder
Monitor
Camera Body
The key to cleaning these glass parts is to not touch themwith your fingers. Use a blower (typically a small device witha rubber bulb attached to one end that you pump toproduce a stream of air out the other) to remove dust or lint.To remove fingerprints or other stains that can not beremoved with a blower, wipe the lens or viewfinder with asoft cloth, using a spiral motion that starts in the center ofthe lens and works out to the edges.
Remove dust or lint with a blower. To remove fingerprintsand other stains, clean the monitor with a soft, dry cloth,being careful not to apply pressure.
Use a blower to remove dust and lint, then wipe gently witha soft, dry cloth. After using the camera at the beach orseaside, wipe off any sand or salt with a cloth lightlydampened with fresh water, then dry thoroughly.
Do not use alcohol, thinner, or other volatile chemicals.
StorageWhen the camera will not be used for an extended period, remove the battery afterchecking to make sure that the camera is off. Do not store your camera inlocations that:• are poorly ventilated or damp• are next to equipment that produces strong electromagnetic fields, such as
televisions or radios• are exposed to temperatures above 50°C (122°F) or below –10°C (14°F)• are subject to humidities of over 60%
Optional AccessoriesAt the time of writing, the following optional accessories were availablefor the COOLPIX885. Contact your retailer or local Nikon representativefor details.
AC adapter/battery charger
Rechargeable battery
Carrying case
CompactFlash memory cards and adapters
Lens Adapter
Lens Converter andSlide copying adapter(UR-E4 step down ring lens adapter required)
Remote release cable
EH-21 AC adapter/battery charger
EN-EL1 rechargeable Li-ion battery (suppliedin some areas)
CS-E885 Soft Case
• EC-CF 64 MB CompactFlash memory card• EC-CF 96 MB CompactFlash memory card• EC-AD1 PC-card adapter
UR-E4 step down ring lens adapter
• WC-E24*/WC-E63 Wideangle converter• TC-E2 (2x)/TC-E3ED (3x) Telephoto
converter• FC-E8 fisheye lens converter• ES-E28 slide-copying adapter* Not available in some areas.
MC-EU1 remote cord
Note on using remote release cableThe remote cord does not function when the camera is set to Movie,Continuous or VGA Sequence.
Approved Memory CardsIn addition to the memory cards listed above, the following memory cards havebeen tested and approved for use in the COOLPIX885:• SanDisk SDCFB series 16 MB, 32 MB, 48 MB, 64 MB, 96 MB, and 128 MB• Lexar Media 4X USB series 8 MB, 16 MB, 32 MB, 48 MB, 64 MB, and 80 MB• Lexar Media 8X USB series 8 MB, 16 MB, 32 MB, 48 MB, 64 MB, and 80 MB• Lexar Media 10X USB series 128 MB and 160 MBOperation is not guaranteed with other makes of memory card. For more detailson the above cards, please contact the manufacturer.
COOLPIX885 (E) 01.10.22 6:03 PM Page 188
191190
Web ResourcesAt the time of writing, the following on-line resources were available forusers of Nikon digital imaging equipment:
For Product Information and Tips• For users in the USA: http://www.nikonusa.com/• For users in the Europe: http://www.nikon-euro.com/• For users in the Asia, Oceania, the Middle East, and Africa:
http://www.nikon-asia.com/
For Contact InformationContact information for the Nikon representative in your area may befound at:
http://www.nikon-image.com/eng/
Reference—Technical Notes
TroubleshootingIf your camera fails to function as expected, check the list of commonproblems below before consulting your retailer or Nikon representative.Refer to the page numbers listed in the rightmost column forinformation on solving the problems listed here.
Problem
Monitor is blank
No indicators appearin monitor
Monitor is hard to read
No picture is takenwhen shutter releasebutton is fully pressed
Possible Cause
• Camera is off.• Battery is not correctly inserted or battery-
chamber cover is not fully closed.• Battery is exhausted.• EH-21 AC adapter/battery charger (available
separately) is not properly connected.• Camera is in sleep mode. Press shutter release
button halfway.• Monitor is off. Press ≤ on Multi selector to turn
monitor on.• PAL is selected in Video Mode menu and video
cable is connected.
• Indicators are hidden. In shooting mode, press≤ on Multi selector until indicators aredisplayed.
• Slide show is in progress.
• Monitor brightness requires adjustment.• Monitor is dirty.
• Camera is in playback or SETUP mode.• Battery is exhausted.• Number of exposures remaining is zero: not
enough memory remaining.• AF light flickers: camera unable to focus.• Flash light flickers: flash is charging.• Message “MEMORY CARD IS NOT
FORMATTED” appears in monitor: CF memorycard is not formatted for use in COOLPIX885.
• Message “NO MEMORY CARD” appears inmonitor: no CF memory card in camera.
Page
2444
5046
115
59,158122
59
168
114188
895056
609948
47
COOLPIX885 (E) 01.10.22 6:03 PM Page 190

193192
Reference—Technical Notes
Problem
Pictures are too bright(overexposed)
Pictures are too dark(underexposed)
Pictures are out offocus
Pictures are blurred
Flash does not fire
Possible Cause
• Exposure compensation is too high.
• Flash is off.• Flash window blocked.• Subject is outside range of flash.• Exposure compensation is too low.
• Subject was not in focus area when shutterrelease button pressed halfway.
• AF light flashes rapidly: camera unable to focus.
• Camera shook during shot.• When lighting is poor:
– Use the flash– Zoom the camera outIf zooming the camera out does not help andyou do not want to or can not use the flash:– Use Best-Shot Selector (BSS)– Use the self-timer– Use a tripod
• Flash is set to Flash Cancel.• Flash is off. Note that flash turns off
automatically when:– Camera is in h (landscape), j (sunset), k
(night landscape), v (museum), l (fireworksshow), z (close up) or m (movie) mode
– Focus is set to @ (infinity)– Setting other than “Single” selected in
“Continuous” sub-menu– Setting other than “Normal” selected in
“Lens” sub-menu– “AE Lock” option in “Exposure Options” sub-
menu is on• Best-Shot Selector (BSS) is on• Battery level is low.
Page
100
9758199100
60
60
58
9790
14195
9898
65-678993139
145
148
14150
Problem
Pictures can not beplayed back
Television does notmirror image inmonitor
Nikon View does notstart when cameraconnected or CFmemory card insertedin card reader or cardslot
Possible Cause
• Picture has been overwritten or renamed by acomputer or another make of camera.
• Video cable not correctly connected.• Television not tuned to video channel.• Video Mode setting does not match video
device.
• Camera is off.• EH-21 AC adapter/battery charger (available
separately) is not properly connected, or batteryis dead.
• Interface cable not correctly connected, or cardnot properly inserted in card reader, cardadapter, or card slot.
See Nikon View Reference Manual for furtherinformation on troubleshooting Nikon View.
Page
—
176176122
2446
182,185,186
COOLPIX885 (E) 01.10.22 6:03 PM Page 192
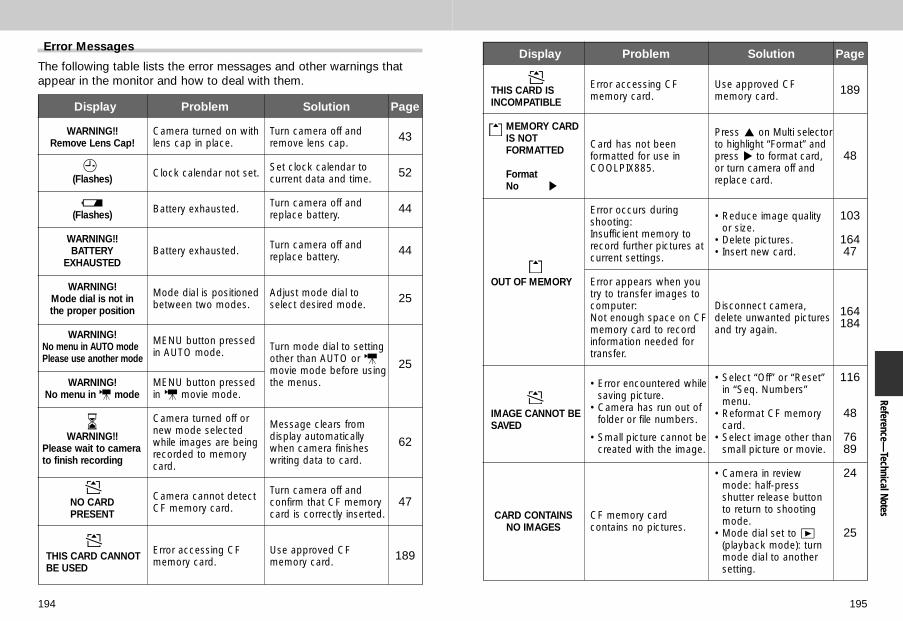
195194
Error Messages
The following table lists the error messages and other warnings thatappear in the monitor and how to deal with them.
Reference—Technical Notes
Display
WARNING!!Remove Lens Cap!
(Flashes)
M(Flashes)
WARNING!!BATTERY
EXHAUSTED
WARNING!Mode dial is not inthe proper position
WARNING!No menu in AUTO modePlease use another mode
WARNING!No menu in m mode
WWARNING!!
Please wait to camerato finish recording
NO CARDPRESENT
THIS CARD CANNOTBE USED
Problem
Camera turned on withlens cap in place.
Clock calendar not set.
Battery exhausted.
Battery exhausted.
Mode dial is positionedbetween two modes.
MENU button pressedin AUTO mode.
MENU button pressedin m movie mode.
Camera turned off ornew mode selectedwhile images are beingrecorded to memorycard.
Camera cannot detectCF memory card.
Error accessing CFmemory card.
Solution
Turn camera off andremove lens cap.
Set clock calendar tocurrent data and time.
Turn camera off andreplace battery.
Turn camera off andreplace battery.
Adjust mode dial toselect desired mode.
Turn mode dial to settingother than AUTO or mmovie mode before usingthe menus.
Message clears fromdisplay automaticallywhen camera finisheswriting data to card.
Turn camera off andconfirm that CF memorycard is correctly inserted.
Use approved CFmemory card.
Page
43
52
44
44
25
25
62
47
189
Display
THIS CARD ISINCOMPATIBLE
MEMORY CARD IS NOT FORMATTED
FormatNo >
OUT OF MEMORY
IMAGE CANNOT BESAVED
CARD CONTAINS NO IMAGES
Problem
Error accessing CFmemory card.
Card has not beenformatted for use inCOOLPIX885.
Error occurs duringshooting:Insufficient memory torecord further pictures atcurrent settings.
Error appears when youtry to transfer images tocomputer:Not enough space on CFmemory card to recordinformation needed fortransfer.
• Error encountered whilesaving picture.
• Camera has run out offolder or file numbers.
• Small picture cannot becreated with the image.
CF memory cardcontains no pictures.
Solution
Use approved CFmemory card.
Press ≤ on Multi selectorto highlight “Format” andpress > to format card,or turn camera off andreplace card.
• Reduce image qualityor size.
• Delete pictures.• Insert new card.
Disconnect camera,delete unwanted picturesand try again.
• Select “Off” or “Reset”in “Seq. Numbers”menu.
• Reformat CF memorycard.
• Select image other thansmall picture or movie.
• Camera in reviewmode: half-pressshutter release buttonto return to shootingmode.
• Mode dial set to p(playback mode): turnmode dial to anothersetting.
Page
189
48
103
16447
164184
116
48
7689
24
25
COOLPIX885 (E) 01.10.22 6:03 PM Page 194

197196
Reference—Technical Notes
Display
ALL IMAGES AREHIDDEN
FILE CONTAINS NOIMAGE DATA
THE FOLDERCANNOT BE
DELETED
COMMUNICATIONSERROR
NO IMAGES AREMARKED FOR
TRANSFER
TRANSFER ERROR
SYSTEM ERROR
Problem
All images in currentfolder are hidden.
File created bycomputer or differentmake of camera.
Folder contains hiddenor protected pictures.
Interface cabledisconnected or CFmemory card removedwhile images are beingtransferred tocomputer.
No images marked withD icon whenTRANSFER buttonpressed to transferimages to computer.
Error has occurredduring image transfer.
Error has occurred incamera’s internalcircuitry.
Solution
Select another folder oruse “Hide Image” tochange hidden status ofimages in current folder.
• Delete file.• Reformat CF memory
card.
Folder can only be deletedif all images it contains areneither hidden norprotected pictures.
If error message displayedin computer monitor, click“OK” to exit Nikon View.Turn camera off andreconnect cable or replaceCF memory card, then turncamera on.
Disconnect camera andmark at least one image fortransfer before connectingcamera again.
Check that the camera isproperly connected andthat the battery is fullycharged.
Turn camera off, unplugoptional AC adapter (ifusing), remove and re-insert battery. If errorpersists, contact retailer orNikon representative.
Page
108171
16448
170,171
182,185
73,120,174
50,183,185,186
2445
Specifications
Type
CCD
Total pixels
Effective pixels
Image size
Lens
Digital zoom
Autofocus (AF)Focus modes
Focus range
ViewfinderFrame coverage
Monitor
Frame coverage
Auto off
Digital camera E885
1/1.8-inch Interline Charge-Coupled Device (CCD)
3.37 million
3.21 million
User can select from:• Full (2048 x 1536 pixels)• XGA (1024 x 768 pixels)• VGA (640 x 480 pixels)Four Small Picture sizes selectable (640 x 480, 320 x240, 160 x 120 or 96 x 72 pixels)
• 3x Zoom Nikkor• F = 8-24 mm (35 mm camera format equivalent to
38-114 mm): f/2.8-f/4.9• 9 elements in 8 groups
4X digital zoom in 20 steps of 0.2X
Contrast-detect through-the-lens (TTL) AF• Continuous AF (monitor on)• Single AF (monitor off)• Manual (49 positions, with focus confirmation indication)• 30 cm (1 ft.)-∞ at widest angle (W), 60 cm (2 ft.)-∞ at
telephoto (T)• Macro mode (Autofocus): 4 cm (1.6 in.)-∞ at widest
angle (W), 30 cm (1 ft.)-∞ at telephoto (T)
Real-image zoom optical viewfinder with LED indicationApproximately 80%
1.5-inch 110,000-dot, low-temperature polysilicon TFTLCD with brightness and hue adjustment
Approximately 97% (through/freeze image)Approximately 100% (playback mode)
Can be selected from 30 sec. (default) and 1, 5 and 30min.
COOLPIX885 (E) 01.10.22 6:03 PM Page 196

199198198
StorageSystem
Media
Approximate Capacity
Shooting modes
Capture modes
Design rule for Camera File systems, Digital Print-OrderFormat (DPOF) compliantHI (uncompressed TIFF-RGB)Compression JPEG-baseline-compliant;• FINE (approx. 1/4)• NORMAL (approx. 1/8)• BASIC (approx. 1/16)QuickTime moviesCompactFlash™ (CF) Card Type I
16 MB (64 MB)
FULL XGA VGA
HI 1 (6) — —
FINE 10 (40) 39 (159) 97 (390)
NORMAL 20 (81) 76 (309) 177 (725)
BASIC 39 (159) 144 (588) 324 (1300)
• Auto • Scene: Portrait, Party/Indoor, Night Portrait,
Beach/Snow, Landscape, Sunset, Night Landscape,Museum, Fireworks Show, Close Up, Copy andBacklight
• Custom (CSM) (includes shooting menu for control ofWhite Balance, Metering, Continuous, Best-ShotSelector, Image Adjustment, Image Sharpening, Lens,Image Size & Quality, Sensitivity, Exposure Options,Focus Options, Auto Bracketing, Noise Reduction andCF Card Format)
• Movie (up to 40 sec. of QVGA frames at 15 frames persecond)
• Single• Continuous• Multi-Shot 16 (sixteen frames 1/16 in size)• VGA Sequence• Ultra HS (seventy QVGA images at approximately 30
fps)
Reference—Technical Notes
Exposure meteringModes
ExposureControl
Range (ISO 100 equivalent)
ShutterSpeed
ApertureRange
Sensitivity
White balance
Self-timer
Built-in SpeedlightRange
Flash controlFlash modes
PlaybackPlayback modes
Image deletionFile attributes
Four-mode TTL metering• 256-segment Matrix• Center-Weighted• Spot• AF Spot
• Exposure modes:Programmed AutoManual
• Exposure compensation (±2.0 EV in steps of 1/3 EV)• Auto Exposure Bracketing• EV –3 to +15 (W)• EV + 1.4 to +16.6 (T)
Mechanical and charge-coupled electronic shutter8-1/1000 sec., Bulb up to 60 sec. in M mode
Electronically controlled preset apertureTwo steps (f/2.8 and f/7.6 [W])
ISO equivalent 100, 200, 400, Auto; can be set in CSMmode
Auto with TTL control, 5-mode manual with fine tuning,pre-set white balance, white balance bracketing
10 sec. or 3 sec. duration
0.4 to 3.7 m (1.3 to 12.1 ft.) (W)0.4 to 2.3 m (1.3 to 7.5 ft.) (T)Sensor flash systemAuto, Flash Cancel (off), Red-Eye Reduction, AnytimeFlash (fill-flash), Slow Sync
Single frame, thumbnail (nine or four images), movie,zoom (4x), slide show, histogram indication/highlight pointdisplay, focus confirmation indicationUser can delete all or selected framesUser can set transfer, hide and protect attributes for eachimage
COOLPIX885 (E) 01.10.22 6:03 PM Page 198

201200
Interface
Video output
I/O terminals
Power requirements
Battery life
Operating environmentTemperatureHumidity
Dimensions (W x H x D)
Weight
USB interface
User can choose from NTSC and PAL
• DC input• Data output (video/USB)
• One rechargeable Nikon EN-EL1 lithium-ion battery, orsix-volt 2CR5 (DL245) lithium battery
• EH-21 AC adapter/battery charger (available separately)
Approximately 90 minutes (EN-EL1) or 100 minutes 2CR5(DL245) when using monitor at 20°C (68°F)
0 - 40°C (32 – 104°F)Under 85% (no condensation)
Approximately 95 x 69 x 52 mm (3.7 x 2.7 x 2.0 in.)
Approximately 225 g (7.9 oz.) without battery andCompactFlash card
COOLPIX885 is supporting EPSON's "PRINT Image Matching". "PRINT Image Matching" is a technology which assists in producing vivid photo-quality prints from PIM-enabled Digital Cameras. To obtain this benefit, a digitalcamera and printer that are compatible with "PRINT Image Matching" are required.
Nikon View 4 System Requirements:MacintoshOS: Mac® OS8.6, 9, 9.1Models: iMac™, Power Macintosh® G3 (Blue/White), Power Macintosh™
G4 or later; iBook™, PowerBook® G3 (only built-in USB ports aresupported) or later
RAM: 32Mbyte, (64Mbyte or more recommended)Hard Disk: An additional amount equivalent to twice the capacity of the camera
memory card required when Nikon View is runningDisplay: 640 x 480 with 16-bit color (800 x 600 or greater, full color
recommended)Others: CD-ROM drive
USB interface (only built in USB ports supported)Mac® OS8.6 needs USB driver (ver. 1.3.5) on Apple’s website
WindowsOS/Models: Windows® 98/98SE, Windows® 2000, Windows® ME pre-
installed modelCPU: MMX® Pentium® or laterRAM: 32Mbyte (64Mbyte or more recommended)Hard Disk: An additional amount equivalent to twice the capacity of the camera
memory card required when Nikon View is runningDisplay: 640 x 480 with 16-bit color (800 x 600 or greater, Full color
recommended)Others: CD-ROM drive, USB interface (only built-in USB ports supported)
Reference—Technical Notes
COOLPIX885 (E) 01.10.22 6:03 PM Page 200

203202
Exposure Compensation .............................................P. 100, 149Exposure mode ...................................................................P. 148Exposure Options.........................................................P. 148-149
Fine (White Balance) ............................................................P. 135FINE mode (image quality)............................................P. 103-104Fireworks Show mode (SCENE) ............................................P. 67Fisheye converter ................................................................P. 145Flash Cancel..........................................................................P. 98Flash mode............................................................................P. 98Fluorescent (White Balance).................................................P. 135Focus Confirmation display..................................................P. 159Focus mode.....................................................................P. 92-94Focus Options..............................................................P. 150-151Folders setting .....................................................P. 108-112, 167
Folders > Options > New.................................................P. 109Folders > Options > Rename...........................................P. 110Folders > Options > Delete..............................................P. 111
Formatting CF memory card ....................................P. 48-49, 117Full-frame playback mode ............................................P. 156-161FULL mode (image size).......................................P. 103, 106-107Full-Screen Review mode ......................................................P. 71
Green light.......................................................................P. 22, 60
Hide Image ..........................................................................P. 171HI mode (image quality)................................................P. 103-104Histogram display................................................................P. 159Hue .....................................................................................P. 114
Image Adjustment ........................................................P. 142-143Image file name ...................................................................P. 116Image Quality ...............................................................P. 103-105Image Sharpening ...............................................................P. 144Image Size ...........................................................P. 103, 106-107Incandescent (White Balance)..............................................P. 135Infinity mode ..........................................................................P. 93info.txt .................................................................................P. 120Interval setting (Slide Show) .................................................P. 169
E
F
GH
I
AE Lock...............................................................................P. 148Anytime Flash ........................................................................P. 98Auto (White Balance) ...........................................................P. 135Auto Bracketing...................................................................P. 152Auto Flash mode ...................................................................P. 98Autofocus mode ....................................................................P. 93Auto-Focus Mode................................................................P. 151Autofocus Target Area (AF Area mode) ................................P. 150AUTO mode.....................................................................P. 55-62Auto Off ...............................................................................P. 115AUTO Sensitivity ..........................................................P. 131, 147Auto Transfer .......................................................................P. 121
Back Light mode (SCENE).....................................................P. 67Battery .............................................................................P. 44-46BASIC (image quality).......................................................103-104Beach/Snow mode (SCENE) .................................................P. 65Best Shot Selector ..............................................................P. 141Black-and-White..................................................................P. 142Brightness ..................................................................P. 114, 142Built-in Speedlight .................................................................P. 97
Center-Weighted metering...................................................P. 137Close Up mode (SCENE).......................................................P. 67Cloudy (White Balance)........................................................P. 135CompactFlash™ memory card ........................P. 47-49, 117, 189Continuous AF...............................................................P. 94, 151Continuous ..........................................................................P. 139Contrast ..............................................................................P. 142Controls...............................................................................P. 118Copy mode (SCENE) .............................................................P. 67CSM (Custom) shooting mode .....................................P. 126-154CSM shooting menu .....................................................P.134-154
Date/Time setting.............................................................P. 52-53DCF (Design rule for Camera File System) ...........................P. 108Delete...........................................................................P. 164-166Delete (Full-frame playback mode).................................P. 71, 157Delete (Thumbnail playback mode) ................................P. 72, 162Delete all images .................................................................P. 165Delete selected image(s)...............................................P. 164-165Digital zoom .....................................................................P. 90-91Display mode.......................................................................P. 113Distance Units .....................................................................P. 151DPOF (Digital Print Order Format) ..................................P. 83, 172
A
D
B
C
Reference—Index
Index
COOLPIX885 (E) 01.10.22 6:03 PM Page 202
205204
SCENE mode...................................................................P. 63-67Self-timer ...............................................................................P. 95Sensitivity ............................................................................P. 147Sensitivity setting..........................................................P. 130-131Seq. Numbers .....................................................................P. 116SETUP mode ...............................................................P. 102-125Shooting menu.............................................................P. 134-154Single AF.......................................................................P. 94, 151Single shooting....................................................................P. 139Slide show ...................................................................P. 168-169Slow Sync Flash ....................................................................P. 98Small picture ............................................................P. 76-79, 175Speedlight (White Balance) ..................................................P. 135Spot AF Area.......................................................................P. 137Spot metering......................................................................P. 137Sunset mode (SCENE) ..........................................................P. 66
Telephoto converter .............................................................P. 145Television playback.......................................................P. 176-177Thumbnail mode............................................................P. 72, 162TIFF ...............................................................................P. 76, 104Transfer .........................................................................P. 73, 174
Ultra HS shooting ................................................................P. 139USB .............................................................................P. 181-184
VGA Sequence shooting .....................................................P. 139VGA (image size) ..................................................P. 103, 106-107Video Mode.........................................................................P. 122
White Balance .....................................................................P. 135White Balance Bracketing....................................................P. 153Wide-angle converter ..........................................................P. 145
XGA (image size) ..................................................P. 103, 106-107
Zoom .........................................................................P. 58, 90-91Zooming in ..........................................................................P. 161
S
T
UV
XZ
W
Landscape (SCENE) ..............................................................P. 66Language ......................................................................P. 51, 123Lens converter .............................................................P. 145-146Long time exposure.............................................................P. 129
Macro Close-up mode...........................................................P. 93Manual Exposure mode .......................................P. 127-129, 148Manual Focus...............................................................P. 132-133Matrix Metering....................................................................P. 137Metering method..........................................................P. 137-138Multi-shot 16 .......................................................................P. 139Monitor button...............................................................P. 59, 158MOV....................................................................................P. 116Movie ............................................................................P. 89, 160Museum mode (SCENE)........................................................P. 66
Night Landscape mode (SCENE)...........................................P. 66Night Portrait (SCENE)...........................................................P. 65Noise Reduction ..................................................................P. 154NORMAL mode (imag quality) ......................................P. 103-104NTSC ..................................................................................P. 122Number of remaining shots ...................................................P. 56
PAL......................................................................................P. 122Party/Indoor mode (SCENE) ..................................................P. 65Playback menu ............................................................P. 163-175Playback mode ............................................................P. 155-177Portrait mode (SCENE) ..........................................................P. 65Preset White Balance ...................................................P. 135-136Print Set (DPOF)...........................................................P. 172-173P Exposure mode................................................................P. 148Protect.................................................................................P. 170
Quick Review mode...............................................................P. 70
Red-Eye Reduction ...............................................................P. 98Red-Eye Reduction lamp.................................................P. 21, 98Red light..........................................................................P. 22, 60Reset All.......................................................................P. 124-125
M
N
P
QR
L
Reference—Index
COOLPIX885 (E) 01.10.22 6:03 PM Page 204

COOLPIX885 (E) 01.10.22 6:03 PM Page 206

No reproduction in any form of this manual, inwhole or in part (except for brief quotation incritical articles or reviews), may be made withoutwritten authorisation from NIKON CORPORATION.
NIKON CORPORATIONFUJI BLDG., 2-3, MARUNOUCHI 3-CHOME, CHIYODA-KU, TOKYO 100-8331, JAPAN
Printed in Japan K1I5000401 (11)6MAA0211-04
N
COOLPIX885 (E) 01.10.22 6:03 PM Page 208


