
DOTH-300 KEYWEDGE
Date 2013-07-26
Rev 3.02
Page 1
CONFIDENTIAL Document D.O.Tel. All rights of reproduction and disclosure reserved.
DOTH-300 KEYWEDGE
D.O.Tel
DOTH-300 KEYWEDGE
Date 2013-07-26
Rev 3.02
Page 2
CONFIDENTIAL Document D.O.Tel. All rights of reproduction and disclosure reserved.
Document Revision History
Doc Ver. Release date Description of change Modified by
1.00 2012-10-12 Fist Edition SD. LEE
2.02 2012-11-08 H300XX_KeyWedge_R0201.CAB added
SD. LEE Additional “KeyWedge Home Screen” for Windows Mobile
3.00 2013-02-25 H300XX_KeyWedge_R0303.CAB added.
SD. LEE Additional Emul Key Time(ms)
3.01 2013-06-04 Additional EPC Mode for UHF Option SD. LEE
3.02 2013-07-26 H300XX_KeyWedge_R0312.CAB added SD. LEE
DOTH-300 KEYWEDGE
Date 2013-07-26
Rev 3.02
Page 3
CONFIDENTIAL Document D.O.Tel. All rights of reproduction and disclosure reserved.
Table of Contents
Introduction
About This Guide
Chapter 1: Windows CE
1-1: KeyWedge
1-2: KeyWedge Option
1-3: SCANNER Option
1-4: HF Option
1-5: UHF Option
Chapter 2: Windows Mobile
2-1: KeyWedge
2-2: KeyWedge Option
2-3: SCANNER Option
2-4: HF Option
2-5: UHF Option
Introduction
KeyWedge is a utility that allows you to add advanced data capturing
capability using barcode scanning, HF RFID and UHF RFID to any application
without writing code. It runs in the background and handles the interface to both
built-in and attached barcode scanners, HF RFID and UHF RFID modules in
DOT mobile computers.
The captured data is converted to keystrokes or copied to the clipboard and
sent to the target application as if it was typed on the keypad.
About This Guide
You can use the following function:
▪ Scanning bar codes (1D/2D)
▪ Reading a HF RFID Tags
▪ Reading a UHF Tags
▪ Emulate a Key-wedge function
¶ NOTE. May vary depending on DOT mobile computer.

DOTH-300 KEYWEDGE
Date 2013-07-26
Rev 3.02
Page 4
CONFIDENTIAL Document D.O.Tel. All rights of reproduction and disclosure reserved.
Chapter 1: Windows CE
1-1: KeyWedge
You can enable/disable keyWedge for barcode scanner and HF RFID, UHF
RFID reader. Also you can specify each peripheral’s reading condition as
what you want.
Once KeyWedge is launched, you can set and modify all keyWedge settings
on KeyWedge Option.
Components
Supported file is as follows.
Model OS File
DOTH-300S(Q)
DOTH-300C(Q) Windows CE 5.0
KeyWedgeTray.exe
KeyWedgeOpt.exe
DOTH-300S(Q)
DOTH-300C(Q) Windows CE 5.0 ScannerOpt.exe
DOTH-300S(Q) Windows CE 5.0 HFOpt.exe
DOTH-300C(Q) Windows CE 5.0 UHFOpt.exe
Installing KeyWedge
■ Copy the latest version of H300CE_KeyWedge_Rxxxx.CAB to the DOT
Mobile Computer. (Refer to Fig 1-1-1)
■ Run H300CE_KeyWedge_Rxxxx.CAB on the DOT mobile computer to
install KeyWedge. (Refer to Fig 1-1-2)
■ After the installation is complete, KeyWedge will run
automatically.
[Fig 1-1-1] Cab file copy [Fig 1-1-2] Cab file install

DOTH-300 KEYWEDGE
Date 2013-07-26
Rev 3.02
Page 5
CONFIDENTIAL Document D.O.Tel. All rights of reproduction and disclosure reserved.
Uninstalling KeyWedge
■ Go to Start > Settings > Control Panel to open the Control Panel window.
Tab the Remove Program icon.
■ Select KeyWedge from the list of installed programs and tap the Remove
button. Tap the Yes button when the Remove Program dialog appears to
uninstall KeyWedge from the DOT mobile computer. (Refer to Fig 1-1-3, Fig
1-1-4, Fig 1-1-5, Fig 1-1-6)
[Fig 1-1-3] Start > Settings [Fig 1-1-4] Control Panel
> Control Panel
[Fig 1-1-5] [Fig 1-1-6]
Remove Programs 1
Remove Programs 2
■ Tab the Yes button when you delete the
user information. Otherwise, tab the No
button.
¶ NOTE. IF you delete user information,
set by default when you reinstall
KeyWedge.
[Fig 1-1-7] Delete user infomation

DOTH-300 KEYWEDGE
Date 2013-07-26
Rev 3.02
Page 6
CONFIDENTIAL Document D.O.Tel. All rights of reproduction and disclosure reserved.
KeyWedge Upgrade
■ Refer to Uninstalling Keywedge, uninstall KeyWedge from the DOT mobile
computer.
■ Refer to Installing Keywedge, on the DOT mobile computer to install
KeyWedge.
¶ NOTE. For proper operation, you must remove the previous program,
and then install it.
¶ NOTE. The previous version in order to keep the user information, tab
the “No” button in Figure 1-1-7. Otherwise, all user information after
the upgrade is set by default.
Start KeyWedge
■ Go to Start > Programs > KeyWedge or Tab Tray icon > Options…
(Refer to Fig 1-1-7, Fig 1-1-8)
■ Change the KeyWedge ON state and press the OK button. See 1-2:
KeyWedge Option for more information.
[Fig 1-1-7] KeyWedge [Fig 1-1-8] KeyWedge Tray Icon
¶ NOTE. If KeyWedge the OFF status or Tray Icon HIDE status, the
Tray icon does not appear.

DOTH-300 KEYWEDGE
Date 2013-07-26
Rev 3.02
Page 7
CONFIDENTIAL Document D.O.Tel. All rights of reproduction and disclosure reserved.
1-2: KeyWedge Option
You can set options for KeyWedge. Press the OK button to save your changes
KeyWedge Option.
GeneralSet Tab
■ KeyWedge: ON or OFF KeyWedge
Application.
■ Tray Icon: SHOW or HIDE the tray icon in
“KeyWede ON” mode.
■ Auto Run: During boot-up, the KeyWedge
can run.
[Fig 1-2-1] GeneralSet Tab
■ Device Enable: Select the device you want to use.
¶ NOTE. The SCANNER, UHF and HF depending on DOT mobile
computer will be inactive.
■ About: Show the version information for
the KeyWedge. (Refer to. Fig 1-2-2)
[Fig 1-2-2] About
WedgeSet Tab
■ Select Scan Type: Select SCANNER, HF
and UHF.
■ End of Scan: will define event following
decoded data
■ Key Operation: Select scan operation
mode. According to scan function key, 3
modes are supported.
[Fig 1-2-3] WedgeSet Tab

DOTH-300 KEYWEDGE
Date 2013-07-26
Rev 3.02
Page 8
CONFIDENTIAL Document D.O.Tel. All rights of reproduction and disclosure reserved.
Mode Key Down Key Up Success Time out
SYNC Reading Stop Stop Stop
ASYNC Reading No Change Stop Stop
CONTINOUS Reading Stop Retry Retry
■ Timeout: Set the time of reading data before the keyWedge stop.
(1sec~15sec)
■ Interval: Time interval that re-scan after previous scan success in
“CONTINOUS” mode. (100 msec~3000 msec)
■ Prefix: Prefix to data to add a string to the beginning of the data.
■ Suffix: Suffix to data to add a string to the end of the data.
Prefix Data Suffix End Of Scan
[Filed of data]
■ Emul Type: Select Send as events to enable sending keystrokes as keyboard
event and as clipboard event.
■ Emul Key Time(ms): Set the Emul key time option to specify the delay to be
inserted between each keystroke character that is sent, in “Keybaord”. (0 msec ~
1000msec)
■ Notification: Select the Beep or Vibration when scanner read successfully.
¶ NOTE. Emul Key Time(ms) function is supported in the following
versions and above.
- KeyWedge CAB Ver: H300CE_KeyWedge_R303.CAB
KeyMapping Tab
■ Left / Center / Right / Gun key: you can assign each key to different scan
device. (SCANNER, HF, UHF)
■ Setting: If combo box setting, the
configuration window of selected device will
appear. See 1-3: SCANNER Option, 1-4: HF
Option, 1-5: UHF Option for more
information.
[Fig 1-2-4] KeyMapping Tab
¶ NOTE. May vary depending on DOT
mobile computer.

DOTH-300 KEYWEDGE
Date 2013-07-26
Rev 3.02
Page 9
CONFIDENTIAL Document D.O.Tel. All rights of reproduction and disclosure reserved.
1-3: SCANNER Option
SCANNER Option
You can set barcode symbologies and options for scanner through
SCANNER Option.
Supported barcode symbols are listed.
Check the barcode symbol you want to read.
■ All Enable: Press All Enable button to
enable all decoders for the selected barcode
symbol.
■ All Disable: Press All Disable button to
disable all the decoders.
[Fig 1-3-1] SCANNER Option
■ Factory Reset: Resets all the settings of the Scanner.
¶ NOTE. Supported barcode symbol may vary depending on the scanner
model. If all barcode symbols to enable, it can take a long time to read.
■ Config…: Set the operation status of the scanner.
• Security Level: Set security level. (Only 1D Scanner)
• Enable Code Type: Barcode type is
enabled.
• Select Code Page: Set the code page.
(UTF-8, ANSI)
[Fig 1-3-2] Config…
• Enable Flash Mode: If selected
“Aimer&Illumination”, Flash mode to work. (Only 2D Scanner)
• Aimer/Illumination: set the Aimer/Illumination combinations that can be
used during a decode attempt. (Only 2D Scanner)
• Enable Centering Mode: Barcode in the center of the Aimer is read only.
(Only 2D Scanner)
¶ NOTE. Depending scanner models, “Config...” menu may be different.

DOTH-300 KEYWEDGE
Date 2013-07-26
Rev 3.02
Page 10
CONFIDENTIAL Document D.O.Tel. All rights of reproduction and disclosure reserved.
Tab the barcode symbol name from the list,
advanced options window appears.
However, the advanced options window is
supported depends on the barcode symbol.
■ Enable Aim ID: AIM ID is output.
[Fig 1-3-2] SCANNER
Advanced option
■ Return Check Digit: Transmit the symbol with or without the check digit.
■ Verify Check Digit: When this feature is enabled, the scan engine checks the
integrity of symbols to verify that the data
complies with specified check digit algorithm.
■ Send Start & Stop: When enabled, the start and stop character transmission.
■ Convert EAN8 to EAN13: Convert EAN-8 to EAN-13.
■ Convert UPCA to EAN13: Convert UPC-A to EAN-13.
■ Convert UPCE to EAN13: Convert UPC-E to EAN-13.
■ Convert UPCE to UPCA: Convert UPC-E to UPC-A.
■ Extended UPCE: Convert UPC-E to UPC-A.
■ Enable FNC1: CODE-128 and GS1-128 barcode to set the FNC1.
■ System Code: Transmit the system character.
■ System & Country Code: Transmit the system character and country code.
■ Full ASCII Mode: Full ASCII is a variant of symbols which pairs characters
to encode the full ASCII character set.
■ Min/Max Length: Minimum / Maximum length for valid barcode string for
this symbol.
■ Only Supplement: The scanner only decodes UPC/EAN symbols with
supplemental characters, and ignores symbols without supplementals.
■ Set Space Character: Determines if there is a space character between the
data from the bar code and the data from the addenda.

DOTH-300 KEYWEDGE
Date 2013-07-26
Rev 3.02
Page 11
CONFIDENTIAL Document D.O.Tel. All rights of reproduction and disclosure reserved.
¶ NOTE. The representation of active/inactive and terms Depend on the
scanner model.
1-4: HF Option
HF Option
You can set tag for HF RFID through HF Option.
Supported HF tags are listed. Check the HF
tag you want to read.
■ All Enable: Press All Enable button to
enable all decoders for the selected HF tag.
■ All Disable: Press All Disable button to
disable all the decoders.
[Fig 1-4-1] HF Option
■ Factory Reset: Resets all the settings of the HF RFID.
¶ NOTE. Can not support all the tags, depending on DOT mobile
computer.
¶ NOTE. If all HF tags to enable, it can take a long time to read.
DOTH-300 KEYWEDGE
Date 2013-07-26
Rev 3.02
Page 12
CONFIDENTIAL Document D.O.Tel. All rights of reproduction and disclosure reserved.
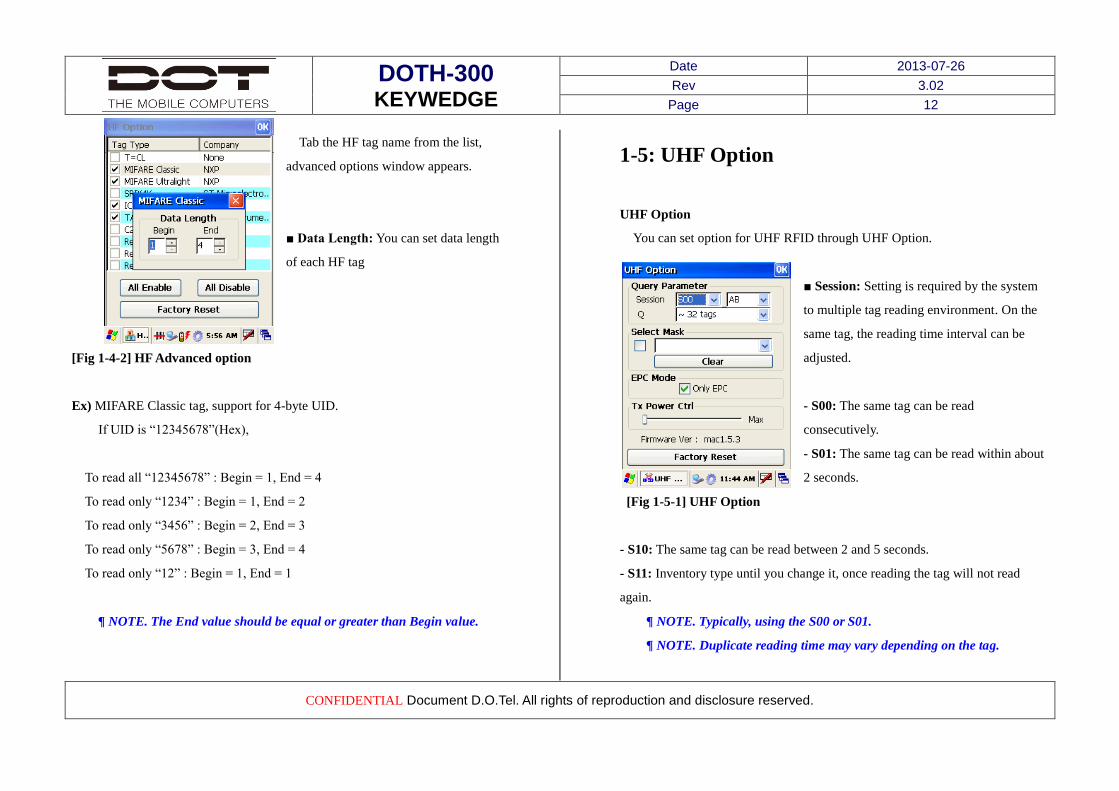
Tab the HF tag name from the list,
advanced options window appears.
■ Data Length: You can set data length
of each HF tag
[Fig 1-4-2] HF Advanced option
Ex) MIFARE Classic tag, support for 4-byte UID.
If UID is “12345678”(Hex),
To read all “12345678” : Begin = 1, End = 4
To read only “1234” : Begin = 1, End = 2
To read only “3456” : Begin = 2, End = 3
To read only “5678” : Begin = 3, End = 4
To read only “12” : Begin = 1, End = 1
¶ NOTE. The End value should be equal or greater than Begin value.
1-5: UHF Option
UHF Option
You can set option for UHF RFID through UHF Option.
■ Session: Setting is required by the system
to multiple tag reading environment. On the
same tag, the reading time interval can be
adjusted.
- S00: The same tag can be read
consecutively.
- S01: The same tag can be read within about
2 seconds.
[Fig 1-5-1] UHF Option
- S10: The same tag can be read between 2 and 5 seconds.
- S11: Inventory type until you change it, once reading the tag will not read
again.
¶ NOTE. Typically, using the S00 or S01.
¶ NOTE. Duplicate reading time may vary depending on the tag.

DOTH-300 KEYWEDGE
Date 2013-07-26
Rev 3.02
Page 13
CONFIDENTIAL Document D.O.Tel. All rights of reproduction and disclosure reserved.
■ Tag Inventory type: Set Inventory type of the tag to read.
- A: Only Inventory type A tag is read.
- B: Only Inventory type B tag is read.
- AB: All Inventory type A and B tag is read.
¶ NOTE. Typically, using the A or AB.
■ Q: The option to use when reading multiple tags. Its range is between
1~32768.
¶ NOTE. Typically, using the ~32tags.
■ Select Mask: Used to detect tag you already selected only. Select a tag from
the list of previously read tag and check.
■ EPC: EPC data output is set.
: EPC data is output only.
: PC and EPC data is output.
¶ NOTE. EPC Mode is supported in the
H300XX_KeyWedge_R0310.CAB version and above.
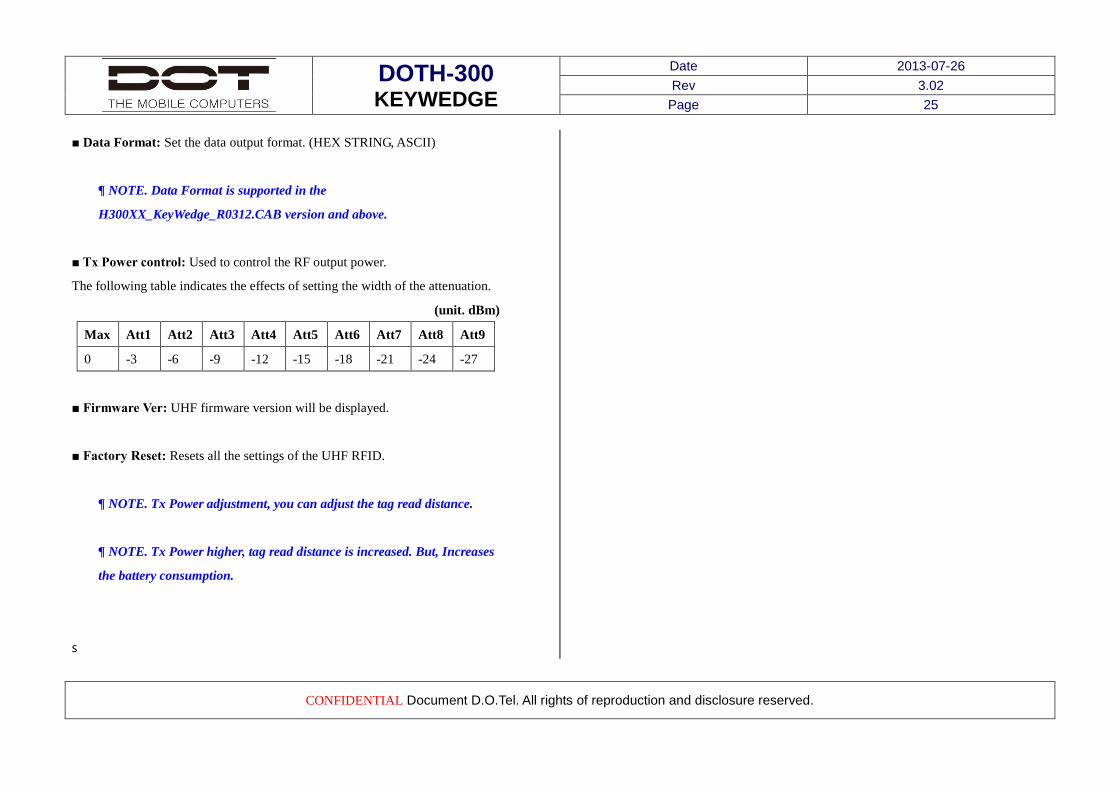
■ Data Format: Set the data output format. (HEX STRING, ASCII)
¶ NOTE. Data Format is supported in the
H300XX_KeyWedge_R0312.CAB version and above.
■ Tx Power control: Used to control the RF output power.
The following table indicates the effects of setting the width of the attenuation.
(unit. dBm)
Max Att1 Att2 Att3 Att4 Att5 Att6 Att7 Att8 Att9
0 -3 -6 -9 -12 -15 -18 -21 -24 -27
■ Firmware Ver: UHF firmware version will be displayed.
■ Factory Reset: Resets all the settings of the UHF RFID.
¶ NOTE. Tx Power adjustment, you can adjust the tag read distance.
¶ NOTE. Tx Power higher, tag read distance is increased. But, Increases
the battery consumption.

DOTH-300 KEYWEDGE
Date 2013-07-26
Rev 3.02
Page 14
CONFIDENTIAL Document D.O.Tel. All rights of reproduction and disclosure reserved.
Chapter 2: Windows Mobile
2-1: KeyWedge
You can enable/disable keyWedge for barcode scanner and HF RFID, UHF
RFID reader. Also you can specify each peripheral’s reading condition as
what you want.
Once KeyWedge is launched, you can set and modify all keyWedge settings
on KeyWedge Option.
Components
Supported file is as follows.
Model OS File
DOTH-300S(Q)
DOTH-300C(Q) Windows Mobile 6.5
KeyWedgeTray.exe
KeyWedgeOpt.exe
DOTH-300S(Q)
DOTH-300C(Q) Windows Mobile 6.5 ScannerOpt.exe
DOTH-300S(Q) Windows Mobile 6.5 HFOpt.exe
DOTH-300C(Q) Windows Mobile 6.5 UHFOpt.exe
Installing KeyWedge
■ Copy the latest version of H300wM_KeyWedge_Rxxxx.CAB to the DOT
Mobile Computer. (Refer to Fig 2-1-1)
■ Run H300WM_KeyWedge_Rxxxx.CAB on the DOT mobile computer to
install KeyWedge. (Refer to Fig 2-1-2)
■ After the installation is complete, KeyWedge will run
automatically.
[Fig 2-1-1] Cab file copy [Fig 2-1-2] Cab file install
Uninstalling KeyWedge

DOTH-300 KEYWEDGE
Date 2013-07-26
Rev 3.02
Page 15
CONFIDENTIAL Document D.O.Tel. All rights of reproduction and disclosure reserved.
■ Go to Start > Settings > System to open the System window. Tab the
Remove Programs applet.
■ Select KeyWedge from the list of installed programs and tap the Remove
button. Tap the Yes button when the Remove Program dialog appears to
uninstall KeyWedge from the DOT mobile computer. (Refer to Fig 2-1-3, Fig
2-1-4, Fig 2-1-5, Fig 2-1-6)
[Fig 2-1-3] Start > Settings [Fig 2-1-4] System
> System
[Fig 2-1-5] [Fig 2-1-6]
Remove Programs 1 Remove Programs 2
■ Tab the Yes button when you delete the user
information. Otherwise, tab the No button.
¶ NOTE. IF you delete user information, set
by default when you reinstall KeyWedge.
[Fig 2-1-7] Delete user information

DOTH-300 KEYWEDGE
Date 2013-07-26
Rev 3.02
Page 16
CONFIDENTIAL Document D.O.Tel. All rights of reproduction and disclosure reserved.
KeyWedge Upgrade
■ Refer to Uninstalling Keywedge, uninstall KeyWedge from the DOT mobile
computer.
■ Refer to Installing Keywedge, on the DOT mobile computer to install
KeyWedge.
¶ NOTE. For proper operation, you must remove the previous program,
and then install it.
¶ NOTE. The previous version in order to keep the user information, tab
the “No” button in Figure 1-1-7. Otherwise, all user information after
the upgrade is set by default.
Start KeyWedge
■ Go to Start > KeyWedge applet or Tab Tray icon > Options… (Refer
to Fig 2-1-7, Fig 2-1-8)
■ Change the KeyWedge ON state and press the OK button. See 2-3:
KeyWedge Option for more information.
[Fig 2-1-7] KeyWedge Applet [Fig 2-1-8] KeyWedge Tray Icon
¶ NOTE. If KeyWedge the OFF status or Tray Icon HIDE status, the
Tray icon does not appear.

DOTH-300 KEYWEDGE
Date 2013-07-26
Rev 3.02
Page 17
CONFIDENTIAL Document D.O.Tel. All rights of reproduction and disclosure reserved.
2-2: KeyWedge Home Screen
KeyWedge Home Screen register
■ Go to Start > Settings > Home to open the Home window. Tab the Items.
Select ( ) KeyWedge from the list of Home Screen and tag the OK button.
(Refer to Fig 2-2-1)
■ Registration is complete, KeyWedge On/Off status is displayed. (Refer to Fig
2-2-2)
■ Tab KeyWedge Home Screen, KeyWedge Option is executed.
KeyWedge Home Screen unregister
■ Go to Start > Settings > Home to open the Home window. Tab the Items.
Select ( ) KeyWedge from the list of Home Screen and tag the OK button.
(Refer to Fig 2-2-3)
■ Deregistration is complete, KeyWedge will be removed from Home Screen.
(Refer to Fig 2-2-4)
[Fig 2-2-1] Home > Items [Fig 2-2-2] Home Screen
[Fig 2-2-3] Home > Items [Fig 2-2-4] Home Screen

DOTH-300 KEYWEDGE
Date 2013-07-26
Rev 3.02
Page 18
CONFIDENTIAL Document D.O.Tel. All rights of reproduction and disclosure reserved.
¶ NOTE. KeyWedge Home Screen function is supported in the following
versions and above.
- KeyWedge CAB Ver: H300WM_KeyWedge_R0201.CAB
- Windows Mobile OS Ver: WMH300XXXXXXX05AX
2-3: KeyWedge Option
You can set options for KeyWedge. Press the OK button to save your changes
KeyWedge Option.
GeneralSet Tab
■ KeyWedge: ON or OFF KeyWedge
Application.
■ Tray Icon: SHOW or HIDE the tray icon in
“KeyWede ON” mode.
■ Auto Run: During boot-up, the KeyWedge
can run.
[Fig 2-3-1] GeneralSet Tab
■ Device Enable: Select the device you want to use.
¶ NOTE. The SCANNER, UHF and HF depending on DOT mobile
computer will be inactive.

DOTH-300 KEYWEDGE
Date 2013-07-26
Rev 3.02
Page 19
CONFIDENTIAL Document D.O.Tel. All rights of reproduction and disclosure reserved.
■ About: Show the version information for
the KeyWedge. (Refer to. Fig 2-3-2)
[Fig 2-3-2] About
WedgeSet Tab
■ Select Scan Type: Select SCANNER, HF
and UHF.
■ End of Scan: will define event following
decoded data
■ Key Operation: Select scan operation
mode. According to scan function key, 3
modes are supported.
[Fig 2-3-3] WedgeSet Tab
Mode Key Down Key Up Success Time out
SYNC Reading Stop Stop Stop
ASYNC Reading No Change Stop Stop
CONTINOUS Reading Stop Retry Retry
■ Timeout: Set the time of reading data before the keyWedge stop.
(1sec~15sec)
■ Interval: Time interval that re-scan after previous scan success in
“CONTINOUS” mode. (100 msec~3000 msec)
■ Prefix: Prefix to data to add a string to the beginning of the data.
■ Suffix: Suffix to data to add a string to the end of the data.
Prefix Data Suffix End Of Scan
[Filed of data]
■ Emul Type: Select Send as events to enable sending keystrokes as keyboard
event and as clipboard event.
■ Emul Key Time(ms): Set the Emul key time option to specify the delay to be
inserted between each keystroke character that is sent, in “Keybaord”. (0 msec ~
1000msec)

DOTH-300 KEYWEDGE
Date 2013-07-26
Rev 3.02
Page 20
CONFIDENTIAL Document D.O.Tel. All rights of reproduction and disclosure reserved.
■ Notification: Select the Beep or Vibration when scanner read successfully.
¶ NOTE. Emul Key Time(ms) function is supported in the following
versions and above.
- KeyWedge CAB Ver: H300WM_KeyWedge_R303.CAB
KeyMapping Tab
■ Left / Center / Right / Gun key: you can
assign each key to different scan device.
(SCANNER, HF, UHF)
■ Setting: If combo box setting, the
configuration window of selected device will
appear. See 2-4: SCANNER Option, 2-5:
HF Option, 2-6: UHF Option for more
information.
[Fig 2-3-4] KeyMapping Tab
¶ NOTE. May vary depending on DOT mobile computer.
2-4: SCANNER Option
SCANNER Option
You can set barcode symbologies and
options for scanner through SCANNER
Option.
Supported barcode symbols are listed.
Check the barcode symbol you want to read.
■ All Enable: Press All Enable button to
enable all decoders for the selected barcode
symbol.
■ All Disable: Press All Disable button to disable all the decoders.
[Fig 2-4-1] SCANNER Option
■ Factory Reset: Resets all the settings of the Scanner.
¶ NOTE. Supported barcode symbol may vary depending on the scanner
model. If all barcode symbols to enable, it can take a long time to read.

DOTH-300 KEYWEDGE
Date 2013-07-26
Rev 3.02
Page 21
CONFIDENTIAL Document D.O.Tel. All rights of reproduction and disclosure reserved.
■ Config…: Set the operation status of the scanner.
• Security Level: Set security level. (Only
1D Scanner)
• Enable Code Type: Barcode type is
enabled.
• Select Code Page: Set the code page.
(UTF-8, ANSI)
[Fig 2-4-2] Config…
• Enable Flash Mode: If selected “Aimer&Illumination”, Flash mode to
work. (Only 2D Scanner)
• Aimer/Illumination: set the Aimer/Illumination combinations that can be
used during a decode attempt. (Only 2D Scanner)
• Enable Centering Mode: Barcode in the center of the Aimer is read only.
(Only 2D Scanner)
¶ NOTE. Depending scanner models, “Config...” menu may be different.
Tab the barcode symbol name from the list,
advanced options window appears.
However, the advanced options window is
supported depends on the barcode symbol.
■ Enable Aim ID: AIM ID is output.
[Fig 2-4-3] SCANNER
Advanced option
■ Return Check Digit: Transmit the symbol with or without the check digit.
■ Verify Check Digit: When this feature is enabled, the scan engine checks the
integrity of symbols to verify that the data
complies with specified check digit algorithm.
■ Send Start & Stop: When enabled, the start and stop character transmission.
■ Convert EAN8 to EAN13: Convert EAN-8 to EAN-13.
■ Convert UPCA to EAN13: Convert UPC-A to EAN-13.

DOTH-300 KEYWEDGE
Date 2013-07-26
Rev 3.02
Page 22
CONFIDENTIAL Document D.O.Tel. All rights of reproduction and disclosure reserved.
■ Convert UPCE to EAN13: Convert UPC-E to EAN-13.
■ Convert UPCE to UPCA: Convert UPC-E to UPC-A.
■ Extended UPCE: Convert UPC-E to UPC-A.
■ Enable FNC1: CODE-128 and GS1-128 barcode to set the FNC1.
■ System Code: Transmit the system character.
■ System & Country Code: Transmit the system character and country code.
■ Full ASCII Mode: Full ASCII is a variant of symbols which pairs characters
to encode the full ASCII character set.
■ Min/Max Length: Minimum / Maximum length for valid barcode string for
this symbol.
■ Only Supplement: The scanner only decodes UPC/EAN symbols with
supplemental characters, and ignores symbols without supplementals.
■ Set Space Character: Determines if there is a space character between the
data from the bar code and the data from the addenda.
¶ NOTE. The representation of active/inactive and terms Depend on the
scanner model.

DOTH-300 KEYWEDGE
Date 2013-07-26
Rev 3.02
Page 23
CONFIDENTIAL Document D.O.Tel. All rights of reproduction and disclosure reserved.
2-5: HF Option
HF Option
You can set tag for HF RFID through HF Option.
Supported HF tags are listed. Check the HF
tag you want to read.
■ All Enable: Press All Enable button to
enable all decoders for the selected HF tag.
■ All Disable: Press All Disable button to
disable all the decoders.
[Fig 2-5-1] HF Option
■ Factory Reset: Resets all the settings of the HF RFID.
¶ NOTE. Can not support all the tags, depending on DOT mobile
computer.
¶ NOTE. If all HF tags to enable, it can take a long time to read.
Tab the HF tag name from the list,
advanced options window appears.
■ Data Length: You can set data length of
each HF tag
[Fig 2-5-2] HF Advanced option
Ex) MIFARE Classic tag, support for 4-byte UID.
If UID is “12345678”(Hex),
To read all “12345678” : Begin = 1, End = 4
To read only “1234” : Begin = 1, End = 2
To read only “3456” : Begin = 2, End = 3
To read only “5678” : Begin = 3, End = 4
To read only “12” : Begin = 1, End = 1
¶ NOTE. The End value should be equal or greater than Begin value.

DOTH-300 KEYWEDGE
Date 2013-07-26
Rev 3.02
Page 24
CONFIDENTIAL Document D.O.Tel. All rights of reproduction and disclosure reserved.
2-6: UHF Option
UHF Option
You can set option for UHF RFID through UHF Option.
■ Session: Setting is required by the system
to multiple tag reading environment. On the
same tag, the reading time interval can be
adjusted.
- S00: The same tag can be read consecutively.
- S01: The same tag can be read within about
2 seconds.
[Fig 2-6-1] UHF Option
- S10: The same tag can be read between 2 and 5 seconds.
- S11: Inventory type until you change it, once reading the tag will not read
again.
¶ NOTE. Typically, using the S00 or S01.
¶ NOTE. Duplicate reading time may vary depending on the tag.
■ Tag Inventory type: Set Inventory type of the tag to read.
- A: Only Inventory type A tag is read.
- B: Only Inventory type B tag is read.
- AB: All Inventory type A and B tag is read.
¶ NOTE. Typically, using the A or AB.
■ Q: The option to use when reading multiple tags. Its range is between
1~32768.
¶ NOTE. Typically, using the ~32tags.
■ Select Mask: Used to detect tag you already selected only. Select a tag from
the list of previously read tag and check.
■ EPC: EPC data output is set.
: EPC data is output only.
: PC and EPC data is output.
¶ NOTE. EPC Mode is supported in the
H300XX_KeyWedge_R0310.CAB version and above.
DOTH-300 KEYWEDGE
Date 2013-07-26
Rev 3.02
Page 25
CONFIDENTIAL Document D.O.Tel. All rights of reproduction and disclosure reserved.
■ Data Format: Set the data output format. (HEX STRING, ASCII)
¶ NOTE. Data Format is supported in the
H300XX_KeyWedge_R0312.CAB version and above.
■ Tx Power control: Used to control the RF output power.
The following table indicates the effects of setting the width of the attenuation.
(unit. dBm)
Max Att1 Att2 Att3 Att4 Att5 Att6 Att7 Att8 Att9
0 -3 -6 -9 -12 -15 -18 -21 -24 -27
■ Firmware Ver: UHF firmware version will be displayed.
■ Factory Reset: Resets all the settings of the UHF RFID.
¶ NOTE. Tx Power adjustment, you can adjust the tag read distance.
¶ NOTE. Tx Power higher, tag read distance is increased. But, Increases
the battery consumption.
s


