1
eFundi Tutorial:
Assignments
The Assignments tool allows instructors to create, distribute, collect, and grade online assignments. Assignments are typically private; student submissions are not visible to other users of the site. However, the instructor has the option to enable peer evaluation of assignments if desired. Assignments may be submitted via file upload or in-line using the Rich Text Editor, depending on instructor preference.
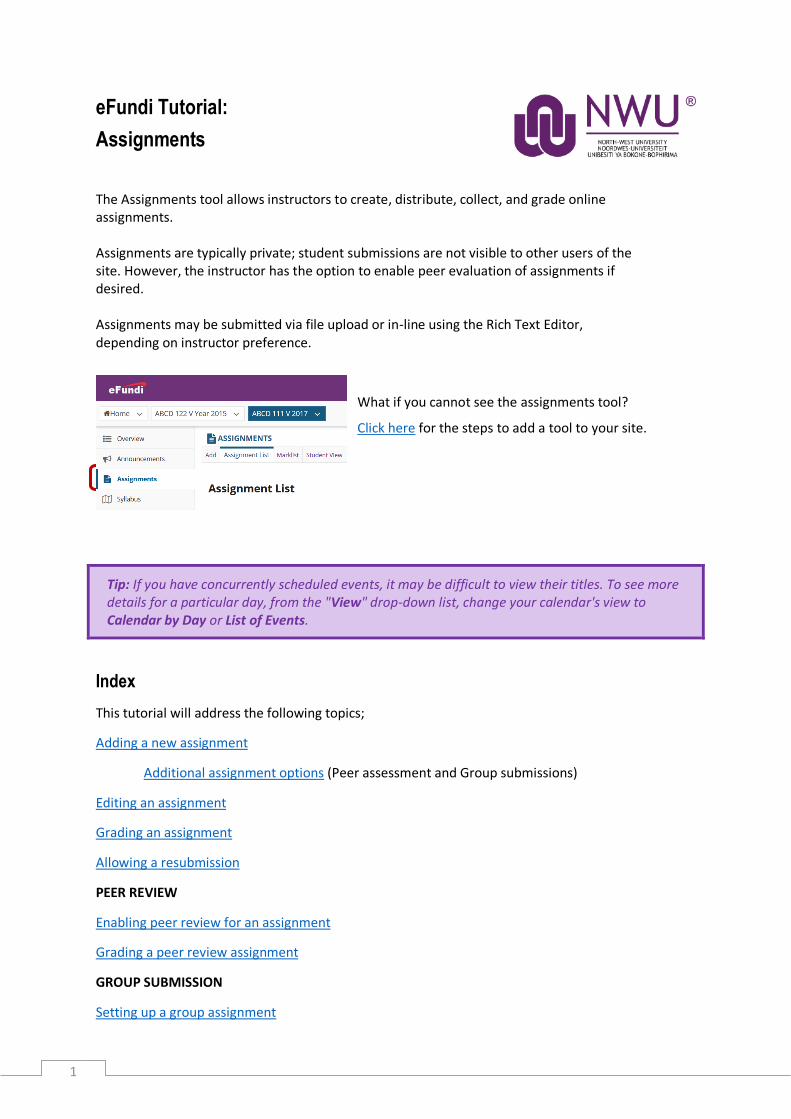
What if you cannot see the assignments tool?
Click here for the steps to add a tool to your site.
Tip: If you have concurrently scheduled events, it may be difficult to view their titles. To see more details for a particular day, from the "View" drop-down list, change your calendar's view to Calendar by Day or List of Events.
Index
This tutorial will address the following topics;
Adding a new assignment
Additional assignment options (Peer assessment and Group submissions)
Editing an assignment
Grading an assignment
Allowing a resubmission
PEER REVIEW
Enabling peer review for an assignment
Grading a peer review assignment
GROUP SUBMISSION
Setting up a group assignment
2
TURNITIN
Setting up TurnItIn
MARKING
Downloading all submissions at once
Uploading all submissions and feedback at once
Releasing assignment grades
How to Delete/Remove an assignment
Need help?
3
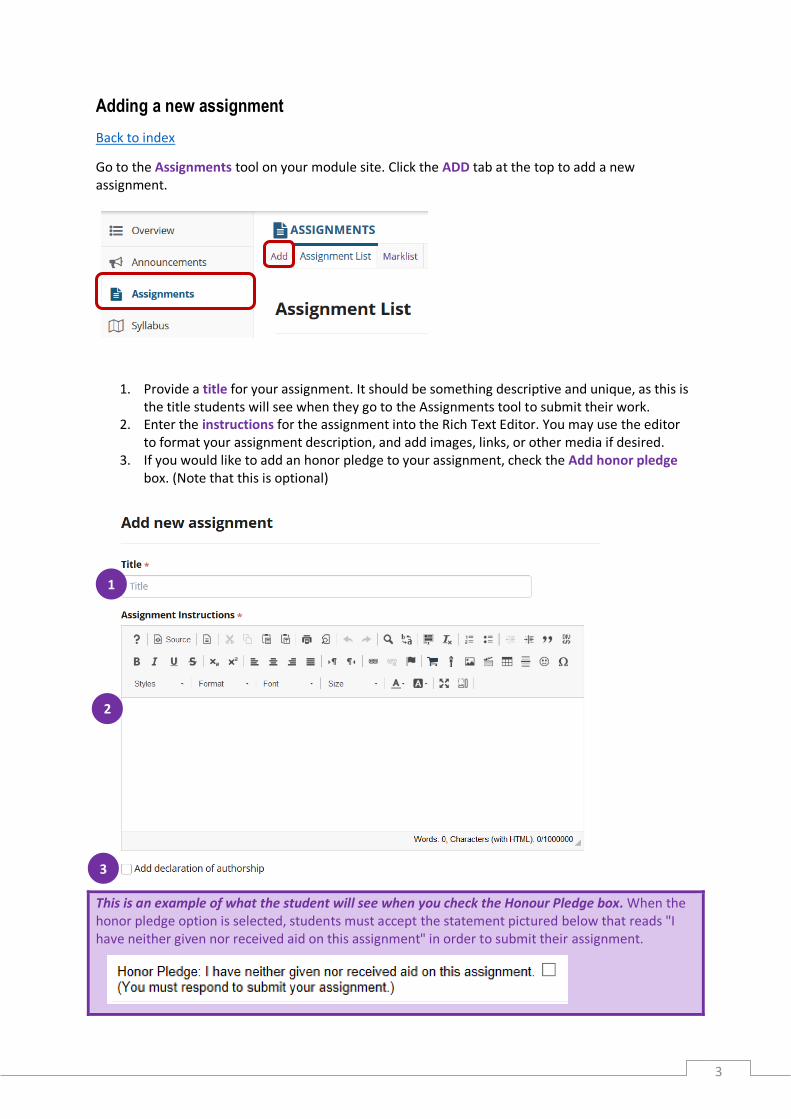
Adding a new assignment
Back to index
Go to the Assignments tool on your module site. Click the ADD tab at the top to add a new assignment.
1. Provide a title for your assignment. It should be something descriptive and unique, as this is the title students will see when they go to the Assignments tool to submit their work.
2. Enter the instructions for the assignment into the Rich Text Editor. You may use the editor to format your assignment description, and add images, links, or other media if desired.
3. If you would like to add an honor pledge to your assignment, check the Add honor pledge box. (Note that this is optional)
This is an example of what the student will see when you check the Honour Pledge box. When the honor pledge option is selected, students must accept the statement pictured below that reads "I have neither given nor received aid on this assignment" in order to submit their assignment.
1
1
2
3
4
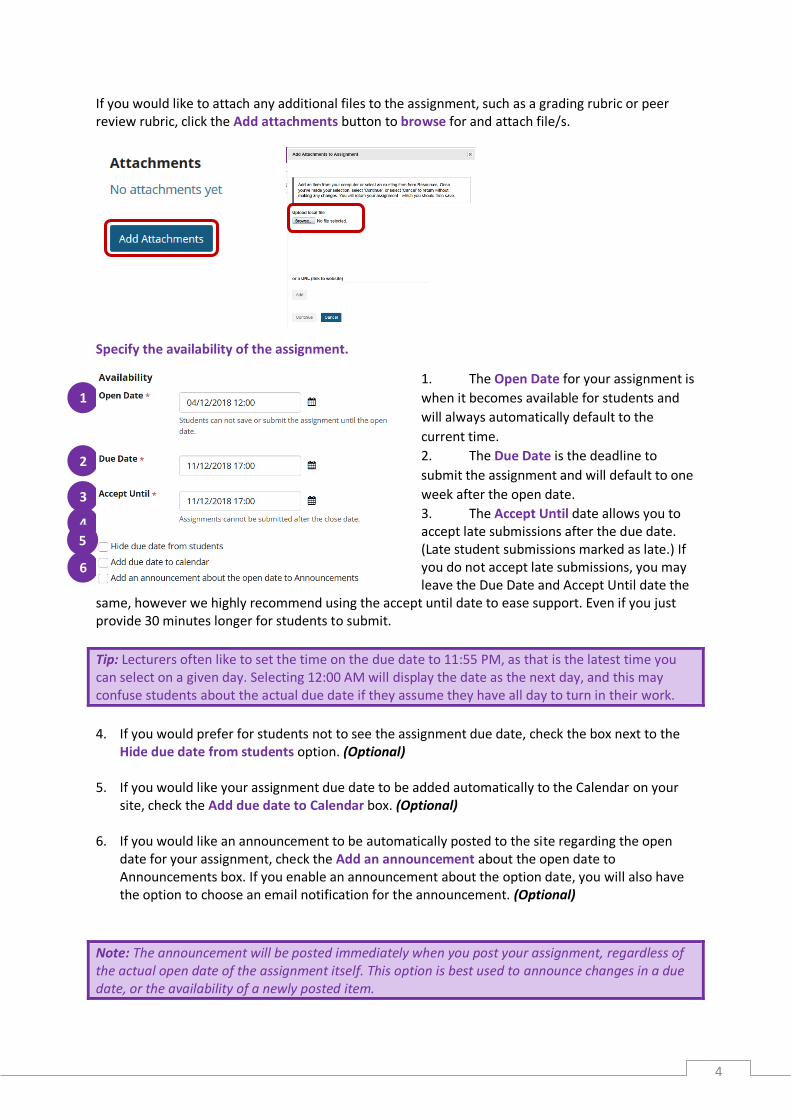
If you would like to attach any additional files to the assignment, such as a grading rubric or peer review rubric, click the Add attachments button to browse for and attach file/s.
Specify the availability of the assignment.
1. The Open Date for your assignment is
when it becomes available for students and
will always automatically default to the
current time.
2. The Due Date is the deadline to
submit the assignment and will default to one
week after the open date.
3. The Accept Until date allows you to accept late submissions after the due date. (Late student submissions marked as late.) If you do not accept late submissions, you may leave the Due Date and Accept Until date the
same, however we highly recommend using the accept until date to ease support. Even if you just provide 30 minutes longer for students to submit.
Tip: Lecturers often like to set the time on the due date to 11:55 PM, as that is the latest time you can select on a given day. Selecting 12:00 AM will display the date as the next day, and this may confuse students about the actual due date if they assume they have all day to turn in their work.
4. If you would prefer for students not to see the assignment due date, check the box next to the
Hide due date from students option. (Optional) 5. If you would like your assignment due date to be added automatically to the Calendar on your
site, check the Add due date to Calendar box. (Optional) 6. If you would like an announcement to be automatically posted to the site regarding the open
date for your assignment, check the Add an announcement about the open date to Announcements box. If you enable an announcement about the option date, you will also have the option to choose an email notification for the announcement. (Optional)
Note: The announcement will be posted immediately when you post your assignment, regardless of the actual open date of the assignment itself. This option is best used to announce changes in a due date, or the availability of a newly posted item.
1
2
3
4
6
5
5
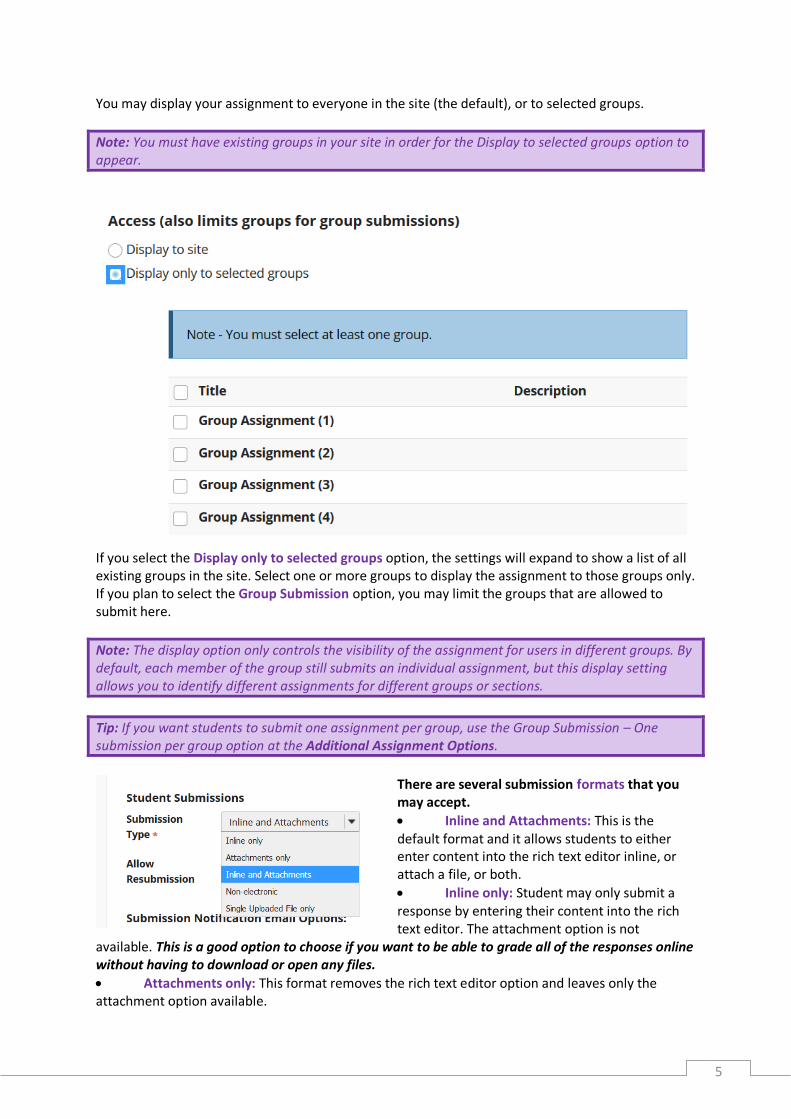
You may display your assignment to everyone in the site (the default), or to selected groups.
Note: You must have existing groups in your site in order for the Display to selected groups option to appear.
If you select the Display only to selected groups option, the settings will expand to show a list of all existing groups in the site. Select one or more groups to display the assignment to those groups only. If you plan to select the Group Submission option, you may limit the groups that are allowed to submit here.
Note: The display option only controls the visibility of the assignment for users in different groups. By default, each member of the group still submits an individual assignment, but this display setting allows you to identify different assignments for different groups or sections.
Tip: If you want students to submit one assignment per group, use the Group Submission – One submission per group option at the Additional Assignment Options.
There are several submission formats that you may accept.
Inline and Attachments: This is the default format and it allows students to either enter content into the rich text editor inline, or attach a file, or both.
Inline only: Student may only submit a response by entering their content into the rich text editor. The attachment option is not
available. This is a good option to choose if you want to be able to grade all of the responses online without having to download or open any files.
Attachments only: This format removes the rich text editor option and leaves only the attachment option available.
6
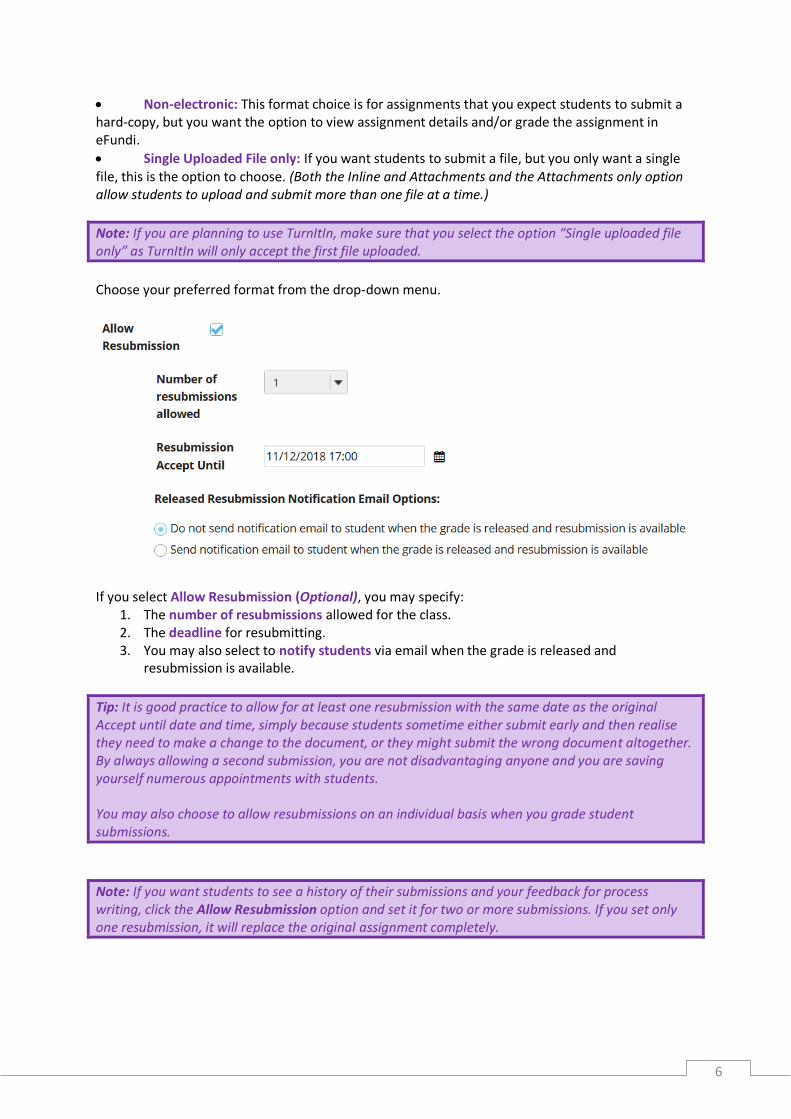
Non-electronic: This format choice is for assignments that you expect students to submit a hard-copy, but you want the option to view assignment details and/or grade the assignment in eFundi.
Single Uploaded File only: If you want students to submit a file, but you only want a single file, this is the option to choose. (Both the Inline and Attachments and the Attachments only option allow students to upload and submit more than one file at a time.)
Note: If you are planning to use TurnItIn, make sure that you select the option “Single uploaded file only” as TurnItIn will only accept the first file uploaded.
Choose your preferred format from the drop-down menu.
If you select Allow Resubmission (Optional), you may specify:
1. The number of resubmissions allowed for the class. 2. The deadline for resubmitting. 3. You may also select to notify students via email when the grade is released and
resubmission is available.
Tip: It is good practice to allow for at least one resubmission with the same date as the original Accept until date and time, simply because students sometime either submit early and then realise they need to make a change to the document, or they might submit the wrong document altogether. By always allowing a second submission, you are not disadvantaging anyone and you are saving yourself numerous appointments with students. You may also choose to allow resubmissions on an individual basis when you grade student submissions.
Note: If you want students to see a history of their submissions and your feedback for process writing, click the Allow Resubmission option and set it for two or more submissions. If you set only one resubmission, it will replace the original assignment completely.
7
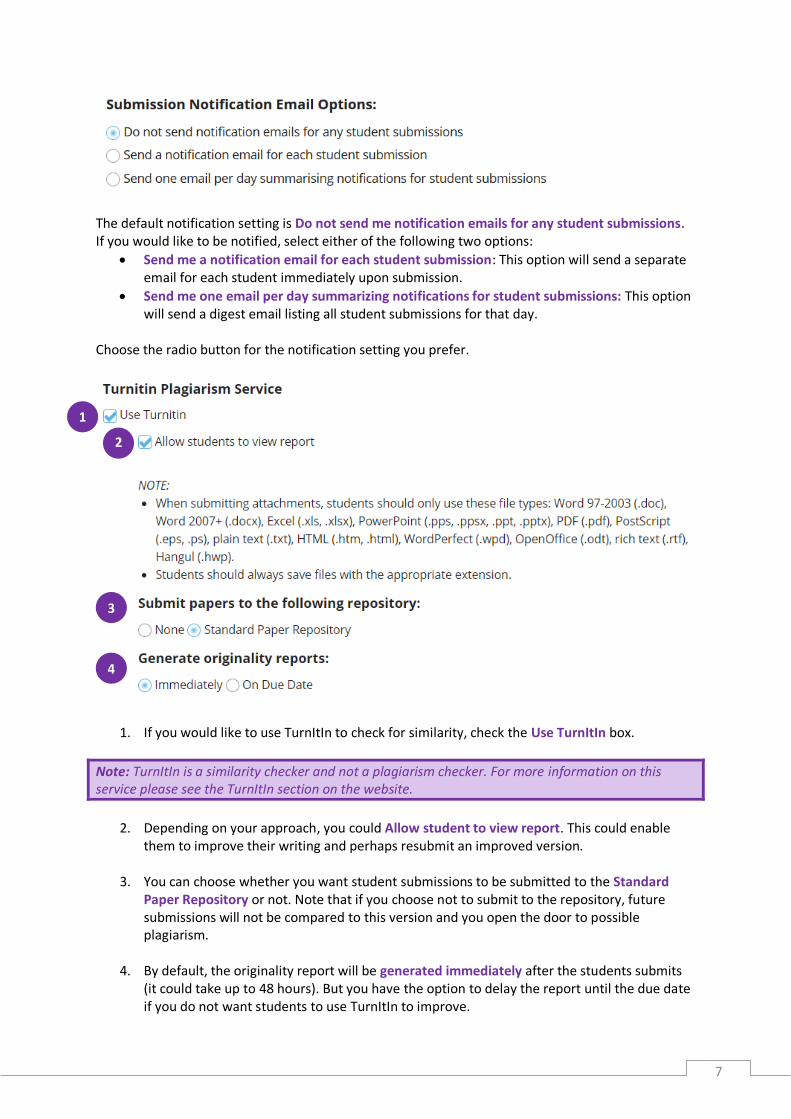
The default notification setting is Do not send me notification emails for any student submissions. If you would like to be notified, select either of the following two options:
Send me a notification email for each student submission: This option will send a separate email for each student immediately upon submission.
Send me one email per day summarizing notifications for student submissions: This option will send a digest email listing all student submissions for that day.
Choose the radio button for the notification setting you prefer.
1. If you would like to use TurnItIn to check for similarity, check the Use TurnItIn box.
Note: TurnItIn is a similarity checker and not a plagiarism checker. For more information on this service please see the TurnItIn section on the website.
2. Depending on your approach, you could Allow student to view report. This could enable
them to improve their writing and perhaps resubmit an improved version.
3. You can choose whether you want student submissions to be submitted to the Standard Paper Repository or not. Note that if you choose not to submit to the repository, future submissions will not be compared to this version and you open the door to possible plagiarism.
4. By default, the originality report will be generated immediately after the students submits
(it could take up to 48 hours). But you have the option to delay the report until the due date if you do not want students to use TurnItIn to improve.
4
1
2
1
3
8
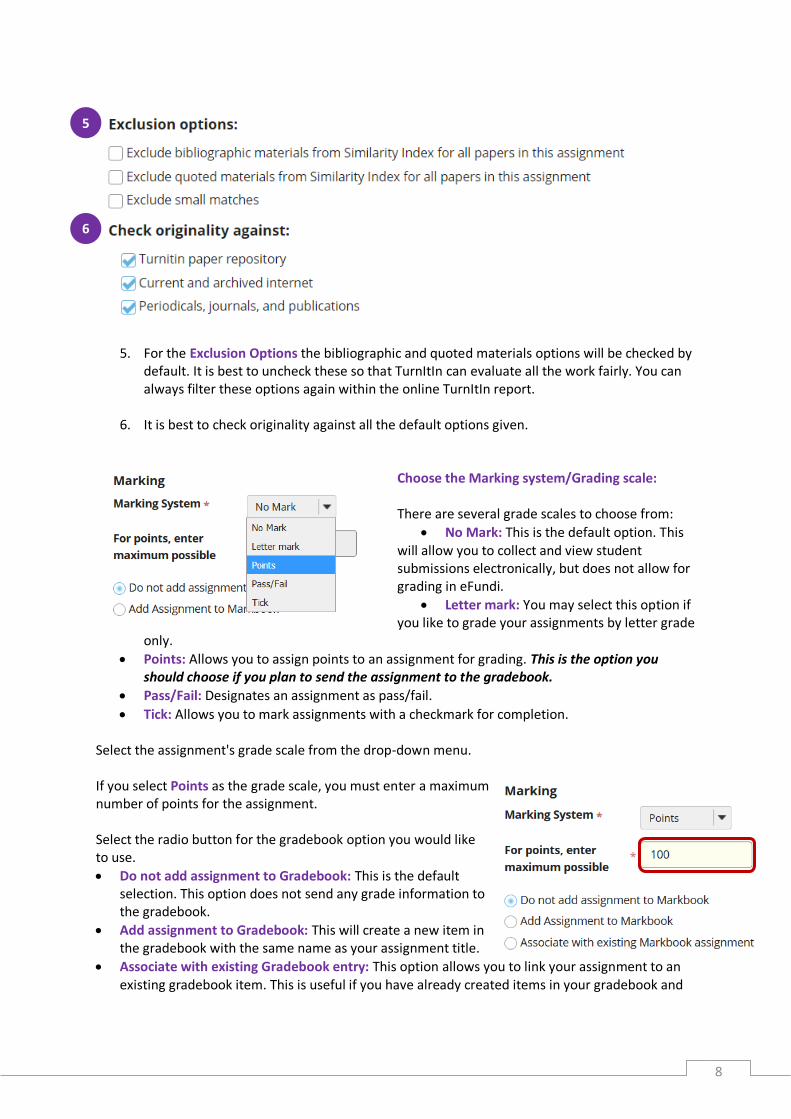
5. For the Exclusion Options the bibliographic and quoted materials options will be checked by default. It is best to uncheck these so that TurnItIn can evaluate all the work fairly. You can always filter these options again within the online TurnItIn report.
6. It is best to check originality against all the default options given.
Choose the Marking system/Grading scale: There are several grade scales to choose from:
No Mark: This is the default option. This will allow you to collect and view student submissions electronically, but does not allow for grading in eFundi.
Letter mark: You may select this option if you like to grade your assignments by letter grade
only.
Points: Allows you to assign points to an assignment for grading. This is the option you should choose if you plan to send the assignment to the gradebook.
Pass/Fail: Designates an assignment as pass/fail.
Tick: Allows you to mark assignments with a checkmark for completion. Select the assignment's grade scale from the drop-down menu. If you select Points as the grade scale, you must enter a maximum number of points for the assignment. Select the radio button for the gradebook option you would like to use.
Do not add assignment to Gradebook: This is the default selection. This option does not send any grade information to the gradebook.
Add assignment to Gradebook: This will create a new item in the gradebook with the same name as your assignment title.
Associate with existing Gradebook entry: This option allows you to link your assignment to an existing gradebook item. This is useful if you have already created items in your gradebook and
5
6
9
you want to use one of them, rather than creating a new assignment. You may only link an assignment to a single gradebook item, and vice versa.
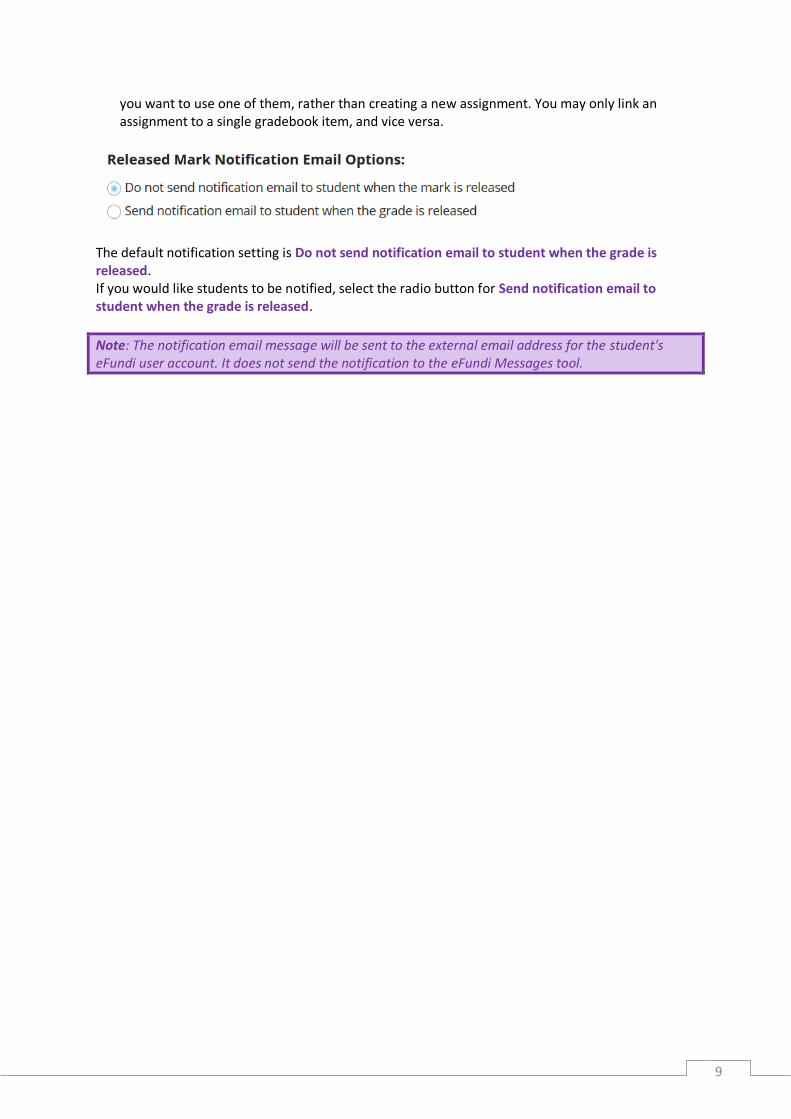
The default notification setting is Do not send notification email to student when the grade is released. If you would like students to be notified, select the radio button for Send notification email to student when the grade is released.
Note: The notification email message will be sent to the external email address for the student's eFundi user account. It does not send the notification to the eFundi Messages tool.
10
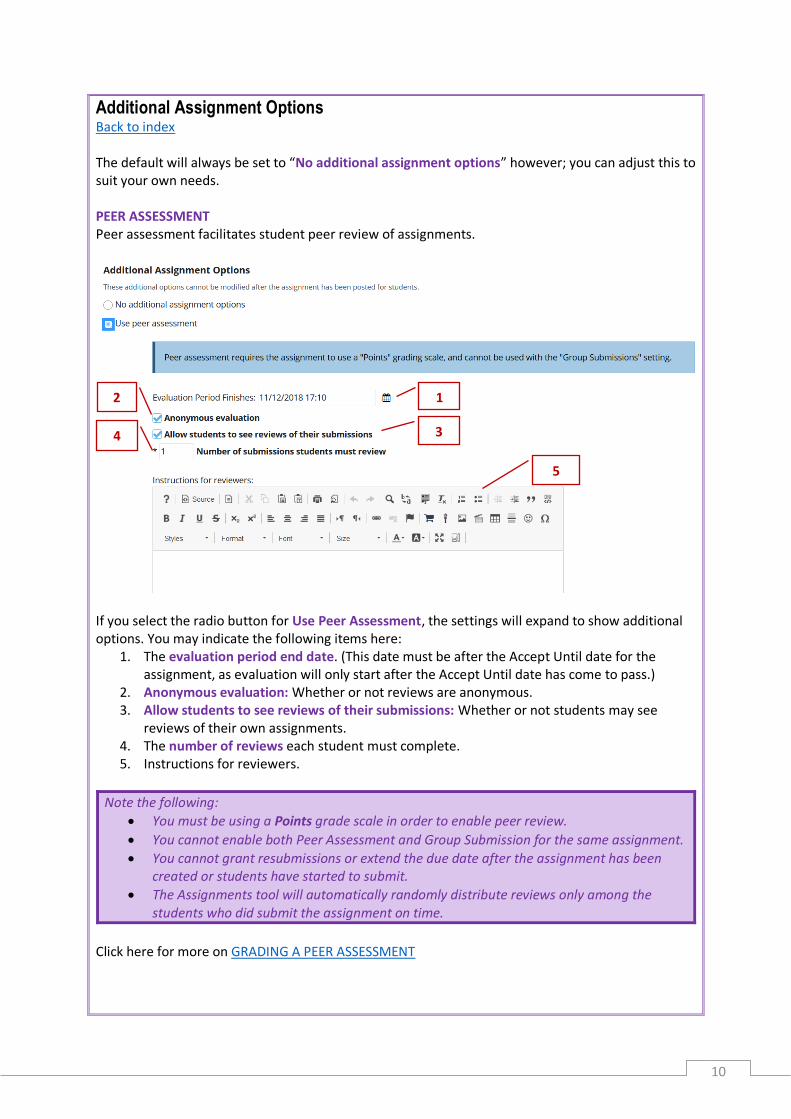
Additional Assignment Options Back to index The default will always be set to “No additional assignment options” however; you can adjust this to suit your own needs. PEER ASSESSMENT Peer assessment facilitates student peer review of assignments.
If you select the radio button for Use Peer Assessment, the settings will expand to show additional options. You may indicate the following items here:
1. The evaluation period end date. (This date must be after the Accept Until date for the assignment, as evaluation will only start after the Accept Until date has come to pass.)
2. Anonymous evaluation: Whether or not reviews are anonymous. 3. Allow students to see reviews of their submissions: Whether or not students may see
reviews of their own assignments. 4. The number of reviews each student must complete. 5. Instructions for reviewers.
Note the following:
You must be using a Points grade scale in order to enable peer review.
You cannot enable both Peer Assessment and Group Submission for the same assignment.
You cannot grant resubmissions or extend the due date after the assignment has been created or students have started to submit.
The Assignments tool will automatically randomly distribute reviews only among the students who did submit the assignment on time.
Click here for more on GRADING A PEER ASSESSMENT
2 1
3 4
5
11
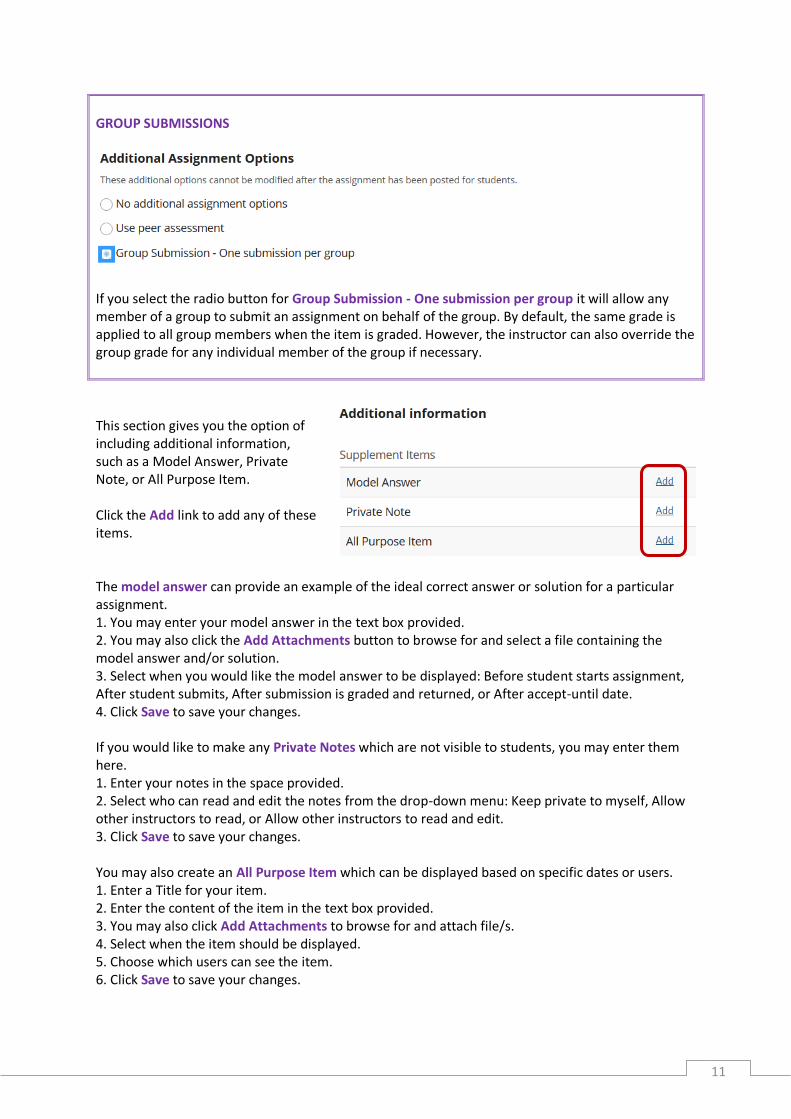
GROUP SUBMISSIONS
If you select the radio button for Group Submission - One submission per group it will allow any member of a group to submit an assignment on behalf of the group. By default, the same grade is applied to all group members when the item is graded. However, the instructor can also override the group grade for any individual member of the group if necessary.
This section gives you the option of including additional information, such as a Model Answer, Private Note, or All Purpose Item. Click the Add link to add any of these items. The model answer can provide an example of the ideal correct answer or solution for a particular assignment. 1. You may enter your model answer in the text box provided. 2. You may also click the Add Attachments button to browse for and select a file containing the model answer and/or solution. 3. Select when you would like the model answer to be displayed: Before student starts assignment, After student submits, After submission is graded and returned, or After accept-until date. 4. Click Save to save your changes. If you would like to make any Private Notes which are not visible to students, you may enter them here. 1. Enter your notes in the space provided. 2. Select who can read and edit the notes from the drop-down menu: Keep private to myself, Allow other instructors to read, or Allow other instructors to read and edit. 3. Click Save to save your changes. You may also create an All Purpose Item which can be displayed based on specific dates or users. 1. Enter a Title for your item. 2. Enter the content of the item in the text box provided. 3. You may also click Add Attachments to browse for and attach file/s. 4. Select when the item should be displayed. 5. Choose which users can see the item. 6. Click Save to save your changes.
12
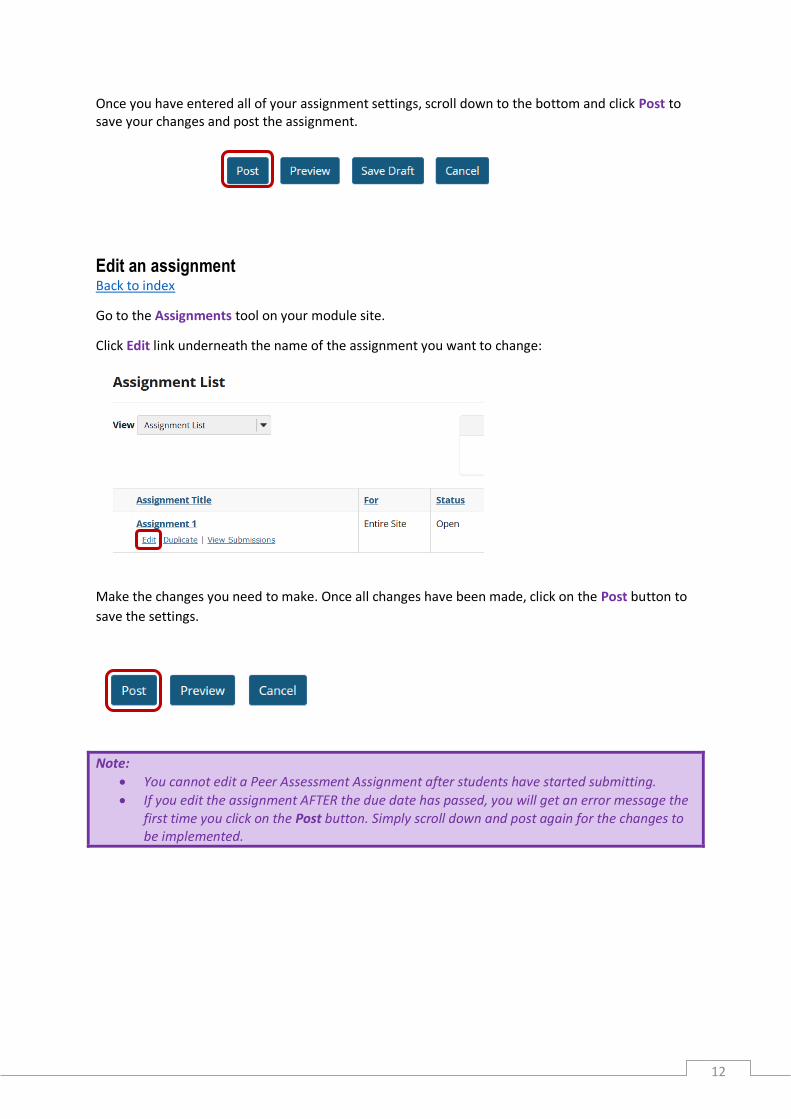
Once you have entered all of your assignment settings, scroll down to the bottom and click Post to save your changes and post the assignment.
Edit an assignment Back to index
Go to the Assignments tool on your module site.
Click Edit link underneath the name of the assignment you want to change:
Make the changes you need to make. Once all changes have been made, click on the Post button to
save the settings.
Note:
You cannot edit a Peer Assessment Assignment after students have started submitting.
If you edit the assignment AFTER the due date has passed, you will get an error message the first time you click on the Post button. Simply scroll down and post again for the changes to be implemented.
13
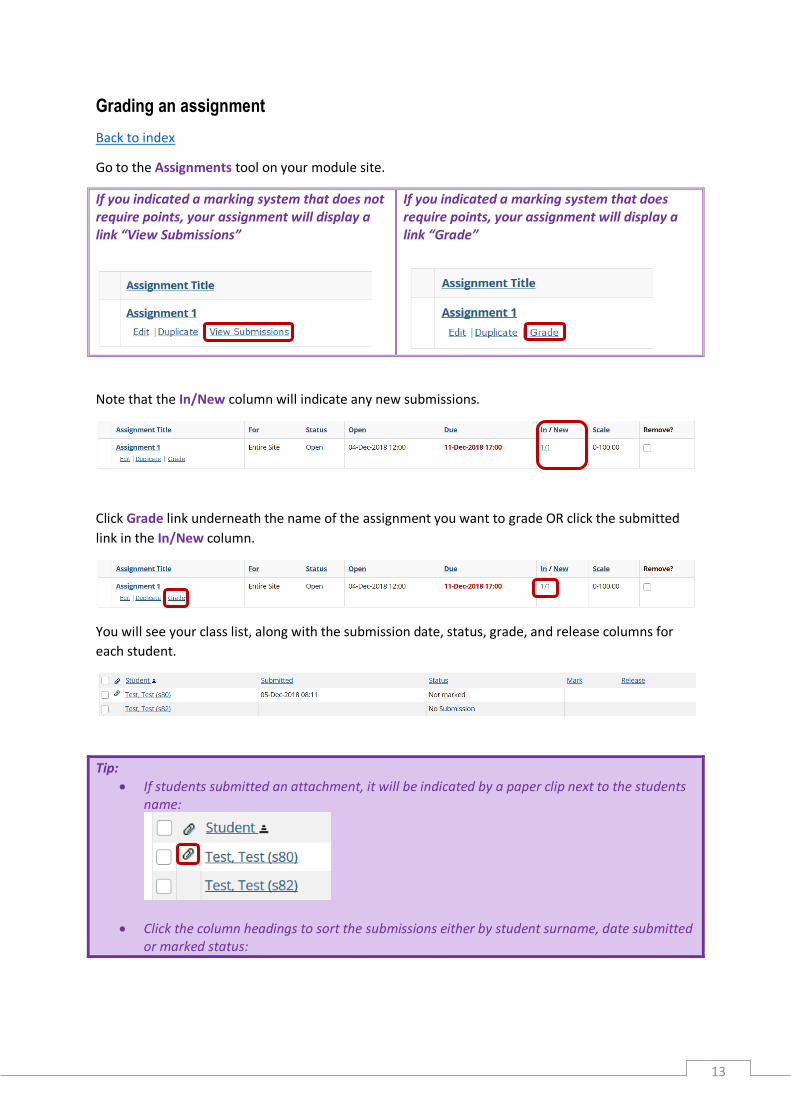
Grading an assignment
Back to index
Go to the Assignments tool on your module site.
If you indicated a marking system that does not require points, your assignment will display a link “View Submissions”
If you indicated a marking system that does require points, your assignment will display a link “Grade”
Note that the In/New column will indicate any new submissions.
Click Grade link underneath the name of the assignment you want to grade OR click the submitted
link in the In/New column.
You will see your class list, along with the submission date, status, grade, and release columns for
each student.
Tip:
If students submitted an attachment, it will be indicated by a paper clip next to the students name:
Click the column headings to sort the submissions either by student surname, date submitted or marked status:
14
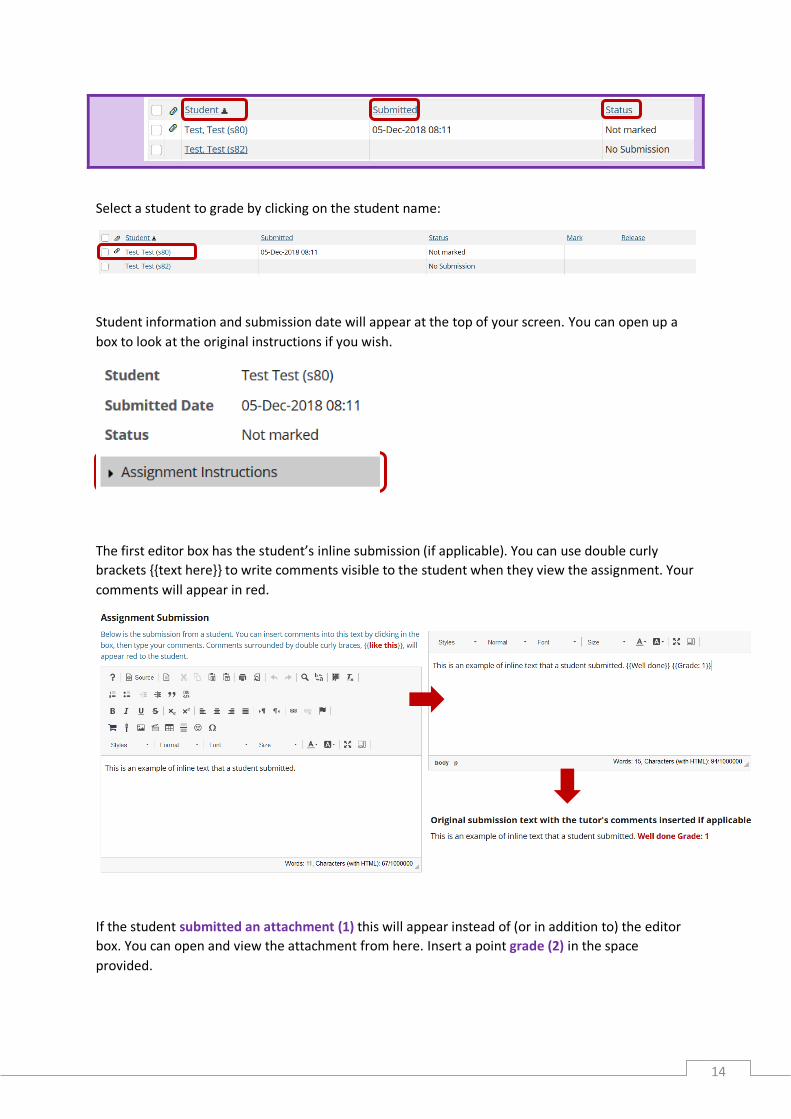
Select a student to grade by clicking on the student name:
Student information and submission date will appear at the top of your screen. You can open up a
box to look at the original instructions if you wish.
The first editor box has the student’s inline submission (if applicable). You can use double curly
brackets {{text here}} to write comments visible to the student when they view the assignment. Your
comments will appear in red.
If the student submitted an attachment (1) this will appear instead of (or in addition to) the editor
box. You can open and view the attachment from here. Insert a point grade (2) in the space
provided.
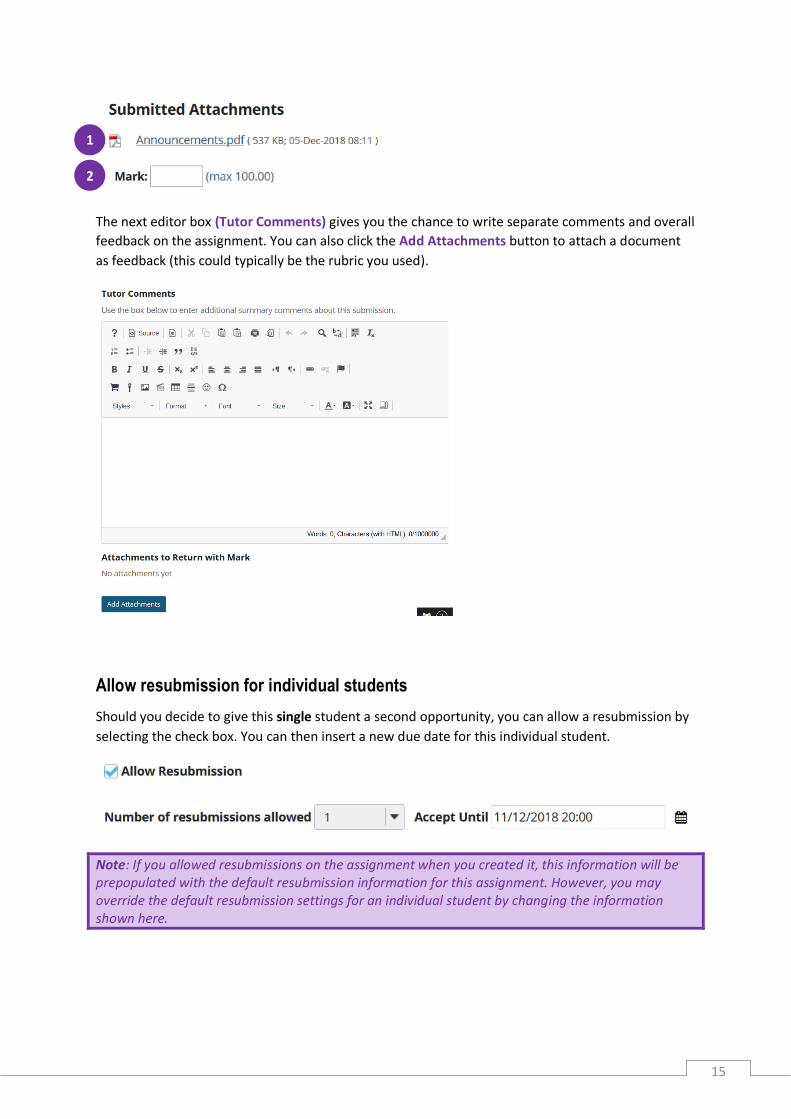
15
The next editor box (Tutor Comments) gives you the chance to write separate comments and overall
feedback on the assignment. You can also click the Add Attachments button to attach a document
as feedback (this could typically be the rubric you used).
Allow resubmission for individual students
Should you decide to give this single student a second opportunity, you can allow a resubmission by
selecting the check box. You can then insert a new due date for this individual student.
Note: If you allowed resubmissions on the assignment when you created it, this information will be prepopulated with the default resubmission information for this assignment. However, you may override the default resubmission settings for an individual student by changing the information shown here.
2
1
16
Once done, you can either save the grade and not release to student, or save and release. It is
recommended that you do not release grades until all assignments have been graded.
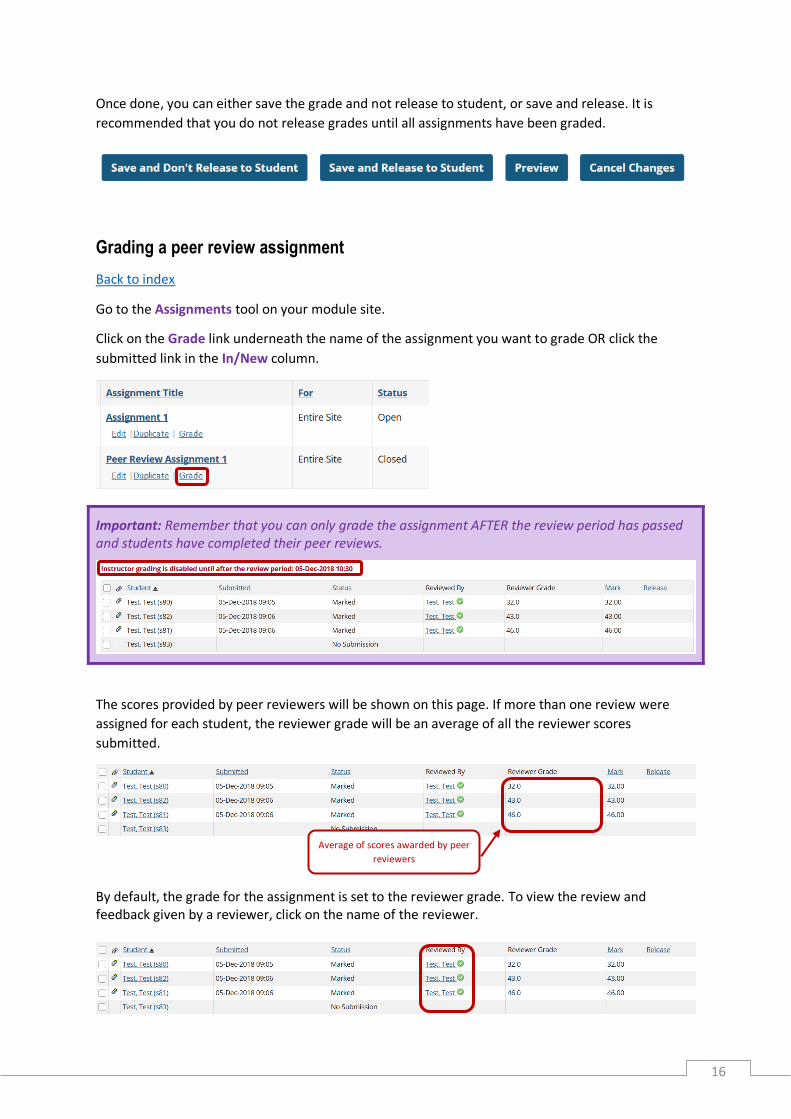
Grading a peer review assignment
Back to index
Go to the Assignments tool on your module site.
Click on the Grade link underneath the name of the assignment you want to grade OR click the
submitted link in the In/New column.
Important: Remember that you can only grade the assignment AFTER the review period has passed and students have completed their peer reviews.
The scores provided by peer reviewers will be shown on this page. If more than one review were
assigned for each student, the reviewer grade will be an average of all the reviewer scores
submitted.
By default, the grade for the assignment is set to the reviewer grade. To view the review and feedback given by a reviewer, click on the name of the reviewer.
Average of scores awarded by peer
reviewers
17
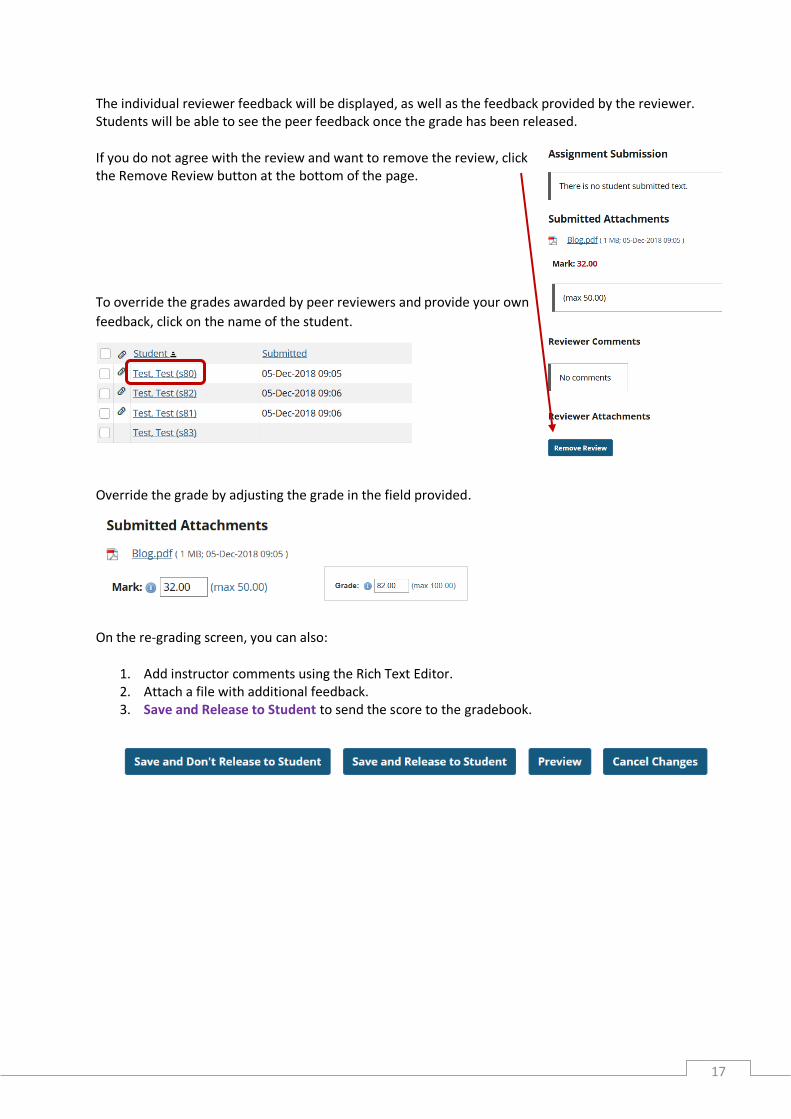
The individual reviewer feedback will be displayed, as well as the feedback provided by the reviewer. Students will be able to see the peer feedback once the grade has been released.
If you do not agree with the review and want to remove the review, click the Remove Review button at the bottom of the page.
To override the grades awarded by peer reviewers and provide your own
feedback, click on the name of the student.
Override the grade by adjusting the grade in the field provided.
On the re-grading screen, you can also:
1. Add instructor comments using the Rich Text Editor. 2. Attach a file with additional feedback. 3. Save and Release to Student to send the score to the gradebook.
18
Downloading all submissions at once
Back to index
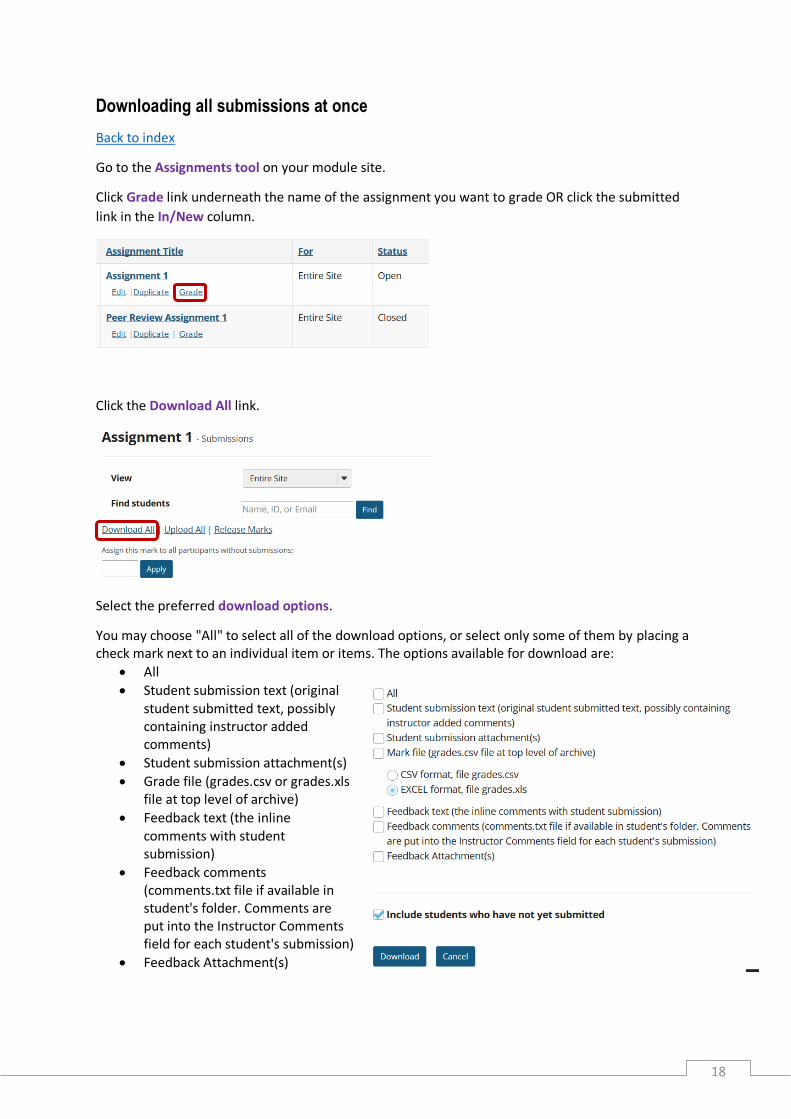
Go to the Assignments tool on your module site.
Click Grade link underneath the name of the assignment you want to grade OR click the submitted
link in the In/New column.
Click the Download All link.
Select the preferred download options.
You may choose "All" to select all of the download options, or select only some of them by placing a check mark next to an individual item or items. The options available for download are:
All
Student submission text (original student submitted text, possibly containing instructor added comments)
Student submission attachment(s)
Grade file (grades.csv or grades.xls file at top level of archive)
Feedback text (the inline comments with student submission)
Feedback comments (comments.txt file if available in student's folder. Comments are put into the Instructor Comments field for each student's submission)
Feedback Attachment(s)
19
You can also choose whether or not you want to include files for the students who have not
submitted.
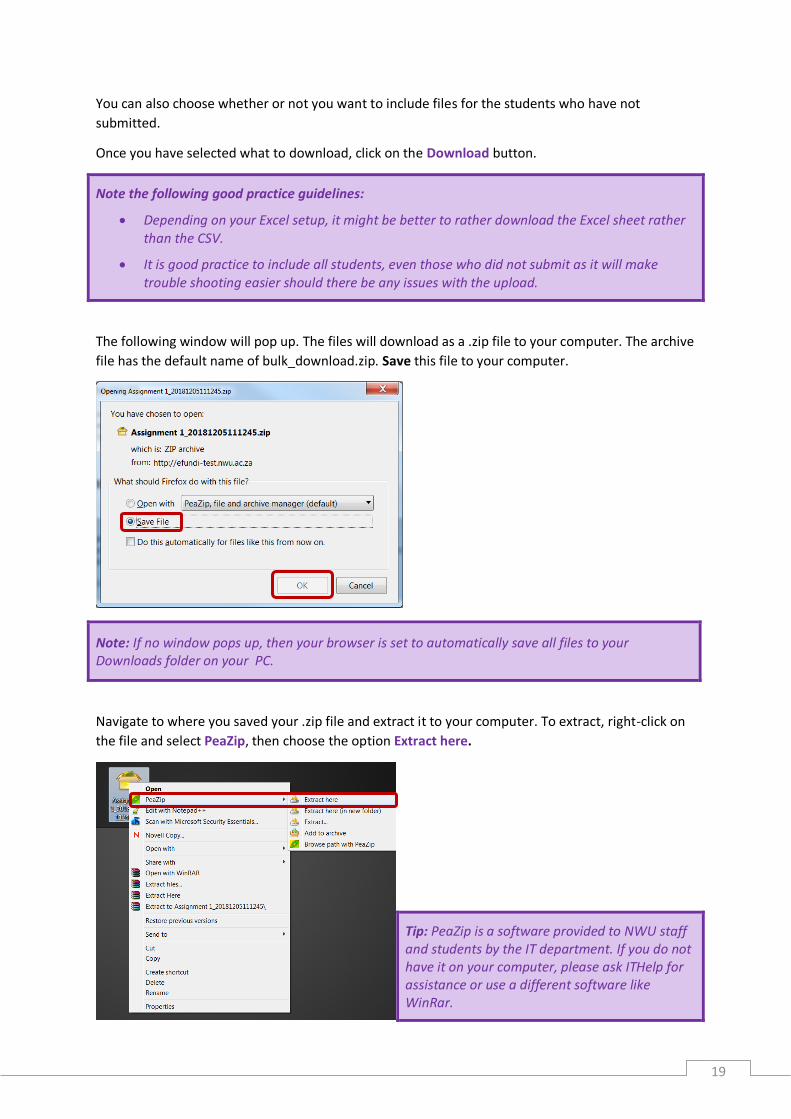
Once you have selected what to download, click on the Download button.
Note the following good practice guidelines:
Depending on your Excel setup, it might be better to rather download the Excel sheet rather than the CSV.
It is good practice to include all students, even those who did not submit as it will make trouble shooting easier should there be any issues with the upload.
The following window will pop up. The files will download as a .zip file to your computer. The archive
file has the default name of bulk_download.zip. Save this file to your computer.
Note: If no window pops up, then your browser is set to automatically save all files to your Downloads folder on your PC.
Navigate to where you saved your .zip file and extract it to your computer. To extract, right-click on
the file and select PeaZip, then choose the option Extract here.
Tip: PeaZip is a software provided to NWU staff and students by the IT department. If you do not have it on your computer, please ask ITHelp for assistance or use a different software like WinRar.
20
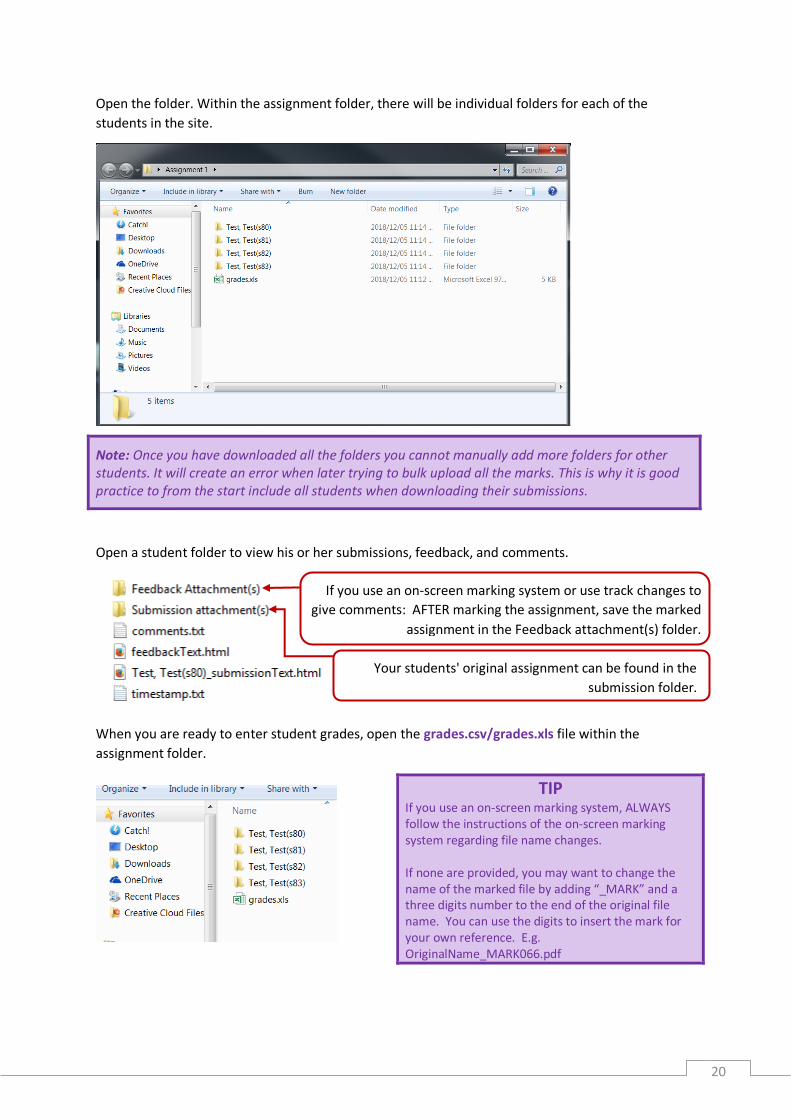
Open the folder. Within the assignment folder, there will be individual folders for each of the
students in the site.
Note: Once you have downloaded all the folders you cannot manually add more folders for other students. It will create an error when later trying to bulk upload all the marks. This is why it is good practice to from the start include all students when downloading their submissions.
Open a student folder to view his or her submissions, feedback, and comments.
When you are ready to enter student grades, open the grades.csv/grades.xls file within the
assignment folder.
TIP If you use an on-screen marking system, ALWAYS follow the instructions of the on-screen marking system regarding file name changes. If none are provided, you may want to change the name of the marked file by adding “_MARK” and a three digits number to the end of the original file name. You can use the digits to insert the mark for your own reference. E.g. OriginalName_MARK066.pdf
If you use an on-screen marking system or use track changes to
give comments: AFTER marking the assignment, save the marked
assignment in the Feedback attachment(s) folder.
Your students' original assignment can be found in the
submission folder.
21
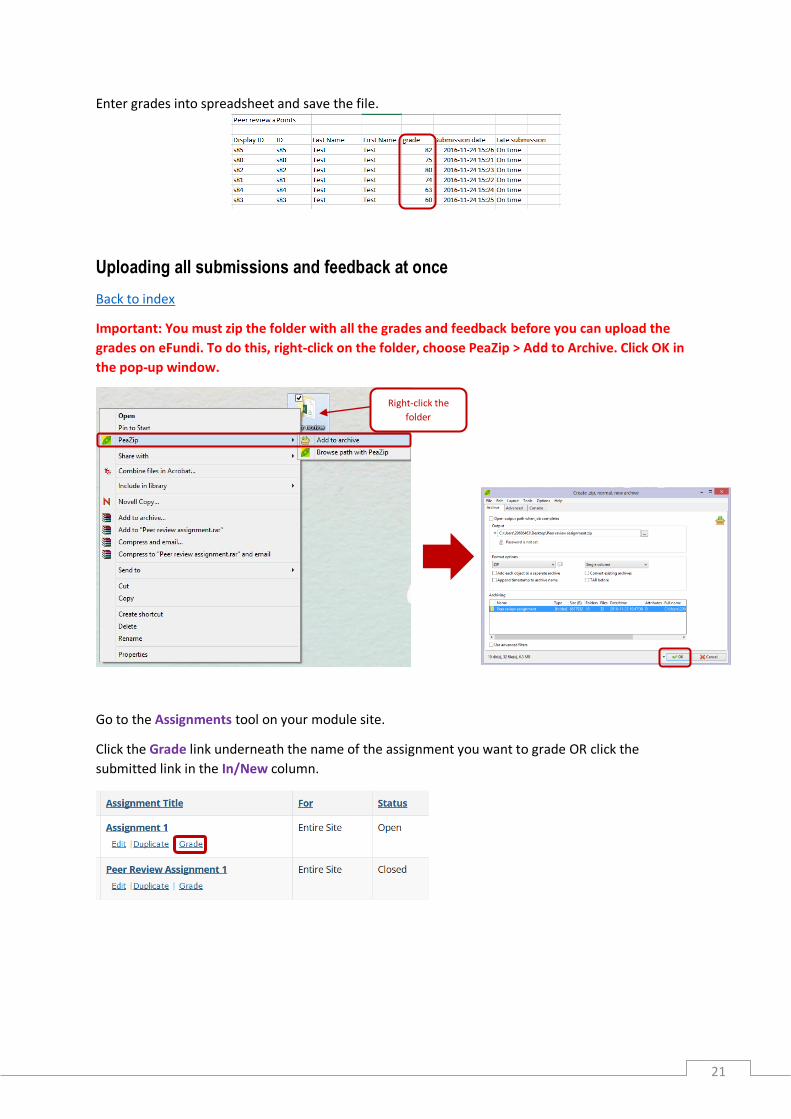
Enter grades into spreadsheet and save the file.
Uploading all submissions and feedback at once
Back to index
Important: You must zip the folder with all the grades and feedback before you can upload the
grades on eFundi. To do this, right-click on the folder, choose PeaZip > Add to Archive. Click OK in
the pop-up window.
Go to the Assignments tool on your module site.
Click the Grade link underneath the name of the assignment you want to grade OR click the
submitted link in the In/New column.
Right-click the
folder
22
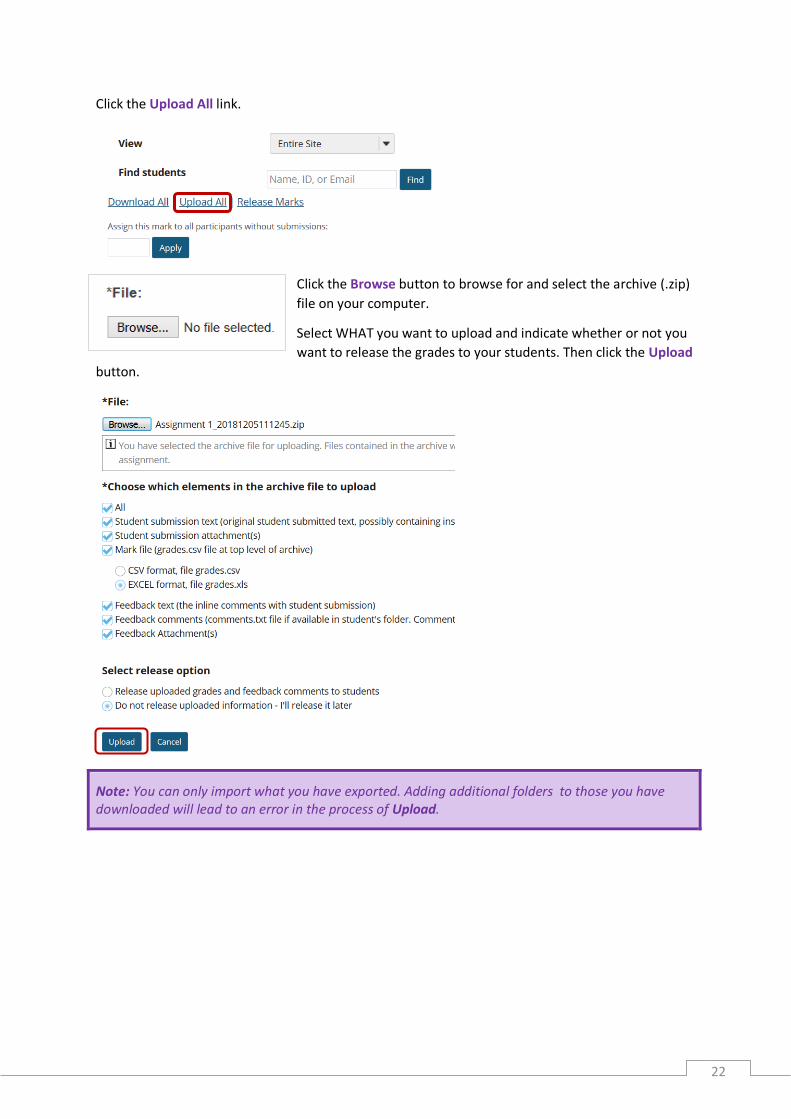
Click the Upload All link.
Click the Browse button to browse for and select the archive (.zip)
file on your computer.
Select WHAT you want to upload and indicate whether or not you
want to release the grades to your students. Then click the Upload
button.
Note: You can only import what you have exported. Adding additional folders to those you have downloaded will lead to an error in the process of Upload.

23
Releasing assignment grades
Back to index
Go to the Assignments tool on your module site.
Click the Grade link underneath the name of the assignment you want to grade OR click the
submitted link in the In/New column.
Click the Release Marks link.
Once grades have been released to students, you will see a check mark in the Release column.
How to remove/delete an assignment
Back to index
In the assignment list, select the assignments you want to remove/delete by clicking the relevant
check boxes in the Remove? column.
Click the Remove Selected button at the bottom of the list.
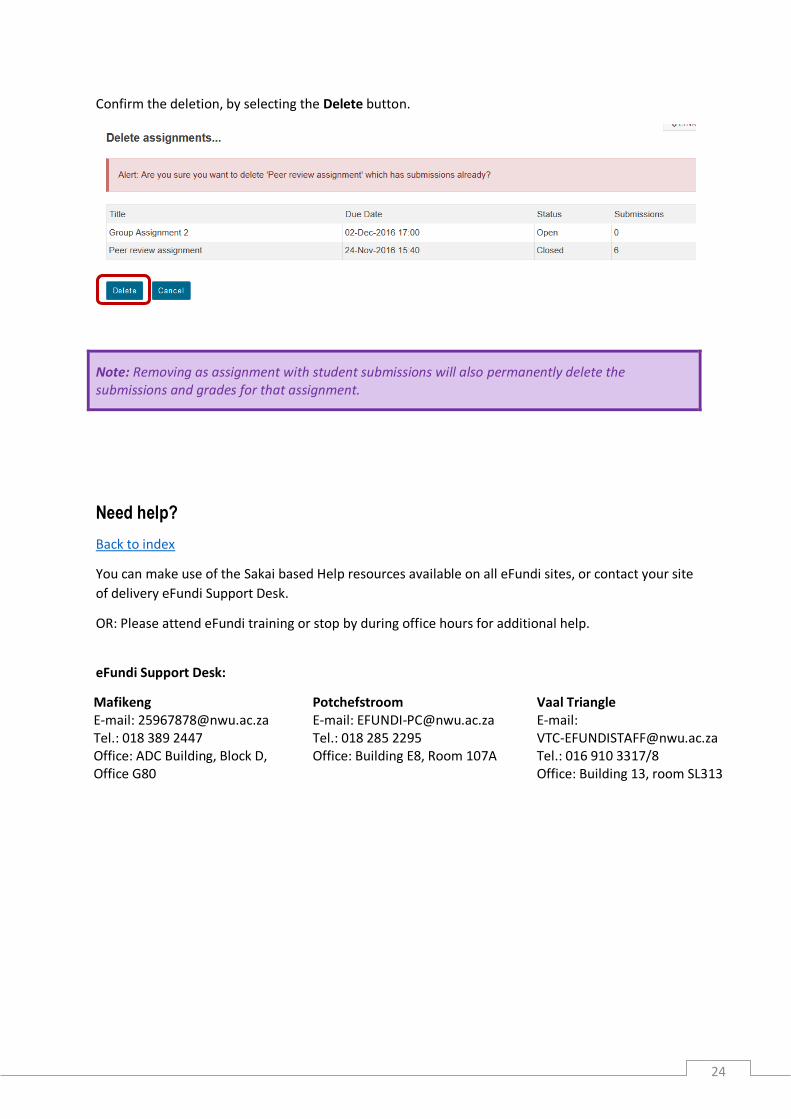
24
Confirm the deletion, by selecting the Delete button.
Note: Removing as assignment with student submissions will also permanently delete the submissions and grades for that assignment.
Need help?
Back to index
You can make use of the Sakai based Help resources available on all eFundi sites, or contact your site
of delivery eFundi Support Desk.
OR: Please attend eFundi training or stop by during office hours for additional help.
eFundi Support Desk:
Mafikeng E-mail: [email protected] Tel.: 018 389 2447 Office: ADC Building, Block D, Office G80
Potchefstroom E-mail: [email protected] Tel.: 018 285 2295 Office: Building E8, Room 107A
Vaal Triangle E-mail: [email protected] Tel.: 016 910 3317/8 Office: Building 13, room SL313


