
ELL/PTICAL ASSEMBLY&USER'S GUIDE
I RE7.6 Rev.l.3.indd 17/17/06 4:54:14 PM

!ii........................................................................................................................................................................................i_:_!!!!!!!!!!!!!!!!!!!!!!!!!!!!!!!!!!!!!!!!!!!!!!i
CONGRATULATIONSand TttANKYOUforyourpurchaseof this HorizonFitnessefliptical/
Whetheryour goal is to win races or simply enjoy a fuller, healthier fifestyle, a Horizon Fitness elliptical
can help you attain it- adding club-quafity performance to your at-home workouts, with the ergonomics
and innovative features you need to get stronger and healthier, faster. Because we're committed to
designing fitness equipment from the inside out, we use only the highest quafity components. It's a
commitment we back with one of the strongest frame-to-brake warranty packages in the industry.
Youwant exerciseequipment that offers the most comfort, the best reliability and the highest qualityin its class.
Horizon Fitnessdelivers.
Important Precautions 4
Assembly 5
Before YouBegin 17
Elliptical Operation i8
Conditioning Guidelines 28
Troubleshooting & Maintenance 34
Limited Warranty 38
CONTACTINFORMATION Back Cover
mI RE7.6 Rev.l.3.indd 2-3 7/17/06 4:54:14 PM I

Ii i i
mI RE7.6 Rev.l.3.indd 4-5
SAVETHESEINSTRUCtiONSRead all instructions before using this elliptical. Whenusing an electrical product, basic precautions
should alwaysbefollowed,including thefollowing:Readaft instructions beforeusingthis elliptical It is theresponsibifityof the ownerto ensurethat aft usersof this efliptical are adequatelyinformedof aft warningsand precautions. If you haveany questionsafter reading this manual, contact Searsat the number listedon the backcoverof this manual
o If you experience any kind of pain, including, but not limited to chest pains, nausea, dizziness, or
shortness of breath, stop exercising immediately and consult your physician before continuing.
e Maintain a comfortable pace. Do not sprint above 80 rpms on this machine.
o Tomaintain balance, it is recommended to keep a grip on the handlebars while exercising, mounting or
dismounting the machine.
o Do not wear clothes that might catch on any part of the elliptical
o Do not turn pedal arms by hand.o Make sure handlebars are secure before each use.
o Do not insert or drop any object into any opening.
• Unplug elliptical before moving or cleaning it. Toclean, wipe surfaces down with soap and slightly damp
cloth only,:never use solvents. (SeeMAINTENANCE)
o This elliptical should not be used by persons weighing more than 250 pounds. Failure to comply will void
the warranty.
o This elliptical is intended for in-home use only. Do not use this elliptical in any commercial, rental, school
or institutional setting. Failure to comply will void the warranty.
o Do not use elliptical in any location that is not temperature controlled, such as but not limited to garages,
porches, pool rooms, bathrooms, carports or outdoors. Failure to comply may void the warranty.
o Use the elliptical only as described in this manual
At NOdine shouldpets orchildrenundertheage Off2 becloserto theelliptical than i0 feet.At NOfime ShouidChildrenunder theageof j2 usethe ellipfical.ChildrenOvertheageof I2 shouldnot use theelliptical withoutaduit supervision:
i................:!t!sesseniiaithaiyou_e!liptica!i_,sedOnty,indoOrs,ina ha__e'
i exPoSedto colder temperatures or high moisture climates, it is strongly recommendedthat the el!ipfica!is
IMPORTANT..READTHESESAFETYINSTRUCtiONSBEFOREUSE!
iii_!ii_ii_i_i!i!ili_!i _ _i_iii__iii_ii_i_ii_iii, i_i_ii_iil_i_ii!_ii__ii_ii_ili_i _i_ii!!i_ !i_!!ii_il _ii__i_i_i_i!i:_i_i__Thereare severalareasdunng the assemblyprocessof a elflpticat that specialattention must bepaid It isi very important to follow the assemblyinstructions correctlyand to makesure all parts arefirmly tightened,
If the assembly,instructions are not foflowedcorrectly,the ellipticai couId haveframe parts that are not
i tightene_an_willseemlooseandmaycauseirritatin_nO!seslToprevenidama_etothei assembtyinstrucfionsmust be reviewedandcorrectiveactions should be taken.
UNPACKINGUnpackthe product whereyou will be using it. Placethe product on a level flat surface.It is recommendedthat you place a protective covering onyour floor. During each assemblystep, ensure that ALLnuts andbolts are in placeand partially threadedin beforecompletelytightening anyONEbolt.
NOTE:A light application of grease may aid in the installation of hardware.Anygrease, such as lithiumbike greaseis recommended.
i ................................. .................... ........................T: ...............
i Beforeproceeding, find your ellipfica!'s serial number
iocated onthe front stabilizer tube and enter it in thei space providedbelow. Also!ocate the mode!name [
which is locatedon the side coverbadge. I
, ENTER SERIALNUMBERANDIN TNEBOXES
SERIALNUMBER:
MODELNAME:
I
ill _ i_i
7/17/06 4:54:16 PM I

mI RE7.6 Rev.l.3.indd 6-7
UPPERHANDLEBAR
FAN
GRIPPULSE
CONSOLEMAST
TOPCOVER
PIVOTINGFOOTPAD
PEUALARM
WHEELCOVER
CONSOLE
HANDLEBARCOVER
MAINFRAME
LOWERHANDLEBAR
LOWERLINKARM
FRONTSTABILIZERTUBE
ELBOWCOVER
[] 5ramAllen Wrench
[] 6ramAllen Wrench
[] Philfips ScrewDriver
[] J3/JSmmFlat Wrench
[] J Console
[] J ConsoleMast
[] J FrontStabilizer Tube
[] 2 UpperHanfllebars
[] 2 LowerHandlebars
[] 2 LowerLinkArms
[] 2 PivotingFootPads
[] 2 TopCovers
[] ] HORIZONFITNESSJ2-volt PowerSupply
[] 2 HandlebarCovers
[] 5 HardwareBags
[] 2 ElbowCovers
[] WaterBottle Cage
..............................t................... .................................. m
ii yoo havequesfio_s!_ if thereare any missi_gparts, contact j _80&4_MY-HOME®!i Furthercontactinformafionislocateflon thebackcoverofthis manual.
Fora completeexplodeddiagram,seeQuickStart and Parts Guide(includedin User'sGuidebag).
MAINFRAME_............... ,
/" _:_--.-- BOLT(A)
,_ _ SPRINGWASHER(B)
_ _WASNER(C). ....... l
FRONTSTABILIZERTUBE
A)OpenHARBWAREBAGFORSTEP1.
B)Attachthe FRONTSTABILIZERTUBEto the MAINFRAMEusing2 BOLTS(A),2 SPRINGWASHERS(B) and2 FLATWASHERS(C).
BOLT(A)20mm
Qty:2
SPRINGWASHER(B)]8 rnmQty:2
FLATWASHER(C)20 turn
Qty:2
S _
m7/17/06 4:54:19 PM I
s
mI RE7.6 Rev.l.3.indd 8-9
f
BOLT(A)
SPRINGWASHER(e) _
FLATWASHER(C)_ _i>
MAST
CONSOLEMASTGROMMET
CONSOLEWIRES ' ''\
MAINFRAME
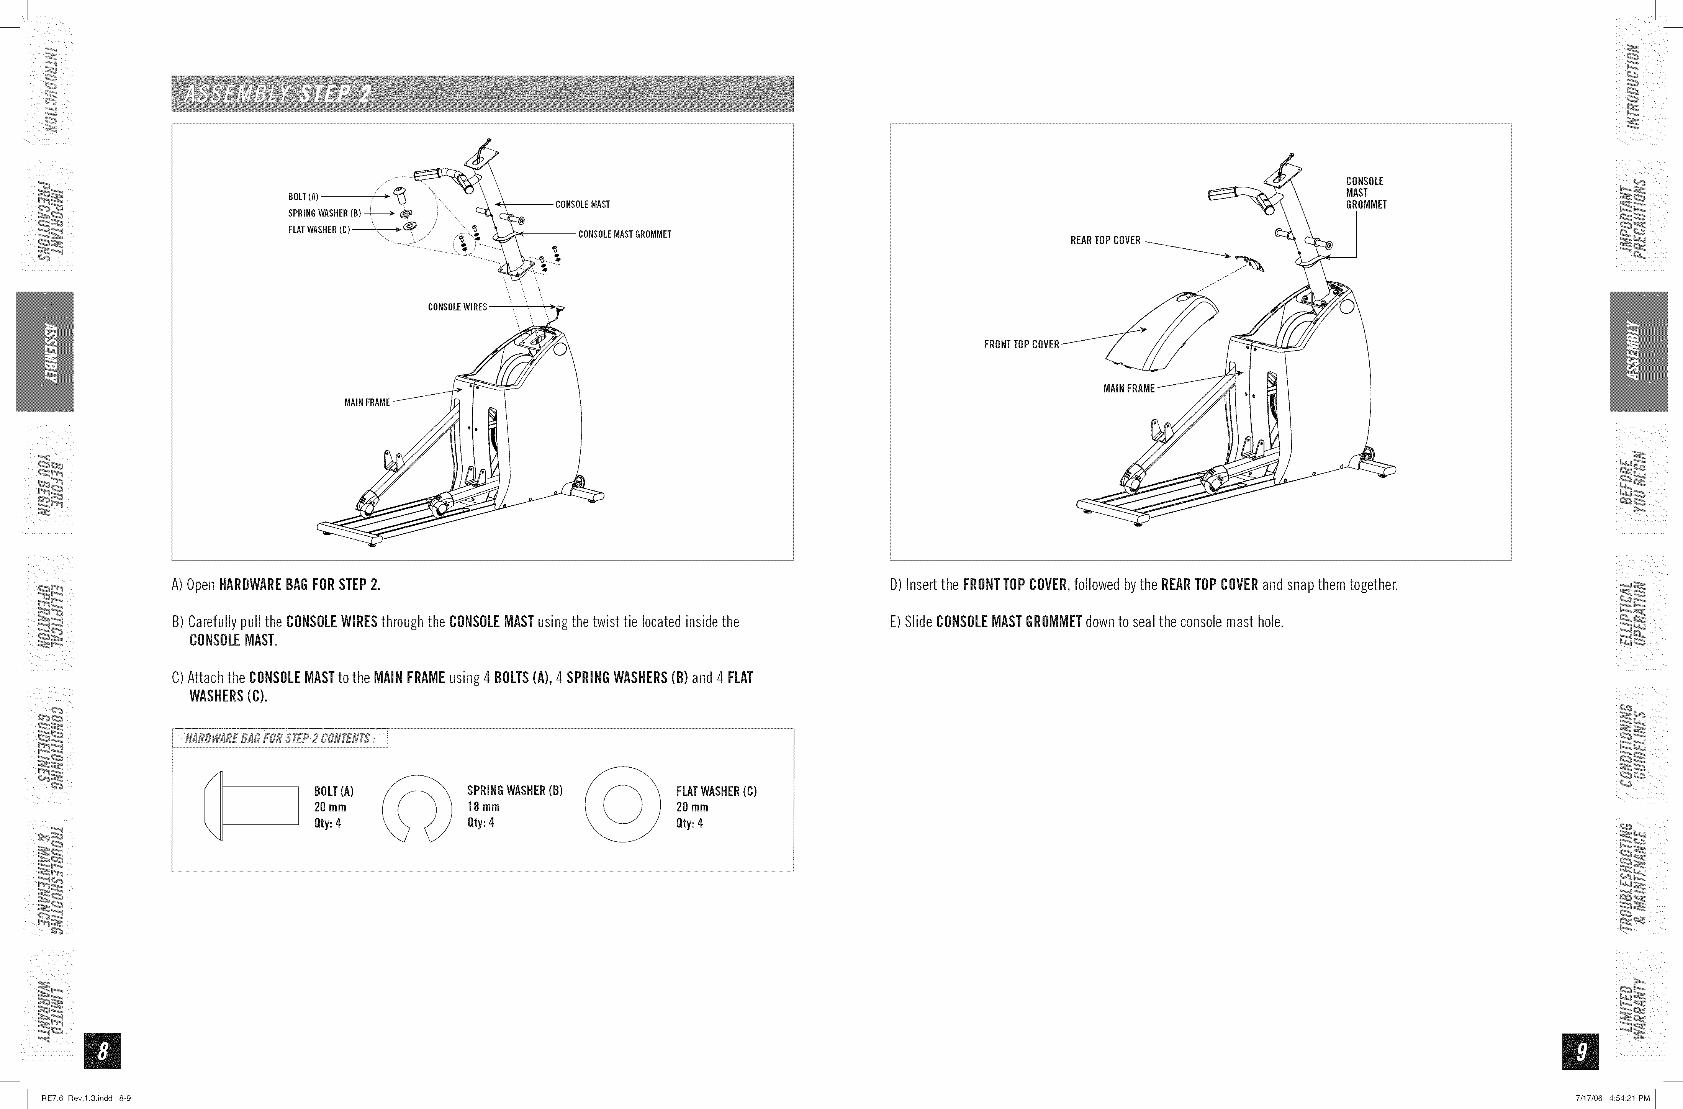
A)OpenHARDWAREBAGFORSTEP2.
B) Carefullypull the CONSOLEWIRESthroughthe CONSOLEMASTusingthe twist tie locatedinsidetheCONSOLEMAST.
C) Attach the CONSOLEMASTto the MAINFRAMEusing 4 BOLTS(A),4 SPRINGWASHERS(B)and 4 FLATWASHERS(C).
lILT(A)21mm
Qty:4
SPRINGWASHER(B) / _ \ FLATWASHER(C)
18rnrn 21 rnrnQty:4 Qty:4
D) insertthe FRONTTOPCOVER,followedby the REARTOPCOVERand snap themtogether.
E)Slide CONSOLEMASTGROMMETdownto sealthe consolemast hole.
L
m7/17/06 4:54:21 PM I

/
USELEFTHANDLEBARS
CONSOLEMAST
NOTCH_
<
UPPERHANDLEBAR
PRE-ATTACHEOSETSCREWS
USERIGHTHANDLEBARS
PRE-ATTACHEDBOLT&WASHER
HANDLEBAR
NOTE:Thereis NOhardwarebag for this step,All hardwareis pre-instaHed.
A) RemovePRE-ATTACHEDBOLT& WASHERSfrom CONSOLEMAST.
B) Slide LOWERHANDLEBARSonto CONSOLEMASTandattach by re-inserting PRE-ATTACHEDBOLT&WASHERS.
C) Slide UPPERHANDLEBARSontoLOWER HANDLEBARSand align NOTCHwith TABmaking sure handlebarsarejoined togethercompletely.SecureUPPERHANDLEBARSto LOWERHANDLEBARSusing PRE-ATTACHEDSETSCREWS.
Reminder: ihe U_fierand lowerhandlebarsare marked with a_ L if theyare to be usedon the left_handside
i of the e!tiptica! or an R if theyareto beused onthe right:hand sideof the elliptical, !f thehandlebarsare
i assembieflon the incorrectSideof the eiliptical, the unit will not funcfion correcfly.
After handlebars are assembied theywi/i rotate freely_ be Caotio,s Unfii the
UPPERHANDLEBAR
,_0__ BACKHANDLEBARCOVER/-
COVER
NOTE:Thereis NOhardwarebag for this step.
A)Snapthe front and back HANDLEBARCOVERStogetheronto the UPPERHANDLEBARS.Notethe positionof the snap tabs on the coversbeforesnapping into position.
B) Repeaton otherside.
I RE7.6 Rev.l.3.indd 10-11 7/17/06 4:54:23 PM I

LOWERLINKARM LOWERHANDLEBAR
GUIDERAIL
A)OpenHARDWAREBAGFORSTEP5.
B) SlideSPACER(F) intoLOWERHANDLEBAR.
C) PlaceTEFLONWASHERS(E) on eitherside of SPACER(F). WhileholdingTEFLONWASHERS(E) slide LOWERLINKARMintobottomendof LOWERHANDLEBAR.
D) insert BOLT(D) into LOWERHANDLEBARand secure using NUT(G).
E) Repeat on other side.
BOLT(B) I I SPACER(F)60mm 44mmaxisQty:2 Qty:2
TEFLONWASNEB(E) _ NYLONNUT(G)
24 mm _ INSIDEDIAMETER:Qty:4 8mmQty:2
_ PLITTEFLON
WASHER(M)
LOWERLINKARM
EOOTPLATETUBE/
BOLT(I)SPLITTEFLONWASHER(M)
A) OpenHARDWAREBAGFORSTEP8.
B) Align LOWERLINKARMwith g BRACKET.
CAUTION:Becareful to keepthe LOWERLINKARMaligned with guide rail. Donot twist it to the leftor rightwhilepositioning it onthe g BRACKET.
C) SlideSPACER(H) through g BRACKETand FOOTPLATETUBE.
D) insertFLATWASHER(J)and BOLT(I) intooutside endof FOOTPLATETUBE.
E) Insert2 SPLITTEFLONWASHERS(M) on left andright sidesof FOOTPLATETUBEand tighten BOLT(I).
F) Repeaton otherside.
mI RE7.6 Rev.l.3.indd 12-13 7/17/06 4:54:26 PM I

WATERBOTTLECAGE
SCREW(L)
LOWERHANDLEBAR
INSIDEELBOWDOVER ...........
_ ///'///"
\
OUTSIDEELBOWCOYER
LOWERLINKARM \
A)OpenHARDWAREBAGFORSTEP7.
B) Attach the OUTSIDEELBOWCOVERto elbowjointusing 1 SCREW(K).
C) Snapthe iNSiDEELBOWCOVERontothe OUTSIDEELBOWCOVER.
Notethe positionof the snap tabs beforesnapping into position.
D) Repeaton otherside.
E) Install WATERBOTTLECAGEto consolemast using 2 SCREWS(L).
SCREWIo(K) _ SCREW15(L)_, rnrn rnrn
Qty:2 _J_ Qty:2
j/SCREW (K)
PRE-ATTADHEBSCREWS
CONSOLEMAST
NOTE:Thereis NOhardwarebag for this step.All hardwareis pre-installed.
A)Attach the CONSOLEMASTwiresto the CONSOLEwires.
B) Carefullytuck the CONSOLEMASTwires into the CONSOLEMASTbeforeattaching the CONSOLE.
C) Attach CONSOLEto the CONSOLEMASTusingthe 4 PRE-ATTACHEDSCREWS(screwswill haveto be removedfrom the consolefirst).
DONOTPINCHWIRES!
mI RE7.6 Rev.l.3.indd 14-15 7/17/06 4:54:30 PM I

7
i̧ !Z!!!Z!!!Z!!3CONGRATULATIONS!onchoosingyourelliptical.You'vetakenanimportantstepindevelopingandsustaining an exercise program! Yourelliptical is a tremendously effective tool for achieving your personal
fitness goals. Regular use of your elliptical can improve the quality of your life in so many ways.
HEREAREJUSTA FEN/OFTHEHEALTHBENEFITSOFEXERCISE:" Weight Losso A Healthier Heart
o Improved Muscle Tone
o Increased Daily Energy Levels
The key to reaping these benefits is to develop an exercise habit. Your new
elliptical will help you eliminate obstacles that prevent you from exercising.
Inclement weather and darkness won't interfere with your workout when you
use your elliptical in the comfort of your home. This guide provides you with
basic information for using and enjoying your new machine.
LOCATIONOFTHEELLIPTICALPlace the elliptical on a level surface. There should be 6 feet of clearance
behind the elliptical, 3 feet on each side and one foot in front for the power
cord (See diagram to the right). Do not place the efliptical in any area that
will block any vent or air openings. The elliptical should not be located in a
garage, covered patio, near water or outdoors.
3 feet
1 foot
3 feet
6 feet
k
mI RE7.6 Rev.l.3.indd 16-17 7/17/06 4:54:33 PM [
POWERYourprogrammablee/liptical is poweredby a powersupply. Thepower must be plugged into the powerjack,which is located in the front of the machinenear the STABILIZERTUBE.Makesure the consolepowerswitch isin the ONposition.
_ i̧ / _ii i;̧ ; _iii_?: :_: i//// _Bo not operate the elliptical if thepower cordor plug is damaged.
If the elliptical appears to not be workingproperly,
MOVINGYourelliptical has a pair of transport wheelsbuiltinto the FRONTSTABILIZERTUBE.Tomove, first
remove the power supply and firmly grasp the
CONSOLEMAST,carefully flit and rod.
O,reiiipticaisareweilbailtandheavy,weighi'g'p tO2oo!bs:Usec_reandadditional help if necessary when movingl
FOOTPOSITIONINGYourelliptical offers a variety of foot positions. Movingyour foot to the forward most position of the footpad
increasesyour step height, which will createa feelsimilar to a step machine.Placingyour foot toward the backof the foot pad decreasesyour stepheight andcreatesmoreof a gliding feel,similar to a smoothwalk orrun.
Yourelliptical also allowsyou to pedal both forward and backwardsto offer a variation to your workoutand tofocuson othermajor leg musclegroups such as your hamstrings and calves.
¢
GG
®
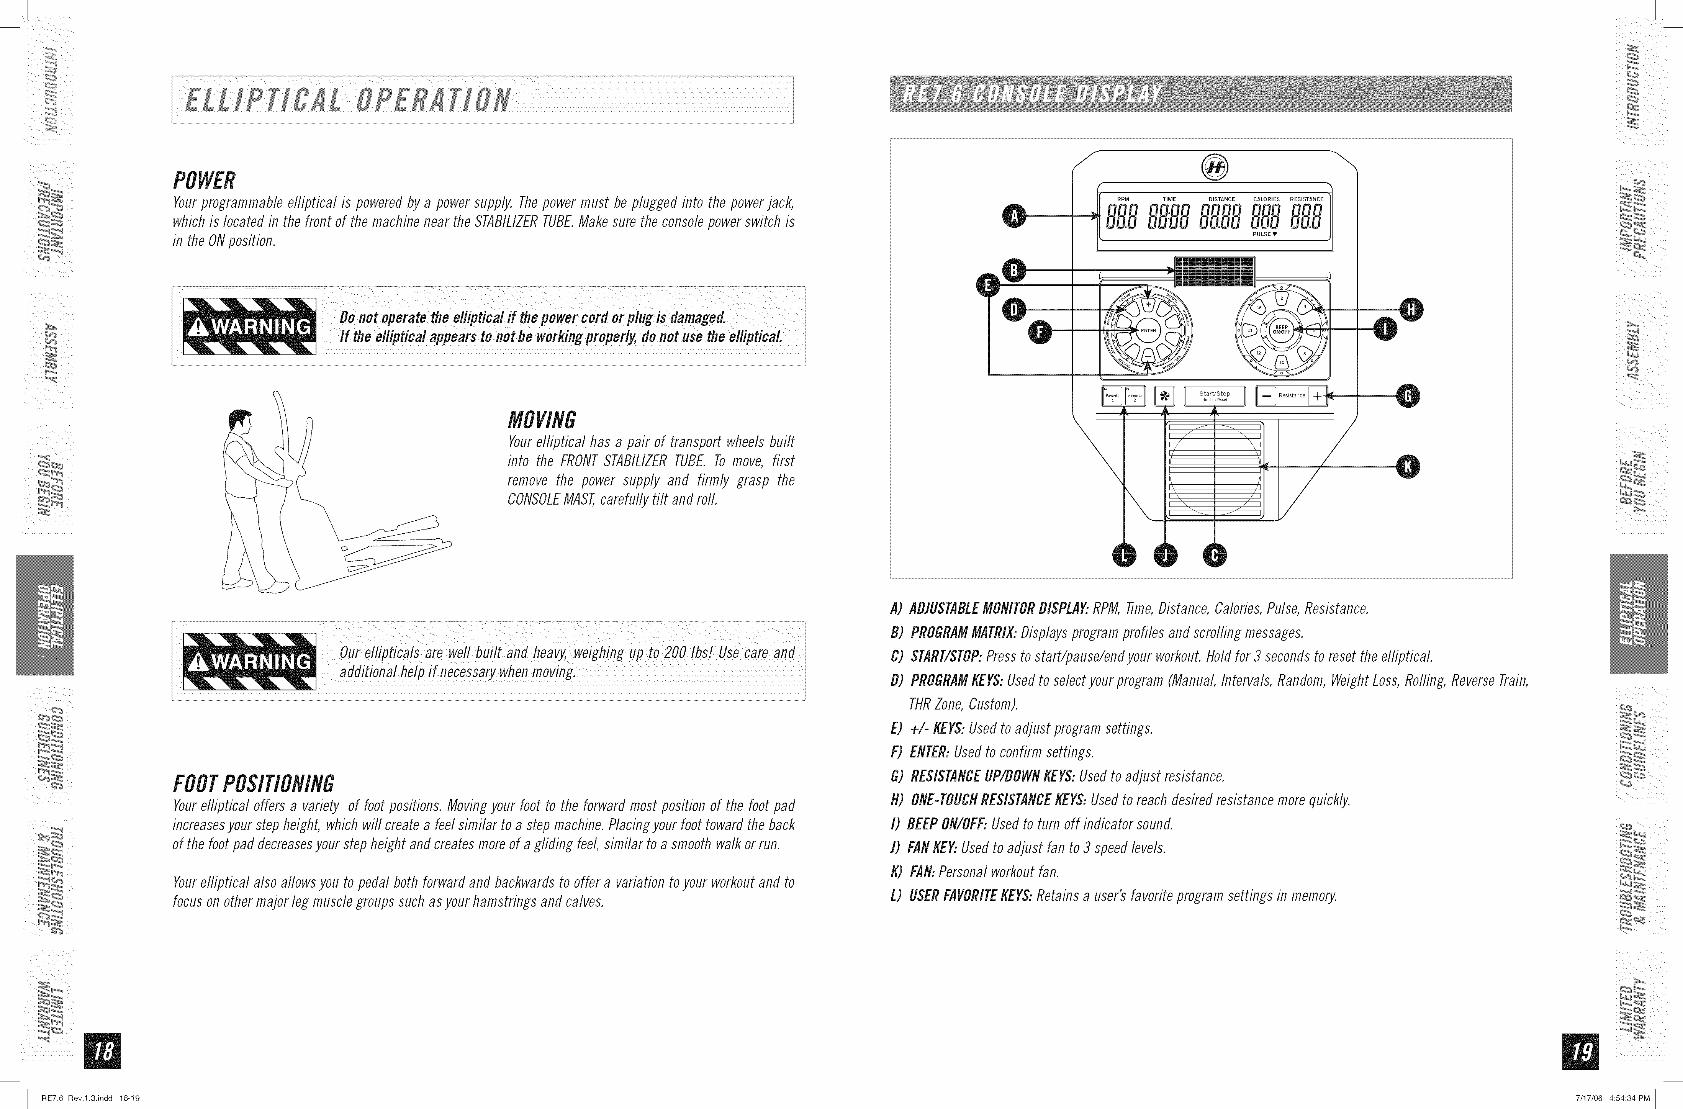
A) ADIUSTABLEMONITORDISPLAY:RPM, time, Distance,Calories,Pulse,Resistance.
B) PROGRAMMATRIX:Displaysprogram profiles and scrolling messages.
C) START/STOP:Pressto start/pause/endyour workout.Holdfor 3 secondsto resetthe elliptical.
B) PROGRAMKEYS:Usedto selectyour program (Manual, Intervals, Random,WeightLoss,Rolling, ReverseTrain,
THRZone,Custom).
E) +/- KEYS:Usedto adjust program settings.
F) ENTER..Usedto confirm settings.
G) RESISTANCEUP/BBWflKEYS:Usedto adjust resistance.
H) OflE-TBUCHRESISTANCEKEYS:Usedto reach desiredresistancemorequickly.
I) BEEPBN/BFF:Usedto turn off indicator sound.
1) FAil KEY..Usedto adjust fan to 3 speedlevels.
K) FAil:Personalworkoutfan.
L) USERFAVORITEKEY$:Retainsa user'sfavorite programsettings in memory.
I/RE7.6 Rev.l.3.indd 18-19 7/17/06 4:54:34 PM [

i ()UtCKSI_T
I) Turnon Elliptical.
2) PressSTARTbutton and begin exercising.
3) Programwill automatically default to MANUAL(PJ), the time will count up from0:00 and theresistance
will default to level J.
4) Theresistancelevel can be adjusted during the workout.
]) Selecta program using the PROGRAMKEYSand press ENTER.
*NOTE:If you press START,theprogram will begin and count downfrom 30:00. Theprogram defaults
to level J.
2) Selecta LEVELusing the +/- KEYSand press ENTER.
3) Set tiME using the ÷/- KEYSanfi press STARTto begin the program.
, Count-downrange is 20:00 to 99:00 minutes (exceptMANUALwhich can be set for 5:00 to 99:00)
- Selectdesired time and press ENTER.
i¸¸ -_ .......................................:--_-_:- ..............................._,,-_t ............................................_, ........... ,,_ -t ......................._..............
i SELECTING FHRZQN£ PRO( RAIIg
I) SelectTHRZONEprogram (PT)using the PROGRAMKEYSand press ENTER.
TheCALORIES/PULSEwindow will flash showing the default target heart rate of 80 beats per minute.
2) Set TARGETIIEARTRATE(from the chart on page29) using the +/- KEYSand press ENTER.
*NOTE:Targetbeatsper minute is selectedin intervals of 5
3) SelectTIMEusing the +/- KEYSand pressSTARTto begin the program.
NOTES:
]) Thereis a 4-minute warm-up built into this program at level J resistance.
2) After 4 minutes the resistance will automatically adjust to bring your heart rate within 5 beats of the
target numberyou selectedat the beginning of the program.
3) If there is no Heart Ratedetected,the resistance will not change.
4) If your Heart Rateis 25 beats overyour TargetZonethe program will shut down.
5) Thereis a 4-minute cool-downbuilt into this program.
I) SelectCUSTOMPROGRAM(PS)using thePROGRAMKEYSand pressENTER.
2) Set TIMEusing the ÷/- KEYSandpress ENTER.
o IF THEPROGRAMIS PREVIOUSLYSTORED- Afteryou set the time and press STARTthe previously
storedprogram will herin.
3) SettheRESISTANCEPROFILESusing the+/- KEYSandpressENTERafter eachRESISTANCEPROFILE
is set to the desiredlevel (repeatuntil aft J5 segmentsare chosen).
*NOTE:If STARTis pressedit will takeyou back to previoussegment.
4) After the JSth segment is set, press ENTERto save the program then press STARTto begin the
program.
*NOTE:Toreset the memorypressand hold the ENTERbutton for 5 seconds.
mI RE7.6 Rev.l.3.indd 20-21 7/17/06 4:54:35 PM I

EI RE7.6 Rev.l.3.indd 22-23
MANUAL(PI)Allowsyouto adjusttheresistanceleveltoyourpreference.
INTERVALS(P2)Improvesyour strength, speedand enduranceby raisingand loweringthe resistancelevelsthroughoutyour workoutto involve bothyour heart andmuscles.
RANDOM(P3)Providesevenmoreworkoutvarietyby mixing upyour resistance intervals in no particular order.
WEIGHTL0$5(P4)Promotesweight loss by raising and loweringthe resistancelevel, whilekeepingyou in your fat
burning zone.
.r',,._.1",.. ROLLING(PS)Createsthe feeling of moving up and downhills by gradually increasing and decreasingtheresistance.
REVERSETRAIN(P6)Programcuesyou to pedal forward and backwardsfor an excitingand challenging workout.
TNRZONE(PZ)Automatically adjusts theresistance level to keepyour heart rate in your desiredrange.
CUSTOM(USERPROGRAM)(P8)Designand storeyour owncustom exerciseprogram.
TheUSERFAVORITEKEYSallow up to two programsand programsettings to be saved into memory.Usinga
favoritekey enablesyou to beginyour favorite programquickly. Toset a USERFAVORITEKEY,follow the stepslisted in the "SETTINGFAVORITEKEYS"section.
SETTINGFAVORITEKEYS
]) Pressandhold theFAVORITEI or FAVORITE2 keyfor five secondsuntil youhear three beeps.TheLED
inside the FAVORITEKEYwifl be flashing.
*NOTE:TheFAVORITEKEYScannotbe programmedif you are already in a program.
2) Selectpreferredprogram using the PROGRAMKEYSandpress ENTER.
*NOTE:TheCUSTOMPROGRAM(PS)cannot be savedinto a FAVORITEKEY.
3) ForprogramsPJ through P6,set LEVELand TIMEusing the +/- KEYSand press ENTERafter setting each
value.ForP7 (THRZone),set TARGETHEARTRATEand TIMEusing the +/- KEYSand pressENTERafter
setting eachvalue.
4) Afteryou havesaved the last value(TIME)into memorybypressingENTERin step 3, the FAVORITEKEY
programmingis completeand the LEDinside the FAVORITEKEYwill no longer flash. PressSTARTto begin
the programyoujust set.
*NOTE:At any time, you may reset a FAVORITEKEYwith a new program or different program settings
by following the four steps listed above.
USINGFAVORITEKEYS
I) Afteryou haveprogrammeda FAVORITEKEYas listed in the "SETTINGFAVORITEKEYS"section,you may
use the FAVORITEKEY.Pressthe desiredFAVORITEI or FAVORITE2 key.
2) PressSTARTto begin the program.
*NOTE:TheFAVORITEI andFAVORITE2 keysmayonly be usedbeforestarting a program. Thekeyswill not
function while in a program.
L
7/17/06 4:54:36 PM I

Allows 'OnTheFly' manual RESISTANCEchanges. Time-basedgoal.
-+ + + .................. + + ..........................+<+ ........................................................ ..................... ..................... ..................... ..................... ..................... ....................
Walkor run a series of alternating RESISTANCElevels. Time-basedgoal with 16 difficulty levels to choosefrom.
WARM-UP PROGRAMSEGMENTS COOL-DOWN
Segment 1 2 3 4 5 6 7 8 9 i0 ii 12 13 14 1:5 i6 I7 I8 I9 20
Seconds 60 60 60 60 30 60 60 30 30 60 30 60 60 30 30 60 60 60 60 60
Level 1 1 2 2 2 4 1 1 4 4 i 4 i i 4 4 1 2 2 2 I
Level2 1 2 2 2 5 2 2 5 5 2 5 2 2 5 5 2 2 2 2 I
Level3 i 2 3 6 2 2 6 6 2 6 2 2 6 6 2
Level4 1 2 2 4 6 3 3 6 6 3 6 3 3 6 6 3 4 2 2
Level5 2 2 4 5 7 4 4 7 7 4 7 4 4 7 7 4 5 4 2 2
Level6 2 6 8 5 5 8 8 5 8 5 5 8 8 5 6 ' 4 ' 2 ' 2
Level7 2 2 4 6 9 6 6 9 9 6 9 6 6 9 9 6 6 4 2 2
Level8 2 2 4 7 10 6 6 10 10 6 10 6 6 10 10 6 7 4 2 2
Level9 2 3 4 8 10 7 7 10 10 7 10 7 7 10 10 7 8 4 3 2
Level16 2 3 6 9 Ii 8 8 ii ii 8 ii 8 8 Ii II 8 9 6 3 ' 2
Level II 2 5 8 10 12 9 9 12 12 9 12 9 9 12 12 9 I0 8 2
Level 12 2 5 8 10 13 10 10 13 13 10 13 10 10 13 13 10 10 8 2
Level 13 4 7 I0 11 14 I0 I0 14 14 10 14 10 10 14 14 10 11 10 7 4
Level 14 4 7 I0 12 14 Ii II 14 14 ii 14 Ii Ii 14 14 11 12 10 7 4
Level 15 4 7 I0 13 15 12 12 15 15 12 15 12 12 15 15 12 13 10 7 4
Level 16 4 7 I0 14 16 13 13 16 16 13 16 13 13 16 16 13 14 I0 7 4
Warm-upand cool-downlast 4:00 minutes each
Providesevenmore workoutvariety by mixing up your resistance intervals (RESISTANCElevels). Time-basedgoal with 14 difficulty levels to choosefrom.
WARM-DP PROGRAMSEGMENTS COOL-DOWN
Segment 2 ' 3 ' 4 5 6 7 8 9 10 11 12 13 14 15 16 17 18
Seconds 60 60 60 60 60 60 60 60 60 60 60 60 60 60 60 60 60 60
LevelI 2 1 2 4 2 3 6 2 2 5 1
Level2 i 2 2 2 2 3 5 2 4 6 2 3 6 2 2 ' I " 1 ' I
Level3 2 2 2 2 4 6 3 5 7 3 4 6 2 2 ' I " 1 ' I
Level4 3 5 6 4 6 8 4 5 7 3 2 I ' 1 I
Level5 2 ' 3 ' 3 3 4 6 7 5 6 9 5 6 8 4 2 ' 2 ' 2 ' I
Level6 5 6 8 6 7 i0 6 6 9 5 3 2 1
Level7 3 6 7 9 6 8 i0 6 7 i0 6 3 ' 2 ' 2 1
Level8 3 4 4 4 6 8 10 7 9 11 7 8 10 6 3 2 ' 2 ' I
Level9 3 4 4 4 7 9 10 8 10 12 8 9 11 7 4 ' 3 2 ' I
Level16 3 4 8 i0 ii 9 i0 13 9 10 12 8 4 ' 3 ' 2 ' I
Levelll 3 ' 4 ' 6 ' 6" 9 i0 12 10 ii 14 10 i0 13 9
Level 12 3 ' 4 ' 6 ' 6" 10 ii 13 10 12 14 10 ii 14 10 5 ' 4 ' 3 ' I
Level l3 3 ' 4 ' 7 ' 7 10 12 14 11 13 15 11 12 14 10
Level 14 3 ' 4 ' 7 ' 7 11 13 14 12 14 16 12 13 15 11 6 ' 5 ' 4 ' 1
Warm-upand cool-downlast 4:00 minutes each
i Ti
Challenges with various combinations of hills and valleys (RESISTANCElevels). Time-basedgoal with 16difficulty levels to choosefrom.
WARM-UP PROGRAMSEGMENTS COOL=DOWN
Segment 2 3 4 5 6 7 8 9 lO II 12 13 14 15 16 17 18 19 20
Seconds 60 60 60 60 60 60 60 60 60 60 60 60 60 60 60 60 60 60 60 60
Levell 2 2 2 2 2 3 3 4 4 4 4 3 3 2 2 2 2 2 1
Level2 2 2 ' 2 3 3 4 4 5 5 5 5 4 4 3 3 2 2 2 1
Level3 2 2 3 4 4 5 5 6 6 6 6 5 5 4 4 3 2 2 1
Level4 1 2 2 4 5 5 6 6 6 6 6 6 6 6 5 5 4 2 2 1
Level5 2 2 4 5 6 6 6 6 7 7 7 7 6 6 6 6 5 4 2 2
Level6 2 2 4 6 6 6 7 7 8 8 8 8 7 7 6 6 6 4 2 2
Level7 2 2 4 6 7 7 8 8 9 9 9 9 8 8 7 7 6 4 2 2
Level8 2 2 4 7 8 8 9 9 i0 10 10 i0 9 9 8 8 7 4 2 2
Level9 2 3 4 8 9 9 I0 I0 i0 I0 10 10 10 10 9 9 8 4 3 2
Level 16 3 6 9 I0 i0 I0 I0 11 11 11 11 10 10 10 10 9 6 3 2
Level ll 2 5 8 16 I0 i0 Ii II 12 12 12 12 Ii II i0 I0 10 8 5 2
Level 12 2 5 8 16 II ii 12 12 13 13 13 13 12 12 ii Ii 10 8 5 2
Level 13 4 7 I0 11 12 12 13 13 14 14 14 14 13 13 12 12 11 I0 7 4
Level 14 4 7 I0 12 13 13 14 14 14 14 14 14 14 14 13 13 12 10 7 4
Level 15 4 7 10 13 14 14 14 14 15 15 15 15 14 14 14 14 13 10 7 4
Level16 4 7 I0 14 14 14 15 15 16 16 16 16 15 15 14 14 14 10 7 4
Warm-upand cool-downlast 4:00 minuteseach
u,, _ ...... i"J-" PROC;RA ROLLINS (PS)
Motivateswith different combinationsof RESISTANCE.Time-basedgoal with 14 difficulty levels to choosefrom.
WARM-UP PROGRAMSEGMENTS COOL-DOWN
Segment I 2 ' 3' 4 5 6 7 8 9 10 11 12 13 14 15 16 i7 i8
Seconds 60 60 60 60 60 60 60 60 60 60 60 60 60 60 60 60 60 60
Level I 1 2 3 4 3 2 1 2 3 2 i
Level2 1 3 2 3 4 5 4 3 2 1 2 3
Level3 2 2 ' 3 ' 3 3 4 5 6 7 8 7 6 5 4 2 i i i
Level4 4 5 6 7 8 9 8 7 6 5 3 i i i
Level5 5 6 7 8 9 10 9 8 7 6
Level6 3 5 4 5 6 7 8 9 10 10 10 9 8 7 4 3 i
Level7 5 5 5 7 7 8 8 9 9 I0 10 9 8 4 3 i
LeveI8 5 5 5 8 8 9 9 10 10 11 11 10 9 4 3 ' 2 1
Level9 5 5 5 9 9 10 10 11 11 12 12 11 10 5
Level lO 4 " 5 " 6 6 I0 I0 Ii Ii 12 12 13 13 12 Ii 6
Level II 4 5 7 7 Ii Ii 12 12 13 13 14 14 13 12
Level 12 5 8 8 12 12 13 13 14 14 15 15 14 13 7 ' 6 ' 5 ' 1
Level 13 5 9 9 13 13 14 14 15 15 16 16 15 14 7 ' 6 ' 5 ' I
Level 14 5 9 ' 9 14 14 15 15 16 16 16 16 16 15 8
Warm-upand cool-downlast 4:00 minutes eachL
RE7.6 Rev.l.3.indd 24-25 7/17/06 4:54:40 PM [

DI RE7.6 Rev.l.3.indd 2&27
Programcuesyou to pedal forward and backwardsfor an exciting andchallenging workout(RESISTANCElevels). Time-basedgoal with J6 difficulty levels to choosefrom.
WARM-UP PROGRAM,SEGMENTS
Segment 2 3 4 5 6 7 8 9 10 11 i2 i3 14 15
Seconds 60 60 60 60 30 60 90 60 90 45 60 45 90 90 30
Direction F F F F F R F R F R F R F R F
Levell I 1 2 2 2 2 i 2 2 I 2 2 I 2
Level2 i i 2 3 2 3 2 2 3 2 2 3 2 2
Level3 1 i J 2 4 3 4 2 3 4 2 3 4 2 3
Level4 ] i J 2 5 4 5 3 4 5 3 4 5 3 4
Level5 2 2 2 6 5 6 4 5 6 4 5 6 4 5
Level6 1 2 2 3 6 6 6 5 6 6 5 6 6 5 6
Level7 1 2 2 3 7 6 7 6 6 7 6 6 7 6 6
Level8 1 2 2 4 8 7 8 6 7 8 6 7 8 6 7
Level9 1 1 2 9 8 9 7 8 9 7 8 9 7 8
Level 10 l i 1 2 I0 9 i0 8 9 I0 8 9 10 8 9
Level I1 2 2 2 2 I0 I0 i0 9 i0 10 9 10 10 9 10
Level 12 2 2 2 3 II I0 ii i0 i0 II I0 10 11 10 10
Level 13 2 3 3 4 12 II 12 i0 ii 12 I0 11 12 10 11
Level 14 2 3 4 5 13 12 13 ii 12 13 II 12 13 11 12
Level 15 2 4 5 6 14 13 14 12 13 14 12 13 14 12 13
Level IG 3 5 6 6 14 14 14 13 14 14 13 14 14 13 14
COOL-DOWN
16 I7 I8 ]9 20
30 60 60 60 60
R F F F F
2 2 1 1 I
3 1 1
4 2 1 l l
5 2 I 1 l
6 2 2 2 1
6 3 2 2 1
7 3 2 2 1
8 4 2 2 1
9 1
I0 2 1 l 1
I0 2 1 l l
11 2 1 1 l
12 2 t
13 3 2 2 1
14 3 2 2 I
14 4 2 2 I
Warmup andcool-downlast 4:00 minuteseach
Automatically adjusts the resistancelevel to keepyour heart rate in your desiredrange (see THRZONECHARTon page29).
GO%OFMAXHEARTRATE: Usedfor beginnersand longerworkouts. Lowerintensity and longerdurationhelps burn fat moreefficiently.
G5% OFMAXHEARTRATE: Usedfor beginner to intermediate usersand mid to long range workouts.Lowerintensity and longerduration helpsbum fat moreefficiently.
70% OFMAXHEARTRATE:For intermediateusersand mid range carflio workouts. Whilethis range burns
fat it really challengesthe cardiovascularsystemand helps strengthenthe heart.
75% OFMAXHEARTRATE:Foradvancedusersand short to mid range cardio workouts. Burns fat, tones
musclesandchallenges the heart.
80% OFMAXHEARTRATE:Foradvancedusersand short workouts.Bums fat, strengthens and tonesmuscles,and challenges theentire cardiovascularsystem.
Warm up and cool-down last 4:00 minutes each
Allowsyou to set your own RESISTANCEchanges. Time-basedgoal.
PULSEGRIPSPlacethe palm ofyour hands directlyon the grip pulse handlebars.Both hands must grip the bars foryourheart rate to register.It takes 5 consecutiveheart beats (15-20 seconds)foryour heart rate to register. Whengripping the pulse handlebars,donot grip tightly. Holdingthe grips tightly mayelevateyour bloodpressure.
Keep a loose, cupping hold. Youmay experience an erratic readout if consistently holding the grip pulse
handlebars. Make sure to clean the pulse sensors to ensure proper contact can be maintained.
7/17/06 4:54:42 PM ]

/ .........
ii i
DI RE7.6 Rev.l.3.indd 28-29
ALWAYSCONSULTYOURPHYSICIANBEFOREBEGINNINGANEXERCISEPROGRAM.
HOWOFTEN?(Frequencyof Workouts)The American Heart Association recommends that you exercise at least 3 to 4 days per week to maintain
cardiovascular fitness. If you have other goals such as weight or fat loss, you will achieve your goal faster with
more frequent exercise. Whether it's 3 days or 6 days, remember that your ultimate goal should be to make
exercise a fifetime habit. Many people are successful staying with a fitness program if they set aside a specific
time of day to exercise. It doesn't matter whether it's in the morning before breakfast, during lunch hour or while
watching the evening news. What's more important is that it's a time that al/ows you to keep a schedule, and a
time when you won't be interrupted. Tobe successful with your fitness program, you ha ve to make it a priority in
your life. So decide on a time, puff out your day planner and pencil in your exercise times for the next month!
HOWLONG?(Durationof Workouts)For aerobic exercise benefits, it's recommended that you exercise from between 24 and 60 minutes per session.
But start slowly and gradually increase your exercise times. If you've been sedentary during the past year, it may
be a good idea to keep your exercise times to as tithe as five minutes initially. Yourbody will need time to adjust
to the new activity. If your goal is weight loss, a longer exercise session at lower intensities has been found to
be most effective. A workout time of 48 minutes or more is recommended for best weight loss results.
HOWHARD?(Intensity of Workouts)flow hard you workout is also determined by your goals. If you use your machine to prepare for a 5tf workout,
you will probably work out at a higher intensity than if your goal is general fitness. Regardless of your long
term goals, always begin an exercise program at low intensity. Aerobic exercise does not have to be painful to
be beneficial! There are two ways to measure your exercise intensity. The first is by monitoring your heart rate
(using the grip pulse handlebars), and the second is by evaluating your perceived exertion level (this is simplerthan it sounds!).
PERCEIVEDEXERtiONLEVELA simple way to gauge your exercise intensity is to evaluate your perceived exertion level. While exercising, if you
are too winded to maintain a conversation without gasping, you are working out too hard. A good rule of thumb
is to work to the point of exhilaration, not exhaustion. If you cannot catch your breath, it's time to slow down.
Always be aware of these warning signs of overexertion.
What is TargetHeart Rate Zone?
Target Heart Rate Zone tells you
the number of times per minute
your heart needs to beat to
achieve a desired workout effect.
It is represented as a percentage
of the maximum number of times
your heart can beat per minute.
Target Zone will vary for each
individual, depending on age,
current level of conditioning,
and personal fitness goals. The
American Heart Association
recommends working-out at a
Target Heart Rate Zone of between
60% and 75% of your maximum
heart rate. A beginner will want to
workout in the 60% range while
a more experienced exerciser wifl
want to workout in the 70-75%
range. Seechart for reference.
;;;;;;;;;;;;;;;;:::::::::::::::::::::::::::
EXAMPLE:
For a 42-year-old user: Find age along the bottom of the chart (round to 40), follow age column up to
the target zone bar. Results: 60% of maximum Hear Rate = i08 Beats Per Minute, 75% of maximum
Heart Rate _i 135 Beat Per Minute.
ALWAYSCONSULTYOURPHYSICIANBEFOREBEGINNINGANEXERCISEPROGRAM.
El7/17/06 4:54:43 PM I

ii i
STRETCHFIRSTBefore using your product, it is best to take a few minutes to do a few gentle stretching exercises. Stretching
prior to exercise will improve flexibility and reduce chances of exercise related injury. Ease into each of these
stretches with a slow gentle motion. Do not stretch to the point of pain. Make sure not to bounce while doing
these stretches.
I. STANDINGCALFMUSCLESTRETCHStand near a wall with the toes of your left foot about 18" from the wall, and
the right foot about 12" behind the other foot. Lean forward, pushing against
the waft with your palms, t_eepyour heels flat and hold this position for a
count of 15 seconds. Make sure that you do not bounce while stretching.
Repeat on the other side.
2. STANDINGOUADRICEPSSTRETCHUsing a wall to provide balance, grasp your left ankle
with your left hand and hold your foot against the back
of your thigh for 15 seconds. Repeat with your rightankle and hand.
3. SITTINGHAMSTRING&LOWERBACKMUSCLESTRETCHSit on the floor with your legs together and straight out in front of you. Do
not lock your knees. Extend your fingers towards your toes and hold for a
count of 15 seconds. Make sure that you do not bounce while stretching. Sit
upright again. Repeat one time.
WARMUPThe first 2 to 5 minutes of a workout should be devoted to warming up. The warm-up will limber your
muscles and prepare them for more strenuous exercise. Make sure that you warm-up on your product at a
slow pace. The warm up should gradually bring your heart rate into your Target Heart Rate Zone.
COOLDOWNNever stop exercising suddenly! A cool-down period of 3-5 minutes allows your heart to readjust to the
decreased demand. Make sure that your cool down period consists of a very slow pace to allow your heart
rate to lower. After the cool-down, repeat the stretching exercises listed above to loosen and relax yourmuscles.
An important step in developing a long term fitness program is to determine your goals. Is your primary
goal for exercising to lose weight? Improve muscle? Reduce stress? Prepare for the spring racing schedule?
Knowing what your goals are will help you develop a more successful exercise program. Below are some
common exercise goals-
e Weight Loss - lower intensity, longer duration workouts
o Improve Body Shape and Tone- interval workouts, alternate between hi and low intensities
o Increased Energy Level - more frequent daily workouts
o Improved Sports Performance - high intensity workouts
o Improved Cardiovascular Endurance - moderate intensity, longer duration workouts
If possible try to define your personal goals in precise, measurable terms, and then putyour goals in writing.
The more specific you can be, the easier it will be to track your progress. If your goals are long term, divide
them up into monthly and weekly segments. Longer term goals can lose some of the immediate motivation
benefits. Short term goals are easier to achieve. Your console provides you with several readouts that can
be used to record your progress. Youcan track Distance, Calories or Time.
KEEPINGANEXERCISEDIARYTomake your personal exercise log book, photocopy the weekly and monthly log sheets, which are located
on the following pages, or you can print them off of your computer by going to-
www.horizonfitness,corn/ uifles/weeklv
www.horizonfitness,corn/ uifles/rnonthlvJ
Asyour fitness improves,you can look backand seehow far you've come!
mI RE7.6 Rev.l.3.indd 30-31 7/17/06 4:54:44 PM I

ii i
WEEK# WEEKLY GOALDAY DATE DISTANCE CALORIES TIME COMMENTS
SUNDAY
MONDAY
TUESDAY
WEDNESDAY
THURSDAY
FRIDAY
SATURDAY
WEEKLYTOTALS :
WEEK# WEEKLY GOAL
DAY DATE DISTANCE CALORIES TIME COMMENTS
SUNDAY
MONDAY
TUESDAY
WEDNESDAY
THURSDAY
FRIDAY
SATURDAY
WEEKLYTOTALS :
WEEK# WEEKLYGOAL
DAY DATE DISTANCE CALORIES TIME COMMENTS
SUNDAY
MONDAY
TUESDAY
WEDNESDAY
THURSDAY
FRIDAY
SATURDAY
WEEKLYTOTALS :
MONTE MONTHLY GOAL
WEEK# DISTANCE CALOEIES TIME
MONTHLY TOTALS:
MONTH MONTHLY GOALWEEK# DISTANCE CALORIES TIME
MONTHLY TOTALS:
MONTH MONTHLY GOALWEEK# DISTANCE CALOEIES TIME
MONTHLY TOTALS:
I RE7.6 Rev.l.3.indd 32-33 7/17/06 4:54:44 PM I

Z
RE7.6 Rev.l.3.indd 34-35
YourHorizonFitness elliptical is designed to be reliable. However,if you do experienceproblems with your
elliptical, pleasereferencethe troubleshootingguide listed below.
PROBLEM:Theconsoledoes not light up,
SOLUTION:Verifythe foflowing:
• Theoutlet the machine is plugged into is functional Doublecheck that the breaker has not tripped.• Thecorrect adapter is being used. Onlyusean adapter intended for HorizonFitness Ellipticals,
Theadapter is not pinched or damaged and is properlyplugged into the outlet ANDthe machine,
Thepower switch is turned to the ONposition (maynot apply to aft models),• Turnoff the machine and unplug power cord. Removethe consoleand check that aft connectionsto the console
are secureand not damaged or pinched.NOTE,If your consoleusesbatteries, they mayneedto be replaced.
PROBLEM:Theconsole lights up but the fime/RPM'sdo not counL
SOLUTION:Verifythe foflowing:
• Turnoff machine and unplug power cord.Removethe consoleand check that all connections to the consolearesecureand not damaged or pinched.If doing the above does not fix the problem, the speed sensor and/or magnet may have become dislodged ordamaged.
PROBLEM: Theresistance leveleseem to be incorrect, seemingtoo hard or too easy.
SOLUTION: Verifythe foflowing:Thecorrect adapter is being used. Onlyusean adapter intended for HorizonFitness Ellipticals,
• Reset the consoleand aflow the resistance to reset to the default position, Restart and retry the resistance levels,
PROBLEM:Theroller wheelsappear to be leaving particles on the guide rails,
$OLUT]_,,: This is considerednormal wearof the elliptical wheels,
Toremove,simply wipe off the roller wheelsand guide rails with a damp cloth,
PROBLEM:Theelliptical makes a squeaking or chirping noise,
SOLUTION:Verifythe following:
• Theelliptical is on a level surface,• Loosenall bolts attached during the assemblyprocess,grease the threads, and tighten again,
YOUMAYEXPERIEflCEAft ERRATICREADOUTUNDERTHEFOLLOW!fiGCOflDITION$:o Grippingthe heart rate handlebars tootight. Tryto maintain moderatepressurewhileholding onto the
heart rate handlebars.
, Constantmovementand vibration due to constantlyholding the heart rate grips whileexercising.
o Whenyou are breathing heavily during a workout.
o Whenyour hands are constricted by wearing a ring.
o Whenyour hands are dry or cold. Trymoistening your palms or rubbing them together to warm.
, Anyonewith heavyarrhythmia."Anyone with arteriosclerosis or peripheral circulation disorder.
o Anyone whose palm skin is especially thick.
NOTE: Outside interferencesourcessuch as computers, motors and fluorescent lights may cause the heart
rate readingto beerratic. Checkyour exerciseenvironmentforsourcesof interferencesuch as high powerlines,large motors,etc.
If the abovetroubleshootingsectiondoesnot remedythe problem,discontinue use, turn the poweroff, andcontact Searsfor serviceat 1-800-4-MY-HOME®.
Thefollowing information maybe askedof you whenyou call. Pleasehave these items readily available:o ModelName, Serial Number
In order for a technicbn to service your elliptical, you may be asked detailed questions about the symptoms that
are occurring. Some troubleshooting questions that may be asked are:
o How long has this problem been occurring?
o Does this problem occur with every use? With every user?
o If you are hearing a noise, does it come from the front, back or inside? What kind of noise is it (thumping,
grinding, squeaking, chirping etc.)?
o If you are having a resistance problem what is occurring? Is the resistance always too hard or too easy?
Does the resistance respond when pushing the buttons on the console? Does the resistance constantly cycle
through the levels during the workout?
o Has the machine been maintained per the maintenance schedule?
o Does the problem occur when using the handlebars? Without using the handlebars?
Answeringtheseand otherquestionswill give the techniciansthe ability to sendproperreplacementparts andthe servicenecessaryto getyou andyour HorizonFitnesselliptical running again!
L
7/17/06 4:54:45 PM [

/ .........
ARETHESOUNDSMYELLIPTICALMAKESNORMAL?Our ellipticals are some of the quietest available because they use belt drives and friction free magnetic
resistance. Weuse the highest grade bearings and belts to minimize noise. However, because the resistance
system itself is so quiet, you wifl occasionally hear other slight mechanical noises. Unlike older, louder
technologies, there are no fans, friction belts, or alternator noises to mask these sounds on our ellipticals.
Thesemechanical noises, which may or may not be intermittent, are normal and are caused by the transfer
of significant amounts of energy to a rapidly spinning flywheel Aft bearings, belts and other rotating parts
will generate some noise which will transmit through the casing and frame. It is also normal for these
sounds to change slightly during a workout and over time because of thermal expansion of the parts.
WHYI$ THEELLIPTICALI HADDELIVEREDLOUDERTHANTHEONEATTHESTORE?All fitness products seem quieter in a large store showroom because there is generally more background
noise than in your home. Also, there will be less reverberation on a carpeted concrete floor than on a wood
overlay floor. Sometimes a heavy rubber mat will help reduce reverberation through the floor. If a fitness
product is placed close to a wall, there will be more reflected noise.
HOWLONGWILLTHEDRIVEBELTLAST?The computer modeling we have done indicated virtually thousands of maintenance free hours. Belts are
now commonly used in far more demanding applications such as motorcycle drives.
CANI MOVETHETRAINEREASILYONCEITISASSEMBLED?Yourelliptical has a pair of transport wheels built into the front legs. It is easy to move your elliptical by
rolling it on the front transport wheels. It is important that you place your elliptical in a comfortable and
in viting room. Yourefliptical is designed to use minimal floor space. Many people will place their ellipticals
facing the TVor a picture window. If at aft possible, avoid putting your elliptical in a unfinished basement.
Tomake exercise a desirable daily activity for you, the elliptical should be in a comfortable setting.
CANI PEDALBACKWARDSONMYELLIPTICAL?Yourelliptical allows you to pedal both forward and backwards to exercise and strengthen a wider rangeof muscles.
WHATKINDOFROUTINEMAINTENANCEIS REQUIRED?We use sealed bearings throughout our ellipticals so lubrication is not needed. The most important
maintenance step is to simply wipe your perspiration off the trainer after each use.
HOWDOI CLEANMYELLIPTICAL?Clean with soap and water cleaners only. Never use solvents on plastic parts.
Cleanliness of your elliptical and its operating environment will keep maintenance problemsand servicecalls to a minimum. For this reason,HorizonFitness recommendsthat the followingpreventivemaintenanceschedulebe followed.
AFTEREACHUSE(DAILY)Turn off the elliptical by unplugging the power cord from the wall outlet
o Wipe down the elliptical with a damp cloth. Never use solvents, as they can cause damage to the
elliptical
o Inspect the power cord. Replace the power cord if damaged.
o Make sure the power cord is not underneath the elliptical or in any other area where it can become
pinched or cut.
i Toremovepowerfromtheeil ptical,thepowerco m'stbe isco,,ecte fro,.i thewaii
WEEKLYClean underneath the elliptical, following these steps:
o Turn off the elliptical
o Move the elliptical to a remote location.
o Wipe or vacuum any dust particles or other objects that may have accumulated underneath the
elliptical
o Return the elliptical to its previous position.
EVERYMONTH* Inspect all assembly bolts and pedals on the machine for proper tightness.
o Clean any debris off of the pedal arm wheels and guide rails.
mRE7.6 Rev.l.3.indd 36-37 7/17/06 4:54:45 PM [

i̧OneYearLimited Warranty
Whenassembled,operatedandmaintainedaccordingto all instructions suppliedwith theproduct, if this Ellipticalmachine fails due to a defect in material or workmanshipwithin oneyear from thedate of purchase,call J-8OO-
4-MY-HOME®to arrange for freerepair.
AdditionalLimited Warrantyon SpecificParts
Fromthe date of purchasefor the time periods listed below,the following specific parts will besupplied freeofcharge if theyfail due to a defect in material or workmanship.After the first year from the date of purchase,youpay for labor to have them installed.
o Seven Years:Brake
o Lifetime: Frame
All warrantycoverageis void if this product is ever usedfor other than private householdpurposes.
Thiswarranty gives you specific legal rights, and you may also have other rights which varyfrom state tostate.
Sears,Roebuckand Co.,HoffmanEstates,IL 60J79
I RE7.6 Rev.l.3.indd 38-39 7/17/06 4:54:45 PM I

Your HomeFor repair-in your home-of all major brand appliances,
lawn and garden equipment, or heating and cooling systems,no matter who made it, no matter who sold it!
For the replacement parts, accessories andowner's manuals that you need to do-it-yourself.
For Sears professional installation of home appliancesand items like garage door openers and water heaters.
1-800-4-MY-HOME ® (1-8004694663)
Call anytime, day or night (U.S.A. and Canada)iiiiiiiiiiiiiiiiii_
www.sears.oom www.sears.oaiiiiiiiiiiiiiii_:i:i:i iiiiiiiiiiiiiiiiiii
our.or.eFor repair of carry-in items like vacuums, lawn equipment,
and electronics, call or go on-line for the location of your nearest
TM® Registered Trademark / ' Trademark / sM Service Mark of Sears Brands, LLCSM® Marca Registrada / TM Marca de F_brica / Marca de Servicio de Sears Brands, LLC
Mc Marque de MDcommerce / Marque d_pos_e de Sears Brands, LLC © Sears Brands, LLC
RE7,6 Re_ J,3 I © 2006 HorizonFitnessProductsI Designed& Engineeredin the U,S.A,I Madein China
I RE7.6 Rev.l.3.indd 40 7/17/06 4:54:46 PM I


