
Owner’s ManualELS-01/01C typeU
ENv1.7

(1)B-13 1/2
2 ELS-01/01C Owner’s Manual
PRECAUTIONSPLEASE READ CAREFULLY BEFORE PROCEEDING
* Please keep this manual in a safe place for future reference.
WARNINGAlways follow the basic precautions listed below to avoid the possibility of serious injury or even death from electrical shock, short-circuiting, damages, fire or other hazards. These precautions include, but are not limited to, the following:
• Only use the voltage specified as correct for the instrument. The required voltage is printed on the name plate of the instrument.
• Check the electric plug periodically and remove any dirt or dust which may have accumulated on it.
• Do not place the power cord near heat sources such as heaters or radiators, and do not excessively bend or otherwise damage the cord, place heavy objects on it, or place it in a position where anyone could walk on, trip over, or roll anything over it.
• Do not open the instrument or attempt to disassemble the internal parts or modify them in any way. The instrument contains no user-serviceable parts. If it should appear to be malfunctioning, discontinue use immediately and have it inspected by qualified Yamaha service personnel.
• Do not expose the instrument to rain, use it near water or in damp or wet conditions, or place containers on it containing liquids which might spill into any openings. If any liquid such as water seeps into the instrument, turn off the power immediately and unplug the power cord from the AC outlet. Then have the instrument inspected by qualified Yamaha service personnel
• Never insert or remove an electric plug with wet hands.
• Do not put burning items, such as candles, on the unit. A burning item may fall over and cause a fire.
• If the power cord or plug becomes frayed or damaged, or if there is a sudden loss of sound during use of the instrument, or if any unusual smells or smoke should appear to be caused by it, immediately turn off the power switch, disconnect the electric plug from the outlet, and have the instrument inspected by qualified Yamaha service personnel.
CAUTIONAlways follow the basic precautions listed below to avoid the possibility of physical injury to you or others, or damage to the instrument or other property. These precautions include, but are not limited to, the following:
• When removing the electric plug from the instrument or an outlet, always hold the plug itself and not the cord. Pulling by the cord can damage it.
• Remove the electric plug from the outlet when the instrument is not to be used for extended periods of time, or during electrical storms.
• Do not connect the instrument to an electrical outlet using a multiple-connector. Doing so can result in lower sound quality, or possibly cause overheating in the outlet.
• Do not expose the instrument to excessive dust or vibrations, or extreme cold or heat (such as in direct sunlight, near a heater, or in a car during the day) to prevent the possibility of panel disfiguration or damage to the internal components.
• Do not use the instrument in the vicinity of a TV, radio, stereo equipment, mobile phone, or other electric devices. Otherwise, the instrument, TV, or radio may generate noise.
• Do not place the instrument in an unstable position where it might accidentally fall over.
• Before moving the instrument, remove all connected cables.
• When setting up the instrument, make sure that the AC outlet you are using is easily accessible. If some trouble or malfunction occurs, immediately turn off the power switch and disconnect the plug from the outlet. Even when the power switch is turned off, electricity is still flowing to the product at the minimum level. When you are not using the product for a long time, make sure to unplug the power cord from the wall AC outlet.
• Do not place the instrument against a wall (allow at least 3 cm/one-inch from the wall), since this can cause inadequate air circulation, and possibly result in the instrument overheating.
Power supply/Power cord
Do not open
Water warning
Fire warning
If you notice any abnormality
Power supply/Power cord Location

(1)B-13 2/2
3ELS-01/01C Owner’s Manual
• Before connecting the instrument to other electronic components, turn off the power for all components. Before turning the power on or off for all components, set all volume levels to minimum. Also, be sure to set the volumes of all components at their minimum levels and gradually raise the volume controls while playing the instrument to set the desired listening level.
• When cleaning the instrument, use a soft, dry cloth. Do not use paint thinners, solvents, cleaning fluids, or chemical-impregnated wiping cloths.
• Take care that the key cover does not pinch your fingers, and do not insert a finger or hand in any gaps on the key cover or instrument.
• Never insert or drop paper, metallic, or other objects into the gaps on the key cover, panel or keyboard. If this happens, turn off the power immediately and unplug the power cord from the AC outlet. Then have the instrument inspected by qualified Yamaha service personnel.
• Do not place vinyl, plastic or rubber objects on the instrument, since this might discolor the panel or keyboard.
• Do not rest your weight on, or place heavy objects on the instrument, and do not use excessive force on the buttons, switches or connectors.
• Do not operate the instrument or headphones for a long period of time at a high or uncomfortable volume level, since this can cause permanent hearing loss. If you experience any hearing loss or ringing in the ears, consult a physician.
• Do not place the bench in an unstable position where it might accidentally fall over.
• Do not play carelessly with or stand on the bench. Using it as a tool or step-ladder or for any other purpose might result in accident or injury.
• Only one person should sit on the bench at a time, in order to prevent the possibility of accident or injury.
• If the bench screws become loose due to extensive long-term use, tighten them periodically using the included tool.
Saving and backing up your data• Always save data to a USB flash memory or other external media, in order to
help prevent the loss of important data due to a malfunction or user operating error.
Backing up the external media• To protect against data loss through media damage, we recommend that you
save your important data onto two external media.
Yamaha cannot be held responsible for damage caused by improper use or modifications to the instrument, or data that is lost or destroyed.
Always turn the power off when the instrument is not in use.
Connections
Maintenance
Handling caution
Using the bench
Saving data
The serial number of this product may be found on the bottom of the unit. You should note this serial number in the space provided below and retain this manual as a permanent record of your purchase to aid identification in the event of theft.
Model No. ELS-01U/ELS-01CU
Serial No.
(bottom)

ELS-01/01C Owner’s Manual4
Accessories• Bench• Owner’s Manual• Playing the ELS-01/01C — Tutorial Guidebook• Product ID card
Congratulations!You are the proud owner of a fine electronic organ, the Electone STAGEA ELS-01/01C typeU (hereafter ELS-01/01C).The Yamaha Electone combines the most advanced tone generation technology with state-of-the-art digital electronics and features to give you stunning sound quality with maximum musical versatility.In order to make the most of your Electone and its extensive performance potential, we urge you to read the manual thoroughly while trying out the various features described.Keep the manual in a safe place for later reference.

ELS-01/01C Owner’s Manual 5
Main Features
Wide Variety of Registration Menus page 19
The Registration Menu buttons feature a total of 240 Registrations, allowing you to instantly set up the Electone for playing your favorite type of music. The ELS-01C contains even more — an additional 60 Registrations that utilize the expressive VA Voices and Organ Flute Voices. The Registrations in Registration Menu are divided into five basic categories for ease of selection. Moreover, you can edit any of the Registrations and customize them to fit your own performance needs.
Richly textured, four-layer AWM Voices and High Quality Digital Effects
pages 22 and 50
The ELS-01 contains a huge amount of exceptionally high-quality Voices – 415 altogether – created with the AWM (Advanced Wave Memory) tone generation system. The ELS-01C adds to that 94 VA (Virtual Acoustic) Voices and a virtually limitless variety of Organ Flute Voices. The authentic touch response keyboard lets you play these Voices with all the expressiveness and control of an actual acoustic instrument. What’s more, there are 183 different effect types in 15 categories that you can apply to each Voice section —letting you enhance and even completely change the character of the Voices, without having to use the Voice Edit features.
Dynamic, Contemporary Rhythms and Auto Accompaniment page 51
The exceptionally of wide selection of 274 rhythms lets you choose exactly the rhythm you need in your performance. Each rhythm contains 15 variations (sections) – such as Main, Fill In, Intro, Ending, and Break – that you can easily switch while you play, to make your performance even more dynamic and professional. Each rhythm has its own matching accompaniment divided into five instrument parts, providing basic backing as well as embellishments.
Large, 6.5-inch TFT-LCD with Intuitive Touch Panel Operation page 12
This large LCD display not only lets you clearly see a wide selection of settings and parameters at almost any angle, it also serves as a touch control panel — letting you intuitively make selections and adjust settings simply by touching the screen! Once you touch a setting, you can even adjust it in finer detail if necessary with the Data Control dial.

ELS-01/01C Owner’s Manual6
This product utilizes NF, an embedded Internet browser from ACCESS Co., Ltd. NF is used with the patented LZW, licensed from Unisys Co., Ltd. NF may not be separated from this product, nor may it be sold, lent or transferred in any way. Also, NF may not be reverse-engineered, reverse-compiled, reverse-assembled or copied.This software includes a module developed by the Independent JPEG Group.
• The bitmap fonts used in this instrument have been provided by and are the property of Ricoh Co., Ltd.
• This product incorporates and bundles computer programs and contents in which Yamaha owns copyrights or with respect to which it has license to use others’ copyrights. Such copyrighted materials include, without limitation, all computer software, styles files, MIDI files, WAVE data and sound recordings. Any unauthorized use of such programs and contents outside of personal use is not permitted under relevant laws. Any violation of copyright has legal consequences. DON’T MAKE, DISTRIBUTE OR USE ILLEGAL COPIES.
• Copying of the commercially available music sequence data and/or digital audio files is strictly prohibited except for your personal use.
• Electone and STAGEA are the trademarks of Yamaha Corporation.
• The company names and product names in this Owner’s Manual are the trademarks or registered trademarks of their respective companies.
• The illustrations and LCD screens as shown in this owner’s manual are for instructional purposes only, and may appear somewhat different from those on your instrument.
• The panel illustrations and LCD screens shown in this owner’s manual are taken from the ELS-01C, Version 1.7.
• The pan flute and sitar, shown in the displays of the ELS-01/01C, are on display at the Hamamatsu Museum of Musical Instruments.
The ELS-01/01C is compatible with the following formats.
“GM (General MIDI)” is one of the most common Voice allocation formats. “GM System Level 2” is a standard specification that enhances the original “GM” and improves Song data compatibility. It provides for increased polyphony, greater Voice selection, expanded Voice parameters, and integrated effect processing.
XG is a major enhancement of the GM System Level 1 format, and was developed by Yamaha specifically to provide more Voices and variations, as well as greater expressive control over Voices and effects, and to ensure compatibility of data well into the future.
GS was developed by the Roland Corporation. In the same way as Yamaha XG, GS is a major enhancement of the GM specifically to provide more Voices and Drum kits and their variations, as well as greater expressive control over Voices and effects.
The Style File Format combines all of Yamaha’s auto accompaniment know-how into a single unified format.
[ELS-01C only] Products bearing the SONDIUS-XG logo are licensed under patents of Stanford University and Yamaha as listed on the internet web site, <http://www.sondius-xg.com>.
1
Voices2
Quick Introductory Guide
Organ Flutes (ELS-01C)3
Voice Controls and Effects4
Rhythm/Keyboard Percussion5
Registration Memory6
Music Data Recorder (MDR)7
Voice Edit8
Rhythm Program9
Footswitches, Knee Lever and Expression Pedals10
Transpose and Pitch Controls11
13
Internet Direct Connection
Connections
14 Appendix
12
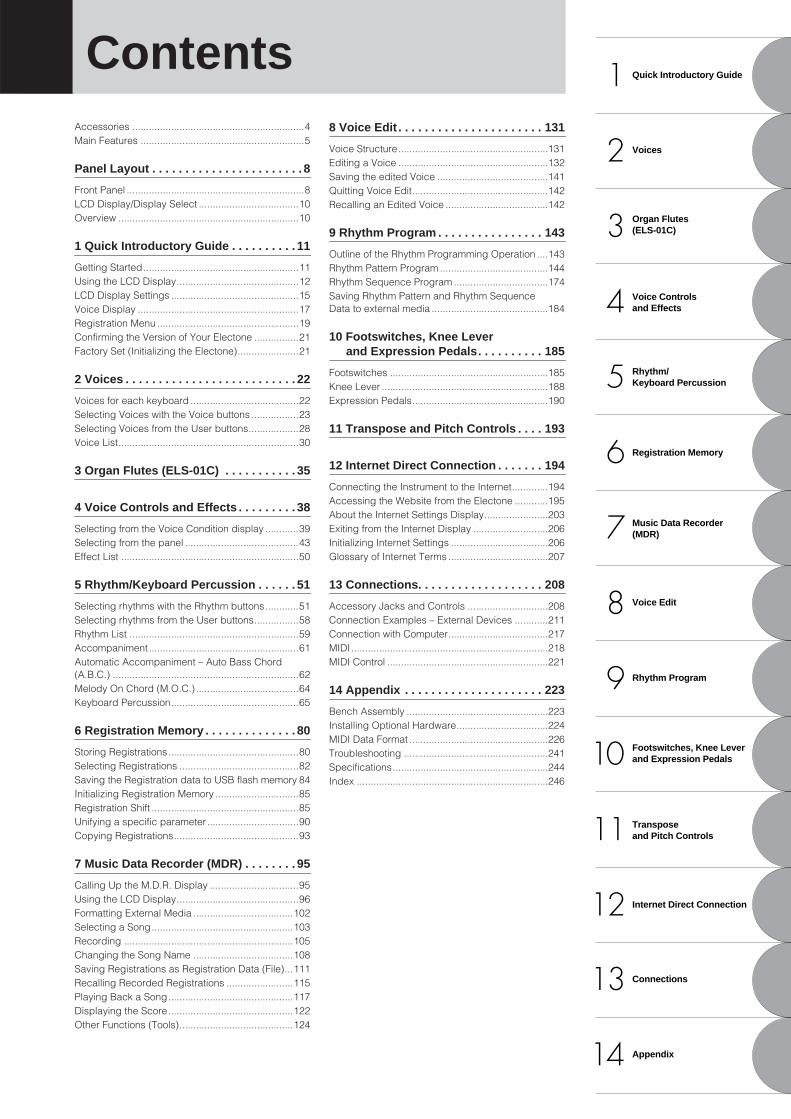
ContentsAccessories ..............................................................4Main Features ...........................................................5
Panel Layout . . . . . . . . . . . . . . . . . . . . . . . 8
Front Panel ................................................................8LCD Display/Display Select ....................................10Overview .................................................................10
1 Quick Introductory Guide . . . . . . . . . . 11
Getting Started........................................................11Using the LCD Display............................................12LCD Display Settings ..............................................15Voice Display ..........................................................17Registration Menu ...................................................19Confirming the Version of Your Electone ................21Factory Set (Initializing the Electone)......................21
2 Voices . . . . . . . . . . . . . . . . . . . . . . . . . . 22
Voices for each keyboard .......................................22Selecting Voices with the Voice buttons .................23Selecting Voices from the User buttons..................28Voice List.................................................................30
3 Organ Flutes (ELS-01C) . . . . . . . . . . . 35
4 Voice Controls and Effects . . . . . . . . . 38
Selecting from the Voice Condition display ............39Selecting from the panel .........................................43Effect List ................................................................50
5 Rhythm/Keyboard Percussion . . . . . . 51
Selecting rhythms with the Rhythm buttons............51Selecting rhythms from the User buttons................58Rhythm List .............................................................59Accompaniment......................................................61Automatic Accompaniment – Auto Bass Chord (A.B.C.) ...................................................................62Melody On Chord (M.O.C.) .....................................64Keyboard Percussion..............................................65
6 Registration Memory . . . . . . . . . . . . . . 80
Storing Registrations...............................................80Selecting Registrations ...........................................82Saving the Registration data to USB flash memory 84Initializing Registration Memory ..............................85Registration Shift .....................................................85Unifying a specific parameter.................................90Copying Registrations.............................................93
7 Music Data Recorder (MDR) . . . . . . . . 95
Calling Up the M.D.R. Display ................................95Using the LCD Display............................................96Formatting External Media ....................................102Selecting a Song...................................................103Recording .............................................................105Changing the Song Name ....................................108Saving Registrations as Registration Data (File)...111Recalling Recorded Registrations ........................115Playing Back a Song.............................................117Displaying the Score.............................................122Other Functions (Tools).........................................124
8 Voice Edit . . . . . . . . . . . . . . . . . . . . . . 131
Voice Structure......................................................131Editing a Voice ......................................................132Saving the edited Voice ........................................141Quitting Voice Edit.................................................142Recalling an Edited Voice .....................................142
9 Rhythm Program . . . . . . . . . . . . . . . . 143
Outline of the Rhythm Programming Operation ....143Rhythm Pattern Program .......................................144Rhythm Sequence Program ..................................174Saving Rhythm Pattern and Rhythm Sequence Data to external media ..........................................184
10 Footswitches, Knee Lever and Expression Pedals. . . . . . . . . . 185
Footswitches .........................................................185Knee Lever ............................................................188Expression Pedals.................................................190
11 Transpose and Pitch Controls . . . . 193
12 Internet Direct Connection . . . . . . . 194
Connecting the Instrument to the Internet.............194Accessing the Website from the Electone ............195About the Internet Settings Display.......................203Exiting from the Internet Display ...........................206Initializing Internet Settings ...................................206Glossary of Internet Terms ....................................207
13 Connections. . . . . . . . . . . . . . . . . . . 208
Accessory Jacks and Controls .............................208Connection Examples – External Devices ............211Connection with Computer....................................217MIDI.......................................................................218MIDI Control ..........................................................221
14 Appendix . . . . . . . . . . . . . . . . . . . . . 223
Bench Assembly ...................................................223Installing Optional Hardware.................................224MIDI Data Format ..................................................226Troubleshooting ....................................................241Specifications........................................................244Index .....................................................................246

ELS-01/01C Owner’s Manual8
REVERB
SUSTAIN
UPPER KEYBOARD VOICE 1
MAX
BRILLIANCE
BRILLIANT
MELLOWMIN
VOLUME UPPER KEYBOARD VOICE 2 BRILLIANCE VOLUME
MAX
MIN
BRILLIANT
MELLOW
MAX
MIN
STRINGS BRASS TUTTI PAD SYNTHWOOD-WIND
PIANO ORGAN GUITAR CHOIR WORLDPERCUS-SION
1
2
STRINGS BRASS TUTTI PAD SYNTHWOOD-WIND
PIANO ORGAN GUITAR CHOIR WORLDPERCUS-SION
1
2
LOWER KEYBOARD VOICE 1
REGISTRATION MENUKEYBOARD
PERCUSSION
BRILLIANCE
BRILLIANT
MELLOW
VOLUME LOWER KEYBOARD VOICE 2 BRILLIANCE VOLUME
MAX
MIN
BRILLIANT
MELLOW
MAX
MIN
STRINGS BRASS TUTTI PAD SYNTHWOOD-WIND
UPPER(KNEE)
MARCH
LATIN WORLDMUSIC
BALLAD ROCK DANCE
WALTZ POPS R & BSWING&JAZZ
LOWER(KNEE)
PEDAL PIANO ORGAN GUITAR CHOIR WORLDPERCUS-SION
1
2
STRINGS BRASS TUTTI PAD SYNTHWOOD-WIND
PIANO ORGAN GUITAR CHOIR WORLDPERCUS-SION
1
2
1 2
2
1
11
2 3
1 2 3
1 2 3 A B C D
4 5
RHYTHM VOLUME
SEQ.2
SEQ.
3SEQ.
4SEQ.
MAX
MIN
TEMPO
INTRO
ENDING MAIN / FILL IN
BAR / BEAT
RHYTHMCONTROL
START BREAKSYNCHROSTART
TEMPO
13 14 15 16 1 2 3 4
Panel LayoutFront Panel
LOWER KEYBOARD VOICE 1, 2(page 23)
REVERB buttons(page 43)
UPPER KEYBOARD VOICE 1, 2(page 22)
Monitor speaker
SUSTAIN buttons(page 47)
REGISTRATION MENU(page 19)
RHYTHM/KEYBOARD PERCUSSION
(page 51)
[M.] (Memory) button(page 80)
Registration memory(page 80)

ELS-01/01C Owner’s Manual 9
BRILLIANCE VOLUME
BRILLIANT
MELLOW
MAX
MIN
BRILLIANT
MELLOW
MAX
MIN
VIOLIN SYNTH
FLUTE TOLOWER
TRUMPET
1
LEAD VOICE 1
BRILLIANCE VOLUME
BRILLIANT
MELLOW
MAX
MIN
CONTRABASS
ELEC.BASS
TIMPANI TOLOWER
SYNTHBASS
1
PEDAL VOICE 1 BRILLIANCE VOLUME
BRILLIANT
MELLOW
MAX
MIN
CONTRABASS
ELEC.BASS
TIMPANI TOLOWER
SYNTHBASS
1
PEDAL VOICE 2
BRILLIANCE VOLUMELEAD VOICE 2
VA VAACOUS-
TICVIRTUAL
VA VAELEC-
TRONIC
SOLO(KNEE)CUSTOM
1
MASTER VOLUME
DISPLAY SELECT
VOICEDISPLAY
FOOTSWITCH
RHYTHMPROGRAM
UTILITY INTERNET
A.B.C.M.O.C. MDR
VOICE EDIT PATTERN SEQUENCE
U.ORGANFLUTES
L.ORGANFLUTES
ROTARY SPSPEED
DATA CONTROL
POWER
5 6 7 8 9 10 12 D.11
LCD display/DISPLAY SELECT
(page 10)PEDAL VOICE 1, 2
(page 23)LEAD VOICE 1, 2
(page 22)
Monitor speaker
MASTER VOLUME dial (page 11)
POWER switch(page 11)
[D.] (Disable) button(page 82)

ELS-01/01C Owner’s Manual10
LCD Display/Display Select
Overview
1 LCD display (touch-panel) . . . . . . . . . . . . page 122 DATA CONTROL dial . . . . . . . . . . . . . . . . page 143 [VOICE DISPLAY] button . . . . . . . . . . . . . page 174 [A.B.C./M.O.C.] button . . . . . . . . . . .pages 62, 645 [MDR] button. . . . . . . . . . . . . . . . . . . . . page 956 [FOOT SWITCH] button . . . . . . . . . .pages 86, 1857 [UTILITY] button . . . . . . pages 15, 191, 193, 2218 [INTERNET] button . . . . . . . . . . . . . . . . page 195
9 [VOICE EDIT] button. . . . . . . . . . . . . . . page 133) [PATTERN] button . . . . . . . . . . . . . . . . page 144! [SEQUENCE] button . . . . . . . . . . . . . . . page 174@ [U. ORGAN FLUTES] button. . . . . . . . . . . page 35# [L. ORGAN FLUTES] button . . . . . . . . . . . page 35$ [ROTARY SP SPEED] button . . . . . . . . . . page 48
DISPLAY SELECT
VOICEDISPLAY
FOOTSWITCH
RHYTHMPROGRAM
UTILITY INTERNET
A.B.C.M.O.C. MDR
VOICE EDIT PATTERN SEQUENCE
U.ORGANFLUTES
L.ORGANFLUTES
ROTARY SPSPEED
DATA CONTROL
1
2
3 4 5
6 7 8
9 ) !
@ # $
Key cover/Music rest
Front Panel (page 8)
Upper keyboard
Lower keyboard
USB/MIDI connectors (page 210)
Knee lever (page 188)
Speaker switch
Left footswitch (page 185)Expression pedal (page 12)
Second expression pedal(ELS-01C); (page 190)
Pedalboard
Speaker
I/O connectors(page 208)
Right footswitch (page 85)
ELS-01/01C Owner’s Manual 11
Quick Introductory GuideWhether you are an advanced performer or have never touched an electronic keyboard in your life, we recommend that you take the time to go through this basic section. It shows you in the simplest possible manner how to start playing your Electone.
Plug the power cord into an appropriate electrical outlet.
Make sure that the POWER switch of the speaker is set to on.If you are using the ELS-01C, also set the REAR SPEAKER switch to on (not available on the ELS-01).
Turn on the Electone by pressing the POWER switch.
Set the MASTER VOLUME control.The MASTER VOLUME control is an overall control that affects the volume of the entire instrument.
Contents
1 Getting Started. . . . . . . . . . . . . . . . . . . . . . . . . . . . 11
2 Using the LCD Display. . . . . . . . . . . . . . . . . . . . . . . 12• Changing the Display Page. . . . . . . . . . . . . . . . . . . . . . . . . . . . 12• Pressing Buttons on the Display. . . . . . . . . . . . . . . . . . . . . . . . 13• Adjusting Parameter Values by Using the Display Sliders . . . . 14
3 LCD Display Settings . . . . . . . . . . . . . . . . . . . . . . . 15• Selecting the Display Language . . . . . . . . . . . . . . . . . . . . . . . . 15• Muting the Touch Panel Sound. . . . . . . . . . . . . . . . . . . . . . . . . 16• Adjusting the Display Brightness . . . . . . . . . . . . . . . . . . . . . . . 16
4 Voice Display. . . . . . . . . . . . . . . . . . . . . . . . . . . . . 17
5 Registration Menu . . . . . . . . . . . . . . . . . . . . . . . . . 19• Selecting Registrations from the Registration Menu. . . . . . . . . 19• Registration Menu List . . . . . . . . . . . . . . . . . . . . . . . . . . . . . . . 20
6 Confirming the Version of Your Electone . . . . . . . . . . 21
7 Factory Set (Initializing the Electone) . . . . . . . . . . . . 21
1 Getting Started
Only use the voltage specified as correct for the Electone. The required voltage is printed on the name plate of the Electone. Yamaha products are manufactured specifically for the supply voltage in the area where they are to be sold. If you intend to use the instrument in another location, or if any doubt exists about the supply voltage, please consult with a qualified technician.
1
2 NOTE
When using the rear speaker, place the Electone against a wall, allowing about 20 cm from the wall for optimum sound.3
POWER
4 NOTE
You do not need to switch the power of the speaker on/off whenever you use the instrument.If you want, you can always keep it on and turn off the power by pressing the main POWER switch of the instrument.
MASTER VOLUME
Decreasingthe volume
Increasing the volume
1
ELS-01/01C Owner’s Manual12
1
Quick Introductory G
uide
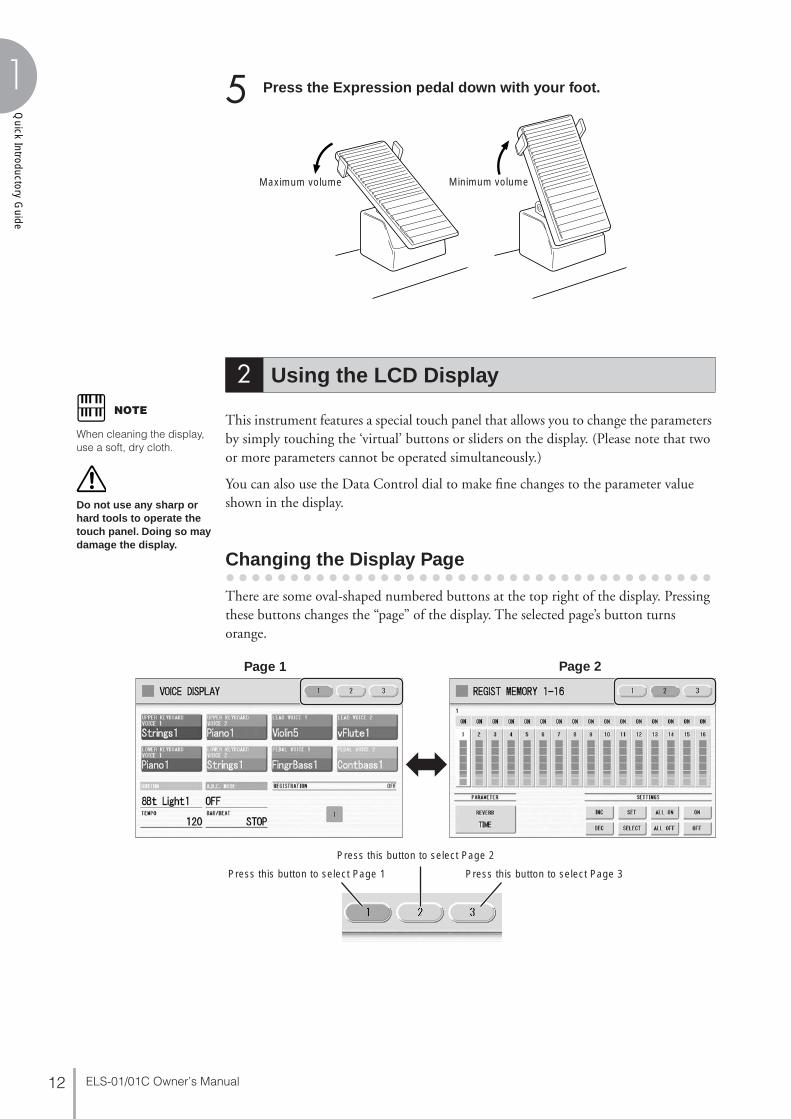
Press the Expression pedal down with your foot.
This instrument features a special touch panel that allows you to change the parameters by simply touching the ‘virtual’ buttons or sliders on the display. (Please note that two or more parameters cannot be operated simultaneously.)
You can also use the Data Control dial to make fine changes to the parameter value shown in the display.
● ● ● ● ● ● ● ● ● ● ● ● ● ● ● ● ● ● ● ● ● ● ● ● ● ● ● ● ● ● ● ● ● ● ● ● ● ●
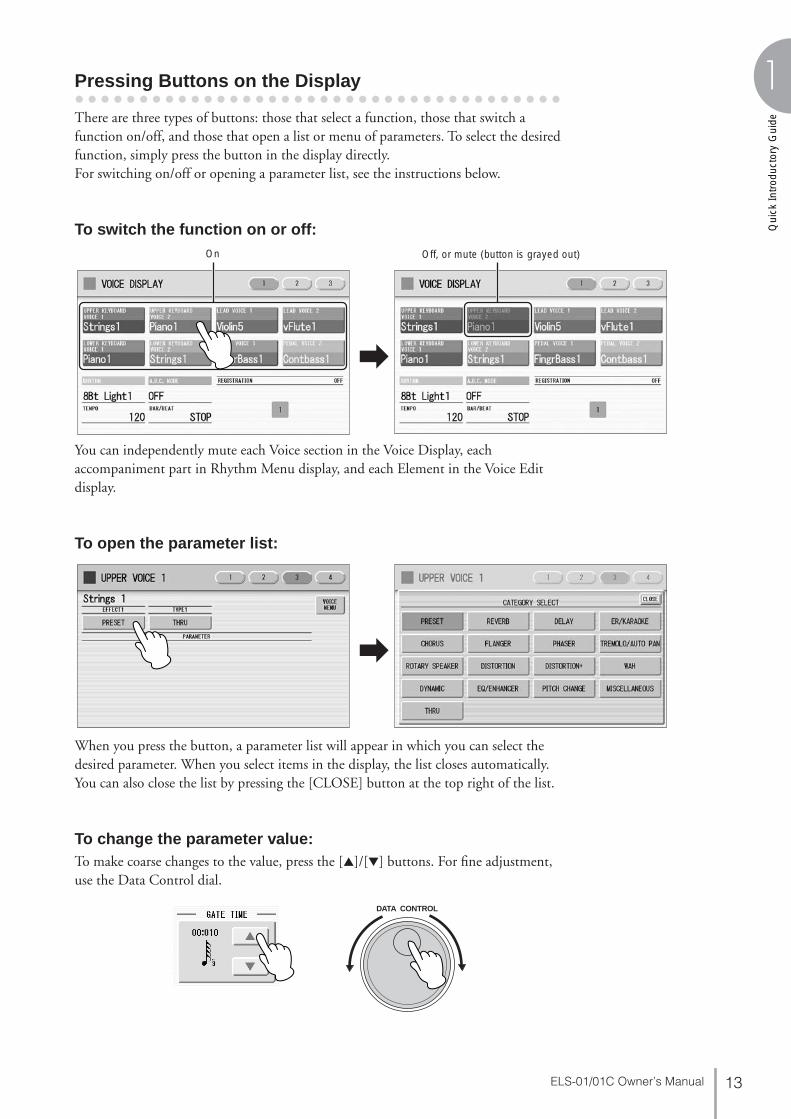
Changing the Display Page
There are some oval-shaped numbered buttons at the top right of the display. Pressing these buttons changes the “page” of the display. The selected page’s button turns orange.
2 Using the LCD Display
5
Maximum volume Minimum volume
NOTE
When cleaning the display, use a soft, dry cloth.
Do not use any sharp or hard tools to operate the touch panel. Doing so may damage the display.
Page 1 Page 2
Press this button to select Page 1
Press this button to select Page 2
Press this button to select Page 3
ELS-01/01C Owner’s Manual 13
1
Qui
ck In
trod
ucto
ry G
uide
● ● ● ● ● ● ● ● ● ● ● ● ● ● ● ● ● ● ● ● ● ● ● ● ● ● ● ● ● ● ● ● ● ● ● ● ● ●
Pressing Buttons on the Display
There are three types of buttons: those that select a function, those that switch a function on/off, and those that open a list or menu of parameters. To select the desired function, simply press the button in the display directly.For switching on/off or opening a parameter list, see the instructions below.
To switch the function on or off:
You can independently mute each Voice section in the Voice Display, each accompaniment part in Rhythm Menu display, and each Element in the Voice Edit display.
To open the parameter list:
When you press the button, a parameter list will appear in which you can select the desired parameter. When you select items in the display, the list closes automatically. You can also close the list by pressing the [CLOSE] button at the top right of the list.
To change the parameter value:To make coarse changes to the value, press the [▲]/[▼] buttons. For fine adjustment, use the Data Control dial.
On Off, or mute (button is grayed out)
DATA CONTROL
ELS-01/01C Owner’s Manual14
1
Quick Introductory G
uide
Adjusting Parameter Values by Using the Display
● ● ● ● ● ● ● ● ● ● ● ● ● ● ● ● ● ● ● ● ● ● ● ● ● ● ● ● ● ● ● ● ● ● ● ● ● ●
Sliders
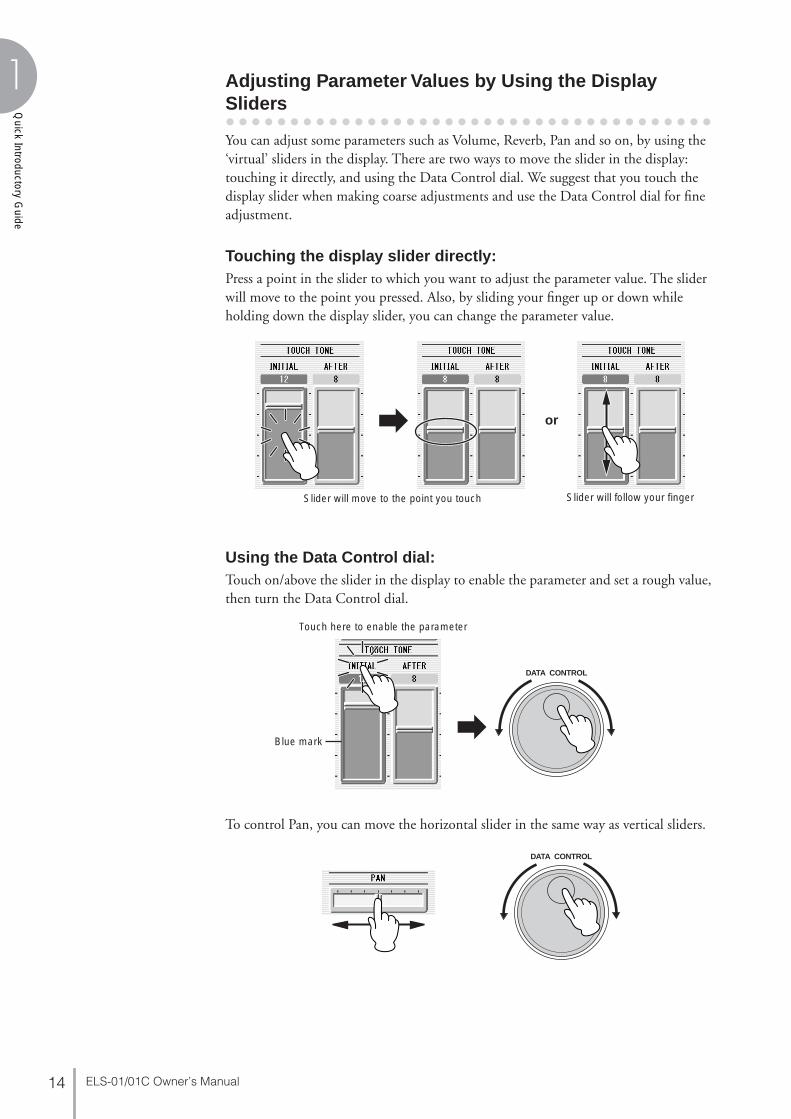
You can adjust some parameters such as Volume, Reverb, Pan and so on, by using the ‘virtual’ sliders in the display. There are two ways to move the slider in the display: touching it directly, and using the Data Control dial. We suggest that you touch the display slider when making coarse adjustments and use the Data Control dial for fine adjustment.
Touching the display slider directly:Press a point in the slider to which you want to adjust the parameter value. The slider will move to the point you pressed. Also, by sliding your finger up or down while holding down the display slider, you can change the parameter value.
Using the Data Control dial:Touch on/above the slider in the display to enable the parameter and set a rough value, then turn the Data Control dial.
To control Pan, you can move the horizontal slider in the same way as vertical sliders.
Slider will move to the point you touch Slider will follow your finger
or
DATA CONTROL
Touch here to enable the parameter
Blue mark
DATA CONTROL

ELS-01/01C Owner’s Manual 15
1
Qui
ck In
trod
ucto
ry G
uide
Here you can change the display settings: displayed language (English or Japanese), touch panel sound, and display brightness.
● ● ● ● ● ● ● ● ● ● ● ● ● ● ● ● ● ● ● ● ● ● ● ● ● ● ● ● ● ● ● ● ● ● ● ● ● ●
Selecting the Display Language
The LCD display can be shown in two languages, English and Japanese. The default setting is English.
Press the [UTILITY] button to call up the GLOBAL Page of the Utility Display.
Press the desired button, (Japanese) or [English].
3 LCD Display Settings
NOTE
The settings in the Utility Display are automatically saved when another display is called up.
1DISPLAY SELECT
VOICEDISPLAY
FOOTSWITCH
RHYTHMPROGRAM
UTILITY INTERNET
A.B.C.M.O.C. MDR
VOICE EDIT PATTERN SEQUENCE
U.ORGANFLUTES
L.ORGANFLUTES
ROTARY SPSPEED
2
LANGUAGE

ELS-01/01C Owner’s Manual16
1
Quick Introductory G
uide
● ● ● ● ● ● ● ● ● ● ● ● ● ● ● ● ● ● ● ● ● ● ● ● ● ● ● ● ● ● ● ● ● ● ● ● ● ●
Muting the Touch Panel Sound
The Electone is set by default with the touch panel sound turned on, giving you audio feedback when you press a button or control. If you want to mute the touch panel sound, follow the procedure below.
Press [UTILITY] button to call up GLOBAL Page of the Utility Display.
Press the [OFF] button of the TOUCH PANEL SOUND to mute the sound.
To turn the sound on again, select [ON] in Step 2.
● ● ● ● ● ● ● ● ● ● ● ● ● ● ● ● ● ● ● ● ● ● ● ● ● ● ● ● ● ● ● ● ● ● ● ● ● ●
Adjusting the Display Brightness
You can adjust the display brightness to a comfortable, easy-to-read level.
Press the [UTILITY] button to call up the GLOBAL Page of the Utility Display.
Move the LCD BRIGHTNESS slider by touching it directly or using the Data Control dial.Higher settings make the display brighter and lower settings make it darker.
12
TOUCH PANEL SOUND
12
DATA CONTROL
LCD BRIGHTNESS

ELS-01/01C Owner’s Manual 17
1
Qui
ck In
trod
ucto
ry G
uide
You can visually confirm the currently assigned Voices to each keyboard, currently selected rhythm, Registration Shift, and so on, in the Voice Display.
How to call up the Voice Display:The Voice Display always appears when the Electone is turned on. To call up the Voice Display from any other display, press the [VOICE DISPLAY] button.
The Voice Display consists of three different pages that can be switched by pressing the [1], [2], or [3] button at the top right of the display.
4 Voice Display
DISPLAY SELECT
VOICEDISPLAY
FOOTSWITCH
RHYTHMPROGRAM
UTILITY INTERNET
A.B.C.M.O.C. MDR
VOICE EDIT PATTERN SEQUENCE
U.ORGANFLUTES
L.ORGANFLUTES
ROTARY SPSPEED
3
1
2
5 64
Switching the Display Pages
Voice Display [Page 1]

ELS-01/01C Owner’s Manual18
1
Quick Introductory G
uide
1 Voice SectionsShows the Voices currently assigned to each Voice section. You can also mute specific Voice section by pressing its button (the button is grayed-out).
2 RHYTHMShows the currently selected rhythm.
3 A.B.C. MODEShows the mode of the Auto Bass Chord.
4 TEMPOShows the current rhythm tempo.
5 BAR/BEATShows the bar/beat when the rhythm is playing.
6 REGISTRATIONShows the current position of the Registration Shift.
You can confirm the parameter values (for example, Reverb, Volume, Pan) for each Registration Memory simultaneously. Moreover, you can unify a specific parameter used in various Registration Memories at one time. See page 90 for the details.
The Registrations stored to the Registration number can be copied to another Registration number for each individual section.
Reference Page
Selecting a Voice (page 23)
Reference Page
Selecting a rhythm (page 51)
Reference Page
Auto Bass Chord (page 62)
Reference Page
Adjusting the tempo (page 56)
Reference Page
Registration Shift (page 85)
Voice Display [Page 2]
Voice Display [Page 3]
Reference Page
Registration Memory (page 80)

ELS-01/01C Owner’s Manual 19
1
Qui
ck In
trod
ucto
ry G
uide
A “Registration” consists of panel settings including the selected Upper Keyboard Voices, Lower Keyboard Voices, Pedal Voices, rhythm and so on. Each Registration Menu button (1 – 5) includes 48 Registrations (or 60 Registrations on the ELS-01C), each specially suited for playing in a different music style.
● ● ● ● ● ● ● ● ● ● ● ● ● ● ● ● ● ● ● ● ● ● ● ● ● ● ● ● ● ● ● ● ● ● ● ● ● ●
Selecting Registrations from the Registration Menu
Press one of the REGISTRATION MENU buttons.Each button has different Registrations for different music genres. For example, if you want to play Jazz, press the [4] button. For details on the Registration Menu, see page 20.
Select the desired Registration by pressing the appropriate button on the display.One display page contains 12 Registration buttons. Pressing the numbered buttons in the display changes the display pages, letting you select up to 48 Registrations from one Registration Menu button (or 60 Registrations, on the ELS-01C).
The color of the selected Registration name changes to orange, indicating that it has been selected, and the Auto Bass Chord mode is shown at the bottom of the display.
Play your favorite song with the selected Registration.
5 Registration Menu
NOTE
Additional basic Registrations are preset on the Registration Memory locations from 1 to 16. See page 80 for details.
Kids
Pops & Rock
Dance & Ballad
Jazz & Latin
Symphony & World
1
REGISTRATION MENU
1 2 3 4 5
1
2
3
4
5
2
Change the display pages here.
Reference Page
Auto Bass Chord (page 62)
3

ELS-01/01C Owner’s Manual20
1
Quick Introductory G
uide
● ● ● ● ● ● ● ● ● ● ● ● ● ● ● ● ● ● ● ● ● ● ● ● ● ● ● ● ● ● ● ● ● ● ● ● ● ● ● ● ● ● ● ● ● ● ● ● ● ●
Registration Menu List
Page REGISTRATION MENU 1KIDS
REGISTRATION MENU 2POPS & ROCK
REGISTRATION MENU 3 DANCE & BALLAD
REGISTRATION MENU 4JAZZ & LATIN
REGISTRATION MENU 5SYMPHONY & WORLD
1 Simple 8 Beat 1 Dynamic 8 Beat Organ Ballad Blow On Sax Fanfare
Simple 8 Beat 2 NY Ballad Dramatic Ballad Sax Ensemble String Orchestra
Light Step British Pop Love Ballad Moonlight Romantic Violin
Sunny Pop 8 Beat Modern Smooth Lead Big Band Baroque
Kids March 1 Rock Band Pop Ballad Clarinet Swing Flute&Harp
Kids March 2 Detroit Pop Guitar Ballad Jazz Combo Serenade
Kids March 3 Techno Pop Acoustic Ballad Medium Jazz Fast March
Synth. Rock Sheriff Reggae Healing Guitar Organ Session Wild West
Symphonic March 1 Rock&Roll Chillout Guitar Combo Vienna Waltz
Symphonic March 2 Power Rock Sweetheart 1 Tender Ballad Polka
Bluegrass 60’s Guitar Rock Sweetheart 2 Jazz Waltz Chanson Club
Sea Carnival Unplugged Slow & Easy Five-Four Theatre Organ
2 Basic Waltz Motor City Euro Trance Big Band Samba Flamenco
Brass Ensemble Lovely Shuffle 6/8 Trance Mambo Brass Pop Flamenco
Pure Waltz Gospel Shuffle Cool Hip Hop Mambo Tenor Mexican Dance
Rococo Ensemble Joyful Gospel Latin House Montuno Mariachi
Pop Cha Cha Frankly Soul Dance Beat Bossa Nova Celtic Dance
Comical Rumba Soul Euro Dance Pop Pop Bossa Folk Step
Comical Samba Gospel UK Pop Sweet Rumba Italiano
Toy Orchestra 6/8 Soul Jive Beguine Musette
Charleston Hit Pop Disco Queen Cha Cha Cha Country
Winter Swing New Country Disco Soul Mellow Groove Hawaiian
Snow Waltz 1 Eternal Pop Pop Disco Modern R&B Chinese Nocturne
Snow Waltz 2 Ground Beat Hot Disco Dixieland Jazz Japanese Sound
3 Alpine Polka *A Bounce Pop *A Ibiza *A Jungle Drum *A Orchestra March*A
Alpine Polka *B Bounce Pop *B Ibiza *B Jungle Drum *B Orchestra March*B
Alpine Polka *C Bounce Pop *C Ibiza *C Jungle Drum *C Orchestra March*C
Alpine Polka *D Bounce Pop *D Ibiza *D Jungle Drum *D Orchestra March*D
Dream Ballad *A Blues Jam *A Power House *A Jazz Club *A Pasodoble *A
Dream Ballad *B Blues Jam *B Power House *B Jazz Club *B Pasodoble *B
Dream Ballad *C Blues Jam *C Power House *C Jazz Club *C Pasodoble *C
Dream Ballad *D Blues Jam *D Power House *D Jazz Club *D Pasodoble *D
Pops Orchestra*A Evergreen Waltz*A Dance Latino *A Afro Session *A Tango *A
Pops Orchestra*B Evergreen Waltz*B Dance Latino *B Afro Session *B Tango *B
Pops Orchestra*C Evergreen Waltz*C Dance Latino *C Afro Session *C Tango *C
Pops Orchestra*D Evergreen Waltz*D Dance Latino *D Afro Session *D Tango *D
4 Kids On Stage *A 16 Beat Pop *A Twilight Disco*A ChaCha Grandee*A Show Time *A
Kids On Stage *B 16 Beat Pop *B Twilight Disco*B ChaCha Grandee*B Show Time *B
Kids On Stage *C 16 Beat Pop *C Twilight Disco*C ChaCha Grandee*C Show Time *C
Kids On Stage *D 16 Beat Pop *D Twilight Disco*D ChaCha Grandee*D Show Time *D
Galaxy March *A Top Gear Rock *A Love Song *A 3/4 Fast Jazz *A Majestic Sound*A
Galaxy March *B Top Gear Rock *B Love Song *B 3/4 Fast Jazz *B Majestic Sound*B
Galaxy March *C Top Gear Rock *C Love Song *C 3/4 Fast Jazz *C Majestic Sound*C
Galaxy March *D Top Gear Rock *D Love Song *D 3/4 Fast Jazz *D Majestic Sound*D
SE *A Southern Pop *A Movie Ballad *A Twilight Sax *A Orchestra Swing*A
SE *B Southern Pop *B Movie Ballad *B Twilight Sax *B Orchestra Swing*B
SE *C Southern Pop *C Movie Ballad *C Twilight Sax *C Orchestra Swing*C
SE *D Southern Pop *D Movie Ballad *D Twilight Sax *D Orchestra Swing*D
5(ELS-01C)
Bright 16 Beat *A Funk *A Hip Hop Pop *A Organ Bossa *A Orchestra 3001*A
Bright 16 Beat *B Funk *B Hip Hop Pop *B Organ Bossa *B Orchestra 3001*B
Bright 16 Beat *C Funk *C Hip Hop Pop *C Organ Bossa *C Orchestra 3001*C
Bright 16 Beat *D Funk *D Hip Hop Pop *D Organ Bossa *D Orchestra 3001*D
Movie Panther *A West Coast Rock*A Fusion Shuffle*A Afro Cuban *A Wedding Song *A
Movie Panther *B West Coast Rock*B Fusion Shuffle*B Afro Cuban *B Wedding Song *B
Movie Panther *C West Coast Rock*C Fusion Shuffle*C Afro Cuban *C Wedding Song *C
Movie Panther *D West Coast Rock*D Fusion Shuffle*D Afro Cuban *D Wedding Song *D
Powerful Swing*A 6/8 Enka *A Whole Ballad *A Midnight Jazz *A Fantasy *A
Powerful Swing*B 6/8 Enka *B Whole Ballad *B Midnight Jazz *B Fantasy *B
Powerful Swing*C 6/8 Enka *C Whole Ballad *C Midnight Jazz *C Fantasy *C
Powerful Swing*D 6/8 Enka *D Whole Ballad *D Midnight Jazz *D Fantasy *D

ELS-01/01C Owner’s Manual 21
1
Qui
ck In
trod
ucto
ry G
uide
You can confirm the version of your Electone by the following procedure.
Press the [UTILITY] button.The Utility display appears.
Press the [GLOBAL] button at the top right of the display, then press the [Version] button in the display.The Version dialog appears in the display. Pressing [OK] closes the dialog.
All current settings including Registration Memory, User Voices, User Rhythms, and LCD Display settings can be deleted at once by the following procedure. Be careful when executing Factory Set, since it erases all your existing data. Always save your important data to external media, such as a USB flash memory. Factory Set does not reset the Internet Direct Connection settings. If you want to reset the Internet Direct Connection settings, see page 206.
Turn off the power.
While holding down the ENDING [1] button, turn the power back on.
Release the ENDING [1] button after Voice Display appears.
If you don’t want to reset the LCD Display settings, you can initialize only Registration settings. See page 85 for more information.
6 Confirming the Version of Your Electone
7 Factory Set (Initializing the Electone)
1
2
Reference Page
Saving Registrations (page 111)
Reference Page
Initializing Internet Settings (page 206)
1
2
1 2 3
ENDINGPOWER
3 Reference Page
Initializing Registration Memory (page 85)

ELS-01/01C Owner’s Manual22
2
Voices
VoicesThis Electone features hundreds of high quality Voices. Any of these Voices can be used on the Upper Keyboard, Lower Keyboard and Pedalboard. Up to four Voice sections are available on the Upper Keyboard for playing together in a layer, while the Lower Keyboard and Pedalboard each have two Voice sections.
Voices for the Upper KeyboardUp to four different Voice sections are available on the Upper Keyboard for playing together: Upper Keyboard Voice 1, Upper Keyboard Voice 2, Lead Voice 1, and Lead Voice 2. Voices for each section can be selected from the panel.
Lead Voice 1 and 2 sound only the highest note (or last note played) if two or more keys are played together. This makes the Lead Voices ideal for “lead” or solo instruments such as Trumpet and Saxophone. Lead Voice 2 includes additional, exclusive VA Voices which are not available in other Voice sections.
Contents
1 Voices for each keyboard. . . . . . . . . . . . . . . . . . . . . 22
2 Selecting Voices with the Voice buttons. . . . . . . . . . . 23• Selecting a Voice . . . . . . . . . . . . . . . . . . . . . . . . . . . . . . . . . . . 23• Changing the Voice volume . . . . . . . . . . . . . . . . . . . . . . . . . . . 25
3 Selecting Voices from the User buttons . . . . . . . . . . . 28
4 Voice List . . . . . . . . . . . . . . . . . . . . . . . . . . . . . . . 30
Voices for the Upper Keyboard
Voices for the Lower Keyboard Voices for Pedalboard
1 Voices for each keyboard
UPPER KEYBOARD VOICE 1 BRILLIANCE
BRILLIANT
MELLOW
VOLUME UPPER KEYBOARD VOICE 2 BRILLIANCE VOLUME
MAX
MIN
BRILLIANT
MELLOW
MAX
MIN
STRINGS BRASS TUTTI PAD SYNTHWOOD-WIND
PIANO ORGAN GUITAR CHOIR WORLDPERCUS-SION
1
2
STRINGS BRASS TUTTI PAD SYNTHWOOD-WIND
PIANO ORGAN GUITAR CHOIR WORLDPERCUS-SION
1
2
BRILLIANCE VOLUME
BRILLIANT
MELLOW
MAX
MIN
BRILLIANT
MELLOW
MAX
MIN
VIOLIN SYNTH
FLUTE TOLOWER
TRUMPET
1
LEAD VOICE 1 BRILLIANCE VOLUMELEAD VOICE 2
VA VAACOUS-
TICVIRTUAL
VA VAELEC-
TRONIC
SOLO(KNEE)CUSTOM
1
Upper Keyboard Voice 1 Upper Keyboard Voice 2
Lead Voice 1 Lead Voice 2
Reference Page
AWM Voices and VA Voices (page 34)
2

2
Voi
ces
ELS-01/01C Owner’s Manual 23
Voices for the Lower KeyboardUp to two different Voice sections are available on the Lower Keyboard for playing together: Lower Keyboard Voice 1 and Lower Keyboard Voice 2. Voices for each section can be selected from the panel.
Voices for PedalboardUp to two different Voice sections are available on the Pedalboard for playing together: Pedal Voice 1 and Pedal Voice 2. Voices for each section can be selected from the panel. Pedal Voices 1 and 2 sound only the highest note if two or more pedals are played, by default.
Since selection of Voices follows the same procedure throughout all Voice sections, instructions for only the Upper Keyboard Voice 1 are given here.
● ● ● ● ● ● ● ● ● ● ● ● ● ● ● ● ● ● ● ● ● ● ● ● ● ● ● ● ● ● ● ● ● ● ● ● ● ●
Selecting a Voice
Press one of the Voice buttons in the Upper Keyboard Voice 1 section.
LOWER KEYBOARD VOICE 1 BRILLIANCE
BRILLIANT
MELLOW
VOLUME LOWER KEYBOARD VOICE 2 BRILLIANCE VOLUME
MAX
MIN
BRILLIANT
MELLOW
MAX
MIN
STRINGS BRASS TUTTI PAD SYNTHWOOD-WIND
PIANO ORGAN GUITAR CHOIR WORLDPERCUS-SION
1
2
STRINGS BRASS TUTTI PAD SYNTHWOOD-WIND
PIANO ORGAN GUITAR CHOIR WORLDPERCUS-SION
1
2
Lower Keyboard Voice 1 Lower Keyboard Voice 2
Reference Page
POLY (page 40)
2 Selecting Voices with the Voice buttons
BRILLIANCE VOLUME
BRILLIANT
MELLOW
MAX
MIN
CONTRABASS
ELEC.BASS
TIMPANI TOLOWER
SYNTHBASS
1
PEDAL VOICE 1 BRILLIANCE VOLUME
BRILLIANT
MELLOW
MAX
MIN
CONTRABASS
ELEC.BASS
TIMPANI TOLOWER
SYNTHBASS
1
PEDAL VOICE 2
Pedal Voice 1 Pedal Voice 2
1UPPER KEYBOARD VOICE 1 BRILLIANCE
BRILLIANT
MELLOW
VOLUME
MAX
MIN
STRINGS BRASS TUTTI PAD SYNTHWOOD-WIND
PIANO ORGAN GUITAR CHOIR WORLDPERCUS-SION
1
2
Voice buttons

2
Voices
ELS-01/01C Owner’s Manual24
For example, if you have pressed the [PIANO] button, the following display (Voice Menu) will appear.
Select the desired Voice name from the Voice menu.The Voice menu contains many Piano Voices, more than can fit on one display page. To change the display pages, press the appropriate number buttons in the display.
The color of the selected Voice name changes to orange, indicating that it has been selected.
2
2
Voi
ces
ELS-01/01C Owner’s Manual 25
● ● ● ● ● ● ● ● ● ● ● ● ● ● ● ● ● ● ● ● ● ● ● ● ● ● ● ● ● ● ● ● ● ● ● ● ● ●
Changing the Voice volume
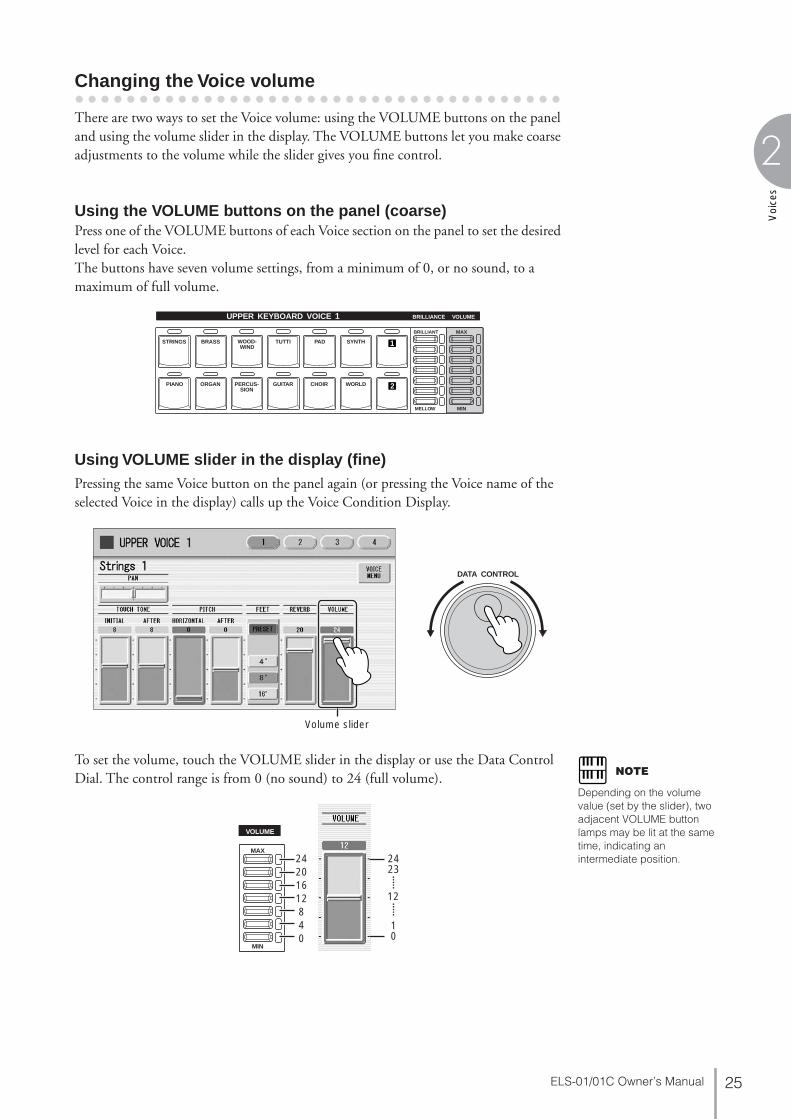
There are two ways to set the Voice volume: using the VOLUME buttons on the panel and using the volume slider in the display. The VOLUME buttons let you make coarse adjustments to the volume while the slider gives you fine control.
Using the VOLUME buttons on the panel (coarse)Press one of the VOLUME buttons of each Voice section on the panel to set the desired level for each Voice.The buttons have seven volume settings, from a minimum of 0, or no sound, to a maximum of full volume.
Using VOLUME slider in the display (fine)Pressing the same Voice button on the panel again (or pressing the Voice name of the selected Voice in the display) calls up the Voice Condition Display.
To set the volume, touch the VOLUME slider in the display or use the Data Control Dial. The control range is from 0 (no sound) to 24 (full volume).
UPPER KEYBOARD VOICE 1 BRILLIANCE
BRILLIANT
MELLOW
VOLUME
MAX
MIN
STRINGS BRASS TUTTI PAD SYNTHWOOD-WIND
PIANO ORGAN GUITAR CHOIR WORLDPERCUS-SION
1
2
DATA CONTROL
Volume slider
NOTE
Depending on the volume value (set by the slider), two adjacent VOLUME button lamps may be lit at the same time, indicating an intermediate position.
VOLUME
MAX
MIN
24201612840
2423
10
12
2
Voices
ELS-01/01C Owner’s Manual26
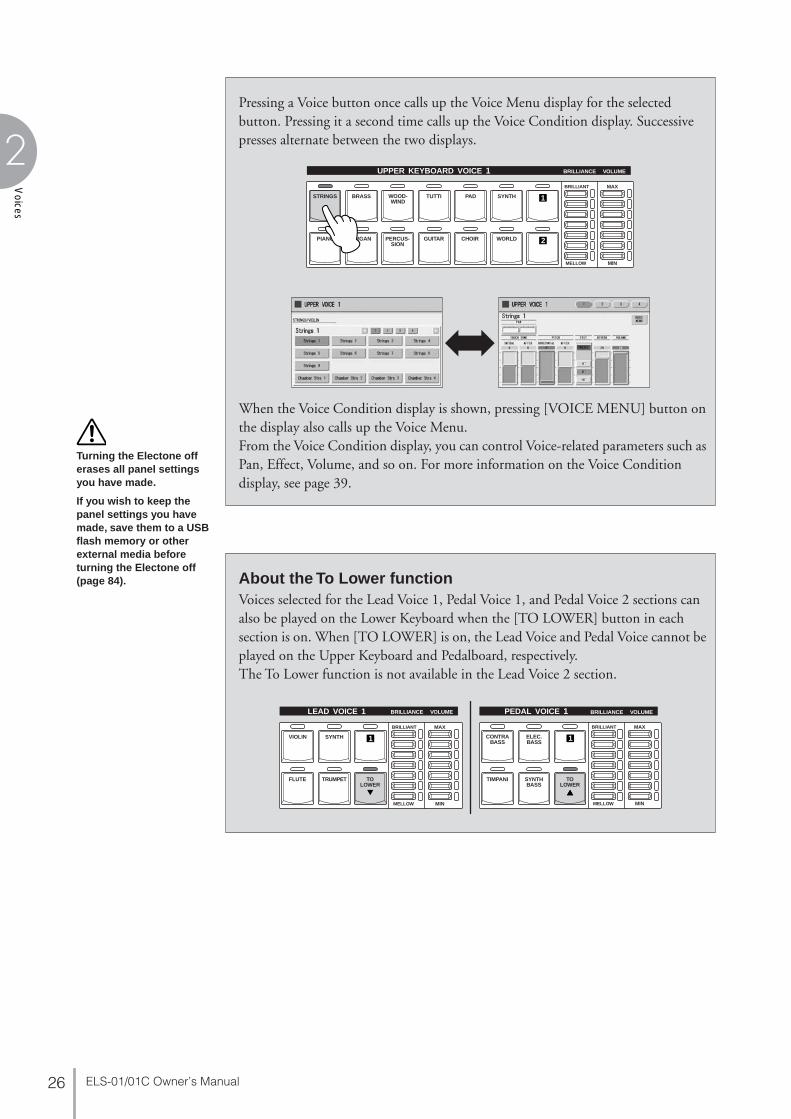
Pressing a Voice button once calls up the Voice Menu display for the selected button. Pressing it a second time calls up the Voice Condition display. Successive presses alternate between the two displays.
When the Voice Condition display is shown, pressing [VOICE MENU] button on the display also calls up the Voice Menu.From the Voice Condition display, you can control Voice-related parameters such as Pan, Effect, Volume, and so on. For more information on the Voice Condition display, see page 39.
UPPER KEYBOARD VOICE 1 BRILLIANCE
BRILLIANT
MELLOW
VOLUME
MAX
MIN
STRINGS BRASS TUTTI PAD SYNTHWOOD-WIND
PIANO ORGAN GUITAR CHOIR WORLDPERCUS-SION
1
2
Turning the Electone off erases all panel settings you have made.
If you wish to keep the panel settings you have made, save them to a USB flash memory or other external media before turning the Electone off (page 84). About the To Lower function
Voices selected for the Lead Voice 1, Pedal Voice 1, and Pedal Voice 2 sections can also be played on the Lower Keyboard when the [TO LOWER] button in each section is on. When [TO LOWER] is on, the Lead Voice and Pedal Voice cannot be played on the Upper Keyboard and Pedalboard, respectively.The To Lower function is not available in the Lead Voice 2 section.
BRILLIANCE VOLUME
BRILLIANT
MELLOW
MAX
MIN
VIOLIN SYNTH
FLUTE TOLOWER
TRUMPET
1
LEAD VOICE 1 BRILLIANCE VOLUME
BRILLIANT
MELLOW
MAX
MIN
CONTRABASS
ELEC.BASS
TIMPANI TOLOWER
SYNTHBASS
1
PEDAL VOICE 1

2
Voi
ces
ELS-01/01C Owner’s Manual 27
About the Solo functionThe Lead Voice 2 section features an exclusive Solo function. Solo lets you instantly switch to a solo Lead Voice in the middle of your performance, muting all other Upper Keyboard Voices.
Select the Voice that you wish to play solo in the Lead Voice 2 section.In this condition, all the Voices for Upper Keyboard (Upper Keyboard Voice 1 and 2, and Lead Voice 1 and 2) can be played.
Press the [SOLO (KNEE)] button in the Lead Voice 2 section. This sets Solo to standby status.
To use Solo, unfold the knee lever. (Bring it down into position.)
In this condition (Solo on), only the Lead Voice 2 is playable on the Upper Keyboard. (All other Voices are muted.)
To temporarily turn Solo off as you play, press the Knee Lever to the right with your knee. In this condition, all Voices set to the Upper Keyboard except for Lead Voice 2 are playable on the Upper Keyboard. (Only Lead Voice 2 is muted.) Each time you press the Knee Lever (Solo off ) you can play all Voices except Lead Voice 2, and each time you release it (Solo on) you can play only Lead Voice 2 on the Upper Keyboard.
Notes on using Solo • The knee lever can be used to control other functions, such as switching Sustain.
When other functions are assigned to the knee lever, pressing knee lever turns these functions on at the same time.
• Pressing the knee lever while holding down a key will not turn Solo off for that key. Solo remains active until the next key is played after pressing the knee lever.
• Lead Voices 1 and 2 sound only the highest note if two or more keys are played. However, in the Solo mode, Lead Voice 2 sounds for the last key played.
Reference Page
Knee Lever (page 188)
Reference Page
Voice Condition Display (page 39)
1
2BRILLIANT
MELLOW
MAX
MIN
BRILLIANCE VOLUMELEAD VOICE 2
VA VAACOUS-
TICVIRTUAL
VA VAELEC-
TRONIC
SOLO(KNEE)CUSTOM
1
3
Unfold
4
2
Voices
ELS-01/01C Owner’s Manual28
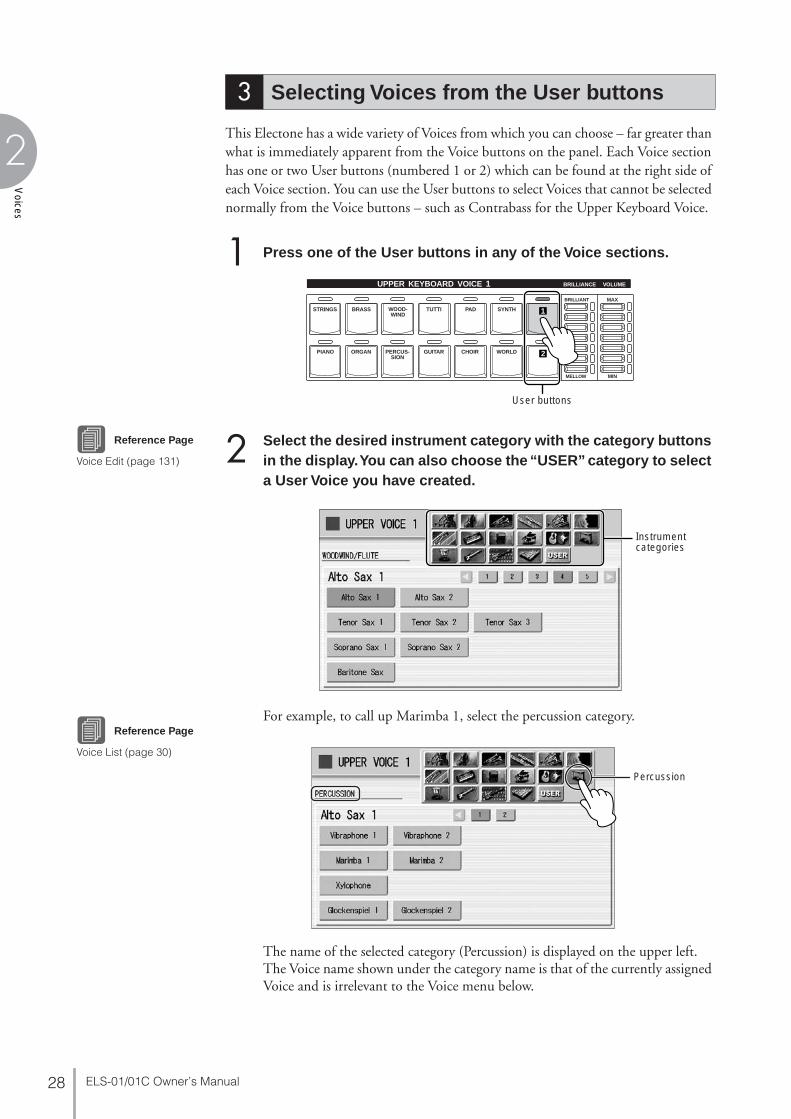
This Electone has a wide variety of Voices from which you can choose – far greater than what is immediately apparent from the Voice buttons on the panel. Each Voice section has one or two User buttons (numbered 1 or 2) which can be found at the right side of each Voice section. You can use the User buttons to select Voices that cannot be selected normally from the Voice buttons – such as Contrabass for the Upper Keyboard Voice.
Press one of the User buttons in any of the Voice sections.
Select the desired instrument category with the category buttons in the display. You can also choose the “USER” category to select a User Voice you have created.
For example, to call up Marimba 1, select the percussion category.
The name of the selected category (Percussion) is displayed on the upper left. The Voice name shown under the category name is that of the currently assigned Voice and is irrelevant to the Voice menu below.
3 Selecting Voices from the User buttons
1UPPER KEYBOARD VOICE 1 BRILLIANCE
BRILLIANT
MELLOW
VOLUME
MAX
MIN
STRINGS BRASS TUTTI PAD SYNTHWOOD-WIND
PIANO ORGAN GUITAR CHOIR WORLDPERCUS-SION
1
2
User buttons
2Reference Page
Voice Edit (page 131)
Instrument categories
Reference Page
Voice List (page 30)
Percussion

2
Voi
ces
ELS-01/01C Owner’s Manual 29
Select a Voice (Marimba 1, for example) from the displayed Voice Menu.Pressing number buttons in the display calls up the other Voices in the category,
The Voice name of the selected Voice (Marimba 1) appears under the category name, indicating that the Voice has been selected.
To directly select the desired category, hold down one of the User buttons and simultaneously press the desired Voice button.
UPPER KEYBOARD VOICE 1 BRILLIANCE
BRILLIANT
MELLOW
VOLUME
MAX
MIN
STRINGS BRASS TUTTI PAD SYNTHWOOD-WIND
PIANO ORGAN GUITAR CHOIR WORLDPERCUS-SION
1
2
1. While holding down the User button…
2. Press the Voice button.
3
2
Voices
ELS-01/01C Owner’s Manual30
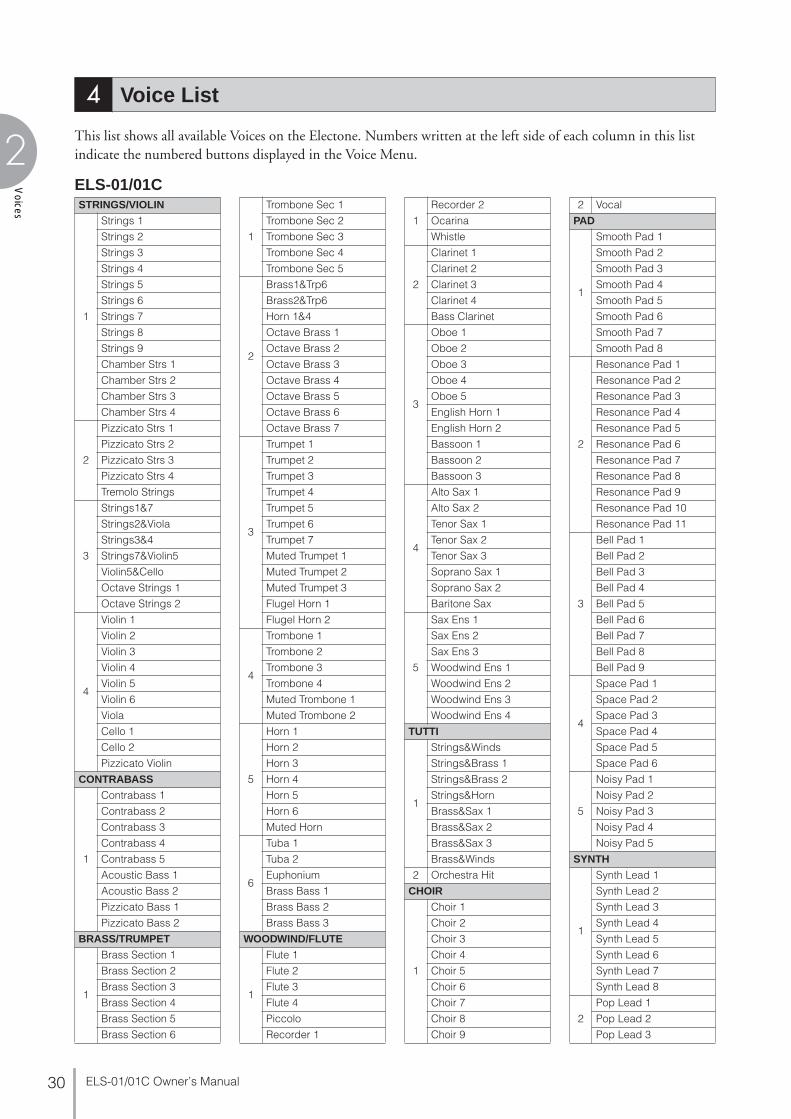
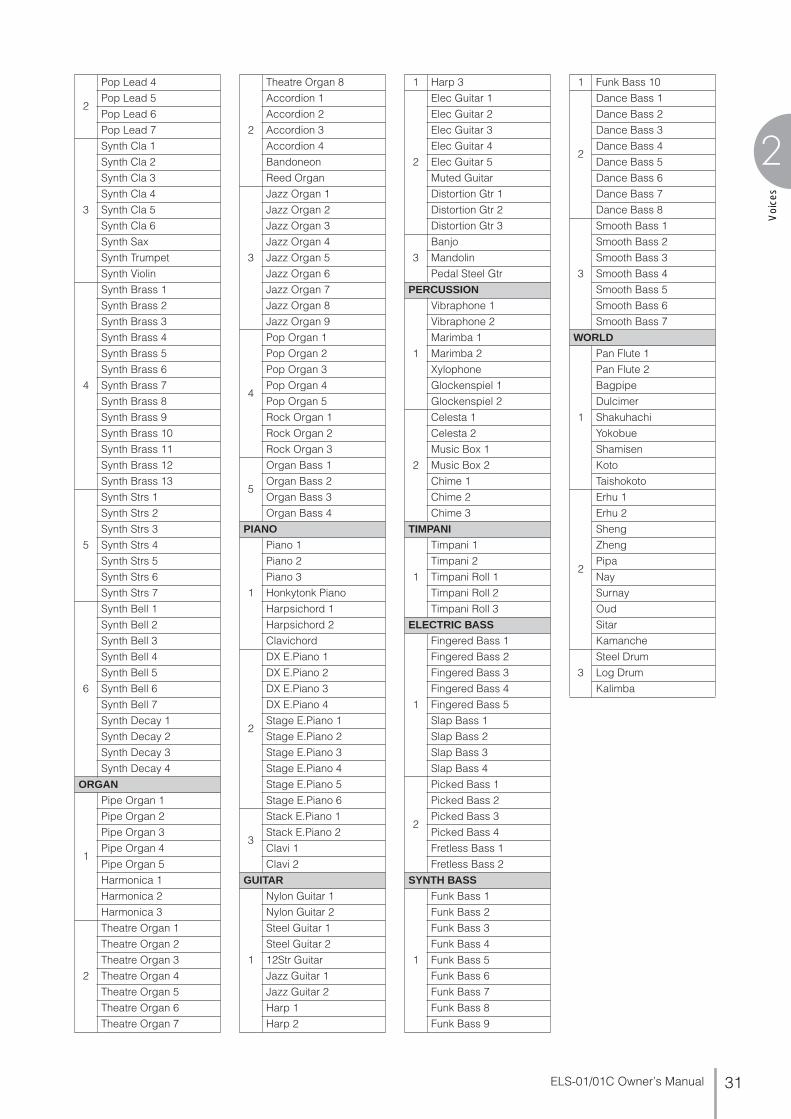
This list shows all available Voices on the Electone. Numbers written at the left side of each column in this list indicate the numbered buttons displayed in the Voice Menu.
4 Voice List
STRINGS/VIOLIN
1
Strings 1
Strings 2
Strings 3
Strings 4
Strings 5
Strings 6
Strings 7
Strings 8
Strings 9
Chamber Strs 1
Chamber Strs 2
Chamber Strs 3
Chamber Strs 4
2
Pizzicato Strs 1
Pizzicato Strs 2
Pizzicato Strs 3
Pizzicato Strs 4
Tremolo Strings
3
Strings1&7
Strings2&Viola
Strings3&4
Strings7&Violin5
Violin5&Cello
Octave Strings 1
Octave Strings 2
4
Violin 1
Violin 2
Violin 3
Violin 4
Violin 5
Violin 6
Viola
Cello 1
Cello 2
Pizzicato Violin
CONTRABASS
1
Contrabass 1
Contrabass 2
Contrabass 3
Contrabass 4
Contrabass 5
Acoustic Bass 1
Acoustic Bass 2
Pizzicato Bass 1
Pizzicato Bass 2
BRASS/TRUMPET
1
Brass Section 1
Brass Section 2
Brass Section 3
Brass Section 4
Brass Section 5
Brass Section 6
1
Trombone Sec 1
Trombone Sec 2
Trombone Sec 3
Trombone Sec 4
Trombone Sec 5
2
Brass1&Trp6
Brass2&Trp6
Horn 1&4
Octave Brass 1
Octave Brass 2
Octave Brass 3
Octave Brass 4
Octave Brass 5
Octave Brass 6
Octave Brass 7
3
Trumpet 1
Trumpet 2
Trumpet 3
Trumpet 4
Trumpet 5
Trumpet 6
Trumpet 7
Muted Trumpet 1
Muted Trumpet 2
Muted Trumpet 3
Flugel Horn 1
Flugel Horn 2
4
Trombone 1
Trombone 2
Trombone 3
Trombone 4
Muted Trombone 1
Muted Trombone 2
5
Horn 1
Horn 2
Horn 3
Horn 4
Horn 5
Horn 6
Muted Horn
6
Tuba 1
Tuba 2
Euphonium
Brass Bass 1
Brass Bass 2
Brass Bass 3
WOODWIND/FLUTE
1
Flute 1
Flute 2
Flute 3
Flute 4
Piccolo
Recorder 1
1
Recorder 2
Ocarina
Whistle
2
Clarinet 1
Clarinet 2
Clarinet 3
Clarinet 4
Bass Clarinet
3
Oboe 1
Oboe 2
Oboe 3
Oboe 4
Oboe 5
English Horn 1
English Horn 2
Bassoon 1
Bassoon 2
Bassoon 3
4
Alto Sax 1
Alto Sax 2
Tenor Sax 1
Tenor Sax 2
Tenor Sax 3
Soprano Sax 1
Soprano Sax 2
Baritone Sax
5
Sax Ens 1
Sax Ens 2
Sax Ens 3
Woodwind Ens 1
Woodwind Ens 2
Woodwind Ens 3
Woodwind Ens 4
TUTTI
1
Strings&Winds
Strings&Brass 1
Strings&Brass 2
Strings&Horn
Brass&Sax 1
Brass&Sax 2
Brass&Sax 3
Brass&Winds
2 Orchestra Hit
CHOIR
1
Choir 1
Choir 2
Choir 3
Choir 4
Choir 5
Choir 6
Choir 7
Choir 8
Choir 9
2 Vocal
PAD
1
Smooth Pad 1
Smooth Pad 2
Smooth Pad 3
Smooth Pad 4
Smooth Pad 5
Smooth Pad 6
Smooth Pad 7
Smooth Pad 8
2
Resonance Pad 1
Resonance Pad 2
Resonance Pad 3
Resonance Pad 4
Resonance Pad 5
Resonance Pad 6
Resonance Pad 7
Resonance Pad 8
Resonance Pad 9
Resonance Pad 10
Resonance Pad 11
3
Bell Pad 1
Bell Pad 2
Bell Pad 3
Bell Pad 4
Bell Pad 5
Bell Pad 6
Bell Pad 7
Bell Pad 8
Bell Pad 9
4
Space Pad 1
Space Pad 2
Space Pad 3
Space Pad 4
Space Pad 5
Space Pad 6
5
Noisy Pad 1
Noisy Pad 2
Noisy Pad 3
Noisy Pad 4
Noisy Pad 5
SYNTH
1
Synth Lead 1
Synth Lead 2
Synth Lead 3
Synth Lead 4
Synth Lead 5
Synth Lead 6
Synth Lead 7
Synth Lead 8
2
Pop Lead 1
Pop Lead 2
Pop Lead 3
ELS-01/01C
2
Voi
ces
ELS-01/01C Owner’s Manual 31
2
Pop Lead 4
Pop Lead 5
Pop Lead 6
Pop Lead 7
3
Synth Cla 1
Synth Cla 2
Synth Cla 3
Synth Cla 4
Synth Cla 5
Synth Cla 6
Synth Sax
Synth Trumpet
Synth Violin
4
Synth Brass 1
Synth Brass 2
Synth Brass 3
Synth Brass 4
Synth Brass 5
Synth Brass 6
Synth Brass 7
Synth Brass 8
Synth Brass 9
Synth Brass 10
Synth Brass 11
Synth Brass 12
Synth Brass 13
5
Synth Strs 1
Synth Strs 2
Synth Strs 3
Synth Strs 4
Synth Strs 5
Synth Strs 6
Synth Strs 7
6
Synth Bell 1
Synth Bell 2
Synth Bell 3
Synth Bell 4
Synth Bell 5
Synth Bell 6
Synth Bell 7
Synth Decay 1
Synth Decay 2
Synth Decay 3
Synth Decay 4
ORGAN
1
Pipe Organ 1
Pipe Organ 2
Pipe Organ 3
Pipe Organ 4
Pipe Organ 5
Harmonica 1
Harmonica 2
Harmonica 3
2
Theatre Organ 1
Theatre Organ 2
Theatre Organ 3
Theatre Organ 4
Theatre Organ 5
Theatre Organ 6
Theatre Organ 7
2
Theatre Organ 8
Accordion 1
Accordion 2
Accordion 3
Accordion 4
Bandoneon
Reed Organ
3
Jazz Organ 1
Jazz Organ 2
Jazz Organ 3
Jazz Organ 4
Jazz Organ 5
Jazz Organ 6
Jazz Organ 7
Jazz Organ 8
Jazz Organ 9
4
Pop Organ 1
Pop Organ 2
Pop Organ 3
Pop Organ 4
Pop Organ 5
Rock Organ 1
Rock Organ 2
Rock Organ 3
5
Organ Bass 1
Organ Bass 2
Organ Bass 3
Organ Bass 4
PIANO
1
Piano 1
Piano 2
Piano 3
Honkytonk Piano
Harpsichord 1
Harpsichord 2
Clavichord
2
DX E.Piano 1
DX E.Piano 2
DX E.Piano 3
DX E.Piano 4
Stage E.Piano 1
Stage E.Piano 2
Stage E.Piano 3
Stage E.Piano 4
Stage E.Piano 5
Stage E.Piano 6
3
Stack E.Piano 1
Stack E.Piano 2
Clavi 1
Clavi 2
GUITAR
1
Nylon Guitar 1
Nylon Guitar 2
Steel Guitar 1
Steel Guitar 2
12Str Guitar
Jazz Guitar 1
Jazz Guitar 2
Harp 1
Harp 2
1 Harp 3
2
Elec Guitar 1
Elec Guitar 2
Elec Guitar 3
Elec Guitar 4
Elec Guitar 5
Muted Guitar
Distortion Gtr 1
Distortion Gtr 2
Distortion Gtr 3
3
Banjo
Mandolin
Pedal Steel Gtr
PERCUSSION
1
Vibraphone 1
Vibraphone 2
Marimba 1
Marimba 2
Xylophone
Glockenspiel 1
Glockenspiel 2
2
Celesta 1
Celesta 2
Music Box 1
Music Box 2
Chime 1
Chime 2
Chime 3
TIMPANI
1
Timpani 1
Timpani 2
Timpani Roll 1
Timpani Roll 2
Timpani Roll 3
ELECTRIC BASS
1
Fingered Bass 1
Fingered Bass 2
Fingered Bass 3
Fingered Bass 4
Fingered Bass 5
Slap Bass 1
Slap Bass 2
Slap Bass 3
Slap Bass 4
2
Picked Bass 1
Picked Bass 2
Picked Bass 3
Picked Bass 4
Fretless Bass 1
Fretless Bass 2
SYNTH BASS
1
Funk Bass 1
Funk Bass 2
Funk Bass 3
Funk Bass 4
Funk Bass 5
Funk Bass 6
Funk Bass 7
Funk Bass 8
Funk Bass 9
1 Funk Bass 10
2
Dance Bass 1
Dance Bass 2
Dance Bass 3
Dance Bass 4
Dance Bass 5
Dance Bass 6
Dance Bass 7
Dance Bass 8
3
Smooth Bass 1
Smooth Bass 2
Smooth Bass 3
Smooth Bass 4
Smooth Bass 5
Smooth Bass 6
Smooth Bass 7
WORLD
1
Pan Flute 1
Pan Flute 2
Bagpipe
Dulcimer
Shakuhachi
Yokobue
Shamisen
Koto
Taishokoto
2
Erhu 1
Erhu 2
Sheng
Zheng
Pipa
Nay
Surnay
Oud
Sitar
Kamanche
3
Steel Drum
Log Drum
Kalimba
2
Voices
ELS-01/01C Owner’s Manual32
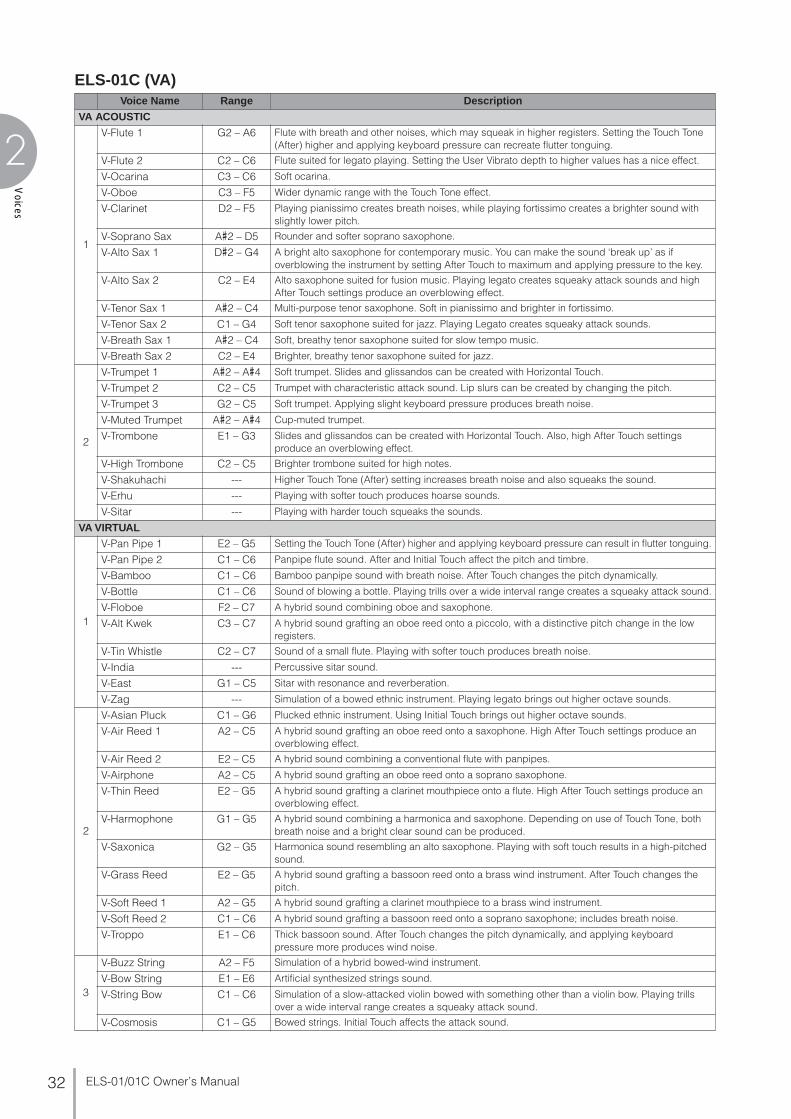
ELS-01C (VA)Voice Name Range Description
VA ACOUSTIC
1
V-Flute 1 G2 – A6 Flute with breath and other noises, which may squeak in higher registers. Setting the Touch Tone (After) higher and applying keyboard pressure can recreate flutter tonguing.
V-Flute 2 C2 – C6 Flute suited for legato playing. Setting the User Vibrato depth to higher values has a nice effect.
V-Ocarina C3 – C6 Soft ocarina.
V-Oboe C3 – F5 Wider dynamic range with the Touch Tone effect.
V-Clarinet D2 – F5 Playing pianissimo creates breath noises, while playing fortissimo creates a brighter sound with slightly lower pitch.
V-Soprano Sax A#2 – D5 Rounder and softer soprano saxophone.
V-Alto Sax 1 D#2 – G4 A bright alto saxophone for contemporary music. You can make the sound ‘break up’ as if overblowing the instrument by setting After Touch to maximum and applying pressure to the key.
V-Alto Sax 2 C2 – E4 Alto saxophone suited for fusion music. Playing legato creates squeaky attack sounds and high After Touch settings produce an overblowing effect.
V-Tenor Sax 1 A#2 – C4 Multi-purpose tenor saxophone. Soft in pianissimo and brighter in fortissimo.
V-Tenor Sax 2 C1 – G4 Soft tenor saxophone suited for jazz. Playing Legato creates squeaky attack sounds.
V-Breath Sax 1 A#2 – C4 Soft, breathy tenor saxophone suited for slow tempo music.
V-Breath Sax 2 C2 – E4 Brighter, breathy tenor saxophone suited for jazz.
2
V-Trumpet 1 A#2 – A#4 Soft trumpet. Slides and glissandos can be created with Horizontal Touch.
V-Trumpet 2 C2 – C5 Trumpet with characteristic attack sound. Lip slurs can be created by changing the pitch.
V-Trumpet 3 G2 – C5 Soft trumpet. Applying slight keyboard pressure produces breath noise.
V-Muted Trumpet A#2 – A#4 Cup-muted trumpet.
V-Trombone E1 – G3 Slides and glissandos can be created with Horizontal Touch. Also, high After Touch settings produce an overblowing effect.
V-High Trombone C2 – C5 Brighter trombone suited for high notes.
V-Shakuhachi --- Higher Touch Tone (After) setting increases breath noise and also squeaks the sound.
V-Erhu --- Playing with softer touch produces hoarse sounds.
V-Sitar --- Playing with harder touch squeaks the sounds.
VA VIRTUAL
1
V-Pan Pipe 1 E2 – G5 Setting the Touch Tone (After) higher and applying keyboard pressure can result in flutter tonguing.
V-Pan Pipe 2 C1 – C6 Panpipe flute sound. After and Initial Touch affect the pitch and timbre.
V-Bamboo C1 – C6 Bamboo panpipe sound with breath noise. After Touch changes the pitch dynamically.
V-Bottle C1 – C6 Sound of blowing a bottle. Playing trills over a wide interval range creates a squeaky attack sound.
V-Floboe F2 – C7 A hybrid sound combining oboe and saxophone.
V-Alt Kwek C3 – C7 A hybrid sound grafting an oboe reed onto a piccolo, with a distinctive pitch change in the low registers.
V-Tin Whistle C2 – C7 Sound of a small flute. Playing with softer touch produces breath noise.
V-India --- Percussive sitar sound.
V-East G1 – C5 Sitar with resonance and reverberation.
V-Zag --- Simulation of a bowed ethnic instrument. Playing legato brings out higher octave sounds.
2
V-Asian Pluck C1 – G6 Plucked ethnic instrument. Using Initial Touch brings out higher octave sounds.
V-Air Reed 1 A2 – C5 A hybrid sound grafting an oboe reed onto a saxophone. High After Touch settings produce an overblowing effect.
V-Air Reed 2 E2 – C5 A hybrid sound combining a conventional flute with panpipes.
V-Airphone A2 – C5 A hybrid sound grafting an oboe reed onto a soprano saxophone.
V-Thin Reed E2 – G5 A hybrid sound grafting a clarinet mouthpiece onto a flute. High After Touch settings produce an overblowing effect.
V-Harmophone G1 – G5 A hybrid sound combining a harmonica and saxophone. Depending on use of Touch Tone, both breath noise and a bright clear sound can be produced.
V-Saxonica G2 – G5 Harmonica sound resembling an alto saxophone. Playing with soft touch results in a high-pitched sound.
V-Grass Reed E2 – G5 A hybrid sound grafting a bassoon reed onto a brass wind instrument. After Touch changes the pitch.
V-Soft Reed 1 A2 – G5 A hybrid sound grafting a clarinet mouthpiece to a brass wind instrument.
V-Soft Reed 2 C1 – C6 A hybrid sound grafting a bassoon reed onto a soprano saxophone; includes breath noise.
V-Troppo E1 – C6 Thick bassoon sound. After Touch changes the pitch dynamically, and applying keyboard pressure more produces wind noise.
3
V-Buzz String A2 – F5 Simulation of a hybrid bowed-wind instrument.
V-Bow String E1 – E6 Artificial synthesized strings sound.
V-String Bow C1 – C6 Simulation of a slow-attacked violin bowed with something other than a violin bow. Playing trills over a wide interval range creates a squeaky attack sound.
V-Cosmosis C1 – G5 Bowed strings. Initial Touch affects the attack sound.

2
Voi
ces
ELS-01/01C Owner’s Manual 33
Each acoustic instrument has its own ideal note range. Keep in mind that playing outside of the range may create unexpected and unrealistic sounds.
Voices that do not have a specified ideal note range (“---” is shown in the chart above) can be played in any range and result in optimum sound with stable pitch.
* When the Feet parameter is set to 8', the resulting sound is actually 16'.
3
V-E.Violin C1 – C6 Synth violin.
V-Bowe C1 – C5 Simulation of a hybrid bowed-saxophone sound.
V-Claviolin G2 – G5 A hybrid sound combining a violin and wind instrument.
V-Air Bow C2 – G5 A bowed instrument sound with noise.
V-Waspy Horn C1 – G4 A hybrid sound grafting a brass wind instrument mouthpiece to a wind instrument. After Touch affects the muted condition. Lip-slide can be created with Horizontal Touch.
V-Mizu Horn C1 – C6 A hybrid sound combining a harmonica and trumpet.
V-Cosmo Mute C1 – C5 Simulation of a distorted brass wind instrument. After and Initial Touch affect the muted condition.
V-Fago F1 – C7 Simulated deep bassoon sound. Playing with soft touch produces breath noise with a high tone range.
VA ELECTRONIC
1
V-Jazz Guitar E1 – E5 Soft and warm jazz guitar sound.
V-Picked Guitar E1 – E5 Hard-attack guitar played with a pick.
V-Simple Bass --- Voice suited for bass phrases. After and Initial touch affect the resonance effect.*
V-Bass Attack --- Voice suited for bass phrases. Initial touch affects the muted condition.*
V-Thumb Bass C1 – E4 Bass sounds played with the thumb.*
V-Fretless C1 – C5 Fretless bass.*
V-Saw Lead C1 – C5 Multi-purpose lead sounds. After Touch affects the filter changes.
V-Edge Lead C1 – C4 Synth bass sound with a sharp attack portion. After Touch affects the filter changes.
V-Dist Lead G1 – C5 Distorted lead sounds. Setting the Touch Tone (After) higher and applying keyboard pressure raises the pitch.
V-Woody Lead C2 – G5 Lead sound with woody quality.
V-Muted Lead C2 – C5 Lead sound with wah-wah effect. After Touch heightens the wah-wah effect.
V-Talken Lead C1 – C5 Human voice-like lead sound. Setting the Touch Tone (After) higher and applying keyboard pressure allows creation of hum noise.
2
V-Mad Tube --- Distorted synth lead with long release sound. High After Touch settings produce an overblowing effect.*
V-Mob --- Distorted lead sound played with pick. Setting the Touch Tone (After) higher and applying keyboard pressure raises the pitch by an octave.*
V-Transylva C1 – C6 Softly distorted lead sounds.*
V-Destiny --- Wah guitar with a sharp attack.
V-Igneous C1 – C4 Lead sound with full feedback effects. After Touch affects the degree of feedback.
V-Wurli Lead C1 – C5 Simple synth lead with a sharp attack. High After Touch settings produce an overblowing effect.
V-Fifty Fifty --- Analog synthesizer with simple square wave sound.
V-Ana Wave --- Analog synthesizer. Initial touch and the length of holding down a key changes the filter effect.
V-Lyric Off C1 – C6 Wind synth sound with square wave sound.
V-Ossyncro C1 – C6 Lead sound with dynamic pitch change.*
V-Wahman C1 – A3 Wah-wah lead voice with pitch change in the attack.
V-Q. Klav C1 – G5 Funky electric clav sound. Initial touch affects the timbre.*
3
V-SFX 1 --- Simulated hand-tapping of the open end of a pipe.
V-SFX 2 --- Simulated scraping of a metallic plate. After Touch affects the degree of scraping.
V-SFX 3 --- Simulated hitting of a metallic plate with a wood block. Initial Touch changes the apparent hardness of the wood block.
V-SFX 4 --- Soft playing results in wind sounds. Applying keyboard pressure (After Touch) produces a distorted guitar sound.
V-SFX 5 --- Jet noise. Applying keyboard pressure produces lead sound.
V-SFX 6 --- Simulation of metallic plates colliding.
V-SFX 7 --- Initial touch affects the resonance effect.
V-SFX 8 --- Cry of a strange animal.
V-SFX 9 --- Simulation of a thick and long hose.
V-SFX 10 --- Trumpet with loop feedback sound.
V-SFX 11 --- Initial touch produces the sound of hitting metal, and After Touch increase the noise.
V-SFX 12 --- Initial touch produces the sounds of footsteps, and After Touch creates a windy sound.
V-SFX 13 --- The sound of a soprano saxophone played in the distance. Playing with softer touch produces only breath noise.
V-SFX 14 --- Lead sound with After Touch-produced pitch change.
V-SFX 15 --- Initial touch produces the sound of metal being scraped, and After Touch creates noise.
V-SFX 16 --- Cry/roar of an animal.
Voice Name Range Description

2
Voices
ELS-01/01C Owner’s Manual34
● ● ● ● ● ● ● ● ● ● ● ● ● ● ● ● ● ● ● ● ● ● ● ● ● ● ● ● ● ● ● ● ● ● ● ● ● ● ● ● ● ● ● ● ● ● ● ● ● ●
AWM Voices and VA Voices
The ELS-01C features two different types of Voices: AWM (Advanced Wave Memory) and VA (Virtual Acoustic).
VA Voices are available only on the Lead Voice 2 section while AWM Voices are available on all sections except Lead Voice 2.
AWM is a synthesis system based on sampled waves, or audio recordings of actual instruments. AWM Voices uses multiple samples, so that they sound like a real instrument.
On the other hand, VA synthesis applies sophisticated computer-based “physical modeling” technology to musical sound synthesis. VA Voices in this Electone offer many advantages in terms of musical performance, not just in terms of sound, but also in terms of the behavior that makes acoustic instruments so musical.
VA synthesis simulates the very complex vibrations, resonances, reflections and other acoustic phenomena that occur in an actual wind or string instrument.
Notes on VA VoicesSince the VA Voices have unique sonic characteristics and are closer in behavior to acoustic instruments than the AWM Voices, you should observe the following precautions when playing VA Voices.
• Some Voices may produce unexpected or unnatural sounds when played outside (higher or lower than) the recommended note range (pages 32 and 33).
• Pitch change may not be smooth on some Voices when Horizontal Touch is applied.
• Portamento (Lead Slide) effects may not be smooth on some Voices.
• Keep in mind that playing legato or trills may not produce any sound.
● ● ● ● ● ● ● ● ● ● ● ● ● ● ● ● ● ● ● ● ● ● ● ● ● ● ● ● ● ● ● ● ● ● ● ● ● ● ● ● ● ● ● ● ● ● ● ● ● ●
Pipe/strings – simulates resonationDriver – generates physical energy
Calculates the speed of the resonated air
Mouthpiece Single-ended pipe (saxophone)
Double-ended pipe(flute)
Embouchure
Bow Strings
Reference Page
Voice Edit (page 131)

3
Org
an F
lute
s (E
LS-0
1C)
ELS-01/01C Owner’s Manual 35
Organ Flutes (ELS-01C)
The ELS-01C has an Organ Flutes feature that allows you to create your own organ Voices, giving you access to an unlimited combination of organ sounds. With this function, you can recreate all of the classic organ sounds by adjusting the flute footage levels and the percussive sounds, just like on conventional organs. There are nine flute footage settings, with three additional footage settings for the attack sound.
Press one of the Organ Flutes buttons (UPPER or LOWER).The lamp above the button lights and the Flute Footage Levers appear on the display.On the ELS-01, [U. ORGAN FLUTES] and [L. ORGAN FLUTES] buttons are not active (Organ Flutes does not function).
Select the wave type for the Organ Flute Voice.Selecting [SINE] button produces a clean, clear sound and selecting [VINTAGE] produces a gritty, slightly distorted sound.
Adjust flute footage settings (over a range of 0 – 8).The Flute footage levers can be adjusted by directly touching the display. The Data Control dial cannot be used. Play the keyboard and listen to the changes in the sound as you adjust the footage levels.
1
DISPLAY SELECT
VOICEDISPLAY
FOOTSWITCH
RHYTHMPROGRAM
UTILITY INTERNET
A.B.C.M.O.C. MDR
VOICE EDIT PATTERN SEQUENCE
U.ORGANFLUTES
L.ORGANFLUTES
ROTARY SPSPEED
FOOTAGE Page
2
3
3

3
Organ F
lutes (ELS
-01C)
ELS-01/01C Owner’s Manual36
Press the [ATTACK/VOLUME] button in the upper right on the display to adjust the volume.
1 ATTACKDetermines the level of each volume in the percussive portion of the Voice. Footage settings are 4', 2-2/3' and 2'. The LENGTH lever determines the duration of the attack sound.
2 RESP. (Response)Determines the overall speed of the keyboard response. Moving the lever downward makes the keyboard response slower, creating a pipe organ effect.
3 MODEDetermines which notes in a held group of notes are given an attack sound. This parameter is common to both Upper and Lower Organ Flute Voices.
FIRST: Only the first note played will have attack. All other notes played while the first is held have no attack.
EACH: All notes played have an attack sound.
4 REVERBReference Page
Reverb (page 43)
Determines the amount of reverb applied to the Organ Flute Voice. When the panel REVERB control is set to the minimum, the setting here will have no effect.
5 VOLUMEDetermines the overall volume of the Organ Flute Voice. The volume balance of the individual footages is maintained. A minimum setting here produces no Organ Flute sound.
4
1 32 4 5
ATTACK/VOLUME Page
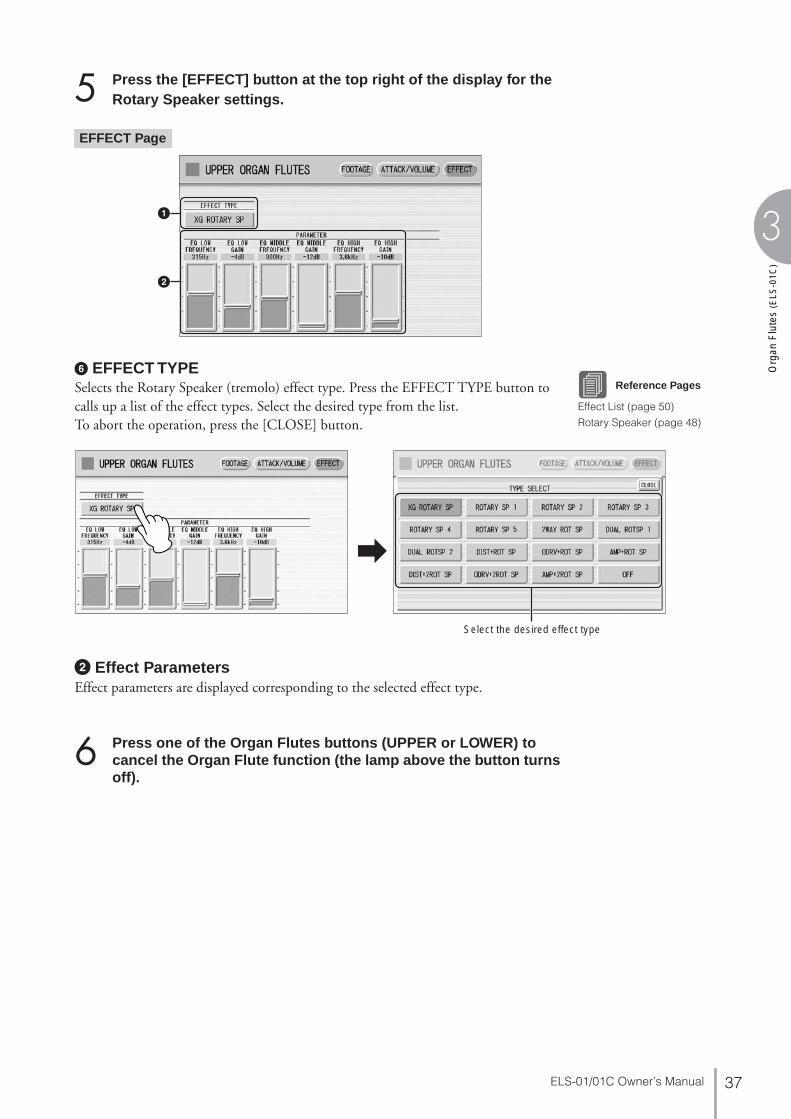
3
Org
an F
lute
s (E
LS-0
1C)
ELS-01/01C Owner’s Manual 37
Press the [EFFECT] button at the top right of the display for the Rotary Speaker settings.
6 EFFECT TYPESelects the Rotary Speaker (tremolo) effect type. Press the EFFECT TYPE button to calls up a list of the effect types. Select the desired type from the list.To abort the operation, press the [CLOSE] button.
2 Effect ParametersEffect parameters are displayed corresponding to the selected effect type.
Press one of the Organ Flutes buttons (UPPER or LOWER) to cancel the Organ Flute function (the lamp above the button turns off).
5
1
2
EFFECT Page
Reference Pages
Effect List (page 50)
Rotary Speaker (page 48)
Select the desired effect type
6
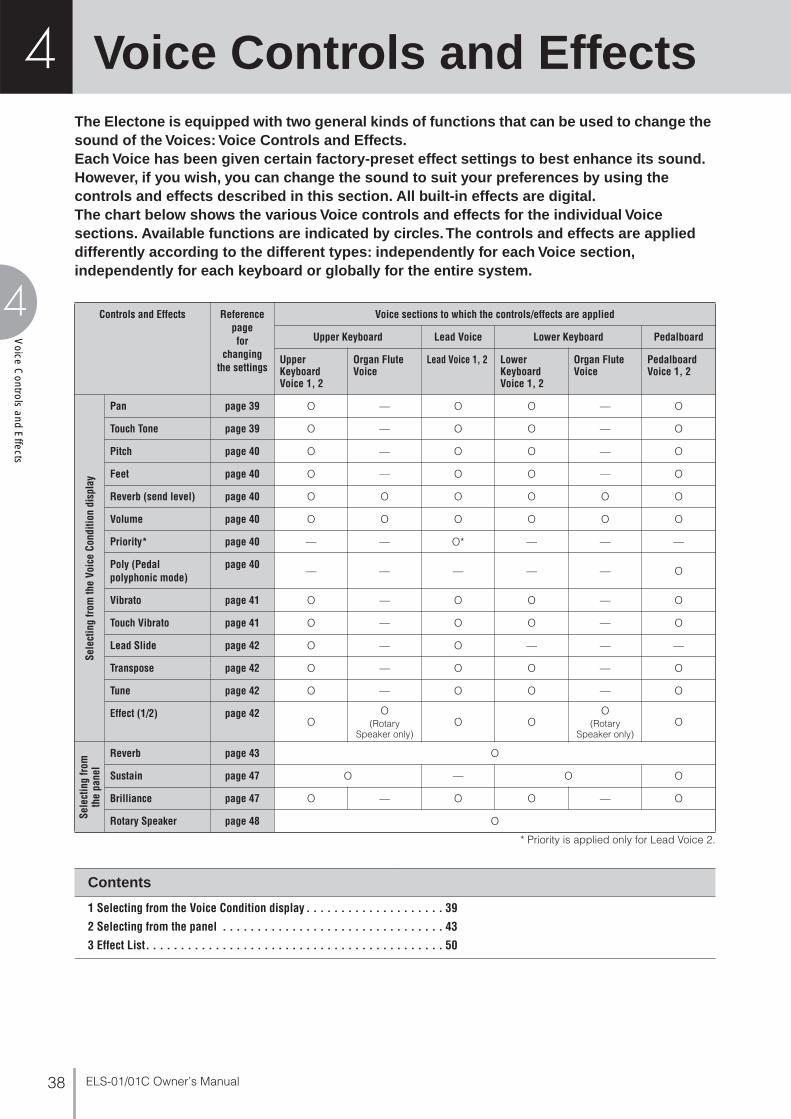
ELS-01/01C Owner’s Manual38
4
Voice C
ontrols and Effects
Voice Controls and EffectsThe Electone is equipped with two general kinds of functions that can be used to change the sound of the Voices: Voice Controls and Effects.Each Voice has been given certain factory-preset effect settings to best enhance its sound. However, if you wish, you can change the sound to suit your preferences by using the controls and effects described in this section. All built-in effects are digital.The chart below shows the various Voice controls and effects for the individual Voice sections. Available functions are indicated by circles. The controls and effects are applied differently according to the different types: independently for each Voice section, independently for each keyboard or globally for the entire system.
* Priority is applied only for Lead Voice 2.
Controls and Effects Reference page for
changing the settings
Voice sections to which the controls/effects are applied
Upper Keyboard Lead Voice Lower Keyboard Pedalboard
Upper Keyboard Voice 1, 2
Organ Flute Voice
Lead Voice 1, 2 Lower Keyboard Voice 1, 2
Organ Flute Voice
Pedalboard Voice 1, 2
Sele
ctin
g fro
m th
e Vo
ice
Cond
ition
dis
play
Pan page 39 O — O O — O
Touch Tone page 39 O — O O — O
Pitch page 40 O — O O — O
Feet page 40 O — O O — O
Reverb (send level) page 40 O O O O O O
Volume page 40 O O O O O O
Priority* page 40 — — O* — — —
Poly (Pedal polyphonic mode)
page 40— — — — — O
Vibrato page 41 O — O O — O
Touch Vibrato page 41 O — O O — O
Lead Slide page 42 O — O — — —
Transpose page 42 O — O O — O
Tune page 42 O — O O — O
Effect (1/2) page 42O
O(Rotary
Speaker only)O O
O(Rotary
Speaker only)O
Sele
ctin
g fro
m
the
pane
l
Reverb page 43 O
Sustain page 47 O — O O
Brilliance page 47 O — O O — O
Rotary Speaker page 48 O
Contents
1 Selecting from the Voice Condition display . . . . . . . . . . . . . . . . . . . . 39
2 Selecting from the panel . . . . . . . . . . . . . . . . . . . . . . . . . . . . . . . . 43
3 Effect List. . . . . . . . . . . . . . . . . . . . . . . . . . . . . . . . . . . . . . . . . . . 50
4

4
Voi
ce C
ontr
ols
and
Effe
cts
ELS-01/01C Owner’s Manual 39
Choose a Voice on the panel, then press the same button on the panel again (or press the name of the selected Voice in the display). The Voice Condition display appears.Voice Condition Display for each Voice has four pages that can be switched by pressing [1] – [4] buttons at the top right of the display.
In this display, you can adjust the basic Voice controls, including panning, touch tone and volume. The displays of the various Voice sections have slight differences in their functions.
1 PANDetermines the position of the Voice in the stereo image. Seven pan positions are available.
2 TOUCH TONEThe Touch Tone function gives you expressive control over the volume and timbre of a Voice. All Voices are provided with this expressive function, making it possible to perfectly reproduce the subtle dynamic and tonal changes of actual instruments.Two types of keyboard touch affect this function: Initial Touch and After Touch.
2 -1 INITIAL touchControls volume and timbre according to the velocity at which you play the keys. The harder you play the keys, the greater the volume and the brighter the timbre will become.Higher settings make the change wider. Minimum setting produces no effect.Range: 0 – 14
2 -2 AFTER touchControls volume and timbre according to the pressure you apply to the keys after playing them.The harder you press down on the keys, the greater the volume and the brighter the timbre will become.Higher settings make the change wider. Minimum setting produces no effect.Range: 0 – 14
1 Selecting from the Voice Condition display
2 - 1 2 - 2 3 - 1 3 - 2
32
1
32
1
4 5 6 7 2 - 1 2 - 2 3 - 2 4 5 6 8
Voice Condition [Page 1]
NOTE
Initial Touch may not be effective on some organ Voices.
NOTE
After Touch has no effect on percussive Voices (such as piano or vibraphone), percussion sounds, or some organ Voices.
NOTE
On the ELS-01, After Touch is not applied to the Pedal Voices.

4
Voice C
ontrols and Effects
ELS-01/01C Owner’s Manual40
3 PITCHControls pitch according to the play style of Horizontal Touch or After Touch. On some Voices in the Lead Voice 2 section, not only pitch but also timbre may be affected.
3 -1 HORIZONTAL touch (ELS-01C)Controls the pitch by holding down the key and moving it laterally (wiggling your finger from side to side). The faster you move the key laterally, the faster and greater the pitch change becomes, within a range of +/- one octave. You can use this function in combination with Touch Tone described above to add expressiveness to your performance.Higher settings result in a wider pitch change. The minimum setting produces no effect. This function is not available on the Pedalboard.Range: 0 – 14
3 -2 AFTER touchControls the pitch according to the pressure you apply to the keys after playing them.The minimum setting produces no effect at all. Higher (positive) settings make the pitch higher according to the pressure and lower (negative) settings make the pitch lower. The setting of +14 or -14 results in the widest pitch change.Range: -14 – +14
4 FEETDetermines the octave setting of the Voice, letting you use the Voice over a wide register. There are three settings: 4', 8' and 16' (4' is highest and 16' is lowest). A 2' setting is added to the Pedal Voice sections. PRESET is the original (factory) setting.
5 REVERBDetermines the amount of reverb applied to each Voice section. When the panel REVERB control is set to the minimum, the setting here will have no effect. See page 43 for details.
6 VOLUMEFine adjustment of the Voice volume. See page 25 for more information.
7 PRIORITY (only for the Lead Voice 2)Determines the mode of Lead Voice 2, Last or Top.
LAST: Only the last played key is sounded when two or more keys are played simultaneously.
TOP: Only the highest note is sounded when two or more keys are played simultaneously. When the Solo mode is on, Lead Voice 2 sounds according to Last mode, regardless of the setting made here.
8 POLY (only for Pedal Voices)Allows you to switch the pedal polyphonic mode on or off. Setting POLY to on switches the normally monophonic pedal Voices to polyphonic play. This makes it possible to play the Pedalboard in various expressive ways, such as playing legato or playing intervals and chords.Keep in mind that you cannot exceed the total maximum polyphony: 14 notes for all sections, Upper, Lower and Pedal.
NOTE
Parameters that are available only on the ELS-01C are indicated by a dark frame and background in their display controls.
Reference Page
Solo function (page 27)
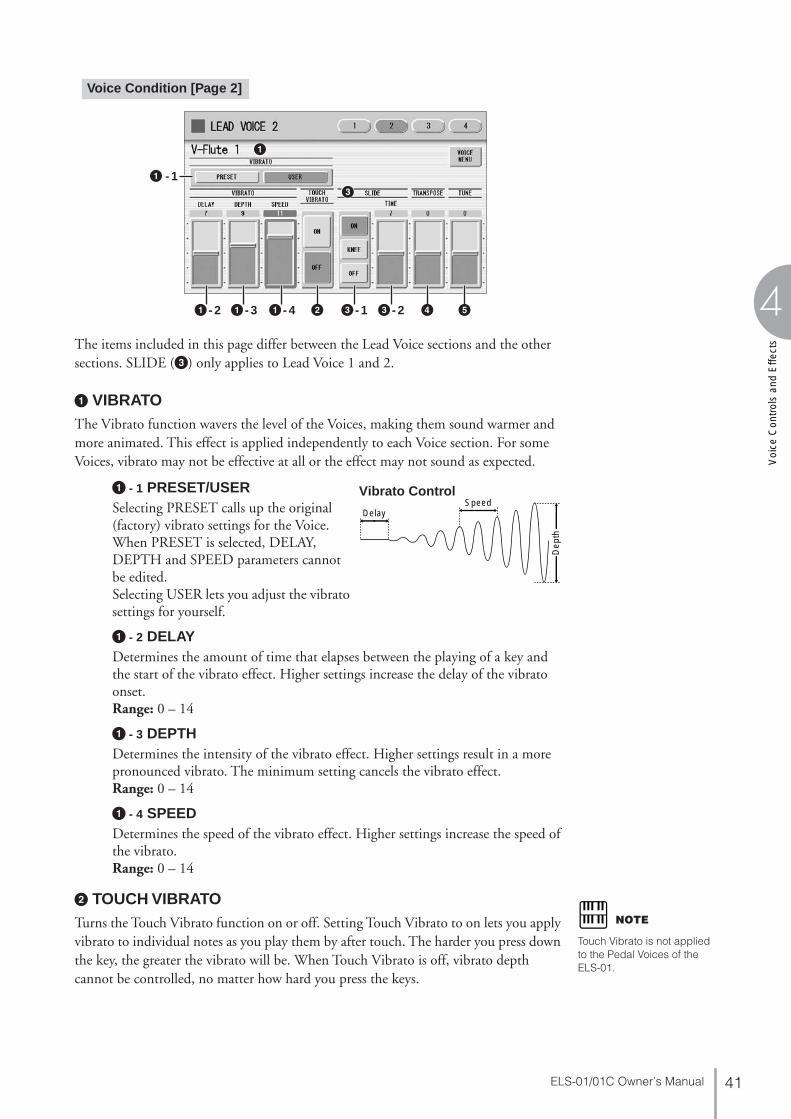
4
Voi
ce C
ontr
ols
and
Effe
cts
ELS-01/01C Owner’s Manual 41
The items included in this page differ between the Lead Voice sections and the other sections. SLIDE (3) only applies to Lead Voice 1 and 2.
1 VIBRATOThe Vibrato function wavers the level of the Voices, making them sound warmer and more animated. This effect is applied independently to each Voice section. For some Voices, vibrato may not be effective at all or the effect may not sound as expected.
1 - 1 PRESET/USERSelecting PRESET calls up the original (factory) vibrato settings for the Voice. When PRESET is selected, DELAY, DEPTH and SPEED parameters cannot be edited.Selecting USER lets you adjust the vibrato settings for yourself.
1 - 2 DELAYDetermines the amount of time that elapses between the playing of a key and the start of the vibrato effect. Higher settings increase the delay of the vibrato onset.Range: 0 – 14
1 - 3 DEPTHDetermines the intensity of the vibrato effect. Higher settings result in a more pronounced vibrato. The minimum setting cancels the vibrato effect.Range: 0 – 14
1 - 4 SPEEDDetermines the speed of the vibrato effect. Higher settings increase the speed of the vibrato.Range: 0 – 14
2 TOUCH VIBRATOTurns the Touch Vibrato function on or off. Setting Touch Vibrato to on lets you apply vibrato to individual notes as you play them by after touch. The harder you press down the key, the greater the vibrato will be. When Touch Vibrato is off, vibrato depth cannot be controlled, no matter how hard you press the keys.
1 - 2 1 - 3 1 - 4 3 - 1 3 - 2
3
1
1 - 1
2 4 5
Voice Condition [Page 2]
DelaySpeed
Dep
th
Vibrato Control
NOTE
Touch Vibrato is not applied to the Pedal Voices of the ELS-01.

4
Voice C
ontrols and Effects
ELS-01/01C Owner’s Manual42
3 SLIDE (only for Lead Voices)Applies a portamento effect to notes played in legato. The Slide function is effective within a one-octave range for Lead Voices. Slide has no effect when playing notes beyond a one-octave range.
3 - 1 ON/KNEE/OFFOn/Off switch and knee lever selector for the Slide effect.
3 - 2 TIMEDetermines the speed of the slide or portamento effect. Higher settings makes the slide speed slower.Range: 0 – 14
4 TRANSPOSEChanges the pitch in semitones for each Voice section. Range is from -6 to +6.
5 TUNEDetermines the fine pitch settings (detune) for each Voice section, producing a richer sound. Each step represents a 1-cent change in pitch.Range: -64 – +63
You can edit the effect parameters from these two displays. Both displays have the same contents. You can select two effects for each Voice section with these displays (Voice Condition Pages 3 and 4).
1 EFFECT 1 (Page 3)/EFFECT 2 (Page 4)Selects the effect category. Pressing the effect button on the display calls up the effect category list. Select the desired effect category from the list.To abort the operation, press the [CLOSE] button.
Reference Page
Controlling Lead Slide (with Knee Lever); (page 190)
Reference Page
Transpose (for entire instrument); (page 193)
Reference Page
Pitch (for entire instrument); (page 193)
3
2
1
Voice Condition [Page 3, 4]
Reference Page
Effect List (page 50)

4
Voi
ce C
ontr
ols
and
Effe
cts
ELS-01/01C Owner’s Manual 43
By selecting [PRESET] in the list, the original (factory) effect category for the selected Voice is automatically set. Selecting [THRU] bypasses the effect (no effect is added to the selected Voice).
2 TYPE 1 (Page 3)/ TYPE 2 (Page 4)Determines the type of the effect. Pressing the TYPE button on the display calls up the effect type list, corresponding to the selected effect category. Select the desired effect type from the list. To abort the operation, press the [CLOSE] button.If you have selected the [PRESET] category, the effect type cannot be edited.After changing the effect type, the effect parameter below is automatically changed corresponding to the selected effect type.
3 Effect ParametersEffect parameters are displayed corresponding to the selected effect type.
The Reverb, Sustain and Rotary Speaker displays are called up by pressing the respective buttons on the panel.
● ● ● ● ● ● ● ● ● ● ● ● ● ● ● ● ● ● ● ● ● ● ● ● ● ● ● ● ● ● ● ● ● ● ● ● ● ●
Reverb
Reverb adds an echo-like effect to the sound, giving the impression of a performance in a large room or concert hall. You can adjust the reverb volume for each Voice sections, or adjust the reverb volume for rhythm and accompaniment separately.
To adjust the reverb effect and call up the Reverb pages:Press one of the REVERB buttons, located to the left of the panel, to set the Reverb effect. The Reverb display appears.
The Reverb display consists of four pages.
2 Selecting from the panel
REVERB
MAX
MIN
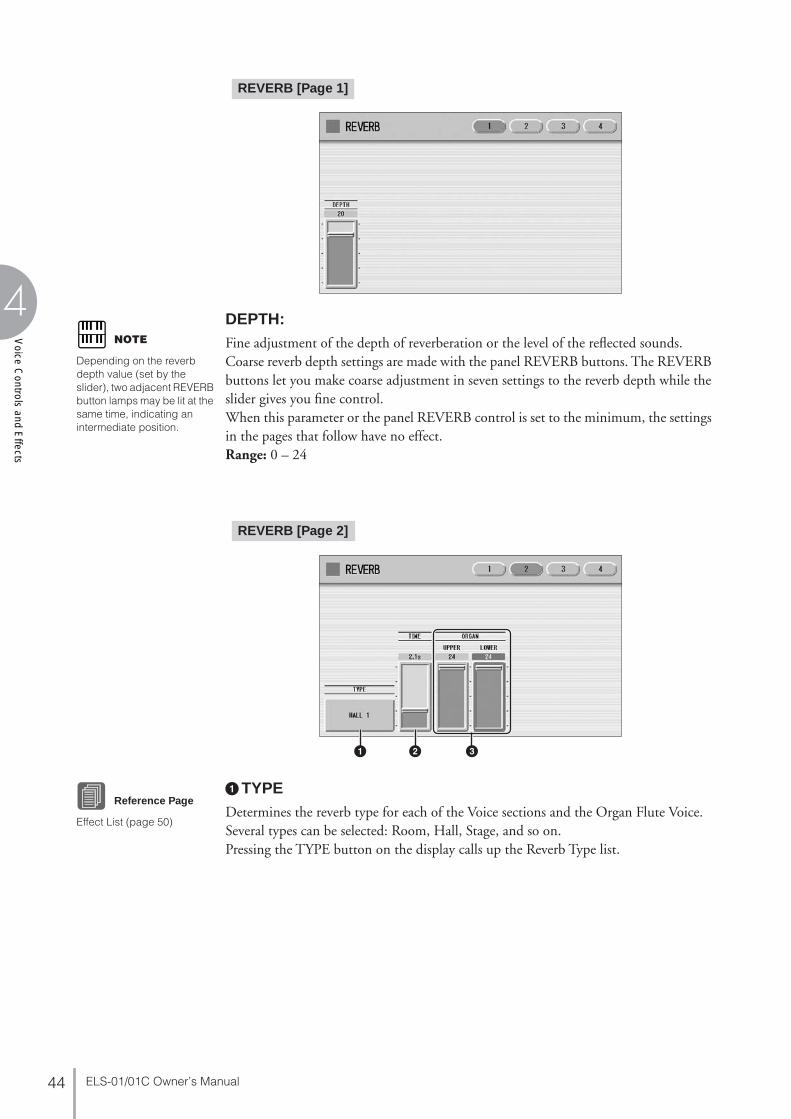
4
Voice C
ontrols and Effects
ELS-01/01C Owner’s Manual44
DEPTH:Fine adjustment of the depth of reverberation or the level of the reflected sounds. Coarse reverb depth settings are made with the panel REVERB buttons. The REVERB buttons let you make coarse adjustment in seven settings to the reverb depth while the slider gives you fine control.When this parameter or the panel REVERB control is set to the minimum, the settings in the pages that follow have no effect.Range: 0 – 24
1 TYPEDetermines the reverb type for each of the Voice sections and the Organ Flute Voice. Several types can be selected: Room, Hall, Stage, and so on.Pressing the TYPE button on the display calls up the Reverb Type list.
REVERB [Page 1]
NOTE
Depending on the reverb depth value (set by the slider), two adjacent REVERB button lamps may be lit at the same time, indicating an intermediate position.
321
REVERB [Page 2]
Reference Page
Effect List (page 50)
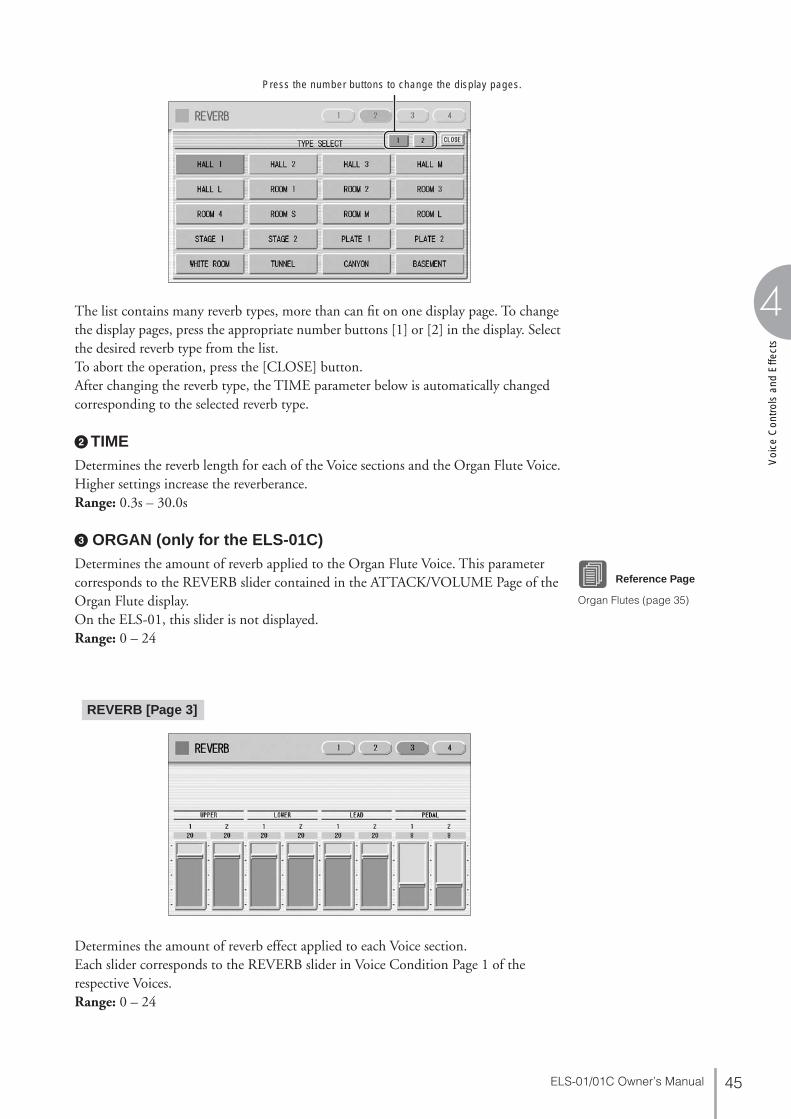
4
Voi
ce C
ontr
ols
and
Effe
cts
ELS-01/01C Owner’s Manual 45
The list contains many reverb types, more than can fit on one display page. To change the display pages, press the appropriate number buttons [1] or [2] in the display. Select the desired reverb type from the list.To abort the operation, press the [CLOSE] button. After changing the reverb type, the TIME parameter below is automatically changed corresponding to the selected reverb type.
2 TIMEDetermines the reverb length for each of the Voice sections and the Organ Flute Voice. Higher settings increase the reverberance.Range: 0.3s – 30.0s
3 ORGAN (only for the ELS-01C)Determines the amount of reverb applied to the Organ Flute Voice. This parameter corresponds to the REVERB slider contained in the ATTACK/VOLUME Page of the Organ Flute display.On the ELS-01, this slider is not displayed.Range: 0 – 24
Determines the amount of reverb effect applied to each Voice section.Each slider corresponds to the REVERB slider in Voice Condition Page 1 of the respective Voices.Range: 0 – 24
Press the number buttons to change the display pages.
Reference Page
Organ Flutes (page 35)
REVERB [Page 3]
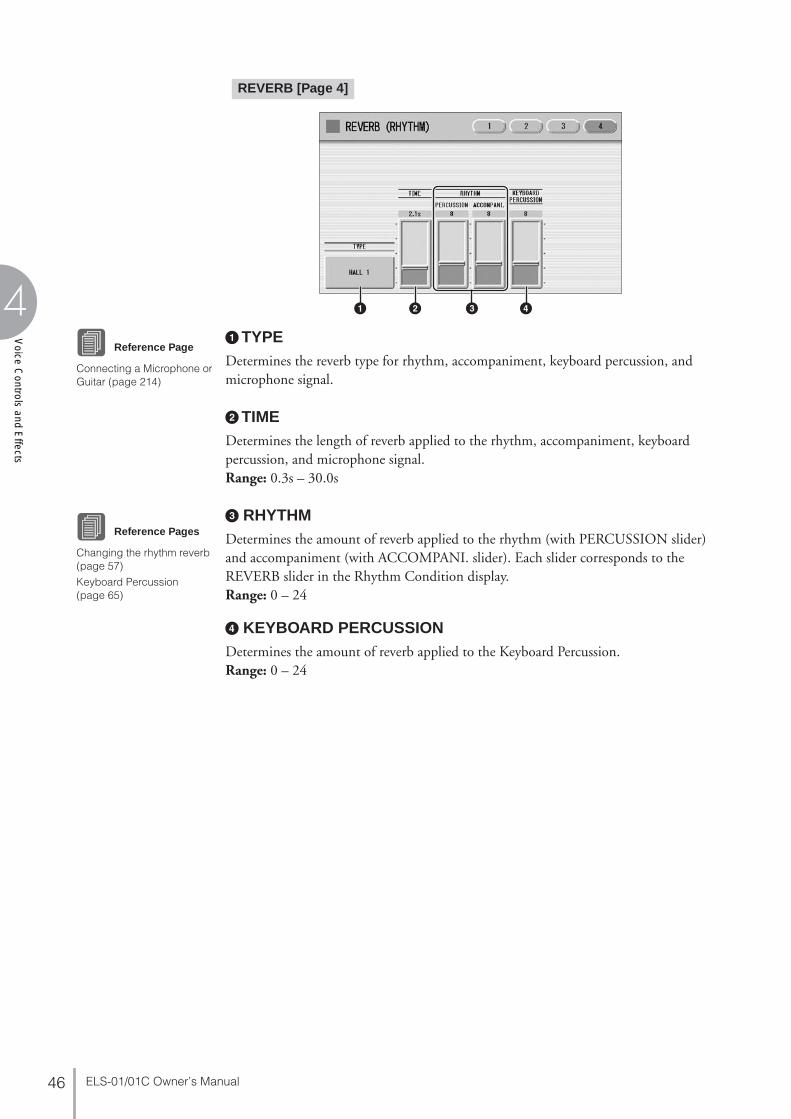
4
Voice C
ontrols and Effects
ELS-01/01C Owner’s Manual46
1 TYPEDetermines the reverb type for rhythm, accompaniment, keyboard percussion, and microphone signal.
2 TIMEDetermines the length of reverb applied to the rhythm, accompaniment, keyboard percussion, and microphone signal.Range: 0.3s – 30.0s
3 RHYTHMDetermines the amount of reverb applied to the rhythm (with PERCUSSION slider) and accompaniment (with ACCOMPANI. slider). Each slider corresponds to the REVERB slider in the Rhythm Condition display.Range: 0 – 24
4 KEYBOARD PERCUSSIONDetermines the amount of reverb applied to the Keyboard Percussion.Range: 0 – 24
32 41
REVERB [Page 4]
Reference Page
Connecting a Microphone or Guitar (page 214)
Reference Pages
Changing the rhythm reverb (page 57)
Keyboard Percussion (page 65)
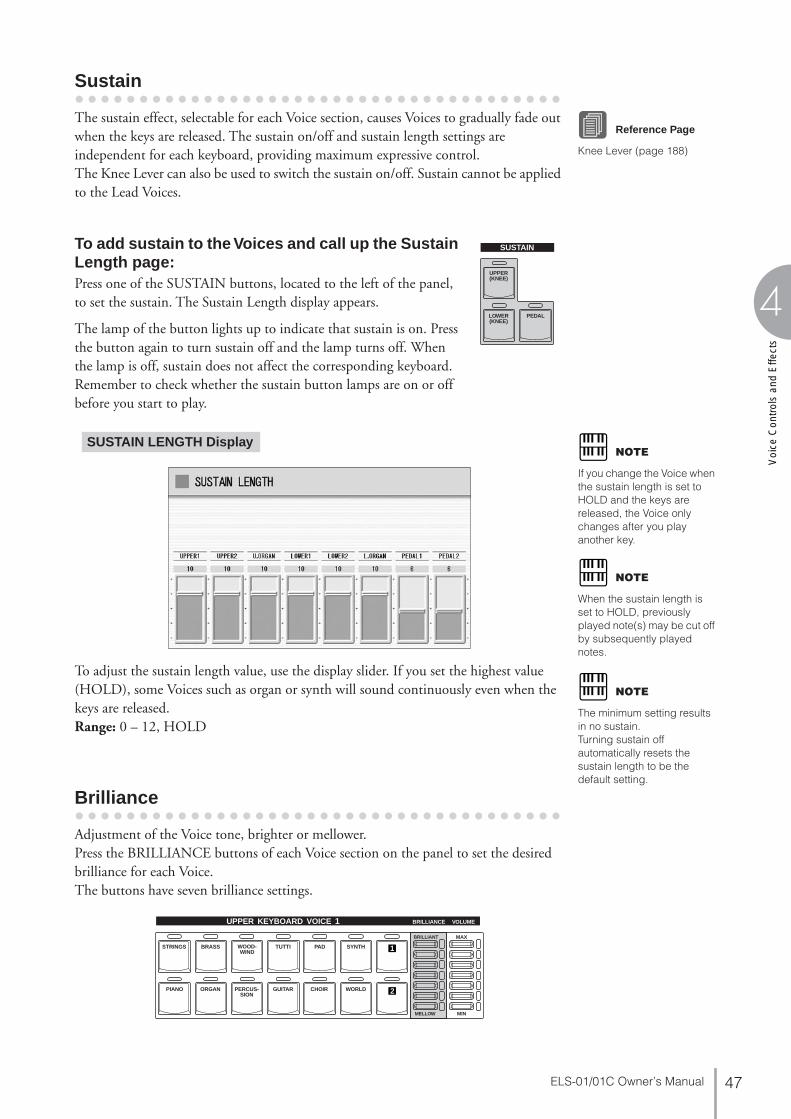
4
Voi
ce C
ontr
ols
and
Effe
cts
ELS-01/01C Owner’s Manual 47
● ● ● ● ● ● ● ● ● ● ● ● ● ● ● ● ● ● ● ● ● ● ● ● ● ● ● ● ● ● ● ● ● ● ● ● ● ●
Sustain
The sustain effect, selectable for each Voice section, causes Voices to gradually fade out when the keys are released. The sustain on/off and sustain length settings are independent for each keyboard, providing maximum expressive control.The Knee Lever can also be used to switch the sustain on/off. Sustain cannot be applied to the Lead Voices.
To add sustain to the Voices and call up the Sustain Length page:Press one of the SUSTAIN buttons, located to the left of the panel, to set the sustain. The Sustain Length display appears.
The lamp of the button lights up to indicate that sustain is on. Press the button again to turn sustain off and the lamp turns off. When the lamp is off, sustain does not affect the corresponding keyboard. Remember to check whether the sustain button lamps are on or off before you start to play.
To adjust the sustain length value, use the display slider. If you set the highest value (HOLD), some Voices such as organ or synth will sound continuously even when the keys are released.Range: 0 – 12, HOLD
● ● ● ● ● ● ● ● ● ● ● ● ● ● ● ● ● ● ● ● ● ● ● ● ● ● ● ● ● ● ● ● ● ● ● ● ● ●
Brilliance
Adjustment of the Voice tone, brighter or mellower.Press the BRILLIANCE buttons of each Voice section on the panel to set the desired brilliance for each Voice.The buttons have seven brilliance settings.
Reference Page
Knee Lever (page 188)
SUSTAIN
UPPER(KNEE)
LOWER(KNEE)
PEDAL
SUSTAIN LENGTH DisplayNOTE
If you change the Voice when the sustain length is set to HOLD and the keys are released, the Voice only changes after you play another key.
NOTE
When the sustain length is set to HOLD, previously played note(s) may be cut off by subsequently played notes.
NOTE
The minimum setting results in no sustain.Turning sustain off automatically resets the sustain length to be the default setting.
UPPER KEYBOARD VOICE 1 BRILLIANCE
BRILLIANT
MELLOW
VOLUME
MAX
MIN
STRINGS BRASS TUTTI PAD SYNTHWOOD-WIND
PIANO ORGAN GUITAR CHOIR WORLDPERCUS-SION
1
2

4
Voice C
ontrols and Effects
ELS-01/01C Owner’s Manual48
● ● ● ● ● ● ● ● ● ● ● ● ● ● ● ● ● ● ● ● ● ● ● ● ● ● ● ● ● ● ● ● ● ● ● ● ● ●
Rotary Speaker
Rotary Speaker recreates the rich, swirling sound of the popular rotating speaker effect. The Rotary Speaker effect can be switched in real time as you play, with either the front panel button or the Left Footswitch (when properly set for Footswitch operation). The Rotary Speaker effect CANNOT be turned on only by turning on the [ROTARY SP SPEED] button. The following procedure is needed to use the Rotary Speaker effect.
Select the Rotary Speaker effect from the desired Voice.
When you want to set Rotary Speaker to one of the Voice section, you can select the effect category of Rotary Speaker in the Voice Condition Display Page 3 or 4. See page 42 for details.
When you want to set Rotary Speaker for the Organ Flute Voice, select the effect type in the EFFECT Page. See page 37 for details.
Adjust the rotating speed and mode of the Rotary Speaker.Press the [ROTARY SP SPEED] button on the panel.The ROTARY SPEAKER display appears. The settings in this display are common to all Voice sections.
1
Select “Rotary Speaker” here.
Select an effect type other than [OFF].
2

4
Voi
ce C
ontr
ols
and
Effe
cts
ELS-01/01C Owner’s Manual 49
1 SPEEDDetermines the speed of the speaker rotation.Range: 2.69Hz – 39.7Hz
2 MODEDetermines the slow/stop mode when [ROTARY SP SPEED] button is off. If [SLOW] is selected, a slow chorus effect is applied when you turn off the button on the panel. If [STOP] is selected, the Rotary Speaker effect turns off when you turn off the button on the panel.
Once the Rotary Speaker effect has been turned on and set, you can control the effect in real time from the panel or from the Left Footswitch.
Control the Rotary Speaker effect from the panel or from the Left Footswitch.You can control Rotary Speaker on/off not only from the panel but also the Left Footswitch, if the Footswitch has been properly assigned. See page 188 for details.
DISPLAY SELECT
VOICEDISPLAY
FOOTSWITCH
RHYTHMPROGRAM
UTILITY INTERNET
A.B.C.M.O.C. MDR
VOICE EDIT PATTERN SEQUENCE
U.ORGANFLUTES
L.ORGANFLUTES
ROTARY SPSPEED
21
ROTARY SPEAKER Display
3

4
Voice C
ontrols and Effects
ELS-01/01C Owner’s Manual50
3 Effect List
REVERB
1
HALL 1
HALL 2
HALL 3
HALL M
HALL L
ROOM 1
ROOM 2
ROOM 3
ROOM 4
ROOM S
ROOM M
ROOM L
STAGE 1
STAGE 2
PLATE 1
PLATE 2
WHITE ROOM
TUNNEL
CANYON
BASEMENT
2
XG HALL 1
XG HALL 2
XG ROOM 1
XG ROOM 2
XG ROOM 3
XG STAGE 1
XG STAGE 2
XG PLATE
GM PLATE
DELAY
DELAY LCR
XG DLY LCR
DELAY LR
ECHO
CROSS DELAY
TEMPO DELAY
TEMPO ECHO
TEMPO CROSS
ER/KARAOKE
ER 1
ER 2
GATE REVERB
REVERS GATE
KARAOKE 1
KARAOKE 2
KARAOKE 3
CHORUS
CHORUS 1
CHORUS 2
XG CHORUS 1
XG CHORUS 2
XG CHORUS 3
XG CHORUS 4
GM CHORUS 1
GM CHORUS 2
GM CHORUS 3
GM CHORUS 4
FB CHORUS
CELESTE 1
CELESTE 2
CELESTE 3
CELESTE 4
SYMPHONIC
XG SYMPHONIC
ENS DETUNE
FLANGER
FLANGER 1
FLANGER 2
XG FLANGER 1
XG FLANGER 2
XG FLANGER 3
GM FLANGER
V_FLANGER
TEMP FLANGER
DYNA FLANGER
PHASER
PHASER 1
PHASER 2
EP PHASER 1
EP PHASER 2
EP PHASER 3
TEMPO PHASER
DYNA PHASER
TREMOLO/AUTO PAN
TREMOLO 1
TREMOLO 2
XG TREMOLO
EP TREMOLO
GT TREMOLO 1
GT TREMOLO 2
ORGAN TREMOLO
AUTO PAN
XG AT PAN 1
XG AT PAN 2
EP AUTO PAN
ROTARY SPEAKER
XG ROTARY SP
ROTARY SP 1
ROTARY SP 2
ROTARY SP 3
ROTARY SP 4
ROTARY SP 5
2WAY ROT SP
DUAL ROTSP 1
DUAL ROTSP 2
DIST+ROT SP
ODRV+ROT SP
AMP+ROT SP
DIST+2ROT SP
ODRV+2ROT SP
AMP+2ROT SP
DISTORTION
DIST HARD 1
DIST HARD 2
DIST SOFT 1
DIST SOFT 2
ST DIST HARD
ST DIST SOFT
OVERDRIVE
ST OVERDRIVE
XG DIST
XG ST DIST
V_DIST HARD
V_DIST SOFT
COMP+DIST
XG CMP+DIST
AMP SIM
XG AMP SIM
ST AMP SIM 1
ST AMP SIM 2
XG ST AMP
DISTORTION+
DIST+DELAY
ODRV+DELAY
XG DIST+DLY
XG ODRV+DLY
CMP+DIST+DLY
CMP+ODRV+DLY
XG CMP+DT+DL
XG CMP+OD+DL
V_DIST H+DLY
V_DIST S+DLY
DIST+T DLY
ODRV+T DLY
CMP+DST+TDLY
CMP+OD+TDLY
V_DST H+TDLY
V_DST S+TDLY
WAH
AUTO WAH
XG AUTO WAH
TOUCH WAH 1
TOUCH WAH 2
AT WAH+DIST
XG AT WH+DST
AT WAH+ODRV
XG AT WAH+OD
TC WAH+DIST
XG TC WH+DST
TC WAH+ODRV
XG TC WAH+OD
CLAVI TC WAH
EP TOUCH WAH
WAH+DST+TDLY
WAH+OD+T DLY
WAH+DIST+DLY
XG WH+DST+DL
WAH+ODRV+DLY
XG WH+OD+DLY
DYNAMIC
M BAND COMP
COMPRESSOR
NOISE GATE
EQ/ENHANCER
ST 2BAND EQ
ST 3BAND EQ
XG 3BAND EQ
EQ DISCO
EQ TEL
HM ENHANCER
XG HM ENHNCE
PITCH CHANGE
PITCH CHANGE
XG PCH CHG 1
XG PCH CHG 2
MISCELLANEOUS
AMBIENCE
IMPULSE EXP
RESONATOR
VOICE CANCEL
TALKING MOD
LO-FI
DYNA FILTER
DYNA RINGMOD
RING MOD
ISOLATOR
THRU
THRU
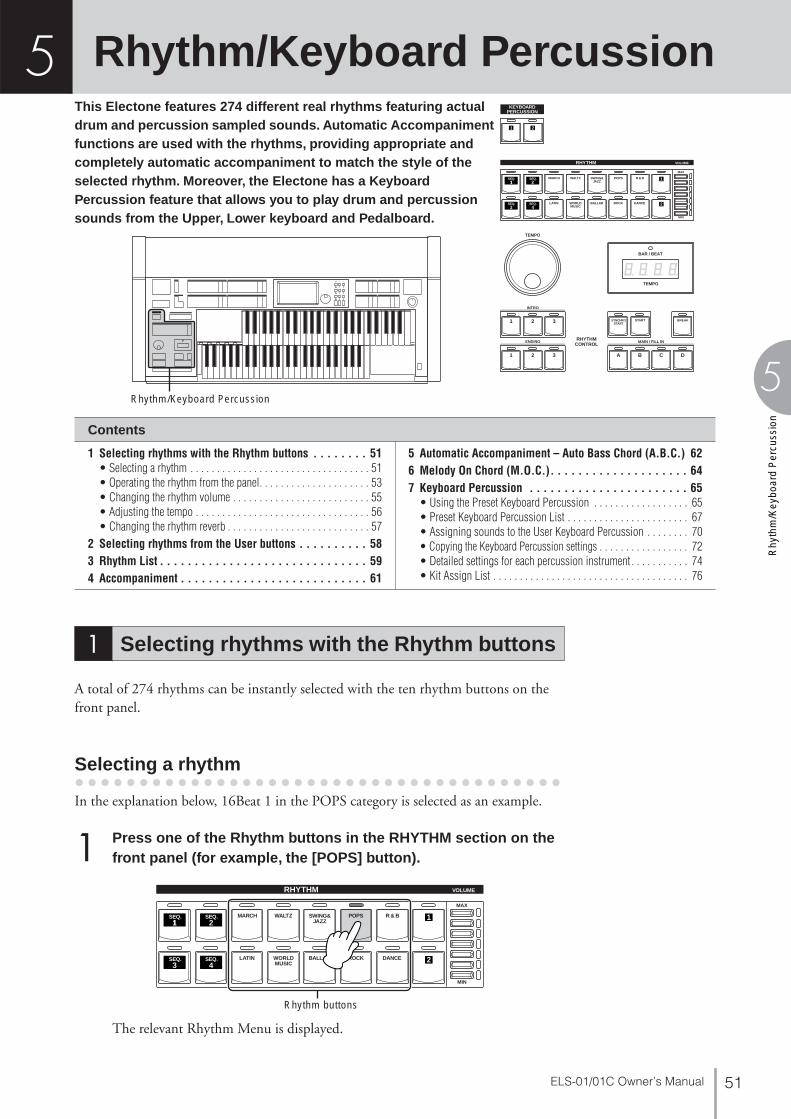
5
Rhy
thm
/Key
boar
d P
ercu
ssio
n
ELS-01/01C Owner’s Manual 51
Rhythm/Keyboard PercussionThis Electone features 274 different real rhythms featuring actual drum and percussion sampled sounds. Automatic Accompaniment functions are used with the rhythms, providing appropriate and completely automatic accompaniment to match the style of the selected rhythm. Moreover, the Electone has a Keyboard Percussion feature that allows you to play drum and percussion sounds from the Upper, Lower keyboard and Pedalboard.
A total of 274 rhythms can be instantly selected with the ten rhythm buttons on the front panel.
● ● ● ● ● ● ● ● ● ● ● ● ● ● ● ● ● ● ● ● ● ● ● ● ● ● ● ● ● ● ● ● ● ● ● ● ● ●
Selecting a rhythm
In the explanation below, 16Beat 1 in the POPS category is selected as an example.
Press one of the Rhythm buttons in the RHYTHM section on the front panel (for example, the [POPS] button).
The relevant Rhythm Menu is displayed.
KEYBOARDPERCUSSION
MARCH
LATIN WORLDMUSIC
BALLAD ROCK DANCE
WALTZ POPS R & BSWING&JAZZ
2
1
11
2
1 2 3
1 2 3 A B C D
RHYTHM VOLUME
SEQ.2
SEQ.
3SEQ.
4SEQ.
MAX
MIN
TEMPO
INTRO
ENDING MAIN / FILL IN
BAR / BEAT
RHYTHMCONTROL
START BREAKSYNCHROSTART
TEMPO
Rhythm/Keyboard Percussion
Contents
1 Selecting rhythms with the Rhythm buttons . . . . . . . . 51• Selecting a rhythm . . . . . . . . . . . . . . . . . . . . . . . . . . . . . . . . . . 51• Operating the rhythm from the panel. . . . . . . . . . . . . . . . . . . . . 53• Changing the rhythm volume . . . . . . . . . . . . . . . . . . . . . . . . . . 55• Adjusting the tempo . . . . . . . . . . . . . . . . . . . . . . . . . . . . . . . . . 56• Changing the rhythm reverb . . . . . . . . . . . . . . . . . . . . . . . . . . . 57
2 Selecting rhythms from the User buttons . . . . . . . . . . 583 Rhythm List . . . . . . . . . . . . . . . . . . . . . . . . . . . . . . 594 Accompaniment . . . . . . . . . . . . . . . . . . . . . . . . . . . 61
5 Automatic Accompaniment – Auto Bass Chord (A.B.C.) 626 Melody On Chord (M.O.C.). . . . . . . . . . . . . . . . . . . . 647 Keyboard Percussion . . . . . . . . . . . . . . . . . . . . . . . 65
• Using the Preset Keyboard Percussion . . . . . . . . . . . . . . . . . . 65• Preset Keyboard Percussion List . . . . . . . . . . . . . . . . . . . . . . . 67• Assigning sounds to the User Keyboard Percussion . . . . . . . . 70• Copying the Keyboard Percussion settings . . . . . . . . . . . . . . . . . 72• Detailed settings for each percussion instrument . . . . . . . . . . . 74• Kit Assign List . . . . . . . . . . . . . . . . . . . . . . . . . . . . . . . . . . . . . 76
1 Selecting rhythms with the Rhythm buttons
1MARCH
LATIN WORLDMUSIC
BALLAD ROCK DANCE
WALTZ POPS R & BSWING&JAZZ
2
11
RHYTHM VOLUME
SEQ.2
SEQ.
3SEQ.
4SEQ.
MAX
MIN
Rhythm buttons
5

ELS-01/01C Owner’s Manual52
5
Rhythm
/Keyboard P
ercussion
Select the desired rhythm name from the Rhythm menu.The Rhythm menu contains many Pops rhythms, more than can fit on the display page. To change the display pages, press the appropriate number buttons in the display.
The color of the selected rhythm name changes to orange, indicating that it has been selected.
Rhythm Structure
Each rhythm is made up of “sections.” Since each section is a rhythmic variation of the basic rhythm, you can use them to add “spice” to your performance and mix up the beats while you are playing. You can freely change the section while the rhythm is played back.
INTROThis is used for the beginning of the song. There are three Intro sections that can be selected with INTRO [1] – [3] buttons. When the Intro finishes playing, the rhythm automatically shifts to the Main section.
MAINThis is used for playing the main part of the song. There are four Main sections that can be selected with MAIN/FILL IN [A] – [D] buttons. The rhythm pattern of several measures repeats indefinitely.
2
1 2 3
INTRO
Selected Intro section’s lamp is lit
A B C D
MAIN / FILL IN
Selected Main section’s lamp is lit

5
Rhy
thm
/Key
boar
d P
ercu
ssio
n
ELS-01/01C Owner’s Manual 53
● ● ● ● ● ● ● ● ● ● ● ● ● ● ● ● ● ● ● ● ● ● ● ● ● ● ● ● ● ● ● ● ● ● ● ● ● ●
Operating the rhythm from the panel
You can turn the rhythm on/off and switch the sections as desired by pressing the buttons on the panel. Using the Fill Ins and Break patterns let you add dynamic interest and “spice” to your performance.
To start/stop the rhythm:
STARTThe rhythm begins as soon as the [START] button is pressed.To stop the rhythm, press the button again.
SYNCHRO STARTThe [SYNCHRO START] button puts the rhythm in “standby.” The rhythm starts when you press a note on the Lower keyboard or Pedalboard.When the A.B.C. mode is set to OFF, pressing the [SYNCHRO START] button again stops the rhythm.When the A.B.C. mode is set to something other than OFF, releasing the key from the Lower keyboard or Pedalboard stops the rhythm.
FILL INThis is designed for use as a temporary and regular rhythmic pattern to spice up a repeating rhythm. There are four Fill In sections that can be played by pressing the selected (lit) MAIN/FILL IN [A] – [D] buttons as desired. When one measure pattern of Fill In finishes playing, the rhythm is automatically shifts to the Main section.
BREAKThis lets you add dynamic variations and breaks in the rhythm pattern. The Break section is selected by pressing the [BREAK] button. When the one-measure Break pattern finishes playing, the rhythm automatically shifts to the Main section.
ENDINGThis is used for the ending of the song. There are three Ending sections that can be selected with the ENDING [1] – [3] buttons. When the ending is finished, the rhythm automatically stops.
A B C D
MAIN / FILL IN
Selected Fill In section’s lamp flashes
BREAKSTARTSYNCHROSTART
The lamp is lit when the Break section is selected
1 2 3
ENDING
Selected Ending section’s lamp is lit
STARTSYNCHROSTART
STARTSYNCHROSTART
Reference Page
Automatic Accompaniment – Auto Bass Chord (A.B.C.) (page 62)

ELS-01/01C Owner’s Manual54
5
Rhythm
/Keyboard P
ercussion
INTROPressing one of the INTRO [1] – [3] buttons automatically adds a short introduction before starting the actual (Main) rhythm.First press one of the INTRO [1] – [3] buttons, then press the [START] or [SYNCHRO START] button to actually start the rhythm.
While the introduction is playing, the BAR/BEAT display shows the countdown to the first measure of the pattern. For example, if there is a four-measure lead-in for a pattern in 4/4 time, the display at right appears:
ENDINGPressing one of the ENDING [1] – [3] buttons automatically adds an ending phrase before stopping the rhythm.
When you press the Ending button while rhythm is playing back, the rhythm will automatically stop after the ending phrase is played. You can have the ending gradually slow down (ritardando) by pressing the ENDING button once again, while the ending is playing.
To switch the rhythm sections:You can change the rhythm section of the Main phrase by pressing the desired MAIN/FILL IN [A] – [D] button. The selected section’s lamp (above the button) is lit.
To use the Fill In patterns:As you play the Electone along with the rhythm, occasionally press the selected MAIN/FILL button as desired. The Fill In pattern (one measure) will be played and the selected Fill In section’s lamp (above the button) flashes.
When you use the Auto Fill In function, Fill Ins will be played automatically. The Auto Fill In function is set in the Rhythm Condition display.Pressing the selected Rhythm button on the panel again (or pressing the rhythm name of the selected rhythm in the display) calls up the Rhythm Condition Display.
When Auto Fill is set to ON in the left side of the display, the Fill In pattern is automatically played whenever you switch the Main sections.
1 2 3
INTRO
BAR / BEAT
TEMPO
NOTE
When an Intro or Ending pattern is playing, the Lower Keyboard cannot be played.
1 2 3
ENDING
NOTE
Pressing the ENDING [1] button during playback of the Main section will first call up the fill in pattern, then the Ending 1 pattern.
A B C D
MAIN / FILL IN
NOTE
You can record the currently selected section to Registration Memory. However, you cannot record the on/off status of the Auto Fill In function.
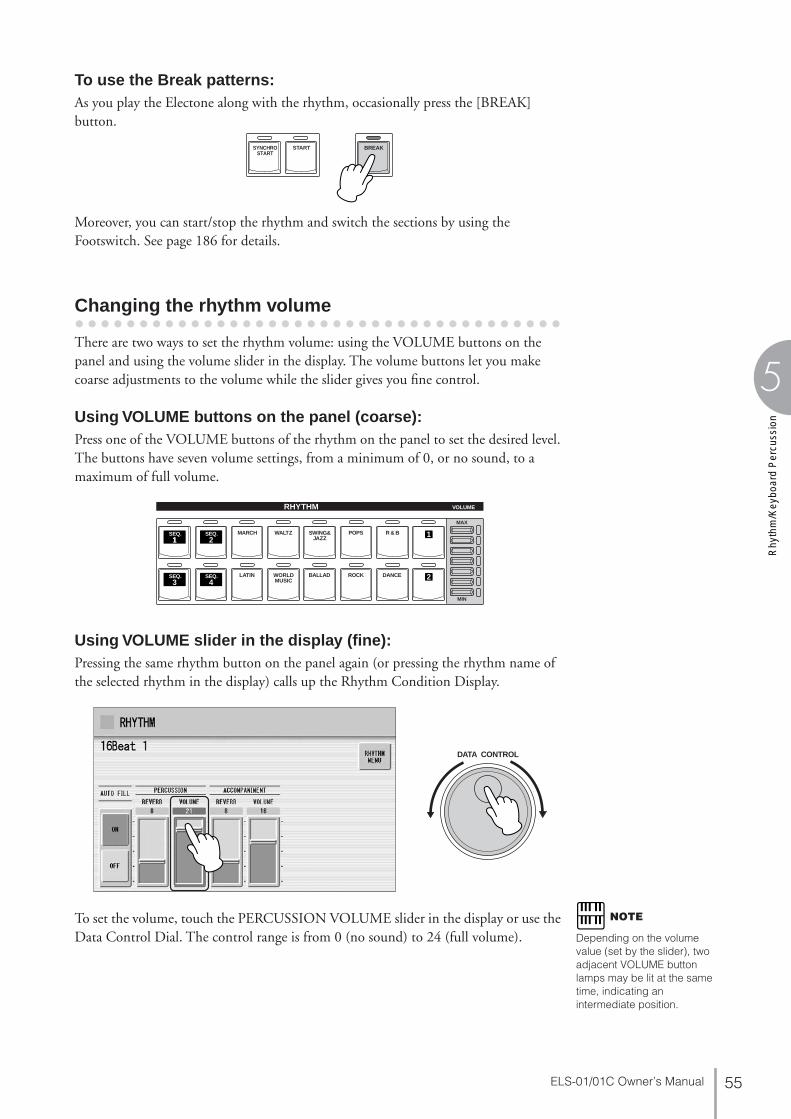
5
Rhy
thm
/Key
boar
d P
ercu
ssio
n
ELS-01/01C Owner’s Manual 55
To use the Break patterns:As you play the Electone along with the rhythm, occasionally press the [BREAK] button.
Moreover, you can start/stop the rhythm and switch the sections by using the Footswitch. See page 186 for details.
● ● ● ● ● ● ● ● ● ● ● ● ● ● ● ● ● ● ● ● ● ● ● ● ● ● ● ● ● ● ● ● ● ● ● ● ● ●
Changing the rhythm volume
There are two ways to set the rhythm volume: using the VOLUME buttons on the panel and using the volume slider in the display. The volume buttons let you make coarse adjustments to the volume while the slider gives you fine control.
Using VOLUME buttons on the panel (coarse):Press one of the VOLUME buttons of the rhythm on the panel to set the desired level. The buttons have seven volume settings, from a minimum of 0, or no sound, to a maximum of full volume.
Using VOLUME slider in the display (fine):Pressing the same rhythm button on the panel again (or pressing the rhythm name of the selected rhythm in the display) calls up the Rhythm Condition Display.
To set the volume, touch the PERCUSSION VOLUME slider in the display or use the Data Control Dial. The control range is from 0 (no sound) to 24 (full volume).
BREAKSTARTSYNCHROSTART
MARCH
LATIN WORLDMUSIC
BALLAD ROCK DANCE
WALTZ POPS R & BSWING&JAZZ
2
11
RHYTHM VOLUME
SEQ.2
SEQ.
3SEQ.
4SEQ.
MAX
MIN
DATA CONTROL
NOTE
Depending on the volume value (set by the slider), two adjacent VOLUME button lamps may be lit at the same time, indicating an intermediate position.

ELS-01/01C Owner’s Manual56
5
Rhythm
/Keyboard P
ercussion
● ● ● ● ● ● ● ● ● ● ● ● ● ● ● ● ● ● ● ● ● ● ● ● ● ● ● ● ● ● ● ● ● ● ● ● ● ●
Adjusting the tempo
Turn the TEMPO dial clockwise to increase the tempo, and counter-clockwise to decrease it.
TEMPO display shows the current tempo. Displayed values are given in beats per minute.The tempo range is 40 to 240 beats per minute.
When the rhythm begins playing, the TEMPO indicator changes function to a BAR/BEAT indicator.
On the BAR/BEAT indicator, the number on the left indicates the current bar or measure and the one on the right indicates the number of the beat in each bar.
You can also see the Tempo and Bar/Beat indications in the Voice Display. In the Voice Display, both Tempo and Bar/Beat can be seen in one display.
BAR / BEAT
TEMPO
TEMPO
Increasing the tempo
Decreasing the tempo
TEMPO Indicator
BAR / BEAT
TEMPO
Bar (measure) Beat
BAR/BEAT Indicator
Reference Page
Voice Display (page 17)
DISPLAY SELECT
VOICEDISPLAY
FOOTSWITCH
RHYTHMPROGRAM
UTILITY INTERNET
A.B.C.M.O.C. MDR
VOICE EDIT PATTERN SEQUENCE
U.ORGANFLUTES
L.ORGANFLUTES
ROTARY SPSPEED

5
Rhy
thm
/Key
boar
d P
ercu
ssio
n
ELS-01/01C Owner’s Manual 57
Each rhythm has its original (preset) tempo. Press [PRESET TEMPO] button in the display to restore the tempo to the original setting.
● ● ● ● ● ● ● ● ● ● ● ● ● ● ● ● ● ● ● ● ● ● ● ● ● ● ● ● ● ● ● ● ● ● ● ● ● ●
Changing the rhythm reverb
You can adjust the amount of reverb applied to the rhythms and the percussion sounds used in the rhythms in the Rhythm Condition display.
When the panel REVERB control is set to the minimum, the setting here will have no effect.Range: 0 – 24
Reference Page
Reverb (page 43)
DATA CONTROL

ELS-01/01C Owner’s Manual58
5
Rhythm
/Keyboard P
ercussion
As with the Voice sections, the Rhythm section also has User buttons (numbered 1 or 2) from which rhythms can be selected. You can select original User rhythms that you have created with the Rhythm Pattern Program function. This also allows you to assign two or three rhythms from the same category to be selected from different buttons; one from the original Rhythm button, and the others from the User buttons.
Press one of the User buttons at the right of the Rhythm buttons.
The Rhythm Menu appears in the display.
Select the desired rhythm category with the category buttons in the display.You can also choose the “User” category to select a User rhythm you have created.
The currently selected rhythm category appears at the top left of the display. The rhythm name shown below the category name is that of the currently assigned rhythm and is irrelevant to the rhythm category.
Select a rhythm from the displayed Rhythm Menu.Pressing the number buttons in the display calls up the other rhythms in the category.
2 Selecting rhythms from the User buttons
1MARCH
LATIN WORLDMUSIC
BALLAD ROCK DANCE
WALTZ POPS R & BSWING&JAZZ
2
11
RHYTHM VOLUME
SEQ.2
SEQ.
3SEQ.
4SEQ.
MAX
MIN
User buttons
Reference Page
Rhythm Pattern Program (page 144)
2
Currently selectedrhythm category
Currently selectedrhythm name
3

5
Rhy
thm
/Key
boar
d P
ercu
ssio
n
ELS-01/01C Owner’s Manual 59
3 Rhythm List
MARCH
1
Marching Band 1
Marching Band 2
Marching Band 3
Alpine March
6/8 March 1
6/8 March 2
6/8 Kids
6/8 Organ March
Broadway
SF March
Wild West
Baroque
WALTZ
1
Vienna Waltz
Orchestra Waltz
Simple Waltz
Gentle Waltz
Guitar Serenade
Snow Waltz
Classic Waltz
Mariachi
Alpine Waltz
Musette
2
Jazz Waltz 1
Jazz Waltz 2
Jazz Waltz 3
Jazz Waltz 4
Modern Waltz
Pop Waltz
Country Waltz
SWING&JAZZ
1
Big Band 1
Big Band 2
Big Band 3
Big Band 4
Big Band 5
Big Band 6
Big Band 7
Big Band Bop
Orch. Big Band
Orchestra Swing
Movie Panther
Jungle Drum
2
Jazz Club
Simple Swing
Acoustic Jazz
Medium Jazz
2
Fast Jazz
Combo Swing
Cool Combo
Light Swing
Afro Cuban 1
Afro Cuban 2
Bebop
Five-Four
3
Jazz Ballad 1
Jazz Ballad 2
Movie Swing
Piano Trio
Midnight Swing
Slow Jazz
Moonlight 1
Moonlight 2
Winter Song 1
Winter Song 2
4
Foxtrot
Slowfox
Quickstep
Dixieland 1
Dixieland 2
Dixieland Jazz
Ragtime
Charleston
Guitar Swing
POPS
1
8Beat Light 1
8Beat Light 2
8Beat Light 3
8Beat Light 4
Folk Rock 1
Folk Rock 2
60’s 8Beat
Asian Pops
Unplugged 1
Unplugged 2
Unplugged 3
8Beat Adria
2
Bubblegum Pop
70’s 8Beat
Tijuana
SingerSongWriter
Surfin’ 8Beat
Finger Pickin’
Heart Beat
Guitar Pop
2 British 16Beat
3
16Beat 1
16Beat 2
16Beat 3
16Beat 4
Fusion Shuffle 1
Fusion Shuffle 2
Jazz Pop
16Beat Shuffle 1
16Beat Shuffle 2
4
Pop Shuffle
Eurovision Pop
British Pop
Sing Along
Simple Shuffle 1
Simple Shuffle 2
Simple Shuffle 3
R&B
1
Blues Rock
Motor City
Soul 1
Soul 2
16Beat Soul
Frankly Soul
Gospel Funk
Jazz Funk
Funk Beat 1
Funk Beat 2
Detroit Pop 1
Detroit Pop 2
2
New R&B
Modern R&B
New Gospel
Cool Blues
Gospel Shuffle
Gospel Sisters
Amazing Gospel
6/8 Blues
Slow Blues
6/8 Soul
Blues Shuffle
LATIN
1
Samba
Big Band Samba
Light Samba 1
Light Samba 2
Pop Samba 1
Pop Samba 2
1
Bossa Nova 1
Bossa Nova 2
Bossa Nova 3
Pop Bossa
2
Mambo 1
Mambo 2
Salsa 1
Salsa 2
Montuno
Calypso
Cha Cha Cha
Big Band Cha Cha
Pop Cha Cha
3
Rumba
Pop Rumba
Fast Rumba
Guitar Rumba
Beguine 1
Beguine 2
Cuban Bolero
Tango 1
Tango 2
Tango Orchestra
Tango Milonga
WORLD MUSIC
1
Bolero
Flamenco
Pop Flamenco
Pasodoble
Polka 1
Polka 2
Banda Polka
Irish Dance
Tarantella
Sirtaki
Enka
2
Reggae
Happy Reggae
Sheriff Reggae
Shuffle Reggae
Bluegrass 1
Bluegrass 2
Hoedown
Country 2/4
Country Shuffle
Country Band
Hawaiian
Mexican Dance
This list shows all available rhythms on the Electone. Numbers written at the left side of each column in this list indicate the numbered buttons displayed in the Rhythm Menu.

ELS-01/01C Owner’s Manual60
5
Rhythm
/Keyboard P
ercussion
•
BALLAD
1
Power Ballad
Dramatic Ballad
Movie Ballad 1
Movie Ballad 2
Secret Service
Carpenters Pop
Romantic Ballad
Love Song
16Beat Ballad 1
16Beat Ballad 2
16Beat Ballad 3
Easy Ballad
2
Guitar Ballad 1
Guitar Ballad 2
Guitar Ballad 3
Organ Ballad
Chart Ballad
Analog Ballad
Pop Ballad
8Beat Modern
Chillout
Slow&Easy
3
6/8 Slow Rock 1
6/8 Slow Rock 2
6/8 Orchestra 1
6/8 Orchestra 2
6/8 Ballad
Acoustic Ballad
ROCK
1
Power Rock
Southern Rock
60’s Rock 1
60’s Rock 2
Hard Rock 1
Hard Rock 2
Rock Shuffle 1
Rock Shuffle 2
Tears Rock 1
Tears Rock 2
Soft Rock
British Rock
2
Country Rock 1
Country Rock 2
New Country
Cowboy Rock
Rock&Roll 1
Rock&Roll 2
Skiffle
Caribbean Rock
R&R Shuffle
Jive
Boogie Woogie
DANCE
1
Ibiza 1
Ibiza 2
Euro Trance
Disco Teens
Techno Party
Club Dance
Dream Dance
Club House
UK Pop
US Disco
Swing House
2
US Pop
US Hip Hop
Classic Hip Hop
Trip Hop
Chart Pop
Ground Beat
Hip Hop Groove
Hip Hop Pop
Hip Hop Light
Euro Hip Hop
3
Latin DJ’s
Club Latin
Latin Disco 1
Latin Disco 2
Garage
6/8 Trance
80’s Dance
Pop Beat 1
Pop Beat 2
Funky Dance
4
Disco Philly 1
Disco Philly 2
70’s Disco 1
70’s Disco 2
Disco Funk
Disco Chocolate
Dance Pop
Table 1:
Certain rhythms created for use with slow, soft Songs or for Songs that do not use a bass part at the beginning, may not have drum sections. To use these rhythms, refer to the following information.
Some sections of the following nine rhythms are configured with accompaniment only; they do not contain any drum or percussion.
Some sections of the following five rhythms do not contain an Auto Bass part. This means that even though the Auto Bass Chord is turned on, the bass part will not sound.
• Guitar Serenade in the WALTZ category• Folk Rock 1 in the POPS category• Unplugged 1 in the POPS category• Pop Flamenco in WORLD MUSIC category• New Country in the ROCK category
Category Rhythm Section
MARCH6/8 Organ March Main A, Main B
Baroque All sections except Intro 1
WALTZSimple Waltz Ending 1
Guitar Serenade All sections except Intro 1
WORLD MUSIC
Banda Polka Main A, Fill In A
Hoedown Ending 1
Mexican Dance Main A, Fill In A
BALLAD Dramatic Ballad Main A
ROCK R&R Shuffle Ending 1

5
Rhy
thm
/Key
boar
d P
ercu
ssio
n
ELS-01/01C Owner’s Manual 61
The Accompaniment function provides arpeggiated chords and other instrumental embellishments when rhythms are used.Accompaniment controls are selected from the Rhythm Menu and Rhythm Condition display.
Press any one of the RHYTHM buttons once.
At the bottom of the display, there are seven part buttons, such as Chord 1, Chord 2, Pad, and so on. These parts, with the exception of Main Drum and Add Drum, are Accompaniment parts.
Turn the desired parts on.The Accompaniment consists of five parts, Chord 1, Chord 2, Pad, Phrase 1, and Phrase 2, and each of them can be set to on or off by pressing corresponding button in the display. If you turn all the parts off, the Accompaniment does not sound.
CHORD 1/CHORD 2:These are the rhythmic chord backing parts.
PAD:This part features sustained chords and commonly uses lush sounds such as strings and organ.
PHRASE 1/PHRASE 2:These parts are used for various embellishments and riffs that enhance the song, such as brass section accents and chord arpeggios.
Not all parts contain accompaniment data. Some parts may be empty depending on the selected rhythm and rhythm section.
4 Accompaniment
Main Drum and Add Drum contains the drum and percussion rhythm patterns. When you turn both Main Drum and Add Drum off, the drum and percussion do not sound. Generally, Main Drum contains the main part of the rhythm and Add drum has additional percussion sounds, such as tambourine.
1
Accompaniment parts
2

ELS-01/01C Owner’s Manual62
5
Rhythm
/Keyboard P
ercussion
Adjust the volume and amount of reverb applied to the Accompaniment.Pressing the same rhythm button on the panel again calls up the Rhythm Condition display.The two sliders at the right side of the display can control the Accompaniment volume and reverb. Touch the slider in the display or use the Data Control dial to adjust the volume/reverb.
The Auto Bass Chord (A.B.C.) function works with the Rhythm section of the Electone to automatically produce bass accompaniment as you play. It adds an entirely new dimension to your performance by effectively putting a full backing band at your disposal. There are three modes used for producing Automatic Accompaniment patterns.Before using the A.B.C. function, turn Pedal Poly off. If Pedal Poly is set to on, the bass pattern of the A.B.C. will not sound.
To set the A.B.C. function:
Press the [A.B.C./M.O.C.] button.
The A.B.C./M.O.C. display appears. The A.B.C. section is at the left half of this display.
5Automatic Accompaniment – Auto Bass Chord (A.B.C.)
3
DATA CONTROL
Reference Page
POLY (page 40)
DISPLAY SELECT
VOICEDISPLAY
FOOTSWITCH
RHYTHMPROGRAM
UTILITY INTERNET
A.B.C.M.O.C. MDR
VOICE EDIT PATTERN SEQUENCE
U.ORGANFLUTES
L.ORGANFLUTES
ROTARY SPSPEED
1 2
A.B.C./M.O.C. Display

5
Rhy
thm
/Key
boar
d P
ercu
ssio
n
ELS-01/01C Owner’s Manual 63
1 A.B.C. MODEOFF:Cancels the Auto Bass Chord function.
SINGLE FINGER:The Single Finger mode provides the fastest and easiest means to obtain many different chord/bass combinations. You can produce major, minor, 7th, and minor 7th chords by simply using one, or at most, two or three fingers to play the chords. The chord produced will sound in the same octave regardless of where it is played on the Lower keyboard.
Key of C
Major chords:Press the root of the chord (the note that corresponds to the chord’s name).
Minor chords:Simultaneously press the root and any one black key to the left of it.
7th chords:Simultaneously press the root and any one white key to the left of it.
Minor 7th chords:Simultaneously press the root as well as any black key and any white key to the left of it.
Playing single finger chords without the use of the rhythm lets you add full continuous chords to your performance.
FINGERED CHORD:The Fingered Chord mode automatically produces bass accompaniment for chords played in the Lower keyboard. It allows you to use a wider range of chord types than in the Single Finger mode. In the Fingered Chord mode, you play full chords while the Auto Bass Chord function automatically selects the appropriate bass pattern. If you play only one or two notes in the Lower keyboard, the appropriate chord will sound on the basis of the previously played chord.
Key of C
Playing fingered chords without the use of the rhythm lets you add full continuous chords to your performance.
CUSTOM A.B.C.:The Custom A.B.C. mode is a slight variation on the Fingered Chord mode. It allows you to determine what bass notes will be played in the accompaniment by playing a note on the Pedalboard along with the chords you play in the Lower keyboard.
C
Cm
C7
Cm7
C Cm C7 Cm7 Cmaj7
CaugCm maj7 Cdim Cdim7 Csus4
Cm7-5C7sus4 C6 Cm6 Cadd9
NOTE
When playing certain chords (aug, dim7, sus4, 6, and m6), make sure to play the root of the chord as the lowest note in that chord.

ELS-01/01C Owner’s Manual64
5
Rhythm
/Keyboard P
ercussion
2 MEMORYLOWER:When this is set to on, the Lower keyboard Voices and chord accompaniment keep playing even after you release your fingers from the Lower keyboard, while the rhythm plays.
PEDAL:When this is set to on, the Pedalboard Voices and bass accompaniment keep playing even after you release your foot from the Pedalboard, while the rhythm plays.(In the Single Finger and Fingered modes:) When this is set to on, the bass accompaniment of the Pedalboard Voices keeps playing even after you release your fingers from the Lower keyboard.
When you start the rhythm with [SYNCHRO START] button, set the Lower/Pedal Memory to on. When Memory is off, releasing your fingers from Lower keyboard stops the rhythm.
The Melody On Chord (M.O.C.) feature automatically adds a harmony part to the melodies you play on the Upper keyboard. The harmony is derived from the chords you play on the Lower keyboard – or from the chords that are played for you, if you use Automatic Accompaniment. Melody On Chord has three different modes, each providing a different set of harmonics to accompany the melody played. Melody On Chord can also be controlled with the Knee Lever.
To set the M.O.C. function:Press the [A.B.C./M.O.C.] button.
The A.B.C./M.O.C. display appears. The M.O.C. section is at the right half of this display.
1 M.O.C. MODE
OFF:Cancels the Melody On Chord function.
Mode 1:Produces harmonies of up to two notes in a range close to the melody played.
6 Melody On Chord (M.O.C.)
DISPLAY SELECT
VOICEDISPLAY
FOOTSWITCH
RHYTHMPROGRAM
UTILITY INTERNET
A.B.C.M.O.C. MDR
VOICE EDIT PATTERN SEQUENCE
U.ORGANFLUTES
L.ORGANFLUTES
ROTARY SPSPEED
1 2
A.B.C./M.O.C. Display

5
Rhy
thm
/Key
boar
d P
ercu
ssio
n
ELS-01/01C Owner’s Manual 65
Mode 2:Produces harmonies of up to three notes in a range close to the melody played.
Mode 3:Produces harmonies of up to four notes in a range relatively distant from the melody played.
2 KNEEOn/off switch for Knee Lever control over Melody On Chord operation. To use the Melody On Chord function with Knee Lever control, first switch the Knee setting to ON, then select one of the three modes (described above). When the control is on, pressing the Knee Lever to the right activates the Melody On Chord function.
Melody On Chord can be heard only when the Upper Keyboard Voice section’s volume is set to the appropriate value. Melody On Chord does not apply to the Lead Voices.
The Keyboard Percussion function features many types of drum and percussion sounds, playable from the keyboards and Pedalboard.Keyboard Percussion has two different modes, Preset and User. Preset Keyboard Percussion lets you play the preset drum kit sounds from the keyboards (assigned beforehand to the keys), while the User Keyboard Percussion lets you freely assign the drum sounds to any key or pedal you wish.
● ● ● ● ● ● ● ● ● ● ● ● ● ● ● ● ● ● ● ● ● ● ● ● ● ● ● ● ● ● ● ● ● ● ● ● ● ●
Using the Preset Keyboard Percussion
Turn off the Upper, Lower and/or Pedal Voices by setting each Voice’s volume to MIN.
Turn on the Keyboard Percussion function by pressing the KEYBOARD PERCUSSION [1] or [2] button.The Keyboard Percussion (K.B.P.) Display appears.
Pressing the KEYBOARD PERCUSSION [1] button calls up the Preset 1 kit on the Upper/Lower keyboards, and pressing [2] button calls up the Preset 2 kit on the Pedalboard.
Reference Page
Controlling Melody On Chord (with Knee Lever); (page 189)
7 Keyboard Percussion
12 NOTE
In the Voice Display, each Voice section can be muted (page 18).
KEYBOARDPERCUSSION
1 2
NOTE
Two Keyboard Percussion sets, [1] and [2], can be played at the same time by setting both buttons to on.

ELS-01/01C Owner’s Manual66
5
Rhythm
/Keyboard P
ercussion
Select the desired percussion kit.As a default, EL Kit is assigned to the keyboards but you can change the kit from a total of 16 different kits. Pressing the Kit button on the display calls up the Percussion Kit List. Choose the desired Kit from the list. To abort the operation, press the [CLOSE] button.
For details of percussion assignments for each kit, see the Preset Keyboard Percussion List on page 67.
Adjust the volume and amount of reverb applied to the Keyboard Percussion.Two sliders in the K.B.P. display determine the reverb and volume settings.
The settings here determine the reverb/volume for the entire Keyboard Percussion setup, not for each percussion instrument. You can, however, adjust each percussion instrument’s reverb/volume (page 74).
Play some notes on the keyboards and/or Pedalboard.
3NOTE
Percussion Kit selection is common for the Keyboard Percussion function. For example, if you select “Standard Kit 1” for Preset 1 of the Keyboard Percussion, the kit for Preset 2 and User 1-8 will also be changed to “Standard Kit 1.”
The message “Are you sure you want to clear all assignments and setup data?” may appear when you change the kit. Select [CLEAR] to clear all assignments (made in the ASSIGN Page) and detailed settings (made in the SETUP Page) and call up the selected kit on the panel. Select [CANCEL] to call up the selected kit without erasing the assignments and detailed settings.
4
DATA CONTROL
5

5
Rhy
thm
/Key
boar
d P
ercu
ssio
n
ELS-01/01C Owner’s Manual 67
● ● ● ● ● ● ● ● ● ● ● ● ● ● ● ● ● ● ● ● ● ● ● ● ● ● ● ● ● ● ● ● ● ● ● ● ● ● ● ● ● ● ● ● ● ● ● ● ● ●
Preset Keyboard Percussion List
: Indicates the keys of the ELS-01/01C keyboard.
*The 10 kits, Standard Kit 2 – Symphony Kit, have the same sound assignments as Standard Kit 1.
EL Kit Standard Kit 1*
Preset 2 (PK) Preset 1 (LK) Preset 1 (UK) Preset 2 (PK) Preset 1 (LK) Preset 1 (UK)
Bass Drum Heavy - Kick -
SD Brush Roll - Side Stick Surdo Mute
Snare Drum Heavy - Snare Surdo Open
SD Brush Shot 1 Claves Hand Clap Hi Q
SD Reverb 1 - Snare Tight Whip Slap
Snare Drum Light - Floor Tom L Scratch H
Tom 3 Synth Tom 3 Hi-Hat Closed Scratch L
Snare Drum Rim 1 Concert BD Floor Tom H Finger Snap
Tom 2 Synth Tom 2 Hi-Hat Pedal Click Noise
Hi-Hat Close Bass Drum Heavy Low Tom Metronome Click
Tom 1 Synth Tom 1 Hi-Hat Open Metronome Bell
Hi-Hat Open Bass Drum Light Mid Tom L Seq Click L
Ride Cymbal 1 Snare Drum Heavy - Mid Tom H Seq Click H -
Synth Tom 3 SD Brush Roll - Crash Cymbal 1 Brush Tap -
Crash Cymbal 1 Snare Drum Heavy - High Tom Brush Swirl -
Synth Tom 2 SD Brush Shot 1 - Ride Cymbal 1 Brush Slap -
Orchestra Cymbal SD Reverb 1 - Chinese Cymbal Brush Tap Swirl -
- Snare Drum Light - Ride Cymbal Cup Snare Roll -
Synth Tom 1 Tom 3 - Tambourine Castanet -
- Snare Drum Rim 1 - Splash Cymbal Snare Soft -
Tom 2 - Sticks -
Hi-Hat Close - Kick Soft -
Tom 1 - Open Rim Shot -
Hi-Hat Open - Kick Tight -
Ride Cymbal 1 - Kick Bongo H
Orch Snare Drum - Side Stick Bongo L
Crash Cymbal 1 - Snare Conga H Mute
Snare Drum Roll - Hand Clap Conga H Open
Orchestra Cymbal - Snare Tight Conga L
Orch Cymbal Roll - Floor Tom L Timbale H
Triangle Mute - Hi-Hat Closed Timbale L
Tambourine - Floor Tom H Agogo H
Triangle Open - Hi-Hat Pedal Agogo L
Castanet - Low Tom Cabasa
Cowbell 1 - Hi-Hat Open Maracas
Timbale 1 Low - Mid Tom L Samba Whistle H
Timbale 1 High - Mid Tom H Samba Whistle L
Wood Block Low - Crash Cymbal 1 Guiro Short
Conga Low - High Tom Guiro Long
Wood Block High - Ride Cymbal 1 Claves
Conga High - Chinese Cymbal Wood Block H
Bongo Low - Ride Cymbal Cup Wood Block L
Agogo Low - Tambourine Cuica Mute
Bongo High - Splash Cymbal Cuica Open
Agogo High - Cowbell Triangle Mute
Cuica Low - Crash Cymbal 2 Triangle Open
Hand Claps - Vibraslap Shaker
Cuica High - Ride Cymbal 2 Jingle Bells
Shaker - - Bell Tree
- -
-
-
-
-
-
-
-
-
-
-
-
C�1D�1
F�1G�1A�1
C�2D�2
F�2G�2A�2
C�3D�3
F�3G�3A�3
C�4D�4
F�4G�4A�4
C�5D�5
F�5G�5A�5
C5
D5
E5
F5
G5
A5
B5
C6
C4
D4
E4
F4
G4
A4
B4
C3
D3
E3
F3
G3
A3
B3
C2
D2
E2
F2
G2
A2
B2
C1
D1
E1
F1
G1
A1
B1
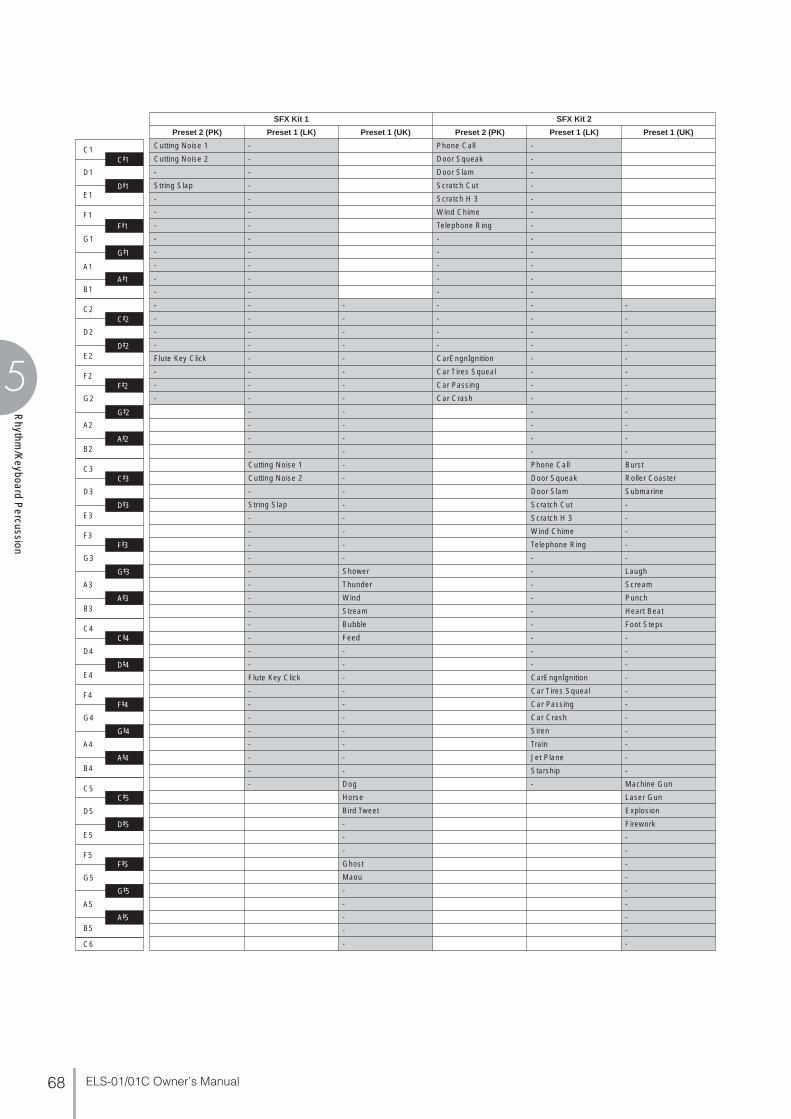
ELS-01/01C Owner’s Manual68
5
Rhythm
/Keyboard P
ercussion
SFX Kit 1 SFX Kit 2
Preset 2 (PK) Preset 1 (LK) Preset 1 (UK) Preset 2 (PK) Preset 1 (LK) Preset 1 (UK)
Cutting Noise 1 - Phone Call -
Cutting Noise 2 - Door Squeak -
- - Door Slam -
String Slap - Scratch Cut -
- - Scratch H 3 -
- - Wind Chime -
- - Telephone Ring -
- - - -
- - - -
- - - -
- - - -
- - - -
- - - - - -
- - - - - -
- - - - - -
- - - - - -
Flute Key Click - - CarEngnIgnition - -
- - - Car Tires Squeal - -
- - - Car Passing - -
- - - Car Crash - -
- - - -
- - - -
- - - -
- - - -
Cutting Noise 1 - Phone Call Burst
Cutting Noise 2 - Door Squeak Roller Coaster
- - Door Slam Submarine
String Slap - Scratch Cut -
- - Scratch H 3 -
- - Wind Chime -
- - Telephone Ring -
- - - -
- Shower - Laugh
- Thunder - Scream
- Wind - Punch
- Stream - Heart Beat
- Bubble - Foot Steps
- Feed - -
- - - -
- - - -
Flute Key Click - CarEngnIgnition -
- - Car Tires Squeal -
- - Car Passing -
- - Car Crash -
- - Siren -
- - Train -
- - Jet Plane -
- - Starship -
- Dog - Machine Gun
Horse Laser Gun
Bird Tweet Explosion
- Firework
- -
- -
Ghost -
Maou -
- -
- -
- -
- -
- -
C�1D�1
F�1G�1A�1
C�2D�2
F�2G�2A�2
C�3D�3
F�3G�3A�3
C�4D�4
F�4G�4A�4
C�5D�5
F�5G�5A�5
C5
D5
E5
F5
G5
A5
B5
C6
C4
D4
E4
F4
G4
A4
B4
C3
D3
E3
F3
G3
A3
B3
C2
D2
E2
F2
G2
A2
B2
C1
D1
E1
F1
G1
A1
B1
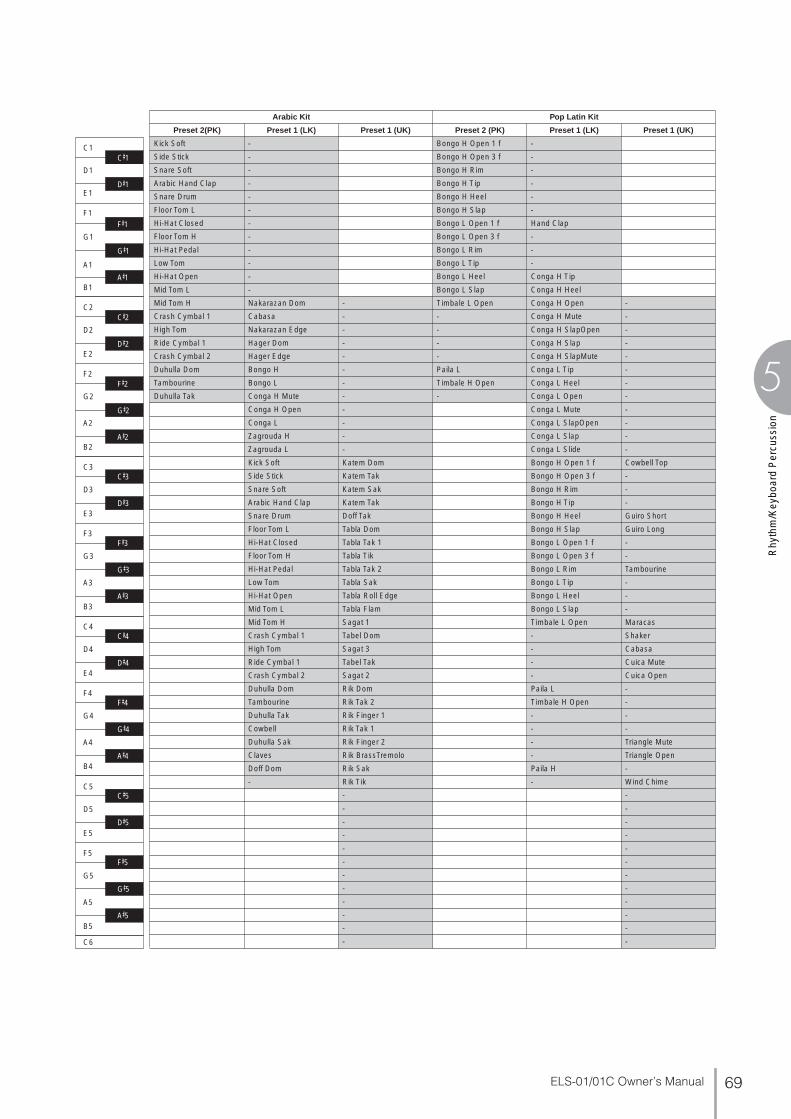
5
Rhy
thm
/Key
boar
d P
ercu
ssio
n
ELS-01/01C Owner’s Manual 69
Arabic Kit Pop Latin Kit
Preset 2(PK) Preset 1 (LK) Preset 1 (UK) Preset 2 (PK) Preset 1 (LK) Preset 1 (UK)
Kick Soft - Bongo H Open 1 f -
Side Stick - Bongo H Open 3 f -
Snare Soft - Bongo H Rim -
Arabic Hand Clap - Bongo H Tip -
Snare Drum - Bongo H Heel -
Floor Tom L - Bongo H Slap -
Hi-Hat Closed - Bongo L Open 1 f Hand Clap
Floor Tom H - Bongo L Open 3 f -
Hi-Hat Pedal - Bongo L Rim -
Low Tom - Bongo L Tip -
Hi-Hat Open - Bongo L Heel Conga H Tip
Mid Tom L - Bongo L Slap Conga H Heel
Mid Tom H Nakarazan Dom - Timbale L Open Conga H Open -
Crash Cymbal 1 Cabasa - - Conga H Mute -
High Tom Nakarazan Edge - - Conga H SlapOpen -
Ride Cymbal 1 Hager Dom - - Conga H Slap -
Crash Cymbal 2 Hager Edge - - Conga H SlapMute -
Duhulla Dom Bongo H - Paila L Conga L Tip -
Tambourine Bongo L - Timbale H Open Conga L Heel -
Duhulla Tak Conga H Mute - - Conga L Open -
Conga H Open - Conga L Mute -
Conga L - Conga L SlapOpen -
Zagrouda H - Conga L Slap -
Zagrouda L - Conga L Slide -
Kick Soft Katem Dom Bongo H Open 1 f Cowbell Top
Side Stick Katem Tak Bongo H Open 3 f -
Snare Soft Katem Sak Bongo H Rim -
Arabic Hand Clap Katem Tak Bongo H Tip -
Snare Drum Doff Tak Bongo H Heel Guiro Short
Floor Tom L Tabla Dom Bongo H Slap Guiro Long
Hi-Hat Closed Tabla Tak 1 Bongo L Open 1 f -
Floor Tom H Tabla Tik Bongo L Open 3 f -
Hi-Hat Pedal Tabla Tak 2 Bongo L Rim Tambourine
Low Tom Tabla Sak Bongo L Tip -
Hi-Hat Open Tabla Roll Edge Bongo L Heel -
Mid Tom L Tabla Flam Bongo L Slap -
Mid Tom H Sagat 1 Timbale L Open Maracas
Crash Cymbal 1 Tabel Dom - Shaker
High Tom Sagat 3 - Cabasa
Ride Cymbal 1 Tabel Tak - Cuica Mute
Crash Cymbal 2 Sagat 2 - Cuica Open
Duhulla Dom Rik Dom Paila L -
Tambourine Rik Tak 2 Timbale H Open -
Duhulla Tak Rik Finger 1 - -
Cowbell Rik Tak 1 - -
Duhulla Sak Rik Finger 2 - Triangle Mute
Claves Rik BrassTremolo - Triangle Open
Doff Dom Rik Sak Paila H -
- Rik Tik - Wind Chime
- -
- -
- -
- -
- -
- -
- -
- -
- -
- -
- -
- -
C�1D�1
F�1G�1A�1
C�2D�2
F�2G�2A�2
C�3D�3
F�3G�3A�3
C�4D�4
F�4G�4A�4
C�5D�5
F�5G�5A�5
C5
D5
E5
F5
G5
A5
B5
C6
C4
D4
E4
F4
G4
A4
B4
C3
D3
E3
F3
G3
A3
B3
C2
D2
E2
F2
G2
A2
B2
C1
D1
E1
F1
G1
A1
B1

ELS-01/01C Owner’s Manual70
5
Rhythm
/Keyboard P
ercussion
● ● ● ● ● ● ● ● ● ● ● ● ● ● ● ● ● ● ● ● ● ● ● ● ● ● ● ● ● ● ● ● ● ● ● ● ● ●
Assigning sounds to the User Keyboard Percussion
You can assign any desired drum and percussion sound to any key or pedal, and your original setups can be saved to eight memory locations: User 1 through User 8. The User setting saved in User memory location can be called up by using the KEYBOARD PERCUSSION [1] or [2] buttons.In the instructions below, drum sounds are assigned to User 1 and called up with KEYBOARD PERCUSSION [1] button.
Turn on the Keyboard Percussion function by pressing the KEYBOARD PERCUSSION [1] button.The K.B.P. display appears.
Press [USER 1] on the display.This procedure assigns User 1 to the KEYBOARD PERCUSSION [1] button. You can call up the User 1 setting the next time you press the [1] button.
Select the desired percussion kit.See page 66 for selecting the kit.
Press the [ASSIGN] button at the top right of the display to call up the ASSIGN Page.In the ASSIGN Page, you can assign specific drum sounds to any of the keys.
Select the desired drum instrument that you wish to assign to a key.Select the desired drum instrument category with the category buttons in the display. The drum instrument menu of the selected category appears.
1
2
34
5Reference Page
Kit Assign List (page 76)
Drum Instrument Category
Drum Instrument Menu

5
Rhy
thm
/Key
boar
d P
ercu
ssio
n
ELS-01/01C Owner’s Manual 71
Assign an instrument to a particular key or pedal by simultaneously holding down the desired instrument name in the display and pressing the key (or pedal) to which the instrument is to be assigned.
When the assignment is complete, the key name and instrument name is displayed at the top of the display. The assignments are saved to the User memory selected in Step 2 (in this example, User 1).
Repeat the operation steps above as necessary to construct your own User Keyboard Percussion set.
To erase one instrument:Simultaneously hold down the [CLEAR] button in the display (ASSIGN Page) and press the key (or pedal) corresponding to the instrument you wish to erase.
6
NOTE
Though eight User Keyboard Percussion setups can be created, they cannot be memorized to Registration Memory. Only on/off data and the Keyboard Percussion Menu are memorized to Registration Memory.
The Keyboard Percussion setting you have created is automatically saved when you switch to another display. While data is being saved, the square at the top left of the display turns light blue for a few seconds. Do not turn the power off while the Keyboard Percussion settings are being saved.
The key to which the instrument is to be assignedInstrument Name
Press the key.
Hold down the Instrument name…
7

ELS-01/01C Owner’s Manual72
5
Rhythm
/Keyboard P
ercussion
To erase all instruments:You can clear all assignments using the [CLEAR] button in the display (ASSIGN Page).
Press, then release the [CLEAR] button. The following display appears, prompting confirmation of the operation.
Press [CLEAR] in the display to erase all data. When [CLEAR] is selected, a “Completed” message momentarily appears on the display.Press [CANCEL] in the display to abort the operation.
● ● ● ● ● ● ● ● ● ● ● ● ● ● ● ● ● ● ● ● ● ● ● ● ● ● ● ● ● ● ● ● ● ● ● ● ● ●
Copying the Keyboard Percussion settings
You can copy the Preset Keyboard Percussion to one of the User locations, or copy from one User location to another. In the instructions below, Preset 1 is copied to User 1.
Press the KEYBOARD PERCUSSION [1] button to copy Preset 1.To copy Preset 1, select the [1] button; to copy Preset 2, select the [2] button. To copy either User location, select button [1] or [2].
Within the Menu buttons, select the User location as the destination — for example, User 1.
1
2
1
2
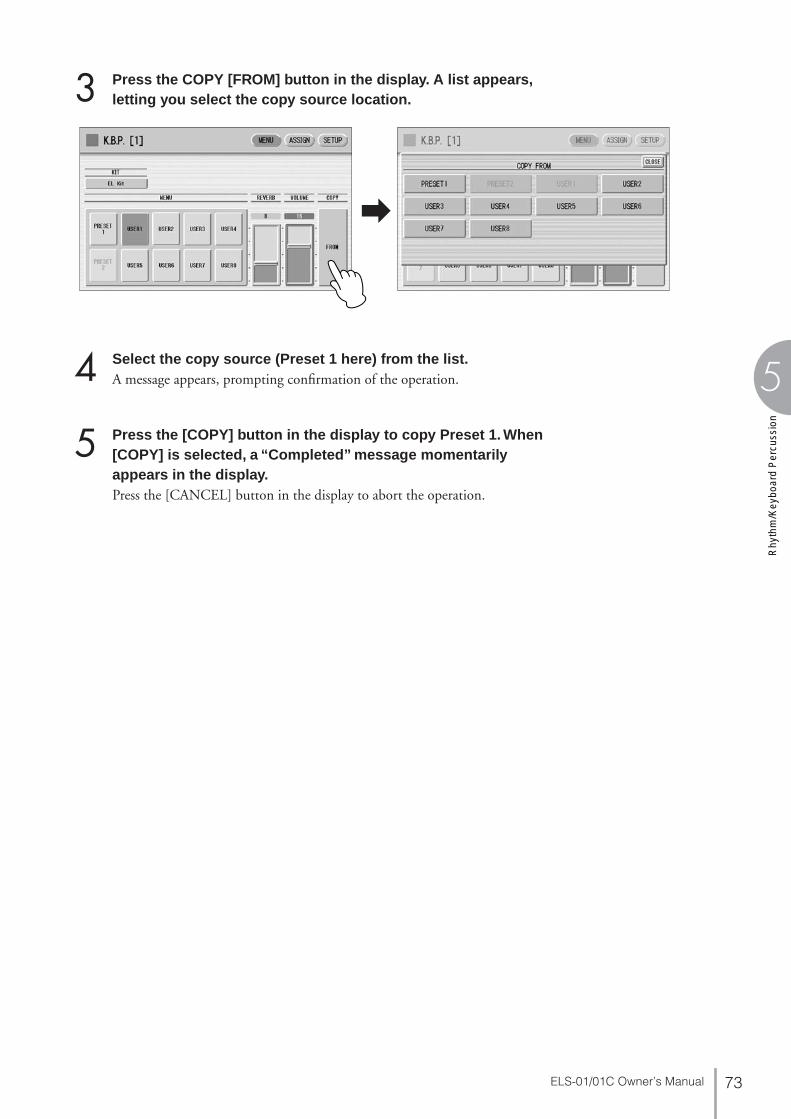
5
Rhy
thm
/Key
boar
d P
ercu
ssio
n
ELS-01/01C Owner’s Manual 73
Press the COPY [FROM] button in the display. A list appears, letting you select the copy source location.
Select the copy source (Preset 1 here) from the list.A message appears, prompting confirmation of the operation.
Press the [COPY] button in the display to copy Preset 1. When [COPY] is selected, a “Completed” message momentarily appears in the display.Press the [CANCEL] button in the display to abort the operation.
3
4
5

ELS-01/01C Owner’s Manual74
5
Rhythm
/Keyboard P
ercussion
● ● ● ● ● ● ● ● ● ● ● ● ● ● ● ● ● ● ● ● ● ● ● ● ● ● ● ● ● ● ● ● ● ● ● ● ● ●
Detailed settings for each percussion instrument
You can independently adjust the settings of pan, pitch, reverb and volume for each instrument. The settings here are system settings that cannot be memorized to Registration memory.
Turn off the volume of the relevant keyboard (the keyboard to which the instrument to be changed is assigned).
Press the [SETUP] button at the top right of the K.B.P. display to call up the SETUP Page.
Press the appropriate key (the key to which the instrument to be changed is assigned).The selected instrument’s name is shown on the display and you can change its settings.
1 PANDetermines the position of the currently selected instrument in the stereo image. Seven pan positions are available.
2 PITCH COARSEAdjusts the pitch of the currently selected instrument by 100 cents.Range: -64 – +63
3 PITCH FINEAdjusts the pitch of the currently selected instrument by one cent, allowing more detailed tuning of the instrument than PITCH COARSE (2).Range: -64 – +63
4 REVERBDetermines the amount of reverb applied to the currently selected instrument.Range: 0 – 24
5 VOLUMEDetermines the volume of the currently selected instrument.Range: 0 – 24
1
2
3
1
2 3 4 5 6
The name of theselected instrument

5
Rhy
thm
/Key
boar
d P
ercu
ssio
n
ELS-01/01C Owner’s Manual 75
6 RESETInitializes settings such as pan, pitch, and reverb to their default values.Pressing the [EXECUTE] button calls up the following display, prompting confirmation of the operation.
Press the [EXECUTE] button in the display to restore (initialize) the default settings. When [EXECUTE] is selected, a “Complete” message momentarily appears on the display.Press the [CANCEL] button in the display to abort the operation.

ELS-01/01C Owner’s Manual76
5
Rhythm
/Keyboard P
ercussion
EL KitCYMBALCrash Cymbal 1Crash Cymbal 2Crash Cym MuteRide Cymbal 1Ride Cymbal 2Ride Cymbal CupOrchestra CymbalOrch Cymbal RollOrch Cymbal MuteCymbal MarchCym Brush ShotTam-TamHI-HATHi-Hat OpenHi-Hat CloseHi-Hat Pedal 1Hi-Hat Pedal 2Analog HH OpenAnalog HH CloseSNARE DRUMSnare Drum LightSnare Drum HeavySnare Drum Rim 1Snare Drum Rim 2SD Accent 1SD Accent 2SD Reverb 1SD Reverb 2Synth Snare DrumOrch Snare DrumSnare Drum RollAnalog SDSNARE BRUSHSD Brush Shot 1SD Brush Shot 2SD Brush RollTOMTom 1Tom 2Tom 3Tom 4Tom Brush Shot 1Tom Brush Shot 2Tom Brush Shot 3Tom Brush Shot 4Synth Tom 1Synth Tom 2Synth Tom 3BASS DRUMBass Drum LightBass Drum HeavyBass Drum AttackSynth Bass DrumBass Drum MarchConcert BDAnalog BD ShortAnalog BD LongCONGA/BONGOConga HighConga LowConga SlapConga MuffConga SlideBongo HighBongo LowBongo SlapBongo MuteCUICA/SURDOCuica HighCuica MiddleCuica LowTamborim OpenTamborim MuteSurdo OpenSurdo MuteSurdo RimSurdo MuffTIMBALES/COWBELLTimbale 1 High
Timbale 1 LowTimbale 2 HighTimbale 2 LowTimbale 3 HighTimbale 3 LowTimbale 4 HighTimbale 4 LowCowbell 1Cowbell 2Cowbell 3Cowbell 4PERCUSSION 1CabasaShakerMaracas HighMaracas LowGuiro ShortGuiro LongWoodblock HighWoodblock MidWoodblock LowClavesCastanetVibraslapPERCUSSION 2Agogo HighAgogo LowTriangle OpenTriangle MuteWindbell DownWindbell UpTambourinePandeiroBellsHand ClapsFinger SnapScratchNoise PercussionPERCUSSION 3Kotsuzumi 1Kotsuzumi 2Kotsuzumi 3Kotsuzumi 4Ohtsuzumi 1Ohtsuzumi 2Taiko 1Taiko 2Ohdaiko 1Ohdaiko 2Kakegoe 1Kakegoe 2Kakegoe 3
Standard Kit 1CYMBALCrash Cymbal 1Crash Cymbal 2Splash CymbalChinese CymbalRide Cymbal 1Ride Cymbal 2Ride Cymbal CupHi-Hat OpenHi-Hat ClosedHi-Hat PedalSNARE DRUMSnareSnare TightSnare SoftSnare RollSide StickOpen Rim ShotBrush TapBrush SlapBrush SwirlBrush Tap SwirlTOMFloor Tom LFloor Tom HLow TomMid Tom L
Mid Tom HHigh TomBASS DRUMKickKick TightKick SoftPERCUSSION 1Conga H OpenConga LConga H MuteBongo HBongo LTimbale HTimbale LCowbellClavesGuiro LongGuiro ShortMaracasVibraslapPERCUSSION 2Surdo MuteSurdo OpenCuica MuteCuica OpenCabasaShakerAgogo HAgogo LSamba Whistle HSamba Whistle LPERCUSSION 3TambourineCastanetJingle BellsBell TreeTriangle OpenTriangle MuteWood Block HWood Block LSticksWhip SlapFinger SnapHand ClapPERCUSSION 4Hi QClick NoiseScratch HScratch LSeq Click LSeq Click HMetronome ClickMetronome Bell
Standard Kit 2CYMBALCrash Cymbal 1Crash Cymbal 2Splash CymbalChinese CymbalRide Cymbal 1Ride Cymbal 2Ride Cymbal CupHi-Hat OpenHi-Hat ClosedHi-Hat PedalSNARE DRUMSnare ShortSnare Tight HSnare Soft 2Snare RollSide Stick LightOpen Rim Shot HBrush TapBrush SlapBrush SwirlBrush Tap SwirlTOMFloor Tom LFloor Tom HLow Tom
Mid Tom LMid Tom HHigh TomBASS DRUMKick ShortKick TightKick SoftPERCUSSION 1Conga H OpenConga LConga H MuteBongo HBongo LTimbale HTimbale LCowbellClavesGuiro LongGuiro ShortMaracasVibraslapPERCUSSION 2Surdo MuteSurdo OpenCuica MuteCuica OpenCabasaShakerAgogo HAgogo LSamba Whistle HSamba Whistle LPERCUSSION 3TambourineCastanetJingle BellsBell TreeTriangle OpenTriangle MuteWood Block HWood Block LSticksWhip SlapFinger SnapHand ClapPERCUSSION 4Hi QClick NoiseScratch HScratch LSeq Click LSeq Click HMetronome ClickMetronome Bell
Hit Kit CYMBALCrash Cymbal 1Crash Cymbal 2Splash CymbalChinese CymbalRide Cymbal 1Ride Cymbal 2Ride Cymbal CupHi-Hat Open 2Hi-Hat Closed 2Hi-Hat Pedal 2SNARE DRUMSnare AmbientSnare Tight 2Snare ElectroSnare RollStick AmbientSnare PitchedBrush TapBrush SlapBrush SwirlBrush Tap SwirlTOMHybrid Tom 1Hybrid Tom 2
● ● ● ● ● ● ● ● ● ● ● ● ● ● ● ● ● ● ● ● ● ● ● ● ● ● ● ● ● ● ● ● ● ● ● ● ● ● ● ● ● ● ● ● ● ● ● ● ● ●
Kit Assign List

5
Rhy
thm
/Key
boar
d P
ercu
ssio
n
ELS-01/01C Owner’s Manual 77
Hybrid Tom 3Hybrid Tom 4Hybrid Tom 5Hybrid Tom 6BASS DRUMKick Tight HKick WetKick Tight LPERCUSSION 1Conga H OpenConga LConga H MuteBongo HBongo LTimbale HTimbale LCowbellClavesGuiro LongGuiro ShortMaracasVibraslapPERCUSSION 2Surdo MuteSurdo OpenCuica MuteCuica OpenCabasaShakerAgogo HAgogo LSamba Whistle HSamba Whistle LPERCUSSION 3Tambourine LightCastanetJingle BellsBell TreeTriangle OpenTriangle MuteWood Block HWood Block LSticksWhip SlapFinger SnapHand ClapPERCUSSION 4Hi QClick NoiseScratch HScratch LSeq Click LSeq Click HMetronome ClickMetronome Bell
Room Kit CYMBALCrash Cymbal 1Crash Cymbal 2Splash CymbalChinese CymbalRide Cymbal 1Ride Cymbal 2Ride Cymbal CupHi-Hat OpenHi-Hat ClosedHi-Hat PedalSNARE DRUMSnare SnappySnare Tight SnapSnare SoftSnare RollSide StickOpen Rim ShotBrush TapBrush SlapBrush SwirlBrush Tap SwirlTOMTom Room 1Tom Room 2Tom Room 3Tom Room 4Tom Room 5
Tom Room 6BASS DRUMKickKick TightKick SoftPERCUSSION 1Conga H OpenConga LConga H MuteBongo HBongo LTimbale HTimbale LCowbellClavesGuiro LongGuiro ShortMaracasVibraslapPERCUSSION 2Surdo MuteSurdo OpenCuica MuteCuica OpenCabasaShakerAgogo HAgogo LSamba Whistle HSamba Whistle LPERCUSSION 3TambourineCastanetJingle BellsBell TreeTriangle OpenTriangle MuteWood Block HWood Block LSticksWhip SlapFinger SnapHand ClapPERCUSSION 4Hi QClick NoiseScratch HScratch LSeq Click LSeq Click HMetronome ClickMetronome Bell
Rock Kit CYMBALCrash Cymbal 1Crash Cymbal 2Splash CymbalChinese CymbalRide Cymbal 1Ride Cymbal 2Ride Cymbal CupHi-Hat OpenHi-Hat ClosedHi-Hat PedalSNARE DRUMSnare RockSnare Rock TightSnare NoisySnare RollSide StickOpen Rim ShotBrush TapBrush SlapBrush SwirlBrush Tap SwirlTOMTom Rock 1Tom Rock 2Tom Rock 3Tom Rock 4Tom Rock 5Tom Rock 6BASS DRUMKick Gate
Kick 2Kick SoftPERCUSSION 1Conga H OpenConga LConga H MuteBongo HBongo LTimbale HTimbale LCowbellClavesGuiro LongGuiro ShortMaracasVibraslapPERCUSSION 2Surdo MuteSurdo OpenCuica MuteCuica OpenCabasaShakerAgogo HAgogo LSamba Whistle HSamba Whistle LPERCUSSION 3TambourineCastanetJingle BellsBell TreeTriangle OpenTriangle MuteWood Block HWood Block LSticksWhip SlapFinger SnapHand ClapPERCUSSION 4Hi QClick NoiseScratch HScratch LSeq Click LSeq Click HMetronome ClickMetronome Bell
Electro Kit CYMBALCrash Cymbal 1Crash Cymbal 2Splash CymbalChinese CymbalRide Cymbal 1Ride Cymbal 2Ride Cymbal CupHi-Hat OpenHi-Hat ClosedHi-Hat PedalSNARE DRUMSnare Noisy 2Snare Noisy 3Snare Snap ElecSnare RollSide StickOpen Rim ShotBrush TapBrush SlapBrush SwirlReverse CymbalTOMTom Electro 1Tom Electro 2Tom Electro 3Tom Electro 4Tom Electro 5Tom Electro 6BASS DRUMKick Gate HeavyKick GateKick 3
PERCUSSION 1Conga H OpenConga LConga H MuteBongo HBongo LTimbale HTimbale LCowbellClavesGuiro LongGuiro ShortMaracasVibraslapPERCUSSION 2Surdo MuteSurdo OpenScratch H 2Scratch L 2CabasaShakerAgogo HAgogo LSamba Whistle HSamba Whistle LPERCUSSION 3TambourineHi Q 2Jingle BellsBell TreeTriangle OpenTriangle MuteWood Block HWood Block LSticksWhip SlapFinger SnapHand ClapPERCUSSION 4Hi QClick NoiseScratch HScratch LSeq Click LSeq Click HMetronome ClickMetronome Bell
Analog Kit CYMBALCrash AnalogCrash Cymbal 2Splash CymbalChinese CymbalRide Cymbal 1Ride Cymbal 2Ride Cymbal CupHat Open AnalogHat Close AnalogHat Close Anlg 2SNARE DRUMSnare AnalogSnare Analog 2Snare Noisy 4Snare RollSide Stick AnlgOpen Rim ShotBrush TapBrush SlapBrush SwirlReverse CymbalTOMTom Analog 1Tom Analog 2Tom Analog 3Tom Analog 4Tom Analog 5Tom Analog 6BASS DRUMKick AnalogKick Anlg ShortKick 3PERCUSSION 1Conga Analog MConga Analog L

ELS-01/01C Owner’s Manual78
5
Rhythm
/Keyboard P
ercussion
Conga Analog HBongo HBongo LTimbale HTimbale LCowbell AnalogClaves 2Guiro LongGuiro ShortMaracas 2VibraslapPERCUSSION 2Surdo MuteSurdo OpenScratch H 2Scratch L 2CabasaShakerAgogo HAgogo LSamba Whistle HSamba Whistle LPERCUSSION 3TambourineHi Q 2Jingle BellsBell TreeTriangle OpenTriangle MuteWood Block HWood Block LSticksWhip SlapFinger SnapHand ClapPERCUSSION 4Hi QClick NoiseScratch HScratch LSeq Click LSeq Click HMetronome ClickMetronome Bell
Dance Kit CYMBALCrash AnalogCrash Cymbal 2Splash CymbalChinese CymbalRide Cymbal 1Ride AnalogRide Cymbal CupHi-Hat Open 3Hi-Hat Closed 3Hat Close Anlg 3SNARE DRUMSnare ClapSnare DrySnare TechnoReverse Dance 2Side Stick AnlgRim GateSnare Analog 3Snare Analog 4Vinyl NoiseReverse CymbalTOMTom Dance 1Tom Dance 2Tom Dance 3Tom Dance 4Tom Dance 5Tom Dance 6BASS DRUMKick TechnoKick Techno LKick Techno QPERCUSSION 1Conga Analog MConga Analog LConga Analog HBongo Analog HBongo Analog L
Timbale HTimbale LCowbell DanceClaves 2Guiro LongGuiro ShortMaracas 2Vibraslap AnalogPERCUSSION 2Kick Dance 1Kick Dance 2Dance Breath 1Dance Breath 2CabasaShakerAgogo HAgogo LSamba Whistle HSamba Whistle LPERCUSSION 3Tambourine AnlgHi Q 2Jingle BellsBell TreeTriangle OpenTriangle MuteDance Perc 3Dance Perc 4Snare Dance 1Whip SlapFinger SnapDance ClapPERCUSSION 4Hi QClick NoiseScratch Dance 1Scratch Dance 2Dance Perc 2Hi Q Dance 1Dance Perc 1Reverse Dance 1
Jazz Kit CYMBALCrash Cymbal 1Crash Cymbal 2Splash CymbalChinese CymbalRide Cymbal 1Ride Cymbal 2Ride Cymbal CupHi-Hat OpenHi-Hat ClosedHi-Hat PedalSNARE DRUMSnare Jazz LSnare Jazz MSnare Jazz HSnare RollSide Stick LightOpen Rim ShotBrush TapBrush SlapBrush SwirlBrush Tap SwirlTOMFloor Tom LFloor Tom HLow TomMid Tom LMid Tom HHigh TomBASS DRUMKick JazzKick TightKick SoftPERCUSSION 1Conga H OpenConga LConga H MuteBongo HBongo LTimbale HTimbale LCowbell
ClavesGuiro LongGuiro ShortMaracasVibraslapPERCUSSION 2Surdo MuteSurdo OpenCuica MuteCuica OpenCabasaShakerAgogo HAgogo LSamba Whistle HSamba Whistle LPERCUSSION 3TambourineCastanetJingle BellsBell TreeTriangle OpenTriangle MuteWood Block HWood Block LSticksWhip SlapFinger SnapHand ClapPERCUSSION 4Hi QClick NoiseScratch HScratch LSeq Click LSeq Click HMetronome ClickMetronome Bell
Brush Kit CYMBALCrash Cymbal 1Crash Cymbal 2Splash CymbalChinese CymbalRide Cymbal 1Ride Cymbal 2Ride Cymbal CupHi-Hat OpenHi-Hat ClosedHi-Hat PedalSNARE DRUMBrush Slap 3Brush Tap 2Brush Slap 2Snare RollSide Stick LightOpen Rim ShotBrush TapBrush SlapBrush SwirlBrush Tap SwirlTOMTom Brush 1Tom Brush 2Tom Brush 3Tom Brush 4Tom Brush 5Tom Brush 6BASS DRUMKick JazzKick TightKick SoftPERCUSSION 1Conga H OpenConga LConga H MuteBongo HBongo LTimbale HTimbale LCowbellClavesGuiro LongGuiro Short
MaracasVibraslapPERCUSSION 2Surdo MuteSurdo OpenCuica MuteCuica OpenCabasaShakerAgogo HAgogo LSamba Whistle HSamba Whistle LPERCUSSION 3TambourineCastanetJingle BellsBell TreeTriangle OpenTriangle MuteWood Block HWood Block LSticksWhip SlapFinger SnapHand ClapPERCUSSION 4Hi QClick NoiseScratch HScratch LSeq Click LSeq Click HMetronome ClickMetronome Bell
Symphony Kit CYMBALHand CymbalHand Cymbal 2Splash CymbalChinese CymbalHand Cymbal SHand Cymbal 2 SRide Cymbal CupHi-Hat OpenHi-Hat ClosedHi-Hat PedalSNARE DRUMBand SnareBand Snare 2Snare SoftSnare RollSide StickOpen Rim ShotBrush TapBrush SlapBrush SwirlBrush Tap SwirlTOMFloor Tom LFloor Tom HLow TomMid Tom LMid Tom HHigh TomBASS DRUMGran Cassa MuteGran CassaKick Soft 2PERCUSSION 1Conga H OpenConga LConga H MuteBongo HBongo LTimbale HTimbale LCowbellClavesGuiro LongGuiro ShortMaracasVibraslap

5
Rhy
thm
/Key
boar
d P
ercu
ssio
n
ELS-01/01C Owner’s Manual 79
PERCUSSION 2Surdo MuteSurdo OpenCuica MuteCuica OpenCabasaShakerAgogo HAgogo LSamba Whistle HSamba Whistle LPERCUSSION 3TambourineCastanetJingle BellsBell TreeTriangle OpenTriangle MuteWood Block HWood Block LSticksWhip SlapFinger SnapHand ClapPERCUSSION 4Hi QClick NoiseScratch HScratch LSeq Click LSeq Click HMetronome ClickMetronome Bell
SFX Kit 1SFXCutting Noise 1Cutting Noise 2String SlapFlute Key ClickShowerThunderWindStreamBubbleFeedGhostMaouDogHorseBird Tweet
SFX Kit 2SFX 1Phone CallTelephone RingWind ChimeDoor SqueakDoor SlamScratch CutScratch H 3LaughScreamPunchHeart BeatFoot StepsSFX 2CarEngnIgnitionCar Tires SquealCar PassingCar CrashSirenTrainJet PlaneStarshipBurstRoller CoasterSubmarineMachine GunLaser GunExplosionFirework
Arabic Kit ARABIC 1Nakarazan DomNakarazan EdgeHager DomHager EdgeZagrouda HZagrouda LArabic Hand ClapDuhulla DomDuhulla TakDuhulla SakDoff DomDoff TakARABIC 2Katem DomKatem TakKatem SakTabla DomTabla Tak 1Tabla Tak 2Tabla SakTabla TikTabla Roll EdgeTabla FlamTabel DomTabel TakARABIC 3Sagat 1Sagat 2Sagat 3Rik DomRik Tak 1Rik Tak 2Rik SakRik TikRik Finger 1Rik Finger 2Rik BrassTremoloCYMBAL/SNARE DRUMCrash Cymbal 1Crash Cymbal 2Ride Cymbal 1Hi-Hat OpenHi-Hat ClosedHi-Hat PedalSnare DrumSnare SoftSide StickTOM/BASS DRUMFloor Tom LFloor Tom HLow TomMid Tom LMid Tom HHigh TomKick SoftPERCUSSIONConga H OpenConga LConga H MuteBongo HBongo LCowbellClavesCabasaTambourine
Pop Latin KitCONGAConga H TipConga H HeelConga H OpenConga H MuteConga H SlapOpenConga H SlapConga H SlapMuteConga L TipConga L HeelConga L OpenConga L MuteConga L SlapOpenConga L SlapConga L Slide
BONGOBongo H Open 1 fBongo H Open 3 fBongo H RimBongo H TipBongo H HeelBongo H SlapBongo L Open 1 fBongo L Open 3 fBongo L RimBongo L TipBongo L HeelBongo L SlapPERCUSSION 1Timbale H OpenTimbale L OpenPaila HPaila LCowbell TopTambourineGuiro LongGuiro ShortMaracasCuica OpenCuica MuteCabasaShakerPERCUSSION 2Triangle OpenTriangle MuteWind ChimeHand Clap
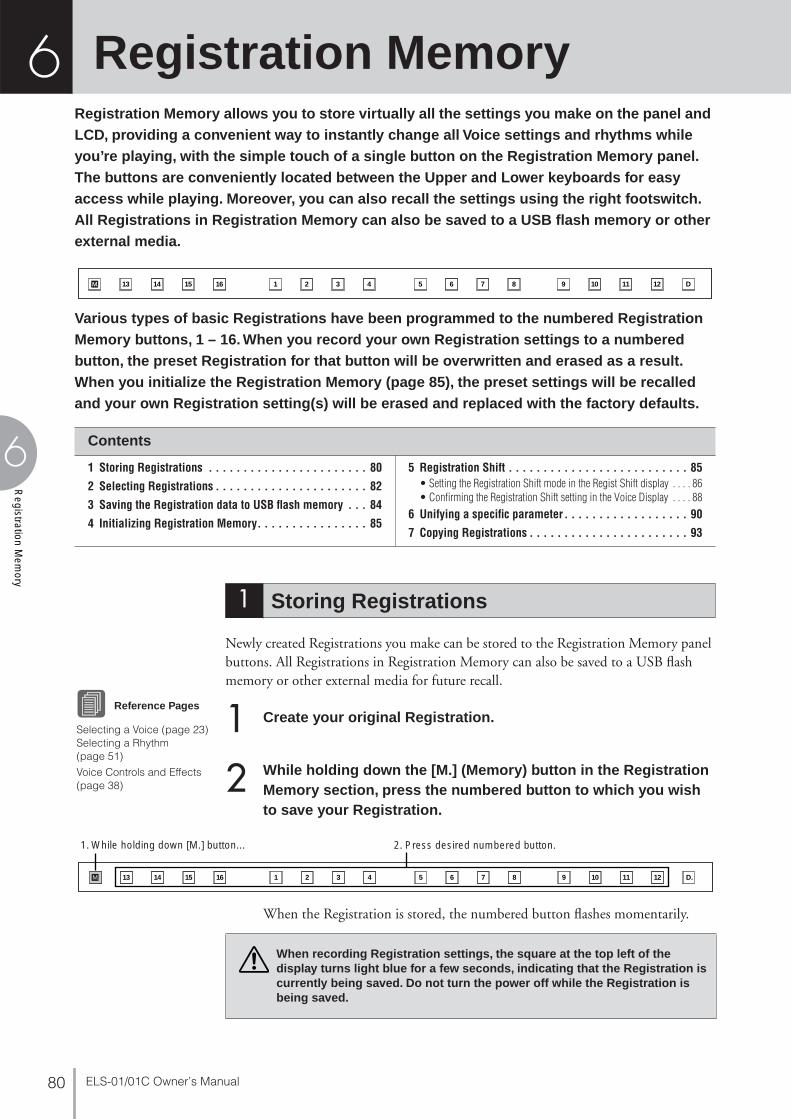
ELS-01/01C Owner’s Manual80
6
Registration M
emory
Registration MemoryRegistration Memory allows you to store virtually all the settings you make on the panel and LCD, providing a convenient way to instantly change all Voice settings and rhythms while you’re playing, with the simple touch of a single button on the Registration Memory panel. The buttons are conveniently located between the Upper and Lower keyboards for easy access while playing. Moreover, you can also recall the settings using the right footswitch. All Registrations in Registration Memory can also be saved to a USB flash memory or other external media.
Various types of basic Registrations have been programmed to the numbered Registration Memory buttons, 1 – 16. When you record your own Registration settings to a numbered button, the preset Registration for that button will be overwritten and erased as a result. When you initialize the Registration Memory (page 85), the preset settings will be recalled and your own Registration setting(s) will be erased and replaced with the factory defaults.
Newly created Registrations you make can be stored to the Registration Memory panel buttons. All Registrations in Registration Memory can also be saved to a USB flash memory or other external media for future recall.
Create your original Registration.
While holding down the [M.] (Memory) button in the Registration Memory section, press the numbered button to which you wish to save your Registration.
When the Registration is stored, the numbered button flashes momentarily.
13 14 15 16 1 2 3 4 5 6 7 8 9 10 11 12 D
Contents
1 Storing Registrations . . . . . . . . . . . . . . . . . . . . . . . 80
2 Selecting Registrations . . . . . . . . . . . . . . . . . . . . . . 82
3 Saving the Registration data to USB flash memory . . . 84
4 Initializing Registration Memory. . . . . . . . . . . . . . . . 85
5 Registration Shift . . . . . . . . . . . . . . . . . . . . . . . . . . 85• Setting the Registration Shift mode in the Regist Shift display . . . . 86• Confirming the Registration Shift setting in the Voice Display . . . . 88
6 Unifying a specific parameter. . . . . . . . . . . . . . . . . . 90
7 Copying Registrations . . . . . . . . . . . . . . . . . . . . . . . 93
1 Storing Registrations
1Reference Pages
Selecting a Voice (page 23)Selecting a Rhythm (page 51)
Voice Controls and Effects (page 38) 2
13 14 15 16 1 2 3 4 5 6 7 8 9 10 11 12 D.
2. Press desired numbered button.1. While holding down [M.] button...
When recording Registration settings, the square at the top left of the display turns light blue for a few seconds, indicating that the Registration is currently being saved. Do not turn the power off while the Registration is being saved.
6

6
Reg
istr
atio
n M
emor
y
ELS-01/01C Owner’s Manual 81
Functions and settings that cannot be memorized:
The following settings cannot be stored to a Registration Memory number.• Pitch (page 193)• MIDI Control settings (fpage 221)• Mic. Volume (page 215)• Mic. Reverb (page 215)• LCD related settings (page 15)• Internet Direct Connection settings (page 203)• Score related settings except Next Page (page 123)
The following settings common to all Registration Memory numbers 1 – 16 and cannot be stored individually for each number. • Transpose (page 193)• Attack mode in Organ Flute Voices (page 36)• Registration Shift (page 85)• Auto Fill setting (page 54)• Reverb type (page 44)• User Voices (page 141)• User rhythms (page 167)• User Keyboard Percussion (page 70)• Rhythm Sequences (page 174)• Disable setting (page 82)• Disable mode (page 83)• Next Page setting of score setting (page 123)
Reference Page
Saving Registrations as Registration Data (File); (page 111)

ELS-01/01C Owner’s Manual82
6
Registration M
emory
Simply press the numbered button that corresponds to the Registration you wish to select.
• You can also recall Registrations by using the right footswitch. This function is called “Registration Shift” (page 85).
• You can also program the Registrations to change automatically at specific points within the Rhythm Sequence. This function is called “Registration Sequence” (page 179).
2 Selecting Registrations
Using the [D.] (Disable) button:
Rhythm and automatic accompaniment patterns also change when you select different Registration Memory buttons. Pressing the [D.] (Disable) button allows you to keep the same rhythm, accompaniment patterns, tempo, and so on throughout all your Registration changes, or make your own rhythm selections if you want to.
The particular settings that do not change when the [D.] (disable) button is on depend on the Disable mode setting. For details on the Disable mode, see “Selecting Disable Mode” on page 83.
7 8 9 10 11 12 D.
Disable Button
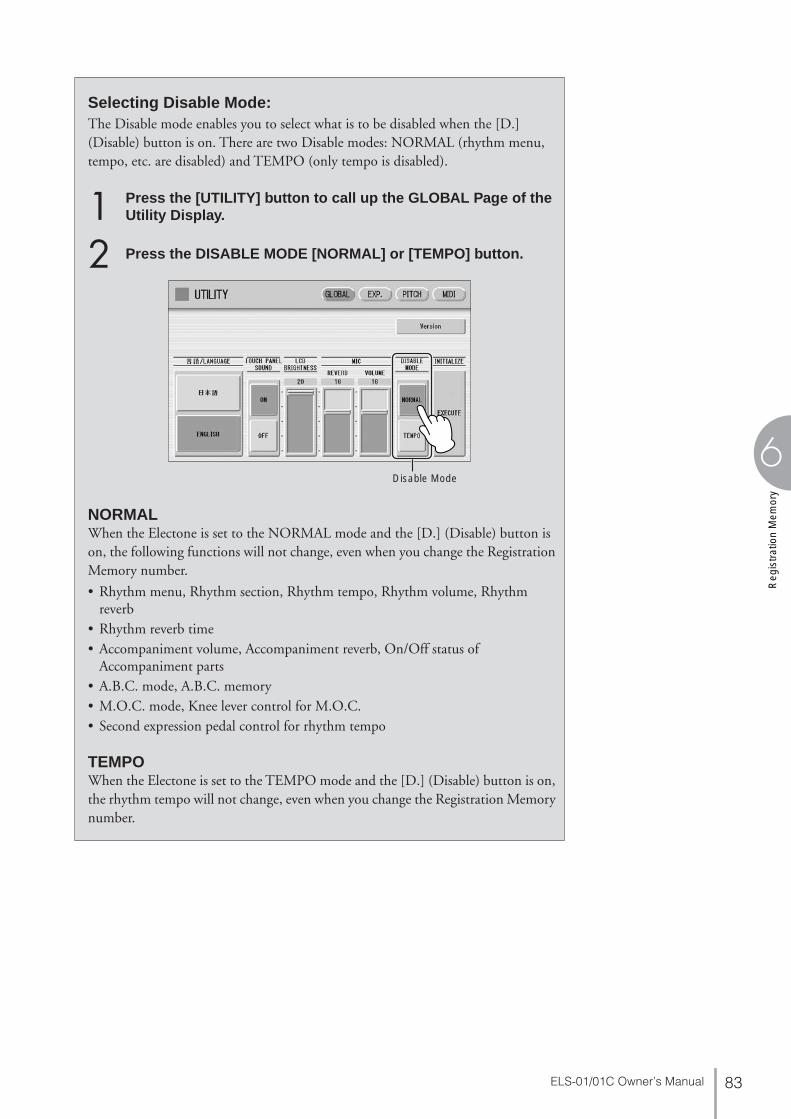
6
Reg
istr
atio
n M
emor
y
ELS-01/01C Owner’s Manual 83
Selecting Disable Mode:The Disable mode enables you to select what is to be disabled when the [D.] (Disable) button is on. There are two Disable modes: NORMAL (rhythm menu, tempo, etc. are disabled) and TEMPO (only tempo is disabled).
Press the [UTILITY] button to call up the GLOBAL Page of the Utility Display.
Press the DISABLE MODE [NORMAL] or [TEMPO] button.
NORMALWhen the Electone is set to the NORMAL mode and the [D.] (Disable) button is on, the following functions will not change, even when you change the Registration Memory number.
• Rhythm menu, Rhythm section, Rhythm tempo, Rhythm volume, Rhythm reverb
• Rhythm reverb time• Accompaniment volume, Accompaniment reverb, On/Off status of
Accompaniment parts• A.B.C. mode, A.B.C. memory• M.O.C. mode, Knee lever control for M.O.C.• Second expression pedal control for rhythm tempo
TEMPOWhen the Electone is set to the TEMPO mode and the [D.] (Disable) button is on, the rhythm tempo will not change, even when you change the Registration Memory number.
12
Disable Mode
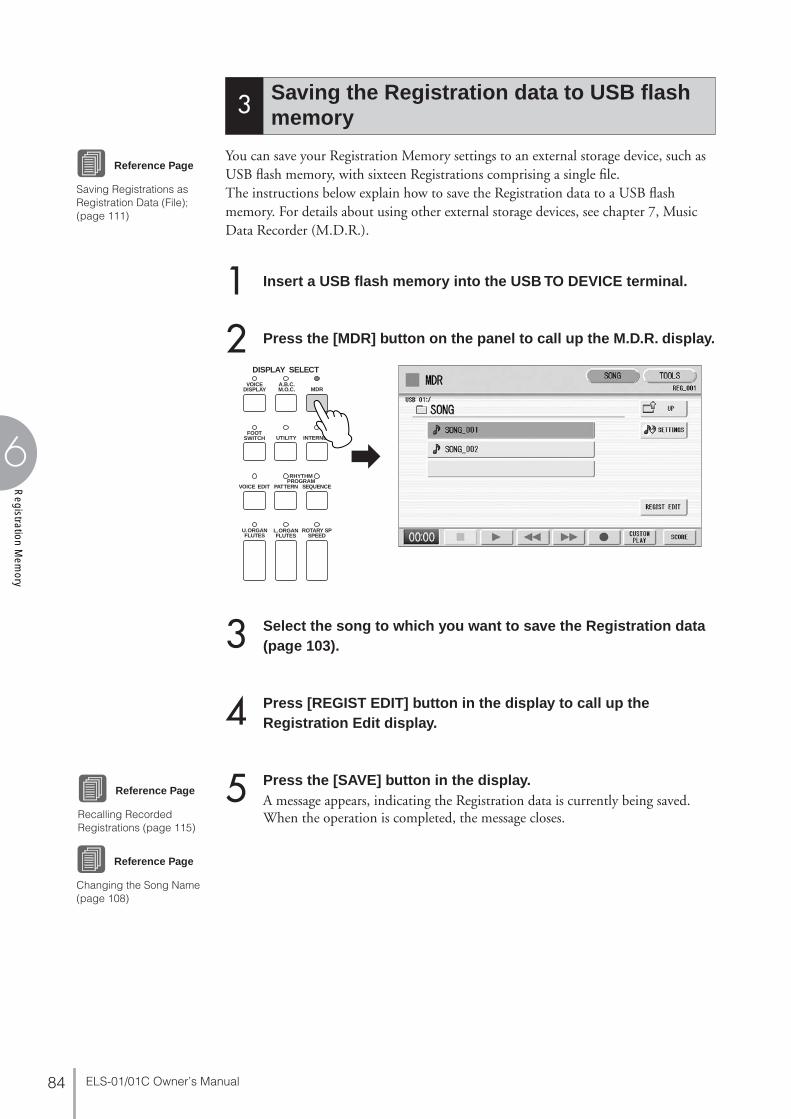
ELS-01/01C Owner’s Manual84
6
Registration M
emory
You can save your Registration Memory settings to an external storage device, such as USB flash memory, with sixteen Registrations comprising a single file.The instructions below explain how to save the Registration data to a USB flash memory. For details about using other external storage devices, see chapter 7, Music Data Recorder (M.D.R.).
Insert a USB flash memory into the USB TO DEVICE terminal.
Press the [MDR] button on the panel to call up the M.D.R. display.
Select the song to which you want to save the Registration data (page 103).
Press [REGIST EDIT] button in the display to call up the Registration Edit display.
Press the [SAVE] button in the display.A message appears, indicating the Registration data is currently being saved. When the operation is completed, the message closes.
3 Saving the Registration data to USB flash memory
Reference Page
Saving Registrations as Registration Data (File); (page 111)
12
DISPLAY SELECT
VOICEDISPLAY
FOOTSWITCH
RHYTHMPROGRAM
UTILITY INTERNET
A.B.C.M.O.C. MDR
VOICE EDIT PATTERN SEQUENCE
U.ORGANFLUTES
L.ORGANFLUTES
ROTARY SPSPEED
3
4
5Reference Page
Recalling Recorded Registrations (page 115)
Reference Page
Changing the Song Name (page 108)

6
Reg
istr
atio
n M
emor
y
ELS-01/01C Owner’s Manual 85
Deleting all Registration data in Registration Memory initializes the Registration Memory. Be careful when using this operation, since it erases all your existing data. In order to avoid inadvertently losing your important data, save it to an external storage device.
Press the [UTILITY] button on the panel to call up the GLOBAL Page in the Utility display.
Press the INITIALIZE [EXECUTE] button on the right side in the display.The message “Are you sure you want to initialize Registration data?” appears. Press [INITIALIZE] to actually initialize the data. When the operation is complete, the Electone will be restarted.Press [CANCEL] to cancel the operation.
The Registration Shift function allows you to change Registrations without taking your hands from the keyboards. By using the Right Footswitch on the expression pedal, you can “jump” to a specified Registration or step through the panel Registrations in sequence, either in numeric order or in any order you specify.Registration Shift has three modes: Shift, Jump and User. These are set in the Regist Shift display. You can also view and check the Registration Shift mode in the Voice Display.
4 Initializing Registration Memory
Reference Page
Factory Set (Initializing the Electone); (page 21)
5 Registration Shift
1DISPLAY SELECT
VOICEDISPLAY
FOOTSWITCH
RHYTHMPROGRAM
UTILITY INTERNET
A.B.C.M.O.C. MDR
VOICE EDIT PATTERN SEQUENCE
U.ORGANFLUTES
L.ORGANFLUTES
ROTARY SPSPEED
2

ELS-01/01C Owner’s Manual86
6
Registration M
emory
Setting the Registration Shift mode in the Regist Shift
● ● ● ● ● ● ● ● ● ● ● ● ● ● ● ● ● ● ● ● ● ● ● ● ● ● ● ● ● ● ● ● ● ● ● ● ● ●
display
Press the [FOOT SWITCH] button on the panel.
Press the [RIGHT] button at the top right of the display to call up the RIGHT Page (Regist Shift display).
1 OFFTurns off the Registration Shift assignment. When you select OFF, you cannot change Registrations by using the Right Footswitch.
2 SHIFTIn the Shift mode, each press of the Right Footswitch selects the Registration Memory presets in their numerical order. After the last Registration is reached, the function ‘wraps around’ to select the first preset again. The numbered buttons light up as they are selected.
3 JUMPPressing the Right Footswitch jumps to select the designated panel Registration.You can set the Jump “destination” with buttons in the display or the Data Control dial.
1
2
DISPLAY SELECT
VOICEDISPLAY
FOOTSWITCH
RHYTHMPROGRAM
UTILITY INTERNET
A.B.C.M.O.C. MDR
VOICE EDIT PATTERN SEQUENCE
U.ORGANFLUTES
L.ORGANFLUTES
ROTARY SPSPEED
1 2 3 4
REGIST SHIFT Display
Registration number of the destination

6
Reg
istr
atio
n M
emor
y
ELS-01/01C Owner’s Manual 87
4 USERIn the User mode, each press of the Right Footswitch selects Registrations according to the order you’ve specified.
To set the User Registration order:1 Press the desired numbered button in the Registration Memory
section.2 Press the [SET] button in the display.
The Registration number appears in the display, indicating that the Registration is entered.
3 Repeat the above procedure 1 through 2 to set the Registration order.
1 POSITIONThese are cursor controls used to move the cursor (colored orange) along the Registration row in the display. Entered Registration numbers are shown in boxes, while the numbers in the row above indicate the position in the sequence (in other words, the number of successive presses of the Right Footswitch). Up to 80 steps (Registrations) can be memorized.
Moves the cursor to the first position.Moves the cursor one step to the left.Moves the cursor one step to the right.Moves the cursor five steps to the right.
2 DATAThese are data controls used to enter and delete Registration numbers in the Registration row.
SET: For initially entering a Registration number to a blank space in the Registration row, or for replacing a number at the current cursor position.To enter a number, press the desired Registration Memory button (the selected button will light), then press [SET] in the display. The entered Registration number will appear in the Registration row. After using SET to enter Registrations, the cursor can be moved among the numbers.
INSERT: For inserting a Registration number just before the current cursor position.To perform the operation, first move the cursor to a numbered position. Then, press the desired Registration Memory button (the selected button will light), and press [INSERT] in the display. The new Registration number is inserted at the cursor position and all other numbers to the right of the cursor are moved to accommodate the new numbers.Registration numbers cannot be entered beyond the Registration Shift function’s capacity of 80. If the insert operation exceeds this capacity, a “Data Full” message appears and the operation cannot be executed.
3
1 2
Registration row
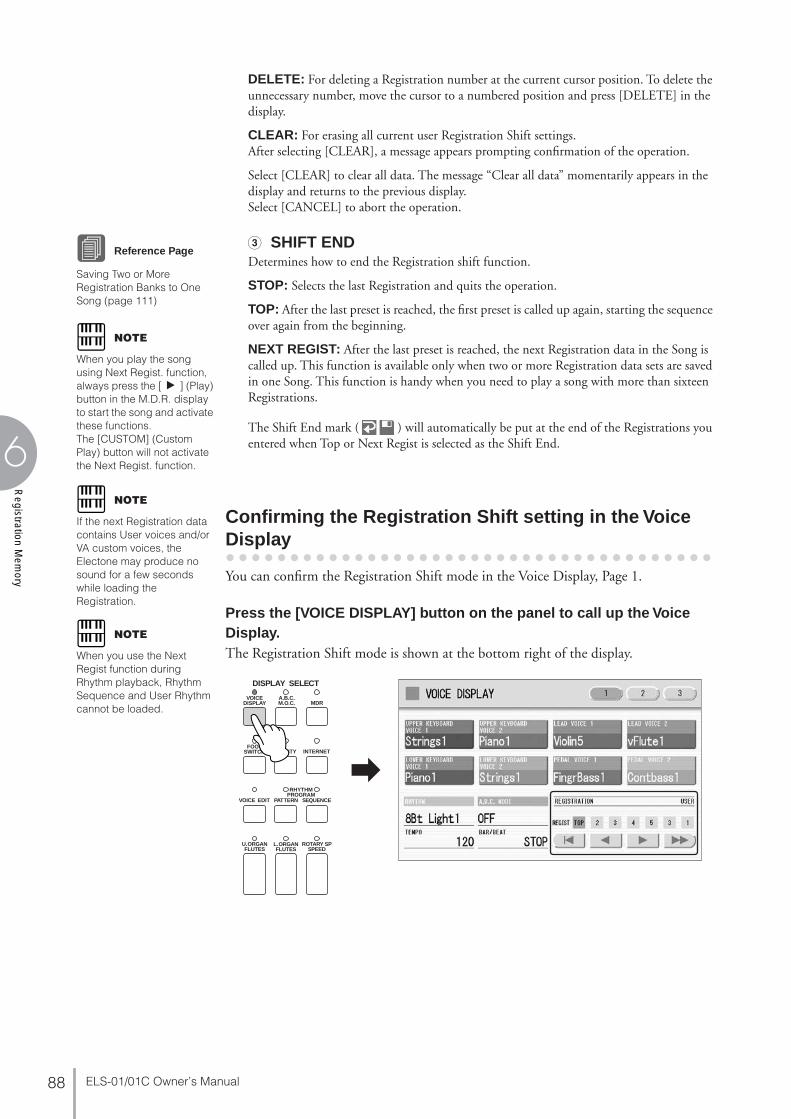
ELS-01/01C Owner’s Manual88
6
Registration M
emory
DELETE: For deleting a Registration number at the current cursor position. To delete the unnecessary number, move the cursor to a numbered position and press [DELETE] in the display.
CLEAR: For erasing all current user Registration Shift settings.After selecting [CLEAR], a message appears prompting confirmation of the operation.
Select [CLEAR] to clear all data. The message “Clear all data” momentarily appears in the display and returns to the previous display.Select [CANCEL] to abort the operation.
3 SHIFT ENDDetermines how to end the Registration shift function.
STOP: Selects the last Registration and quits the operation.
TOP: After the last preset is reached, the first preset is called up again, starting the sequence over again from the beginning.
NEXT REGIST: After the last preset is reached, the next Registration data in the Song is called up. This function is available only when two or more Registration data sets are saved in one Song. This function is handy when you need to play a song with more than sixteen Registrations.
The Shift End mark ( ) will automatically be put at the end of the Registrations you entered when Top or Next Regist is selected as the Shift End.
Confirming the Registration Shift setting in the Voice
● ● ● ● ● ● ● ● ● ● ● ● ● ● ● ● ● ● ● ● ● ● ● ● ● ● ● ● ● ● ● ● ● ● ● ● ● ●
Display
You can confirm the Registration Shift mode in the Voice Display, Page 1.
Press the [VOICE DISPLAY] button on the panel to call up the Voice Display.The Registration Shift mode is shown at the bottom right of the display.
Reference Page
Saving Two or More Registration Banks to One Song (page 111)
NOTE
When you play the song using Next Regist. function, always press the [F] (Play) button in the M.D.R. display to start the song and activate these functions. The [CUSTOM] (Custom Play) button will not activate the Next Regist. function.
NOTE
If the next Registration data contains User voices and/or VA custom voices, the Electone may produce no sound for a few seconds while loading the Registration.
NOTE
When you use the Next Regist function during Rhythm playback, Rhythm Sequence and User Rhythm cannot be loaded.
DISPLAY SELECT
VOICEDISPLAY
FOOTSWITCH
RHYTHMPROGRAM
UTILITY INTERNET
A.B.C.M.O.C. MDR
VOICE EDIT PATTERN SEQUENCE
U.ORGANFLUTES
L.ORGANFLUTES
ROTARY SPSPEED

6
Reg
istr
atio
n M
emor
y
ELS-01/01C Owner’s Manual 89
Registration Shift, OFF:
The current Registration number is displayed.
Registration Shift, in “SHIFT” mode:
The current Registration number (left) and the next number (right) are displayed.
Registration Shift, in “JUMP” mode:
The current Registration number (left) and the destination number (right) will be displayed. You can change the destination number even in the middle of the performance by using the buttons in the display or the Data Control dial.
Registration Shift, in “USER” mode:
Indicates the current position of the Registration Shift. You can change the Registration by moving the cursor (in orange) right/left, using the displayed buttons or the Data Control dial. This is handy if you’ve inadvertently advanced the shift setting in the middle of your performance. The user Registration settings cannot be edited here.
Moves the cursor to the first position. Moves the cursor one step to the left and selects the next Registration. Moves the cursor one step to the right and selects the previous Registration. Moves the cursor five step to the right and selects the Registration.
Current Registration Next Registration
Destination number can be changed.
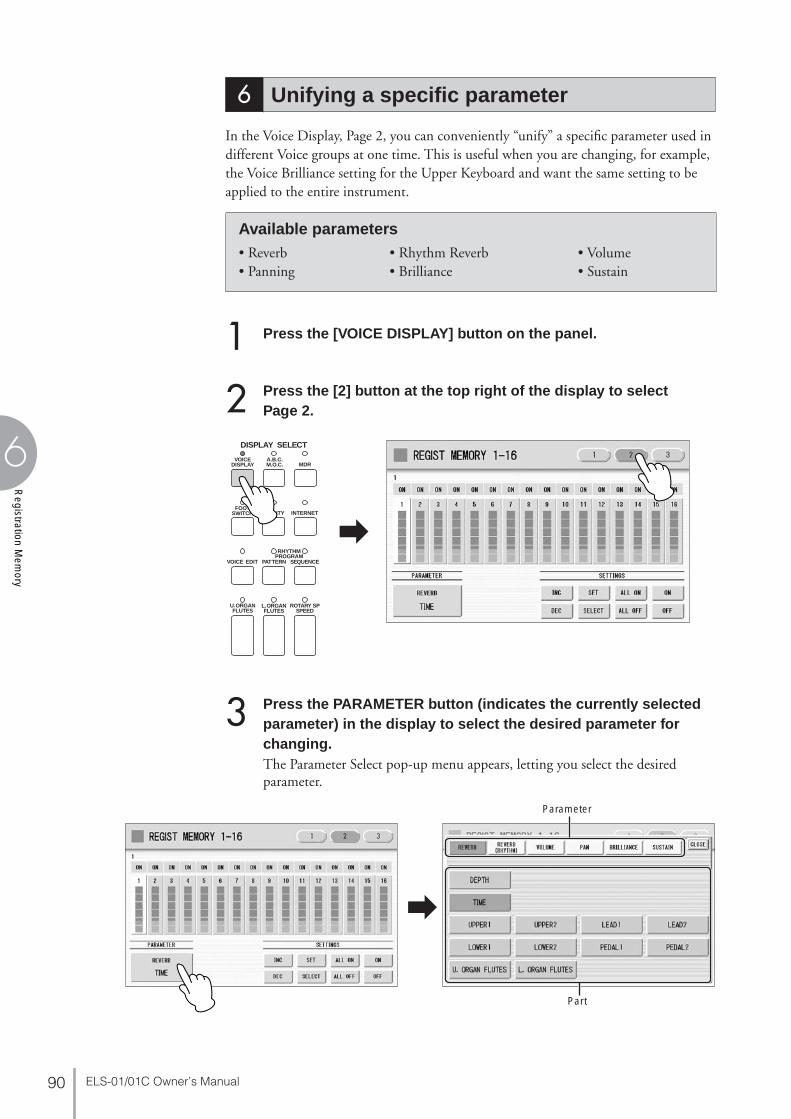
ELS-01/01C Owner’s Manual90
6
Registration M
emory
In the Voice Display, Page 2, you can conveniently “unify” a specific parameter used in different Voice groups at one time. This is useful when you are changing, for example, the Voice Brilliance setting for the Upper Keyboard and want the same setting to be applied to the entire instrument.
Press the [VOICE DISPLAY] button on the panel.
Press the [2] button at the top right of the display to select Page 2.
Press the PARAMETER button (indicates the currently selected parameter) in the display to select the desired parameter for changing.The Parameter Select pop-up menu appears, letting you select the desired parameter.
6 Unifying a specific parameter
Available parameters• Reverb • Rhythm Reverb • Volume• Panning • Brilliance • Sustain
1
2DISPLAY SELECT
VOICEDISPLAY
FOOTSWITCH
RHYTHMPROGRAM
UTILITY INTERNET
A.B.C.M.O.C. MDR
VOICE EDIT PATTERN SEQUENCE
U.ORGANFLUTES
L.ORGANFLUTES
ROTARY SPSPEED
3
Parameter
Part

6
Reg
istr
atio
n M
emor
y
ELS-01/01C Owner’s Manual 91
Select the parameter and part in the Parameter Select pop-up menu. After selecting the desired parameter, the pop-up menu automatically closes.The amount of the selected parameter for each Registration is shown in the display.
Select the targeted Registration numbers and turn them on.
Press the targeted Registration in the display and turn it on with the SETTINGS buttons: ALL ON, ALL OFF, ON, OFF, and SELECT.
ALL ON: Selects all Registration memory numbers.
ALL OFF: Cancels all Registration memory numbers.
ON: Sets the currently selected Registration memory number to “ON.”
OFF: Sets the currently selected Registration memory number to “OFF.”
SELECT: Turns on the Registration memory numbers that contain the same Voice as the one which is currently set in the Registration at the cursor position. The targeted Registration numbers are underlined.
Parameter valuefor each
Registration
Selectedparameter
4Parameters in Registrations set to ON will be changed.

ELS-01/01C Owner’s Manual92
6
Registration M
emory
Unifies the currently turned-on parameter’s values.You unify the relevant parameter values in each Registration memory number or offset them. Keep in mind that you cannot restore the original data once you change the parameter’s value.
Unifying the currently turned-on parameter’s value:Pressing [SET] unifies the currently turned-on parameter’s values to the one in the currently selected Registration (at the cursor position). A message appears prompting you to confirm the operation.
To continue the operation, select [UNIFY]. Select [CANCEL] to abort the operation.
Offsetting the currently turned-on parameter’s value.Pressing the [+]/[-] buttons in the display or using the Data Control dial offsets the currently turned-on parameter’s value. If you select Pan as the parameter, [E]/[F] buttons are shown instead of [+]/[-].If you change the value, and if parameter values for some Registration memory number reach the maximum or minimum, the following message appears.
In this case, pressing [OK] continues the operation, ignoring those parameters at maximum or minimum value. Pressing [CANCEL] aborts the operation.
5

6
Reg
istr
atio
n M
emor
y
ELS-01/01C Owner’s Manual 93
In the Voice Display, Page 3, you can copy a Registration stored to a specific Registration Memory number to another number on a specific section basis (Voices, rhythm, keyboard percussion). (The function is called Regist Section Copy.) This is useful, for example, when you want the upper keyboard Voice in Registration number 4 to be the same as in Registration number 1.
Press the [VOICE DISPLAY] button on the panel to call up the Voice Display.
Press the [3] button at the top right of the display to call up Page 3.
Press the COPY FROM [REGIST] number button and select the Registration number that you wish to copy.To abort the operation press the [CLOSE] button.
7 Copying Registrations
12
DISPLAY SELECT
VOICEDISPLAY
FOOTSWITCH
RHYTHMPROGRAM
UTILITY INTERNET
A.B.C.M.O.C. MDR
VOICE EDIT PATTERN SEQUENCE
U.ORGANFLUTES
L.ORGANFLUTES
ROTARY SPSPEED
3
Registration number

ELS-01/01C Owner’s Manual94
6
Registration M
emory
Press the COPY FROM [SECTION] button and select the Regist Section that you wish to copy.To abort the operation press the [CLOSE] button.
In the same way, select the COPY TO Registration number and Regist Section.The COPY TO Regist Section depends on the Regist Section selected for COPY FROM.
Press the [COPY EXECUTE] button at the bottom right in the display.The following display appears, prompting confirmation of the operation.
Press the [COPY] button in the display to copy the Registration and a message momentarily appears in the display indicating that the Registration has been copied.Select [CANCEL] to abort the operation.
4
Section
5NOTE
If you change the source Regist Section after changing the destination Regist Section the destination may automatically change to the section selected as the source Regist Section.
6
7

ELS-01/01C Owner’s Manual 95
Mus
ic D
ata
Rec
orde
r (M
DR
)
7
Music Data Recorder (MDR)The Music Data Recorder (M.D.R.) is a sophisticated recording system built into the Electone that lets you record your performances and Registration settings to a USB flash memory or other external media. If you install the optional floppy disk drive such as the UD-FD01 to the Electone, you can record your performances/settings to floppy disks. Before using an external media such as USB flash memory, carefully read “Precautions when using the USB TO DEVICE terminal” section on page 100.
Press the [MDR] button in the panel to call up the M.D.R. display. All operations related to the M.D.R., such as recording and playing your performances, can be done in the M.D.R. display.
Pressing any button other than the [MDR] button while the M.D.R. display is open exits from the M.D.R. display. If you exit from the function inadvertently, simply press the [MDR] button again to recall the M.D.R. display.
All the instructions in this chapter are related to the M.D.R. display. To call up the M.D.R. functions and the M.D.R. display, press the [MDR] button.
Contents
1 Calling Up the M.D.R. Display . . . . . . . . . . . . . . . . 95
2 Using the LCD Display . . . . . . . . . . . . . . . . . . . . . . 96• Song Icons . . . . . . . . . . . . . . . . . . . . . . . . . . . . . . . . . . . . . . . . . . . . 98• Precautions when using the USB TO DEVICE terminal . . . . . . . . . . 100• Handling the floppy disk drive (FDD) and floppy disks . . . . . . . . . . 101
3 Formatting External Media . . . . . . . . . . . . . . . . . . 102
4 Selecting a Song . . . . . . . . . . . . . . . . . . . . . . . . . 103
5 Recording . . . . . . . . . . . . . . . . . . . . . . . . . . . . . 105• Recording your performance. . . . . . . . . . . . . . . . . . . . . . . . . . . . . . 105• Re-recording (Retry) . . . . . . . . . . . . . . . . . . . . . . . . . . . . . . . . . . . . 106• Recording each part separately . . . . . . . . . . . . . . . . . . . . . . . . . . . . 106• Punch-in Recording . . . . . . . . . . . . . . . . . . . . . . . . . . . . . . . . . . . . 108
6 Changing the Song Name . . . . . . . . . . . . . . . . . . . 108
7 Saving Registrations as Registration Data (File) . . . 111• Saving Two or More Registration Banks to One Song . . . . . . . . . . . 111• Replacing Registrations . . . . . . . . . . . . . . . . . . . . . . . . . . . . . . . . . 112
• Next Regist (Registration) Settings (Changing the order of the Registration data) . . . . . . . . . . . . . . . . . . . . . . . . . . . . . . . . . . . . . . 113
8 Recalling Recorded Registrations . . . . . . . . . . . . . 115
9 Playing Back a Song . . . . . . . . . . . . . . . . . . . . . . 117• Playing Back the Selected Part(s) . . . . . . . . . . . . . . . . . . . . . . . . . . 118• Fast Forward, Rewind and Pause. . . . . . . . . . . . . . . . . . . . . . . . . . . 119• Changing the Tempo . . . . . . . . . . . . . . . . . . . . . . . . . . . . . . . . . . . . 119• Repeat Playback . . . . . . . . . . . . . . . . . . . . . . . . . . . . . . . . . . . . . . . 120
10 Displaying the Score . . . . . . . . . . . . . . . . . . . . . . 122• Changing the score contents and settings . . . . . . . . . . . . . . . . . . . . 123
11 Other Functions (Tools) . . . . . . . . . . . . . . . . . . . . 124• Song Copy . . . . . . . . . . . . . . . . . . . . . . . . . . . . . . . . . . . . . . . . . . . 124• Song Delete. . . . . . . . . . . . . . . . . . . . . . . . . . . . . . . . . . . . . . . . . . . 126• Converting to XG. . . . . . . . . . . . . . . . . . . . . . . . . . . . . . . . . . . . . . . 128• Converting ELS format to EL . . . . . . . . . . . . . . . . . . . . . . . . . . . . . . 129• Converting EL format to ELS . . . . . . . . . . . . . . . . . . . . . . . . . . . . . . 129• Checking the Remaining Memory . . . . . . . . . . . . . . . . . . . . . . . . . . 130
1 Calling Up the M.D.R. Display
NOTE
The items shown in the display and their order differ depending on the connected external media.
DISPLAY SELECT
VOICEDISPLAY
FOOTSWITCH
RHYTHMPROGRAM
UTILITY INTERNET
A.B.C.M.O.C. MDR
VOICE EDIT PATTERN SEQUENCE
U.ORGANFLUTES
L.ORGANFLUTES
ROTARY SPSPEED
7
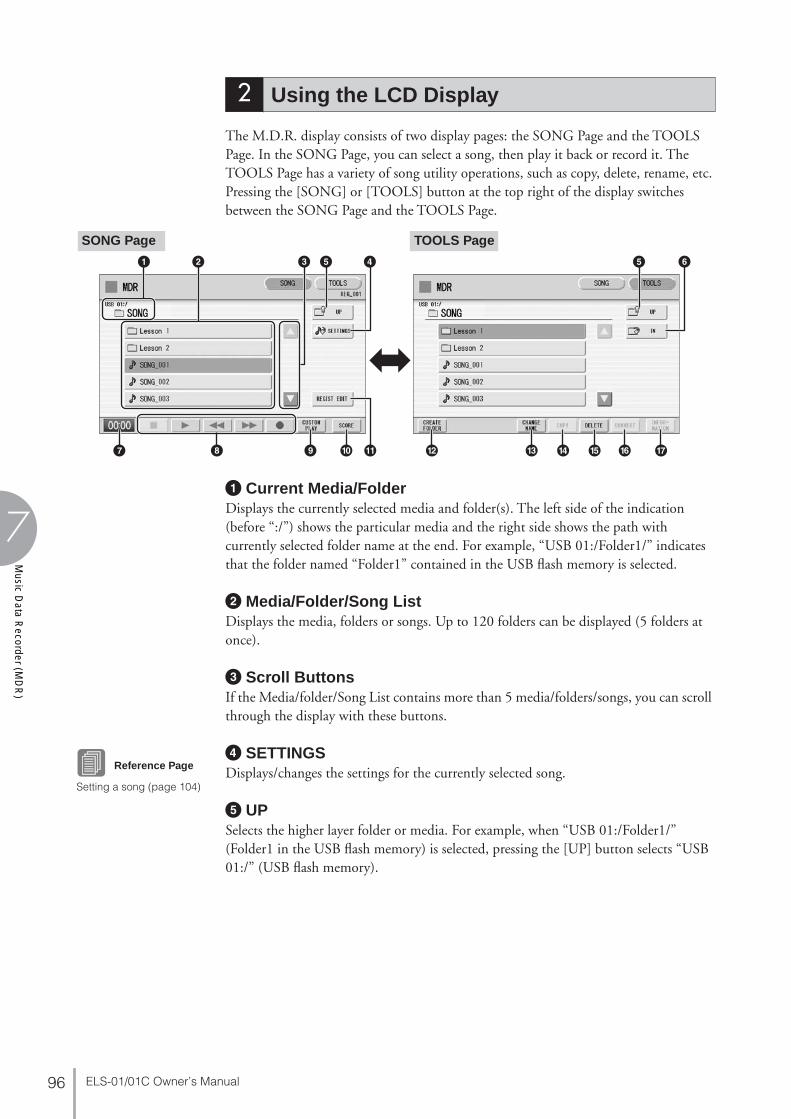
ELS-01/01C Owner’s Manual96
Music D
ata Recorder (M
DR
)
7
The M.D.R. display consists of two display pages: the SONG Page and the TOOLS Page. In the SONG Page, you can select a song, then play it back or record it. The TOOLS Page has a variety of song utility operations, such as copy, delete, rename, etc.Pressing the [SONG] or [TOOLS] button at the top right of the display switches between the SONG Page and the TOOLS Page.
1 Current Media/FolderDisplays the currently selected media and folder(s). The left side of the indication (before “:/”) shows the particular media and the right side shows the path with currently selected folder name at the end. For example, “USB 01:/Folder1/” indicates that the folder named “Folder1” contained in the USB flash memory is selected.
2 Media/Folder/Song ListDisplays the media, folders or songs. Up to 120 folders can be displayed (5 folders at once).
3 Scroll ButtonsIf the Media/folder/Song List contains more than 5 media/folders/songs, you can scroll through the display with these buttons.
4 SETTINGSDisplays/changes the settings for the currently selected song.
5 UPSelects the higher layer folder or media. For example, when “USB 01:/Folder1/” (Folder1 in the USB flash memory) is selected, pressing the [UP] button selects “USB 01:/” (USB flash memory).
2 Using the LCD Display
1
7 8 9 ) @ # $ % ^ &!
2 3 55 4 6
SONG Page TOOLS Page
Reference Page
Setting a song (page 104)

ELS-01/01C Owner’s Manual 97
Mus
ic D
ata
Rec
orde
r (M
DR
)
7
6 INSelects the next lower (or deeper) layer folder or media. For example, when “USB 01:/Folder1/” (Folder1 in the USB flash memory) is selected, pressing the [IN] button selects “USB 01:/Folder1/SONG/” (the SONG folder contained in Folder1 of the USB flash memory).
7 Elapsed TimeDisplays the elapsed time when recording/playing back a song (up to 59 min. 59 sec.).
8 Song ControlControls song recording, playback, etc.
9 CUSTOM PLAYRecords/plays back only the performance data of the selected songs. Using this button does not recall the Registration data.
) SCOREDisplays the selected song’s score.
! REGIST EDITDisplays the Regist (Registration) Edit Display for the selected song’s Registration data.
@ CREATE FOLDERCreates a new folder in the Media/Folder/Song List. Up to 120 folders can exist in one media or within a single upper folder. Pressing this button calls up the New Folder display in which you can enter the desired name. Enter the name and press the [OK] button to create a new folder. The method for entering a folder name is the same as that of the song name. See page 108.
# CHANGE NAMEChanges the folder/song name.
$ COPYCopies the selected song.
% DELETEDeletes the selected folder/song.
^ CONVERTConverts the selected song for use on another Electone or other instruments, or converts songs recorded on another Electone for use on the ELS-01/01C. Songs can be converted to XG format, EL format or ELS format.
& INFORMATIONDisplays available memory when media is selected and displays information such as the title and composer when a song is selected. The information to be displayed depends on the songs.
Reference Page
Displaying the Score (page 122)
Reference Pages
Saving Registrations as Registration Data (File) (page 111)
Recalling Recorded Registrations (page 115)
Reference Page
Changing the Song Name (page 108)
Reference Page
Song Copy (page 124)
Reference Page
Song Delete (page 126)
Reference Pages
Converting to XG (page 128)
Converting ELS format to EL (page 129)
Converting EL format to ELS (page 129)
Reference Pages
Checking the Remaining Memory (page 130)
About Protected Songs (page 116)
Reference Pages
Recording Your Performance (page 105)
Playing Back a Song (page 117)
ELS-01/01C Owner’s Manual98
Music D
ata Recorder (M
DR
)
7
If media cannot be found:
Press the button until the button is grayed out.The Media List will be displayed. If there are more than five media selections, scroll through the display with the Scroll buttons (page 96) to display the desired media.
If songs cannot be found:
Check the current media/folder (page 96).
If the desired song is stored in the currently displayed folder, use the Scroll buttons (page 96) to display the song.
If the desired song is stored in a different folder, use the and buttons to select the folder in which the desired song is stored.
If you are not sure of the folder in which the desired song is stored, press button a few times to display the Media List and check the folders in
which the song is likely to be stored.
● ● ● ● ● ● ● ● ● ● ● ● ● ● ● ● ● ● ● ● ● ● ● ● ● ● ● ● ● ● ● ● ● ● ● ● ● ●
Song Icons
These icons are shown when you select a media, folder, and song.
1
12NOTE
If the message “Registration data will be initialized” is displayed when you select a folder, press [INITIALIZE] button (media is not initialized). The message will appear when recalling the protected song.
Indicates media such as a USB flash memory or floppy disk. This icon is displayed in the Media/Folder List.
Indicates a folder.
Indicates that write-protect or copy-protect is effective for the media.
Indicates that performance data is contained in the song.
Indicates an XG-compatible song.
Indicates a Protected Original Song. See page 116 for details.
Indicates a Protected Edit Song. See page 116 for details.

ELS-01/01C Owner’s Manual 99
Mus
ic D
ata
Rec
orde
r (M
DR
)
7
Media Contents: Folders, Songs, and Files
Folders:A folder is a storage location in the media, used to organize multiple songs in groups. If you’ve saved hundreds of songs to a USB flash memory, it may be difficult to find the desired song quickly. Organizing your songs in folders, with similar songs grouped together (for example, according to genre or tempo), makes it easier to find the songs you want.
Songs:A song is the Electone data for a piece of music, recorded to external media. A single song can contain a variety of data, including the recorded performance, Registrations, and so on.
Files:A file is an element of data in a song. For example, a single song consists of various files, such as Registration files and performance files. The following files are created with the M.D.R. (The extension will not appear in the Electone display. They will, however, be displayed on a computer.)
In addition, one file (extension: .name) is automatically created in each folder for organization/maintenance of the folder contents. It does not appear on the Electone display.
Song1
Song2
Song3
Song4
Song5
Song6
3Song 2Song 1
Song Song Song
Folder A
Song 4
Folder B
5 6Creating folders
USB flash memory USB flash memory
Files in the song
File Explanation Extension
Performance data This file contains performance data, played on the keyboards and pedals of the Electone.
.mid
Registration data This file contains Registration settings, User Voices, User rhythms, and Rhythm Sequences.
.b00
XG-converted data This file contains XG song data, for which Electone performance data is converted to XG-compatible format.
.mid

ELS-01/01C Owner’s Manual100
Music D
ata Recorder (M
DR
)
7
● ● ● ● ● ● ● ● ● ● ● ● ● ● ● ● ● ● ● ● ● ● ● ● ● ● ● ● ● ● ● ● ● ● ● ● ● ● ● ● ● ● ● ● ● ● ● ● ● ●
Precautions when using the USB TO DEVICE terminal
This instrument features a built-in USB TO DEVICE terminal. When connecting a USB device to the terminal, be sure to handle the USB device with care. Follow the important precautions below.
NOTE
For more information about the handling of USB devices, refer to the owner’s manual of the USB device.
■ Compatible USB devices• USB storage devices (flash memory, floppy disk drive, hard
disk drive, etc.)
• USB hub
• USB-LAN adaptor
The instrument does not necessarily support all commercially available USB devices. Yamaha cannot guarantee operation of USB devices that you purchase. Before purchasing a USB device for use with this instrument, please visit the following web page:
http://www.yamahamusicsoft.com/
NOTE
Other USB devices such as a computer keyboard or mouse cannot be used.
■ Connecting USB device• When connecting a USB device to the USB TO DEVICE
terminal, make sure that the connector on the device is appropriate and that it is connected in the proper direction.
NOTE
During your performance, make sure to slide the USB unit under the keyboard. If you leave it in the forward position, there is a danger of hitting it with your hand and breaking the USB device.
• If you intend to connect two or three devices at the same time to a terminal, you should use a self-powered USB hub device. Make sure to connect the USB hub to the USB TO DEVICE terminal directly, not to the USB unit. Up to two USB hubs can be used. If an error message appears while using the USB hub, disconnect the hub from the instrument, then turn on the power of the instrument and re-connect the USB hub.
• Though the instrument supports the USB 1.1 standard, you can connect and use a USB 2.0 storage device with the instrument. However, note that the transfer speed is that of USB 1.1.
● ● ● ● ● ● ● ● ● ● ● ● ● ● ● ● ● ● ● ● ● ● ● ● ● ● ● ● ● ● ● ● ● ● ● ● ● ● ● ● ● ● ● ● ● ● ● ● ● ●
Using USB Storage Devices
By connecting the instrument to a USB storage device (external media), you can save data you’ve created to the connected device, as well as read data from the connected device.
NOTE
Although CD-R/RW drives can be used to read data to the instrument, they cannot be used for saving data.
■ The number of USB storage device to be usedUp to four USB storage devices can be connected to the USB TO DEVICE terminal. (If necessary, use a USB hub. The number of USB storage devices that can be used simultaneously with musical instruments even when a USB hub is used is a maximum of four.) This instrument can recognize up to four drives in one USB storage device.
■ Formatting USB storage mediaWhen a USB storage device is connected or media is inserted, a message may appear prompting you to format the device/media. If so, execute the Format operation (page 102).
The format operation overwrites any previously existing data. Make sure that the media you are formatting does not contain important data. Proceed with caution, especially when connecting multiple USB storage media.
■ To protect your data (write-protect)To prevent important data from being inadvertently erased, apply the write-protect provided with each storage device or media. If you are saving data to the USB storage device, make sure to disable write-protect.
■ Connecting/removing USB storage deviceBefore removing the media from the device, make sure that the instrument is not accessing data (such as in the Save, Copy and Delete operations).
While the instrument is accessing data (such as during Save, Copy, Delete, Load and Format operations) or is mounting the USB storage device (shortly after the connection), do NOT unplug the USB connector, do NOT remove the media from the device, and do NOT turn the power off to either device. Doing so may corrupt the data on either or both devices.If you are using a USB flash memory which has a lamp, the lamp will flash when the instrument is accessing the USB flash memory.
Avoid frequently turning the power on/off to the USB storage device, or connecting/disconnecting the device too often. Doing so may result in the operation of the instrument “freezing” or hanging up.
■ Data BackupFor maximum data security, Yamaha recommends that you keep two copies of important data on separate USB storage devices. This gives you a backup if one device is lost or damaged.
While holding this button, pull the unit toward you.
Keeping the unit in position toward you, connect/disconnect the device.

ELS-01/01C Owner’s Manual 101
Mus
ic D
ata
Rec
orde
r (M
DR
)
7
● ● ● ● ● ● ● ● ● ● ● ● ● ● ● ● ● ● ● ● ● ● ● ● ● ● ● ● ● ● ● ● ● ● ● ● ● ● ● ● ● ● ● ● ● ● ● ● ● ●
Handling the floppy disk drive (FDD) and floppy disks
If you want to use floppy disks, install the optional UD-FD01 floppy disk drive to the Electone. For information on how to install the UD-FD01, see page 224.
Be sure to handle floppy disks and treat the disk drive with care. Follow the important precautions below.
■ Floppy disk compatibility• 3.5" 2DD and 2HD type floppy disks can be used.
■ Formatting a floppy disk• If you find that you are unable to use new, blank disks or old
disks that have been used with other devices, you may need to format them. For details on how to format a disk, see page 102. Keep in mind that all data on the disk will be lost after formatting. Make sure to check beforehand whether or not the disk contains important data.
NOTE
Floppy disks formatted on this device may or may not be useable as is on other devices.
■ Inserting/removing Floppy Disks● Inserting a floppy disk into the disk drive
• Hold the disk so that the label of the disk is facing upward and the sliding shutter is facing forward, towards the disk slot. Carefully insert the disk into the slot, slowly pushing it all the way in until it clicks into place and the eject button pops out.
Never insert anything but floppy disks into the disk drive. Other objects may cause damage to the disk drive or floppy disks.
● Removing a floppy disk• After checking that the instrument is not accessing* the floppy
disk, firmly press the eject button at the upper right of the disk slot all the way in. When the floppy disk is ejected, pull it out of the drive. If the floppy disk cannot be removed because it is stuck, do not try to force it, but instead try pressing the eject button again, or try re-inserting the disk and attempt to eject it again.
* Access of the disk indicates an active operation, such as recording, playback, or deletion of data. If a floppy disk is inserted while the power is on, the disk is automatically accessed, since the instrument checks whether the disk has data.
Do not remove the floppy disk or turn off the instrument itself while the disk is being accessed. Doing so may result not only in loss of data on the disk but also damage to the floppy disk drive.
• Be sure to remove the floppy disk from the disk drive before turning off the power. A floppy disk left in the drive for extended periods can easily pick up dust and dirt that can cause data-read and -write errors.
■ Cleaning the disk drive read/write head• Clean the read/write head regularly. This instrument employs a
precision magnetic read/write head which, after an extended period of use, will pick up a layer of magnetic particles from the disks used that will eventually cause read and write errors.
• To maintain the disk drive in optimum working order Yamaha recommends that you use a commercially-available dry-type head cleaning disk to clean the head about once a month. Ask your Yamaha dealer about the availability of proper headcleaning disks.
■ About floppy disks● Handle floppy disks with care, and follow these
precautions:• Do not place heavy objects on a disk or bend or apply pressure
to the disk in any way. Always keep floppy disks in their protective cases when they are not in use.
• Do not expose the disk to direct sunlight, extremely high or low temperatures, or excessive humidity, dust or liquids.
• Do not open the sliding shutter and touch the exposed surface of the floppy disk inside.
• Do not expose the disk to magnetic fields, such as those produced by televisions, speakers, motors, etc., since magnetic fields can partially or completely erase data on the disk, rendering it unreadable.
• Never use a floppy disk with a deformed shutter or housing.
• Do not attach anything other than the provided labels to a floppy disk. Also make sure that labels are attached in the proper location.
● To protect your data (write-protect tab):• To prevent accidental erasure of important data, slide the disk’s
write-protect tab to the “protect” position (tab open). When saving data, make sure that the disk’s write-protect tab is set to the “overwrite” position (tab closed).
● Data backup• For maximum data security Yamaha recommends that you
keep two copies of important data on separate floppy disks. This gives you a backup if one disk is lost or damaged.
ELS-01/01C Owner’s Manual102
Music D
ata Recorder (M
DR
)
7
If you find that you are unable to use new, blank external media (such as floppy disks or USB flash memory) or old one that have been used with other devices, you may need to format them.Formatting erases all the data in the media and makes it ready to record. The data erased by formatting will be lost permanently. Check whether or not the media contains any important data you wish to keep before executing the operation. Proceed with caution, especially when connecting multiple USB storage media.
Connect the media to the USB TO DEVICE terminal.
Press the [TOOLS] button at the top right of the display to call up the TOOLS Page.
Press the button repeatedly if necessary until the button is grayed out.
Select the desired media you want to format.To format a USB flash memory, select [USB XX] (USB 01, USB 02, etc.). To format a floppy disk, select [USB-FD01].
Press the [FORMAT] button in the display.A message appears, prompting confirmation of the operation. Select [FORMAT] to format the media, or [CANCEL] to abort the operation.
3 Formatting External Media
NOTE
Before purchasing a USB flash memory device, please consult your Yamaha dealer, or an authorized Yamaha distributor for advice, or see the Yamaha website (http://www.yamahamusicsoft.com/).
1234NOTE
“USB-FD01” appears in the display only when a floppy disk drive has been installed to the Electone.
NOTE
The indications USB 1, USB 2, etc. will be displayed depending on the number of the connected media.
5Do not remove the media
while formatting.

ELS-01/01C Owner’s Manual 103
Mus
ic D
ata
Rec
orde
r (M
DR
)
7
In the M.D.R. display, you can select a blank song to which you want to record your performance or save the Registration settings, or you can select a desired song for playback.
In the M.D.R. display, songs in the currently selected media are displayed.First call up the desired media (and folder, if necessary) in the display, then select the desired song.
Check the currently selected media at the top of the display.For example, if you want to select a song in the USB flash memory, confirm that “USB 01:/” is displayed at the top of the display.
For information on selecting the desired media, see page 98.
Press desired song button in the display.Referring to the song name and icons, select the desired song. The selected song button is highlighted in orange.
4 Selecting a Song
1Do not remove the media while the instrument is accessing the media. (If you are using a USB flash memory which has a lamp, the lamp will flash when the instrument is accessing the USB flash memory.)
Currently selected media/folder
2 Reference Pages
Changing the Song Name (page 108)
Song Icons (page 98)Song containing data
Blank song (containing no data)

ELS-01/01C Owner’s Manual104
Music D
ata Recorder (M
DR
)
7
About the [SETTINGS] buttonPressing the button calls up a display of the currently selected song, letting you confirm the tempo and parts that are played when playing the song.
When playing back the song (by pressing the [F] (Play) button), only those parts that are set to “PLAY” in the display actually play at the indicated tempo (over a range of 50% to 200% of the original tempo when recording). If the song contains no performance data, all parts are set to “OFF.” Pressing the [PART SAVE] button saves each part playback setting (the tempo is not saved).
Reference Pages
Playing Back the Selected Part(s) (page 118)
Changing the Tempo (page 119)

ELS-01/01C Owner’s Manual 105
Mus
ic D
ata
Rec
orde
r (M
DR
)
7
● ● ● ● ● ● ● ● ● ● ● ● ● ● ● ● ● ● ● ● ● ● ● ● ● ● ● ● ● ● ● ● ● ● ● ● ● ●
Recording your performance
Set the desired Registrations on the Electone. Make all the Electone settings necessary for the song you will record. This means entering the all Registrations you will need for the entire performance in the Registration Memory. Make sure also to select the Registration that you will use at the beginning of the song.
Insert a media to the USB TO DEVICE terminal.
Select a blank song for recording your performance.For details on selecting a song, see page 103.If you want to overwrite an existing song already containing performance data, you will need to delete it beforehand.
Press the [SONG] button at the top right of the display to call up the SONG Page, then select the [I] (Record) button.The following display appears, indicating that you can record your performance.
Press the [F] (Play) button.An hourglass icon appears at the bottom left of the display, indicating that Registration data is currently being read.
After the hourglass disappears, begin playing.
When you finish playing, press the [J] (Stop) button in the display.The recording is finished and the LCD returns to the M.D.R. display. The song to which your performance is recorded is automatically named “SONG_XXX” (XXX indicates song number). You can change the song name as desired. (For details, see page 108.)
5 Recording
Never attempt to eject the media or turn the power off during recording, reading and playing back.1
2
3 NOTE
If a message appears indicating there is not enough free space in media, press the [CANCEL] button, then press the [J] (Stop) button to go back to the M.D.R. display. Delete any unnecessary songs if possible or insert new media. To continue recording your performance on media that does not have enough space, press the [CONTINUE] button.
4
56
Do not remove the media from the Electone while data is being recorded (while the hourglass icon or other message is shown).

ELS-01/01C Owner’s Manual106
Music D
ata Recorder (M
DR
)
7
● ● ● ● ● ● ● ● ● ● ● ● ● ● ● ● ● ● ● ● ● ● ● ● ● ● ● ● ● ● ● ● ● ● ● ● ● ●
Re-recording (Retry)
If you make a mistake during recording, you can re-record the song from the beginning.
Press the [I] (Record) button while the song is still running.This automatically stops recording and returns you to the starting point of the song.
Press the [F] (Play) or [CUSTOM PLAY] button to begin re-recording the song. Re-recording starts from the beginning of the song and replaces the previously recorded performance with the newly recorded performance.
● ● ● ● ● ● ● ● ● ● ● ● ● ● ● ● ● ● ● ● ● ● ● ● ● ● ● ● ● ● ● ● ● ● ● ● ● ●
Recording each part separately
You can also record the parts of your performance independently. This function lets you record Keyboard Percussion and performance control data, such as Registration changes and expression pedal operation, separately from the other parts of the song. Even Keyboard Percussion and Lead Voice 1 Voices can be recorded separately, though, the Lead Voice 2 Voices will be included in the performance data of the Upper Keyboard. The following instruction is an example: First, record the chords and bass to the song using the Lower and Pedalboard, and then record the melody using the Upper Keyboard.
Follow steps 1 – 3 on page 105 to call up the Rec Standby display.
Select the parts for recording.Each pressing of a part button switches the status: PLAY, OFF, and REC.
PLAY: Playback the parts that have been recorded.OFF: Recording or playback is not active.REC: Records the part.
If you set the Upper part to “REC,” the performance on the Upper Keyboard (including Lead Voice 1 Voices) is recorded. Setting Lead to “REC,” however, records only the Lead Voice 1 Voices. You cannot set both Upper and Lead to “REC” at the same time; neither can the Lower and Keyboard Percussion parts be recorded at the same time.
1
2NOTE
Pressing the [J] (Stop) button cancels the re-recording and records the previous performance.
12
NOTE
When you record the Keyboard Percussion, make sure that the KEYBOARD PERCUSSION [1] and/or [2] button is set to on.

ELS-01/01C Owner’s Manual 107
Mus
ic D
ata
Rec
orde
r (M
DR
)
7
The following setting lets you record only Lower Keyboard and Pedalboard parts.
Press the [F] (Play) button, and start playing after the hourglass icon disappears.
Press the [J] (Stop) button when you are finished with your performance to stop recording.Now you’ve recorded the first parts of your performance.
Press the [I] (Record) button to set up recording of the next part—Upper part in this case.A message appears prompting confirmation of operation. Select [OVERWRITE] to overwrite and the Rec Standby display appears.
Select the parts for recording.Set the next parts you want to record (in this case, the Upper part) to “REC.” Also set the part already recorded (in this case Lower and Pedal parts) to “PLAY,” so you can hear the previously recorded parts as you record new ones.
Change the playback tempo for the selected part.The playback tempo can be set over a range of 50% to 200% of the original. The original recorded tempo is 100%; values less than 100% result in a slower tempo while values greater than 100% result in a faster tempo.
Press the [CUSTOM PLAY] button to start recording of the new part or parts (Upper part).Playback of the previously recorded parts starts immediately.The [CUSTOM PLAY] button is used here to record only the parts that have been selected for recording, and plays back only those parts that have been selected for playback. While you listen to the parts being played back, start playing the melody on the Upper Keyboard.
When the end of the recorded performance is reached, playback is automatically stopped. The length of a subsequently recorded part cannot exceed the length of the previously recorded parts.
NOTE
You should also set the Control button to “REC,” in order to record Registration changes and expression pedal operation.
34
5
6
7 NOTE
Use the TEMPO [RESET] button in the display to reset the tempo to its original value (100%).
8

ELS-01/01C Owner’s Manual108
Music D
ata Recorder (M
DR
)
7
● ● ● ● ● ● ● ● ● ● ● ● ● ● ● ● ● ● ● ● ● ● ● ● ● ● ● ● ● ● ● ● ● ● ● ● ● ●
Punch-in Recording
This lets you re-record a specific phrase or section which you don’t want to use, either that of a specific part(s) or all parts.
Select the song which contains the phrase you want to change.For details on selecting a song, see page 103.
Press the [F] (Play) button to start playback of the song.
Press the [K] (Pause) button at the point you want to execute punch-in recording.
Press the [I] (Record) button.The recording display appears, indicating that the Music Data Recorder is ready to record.
Set the parts which you want to change to “REC” status and other parts to “PLAY.”
Press the [F] (Play) button to start punch-in recording. Play the new phrase, as you want it to be changed.
Press the [J] (Stop) button to quit the punch-in recording as soon as you reach the end of the phrase.
You can name the song, such as giving it a title or indicating the date on which it was recorded. However, song names of the EL-series Electone, such as the EL-900, cannot be changed.
Select the song whose name you want to change.For details on selecting a song, see page 103.
Press the [TOOLS] button at the top right of the display to call up the TOOLS Page.
1NOTE
This function is best used when the phrase to be re-recorded has definite beginning and end points, with slight pauses before and after.
6 Changing the Song Name
234
567
NOTE
When you change the name of an XG song, the extension (.mid) cannot be changed. 1
2

ELS-01/01C Owner’s Manual 109
Mus
ic D
ata
Rec
orde
r (M
DR
)
7
Press the [CHANGE NAME] button.The following display appears.
Move the cursor to the desired point by using the [E][F] buttons in the display or the Data Control dial.
Select the desired character type: alphabet, upper or lowercase, or symbol.
Select the desired character for entry.A song name can contain up to 50 characters.
After finished, select [OK] to actually enter the name.The LCD will return to the TOOLS Page display.
3
4DATA CONTROLCursor
or
5 NOTE
If you select Japanese as the Language in the Utility display, you can also select Japanese language characters (hiragana and kanji, normal size katakana, half size katakana, full size alphabet, and full size symbols).
6 NOTE
An XG song name can contain up to 46 characters.
7

ELS-01/01C Owner’s Manual110
Music D
ata Recorder (M
DR
)
7
To delete the entered character:
Move the cursor to the character you want to delete.
Press the [DELETE] button at the bottom right in the display.The character is deleted.
To convert into kanji (Japanese language):This applies only if you are using the (Kana-Kan) button in Japanese.
When the input “Hiragana” characters are shown in the reverse display (highlighted), press the (kanji-conversion) button once or several times to convert to the characters into the appropriate kanji.• The reversed area can be changed by the [E][F] buttons in the display or
the Data Control dial.• The converted area can be cleared at once by pressing the (cancel)
button.
To actually enter the change, press the [OK] button or enter the next character. To enter the hiragana character itself (without converting it), press the (delete) button.
1DATA CONTROLCursor
or
A “name is not available” message may appear when you press the [OK] button to finish entering the name. If this message appears, the name is invalid and you should enter another name.The following names cannot be used. (“xx” indicates numbers.)
MDR_xx.EVT ELS_SONG.NAM MDR_xxx.TMP TMPMDR_xx.MID MDR_xxx.MID REG_xxx.TMP TMP.E02MDR_xx.Bxx REG_xxx.B00 ELS_SONG.TMPMDR_xx.Vxx SONG_xxx SONG_xxx.C02SONG.NAM
2
1
2
NOTE
Songs are ordered in the following sequence: symbol, number, alphabet, hiragana, kanji, other symbols. Names with an asterisk (*) at the top are exceptions to this rule.
ELS-01/01C Owner’s Manual 111
Mus
ic D
ata
Rec
orde
r (M
DR
)
7
You can also record Registrations by themselves, without recording a performance. Bulk data, including Registration Memory and Registration Shift settings, Rhythm Patterns (User rhythms) Rhythm Sequence data, and User Voices, are also saved in the operation.
First create your original settings you want to save then select the destination (blank song).For details on selecting a song, see page 103.
Press the [REGIST EDIT] button in the display to call up the Regist (Registration) Edit Display.
Press the [SAVE] button in the display.A message appears, indicating the Registration data is currently being saved. After the message disappears, exit from the Regist (Registration) Edit Display by pressing the [CLOSE] button and return to the SONG SELECT Page. The song to which the Registration is recorded is automatically named “SONG XXX” (XXX indicates song number).
● ● ● ● ● ● ● ● ● ● ● ● ● ● ● ● ● ● ● ● ● ● ● ● ● ● ● ● ● ● ● ● ● ● ● ● ● ●
Saving Two or More Registration Banks to One Song
When you want to use more than 16 Registration numbers, you can save additional Registration banks to a single song, with the following procedure.
First create the original settings you want to save, then select the destination song.For details on selecting a song, see page 103.
Press the [REGIST EDIT] button in the display to call up the Regist (Registration) Edit Display.The Registration data which has previously been saved to the song is shown.
Press the lowest blank (empty) Registration button.
7 Saving Registrations as Registration Data (File)
1
23
Reference Page
Next Regist (page 88)Programming a Registration Sequence (page 179)
1
2
3

ELS-01/01C Owner’s Manual112
Music D
ata Recorder (M
DR
)
7
Press the [SAVE] button.The Registration data will be added.When you play back this song, the top Registration bank in this display will be loaded to the Electone. You can also change the order of the Registration bank. See page 113.
● ● ● ● ● ● ● ● ● ● ● ● ● ● ● ● ● ● ● ● ● ● ● ● ● ● ● ● ● ● ● ● ● ● ● ● ● ●
Replacing Registrations
The M.D.R. also lets you change the Registrations of an existing song without changing the performance data. In advance, you need to create the original Registration that will replace the old one.
Select the song for which you wish to replace the Registrations.For details on selecting a song, see page 103.
Press the [REGIST EDIT] button in the display to call up the Regist (Registration) Edit Display.The Registration bank which has been saved to the song is shown.
Select the Registration bank you wish to replace.
Press the [SAVE] button.A message appears, prompting confirmation of overwriting the Registration bank. Select [OVERWRITE] to overwrite (replace), or select [CANCEL] to abort the operation.
4
1
2
3
4

ELS-01/01C Owner’s Manual 113
Mus
ic D
ata
Rec
orde
r (M
DR
)
7
Next Regist (Registration) Settings (Changing the order
● ● ● ● ● ● ● ● ● ● ● ● ● ● ● ● ● ● ● ● ● ● ● ● ● ● ● ● ● ● ● ● ● ● ● ● ● ●
of the Registration data)
When playing back a song which uses more than 16 Registration numbers, you can use two or more Registration banks saved in a single song and recall them one by one as you play the song. This function is called Next Regist (Registration).
If you want to use the Next Regist (Registration) function, you’ll have to make one of the following settings in advance:
• Set the Registration Shift mode to User, and select Next Regist (Registration) as the Shift End, in advance.
• Enter the Next Regist (Registration) data in the Registration Sequence.
Save the desired Registrations to a song.For instructions on saving two or more Registration banks to a song, see page 111.
Select the song containing the Registrations for which you want to change the order.For details on selecting a song, see page 103.
Press the [REGIST EDIT] button in the SONG Page to call up the Regist (Registration) Edit Display.
Change the Registration order, in the order you want to recall.First select the specific Registration bank you want to edit, then move, copy or delete the selected data as needed to change the order.
M1
REG_001
M16 M1 M16
REG_002
NOTE
If the next Registration data contains User voices and/or VA custom voices, the Electone may produce no sound for a few seconds while the Registration is being loaded.
1 NOTE
If the Next Regist (Registration) function is used while the rhythm is being played back, the sequence data and User rhythm will not change.
2
3
4

ELS-01/01C Owner’s Manual114
Music D
ata Recorder (M
DR
)
7
1 Registration Data ListFrom this list, select the Registration you want to move, copy or delete. The selected Registration is highlighted in orange. When more than five Registration banks are saved in the song, a scroll button is available for scrolling through the Registration Data List.
2 MOVEMoves the selected Registration bank up or down.
3 DATA TO BE LOADEDWhen loading the Registration bank to the panel, select the desired data you want to load. For more information, see page 115.
4 LOADLoads the selected Registration bank to the panel/keyboards. After loading, press one of the Registration Memory button and play the keyboard to check the Registration.
5 SAVESaves the current panel settings as a Registration bank in the song. The currently selected Registration in the Registration Data List (1) will become the destination location.
6 COPYCopies the currently selected Registration to the lowest blank location in the Registration Data List.
7 DELETEDeletes the currently selected Registration bank in the Registration Data List.
Exit from the Regist (Registration) Edit Display by pressing the [CLOSE] button at the top right of the display.
2
1
4
3
7
6
5
5

ELS-01/01C Owner’s Manual 115
Mus
ic D
ata
Rec
orde
r (M
DR
)
7
Registrations (and bulk data) recorded to song numbers can be easily loaded back to the Electone by the following procedure. The M.D.R. independently recalls the following five types of data:
• REGIST• USER VOICE• K.B.P.• USER RHYTHM• SEQUENCE
You can select and recall the desired data independently.
Insert the appropriate media and select the song you want to load back to the Electone.For details on selecting a song, see page 103.
Press [REGIST EDIT] button in the display to call up the Regist (Registration) Edit Display.
Select the Registration you want to load to the Electone.
Using the five “DATA TO BE LOADED” buttons, select the desired data you want to load.
8 Recalling Recorded Registrations
1
23
4NOTE
When you load the Registration data by using the Next Regist function, all data will be loaded no matter which buttons you select here.

ELS-01/01C Owner’s Manual116
Music D
ata Recorder (M
DR
)
7
Press the [LOAD] button.A message appears, prompting confirmation of the operation. Press the [LOAD] button to load the Registration data.Press [CANCEL] to cancel the operation.
Exit from the Regist (Registration) Edit Display by pressing the [CLOSE] button at the top right of the display.
5NOTE
If you load a Registration while a rhythm is playing, sequence data and User rhythms in the Registration data cannot be loaded.
When you select the protected song, the buttons (DATA TO BE LOADED) may be unavailable (grayed out). For example, combining a part of one protected song with another protected song is not allowed.
About Protected SongsIf you buy or download the song data, it may be protected so that you cannot delete or copy, in order to prevent accidental erasure or protect copyright. This is “Protected Song.” Protected songs can be saved to a USB flash memory confirmed by Yamaha.The protected song can be played back as well as the song you created, but it cannot be converted to XG format, or EL format. It is not possible to edit the Registration data in the protected song, nor to overwrite the performance data.If you want to edit the protected song, first copy it within one media/folder, then edit the copy. (You cannot copy to another media/folder.) The copy song (called “protected edit song”) is available only when the original song (called “protected original song”) exists in the same folder. Be careful not to delete the protected original song.
To move the protected song in a USB flash memory with a computer, you’ll need to use the Musicsoft Downloader application. If you move the song without Musicsoft Downloader, the song cannot be played back. Musicsoft Downloader can be obtained at the following Internet address: http://music.yamaha.com/download/
6
You cannot edit this song
You can edit this song, only when this is in the folder that contains protected original song.
Folder
Protected Original
Song
Protected Edit Song
Copy
When you want to edit a
protected song, first
initialize the Registration
Memory (page 85), then
select the desired song. If
you have not initialized the
Registration first, the
edited song may not be
saved.

ELS-01/01C Owner’s Manual 117
Mus
ic D
ata
Rec
orde
r (M
DR
)
7
The M.D.R. enables you to play back commercially available XG-compatible song data and MIDI data created with a computer as well as songs recorded on the Electone itself.
Select the song to be played back.For details on selecting a song, see page 103.
Press the [F] (Play) button in the display to load the Registration data.An hourglass icon appears, indicating the Registration data is loading.If the song contains more than two Registration banks, the first one will be loaded. You can check the Registration order in the Regist (Registration) Edit Display.If the song contains no performance data, after loading the Registration data, the LCD returns to the SONG Page.
Playback starts automatically after reading the Registration data (the elapsed time is shown).In general, all parts recorded to the song are played back; however, you can mute specific parts and playback only selected parts. For more information, see page 118.When the end of the recorded performance is reached, playback automatically stops. You can, however, stop playback in the middle of the song by pressing the [J] (Stop) button in the display.
9 Playing Back a Song
12
Reference Page
Next Regist Settings (Changing the order of the Registration data) (page 113)
3Reference Page
About the [SETTINGS] button (page 104)
Custom PlayIf you want to play back the song without resetting the Registrations, press the [CUSTOM PLAY] button instead of the [F] (Play) button. This displays the song time and starts playback immediately.
When you play the song using the Next Regist function, always press the [F] (Play) button to start the song, not the [CUSTOM PLAY] button.
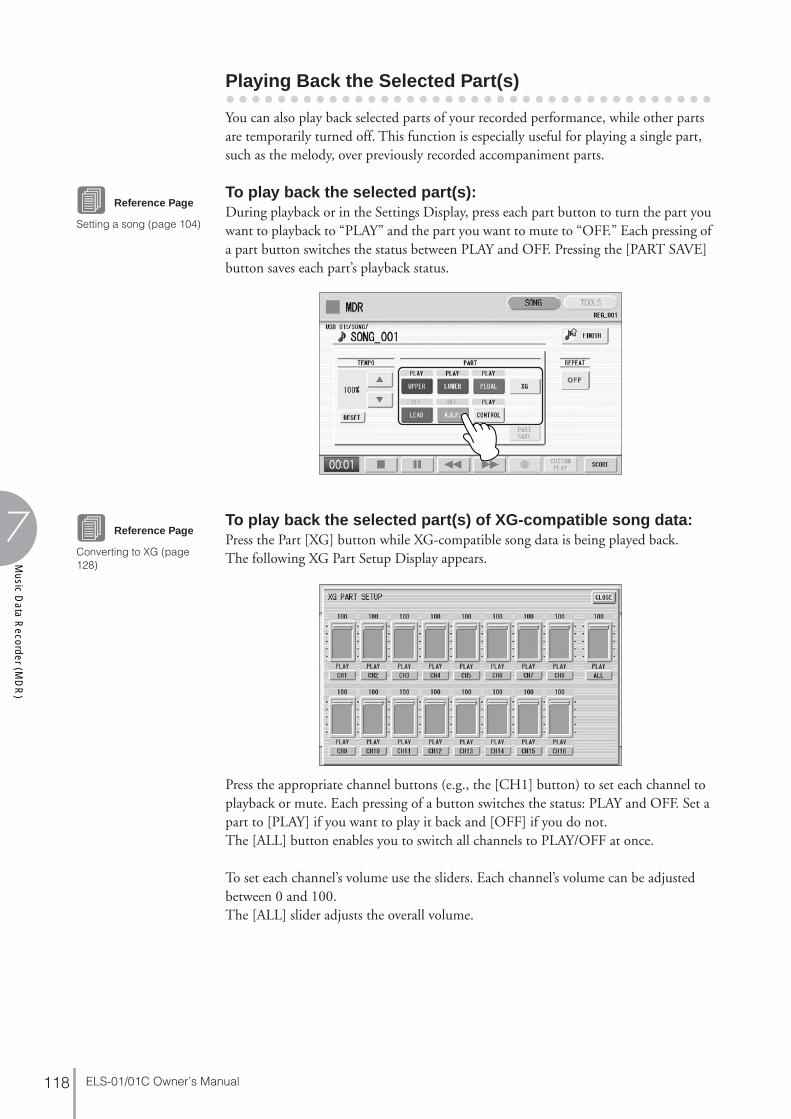
ELS-01/01C Owner’s Manual118
Music D
ata Recorder (M
DR
)
7
● ● ● ● ● ● ● ● ● ● ● ● ● ● ● ● ● ● ● ● ● ● ● ● ● ● ● ● ● ● ● ● ● ● ● ● ● ●
Playing Back the Selected Part(s)
You can also play back selected parts of your recorded performance, while other parts are temporarily turned off. This function is especially useful for playing a single part, such as the melody, over previously recorded accompaniment parts.
To play back the selected part(s):During playback or in the Settings Display, press each part button to turn the part you want to playback to “PLAY” and the part you want to mute to “OFF.” Each pressing of a part button switches the status between PLAY and OFF. Pressing the [PART SAVE] button saves each part’s playback status.
To play back the selected part(s) of XG-compatible song data:Press the Part [XG] button while XG-compatible song data is being played back.The following XG Part Setup Display appears.
Press the appropriate channel buttons (e.g., the [CH1] button) to set each channel to playback or mute. Each pressing of a button switches the status: PLAY and OFF. Set a part to [PLAY] if you want to play it back and [OFF] if you do not.The [ALL] button enables you to switch all channels to PLAY/OFF at once.
To set each channel’s volume use the sliders. Each channel’s volume can be adjusted between 0 and 100.The [ALL] slider adjusts the overall volume.
Reference Page
Setting a song (page 104)
Reference Page
Converting to XG (page 128)
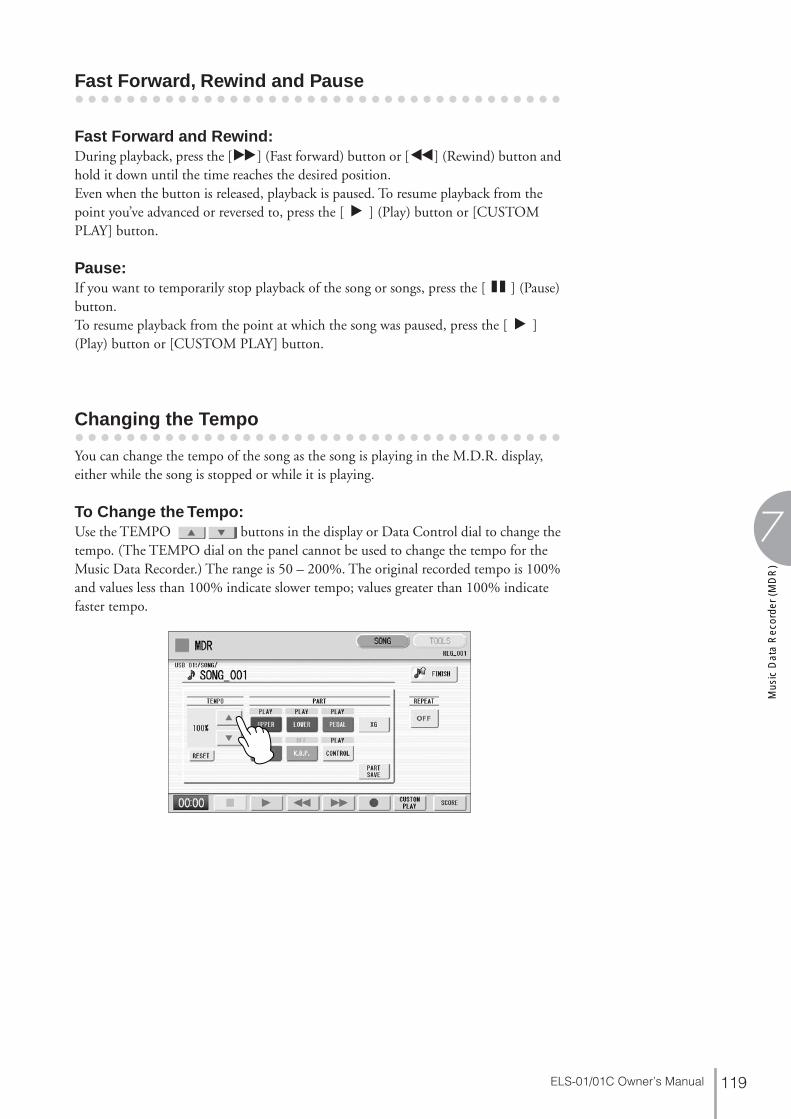
ELS-01/01C Owner’s Manual 119
Mus
ic D
ata
Rec
orde
r (M
DR
)
7
● ● ● ● ● ● ● ● ● ● ● ● ● ● ● ● ● ● ● ● ● ● ● ● ● ● ● ● ● ● ● ● ● ● ● ● ● ●
Fast Forward, Rewind and Pause
Fast Forward and Rewind:During playback, press the [H] (Fast forward) button or [G] (Rewind) button and hold it down until the time reaches the desired position.Even when the button is released, playback is paused. To resume playback from the point you’ve advanced or reversed to, press the [F] (Play) button or [CUSTOM PLAY] button.
Pause:If you want to temporarily stop playback of the song or songs, press the [K] (Pause) button.To resume playback from the point at which the song was paused, press the [F] (Play) button or [CUSTOM PLAY] button.
● ● ● ● ● ● ● ● ● ● ● ● ● ● ● ● ● ● ● ● ● ● ● ● ● ● ● ● ● ● ● ● ● ● ● ● ● ●
Changing the Tempo
You can change the tempo of the song as the song is playing in the M.D.R. display, either while the song is stopped or while it is playing.
To Change the Tempo:Use the TEMPO buttons in the display or Data Control dial to change the tempo. (The TEMPO dial on the panel cannot be used to change the tempo for the Music Data Recorder.) The range is 50 – 200%. The original recorded tempo is 100% and values less than 100% indicate slower tempo; values greater than 100% indicate faster tempo.

ELS-01/01C Owner’s Manual120
Music D
ata Recorder (M
DR
)
7
To reset the changed tempo:Use the TEMPO [RESET] button in the display to reset the tempo to its original value (100%).
● ● ● ● ● ● ● ● ● ● ● ● ● ● ● ● ● ● ● ● ● ● ● ● ● ● ● ● ● ● ● ● ● ● ● ● ● ●
Repeat Playback
This feature allows you to repeatedly play back either all songs on a folder or only one specific song.
Select the song you wish to play back.If you wish to play back all songs on a folder, select the first song that will be played back. For details on selecting a song, see page 103.
Press the [SONG] button at the top right of the display to call up the SONG Page.
Press the button on the panel to call up the Settings Display.
1
23

ELS-01/01C Owner’s Manual 121
Mus
ic D
ata
Rec
orde
r (M
DR
)
7
Press the REPEAT button to select the repeat mode.Each press of the button switches the mode.
SINGLERepeats the currently selected song again and again.
ALLRepeats all songs in the currently selected folder in order.
RANDOMRepeats all songs in the currently selected folder randomly.
OFFCancels repeat playback.
Exit from the Settings Display by pressing the button at the top right of the display.
Press the [F] (Play) button in the SONG Page to begin playback.
4
REPEAT button
56
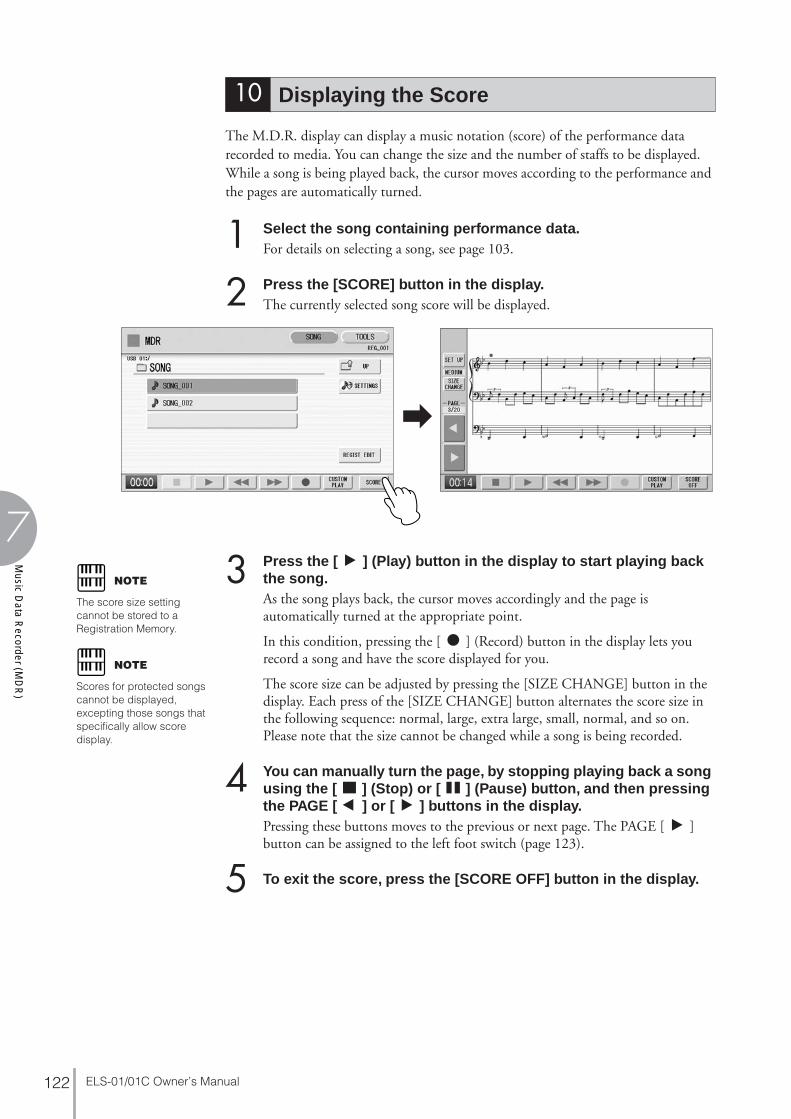
ELS-01/01C Owner’s Manual122
Music D
ata Recorder (M
DR
)
7
The M.D.R. display can display a music notation (score) of the performance data recorded to media. You can change the size and the number of staffs to be displayed. While a song is being played back, the cursor moves according to the performance and the pages are automatically turned.
Select the song containing performance data.For details on selecting a song, see page 103.
Press the [SCORE] button in the display.The currently selected song score will be displayed.
Press the [F] (Play) button in the display to start playing back the song.As the song plays back, the cursor moves accordingly and the page is automatically turned at the appropriate point.
In this condition, pressing the [I] (Record) button in the display lets you record a song and have the score displayed for you.
The score size can be adjusted by pressing the [SIZE CHANGE] button in the display. Each press of the [SIZE CHANGE] button alternates the score size in the following sequence: normal, large, extra large, small, normal, and so on. Please note that the size cannot be changed while a song is being recorded.
You can manually turn the page, by stopping playing back a song using the [J] (Stop) or [K] (Pause) button, and then pressing the PAGE [E] or [F] buttons in the display.Pressing these buttons moves to the previous or next page. The PAGE [F] button can be assigned to the left foot switch (page 123).
To exit the score, press the [SCORE OFF] button in the display.
10 Displaying the Score
12
3NOTE
The score size setting cannot be stored to a Registration Memory.
NOTE
Scores for protected songs cannot be displayed, excepting those songs that specifically allow score display.
4
5

ELS-01/01C Owner’s Manual 123
Mus
ic D
ata
Rec
orde
r (M
DR
)
7
● ● ● ● ● ● ● ● ● ● ● ● ● ● ● ● ● ● ● ● ● ● ● ● ● ● ● ● ● ● ● ● ● ● ● ● ● ●
Changing the score contents and settings
The Score Settings Display lets you choose the contents to be displayed. In this display, you can also assign the Next Page function to the left foot switch:
Display the score.
Press the [SET UP] button in the display to call up the Score Settings Display.
Change the score settings.To set whether a specific part is displayed or not in the score, press the appropriate [ON] or [OFF] buttons of each part. Please note that at least one of the upper keyboard, lower keyboard or pedalboard will be set to [ON].
Available settings for notes and how they will be displayed (NOTE) include [A, B, C] (conventional C-D-E indications), [FIXED DO] (solfeggio), [MOVABLE DO] (relative solfeggio) and [OFF].
For the CH SETTINGS, the upper keyboard, lower keyboard and pedalboard can be assigned to the channels with the [▲] or [▼] button. You can also use the Data Control dial to select channels after pressing the [▲] or [▼] button. Selecting [AUTO] automatically assigns parts to the channels according to the song data.
To set the QUANTIZE value use the [▲] or [▼] button. You can also use the Data Control dial to select channels after pressing the [▲] or [▼] button. The shorter the note value is selected, the more precisely the score is displayed.
Setting the NEXT PAGE L. Foot SW [ON] lets you turn the score to the next page with the left foot switch. You can also turn the score to the next page with the PAGE [F] button in the display. If rhythm, glide and/or rotary speaker are assigned to the left foot switch and set on, both the assigned functions and the Next Page function work.
Exit from the Score Settings Display by pressing the [CLOSE] button at the top right of the display.
12
NOTE
Please note that the score settings cannot be changed while the song is being recorded. The [SET UP] button is disabled during recording.
3 NOTE
The score display settings cannot be stored to a Registration Memory.Only the left foot switch setting can be stored to USB flash memory as Registration data common to all Registration Memory numbers.
NOTE
Setting the NOTE to [MOVABLE DO] displays each key note as “Do.”
Reference Page
About Quantize (page 156)
4

ELS-01/01C Owner’s Manual124
Music D
ata Recorder (M
DR
)
7
The TOOLS Page in the M.D.R. display has many functions, such as song copy, song delete, etc.
● ● ● ● ● ● ● ● ● ● ● ● ● ● ● ● ● ● ● ● ● ● ● ● ● ● ● ● ● ● ● ● ● ● ● ● ● ●
Song Copy
This function lets you copy data recorded in one song to another song. You can copy and exchange the data even between two different media. (Only songs created with the ELS-01/01C can be copied. Songs created with the EL-series, such as the EL-900, cannot be copied.) Make sure to check the remaining memory of the destination media in advance. If memory space is insufficient, or if the folder already contains 100 songs, Song Copy is not available.
To copy a song:Insert the media that contains a song to be copied and the destination media.
• To copy within one mediaInsert the media that contains a song to be copied.
• To copy a song from USB flash memory to anotherInsert both the USB flash memory that contains a song to be copied and the destination USB flash memory. When there are not enough terminals available, use a self powered USB hub. If you don’t have a USB hub, you can copy a song by following the procedure on page 125.
Select the song to be copied.For details on selecting a song, see page 103.
Press the [TOOLS] button at the top right of the display to call up the TOOLS Page.
11 Other Functions (Tools)
Moving a Protected SongA protected song can be copied within a folder, but it cannot be copied to another folder or media. If you specify another folder or media as the copy destination, a message appears prompting moving of the song—not copying. When the [MOVE] button is pressed, the protected original song and all protected edit songs which come from the same protected original song will be moved together. This effectively “moves” a protected song, but does not “copy” it.
12

ELS-01/01C Owner’s Manual 125
Mus
ic D
ata
Rec
orde
r (M
DR
)
7
Press the [COPY] button in the display to call up the Copy To Display.
(If necessary) Change the destination.For details on changing the destination, see page 103.
Press the [EXECUTE] button to execute the copy.The song name in the destination is the same as the one of the source song. If you copy a song to a folder that contains a song whose name is the same as the source song, the copied song name will be “source song name_XXX” (XXX indicates song number). If you want to change the song name, see page 108.If you copy an XG-compatible song to another folder or media that contains a song with the same name as the source song, a message appears prompting confirmation of overwriting the song. Selecting [OVERWRITE] overwrites the XG-compatible song in the destination.
To copy a song from USB flash memory to another:It is recommended that you use connect both media (source and destination) to the USB TO DEVICE terminal. However, if there are not enough terminals available, you can copy a song by following the procedure below.
Follow the step 1 – 3 on page 124.
Press the button several times until the Media List is displayed.
Select “MEMORY” as the destination.
3
45
Never attempt to eject the media or turn the power off during copying (or moving a protected song). Data may be lost.
NOTE
If you copy a protected song to the same folder as the source song, the copied song will be the protected edit song.
123
Removing the media during operation may result in loss of the data. Never attempt to remove the media unless the “Eject the source media” message appears.
ELS-01/01C Owner’s Manual126
Music D
ata Recorder (M
DR
)
7
Press the [EXECUTE] button to execute the Song Copy.The song to be copied is copied to the internal memory of the Electone. The message “Eject the source media” will appear on the display.
Eject the source media.After ejecting the source media, the message “Insert the destination media” will appear on the display.
Insert the destination media to which you want to copy.
Select the destination.For details on specifying the destination, see page 103.
Press the [EXECUTE] button to execute Song Copy. Select [OVERWRITE] to execute or [CANCEL] to abort the operation.The song is copied with the same name as the source song. If you copy a song to a folder that contains a song whose name is the same as the source song, the copied song name will be “source song name_XXX” (XXX indicates song number).If you copy an XG-compatible song to another folder or media that contains a song with the same name as the source song, a message appears prompting confirmation of overwriting the song. Selecting [OVERWRITE] overwrites the XG-compatible song in the destination.If you want to change the song name, see page 108.
● ● ● ● ● ● ● ● ● ● ● ● ● ● ● ● ● ● ● ● ● ● ● ● ● ● ● ● ● ● ● ● ● ● ● ● ● ●
Song Delete
You can delete the data of one song. You can specify for deletion only Registration data, only the performance data, or both of them (entire song). Also, only the songs created on the ELS-01/01C and XG-compatible songs can be deleted. Songs created on the EL series instruments such as the EL-900 cannot be deleted.
Select the song to be deleted.For details on selecting a song, see page 103.
Press the [TOOLS] button at the top right of the display to call up the TOOLS Page.
Press the [DELETE] button in the display.A message appears, prompting confirmation of the operation.Confirm that the song to be deleted is shown in the display. If you want to change the song, press the [CANCEL] button and select the desired song.
4NOTE
If you want to abort the operation, press the [CANCEL] button.
Never attempt to turn the power off during copying a protected song. Data may be lost.
5
678
123

ELS-01/01C Owner’s Manual 127
Mus
ic D
ata
Rec
orde
r (M
DR
)
7
Press the button of the specific data you want to delete (“DELETE ALL,” “DELETE REGIST” or “DELETE PERFORMANCE”). The selected data will be deleted.
• DELETE ALL: Deletes the entire song.• DELETE REGIST: Deletes only Registration data in the song.• DELETE PERFORMANCE: Deletes only performance data in the song.
Pressing [CANCEL] aborts the operation.
When deleting folders, songs with only registration, songs with only performance data, protected songs or XG-compatible songs:
Select [DELETE] to actually delete the data, or select [CANCEL] to abort the operation.
4

ELS-01/01C Owner’s Manual128
Music D
ata Recorder (M
DR
)
7
● ● ● ● ● ● ● ● ● ● ● ● ● ● ● ● ● ● ● ● ● ● ● ● ● ● ● ● ● ● ● ● ● ● ● ● ● ●
Converting to XG
This function allows you to convert the ELS-01/01C song data to XG format data. You can playback the data using XG devices. The converted XG song data may sound differently from the original data.Confirm that the media should contain enough amount of available memory before the conversion. The protected songs cannot be converted to XG format.
Select a song to be converted to XG.For details on selecting a song, see page 103.
Press the [TOOLS] button at the top right of the display to call up the TOOLS Page.
Press the [CONVERT] button.A message “Which do you want to select?” appears.
Press the [CONVERT TO XG] button.The following display appears.
(If necessary) Changes the destination to save the converted song.For details on changing the destination, see page 103.
Press the [EXECUTE] button.A message appears indicating that the converted data is being checked and the M.D.R. starts playback of the selected song. When playback is finished, the display returns to the previous display.
123
4
5
6NOTE
Playing the keyboard or pressing the panel controls during the confirmation of the conversion will be recorded to the converted XG-compatible song.

ELS-01/01C Owner’s Manual 129
Mus
ic D
ata
Rec
orde
r (M
DR
)
7
● ● ● ● ● ● ● ● ● ● ● ● ● ● ● ● ● ● ● ● ● ● ● ● ● ● ● ● ● ● ● ● ● ● ● ● ● ●
Converting ELS format to EL
You can convert songs created on the ELS-01/01C to EL-series format, and save them to a floppy disk. The converted data can be used with EL-series Electones, such as the EL-900. This function is not available for protected songs.You’ll need to install the optional floppy disk drive such as UD-FD01.
Select the song to be converted to EL-series format.For details on selecting a song, see page 103.
In the TOOLS Page, press the [CONVERT] button.A “Which do you want to select?” message appears.
Press the [CONVERT ELS ➞ EL] button.If the source song contains two or more Registration banks, you’ll need to make ready the same number of destination songs to save the converted data.
Insert the floppy disk, then press the [EXECUTE] button in the display.If the remaining memory of the floppy disk is insufficient, conversion cannot be executed. (An error message appears and the operation is cancelled.)
● ● ● ● ● ● ● ● ● ● ● ● ● ● ● ● ● ● ● ● ● ● ● ● ● ● ● ● ● ● ● ● ● ● ● ● ● ●
Converting EL format to ELS
You can convert the songs in the floppy disk created with an EL-series Electone, such as the EL-900, to the ELS-01/01C format, and save it to a USB flash memory confirmed by Yamaha. You’ll need to install the optional floppy disk drive such as UD-FD01. Depending on the original song, the sound or tempo of the converted song may differ from the original song, or the Next Song function of the original song may not be effective.
Insert the floppy disk that contains the song you want to convert to ELS format, then select the source song.For details on selecting a song, see page 103.
Reference Page
About Protected Songs (page 116)
NOTE
User rhythms cannot be converted to EL format.
12
3 NOTE
If the source song’s name contains full size characters or Japanese characters, these characters will be shown as question marks (such as “????”).
4
NOTE
When you convert the protected EL data to ELS format, set the write-protect tab of the EL disk to the “overwrite” position (tab closed).
Reference Page
Installing the Floppy Disk Drive (page 224)
1
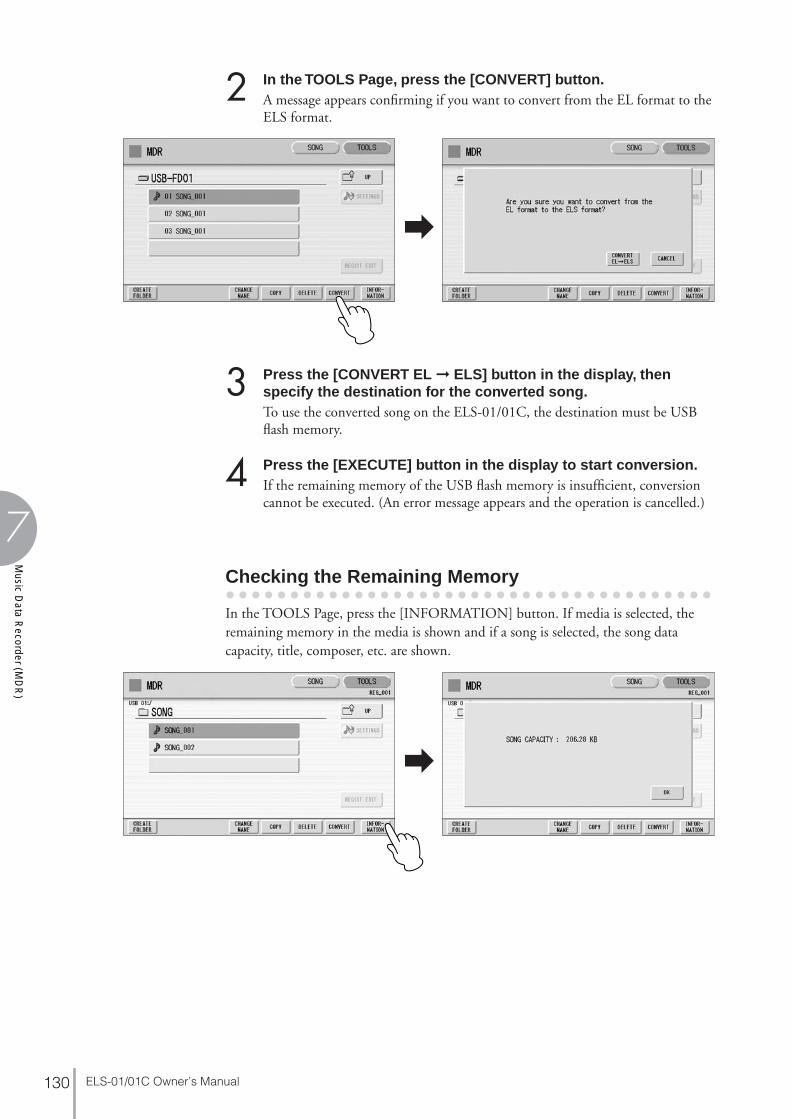
ELS-01/01C Owner’s Manual130
Music D
ata Recorder (M
DR
)
7
In the TOOLS Page, press the [CONVERT] button.A message appears confirming if you want to convert from the EL format to the ELS format.
Press the [CONVERT EL ➞ ELS] button in the display, then specify the destination for the converted song.To use the converted song on the ELS-01/01C, the destination must be USB flash memory.
Press the [EXECUTE] button in the display to start conversion.If the remaining memory of the USB flash memory is insufficient, conversion cannot be executed. (An error message appears and the operation is cancelled.)
● ● ● ● ● ● ● ● ● ● ● ● ● ● ● ● ● ● ● ● ● ● ● ● ● ● ● ● ● ● ● ● ● ● ● ● ● ●
Checking the Remaining Memory
In the TOOLS Page, press the [INFORMATION] button. If media is selected, the remaining memory in the media is shown and if a song is selected, the song data capacity, title, composer, etc. are shown.
2
3
4
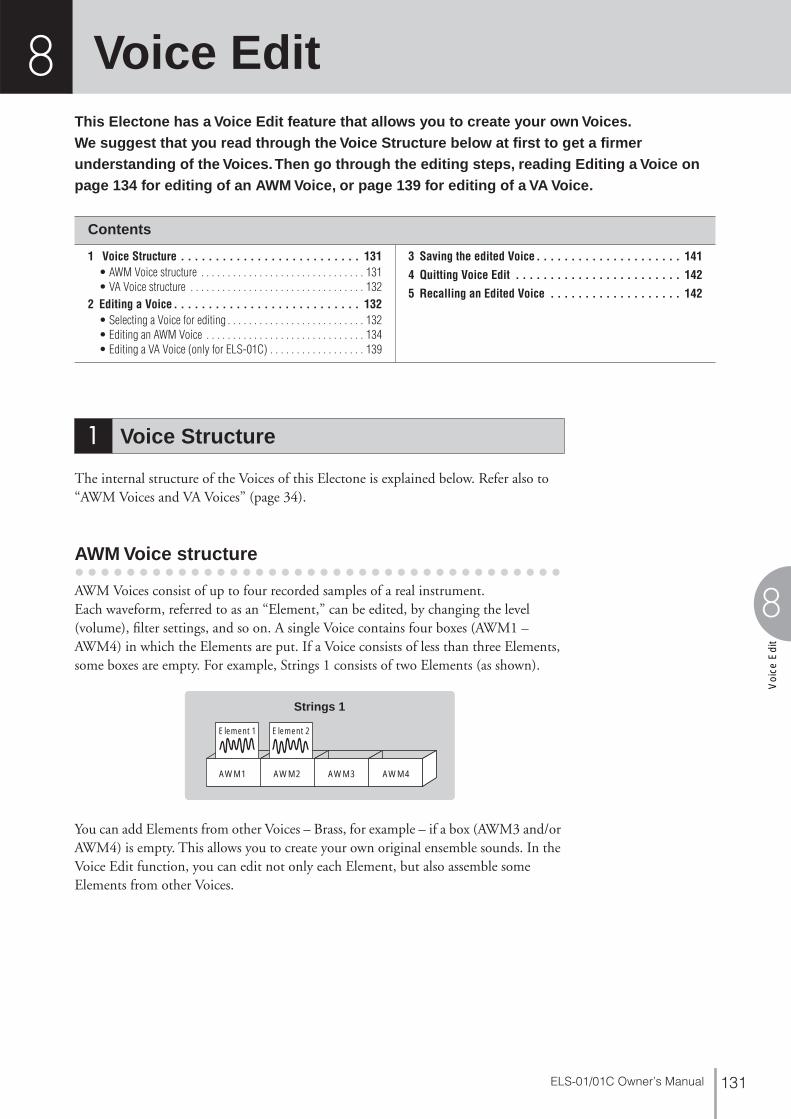
8
Voi
ce E
dit
ELS-01/01C Owner’s Manual 131
Voice EditThis Electone has a Voice Edit feature that allows you to create your own Voices.We suggest that you read through the Voice Structure below at first to get a firmer understanding of the Voices. Then go through the editing steps, reading Editing a Voice on page 134 for editing of an AWM Voice, or page 139 for editing of a VA Voice.
The internal structure of the Voices of this Electone is explained below. Refer also to “AWM Voices and VA Voices” (page 34).
● ● ● ● ● ● ● ● ● ● ● ● ● ● ● ● ● ● ● ● ● ● ● ● ● ● ● ● ● ● ● ● ● ● ● ● ● ●
AWM Voice structure
AWM Voices consist of up to four recorded samples of a real instrument.Each waveform, referred to as an “Element,” can be edited, by changing the level (volume), filter settings, and so on. A single Voice contains four boxes (AWM1 – AWM4) in which the Elements are put. If a Voice consists of less than three Elements, some boxes are empty. For example, Strings 1 consists of two Elements (as shown).
You can add Elements from other Voices – Brass, for example – if a box (AWM3 and/or AWM4) is empty. This allows you to create your own original ensemble sounds. In the Voice Edit function, you can edit not only each Element, but also assemble some Elements from other Voices.
Contents
1 Voice Structure . . . . . . . . . . . . . . . . . . . . . . . . . . 131• AWM Voice structure . . . . . . . . . . . . . . . . . . . . . . . . . . . . . . . 131• VA Voice structure . . . . . . . . . . . . . . . . . . . . . . . . . . . . . . . . . 132
2 Editing a Voice . . . . . . . . . . . . . . . . . . . . . . . . . . . 132• Selecting a Voice for editing . . . . . . . . . . . . . . . . . . . . . . . . . . 132• Editing an AWM Voice . . . . . . . . . . . . . . . . . . . . . . . . . . . . . . 134• Editing a VA Voice (only for ELS-01C) . . . . . . . . . . . . . . . . . . 139
3 Saving the edited Voice . . . . . . . . . . . . . . . . . . . . . 141
4 Quitting Voice Edit . . . . . . . . . . . . . . . . . . . . . . . . 142
5 Recalling an Edited Voice . . . . . . . . . . . . . . . . . . . 142
1 Voice Structure
Element 1 Element 2
Strings 1
AWM1 AWM2 AWM3 AWM4
8

8
Voice E
dit
ELS-01/01C Owner’s Manual132
● ● ● ● ● ● ● ● ● ● ● ● ● ● ● ● ● ● ● ● ● ● ● ● ● ● ● ● ● ● ● ● ● ● ● ● ● ●
VA Voice structure
VA Voices are made by simulating the characteristic behavior of acoustic instruments.You can edit the Voice’s volume and timbre. Moreover, you can also add AWM Elements to a VA Voice to create your own original Voice.VA Voices are available only on the Lead Voice 2 section of the ELS-01C. All Voices in the other Voice sections are AWM Voices.
● ● ● ● ● ● ● ● ● ● ● ● ● ● ● ● ● ● ● ● ● ● ● ● ● ● ● ● ● ● ● ● ● ● ● ● ● ●
Selecting a Voice for editing
Select the Voice you want to edit from the Voice Menu.For example, if you want to edit Accordion 1, select [Accordion 1] in the Voice Menu of the [ORGAN] button in any Voice section.
Mute all other Voice sections except for the targeted Voice section.
2 Editing a Voice
1UPPER KEYBOARD VOICE 1 BRILLIANCE
BRILLIANT
MELLOW
VOLUME
MAX
MIN
STRINGS BRASS TUTTI PAD SYNTHWOOD-WIND
PIANO ORGAN GUITAR CHOIR WORLDPERCUS-SION
1
2

8
Voi
ce E
dit
ELS-01/01C Owner’s Manual 133
While holding down the [VOICE EDIT] button, press the Voice button corresponding to the Voice you wish to edit.If you press [VOICE EDIT] without selecting a Voice, the following display will prompt you to complete the step. While this display appears, press the desired Voice button.
After you have selected the Voice button, the AWM Page (first page of the Voice Edit display) will appear if the selected Voice is an AWM Voice. If you have selected a VA Voice, the VA Page will appear.
If you release the [VOICE EDIT] button before pressing a Voice button, the Voice Edit function will not be called up, and the normal Voice Display will appear.
2
DISPLAY SELECT
VOICEDISPLAY
FOOTSWITCH
RHYTHMPROGRAM
UTILITY INTERNET
A.B.C.M.O.C. MDR
VOICE EDIT PATTERN SEQUENCE
U.ORGANFLUTES
L.ORGANFLUTES
ROTARY SPSPEED
UPPER KEYB
STRINGS BRASS TWOOD-WIND
PIANO ORGAN GPERCUS-SION
While holding down…
Press the Voice button.
The message “Voice data is too large to edit” may appear when you press the Voice button while holding down the [VOICE EDIT]. If this message appears, select another Voice.

8
Voice E
dit
ELS-01/01C Owner’s Manual134
● ● ● ● ● ● ● ● ● ● ● ● ● ● ● ● ● ● ● ● ● ● ● ● ● ● ● ● ● ● ● ● ● ● ● ● ● ●
Editing an AWM Voice
You can edit an AWM Voice on the AWM Page and LAYER Page in the Voice Edit display. In the AWM Page, the tonal balance of the entire Voice can be corrected by some EQ parameters. In the LAYER Page, you can make detailed edits to each Element.
1 Element On/Off switchesThe [AWM1] – [AWM4] buttons indicate the Elements which make up the selected Voice, and the [VA] button indicates the VA tone generator (the VA button is grayed out when you are editing an AWM Voice). You can mute any of the Elements by simply pressing the corresponding button. Pressing the button again cancels the mute.
2 VOICE/ELEMENTIndicates the Voice/Element currently being edited. For example, the screen above shows that Element 1 of Accordion 1 is assigned to AWM1, the Element 2 of Accordion 1 is assigned to AWM2 and no Voice is assigned to AWM3 and AWM4.You can also call up another Element from another Voice and replace the currently selected Element with it. Pressing the VOICE or ELEMENT button in the display calls up the Voice or Element menu, from which you can select the desired Voice/Element (usually Element 1). If you change Voice, the Element will automatically change to the first Element of the Voice (usually Element 1).
3 EQ LOW FREQ./EQ LOW GAINSets the frequency and gain (level) of the low frequency band. The EQ LOW FREQ. slider sets the desired frequency band over a range of 32 Hz – 2.0 kHz. The EQ LOW GAIN slider sets the level for the frequency band (specified by the EQ LOW FREQ. slider) over a range of -12 dB – +12 dB.
4 EQ HIGH FREQ./EQ HIGH GAINSets the frequency and gain (level) of the high frequency band. The EQ HIGH FREQ. slider sets the desired frequency band over a range of 500 Hz – 16.0 kHz. The EQ HIGH GAIN slider sets the level for the frequency band (specified by the EQ HIGH FREQ. slider) over a range of -12 dB – +12 dB.
2 3 41
AWM Page
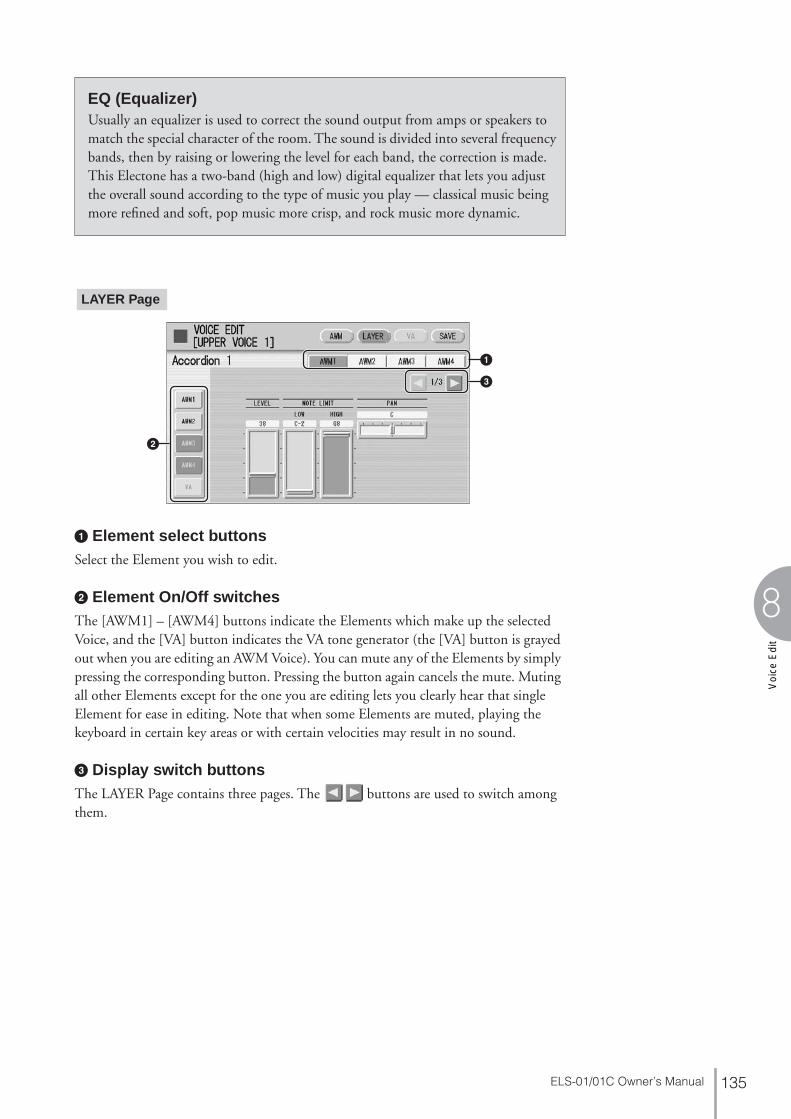
8
Voi
ce E
dit
ELS-01/01C Owner’s Manual 135
1 Element select buttonsSelect the Element you wish to edit.
2 Element On/Off switchesThe [AWM1] – [AWM4] buttons indicate the Elements which make up the selected Voice, and the [VA] button indicates the VA tone generator (the [VA] button is grayed out when you are editing an AWM Voice). You can mute any of the Elements by simply pressing the corresponding button. Pressing the button again cancels the mute. Muting all other Elements except for the one you are editing lets you clearly hear that single Element for ease in editing. Note that when some Elements are muted, playing the keyboard in certain key areas or with certain velocities may result in no sound.
3 Display switch buttonsThe LAYER Page contains three pages. The buttons are used to switch among them.
EQ (Equalizer)Usually an equalizer is used to correct the sound output from amps or speakers to match the special character of the room. The sound is divided into several frequency bands, then by raising or lowering the level for each band, the correction is made. This Electone has a two-band (high and low) digital equalizer that lets you adjust the overall sound according to the type of music you play — classical music being more refined and soft, pop music more crisp, and rock music more dynamic.
3
2
1
LAYER Page

8
Voice E
dit
ELS-01/01C Owner’s Manual136
1 LEVELDetermines the output level of the Element.Range: 0 – 127
2 NOTE LIMITDetermines the lowest and highest notes in the range for which the Element sounds. The setting of the HIGH slider cannot be set lower than that of the LOW slider. Some Elements are not affected by this parameter. Range: C-2 – G8
3 PANDetermines the position of the Element in the stereo image. Range: L64 – R63
1 NOTE SHIFTDetermines the pitch settings in semitones.Range: -64 – +63
2 TUNE FINEDetermines the fine tuning.Range: -64 – +63
LAYER Page 1
1 2 3
These buttons switch the display.
LAYER Page 2
3 4 5 61 2

8
Voi
ce E
dit
ELS-01/01C Owner’s Manual 137
3 ATTACK RATEDetermines how quickly the Element will reach its maximum level after the key is played. Higher values produce a faster attack.Range: 0 – 127
4 RELEASE RATEDetermines how much time it takes for the level to reach 0 after the key is released. Higher values make the time shorter.Range: 1 – 127
5 CUTOFF FREQ.Determines the cutoff frequency of the filter.Range: 9600 – 24000 cent
6 RESONANCEDetermines the amount of resonance (harmonic emphasis) applied to the signal at the cutoff frequency. Some Elements are not affected by this parameter.Range: 16 – 140
Reference Page
Envelope Parameters (page 140)
Filter — Cutoff frequency and ResonanceFilter modifies the tone by cutting the output of a specific frequency portion of the sound. This Electone is equipped with a low pass filter, which passes only those signals below the cutoff frequency and cuts signals above the cutoff frequency.
You can produce a relatively bright or darker sound by setting the cutoff frequency. Resonance is a parameter that boosts the level of the signal in the area of the cutoff frequency. By emphasizing the overtones in this area, this can produce a distinctive “peaky” tone.
Level
Level
Cutoff Frequency
Cutoff Frequency
Frequency
Frequency
Resonance
These frequencies are passed by the filter.

8
Voice E
dit
ELS-01/01C Owner’s Manual138
1 LFO WAVEDetermines the LFO waveform used to vary the sound. For details, see page 139.
2 LFO SPEEDDetermines the speed of the LFO waveform. Higher values make the speed faster.Range: 2 – 93
3 LFO PMD (Pitch Modulation Depth)Determines the amount by which the LFO waveform varies the pitch of the sound. Higher values result in a greater amount of pitch change. For the minimum setting, the pitch does not change.Range: 0 – 400
4 LFO FMD (Frequency Modulation Depth)Determines the amount by which the LFO waveform varies the filter cutoff frequency. Higher values result in a greater amount of frequency change. For the minimum setting, the frequency does not change.Range: 0 – 4800 cent
5 LFO AMD (Amplitude Modulation Depth)Determines the amount by which the LFO waveform varies the amplitude of the sound. Higher values result in a greater amount of amplitude change. For the minimum setting, the amplitude does not change.Range: 0 – 128
When playing a User Voice you have created using the LFO parameters (above), set the Vibrato setting in the Voice Condition display to “Preset,” not “User.” If Vibrato is set to “User” and the Vibrato parameters (depth and/or speed) are set fairly high, you may not be able to hear the effect of the LFO.
LAYER Page 3
3 4 51 2
Reference Page
Vibrato (page 41)

8
Voi
ce E
dit
ELS-01/01C Owner’s Manual 139
● ● ● ● ● ● ● ● ● ● ● ● ● ● ● ● ● ● ● ● ● ● ● ● ● ● ● ● ● ● ● ● ● ● ● ● ● ●
Editing a VA Voice (only for ELS-01C)
You can edit a VA Voice in the VA Page of the Voice Edit display. If you are using the ELS-01, the VA Page cannot be selected.
1 Element On/Off switchesThe [AWM1] – [AWM4] buttons indicate the Elements which make up the selected Voice, and the [VA] button indicates the VA tone generator. You can mute any of the Elements by simply pressing the corresponding button. Pressing the button again cancels the mute. AWM buttons are grayed out when you are editing a VA Voice since VA Voices do not contain Elements. However, you can add AWM Elements to a VA sound in the AWM and LAYER Pages if you want. See page 134.
2 LEVELDetermines the level of the VA sound.Range: 0 – 127
LFO (Low Frequency Oscillator)As its name suggests, the LFO creates waveforms of a low frequency. These waveforms can be used to vary the pitch, filter or amplitude to create effects such as vibrato, wah and tremolo.The following five waveforms are available.
tri squ
rnd sine
saw
VA Page
3 4 5 6 721

8
Voice E
dit
ELS-01/01C Owner’s Manual140
3 ATTACK RATEDetermines how quickly the sound will reach its maximum level after the key is played. Lower values produce a slower attack.Range: -64 – +63
4 DECAY RATEDetermines how much time it takes to reach its second level from the first (maximum) level.Range: -64 – +63
5 RELEASE RATEDetermines how much time it takes for the level to reach 0 after the key is released. Positive value makes the time shorter and negative value makes it longer.Range: -64 – +63
6 EQ LOWDetermines the level (volume) of the low range frequencies. Positive values boost or increase the level, while negative values decrease or cut it.Range: -64 – +63
7 EQ HIGHDetermines the level (volume) of the high range frequencies. Positive values boost or increase the level, while negative values decrease or cut it.Range: -64 – +63
Reference Page
EQ (Equalizer); (page 135)
Envelope ParametersThe level envelope lets you control the transition in volume from the moment a note is pressed on the keyboard to the moment the sound stops. The parameters 2 – 5 above are envelope-related parameters.
2 Level
4 Decay Rate
Level (volume)
5
Release Rate
TimePressing the key Releasing the key
3Attack Rate
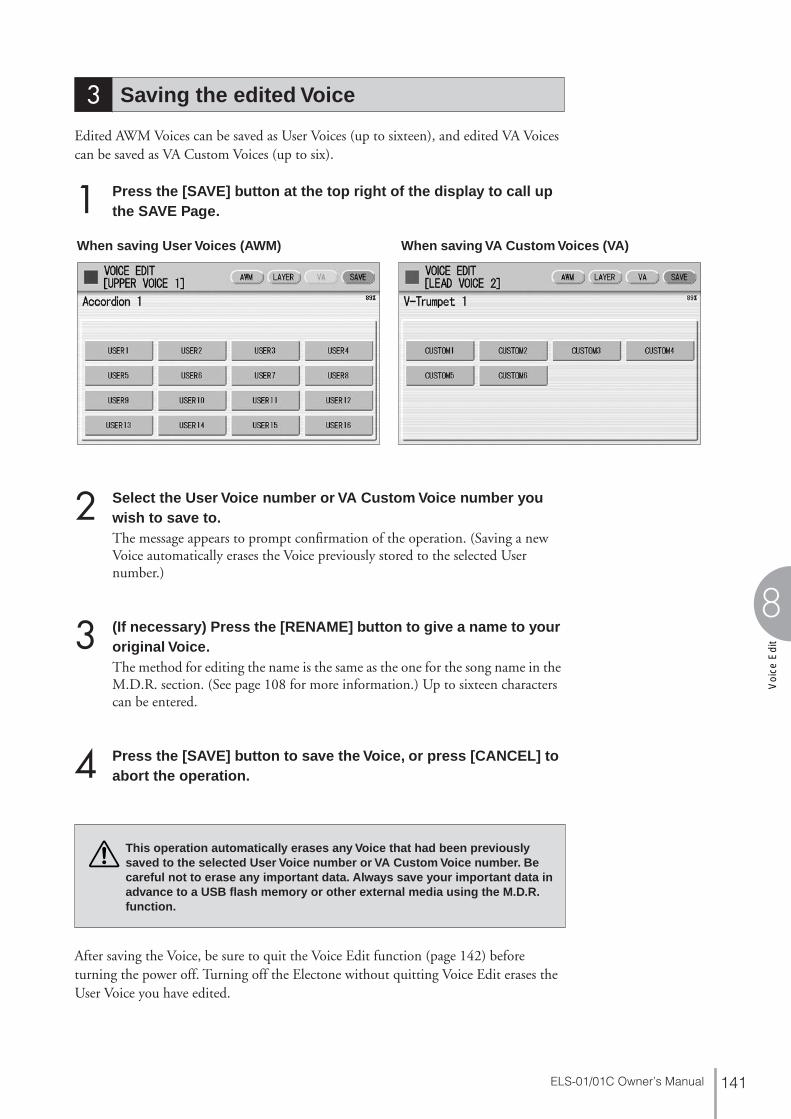
8
Voi
ce E
dit
ELS-01/01C Owner’s Manual 141
Edited AWM Voices can be saved as User Voices (up to sixteen), and edited VA Voices can be saved as VA Custom Voices (up to six).
Press the [SAVE] button at the top right of the display to call up the SAVE Page.
Select the User Voice number or VA Custom Voice number you wish to save to.The message appears to prompt confirmation of the operation. (Saving a new Voice automatically erases the Voice previously stored to the selected User number.)
(If necessary) Press the [RENAME] button to give a name to your original Voice.The method for editing the name is the same as the one for the song name in the M.D.R. section. (See page 108 for more information.) Up to sixteen characters can be entered.
Press the [SAVE] button to save the Voice, or press [CANCEL] to abort the operation.
After saving the Voice, be sure to quit the Voice Edit function (page 142) before turning the power off. Turning off the Electone without quitting Voice Edit erases the User Voice you have edited.
3 Saving the edited Voice
1When saving User Voices (AWM) When saving VA Custom Voices (VA)
This operation automatically erases any Voice that had been previously saved to the selected User Voice number or VA Custom Voice number. Be careful not to erase any important data. Always save your important data in advance to a USB flash memory or other external media using the M.D.R. function.
2
3
4

8
Voice E
dit
ELS-01/01C Owner’s Manual142
You can quit the Voice Edit function from any of its display pages.
Press the [VOICE EDIT] button on the panel.If your original Voice has already been saved, the Voice Edit function quits automatically. If the edited Voice has not been saved, a message appears prompting confirmation of the operation.
Select [EXIT] to quit the Voice Edit function, or [CANCEL] to about the operation and return to the previous display.
Once your original AWM Voice has been saved, it can be selected from the User button in each Voice section. Refer to chapter 2, “Selecting Voices from the User buttons” (page 28).
Once your original VA Voice has been saved, it can be selected from the [VA CUSTOM] button in LEAD VOICE 2. Refer to chapter 2, “Selecting Voices with the Voice buttons” (page 23).
4 Quitting Voice Edit
When quitting Voice Edit, the square at the top left of the display turns light blue for a few seconds, indicating that the Voice you have created is currently being saved. Do not turn the power off while the Voice is being saved.
5 Recalling an Edited Voice
1
2
UPPER KEYBOARD VOICE 1 BRILLIANCE
BRILLIANT
MELLOW
VOLUME
MAX
MIN
STRINGS BRASS TUTTI PAD SYNTHWOOD-WIND
PIANO ORGAN GUITAR CHOIR WORLDPERCUS-SION
1
2
BRILLIANT
MELLOW
MAX
MIN
BRILLIANCE VOLUMELEAD VOICE 2
VA VAACOUS-
TICVIRTUAL
VA VAELEC-
TRONIC
SOLO(KNEE)CUSTOM
1

9
Rhy
thm
Pro
gram
ELS-01/01C Owner’s Manual 143
Rhythm ProgramThe Electone includes powerful rhythm programming functions: Rhythm Pattern Program and Rhythm Sequence Program. Rhythm Pattern Program allows you to record your own original rhythms and save them as user rhythms. Rhythm Sequence Program lets you connect the existing rhythms or your original rhythms to create complete rhythm tracks, which you can automatically play back during your performance. Moreover, Rhythm Sequence Program includes an automatic Registration Shift feature — called Registration Sequence.
Contents
1 Outline of the Rhythm Programming Operation . . . . . . . 143
2 Rhythm Pattern Program . . . . . . . . . . . . . . . . . . . . . . 144• Entering the Rhythm Pattern Program. . . . . . . . . . . . . . . . . . . . . . 144• Basic settings for the Rhythm Pattern . . . . . . . . . . . . . . . . . . . . . . 146• Entering Percussion Sounds to a Rhythm Pattern – Step Write . . 150• Editing Entered Percussion Notes. . . . . . . . . . . . . . . . . . . . . . . . . 152• Entering Percussion Sounds to a Rhythm Pattern – Real Time Write 157• Creating Backing Patterns (Rhythmic Chord Function). . . . . . . . . 158• Changing the Voices for Accompaniment Parts . . . . . . . . . . . . . . 161• Adjusting Volume and Panning . . . . . . . . . . . . . . . . . . . . . . . . . . 162• Effect Settings. . . . . . . . . . . . . . . . . . . . . . . . . . . . . . . . . . . . . . . . 163• Detailed settings for each percussion instrument . . . . . . . . . . . . . 166• Saving Rhythm Patterns . . . . . . . . . . . . . . . . . . . . . . . . . . . . . . . . 167• Quitting the Rhythm Pattern Program . . . . . . . . . . . . . . . . . . . . . . 169• Recalling User Rhythm Patterns . . . . . . . . . . . . . . . . . . . . . . . . . . 169
• Selecting Rhythm from an External Media. . . . . . . . . . . . . . . . . . . 170• Percussion Kit List . . . . . . . . . . . . . . . . . . . . . . . . . . . . . . . . . . . . 171
3 Rhythm Sequence Program . . . . . . . . . . . . . . . . . . . . 174• Selecting a Sequence . . . . . . . . . . . . . . . . . . . . . . . . . . . . . . . . . . 174• Programming a Sequence . . . . . . . . . . . . . . . . . . . . . . . . . . . . . . . 175• Auditioning a Sequence . . . . . . . . . . . . . . . . . . . . . . . . . . . . . . . . 177• Editing an Existing Rhythm Sequence . . . . . . . . . . . . . . . . . . . . . . 177• Programming a Registration Sequence . . . . . . . . . . . . . . . . . . . . . 179• Editing an Existing Registration Sequence . . . . . . . . . . . . . . . . . . 181• Quitting the Rhythm Sequence Program . . . . . . . . . . . . . . . . . . . . 181• Playing Rhythm Sequences. . . . . . . . . . . . . . . . . . . . . . . . . . . . . . 182• Playing All Sequences in Order. . . . . . . . . . . . . . . . . . . . . . . . . . . 182• Copying a Sequence . . . . . . . . . . . . . . . . . . . . . . . . . . . . . . . . . . . 183
4 Saving Rhythm Pattern and Rhythm Sequence Data to external media . . . . . . . . . . . . . . . . . . . . . . . . . . . . . 184
1 Outline of the Rhythm Programming Operation
Entering percussion sounds and/or editing them
Creating the backing (Rhythmic Chord) patterns and/or editing them
Effect settings and detailed settings for each percussion Voice (Panning, Tuning, and so on)
Saving your rhythm patterns as User rhythms
Selecting the destination of the sequence
Entering a rhythm pattern one by one
Programming the Registration Sequence
Rhythm Pattern Program (pages 144 – 169)You can create your original rhythm patterns by entering percussion sounds or editing preset rhythm patterns.
Rhythm Sequence Program (pages 174 – 181)You can connect any of the rhythms together to make complete rhythm compositions. Moreover, you can also program Registration Shift events at any point in the composition so that the Registration Memory settings automatically change as the rhythm sequence plays back.
9

ELS-01/01C Owner’s Manual144
9
Rhythm
Program
Rhythm Pattern Program lets you use any of the different instrument sounds (drum and percussion) assigned to each key on the Upper and Lower keyboards in creating your own rhythms. Up to 48 of your original rhythms can be saved as User Rhythms.
● ● ● ● ● ● ● ● ● ● ● ● ● ● ● ● ● ● ● ● ● ● ● ● ● ● ● ● ● ● ● ● ● ● ● ● ● ●
Entering the Rhythm Pattern Program
There are two ways to program a User pattern: copying a preset rhythm that is similar to the rhythm you want to create, and creating your own rhythm from scratch.
To copy a preset rhythm:Copying a preset rhythm lets you make changes to an existing rhythm, saving you time if you want to program a rhythm that is similar to an existing preset pattern.
Select the rhythm you want to copy from the Rhythm Menu.
While holding down the [PATTERN] button in the panel (the display prompts you to select a rhythm), select the Rhythm button that contains the preset rhythm to be copied to the Rhythm Pattern Program.
2 Rhythm Pattern Program
1
2NOTE
Pressing the [PATTERN] button while the rhythm is running automatically stops the rhythm.
DISPLAY SELECT
VOICEDISPLAY
FOOTSWITCH
RHYTHMPROGRAM
UTILITY INTERNET
A.B.C.M.O.C. MDR
VOICE EDIT PATTERN SEQUENCE
U.ORGANFLUTES
L.ORGANFLUTES
ROTARY SPSPEED
MARCH
LATIN WORLDMUSIC
BALLAD ROCK DANCE
WALTZ POPS R & BSWING&JAZZ
2
11
RHYTHM VOLUME
SEQ.2
SEQ.
3SEQ.
4SEQ.
MAX
MIN

ELS-01/01C Owner’s Manual 145
9
Rhy
thm
Pro
gram
To create your own rhythm from scratch:Press the [PATTERN] button and release it without selecting a Rhythm button. A blank pattern is loaded to the Rhythm Pattern Program.
A Rhythm consists of 15 sections: Intro 1 – 3, Main A – D, Fill In A – D, Ending 1 – 3, and Break.In Rhythm Pattern Program, you can enter or edit percussion notes one by one, or assemble each part from other different rhythms to create your own new User Rhythm.
Case 1: Creating your own rhythm by changing a preset rhythm
Case 2: Creating your own rhythm by assembling parts from other different rhythms
Case 3: Creating your own rhythm from scratch
Intro 1
2
3
Main A
B
C
D
Fill In A
B
C
DEnding 1
2
3
Break
Intro 1'
2
3
Main A
B
C
D
Fill In A
B
C
DEnding 1
2
3
Break
Preset Rhythm User Rhythm
Changing Intro 1 to Intro 1'
Save as a User Rhythm
All Rhythm sections, including any which have not been edited, are saved as one User Rhythm.
Intro 1
2
3
Main A
B
C
D
Fill In A
B
C
DEnding 1
2
3Break Intro 1
2
3'
Main A
B
C'
D'
Fill In A
B
C'
D'Ending 1
2
3Break'
Preset Rhythm
Intro 1'
2'
3'
Main A'
B'
C'
D'
Fill In A'
B'
C'
D'Ending 1'
2'
3'Break'
Preset Rhythm
Save as a User Rhythm
User Rhythm
Assemble some sections or parts
Intro 1
2
3
Main A
B
C
D
Fill In A
B
C
DEnding 1
2
3
Break
Intro 1
2
3
Main A
B
C
D
Fill In A
B
C
DEnding 1
2
3
Break
Blank Rhythm User RhythmEntering percussion sounds into each section
Save as a User Rhythm
These are blank sections (no percussion sounds); if you press ENDING [2] or [3] button, no sound is played.

ELS-01/01C Owner’s Manual146
9
Rhythm
Program
● ● ● ● ● ● ● ● ● ● ● ● ● ● ● ● ● ● ● ● ● ● ● ● ● ● ● ● ● ● ● ● ● ● ● ● ● ●
Basic settings for the Rhythm Pattern
In the SETTING Page of the display, set the conditions of the rhythm, such as time signature, measure length, and so on. You can also customize the part settings in this SETTING Page — deleting any part or copying a part from another rhythm to the currently selected rhythm.
Press the [SETTING] button in the display to call up the SETTING Page.
Determines the time signature used for the rhythm.You can select the time signature with the BEAT buttons.
If you start the Rhythm Pattern Program from a preset rhythm, pressing a BEAT button that is not the same as the currently selected rhythm calls up the following message.
Selecting [CLEAR] deletes all data in the rhythm and changes the time signature.Select [CANCEL] to abort the operation.
1
2

ELS-01/01C Owner’s Manual 147
9
Rhy
thm
Pro
gram
Select a section to which you want to enter or edit the rhythm pattern.Pressing the SECTION button on the display calls up the Section Select pop-up menu. After selecting the desired section, the pop-up menu automatically closes.
You can play the selected section by pressing the Rhythm [START] button on the panel. You can also change the section while the rhythm is playing. For details on muting the accompaniment part, refer to page 162.
Sets the measure length of the rhythm pattern.Pressing the MEASURE button on the display calls up the Measure Select pop-up menu. Select the desired measure in the pop-up menu. If you select Break or Fill In as the section, the measure cannot be changed.
(If necessary) Set the Metronome, Part Assemble, and Part Clear parameters.
1 METRONOMETurns the metronome click on or off. When set to ON, the metronome sounds on each beat of the measure (for example, three times per measure in 3/4 time) to serve as a rhythmic guide when programming patterns. Set to On here with Real Time Write.
3
4
5
1
2
3
Reference Pages
Step Write and Real Time Write (page 149)
Entering Percussion Sounds to a Rhythm Pattern — Real Time Write (page 157)
NOTE
Pressing the VOLUME buttons for Rhythm also changes the volume of the metronome.

ELS-01/01C Owner’s Manual148
9
Rhythm
Program
2 ASSEMBLECopies the part from another rhythm to the currently selected rhythm. You can assemble various sections from multiple rhythms to create your original rhythm.Pressing the [ASSEMBLE] button calls up the following display.
Select the copy source: Rhythm, Section and Part. Then select the destination. You can copy only one part, or all parts of a rhythm.
After setting the source and destination, press [EXECUTE]. Copy is executed and returning to the previous display.
You can also select a rhythm pattern currently being created as the COPY FROM RHYTHM.To create a MAIN B section based on MAIN A, you can conveniently create that you create the MAIN A rhythm first and copy it to MAIN B, then edit the MAIN B rhythm.
To select the rhythm currently being created, select “Current Rhythm” on the 5th page of the “USER” category.
Select copy source(Rhythm, Section,
and Part)
Select the part forthe copy destination
Press here to execute the copy

ELS-01/01C Owner’s Manual 149
9
Rhy
thm
Pro
gram
3 CLEAR PARTClears a specific part or parts from the currently selected rhythm. Pressing this button calls up the following display.
Select the part you want to delete from the displayed parts. You cannot select a part that contains no data (the button is grayed out). If you select [ALL] here, the percussion and all accompaniment parts are cleared.
When selecting the desired part, a display prompting confirmation of the operation appears. Select [CLEAR] to execute the operation, or select [CANCEL] to abort the operation.
Reference Page
Accompaniment (page 61)
NOTE
If you select BASS here, the bass phrase in the A.B.C. will be cleared.
Step Write and Real Time WriteThere are two different methods you can use to program rhythms: Step Write and Real Time Write.
Step Write allows you to enter percussion sounds as individual note values. As a method, it is very similar to writing down the notes on a sheet of music paper; each note is entered one at a time, and though you can hear each individual note entered, you cannot actually hear the pattern playing as you create it. Step Write is good for precision and for entering percussion sounds whose note placement and rhythmic value has been determined, such as a bass drum that plays every beat in a measure.
Real Time Write on the other hand, is similar to using a multi-track tape recorder; you can hear previously recorded parts of the pattern as you record new parts on top. Real Time Write is best for capturing the “feel” of a rhythm, because it allows you to actually play the pattern as you are creating it.
Each method has its own advantages and uses. Which method you use depends partly on the type of rhythm you intend to create and partly on your own personal preference. You can switch between the two methods in editing to create a single rhythm by the use of both methods. This would come handy, for example, in programming the basic beats of a rhythm with Step Write, then using Real Time Write to add percussion accents and embellishments.
Which mode of the operation is selected depends on the play status of the rhythm. If the rhythm is stopped, Step Write is automatically selected. If the rhythm is playing, Real Time Write is selected. See the instructions below for Step Write, and page 157 for Real Time Write.
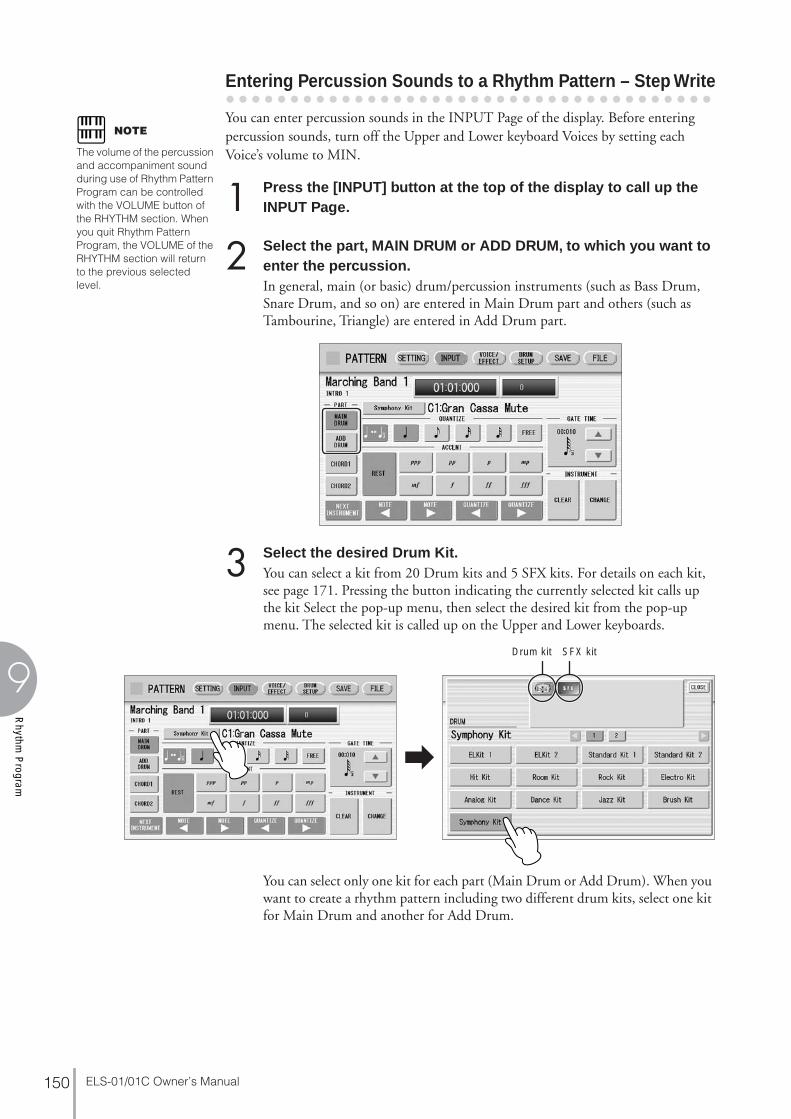
ELS-01/01C Owner’s Manual150
9
Rhythm
Program
● ● ● ● ● ● ● ● ● ● ● ● ● ● ● ● ● ● ● ● ● ● ● ● ● ● ● ● ● ● ● ● ● ● ● ● ● ●
Entering Percussion Sounds to a Rhythm Pattern – Step Write
You can enter percussion sounds in the INPUT Page of the display. Before entering percussion sounds, turn off the Upper and Lower keyboard Voices by setting each Voice’s volume to MIN.
Press the [INPUT] button at the top of the display to call up the INPUT Page.
Select the part, MAIN DRUM or ADD DRUM, to which you want to enter the percussion.In general, main (or basic) drum/percussion instruments (such as Bass Drum, Snare Drum, and so on) are entered in Main Drum part and others (such as Tambourine, Triangle) are entered in Add Drum part.
Select the desired Drum Kit.You can select a kit from 20 Drum kits and 5 SFX kits. For details on each kit, see page 171. Pressing the button indicating the currently selected kit calls up the kit Select the pop-up menu, then select the desired kit from the pop-up menu. The selected kit is called up on the Upper and Lower keyboards.
You can select only one kit for each part (Main Drum or Add Drum). When you want to create a rhythm pattern including two different drum kits, select one kit for Main Drum and another for Add Drum.
NOTE
The volume of the percussion and accompaniment sound during use of Rhythm Pattern Program can be controlled with the VOLUME button of the RHYTHM section. When you quit Rhythm Pattern Program, the VOLUME of the RHYTHM section will return to the previous selected level.
12
3
Drum kit SFX kit
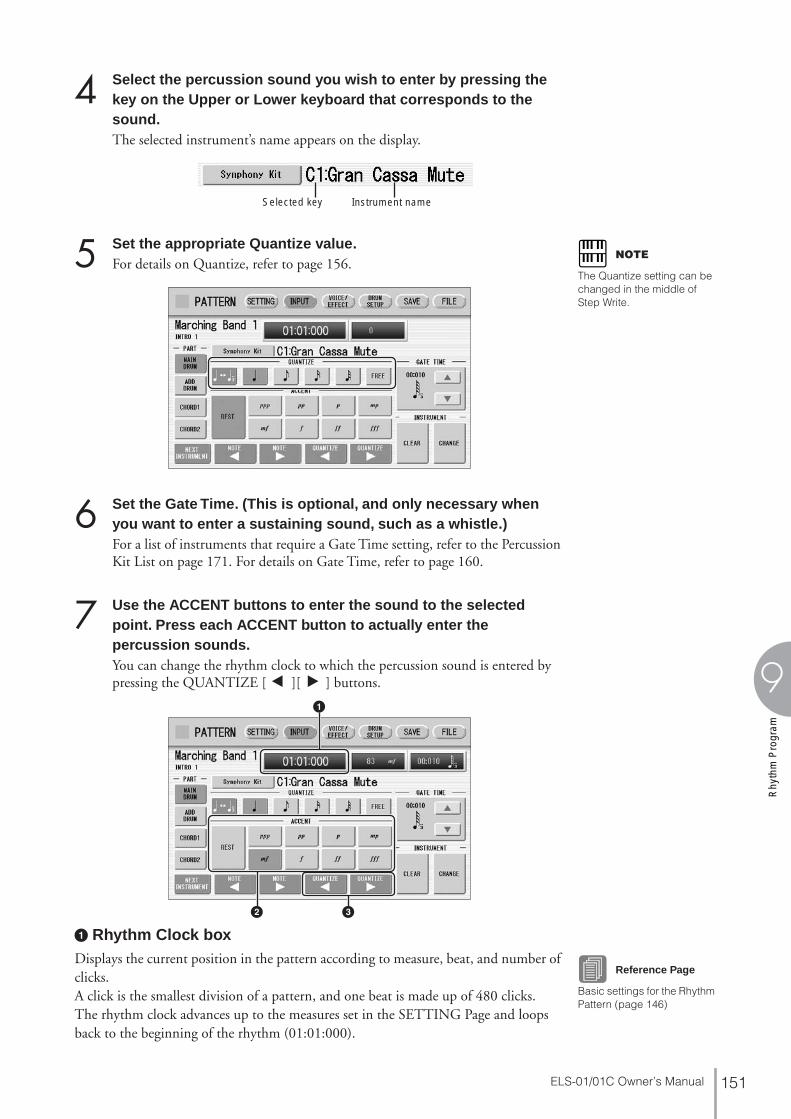
ELS-01/01C Owner’s Manual 151
9
Rhy
thm
Pro
gram
Select the percussion sound you wish to enter by pressing the key on the Upper or Lower keyboard that corresponds to the sound.The selected instrument’s name appears on the display.
Set the appropriate Quantize value.For details on Quantize, refer to page 156.
Set the Gate Time. (This is optional, and only necessary when you want to enter a sustaining sound, such as a whistle.)For a list of instruments that require a Gate Time setting, refer to the Percussion Kit List on page 171. For details on Gate Time, refer to page 160.
Use the ACCENT buttons to enter the sound to the selected point. Press each ACCENT button to actually enter the percussion sounds.You can change the rhythm clock to which the percussion sound is entered by pressing the QUANTIZE [E][F] buttons.
1 Rhythm Clock boxDisplays the current position in the pattern according to measure, beat, and number of clicks. A click is the smallest division of a pattern, and one beat is made up of 480 clicks.The rhythm clock advances up to the measures set in the SETTING Page and loops back to the beginning of the rhythm (01:01:000).
4
Instrument nameSelected key
5 NOTE
The Quantize setting can be changed in the middle of Step Write.
6
7
1
32
Reference Page
Basic settings for the Rhythm Pattern (page 146)

ELS-01/01C Owner’s Manual152
9
Rhythm
Program
2 ACCENT buttonsRecords the instrument and determines its volume or Accent level. Press one of the ACCENT buttons you wish to set (“���” is softer and “��� ” is louder; “REST” is no sound). The instrument is automatically inserted at the Accent level to the selected position in the pattern. Selection of an Accent level automatically advances the rhythm clock by one step, according to the current Quantize resolution value.
3 QUANTIZE [E][F] controlsEach press of the buttons advances or reverses the rhythm clock by one step. The size of a single step is determined by the Quantize value.
Repeat steps 4 through 7 above to layer each instrument and complete your own rhythm.
● ● ● ● ● ● ● ● ● ● ● ● ● ● ● ● ● ● ● ● ● ● ● ● ● ● ● ● ● ● ● ● ● ● ● ● ● ●
Editing Entered Percussion Notes
You can change the accent level, position, or gate time of the entered sound, or delete the entered sound.
To change the accent level of an entered note:
Select the desired note for changing the accent level.
1 NEXT INSTRUMENTSelects the entered instruments one by one, from left key to right.
2 NOTE [E][F] controlsSelects the previous/next position’s note of the currently selected instrument. In the above notes for example, you can select notes 1, 3 and 4 one by one. Rests (2 and 5) are ignored.
3 QUANTIZE [E][F] controlsAdvances or reverses the rhythm clock by one step. The size of a single step is determined by the Quantize value.
8
1
21 3
1 2 3 4 5

ELS-01/01C Owner’s Manual 153
9
Rhy
thm
Pro
gram
Change the accent level by using the ACCENT buttons or Accent box.The Accent box allows for finer changes.
1 Accent boxTouch on the box to enable the Accent box.Turning the Data Control dial changes the accent level over a range of 0 – 127. The minimum setting results in no sound.
2 ACCENT buttonsDetermines the coarse accent level. Eight accent levels (from “���” to “��� ”) are available.Press the desired Accent button to change the currently selected note to the selected level.
To move an entered note:
Select the note you want to move (as in Step 1 on page 152).
Press the Rhythm Clock box to enable the box.
Turn the Data Control dial to change the position by one clock.
21
2
12
3

ELS-01/01C Owner’s Manual154
9
Rhythm
Program
To change the length of an entered note:The length of sustaining sounds such as Snare Roll and Whistle can be changed by adjusting the Gate Time. See page 161 for more information.
To erase an entered note:
Select the note you want to erase (as in Step 1 on page 152).
Press the [REST] button in the ACCENT section of the display.The selected note is deleted and replaced with a rest.
You can also erase all notes of a single instrument, or all notes entered.
To erase one instrument:
Select the key to which the instrument that you want to erase is assigned.The key name you have selected and its instrument name are displayed.
Press [CLEAR] in the display.The following display appears, prompting confirmation of the operation.
Select [CLEAR] to erase the selected instrument.A bell sound indicates that the instrument has been erased.
12
1
Instrument nameSelected key
2
3

ELS-01/01C Owner’s Manual 155
9
Rhy
thm
Pro
gram
The following method can also be used to erase one instrument.
While holding down the [CLEAR] button, press the key on the keyboard corresponding to the instrument you wish to erase. A bell sound indicates that the instrument has been erased.
To erase all instruments:
Press [CLEAR] in the display.The following display appears, prompting confirmation of the operation.
Select [CLEAR ALL] to erase all instruments.All instruments are instantly erased.
When you want to replace the instrument you have already entered with another instrument, it’s not necessary to delete and re-enter. You can quickly replace the sound with the following procedure.
To replace the instrument:Before the operation, stop the rhythm.
Select the key to which the instrument you want to replace is assigned.The key name you have selected and its instrument name are displayed.
Simultaneously hold down the [CHANGE] button in the display and press the key on the Upper or Lower keyboard that corresponds to the instrument you want to use.The instrument is instantly erased and replaced with the newly selected one.
1
2
1
Instrument nameSelected key
2

ELS-01/01C Owner’s Manual156
9
Rhythm
Program
About QuantizeThe Quantize function is a process of rounding off timing or duration values, so that each note plays with precise timing. You can select nine types of Quantize value.
With Step WriteIt allows you to automatically correct the length (duration) and timing of each note you enter.
Steps Depending on the Quantize Values
With Real Time WriteIt allows you to automatically correct the timing of the notes you play, according to the specified Quantize resolution. No correction occurs when you select FREE. Generally, you should set Quantize to be the same as the shortest note you intend to play.
1 2 3 4 5
6 7 8 9 5
With this button,change the displayed
Quantize buttons
0 120 240 360 480(1 beat)
Clock
1
2
3
4
6
7
8
9 40
80
160
120
60
240
320
Setting Quantize to FREE (5) results in the finest, least amount of quantization (1/480 beat).
Original data (you play)
After applying a “ ” quantize value to the original data
Quarter note length

ELS-01/01C Owner’s Manual 157
9
Rhy
thm
Pro
gram
Entering Percussion Sounds to a Rhythm Pattern —
● ● ● ● ● ● ● ● ● ● ● ● ● ● ● ● ● ● ● ● ● ● ● ● ● ● ● ● ● ● ● ● ● ● ● ● ● ●
Real Time Write
While you listen to the entered rhythm or metronome click, play the Upper/Lower keyboards to enter the desired percussion sounds.
Select the desired part to which the percussion sounds are entered, and the desired drum kit, by following Steps 1 – 3 on page 150.
Set the appropriate Quantize value.The positions at which the sounds are input will be corrected according to the predetermined Quantize value in the Real Time Write operation. For details, refer to page 156.
Press the rhythm [START] button in the panel.The rhythm (or Metronome) starts playing, enabling the Real Time Write operation.
While the rhythm is running, play the percussion sounds from the Upper and/or Lower keyboards.If you have started the Rhythm Pattern Program by copying a preset rhythm, you can listen the selected rhythm as you play the sound. If you have started from scratch, set the Metronome to “on” in the SETTING Page and listen to the metronome click. The pattern will automatically repeat (or “loop”) for a certain number of measures as set in the SETTING Page.
Repeat steps 2 through 4 above to layer each instrument and complete your own rhythm.
1
2
3
4Reference Page
Metronome (page 147)
5

ELS-01/01C Owner’s Manual158
9
Rhythm
Program
You can erase an instrument while rhythm is played.
To erase an instrument/key assignment:While holding down the [CLEAR] button, press the key on the keyboard corresponding to the instrument you wish to erase. All instances of the selected instrument will be erased from the pattern.
When you want to erase all instruments, or edit entered percussion notes, you need to stop the rhythm then edit. See page 152, “Editing Entered Percussion Notes.”
● ● ● ● ● ● ● ● ● ● ● ● ● ● ● ● ● ● ● ● ● ● ● ● ● ● ● ● ● ● ● ● ● ● ● ● ● ●
Creating Backing Patterns (Rhythmic Chord Function)
The Rhythm Pattern Program allows you to use one of the Electone’s Accompaniment patterns with your original rhythm. You can select and save the Accompaniment pattern that best matches the rhythm that you have created. Moreover, Rhythm Pattern Program features a Rhythmic Chord function that lets you add your own backing patterns to the rhythms you create.
To select an appropriate Accompaniment pattern for your newly created rhythm:
Press the [SETTING] button at the top of the display to call up the SETTING Page.
Press the [ASSEMBLE] button.A pop-up menu appears, letting you select the copy source and destination part.
Using the COPY FROM [RHYTHM] and [SECTION] buttons, select the rhythm and the section which has the accompaniment you wish to use.
Using the COPY FROM [PART] button, select the accompaniment part you want to copy.
Using the COPY TO [PART] button, select the desired accompaniment part (CHORD 1 or CHORD 2) to be used for the Rhythmic Chord pattern.
123Reference Page
Basic settings for the Rhythm Pattern (page 146)
45

ELS-01/01C Owner’s Manual 159
9
Rhy
thm
Pro
gram
Press the [EXECUTE] button to execute the copy.
The desired accompaniment part (Rhythmic Chord pattern) has been copied.
To create your own backing patterns with the Rhythmic Chord function:
The Rhythmic Chord pattern can be entered by the same methods as the rhythm: Step Write and/or Real Time Write.
Press the [INPUT] button at the top of the display to call up the INPUT Page.
Select the part, CHORD 1 or CHORD 2, which you want to create for the Rhythmic Chord pattern.
If the part you have select contains a preset accompaniment pattern, a message appears prompting you to confirm whether you want to clear the existing data or not. To create your own Rhythmic Chord pattern, select [CLEAR].
Select the desired Voice.Pressing the button showing the Voice name calls up the relevant Voice Menu. Select the desired Voice category with the instrument icon buttons, then select the desired Voice from the Voice Menu. The selected Voice is called up for both the Upper and Lower keyboards.
Voices can also be changed even after entering the Rhythmic Chord pattern.You can select only one Voice for one part (Chord 1 or Chord 2). When you want to create a Rhythmic Chord pattern including two different Voices, select one Voice for Chord 1 and another for Chord 2.
6
12
3 NOTE
The Voice menu that appears here is not the same as the one for the Voice Sections.

ELS-01/01C Owner’s Manual160
9
Rhythm
Program
Set the appropriate Quantize value.For details on the Quantize function, refer to page 156.
Set the Gate Time.You can adjust the Gate Time setting by using the GATE TIME buttons in the display, or the Data Control dial. Using the buttons in the display makes coarse changes in the value. Using the Data Control dial makes fine changes.
Enter the Rhythmic Chord pattern.The methods for entering the Rhythmic Chord pattern are the same as those for entering the rhythm pattern. Any key you press sounds a C major triad chord (C, E, and G). For information on Step Write, see page 151; for information on Real Time Write, see page 157.
You can also edit the entered Rhythmic Chord pattern using the same method as in “Editing Entered Percussion Notes” (page 152). To change the gate time of the notes of the Rhythmic Chord pattern, follow the instructions below.
Gate time determines the actual length of time a note sounds. For example, a quarter note is sometimes played as tenuto (long length) and sometimes played as staccato (short length).Since 1 beat is made up of 480 clocks, a quarter note played tenuto may have a gate time between 450 – 470, and a staccato quarter note may be about 240.
4
5
DATA CONTROL
6
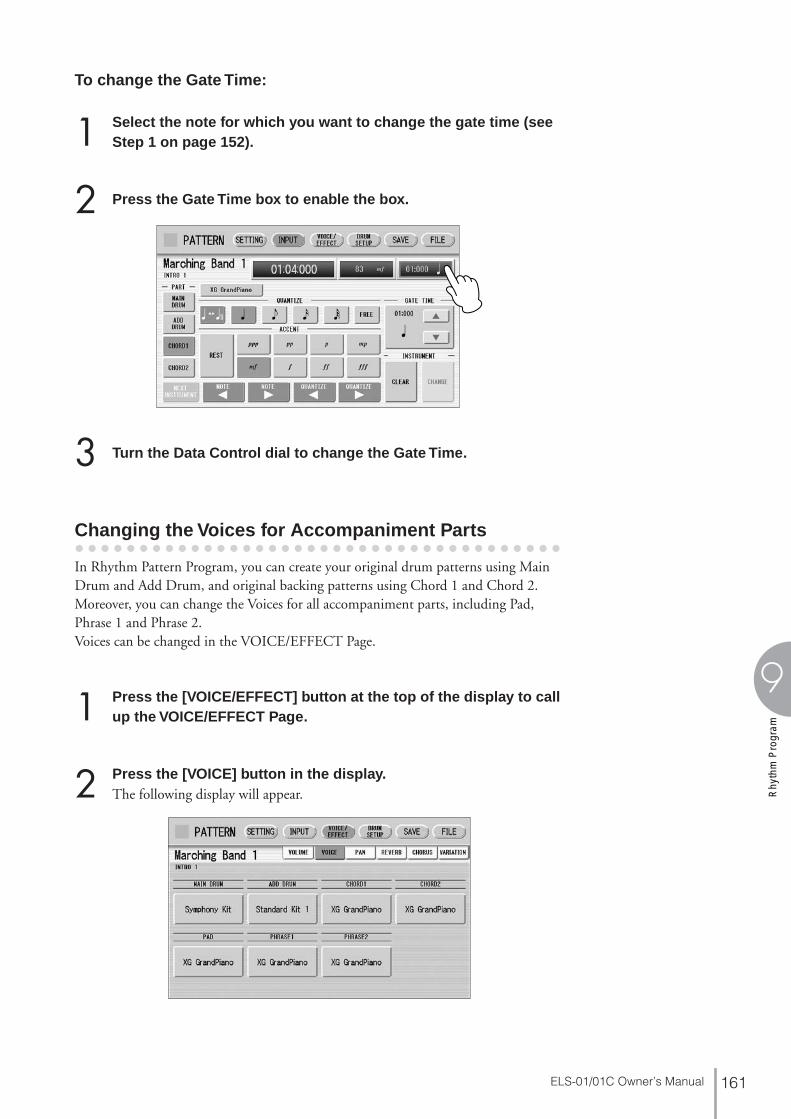
ELS-01/01C Owner’s Manual 161
9
Rhy
thm
Pro
gram
To change the Gate Time:
Select the note for which you want to change the gate time (see Step 1 on page 152).
Press the Gate Time box to enable the box.
Turn the Data Control dial to change the Gate Time.
● ● ● ● ● ● ● ● ● ● ● ● ● ● ● ● ● ● ● ● ● ● ● ● ● ● ● ● ● ● ● ● ● ● ● ● ● ●
Changing the Voices for Accompaniment Parts
In Rhythm Pattern Program, you can create your original drum patterns using Main Drum and Add Drum, and original backing patterns using Chord 1 and Chord 2.Moreover, you can change the Voices for all accompaniment parts, including Pad, Phrase 1 and Phrase 2.Voices can be changed in the VOICE/EFFECT Page.
Press the [VOICE/EFFECT] button at the top of the display to call up the VOICE/EFFECT Page.
Press the [VOICE] button in the display.The following display will appear.
1
2
3
1
2

ELS-01/01C Owner’s Manual162
9
Rhythm
Program
Select the desired part for which you wish to change the Voice.The Voice menu appears.
Select the desired Voice, and the Voice menu automatically closes.
After selecting the desired Voice, customize the accompaniment to your personal preference by adjusting the volume and pan, and setting the desired effects below.
● ● ● ● ● ● ● ● ● ● ● ● ● ● ● ● ● ● ● ● ● ● ● ● ● ● ● ● ● ● ● ● ● ● ● ● ● ●
Adjusting Volume and Panning
Volume and Pan are set in VOICE/EFFECT Page.
1 ON/OFFDetermines the on/off status of each accompaniment part. When this is set to OFF, the part is muted.
2 Volume slidersDetermines the volume of each accompaniment part.Range: 0 – 127
3
4NOTE
The Voice menu that appears here is not the same as the one for the Voice Sections.
1
2
VOLUME Display
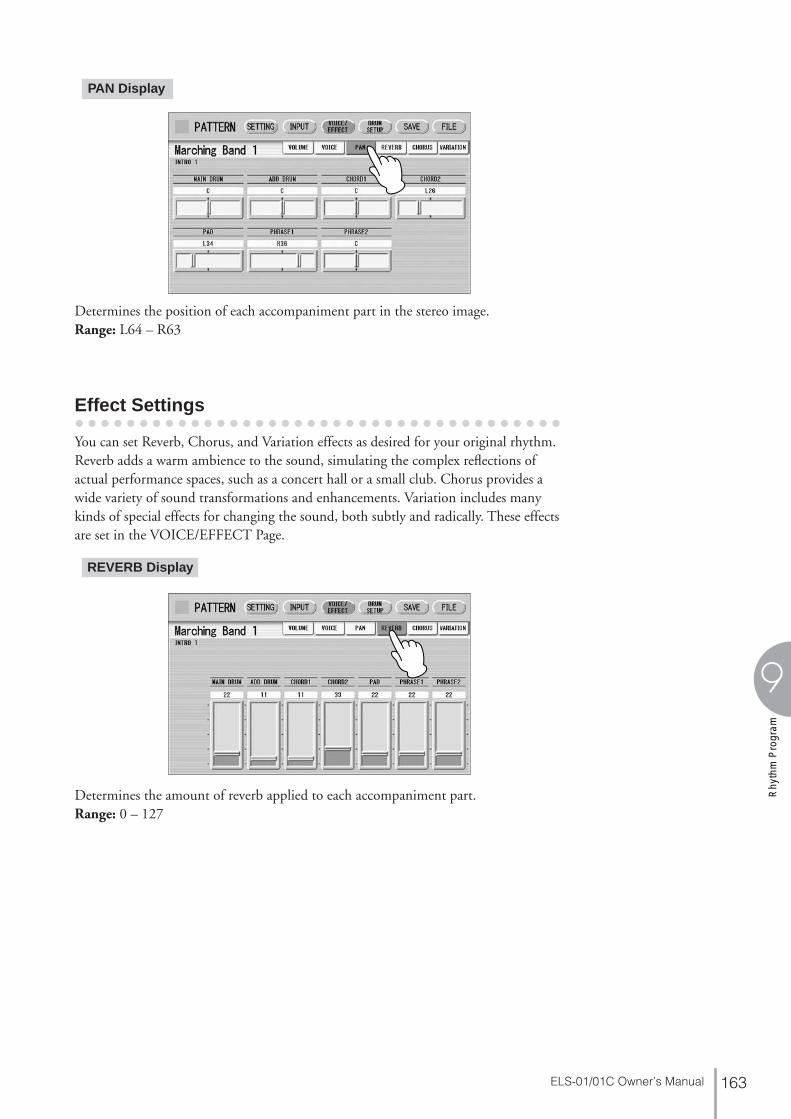
ELS-01/01C Owner’s Manual 163
9
Rhy
thm
Pro
gram
Determines the position of each accompaniment part in the stereo image.Range: L64 – R63
● ● ● ● ● ● ● ● ● ● ● ● ● ● ● ● ● ● ● ● ● ● ● ● ● ● ● ● ● ● ● ● ● ● ● ● ● ●
Effect Settings
You can set Reverb, Chorus, and Variation effects as desired for your original rhythm.Reverb adds a warm ambience to the sound, simulating the complex reflections of actual performance spaces, such as a concert hall or a small club. Chorus provides a wide variety of sound transformations and enhancements. Variation includes many kinds of special effects for changing the sound, both subtly and radically. These effects are set in the VOICE/EFFECT Page.
Determines the amount of reverb applied to each accompaniment part.Range: 0 – 127
PAN Display
REVERB Display

ELS-01/01C Owner’s Manual164
9
Rhythm
Program
1 CHORUS TYPEDetermines the type of the chorus effect. Pressing the CHORUS TYPE button calls up the chorus type list.
Select the desired chorus type, and the list automatically closes.
2 Chorus slidersDetermines the amount of chorus effect applied to each accompaniment part.Range: 0 – 127
1
2
CHORUS Display
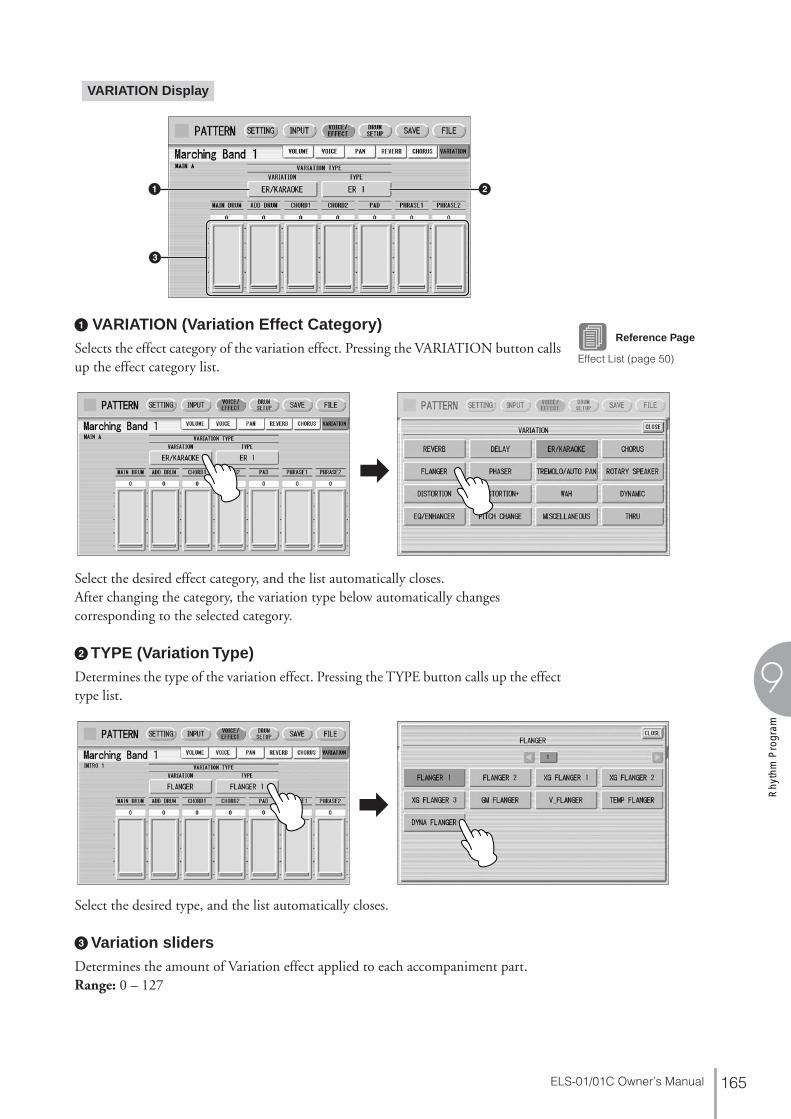
ELS-01/01C Owner’s Manual 165
9
Rhy
thm
Pro
gram
1 VARIATION (Variation Effect Category)Selects the effect category of the variation effect. Pressing the VARIATION button calls up the effect category list.
Select the desired effect category, and the list automatically closes.After changing the category, the variation type below automatically changes corresponding to the selected category.
2 TYPE (Variation Type)Determines the type of the variation effect. Pressing the TYPE button calls up the effect type list.
Select the desired type, and the list automatically closes.
3 Variation slidersDetermines the amount of Variation effect applied to each accompaniment part.Range: 0 – 127
1 2
3
VARIATION Display
Reference Page
Effect List (page 50)
LCD

ELS-01/01C Owner’s Manual166
9
Rhythm
Program
● ● ● ● ● ● ● ● ● ● ● ● ● ● ● ● ● ● ● ● ● ● ● ● ● ● ● ● ● ● ● ● ● ● ● ● ● ●
Detailed settings for each percussion instrument
You can independently adjust the settings of pan, pitch, reverb and volume for each instrument.
Press the [DRUM SETUP] button at the top of the display to call up the DRUM SETUP Page.
Select the desired part, Main Drum or Add Drum.
Press the appropriate key (the key to which the instrument to be changed is assigned).The selected instrument’s name is shown on the display and you can change its settings.
Adjust the parameters: Pan, Volume, Reverb and Pitch.
12
3
4
2
3 4 5 6
1
ELS-01/01C Owner’s Manual 167
9
Rhy
thm
Pro
gram
1 Percussion Kit NameIndicates the currently selected kit. Pressing this button calls up the Percussion Kit list, letting you select the desired kit. When you change the kit, the instruments you have already entered are replaced with the instruments of the newly selected kit.
2 PANDetermines the position of the currently selected instrument in the stereo image.Range: L63 – R63
3 VOLUMEDetermines the volume of the currently selected instrument.Range: 0 – 127
4 REVERBDetermines the amount of reverb applied to the currently selected instrument.Range: 0 – 127
5 PITCH COARSEDetermines the pitch of the currently selected instrument, adjustable in semitone (100-cent) steps.Range: -64 – +63
6 PITCH FINEDetermines the pitch of the currently selected instrument, adjustable in 1-cent steps, allowing more detailed tuning of the instrument than in PITCH COARSE (5) above.Range: -64 – +63
● ● ● ● ● ● ● ● ● ● ● ● ● ● ● ● ● ● ● ● ● ● ● ● ● ● ● ● ● ● ● ● ● ● ● ● ● ●
Saving Rhythm Patterns
You can save your newly created rhythm pattern as a User Rhythm, up to a maximum of 48 patterns.
If necessary, confirm the contents of the rhythm you want to save.
Reference Page
Percussion Kit List (page 171)
Confirming rhythm patterns before savingThe rhythm pattern you have created will be saved with 15 sections collectively into one rhythm. Before saving, we recommend that you confirm the contents of each section.
Example: When saving the Main A and Main B sections you have created into one user rhythmFirst select “Main A” by using the [SECTION] button on the SETTING Page, then press the [START] button on the panel. This lets you hear the Main A pattern you have created. Confirm that the rhythm pattern is what you want to save as Main A. Next, select “Main B” by using the [SECTION] button, then play it back and confirm that this is what you want to save as Main B.If the Main A and/or Main B patterns contain undesired data or no data, create the desired data by using the Assemble function (page 148).
After confirming the desired section (Main A and Main B here), we recommend that you confirm that all other sections contain no data. If unnecessary data is contained in some sections which you don’t want to save, delete that unnecessary data. This can reduce the data size of the user rhythm.
1

ELS-01/01C Owner’s Manual168
9
Rhythm
Program
Press the [SAVE] button at the top right of the display to call up the SAVE Page.If the rhythm is playing, it will automatically be stopped.
Select the User Rhythm number to which you wish to save.The following display appears, prompting confirmation of the operation.
Press the [SAVE] button to save the pattern, or press [CANCEL] to abort the operation.
After saving the Rhythm, be sure to quit Rhythm Pattern Program (page 169) before turning the power off. Turning off the Electone without quitting Rhythm Pattern Program erases the User Rhythm you have created.
2
3
LCD
Remaining Memory (amount of memory available for storing rhythms) is shown on the display as a percentage.
If a “Data full” message appears when you press the [SAVE] button, the pattern cannot be saved because of lack of available memory space. If this occurs, check through all fifteen sections for any unnecessary data. After erasing some of the less necessary data, try to save the pattern again.To avoid this, you should periodically check the amount of remaining memory while you are creating your rhythm.
4
Remaining Memory
Reference Page
Confirming rhythm pattens before saving (page 167)
CLEAR PART (page 149)

ELS-01/01C Owner’s Manual 169
9
Rhy
thm
Pro
gram
● ● ● ● ● ● ● ● ● ● ● ● ● ● ● ● ● ● ● ● ● ● ● ● ● ● ● ● ● ● ● ● ● ● ● ● ● ●
Quitting the Rhythm Pattern Program
You can quit the Rhythm Pattern Program from any of its display pages.
Press the [PATTERN] button.If a rhythm is playing, it will automatically be stopped.If you leave Rhythm Pattern Program without having edited any patterns, this simply quits the Rhythm Pattern Program.If you have not saved the edited pattern, a message appears, prompting confirmation of the operation.
Select [EXIT] to leave Rhythm Pattern Program, or [CANCEL] to abort the operation and return to the previous display.
● ● ● ● ● ● ● ● ● ● ● ● ● ● ● ● ● ● ● ● ● ● ● ● ● ● ● ● ● ● ● ● ● ● ● ● ● ●
Recalling User Rhythm Patterns
The User rhythms you have created in the Rhythm Pattern Program can be selected and played from the User buttons in the panel Rhythm section. Refer to Chapter 5, “Selecting rhythms from the User buttons” (page 58).
When you leave the Rhythm Pattern Program, the square at the top left in the display turns light blue for a few seconds, indicating that data is currently being saved. Do not turn the power off while the data is being saved.
1
2
MARCH
LATIN WORLDMUSIC
BALLAD ROCK DANCE
WALTZ POPS R & BSWING&JAZZ
2
11
RHYTHM VOLUME
SEQ.2
SEQ.
3SEQ.
4SEQ.
MAX
MIN
User Buttons
Select “USER” category here.
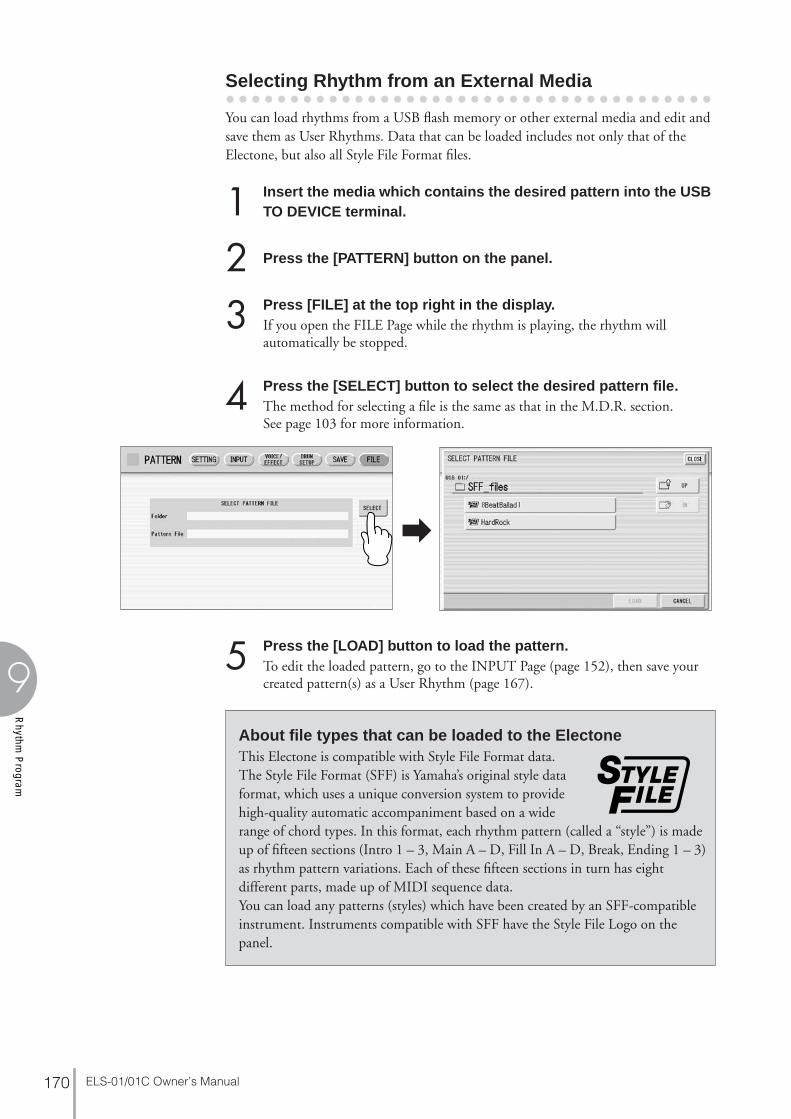
ELS-01/01C Owner’s Manual170
9
Rhythm
Program
● ● ● ● ● ● ● ● ● ● ● ● ● ● ● ● ● ● ● ● ● ● ● ● ● ● ● ● ● ● ● ● ● ● ● ● ● ●
Selecting Rhythm from an External Media
You can load rhythms from a USB flash memory or other external media and edit and save them as User Rhythms. Data that can be loaded includes not only that of the Electone, but also all Style File Format files.
Insert the media which contains the desired pattern into the USB TO DEVICE terminal.
Press the [PATTERN] button on the panel.
Press [FILE] at the top right in the display.If you open the FILE Page while the rhythm is playing, the rhythm will automatically be stopped.
Press the [SELECT] button to select the desired pattern file.The method for selecting a file is the same as that in the M.D.R. section. See page 103 for more information.
Press the [LOAD] button to load the pattern.To edit the loaded pattern, go to the INPUT Page (page 152), then save your created pattern(s) as a User Rhythm (page 167).
123
4
About file types that can be loaded to the ElectoneThis Electone is compatible with Style File Format data. The Style File Format (SFF) is Yamaha’s original style data format, which uses a unique conversion system to provide high-quality automatic accompaniment based on a wide range of chord types. In this format, each rhythm pattern (called a “style”) is made up of fifteen sections (Intro 1 – 3, Main A – D, Fill In A – D, Break, Ending 1 – 3) as rhythm pattern variations. Each of these fifteen sections in turn has eight different parts, made up of MIDI sequence data.You can load any patterns (styles) which have been created by an SFF-compatible instrument. Instruments compatible with SFF have the Style File Logo on the panel.
5
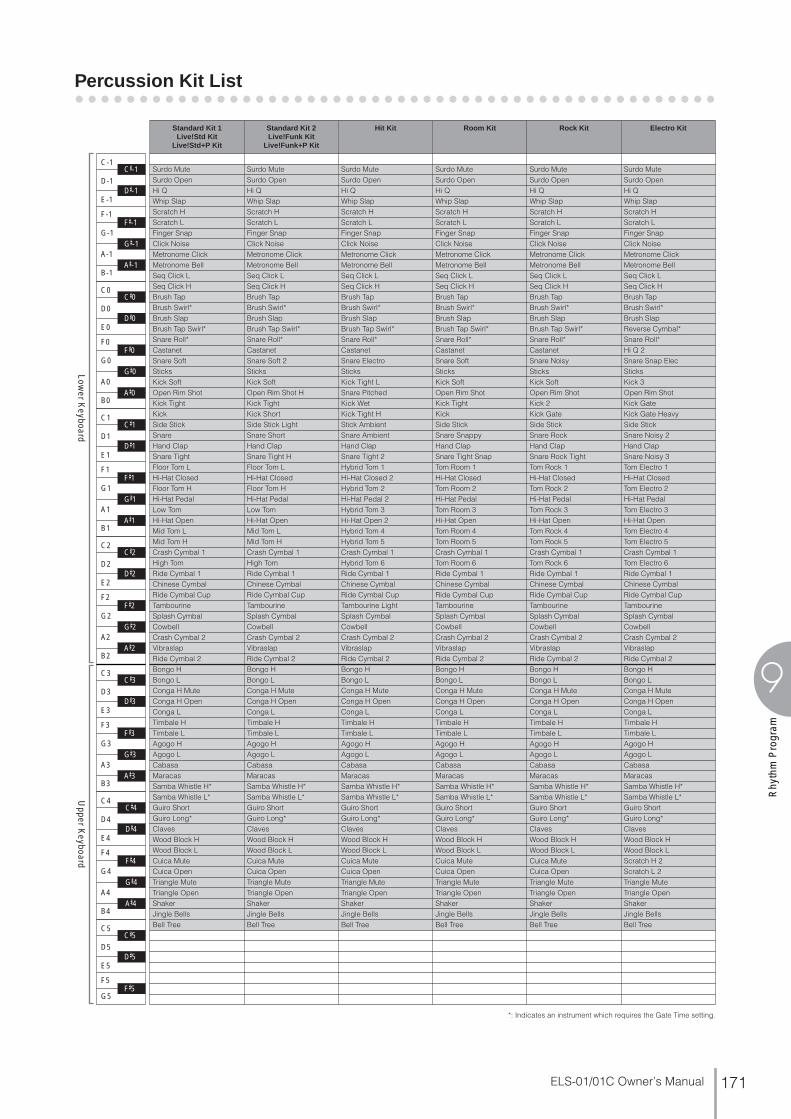
ELS-01/01C Owner’s Manual 171
9
Rhy
thm
Pro
gram
● ● ● ● ● ● ● ● ● ● ● ● ● ● ● ● ● ● ● ● ● ● ● ● ● ● ● ● ● ● ● ● ● ● ● ● ● ● ● ● ● ● ● ● ● ● ● ● ● ●
Percussion Kit List
*: Indicates an instrument which requires the Gate Time setting.
Standard Kit 1Live!Std Kit
Live!Std+P Kit
Standard Kit 2Live!Funk Kit
Live!Funk+P Kit
Hit Kit Room Kit Rock Kit Electro Kit
Surdo Mute Surdo Mute Surdo Mute Surdo Mute Surdo Mute Surdo MuteSurdo Open Surdo Open Surdo Open Surdo Open Surdo Open Surdo OpenHi Q Hi Q Hi Q Hi Q Hi Q Hi QWhip Slap Whip Slap Whip Slap Whip Slap Whip Slap Whip SlapScratch H Scratch H Scratch H Scratch H Scratch H Scratch HScratch L Scratch L Scratch L Scratch L Scratch L Scratch LFinger Snap Finger Snap Finger Snap Finger Snap Finger Snap Finger SnapClick Noise Click Noise Click Noise Click Noise Click Noise Click NoiseMetronome Click Metronome Click Metronome Click Metronome Click Metronome Click Metronome ClickMetronome Bell Metronome Bell Metronome Bell Metronome Bell Metronome Bell Metronome BellSeq Click L Seq Click L Seq Click L Seq Click L Seq Click L Seq Click LSeq Click H Seq Click H Seq Click H Seq Click H Seq Click H Seq Click HBrush Tap Brush Tap Brush Tap Brush Tap Brush Tap Brush TapBrush Swirl* Brush Swirl* Brush Swirl* Brush Swirl* Brush Swirl* Brush Swirl*Brush Slap Brush Slap Brush Slap Brush Slap Brush Slap Brush SlapBrush Tap Swirl* Brush Tap Swirl* Brush Tap Swirl* Brush Tap Swirl* Brush Tap Swirl* Reverse Cymbal*Snare Roll* Snare Roll* Snare Roll* Snare Roll* Snare Roll* Snare Roll*Castanet Castanet Castanet Castanet Castanet Hi Q 2Snare Soft Snare Soft 2 Snare Electro Snare Soft Snare Noisy Snare Snap ElecSticks Sticks Sticks Sticks Sticks SticksKick Soft Kick Soft Kick Tight L Kick Soft Kick Soft Kick 3Open Rim Shot Open Rim Shot H Snare Pitched Open Rim Shot Open Rim Shot Open Rim ShotKick Tight Kick Tight Kick Wet Kick Tight Kick 2 Kick GateKick Kick Short Kick Tight H Kick Kick Gate Kick Gate HeavySide Stick Side Stick Light Stick Ambient Side Stick Side Stick Side StickSnare Snare Short Snare Ambient Snare Snappy Snare Rock Snare Noisy 2Hand Clap Hand Clap Hand Clap Hand Clap Hand Clap Hand ClapSnare Tight Snare Tight H Snare Tight 2 Snare Tight Snap Snare Rock Tight Snare Noisy 3Floor Tom L Floor Tom L Hybrid Tom 1 Tom Room 1 Tom Rock 1 Tom Electro 1Hi-Hat Closed Hi-Hat Closed Hi-Hat Closed 2 Hi-Hat Closed Hi-Hat Closed Hi-Hat ClosedFloor Tom H Floor Tom H Hybrid Tom 2 Tom Room 2 Tom Rock 2 Tom Electro 2Hi-Hat Pedal Hi-Hat Pedal Hi-Hat Pedal 2 Hi-Hat Pedal Hi-Hat Pedal Hi-Hat PedalLow Tom Low Tom Hybrid Tom 3 Tom Room 3 Tom Rock 3 Tom Electro 3Hi-Hat Open Hi-Hat Open Hi-Hat Open 2 Hi-Hat Open Hi-Hat Open Hi-Hat OpenMid Tom L Mid Tom L Hybrid Tom 4 Tom Room 4 Tom Rock 4 Tom Electro 4Mid Tom H Mid Tom H Hybrid Tom 5 Tom Room 5 Tom Rock 5 Tom Electro 5Crash Cymbal 1 Crash Cymbal 1 Crash Cymbal 1 Crash Cymbal 1 Crash Cymbal 1 Crash Cymbal 1High Tom High Tom Hybrid Tom 6 Tom Room 6 Tom Rock 6 Tom Electro 6Ride Cymbal 1 Ride Cymbal 1 Ride Cymbal 1 Ride Cymbal 1 Ride Cymbal 1 Ride Cymbal 1Chinese Cymbal Chinese Cymbal Chinese Cymbal Chinese Cymbal Chinese Cymbal Chinese CymbalRide Cymbal Cup Ride Cymbal Cup Ride Cymbal Cup Ride Cymbal Cup Ride Cymbal Cup Ride Cymbal CupTambourine Tambourine Tambourine Light Tambourine Tambourine TambourineSplash Cymbal Splash Cymbal Splash Cymbal Splash Cymbal Splash Cymbal Splash CymbalCowbell Cowbell Cowbell Cowbell Cowbell CowbellCrash Cymbal 2 Crash Cymbal 2 Crash Cymbal 2 Crash Cymbal 2 Crash Cymbal 2 Crash Cymbal 2Vibraslap Vibraslap Vibraslap Vibraslap Vibraslap VibraslapRide Cymbal 2 Ride Cymbal 2 Ride Cymbal 2 Ride Cymbal 2 Ride Cymbal 2 Ride Cymbal 2Bongo H Bongo H Bongo H Bongo H Bongo H Bongo HBongo L Bongo L Bongo L Bongo L Bongo L Bongo LConga H Mute Conga H Mute Conga H Mute Conga H Mute Conga H Mute Conga H MuteConga H Open Conga H Open Conga H Open Conga H Open Conga H Open Conga H OpenConga L Conga L Conga L Conga L Conga L Conga LTimbale H Timbale H Timbale H Timbale H Timbale H Timbale HTimbale L Timbale L Timbale L Timbale L Timbale L Timbale LAgogo H Agogo H Agogo H Agogo H Agogo H Agogo HAgogo L Agogo L Agogo L Agogo L Agogo L Agogo LCabasa Cabasa Cabasa Cabasa Cabasa CabasaMaracas Maracas Maracas Maracas Maracas MaracasSamba Whistle H* Samba Whistle H* Samba Whistle H* Samba Whistle H* Samba Whistle H* Samba Whistle H*Samba Whistle L* Samba Whistle L* Samba Whistle L* Samba Whistle L* Samba Whistle L* Samba Whistle L*Guiro Short Guiro Short Guiro Short Guiro Short Guiro Short Guiro ShortGuiro Long* Guiro Long* Guiro Long* Guiro Long* Guiro Long* Guiro Long*Claves Claves Claves Claves Claves ClavesWood Block H Wood Block H Wood Block H Wood Block H Wood Block H Wood Block HWood Block L Wood Block L Wood Block L Wood Block L Wood Block L Wood Block LCuica Mute Cuica Mute Cuica Mute Cuica Mute Cuica Mute Scratch H 2Cuica Open Cuica Open Cuica Open Cuica Open Cuica Open Scratch L 2Triangle Mute Triangle Mute Triangle Mute Triangle Mute Triangle Mute Triangle MuteTriangle Open Triangle Open Triangle Open Triangle Open Triangle Open Triangle OpenShaker Shaker Shaker Shaker Shaker ShakerJingle Bells Jingle Bells Jingle Bells Jingle Bells Jingle Bells Jingle BellsBell Tree Bell Tree Bell Tree Bell Tree Bell Tree Bell Tree
C-1
D-1
E-1
F-1
G-1
A-1
B-1
C�-1D�-1
F�-1G�-1A�-1
C0
D0
E0
F0
G0
A0
B0
C�0D�0
F�0G�0A�0
C1
D1
E1
F1
G1
A1
B1
C�1D�1
F�1G�1A�1
C2
D2
E2
F2
G2
A2
B2
C�2D�2
F�2G�2A�2
C3
D3
E3
F3
G3
A3
B3
C�3D�3
F�3G�3A�3
C4
D4
E4
F4
G4
A4
B4
C�4D�4
F�4G�4A�4
C5
D5
E5
F5
G5
C�5D�5
F�5
Upper K
eyboardLow
er Keyboard

ELS-01/01C Owner’s Manual172
9
Rhythm
Program
*: Indicates an instrument which requires the Gate Time setting.
Analog Kit Dance Kit Jazz Kit Brush KitLive!Brush Kit
Live!Brush+P Kit
Symphony Kit EL Kit 1
Surdo Mute Kick Dance 1 Surdo Mute Surdo Mute Surdo Mute ScratchSurdo Open Kick Dance 2 Surdo Open Surdo Open Surdo Open Concert BDHi Q Hi Q Hi Q Hi Q Hi Q Noise PercussionWhip Slap Whip Slap* Whip Slap Whip Slap Whip Slap Bass Drum MarchScratch H Scratch Dance 1* Scratch H Scratch H Scratch H Analog BD ShortScratch L Scratch Dance 2* Scratch L Scratch L Scratch L Synth Tom 3Finger Snap Finger Snap Finger Snap Finger Snap Finger Snap Analog BD LongClick Noise Click Noise Click Noise Click Noise Click Noise Synth Tom 2Metronome Click Dance Perc 1 Metronome Click Metronome Click Metronome Click Synth Bass DrumMetronome Bell Reverse Dance 1 Metronome Bell Metronome Bell Metronome Bell Synth Tom 1Seq Click L Dance Perc 2 Seq Click L Seq Click L Seq Click L Bass Drum AttackSeq Click H Hi Q Dance 1 Seq Click H Seq Click H Seq Click H Bass Drum HeavyBrush Tap Snare Analog 3 Brush Tap Brush Tap Brush Tap Tom 4Brush Swirl* Vinyl Noise* Brush Swirl* Brush Swirl* Brush Swirl* Bass Drum LightBrush Slap Snare Analog 4 Brush Slap Brush Slap Brush Slap Tom 3Reverse Cymbal* Reverse Cymbal* Brush Tap Swirl* Brush Tap Swirl* Brush Tap Swirl* Orchestra CymbalSnare Roll* Reverse Dance 2* Snare Roll* Snare Roll* Snare Roll* Snare Drum Roll*Hi Q 2 Hi Q 2 Castanet Castanet Castanet Tom 2Snare Noisy 4 Snare Techno Snare Jazz H Brush Slap 2 Snare Soft SD Brush RollSticks Snare Dance 1 Sticks Sticks Sticks Tom 1Kick 3 Kick Techno Q Kick Soft Kick Soft Kick Soft 2 SD Brush Shot 2Open Rim Shot Rim Gate Open Rim Shot Open Rim Shot Open Rim Shot Tom Brush Shot 4Kick Anlg Short Kick Techno L Kick Tight Kick Tight Gran Cassa SD Brush Shot 1Kick Analog Kick Techno Kick Jazz Kick Jazz Gran Cassa Mute Snare Drum HeavySide Stick Anlg Side Stick Anlg Side Stick Light Side Stick Light Side Stick Tom Brush Shot 3Snare Analog Snare Clap Snare Jazz L Brush Slap 3 Band Snare Snare Drum LightHand Clap Dance Clap Hand Clap Hand Clap Hand Clap Tom Brush Shot 2Snare Analog 2 Snare Dry Snare Jazz M Brush Tap 2 Band Snare 2 SD Accent 2Tom Analog 1 Tom Dance 1 Floor Tom L Tom Brush 1 Floor Tom L SD Accent 1Hat Close Analog Hi-Hat Closed 3 Hi-Hat Closed Hi-Hat Closed Hi-Hat Closed Tom Brush Shot 1Tom Analog 2 Tom Dance 2 Floor Tom H Tom Brush 2 Floor Tom H SD Reverb 2Hat Close Anlg 2 Hat Close Anlg 3 Hi-Hat Pedal Hi-Hat Pedal Hi-Hat Pedal Snare Drum Rim 2Tom Analog 3 Tom Dance 3 Low Tom Tom Brush 3 Low Tom SD Reverb 1Hat Open Analog Hi-Hat Open 3 Hi-Hat Open Hi-Hat Open Hi-Hat Open Snare Drum Rim 1Tom Analog 4 Tom Dance 4 Mid Tom L Tom Brush 4 Mid Tom L Synth Snare DrumTom Analog 5 Tom Dance 5 Mid Tom H Tom Brush 5 Mid Tom H Analog SDCrash Analog Crash Analog Crash Cymbal 1 Crash Cymbal 1 Hand Cymbal Triangle MuteTom Analog 6 Tom Dance 6 High Tom Tom Brush 6 High Tom TambourineRide Cymbal 1 Ride Cymbal 1 Ride Cymbal 1 Ride Cymbal 1 Hand Cymbal S Triangle OpenChinese Cymbal Chinese Cymbal Chinese Cymbal Chinese Cymbal Chinese Cymbal CastanetRide Cymbal Cup Ride Cymbal Cup Ride Cymbal Cup Ride Cymbal Cup Ride Cymbal Cup ClavesTambourine Tambourine Anlg Tambourine Tambourine TambourineSplash Cymbal Splash Cymbal Splash Cymbal Splash Cymbal Splash Cymbal CabasaCowbell Analog Cowbell Dance Cowbell Cowbell CowbellCrash Cymbal 2 Crash Cymbal 2 Crash Cymbal 2 Crash Cymbal 2 Hand Cymbal 2 Finger SnapVibraslap Vibraslap Analog Vibraslap Vibraslap VibraslapRide Cymbal 2 Ride Analog Ride Cymbal 2 Ride Cymbal 2 Hand Cymbal 2 S Hand ClapsBongo H Bongo Analog H Bongo H Bongo H Bongo H Crash Cymbal 2Bongo L Bongo Analog L Bongo L Bongo L Bongo L Hi-Hat CloseConga Analog H Conga Analog H Conga H Mute Conga H Mute Conga H Mute Crash Cymbal 1Conga Analog M Conga Analog M Conga H Open Conga H Open Conga H Open Hi-Hat OpenConga Analog L Conga Analog L Conga L Conga L Conga L Crash Cym MuteTimbale H Timbale H Timbale H Timbale H Timbale H Ride Cymbal 2Timbale L Timbale L Timbale L Timbale L Timbale L Hi-Hat Pedal 2Agogo H Agogo H Agogo H Agogo H Agogo H Ride Cymbal 1Agogo L Agogo L Agogo L Agogo L Agogo L Hi-Hat Pedal 1Cabasa Cabasa Cabasa Cabasa Cabasa Ride Cymbal CupMaracas 2 Maracas 2 Maracas Maracas MaracasSamba Whistle H* Samba Whistle H* Samba Whistle H* Samba Whistle H* Samba Whistle H* Cym Brush ShotSamba Whistle L* Samba Whistle L* Samba Whistle L* Samba Whistle L* Samba Whistle L* Cymbal MarchGuiro Short Guiro Short Guiro Short Guiro Short Guiro Short Analog HH CloseGuiro Long* Guiro Long* Guiro Long* Guiro Long* Guiro Long* Orch Cymbal RollClaves 2 Claves 2 Claves Claves Claves Analog HH OpenWood Block H Dance Perc 3 Wood Block H Wood Block H Wood Block H Orch CymbalWood Block L Dance Perc 4* Wood Block L Wood Block L Wood Block L Orch Cymbal MuteScratch H 2 Dance Breath 1 Cuica Mute Cuica Mute Cuica MuteScratch L 2 Dance Breath 2* Cuica Open Cuica Open Cuica Open Tam-TamTriangle Mute Triangle Mute Triangle Mute Triangle Mute Triangle MuteTriangle Open Triangle Open Triangle Open Triangle Open Triangle OpenShaker Shaker Shaker Shaker ShakerJingle Bells Jingle Bells Jingle Bells Jingle Bells Jingle BellsBell Tree Bell Tree Bell Tree Bell Tree Bell Tree
C-1
D-1
E-1
F-1
G-1
A-1
B-1
C�-1D�-1
F�-1G�-1A�-1
C0
D0
E0
F0
G0
A0
B0
C�0D�0
F�0G�0A�0
C1
D1
E1
F1
G1
A1
B1
C�1D�1
F�1G�1A�1
C2
D2
E2
F2
G2
A2
B2
C�2D�2
F�2G�2A�2
C3
D3
E3
F3
G3
A3
B3
C�3D�3
F�3G�3A�3
C4
D4
E4
F4
G4
A4
B4
C�4D�4
F�4G�4A�4
C5
D5
E5
F5
G5
C�5D�5
F�5
Upper K
eyboardLow
er Keyboard

ELS-01/01C Owner’s Manual 173
9
Rhy
thm
Pro
gram
*: Indicates an instrument which requires the Gate Time setting.
EL Kit 2 Live!Studio Kit SFX Kit 1 SFX Kit 2 Arabic Kit Cuban Kit Pop Latin Kit
Maracas High Surdo MuteSurdo Mute Surdo OpenMaracas Low Hi QSurdo Muff Whip SlapSurdo Rim Scratch HCuica High Scratch L Hand ClapSurdo Open Finger SnapCuica Middle Click NoiseTamborim Mute Metronome ClickCuica Low Metronome Bell Conga H Tip Conga H TipTamborim Open Seq Click L Conga H Heel Conga H HeelPandeiro Seq Click H Nakarazan Dom Conga H Open Conga H OpenBongo High Brush Tap Cabasa Conga H Mute Conga H MuteConga Slide Brush Swirl* Nakarazan Edge Conga H SlapOpen Conga H SlapOpenBongo Low Brush Slap Hager Dom Conga H Slap Conga H SlapConga Slap Brush Tap Swirl* Hager Edge Conga H SlapMute Conga H SlapMuteConga Muff Snare Roll* Bongo H Conga L Tip Conga L TipBongo Mute Castanet Bongo L Conga L Heel Conga L HeelConga High Snare Studio L Conga H Mute Conga L Open Conga L OpenBongo Slap Sticks Conga H Open Conga L Mute Conga L MuteConga Low Kick Ambience H Conga L Conga L SlapOpen Conga L SlapOpen
Open Rim Shot Zagrouda H Conga L Slap Conga L SlapTimbale 1 High Kick Ambience L Zagrouda L* Conga L Slide* Conga L Slide*Timbale 1 Low Kick Studio Cutting Noise 1* Phone Call* Kick Soft Bongo H Open 1 f Bongo H Open 1 f
Side Stick Cutting Noise 2* Door Squeak* Side Stick Bongo H Open 3 f Bongo H Open 3 fTimbale 2 High Snare Studio M Door Slam* Snare Soft Bongo H Rim Bongo H Rim
Hand Clap String Slap* Scratch Cut* Arabic Hand Clap Bongo H Tip Bongo H TipTimbale 2 Low Snare Studio L Scratch H 3* Snare Drum Bongo H Heel Bongo H HeelTimbale 3 High Floor Tom L Wind Chime* Floor Tom L Bongo H Slap Bongo H SlapWoodblock High Hi-Hat Closed Telephone Ring* Hi-Hat Closed Bongo L Open 1 f Bongo L Open 1 fTimbale 3 Low Floor Tom H Floor Tom H Bongo L Open 3 f Bongo L Open 3 fWoodblock Mid Hi-Hat Pedal Hi-Hat Pedal Bongo L Rim Bongo L RimTimbale 4 High Low Tom Low Tom Bongo L Tip Bongo L TipWoodblock Low Hi-Hat Open Hi-Hat Open Bongo L Heel Bongo L HeelTimbale 4 Low Mid Tom L Mid Tom L Bongo L Slap Bongo L SlapVibraslap Mid Tom H Mid Tom H Timbale L Open Timbale L OpenTriangle Mute Crash Cymbal 1 Crash Cymbal 1Tambourine High Tom High TomTriangle Open Ride Cymbal 1 Ride Cymbal 1Castanet Chinese Cymbal Flute Key Click* CarEngnIgnition* Crash Cymbal 2Claves Ride Cymbal Cup Car Tires Squeal* Duhulla Dom Paila L Paila L
Tambourine Car Passing* Tambourine Timbale H Open Timbale H OpenCabasa Splash Cymbal Car Crash* Duhulla Tak
Cowbell Siren* CowbellFinger Snap Crash Cymbal 2 Train* Duhulla Sak
Vibraslap Jet Plane* ClavesRide Cymbal 2 Starship* Doff Dom Paila H Paila H
Wind Bell Down Bongo H Burst* Katem Dom Cowbell Top Cowbell TopAgogo High Bongo L Roller Coaster* Katem TakWind Bell Up Conga H Mute Submarine* Katem SakAgogo Low Conga H Open Katem TakBells Conga L Doff Tak Guiro Short Guiro ShortCowbell 4 Timbale H Tabla Dom Guiro Long* Guiro Long*Shaker Timbale L Tabla Tak 1Cowbell 3 Agogo H Tabla TikGuiro Short Agogo L Shower* Laugh* Tabla Tak 2 Tambourine TambourineCowbell 2 Cabasa Thunder* Scream* Tabla SakGuiro Long Maracas Wind* Punch* Tabla Roll Edge*Cowbell 1 Samba Whistle H* Stream* Heart Beat* Tabla FlamTaiko 2 Samba Whistle L* Bubble* Foot Steps* Sagat 1 Maracas MaracasOhdaiko 2 Guiro Short Feed* Tabel Dom Shaker ShakerTaiko 1 Guiro Long* Sagat 3 Cabasa CabasaOhdaiko 1 Claves Tabel Tak Cuica MuteOhtsuzumi 2 Wood Block H Sagat 2 Cuica OpenOhtsuzumi 1 Wood Block L Rik DomKakegoe 3 Cuica Mute Rik Tak 2Kotsuzumi 4 Cuica Open Rik Finger 1Kakegoe 2 Triangle Mute Rik Tak 1Kotsuzumi 3 Triangle Open Rik Finger 2 Triangle MuteKakegoe 1 Shaker Rik BrassTremolo* Triangle OpenKotsuzumi 2 Jingle Bells Rik SakKotsuzumi 1 Bell Tree Dog* Machine Gun* Rik Tik Wind Chime
Horse* Laser Gun*Bird Tweet* Explosion*
Firework*
Ghost*Maou*
C-1
D-1
E-1
F-1
G-1
A-1
B-1
C�-1D�-1
F�-1G�-1A�-1
C0
D0
E0
F0
G0
A0
B0
C�0D�0
F�0G�0A�0
C1
D1
E1
F1
G1
A1
B1
C�1D�1
F�1G�1A�1
C2
D2
E2
F2
G2
A2
B2
C�2D�2
F�2G�2A�2
C3
D3
E3
F3
G3
A3
B3
C�3D�3
F�3G�3A�3
C4
D4
E4
F4
G4
A4
B4
C�4D�4
F�4G�4A�4
C5
D5
E5
F5
G5
C�5D�5
F�5
Upper K
eyboardLow
er Keyboard
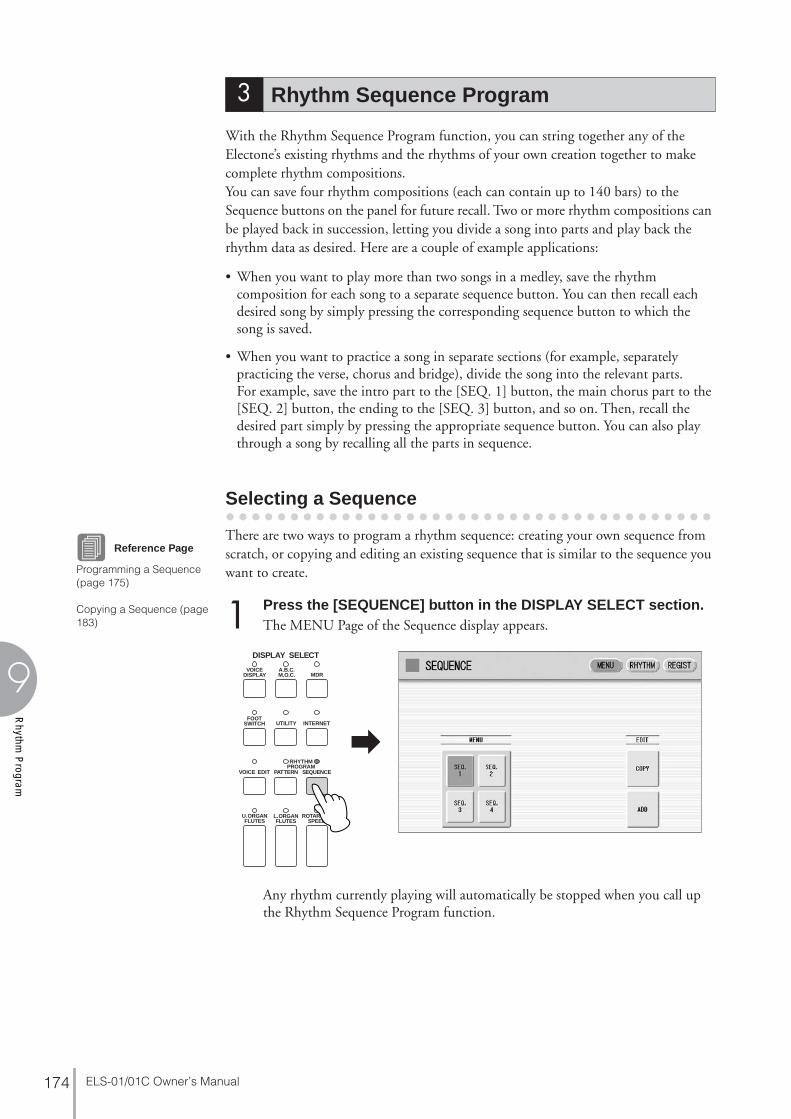
ELS-01/01C Owner’s Manual174
9
Rhythm
Program
With the Rhythm Sequence Program function, you can string together any of the Electone’s existing rhythms and the rhythms of your own creation together to make complete rhythm compositions.You can save four rhythm compositions (each can contain up to 140 bars) to the Sequence buttons on the panel for future recall. Two or more rhythm compositions can be played back in succession, letting you divide a song into parts and play back the rhythm data as desired. Here are a couple of example applications:
• When you want to play more than two songs in a medley, save the rhythm composition for each song to a separate sequence button. You can then recall each desired song by simply pressing the corresponding sequence button to which the song is saved.
• When you want to practice a song in separate sections (for example, separately practicing the verse, chorus and bridge), divide the song into the relevant parts. For example, save the intro part to the [SEQ. 1] button, the main chorus part to the [SEQ. 2] button, the ending to the [SEQ. 3] button, and so on. Then, recall the desired part simply by pressing the appropriate sequence button. You can also play through a song by recalling all the parts in sequence.
● ● ● ● ● ● ● ● ● ● ● ● ● ● ● ● ● ● ● ● ● ● ● ● ● ● ● ● ● ● ● ● ● ● ● ● ● ●
Selecting a Sequence
There are two ways to program a rhythm sequence: creating your own sequence from scratch, or copying and editing an existing sequence that is similar to the sequence you want to create.
Press the [SEQUENCE] button in the DISPLAY SELECT section.The MENU Page of the Sequence display appears.
Any rhythm currently playing will automatically be stopped when you call up the Rhythm Sequence Program function.
3 Rhythm Sequence Program
Reference Page
Programming a Sequence (page 175)
Copying a Sequence (page 183) 1
DISPLAY SELECT
VOICEDISPLAY
FOOTSWITCH
RHYTHMPROGRAM
UTILITY INTERNET
A.B.C.M.O.C. MDR
VOICE EDIT PATTERN SEQUENCE
U.ORGANFLUTES
L.ORGANFLUTES
ROTARY SPSPEED
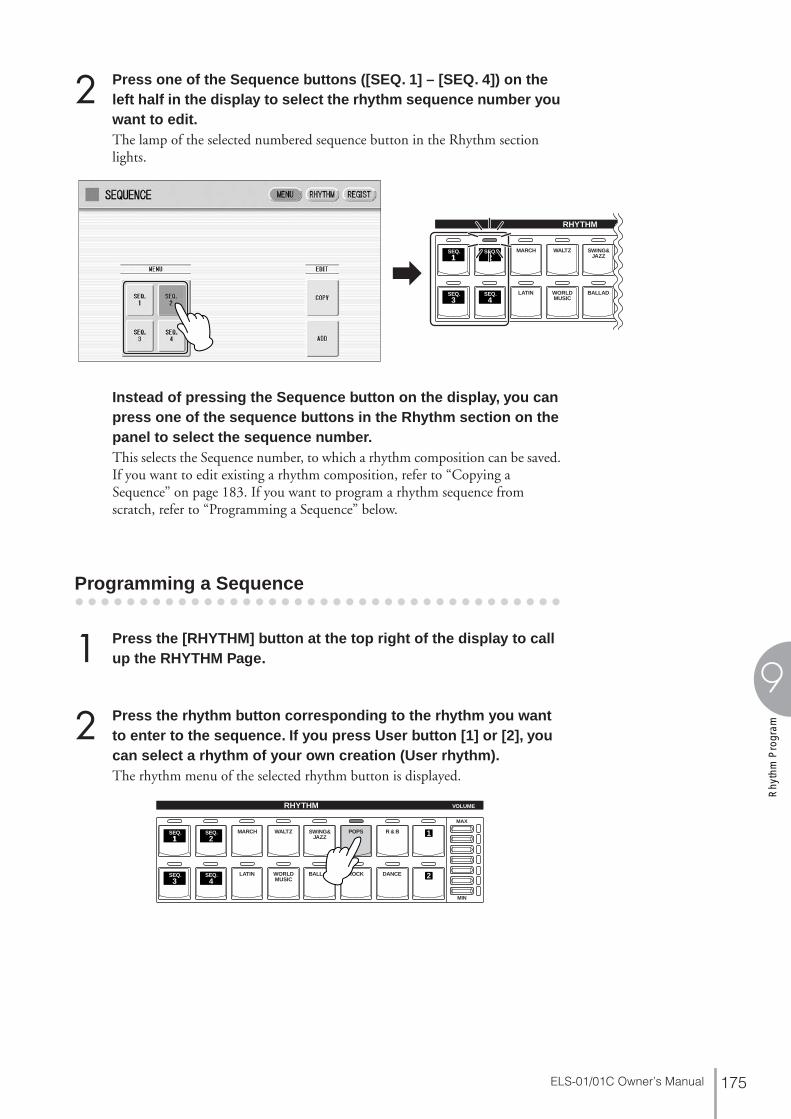
ELS-01/01C Owner’s Manual 175
9
Rhy
thm
Pro
gram
Press one of the Sequence buttons ([SEQ. 1] – [SEQ. 4]) on the left half in the display to select the rhythm sequence number you want to edit.The lamp of the selected numbered sequence button in the Rhythm section lights.
Instead of pressing the Sequence button on the display, you can press one of the sequence buttons in the Rhythm section on the panel to select the sequence number.This selects the Sequence number, to which a rhythm composition can be saved. If you want to edit existing a rhythm composition, refer to “Copying a Sequence” on page 183. If you want to program a rhythm sequence from scratch, refer to “Programming a Sequence” below.
● ● ● ● ● ● ● ● ● ● ● ● ● ● ● ● ● ● ● ● ● ● ● ● ● ● ● ● ● ● ● ● ● ● ● ● ● ●
Programming a Sequence
Press the [RHYTHM] button at the top right of the display to call up the RHYTHM Page.
Press the rhythm button corresponding to the rhythm you want to enter to the sequence. If you press User button [1] or [2], you can select a rhythm of your own creation (User rhythm).The rhythm menu of the selected rhythm button is displayed.
2
MARCH
LATIN WORLDMUSIC
BALLAD
WALTZ SWING&JAZZ1
RHYTHM
SEQ.2
SEQ.
3SEQ.
4SEQ.
1
2
MARCH
LATIN WORLDMUSIC
BALLAD ROCK DANCE
WALTZ POPS R & BSWING&JAZZ
2
11
RHYTHM VOLUME
SEQ.2
SEQ.
3SEQ.
4SEQ.
MAX
MIN
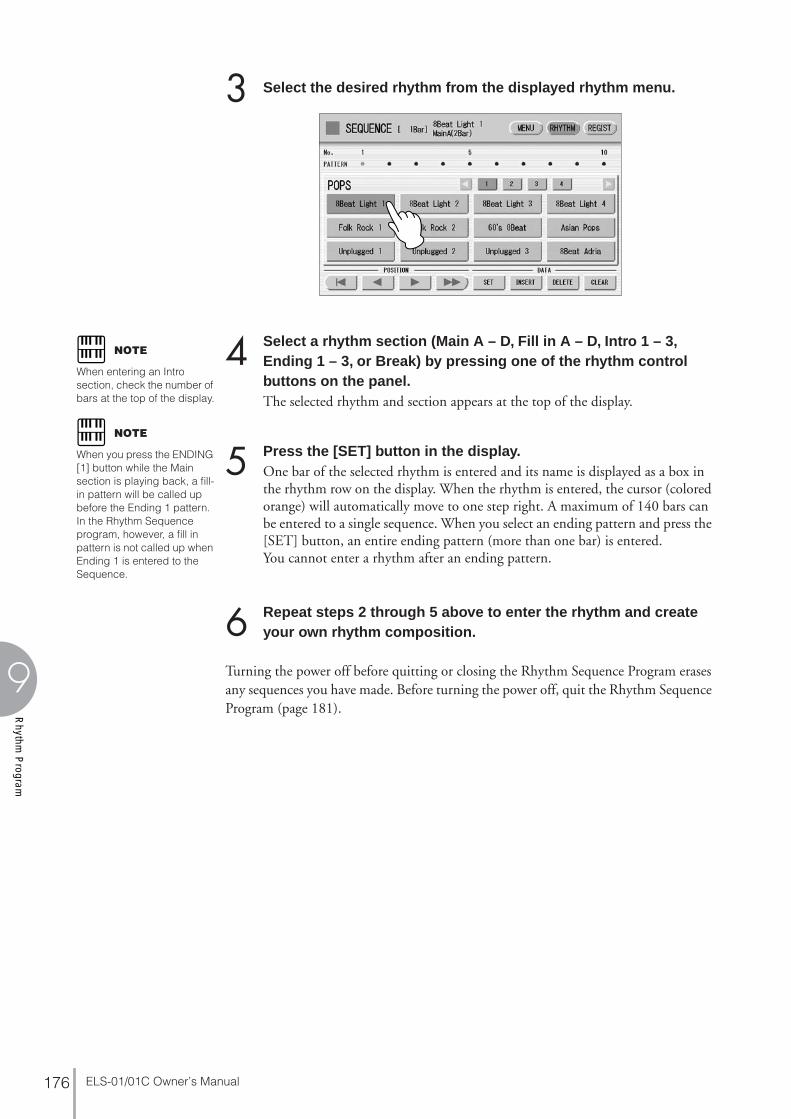
ELS-01/01C Owner’s Manual176
9
Rhythm
Program
Select the desired rhythm from the displayed rhythm menu.
Select a rhythm section (Main A – D, Fill in A – D, Intro 1 – 3, Ending 1 – 3, or Break) by pressing one of the rhythm control buttons on the panel.The selected rhythm and section appears at the top of the display.
Press the [SET] button in the display.One bar of the selected rhythm is entered and its name is displayed as a box in the rhythm row on the display. When the rhythm is entered, the cursor (colored orange) will automatically move to one step right. A maximum of 140 bars can be entered to a single sequence. When you select an ending pattern and press the [SET] button, an entire ending pattern (more than one bar) is entered.You cannot enter a rhythm after an ending pattern.
Repeat steps 2 through 5 above to enter the rhythm and create your own rhythm composition.
Turning the power off before quitting or closing the Rhythm Sequence Program erases any sequences you have made. Before turning the power off, quit the Rhythm Sequence Program (page 181).
3
4NOTE
When entering an Intro section, check the number of bars at the top of the display.
NOTE
When you press the ENDING [1] button while the Main section is playing back, a fill-in pattern will be called up before the Ending 1 pattern. In the Rhythm Sequence program, however, a fill in pattern is not called up when Ending 1 is entered to the Sequence.
5
6

ELS-01/01C Owner’s Manual 177
9
Rhy
thm
Pro
gram
● ● ● ● ● ● ● ● ● ● ● ● ● ● ● ● ● ● ● ● ● ● ● ● ● ● ● ● ● ● ● ● ● ● ● ● ● ●
Auditioning a Sequence
You can play a sequence you are editing at any time to audition the changes.
Move the cursor to the desired position for playback.Move the cursor by using the Data Control dial, or the POSITION buttons on the display.
Press the rhythm [START] button on the panel.
The Sequence plays back. Pressing the [START] button again stops playback.
● ● ● ● ● ● ● ● ● ● ● ● ● ● ● ● ● ● ● ● ● ● ● ● ● ● ● ● ● ● ● ● ● ● ● ● ● ●
Editing an Existing Rhythm Sequence
You can insert a new rhythm between the rhythms you have already entered, or delete the entered rhythm from the sequence.
1
DATA CONTROL
2START BREAKSYNCHRO
START
1 2

ELS-01/01C Owner’s Manual178
9
Rhythm
Program
1 POSITIONThese are cursor controls for moving the cursor (colored orange) along the rhythm row in the display.
Moves the cursor to the first position.
Moves the cursor one step to the left.
Moves the cursor one step to the right.
Moves the cursor five steps to the right.
2 DATAThese are data controls for entering rhythms and deleting existing rhythms in the rhythm row.
SETFor initially entering a rhythm to an empty position in the rhythm row, or for replacing a pattern at the cursor position. Pressing the [SET] button enters the rhythm selected from the rhythm menu to the cursor position.This operation is not available between measures of an ending pattern.
INSERTFor inserting a rhythm before the current cursor position. The new rhythm is entered just before the cursor position and all other rhythms to the right of the cursor are moved to accommodate the new number. This operation is not available between measures of an ending pattern.Additional rhythms cannot be entered beyond the Rhythm sequence function’s capacity of 140. If the Insert operation results in the rhythm number going over the capacity, a “Data Full” message appears and the operation cannot be executed.
DELETEFor deleting a rhythm at the current cursor position. When the ending pattern is selected, pressing the [DELETE] button deletes the entire ending pattern (more than one bar).
CLEARFor erasing all patterns entered to the selected sequence.After selecting [CLEAR], a message appears prompting confirmation of the operation.Select [CLEAR] to clear the currently selected rhythm sequence, or select [CANCEL] to abort the operation and return to the previous display.
NOTE
When you insert an ending pattern into the editing sequence, any existing rhythm data that follows an Ending pattern is automatically deleted.
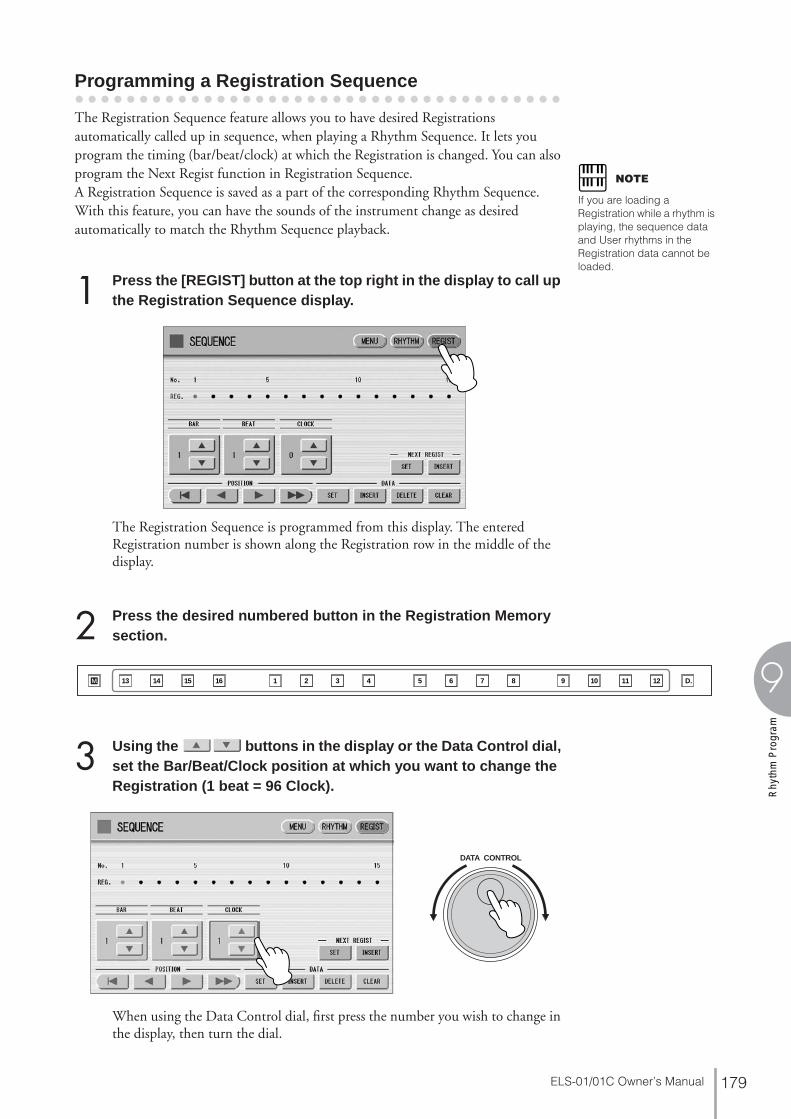
ELS-01/01C Owner’s Manual 179
9
Rhy
thm
Pro
gram
● ● ● ● ● ● ● ● ● ● ● ● ● ● ● ● ● ● ● ● ● ● ● ● ● ● ● ● ● ● ● ● ● ● ● ● ● ●
Programming a Registration Sequence
The Registration Sequence feature allows you to have desired Registrations automatically called up in sequence, when playing a Rhythm Sequence. It lets you program the timing (bar/beat/clock) at which the Registration is changed. You can also program the Next Regist function in Registration Sequence.A Registration Sequence is saved as a part of the corresponding Rhythm Sequence. With this feature, you can have the sounds of the instrument change as desired automatically to match the Rhythm Sequence playback.
Press the [REGIST] button at the top right in the display to call up the Registration Sequence display.
The Registration Sequence is programmed from this display. The entered Registration number is shown along the Registration row in the middle of the display.
Press the desired numbered button in the Registration Memory section.
Using the buttons in the display or the Data Control dial, set the Bar/Beat/Clock position at which you want to change the Registration (1 beat = 96 Clock).
When using the Data Control dial, first press the number you wish to change in the display, then turn the dial.
NOTE
If you are loading a Registration while a rhythm is playing, the sequence data and User rhythms in the Registration data cannot be loaded.
1
213 14 15 16 1 2 3 4 5 6 7 8 9 10 11 12 D.
3
DATA CONTROL
ELS-01/01C Owner’s Manual180
9
Rhythm
Program
Press the DATA [SET] button in the display.The Registration number appears in the display (in the timing order), indicating that the Registration is entered. Up to 140 Registrations can be entered.If some Registration numbers are entered to the same Bar/Beat/Clock, the last entered one takes priority.
Repeat steps 2 through 4 above to set the Registration Sequence.
Entering Next Regist:When you program the Next Regist function in Registration Sequence, the next registration data in current song can be loaded automatically just by playing the rhythm sequence.
Using the buttons in the display or the Data Control dial, set the Bar/Beat/Clock position at which you want to enter the Next Regist (1 beat = 96 clock).
Press the NEXT REGIST [INSERT] button in the display.The Next Regist mark appears at the timing point you set in step 1, indicating that the Next Regist is entered.
Next Regist Loading Time• Loading Next Regist may take a few seconds (the time may differ depending on
the size of the data to be loaded). • When using a floppy disk instead of USB flash memory, the loading time will be
longer than when using USB flash memory.• Next Registration data can be loaded by two ways: using right footswitch and
programming Next Regist in the Registration Sequence. Loading time is the same regardless of which way you load the Next Registration data.
4
5
1
2
ELS-01/01C Owner’s Manual 181
9
Rhy
thm
Pro
gram
● ● ● ● ● ● ● ● ● ● ● ● ● ● ● ● ● ● ● ● ● ● ● ● ● ● ● ● ● ● ● ● ● ● ● ● ● ●
Editing an Existing Registration Sequence
You can move or delete the entered Registration Sequence (Registration number or Next Regist data) from the sequence.
To move an entry:
Using the POSITION buttons, move the cursor and select the data (Registration number or Next Regist) you want to move.
Change the position by pressing the Bar/Beat/Clock buttons in the display.
To move the Registration number timing, press the DATA [SET] button. To move the Next Regist timing, press the NEXT REGIST [SET] button.The position of the Registration number or Next Regist is changed and displayed in the proper order.
To erase an entry:
Using the POSITION buttons, move the cursor and select the data (Registration number or Next Regist) you want to delete.
Press the [DELETE] button to delete the data.
● ● ● ● ● ● ● ● ● ● ● ● ● ● ● ● ● ● ● ● ● ● ● ● ● ● ● ● ● ● ● ● ● ● ● ● ● ●
Quitting the Rhythm Sequence Program
You can quit the Rhythm Sequence Program from any of its display pages. When you quit, the sequence you have made will be automatically saved.
To quit the Rhythm Sequence Program:
Press the [SEQUENCE] button on the panel.The Voice Display appears, indicating that the Rhythm Sequence Program is closed.
When quitting the Rhythm Sequence Program, the square at the top left of the display turns light blue for a few seconds, indicating that the sequence is currently being saved. Do not turn the power off while the sequence is being saved.
1
23
1
2
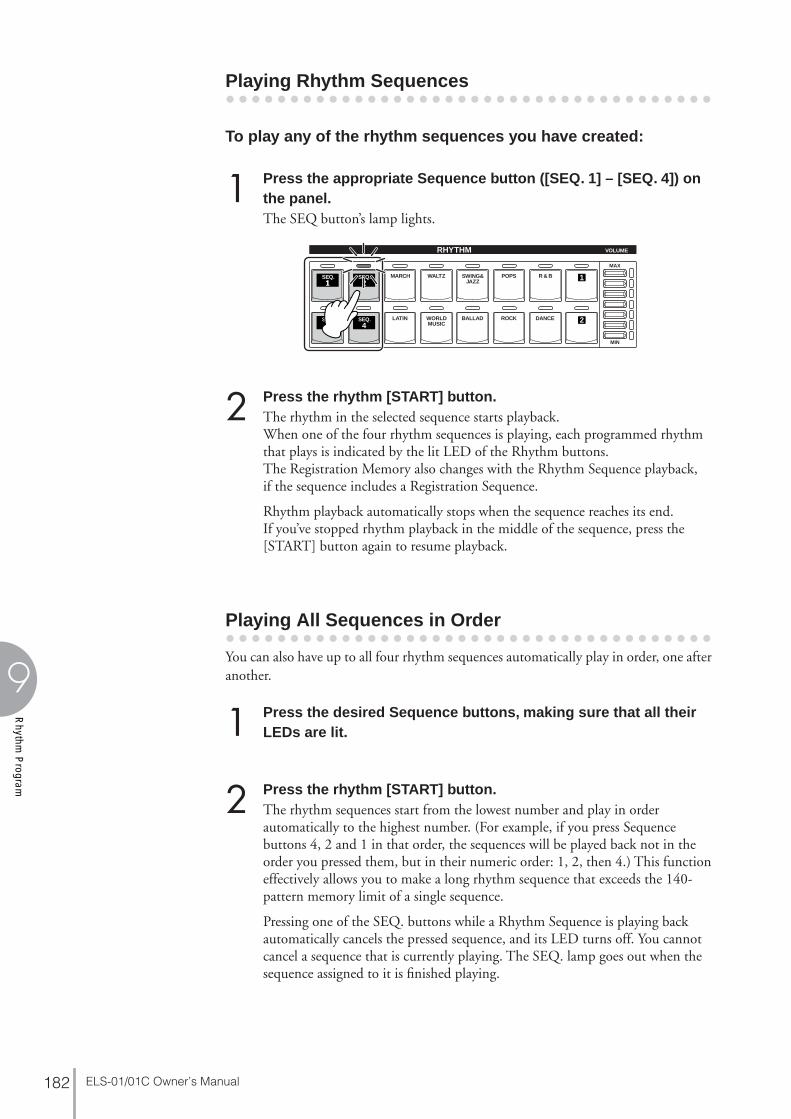
ELS-01/01C Owner’s Manual182
9
Rhythm
Program
● ● ● ● ● ● ● ● ● ● ● ● ● ● ● ● ● ● ● ● ● ● ● ● ● ● ● ● ● ● ● ● ● ● ● ● ● ●
Playing Rhythm Sequences
To play any of the rhythm sequences you have created:
Press the appropriate Sequence button ([SEQ. 1] – [SEQ. 4]) on the panel.The SEQ button’s lamp lights.
Press the rhythm [START] button.The rhythm in the selected sequence starts playback.When one of the four rhythm sequences is playing, each programmed rhythm that plays is indicated by the lit LED of the Rhythm buttons.The Registration Memory also changes with the Rhythm Sequence playback, if the sequence includes a Registration Sequence.
Rhythm playback automatically stops when the sequence reaches its end. If you’ve stopped rhythm playback in the middle of the sequence, press the [START] button again to resume playback.
● ● ● ● ● ● ● ● ● ● ● ● ● ● ● ● ● ● ● ● ● ● ● ● ● ● ● ● ● ● ● ● ● ● ● ● ● ●
Playing All Sequences in Order
You can also have up to all four rhythm sequences automatically play in order, one after another.
Press the desired Sequence buttons, making sure that all their LEDs are lit.
Press the rhythm [START] button.The rhythm sequences start from the lowest number and play in order automatically to the highest number. (For example, if you press Sequence buttons 4, 2 and 1 in that order, the sequences will be played back not in the order you pressed them, but in their numeric order: 1, 2, then 4.) This function effectively allows you to make a long rhythm sequence that exceeds the 140-pattern memory limit of a single sequence.
Pressing one of the SEQ. buttons while a Rhythm Sequence is playing back automatically cancels the pressed sequence, and its LED turns off. You cannot cancel a sequence that is currently playing. The SEQ. lamp goes out when the sequence assigned to it is finished playing.
1
MARCH
LATIN WORLDMUSIC
BALLAD ROCK DANCE
WALTZ POPS R & BSWING&JAZZ
2
11
RHYTHM VOLUME
SEQ.2
SEQ.
3SEQ.
4SEQ.
MAX
MIN
2
1
2

ELS-01/01C Owner’s Manual 183
9
Rhy
thm
Pro
gram
To start a sequence using the Left Footswitch:You can start or stop the Rhythm Sequence playback using the left footswitch.
Press the desired Sequence buttons, making sure that all their LEDs are lit.
Press the [FOOT SWITCH] button on the panel to call up the Footswitch display, LEFT Page.
Set the control mode of the Footswitch to RHYTHM STOP.(See page 185 for information about the Footswitch settings.)
Press the Left Footswitch with your right foot to turn the sequence on.Pressing the Left Footswitch again in the middle of the sequence playback cancels the Rhythm Sequence.
When you are playing a Rhythm Sequence that is made up of several sequences (SEQ. buttons), pressing the Left footswitch turns off the currently playing Rhythm Sequence, and pressing it again starts the next sequence.
● ● ● ● ● ● ● ● ● ● ● ● ● ● ● ● ● ● ● ● ● ● ● ● ● ● ● ● ● ● ● ● ● ● ● ● ● ●
Copying a Sequence
You can copy a rhythm sequence stored on a sequence button to another button. You can also add a rhythm sequence to the end of another rhythm sequence.
Press the EDIT [COPY] or [ADD] button in the Sequence Menu page.The Copy From or Add From Display appears.
Select the number of the desired rhythm sequence program to which you want to copy or to which you want to add.A message appears prompting confirmation of operation.
Press the [COPY] or [ADD] button to copy or add the rhythm sequence.Press [CANCEL] to abort the operation.
If necessary, edit the sequence.Refer to the section “Editing an Existing Rhythm Sequence” on page 177 and/or “Editing an Existing Registration Sequence” on page 181.
1234
1
2 NOTE
If you add a rhythm sequence to another rhythm sequence that has an ending at the end, the section will automatically change to MAIN A and the new sequence will be added after the MAIN A part.
3
4

ELS-01/01C Owner’s Manual184
9
Rhythm
Program
You can save your own rhythm patterns (created in the Rhythm Pattern Program) and Rhythm Sequence (created in the Rhythm Sequence Program) to external media, such as USB flash memory. Refer to the section “Saving Registrations as Registration Data (File)” on page 111 for instructions.
When loading your original Rhythm data from external media back to the Electone, be sure to stop the rhythm if it is playing. Loading cannot be executed when a rhythm is running.
4 Saving Rhythm Pattern and Rhythm Sequence Data to external media

ELS-01/01C Owner’s Manual 185
10F
oots
witc
hes,
Kne
e Le
ver
and
Exp
ress
ion
Ped
als
Footswitches, Knee Lever and Expression Pedals
These leg- and foot-operated controls allow you to execute various performance functions and switch the effect on/off, without taking your hands from the keyboard.
The Electone has two Footswitches on the main expression pedal. The Right Footswitch is used for the Registration Shift function. The Left Footswitch can be set to control one of the following functions: Rhythm, Glide, and Rotary speaker.See page 85 for the details of the Registration Shift function or Right Footswitch. The explanation on the Left Footswitch is given here.
Press the [FOOT SWITCH] button.
Press the [LEFT] button at the top right of the display to call up the LEFT Page.
Contents
1 Footswitches . . . . . . . . . . . . . . . . . . . . . . . . . . . . 185• Controlling the Rhythm . . . . . . . . . . . . . . . . . . . . . . . . . . . . . . . . 186• Controlling Glide . . . . . . . . . . . . . . . . . . . . . . . . . . . . . . . . . . . . . 187• Controlling Rotary Speaker. . . . . . . . . . . . . . . . . . . . . . . . . . . . . . 188
2 Knee Lever . . . . . . . . . . . . . . . . . . . . . . . . . . . . . 188• Controlling Sustain . . . . . . . . . . . . . . . . . . . . . . . . . . . . . . . . . . . 188• Controlling Melody On Chord . . . . . . . . . . . . . . . . . . . . . . . . . . . 189• Controlling Lead Slide . . . . . . . . . . . . . . . . . . . . . . . . . . . . . . . . . 190• Controlling the Solo Function . . . . . . . . . . . . . . . . . . . . . . . . . . . 190
3 Expression Pedals . . . . . . . . . . . . . . . . . . . . . . . . 190• Controlling Pitch Bend . . . . . . . . . . . . . . . . . . . . . . . . . . . . . . . . . 191• Controlling the Rhythm Tempo . . . . . . . . . . . . . . . . . . . . . . . . . . . 192
1 Footswitches
Right Footswitch
Left Footswitch
Expression Pedal
1
2
10
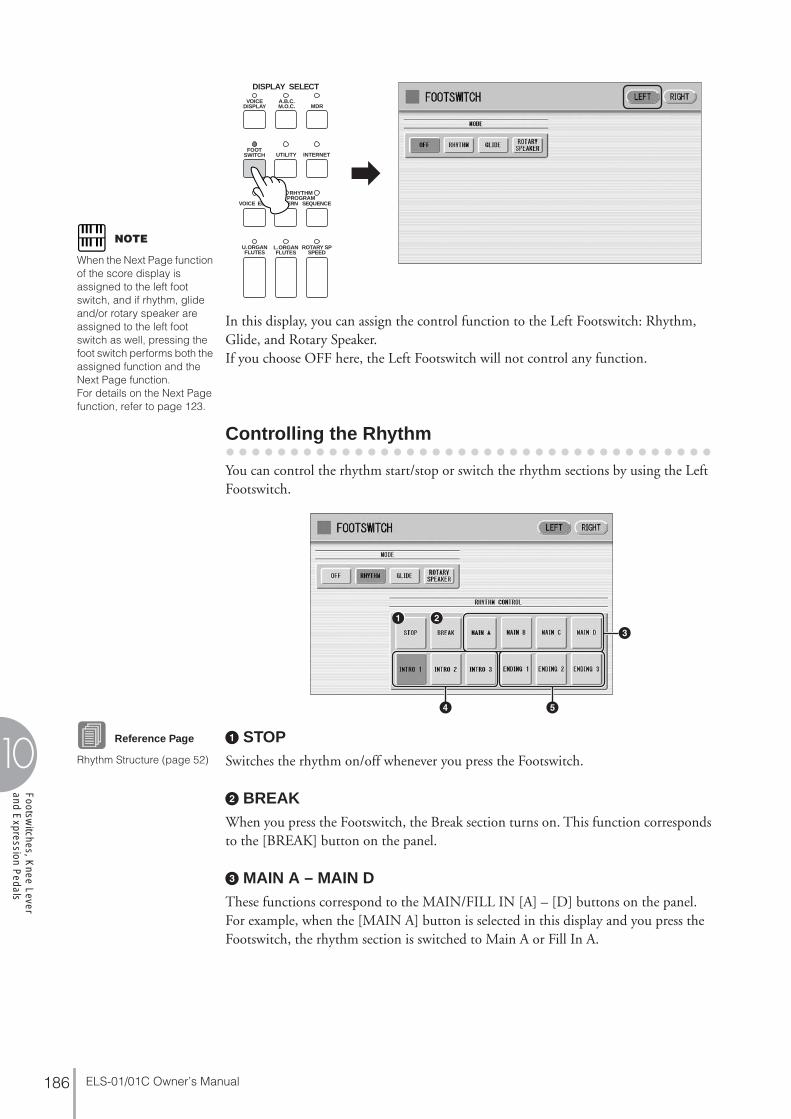
ELS-01/01C Owner’s Manual186
10F
ootswitches, K
nee Lever and E
xpression Pedals
In this display, you can assign the control function to the Left Footswitch: Rhythm, Glide, and Rotary Speaker.If you choose OFF here, the Left Footswitch will not control any function.
● ● ● ● ● ● ● ● ● ● ● ● ● ● ● ● ● ● ● ● ● ● ● ● ● ● ● ● ● ● ● ● ● ● ● ● ● ●
Controlling the Rhythm
You can control the rhythm start/stop or switch the rhythm sections by using the Left Footswitch.
1 STOPSwitches the rhythm on/off whenever you press the Footswitch.
2 BREAKWhen you press the Footswitch, the Break section turns on. This function corresponds to the [BREAK] button on the panel.
3 MAIN A – MAIN DThese functions correspond to the MAIN/FILL IN [A] – [D] buttons on the panel. For example, when the [MAIN A] button is selected in this display and you press the Footswitch, the rhythm section is switched to Main A or Fill In A.
DISPLAY SELECT
VOICEDISPLAY
FOOTSWITCH
RHYTHMPROGRAM
UTILITY INTERNET
A.B.C.M.O.C. MDR
VOICE EDIT PATTERN SEQUENCE
U.ORGANFLUTES
L.ORGANFLUTES
ROTARY SPSPEED
NOTE
When the Next Page function of the score display is assigned to the left foot switch, and if rhythm, glide and/or rotary speaker are assigned to the left foot switch as well, pressing the foot switch performs both the assigned function and the Next Page function.For details on the Next Page function, refer to page 123.
1 2
3
4 5
Reference Page
Rhythm Structure (page 52)

ELS-01/01C Owner’s Manual 187
10F
oots
witc
hes,
Kne
e Le
ver
and
Exp
ress
ion
Ped
als
4 INTRO 1 – INTRO 3These functions correspond to the INTRO [1] – [3] buttons on the panel. For example, when the INTRO [1] button is selected in this display and you press the Footswitch, the rhythm section is switched to Intro 1.
5 ENDING 1 – ENDING 3These functions correspond to the ENDING [1] – [3] buttons on the panel. For example, when the ENDING [1] button is selected in this display and you press the Footswitch, the rhythm section is switched to Ending 1. After the ending pattern is played, the rhythm stops.
● ● ● ● ● ● ● ● ● ● ● ● ● ● ● ● ● ● ● ● ● ● ● ● ● ● ● ● ● ● ● ● ● ● ● ● ● ●
Controlling Glide
You can control the Glide effect by using the Left Footswitch.
Pressing the Footswitch immediately lowers the pitch of the selected Voice or Voices by a half-step and releasing it slowly returns the pitch to the original.
1 Voice Selections (UPPER1/UPPER2/LEAD1/LEAD2/LOWER1/LOWER2)
Select the desired Voice section(s) to which the Glide function is to be applied.
2 TIMEDetermines the speed of the Glide function, or in other words, how gradually the pitch returns when the Footswitch is released. Higher values make the speed slower.Range: 1 – 5
1 2

ELS-01/01C Owner’s Manual188
10F
ootswitches, K
nee Lever and E
xpression Pedals
● ● ● ● ● ● ● ● ● ● ● ● ● ● ● ● ● ● ● ● ● ● ● ● ● ● ● ● ● ● ● ● ● ● ● ● ● ●
Controlling Rotary Speaker
You can control the Rotary Speaker effect (on/off ) by using the Left Footswitch.
When the [Rotary Speaker] button is selected in this display and you press the Footswitch, the Rotary Speaker effect is switched on or off. This function corresponds to the [ROTARY SP SPEED] button on the panel. To use this function, you’ll need to make the appropriate Rotary Speaker settings for each Voice section or Organ Flute Voice. For details, see page 48.
The Knee Lever, located on the underside of the keyboard panel, can be used to turn one of the following on and off: Sustain effect, Melody On Chord function, Lead Slide effect, or Solo function.
● ● ● ● ● ● ● ● ● ● ● ● ● ● ● ● ● ● ● ● ● ● ● ● ● ● ● ● ● ● ● ● ● ● ● ● ● ●
Controlling Sustain
You can control on/off status of sustain for the Upper and Lower keyboards by using the Knee Lever. Sustain for the Pedalboard cannot be controlled.
Make sure that the Upper and/or Lower Sustain buttons have been turned on.
Fold the Knee Lever down.Sustain is off when the Knee Lever is folded down.
Reference Page
Rotary Speaker (page 48)
2 Knee Lever
Reference Page
Sustain (page 47)
SUSTAIN
UPPER(KNEE)
LOWER(KNEE)
PEDAL
1
2
Folding down

ELS-01/01C Owner’s Manual 189
10F
oots
witc
hes,
Kne
e Le
ver
and
Exp
ress
ion
Ped
als
To apply sustain, press the Knee Lever to the right. Sustain is constantly applied as long as the Knee Lever is pressed. Releasing the Knee Lever turns sustain off.
1 When the Knee Lever is folded up:Sustain is applied constantly, as long as the front panel Sustain buttons are on.
2 When the Knee Lever is vertical:Sustain is cancelled.
3 When the Knee Lever is continuously pressed to the right:Sustain is on.
● ● ● ● ● ● ● ● ● ● ● ● ● ● ● ● ● ● ● ● ● ● ● ● ● ● ● ● ● ● ● ● ● ● ● ● ● ●
Controlling Melody On Chord
Press the [A.B.C./M.O.C.] button on the front panel.The Melody On Chord section appears in the right half of the display.
Set the KNEE control to “ON,” and select one of the modes.
Press the Knee Lever to the right with your knee when you want to apply the M.O.C. effect.The M.O.C. effect is applied constantly, as long as the Knee Lever is pressed. When you release the Knee Lever, the M.O.C. effect is cancelled.
3
1
2 3
Pressing to the right
On
Off On
1
2Reference Page
Melody On Chord (page 64)
DISPLAY SELECT
VOICEDISPLAY
FOOTSWITCH
RHYTHMPROGRAM
UTILITY INTERNET
A.B.C.M.O.C. MDR
VOICE EDIT PATTERN SEQUENCE
U.ORGANFLUTES
L.ORGANFLUTES
ROTARY SPSPEED
3

ELS-01/01C Owner’s Manual190
10F
ootswitches, K
nee Lever and E
xpression Pedals
● ● ● ● ● ● ● ● ● ● ● ● ● ● ● ● ● ● ● ● ● ● ● ● ● ● ● ● ● ● ● ● ● ● ● ● ● ●
Controlling Lead Slide
Call up the Voice Condition display Page 2 of the Lead Voice section to which you want to apply the Lead Slide effect.
Press the [KNEE] button of the Slide section on the display.
Press the Knee Lever to the right with your knee when you want to apply the Slide effect.The Slide effect is applied as long as the Knee Lever is pressed. Releasing the Knee Lever, cancels the Lead Slide effect.
● ● ● ● ● ● ● ● ● ● ● ● ● ● ● ● ● ● ● ● ● ● ● ● ● ● ● ● ● ● ● ● ● ● ● ● ● ●
Controlling the Solo Function
You can turn the Solo function on/off by using the Knee Lever. See page 27 for more information.
The Expression pedal can be used to control the volume with your foot as you play. Moreover, the ELS-01C has another Expression Pedal, the 2nd Expression Pedal. The 2nd Expression Pedal can be used to control the Pitch Bend and the Tempo of the Rhythm. The explanation on the 2nd Expression Pedal is given here.
Reference Page
Voice Condition Display (page 39)
3 Expression Pedals
1
2
3
Reference Page
Getting Started (page 11)
Expression Pedal
2nd Expression Pedal (ELS-01C)

ELS-01/01C Owner’s Manual 191
10F
oots
witc
hes,
Kne
e Le
ver
and
Exp
ress
ion
Ped
als
Press the [UTILITY] button on the front panel.The Utility display appears.
Press the [EXP.] button in the upper right of the display to call up the EXP. (Expression) Page.
In this display, you can assign the Pitch Bend control or Tempo control to the 2nd Expression Pedal. If both Pitch Bend and Rhythm Tempo controls are set to ON, both functions are applied when you press the 2nd Expression Pedal. Generally one of them is assigned to the 2nd Expression Pedal.
● ● ● ● ● ● ● ● ● ● ● ● ● ● ● ● ● ● ● ● ● ● ● ● ● ● ● ● ● ● ● ● ● ● ● ● ● ●
Controlling Pitch Bend
1 MODEDetermines the range of the Pitch Bend control. Each step changes the pitch range by a semitone.Range: 1 – 12The setting 2 (NARROW) results in a small amount of pitch variation (over +/- two semitones); the setting 12 (WIDE) results in a large amount of pitch variation (over +/- one octave).
2 Voice Sections (PITCH BEND)Selects the Voice sections to which the Pitch Bend function will be applied, and turns the function ON. Pitch Bend can be selected independently or together for Upper Voices 1 and 2, Lead Voice 1 and 2, Pedal Voices 1 and 2.
12
DISPLAY SELECT
VOICEDISPLAY
FOOTSWITCH
RHYTHMPROGRAM
UTILITY INTERNET
A.B.C.M.O.C. MDR
VOICE EDIT PATTERN SEQUENCE
U.ORGANFLUTES
L.ORGANFLUTES
ROTARY SPSPEED
21

ELS-01/01C Owner’s Manual192
10F
ootswitches, K
nee Lever and E
xpression Pedals
● ● ● ● ● ● ● ● ● ● ● ● ● ● ● ● ● ● ● ● ● ● ● ● ● ● ● ● ● ● ● ● ● ● ● ● ● ●
Controlling the Rhythm Tempo
1 MODEDetermines the range of tempo change.Range: 1 – 12The setting 2 (NARROW) results in a small amount of tempo change (70% – 140%); the setting 12 (WIDE) results in a large amount of tempo change (50% – 200%).
2 TEMPOWhen you want to control the tempo with the 2nd Expression Pedal, set this to “ON.” When set to on, pressing the pedal down with your toe speeds up the tempo and pressing it back with your heel slows it down.
21

ELS-01/01C Owner’s Manual 193
11
Tran
spos
e an
d P
itch
Con
trol
s
Transpose and Pitch ControlsThere are two pitch-related controls on the Electone: Transpose and Pitch. Transpose allows you to change the key of the instrument and Pitch lets you finely adjust the tuning. Transpose and Pitch can be adjusted in the Utility display. (The settings here cannot be recorded to the Music Data Recorder.)
Press the [UTILITY] button.The Utility display appears.
Press the [PITCH] button at the top right of the display to call up the PITCH Page.
In this display, you can change the Transpose and Pitch settings by using the buttons on the display or the Data Control Dial.
1 TRANSPOSEDetermines the coarse pitch setting of all the Voices, and is adjustable in half-steps (semitones).Range: -6 – +6
2 PITCHDetermines the fine pitch setting of all the Voices. Each step changes the pitch by 0.2 Hz. The default Pitch is 440.0 Hz (corresponding to key A3).Range: 427.2 Hz – 452.6 Hz
You can also change the Transpose and Pitch for each Voice section, in the Voice Condition display. For more information, see page 42.
12
DISPLAY SELECT
VOICEDISPLAY
FOOTSWITCH
RHYTHMPROGRAM
UTILITY INTERNET
A.B.C.M.O.C. MDR
VOICE EDIT PATTERN SEQUENCE
U.ORGANFLUTES
L.ORGANFLUTES
ROTARY SPSPEED
21
NOTE
The Transpose/Pitch setting here is not applied to an XG Song.
11

ELS-01/01C Owner’s Manual194
Internet Direct C
onnection
12
Internet Direct ConnectionThis convenient, powerful feature lets you directly connect your Electone to the Internet. In this section, you may come across some unfamiliar terms and phrases related to computers and online communications. To look up the meaning of these terms, refer to the Internet Glossary (page 207).
You can connect the instrument to a full-time online connection (ADSL, optical fiber, cable Internet, etc.) via a router or a modem equipped with a router.
To use the Internet connection, you will first need to subscribe to an Internet service or provider.
Contents
1 Connecting the Instrument to the Internet. . . . . . . . . 194
2 Accessing the Website from the Electone. . . . . . . . . 195• Scrolling the Display . . . . . . . . . . . . . . . . . . . . . . . . . . . . . . . 196• Following Links . . . . . . . . . . . . . . . . . . . . . . . . . . . . . . . . . . . 196• Refreshing a Web Page/Canceling Loading of a Web Page. . . 198• Return to the Previous Web Page . . . . . . . . . . . . . . . . . . . . . . 198• Saving Bookmarks of Your Favorite Pages . . . . . . . . . . . . . . . 199• Editing Bookmarks . . . . . . . . . . . . . . . . . . . . . . . . . . . . . . . . . 201• Changing the Home Page . . . . . . . . . . . . . . . . . . . . . . . . . . . . 202
3 About the Internet Settings Display . . . . . . . . . . . . . 203• Browser . . . . . . . . . . . . . . . . . . . . . . . . . . . . . . . . . . . . . . . . . 203• LAN . . . . . . . . . . . . . . . . . . . . . . . . . . . . . . . . . . . . . . . . . . . . 204• Wireless LAN . . . . . . . . . . . . . . . . . . . . . . . . . . . . . . . . . . . . . 204• Others . . . . . . . . . . . . . . . . . . . . . . . . . . . . . . . . . . . . . . . . . . 205
4 Exiting from the Internet Display. . . . . . . . . . . . . . . 206
5 Initializing Internet Settings . . . . . . . . . . . . . . . . . . 206
6 Glossary of Internet Terms . . . . . . . . . . . . . . . . . . . 207
1 Connecting the Instrument to the Internet
Use a computer to connect to the Internet and get online before connecting the instrument, since no modem or router settings can be made from the instrument itself.
NOTE
Depending on the Internet connection, you may not be able to connect to two or more devices (for example, a computer and the instrument), depending on the contract with the provider. This means you cannot connect with the Electone. If in doubt, check your contract or contact your provider.
Reference Page
Connecting USB storage devices or USB-LAN adapter (page 216)
Connection example 1:Connecting by cable (using a modem without router)
Modem*No router capability
RouterCable type
LAN cable
LAN cable
USB-LAN adapter
* Here, “modem” refers to an ADSL modem, optical network unit (ONU) or cable modem.
12

Inte
rnet
Dire
ct C
onne
ctio
n
12
ELS-01/01C Owner’s Manual 195
To access the website, press the [INTERNET] button while the instrument is connected to the Internet.
Connection example 2:Connecting by cable (using a modem with router)
LAN cable
USB-LAN adapter
ADSL modemRouter capability
LAN cable
NOTE
Some types of modems require an optional hub network for simultaneously connecting to several devices (such as computer, musical instrument, etc.).
2 Accessing the Website from the Electone
Connection example 3:Wireless connection
Modem*
* Here, “modem” refers to an ADSL modem, optical network unit (ONU) or cable modem.
USB wireless LAN adapter
Router Access Point
DISPLAY SELECT
VOICEDISPLAY
FOOTSWITCH
RHYTHMPROGRAM
UTILITY INTERNET
A.B.C.M.O.C. MDR
VOICE EDIT PATTERN SEQUENCE
U.ORGANFLUTES
L.ORGANFLUTES
ROTARY SPSPEED
Control Menu Browser

Internet Direct C
onnection
12
ELS-01/01C Owner’s Manual196
In the Control Menu located in the left part of the display, you can control the displayed website and set various settings. The browser display, to the right of the control menu, is the area in which the website is displayed.
● ● ● ● ● ● ● ● ● ● ● ● ● ● ● ● ● ● ● ● ● ● ● ● ● ● ● ● ● ● ● ● ● ● ● ● ● ●
Scrolling the Display
When the size of the web page is too large to be shown at one time in the browser display of the instrument, a scroll bar appears at the right side or bottom of the display. Touch and move the scroll bar to view those parts of the page that are not shown.
● ● ● ● ● ● ● ● ● ● ● ● ● ● ● ● ● ● ● ● ● ● ● ● ● ● ● ● ● ● ● ● ● ● ● ● ● ●
Following Links
When there is a link in the page, it is shown as a button or in colored text, etc. To select the link, press it (the button or text) directly on the display.
The touch panel will not sound when you press a link, even if the touch panel sound is set to ON in the Utility Display (page 16).
The first page shown when opening a browser and connecting to the Internet is called the “home page.” If you want to return to the home page from another website, press the [HOME] button in the Control Menu.
Reference Page
Changing the Home Page (page 202)

Inte
rnet
Dire
ct C
onne
ctio
n
12
ELS-01/01C Owner’s Manual 197
Monitoring the Internet Connection StatusThe four icons and a message indicate the current Internet connection status.
1 Offline indicator ( )This is shown when the instrument is not connected to the Internet. When this appears, you cannot view any web pages.
2 Communication Status indicator ( )This flashes when the web page is being loaded, indicating that communication with the site is in progress. The indicator lights continuously when loading is finished (communication is established).
3 SSL indicator ( )This is shown when the opened website uses SSL, and it indicates that data is encrypted before transmission.
4 Wireless LAN indicator
When you connect the Electone to Internet using wireless LAN, an icon indicating the condition of the connection is displayed. If the signal to the Electone becomes weak or there is no signal from the access point, move the Electone nearer to the access point.
: Strong
: Normal
: Weak (not connected to Internet)
: No signal (not connected to Internet)
5 Communication status indicator
The following three messages will be shown depending on the status of accessing web site.
1
5
2 34
Now opening web page ... Indicates loading of the web page.
Web page has been displayed. Indicates the web page has been loaded and the web page is completely displayed.
Disconnected. Indicates the Electone is offline (not connected to Internet).
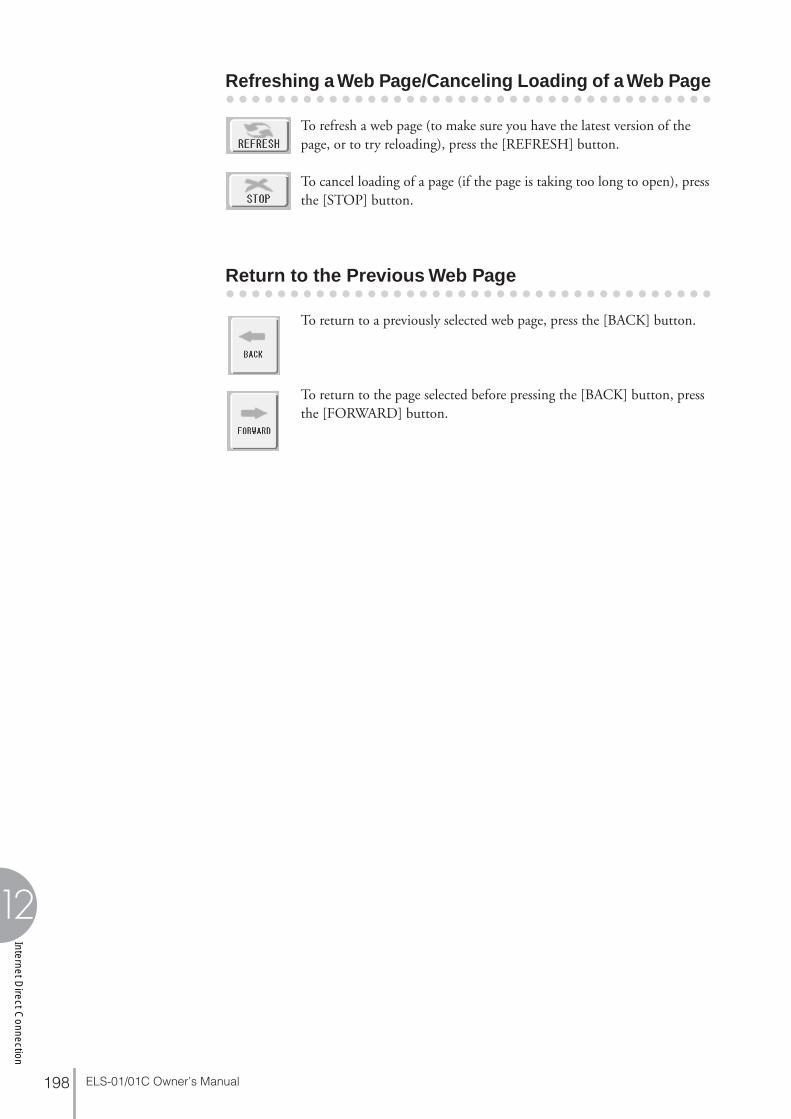
Internet Direct C
onnection
12
ELS-01/01C Owner’s Manual198
● ● ● ● ● ● ● ● ● ● ● ● ● ● ● ● ● ● ● ● ● ● ● ● ● ● ● ● ● ● ● ● ● ● ● ● ● ●
Refreshing a Web Page/Canceling Loading of a Web Page
To refresh a web page (to make sure you have the latest version of the page, or to try reloading), press the [REFRESH] button.
To cancel loading of a page (if the page is taking too long to open), press the [STOP] button.
● ● ● ● ● ● ● ● ● ● ● ● ● ● ● ● ● ● ● ● ● ● ● ● ● ● ● ● ● ● ● ● ● ● ● ● ● ●
Return to the Previous Web Page
To return to a previously selected web page, press the [BACK] button.
To return to the page selected before pressing the [BACK] button, press the [FORWARD] button.

Inte
rnet
Dire
ct C
onne
ctio
n
12
ELS-01/01C Owner’s Manual 199
● ● ● ● ● ● ● ● ● ● ● ● ● ● ● ● ● ● ● ● ● ● ● ● ● ● ● ● ● ● ● ● ● ● ● ● ● ●
Saving Bookmarks of Your Favorite Pages
You can “bookmark” the page you’re viewing, and set up a custom link so the page can be instantly called up in the future.
With the desired page currently selected, press the [BOOKMARK] button in the control menu.The Bookmark display appears, showing a list of the currently saved bookmarks. The title of the web page registered to the selected bookmark is shown below the list.
Call up the display for registering bookmarks by pressing the [ADD] button.
1
2
Page title

Internet Direct C
onnection
12
ELS-01/01C Owner’s Manual200
Select the position of the new bookmark by pressing the desired position directly, or using the [UP]/[DOWN] button or the Data Control Dial.
To save the bookmark, press the [EXECUTE] button, or press the [CANCEL] button to cancel.
To return to the browser, press the [EXIT] button.
Opening a Bookmarked Page:
Press the [BOOKMARK] button in the control menu to call up the Bookmark display, then select the desired bookmark.
Press the [JUMP] button to open the page of the selected bookmark.
3
DATA CONTROL
4
5
1
2
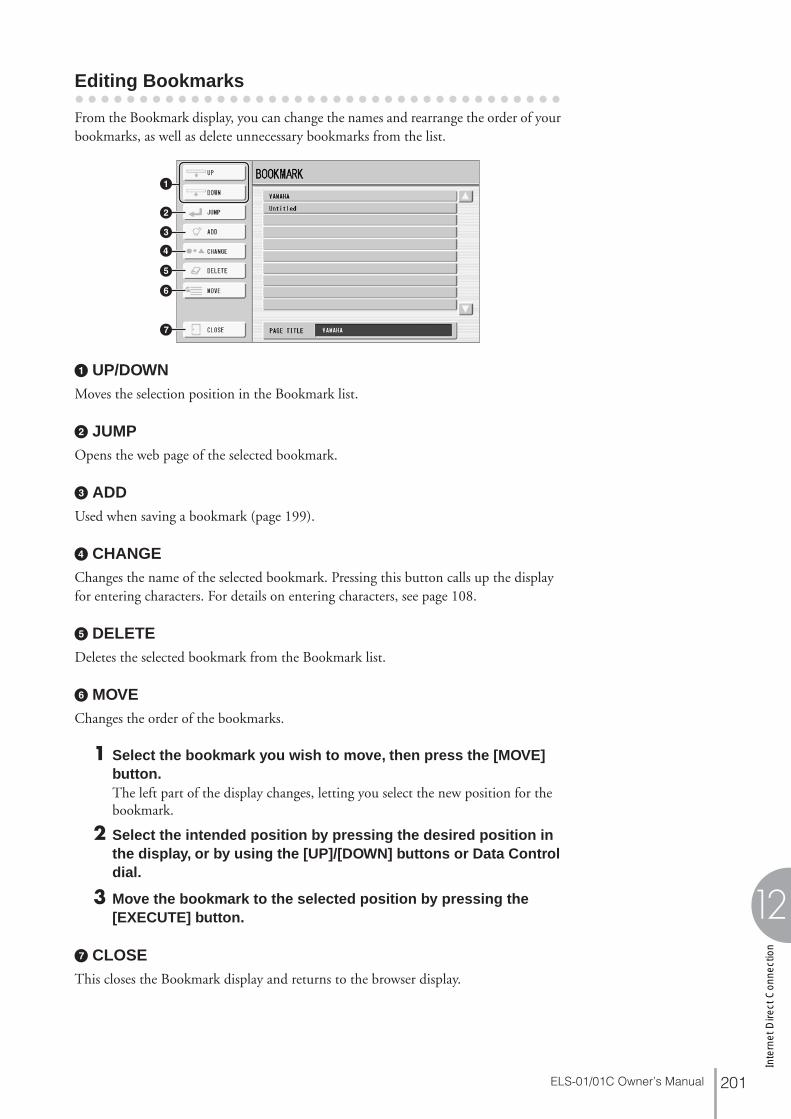
Inte
rnet
Dire
ct C
onne
ctio
n
12
ELS-01/01C Owner’s Manual 201
● ● ● ● ● ● ● ● ● ● ● ● ● ● ● ● ● ● ● ● ● ● ● ● ● ● ● ● ● ● ● ● ● ● ● ● ● ●
Editing Bookmarks
From the Bookmark display, you can change the names and rearrange the order of your bookmarks, as well as delete unnecessary bookmarks from the list.
1 UP/DOWNMoves the selection position in the Bookmark list.
2 JUMPOpens the web page of the selected bookmark.
3 ADDUsed when saving a bookmark (page 199).
4 CHANGEChanges the name of the selected bookmark. Pressing this button calls up the display for entering characters. For details on entering characters, see page 108.
5 DELETEDeletes the selected bookmark from the Bookmark list.
6 MOVEChanges the order of the bookmarks.
1 Select the bookmark you wish to move, then press the [MOVE] button.The left part of the display changes, letting you select the new position for the bookmark.
2 Select the intended position by pressing the desired position in the display, or by using the [UP]/[DOWN] buttons or Data Control dial.
3 Move the bookmark to the selected position by pressing the [EXECUTE] button.
7 CLOSEThis closes the Bookmark display and returns to the browser display.
1
2
3
4
5
6
7

Internet Direct C
onnection
12
ELS-01/01C Owner’s Manual202
● ● ● ● ● ● ● ● ● ● ● ● ● ● ● ● ● ● ● ● ● ● ● ● ● ● ● ● ● ● ● ● ● ● ● ● ● ●
Changing the Home Page
You can specify any desired page on the site to be the home page. In advance, open the page you wish to set as your new home page.
Press the [SETTING] button in the control menu to call up the Internet Setting display.
Press the [Browser] button to call up the Browser Page.
Press the [Register] button of the “Set this page as Home.”
To return to the browser, press the [EXECUTE] button in the control menu. A message appears, prompting confirmation of the operation. Select [YES] to return to the browser.
1
2
3
4

Inte
rnet
Dire
ct C
onne
ctio
n
12
ELS-01/01C Owner’s Manual 203
From the Internet Settings display, you can make various settings related to the Internet connection, including preferences for the menus and displays. The Internet Settings display has four sub-displays: Browser, LAN, Wireless LAN, and Others.
● ● ● ● ● ● ● ● ● ● ● ● ● ● ● ● ● ● ● ● ● ● ● ● ● ● ● ● ● ● ● ● ● ● ● ● ● ●
Browser
1 EncodeSelects the character code encoding for the browser.
2 Home pageShows and allows editing of the web page which is set as the home page.
3 Set this page as HomeFor details, refer to “Changing the Home Page” on page 202.
4 Restore default HomeRestores the home page setting.
5 Show imagesImage data and pictures in the web page are shown in the browser when this is set to on. Image data is not shown when this is set to off.
6 Character entry keysThis setting lets you select the character order of the virtual keyboard for entering characters. When this is set to “Alphabetical,” the keys are in alphabetical order. When this is set to “ASCII,” the keys are arranged as a conventional “QWERTY” keyboard.
7 Time zoneThis determines the time setting for the browser.
3 About the Internet Settings Display
1
34567
2

Internet Direct C
onnection
12
ELS-01/01C Owner’s Manual204
● ● ● ● ● ● ● ● ● ● ● ● ● ● ● ● ● ● ● ● ● ● ● ● ● ● ● ● ● ● ● ● ● ● ● ● ● ●
LAN
In this display page, you can make settings for the LAN connection. These settings are needed for not only wired LAN connection but also wireless LAN connection.
1 Use DHCPDetermines whether or not DHCP is used. If your router is compatible with DHCP, select “ON (set DNS automatically)” here.
2 DNS server 1 / DNS server 2These determine the addresses of the primary and secondary DNS servers. These settings must be made when “Use DHCP” above is set to “ON (set DNS manually)” or “OFF.”
3 IP address / Subnet mask / GatewayThese settings are available only when DHCP is not used. The settings here are: IP address, subnet mask, and gateway server address. These settings must be made when “Use DHCP” above is set to “OFF.”
● ● ● ● ● ● ● ● ● ● ● ● ● ● ● ● ● ● ● ● ● ● ● ● ● ● ● ● ● ● ● ● ● ● ● ● ● ●
Wireless LAN
In this display page, you can make settings for the wireless LAN connection. These settings must be the same as the settings on the Access Point.
1
2
3
Make a written note of these settings, in case you have to enter the settings again.
Use DHCP
DNS server 1
DNS server 2
IP address
Subnet mask
Gateway
123
5
4
Make a written note of these settings, in case you have to enter the settings again.
SSID
Channel Ch
Encryption On Off
WEP key type ASCII Hexadecimal
WEP key length 64 bit 128 bit
WEP key
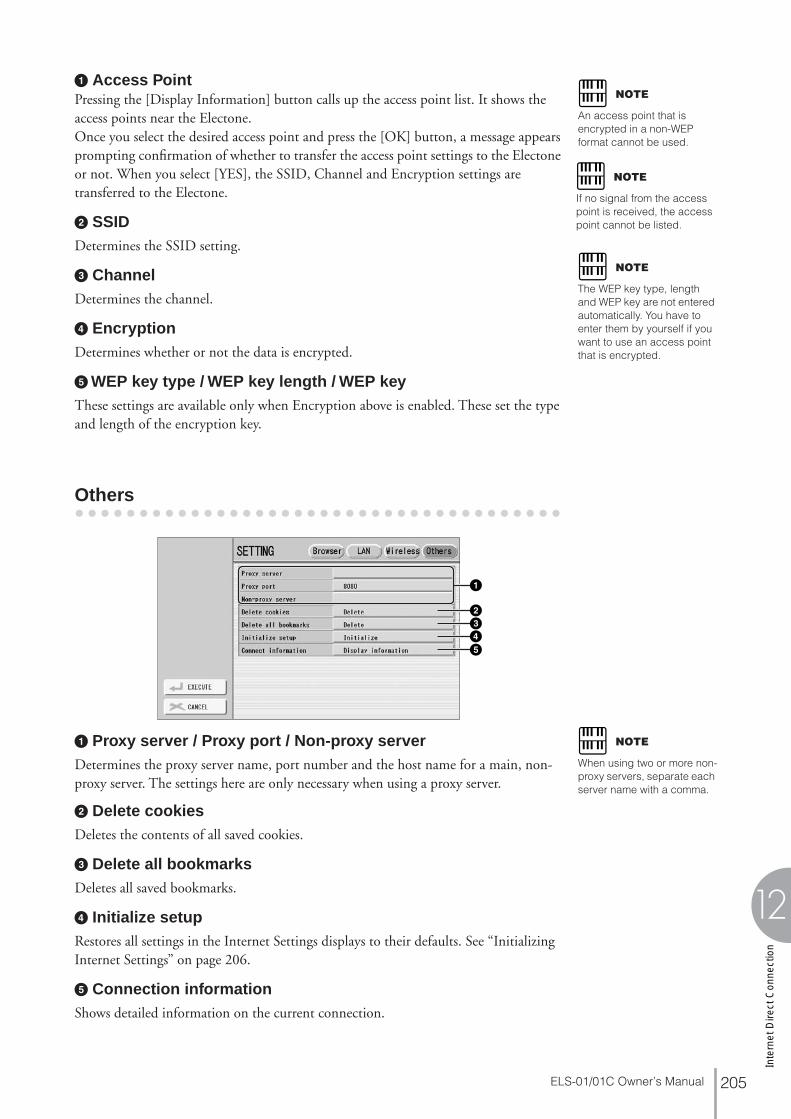
Inte
rnet
Dire
ct C
onne
ctio
n
12
ELS-01/01C Owner’s Manual 205
1 Access PointPressing the [Display Information] button calls up the access point list. It shows the access points near the Electone.Once you select the desired access point and press the [OK] button, a message appears prompting confirmation of whether to transfer the access point settings to the Electone or not. When you select [YES], the SSID, Channel and Encryption settings are transferred to the Electone.
2 SSIDDetermines the SSID setting.
3 ChannelDetermines the channel.
4 EncryptionDetermines whether or not the data is encrypted.
5 WEP key type / WEP key length / WEP keyThese settings are available only when Encryption above is enabled. These set the type and length of the encryption key.
● ● ● ● ● ● ● ● ● ● ● ● ● ● ● ● ● ● ● ● ● ● ● ● ● ● ● ● ● ● ● ● ● ● ● ● ● ●
Others
1 Proxy server / Proxy port / Non-proxy serverDetermines the proxy server name, port number and the host name for a main, non-proxy server. The settings here are only necessary when using a proxy server.
2 Delete cookiesDeletes the contents of all saved cookies.
3 Delete all bookmarksDeletes all saved bookmarks.
4 Initialize setupRestores all settings in the Internet Settings displays to their defaults. See “Initializing Internet Settings” on page 206.
5 Connection informationShows detailed information on the current connection.
NOTE
An access point that is encrypted in a non-WEP format cannot be used.
NOTE
If no signal from the access point is received, the access point cannot be listed.
NOTE
The WEP key type, length and WEP key are not entered automatically. You have to enter them by yourself if you want to use an access point that is encrypted.
2345
1
NOTE
When using two or more non-proxy servers, separate each server name with a comma.

Internet Direct C
onnection
12
ELS-01/01C Owner’s Manual206
Pressing any button other than [INTERNET] button quits the Internet Direct Connection and closes the website display. Pressing the [INTERNET] button again automatically opens the previously opened website.
The settings of the Internet function are not initialized when using the Initialize operation of the Electone (page 21); Internet settings must be initialized separately, as explained here. Initializing will reset to the default values not only the settings of the browser, but also all settings you have made in the Internet Settings displays, including those related to Internet connection.
Press the [SETTING] button in the control menu to call up the Internet Settings display.
Press the [Others] button at the top right of the display.
Press the [Initialize] button to initialize the Internet settings.A message appears, prompting confirmation of the operation.
Select [YES] to initialize the Internet settings, or select [NO] to abort the operation.
4 Exiting from the Internet Display
5 Initializing Internet Settings
1
2
3
4

Inte
rnet
Dire
ct C
onne
ctio
n
12
ELS-01/01C Owner’s Manual 207
6 Glossary of Internet Terms
Broadband An Internet connection technology/service (such as ADSL and optical fiber) that allows for high-speed, high-volume data communication.
Browser The software used to search for, access, and view web pages. For this instrument, this refers to the display that shows the contents of the web pages.
Cookie A system that records certain information that the user transfers when visiting a website and using the Internet. The function is similar to a preference file in a conventional computer program, in that it “remembers” certain information such as your user name and password, so you don’t have to re-enter the information each time you visit the site.
DHCP This is a standard or protocol by which IP addresses and other low-level network configuration information can be dynamically and automatically assigned each time connection is made to the Internet.
DNS A system that translates names of computers connected to a network to their corresponding IP addresses.
Download Transferring data over a network, from a larger “host” system to a smaller “client” system’s hard drive or other local storage device — much like copying files from your hard disk drive to a floppy disk. For this instrument, this refers to the process of transferring Song and other data from a website to the instrument.
Gateway A system which links different networks or systems, and makes possible data transfer and conversion despite differing communications standards.
Home page The first page shown when opening a browser and connecting to the Internet. This phrase is also used to mean the “front screen” or top page of a website.
Internet A huge network made up of networks, the Internet allows high-speed data transfer among computers, mobile phones and other devices.
IP address A string of numbers assigned to each computer connected to a network, and indicating the device’s location on the network.
LAN Short for Local Area Network, this is a data-transfer network that connects a group of computers at a single location (such as an office or home) by means of a special cable.
Link A highlighted word, button or icon within a web page that, when clicked, opens another web page.
Modem A device which connects and allows data transfer between a conventional telephone line and a computer. It converts the digital signals from the computer to analog audio for sending over the phone line, and vice versa.
NTP Short for Network Time Protocol, a standard for setting the internal system clock of the computer over a network. For this instrument, the internal clock of the computer is used to specify the valid time/date for cookies and SSL.
Provider A communications business that offers Internet connection services. In order to connect to the Internet, it is necessary to contract to a provider.
Proxy A proxy server is a server that all computers on a local network have to go through before accessing information on the Internet. It intercepts all or designated requests to the real server to see if it can fulfill the requests itself. If not, it forwards the request to the real server. Proxy servers are used to improve performance and speed, and to filter requests, usually for security and to prevent unauthorized access to an internal network.
Router A device for connecting multiple computer networks. For example, a router is necessary when connecting several computers in a house or office, and allow them to all access the Internet and share data. A router is usually connected between a modem and a computer, although some modems have a built-in router.
Server A hardware system or computer used as a central point for a network, providing access to files and services.
Site Short for “website,” this refers to the group of web pages that are opened together. For example, the collection of web pages whose addresses begin with “http://www.yamaha.com/” is referred to as the Yamaha site.
SSID This is an identification name for specifying a particular network over a wireless LAN connection. Communication is possible only between terminals with matching SSID names.
SSL Short for Secure Sockets Layer, a standard for transmitting confidential data such as credit card numbers over the Internet.
Subnet mask A setting used to divide a large-scale network into several smaller networks.
URL Short for Uniform Resource Locator, a string of characters used to identify and link to specific websites and pages on the Internet. A complete URL usually starts with the characters “http://.”
Web page Refers to each individual page that makes up a website.
Wireless LAN A LAN connection that allows data transfer through a wireless, cable-free connection.

ELS-01/01C Owner’s Manual208
Connections
13
ConnectionsOn the underside of the Electone keyboard is a separate panel equipped with various input/output terminals and miscellaneous controls.
This section provides brief explanations for each jack/control on the Electone. For details on connecting to external devices, see page 211.
1 INPUT VOLUME knobFor adjusting the level of input signal from the MIC./LINE IN jack.
2 MIC./LINE IN jackFor connecting a mono input, such as microphone or guitar. The Electone outputs the microphone or guitar sounds, with reverb processing, through the built-in speaker system.
3 MIC./LINE switchWhen connecting a microphone or other electric/electronic instrument to the MIC./LINE IN jack, make sure to set this level gain switch appropriately, depending on the device you use.
4 PHONES jacksFor connection of a stereo headphone set. When headphones are connected to this jack, sound to the Electone’s built-in speaker system is automatically cut off, allowing you to play without disturbing others.
Contents
1 Accessory Jacks and Controls. . . . . . . . . . . . . . . . . 208
2 Connection Examples – External Devices . . . . . . . . . 211•Using Headphones . . . . . . . . . . . . . . . . . . . . . . . . . . . . . . . . . 211•Playing the Sounds of the Electone Through an External Audio
System . . . . . . . . . . . . . . . . . . . . . . . . . . . . . . . . . . . . . . . . . . 211•Recording the Sounds of the Electone to an External Recorder 213•Outputting the Sound of an External Device Through the Built-in
Speakers of the Electone . . . . . . . . . . . . . . . . . . . . . . . . . . . . . 213•Connecting a Microphone or Guitar . . . . . . . . . . . . . . . . . . . . 214•Controlling External MIDI Devices from the Electone . . . . . . . 215
•Controlling the Electone from an External Device . . . . . . . . . . 216•Connecting USB storage devices or USB-LAN adapter . . . . . . 216
3 Connection with Computer . . . . . . . . . . . . . . . . . . . 217
4 MIDI . . . . . . . . . . . . . . . . . . . . . . . . . . . . . . . . . . 218•What is MIDI? . . . . . . . . . . . . . . . . . . . . . . . . . . . . . . . . . . . . . 218•MIDI Messages of the Electone. . . . . . . . . . . . . . . . . . . . . . . . 219•MIDI Channels . . . . . . . . . . . . . . . . . . . . . . . . . . . . . . . . . . . . 220
5 MIDI Control . . . . . . . . . . . . . . . . . . . . . . . . . . . . 221
1 Accessory Jacks and Controls
MIN MAX
INPUTVOLUME MIC. /
LINE IN MIC. LINE PHONES
1 2 3
4
Reference Page
Connecting a Microphone or Guitar (page 214)
Reference Page
Using Headphones (page 211)
13

Con
nect
ions
13
ELS-01/01C Owner’s Manual 209
5 AUX IN (Phone; L/L+R, R) jacksThis pair of stereo phone jacks is for connection to an external device. The signal from the connected external device sounds from the Electone’s built-in speakers.
6 AUX OUT (Phone; L/L+R, R) jacksThis pair of stereo outputs is for connection to an external amplifier/speaker system.The output level can be controlled with the MASTER VOLUME Dial.
7 AUX OUT (RCA; L, R) jacks (LEVEL FIXED)This set of stereo outputs is for connection to an external amplifier/speaker. The output level is fixed and cannot be controlled.
AUX INL / L+R R
AUX OUTL / L+R R
AUX OUTL R
(LEVEL FIXED)
5 6 7
Reference Page
Outputting the Sound of an External Device Through the Built-in Speakers of the Electone (page 213)
Reference Pages
Playing the Sounds of the Electone Through an External Audio System (page 211)
Recording the Sounds of the Electone to an External Recorder (page 213)
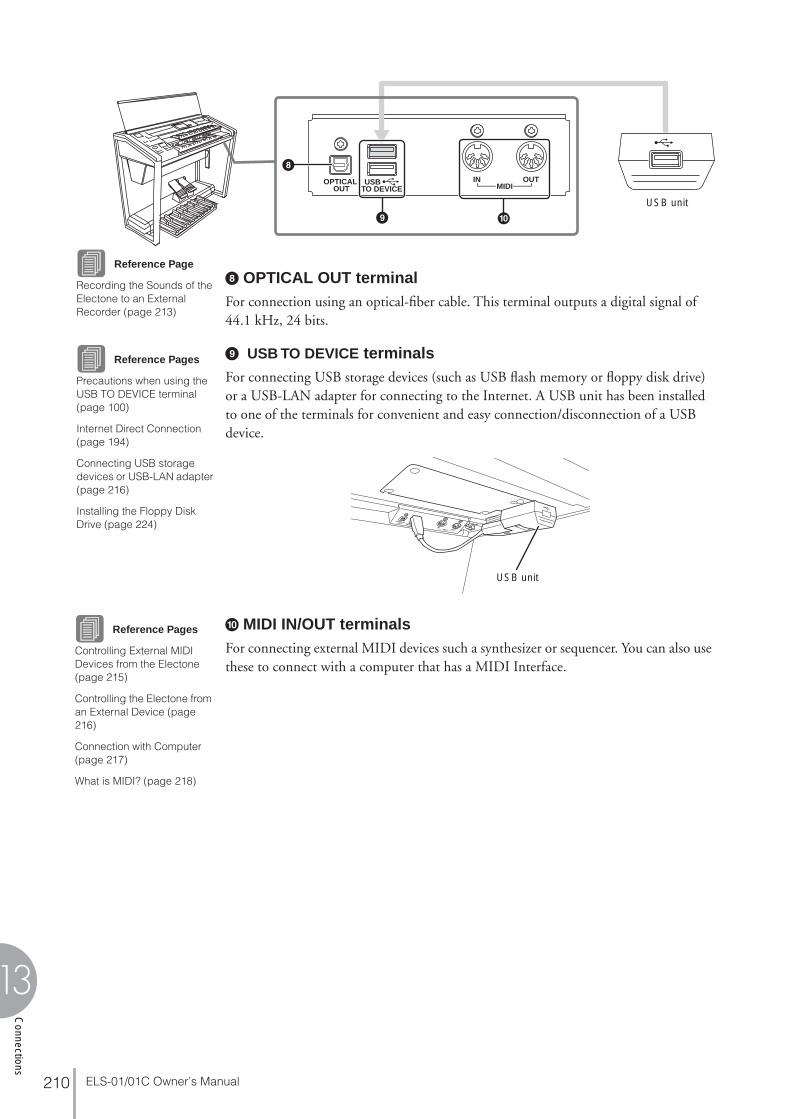
ELS-01/01C Owner’s Manual210
Connections
13
8 OPTICAL OUT terminalFor connection using an optical-fiber cable. This terminal outputs a digital signal of 44.1 kHz, 24 bits.
9 USB TO DEVICE terminalsFor connecting USB storage devices (such as USB flash memory or floppy disk drive) or a USB-LAN adapter for connecting to the Internet. A USB unit has been installed to one of the terminals for convenient and easy connection/disconnection of a USB device.
) MIDI IN/OUT terminalsFor connecting external MIDI devices such a synthesizer or sequencer. You can also use these to connect with a computer that has a MIDI Interface.
OPTICAL OUT TO DEVICE
USB IN OUTMIDI
)
8
9
USB unit
Reference Page
Recording the Sounds of the Electone to an External Recorder (page 213)
USB unit
Reference Pages
Precautions when using the USB TO DEVICE terminal (page 100)
Internet Direct Connection (page 194)
Connecting USB storage devices or USB-LAN adapter (page 216)
Installing the Floppy Disk Drive (page 224)
Reference Pages
Controlling External MIDI Devices from the Electone (page 215)
Controlling the Electone from an External Device (page 216)
Connection with Computer (page 217)
What is MIDI? (page 218)

Con
nect
ions
13
ELS-01/01C Owner’s Manual 211
● ● ● ● ● ● ● ● ● ● ● ● ● ● ● ● ● ● ● ● ● ● ● ● ● ● ● ● ● ● ● ● ● ● ● ● ● ●
Using Headphones
To use headphones, connect them to one of the PHONES jacks (standard 1/4" phone jacks). Two people can enjoy listening to the Electone together by connecting two pairs of headphones to the two jacks.
Playing the Sounds of the Electone Through an
● ● ● ● ● ● ● ● ● ● ● ● ● ● ● ● ● ● ● ● ● ● ● ● ● ● ● ● ● ● ● ● ● ● ● ● ● ●
External Audio System
By using the AUX OUT jacks, you can connect your Electone to external speakers. If you’re connecting the Electone to a mono device, use only the AUX OUT L/L+R jack (standard phone).
2 Connection Examples – External Devices
Before connecting the Electone to other electronic components, turn off the power to all the components. Before turning the power of the components on or off, set all volume levels to minimum (0). Otherwise, electrical shock or damage to the components may occur.
PHONES
AUX OUT L/L+R R
Speaker (Left) Speaker (Right)
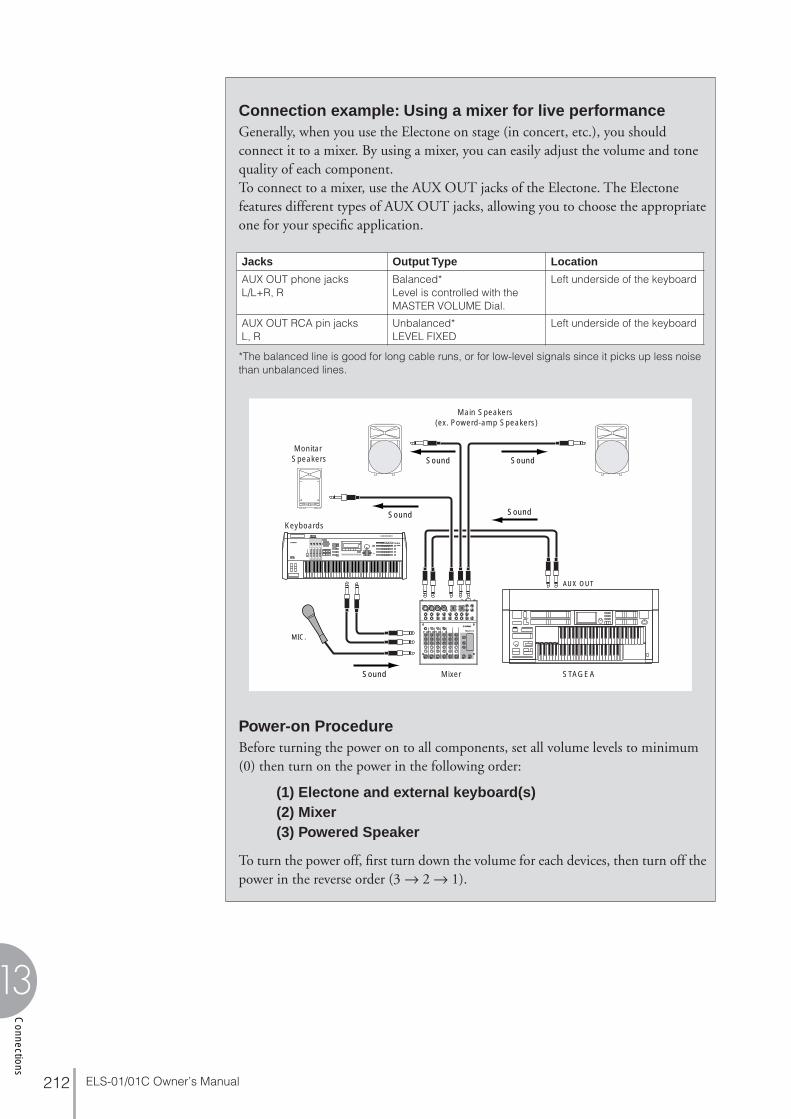
ELS-01/01C Owner’s Manual212
Connections
13
Connection example: Using a mixer for live performanceGenerally, when you use the Electone on stage (in concert, etc.), you should connect it to a mixer. By using a mixer, you can easily adjust the volume and tone quality of each component.To connect to a mixer, use the AUX OUT jacks of the Electone. The Electone features different types of AUX OUT jacks, allowing you to choose the appropriate one for your specific application.
*The balanced line is good for long cable runs, or for low-level signals since it picks up less noise than unbalanced lines.
Power-on ProcedureBefore turning the power on to all components, set all volume levels to minimum (0) then turn on the power in the following order:
(1) Electone and external keyboard(s)(2) Mixer(3) Powered Speaker
To turn the power off, first turn down the volume for each devices, then turn off the power in the reverse order (3 → 2 → 1).
Jacks Output Type Location
AUX OUT phone jacksL/L+R, R
Balanced*Level is controlled with the MASTER VOLUME Dial.
Left underside of the keyboard
AUX OUT RCA pin jacksL, R
Unbalanced*LEVEL FIXED
Left underside of the keyboard
MIC.
MUSIC PRODUCTION SYNTHESIZER
Sound
Sound
Sound
SoundSound
Main Speakers (ex. Powerd-amp Speakers)
Monitar Speakers
Mixer
Keyboards
AUX OUT
STAGEA

Con
nect
ions
13
ELS-01/01C Owner’s Manual 213
Recording the Sounds of the Electone to an External
● ● ● ● ● ● ● ● ● ● ● ● ● ● ● ● ● ● ● ● ● ● ● ● ● ● ● ● ● ● ● ● ● ● ● ● ● ●
Recorder
You can record your Electone performance to an external recorder, such as an MD recorder or cassette tape recorder, using the OPTICAL OUT terminal or AUX OUT jacks. Using the OPTICAL OUT terminal allows you to record to external media with exceptionally high-quality digital sound (providing the external recorder has an Optical In terminal). Or you can use the AUX OUT jacks (RCA or standard phone, depending on the connectors of your particular recorder).
Outputting the Sound of an External Device Through
● ● ● ● ● ● ● ● ● ● ● ● ● ● ● ● ● ● ● ● ● ● ● ● ● ● ● ● ● ● ● ● ● ● ● ● ● ●
the Built-in Speakers of the Electone
Connect the AUX IN jacks of the Electone with the LINE OUT of an external device, such as a CD player. The sound from the CD player is output from Electone’s built-in speakers.First turn on the power of the external device, then that of the Electone. Reverse this order when you turn the power off.
If you’re connecting the Electone to a mono device, use only the AUX IN L/L+R jack.
NOTE
If you want to record the sound input from the AUX IN jack together with the Electone sound, use the AUX OUT standard phone jack on the underside of the keyboard.
OPTICAL IN
OPTICAL OUTAUX OUT L
LINE IN L
R
R
Cassette tape recorder, etc. Cassette tape recorder, etc.
Audio cable Optical digital cable
Recording Recording
R
R
L/L+R
L/L+RLINE OUT
AUX IN
Stereo audio system
Playing
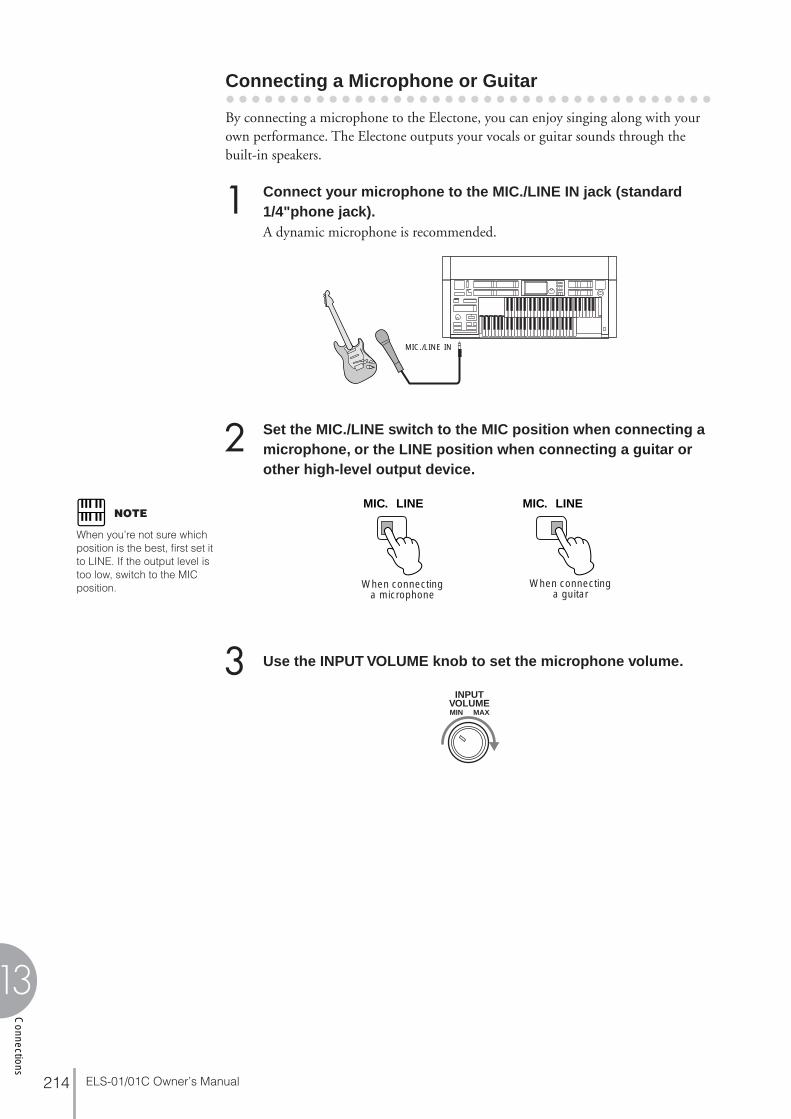
ELS-01/01C Owner’s Manual214
Connections
13
● ● ● ● ● ● ● ● ● ● ● ● ● ● ● ● ● ● ● ● ● ● ● ● ● ● ● ● ● ● ● ● ● ● ● ● ● ●
Connecting a Microphone or Guitar
By connecting a microphone to the Electone, you can enjoy singing along with your own performance. The Electone outputs your vocals or guitar sounds through the built-in speakers.
Connect your microphone to the MIC./LINE IN jack (standard 1/4"phone jack).A dynamic microphone is recommended.
Set the MIC./LINE switch to the MIC position when connecting a microphone, or the LINE position when connecting a guitar or other high-level output device.
Use the INPUT VOLUME knob to set the microphone volume.
1
MIC./LINE IN
2MIC. LINE MIC. LINE
When connecting a microphone
When connecting a guitar
NOTE
When you’re not sure which position is the best, first set it to LINE. If the output level is too low, switch to the MIC position.
3MIN MAX
INPUTVOLUME
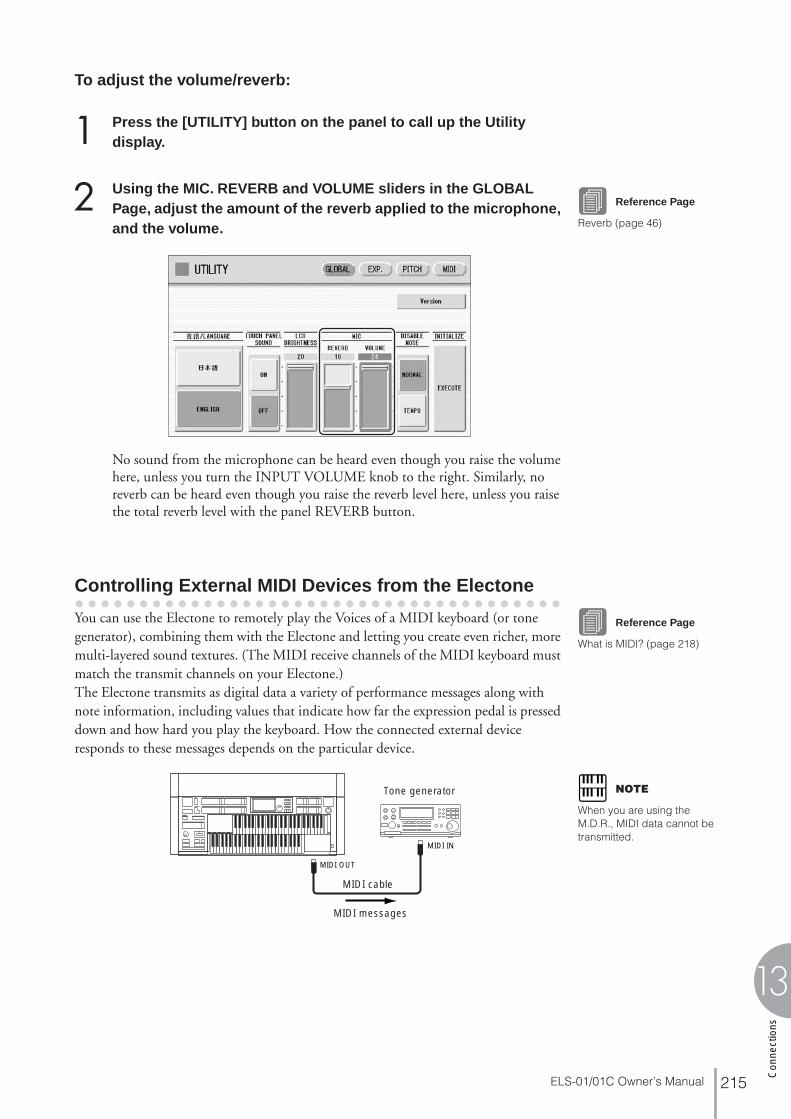
Con
nect
ions
13
ELS-01/01C Owner’s Manual 215
To adjust the volume/reverb:
Press the [UTILITY] button on the panel to call up the Utility display.
Using the MIC. REVERB and VOLUME sliders in the GLOBAL Page, adjust the amount of the reverb applied to the microphone, and the volume.
No sound from the microphone can be heard even though you raise the volume here, unless you turn the INPUT VOLUME knob to the right. Similarly, no reverb can be heard even though you raise the reverb level here, unless you raise the total reverb level with the panel REVERB button.
● ● ● ● ● ● ● ● ● ● ● ● ● ● ● ● ● ● ● ● ● ● ● ● ● ● ● ● ● ● ● ● ● ● ● ● ● ●
Controlling External MIDI Devices from the Electone
You can use the Electone to remotely play the Voices of a MIDI keyboard (or tone generator), combining them with the Electone and letting you create even richer, more multi-layered sound textures. (The MIDI receive channels of the MIDI keyboard must match the transmit channels on your Electone.)The Electone transmits as digital data a variety of performance messages along with note information, including values that indicate how far the expression pedal is pressed down and how hard you play the keyboard. How the connected external device responds to these messages depends on the particular device.
1
2 Reference Page
Reverb (page 46)
Reference Page
What is MIDI? (page 218)
MIDI IN
MIDI OUT
Tone generator
MIDI cable
MIDI messages
NOTE
When you are using the M.D.R., MIDI data cannot be transmitted.

ELS-01/01C Owner’s Manual216
Connections
13
● ● ● ● ● ● ● ● ● ● ● ● ● ● ● ● ● ● ● ● ● ● ● ● ● ● ● ● ● ● ● ● ● ● ● ● ● ●
Controlling the Electone from an External Device
You can use an external MIDI keyboard or sequencer to remotely play the sounds of your Electone and change its Registrations. (You will need to set the MIDI transmit channels of the MIDI keyboard to match the fixed receive channels on your Electone.)
● ● ● ● ● ● ● ● ● ● ● ● ● ● ● ● ● ● ● ● ● ● ● ● ● ● ● ● ● ● ● ● ● ● ● ● ● ●
Connecting USB storage devices or USB-LAN adapter
Using the USB TO DEVICE terminal(s), you can connect USB storage devices (such as the USB flash memory or UD-FD01 floppy disk drive) for saving your Electone data, and/or a USB-LAN adapter for direct connection to the Internet.
When you use USB devices, refer to “Precautions when using the USB TO DEVICE terminal” on page 100.
NOTE
When you are using the M.D.R., MIDI data cannot be received.
MIDI IN MIDI OUT
MUSIC PRODUCTION SYNTHESIZER
MIDI keyboard or synthesizer
MIDI cable
MIDI messages
Reference Pages
Installing the Floppy Disk Drive (page 224)
Internet Direct Connection (page 194)
Formatting External Media (page 102)
NOTE
If necessary, use a USB hub. Only self-powered (battery or external power supply) types can be used. Up to two USB hubs can be used.
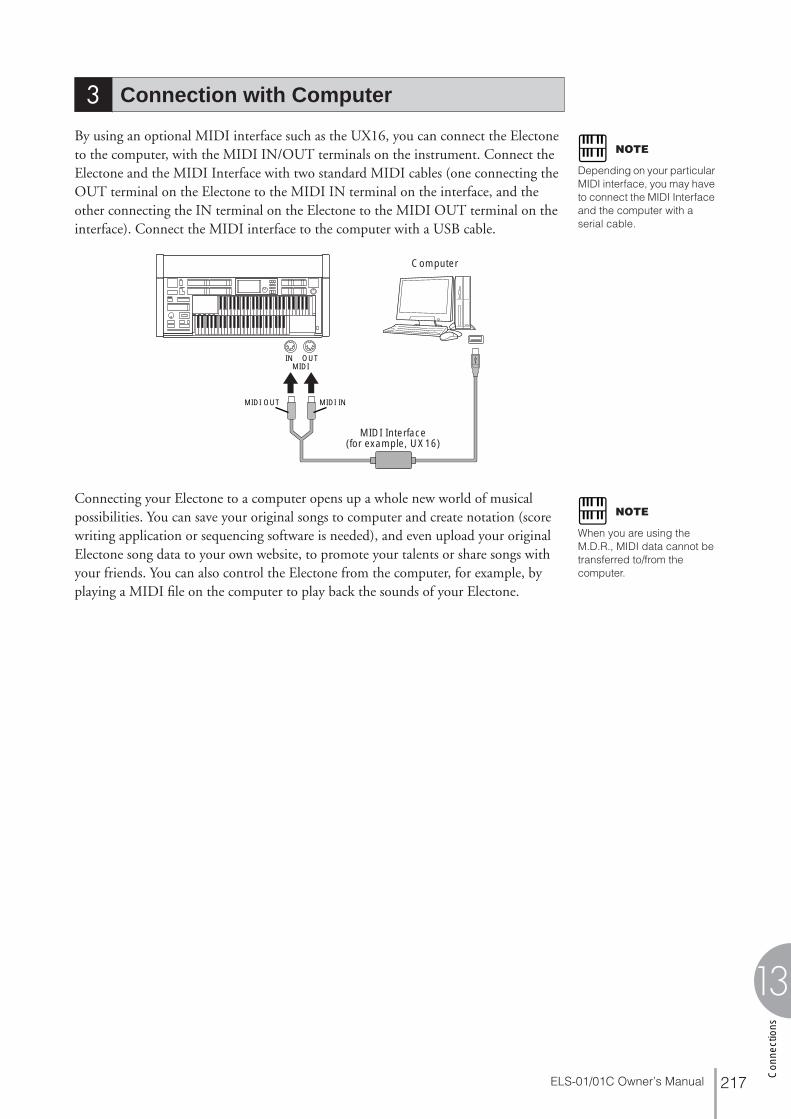
Con
nect
ions
13
ELS-01/01C Owner’s Manual 217
By using an optional MIDI interface such as the UX16, you can connect the Electone to the computer, with the MIDI IN/OUT terminals on the instrument. Connect the Electone and the MIDI Interface with two standard MIDI cables (one connecting the OUT terminal on the Electone to the MIDI IN terminal on the interface, and the other connecting the IN terminal on the Electone to the MIDI OUT terminal on the interface). Connect the MIDI interface to the computer with a USB cable.
Connecting your Electone to a computer opens up a whole new world of musical possibilities. You can save your original songs to computer and create notation (score writing application or sequencing software is needed), and even upload your original Electone song data to your own website, to promote your talents or share songs with your friends. You can also control the Electone from the computer, for example, by playing a MIDI file on the computer to play back the sounds of your Electone.
3 Connection with Computer
NOTE
Depending on your particular MIDI interface, you may have to connect the MIDI Interface and the computer with a serial cable.
MIDIIN OUT
MIDI OUT MIDI IN
Computer
MIDI Interface (for example, UX16)
NOTE
When you are using the M.D.R., MIDI data cannot be transferred to/from the computer.
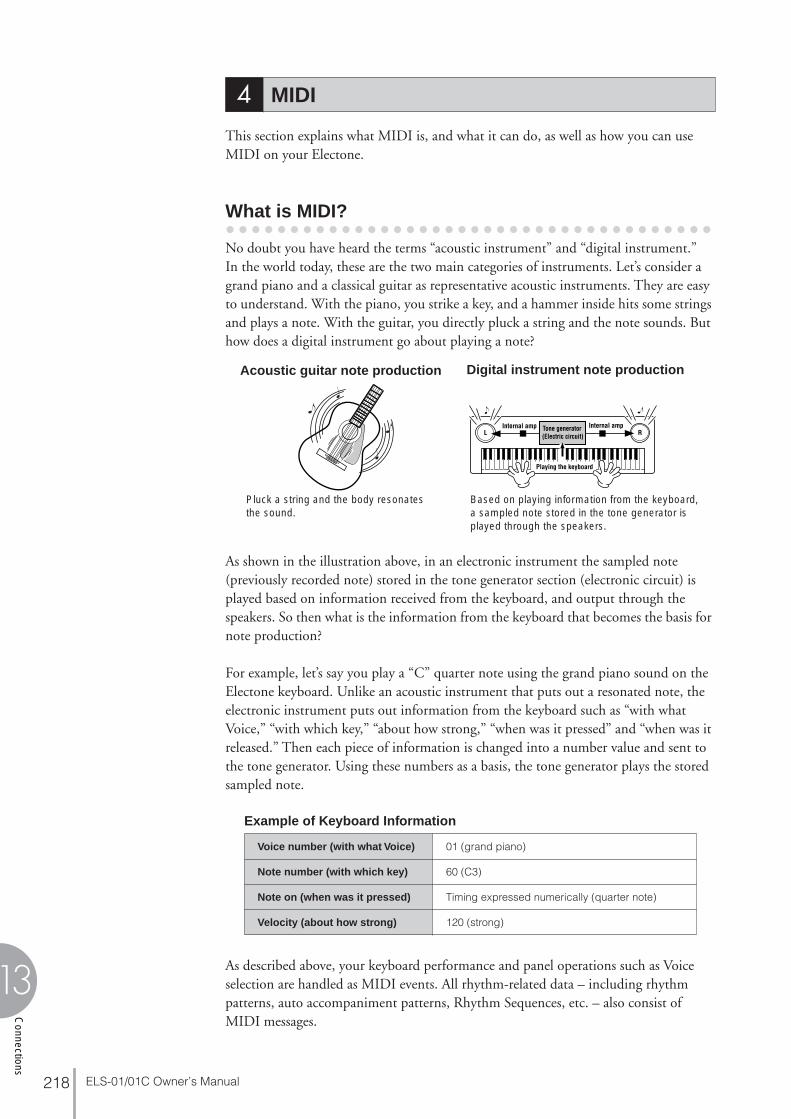
ELS-01/01C Owner’s Manual218
Connections
13
This section explains what MIDI is, and what it can do, as well as how you can use MIDI on your Electone.
● ● ● ● ● ● ● ● ● ● ● ● ● ● ● ● ● ● ● ● ● ● ● ● ● ● ● ● ● ● ● ● ● ● ● ● ● ●
What is MIDI?
No doubt you have heard the terms “acoustic instrument” and “digital instrument.” In the world today, these are the two main categories of instruments. Let’s consider a grand piano and a classical guitar as representative acoustic instruments. They are easy to understand. With the piano, you strike a key, and a hammer inside hits some strings and plays a note. With the guitar, you directly pluck a string and the note sounds. But how does a digital instrument go about playing a note?
As shown in the illustration above, in an electronic instrument the sampled note (previously recorded note) stored in the tone generator section (electronic circuit) is played based on information received from the keyboard, and output through the speakers. So then what is the information from the keyboard that becomes the basis for note production?
For example, let’s say you play a “C” quarter note using the grand piano sound on the Electone keyboard. Unlike an acoustic instrument that puts out a resonated note, the electronic instrument puts out information from the keyboard such as “with what Voice,” “with which key,” “about how strong,” “when was it pressed” and “when was it released.” Then each piece of information is changed into a number value and sent to the tone generator. Using these numbers as a basis, the tone generator plays the stored sampled note.
Example of Keyboard Information
As described above, your keyboard performance and panel operations such as Voice selection are handled as MIDI events. All rhythm-related data – including rhythm patterns, auto accompaniment patterns, Rhythm Sequences, etc. – also consist of MIDI messages.
4 MIDI
Voice number (with what Voice) 01 (grand piano)
Note number (with which key) 60 (C3)
Note on (when was it pressed) Timing expressed numerically (quarter note)
Velocity (about how strong) 120 (strong)
Internal ampInternal amp Tone generator (Electric circuit)
Playing the keyboard
RL
Acoustic guitar note production Digital instrument note production
Pluck a string and the body resonates the sound.
Based on playing information from the keyboard, a sampled note stored in the tone generator is played through the speakers.

Con
nect
ions
13
ELS-01/01C Owner’s Manual 219
MIDI (Musical Instrument Digital Interface) allows electronic musical instruments to communicate with each other, by sending and receiving compatible Note, Control Change, Program Change and various other types of MIDI data, or messages.
● ● ● ● ● ● ● ● ● ● ● ● ● ● ● ● ● ● ● ● ● ● ● ● ● ● ● ● ● ● ● ● ● ● ● ● ● ●
MIDI Messages of the Electone
MIDI messages can be divided into two groups: the Channel Messages and System Messages. Channel Messages consist of data related to the performance on the keyboard for a specific channel. System Messages consist of data that allows several MIDI devices to communicate with each other.
Channel MessagesEach time you play the keyboard on the Electone, channel messages (indicating which keys are played and how strongly) are transmitted via a specific channel. Similarly, the Electone can be played remotely when receiving this data from an external keyboard.
Note On: Indicates which keys are played with the note numbers 0 through 127. The reception note range is C-2 (0) – G8 (127), C3 = 60.
Note Off: Generated when a key is released.
Velocity: Indicates how strongly the key is played. The range is 1 – 127.
For more detailed information, see MIDI Data Format on page 226 and MIDI Implementation Chart on page 236.
• Program ChangeProgram Change messages allow you to change Voices in the middle of a song. With these messages you can change the Registrations of the Electone. For more detailed information, see MIDI Data Format on page 226 and MIDI Implementation Chart on page 236.
• Control ChangeControl Change Messages let you select Voice banks, control the volume, panning, modulation, portamento time, brightness and various other sound parameters, through specific Control Change numbers.For more detailed information on the Control Change messages available on the Electone, see MIDI Data Format on page 226 and MIDI Implementation Chart on page 236.
System Messages
• System Exclusive MessagesSystem Exclusive messages are used to exchange the system and Voice/Registration data.

ELS-01/01C Owner’s Manual220
Connections
13
● ● ● ● ● ● ● ● ● ● ● ● ● ● ● ● ● ● ● ● ● ● ● ● ● ● ● ● ● ● ● ● ● ● ● ● ● ●
MIDI Channels
MIDI data is assigned to one of sixteen MIDI channels. Using these channels, 1 – 16, the performance data for sixteen different instrument parts can be simultaneously sent over one MIDI cable.Think of the MIDI channels as TV channels. Each TV station transmits its broadcasts over a specific channel. Your home TV set receives many different programs simultaneously from several TV stations and you select the appropriate channel to watch the desired program.
MIDI operates on the same basic principle. The transmitting instrument sends MIDI data on a specific MIDI channel (MIDI Transmit Channel) via a single MIDI cable to the receiving instrument. If the receiving instrument’s MIDI channel (MIDI Receive Channel) matches the Transmit Channel, the receiving instrument will sound according to the data sent by the transmitting instrument.
The receive channel of the Electone is fixed at channel 1 for the Upper Keyboard, channel 2 for the Lower Keyboard, and channel 3 for the Pedalboard. This means that when you are using another MIDI device to play the Electone’s Voices, you must set the MIDI transmit channel(s) of the connected device to match the receive channel(s) of the Electone. You can select the transmit channel for each keyboard (Upper, Lower and Pedal) from channels 1 – 16. See page 221 for more information.
1
Weather Report
NEWS
2
2
NEWS
MIDI Transmit channel 2 MIDI Receive channel 2
MIDIcable

Con
nect
ions
13
ELS-01/01C Owner’s Manual 221
When you connect your Electone with a second MIDI device (such as a synthesizer or computer), you can determine how the Electone controls that MIDI device, or how the Electone is controlled.
Press the [UTILITY] button in the panel to call up the Utility Display.
Press the [MIDI] button at the top right of the display to call up the MIDI Page.
1 OUTPUTFor setting the channels over which MIDI information will be transmitted. Any channel from 1 through 16 can be assigned to each keyboard (the Upper keyboard, the Lower keyboard and the Pedalboard) as well as the Expression pedal and 2nd Expression pedal. The MIDI messages for each keyboard and Expression pedal will be sent on the channels set here. You must set the transmit channel here to match the receive channel of the connected device. (The ELS-01 does not show the 2nd Expression pedal.)Pressing each OUTPUT button calls up the channel selection pop-up menu. After you select the desired channel, the pop-up menu automatically closes.The Expression pedal and 2nd Expression pedal can be set to “OFF” (MIDI information will not be transmitted). On the 2nd Expression pedal, CC#4 by which MIDI information is output as Second Expression can be also set.
2 MIDI OUT FILTERDeletes unnecessary MIDI data and keeps it from being transmitted from the Electone. After Touch and Rhythm start/stop are automatically filtered on the ELS-01. In addition, Horizontal Touch and Second Expression are automatically filtered on the ELS-01C. Set the parameter for which you wish to disable transmission to ON.
5 MIDI Control
1
2
1
2 3
3 -1 3 -2 3 -3
NOTE
If you set Second Expression to on in the MIDI OUT FILTER parameters, the setting in the OUTPUT (1) parameters will be disabled.
ELS-01/01C Owner’s Manual222
Connections
13
3 INTERNAL/EXTERNALSwitches control over the displayed items between the Electone (INTERNAL) or the connected device (EXTERNAL).
3 - 1 LEAD 1Determines Internal or External control of the Lead Voices.INT. (Internal): Lead Voice 1 is played from the Upper keyboard of the Electone. (If the To Lower function is on, it is played from Lower keyboard.)EXT. (External): The Lead Voice 1 is played from the connected instrument via MIDI channel 4.
3 - 2 SYNC.To synchronize playback with an external MIDI device, you can use either the instrument's internal clock (INT.) or MIDI clock signals from the external device (EXT.).INT. (Internal): The instrument uses its own internal clock.EXT. (External): The instrument uses MIDI clock signals from the external device (MIDI).
3 - 3 EXPRESSIONDetermines the control of the expression pedal functions. Ordinarily, this control is set to AUTO.AUTO: Internal and External is automatically switched.INT. (Internal): You can manually control the expression pedal even during M.D.R. playback.EXT. (External): While playing the M.D.R. or receiving MIDI messages, the expression pedal is invalid. (The volume is controlled by the recorded data in a USB flash memory or received MIDI data.)

App
endi
x
14ELS-01/01C Owner’s Manual 223
Appendix
Have a Phillips-head (+) screwdriver ready.
● ● ● ● ● ● ● ● ● ● ● ● ● ● ● ● ● ● ● ● ● ● ● ●
Bench for the ELS-01
Turn the bench board over and install two legs for the front side.Tighten the bolts using the included wrench (as shown).
Make sure to put washers between the bolts and the bench board.
Install the foot rest to the legs with the included four screws, using a screwdriver.
Install the two legs for the back side.
● ● ● ● ● ● ● ● ● ● ● ● ● ● ● ● ● ● ● ● ● ● ● ●
Bench for the ELS-01C
Turn the bench board over and install the legs with the included eight screws.Tighten the screws using the included hexagonal wrench (as shown).
Make sure to put washers between the screws and the bench board.
Install the foot rest to the legs with the included four screws, using a screwdriver.
Bench Assembly
1
L
R
Logo is written on back
WasherBolt
2
3
If the bench screws become loose due to extensive long-term use, tighten them periodically using the included tool and a screwdriver.
1
L
R
Logo is written on back
WasherBolt
2
14
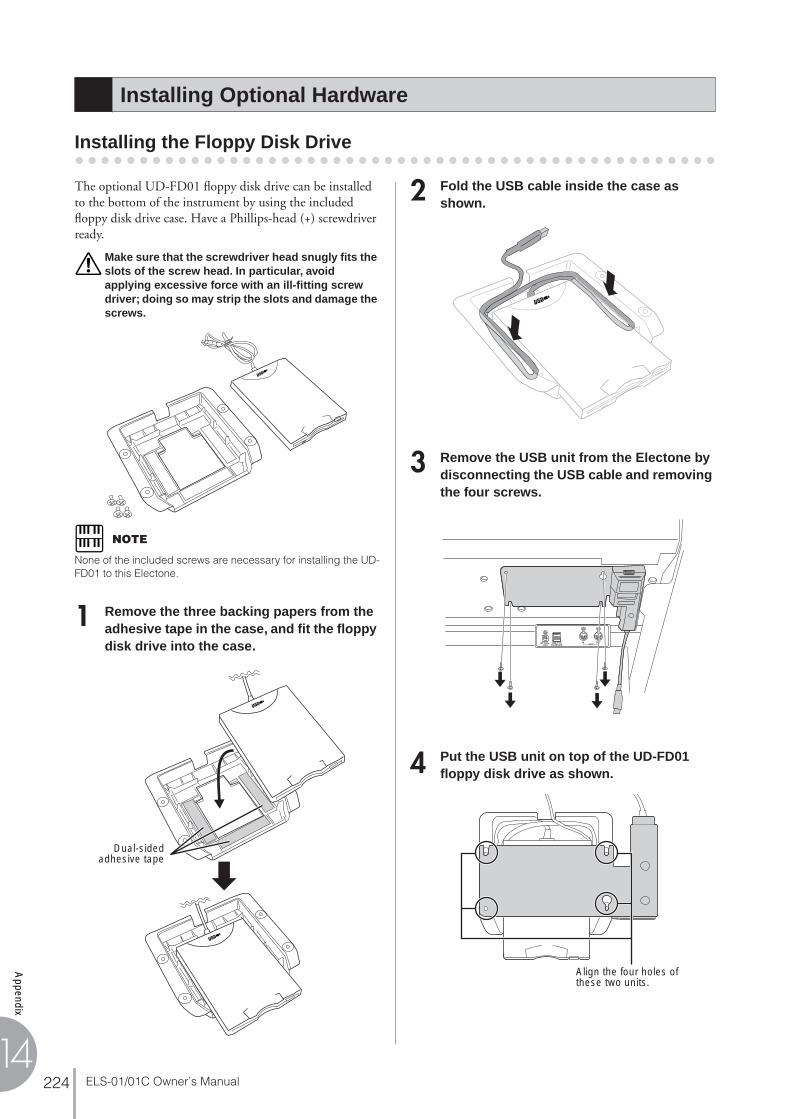
Appendix
14ELS-01/01C Owner’s Manual224
● ● ● ● ● ● ● ● ● ● ● ● ● ● ● ● ● ● ● ● ● ● ● ● ● ● ● ● ● ● ● ● ● ● ● ● ● ● ● ● ● ● ● ● ● ● ● ● ● ●
Installing the Floppy Disk Drive
The optional UD-FD01 floppy disk drive can be installed to the bottom of the instrument by using the included floppy disk drive case. Have a Phillips-head (+) screwdriver ready.
Make sure that the screwdriver head snugly fits the slots of the screw head. In particular, avoid applying excessive force with an ill-fitting screw driver; doing so may strip the slots and damage the screws.
NOTE
None of the included screws are necessary for installing the UD-FD01 to this Electone.
Remove the three backing papers from the adhesive tape in the case, and fit the floppy disk drive into the case.
Fold the USB cable inside the case as shown.
Remove the USB unit from the Electone by disconnecting the USB cable and removing the four screws.
Put the USB unit on top of the UD-FD01 floppy disk drive as shown.
Installing Optional Hardware
1
Dual-sidedadhesive tape
2
3
4
Align the four holes of these two units.

App
endi
x
14ELS-01/01C Owner’s Manual 225
Install these two units together with the screws removed in step 3.First temporarily install the right-front screw, then insert and partially fix the remaining three screws. Finally, firmly tighten all four screws.
Connect the USB cables for both units to the USB TO DEVICE terminals.
5
First install this screw.
6

Appendix
14ELS-01/01C Owner’s Manual226
1. Channel Messages
1.1 EL Mode
MIDI Data Format
Code (Hexadecimal) Function Receive Transmit Remarks
8n, nn, 00-7F Note Off 1ch2ch3ch
(4ch)*5-14ch15ch
˛˛˛˛˛˛
UKLKPEDALLEAD 1XGKeyboard Percussion
9n, nn, 009n, nn, 01-7F
Note OffNote On
1ch2ch3ch
(4ch)*5-14ch15ch
(1ch)* (2ch)* (3ch)*
˛˛˛
UKLKPEDALLEAD 1XGKeyboard Percussion
An, nn, 00-7F Polyphonic After Touch 5-14ch ˛ XG
Bn, 00, 00-7FBn, 20, 00-7F
Bank select 5-14ch ˛ XG
Bn, 01, 00-7F Modulation 5-14ch ˛ XG
Bn, 04, 00-7F 2nd Expression 16ch (4ch)*
16ch (4ch)**
ControlLEAD 1(ELS-01 not transmitted)
Bn, 05, 00-7F Portamento Time 5-14ch ˛ XG
Bn, 06, 00-7FBn, 26, 00-7F
Data Entry 5-14ch ˛ XG
Bn, 07, 00-7F Volume 5-14ch ˛ XG
Bn, 0A, 00-7F Pan 5-14ch ˛ XG
Bn, 0B, 00-7F Expression 16ch5-14ch
(16ch)* ControlXG
Bn,10, 00-7F VA After Touch 1ch (1ch)* UK(ELS-01C only)
Bn, 40, 00-7F Hold 5-14ch ˛ XG
Bn, 41, 00-7F Portamento 5-14ch ˛ XG
Bn, 42, 00-7F Sostenuto 5-14ch ˛ XG
Bn, 43, 00-7F Soft Pedal 5-14ch ˛ XG
Bn, 47, 00-7F Resonance 5-14ch ˛ XG
Bn, 48, 00-7F Release Time 5-14ch ˛ XG
Bn, 49, 00-7F Attack Time 5-14ch ˛ XG
Bn, 4A, 00-7F Brightness 5-14ch ˛ XG
Bn, 4B, 00-7F Decay Time 5-14ch ˛ XG
Bn, 4C, 00-7F Vibrato Rate 5-14ch ˛ XG
Bn, 4D, 00-7F Vibrato Depth 5-14ch ˛ XG
Bn, 4E, 00-7F Vibrato Delay 5-14ch ˛ XG
Bn, 54, 00-7F Portamento Control 5-14ch ˛ XG
Bn, 5B, 00-7F Reverb Send Level 5-14ch ˛ XG
Bn, 5D, 00-7F Chorus Send Level 5-14ch ˛ XG
Bn, 5E, 00-7F Variation Effect Send Level 5-14ch ˛ XG
Bn, 60, 00-7FBn, 61, 00-7F
Data IncrementData Decrement
5-14ch ˛ XG
Bn, 62, 00-7FBn, 63, 00-7F
NRPN LSBNRPN MSB
5-14ch ˛ XG
Bn, 64, 00-7FBn, 65, 00-7F
RPN LSBRPN MSB
5-14ch ˛ XG
“˛” indicates “Not available.”“Ø” indicates “Available.”

App
endi
x
14ELS-01/01C Owner’s Manual 227
* Can be changed in the MIDI settings (page 221).
** Can be output when assigned to channel 4.
1.2 XG Mode
Bn, 78, 00Bn, 79, 00Bn, 7B, 00Bn, 7C, 00Bn, 7D, 00Bn, 7E, 00Bn, 7F, 00
All Sound OffReset All ControllersAll Note OffOmni OffOmni OnMonoPoly
5-14ch ˛ XG
Cn, nn Program Change 5-14ch16ch
˛16ch
XGControl
Dn, 00-7F After Touch 1ch2ch3ch
(4ch)*
5-14ch
(1ch)* (2ch)* (3ch)*
UKLKPEDALLEAD 1XG
En, 00-7F, 00-7F Pitch Bend 1ch2ch
(4ch)*˛
5-14ch
(1ch)* (2ch)*
˛(1-16ch)*
UKLKLEAD 12nd Expression (ELS-01C only)XG
Code (Hexadecimal) Function Receive Transmit Remarks
8n, nn, 00-7F Note Off 1-16ch ˛
9n, nn, 009n, nn, 01-7F
Note OnNote Off
1-16ch
(1ch)*(2ch)*(3ch)*
UKLKPEDAL
An, nn, 00-7F Polyphonic After Touch 1-16ch ˛
Bn, 00, 00-7FBn, 20, 00-7F
Bank select 1-16ch ˛
Bn, 01, 00-7F Modulation1-16ch
˛
Bn, 04, 00-7F 2nd Expression ˛ 16ch (4ch)**
ControlLEAD 1(ELS-01C only)
Bn, 05, 00-7F Portamento Time 1-16ch ˛
Bn, 06, 00-7FBn, 26, 00-7F
Data Entry 1-16ch ˛
Bn, 07, 00-7F Volume 1-16ch ˛
Bn, 0A, 00-7F Pan 1-16ch ˛
Bn, 0B, 00-7F Expression1-16ch
(16ch)* Control
Bn,10, 00-7F VA After Touch ˛ (1ch)* UK(ELS-01C only)
Bn, 40, 00-7F Hold 1-16ch ˛
Bn, 41, 00-7F Portamento 1-16ch ˛
Bn, 42, 00-7F Sostenuto 1-16ch ˛
Bn, 43, 00-7F Soft Pedal 1-16ch ˛
Bn, 47, 00-7F Resonance 1-16ch ˛
Bn, 48, 00-7F Release Time 1-16ch ˛
Bn, 49, 00-7F Attack Time 1-16ch ˛
Bn, 4A, 00-7F Brightness 1-16ch ˛
Bn, 4B, 00-7F Decay Time 1-16ch ˛
Bn, 4C, 00-7F Vibrato Rate 1-16ch ˛
Code (Hexadecimal) Function Receive Transmit Remarks
Appendix
14ELS-01/01C Owner’s Manual228
* Can be changed in the MIDI settings (page 221).** Can be output when assigned to channel 4.
2. Realtime Messages
* Received only when in the Ext. mode
3. System Exclusive Messages
3.1 Format
Universal Realtime Messages
Bn, 4D, 00-7F Vibrato Depth 1-16ch ˛
Bn, 4E, 00-7F Vibrato Delay 1-16ch ˛
Bn, 54, 00-7F Portamento Control 1-16ch ˛
Bn, 5B, 00-7F Reverb Send Level 1-16ch ˛
Bn, 5D, 00-7F Chorus Send Level 1-16ch ˛
Bn, 5E, 00-7F Variation Effect Send Level 1-16ch ˛
Bn, 60, 00-7FBn, 61, 00-7F
Data IncrementData Decrement
1-16ch ˛
Bn, 62, 00-7FBn, 63, 00-7F
NRPN LSBNRPN MSB
1-16ch ˛
Bn, 64, 00-7FBn, 65, 00-7F
RPN LSBRPN MSB
1-16ch ˛
Bn, 78, 00Bn, 79, 00Bn, 7B, 00Bn, 7C, 00Bn, 7D, 00Bn, 7E, 00Bn, 7F, 00
All Sound OffReset All ControllersAll Note OffOmni OffOmni OnMonoPoly
1-16ch ˛
Cn, 00-7F Program Change1-16ch
16ch Control
Dn, 00-7F After Touch
1-16ch
(1ch)* (2ch)* (3ch)*
UKLKPEDAL
En, 00-7F, 00-7F Pitch Bend
1-16ch
(1ch)* (2ch)*
(1-16ch)*˛
UKLK2nd Expression (ELS-01C only)
Code (Hexadecimal) Function Receive Transmit Remarks
F8 Clock Ø* Ø
FA Start Ø Ø
FC Stop Ø Ø
FE Active Sensing Ø Ø
FF Reset ˛ ˛
Code (Hexadecimal) Message Receive Transmit
F0, 7F, 7F, 04, 01, SS, TT, F7 XN
GM2 Master Volume Ø ˛
F0, 7F, 7F, 04, 03, SS, TT, F7 XN
GM2 Master Fine Tuning Ø ˛
F0, 7F, 7F, 04, 04, 00, TT, F7 XN
GM2 Master Coarse Tuning Ø ˛
F0, 7F, 7F, 04, 05, 01, 01, 01, 01, 01, PP, VV, ..., F7 XN
GM2 Reverb Parameter Ø ˛
Code (Hexadecimal) Function Receive Transmit Remarks

App
endi
x
14ELS-01/01C Owner’s Manual 229
Universal Non-Realtime Messages
XG Native
Clavinova Exclusive
Message Exclusive
Electone Exclusive
˛: don’t care N: Device Number (“0” on ELS-01/01C) ID: Model ID (ELS-01C=4DH, ELS-01=4EH)
F0, 7F, 7F, 04, 05, 01, 01, 01, 01, 02, PP, VV, ..., F7 XN
GM2 Chorus Parameter Ø ˛
F0, 7F, 7F, 09, 01, 0n, PP, VV, ..., F7 XN
GM2 After Touch Parameter Ø ˛
F0, 7F, 7F, 09, 03, 0n, CC, PP, VV, ..., F7 XN
GM2 Control Change Parameter Ø ˛
F0, 7F, 7F, 0A, 01, 0n, KK, CC, PP, VV, ..., F7 XN
GM2 Key-Based Controller Ø ˛
Code (Hexadecimal) Message Receive Transmit
F0, 7E, 7F, 09, 01, F7 XN
GM ON Ø ˛
F0, 7E, 7F, 09, 03, F7 XN
GM2 ON Ø ˛
F0, 7E, 7F, 09, 02, F7 XN
GM OFF Ø ˛
F0, 7E, 7F, 08, 08, JJ, GG, MM, ..data.., F7 XN
GM2 Scale/Octave Tuning Ø ˛
Code (Hexadecimal) Message Receive Transmit
F0, 43, 1N, 4C, AH, AM, AL, ..data.., F7 XG Parameter Change Ø ˛
F0, 43, 0N, 4C, BH, BL, AH, AM, AL, ..data.., cc, F7 XG Bulk Dump Ø ˛
F0, 43, 1N, 27, 30, 00, 00, MM, LL, cc, F7 XG Master Tuning Ø ˛
Code (Hexadecimal) Message Receive Transmit
F0, 43, 73, 01, 02, F7 03
Request for Internal Synch. ModeRequest for External Synch. Mode
ØØ
˛˛
Code (Hexadecimal) Message Receive Transmit
F0, 43, 60, 7A, F7 Rhythm Start Ø ˛
F0, 43, 60, 7D, F7 Rhythm Stop Ø ˛
Code (Hexadecimal) Message Receive Transmit
F0, 43, 70, ID, 00, F7 Model ID Data ˛ Ø
F0, 43, 70, 70, 30, F7 Request-to-Send Model ID Data Ø ˛
F0, 43, 70, 70, 40, nn(*1), 7F, F7 00
Switch ONSwitch OFF
ØØ
ØØ
F0, 43, 70, 70, 40, 50, TL, TH, F7 Tempo Ø Ø
F0, 43, 70, 78, 41, cc, dd, F7(*2) Panel Switch Events Ø Ø
F0, 43, 70, 78, 42, 3C, ..data.., F7 Current Registration Data Ø Ø
F0, 43, 70, 78, 44, ..data..(*3), F7 MIDI Parameters Ø Ø
F0, 43, 70, 70, 70, nn(*4), F7 MDR Ø ˛
F0, 43, 70, 70, 73, F7 EL ON Ø ˛
F0, 43, 70, 70, 78, 00, 00, F7 Bar Signal ˛ Ø
Code (Hexadecimal) Message Receive Transmit

Appendix
14ELS-01/01C Owner’s Manual230
*1. Switches
*2. Panel Switch Events
Selectors
Volume
Organ Flute Voice
To Lower
Solo Mode
nn Switch Receive Transmit
45H Left Footswitch Ø Ø
47H Knee Lever Ø Ø
cc Switch dd Remarks
Code Receive Rx Range Transmit Tx Range
0F Registration Memory [1-16] Ø [00-0F] ˛ -
cc Switch dd Remarks
Code Receive Rx Range Transmit Tx Range
12 Upper Keyboard Voice 1 Volume Ø [00-7F] Ø [00-7F] Volume Data 00:MAX, 7F:MIN
13 Lower Keyboard Voice 1 Volume Ø [00-7F] Ø [00-7F] Volume Data 00:MAX, 7F:MIN
14 Upper Keyboard Voice 2 Volume Ø [00-7F] Ø [00-7F] Volume Data 00:MAX, 7F:MIN
15 Lower Keyboard Voice 2 Volume Ø [00-7F] Ø [00-7F] Volume Data 00:MAX, 7F:MIN
16 Lead Voice 1 Volume Ø [00-7F] Ø [00-7F] Volume Data 00:MAX, 7F:MIN
17 Pedal Voice 1 Volume Ø [00-7F] Ø [00-7F] Volume Data 00:MAX, 7F:MIN
18 Pedal Voice 2 Volume Ø [00-7F] Ø [00-7F] Volume Data 00:MAX, 7F:MIN
19 Lead Voice 2 Volume Ø [00-7F] Ø [00-7F] Volume Data 00:MAX, 7F:MIN
1A Percussion Volume Ø [00-7F] Ø [00-7F] Volume Data 00:MAX, 7F:MIN
1B Reverb Depth Ø [00-7F] Ø [00-7F] Depth Data 00:MAX, 7F:MIN
cc Switch dd Remarks
Code Receive Rx Range Transmit Tx Range
30 Upper Organ Flute Voice[U. ORGAN FLUTES]
Ø [00-01] Ø [00-01] 00:OFF, 01:ON
31 Lower Organ Flute Voice[L. ORGAN FLUTES]
Ø [00-01] Ø [00-01] 00:OFF, 01:ON
cc Switch dd Remarks
Code Receive Rx Range Transmit Tx Range
36 Lead Voice 1 To Lower[TO LOWER ▼]
Ø [00-01] Ø [00-01] 00:OFF, 01:ON
37 Pedal Voice 1 To Lower[TO LOWER ▲]
Ø [00-01] Ø [00-01] 00:OFF, 01:ON
38 Pedal Voice 2 To Lower[TO LOWER ▲]
Ø [00-01] Ø [00-01] 00:OFF, 01:ON
cc Switch dd Remarks
Code Receive Rx Range Transmit Tx Range
39 Lead Voice 2 Solo (Knee)[SOLO (KNEE)]
Ø [00-01] Ø [00-01] 00:OFF, 01:ON
MIDI Exclusive FormatF0, 43, 70, 78, 41, cc, dd, F7

App
endi
x
14ELS-01/01C Owner’s Manual 231
Brilliance
Sustain
Solo Bar
Keyboard Percussion
Disable
Rotary Speaker
Rhythm Sequence
cc Switch dd Remarks
Code Receive Rx Range Transmit Tx Range
42 Upper Keyboard Voice 1 Brilliance Ø [00-06] Ø [00-06] 00:BRILLIANT, 06:MELLOW
43 Lower Keyboard Voice 1 Brilliance Ø [00-06] Ø [00-06] 00:BRILLIANT, 06:MELLOW
44 Upper Keyboard Voice 2 Brilliance Ø [00-06] Ø [00-06] 00:BRILLIANT, 06:MELLOW
45 Lower Keyboard Voice 2 Brilliance Ø [00-06] Ø [00-06] 00:BRILLIANT, 06:MELLOW
46 Lead Voice 1 Brilliance Ø [00-06] Ø [00-06] 00:BRILLIANT, 06:MELLOW
47 Pedal Voice 1 Brilliance Ø [00-06] Ø [00-06] 00:BRILLIANT, 06:MELLOW
48 Pedal Voice 2 Brilliance Ø [00-06] Ø [00-06] 00:BRILLIANT, 06:MELLOW
49 Lead Voice 2 Brilliance Ø [00-06] Ø [00-06] 00:BRILLIANT, 06:MELLOW
cc Switch dd Remarks
Code Receive Rx Range Transmit Tx Range
50 Upper Sustain [UPPER (KNEE)] Ø [00-01] Ø [00-01] 00:OFF, 01:ON
51 Lower Sustain [LOWER (KNEE)] Ø [00-01] Ø [00-01] 00:OFF, 01:ON
52 Pedal Sustain [PEDAL] Ø [00-01] Ø [00-01] 00:OFF, 01:ON
cc Switch dd Remarks
Code Receive Rx Range Transmit Tx Range
59 Solo Bar Ø [00-01] ˛ - 00:OFF, 01:ON
cc Switch dd Remarks
Code Receive Rx Range Transmit Tx Range
5B Keyboard Percussion [1] Ø [00-01] Ø [00-01] 00:OFF, 01:ON
5C Keyboard Percussion [2] Ø [00-01] Ø [00-01] 00:OFF, 01:ON
cc Switch dd Remarks
Code Receive Rx Range Transmit Tx Range
5F Disable [D.] Ø [00-01] Ø [00-01] 00:OFF, 01:ON
cc Switch dd Remarks
Code Receive Rx Range Transmit Tx Range
60 Rotary Speaker Speed[ROTARY SP SPEED]
Ø [00-01] Ø [00-01] 00:OFF, 01:ON
cc Switch dd Remarks
Code Receive Rx Range Transmit Tx Range
61 Sequence 1 [SEQ.1] Ø [00-01] Ø [00-01] 00:OFF, 01:ON
62 Sequence 2 [SEQ.2] Ø [00-01] Ø [00-01] 00:OFF, 01:ON
63 Sequence 3 [SEQ.3] Ø [00-01] Ø [00-01] 00:OFF, 01:ON
64 Sequence 4 [SEQ.4] Ø [00-01] Ø [00-01] 00:OFF, 01:ON

Appendix
14ELS-01/01C Owner’s Manual232
*3. MIDI Parameter
Voice Section ParametersPanel Voice Parameters (Address mm: 0 – 7 = UK1, UK2, LK1, LK2, LEAD 1, LEAD 2, PEDAL 1, PEDAL 2)
Address Size Data Parameter Data Receive Rx Range Transmit Tx Range
hh mm ll
10 00-07 00-0D 5 00-7F00-7F00-02
0000
Voice Assign Number 00-7F00-7F00-02
0000
Ø 00-7F00-7F00-02
0000
Ø 00-7F00-7F00-02
0000
10 00-07 10 1 00-0D Voice Selector Number 00-0D Ø 00-0D Ø 00-0D
10 00-07 11 1 00-7F Volume 00:MIN7F:MAX
Ø 00-7F ˛ -
10 00-07 12 1 00-7F Reverb (Send Level) 00:MIN7F:MAX
Ø 00-7F Ø 00-7F
10 00-07 13 1 00-7F Brilliance 00:BRILLIANT40:CENTER7F:MELLOW
Ø 00-7F ˛ -
10 00-07 14 1 00-04 Feet 00:PRESET01:16'02:8'03:4'04:2'
Ø 00-7F Ø 00-04
10 00-07 15 1 00-7F Pan 00:LEFT40:CENTER7F:RIGHT
Ø 00-7F Ø 08-78
10 00-07 16 1 00-7F Touch Tone Initial Touch 00:MIN7F:MAX
Ø 00-7F Ø 00-7F
10 00-07 17 1 00-7F Touch Tone After Touch 00:MIN7F:MAX
Ø 00-7F Ø 00-7F
10 00-07 18 1 00-7F Pitch After Touch 00:NARROW7F:WIDE
Ø 00-7F Ø 32-4E
10 00-07 19 1 00-7F User Vibrato 00:PRESET01:USER
Ø 00-7F Ø 00-01
10 00-07 1A 1 00-7F Vibrato Delay 00:SHORT7F:LONG
Ø 00-7F Ø 02-1A
10 00-07 1B 1 00-7F Vibrato Depth 00:MIN7F:MAX
Ø 00-7F Ø 00-54
10 00-07 1C 1 00-7F Vibrato Speed 00:SLOW7F:FAST
Ø 00-7F Ø 3C-6C
10 00-05 1D 1 00-7F Pitch Horizontal Touch 00:NARROW7F:WIDE
Ø 00-7F Ø 00-7F
10 00-07 1E 1 00-7F Touch Vibrato (On/Off) 00:OFF7F:ON
Ø 00-7F Ø 00-7F
10 04-07 1F 1 00-7F TO LOWER▼/▲/SOLO (KNEE) 00:OFF01:ON
Ø 00-7F ˛ -
10 04-05 20 1 00-02 Slide (On/Knee Lever/Off) 00:OFF01:ON02:Knee Lever
Ø 00-02 Ø 00-02
10 04-05 21 1 00-7F Slide Time 00:FAST7F:SLOW
Ø 00-7F Ø 02-7F
10 00-07 22 1 00-7F Tune/Detune 00:Down40:Center7F:Up
Ø 00-7F Ø 00-7F
10 00-01/04-07
23 1 00-7F 2nd Expression Pitch Bend 00:OFF01:ON
Ø 00-7F Ø 00-01
10 00-05 24 1 00-7F Footswitch Glide Control 00:OFF01:ON
Ø 00-7F Ø 00-01
10 00-07 25 1 3A-46 Transpose 3A:KeyDown40:Normal46:KeyUp
Ø 3A-46 Ø 3A-46
10 06-07 28 1 00-7F Poly (On/Off) 00:Mono01:Poly
Ø 00-7F Ø 00-01
10 05 29 1 00-7F Priority (Last/Top) 00:TOP01:LAST
Ø 00-7F Ø 00-01
10 00-07 2A 1 00-7F Volume Mute 00:Mute OFF01:Mute ON
Ø 00-7F Ø 00-01
MIDI Exclusive FormatF0, 43, 70, 78, 44, hh, mm, ll, ..., F7

App
endi
x
14ELS-01/01C Owner’s Manual 233
10 00-07 40 3 0000-7F00-7F
Effect 1 Type MSB/LSB 0000-7F00-7F
Ø 0000-7F00-7F
Ø 0000-7F00-7F
10 00-07 41 2 0000-7F7F Effect 1 Parameter 1 MSB/LSB 0000-7F7F Ø 0000-7F7F Ø 0000-7F7F
10 00-07 42 2 0000-7F7F Effect 1 Parameter 2 MSB/LSB 0000-7F7F 0000-7F7F 0000-7F7F
10 00-07 43 2 0000-7F7F Effect 1 Parameter 3 MSB/LSB 0000-7F7F 0000-7F7F 0000-7F7F
10 00-07 44 2 0000-7F7F Effect 1 Parameter 4 MSB/LSB 0000-7F7F 0000-7F7F 0000-7F7F
10 00-07 45 2 0000-7F7F Effect 1 Parameter 5 MSB/LSB 0000-7F7F 0000-7F7F 0000-7F7F
10 00-07 46 2 0000-7F7F Effect 1 Parameter 6 MSB/LSB 0000-7F7F 0000-7F7F 0000-7F7F
10 00-07 47 2 0000-7F7F Effect 1 Parameter 7 MSB/LSB 0000-7F7F 0000-7F7F 0000-7F7F
10 00-07 48 2 0000-7F7F Effect 1 Parameter 8 MSB/LSB 0000-7F7F 0000-7F7F 0000-7F7F
10 00-07 49 2 0000-7F7F Effect 1 Parameter 9 MSB/LSB 0000-7F7F 0000-7F7F 0000-7F7F
10 00-07 4A 2 0000-7F7F Effect 1 Parameter 10 MSB/LSB 0000-7F7F 0000-7F7F 0000-7F7F
10 00-07 4B 2 0000-7F7F Effect 1 Parameter 11 0000-7F7F 0000-7F7F 0000-7F7F
10 00-07 4C 2 0000-7F7F Effect 1 Parameter 12 0000-7F7F 0000-7F7F 0000-7F7F
10 00-07 4D 2 0000-7F7F Effect 1 Parameter 13 0000-7F7F 0000-7F7F 0000-7F7F
10 00-07 4E 2 0000-7F7F Effect 1 Parameter 14 0000-7F7F 0000-7F7F 0000-7F7F
10 00-07 4F 2 0000-7F7F Effect 1 Parameter 15 0000-7F7F 0000-7F7F 0000-7F7F
10 00-07 50 2 0000-7F7F Effect 1 Parameter 16 0000-7F7F 0000-7F7F 0000-7F7F
10 00-07 51 3 0000-7F00-7F
Effect 2 Type MSB/LSB 0000-7F00-7F
Ø 0000-7F00-7F
Ø 0000-7F00-7F
10 00-07 52 2 0000-7F7F Effect 2 Parameter 1 MSB/LSB 0000-7F7F Ø 0000-7F7F Ø 0000-7F7F
10 00-07 53 2 0000-7F7F Effect 2 Parameter 2 MSB/LSB 0000-7F7F 0000-7F7F 0000-7F7F
10 00-07 54 2 0000-7F7F Effect 2 Parameter 3 MSB/LSB 0000-7F7F 0000-7F7F 0000-7F7F
10 00-07 55 2 0000-7F7F Effect 2 Parameter 4 MSB/LSB 0000-7F7F 0000-7F7F 0000-7F7F
10 00-07 56 2 0000-7F7F Effect 2 Parameter 5 MSB/LSB 0000-7F7F 0000-7F7F 0000-7F7F
10 00-07 57 2 0000-7F7F Effect 2 Parameter 6 MSB/LSB 0000-7F7F 0000-7F7F 0000-7F7F
10 00-07 58 2 0000-7F7F Effect 2 Parameter 7 MSB/LSB 0000-7F7F 0000-7F7F 0000-7F7F
10 00-07 59 2 0000-7F7F Effect 2 Parameter 8 MSB/LSB 0000-7F7F 0000-7F7F 0000-7F7F
10 00-07 5A 2 0000-7F7F Effect 2 Parameter 9 MSB/LSB 0000-7F7F 0000-7F7F 0000-7F7F
10 00-07 5B 2 0000-7F7F Effect 2 Parameter 10 MSB/LSB 0000-7F7F 0000-7F7F 0000-7F7F
10 00-07 5C 2 0000-7F7F Effect 2 Parameter 11 0000-7F7F 0000-7F7F 0000-7F7F
10 00-07 5D 2 0000-7F7F Effect 2 Parameter 12 0000-7F7F 0000-7F7F 0000-7F7F
10 00-07 5E 2 0000-7F7F Effect 2 Parameter 13 0000-7F7F 0000-7F7F 0000-7F7F
10 00-07 5F 2 0000-7F7F Effect 2 Parameter 14 0000-7F7F 0000-7F7F 0000-7F7F
10 00-07 60 2 0000-7F7F Effect 2 Parameter 15 0000-7F7F 0000-7F7F 0000-7F7F
10 00-07 61 2 0000-7F7F Effect 2 Parameter 16 0000-7F7F 0000-7F7F 0000-7F7F
10 00-07 63 1 00-7F Sustain Length 7F:Hold 7E:Long 00:Short
Ø 00-7F Ø 00-7F
Address Size Data Parameter Data Receive Rx Range Transmit Tx Range
hh mm ll

Appendix
14ELS-01/01C Owner’s Manual234
Organ Flute Voice Parameters (Address mm: 0 – 1 = UK, LK)
Address Size Data Parameter Data Receive Rx Range Transmit Tx Range
hh mm ll
11 00-01 00 1 00-7F Footage 16' 00:MIN7F:MAX
Ø 00-7F Ø 00-7F
11 00-01 01 1 00-7F Footage 8' 00:MIN7F:MAX
Ø 00-7F Ø 00-7F
11 00-01 02 1 00-7F Footage 5-1/3' 00:MIN7F:MAX
Ø 00-7F Ø 00-7F
11 00-01 03 1 00-7F Footage 4' 00:MIN7F:MAX
Ø 00-7F Ø 00-7F
11 00-01 04 1 00-7F Footage 2-2/3' 00:MIN7F:MAX
Ø 00-7F Ø 00-7F
11 00-01 05 1 00-7F Footage 2' 00:MIN7F:MAX
Ø 00-7F Ø 00-7F
11 00-01 06 1 00-7F Footage 1-3/5' 00:MIN7F:MAX
Ø 00-7F Ø 00-7F
11 00-01 07 1 00-7F Footage 1-1/3' 00:MIN7F:MAX
Ø 00-7F Ø 00-7F
11 00-01 08 1 00-7F Footage 1' 00:MIN7F:MAX
Ø 00-7F Ø 00-7F
11 00-01 09 1 00-7F Response 00:FAST7F:SLOW
Ø 00-7F Ø 00-7F
11 00-01 0A 1 00-7F Attack 4' 00:MIN7F:MAX
Ø 00-7F Ø 00-7F
11 00-01 0B 1 00-7F Attack 2-2/3' 00:MIN7F:MAX
Ø 00-7F Ø 00-7F
11 00-01 0C 1 00-7F Attack 2' 00:MIN7F:MAX
Ø 00-7F Ø 00-7F
11 00-01 0D 1 00-7F Attack Length 00:Short7F:Long
Ø 00-7F Ø 00-7F
11 00-01 10 1 00-7F Organ Flutes (On/Off) 00:OFF01:ON
Ø 00-7F ˛ -
11 00-01 11 1 00-7F Volume 00:MIN7F:MAX
Ø 00-7F Ø 00-7F
11 00-01 12 1 00-7F Reverb (Send Level) 00:MIN7F:MAX
Ø 00-7F Ø 00-7F
11 00-01 13 1 00-7F Type (Sine/Vintage) 00:Sine01:Vintage
Ø 00-7F Ø 00-01
11 00-01 40 3 0000-7F00-7F
Effect Type MSB/LSB 0000-7F00-7F
Ø 0000-7F00-7F
Ø 0000-7F00-7F
11 00-01 41 2 0000-7F7F Effect Parameter 1 MSB/LSB 0000-7F7F Ø 0000-7F7F Ø 0000-7F7F
11 00-01 42 2 0000-7F7F Effect Parameter 2 MSB/LSB 0000-7F7F Ø 0000-7F7F Ø 0000-7F7F
11 00-01 43 2 0000-7F7F Effect Parameter 3 MSB/LSB 0000-7F7F Ø 0000-7F7F Ø 0000-7F7F
11 00-01 44 2 0000-7F7F Effect Parameter 4 MSB/LSB 0000-7F7F Ø 0000-7F7F Ø 0000-7F7F
11 00-01 45 2 0000-7F7F Effect Parameter 5 MSB/LSB 0000-7F7F Ø 0000-7F7F Ø 0000-7F7F
11 00-01 46 2 0000-7F7F Effect Parameter 6 MSB/LSB 0000-7F7F Ø 0000-7F7F Ø 0000-7F7F
11 00-01 47 2 0000-7F7F Effect Parameter 7 MSB/LSB 0000-7F7F Ø 0000-7F7F Ø 0000-7F7F
11 00-01 48 2 0000-7F7F Effect Parameter 8 MSB/LSB 0000-7F7F Ø 0000-7F7F Ø 0000-7F7F
11 00-01 49 2 0000-7F7F Effect Parameter 9 MSB/LSB 0000-7F7F Ø 0000-7F7F Ø 0000-7F7F
11 00-01 4A 2 0000-7F7F Effect Parameter 10 MSB/LSB 0000-7F7F Ø 0000-7F7F Ø 0000-7F7F
11 00-01 4B 2 0000-7F7F Effect Parameter 11 0000-7F7F Ø 0000-7F7F Ø 0000-7F7F
11 00-01 4C 2 0000-7F7F Effect Parameter 12 0000-7F7F Ø 0000-7F7F Ø 0000-7F7F
11 00-01 4D 2 0000-7F7F Effect Parameter 13 0000-7F7F Ø 0000-7F7F Ø 0000-7F7F
11 00-01 4E 2 0000-7F7F Effect Parameter 14 0000-7F7F Ø 0000-7F7F Ø 0000-7F7F
11 00-01 4F 2 0000-7F7F Effect Parameter 15 0000-7F7F Ø 0000-7F7F Ø 0000-7F7F
11 00-01 50 2 0000-7F7F Effect Parameter 16 0000-7F7F Ø 0000-7F7F Ø 0000-7F7F
11 00-01 63 1 00-7F Sustain Length 7F:Hold 7E:Long 00:Short
Ø 00-7F Ø 15-3D, 7F

App
endi
x
14ELS-01/01C Owner’s Manual 235
Keyboard Parameters Sustain Parameters (Address mm: 0 – 2 = UK, LK, PEDAL)
Keyboard Percussion Parameters (Address mm: 1 – 2 = K.B.P. [1], K.B.P. [2])
RhythmRhythm Parameters
Address Size Data Parameter Data Receive Rx Range Transmit Tx Range
hh mm ll
12 00-02 00 1 00-7F Sustain (On/Off) 00:OFF01:ON
Ø 00-7F ˛ -
12 00-02 01 1 00-7F Length 00:Short7F:Long
Ø 00-7F ˛ -
Address Size Data Parameter Data Receive Rx Range Transmit Tx Range
hh mm ll
12 01-02 10 1 00-7F Keyboard Percussion (On/Off) 00:OFF01:ON
Ø 00-7F ˛ -
12 01-02 11 1 00-08 Keyboard Percussion Menu 00:PRESET01:USER 102:USER 203:USER 304:USER 405:USER 506:USER 607:USER 708:USER 8
Ø 00-08 Ø 00-08
Address Size Data Parameter Data Receive Rx Range Transmit Tx Range
hh mm ll
13 00 00-0B 2 0000-7F7F Rhythm Assign Number 0000-7F7F Ø 00-7F00-7F
Ø 00-7F00-7F
13 00 10 1 00-0B Rhythm Selector Number 00-0B Ø 00-0B Ø 00-0B
13 00 11 1 00-7F Percussion Volume 00:MIN7F:MAX
Ø 00-7F ˛ -
13 00 12 1 00-7F Percussion Reverb (Send Level) 00:MIN7F:MAX
Ø 00-7F Ø 00-7F
13 00 13 1 00-7F 2nd Expression Tempo Control (On/Off)
00:OFF01:ON
Ø 00-7F Ø 00-01
13 00 14 1 00-7F Footswitch Rhythm Control 00:INTRO 101:INTRO 202:INTRO 308:MAIN A09:MAIN B0A:MAIN C0B:MAIN D18:BREAK20:ENDING 121:ENDING 222:ENDING 37E:STOP7F:OFF (INTRO 1 – STOP)
Ø 00-7F Ø 00-7F
13 00 15 1 00-7F Add Drum (On/Off) 00:OFF01:ON
Ø 00-7F Ø 00-01
13 00 16 1 00-7F Main Drum (On/Off) 00:OFF01:ON
Ø 00-7F Ø 00-01
13 00 17 1 00-7F Chord 1 (On/Off) 00:OFF01:ON
Ø 00-7F Ø 00-01
13 00 18 1 00-7F Chord 2 (On/Off) 00:OFF01:ON
Ø 00-7F Ø 00-01
13 00 19 1 00-7F Pad (On/Off) 00:OFF01:ON
Ø 00-7F Ø 00-01
13 00 1A 1 00-7F Phrase 1 (On/Off) 00:OFF01:ON
Ø 00-7F Ø 00-01
13 00 1B 1 00-7F Phrase 2 (On/Off) 00:OFF01:ON
Ø 00-7F Ø 00-01
13 00 1C 1 00-7F Auto Fill (On/Off) 00:OFF01:ON
Ø 00-7F Ø 00-01

Appendix
14ELS-01/01C Owner’s Manual236
Rhythm Sequence Parameters
Accompaniment Parameters
A.B.C. Function Parameters
M.O.C. Function Parameters
Section Parameters
Address Size Data Parameter Data Receive Rx Range Transmit Tx Range
hh mm ll
13 01 00-03 1 00-7F Sequence [SEQ.1] – [SEQ.4] 00:OFF01:ON
Ø 00-7F ˛ -
Address Size Data Parameter Data Receive Rx Range Transmit Tx Range
hh mm ll
13 02 11 1 00-7F Accompaniment Volume 00:MIN7F:MAX
Ø 00-7F Ø 00-7F
13 02 12 1 00-7F Accompaniment Reverb (Send Level)
00:MIN7F:MAX
Ø 00-7F Ø 00-7F
Address Size Data Parameter Data Receive Rx Range Transmit Tx Range
hh mm ll
13 03 00 1 00-7F Auto Bass Chord Mode 00:OFF01:Single Finger02:Fingered03:Custom A.B.C.
Ø 00-7F Ø 00-03
13 03 01 1 00-7F Lower Memory (On/Off) 00:OFF01:ON
Ø 00-7F Ø 00-01
13 03 02 1 00-7F Pedal Memory (On/Off) 00:OFF01:ON
Ø 00-7F Ø 00-01
Address Size Data Parameter Data Receive Rx Range Transmit Tx Range
hh mm ll
13 04 00 1 00-7F Melody On Chord Mode 00:OFF01:102:203:3
Ø 00-7F Ø 00-03
13 04 01 1 00-7F M.O.C. Knee Lever Control (On/Off)
00:OFF01:ON
Ø 00-7F Ø 00-01
Address Size Data Parameter Data Receive Rx Range Transmit Tx Range
hh mm ll
13 05 00 1 00-7F Intro 1 (On/Off) 00:OFF01:ON
Ø 00-7F Ø 00-01
13 05 01 1 00-7F Intro 2 (On/Off) 00:OFF01:ON
Ø 00-7F Ø 00-01
13 05 02 1 00-7F Intro 3 (On/Off) 00:OFF01:ON
Ø 00-7F Ø 00-01
13 05 08 1 00-7F Main A (On/Off) 00:OFF01:ON
Ø 00-7F Ø 00-01
13 05 09 1 00-7F Main B (On/Off) 00:OFF01:ON
Ø 00-7F Ø 00-01
13 05 0A 1 00-7F Main C (On/Off) 00:OFF01:ON
Ø 00-7F Ø 00-01
13 05 0B 1 00-7F Main D (On/Off) 00:OFF01:ON
Ø 00-7F Ø 00-01
13 05 18 1 00-7F Break (On/Off) 00:OFF01:ON
Ø 00-7F Ø 00-01
13 05 20 1 00-7F Ending 1 (On/Off) 00:OFF01:ON
Ø 00-7F Ø 00-01
13 05 21 1 00-7F Ending 2 (On/Off) 00:OFF01:ON
Ø 00-7F Ø 00-01
13 05 22 1 00-7F Ending 3 (On/Off) 00:OFF01:ON
Ø 00-7F Ø 00-01
MIDI Implementation chart

App
endi
x
14ELS-01/01C Owner’s Manual 237
Keyboard Percussion Parameters
OverallSystem Parameters
*ELS-01
Effect Parameters (Overall): Reverb
Effect Parameters (Overall): Rhythm Reverb
Address Size Data Parameter Data Receive Rx Range Transmit Tx Range
hh mm ll
13 10 11 1 00-7F Volume 00:MIN7F:MAX
Ø 00-7F Ø 00-7F
13 10 12 1 00-7F Reverb (Send Level) 00:MIN7F:MAX
Ø 00-7F Ø 00-7F
Address Size Data Parameter Data Receive Rx Range Transmit Tx Range
hh mm ll
14 00 00 1 00-7F Disable (On/Off) 00:OFF01:ON
Ø 00-7F ˛ -
14 00 01 1 00-7F Organ Flute Attack Mode 00:Each01:First
Ø 00-7F Ø 00-01
14 00 02 1 3A-46 Transpose 3A:KeyDown40:Normal46:KeyUp
Ø 3A-46 Ø 3A-46
14 00 03 1 01-0C 2nd Expression Range 01:100 C0C:1200 C
Ø 01-0C Ø 01-0C
14 00 04 1 00-7F Footswitch Mode 00:OFF01:Rhythm02:Glide03:Rotary Speaker
Ø 00-7F Ø 00-03
14 00 05 1 00-7F Pitch 00:PitchDown40:Normal7F:PitchUp
Ø 00-7F Ø 00-7F
14 00 06 1 00-7F Footswitch Glide Time 00:FAST7F:SLOW
Ø 00-7F Ø 04-1C
14 00 08 1 00-7F MIDI Control Expression (INT/EXT) 00:Internal01:External
Ø 00-7F ˛ -
14 00 09 1 00-7F MIDI Control Lead 1 (INT/EXT) 00:Internal01:External
Ø 00-7F ˛ -
14 00 0A 3 00-0400-04
(00-03)*00-0B
Registration Menu 00-0400-04 (00-03)00-0B
Ø 00-0400-04
(00-03)00-0B
Ø 00-0400-04
(00-03)00-0B
14 00 0B 1 00-01 Disable Mode 00:Normal01:Tempo
Ø 00-01 Ø 00-01
Address Size Data Parameter Data Receive Rx Range Transmit Tx Range
hh mm ll
14 01 00 1 00-7F Reverb Depth 00:MIN7F:MAX
Ø 00-7F ˛ -
14 01 01 1 00-7F Reverb Time (Panel) 00:FAST7F:SLOW
Ø 00-7F Ø 00-45
14 01 02 3 0000-7F00-7F
Reverb Type (Panel) 0000-7F00-7F
Ø 0000-7F00-7F
Ø 0000-7F00-7F
Address Size Data Parameter Data Receive Rx Range Transmit Tx Range
hh mm ll
14 02 01 1 00-7F Reverb Time (Rhythm) 00:FAST7F:SLOW
Ø 00-7F Ø 00-45
14 02 02 3 0000-7F00-7F
Reverb Type (Rhythm) 0000-7F00-7F
Ø 0000-7F00-7F
Ø 0000-7F00-7F
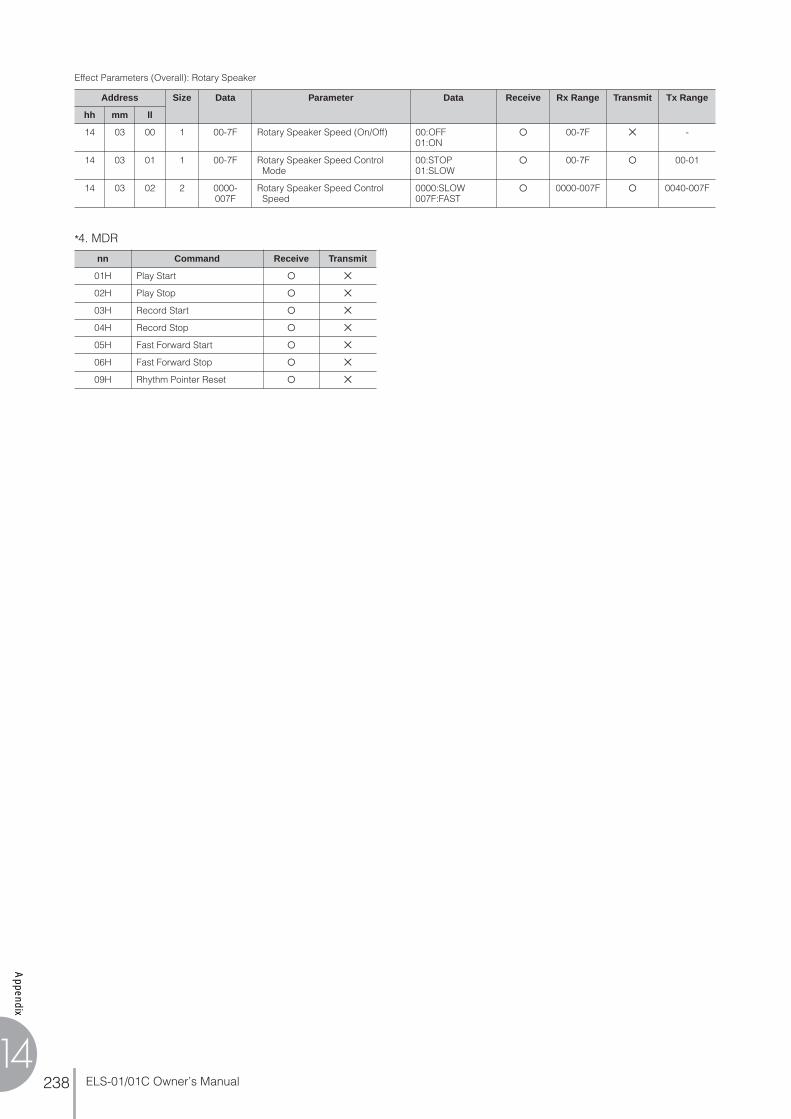
Appendix
14ELS-01/01C Owner’s Manual238
Effect Parameters (Overall): Rotary Speaker
*4. MDR
Address Size Data Parameter Data Receive Rx Range Transmit Tx Range
hh mm ll
14 03 00 1 00-7F Rotary Speaker Speed (On/Off) 00:OFF01:ON
Ø 00-7F ˛ -
14 03 01 1 00-7F Rotary Speaker Speed Control Mode
00:STOP01:SLOW
Ø 00-7F Ø 00-01
14 03 02 2 0000-007F
Rotary Speaker Speed Control Speed
0000:SLOW007F:FAST
Ø 0000-007F Ø 0040-007F
nn Command Receive Transmit
01H Play Start Ø ˛
02H Play Stop Ø ˛
03H Record Start Ø ˛
04H Record Stop Ø ˛
05H Fast Forward Start Ø ˛
06H Fast Forward Stop Ø ˛
09H Rhythm Pointer Reset Ø ˛

App
endi
x
14ELS-01/01C Owner’s Manual 239
0, 321, 5, 7, 10
46, 38
1116
96, 9764-6771-78
84, 91, 93, 9498-99, 100-101
:True Voice
1, 2, 3, 16 (*1)
1-16
Ø 9nH, v=1-127˛ 9nH, v=0
˛Ø
˛˛Ø (*7, *12)
˛Ø (*7)
Ø (*8, *12)
˛˛˛˛˛
Ø (*10)
************************
˛˛˛
ØØ
˛˛˛˛Ø˛*1;*2;*3;*4;*5;*6;*8;*10;*11;*12;
*7; CONTROL only*9; External Mode only
1ch: UK, 2ch: LK, 3ch: PEDAL, 16ch: CONTROL1ch: UK, 2ch: LK, 3ch: PEDAL, 4ch: LEAD1, 5-14ch: XG, 15ch: KEYBOARD PERCUSSION, 16ch: CONTROLUK: 36-96, LK: 36-96, PEDAL: 36-60UK, LK, PEDAL, LEAD1: 36-96, XG: 0-127, PERCUSSION: 3-127UK: UK HorizontalTouch, LK: LK HorizontalTouchXG onlyUK onlyCONTROL: 0-15UK, LK, PEDAL, CONTROL: 0-15 XG: 0-127ELS-01C only
Mode 3˛************************
36-96 (*3)
************************
Ø
Mode 1 : OMNI ON, POLYMode 3 : OMNI OFF, POLY
Ø (*5)
1-3, 5-16 (*2)
4
Ø 9nH, v=1-127˛ 9nH, v=0 or 8nH
Ø (*6)
Ø
Ø (*6)
Ø (*6)
Ø (*7)
Ø (*6)
Ø (*6, 7)
Ø (*8, *12)
Ø (*6)
Ø (*6)
Ø (*6)
Ø (*6)
Ø (*6)
Ø (*11)
˛˛˛
Ø (*9)
Ø
Ø (120) (*6)
Ø (121) (*6)
˛Ø (123-127) (*6)
Ø ˛
Mode 3˛˛
0-127 (*4)
Ø
Ø
Bank Select
2nd ExpressionData EntryExpressionVA After TouchData Entry SW
Sound Controller
NRPN, RPN
(FAH, FCH)
Ø : Yes˛ : No
Date: 10-Oct-2008Version: 1.00YAMAHA [Electone-EL mode] / Model: ELS-01/01C typeU
Mode 2 : OMNI ON, MONOMode 4 : OMNI OFF, MONO
TransmittedFunction Recognized Remarks
Basic Channel
Note Number
Velocity
After Touch
Pitch Bend
Control Change
Program Change
System Exclusive
SystemCommon
System Real Time
Aux Messages
Notes
Mode
DefaultChanged
Note onNote off
Key'sCh's
:Clock:Commands
:All Sound Off:Reset All Cntrls:Local On/Off:All Notes Off:Active Sense:Reset
:Song Position:Song Select:Tune
:True number
DefaultMessagesAltered
MIDI Implementation Chart

Appendix
14ELS-01/01C Owner’s Manual240
0, 321, 5, 7, 10
46, 38
1116
96, 9764-6771-78
84, 91, 93, 9498-99, 100-101
:True Voice
1, 2, 3, 16 1-16
Ø 9nH, v=1-127˛ 9nH, v=0
˛Ø
˛˛Ø (*2)
˛ØØ (*2)
˛˛˛˛˛
Ø 0-15
************************
˛˛˛
ØØ
*1;*2;
Same as that in the EL modeELS-01C only
Mode3˛
************************
36-96
************************
Ø
Ø
1-161-16
Ø 9nH, v=1-127˛ 9nH, v=0 or 8nH
ØØ
ØØ˛ØØ˛ØØØØØ
Ø
˛˛˛
˛˛
Mode 3˛˛
0-127
Ø
Ø
Bank Select
2nd ExpressionData EntryExpressionVA After TouchData Entry SW
Sound Controller
NRPN, RPN
Date: 10-Oct-2008Version: 1.00YAMAHA [Electone-XG mode] / Model: ELS-01/01C typeU
Mode 1 : OMNI ON, POLYMode 3 : OMNI OFF, POLY
Ø : Yes˛ : No
Mode 2 : OMNI ON, MONOMode 4 : OMNI OFF, MONO
˛˛˛˛Ø˛
Ø (120) Ø (121) ˛Ø (123-127) Ø ˛
Transmitted (*1)Function Recognized Remarks
Basic Channel
Note Number
Velocity
After Touch
Pitch Bend
Control Change
Program Change
System Exclusive
SystemCommon
System Real Time
Aux Messages
Notes
Mode
DefaultChanged
Note onNote off
Key'sCh's
:Clock:Commands
:Song Position:Song Select:Tune
:True number
DefaultMessagesAltered
:All Sound Off:Reset All Cntrls:Local On/Off:All Notes Off:Active Sense:Reset

App
endi
x
14ELS-01/01C Owner’s Manual 241
Troubleshooting
Problem Possible Cause and Solution
GENERAL OPERATION
The sound is not heard for about 10 seconds after turning the power on.
This is normal; the Electone takes a while to start up.
A cracking noise is sometimes heard. Noise may be produced when either an electrical appliance is turned on or an electric power tool (such as drill) is used in the proximity of the Electone. If this occurs, plug the Electone into an electrical outlet located as far as possible from the device that seems to be the source of the problem.
Interference from radio, TV, or other sources occurs. This is caused by the proximity of a high-power broadcasting station, an amateur ham radio setup or a mobile phone.
The sound of the Electone causes surrounding objects to resonate.
Because the Electone is capable of producing powerful bass sounds, resonance may be caused in surrounding objects, such as cabinets or glass windows. To avoid this, relocate the objects or lower the Electone’s volume.
In the LCD display, there are some black points (unlit) or white points (always lit).
Unfortunately, this is a common characteristic of TFT-LCDs.
Some buttons on the panel do not respond. The UPPER/LOWER ORGAN FLUTES and LEAD VOICE 2 buttons are invalid on the ELS-01. If you upgrade the ELS-01 to the ELS-01C, these buttons can be used.
Some of the LEDs in the DISPLAY SELECT section do not light.
The LEDs of on/off buttons (UPPER/LOWER ORGAN FLUTES, VOICE EDIT, RHYTHM PROGRAM, and ROTARY SP SPEED) are lit when those functions are turned on. The LEDs of other function’s buttons momentarily light when the functions are selected.
The sound is too small even when the volume is set to its maximum.
• The Master Volume may be set around the minimum position. Turn it clockwise.
• The Expression Pedal may not be pressed down. Press it down with your toe.
• The POWER switch of the speaker may have been turned off. Turn it on.
• (For the ELS-01C) The REAR SPEAKER switch may have been set to OFF. Switch it to ON.
The Electone panel does not function normally or the content of the memorized data has changed.
This happens very rarely. Occasionally, power surges and spikes due to electrical storms or other reasons may cause the Electone to malfunction and/or alter the contents of memorized data. If this happens, perform the Factory Set operation to reset the Electone (page 21).
VOICES/RHYTHMS
The pitch may sound excessively high on the Pedalboard and low in the higher registers of the Lower and Upper keyboards.
This may occur when you compare the Electone’s sounds with that of a piano. Because of the difference of the harmonics structure, the tuning system of the Electone is different from the piano in the higher and lower ranges.
Some of the Voices may contain cracking and/or noisy sounds.
You may find these mainly in the wind instrument Voices. These are purposely added effects to the Voices to reproduce the characteristics of the wind instruments such as the pipe vibrations, breath noises and squeaks.
When too many keys are pressed, not all of the notes sound.
Total polyphonic capacity (notes sounding for both Upper and Lower Keyboards) is 14 notes. When you turn the Pedal Polyphonic mode to on, the total is 14 for all keyboards, Upper, Lower and Pedalboard.
When sustain length is set to HOLD, previously played notes are cut off.
Since the HOLD setting causes notes to keep sounding, the cumulative notes (elements) may go over the maximum elements that the Electone can sound. When this occurs, previously played notes are cut off.
Only one sound is heard when two notes of the Lead or Pedal Voices are simultaneously played.
For practical performance reasons, the Electone has been designed so that only one note of the Lead or Pedal Voices can be played at a time. If you want, the pedal Voice can be set to polyphonic mode (page 40).
The Pedal Voices do not sound, even though the volume is properly set.
• The Single Finger or Fingered Chord mode of Auto Bass Chord is on. Turn off the mode in the display (page 62).
• TO LOWER buttons in the Pedal Voice sections are turned on. Turn the function off (page 26).

Appendix
14ELS-01/01C Owner’s Manual242
When selecting a User button Voice or rhythm, the Voice or rhythm title at the top of the LCD does not match the selected Voice or rhythm.
The currently assigned Voice or rhythm is displayed at the top of the LCD, and remains until another Voice or rhythm has been selected.
When keys are pressed, the sounds of percussion instruments are also heard.
The Keyboard Percussion function has been turned on. When not using the function, be sure to turn it off (page 65).
Even though a User button’s rhythm has been selected and started, the pattern does not sound.
Since the User buttons contain User rhythms, no rhythm will sound if a pattern has not been saved to the selected User button.
EFFECTS
The Touch Tone function does not operate. Adjust the Touch Tone settings in the Voice Condition display (page 39).
The Reverb effect is not applied to the desired Voice sections, even when the REVERB button setting on the panel is increased.
Increase the Reverb depth for the desired Voice sections in Reverb Display Pages 2 – 4.
The Rotary Speaker effect cannot be heard, even when the [ROTARY SP SPEED] button in the DISPLAY SELECT section is on.
Rotary Speaker must be selected first in Voice Condition display Pages 3 and/or 4 (for panel Voices), or in the Organ Flute Voices ATTACK/VOLUME Page (for Organ Flute Voices).
ACCOMPANIMENT
The pitch in the Single Finger mode does not change, even when pressing different keys of the keyboard.
Single Finger mode will only produce notes when played within a fixed octave interval on the Lower keyboard. If notes with the same letter name are pressed outside of that range, the chords that are sounded will share the same pitch.
While an Intro/Ending pattern is automatically playing, the Lower keyboard does not produce any sound, even when the keys are played.
Since the Accompaniment chords play automatically one after another, the Lower keyboard is designed not to produce any sound during the playback of an Intro/Ending pattern.
The Accompaniment cannot be heard even when an appropriate Accompaniment type is selected and the rhythm has been started.
• The Accompaniment volume may have been set to 0. Be sure to raise the Accompaniment volume in the Rhythm Condition display (page 62).
• All Accompaniment parts may be set to off (mute). Set the desired part on (page 61).
The harmony notes of the Melody On Chord function cannot be heard.
The Upper keyboard has been set to sound only Lead Voices. Increase the volume of the Upper Keyboard Voices.
The bass phrase of the Auto Bass Cord cannot be heard.
The pedal polyphonic mode may be set to on. Turn it off in the Voice Condition display (page 40).
REGISTRATION MEMORY
Certain functions have not been memorized to Registration Memory.
Some functions cannot be memorized. Refer to page 81.
VOICE EDITING
The Voice Edit display cannot be called up even when the [VOICE EDIT] button is pressed.
The Voice Edit display cannot called up by pressing only the [VOICE EDIT] button. While holding down the [VOICE EDIT] button, press the desired Voice button.
During Voice editing, the specified Voice isn’t heard, even when the keyboard is played.
• The Element is turned to mute or its level is set to minimum. Turn it to on or increase the volume.
• You may have played keys outside the range of Note Limit. Play only keys within the Note Limit range.
An error message appears while the Voice name is entered.
Voice name capacity is 16 characters. Delete the unnecessary letters or spaces.
RHYTHM PROGRAM
During use of the Rhythm Pattern Program, no sound is produced even when you play a certain percussion sound.
If percussion sounds have been recorded while memory is full, no subsequently selected instruments can be heard or recorded. If necessary, erase some of the less necessary percussion sounds and play again.
Problem Possible Cause and Solution

App
endi
x
14ELS-01/01C Owner’s Manual 243
MUSIC DATA RECORDER
The USB flash memory is not recognized. The USB cable of the USB unit is disconnected. Firmly connect the cable to the USB TO DEVICE terminal.
Recording or playback cannot be performed. • The part buttons in the Rec Standby display or Playing display may have been turned off. Turn the desired part to REC or PLAY.
• The performance data is too large. The maximum limit for recording performance data is 1 MB.
• The media is write-protected. Cancel the write-protect.
• The media/folder may contain EL-format songs. You cannot record to the media/folder that contains EL-format songs. Create a new folder and record the song to it.
Recording is stopped before the performance is finished.
• The amount of recorded data on the media is close to the maximum limit. Either use another media or delete the data of unnecessary songs.
• When you overwrite the song, the length of a subsequently recorded part cannot exceed the length of the previously recorded parts. Delete the previously recorded song, then record again (page 126).
• The performance data is too large. The maximum limit for recording performance data is 1 MB.
An error message appears while entering a folder name or song name.
• The song/folder name is too long. The capacity is 50 letters.
• The song/folder name may be an invalid name. Refer to page 110.
• The path name is too long. The capacity of the path name is 234 letters. Reduce the layer or shorten the song/folder name to shorten the path.
The rhythm does not start at the beginning of a recording, or stops in the middle of the performance.
The M.D.R. is designed so that the rhythm cannot be started at the very beginning of a recording. If you wish to use the rhythm, start it after the time indicator appears in the display.
The floppy disk cannot be formatted when you want to format an unformatted disk.
Recognizing an unformatted disk takes a few seconds after it is inserted. Wait about 30 seconds, then try to format again.
The notes of the recording are “stuck” and sound continuously.
During playback, you may have removed the USB flash memory. Whenever you wish to stop playback, always press the [J] (Stop) button before removing the media.
Problem Possible Cause and Solution

Appendix
14ELS-01/01C Owner’s Manual244
Specifications
Electone STAGEA ELS-01 typeU (ELS-01U)
Electone STAGEA ELS-01C typeU (ELS-01CU)
TONE GENERATION AWM (4) AWM (4) + VA + Organ Flutes
KEYBOARD Upper: 49 keys (C – C), Lower: 49 keys (C – C), Pedal: 20 keys (C – G)
Keyboard Type Standard (FS) Custom (FSV)
Initial Touch Upper, Lower, Pedal
After Touch Upper, Lower Upper, Lower, Pedal
Horizontal Touch — Upper, Lower
REGISTRATION Registration Menu 240 300
Registration Memory M. (Memory), 1 – 16, D. (Disable)
Registration Shift Shift, Jump, User (80)
VOICE Voice Sections Upper 1, Upper 2, Lead 1, Lead 2, Lower 1, Lower 2, Pedal 1, Pedal 2
Voice Buttons
Upper/Lower
STRINGS, BRASS, WOODWIND, TUTTI, PAD, SYNTH, PIANO, ORGAN, PERCUSSION, GUITAR, CHOIR, WORLD, USER 1, USER 2
Lead VIOLIN, SYNTH, FLUTE, TRUMPET, USER 1, TO LOWER (Lead 1), SOLO (Lead 2)
VIOLIN, SYNTH, FLUTE, TRUMPET, VA-ACOUSTIC, VA-VIRTUAL, VA-ELECTRONIC,
VA-CUSTOM, USER 1, TO LOWER (Lead 1), SOLO (Lead 2)
Pedal CONTRABASS, ELEC. BASS, TIMPANI, SYNTH BASS, USER 1, TO LOWER
Preset Voice 415 509 (including VA Voices)
User Voice AWM: 16 AWM:16, VA: 6
Organ Flute Voice — Type: Sine, VintageFootage: 16', 5 1/3', 8', 4', 2 2/3', 2', 1 3/5', 1 1/3', 1'
Attack: 4', 2 2/3', 2', Length, ResponseEffect: XG Rotary Sp, Rotary Sp 1 – 5,
2Way Rot Sp, Dual Rotsp 1 – 2, Dist+Rot Sp, Odrv+Rot Sp, Amp+Rot Sp, Dist+2Rot Sp,
Odrv+2Rop Sp, Amp+2Rot Sp, OFF
Rotary Speaker Control 2.69 – 39.7 Hz, Slow, Stop
EFFECT/CONDITION
Sustain Upper 1, 2 (KNEE), Lower 1, 2 (KNEE), Pedal 1, 2
Reverb Type: Hall 1 – 3, M, L, Room 1 – 4, S, M, L, Stage 1 – 2, Plate 1 – 2, White Room, Tunnel,
Canyon, Basement, XG Hall 1 – 2, XG Room 1 – 3, XG Stage 1 – 2, XG Plate,
GM PlateDepth: Upper 1 – 2, Lower 1 – 2, Lead 1 – 2,
Pedal 1 – 2, Percussion, Accompaniment, Keyboard Percussion
Type: Hall 1 – 3, M, L, Room 1 – 4, S, M, L, Stage 1 – 2, Plate 1 – 2, White Room, Tunnel,
Canyon, Basement, XG Hall 1 – 2, XG Room 1 – 3, XG Stage 1 – 2, XG Plate,
GM PlateDepth: Upper 1 – 2, Lower 1 – 2, Lead 1 – 2,
Pedal 1 – 2, Percussion, Accompaniment, Keyboard Percussion, Upper Organ Flute,
Lower Organ Flute
Effects Reverb, Delay, ER/Karaoke, Chorus, Flanger, Phaser, Tremolo/Auto Pan, Rotary Speaker, Distortion, Distortion+, Wah, Dynamic, EQ/Enhancer, Pitch Change, Miscellaneous, Thru
RHYTHM Rhythm Buttons MARCH, WALTZ, SWING & JAZZ, POPS, R&B, LATIN, WORLD MUSIC, BALLAD, ROCK, DANCE, USER 1, USER 2
Preset Rhythm Pattern 274
Parts Main Drum, Add Drum
Sections Intro 1 – 3, Ending 1 – 3, Main/Fill In A – D, Break, Auto Fill
ACCOMPANIMENT Accompaniment Parts Chord 1, Chord 2, Pad, Phrase1, Phrase 2
Auto Bass Chord OFF, Single Finger, Fingered Chord, Custom A.B.C.Memory: Lower, Pedal
Melody On Chord OFF, 1, 2, 3, Knee
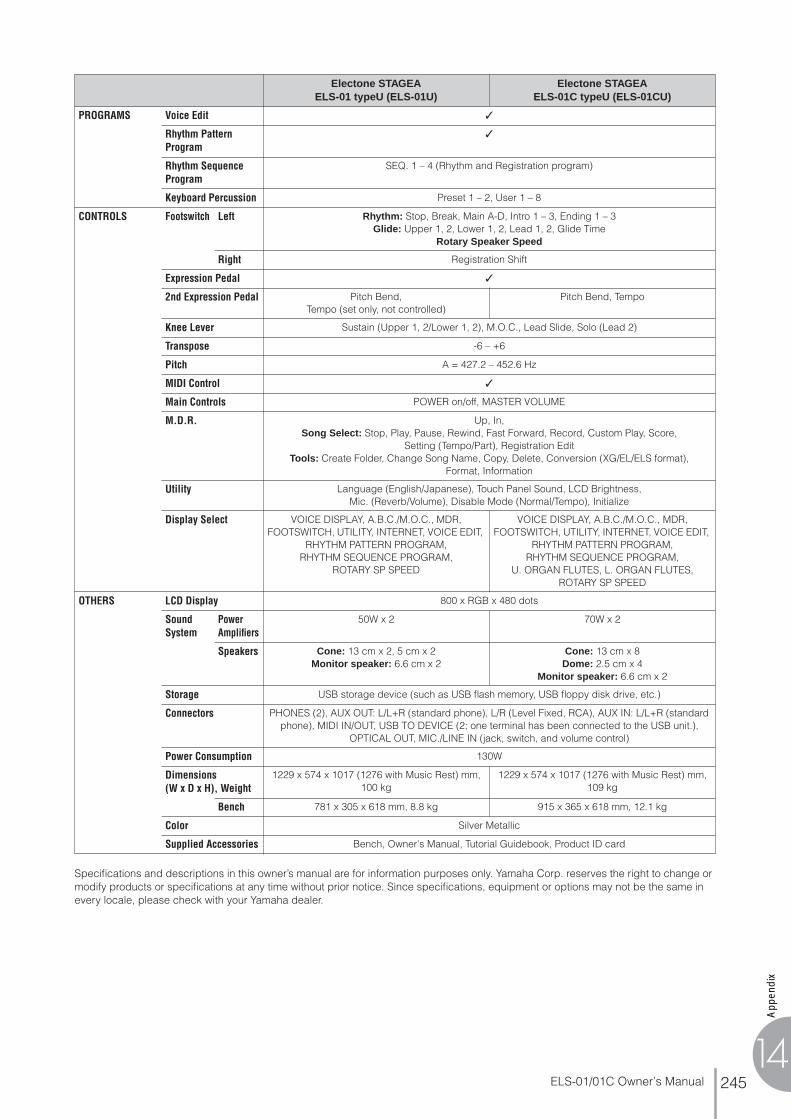
App
endi
x
14ELS-01/01C Owner’s Manual 245
Specifications and descriptions in this owner’s manual are for information purposes only. Yamaha Corp. reserves the right to change or modify products or specifications at any time without prior notice. Since specifications, equipment or options may not be the same in every locale, please check with your Yamaha dealer.
PROGRAMS Voice Edit ✓
Rhythm Pattern Program
✓
Rhythm Sequence Program
SEQ. 1 – 4 (Rhythm and Registration program)
Keyboard Percussion Preset 1 – 2, User 1 – 8
CONTROLS Footswitch Left Rhythm: Stop, Break, Main A-D, Intro 1 – 3, Ending 1 – 3 Glide: Upper 1, 2, Lower 1, 2, Lead 1, 2, Glide Time
Rotary Speaker Speed
Right Registration Shift
Expression Pedal ✓
2nd Expression Pedal Pitch Bend, Tempo (set only, not controlled)
Pitch Bend, Tempo
Knee Lever Sustain (Upper 1, 2/Lower 1, 2), M.O.C., Lead Slide, Solo (Lead 2)
Transpose -6 – +6
Pitch A = 427.2 – 452.6 Hz
MIDI Control ✓
Main Controls POWER on/off, MASTER VOLUME
M.D.R. Up, In,Song Select: Stop, Play, Pause, Rewind, Fast Forward, Record, Custom Play, Score,
Setting (Tempo/Part), Registration EditTools: Create Folder, Change Song Name, Copy, Delete, Conversion (XG/EL/ELS format),
Format, Information
Utility Language (English/Japanese), Touch Panel Sound, LCD Brightness, Mic. (Reverb/Volume), Disable Mode (Normal/Tempo), Initialize
Display Select VOICE DISPLAY, A.B.C./M.O.C., MDR, FOOTSWITCH, UTILITY, INTERNET, VOICE EDIT,
RHYTHM PATTERN PROGRAM, RHYTHM SEQUENCE PROGRAM,
ROTARY SP SPEED
VOICE DISPLAY, A.B.C./M.O.C., MDR, FOOTSWITCH, UTILITY, INTERNET, VOICE EDIT,
RHYTHM PATTERN PROGRAM, RHYTHM SEQUENCE PROGRAM,
U. ORGAN FLUTES, L. ORGAN FLUTES, ROTARY SP SPEED
OTHERS LCD Display 800 x RGB x 480 dots
Sound System
Power Amplifiers
50W x 2 70W x 2
Speakers Cone: 13 cm x 2, 5 cm x 2Monitor speaker: 6.6 cm x 2
Cone: 13 cm x 8 Dome: 2.5 cm x 4
Monitor speaker: 6.6 cm x 2
Storage USB storage device (such as USB flash memory, USB floppy disk drive, etc.)
Connectors PHONES (2), AUX OUT: L/L+R (standard phone), L/R (Level Fixed, RCA), AUX IN: L/L+R (standard phone), MIDI IN/OUT, USB TO DEVICE (2; one terminal has been connected to the USB unit.),
OPTICAL OUT, MIC./LINE IN (jack, switch, and volume control)
Power Consumption 130W
Dimensions (W x D x H), Weight
1229 x 574 x 1017 (1276 with Music Rest) mm, 100 kg
1229 x 574 x 1017 (1276 with Music Rest) mm, 109 kg
Bench 781 x 305 x 618 mm, 8.8 kg 915 x 365 x 618 mm, 12.1 kg
Color Silver Metallic
Supplied Accessories Bench, Owner's Manual, Tutorial Guidebook, Product ID card
Electone STAGEA ELS-01 typeU (ELS-01U)
Electone STAGEA ELS-01C typeU (ELS-01CU)
Appendix
14ELS-01/01C Owner’s Manual246
Numerics2nd Expression Pedal............................................................. 190
AA.B.C./M.O.C. ..................................................................... 62, 64
ACCENT.................................................................................. 152
Accompaniment........................................................................ 61
Add Drum ................................................................................. 61
AFTER touch (Pitch).................................................................. 40
AFTER touch (Touch Tone)....................................................... 39
ASSEMBLE ............................................................................. 148
ASSIGN (Keyboard Percussion)............................................... 70
ATTACK (Organ Flutes) ............................................................ 36
ATTACK RATE (Voice Edit)............................................. 137, 140
Auto Bass Chord....................................................................... 62
Auto Fill ..................................................................................... 54
AUX IN .................................................................................... 209
AUX OUT ................................................................................ 209
AUX OUT (LEVEL FIXED) ....................................................... 209
AWM (Voice Edit).................................................................... 134
AWM Voice ............................................................................... 34
BBAR/BEAT................................................................................. 56
Bookmark................................................................................ 199
BREAK ...................................................................................... 53
BRILLIANCE (Panel) ................................................................. 47
Browser........................................................................... 196, 203
CCHANGE SONG NAME .......................................................... 108
Channel Messages ................................................................. 219
CHORD 1 .................................................................................. 61
CHORD 2 .................................................................................. 61
CHORUS (Effect) ...................................................................... 50
CHORUS (Rhythm Pattern Program) ...................................... 164
Control Change....................................................................... 219
Control Menu .......................................................................... 196
CONVERT EL TO ELS............................................................. 129
CONVERT ELS TO EL............................................................. 129
CONVERT TO XG ................................................................... 128
CUSTOM A.B.C. ....................................................................... 63
CUTOFF FREQ........................................................................ 137
D[D.] (Disable) ............................................................................ 82
DATA CONTROL dial................................................................ 10
DECAY RATE .......................................................................... 140
DELAY (Effect) .......................................................................... 50
DELAY (Vibrato)........................................................................ 41
DEPTH (Reverb) ....................................................................... 44
DEPTH (Vibrato)........................................................................ 41
Display Select ........................................................................... 10
DISTORTION............................................................................. 50
DYNAMIC.................................................................................. 50
EEACH (Organ Flutes).................................................................36
EFFECT......................................................................................42
Effect category (Voice)..............................................................42
Effect Parameters ......................................................................43
EFFECT TYPE (Organ Flutes)....................................................37
Effect type (Voice) .....................................................................43
Element....................................................................................131
ENDING.....................................................................................53
Envelope Parameters ..............................................................140
EQ (Equalizer) .................................................................135, 140
EQ/ENHANCER (Effect) ............................................................50
ER/KARAOKE ............................................................................50
Expression pedal.......................................................................12
EXTERNAL...............................................................................222
FFactory Set ................................................................................21
Fast Forward............................................................................119
FEET ..........................................................................................40
File .............................................................................................99
FILL IN .......................................................................................53
Filter.........................................................................................137
FINGERED CHORD...................................................................63
FIRST (Organ Flutes).................................................................36
FLANGER ..................................................................................50
Floppy disk ..............................................................................101
Folder ........................................................................................99
FOOT SWITCH ..................................................................86, 185
FOOTAGE..................................................................................35
Footswitch ...............................................................................185
FORMAT (MDR).......................................................................102
GGate Time ................................................................................160
Glide ........................................................................................187
HHeadphones............................................................................211
Home Page..............................................................................202
HORIZONTAL touch..................................................................40
IINITIAL touch.............................................................................39
Initialize (Factory Set) ................................................................21
Initialize (Internet Settings) ......................................................206
Initialize (Registration Memory) .................................................85
INPUT VOLUME ......................................................................208
INTERNAL ...............................................................................222
INTERNET................................................................................195
Internet Direct Connection ......................................................194
INTRO........................................................................................52
Index

App
endi
x
14ELS-01/01C Owner’s Manual 247
JJacks and Controls ................................................................. 208
JUMP ........................................................................................ 86
KKeyboard Percussion ............................................................... 65
Knee Lever.............................................................................. 188
LL. ORGAN FLUTES ................................................................... 35
LAN ......................................................................................... 204
LANGUAGE .............................................................................. 15
LAST (Lead Voice).................................................................... 40
LAYER (Voice Edit) ................................................................. 135
LCD BRIGHTNESS ................................................................... 16
LCD Display.............................................................................. 10
Lead Slide................................................................................. 42
Lead Voice................................................................................ 22
LEAD VOICE (Panel)................................................................... 9
LEVEL (Voice Edit).......................................................... 136, 139
LFO (Low Frequency Oscillator)............................................. 139
Lower Keyboard Voice ............................................................. 23
LOWER KEYBOARD VOICE (Panel)........................................... 8
M[M.] (Memory) ........................................................................... 80
M.O.C........................................................................................ 64
MAIN ......................................................................................... 52
Main Drum ................................................................................ 61
MAIN/FILL IN ............................................................................ 52
MASTER VOLUME .................................................................... 11
MDR .......................................................................................... 95
Melody On Chord ..................................................................... 64
MEMORY (A.B.C.)..................................................................... 64
METRONOME ......................................................................... 147
MIC./LINE IN jack ................................................................... 208
MIC./LINE switch .................................................................... 208
MIDI ........................................................................................ 218
MIDI Control............................................................................ 221
MIDI IN/OUT ........................................................................... 210
MIDI OUT FILTER ................................................................... 221
MISCELLANEOUS .................................................................... 50
MODE (Organ Flutes) ............................................................... 36
MODE (Rotary Speaker) ........................................................... 49
Music Data Recorder................................................................ 95
NNext Page ............................................................................... 123
Next Regist ............................................................................. 113
NEXT REGIST (Shift End).......................................................... 88
NOTE LIMIT ............................................................................ 136
NOTE SHIFT............................................................................ 136
OOPTICAL OUT......................................................................... 210
Organ Flutes ............................................................................. 35
OUTPUT (MIDI)....................................................................... 221
PPAD ...........................................................................................61
PAN (Voice Edit) ......................................................................136
PAN (Voice) ...............................................................................39
Part (Rhythm).............................................................................61
PART SETUP (MDR) ................................................................104
PATTERN.................................................................................144
Pause.......................................................................................119
Pedal polyphonic mode ............................................................40
Pedal Voice ...............................................................................23
PEDAL VOICE (Panel) .................................................................9
PHASER.....................................................................................50
PHONES ..................................................................................208
PHRASE 1..................................................................................61
PHRASE 2..................................................................................61
Pitch.........................................................................................193
PITCH (Voice Section)...............................................................40
Pitch Bend ...............................................................................191
PITCH CHANGE ........................................................................50
Playback..................................................................................117
POLY .........................................................................................40
POWER......................................................................................11
PRESET (Vibrato).......................................................................41
Preset Keyboard Percussion.....................................................65
PRESET TEMPO ........................................................................57
PRIORITY...................................................................................40
Program Change .....................................................................219
Protected Song........................................................................116
Punch-in Recording.................................................................108
QQuantize ..................................................................................156
RReal Time Write ...............................................................149, 157
Recording................................................................................105
Recording (Lead Voice 1 Voice only)......................................106
Recording (Part) ......................................................................106
REGIST EDIT (MDR)................................................................111
Registration Memory .................................................................80
REGISTRATION MENU .............................................................19
Registration Sequence ............................................................179
Registration Shift .......................................................................85
RELEASE RATE (Voice Edit) ...........................................137, 140
Repeat .....................................................................................120
Re-recording (Retry)................................................................106
RESONANCE...........................................................................137
RESP. (Response) .....................................................................36
Reverb .......................................................................................43
REVERB (MIC.)........................................................................215
REVERB (Panel) ........................................................................43
REVERB (Rhythm Pattern Program) ........................................163
Rewind.....................................................................................119
Rhythm ......................................................................................51
Rhythm button ...........................................................................51
Rhythm Clock ..........................................................................151
Rhythm Condition ......................................................................54
Rhythm Menu ............................................................................52
Rhythm Pattern Program .........................................................144
Rhythm Program......................................................................143
Appendix
14ELS-01/01C Owner’s Manual248
Rhythm Sequence Program.................................................... 174
Rhythmic Chord ...................................................................... 158
ROTARY SP SPEED .................................................................. 48
Rotary Speaker ......................................................................... 48
SSCORE.................................................................................... 122
Sections .................................................................................... 52
SEQUENCE............................................................................. 174
SHIFT (Registration Shift).......................................................... 86
SHIFT END................................................................................ 88
SINGLE FINGER ....................................................................... 63
SLIDE ........................................................................................ 42
SLOW (Rotary Speaker)............................................................ 49
SOLO ........................................................................................ 27
Song.................................................................................. 99, 103
Song Copy .............................................................................. 124
Song Delete ............................................................................ 126
Specifications ......................................................................... 244
SPEED (Rotary Speaker) .......................................................... 49
SPEED (Vibrato)........................................................................ 41
START ....................................................................................... 53
Step Write ............................................................................... 149
STOP (Rotary Speaker)............................................................. 49
STOP (Shift End) ....................................................................... 88
Style File Format ..................................................................... 170
Sustain ...................................................................................... 47
SUSTAIN (Panel)....................................................................... 47
SYNCHRO START..................................................................... 53
System Exclusive Messages .................................................. 219
System Messages................................................................... 219
TTempo (MDR) ......................................................................... 119
TEMPO (Rhythm) ...................................................................... 56
THRU (Effect)............................................................................ 50
TIME (Slide) .............................................................................. 42
TO LOWER................................................................................ 26
TOP (Lead Voice) ..................................................................... 40
TOP (Shift End) ......................................................................... 88
TOUCH PANEL SOUND ........................................................... 16
TOUCH TONE........................................................................... 39
TOUCH VIBRATO ..................................................................... 41
Transpose ............................................................................... 193
TRANSPOSE (Voice section) .................................................... 42
TREMOLO/AUTO PAN.............................................................. 50
TUNE (Voice section)................................................................ 42
TUNE FINE (Voice Edit) .......................................................... 136
UU. ORGAN FLUTES .................................................................. 35
UD-FD01 ................................................................................. 224
Upper Keyboard Voice ............................................................. 22
UPPER KEYBOARD VOICE (Panel)............................................ 8
USB flash memory .................................................................. 100
USB TO DEVICE ..................................................... 100, 210, 216
USB unit .................................................................................. 210
USER (Registration Shift) .......................................................... 87
USER (Vibrato).......................................................................... 41
User button (Rhythm)................................................................ 58
User button (Voice) ...................................................................28
User Keyboard Percussion .......................................................70
User Rhythm............................................................................167
User Voice ...............................................................................141
UTILITY......................................................................................15
VVA (Voice Edit) ........................................................................139
VA Custom Voice.....................................................................141
VA Voice ....................................................................................34
VARIATION (Rhythm Pattern Program) ...................................165
Version.......................................................................................21
VIBRATO ...................................................................................41
Voice..........................................................................................22
Voice button ..............................................................................23
Voice Condition ...................................................................25, 39
VOICE DISPLAY ........................................................................17
Voice Edit ................................................................................131
VOICE EDIT (Panel).................................................................133
Voice Menu................................................................................24
Voice section .............................................................................22
Volume (Accompaniment).........................................................62
Volume (Keyboard Percussion).................................................66
VOLUME (MIC.).......................................................................215
VOLUME (Organ Flutes)............................................................36
VOLUME (Rhythm Pattern Program) .......................................162
VOLUME (Rhythm) ....................................................................55
VOLUME (Voice) .......................................................................25
WWAH ..........................................................................................50
Wireless LAN ...........................................................................204
XXG................................................................................................6

App
endi
x
14ELS-01/01C Owner’s Manual 249
● ● ● ● ● ● ● ● ● ● ● ● ● ● ● ● ● ● ● ● ● ● ● ● ● ● ● ● ● ● ● ● ● ● ● ● ● ● ● ● ● ● ● ● ● ● ● ● ● ●
MEMO
Appendix
14ELS-01/01C Owner’s Manual250
● ● ● ● ● ● ● ● ● ● ● ● ● ● ● ● ● ● ● ● ● ● ● ● ● ● ● ● ● ● ● ● ● ● ● ● ● ● ● ● ● ● ● ● ● ● ● ● ● ●
MEMO
For details of products, please contact your nearest Yamaha representative or the authorized distributor listed below.
MEXICOYamaha de México S.A. de C.V.Calz. Javier Rojo Gómez #1149,Col. Guadalupe del MoralC.P. 09300, México, D.F., MéxicoTel: 55-5804-0600
BRAZILYamaha Musical do Brasil Ltda.Rua Joaquim Floriano, 913 - 4' andar, Itaim Bibi, CEP 04534-013 Sao Paulo, SP. BRAZILTel: 011-3704-1377
ARGENTINAYamaha Music Latin America, S.A. Sucursal de ArgentinaOlga Cossettini 1553, Piso 4 NorteMadero Este-C1107CEKBuenos Aires, ArgentinaTel: 011-4119-7000
PANAMA AND OTHER LATIN AMERICAN COUNTRIES/CARIBBEAN COUNTRIES
Yamaha Music Latin America, S.A.Torre Banco General, Piso 7, Urbanización Marbella, Calle 47 y Aquilino de la Guardia, Ciudad de Panamá, Panamá Tel: +507-269-5311
Yamaha Corporation, Asia-Pacific Music Marketing GroupNakazawa-cho 10-1, Naka-ku, Hamamatsu, Japan 430-8650Tel: +81-53-460-2312
TURKEY/CYPRUSYamaha Music Central Europe GmbHSiemensstraße 22-34, 25462 Rellingen, GermanyTel: 04101-3030
OTHER COUNTRIESYamaha Music Gulf FZELOB 16-513, P.O.Box 17328, Jubel Ali, Dubai, United Arab EmiratesTel: +971-4-881-5868
THE PEOPLE’S REPUBLIC OF CHINAYamaha Music & Electronics (China) Co.,Ltd.2F, Yunhedasha, 1818 Xinzha-lu, Jingan-qu, Shanghai, ChinaTel: 021-6247-2211
HONG KONGTom Lee Music Co., Ltd.11/F., Silvercord Tower 1, 30 Canton Road,Tsimshatsui, Kowloon, Hong KongTel: 2737-7688
INDIAYamaha Music India Pvt. Ltd.5F Ambience Corporate Tower Ambience Mall ComplexAmbience Island, NH-8, Gurgaon-122001, Haryana, IndiaTel: 0124-466-5551
INDONESIAPT. Yamaha Music Indonesia (Distributor)PT. NusantikGedung Yamaha Music Center, Jalan Jend. Gatot Subroto Kav. 4, Jakarta 12930, IndonesiaTel: 21-520-2577
KOREAYamaha Music Korea Ltd.8F, 9F, Dongsung Bldg. 158-9 Samsung-Dong, Kangnam-Gu, Seoul, KoreaTel: 080-004-0022
MALAYSIAYamaha Music Malaysia, Sdn., Bhd.Lot 8, Jalan Perbandaran, 47301 Kelana Jaya, Petaling Jaya, Selangor, MalaysiaTel: 3-78030900
PHILIPPINESYupangco Music Corporation339 Gil J. Puyat Avenue, P.O. Box 885 MCPO, Makati, Metro Manila, PhilippinesTel: 819-7551
SINGAPOREYamaha Music Asia Pte., Ltd.#03-11 A-Z Building140 Paya Lebor Road, Singapore 409015Tel: 747-4374
TAIWANYamaha KHS Music Co., Ltd. 3F, #6, Sec.2, Nan Jing E. Rd. Taipei.Taiwan 104, R.O.C.Tel: 02-2511-8688
THAILANDSiam Music Yamaha Co., Ltd.4, 6, 15 and 16th floor, Siam Motors Building, 891/1 Rama 1 Road, Wangmai, Pathumwan, Bangkok 10330, ThailandTel: 02-215-2626
OTHER ASIAN COUNTRIES Yamaha Corporation,Asia-Pacific Music Marketing GroupNakazawa-cho 10-1, Naka-ku, Hamamatsu, Japan 430-8650Tel: +81-53-460-2317
CENTRAL & SOUTH AMERICA
AFRICA
MIDDLE EAST
ASIA
HEAD OFFICE Yamaha Corporation, Digital Musical Instruments DivisionNakazawa-cho 10-1, Naka-ku, Hamamatsu, Japan 430-8650Tel: +81-53-460-3273
EKB48

This document is printed on chlorine free (ECF) paper with soy ink.
U.R.G., Digital Musical Instruments Division© 2004 – 2011 Yamaha Corporation
WR03710 109MWCP**-**E0Printed in Japan
Yamaha Manual Libraryhttp://www.yamaha.co.jp/manual/


