
Information produced by Sisters G Nicholson & H Gray Date of origin August 2007, Review date August 2008
1
Endoscopy Services
Freeman Hospital Endoscopy Unit
STUDENT NURSE
Induction Pack
Name__________________________
MENTOR_______________________
Start Date_______________________

Information produced by Sisters G Nicholson & H Gray Date of origin August 2007, Review date August 2008
2
Introduction to Endoscopy Unit The Endoscopy Unit at Freeman Hospital is part of the Newcastle upon Tyne Hospitals NHS Foundation Trust. The Endoscopy Services within the Trust are provided over 4 sites - Royal Victoria Infirmary, Freeman Hospital, Newcastle General Hospital, and Biddlestone Road Health Centre and currently carries out 15,000 procedures per year. These are performed by Consultant Gastroenterologists, Consultant Respiratory Physicians, Consultant Surgeons, Consultant Radiologists and Nurse Endoscopists. The service is also a tertiary referral centre for Gastro-Oesophageal Cancer and Hepatobiliary Disease. This is reflected in particular areas of expertise and the complexity of some procedures. Endoscopy Services lies within the Surgical Directorate and provides „same day‟ endoscopic investigation, diagnosis and treatment for gastrointestinal and respiratory disorders and disease. The Freeman Endoscopy Unit is located in the cardio block (Ward 28) and is in temporary accommodation It has two procedure rooms and sees approximately 6,000 patients each year, the majority of these are day patients. The day patients are admitted to the Day Treatment Centre (Ward 21) where a pre procedure assessment is carried out. The Unit works closely with the hepatobiliary team, the colorectal team, the general medical team and provides an in patient service. The unit is open Monday to Friday from 7.30am to 6pm. The on call theatre team provides an out of hour‟s service. The term „Endoscopy‟ literally means „to look in and see‟, it can describe a variety of procedures, it is a term that is widely used and may cause some confusion, it is therefore preferable to use specific terminology: Gastroscopy - examination of oesophagus, stomach and duodenum Colonoscopy - examination of the large bowel Flexible sigmoidoscopy - examination of the left side of bowel An endoscopic procedure is described as either diagnostic - when a cause for patient‟s symptoms may be discovered or therapeutic - where treatment can be administered to ease a patient‟s problem/disease Useful reading (all available within the endoscopy for reference) Practical Gastrointestinal Endoscopy, 4th Edition, Cotton & Williams Practical Endoscopy, Shephard and Mason British Society of Gastroenterology Guidelines

Information produced by Sisters G Nicholson & H Gray Date of origin August 2007, Review date August 2008
3
Philosophy of Care The Endoscopy Unit is a highly technical area where patients can feel vulnerable resulting in high levels of anxiety. Our aim in each endoscopy unit is to use resources effectively and ensure patient safety by providing continuity of care from the time of assessment, through the admission, during the procedure to discharge. We shall endeavour to understand the patient as an individual so that their emotional and physical needs are met. Communication will be open and honest with all patients and staff, including relatives and carers, as appropriate, without breaches of confidentiality. Patients will be cared for by staff with relevant knowledge and skills.
This document is for use by the multi-disciplinary teams, working at Newcastle upon Tyne Hospitals NHS Foundation Trust, for patients attending for endoscopic procedures in the Endoscopy Units and associated areas such as the X-ray Departments. It outlines the provision of high quality, holistic and effective care underpinned by evidence-based practice with the patient as the primary focus.

Information produced by Sisters G Nicholson & H Gray Date of origin August 2007, Review date August 2008
4
Week 1 Objectives: Orientation, observation and discuss outline of programme. Introduction to the unit
Geography
Multidisciplinary team
Session times
Health and safety
Conscious sedation
Informed consent Introduction to endoscopes and disinfection
Recognition of endoscopes
COSHH
Traceability
Decontamination of equipment
Storage of endoscopes
Set up endoscope for use
The Endoscopy Resource File will be a useful reference. Specialist text books can be borrowed from Sister‟s Office.
Week 2 Objectives: Under supervision observe
Care of patient undergoing Gastroscopy
Care of patient undergoing Colonoscopy
Nursing documentation /observations
Cleaning and disinfection of endoscope
Traceability and storage of endoscopes
Drying cabinets
Checking out of hours trolley
Checking arrest trolley
Calibration of blood sugar monitoring equipment
Receiving and discharging of patients
Achieved

Information produced by Sisters G Nicholson & H Gray Date of origin August 2007, Review date August 2008
5
Observe the following
Care of patient during ERCP
Care of patient undergoing EUS/FNA
Ward visits
Pre assessment
Biopsy taking, processing of specimens
Introduction to drugs used in the department, including reversal agents. Implications of their use.
Weeks 3 & 4 Objectives: Develop knowledge of cleaning processes
Leak testing
Manual cleaning of - Gastroscope
Manual cleaning of - Colonoscope
Use of washer disinfectors
Reprocess an endoscope
Traceability and storage of endoscopes
Introduction to accessories & equipment used in gastroscopy & colonoscopy.
Biopsy forceps
Cytology brushes
Cytology slides
Snares
Grabbers
Baskets
Injection needles
Diathermy units
Gold probes
Quick clips

Information produced by Sisters G Nicholson & H Gray Date of origin August 2007, Review date August 2008
6
Recommended Independent Study
Patient care/safety, pre, peri and post procedure.
Anatomy and physiology of G.I. tract
Therapeutic gastroscopy
Therapeutic colonoscopy
ERCP
EUS/FNA
Commonly used drugs and their administration, including I.V. antibiotics
Referral routes of patients
Bowel preparation
Patient information leaflets
Local guidelines

Information produced by Sisters G Nicholson & H Gray Date of origin August 2007, Review date August 2008
7
Freeman Endoscopy Unit Staff
Directorate: General Surgery
Speciality Manager: Gill Bewick Modern Matron:
Endoscopy Services Manager: Linda Hodgson Nursing Staff: Sister Gill Nicholson (Manager)
Sister Heather Gray Staff Nurse Robbie Brady Staff Nurse Jan Gaffney Staff Nurse Judith Bryson Staff Nurse Janet Bowman Staff Nurse Joan Wood Staff Nurse Chris Wallace Staff Nurse Val Mills Staff Nurse Julia Lambourn Staff Nurse William Cresswell Staff Nurse Paul Watson Staff Nurse Gillian Campbell Staff Nurse Sarah Jack HCA Philip Wilson HCA
Admin & Clerical Staff: Michelle Cullen (Office Administrator) Vanessa Chirnside (Office Administrator) Brenda Wilson Alyson Marsh
Consultant Physicians: Dr Kofi Oppong (Lead Clinician for Endoscopy)
Dr Mark Hudson Dr Nick Thompson Dr Steve Stewart
Consultant Surgeons: Mr Richard Charnley (Hepatobiliary) Mr Alan Horgan (Colorectal) Mr Paul Hainsworth (Colorectal)
Porter Michael Barlow
Ward 21 Day Sister Kath Tyrell Treatment Centre Sister Sarah Caise
RVI Endoscopy Unit Sister Eileen Woodall (Unit Manager) Sister Helen Wright Sister Jill Doyle June McAllister (Office Administrator)
Nurse Endoscopists: Sister Elaine Stoker, (Freeman) Sister Mandy Robinson (RVI) Sister Lesley Jeffrey (Freeman) Sister Jayne Robinson (RVI)

8
MONDAY TUESDAY WEDNESDAY THURSDAY FRIDAY
AM
MR CHARNLEY
ERCP
DUODENOSCOPY
NO EUS
MAX 4 PATIENTS
3 BOOKED & 1
CONSULT
MR HAINSWORTH
COLONS /FLEXI
MAX 5COLONS
OR EQVALENT
F/S &EAUS=1 COLON
HAINSWORTHS
PATIENTS ONLY
DR OPPONG
EUS/EUS FNA ONLY
MAX 4
DR OPPONG / DR
DIPPER
MAX 4 COLONS
AT PRESENT FROM
OCT 07
DR HUDSON MAX 6 COLONS OR
EQUIVALENT
DR OPPONG ERCPS/EUS/EUS FNA
MAX 4 PATIENTS =
BOOKED & 1
CONSULT
MR HORGAN
(ELAINE)
MAX 5 COLONS
MR HORGAN
(LESLEY)
MAX 6 FLEXI’S
MR CHARNLEY/
DR OPPONG
ERCP
DUODENOSCOPY
EUS/ EUS FNA
MAX 4 PATIENTS= 3
BOOKED & 1
CONSULT
DR THOMPSON
MAX 6COLONS OR
EQUIVALENT
PM
ELAINE
MAX 4 COLONS
OR EQUVALENT
DR OPPONG
MAX 5 COLONS
OR EQUVALENT
DR STEWART
MAX 5 COLONS
+ 1 ENDO/F/S
OR EQUVALENT
DR MANU NAYAR
3EUS, IF EUS &FNA
ONLY 2
SPR OPEN ACCESS
MAX 10 ENDOS
ALTERNATE WEEKS
OPEN ACCESS
MAX 10 ENDOS
MR HAINSWORTH
FLEXI SIGS ONLY
MAX 10
DR THOMPSON
10 ENDOS
TRAINING LIST
DR MANU NAYAR
3EUS, IF EUS &FNA
ONLY 2
DR STEWART
5 COLONS & 5
UPPERS BETWEEN 2
ROOMS
DR STEWART

9
Summary of Procedures
1. Gastroscopy The complete title should be oesophagastroduodenoscopy, but for practical reasons has been shortened to gastroscopy. The lining of the oesophagus, stomach and duodenum are visualised. You may hear the abbreviation OGD also used. To have the examination performed patients are given a choice of either local anaesthetic spray applied to the back of their throat or intravenous sedation. Patients are only able to receive sedation if they have a responsible adult to take them home and stay with them overnight. Patients receiving sedation require close observation. Their level of consciousness and respiratory function must be monitored throughout the procedure and immediately afterwards. Oxygen is given to all patients receiving sedation as per policy. All patients must be nil by mouth, 4 hours for food and 2 hours for fluids prior to the procedure to minimise risk of aspiration. The procedure takes approximately 10-15 minutes

10
2. Colonoscopy. During colonoscopy the internal lumen of the large bowel is visualised. It is possible to inspect from rectum to caecum. Patients receive intravenous Pethidine or Fentanyl as pain relief and Midazolam as sedation. Prior to colonoscopy patients must stop all iron supplements for 1 week, commence a low residue diet for 48 hours prior to the procedure and take bowel preparation the day before the procedure to ensure the bowel is completely empty so that the mucosal wall can be visualised. The procedure takes approximately 20-30 minutes.
3. Flexible sigmoidoscopy The lower part of the colon is visualised during flexible sigmoidoscopy, from rectum to splenic flexure. Patients usually do not require sedation for this procedure. To clear the lower part of the bowel the patient is given 1-2 phosphate enemas 1-2 hours prior to the procedure. These can be self administered at home or given by the ward nurse in hospital. The test takes 5-10minutes.

11
4. E.R.C.P. Its literal meaning is
ENDOSCOPIC - via an endoscope RETROGRADE - directed backwards CHOLANGIO PANCREATOGRAPHY - to visualise and obtain x-ray
images of the gallbladder, common bile duct, pancreatic duct and biliary tree. This is a highly skilled and technical procedure, probably the most demanding of all endoscopic procedures. It is performed under x-ray vision in the endoscopy department. The aim is to visualise the biliary and pancreatic system using x-ray contrast, in order to remove stones, obtain brushings for histological examination or drain the biliary system by inserting a stent. This procedure can last any where from 20-60 minutes. Prior to the procedure patients must have no food for 4- 6 hours and no fluids for 2 hours. All patients must have recent blood screening to check:
Clotting studies
Liver function
Electrolytes Most patients will require IV antibiotics 1 hour before the procedure.

12
5. Endoscopic Ultrasound (EUS) An Endoscopic Ultrasound is an internal scan of the upper GI tract giving accurate images of the Hepatobiliary system. Samples can be taken of any lesions found; this is called a fine needle aspiration (FNA). Before an FNA is performed; the patients clotting has to be checked and found to be within normal limits. Patients must have nothing to eat for 4-6 hours and water only up to 2 hours before the procedure.

13
COMMONLY USED DRUGS IN ENDOSCOPY
BENZPDOAZEPINES - These possess useful properties, including, reducing anxiety, causing amnesia and sedation. They have no analgesic effect, so opioids can be given in conjunction with them for pain relief. The main side effect is respiratory depression and the reversal drug is Flumazenil. Other side effects include, in profound sedation, sexual fantasies.
Midazolam (Hypnoval)
Midazolam is the drug of choice in the majority of our procedures; Gastroscopy, Colonoscopy, PEG, ERCP etc. with a sedative effect for up to 24 hours. Midazolam has a faster recovery time than other Benzodiazepines.
Given IV. Draw up 1 ampoule in 5 ml labelled syringe. Concentration is 10mg/5ml – 2mg/1ml.
Diazepam (Diazemuls)
Diazepam is the preference of some doctors for ERCP. It is longer acting and can have a second period of drowsiness after several hours. It comes ready prepared as a white emulsion.
Given IV. Draw up 2x10mg ampoules into a 5ml labelled syringe. Concentration is 5mgs in 1ml.
OPIOIDS - Opoids are used to relieve moderate to severe pain. The main side effects include nausea, vomiting, constipation, drowsiness, hypotension and respiratory depression. The reversal drug is Naloxone (Narcan).
Pethidine
Pethidine is given during Colonoscopy and ERCP. Produces prompt short lasting analgesia.
Given IV. Draw up 1 ampoule in a 2ml labelled syringe. Concentration is 50mg/1ml.
Fentanyl
Fentanyl is the preference of some doctors for Colonoscopy. It is very quick acting.
Given IV. Draw up 1 ampoule in 2ml labelled syringe. Concentration is 100mcg in 2mls, 50mcg in 1ml.

14
REVERSAL DRUGS - Used as antagonists. Both Naloxone and Flumazenil have shorter half life that the drugs they reverse, and the patient is at risk of becoming re-sedated.
Flumazenil (Anexate)
Flumazenil is used to reverse Benzodiazepines. It is short acting and may need to be repeated.
Given IV. Draw up 1 ampoule in 5ml labelled syringe. Concentration is 500mcgs in 5mls, 100mcgs in 1ml.
Naloxone (Narcan)
Naloxone is used to reverse Opioid drugs. It is short acting and may need to be repeated.
Given IV. Draw up 1 ampoule in 2ml labelled syringe. Concentration is 400mcg in 1ml.
ANTISPASMODICS
Used to relax the gut during therapeutic procedures and Colonoscopy by reducing peristalsis and spasm.
Hyoscine Butylbromide (Buscopan)
The side effects include bradycardia and tachycardia: therefore it should not be used for patients who have recently had an MI, or cardiac rhythm disturbances.
Given IV. Draw up I or 2 ampoules, depending on the dose required, in a 2ml labelled syringe. Concentration is 20mg in 1ml
Glucagon
Glucagon inhibits gut motility and tends to be used when Buscopan is contraindicated. Caution must be given to diabetic patients, as it is a hyperglycaemic agent. Glucagon comes in a ready prepared “hypokit”.
Given IV. The pack contains a syringe containing water and a vial of powder to be reconstituted, inject the water into the vial and then draw it up into a normal syringe so that the needle can be removed in order to be given IV. Concentration is 1 unit (1mg) in 1ml.
LOCAL ANAESTHETICS Lidocaine Throat Spray (Xylocaine) Lidocaine is used for Gastroscopy patients who do not want to be sedated. It works by numbing the mouth and throat. The loss of sensation may make swallowing difficult and reassurance is given to the patient that swallowing and breathing remain the same. This effect can last for up to one hour and the patient is kept nil by mouth for one hour to reduce the risk of aspiration.

15
LEARNING OPPORTUNITIES RESOURCE/DEPARTMENT
PERSONEL/DEPARTMENT
Learning Opportunities
Resource/Relevant/
Personel/Department
Patient Hygiene
Skin care
Pressure care prevention
(waterlow scoring)
recording of physiological
observations
BP
TPR
Blood Glucose
Maintaining accurate charts
Giving medications
Rectal
Intravenous
IV infusions
Cannulation/care of venflons
Medical devices
Administration of blood and blood
product
Aseptic techniques (Peg)
Risk assessment
BMI nutritional assessment
Moving and Handling
Infection control
Patient Safety
Checking equipment
Consent
Information
Non-invasive radiology
Registered Nurse/HCA
Registered/HCA/Doctor
Ward staff
Registered nurse/diabetic specialist
nurse
Registered/HCA
Registered
nurse/pharmacist/doctors
Registered nurse/infection control
nurse
Registered nurse/medical
electronics/equip library
KEY ELEMENT
CLINICAL SKILLS

16
LEARNING OPPORTUNITIES RESOURCE/RELEVANT
PERSONEL/DEPARTMENT
Colo-Rectal
Anatomy-physiology
Disorders
Investigations
Infections
Treatment
Drugs
Role of nurse specialist
Support mechanisms
Hepato-Biliary
Anatomy-physiology
Disorders
Symptoms
Investigations
Treatment options
Drugs
Role of nurse specialist
Support mechanisms
Nutrition
Nasog – gastric tubes insertion
Naso jejunal tubes insertion
Nutrition nurse specialist
Support mechanisms
Registered nurses/nurse
specialist/doctors/books/computer
Microbiology/infection control
Pharmacy/registered
nurse/doctor/nurse
specialist/registered nurse
Registered nurse/nurse
specialist/doctors books/computer
Pharmacy/registered nurse/doctor
Hepato-biliary nurse specialist
Registered nurse/nurse
specialist/dietician/nurse
specialist/dietician

17
KEY ELEMENT
HEALTH DEVELOPMENT OPPORTUNITIES
LEARNING OPPORTUNITIES RESOURCE/RELEVANT
PERSONEL/DEPARTMENT
Healthy life style in relation to
Smoking cessation
Alcoholic liver disease
Bowel disorders
Cancer
Obesity
Diabetes
Eating for a healthy heart
Drug and alcohol abuse
Promotion of exercise
Healthy heart
Patient information leaflets and
Health
Promotion unit

18
KEY ELEMENT
MANAGEMENT OF CARE
LEARNING OPPORTUNITES RESOURCE/RELEVANT/
PERSONEL/DEPARTMENT
Nursing process
Assessment
Who assesses
How is assessment carried out/open
or closed questions
What is assessed
Where does it take place
Planning
Care plans
Risk assessment tools
Care pathways
Multi disciplinary plan/working
Referrals to other agencies
Specialist nurses
Implementation/Evaluation
MDT
Documentation
Standards
Protocols
Policies
Communication/relative/patient
Time management
Planning priorities
Dealing with difficult situations
Patient property
Religious needs
Registered nurse/pre-assessment
nurse
Source of information
Patient,relatives,doctor,pharmacist,
notes
District nurses,specialist nurse
Registered nurse
MDT
Registered nurse
Registered nurse
Registered nurse
Registered nurse
Registered nurse
Registered nurse/royal marsden
Handbook/intranet
Registered nurse/doctor/nurse
specialist
Registered nurse
Registered nurse
Registered nurse/doctor/nursing
manager
General office/registered nurse
Registered nurse/hospital/chaplain
priest

19
KEY ELEMENT
ORGANISATIONAL AND MANGERIAL ISSUES
LEARNING OPPORTUNITIES RESOURCE/RELEVANT/
PERSONAL/DEPARTMENT
Managing a team
Organisational skills
Delegation skills
Prioritising skills
Time management
Leadership
Off duty
Managing patient work load
Quality
Standards of care
Implementing change
Documentation
Giving information to
Staff
Doctors
Patients
Relatives
Multi-disciplinary team members
Other departments
Resources
Stock control
Drugs
Materials management
Non stock
Stationary
Establishment/skill mix
Budget control
Managing risk
Policies and procedures
Equipment safety checks
Quality control
Weekly environment checks
Infection control
Moving and handling
Emergency situations
Cardiac arrest
Fast bleep system
Registered nurse/nurse managers
Registered nurse
Registered nurse/doctors
Registered nurse/all ward staff
Sister
Sister/E grade staff nurse
Registered nurse
Registered nurse/audit tools/spec
nurse
Registered nurse
Registered nurse
Clerical/registered nurse
Sister/nurse manager
Sister/registered nurse
Registered nurse/doctor
Registered nurse/doctor
Registered nurses
Registered nurses/doctors
Registered nurse/pharmacists/stores
Registered nurse/pharmacists
Registered nurse/stores/material
manag
Sister/charge nurse/stores dept
Sister/charge nurse/clerical
Sister
Sister
Sister/registered nurse/computer
Health &
Safetyofficer/elect/housekeeper
Health & Safety officer
Unit nurse
Control of infection sister
Moving and handling co-ordinator

20
Violent incidents
Fire
Staff developments
Clinical supervision
Reflective practice
Cardiac arrest team/registered nurse
Registered nurses/switchboard
Registered nurse/security officer
Fire officer/registered nurse
Registered nurses
Registered nurses

21
MULTIPLE GASTROINTESTINAL BIOPSIES
The millipore filter is a disc of up to 12 squares wide and which are approximately 3mm2. A strip of the filter paper two squares wide will be provided. At endoscopy, place the biopsies in sequence starting at the pointed end and as close as possible to the bottom edge of the filter paper strip (as below).
Once the endoscopy has finished and all the biopsies have been taken (no more than 6 should be put on a strip), place the millipore strip into a universal container with sufficient formalin, for processing in the laboratory. If you have taken more than one strip of biopsies, then put each strip in a different universal container. This procedure should not be used for macroscopic polyps which should be sent in separate pots as previously. Potential savings are 1. Less handling of the tissue 2. Fewer specimen pots are required for each investigation 3. For upper gastrointestinal biopsies a greater range of special stains can be
applied as a routine. Ref: J Clin Pathol 1992; 45: 751-755 ACP Broad sheet 132

22
SCOPE TYPE SCOPE NO:
SERIAL NO:
CHANNEL SIZE
DISTAL END SIZE
SERVICE CONTRACT & EXPIRY DATE
GASTROSCOPES GIFIT240 A 0910 2030109 3.7mm 10.9mm Keymed 28/02/08
GIFIT240 B 3410 2430266 3.7mm 10.9mm Keymed 31/03/08
GIFIT240C 2710 2630363 3.7mm 10.9mm Keymed 26/02/10
GIFXQ230 A 0808 2715463 2.8mm 9.2mm T.B.S. 28/02/08
GIFXQ230 B 0308 2715462 2.8mm 9.2mm Keymed 28/02/08
GIFP230 0608 2700475 2.2mm 8.7mm T.B.S. 28/02/08
GIF2T240 4113 2430754 L 2.8mm R 3.7mm
11.8mm Keymed 31/03/08
XQ260A 3508 2521986 2.8mm 9.0mm Keymed 31/03/08
XQ260B 3608 2521994 2.8mm 9.0mm Keymed 31/03/08
GIFQ230 A 0708 2701460 2.8mm 10.5mm T.B.S. 28/02/08
EUS SCOPES
EG383 OUT 3214 E110021 3.8mm 12.8mm Pentax no contract
EG363 OUR 3110 E110164 2.4mm 12.1mm Pentax no contract
EG363 OU 3314 E110215 2.4mm 12.1mm Pentax no contract
COLONOSCOPES
CF240DLA 2908 2300127 3.2mm 12.2mm Keymed 24/04/08
CF240DLB 3008 2300129 3.2mm 12.2mm Keymed 02/06/08
CF240AL 2208 2010126 3.2mm 12.2mm Keymed 28/02/08
CF240L 1708 2900394 3.2mm 12.2mm Keymed 28/02/08
CF230L 2110 2700892 3.2mm 13.6mm No contract
IT200LA 1810 2500236 4.2mm 15.4mm T.B.S 28/02/08
IT200LB 1910 2700275 4.2mm 15.4mm T.B.S. 28/02/08
GIFQ260DLA 3708 2510218 3.2mm 12.2mm Keymed 31/03/08
GIFQ260DLB 3808 2510225 3.2mm 12.2mm Keymed 31/03/08
GIFQ260DLC 3908 2510232 3.2mm 12.2mm Keymed 31/03/08
GIFQ260DLD 4008 2510242 3.2mm 12.2mm Keymed 31/03/08
CFH260AL 2808 2700551 3.7mm 13.2mm Keymed 26/02/10
DUODENOSCOPES
TJF200 2309 2700798 4.2mm 13.0mm T.B.S. 28/02/08
TJF240 2509 2030238 4.2mm 13.5mm Keymed 28/02/08
JF230 2409 2700995 3.2mm 12.0mm Keymed 28/02/08
TJF260V 2609 2700282 4.2mm 13.5mm Keymed 18/02/10
BRONCHOSCOPES
LF-02 1602 2714612 1.5mm 4.1mm Keymed / Theatre
LF-GP 4202 1212730 1.5mm 4.1mm Keymed /Theatre
LF-TP 4302 1001547 2.6mm 5.2mm Keymed /G.I.T.U.
Company Service Contract - Contact numbers: KEYMED 01702 616333 TBS (MDS) 01702 608728 Hitachi (pentax) 01933402111

23
Equipment requiring endoscopes with certain dimensions
SIX SHOOTER BANDER (9.5-13mm distal end) 2.8mm channel size.
N.J. TUBES 8fr (3.2mm) 10fr (3.7mm)
COLONIC STENTS 3.7mm minimum channel size.
GOLD PROBE 7fr (2.3mm) 10fr (3.2mm)
PAEDIATRIC SCOPE (P230) forceps FB-241K blue handle
OVER TUBES short (8.6-10mm) long (10.0 – 11.7mm)

24
Cleaning and disinfection of equipment used for gastrointestinal flexible endoscopy
Immediately post procedures perform the following:
Wipe down scope immediately post procedure with a gauze swab warm water and detergent
Suck through suction channel until suction runs clear or for at least 10 seconds
Blow and bubble with air water valve for at least 10 seconds
Remove air water valve and replace with flushing valve depress this for ten to 15 seconds with tip under water
Dispose of biopsy bung if biopsies have been taken
Place scope in a plastic disposable transportation tray or bag and place in stack marked contaminated scopes outside cleaning room
Endoscopy cleaning room:
Fill sink with warm water to marked level on sink and press button on wall for measured amount of enzymatic cleaner.
Ensure leak test cap is in place switch on leak tester, attach to leak test cap.
Using large then small angulations wheels check that angulations are working check for air leaks at distal tip.
Immerse all of the scope in the sink and check for leaks. If a leak is seen wipe external surface of scope with alcohol wipes and leave on clean waterproof towel, inform endoscopy staff to arrange repair.
Switch off leak detector and leave attached for 30 seconds to deflate.
Using the flushing devise flush all channels with diluted enzymatic fluid at least 3 times.
Use 5ml syringe + connector to flush back channels where fitted with dilute enzymatic cleaner.
Cleaning brushes can be found on the first shelf to the left of the sink.
Brush distal end with large end of cleaning brush paying particular attention to air water outlet and bridge elevator if fitted.
Brush around biopsy channel, suction and air water ports brush down these channels with large end of brush for approximately 1 inch with the scope under water.
Internal cleaning process:
With the scope fully immersed brush through at least three times from each port with small end of cleaning brush, cleaning brush each time it emerges.
1. Brush from biopsy port until brush emerges from distal end. 2. Brush through suction port and down until brush emerges
from distal end. 3. Brush from suction port though umbilical cord until brush
emerges from suction connector.

25
On endoscopes with a raiser bridge attach a bridge channel adapter and flush with dilute enzymatic solution found on back of sink and a 2 ml syringe
Using an all channel irrigation device; Blue for 230 series Green for 240 and 260 series
Flush 60mls of dilute enzymatic cleaner down each port on device.
The scope is now ready to connect to the Labcaire Washer Disinfector for disinfecting
All valves should be scrupulously cleaned
Rinse water bottle and dry

26
Cleaning Pentax E.U.S. Scopes
Immediately after removal from patient.
1. Remove balloon and securing „o‟ ring. 2. Wipe down scope with a gauze swab in warm water with detergent.
3. Depress valves to suck and blow channels clear.
4. .Remove balloon valve and put on white cap, remove air water and
suction valves and put in channel separator.
5. Place distal end in sink and suck through for 5 seconds.
6. Remove scope from processor and put on metal cap, remove relay end from Hitachi machine and secure in metal box.
7. Ensure metal water resistant cap is on scope (do not put box in sink).
8. Place in carrying tray, cover and send to cleaning
In Cleaning Room 1. Leak test box (do not release pressure as this makes air tight seal.) 2. Leak test as usual on tree and release pressure. 3. Remove all valves. Clean them with small brush and place in ultrasonic
cleaner for 30mins. Then disinfect. 4. Place white cap on balloon port and screw channel separator in place and put clean biopsy cap over biopsy port. 5. Flush back channel with dilute enzymatic solution, 10mls in 10ml syringe x
3. 6. Flush bridge wash channel with dilute enzymatic solution, 2mls in 2ml
syringe x 3, moving bridge, to dislodge any tissue. 7. Plug flushing adaptor into water bottle port, block suction port on tree with
finger and flush 60mls of dilute enzymatic solution through adapter. Then flush 60mls of solution through suction port with biopsy cap in place and with flushing adapter still in water bottle port.
8. Clean ports and bridge with a small brush. Clean raiser bridge carefully
with an orange stick covered with cotton wool. 9. Remove white balloon cap and red and blue washing valves. 10. Brush at least 3 times or until clean, from suction port on tree to suction
valve.

27
11. Brush at least 3 times or until clean, from suction valve to balloon port with
white cap off. 12. Brush at least 3 times or until clean, from biopsy port to tip. 13. Replace white balloon cap, washing valves and place the clean biopsy
cap over biopsy port. 14. Repeat steps 6. 7. & 8. 15. Endoscope is now ready for chemical disinfection.

28
Returning an endoscope for repair
Failed leak test after use:
Remove gross debris, with solution of water and enzymatic cleaner. Then dry exterior of scope and wipe down with alcohol.
Mechanical or electronic fault:
Reprocess as normal. 1. Remove I.D. disc from scope, place it in a small white autoclave bag
and label it with scope no: stick it to bottom of white board in cleaning room. Complete movement details on board. Also remove all caps and valves.
2. Fill in appropriate decontamination certificate and pack this along with the scope in the correct case. (check serial numbers)
3. Refer to back page of scope movement record book, for maintenance contract details.
4. Note, model, serial no. and maintenance contractor.
Keymed - 01506416655 courier tel. #61384
M.D.S./T.B.S. - 01702608728 courier tel. #861383
HITACHI (pentax) - 01933402111
Inform them you are returning a scope for repair, they will require: contact name, decontamination status, details of fault, scope model and serial no. Request a loan scope of equal specification.
5. Fill in ALL details in scope movement book. Arrange for appropriate courier to pick up scope from stores between 08.30 and 15.30. They will require hospital post code : NE7 7DN. Phone stores they will pick up the scope from the department for collection by the courier, for return to Keymed/T.B.S.(MDS)
6. Pentax scopes are returned via medical electronics. Receiving a loan scope:
Document, date, type, serial no. and contractor‟s name, in scope movement log
Attach pt. I.D. label onto scope & case with above details
Fill in scope movement details on white board in cleaning room
Receiving repaired scope:
Complete paperwork in log book.
Attach I.D. disc.
Pack up loan scope with decontamination certificate and arrange return of loan equipment.

29
Self Disinfect Process for Labcaire Washer Disinfector
The self disinfect process is controlled by a step by step procedure that is displayed on the screen of the control panel. The process is controlled by the left hand control panel only. Before commencing the self disinfect cycle, the control panel must display the auto ready screen.
The procedure:
1. Remove scope connector and connect the self disinfect outlets. Make sure that they are firmly in place.
2. Empty the detergent container, rinse and place in the front of the tray with the opening towards the drainage outlet.
3. Close the machine and press proceed. 4. Wait as the water filtration trolley drains some water away to the
drain, which brings the water in the tank down to the correct level. 5. The screen will prompt you to add the Autosan solution to the
filtration tank. 6. Another menu will come up asking for when the self disinfect is
required either now or 1st, 2nd or 3rd day. 7. When the process is completed the printer will print out details of
whether the process has passed or failed. I f failed for no obvious mistake made in the processing, contact maintenance for appropriate action.
8. If the process is satisfactory, open the machine and place a small quantity of detergent into the container and then fill it up with sterile water, rinse the filters under the running tap.
9. Top up the alcohol bottle. 10. Clean the machine with wet blue roll and detergent both internally
and externally. Wipe the detergent off with clean wet blue roll. Wipe the tray and the non plastic part of the interior with alcohol wipes.
11. Replace the scope connections, ready for use. 12. Complete the paper work in the appropriate file and then sign the
necessary documentations.

30
Newcastle upon Tyne Hospitals NHS Foundation Trust
Endoscopy Services
Guidelines for Performing Endoscopic Procedures as Day Cases in Patients with Diabetes
These guidelines are based on expert opinion and pragmatism rather than robust evidence. The following guidelines are for preparing diabetic patients who are well controlled, fit (without major co morbidity) and are able to check capillary glucose levels. All Diabetics must have a pre procedure assessment. Insulin Dependent Diabetics requiring therapeutic procedures should be day case in patients & have a GKI if necessary. Diabetic patients who are controlled by diet alone should follow normal non diabetic preparations and can be on am or pm lists. 1. Gastroscopy: Gastroscopy (especially diagnostic) is a relatively short procedure and can easily be performed as a day case procedure provided every effort is made to perform such procedures first on the morning list. Gastroscopy in Insulin Dependent Diabetic patients:
Patients should not eat anything from midnight, but may drink water (or Lucozade if required) up to 2 hours before appointment time.
Patients should omit morning dose of insulin, unless this is insulin
glargine (Lantus) which should be given as usual.
Patients should check capillary blood glucose first thing in the morning and drink Lucozade (one glass; ~200 ml) if glucose 4 mmol/l or less.
Patients should bring insulin with them to the Endoscopy Unit.
On arrival at the Endoscopy Unit, the patients blood glucose must be
checked by endoscopy nurse before the procedure – ensure 5 mmol/l.
Post procedure:
If before 11 am, as soon as the patient can safely eat give usual morning dose of insulin and carbohydrate equivalent to usual breakfast If pre-lunch, on basal/bolus regimen, as soon as the patient can safely eat, give usual quick-acting lunchtime insulin and lunch carbohydrate If pre lunch on twice daily insulin, as soon as the patient can safely eat give half doses of the pre-breakfast usual insulin(s) and lunch carbohydrate
Check blood glucose hourly until next meal.

31
Gastroscopy in Diabetic Patients on oral hypoglycaemic agents
Patients should not eat anything from midnight, patients may drink water (or Lucozade if required) up to 2 hours before appointment time.
Patients should omit morning dose of oral hypoglycaemic agent.
Patients should restart usual tablets and diet with the first meal post
endoscopy.
Patients on Chlorpropamide and Glibenclamide should possibly be converted to short acting sulphonylureas (e.g. Gliclazide) at least 48hrs prior to endoscopy to prevent hypoglycaemia. Patients should contact their own diabetic team for advice.
2. Flexible Sigmoidoscopy:
Patients should not alter medication or eating routine 3. Colonoscopy: Colonoscopy is more of an issue as this requires a more prolonged period of preparation prior to the procedure. Outpatients should always have their procedure first on the morning list. Colonoscopy in Diabetic patients who are Insulin Dependent or on oral hypoglycaemic agents
Patients should do regular checks of blood glucose (at least before each meal and at bed time) in the 48hr period prior to the procedure.
Day prior to colonoscopy: Patients should –
Start their preparation as instructed at 8am on the morning before the procedure
Drink plenty of fluids during the preparation period as instructed (at least 6 pints during the day)
Patients should follow bowel preparation leaflet but in place of diet take one Enlive Plus drink each for breakfast, lunch, evening meal and supper (total of 4). The entire contents of the cartons must be drunk. If blood glucose low at any point take a drink of Lucozade (1 glass; ~200 ml). Continue usual insulin/oral agents during this time. Consult your own diabetes care team if you are unsure what to do.
Day of colonoscopy:
Omit their morning dose of insulin and/or oral hypoglycaemic tablets on the morning of the procedure unless this is insulin glargine (Lantus) which should be given as usual.
Patients may drink water (or Lucozade if required) up to 2 hours before appointment time.

32
Check their blood glucose before leaving home for the hospital where the procedure will be performed.
On arrival at the Endoscopy Unit, your blood glucose will be checked
by endoscopy nurse before the procedure – ensure 5 mmol/l After the procedure, patients should have their blood glucose checked
and insulin or oral hypoglycaemic agent administered as per instructions for gastroscopy when patient has recovered from sedation and ready to eat.
Patients with multiple co morbidity and those who are frail or for any reason unable to regularly check their blood glucose levels should be admitted for in-patient preparation and probably have a glucose-potassium-insulin infusion for their procedure.
The same should apply to patients who have planned complex therapeutic colonoscopy procedures.

33
Newcastle upon Tyne Hospitals NHS Foundation Trust
Endoscopy Services
Guidelines for Diabetic Patients attending for Gastroscopy as a Day Case
All diabetic patients on Insulin or Oral Hypoglycaemic Tablets should have a pre procedure
assessment and be first on the morning list
Does the patient take Insulin or
Oral Hypoglycaemic Tablets
Patient follows
normal
Non diabetic preparation &
can be on am or
pm list
No
Yes
What type of treatment does
the patient have?
Oral Hypoglycaemic
Tablets
Insulin
Omit morning dose
Bring medication to hospital
Monitor Blood Glucose - if
4mmol/l or less drink 1x 200ml
glass of Lucozade
Omit morning dose of insulin unless
Insulin Glargine (Lantus) which should
be given as usual
Nothing to eat from 12 midnight,
may drink water (or lucozade if
required) up to 2hours prior to test
Restart tablets and diet with first
meal post procedure
Nothing to eat from 12 midnight, may
drink water (or lucozade if required)
up to 2hours prior to test
Monitor Blood Glucose - if 4mmol/l or
less, drink 1x 200ml glass of Lucozade
Bring Insulin to hospital
Post procedure, if
before 11am – usual
insulin dose &
carbohydrate
equivalent to usual
breakfast
Post procedure, if pre
lunch on bolus regime
- give quick acting
lunchtime insulin &
usual lunch
carbohydrate
Post procedure, if pre
lunch on twice daily -
give half usual dose of
pre breakfast insulin(s)
& usual lunch
carbohydrate
Patient to have blood glucose checked
on arrival to ensure
5 mmol/l or more
(See Day case Protocol)
Check blood glucose hourly until
next meal
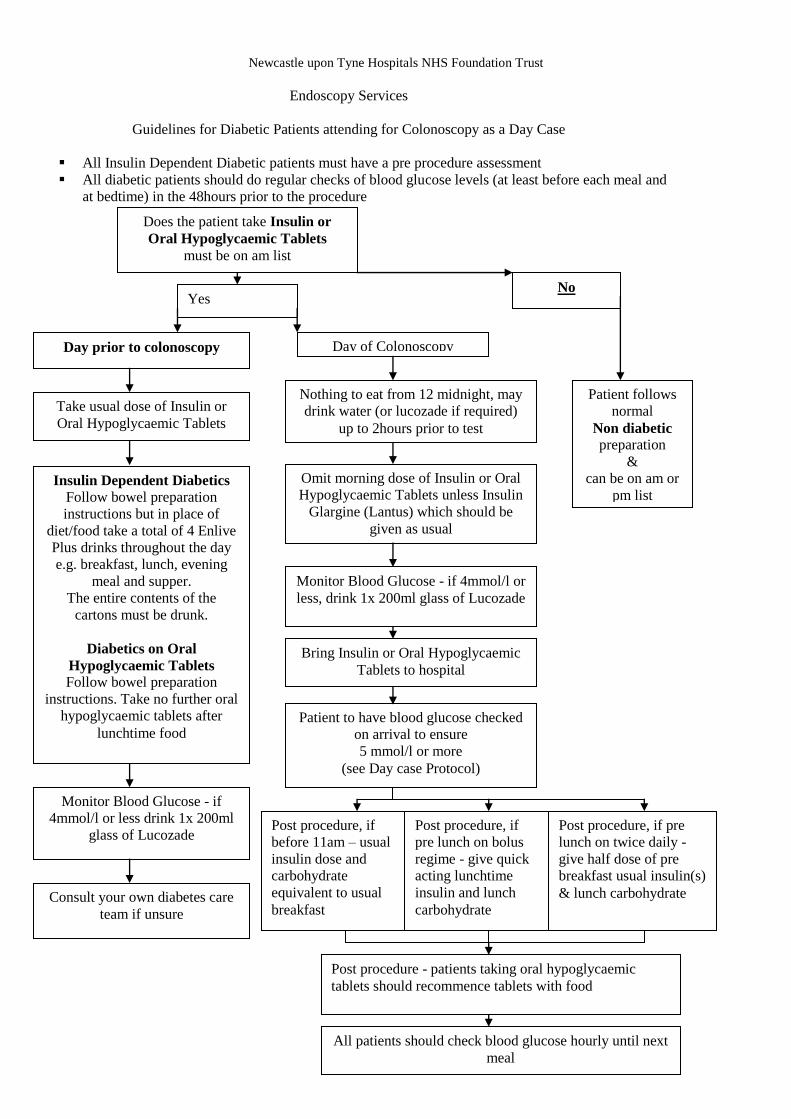
34
Newcastle upon Tyne Hospitals NHS Foundation Trust
Endoscopy Services
Guidelines for Diabetic Patients attending for Colonoscopy as a Day Case
All Insulin Dependent Diabetic patients must have a pre procedure assessment
All diabetic patients should do regular checks of blood glucose levels (at least before each meal and
at bedtime) in the 48hours prior to the procedure
Does the patient take Insulin or
Oral Hypoglycaemic Tablets
must be on am list
Patient follows
normal
Non diabetic preparation
&
can be on am or
pm list
No Yes
Day prior to colonoscopy Day of Colonoscopy
Monitor Blood Glucose - if
4mmol/l or less drink 1x 200ml
glass of Lucozade
Omit morning dose of Insulin or Oral
Hypoglycaemic Tablets unless Insulin
Glargine (Lantus) which should be
given as usual
Take usual dose of Insulin or
Oral Hypoglycaemic Tablets
Consult your own diabetes care
team if unsure
Nothing to eat from 12 midnight, may
drink water (or lucozade if required)
up to 2hours prior to test
Monitor Blood Glucose - if 4mmol/l or
less, drink 1x 200ml glass of Lucozade
Bring Insulin or Oral Hypoglycaemic
Tablets to hospital
Post procedure, if
before 11am – usual
insulin dose and
carbohydrate
equivalent to usual
breakfast
Post procedure, if
pre lunch on bolus
regime - give quick
acting lunchtime
insulin and lunch
carbohydrate
Post procedure, if pre
lunch on twice daily -
give half dose of pre
breakfast usual insulin(s)
& lunch carbohydrate
Patient to have blood glucose checked
on arrival to ensure
5 mmol/l or more
(see Day case Protocol)
All patients should check blood glucose hourly until next
meal
Insulin Dependent Diabetics Follow bowel preparation
instructions but in place of
diet/food take a total of 4 Enlive
Plus drinks throughout the day
e.g. breakfast, lunch, evening
meal and supper.
The entire contents of the
cartons must be drunk.
Diabetics on Oral
Hypoglycaemic Tablets
Follow bowel preparation
instructions. Take no further oral
hypoglycaemic tablets after
lunchtime food
Post procedure - patients taking oral hypoglycaemic
tablets should recommence tablets with food

35
Newcastle upon Tyne Hospitals NHS Foundation Trust
Endoscopy Services
Guidelines for Patients with Diabetes attending as Day Cases for Endoscopic Procedures whilst in the Endoscopy Unit
Pre procedure:
All diabetic patients to have pre procedure Blood Glucose Level checked to ensure 5mmol/l or above
All insulin dependent diabetics have IV access in situ for any endoscopic procedure with or without sedation
Blood Glucose Range:
< 3.3 mmol/l Inform Endoscopist - follow NUTH Guidelines for the Treatment of Hypoglycaemia in Hospital (found on Intranet)
4-7 mmol/l optimal level for fasting blood glucose
> 11 mmol/l Inform Endoscopist
Post procedure:
Follow NUTH Guidelines for performing Endoscopic procedures as Day Cases in Diabetic Patients
All diabetic patients to have Blood Glucose Level checked prior to discharge
If Blood glucose > 11mmol/l patient advised to have follow up with GP or Diabetic Centre, NGH.
Guidelines on the Trust Intranet:
NUTH Guidelines for Management of Patients with Diabetes during surgery
Guidelines for Diabetes management using Glucose Insulin Potassium (GKI) Infusion.
Guidelines for the Treatment of Hypoglycaemia in Hospital
Guidelines for the Management of Hyperglycaemia Emergencies

36
Guidelines on the Management of Anticoagulation for Endoscopic Procedures
1. The decision to reverse anticoagulation and the extent of anticoagulation reversal should be
individualised, weighing the risk of thromboembolism against the risk of continual bleeding.
2. A supratherapeutic INR may be corrected with the infusion of fresh frozen plasma. Correction
of the INR to 1.5 or less permits effective endoscopic diagnosis and therapy.
3. In cases of acute bleeding and the need for emergency Endoscopy, Beriplex is probably the
treatment of choice for reversal of INR but liaison with the on–call Haematologist and reference
to the INR reversal document is advised
4. Reinstitution of anticoagulation should be individualised.
5. Recommendations for the management of anticoagulation, aspirin and Clopidogrel use in
patients undergoing endoscopic procedures based on relative risks of the procedure and
underlying condition.
6. Patients should have INR check on day of or day prior to Endoscopy
High risk condition Low risk condition
High Risk
Procedures
Discontinue Warfarin 5 days before procedure
Consider IV Heparin while INR is below
therapeutic level, stop 4hrs before time of
procedure
Discontinue Warfarin 5
days before procedure
Re-institute Warfarin
after procedure
Low Risk
Procedure
No change in anticoagulation.
Elective procedures should be
delayed while INR is in
supratherapeutic range
Discontinue Warfarin 5
days before procedure
Re-institute Warfarin
after procedure
High Risk Procedures
Polypectomy
Biliary sphincterotomy
Pneumatic or bougie dilatation
Endosonographic guided fine needle
aspiration
PEG placement
Laser ablation and coagulation
Treatment of varices
Low Risk Procedures
Diagnostic
- OGD +/- biopsy
- Flex sigmoidoscopy +/- biopsy
- Colonoscopy +/- biopsy
ERCP without sphincterotomy
Biliary/pancreatic stent without
sphincterotomy
Endosonography without fine needle
aspiration
Enteroscopy
High Risk Conditions
Atrial fibrillation associated with
valvular heart disease
Mechanical valve in the mitral
position
Mechanical valve and prior
thromboembolic event
Thromboembolic event less than 4
weeks previously
Anti-phospholipid syndrome
INR target range greater than 3.0
Low Risk Conditions
Deep vein thrombosis over 12 weeks ago
Uncomplicated or paroxysmal non-valvular
arterial fibrillation
Bio prosthetic valve
Mechanical valve in the aortic position, but
if patient’s normal INR target range is
greater than 3.0 seek advise from
cardiologist
Aspirin and Clopidogrel Use (High Risk Procedures)
In the absence of a pre existing bleeding disorder, endoscopic procedures may be performed.
Emergency procedures – proceed immediately, give platelets if bleeding occurs
Urgent procedures - stop 48 hours pre procedure
Elective procedures - stop 10 days pre procedure Guidelines adapted from American Society for Gastrointestinal Endoscopy (2002). Guideline on the management of
anticoagulation and antiplatelet therapy for endoscopic procedures. Gastrointestinal Endoscopy, Vol 55 (7), 775-779
By Dr M Gunn Consultant Gastroenterologist, Dr P Kesteven Consultant Haematologist, L Hodgson Endoscopy Services Manager. Date of origin July 2007 Review Date July 2008

37
Endoscopy Services
Policy for withdrawal of consent during an endoscopic procedure
The purpose of this guideline is to assist clinicians and endoscopy staff when confronted with the situation where a patient wishes to withdraw consent whilst undergoing an endoscopic procedure. It also offers some practical guidance within the clinical setting. Introduction: The process of consent starts when options for treatment are first discussed with a patient in the GP surgery, outpatients department, or ward. It continues up to and during the procedure. If the process is to be meaningful, refusal must be one of the patient‟s options. Additionally, the patient is entitled to change their mind at any time. A component of the consent procedure is a discussion with the patient on alternative treatments or tests available for their condition. As part of this discussion, the patient should be made aware of the consequences should the procedure not be performed or completed. Where the patient has signed a consent form and subsequently changes their mind, the person taking consent or the endoscopist performing the procedure (and where possible the patient) should note this on the consent form. However, this information must be documented in the medical notes. Guidance: Directly before their procedure, the patient should have the opportunity to discuss this guideline either with the nurse looking after them or the endoscopist. The patient should be informed that:
The procedure will only be carried out with their consent.
They can withdraw their consent at any time throughout the procedure.
In the event of a life-threatening situation, the endoscopist will decide whether to continue the procedure based on the patients best interests.
The Sedated Patient (All Procedures): Sedation used for all endoscopic procedures is „conscious sedation‟. This has been defined as “a technique in which the use of drug or drugs produces a state of depression of the central nervous system enabling treatment to be carried out, but during which verbal contact with the patient is maintained throughout the period of sedation. The drug and techniques used to provide conscious sedation should carry a margin of safety wide enough to render loss of consciousness unlikely”. If purposeful or verbal responsiveness is lost the patient requires a level of care identical to that needed for general anaesthesia.
Safety and sedation during endoscopic procedures BSG Guidelines 2003
When a patient has been sedated it is a reasonable assumption that the patient has impaired ability to give valid consent. The anticipated effect of sedation is that the patient will be able to communicate, but is in a relaxed state. However, sedation is unpredictable and patients are unreliably affected.

38
Assessing capacity during a procedure can be difficult. Therefore, the decision to stop the procedure is a matter of clinical judgement. There needs to be a balance between the level of distress being experienced by the patient and the need to complete the endoscopy at that time. If the patient wishes the procedure to be stopped whilst under the influence of conscious sedation: “The endoscopist should try to establish whether the patient has capacity to withdraw a previously given consent. If capacity is lacking, it may be justified to continue in the patient’s best interest”
“Reference Guide to Consent to Examination or Treatment” DOH: Chapter 1;18.1
In addition to the endoscopist, nurses attending the patient during the procedure have a duty to minimise the risk to patients. Doses of sedation or analgesia can be repeated according to clinical need. However, in certain types of patients e.g. liver disease, increased doses of sedation can cause increased confusion/disinhibition rather than increased co-operation or tolerance to the procedure. Additionally, increased doses of sedation can induce respiratory depression, a potentially life-threatening condition. General: Once concern has been raised by either the patient or the nurse during the procedure, the endoscopist should stop the procedure and assess the situation. In some instances it will be in the patients best interest to continue the procedure and complete a specific aspect of the procedure e.g. duct clearance or stent insertion. It may also be possible reduce patient discomfort eg by reducing looping of the colonoscope or to increase sedation, with the caveats as above. This should be fully explained to the patient. If the patient clearly wishes the procedure to stop despite these manoeuvres and understands the consequences of that decision then that decision should be respected. Audit: Is there is disagreement between the nurses attending the patient and the endoscopist, the event will be reviewed afterwards. An Adverse Clinical Incident (ACI) form will be completed as per Trust policy, and will be discussed at the quarterly clinical governance meeting. References: Good Practice in consent Implementation Guide: Consent to Examination or Treatment. Department of Health November 2001. DOH 25751 1p10K Reference Guide to Consent to Examination or Treatment DOH October 2002: 24811 3p 15k
Seeking patients consent, the ethical considerations. GMC guidelines November 1998 Safety and sedation during endoscopic procedures BSG Guidelines September 2003 Code of Professional Conduct (2002) Nursing and Midwifery Council Information produced by Dr Nick Thompson Adapted from Gloucester Endoscopy Unit 24-3-06

39
Newcastle upon Tyne Hospitals NHS Foundation Trust
Moving & Handling Protocol - Endoscopy Unit
Please assess and record score for all patients attending for Endoscopy
1
2
Mobile patients having throat spray
Partially dependant or dependant patients
having throat spray
Assessment
Patient able to climb on and off trolley
and position themselves unaided.
Assessment
Patient may require assistance onto the
trolley and to position themselves.
Method
place trolley in procedure room at
lowest height
provide a step if fixed height trolley
in use
ask patient to climb onto trolley
ask patient to position themselves in
the required position
position trolley at correct working
height if adjustable
Method
place trolley in procedure room at
required height
using an approved handling technique
and a minimum of 2 people, assist
patient onto trolley (PAT slide or
hoist should be used if necessary)
assist patient if necessary using a
slide sheet and a minimum of 2
people, sliding not lifting
position trolley at correct working
height, if adjustable
Recovery
ask patient to sit up on trolley,
allowing time to recover
lower trolley height, if adjustable
ask patient to climb down from
trolley, using step if necessary
give any required information and
discharge
Recovery
using an approved handling technique
and a minimum of 2 people sit patient
up on trolley and raise back rest,
allow time to recover, lower trolley
height
using an approved handling technique
and a minimum of 2 people, assist
patient from trolley into chair /
wheelchair or onto their feet (a hoist
should be used if necessary)
if transfer to another trolley required,
use PAT slide and a minimum of 4
people
give required information and
discharge

40
3
4
Mobile patients having sedation Partially dependant or dependant
patients having sedation
Assessment
Patient able to climb on and off trolley
and position themselves unaided.
Assessment
Patient may require some assistance
climbing onto trolley and to position
themselves.
Method
place trolley in procedure room at
lowest height
provide a step if fixed height trolley
being used
ask patient to climb onto trolley
ask patient to position themselves in
the required position
position trolley at correct working
height, if adjustable
Method
place trolley in procedure room at
lowest height
using an approved handling technique
& a minimum of 2 people, assist
patient onto trolley (a hoist or PAT
slide should be used if necessary)
encourage patient to position
themselves in the required position
assist if necessary using an approved
handling technique, slide sheet and a
minimum of 2 people, sliding not
lifting
position trolley at correct working
height, if adjustable
Recovery
push trolley from procedure room to
recovery area using 2 people
when recovered, ask patient to sit up,
raise back rest
lower trolley to lowest height, if
adjustable
ask patient to climb down from
trolley, using step if necessary, walk
to chair, assist if necessary
discharge patient when discharge
criteria met
Recovery
push trolley from procedure room to
recovery area using 2 people
when recovered, using an approved
handling technique sit patient up,
raise back rest
lower trolley to lowest height, if
adjustable
using an approved handling technique
and a minimum of 2 people assist
patient to chair / wheelchair (a hoist
should be used if necessary)
discharge patient when discharge
criteria met

41
5
6
Dependant patients unable to fully
weight bear, unsteady on feet but able
to stand with support having sedation
Dependant patients unable to weight
bear having sedation
Assessment
Patient requires assistance on and off
trolley.
Assessment
Patient requires assistance to move,
unable to move themselves.
Method
place adjustable height trolley in the
procedure room at its lowest height
bring patient into procedure room in
wheelchair if necessary
using an approved handling technique
and a minimum of 2 people, assist
patient onto trolley and lie in correct
position (hoist or slide sheet should
be used if necessary)
if patient requires transfer, trolley to
trolley, use PAT slide and a minimum
of 4 people
position trolley at correct working
height
Method
place adjustable height trolley in the
procedure room at the required height
bring patient into procedure room
using an approved handling technique
and a minimum of 2 people, assist
patient onto trolley and lie in correct
position (hoist or slide sheet should
be used if necessary)
if patient requires transfer, trolley to
trolley, use PAT slide and a minimum
of 4 people
position trolley at correct working
height
Recovery
push trolley from procedure room to
recovery area using 2 people
if necessary, using an approved
handling technique and a minimum of
2 people, help patient to change
position using slide sheet, sliding not
lifting
when recovered, using an approved
handling technique and a minimum of
2 people, sit patient up & raise back
rest, lower trolley to lowest height
using an approved handling technique
and a minimum of 2 people assist
patient to chair / wheelchair (a hoist
should be used if necessary)
discharge patient when discharge
criteria met
Recovery
push trolley from procedure room to
recovery area using 2 people
if necessary, using an approved
handling technique and a minimum of
2 people, help patient to change
position using slide sheet, sliding not
lifting
when recovered, using an approved
handling technique and a minimum of
2 people, sit patient up & raise back
rest, lower trolley to lowest height
using an approved handling technique
and a minimum of 2 people assist
patient to wheelchair (a hoist should
be used if necessary)
if ambulance, transfer patient to
ambulance stretcher using an
approved handling technique with
PAT slide and a minimum of 4 people
discharge patient when discharge
criteria met

42
The Newcastle Upon Tyne Hospitals NHS Foundation Trust
Surgical Directorate - Endoscopy Services
Safety of Sedated Patients During Recovery Following Endoscopic Procedures
The Trust has a responsibility to ensure the safety of sedated patients during the recovery period following endoscopic procedures. Based on the following national guidelines1,2 and the Trust Intravenous Sedation Drug Policy3, the following criteria for the practice of recovering sedated patients are recommended. These should be implemented in all sites of the Trust where intravenous sedation is practiced.
Clinical monitoring of the patient should be undertaken continuously throughout the period of sedation and recovery
Pulse oximetry must be used on all sedated patients from the induction of sedation until the patient is assessed to be sufficiently recovered
Patients may require supplementary oxygen (2 litres O2 per minute) to be continued during the recovery period as instructed by Endoscopy Staff
There must be an appropriately trained qualified nurse whose responsibility is to provide dedicated monitoring and care for the sedated patients
Resuscitation equipment must be available in the treatment and recovery areas
A source of oxygen, high volume suction and a trolley which has the facility to tilt the patient head down must also be available
Day cases should be assessed as to their suitability for discharge home
The minimum criteria for discharge should include stable vital signs, the ability to walk without support, toleration of fluids, the ability to void urine, minimal nausea and adequate analgesia if required
Day cases must be accompanied home and supervised by a responsible adult for 24hours
Patients must be advised in writing not to drive, operate machinery, drink alcohol or sign any legal documents for 24hours
A written record of the sedation episode should be included in the patient notes. As a minimum this should include the drugs and dosage used, the site of venous access and a record of all clinical monitoring
References
1. Guidelines for Sedation by Non Anaesthetists. Royal College of Surgeons of England (1993) 2. Safety and Sedation during Endoscopic Procedures. British Society of Gastroenterology (2003) - update
from Recommendations for Standards of Sedation and Patient Monitoring during Gastrointestinal Endoscopy. British Society of Gastroenterology (1990)
3. NUTH Guidelines for the Practice of Intravenous Sedation (2000)

43
NEWCASTLE UPON TYNE HOSPITALS NHS FOUNDATION TRUST
Infection Control Committee
HAND HYGIENE POLICY Summary 1. Hands must be decontaminated immediately before each and every
episode of direct patient contact/care and after any activity or contact that potentially results in hands becoming contaminated.
2. Hands that are visibly soiled or potentially grossly contaminated with
dirt or organic material must be washed with liquid soap and water. 3. Apply an alcohol based hand gel or wash hands with liquid soap and
water to decontaminate hands between caring for different patients, or between different caring activities for the same patient.
4. All wrist and ideally hand jewellery (particularly stoned rings) should be
removed before hand decontamination. Cuts and abrasions must be covered with waterproof dressings.
5. Effective handwashing technique involves three stages: preparation,
washing and rinsing, and drying. Preparation requires wetting hands under tepid running water before applying liquid soap or an antimicrobial preparation. The handwash solution must come into contact with all surfaces of the hand. The hands must be rubbed together vigorously for a minimum of 10-15 seconds paying particular attention to the tips of the fingers, the thumbs and areas between the fingers. Hands should be rinsed thoroughly prior to drying with good quality paper towels.
6. When decontaminating hands using an alcohol based hand gel, hands
should be free of dirt and organic material. The handrub solution must come into contact with all surfaces of the hand. The hands must be rubbed together vigorously for a minimum of 15 – 30 seconds, paying particular attention to the tips of the fingers, the thumbs and the areas between the fingers, and until the solution has evaporated and the hands are left dry.
7. Apply a clinically compatible emollient hand cream regularly to protect
skin from the drying effects of regular hand decontamination. If a particular soap, antimicrobial handwash or alcohol causes skin irritation, complete an incident form and seek occupational health advice.

44
1 INTRODUCTION Health care workers should appreciate that hand washing is a complex practice which is important in providing quality care with minimal risk of infection. Good hand washing technique and practice assists greatly in reducing the spread of infection. Microorganisms are invisible to the naked eye and health care workers must be aware that their hands are sometimes responsible for cross infection. Normal flora or commensals on the hands are referred to as resident microorganisms. Resident microorganisms are usually present on the skin and protect against invasion by more harmful microorganisms. Transient microorganisms exist on the skin surface and can be viral or bacterial. They are termed “transient”, as they are transferable through direct contact with equipment, the environment or individuals. The ease with which these microorganisms can transfer makes hands extremely efficient vectors of infection. Transient microorganisms, unlike resident flora, are easily removed by hand washing. Therefore the risk of cross infection can be greatly reduced by adopting a good hand hygiene technique. A healthy person usually has defences against transient organisms; however, an ill person has an increased risk of cross infection. Effective hand washing with a liquid soap removes transient organisms and renders hands socially clean. This level of decontamination is sufficient for general social contact. The use of an antimicrobial liquid soap will remove transient microorganisms and reduce resident flora. The effective use of alcohol based hand gels on contaminated hands will also result in substantial reductions of transient microorganisms, although alcohol is not effective at removing dirt and organic material. However, alcohol based hand gels offer a practical and acceptable alternative to handwashing when the hands are not soiled and are recommended for routine use.
2 FACILITIES
All clinical areas should have
appropriate number and type of hand washing facilities appropriate to the area
clear unobstructed access to all hand washing sinks
hand washing sinks for that purpose only and clear of inappropriate items
hand washing sinks fitted appropriately with elbow or wrist operated mixer taps
liquid soap available at every sink
hand drying facilities must be readily available at every sink
hand washing posters should be placed by each sink
The Infection Control Team must be consulted before any new construction or refurbishment work is planned to advise on sink type, number and placement of hand washing facilities. Facilities in patients homes for hand washing may be not ideal. If necessary healthcare workers should be provided with appropriate liquid soap solution and paper hand towels. If hands are physically clean an alcohol hand gel may be applied if hand disinfection is required.

45
3 HANDWASHING TECHNIQUE
3.1 Preparation
Artificial nails and the wearing of nail polish may increase the microbial load on hands and should not be worn. Similarly higher bacterial counts have been reported when stoned rings are worn. Stoned rings and wristwatches must be removed prior to hand washing. Wedding bands must moved around during hand washing.
3.2 When, Why and How
SOCIAL HAND WASH
WHEN Before all routine tasks within general wards/departments and after every patient contact (hand disinfection may be required)
WHY To render hands socially clean and remove transient microbes
HOW A thorough wash with an acceptable liquid soap for 15-30 seconds
HAND DISINFECTION
WHEN During outbreaks of infection, in high risk areas and before aseptic procedures. Particularly after leaving source isolation areas. After contact with any secretions and excretions – even if gloves have been worn.
WHY To remove transient organisms and reduce resident flora
HOW A thorough wash for 15-30 seconds with an antimicrobial liquid soap or detergent e.g. chlorhexidine, povidone-iodine. In order to disinfect hands, apply an alcohol based hand gel.
SURGICAL HANDWASH
WHEN Prior to surgery or invasive procedure
WHY To reduce resident flora and to remove or destroy transient organisms
HOW Apply antimicrobial soap or detergent e.g. chlorhexidine or povidone-iodine (manufacturers‟ recommendations and instructions for use must be followed) to hands and forearms using a defined technique for a minimum of 2 minutes. Dry hands on a sterile towel. In operating theatres, between short cases only, hands may be disinfected by applying two or more applications of 80% alcohol based hand gel. Sterile nailbrushes should be used for nails only. Prolonged or abrasive scrubbing may damage the skin.

46
3.3 HOW TO WASH HANDS CORRECTLY AND REDUCE INFECTION
Wet Hands, apply hand washing agent and use the following procedure: -
(Adapted from Ayliffe GAJ, et al (1978) and Gould D (1994)
1. Rub palm to palm
2. Rub back of both hands 3.Rub palm to palm with fingers interlaced
4. Rub backs of fingers (interlocked)
5. Rub all parts of both thumbs 6. Rub both palms with finger
tips 7. Rinse hands under running water and dry thoroughly.

47
3.4 HOW TO APPLY ALCOHOL BASED HAND GELCORRECTLY
4. HANDWASHING AGENTS
There are three types of agent that can be used to remove microorganisms from hands: soap,
alcohol based hand gel and antimicrobial agents.
Soap
- will mechanically remove transient microorganisms but has little effect on resident microorganisms. However, hand
washing with soap is usually all that is necessary to prevent cross infection and protects staff and patients from acquiring
infection. The infection control team recommend the use of liquid soap in containers which supply a measured dose, and which cannot be topped up. This minimises the risk of microbial contamination.

48
Antimicrobial Agents- are designed to remove transient and reduce resident skin microorganisms. Chlorhexidine based preparations have been found to be more effective than iodine-based solutions as they have a residual effect which influences the survival times of many organisms on hand surfaces.
Antimicrobial agents should be used in situations when there is a need to reduce resident microbial flora, e.g. in operating theatres or similar departments or when dealing with patients in isolation and before performing an invasive procedure.
Alcohol-Based Hand Gels - can be applied quickly without access to water. However they are not effective in removing soiling and should only be used if hands are visibly clean.
Recent legislation advocates the use of alcohol based hand gels between each patient contact as a measure to reduce the incidence of healthcare acquired infections.
5. Hand Drying Agents
Drying hands with paper products is preferable to using hot air or linen towels. The use of hot air dryers should not be used in clinical areas as these spread airborne bacteria by re-circulating the surrounding environmental air.
Drying with a high absorbency paper towel will remove some of the transient organisms that remain after hand washing. Paper towel dispensers should be wall mounted.
6. Hand Cream And Handcare
Frequent use of antimicrobial and liquid soaps can cause skin damage to some health care workers, with consequential increases in levels of bacteria on the skin. The use of an appropriate hand cream i.e. compatible with the hand washing agent will help overcome some of these adverse effects. Compatible hand creams should be provided in measured-dose pump dispensers. Advice re compatibility may be obtained from pharmacy. Health care workers must complete an Incident Form and consult the Occupational Health Department if they experience any skin problems, which could be attributed to the hand washing agent being used.
7. PATIENT HAND HYGIENE
Hand hygiene for patients must be encouraged as it is equally as important in the prevention and control of infection. Staff must ensure that patients are afforded an opportunity to hand wash prior to meals,

49
after having used a bedpan/urinal or commode/toilet or when hands are otherwise soiled.
References 1. The epic Project: developing national evidence-based guidelines for
preventing healthcare associated infections. Phase 1: Guidelines for preventing hospital-acquired infections. J. Hosp. Infect (2001) 47 (Supplement): S1 – S82 Also available on Department of Health website at www.doh.gov.uk/HAI
2. Infection Control: Prevention of Healthcare-associated infection in Primary and Community Care. Pellow CM et al. Journal of Hospital Infection 55 (Supplement 2): 1 - 127
3. National Patient Safety Alert (2004) Alcohol Based Hand Gels 4. The epic project. Updating the evidence-base for national evidence-
based guidelines for preventing healthcare associated infections in NHS hospitals in England: a report with recommendations. Pellow CM et al. British Journal of Infection Control, (December 2004), vol 5 No 6, 10 - 16
5. Winning Ways: Working together to reduce healthcare associated
infections in England, A Report from the Chief Medical Officer (2003) http://www.dh.gov.uk/com
6. NHS Estates (2002) Infection Control in the Built Environment – design
and briefing (2002). Also available on [email protected] 7. Larsen EL. Draft APIC Guidelines for Hand Hygiene and Hand Asepsis
in Health Care Settings. Am. J. Infect. Control 1994; 22: 25A-47A.
Further Reading 1. Guidelines for Hand Hygiene, Infection Control Nurses Association
(2000) http://www.icna.co.uk 2. MMWR: Morbidity and Mortality Weekly Report. Guideline for Hand
Hygiene in Healthcare Settings: Recommendations of the Healthcare Infection Control Practices Advisory Committee and the HICPAC/SHEA/APIC/IDSA Hand Hygiene Task Force. October 25 2002/vol51/No RR – 16. http://www.cdc.gov/mmwr
S Morgan
Issue Date: July 2006 Review Date: July 2008

50


