
Inventek Systems
2 Republic Road • Billerica • MA 01862 • Phone 978-667-1962• www.Inventeksys.com eS-WiFi Module User Manual
eS-WiFi Module
AT Command Set
“IWIN” User Manual

DOC-UM-20035-4.1 User Manual eS-WiFi Module
Preliminary - Subject to change eS-WiFi Module AT Command Set Version v4.1 2
eS-WiFi Module ‘embedded Serial-to-WiFi’
AT Command Set
IWIN User Manual
Inventek Systems, Inc.

DOC-UM-20035-4.1 User Manual eS-WiFi Module
Preliminary - Subject to change eS-WiFi Module AT Command Set Version v4.1 3
Inventek System, Inc. AT Command Set Copyright and Company Information Contact Information: Telephone: 978-667-1962 Fax: 978-667-1949 Location/Mailing Address: Inventek Systems 2 Republic Road, Billerica, MA 01862 Hours of Operation Monday - Friday U.S. EST 08:00 a.m. - 05:00 p.m. Send E-mail inquiries to: Sales Support: [email protected]
Technical support: [email protected]
____ __ __ _ _____ _ ___ / ___| \ \ / /(_)| ___|(_) / _ \\___ \ _____\ \ /\ / / | || |_ | | | __/ ___) ||_____|\ V V / | || _| | | \___||____/ \_/\_/ |_||_| |_| Inventek Systems Embedding Connectivity Everywhere Copyright (c)2011
Inventek Systems is a USA-based, full-service wireless solutions provider focused on 802.11 b/g/n WiFi embedded solutions, GPS embedded modules and antennas. We provide a wide range of standard and custom embedded options ranging from low cost system-in-a-package (SiP) products to modular based custom solutions. We provide complete services from consulting to custom design to cost effective high volume manufacturing.
Copyright ©2011 Inventek Systems

DOC-UM-20035-4.1 User Manual eS-WiFi Module
Preliminary - Subject to change eS-WiFi Module AT Command Set Version v4.1 4
AT Command Set User Manual Table of Contents
1. INTRODUCTION .................................................................................................................................................. 9
1.1 SCOPE 9
1.2 AT COMMAND USAGE IN THE USER MANUAL IS SHOWN AS 9
1.3 SUPPORTED PRODUCT VERSIONS 9
1.4. AT COMMAND SET 9
1.4.1 Entering AT Commands.............................................................................................................................. 10
1.4.2 eS-WiFi Command Formats ....................................................................................................................... 10
All AT commands sent to the module must be formatted as follows: ............................................................... 10
All AT command responses from the module will follow this format: ............................................................... 11
2 HARDWARE INTERFACE AND MODULE OPERATION .......................................................................................... 12
2.1 RS-232 SERIAL COMMUNICATION 12
2.1.1 Data Mode ................................................................................................................................................. 12
2.1.2 Flow Control ............................................................................................................................................... 12
2.1.3 Supported Baud Rates ............................................................................................................................... 12
2.1.2 Default Serial Configuration ....................................................................................................................... 12
2.2 USB (UNIVERSAL SERIAL BUS) 12
2.3 SPI (SERIAL PERIPHERAL INTERFACE BUS) 12
2.4 MODULE OPERATION MODES 13
2.4.1 Human Readable Mode ............................................................................................................................. 13
2.4.2 Machine Readable Mode ........................................................................................................................... 13
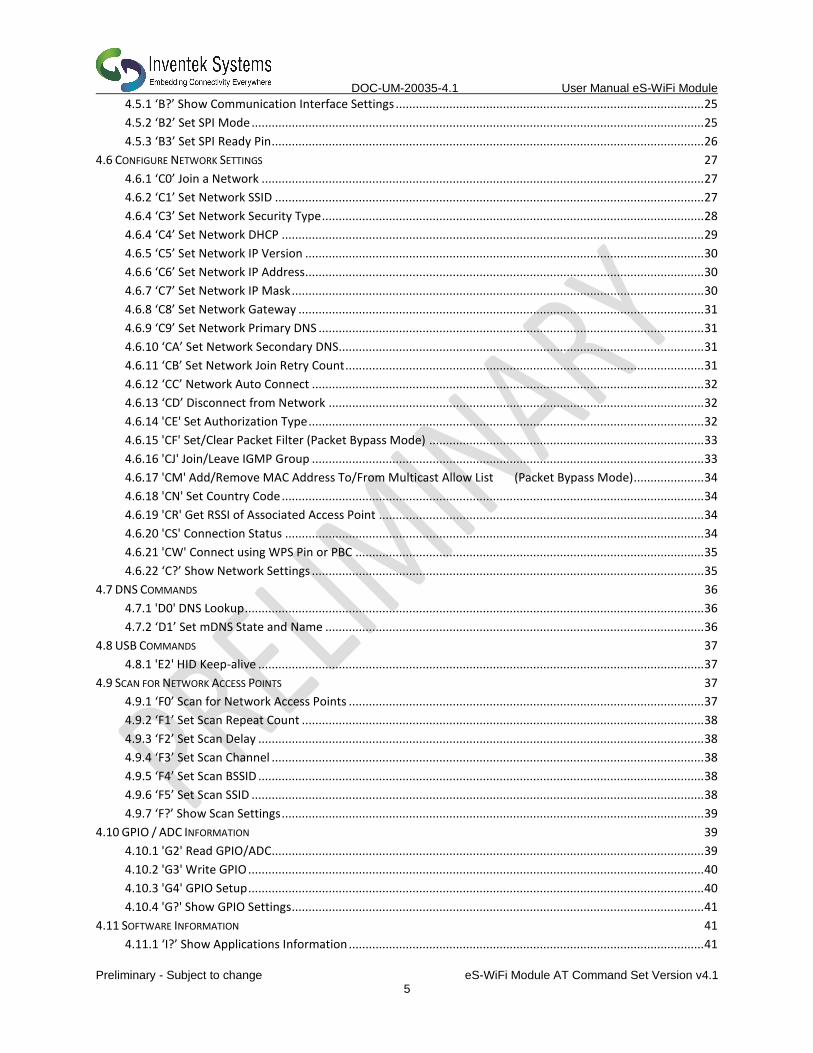
3. AT COMMAND SET VERSION 2.0 ...................................................................................................................... 14
3.1 AT COMMAND SET LIST OF SUPPORTED FUNCTIONS 14
4. AT COMMAND DETAIL DESCRIPTION ............................................................................................................... 19
4.1 ‘?’ PRINT HELP MESSAGE 19
4.2 ‘$$$’ ENTER COMMAND MODE 19
4.3 ‘---’ EXIT COMMAND MODE 19
4.4 ACCESS POINT 19
4.4.1 'A?' Show Access Point Settings ................................................................................................................. 20
4.4.2 'A0' Activate Access Point .......................................................................................................................... 21
4.4.3 'A1' Set Access Point Security Mode .......................................................................................................... 21
4.4.4 'A2' Set Security Key ................................................................................................................................... 22
4.4.5 'AA' Get AP DHCP Cached Address(es) ...................................................................................................... 22
4.4.6 'AC' Set Access Point Channel .................................................................................................................... 22
4.4.7 'AD' Activate Access Point Direct Connect Mode ...................................................................................... 22
4.4.8 'AE' Exit Access Point Direct Connect Mode .............................................................................................. 23
4.4.9 'AL' Set Access Point DHCP Lease Time ...................................................................................................... 23
4.4.10 'AR' Get Client RSSI (SoftAP Only, Direct Connect Mode) ........................................................................ 24
4.4.11 'AS' Set Access Point SSID ........................................................................................................................ 24
4.4.12 'AT' Set Maximum Number of AP Clients ................................................................................................. 24
4.5 SELECT COMMUNICATION INTERFACE 25
DOC-UM-20035-4.1 User Manual eS-WiFi Module
Preliminary - Subject to change eS-WiFi Module AT Command Set Version v4.1 5
4.5.1 ‘B?’ Show Communication Interface Settings ............................................................................................ 25
4.5.2 ‘B2’ Set SPI Mode ....................................................................................................................................... 25
4.5.3 ‘B3’ Set SPI Ready Pin ................................................................................................................................. 26
4.6 CONFIGURE NETWORK SETTINGS 27
4.6.1 ‘C0’ Join a Network .................................................................................................................................... 27
4.6.2 ‘C1’ Set Network SSID ................................................................................................................................ 27
4.6.4 ‘C3’ Set Network Security Type .................................................................................................................. 28
4.6.4 ‘C4’ Set Network DHCP .............................................................................................................................. 29
4.6.5 ‘C5’ Set Network IP Version ....................................................................................................................... 30
4.6.6 ‘C6’ Set Network IP Address....................................................................................................................... 30
4.6.7 ‘C7’ Set Network IP Mask ........................................................................................................................... 30
4.6.8 ‘C8’ Set Network Gateway ......................................................................................................................... 31
4.6.9 ‘C9’ Set Network Primary DNS ................................................................................................................... 31
4.6.10 ‘CA’ Set Network Secondary DNS ............................................................................................................. 31
4.6.11 ‘CB’ Set Network Join Retry Count ........................................................................................................... 31
4.6.12 ‘CC’ Network Auto Connect ..................................................................................................................... 32
4.6.13 ‘CD’ Disconnect from Network ................................................................................................................ 32
4.6.14 'CE' Set Authorization Type ...................................................................................................................... 32
4.6.15 'CF' Set/Clear Packet Filter (Packet Bypass Mode) .................................................................................. 33
4.6.16 'CJ' Join/Leave IGMP Group ..................................................................................................................... 33
4.6.17 'CM' Add/Remove MAC Address To/From Multicast Allow List (Packet Bypass Mode) ..................... 34
4.6.18 'CN' Set Country Code .............................................................................................................................. 34
4.6.19 'CR' Get RSSI of Associated Access Point ................................................................................................. 34
4.6.20 'CS' Connection Status ............................................................................................................................. 34
4.6.21 'CW' Connect using WPS Pin or PBC ........................................................................................................ 35
4.6.22 ‘C?’ Show Network Settings ..................................................................................................................... 35
4.7 DNS COMMANDS 36
4.7.1 'D0' DNS Lookup ......................................................................................................................................... 36
4.7.2 ‘D1’ Set mDNS State and Name ................................................................................................................. 36
4.8 USB COMMANDS 37
4.8.1 'E2' HID Keep-alive ..................................................................................................................................... 37
4.9 SCAN FOR NETWORK ACCESS POINTS 37
4.9.1 ‘F0’ Scan for Network Access Points .......................................................................................................... 37
4.9.2 ‘F1’ Set Scan Repeat Count ........................................................................................................................ 38
4.9.3 ‘F2’ Set Scan Delay ..................................................................................................................................... 38
4.9.4 ‘F3’ Set Scan Channel ................................................................................................................................. 38
4.9.5 ‘F4’ Set Scan BSSID ..................................................................................................................................... 38
4.9.6 ‘F5’ Set Scan SSID ....................................................................................................................................... 38
4.9.7 ‘F?’ Show Scan Settings .............................................................................................................................. 39
4.10 GPIO / ADC INFORMATION 39
4.10.1 'G2' Read GPIO/ADC................................................................................................................................. 39
4.10.2 'G3' Write GPIO ........................................................................................................................................ 40
4.10.3 'G4' GPIO Setup ........................................................................................................................................ 40
4.10.4 'G?' Show GPIO Settings ........................................................................................................................... 41
4.11 SOFTWARE INFORMATION 41
4.11.1 ‘I?’ Show Applications Information .......................................................................................................... 41

DOC-UM-20035-4.1 User Manual eS-WiFi Module
Preliminary - Subject to change eS-WiFi Module AT Command Set Version v4.1 6
4.12 MISCELLANEOUS COMMAND 41
4.12.1 'MF' Test External Serial Flash.................................................................................................................. 41
4.12.2 'MR' MESSAGE READ (SPI ONLY) 42
4.12.3 'MS' Suppress Async Message DHCP ....................................................................................................... 42
4.12.4 'MT' Set Message Type ............................................................................................................................ 43
4.13 TRANSPORT COMMUNICATION 44
4.13.1 ‘P0’ Set/Display Communication Socket .................................................................................................. 44
4.13.2 ‘P1’ Set Transport Protocol ...................................................................................................................... 45
4.13.3 ‘P2’ Set Transport Local Port Number...................................................................................................... 45
4.13.4 ‘P3’ Set Transport Remote Host Port IP Address ..................................................................................... 45
4.13.5 ‘P4’ Set Transport Remote Port Number ................................................................................................. 46
4.13.6 ‘P5’ Stop/Start Transport Server .............................................................................................................. 46
4.13.7 ‘P6’ Stop/Start Transport Client ............................................................................................................... 46
4.13.8 'P7' Start/Stop Request TCP Loop ............................................................................................................ 47
4.13.9 'P8' Set Listen Backlogs ............................................................................................................................ 47
4.13.10 'PA' Set Custom Certificate Authority .................................................................................................... 47
4.13.12 'PB' Set Root CA Verification Results ..................................................................................................... 48
4.13.13 'PC' Write Security Certificates .............................................................................................................. 48
4.13.14 'PD' Write Security Key .......................................................................................................................... 48
4.13.15 'PK' TCP Keep-Alive ................................................................................................................................ 48
4.13.16 'PR' Packet Bypass Mode (PBM) Read Mode ......................................................................................... 49
4.13.17 'PS' Raw Ethernet (PBM)/USB HID Packet Statistics .............................................................................. 49
4.13.18 'PT' USB HID RX Sequencing ................................................................................................................... 49
4.13.19 'PW' Packet Bypass Mode (PBM) Write Packet ..................................................................................... 50
4.13.20 'PY' Set TCP API Message Timeout ......................................................................................................... 50
4.13.21 ‘P?’ Show Transport Settings ................................................................................................................. 50
4.14 RECEIVE TRANSPORT DATA 51
4.14.1 ‘R0’ Read Transport Data ......................................................................................................................... 51
4.14.2 ‘R1’ Set Read Transport Packet Size (bytes) ............................................................................................. 51
4.14.3 ‘R2’ Set Read Transport Timeout (ms) ..................................................................................................... 51
4.14.4 'R3' Set Receive Mode .............................................................................................................................. 51
4.14.5 ‘R?’ Show Read Transport Settings .......................................................................................................... 52
4.15 WRITE TRANSPORT DATA 52
4.15.1 ‘S0’ Write Transport Data ........................................................................................................................ 52
4.15.2 ‘S1’ Set Write Transport Packet Size (bytes) ............................................................................................ 52
4.15.3 ‘S2’ Set Write Transport Timeout (ms) ................................................................................................... 52
4.15.4 ‘S3’ Write Transport Data ........................................................................................................................ 53
4.15.5 ‘S?” Show Write Transport Settings ......................................................................................................... 53
4.16 PING IP TARGET ADDRESS 53
4.16.1 ‘T0’ Ping IP Target Address ...................................................................................................................... 53
4.16.2 ‘T1’ Set Ping Target Address .................................................................................................................... 53
4.16.3 ‘T2’ Set Ping Repeat Count ....................................................................................................................... 54
4.16.4 ‘T3’ Set Ping Delay (ms) ............................................................................................................................ 54
4.16.5 ‘T?’ Show Ping Settings ............................................................................................................................ 54
4.17 CONFIGURE UART 54
4.17.1 ‘U0’ Activate UART Settings ..................................................................................................................... 54

DOC-UM-20035-4.1 User Manual eS-WiFi Module
Preliminary - Subject to change eS-WiFi Module AT Command Set Version v4.1 7
4.17.2 ‘U2’ Set UART Baud Rate.......................................................................................................................... 55
4.17.3 ‘U?’ Show UART Setting ........................................................................................................................... 56
4.18 WLAN 57
4.18.1 'WL' Set GPIOs for Link Status and Activity .............................................................................................. 57
4.19 SYSTEM INFORMATION FLASH 58
4.19.1 'Z0' Reset To Factory Defaults .................................................................................................................. 58
4.19.2 'Z1' Save Current Settings ........................................................................................................................ 58
4.19.3 'Z2' Clear Saved Settings .......................................................................................................................... 59
4.19.4 'Z3' Set Factory/User Space ..................................................................................................................... 59
4.19.5 'Z4' Set MAC Address ............................................................................................................................... 59
4.19.6 'Z5' Get MAC Address .............................................................................................................................. 59
4.19.7 'Z6' Set Access Point IP Address ............................................................................................................... 60
4.19.8 'Z7' Set WPS Pin ....................................................................................................................................... 60
4.19.9 'Z8' Get WPS Pin ....................................................................................................................................... 60
4.19.10 'Z9' Set USB VID/PID ............................................................................................................................... 60
4.19.11 'ZC' Clear Factory Lock Switch ................................................................................................................ 60
4.19.12 'ZD' Flash Dump ..................................................................................................................................... 61
4.19.13 'ZF' Set Factory Lock Switch ................................................................................................................... 61
4.19.14 'ZN' Set Product Name ........................................................................................................................... 61
4.19.15 'ZO' OTA Firmware Update .................................................................................................................... 62
4.19.16 'ZP' Power Management ........................................................................................................................ 62
4.19.17 'ZR' Reset Module .................................................................................................................................. 62
4.19.18 'ZU' Firmware Upgrade (M3G Only, uses STM32F205 boot loader) ..................................................... 63
4.19.19 'ZV' Set OTA Method .............................................................................................................................. 63
4.19.20 'Z?' Show System Settings ..................................................................................................................... 63
5 EXAMPLE ES-WIFI MODULE AT COMMAND USAGE ........................................................................................... 64
5.1 ENTERING HUMAN READABLE COMMAND MODE 64
5.2 CHANGING THE BAUD RATE 64
5.3 FIND ACCESS POINTS: 65
5.4 JOIN NETWORK ACCESS POINT 66
5.5 PING A SYSTEM ON A NETWORK 68
5.6 TRANSMISSION CONTROL PROTOCOL 69
5.6.1 TCP Server Set up and Data Transport ....................................................................................................... 69
5.6.1.1 TCP Server Set Up ................................................................................................................................... 69
5.6.1.2 Read and Write TCP Data in Server Mode .............................................................................................. 70
5.6.2 TCP Client Setup and Data Transport ......................................................................................................... 71
5.6.2.1 TCP Client Set Up .................................................................................................................................... 71
5.6.2.2 Read and Write TCP Data in Client Mode ............................................................................................... 72
5.6.3 UDP Server Set Up and Data Transport ..................................................................................................... 72
5.6.3.1 UDP Server Set Up .................................................................................................................................. 73
5.6.3.2 Read and Write UDP Data in Server Mode ............................................................................................. 73
5.6.4 UDP Client Setup and Data Transport ........................................................................................................ 74
5.6.4.1 UDP Client Set Up ................................................................................................................................... 74
5.6.4.2 Read and Write UDP Data in Client Mode .............................................................................................. 75
6. APPENDIX A ..................................................................................................................................................... 77

DOC-UM-20035-4.1 User Manual eS-WiFi Module
Preliminary - Subject to change eS-WiFi Module AT Command Set Version v4.1 8
7. DOCUMENT REVISION HISTORY ....................................................................................................................... 79

DOC-UM-20035-4.1 User Manual eS-WiFi Module
Preliminary - Subject to change eS-WiFi Module AT Command Set Version v4.1 9
1. Introduction
1.1 Scope The scope of this document is to introduce users to Inventek System’s AT Command Set called IWIN for the eS-WiFi Module product, and to explain how to take advantage of the AT Command Set for Wi-Fi Communications. When you purchase the Inventek module we have programmed our latest firmware for either UART,SPI or USB onto the module. When you order your production parts, you need to specify your firmware build that you have qualified, details are found in the product specifications. The AT Command set is very simple to use and the default firmware is set for UART, 115K baud and you can download a free demo software program from the Inventek web site to exercise the module.
1.2 AT Command Usage in the User Manual is shown as Usage: < AT Command > < optional ‘=’ > < data if ‘=’ is used > < Carriage Return (CR) > or < AT Command > < CR > And default values are show as Default: <AT Command>=<Value>
1.3 Supported Product Versions This document covers the following currently available eS-WiFi modules:
ISM4319-M3-L44-C (Ceramic Antenna) ISM4319-M3-L44-E (Printed Micro-strip Antenna) ISM4319-M3-L44-U (U.FL Connector to external antenna) ISM4319-M3G-L44-E (Printed Micro-strip Antenna) ISM43362-M3G-L44-E (Printed Micro-strip Antenna) ISM43362-M3G-L44-U (U.FL Connector to external antenna)
1.4. AT Command Set
In the early 1980’s, Hayes Microcomputer Products, Inc. was one of the first modem manufactures to use an ‘AT’ type Command Set to control operations of their modem products for communication over the Plain Old Telephone Service (POTS). Since then a number of products have been developed for communications that use the ‘AT Command Set’ for device control. ‘AT’ is short for ‘AT’tention, and is used to get the attention of a device for set up and control of it’s functions. Normally, following the ‘AT’ command would be other letters and numbers that would control the functions associated with the command. For example, ‘ATDT1234567‘ means ATtention modem Dial with Tone the number following the command, which in this case is 1234567. Common practice today is to shorten the ‘AT’ command to just the function command, which using the example above, the shorten command to dial using tone for a number would be DT1234567.

DOC-UM-20035-4.1 User Manual eS-WiFi Module
Preliminary - Subject to change eS-WiFi Module AT Command Set Version v4.1 10
1.4.1 Entering AT Commands As mentioned above, it is common practice to drop the ‘AT’ in front of a device control command and just use the device control function command letters and number combinations. Inventek System has adopted this method for controlling the functions of the eS-WiFi module. In addition, Inventek System has added an ‘=’ to the command to delimit the command from its data. For example, the AT Command to set the eS-WiFi module’s IP Address would be ‘C6=127.0.0.1’ instead of ‘ATC6=127.0.0.1. Also, a number of AT Commands for the eS-WiFi module only use a single letter or a single letter plus number to execute the command. For instance, ‘?’ will return available help information on the eS-WiFi module. While a ‘C0’ command would command the eS-WiFi module to joined a network. The format for entering AT Commands is shown as follows: < AT Command > < optional ‘=’ > < data if ‘=’ is used > < Carriage Return (CR) > or < AT Command > < CR > All AT Commands must be followed by a <CR> to activate the command. Empty string values for AT Commands are shown with ‘NONE’ in the User Manual. The
Supported character sets:
Currently, the eS-WiFi module only supports 8 bit ASCII. All AT Commands must be in capital letters; however, data can contain both upper and letter case letters, and numbers. Future support for binary data transfers to be added.
1.4.2 eS-WiFi Command Formats All AT commands sent to the module must be formatted as follows:
Command Delimiter payload Delimiter
2 Character Command =
Req Data \r1
2 Character Command = F1,F2,F32 \r
1
2 Character Command \r1
Note 1: \r = Carriage Return For example:
P1=0\r PK=1,3000\r I?\r

DOC-UM-20035-4.1 User Manual eS-WiFi Module
Preliminary - Subject to change eS-WiFi Module AT Command Set Version v4.1 11
All AT command responses from the module will follow this format:
Notes: 1: \r = Carriage Return, \n=New Line 3: sp =>space For example:
\r\nDATA\r\nOK\r\n>sp \r\nERROR\r\nUSAGE\r\n>sp
ASCII
ODOADATA0D0AOKODOA3E20 ODOADATA0D0AUSAGEODOA3E20
AT command to send Data can follow either of these formats:
Command Delimiter payload
S0 \r1 Binary data
1-1460 bytes
Note 1: \r = Carriage Return
Command Payload Size Delimiter Payload
S3 Number of Bytes to be sent \r1 Binary data
(1-1460 bytes )
Note 1: \r = Carriage Return For example:
S0DATA\r S3=77\rDATA77byteslong
Response Formats
Delimeter Payload Delimeter Return Delimeter Prompt
\r\n1 Data \r\n1 OK \r\n1 >sp3
\r\n1 Error Type \r\n1 Usage \r\n1 >sp3

DOC-UM-20035-4.1 User Manual eS-WiFi Module
Preliminary - Subject to change eS-WiFi Module AT Command Set Version v4.1 12
2 Hardware Interface and Module Operation
The eS-WiFi module supports RS-232 Serial Communications Universal Serial Bus (USB), and Serial Peripheral Interface Bus (SPI). A Micro-Controller or System Host can easily interface to the eS-WiFi module using one of the support hardware interfaces. The eS-WiFi module has two modes of operation: Human Readable Mode and Machine Readable Mode.
2.1 RS-232 Serial Communication
2.1.1 Data Mode When the eS-WiFi module is interfaced serially, the serial interface needs to be configured for 8 bit data, no parity, and one stop bit -- (8-n-1).
2.1.2 Flow Control The eS-WiFi module doesn’t require or support Flow Control, so Flow Control should be ‘None’
2.1.3 Supported Baud Rates The eS-WiFi module supports the following serial baud rates: Basic Rates:1200, 2400, 4800, 9600, 19200, 38400, 57600, 115200, 230400, 460800, 921600 Extended Rates: 1152000, 1382400, 1612800, 1834200, 2073600 (M3G Only)
2.1.2 Default Serial Configuration The eS-WiFi module is shipped with the default serial configuration of 115200 baud, 8 data bits, no party, and 1 stop bits.
2.2 USB (Universal Serial Bus) The eS-WiFi module supports USB (Contact Inventek for firmware)
2.3 SPI (Serial Peripheral Interface Bus) The eS-WiFi module supports SPI (Contact Inventek for firmware)
DOC-UM-20035-4.1 User Manual eS-WiFi Module
Preliminary - Subject to change eS-WiFi Module AT Command Set Version v4.1 13
2.4 Module Operation Modes
The eS-WiFi module has two modes of operation, Human Readable Mode (verbose) and Machine Readable Mode, that can be used to control the operation of the module. At power up, the eS-WiFi module defaults to Machine Readable Mode. An AT command is used to put the eS-WiFi module into Human Readable Mode or Machine Readable Mode.
2.4.1 Human Readable Mode In Human Readable Mode, a user can interact with the module via the module’s built-in console and a
serial terminal program. All AT commands will return detail information related to the operation of the
command.
2.4.2 Machine Readable Mode Machine Readable Mode is intended for direct control of the eS-WiFi module operation via a Micro-
Controller or System Host. All AT commands will return short, limited information about operation of the
command.
DOC-UM-20035-4.1 User Manual eS-WiFi Module
Preliminary - Subject to change eS-WiFi Module AT Command Set Version v4.1 14
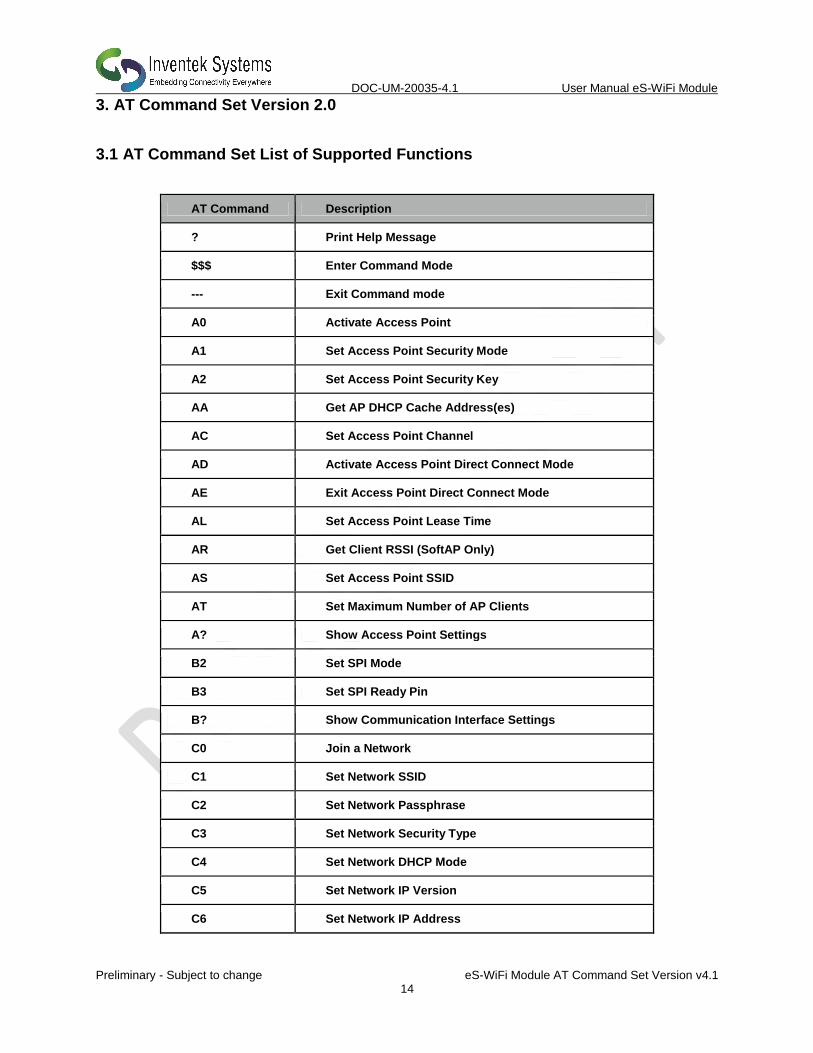
3. AT Command Set Version 2.0
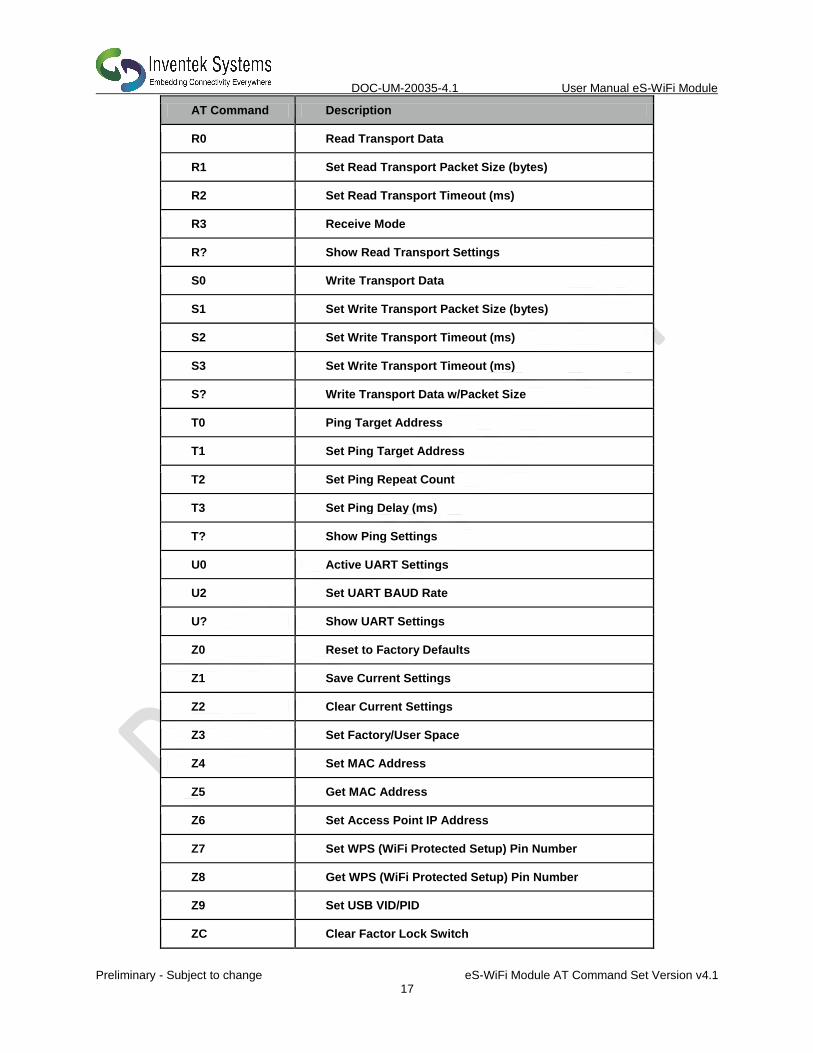
3.1 AT Command Set List of Supported Functions
AT Command Description
? Print Help Message
$$$ Enter Command Mode
--- Exit Command mode
A0 Activate Access Point
A1 Set Access Point Security Mode
A2 Set Access Point Security Key
AA Get AP DHCP Cache Address(es)
AC Set Access Point Channel
AD Activate Access Point Direct Connect Mode
AE Exit Access Point Direct Connect Mode
AL Set Access Point Lease Time
AR Get Client RSSI (SoftAP Only)
AS Set Access Point SSID
AT Set Maximum Number of AP Clients
A? Show Access Point Settings
B2 Set SPI Mode
B3 Set SPI Ready Pin
B? Show Communication Interface Settings
C0 Join a Network
C1 Set Network SSID
C2 Set Network Passphrase
C3 Set Network Security Type
C4 Set Network DHCP Mode
C5 Set Network IP Version
C6 Set Network IP Address
DOC-UM-20035-4.1 User Manual eS-WiFi Module
Preliminary - Subject to change eS-WiFi Module AT Command Set Version v4.1 15
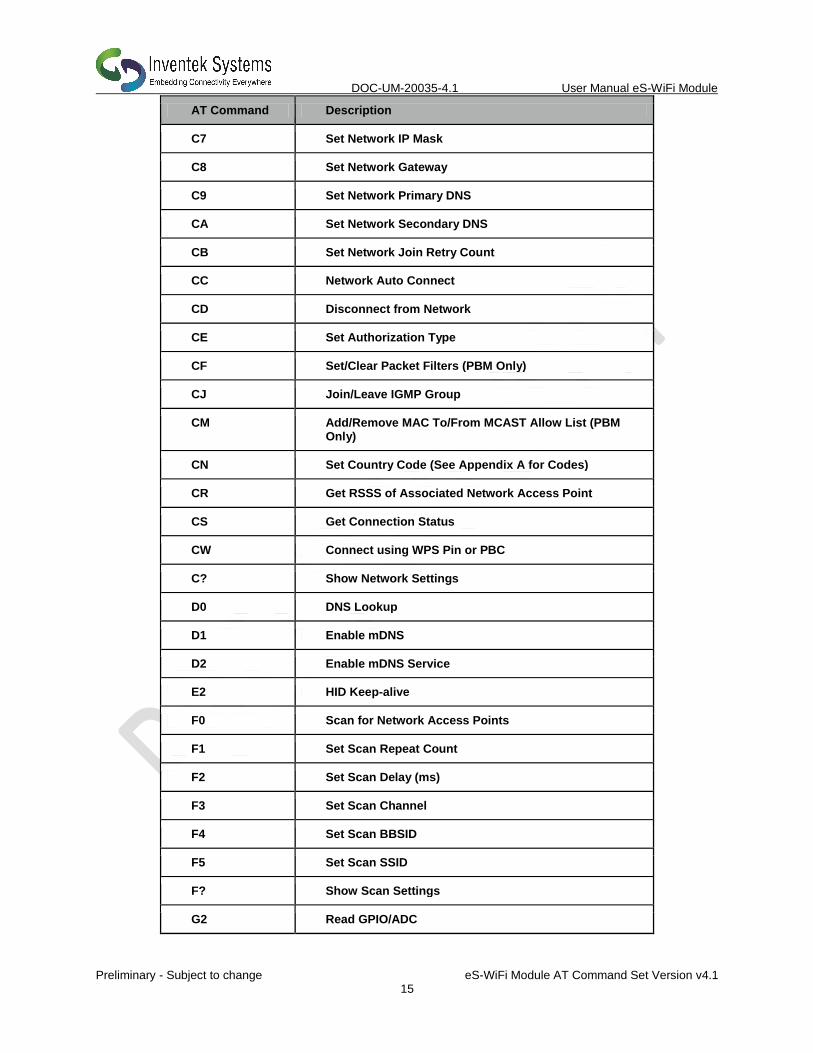
AT Command Description
C7 Set Network IP Mask
C8 Set Network Gateway
C9 Set Network Primary DNS
CA Set Network Secondary DNS
CB Set Network Join Retry Count
CC Network Auto Connect
CD Disconnect from Network
CE Set Authorization Type
CF Set/Clear Packet Filters (PBM Only)
CJ Join/Leave IGMP Group
CM Add/Remove MAC To/From MCAST Allow List (PBM Only)
CN Set Country Code (See Appendix A for Codes)
CR Get RSSS of Associated Network Access Point
CS Get Connection Status
CW Connect using WPS Pin or PBC
C? Show Network Settings
D0 DNS Lookup
D1 Enable mDNS
D2 Enable mDNS Service
E2 HID Keep-alive
F0 Scan for Network Access Points
F1 Set Scan Repeat Count
F2 Set Scan Delay (ms)
F3 Set Scan Channel
F4 Set Scan BBSID
F5 Set Scan SSID
F? Show Scan Settings
G2 Read GPIO/ADC

DOC-UM-20035-4.1 User Manual eS-WiFi Module
Preliminary - Subject to change eS-WiFi Module AT Command Set Version v4.1 16
AT Command Description
G3 Write GPIO
G4 GPIO Setup
G? Show GPIO Settings
I? Show Application Information
MF Test External Serial Flash
MR Message Read (SPI Only)
MS Suppress Async Message DHCP
MT Set Message Type
P0 Set/Display Communication Socket
P1 Set Transport Protocol
P2 Set Transport Local Port Number
P3 Set Transport Remote Host IP Address
P4 Set Transport Remote Port Number
P5 Stop/Start Transport Server
P6 Stop/Start Transport Client
P7 Start/Stop Request TCP Loop
P8 Set Listen Backlogs
P9 SSL Certificate Authentication
PC Security Certificates
PD Security Keys
PK TCP Keep-Alive
PR Read Mode, Packet Bypass Mode
PS Raw Ethernet Packet Statistics
PT USB HID RX Sequencing
PW Write Packet, Packet Bypass Mode
PX Enable UART Streaming Mode
PY Set TCP API Message Timeout
PZ Test Root CA Verification
P? Show Transport Settings
DOC-UM-20035-4.1 User Manual eS-WiFi Module
Preliminary - Subject to change eS-WiFi Module AT Command Set Version v4.1 17
AT Command Description
R0 Read Transport Data
R1 Set Read Transport Packet Size (bytes)
R2 Set Read Transport Timeout (ms)
R3 Receive Mode
R? Show Read Transport Settings
S0 Write Transport Data
S1 Set Write Transport Packet Size (bytes)
S2 Set Write Transport Timeout (ms)
S3 Set Write Transport Timeout (ms)
S? Write Transport Data w/Packet Size
T0 Ping Target Address
T1 Set Ping Target Address
T2 Set Ping Repeat Count
T3 Set Ping Delay (ms)
T? Show Ping Settings
U0 Active UART Settings
U2 Set UART BAUD Rate
U? Show UART Settings
Z0 Reset to Factory Defaults
Z1 Save Current Settings
Z2 Clear Current Settings
Z3 Set Factory/User Space
Z4 Set MAC Address
Z5 Get MAC Address
Z6 Set Access Point IP Address
Z7 Set WPS (WiFi Protected Setup) Pin Number
Z8 Get WPS (WiFi Protected Setup) Pin Number
Z9 Set USB VID/PID
ZC Clear Factor Lock Switch
DOC-UM-20035-4.1 User Manual eS-WiFi Module
Preliminary - Subject to change eS-WiFi Module AT Command Set Version v4.1 18
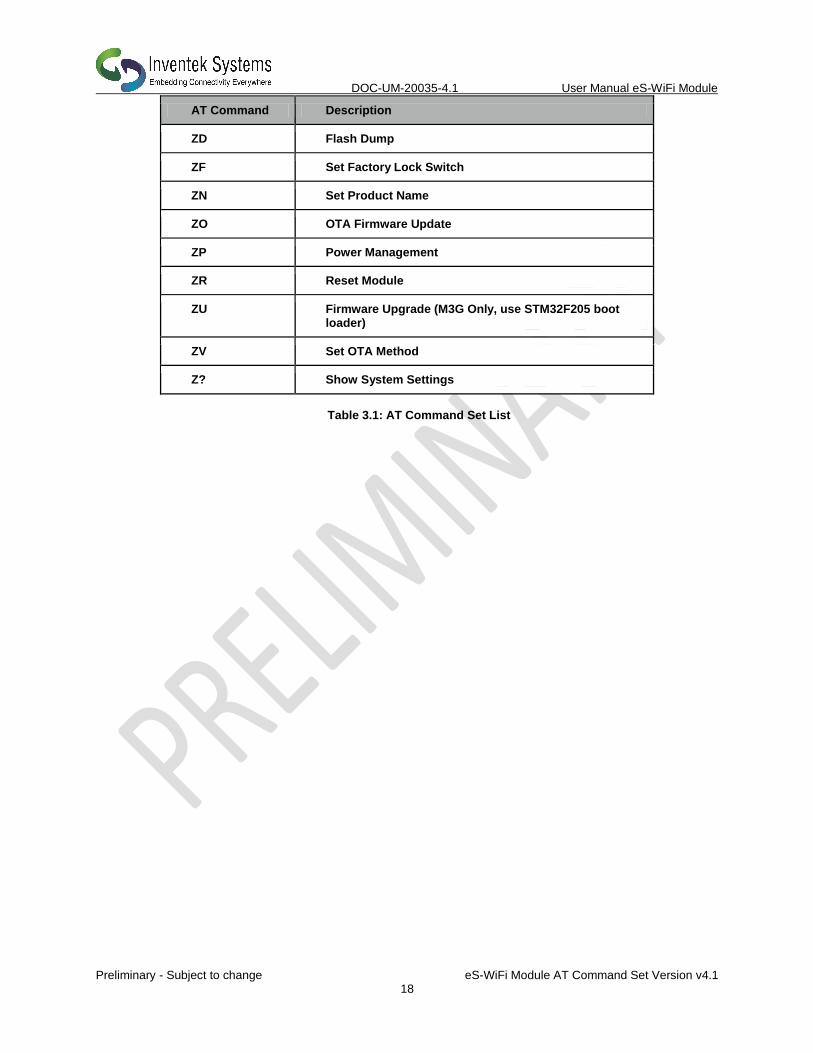
AT Command Description
ZD Flash Dump
ZF Set Factory Lock Switch
ZN Set Product Name
ZO OTA Firmware Update
ZP Power Management
ZR Reset Module
ZU Firmware Upgrade (M3G Only, use STM32F205 boot loader)
ZV Set OTA Method
Z? Show System Settings
Table 3.1: AT Command Set List

DOC-UM-20035-4.1 User Manual eS-WiFi Module
Preliminary - Subject to change eS-WiFi Module AT Command Set Version v4.1 19
4. AT Command Detail Description 4.1 ‘?’ Print Help Message
Print Help menu to console. Usage: ?<CR> Default Value: None
4.2 ‘$$$’ Enter Command Mode Command (Human Readable) Mode is entered via ‘$$$’. While in Command mode, all AT Commands return detail text formatted information to the user when the command is executed. Command Mode is helpful when debugging network interfaces or interaction with the eS-WiFi module. Usage: $$$<CR> Default Value: None Response from eS-WiFi: > Entering CMD Mode OK >
4.3 ‘---’ Exit Command Mode Command Mode is exited via ‘---’, which places the eS-WiFi module in Machine Readable mode where AT Commands generate short, limited coma delimited information on the execution of a command. Machine mode is intended for Micro-Controller or Host System control of the eS-WiFi module. This document is focused on users connecting the eS-WiFi to a microcontroller so the responses document will not be in Command Mode. Usage: ---<CR> Default Value: --- Response from eS-WiFi: > Exiting CMD Mode OK >
4.4 Access Point
Used to setup the internal Access Point (Network Access). The eS-WiFi runs a Soft Access Point that
allows a user to setup a connection to a local network as a STA (Client) on that network or serve up a
HTML page to a user.
DOC-UM-20035-4.1 User Manual eS-WiFi Module
Preliminary - Subject to change eS-WiFi Module AT Command Set Version v4.1 20
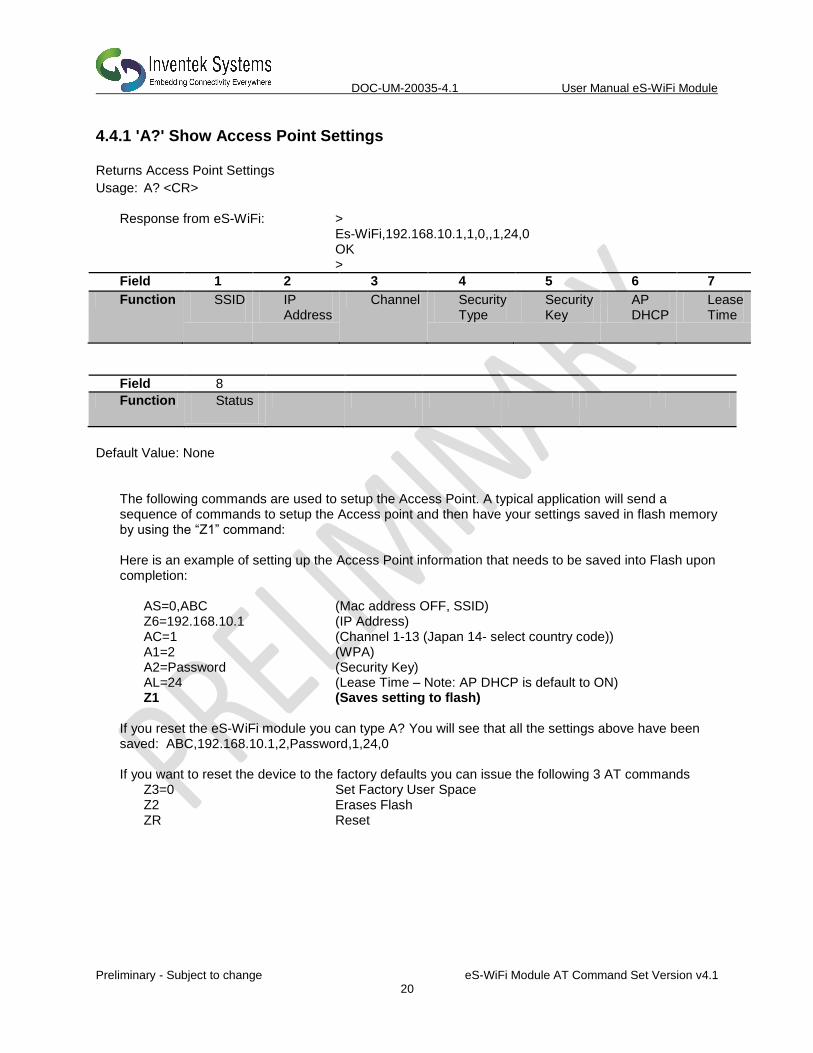
4.4.1 'A?' Show Access Point Settings
Returns Access Point Settings
Usage: A? <CR>
Response from eS-WiFi: > Es-WiFi,192.168.10.1,1,0,,1,24,0 OK >
Field 1 2 3 4 5 6 7
Function SSID
IP Address
Channel Security Type
Security Key
AP DHCP
Lease Time
Field 8
Function Status
Default Value: None
The following commands are used to setup the Access Point. A typical application will send a sequence of commands to setup the Access point and then have your settings saved in flash memory by using the “Z1” command: Here is an example of setting up the Access Point information that needs to be saved into Flash upon completion:
AS=0,ABC (Mac address OFF, SSID) Z6=192.168.10.1 (IP Address) AC=1 (Channel 1-13 (Japan 14- select country code)) A1=2 (WPA) A2=Password (Security Key) AL=24 (Lease Time – Note: AP DHCP is default to ON) Z1 (Saves setting to flash)
If you reset the eS-WiFi module you can type A? You will see that all the settings above have been saved: ABC,192.168.10.1,2,Password,1,24,0 If you want to reset the device to the factory defaults you can issue the following 3 AT commands Z3=0 Set Factory User Space Z2 Erases Flash ZR Reset

DOC-UM-20035-4.1 User Manual eS-WiFi Module
Preliminary - Subject to change eS-WiFi Module AT Command Set Version v4.1 21
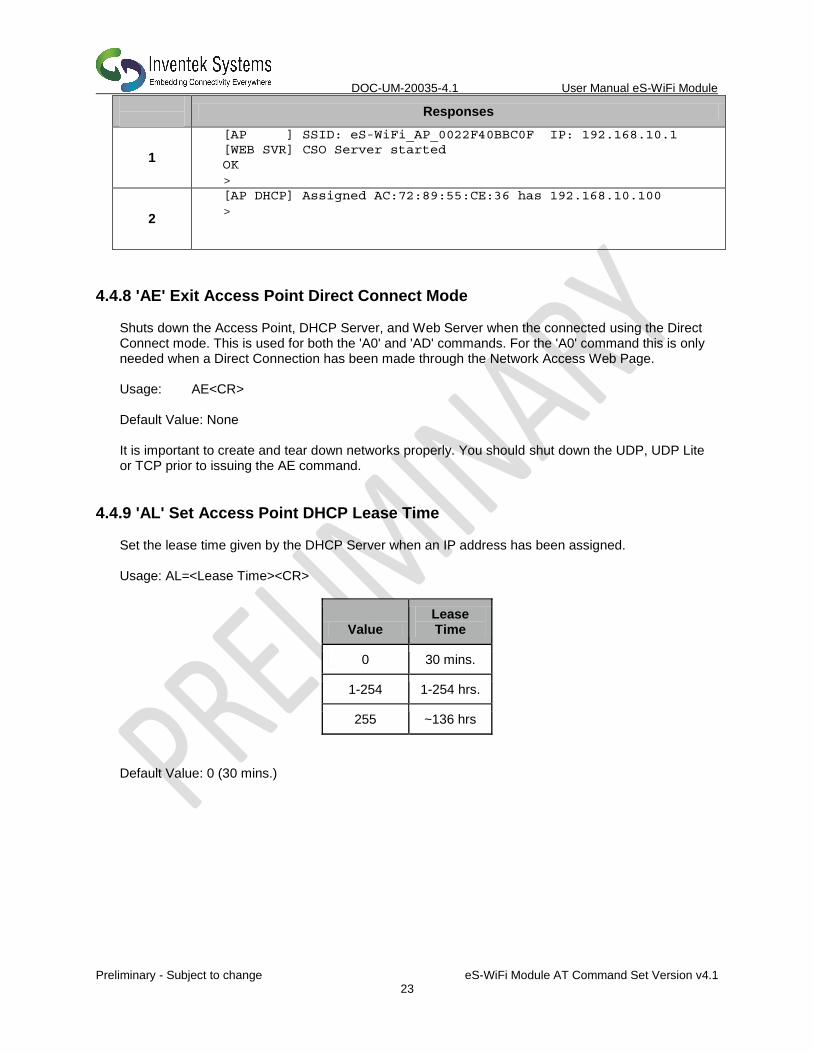
4.4.2 'A0' Activate Access Point Starts the Access Point, DHCP Server, DNS Server, and Web Server. Usage: A0<CR> Default Value: None
Responses
1
[AP ] SSID: eS-WiFi_AP_0022F40BBC0F IP: 192.168.10.1
[WEB SVR] Server started
>
2
[AP DHCP] Assigned AC:72:89:55:CE:36 has 192.168.10.100
>
3
[JOIN ] SSID
[DHCP ] 192.168.2.18
OK
>
4
[AP ] Shutdown
OK
>
4.4.3 'A1' Set Access Point Security Mode Set the security mode for the Access Point Usage: A1=<Mode><CR>
WiFi Security WiFi Security Mode Description
Open 0 No WiFi Security
Reserved 1 Not Valid
WPA 2 WiFi Protected Access
WPA2 3 WiFi Protected Access 2
WPA + WPA2 4 WiFi Protected Access and WiFi Protected Access 2
Default Value = 0 (Open)

DOC-UM-20035-4.1 User Manual eS-WiFi Module
Preliminary - Subject to change eS-WiFi Module AT Command Set Version v4.1 22
4.4.4 'A2' Set Security Key Security Key can be up to 32 characters and is an unique security keyword for access to a wireless network. A system (PC, Smartphone, Tablet, etc) must use the Security Key to associate with the eS-WiFi Access Point to communicate with the eS-WiFi Module. Usage: A2=<Key><CR> Default Value: None
4.4.5 'AA' Get AP DHCP Cached Address(es) Gets the MAC and IP addresses in the AP DHCP cache Usage: AA=<Channel><CR> Default Value: None
4.4.6 'AC' Set Access Point Channel Set the channel the Access Point will broadcast on. The channels are from 1 to 13 based upon the Country Code setting for the eS-WiFi module. A setting of 0 selects the auto-channel algorithm. Usage: AC=<Channel><CR> Default Value: C1.3.x=1, C2.4.0=0
4.4.7 'AD' Activate Access Point Direct Connect Mode Starts the Access Point, DHCP Server, and minimal CSO (Connection Support Only) Web Server. The CSO Web Server handles the support for connecting Apple devices with iOS6 and other devices that require addition support to connect to a captive network. Usage: AD<CR> Default Value: None
This mode is used to establish a IPV4 “Direct Connection” to a PC, Smartphone or IOT appliance. Once
your PC, smart phone or IOT device joins the eS-WiFi, the eS-WiFi will issue an IP Address and create a
wireless network connection between the eS-Wi-Fi and the Smartphone or IOT appliance. The “ Direct
Connection” is an Infrastructure connection that has advantages over Adhoc, for example Android does
not support Adhoc natively
Once you have established this infrastructure connection you can setup a Peer to Peer connection using
UDP, UDP Lite or TCP.
DOC-UM-20035-4.1 User Manual eS-WiFi Module
Preliminary - Subject to change eS-WiFi Module AT Command Set Version v4.1 23
Responses
1
[AP ] SSID: eS-WiFi_AP_0022F40BBC0F IP: 192.168.10.1
[WEB SVR] CSO Server started
OK
>
2
[AP DHCP] Assigned AC:72:89:55:CE:36 has 192.168.10.100
>
4.4.8 'AE' Exit Access Point Direct Connect Mode
Shuts down the Access Point, DHCP Server, and Web Server when the connected using the Direct Connect mode. This is used for both the 'A0' and 'AD' commands. For the 'A0' command this is only needed when a Direct Connection has been made through the Network Access Web Page. Usage: AE<CR> Default Value: None It is important to create and tear down networks properly. You should shut down the UDP, UDP Lite or TCP prior to issuing the AE command.
4.4.9 'AL' Set Access Point DHCP Lease Time Set the lease time given by the DHCP Server when an IP address has been assigned. Usage: AL=<Lease Time><CR>
Value Lease Time
0 30 mins.
1-254 1-254 hrs.
255 ~136 hrs
Default Value: 0 (30 mins.)
DOC-UM-20035-4.1 User Manual eS-WiFi Module
Preliminary - Subject to change eS-WiFi Module AT Command Set Version v4.1 24
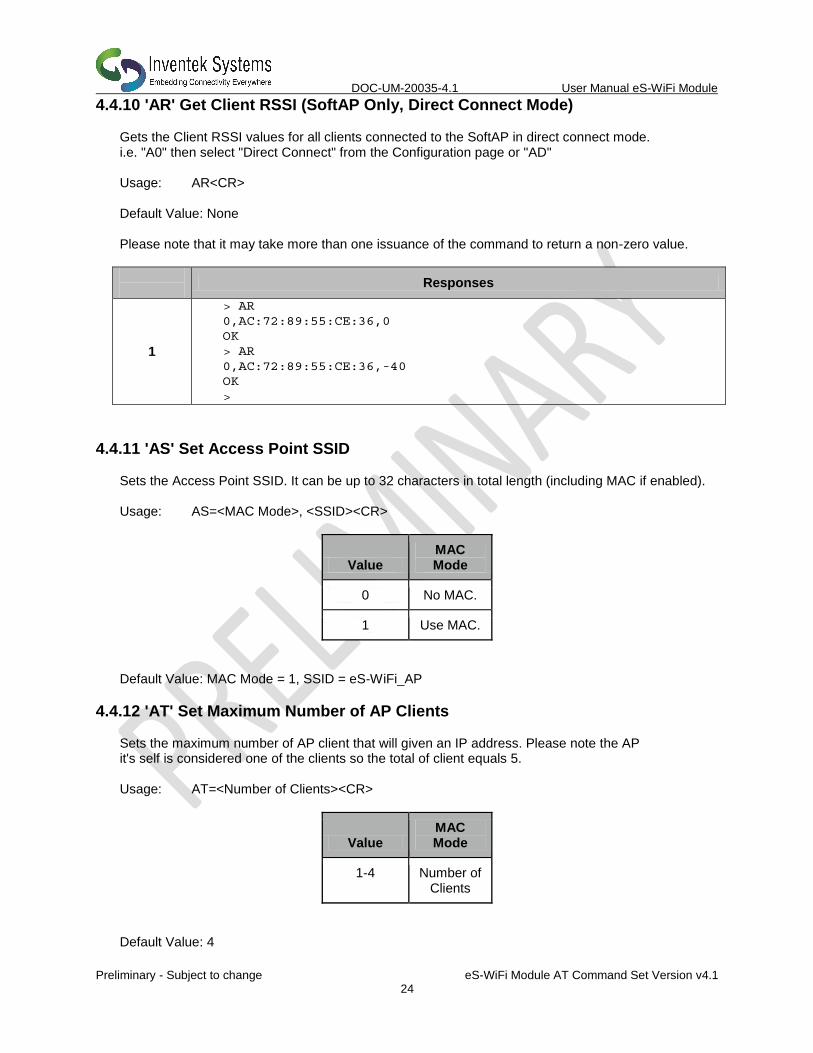
4.4.10 'AR' Get Client RSSI (SoftAP Only, Direct Connect Mode) Gets the Client RSSI values for all clients connected to the SoftAP in direct connect mode. i.e. "A0" then select "Direct Connect" from the Configuration page or "AD" Usage: AR<CR> Default Value: None Please note that it may take more than one issuance of the command to return a non-zero value.
Responses
1
> AR
0,AC:72:89:55:CE:36,0
OK
> AR
0,AC:72:89:55:CE:36,-40
OK
>
4.4.11 'AS' Set Access Point SSID Sets the Access Point SSID. It can be up to 32 characters in total length (including MAC if enabled). Usage: AS=<MAC Mode>, <SSID><CR>
Value MAC Mode
0 No MAC.
1 Use MAC.
Default Value: MAC Mode = 1, SSID = eS-WiFi_AP
4.4.12 'AT' Set Maximum Number of AP Clients Sets the maximum number of AP client that will given an IP address. Please note the AP it's self is considered one of the clients so the total of client equals 5. Usage: AT=<Number of Clients><CR>
Value MAC Mode
1-4 Number of Clients
Default Value: 4

DOC-UM-20035-4.1 User Manual eS-WiFi Module
Preliminary - Subject to change eS-WiFi Module AT Command Set Version v4.1 25
4.5 Select Communication Interface
Used to select SPI, UART, or USB interface for communication with the eS-WiFi module.
4.5.1 ‘B?’ Show Communication Interface Settings Return current Communication Interface settings. Usage: B?<CR>
Value Host
Interface
0 UART.
1 SPI
2 USB – HID
3 USB -VCP
Field 1 2 3 4 5 6 7
Function Host Interface
N/A N/A N/A N/A N/A N/A
Default Value: None Response from eS-WiFi in UART Mode: > 0 OK
>
4.5.2 ‘B2’ Set SPI Mode Set the SPI mode for phase and polarity Usage: B2=<value><CR>
Value Mode
0 CPOL = 0, CPHA = 0
1 CPOL = 0, CPHA = 1
2 CPOL = 1, CPHA =0
3 CPOL = 1, CPHA = 1
Default: 0

DOC-UM-20035-4.1 User Manual eS-WiFi Module
Preliminary - Subject to change eS-WiFi Module AT Command Set Version v4.1 26
4.5.3 ‘B3’ Set SPI Ready Pin Sets whether the WKUP pin is has the SDRDY signal for design that didn't implement the SDRDY pin. Usage: B3=<value><CR>
Value Ready Pin
0 SDRDY(ADC0) Only
1 SDRDY(ADC0) and WKUP
Default: 0

DOC-UM-20035-4.1 User Manual eS-WiFi Module
Preliminary - Subject to change eS-WiFi Module AT Command Set Version v4.1 27
4.6 Configure Network Settings Used to set up the network parameters needed to access a Wi-Fi network. The eS-WiFi can connect to a network using three techniques depending upon your application:
1. Your microcontroller can issue a series of AT commands starting with “C1” as outlined in this section
2. You can setup a “Direct Connection” a private network as detailed in section above. 3. You can start the Access Point and a web server running on eS-WiFi and the user will be
able to connect to the Web Site and enter the password and
4.6.1 ‘C0’ Join a Network Using the user defined parameters of SSID, Passphrase, Security Type, etc. attempt to join a WiFi network for access. A successful Join, returns SSID and IP Address; otherwise, an error message is return. A network cannot be re-joined once the eS-WiFi module has joined a network without first closing the current network connection. Usage: C0<CR> Default Value: None
Responses
C1.3.x
[JOIN ] SSID
[DHCP ] 192.168.2.18
OK
>
Responses
2.4.0
[JOIN ] SSID,192.168.2.18,0,0
OK
>
4.6.2 ‘C1’ Set Network SSID Network Service Set Identifier (SSID) can be up to 32 characters and is an unique identifier (network name) for a wireless network. The eS-WiFi module must use the SSID, Passphrase and WiFi Security to communicate with a wireless network. The SSID is normally supplied by a network administrator. Usage: C1=<SSID><CR> Default Value C1=NONE
DOC-UM-20035-4.1 User Manual eS-WiFi Module
Preliminary - Subject to change eS-WiFi Module AT Command Set Version v4.1 28
4.6.3 ‘C2’ Set Network Passphrase Network Passphrase can be up to 32(63/64 for WPA2, C2.4.0 or greater) characters and is a unique security keyword for access to a wireless network. The eS-WiFi module must use the Passphrase associated with the network SSID and the WiFi Network Security to communicate with a wireless network. The Passphrase is normally supplied by a network administrator. Usage: C2=<Passphrase><CR> Default Value: C2=NONE
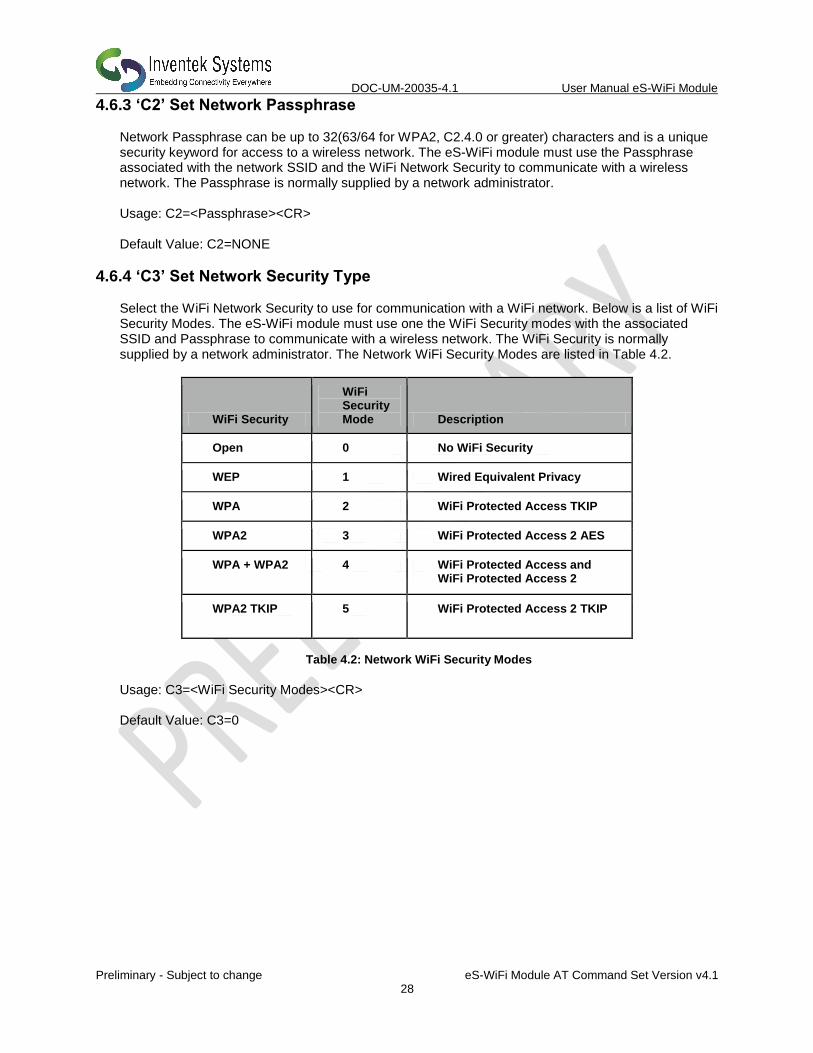
4.6.4 ‘C3’ Set Network Security Type Select the WiFi Network Security to use for communication with a WiFi network. Below is a list of WiFi Security Modes. The eS-WiFi module must use one the WiFi Security modes with the associated SSID and Passphrase to communicate with a wireless network. The WiFi Security is normally supplied by a network administrator. The Network WiFi Security Modes are listed in Table 4.2.
WiFi Security
WiFi Security Mode Description
Open 0 No WiFi Security
WEP 1 Wired Equivalent Privacy
WPA 2 WiFi Protected Access TKIP
WPA2 3 WiFi Protected Access 2 AES
WPA + WPA2 4 WiFi Protected Access and WiFi Protected Access 2
WPA2 TKIP 5 WiFi Protected Access 2 TKIP
Table 4.2: Network WiFi Security Modes
Usage: C3=<WiFi Security Modes><CR> Default Value: C3=0

DOC-UM-20035-4.1 User Manual eS-WiFi Module
Preliminary - Subject to change eS-WiFi Module AT Command Set Version v4.1 29
4.6.4 ‘C4’ Set Network DHCP
Dynamic Host Configuration Protocol (DHCP) is used to query a network for an available IP Address that would be used for communications on the network. The eS-WiFi module can use DHCP or a user defined IP Address. The eS-WiFi module must have an IP Address to communicate with a wireless network. The Network DHCP Modes are listed in Table 4.3.
DHCP DHCP Mode
Disabled User supplied IP Address
0
Enabled Network supplied IP Address
1
Table 4.3: Network DHCP Modes
Usage: C4=<DHCP Modes><CR> Default Value: C4=1 The following commands are used to configure the eS-WiFi to join a wireless network. Here is an example of the AT commands:
C1=Inventek (SSID) C2=Password (Router Passphrase) C3=2 (WPA) C4=1 (DHCP) C0 (eS-WiFi joins the network) CC=1 (Auto Connect On (Automatically connects on power up) Z1 (Saves setting to flash)
In the above scenario as soon as power is applied to the eS-WiFi the module will automatically connect to the Inventek router with the password and settings you entered. If you want to change to another network you simple make the changes to the AT command and save your new settings into flash using the “Z1” command.

DOC-UM-20035-4.1 User Manual eS-WiFi Module
Preliminary - Subject to change eS-WiFi Module AT Command Set Version v4.1 30
4.6.5 ‘C5’ Set Network IP Version Set Network IP Version is used to select between Internet Protocol Version 4 (IPV4) and Internet Protocol Version 6 (IPV6). The IP Version must be set for correct operation of the eS-WiFi module on a wireless network. The Network IP Version settings are listed in Table 4.4.
IP Version
IP Version Mode
IPV4 0
IPV6 1
Table 4.4: Network IP Version Modes
Usage: C5=<IP Version Modes><CR> Default Value C5=0
4.6.6 ‘C6’ Set Network IP Address Set Network IP Address allows the user to define the IP Address that the eS-WiFi module will use on a wireless network. If DHCP is disabled, the IP Address must be set to allow the eS-WiFi module to work correctly on a wireless network. The IP Address must be entered in dotted-decimal notation, which is defined as xxx.xxx.xxx.xxx for the network address. If DHCP is enabled, the IP Address will be set by the wireless network on a network join. Usage: C6=<xxx.xxx.xxx.xxx.><CR> Default Value: 000.000.000.000
4.6.7 ‘C7’ Set Network IP Mask Set Network IP Mask is a user defined value for the network net mask (subnetting of the network) used on the WiFi Network. If DHCP is disabled, the net mask must be set to allow the eS-WiFi module to work correctly on a wireless network. The net mask must be entered in dotted-decimal notation, which is defined as xxx.xxx.xxx.xxx. If DHCP is enabled, the Net Mask will be set by the wireless network on a network join. Usage: C7=<xxx.xxx.xxx.xxx><CR> Default Value: 000.000.000.000

DOC-UM-20035-4.1 User Manual eS-WiFi Module
Preliminary - Subject to change eS-WiFi Module AT Command Set Version v4.1 31
4.6.8 ‘C8’ Set Network Gateway Set Network Gateway is a user defined Gateway IP Address used by the devices on the network to access other networks or as a default gateway when no other IP Address matches any other routes in the network routing table. The Gateway IP Address must be entered in dotted-decimal notation, which is defined as xxx.xxx.xxx.xxx. Usage: C8=<xxx.xxx.xxx.xxx><CR> Default Value: 255.255.255.255
4.6.9 ‘C9’ Set Network Primary DNS Set Network Primary Domain Name System (DNS) is a user defined address used for translating human readable domain names into numerical identifiers for network devices. The Primary DNS must be entered in dotted-decimal notation, which is defined as xxx.xxx.xxx.xxx. Usage C9=<xxx.xxx.xxx.xxx><CR> Default Value: 255.255.255.255
4.6.10 ‘CA’ Set Network Secondary DNS Set Network Secondary DNS is used as a back up to the Primary DNS. The Secondary DNS must be entered in dotted-decimal notation, which is defined as xxx.xxx.xxx.xxx. Usage: CA=<xxx.xxx.xxx.xxx><CR> Default Value: 255.255.255.255
4.6.11 ‘CB’ Set Network Join Retry Count Set Network Join Retry Count is a user defined value that controls the number of times the eS-WiFi module will attempt to join a wireless network before stopping with a failure notice if the system is unable to join the network. Input range for Join Retries is 0 to 10. Usage: CB=<Join Retries><CR> Default Value: 5

DOC-UM-20035-4.1 User Manual eS-WiFi Module
Preliminary - Subject to change eS-WiFi Module AT Command Set Version v4.1 32
4.6.12 ‘CC’ Network Auto Connect Network Auto Connect allows the user to define weather or not the eS-WiFi module will attempt a Join a wireless network after the system is powered up and operational, or after a reset. The Network Auto Connect modes are listed in Table 4.5. You must save the “CC” AT command with the Z1 command to save the setting.
Auto Connect Auto Connect Mode
Disable Network Auto-Join 0
Enable Network Auto-Join 1
Table 4.5: Network Auto Connect Modes
Usage: CC=<Auto Connect Modes><CR> Default Value: 0
4.6.13 ‘CD’ Disconnect from Network To disconnect the eS-WiFi module from a wireless network, the AT Command ‘CD’ is used. ‘CD’ will shut down the network communications and clear the network IP Address, Net Mask, and Gateway Address assigned to the eS-WiFi Module. Usage: CD<CR> Default Value: None
4.6.14 'CE' Set Authorization Type
Set the authorization type for WEP security.
Usage: CE=<Type><CR>
Type IP Version
Mode
0 Open
1 Shared Key
Default Value: 0 (Open)

DOC-UM-20035-4.1 User Manual eS-WiFi Module
Preliminary - Subject to change eS-WiFi Module AT Command Set Version v4.1 33
4.6.15 'CF' Set/Clear Packet Filter (Packet Bypass Mode)
Set/Clear the packet filters when operating in the PBM (Packet Bypass Mode). The PBM sends the
received Ethernet packet directly to host interface bypassing the module’s TCP/IP Stack.
Usage: CF=<Mode Byte><CR>
Bits Filter
00 No Filtering
01 ARP
02 SNMP
40 IPv4
80 Multicast
Note: The filters remove the packets that are not directed to or are not part a Multicast group that has
been enabled to the eS-WiFi module. The packets sent are RAW 802.3 Ethernet packets with the Wi-Fi
headers stripped off. We insert our AT command format at the end of each packet as detailed in section
1.4.2.
Default Value: 00 (No Filtering)
4.6.16 'CJ' Join/Leave IGMP Group
Join or leave a IGMP group.
Usage: CJ=<Action>,<Group IP Address><CR>
Action Join/Leave
0 Leave
1 Join
Default Value: None

DOC-UM-20035-4.1 User Manual eS-WiFi Module
Preliminary - Subject to change eS-WiFi Module AT Command Set Version v4.1 34
4.6.17 'CM' Add/Remove MAC Address To/From Multicast Allow List (Packet Bypass Mode)
Adds or removes a MAC address to or from the multicast allow list while in PBM.
Usage: CM=<MAC Address><CR>
Default Value: None
4.6.18 'CN' Set Country Code
Set the country code for the eS-WiFi module. The country code is a two letter code representing a
country which selects which channels are valid to use.
Usage: CN=<Code><CR>
Please see Appendix A for the list of Country Code supported.
Default Value: 'US'
4.6.19 'CR' Get RSSI of Associated Access Point Get the RSSI on the currently associated Access Point.
Usage: CR<CR>
Response Description
0 No Associated AP
All other values RSSI (dB)
Default Value: None
4.6.20 'CS' Connection Status Gets the current wireless network connection status.
Usage: CS<CR>
Response Status
0 Not Connected
1 Connected
Default Value: None

DOC-UM-20035-4.1 User Manual eS-WiFi Module
Preliminary - Subject to change eS-WiFi Module AT Command Set Version v4.1 35
4.6.21 'CW' Connect using WPS Pin or PBC Connects to an access point using WPS (WiFi Protected Setup) Pin or PBC (Push Button Configuration) methods. Once connected the SSID, Password/Security Key, Security Type settings will be populated and then can be saved using the "Z1" command for use later. Please note when using the Pin method the pin must be set using the "Z7" command.
Usage: CW=<value><CR>
Response Method
0 Pin
1 PBC
Default Value: None
Responses
1
[WPS ] Searching...
[WPS ] Associated
[WPS ] SSID
[DHCP ] 192.168.2.18
OK
>
4.6.22 ‘C?’ Show Network Settings Return current Configured Network Settings. Usage: C?<CR>
Field 1 2 3 4 5 6 7
Function SSID
Password Security Type
DHCP IP Version
IP Address
Mask
Field 8 9 10 11 12 13 14
Function Gateway
DNS1 DNS2 Retries Auto- Connect
Authent -ication
Country Code
Field 15
Function Status
Default Value: None

DOC-UM-20035-4.1 User Manual eS-WiFi Module
Preliminary - Subject to change eS-WiFi Module AT Command Set Version v4.1 36
4.7 DNS Commands
4.7.1 'D0' DNS Lookup This command performs a DNS lookup of a Domain Name to get its IPv4 address. The Domain Name is limited to 64 characters. Usage: D0=<Domain Name><CR> Default Value: None
Example
1
> D0=www.yahoo.com
98.139.183.24
OK
>
4.7.2 ‘D1’ Set mDNS State and Name This command Enables/Disables the use of mDNS and sets the Device name. This is supported in C2.4.0 or greater. Usage: D1=<0/1>,<Device Name><CR> Default: None
Example
1
> D1=1,es-WiFi43362
OK
>
4.7.3 ‘D2’ Set mDNS Services This command sets up the 2 available services. The status will be displayed as part of the Join message (2). This is supported in C2.4.0 or greater. Usage: D2=<Service # 0/1>,<Instance(32chars)>,<Service(32Chars)>,<Port>,<TTL> Default: None
Example
1
> D2=0,0
OK
> C0
[JOIN ] SSID,192.168.2.18,0,0
OK
>
DOC-UM-20035-4.1 User Manual eS-WiFi Module
Preliminary - Subject to change eS-WiFi Module AT Command Set Version v4.1 37
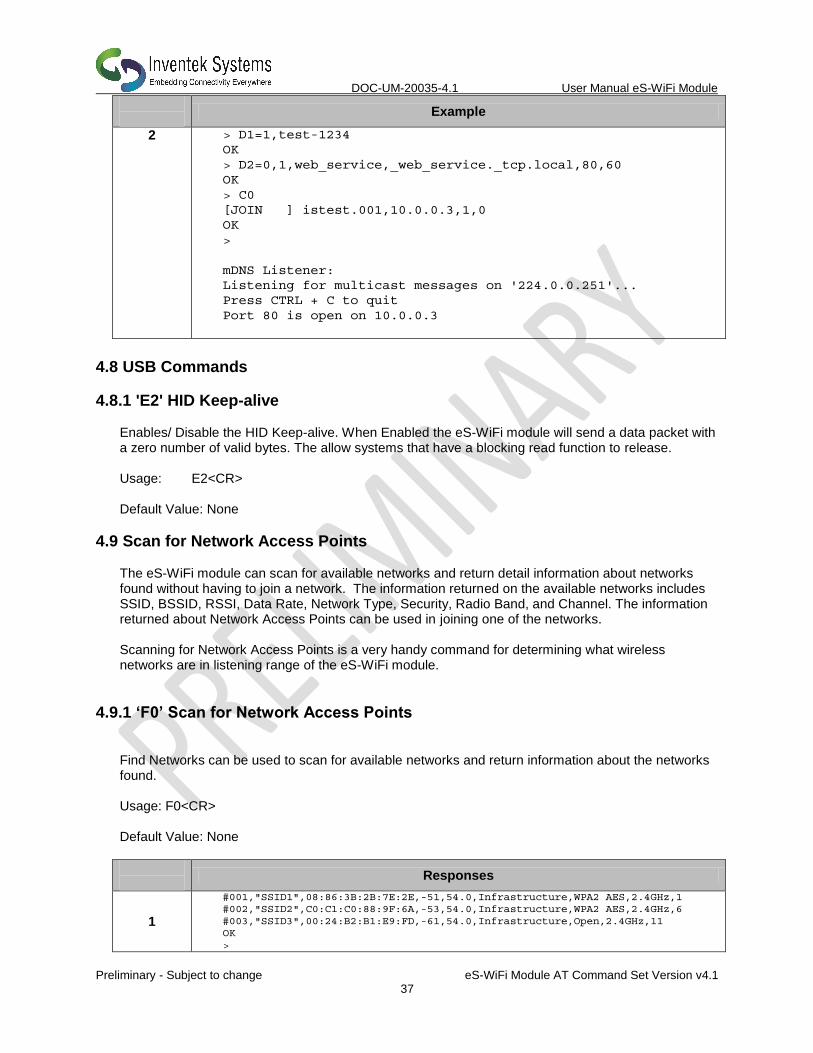
Example
2 > D1=1,test-1234
OK
> D2=0,1,web_service,_web_service._tcp.local,80,60
OK
> C0
[JOIN ] istest.001,10.0.0.3,1,0
OK
>
mDNS Listener:
Listening for multicast messages on '224.0.0.251'...
Press CTRL + C to quit
Port 80 is open on 10.0.0.3
4.8 USB Commands
4.8.1 'E2' HID Keep-alive Enables/ Disable the HID Keep-alive. When Enabled the eS-WiFi module will send a data packet with a zero number of valid bytes. The allow systems that have a blocking read function to release. Usage: E2<CR> Default Value: None
4.9 Scan for Network Access Points The eS-WiFi module can scan for available networks and return detail information about networks found without having to join a network. The information returned on the available networks includes SSID, BSSID, RSSI, Data Rate, Network Type, Security, Radio Band, and Channel. The information returned about Network Access Points can be used in joining one of the networks. Scanning for Network Access Points is a very handy command for determining what wireless networks are in listening range of the eS-WiFi module.
4.9.1 ‘F0’ Scan for Network Access Points
Find Networks can be used to scan for available networks and return information about the networks found. Usage: F0<CR> Default Value: None
Responses
1
#001,"SSID1",08:86:3B:2B:7E:2E,-51,54.0,Infrastructure,WPA2 AES,2.4GHz,1
#002,"SSID2",C0:C1:C0:88:9F:6A,-53,54.0,Infrastructure,WPA2 AES,2.4GHz,6
#003,"SSID3",00:24:B2:B1:E9:FD,-61,54.0,Infrastructure,Open,2.4GHz,11
OK
>

DOC-UM-20035-4.1 User Manual eS-WiFi Module
Preliminary - Subject to change eS-WiFi Module AT Command Set Version v4.1 38
4.9.2 ‘F1’ Set Scan Repeat Count
Set Repeat Count is a user defined value that controls the number of times to scan for Network Access Points. Input range for Set Scan Repeat Count is 0 to 255. Usage: F1=<Set Scan Repeat Count><CR> Default Value: 0
4.9.3 ‘F2’ Set Scan Delay Set Scan Delay is a user defined value that sets the amount of time in milliseconds to wait between scans for Network Access Points. Input range for Set Scan Delay is 0 to 5000, which represents the delay in milliseconds. Usage: F2=<Set Scan Delay><CR> Default Value: 1000
4.9.4 ‘F3’ Set Scan Channel Set Scan Channel to scan for. Input range 0=None 1 to 14 Usage: F3=<Channel><CR> Default Value: 1
4.9.5 ‘F4’ Set Scan BSSID Set Scan Channel to scan for. Usage: F4=<XX.XX.XX.XX.XX.XX><CR> Default Value: None
4.9.6 ‘F5’ Set Scan SSID Set Scan Channel to scan for. Input range #=Clear, <32 character SSID> Usage: F5=<32 character SSID><CR> Default Value: None

DOC-UM-20035-4.1 User Manual eS-WiFi Module
Preliminary - Subject to change eS-WiFi Module AT Command Set Version v4.1 39
4.9.7 ‘F?’ Show Scan Settings Returns current Scan Settings. Usage: F?<CR>
Field 1 2 3 4 5 6 7
Function Repeat (1+Repeat)
Delay (ms)
Default Value: None
4.10 GPIO / ADC Information
You can setup the GPIO to Control an LED, Read a Button, Digital Input or Digital Output. The output is a 3.3V CMOS. GPIO2 is the only output available as an ADC. An couple of examples:
1. Issue and AT command to see if you are connected to the network. Once you know you are connected you can light an LED.
2. Setup GPIO2 as an A/D, connect a temperature sensor and reads the value A user can setup and read the state of GPIO’s 1-7 with the AT command. Some Firmware revision may use some of the GPIO’s for special functions so please contact Inventek for details. For example the SPI firmware uses the GPIO2 (ADC) for the SPI ready function.
4.10.1 'G2' Read GPIO/ADC Reads the current value of the specified GPIO or ACD pin Usage: G2=<Pin Number>,<Value><CR>
Value Type
2 Button
3 Digital Input
5 ADC
Default Value: None
DOC-UM-20035-4.1 User Manual eS-WiFi Module
Preliminary - Subject to change eS-WiFi Module AT Command Set Version v4.1 40
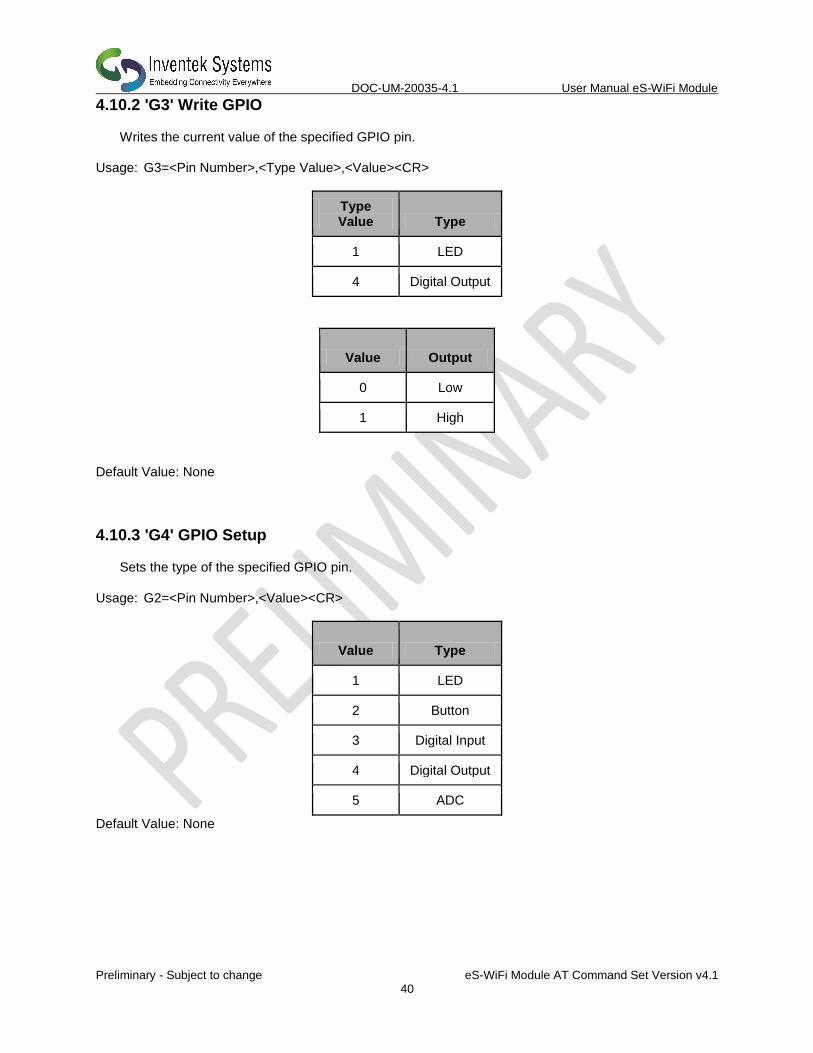
4.10.2 'G3' Write GPIO Writes the current value of the specified GPIO pin.
Usage: G3=<Pin Number>,<Type Value>,<Value><CR>
Type Value Type
1 LED
4 Digital Output
Value Output
0 Low
1 High
Default Value: None
4.10.3 'G4' GPIO Setup Sets the type of the specified GPIO pin.
Usage: G2=<Pin Number>,<Value><CR>
Value Type
1 LED
2 Button
3 Digital Input
4 Digital Output
5 ADC
Default Value: None

DOC-UM-20035-4.1 User Manual eS-WiFi Module
Preliminary - Subject to change eS-WiFi Module AT Command Set Version v4.1 41
4.10.4 'G?' Show GPIO Settings The AT Command ‘G?’ will return the GPIO pin type. To confirm your settings and the sequence of returned states from this request will be grouped by type, not by pin number. Usage: I?<CR>
Field 1 2 3 4 5 6 7
Function GPIO0
GPIO1 GPIO2 GPIO3 GPIO4 CFG0 CFG1
Default Value: None
4.11 Software Information Information about the AT Command application that includes Firmware Version, WICED
TM Version, IP
Stack Name and Version, RTOS Name and Version can be access using the following AT Commands.
4.11.1 ‘I?’ Show Applications Information The AT Command ‘I?’ will return Application, Firmware, Platform, IP Stack, and FreeRTOS information. Usage: I?<CR>
Field 1 2 3 4 5 6 7
Function Product ID
FW Revision
API Revision
Stack Revision
RTOS Revision
CPU Clock
Product Name
Default Value: None
4.12 Miscellaneous Command 4.12.1 'MF' Test External Serial Flash
Does an erase, write, read, and verify test on the external serial flash used for Factory Reset or Over-The-Air (OTA) firmware updates. Usage: MF<CR>
Value Output
0 Failed
1 Passed
Default Value: None

DOC-UM-20035-4.1 User Manual eS-WiFi Module
Preliminary - Subject to change eS-WiFi Module AT Command Set Version v4.1 42
4.12.2 'MR' Message Read (SPI Only) This command reads any asynchronous message that occur based on asynchronous event such as a device connecting the Soft AP(Access Point) A0 and AD commands, TCP connection message from the P5 command. The message will have a Start Of Message Asynchronous [SOMA] and End Of Message Asynchronous [EOMA] delimiters.
Responses
1
[SOMA][AP DHCP] Assigned AC:72:89:55:CE:36 has 192.168.10.100[EOMA]
OK
>
2
[SOMA][TCP SVR] Accepted 192.168.2.2:5024[EOMA]
OK
>
4.12.3 'MS' Suppress Async Message DHCP Suppresses the DHCP assigned messages from being sent to the host. Usage: MS=<Disable/Supress><CR>
Value Output
0 Disabled
1 Suppress
Default Value: 0

DOC-UM-20035-4.1 User Manual eS-WiFi Module
Preliminary - Subject to change eS-WiFi Module AT Command Set Version v4.1 43
4.12.4 'MT' Set Message Type Set the message type. Normal: full messages including usage on error or Simple: No usage on error. Usage: MS=<Disable/Simple><CR>
Value Output
0 Disabled
1 Simple
Default Value: 0
Example
1 > MT ERROR: Unknown Error Usage: MT <0=Normal/1=Simple> > MT=1 OK > MT ERROR >
DOC-UM-20035-4.1 User Manual eS-WiFi Module
Preliminary - Subject to change eS-WiFi Module AT Command Set Version v4.1 44
4.13 Transport Communication Transmission Control Protocol (TCP) and User Datagram Protocol (UDP) are used for point to point or port to port communications on a network. TCP is a guarantee port to port communication protocol that is used to insure data is transferred error free between a server and client. UDP is consider to be faster than TCP for the movement of data over a network; however, UDP does not guarantee the delivery of data between a server and a client. UDP lite is UDP with the partial removable of checksums which may improve network data movement performance but may be more prone to data errors. The eS-WiFi module supports TCP, UDP, and UDP lite for port to port communication. The eS-WiFi module can be configured as a server or client on a network for TCP/UDP communication. In Transport server mode, the eS-WiFi module will wait in the background for connection requests. Once a network device request a connection to the server, the server will enter a mode were data can be requested by a client and data delivered to a client. The eS-WiFi module can also be configured as a client for TCP/UDP communications to make requests to a Transport server on the wireless network. If UDP or UDP lite is used, it is recommended that the user develop their own packet numbering and error checking for data transfers.
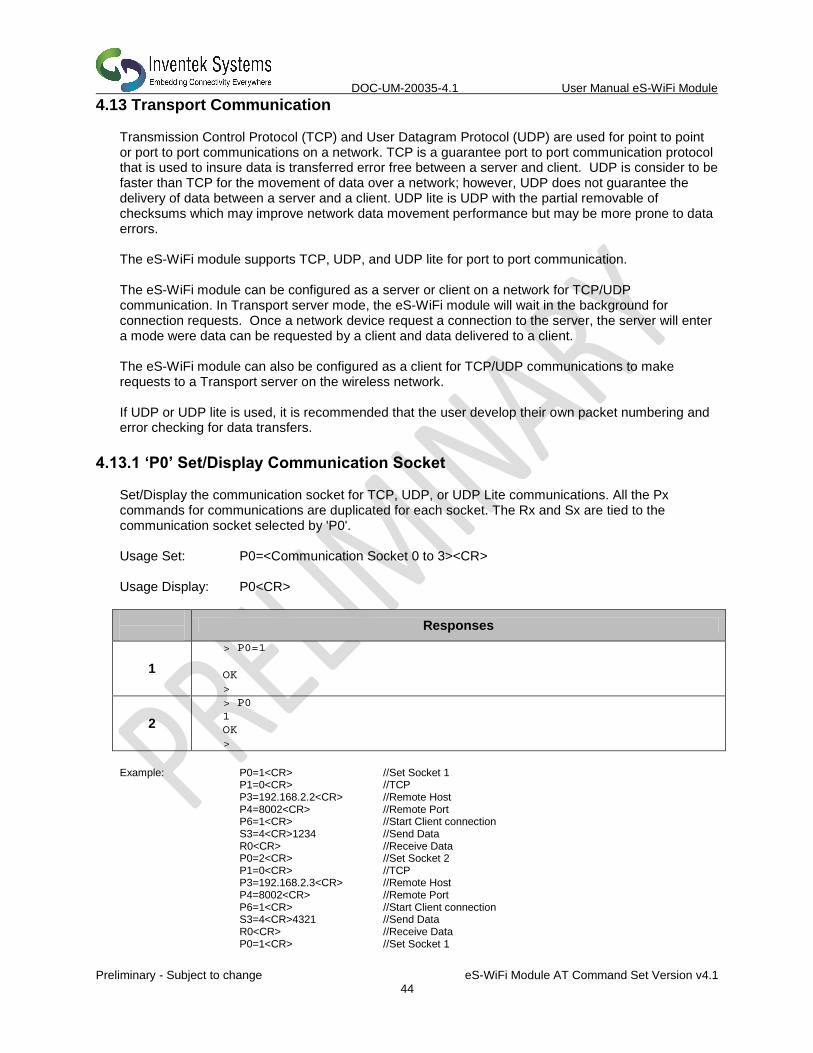
4.13.1 ‘P0’ Set/Display Communication Socket
Set/Display the communication socket for TCP, UDP, or UDP Lite communications. All the Px commands for communications are duplicated for each socket. The Rx and Sx are tied to the communication socket selected by 'P0'. Usage Set: P0=<Communication Socket 0 to 3><CR> Usage Display: P0<CR>
Responses
1
> P0=1
OK
>
2
> P0
1
OK
>
Example: P0=1<CR> //Set Socket 1 P1=0<CR> //TCP P3=192.168.2.2<CR> //Remote Host P4=8002<CR> //Remote Port P6=1<CR> //Start Client connection S3=4<CR>1234 //Send Data R0<CR> //Receive Data P0=2<CR> //Set Socket 2 P1=0<CR> //TCP P3=192.168.2.3<CR> //Remote Host P4=8002<CR> //Remote Port P6=1<CR> //Start Client connection S3=4<CR>4321 //Send Data R0<CR> //Receive Data P0=1<CR> //Set Socket 1
DOC-UM-20035-4.1 User Manual eS-WiFi Module
Preliminary - Subject to change eS-WiFi Module AT Command Set Version v4.1 45
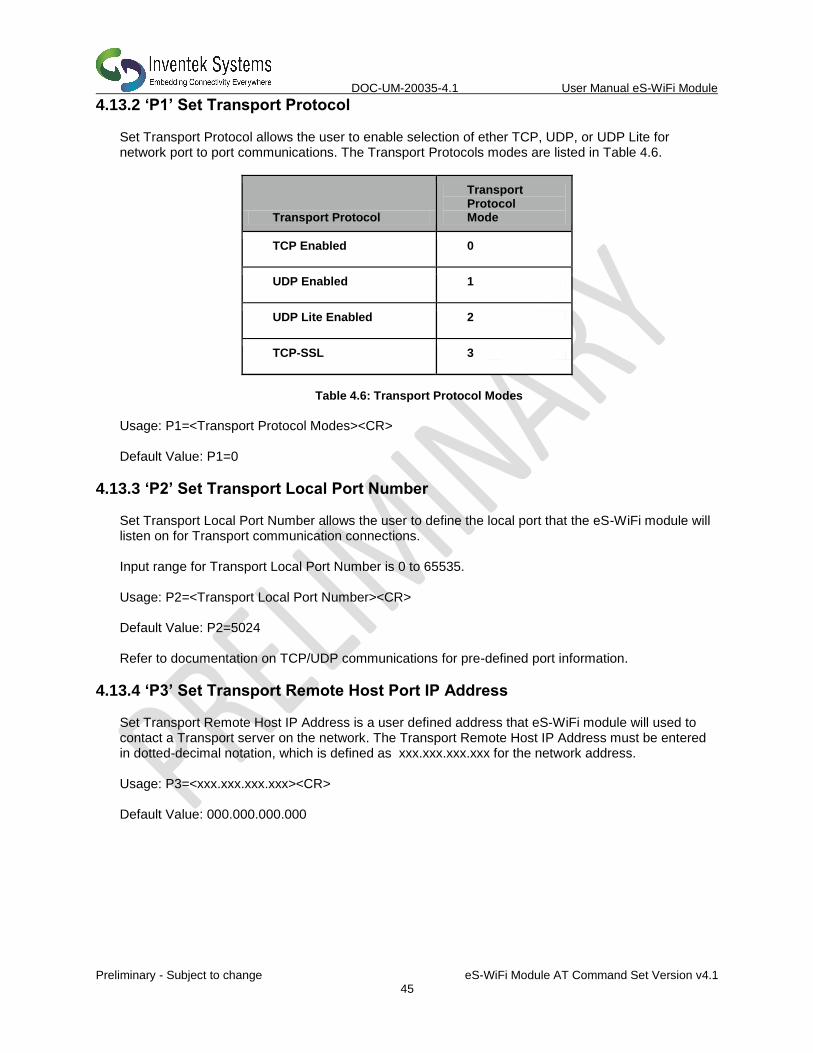
4.13.2 ‘P1’ Set Transport Protocol Set Transport Protocol allows the user to enable selection of ether TCP, UDP, or UDP Lite for network port to port communications. The Transport Protocols modes are listed in Table 4.6.
Transport Protocol
Transport Protocol Mode
TCP Enabled 0
UDP Enabled 1
UDP Lite Enabled 2
TCP-SSL 3
Table 4.6: Transport Protocol Modes
Usage: P1=<Transport Protocol Modes><CR> Default Value: P1=0
4.13.3 ‘P2’ Set Transport Local Port Number Set Transport Local Port Number allows the user to define the local port that the eS-WiFi module will listen on for Transport communication connections. Input range for Transport Local Port Number is 0 to 65535. Usage: P2=<Transport Local Port Number><CR> Default Value: P2=5024 Refer to documentation on TCP/UDP communications for pre-defined port information.
4.13.4 ‘P3’ Set Transport Remote Host Port IP Address Set Transport Remote Host IP Address is a user defined address that eS-WiFi module will used to contact a Transport server on the network. The Transport Remote Host IP Address must be entered in dotted-decimal notation, which is defined as xxx.xxx.xxx.xxx for the network address. Usage: P3=<xxx.xxx.xxx.xxx><CR> Default Value: 000.000.000.000

DOC-UM-20035-4.1 User Manual eS-WiFi Module
Preliminary - Subject to change eS-WiFi Module AT Command Set Version v4.1 46
4.13.5 ‘P4’ Set Transport Remote Port Number Set Transport Remote Port Number allows the user to define the port number for a Transport Server on the network that the eS-WiFi module will use for communications with that server. Input range for Local Port is 0 to 65535. Usage: P4=<Local Port><CR> Default Value: P4=5025
4.13.6 ‘P5’ Stop/Start Transport Server Stop/Start Transport Server is used to stop or start the eS-WiFi module’s Transport Server mode. The AT Command ‘P1’ is used to select between TCP, UDP or UDP Lite server protocols. The Transport Server modes are listed in Table 4.7.
Transport Server Transport Server Mode
Server Disable 0
Server Enable 1
Multi-Accept Server Close Socket 10
Multi-Accept Server Enable 11
Figure 4.7: Transport Server Modes
Usage: P5=<Transport Server Modes><CR> Default Value: P5=0
4.13.7 ‘P6’ Stop/Start Transport Client Stop/Start Transport Client is used to stop or start the eS-WiFi module’s Transport Client mode. The AT Command ‘P1’ is used to select between TCP, UDP or UDP Lite server protocols. The Transport Server modes are listed in Table 4.8.
Transport Client
Transport Client Mode
Client Disable 0
Client Enable 1
Figure 4.8: Transport Server Mode
Usage: P6=<Transport Client Modes><CR> Default Value: P5=0
DOC-UM-20035-4.1 User Manual eS-WiFi Module
Preliminary - Subject to change eS-WiFi Module AT Command Set Version v4.1 47
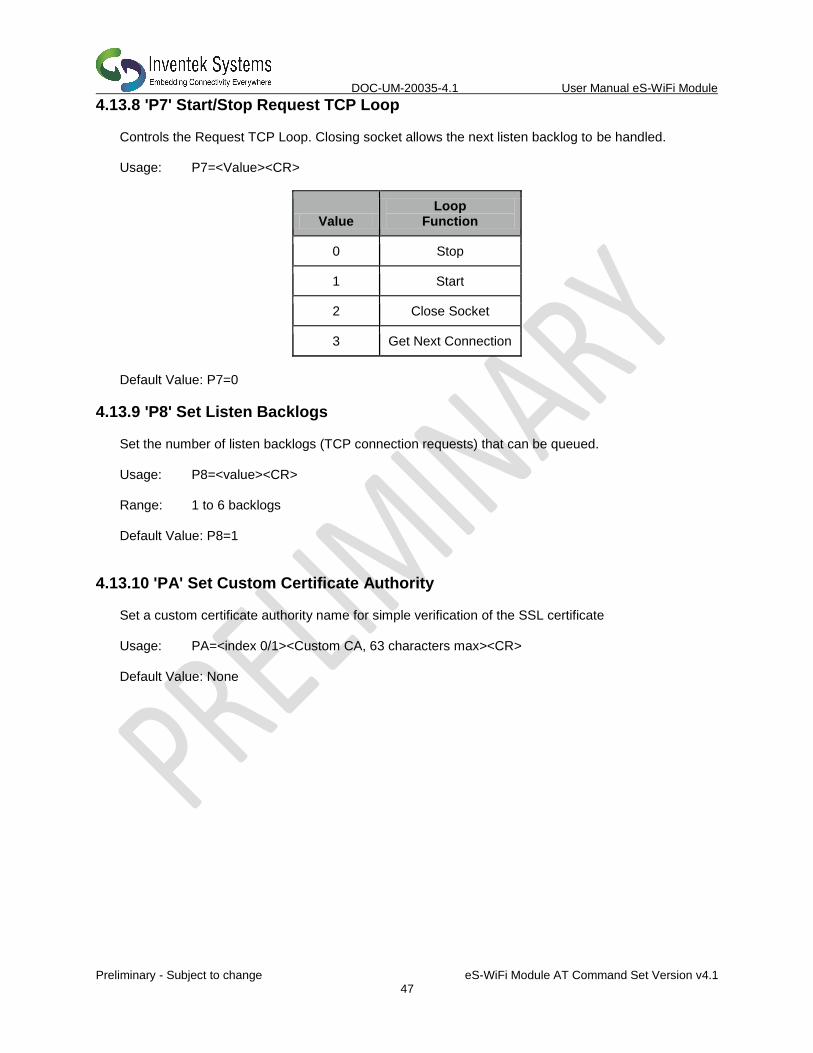
4.13.8 'P7' Start/Stop Request TCP Loop Controls the Request TCP Loop. Closing socket allows the next listen backlog to be handled. Usage: P7=<Value><CR>
Value Loop
Function
0 Stop
1 Start
2 Close Socket
3 Get Next Connection
Default Value: P7=0
4.13.9 'P8' Set Listen Backlogs Set the number of listen backlogs (TCP connection requests) that can be queued. Usage: P8=<value><CR> Range: 1 to 6 backlogs Default Value: P8=1
4.13.10 'PA' Set Custom Certificate Authority Set a custom certificate authority name for simple verification of the SSL certificate Usage: PA=<index 0/1><Custom CA, 63 characters max><CR> Default Value: None
DOC-UM-20035-4.1 User Manual eS-WiFi Module
Preliminary - Subject to change eS-WiFi Module AT Command Set Version v4.1 48
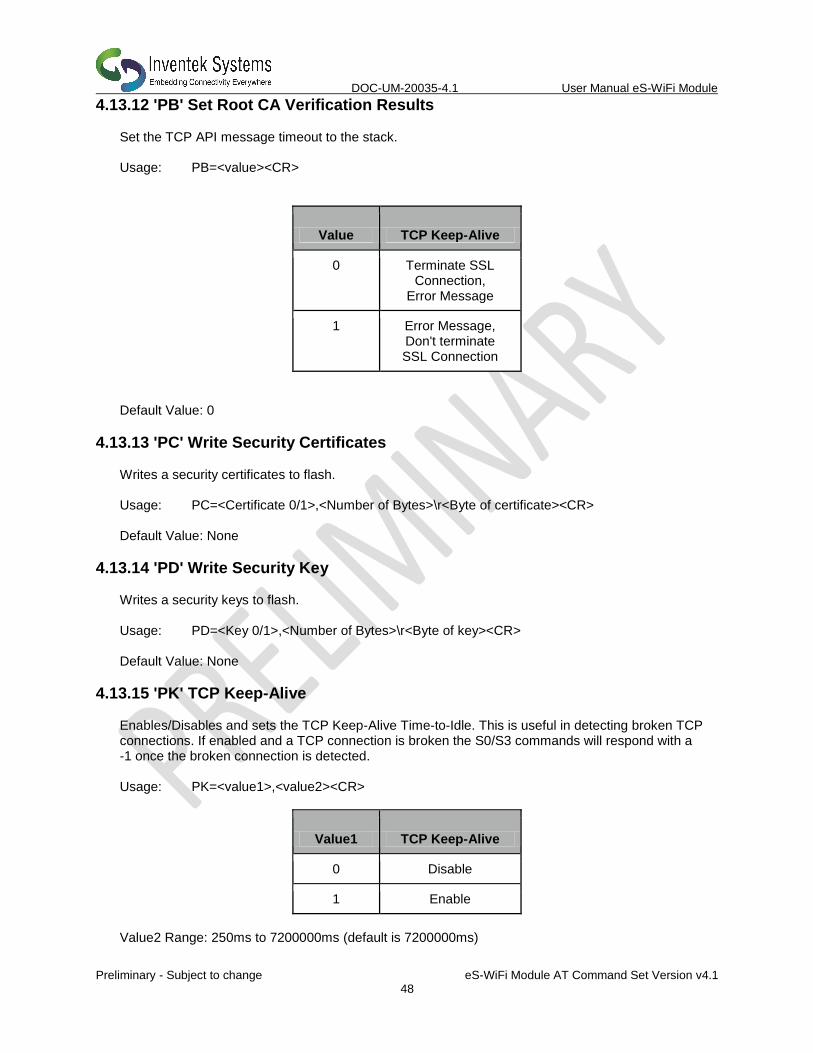
4.13.12 'PB' Set Root CA Verification Results Set the TCP API message timeout to the stack. Usage: PB=<value><CR>
Value TCP Keep-Alive
0 Terminate SSL Connection,
Error Message
1 Error Message, Don't terminate SSL Connection
Default Value: 0
4.13.13 'PC' Write Security Certificates Writes a security certificates to flash. Usage: PC=<Certificate 0/1>,<Number of Bytes>\r<Byte of certificate><CR> Default Value: None
4.13.14 'PD' Write Security Key Writes a security keys to flash. Usage: PD=<Key 0/1>,<Number of Bytes>\r<Byte of key><CR> Default Value: None
4.13.15 'PK' TCP Keep-Alive Enables/Disables and sets the TCP Keep-Alive Time-to-Idle. This is useful in detecting broken TCP connections. If enabled and a TCP connection is broken the S0/S3 commands will respond with a -1 once the broken connection is detected. Usage: PK=<value1>,<value2><CR>
Value1 TCP Keep-Alive
0 Disable
1 Enable
Value2 Range: 250ms to 7200000ms (default is 7200000ms)

DOC-UM-20035-4.1 User Manual eS-WiFi Module
Preliminary - Subject to change eS-WiFi Module AT Command Set Version v4.1 49
4.13.16 'PR' Packet Bypass Mode (PBM) Read Mode Set the Packet Bypass Mode (PBM). In this mode Ethernet packets are forwarded from the WiFi interface, bypass the internal TCI/IP stack and are presented to the host interface. Usage: PR=<Value><CR>
Value Bypass Mode
0 Normal (No Bypass)
1 Forward All
2 Forward Non-ARP
3 Copy All
4 Copy Non-ARP
Note: In all mode the packets forwarded or copied can be filtered with the PF command. Default Value: PR=0
4.13.17 'PS' Raw Ethernet (PBM)/USB HID Packet Statistics Send the raw ether packet statistics to the host.. Usage: PS<CR> Default Value: None Returns: Receive Packets, Write Packets, Command Packets, Current Packet (CP), Last Packet(LP)
4.13.18 'PT' USB HID RX Sequencing When enabled add a sequence number of CP(current packet) of PT (Packets Total) as the second and third bytes of the USB HID packet.. Usage: PT=<0/1><CR> Default Value: None

DOC-UM-20035-4.1 User Manual eS-WiFi Module
Preliminary - Subject to change eS-WiFi Module AT Command Set Version v4.1 50
4.13.19 'PW' Packet Bypass Mode (PBM) Write Packet This writes Ethernet packets directly to the WiFi interface bypassing the internal TCP/IP stack. Usage: PW=<NOB>,<DATA><CR> NOB = Number of Bytes to send. Data = Ethernet Packet (1516 Bytes Max.) Default Value: None
4.13.20 'PY' Set TCP API Message Timeout Set the TCP API message timeout to the stack. Usage: PY=<Timeout in ms><CR> Range: #=Restore Default, 0-65535, ?-Info Default Value: 10000
4.13.21 ‘P?’ Show Transport Settings Return current Transport Communication Settings. Usage: P?<CR>
Field 1 2 3 4 5 6 7
Function Protocol
Client IP
Local Port
Host IP
Remote Port
TCP Server
UDP Server
Field 8 9 10
Function TCP Backlogs
Accept Loop
Read Mode
Default Value: None

DOC-UM-20035-4.1 User Manual eS-WiFi Module
Preliminary - Subject to change eS-WiFi Module AT Command Set Version v4.1 51
4.14 Receive Transport Data Once the Transport Protocol has been defined and either the server or client mode has been enabled, data can be received from a connected server or client using the AT Command ‘R0’ with AT Command ‘R1‘ setting the size of data to read from the transport protocol stack. For TCP data, multiple reads may have been needed to return all of the available data; however, for UDP, data received greater than the number of bytes defined by the AT Command ‘R1’ will be lost.
4.14.1 ‘R0’ Read Transport Data Available receive data is read using the AT Command ‘R0’. ‘R0’ reads the transport buffer for AT Command ‘R1’ size bytes. Multiple reads may been needed to read all of the available TCP data. UDP data received greater than the bytes size defined by R1 will be lost. Usage: R0<CR> Default Value: None
4.14.2 ‘R1’ Set Read Transport Packet Size (bytes) The AT Command ‘R1’ is a user defined value for the packet size of data to return a data read. The AT Command ‘R1’ should be set before performing AT Command ‘R0’. The input range for AT Command ‘R1’ is 0 to 1200 bytes. Usage: R1=<Data Packet Size><CR> Default Value: R1=1200
4.14.3 ‘R2’ Set Read Transport Timeout (ms) The AT Command ‘R2’ is a user defined value for the amount of time in milliseconds to wait on the Read Transport Data AT Command ‘R2’ to finish. The input range for R2 is 0 to 30000 milliseconds. Usage: R2=<Read Transport Timeout><CR> Default Value: R1=5000
4.14.4 'R3' Set Receive Mode The AT Command R3 sets the receive mode. In receive mode = 1 the CRLF(Carriage Return/ Line Feed) delineation are removed from the Read response. Usage: R3=<Value><CR>
Value Receive
Mode
0 Normal
1 No Delineation
Default Value: None

DOC-UM-20035-4.1 User Manual eS-WiFi Module
Preliminary - Subject to change eS-WiFi Module AT Command Set Version v4.1 52
4.14.5 ‘R?’ Show Read Transport Settings Return current Receive Transport Data Settings. Usage: R?<CR>
Field 1 2 3
Function Number of Bytes
Timeout Receive Mode
Default Value: None
4.15 Write Transport Data Once the Transport Protocol has been define and either the server or client mode has been enabled, data can be written to a connected Transport Server or Client using the AT Command ‘S0’ with AT Command ‘S1‘ defining the size of data to write.
4.15.1 ‘S0’ Write Transport Data The AT Command ‘S0’ is used to write data to a Transport Server or Client. The size of the data to write is defined via the AT Command ‘S1’. After the AT Command ‘S0’ is entered, any data writing to the eS-WiFi module’s selected communicating interface will be sent to a connected Transport Server or Client. Once the number bytes defined by AT Command ‘S1’ have been sent, the eS-WiFi module will return back to the AT Command mode waiting for the next ‘AT Command’. If more bytes are written to the eS-WiFi module than are defined by the AT Command ‘S1’, the data will be lost and error message will be returned on the excess data written to the eS-WiFi module selected communication interface. Usage: S0<CR><Data>
4.15.2 ‘S1’ Set Write Transport Packet Size (bytes) AT Command ‘S1’ is used to define the packet size of data to write to a connected Transport Server or Client. The AT Command ‘S1’ should be set before a performing AT Command ‘S0’. Usage: S1=<Data Packet Size><CR> Default Value: S1=1200
4.15.3 ‘S2’ Set Write Transport Timeout (ms) The AT Command ‘S2’ is a user defined value for the amount of time in milliseconds to wait on the Write Transport Data AT Command ‘R2’ to finish. The input range for S2 is 0 to 30000 milliseconds. Usage: S2=<Write Transport Timeout><CR> Default Value: S1=5000

DOC-UM-20035-4.1 User Manual eS-WiFi Module
Preliminary - Subject to change eS-WiFi Module AT Command Set Version v4.1 53
4.15.4 ‘S3’ Write Transport Data The AT Command ‘S3’ is used to write data to a Transport Server or Client. The size of the data to write is defined by the first parameter. After the AT Command ‘S3’ is entered (i.e. the <CR> is received by the eS-WiFi, any data writing to the eS-WiFi module’s selected communicating interface will be sent to a connected Transport Server or Client. Once the number bytes defined by the first parameter have been sent, the eS-WiFi module will return back to the AT Command mode waiting for the next ‘AT Command’. If more bytes are written to the eS-WiFi module than are defined by first parameter, the data will be lost and error message will be returned on the excess data written to the eS-WiFi module selected communication interface. Usage: S3=<Data Packet Size<CR><Data>
4.15.5 ‘S?” Show Write Transport Settings Return current Write Transport Data Settings. Usage: S?<CR>
Field 1 2
Function Number of Bytes
Timeout
Default Value: None
4.16 Ping IP Target Address Ping is a network utility for testing the reachability of hosts on a network. Ping will measure the round-trip time to a host or return a timeout if the host is not reachable.
4.16.1 ‘T0’ Ping IP Target Address The AT Command ‘T0’ will Ping a remote host returning the round-trip time or a timeout message. The host IP Address used by Ping must be set up by using the AT Command ‘T1’. Usage: T0<CR> Default Value: None
4.16.2 ‘T1’ Set Ping Target Address The AT Command ‘T1’ is used to set the IP Address of the host to Ping. Usage T1=<xxx.xxx.xxx.xxx><CR> Default Value: 000.000.000.000

DOC-UM-20035-4.1 User Manual eS-WiFi Module
Preliminary - Subject to change eS-WiFi Module AT Command Set Version v4.1 54
4.16.3 ‘T2’ Set Ping Repeat Count The AT Command ‘T2’ is used to define the number of times to repeat a Ping of a host on the network. Usage T2=<Repeats><CR> Range: 0-65534, 65535=Continuous Default Value: T2=0
4.16.4 ‘T3’ Set Ping Delay (ms) The AT Command ‘T3’ is used to define the amount of time to wait between Pinging a host on the network. The amount of time to wait is defined in milliseconds and is limited to the range of 0 to 5000. Usage T3=<delay in ms><CR> Default Value: T3=0
4.16.5 ‘T?’ Show Ping Settings Return current Ping Settings. Usage: T?<CR>
Field 1 2 3
Function Target IP Address
Repeats (1+Repeats)
Delay
Default Value: None
4.17 Configure UART
The eS-WiFi module can be configured to use its serial interface for communications with a host computer or terminal console programs. Currently, the only UART Configuration mode for the eS-WiFi module is the serial interface, which is set to 8 data bits, no parity, one stop bits. The eS-WiFi modules can support baud rates from 1200 to 2073600 baud. The AT Command ‘U2’ is used to set the baud rate. The eS-WiFi module interface can also be set up in ASCII or Binary mode for data. In addition, the eS-WiFi module can be configured to generate timeout messages on the serial communications.
4.17.1 ‘U0’ Activate UART Settings The AT Command ‘U0’ is used to store the current eS-WiFi module UART settings in non-volatile memory for power on or after a reset for automatic configuration of the UART. Usage: U0<CR> Default Value: None
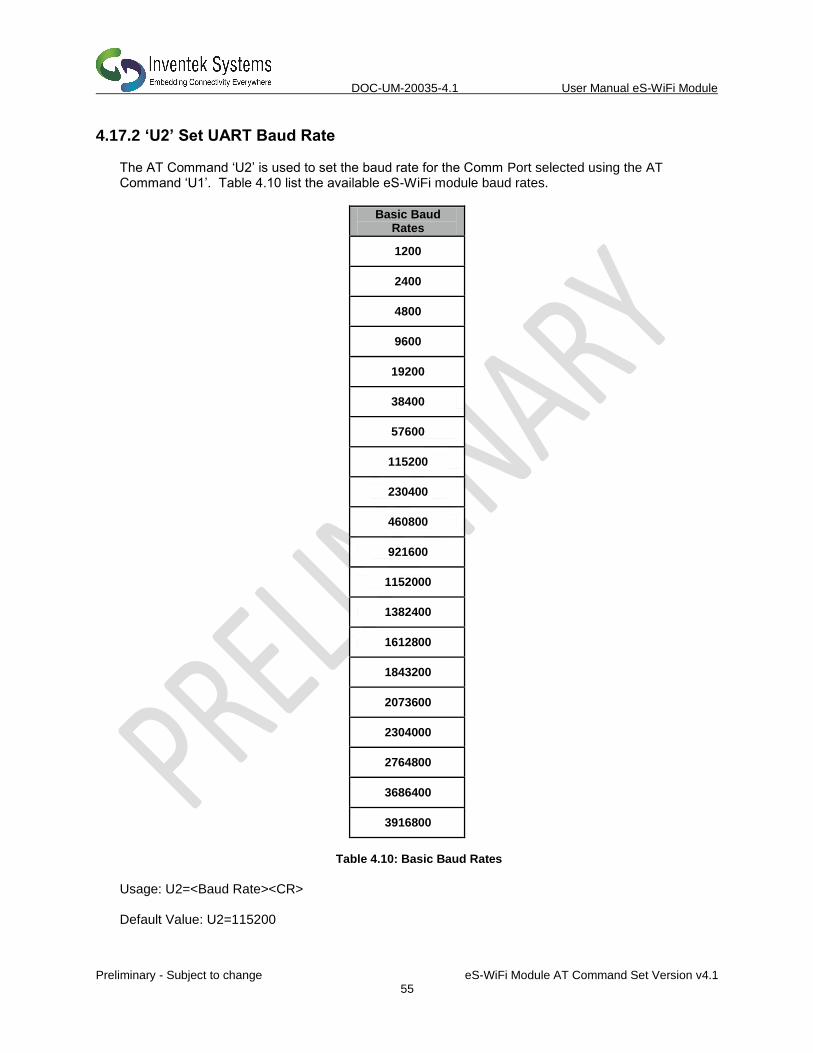
DOC-UM-20035-4.1 User Manual eS-WiFi Module
Preliminary - Subject to change eS-WiFi Module AT Command Set Version v4.1 55
4.17.2 ‘U2’ Set UART Baud Rate The AT Command ‘U2’ is used to set the baud rate for the Comm Port selected using the AT Command ‘U1’. Table 4.10 list the available eS-WiFi module baud rates.
Basic Baud Rates
1200
2400
4800
9600
19200
38400
57600
115200
230400
460800
921600
1152000
1382400
1612800
1843200
2073600
2304000
2764800
3686400
3916800
Table 4.10: Basic Baud Rates
Usage: U2=<Baud Rate><CR> Default Value: U2=115200

DOC-UM-20035-4.1 User Manual eS-WiFi Module
Preliminary - Subject to change eS-WiFi Module AT Command Set Version v4.1 56
4.17.3 ‘U?’ Show UART Setting Return current UART Configuration. Usage: U?<CR>
Field 1 2 3 4 5 6
Function Port
Baud Rate
Data Width
Parity Stop Bit(s)
Mode
Default Value: None

DOC-UM-20035-4.1 User Manual eS-WiFi Module
Preliminary - Subject to change eS-WiFi Module AT Command Set Version v4.1 57
4.18 WLAN
4.18.1 'WL' Set GPIOs for Link Status and Activity Sets the GPIO pins for WLAN link status and activity. The link status can also be used as an IRQ to the host processor to indicate if the module is connected to a wireless network. Usage: WL=<Arg1><Activity GPIO, 0-9>,<Polarity 0=Active Low/1=Active High><CR> Arg1:
# to clear(reset) GPIO pin to original settings
? to show current values
Link GPIO, 0-9
Examples:
> WL=#
OK
> WL=4,3,1
OK
> WL=?
4,3,1
OK
>
Note: GPIOs 0-4 are GPIO0-4 and GPIOs 5-9 are ADC0-4. Default Value: Link = 255,Activity=255
Link Activity
Link Status
State
Off Off No connection
Off On Connected
On Off Connection lost
Flashing Off WPS In-progress
Flashing On Connected with link activity

DOC-UM-20035-4.1 User Manual eS-WiFi Module
Preliminary - Subject to change eS-WiFi Module AT Command Set Version v4.1 58
4.19 System Information Flash
The AT commands can be saved into flash to initialize the systems, such as customer Mac address,
out the auto connect to join a network once the SSID and password have been saved into “User
Space”.
We architected the flash memory to have two banks of flash, partitioned as :
1. Factory Default Space
2. Customer “User Space
We recommend that customers save there default settings in “User Space” and if you have
trouble with flash in the field or a flash error, you can switch to “Factory space” and do a reset , this
will erase the flash in the “User Space” , this starting the module in a known state.
4.19.1 'Z0' Reset To Factory Defaults Reset the current user space settings to factory default. The setting are not saved until a 'Z1' command is issued. You cannot be connected to a Network when trying to reset eS-WiFi to defaults. Usage: Z0<CR> Default Value: None
4.19.2 'Z1' Save Current Settings Saves the current user setting to the space selected with the 'Z3' command. Usage: Z1<CR> Default Value: None
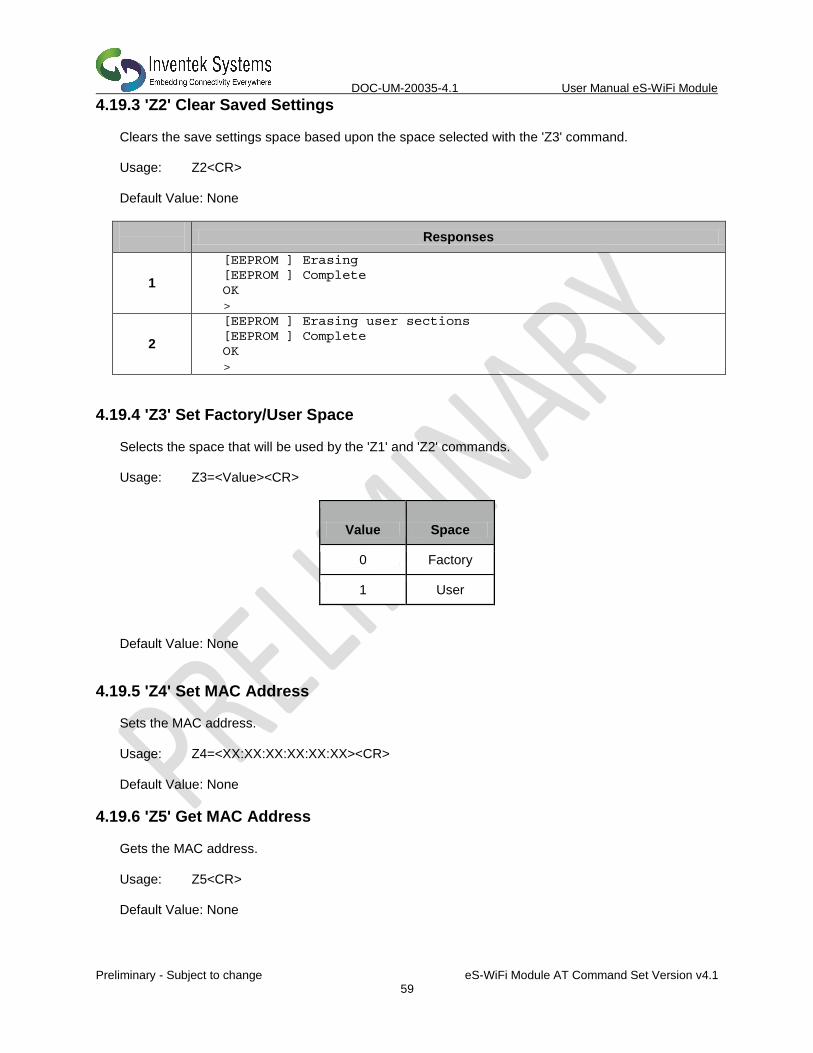
DOC-UM-20035-4.1 User Manual eS-WiFi Module
Preliminary - Subject to change eS-WiFi Module AT Command Set Version v4.1 59
4.19.3 'Z2' Clear Saved Settings Clears the save settings space based upon the space selected with the 'Z3' command. Usage: Z2<CR> Default Value: None
Responses
1
[EEPROM ] Erasing
[EEPROM ] Complete
OK
>
2
[EEPROM ] Erasing user sections
[EEPROM ] Complete
OK
>
4.19.4 'Z3' Set Factory/User Space Selects the space that will be used by the 'Z1' and 'Z2' commands. Usage: Z3=<Value><CR>
Value Space
0 Factory
1 User
Default Value: None
4.19.5 'Z4' Set MAC Address Sets the MAC address. Usage: Z4=<XX:XX:XX:XX:XX:XX><CR> Default Value: None
4.19.6 'Z5' Get MAC Address Gets the MAC address. Usage: Z5<CR> Default Value: None

DOC-UM-20035-4.1 User Manual eS-WiFi Module
Preliminary - Subject to change eS-WiFi Module AT Command Set Version v4.1 60
4.19.7 'Z6' Set Access Point IP Address Sets the Access Point IP address. Usage: Z6=<XXX.XXX.XXX.XXX><CR> Default value: 192.168.10.1
4.19.8 'Z7' Set WPS Pin Sets the 8 digit numeric WPS (WiFi Protected Setup) pin number. Usage: Z7=<XXXXXXXX><CR> Default Value: None
4.19.9 'Z8' Get WPS Pin Gets the WPS (WiFi Protected Setup) pin number. Usage: Z8<CR> Default Value: 12345678
4.19.10 'Z9' Set USB VID/PID Sets the USB VID (Vendor ID) and the PID (Product ID) (Valid only when firmware supports USB). Usage: Z9=<XXXX,XXXX><CR> Default Value: None
4.19.11 'ZC' Clear Factory Lock Switch Clears the Factory Lock switch, allowing the factory flash space to be changed. Usage: ZC=0<CR> Default Value: None
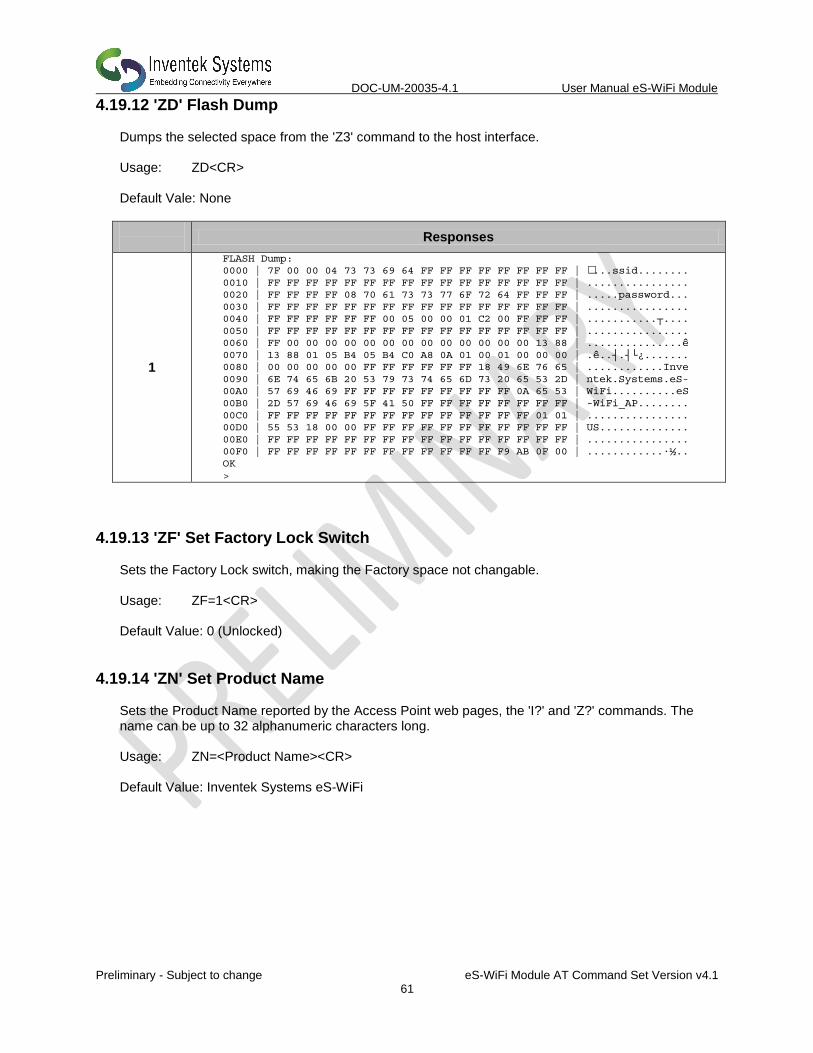
DOC-UM-20035-4.1 User Manual eS-WiFi Module
Preliminary - Subject to change eS-WiFi Module AT Command Set Version v4.1 61
4.19.12 'ZD' Flash Dump Dumps the selected space from the 'Z3' command to the host interface. Usage: ZD<CR> Default Vale: None
Responses
1
FLASH Dump:
0000 | 7F 00 00 04 73 73 69 64 FF FF FF FF FF FF FF FF | •...ssid........ 0010 | FF FF FF FF FF FF FF FF FF FF FF FF FF FF FF FF | ................
0020 | FF FF FF FF 08 70 61 73 73 77 6F 72 64 FF FF FF | .....password...
0030 | FF FF FF FF FF FF FF FF FF FF FF FF FF FF FF FF | ................
0040 | FF FF FF FF FF FF 00 05 00 00 01 C2 00 FF FF FF | ...........┬....
0050 | FF FF FF FF FF FF FF FF FF FF FF FF FF FF FF FF | ................
0060 | FF 00 00 00 00 00 00 00 00 00 00 00 00 00 13 88 | ...............ê
0070 | 13 88 01 05 B4 05 B4 C0 A8 0A 01 00 01 00 00 00 | .ê..┤.┤└¿.......
0080 | 00 00 00 00 00 FF FF FF FF FF FF 18 49 6E 76 65 | ............Inve
0090 | 6E 74 65 6B 20 53 79 73 74 65 6D 73 20 65 53 2D | ntek.Systems.eS-
00A0 | 57 69 46 69 FF FF FF FF FF FF FF FF FF 0A 65 53 | WiFi..........eS
00B0 | 2D 57 69 46 69 5F 41 50 FF FF FF FF FF FF FF FF | -WiFi_AP........
00C0 | FF FF FF FF FF FF FF FF FF FF FF FF FF FF 01 01 | ................
00D0 | 55 53 18 00 00 FF FF FF FF FF FF FF FF FF FF FF | US..............
00E0 | FF FF FF FF FF FF FF FF FF FF FF FF FF FF FF FF | ................
00F0 | FF FF FF FF FF FF FF FF FF FF FF FF F9 AB 0F 00 | ............∙½..
OK
>
4.19.13 'ZF' Set Factory Lock Switch Sets the Factory Lock switch, making the Factory space not changable. Usage: ZF=1<CR> Default Value: 0 (Unlocked)
4.19.14 'ZN' Set Product Name Sets the Product Name reported by the Access Point web pages, the 'I?' and 'Z?' commands. The name can be up to 32 alphanumeric characters long. Usage: ZN=<Product Name><CR> Default Value: Inventek Systems eS-WiFi

DOC-UM-20035-4.1 User Manual eS-WiFi Module
Preliminary - Subject to change eS-WiFi Module AT Command Set Version v4.1 62
4.19.15 'ZO' OTA Firmware Update Get the URL for the update firmware, downloads to external serial flash and then updates the micro-processors on board flash and re-boots. Usage: Z0=<1 - 128><CR><URL Bytes(http://domain:port/bin_file_path)> Default Value: None
4.19.16 'ZP' Power Management Enable/Disable Power Management features. Usage: ZP=<Feature>, <Value><CR>
Feature Value Description
0 None Wi-Fi On, All Power Save Off
1 0 Power Save Off
1 1 Power Save On
2 1-60 Beacon Interval (sec)
3 0 WiFi Radio Off
3 1 WiFi Radio On
4 None Reset WiFi Radio
5 None Stop Mode
6 0-3600000 Sleep in ms
Default Value: Feature 0 (WiFi On, All Power Save Off)
4.19.17 'ZR' Reset Module Software reset of the module. The equivalent of using the RTSN pin. Usage: ZR<CR> Default Value: None
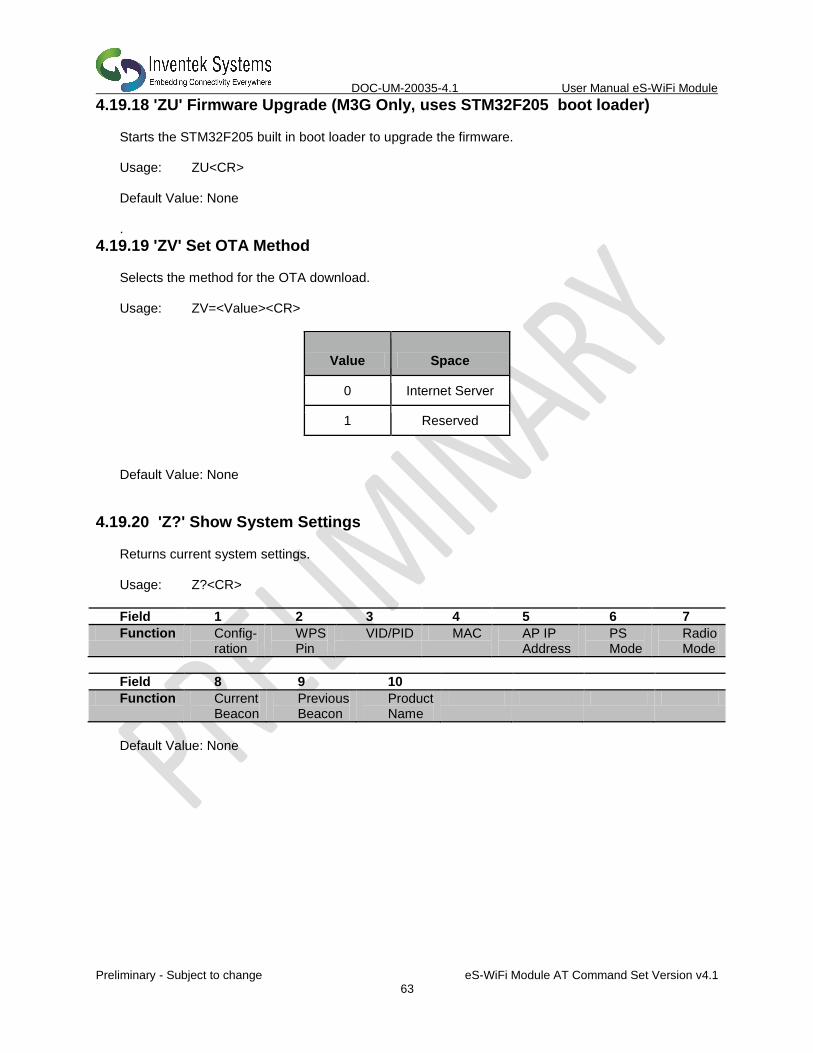
DOC-UM-20035-4.1 User Manual eS-WiFi Module
Preliminary - Subject to change eS-WiFi Module AT Command Set Version v4.1 63
4.19.18 'ZU' Firmware Upgrade (M3G Only, uses STM32F205 boot loader) Starts the STM32F205 built in boot loader to upgrade the firmware. Usage: ZU<CR> Default Value: None .
4.19.19 'ZV' Set OTA Method Selects the method for the OTA download. Usage: ZV=<Value><CR>
Value Space
0 Internet Server
1 Reserved
Default Value: None
4.19.20 'Z?' Show System Settings Returns current system settings. Usage: Z?<CR>
Field 1 2 3 4 5 6 7
Function Config- ration
WPS Pin
VID/PID MAC AP IP Address
PS Mode
Radio Mode
Field 8 9 10
Function Current Beacon
Previous Beacon
Product Name
Default Value: None

DOC-UM-20035-4.1 User Manual eS-WiFi Module
Preliminary - Subject to change eS-WiFi Module AT Command Set Version v4.1 64
5 Example eS-WiFi Module AT Command Usage
This section of the eS_WiFi Module User Manual covers example usage of the AT Command Set. Areas covered include Changing the Baud Rate, Scanning for Access Points, Joining Networks and transferring data via Transmission Control Protocol using TCP and UDP.
5.1 Entering Human Readable Command Mode The eS-WiFi Module supports a Human Readable Command Mode for console interaction with the AT-Command set. For the AT Command usage examples that follow, the Human Readable Command Mode will be used. Sending the AT Command ‘$$$’ at the console prompt will put the eS-WiFi Module into human readable mode. Sending the AT Command ‘---‘ will take the eS-WiFi Module out of Human Readable mode and back into Machine Readable Mode, which is the default console mode for the eS-WiFI Module. Entering Human Readable Mode example: >$$$ Entering CMD mode --- OK >
5.2 Changing the Baud Rate One of the first things that may be useful when using the eS-WiFi Module is to up the data rate of the eS-WiFi Module serial interface for faster interaction with the console and data transfer.
Check Current Baud Rate:
>U? Communication Port: UART Baud Rate: 115200 Data Width: 8 bit Parity: NONE Stop Bits: 1 Mode: ASCII RX Timeout: 0 ms TX Timeout: 0 ms OK >
Set New Baud:
>U2=921600 OK >
Activate Baud Change:
>U0
At this point the eS-WiFi Module will expect a faster or slower baud rate depending on the baud rate used
for U2. The next step is to change the baud rate of the system to continue communicating with the eS-
WiFI Module. After changing the System baud, sending a <CR> should return the console prompt ‘>’, If
not reset the eS-WiFi Module and retry changing the baud.

DOC-UM-20035-4.1 User Manual eS-WiFi Module
Preliminary - Subject to change eS-WiFi Module AT Command Set Version v4.1 65
Check Baud Rate After Change:
>U? Communication Port: UART Baud Rate: 921600 Data Width: 8 bit Parity: NONE Stop Bits: 1 Mode: ASCII RX Timeout: 0 ms TX Timeout: 0 ms OK >
Finding Access Points
The first steps in joining a network is to determining available Access Points in the listening range of the
eS-WiFi Module. The eS-WiFi Module AT Command Set supports functions for finding Access Points.
The AT Command for finding Access Points can be used without joining a network.
5.3 Find Access Points: > F0 Waiting for scan results... #001 SSID : mars BSSID : CC:33:CC:99:39:00 RSSI : -39dBm Max Data Rate : 54.0 Mbits/s Network Type : Infrastructure Security : WPA2 AES Radio Band : 2.4GHz Channel : 2 #002 SSID : jupiter BSSID : EE:99:FF:AA:DD:00 RSSI : -90dBm Max Data Rate : 54.0 Mbits/s Network Type : Infrastructure Security : WPA2 AES Radio Band : 2.4GHz Channel : 1 #003 SSID : saturn BSSID : FF:11:00:55:CC:EE RSSI : -90dBm Max Data Rate : 54.0 Mbits/s Network Type : Infrastructure Security : WEP Radio Band : 2.4GHz Channel : 6 #004 SSID : uranus BSSID : 33:44:99:44:11:CC RSSI : -94dBm Max Data Rate : 54.0 Mbits/s Network Type : Infrastructure Security : WPA2 AES Radio Band : 2.4GHz Channel : 11 End of scan results OK >

DOC-UM-20035-4.1 User Manual eS-WiFi Module
Preliminary - Subject to change eS-WiFi Module AT Command Set Version v4.1 66
If needed, the eS-WiFi Module can be set up to scan a number of times for Access Points. This mode
can be helpful during set up or debug on a network. The example below sets up the eS-WiFi Module to
run 5 Access Point scans.
> F1=5 OK >
> F0 Waiting for scan results... ... (returned data) End of scan results Waiting for scan results... ... (returned data) End of scan results Waiting for scan results... ... (returned data) End of scan results Waiting for scan results... ... (returned data) End of scan results Waiting for scan results... ... (returned data) End of scan results OK >
The eS-WiFi Module can also be set up using an AT Command to delay between scans. The delay is set
in milliseconds. The time range for delay is 0 to 5000 milliseconds.
Delay one second between scans:
> F2=1000 OK >
Check current Find settings:
> F? Scan Repeats: 10 Scan Delay in ms: 1000 OK >
5.4 Join Network Access Point
To join a Network Access Point, the SSID, the PASSWORD, the Security Mode, and the IP Address
mode (DHCP or locally assigned IP Address) must be set. See your network administrator for information
needed to accessing Access Points on your network.
Using the information returned from previous network scan (F0) and network information supplied by the
Network Administrator, the eS-WiFi module can be configured to join an Access Point on the Network.
The following example shows how to join an Access Point using DHCP; however, a locally defined IP
Address can also be used. Refer to the sections 4.6.4, 4.6.6, and 4.6.7 on setting a local IP Address for
the eS-WiFi module.
Set SSID for Access Point:

DOC-UM-20035-4.1 User Manual eS-WiFi Module
Preliminary - Subject to change eS-WiFi Module AT Command Set Version v4.1 67
> C1=mars
Ok >
Set Password for Access Point:
> C2=PASSWORD OK >
Set Security Mode (WPA2 AES) for Access Point:
> C3=3 OK >
Set eS-WiFi Module IP Address via DHCP:
> C4=1 OK >
Check Network Join settings before joining Access Point:
> C? SSID: mars PSWD: PASSWORD SECURITY: WPA2 AES DHCP: Enabled IP: IPV4 IP ADDR: 0.0.0.0 MASK: 0.0.0.0 GW ADDR: 0.0.0.0 DNS1: 0.0.0.0 DNS2: 0.0.0.0 Join Retries: 5 Auto Connect: 0 Status: Not Connected OK >
Join Network Access Point mars, using PASSWORD, WPA2 AES, and DHCP:
> C0 Joining : mars Successfully joined : mars Obtaining IP address via DHCP Network ready IP: 192.168.1.117 OK >
Check Network Join Settings after joining Access Point:
> C? SSID: mars PSWD: PASSWORD SECURITY: WPA2 AES DHCP: Enabled IP: IPV4 IP ADDR: 192.168.1.117 MASK: 255.255.255.0

DOC-UM-20035-4.1 User Manual eS-WiFi Module
Preliminary - Subject to change eS-WiFi Module AT Command Set Version v4.1 68
GW ADDR: 192.168.1.1 DNS1: 0.0.0.0 DNS2: 0.0.0.0 Join Retries: 5 Auto Connect: 0 Status: Connected OK >
Turn on auto connect
“CC”
Save settings in Flash above:
“Z1”
5.5 Ping a System on a Network
From time to time there is a need to Ping a system on a network or Ping a system while debugging a
connection on the network. The eS-WiFi module can be configured to Ping systems on a network. To
Ping a system on a network from the eS-WiFi Module, the IP Address of the system must be set up. In
addition to setting up IP Address for the system to ping, the number of times to perform the Ping and the
delay between Pings can be set. Assuming that eS-Wifi Module has already joined to a network, the
following steps will ping a system on the network.
Set Ping IP Address to 192.168.1.90 for a system on the Network: > T1=192.168.1.90 OK >
Set Ping Repeats to 5:
> T2=5 OK >
Set Ping Delay to 500 milliseconds:
> T3=500 OK >
Check Ping Settings:
> T? Ping Target Address: 192.168.1.90 Ping Repeats: 5 Ping Delay: 500 ms OK >
Ping 192.168.1.90 on the network for five times with a 500 millisecond delay between pings:
> T0 Pinging: 192.168.1.90 Ping Reply 32ms Pinging: 192.168.1.90 Ping Reply 5ms

DOC-UM-20035-4.1 User Manual eS-WiFi Module
Preliminary - Subject to change eS-WiFi Module AT Command Set Version v4.1 69
Pinging: 192.168.1.90 Ping Reply 3ms Pinging: 192.168.1.90 Ping Reply 4ms Pinging: 192.168.1.90 Ping Reply 6ms OK >
5.6 Transmission Control Protocol
To move data across a network, Transmission Control Protocol is often used. The eS-WiFi Module can be
configured to be a Server or Client on a network for Transmission Control Protocol communications.
Also, the eS-WiFi Module supports TCP and UDP protocols for data transfer. The examples that follow
show TCP and UDP Server, and TCP and UDP Client operational modes of the eS-WiFi module. The
following examples also assume that Transmission Control Protocol software is used on the remote
Server or remote Client system and that a port number has been set up for use.
5.6.1 TCP Server Set up and Data Transport
The first step in setting up the eS-WiFi Module to be a TCP server on the Network, assuming the eS-WiFi
has been joined to a Network, is to set the protocol mode, followed by enabling the TCP server mode.
Once the eS-Wifi Module is in TCP server mode, data can then be written to and read from a remote
client on the network.
5.6.1.1 TCP Server Set Up
Set Communication Socket:
> P0=0 OK
Set protocol to TCP:
> P1=0 OK
Set local TCP Port Number to 5024:
> P2=5024 OK >
Enable TCP Server mode (the eS-WiFi Module will wait for a connection from a remote Client):
> P5=1 TCP Task set up OK > Waiting on TCP connection ... > Accepted TCP connection from 192.168.1.107 on port 5024 >

DOC-UM-20035-4.1 User Manual eS-WiFi Module
Preliminary - Subject to change eS-WiFi Module AT Command Set Version v4.1 70
Check TCP Server Mode Configuration:
> P? Transport Protocol: TCP Client IP ADDR: 192.168.1.107 Local Port: 5024 Remote Host IP ADDR: 0.0.0.0 Remote Host Port: 5025 TCP Server Enabled: Yes UDP Server Enabled: No OK >
5.6.1.2 Read and Write TCP Data in Server Mode
The eS-WiFi Module can read and write data over the network using Transmission Control Protocol. To
aid in moving data over the network, the eS-WiFi Module’s AT Command Set has commands for setting
the Packet Size and for setting the Timeouts for data movement. For TCP communications, multiple
reads may be needed to read all available data received. If no data is available, the read will timeout.
Set 1200 byte packet size for Read (range 1 to 1200):
> R1=1200 OK >
Set five second timeout for Read in milliseconds (range 0 to 5000):
> R2=5000
Check Read Configuration:
> R? Number of TCP/UPD bytes to receive per read: 1200 TCP/UPD receive timeout: 5000 ms OK >
Perform Read of Remote Client:
> R0 testing... 1234567890 OK >
Write data to Remote Client:
> S0 0123456789 bytes sent 10 OK >
The timeout was detected because the packet size was set to 1200 bytes, but only 10 bytes were written
to the remote client. After a 5000 millisecond delay and no further data, the 10 bytes were sent.

DOC-UM-20035-4.1 User Manual eS-WiFi Module
Preliminary - Subject to change eS-WiFi Module AT Command Set Version v4.1 71
5.6.2 TCP Client Setup and Data Transport
The first step in setting up the eS-WiFi Module to be a client on a Network, assuming the eS-WiFi has
been joined to a Network, is to set the protocol mode, the remote port number, and remote server IP
Address. Once the eS-Wifi Module has been set up as a client for TCP data transfer, data can then be
written and read from a remote server on the network.
5.6.2.1 TCP Client Set Up
Set Communication Socket:
> P0=0 OK
Set protocol to TCP:
> P1=0 OK
Set remote Server IP Address:
> P3=192.168.1.110 OK
Set remote TCP Port Number to 5025:
> P4=5025 OK >
Enable TCP Client mode:
> P6=1 Connecting to 192.168.1.110 OK >
Once the TCP Client mode AT Command returns to the console, a connection has been established with
a remote server or an error message will be generated on a connection failure.
Check TCP Client Mode Configuration:
> P? Transport Protocol: UDP Client IP ADDR: 0.0.0.0 Local Port: 5024 Remote Host IP ADDR: 192.168.1.110 Remote Host Port: 5025 TCP Server Enabled: NO UDP Server Enabled: No OK >
DOC-UM-20035-4.1 User Manual eS-WiFi Module
Preliminary - Subject to change eS-WiFi Module AT Command Set Version v4.1 72
5.6.2.2 Read and Write TCP Data in Client Mode
The eS-WiFi Module can read and write data over the network using Transmission Control Protocol. To
aid in moving data over the network, the eS-WiFi Module’s AT Command Set has commands for setting
the Packet Size and for setting the Timeouts for data movement. For TCP communications, multiple
reads may be needed to read all available data received. If no data is available, the read will timeout.
Set 1200 byte packet size for Read:
> R1=1200 OK >
Set five second timeout for Read in milliseconds:
> R2=5000
Check Read Configuration:
> R? Number of TCP/UPD bytes to receive per read: 1200 TCP/UPD receive timeout: 5000 ms OK >
Perform Read of Remote Client:
> R0 testing... 1234567890 OK >
Write data to Remote Client:
> S0 0123456789 bytes sent 10 OK >
The timeout was detected because the packet size was set to 1200 bytes, but only 10 bytes were written
to the remote client. After a 5000 millisecond delay and no further data, the 10 bytes were sent.
5.6.3 UDP Server Set Up and Data Transport
The first step in setting up the eS-WiFi Module to be a UDP server on the Network, assuming the eS-WiFi
has been joined to a Network, is to set the protocol mode, followed by enabling the UDP server mode.
Once the eS-Wifi Module is in UDP server mode, data can then be written to and read from a remote
client on the network.

DOC-UM-20035-4.1 User Manual eS-WiFi Module
Preliminary - Subject to change eS-WiFi Module AT Command Set Version v4.1 73
5.6.3.1 UDP Server Set Up
Set protocol to UDP:
> P1=1 OK
Set local UDP Port Number to 5024:
> P2=5024 OK >
Enable UDP Server mode (the eS-WiFi Module will wait for a connection from a remote Client):
> P5=1 UDP Task set up OK > Waiting on UDP connection ... > Accepted UDP connection from 192.168.1.110 on port 5024 >
Check UDP Server Mode Configuration:
> P? Transport Protocol: UDP Client IP ADDR: 192.168.1.110 Local Port: 5024 Remote Host IP ADDR: 0.0.0.0 Remote Host Port: 5025 TCP Server Enabled: No UDP Server Enabled: Yes OK >
5.6.3.2 Read and Write UDP Data in Server Mode
The eS-WiFi Module can read and write data over the network using Transmission Control Protocol. To
aid in moving data over the network, the eS-WiFi Module’s AT Command Set has commands for setting
the Packet Size and for setting the Timeouts for data movement. For UDP communications, the number
bytes sent to the server must match the number bytes to read -- any additional data sent to the server
may be lost.
Set 1200 byte packet size for Read (range 1 to 1200):
> R1=1200 OK >
Set five second timeout for Read in milliseconds (range 0 to 5000):
> R2=5000
DOC-UM-20035-4.1 User Manual eS-WiFi Module
Preliminary - Subject to change eS-WiFi Module AT Command Set Version v4.1 74
Check Read Configuration:
> R? Number of TCP/UPD bytes to receive per read: 1200 TCP/UPD receive timeout: 5000 ms OK >
Perform Read of Remote Client:
> R0 testing... 1234567890 OK >
Write data to Remote Client:
> S0 0123456789 bytes sent 10 OK >
The timeout was detected because the packet size was set to 1200 bytes, but only 10 bytes were written
to the remote client. After a 5000 millisecond delay and no further data, the 10 bytes were sent.
5.6.4 UDP Client Setup and Data Transport
The first step in setting up the eS-WiFi Module to be a client on a Network, assuming the eS-WiFi has
been joined to a Network, is to set the protocol mode, the remote port number, and remote server IP
Address. Once the eS-Wifi Module has been set up as a client for UDP data transfer, data can then be
written and read from a remote server on the network.
5.6.4.1 UDP Client Set Up
Set Communication Socket:
> P0=0 OK
Set protocol to UDP:
> P1=0 OK
Set remote Server IP Address:
> P3=192.168.1.110 OK
Set remote UDP Port Number to 5025:
> P4=5025 OK >

DOC-UM-20035-4.1 User Manual eS-WiFi Module
Preliminary - Subject to change eS-WiFi Module AT Command Set Version v4.1 75
Enable UDP Client mode:
> P6=1 Connecting to 192.168.1.110 OK >
Once the UDP Client mode AT Command returns to the console, a connection has been established with
a remote server or an error message will be generated on a connection failure.
Check UDP Client Mode Configuration:
> P? Transport Protocol: UDP Client IP ADDR: 0.0.0.0 Local Port: 5024 Remote Host IP ADDR: 192.168.1.110 Remote Host Port: 5025 TCP Server Enabled: NO UDP Server Enabled: No OK >
5.6.4.2 Read and Write UDP Data in Client Mode
The eS-WiFi Module can read and write data over the network using Transmission Control Protocol. To
aid in moving data over the network, the eS-WiFi Module’s AT Command Set has commands for setting
the Packet Size and for setting the Timeouts for data movement. For UDP communications, the number
bytes sent to the server must match the number bytes to read -- any additional data sent to the server
may be lost.
Set 1200 byte packet size for Read:
> R1=1200 OK >
Set five second timeout for Read in milliseconds:
> R2=5000
Check Read Configuration:
> R? Number of TCP/UPD bytes to receive per read: 1200 TCP/UPD receive timeout: 5000 ms OK >
Perform Read of Remote Client:
> R0 testing... 1234567890 OK >

DOC-UM-20035-4.1 User Manual eS-WiFi Module
Preliminary - Subject to change eS-WiFi Module AT Command Set Version v4.1 76
Write data to Remote Client:
> S0 0123456789 bytes sent 10 OK >
The timeout was detected because the packet size was set to 1200 bytes, but only 10 bytes were written
to the remote client. After a 5000 millisecond delay and no further data, the 10 bytes were sent.

DOC-UM-20035-4.1 User Manual eS-WiFi Module
Preliminary - Subject to change eS-WiFi Module AT Command Set Version v4.1 77
6. Appendix A
Country Code
Country Code
Country Code
AFGHANISTAN AF
GREECE GR
OMAN OM
ALBANIA AL
GRENADA GD
PAKISTAN PK
ALGERIA DZ
GUADELOUPE GP
PALAU PW
AMERICAN_SAMOA AS
GUAM GU
PANAMA PA
ANGOLA AO
GUATEMALA GT
PAPUA_NEW_GUINEA PG
ANGUILLA AI
GUERNSEY GG
PARAGUAY PY
ANTIGUA_AND_BARBUDA AG
GUINEA GN
PERU PE
ARGENTINA AR
GUINEA_BISSAU GW
PHILIPPINES PH
ARMENIA AM
GUYANA GY
POLAND PL
ARUBA AW
HAITI HT
PORTUGAL PT
AUSTRALIA AU
HOLY_SEE_VATICAN_CITY_STATE VA
PUETO_RICO PR
AUSTRIA AT
HONDURAS HN
QATAR QA
AZERBAIJAN AZ
HONG_KONG HK
REUNION RE
BAHAMAS BS
HUNGARY HU
ROMANIA RO
BAHRAIN BH
ICELAND IS
RUSSIAN_FEDERATION RU
BAKER_ISLAND 0B
INDIA IN
RWANDA RW
BANGLADESH BD
INDONESIA ID
SAINT_KITTS_AND_NEVIS KN
BARBADOS BB
IRAN_ISLAMIC_REPUBLIC_OF IR
SAINT_LUCIA LC
BELARUS BY
IRAQ IQ
SAINT_PIERRE_AND_MIQUELON PM
BELGIUM BE
IRELAND IE
SAINT_VINCENT_AND_THE_GRENADINES VC
BELIZE BZ
ISRAEL IL
SAMOA WS
BENIN BJ
ITALY IT
SANIT_MARTIN_SINT_MARTEEN MF
BERMUDA BM
JAMAICA JM
SAO_TOME_AND_PRINCIPE ST
BHUTAN BT
JAPAN JP
SAUDI_ARABIA SA
BOLIVIA BO
JERSEY JE
SENEGAL SN
BOSNIA_AND_HERZEGOVINA BA
JORDAN JO
SERBIA RS
BOTSWANA BW
KAZAKHSTAN KZ
SEYCHELLES SC
BRAZIL BR
KENYA KE
SIERRA_LEONE SL
BRITISH_INDIAN_OCEAN_TERRITORY IO
KIRIBATI KI
SINGAPORE SG
BRUNEI_DARUSSALAM BN
KOREA_REPUBLIC_OF KR
SLOVAKIA SK
BULGARIA BG
KOSOVO 0A
SLOVENIA SI
BURKINA_FASO BF
KUWAIT KW
SOLOMON_ISLANDS SB
BURUNDI BI
KYRGYZSTAN KG
SOMALIA SO
CAMBODIA KH
LAO_PEOPLES_DEMOCRATIC_REPUBIC LA
SOUTH_AFRICA ZA
CAMEROON CM
LATVIA LV
SPAIN ES
CANADA CA
LEBANON LB
SRI_LANKA LK
CAPE_VERDE CV
LESOTHO LS
SURINAME SR
CAYMAN_ISLANDS KY
LIBERIA LR
SWAZILAND SZ
CENTRAL_AFRICAN_REPUBLIC CF
LIBYAN_ARAB_JAMAHIRIYA LY
SWEDEN SE
CHAD TD
LIECHTENSTEIN LI
SWITZERLAND CH
CHILE CL
LITHUANIA LT
SYRIAN_ARAB_REPUBLIC SY
CHINA CN
LUXEMBOURG LU
TAIWAN_PROVINCE_OF_CHINA TW
CHRISTMAS_ISLAND CX
MACAO MO
TAJIKISTAN TJ
COLOMBIA CO
MACEDONIA_FORMER_YUGOSLAV_REPUBLIC_OF MK
TANZANIA_UNITED_REPUBLIC_OF TZ
COMOROS KM
MADAGASCAR MG
THAILAND TH
CONGO CG
MALAWI MW
TOGO TG
CONGO_THE_DEMOCRATIC_REPUBLIC_OF_THE CD
MALAYSIA MY
TONGA TO
COSTA_RICA CR
MALDIVES MV
TRINIDAD_AND_TOBAGO TT
COTE_DIVOIRE CI
MALI ML
TUNISIA TN
CROATIA HR
MALTA MT
TURKEY TR
CUBA CU
MAN_ISLE_OF IM
TURKMENISTAN TM
CYPRUS CY
MARTINIQUE MQ
TURKS_AND_CAICOS_ISLANDS TC
CZECH_REPUBLIC CZ
MAURITANIA MR
TUVALU TV

DOC-UM-20035-4.1 User Manual eS-WiFi Module
Preliminary - Subject to change eS-WiFi Module AT Command Set Version v4.1 78
Country Code
Country Code
Country Code
DENMARK DK
MAURITIUS MU
UGANDA UG
DJIBOUTI DJ
MAYOTTE YT
UKRAINE UA
DOMINICA DM
MEXICO MX
UNITED_ARAB_EMIRATES AE
DOMINICAN_REPUBLIC DO
MICRONESIA_FEDERATED_STATES_OF FM
UNITED_KINGDOM GB
ECUADOR EC
MOLDOVA_REPUBLIC_OF MD
UNITED_STATES US
EGYPT EG
MONACO MC
UNITED_STATES_REV4 US
EL_SALVADOR SV
MONGOLIA MN
UNITED_STATES_NO_DFS Q2
EQUATORIAL_GUINEA GQ
MONTENEGRO ME
UNITED_STATES_MINOR_OUTLYING_ISLANDS UM
ERITREA ER
MONTSERRAT MS
URUGUAY UY
ESTONIA EE
MOROCCO MA
UZBEKISTAN UZ
ETHIOPIA ET
MOZAMBIQUE MZ
VANUATU VU
FALKLAND_ISLANDS_MALVINAS FK
MYANMAR MM
VENEZUELA VE
FAROE_ISLANDS FO
NAMIBIA NA
VIET_NAM VN
FIJI FJ
NAURU NR
VIRGIN_ISLANDS_BRITISH VG
FINLAND FI
NEPAL NP
VIRGIN_ISLANDS_US VI
FRANCE FR
NETHERLANDS NL
WALLIS_AND_FUTUNA WF
FRENCH_GUINA GF
NETHERLANDS_ANTILLES AN
WEST_BANK 0C
FRENCH_POLYNESIA PF
NEW_CALEDONIA NC
WESTERN_SAHARA EH
FRENCH_SOUTHERN_TERRITORIES TF
NEW_ZEALAND NZ
YEMEN YE
GABON GA
NICARAGUA NI
ZAMBIA ZM
GAMBIA GM
NIGER NE
ZIMBABWE ZW
GEORGIA GE
NIGERIA NG
GERMANY DE
NORFOLK_ISLAND NF
GHANA GH
NORTHERN_MARIANA_ISLANDS MP
GIBRALTAR GI
NORWAY NO
DOC-UM-20035-4.1 User Manual eS-WiFi Module
Preliminary - Subject to change eS-WiFi Module AT Command Set Version v4.1 79
7. Document Revision History
Date Name Description Revision
File Name
12/08/11 RES Initial Creation 0.1 AT Command Set.docx
12/15/11 RES Initial Release 1.0 AT Command Set r1.0.docx
12/15/11 SEP Minor corrections/formatting
1.1 AT Command Set r1.1.docx
1/2/2012 RES Added Usage Examples 1.2 AT Command Set r1.2.docx
3/12/2012 MFT Changed Logo 1.3 AT Command Set r1.3.docx
11/21/2012 SEP Update with new commands
1.4 AT Command Set r1.4.docx
2/5/2013 MFT Update AT Command List 2.0 AT Command Set 2.0.docx
5/9/2013 SEP Update AT Command List 2.1 AT Command Set 2.1.docx
6/16/2014 SEP Updated for C2.4.0.X release
2.2 AT_Command_Set_ DOC_UM_20035-2.2.docx
3/10/2015 SEP Updated for C2.5.0.X release
4.1 AT_Command_Set_ DOC_UM_20035-4.1.docx

DOC-UM-20035-4.1 User Manual eS-WiFi Module
Preliminary - Subject to change eS-WiFi Module AT Command Set Version v4.1 80
Inventek Systems
2 Republic Road
Billerica, MA 01862
www.inventeksys.com


