Intended Use & Introduction
Components
Color Chart
Characteristics
Clinicial Procedures
Composite Build-up
Procedure
Step-by-Step
Studies Physical
Properties
Case Presentations
Questions & Answers
Related Products
Item List
1
GRADIA® PLUSfrom GC
Modular composite system
for indirect restorations
Technical Manual

2
GENERAL REMARK
For use only by a dental professional in the recommended indications.
Prior to use, carefully read the Instructions for Use included with the sets.
Do not use in clinical applications that are not described as an indication.
Veneering of GC GRADIA® PLUS on different types of frameworks shall not be done without the use of recommended polymerization devices and bonding agents. Composite restorations may require clinical repair over time, depending on the situation and the individual case.
This technical manual is illustrated with major works by dental specialists from throughout whole Europe and the US: MDT S. Maffei (IT), MDT R. De Paepe (BE), CDT F. Troyano (ES), MDT M. Brüsch (DE), MDT B. Marais (US), RDT S. Lusty (GB), Dr. R. Medzin (PL), RDT M. Bladen (UK), MDT P. Llobell (FR), RDT L. Johnson (UK), MDT C. Thie (DE), MDT L. Colella (IT), MDT J.A. Pamplona (ES), MDT D. Ibraimi (CH), MDT D. Galle (BE)
BG
CS
HR
HU
PL
RO
RU
SK
SL
SR
UK
TR
LV
LT
ET
EN
DE
FR
IT
ES
NL
DA
SV
PT
EL
NO
FI
This technical manual will give you a
good idea of how easy it is to get a
convincing aesthetic result with
minimum effort, and highlights the
excellent features of this light-cured
composite for indirect techniques.
Before using the material, please
carefully read the instructions for use
included with the sets.
TABLE OF CONTENTS
1. Intended Use and Introduction p.3
2. GC GRADIA® PLUS Components p.6
3. Color Chart p.13
4. GC GRADIA® PLUS Characteristics p.14
5. Clinical Procedure p.17
6. Build-up Procedure p.21
7. Step-by-Step p.31
7.1 Metal Based Restorations p.31
- Build up procedure for p.31
Metal Supported Crown / Standard V-Shade
- Build up procedure for p.33
Metal Supported Implant Bridge / Polychromatic Layering
- Build up procedure for One Body Flask technique p.35
7.2 Metal Free Restorations p.37
- Lustre Paint on CERASMART™ Anterior p.37
- Lustre Paint on CERASMART™ Posterior p.38
- Build up procedure for CERASMART™ Cutback Coping p.39
- Build up procedure for Inlay p.41
- Build up procedure for Anterior Jacket Crown p.43
- Build up procedure for Posterior Jacket Crown p.45
- Build up procedure for Facing p.47
- Build up procedure for One Body Fibre Reinforced Crown or Bridge p.49
7.3 Denture p.50
8. Studies / Physical Properties p.55
9. Questions and Answers p.62
10. Related Products p.64
11. Item List p.69
3
Intended Use & Introduction
Components
Color Chart
Characteristics
Clinicial Procedures
Composite Build-up
Procedure
Step-by-Step
Studies Physical
Properties
Questions & Answers
Related Products
Item List
INTENDED USE
Thank you for choosing GC GRADIA® PLUS.
MODULAR COMPOSITE SYSTEM FOR INDIRECT RESTORATIONS
With GC GRADIA® PLUS, GC introduces a unique modular concept for dental lab indirect composite techniques.
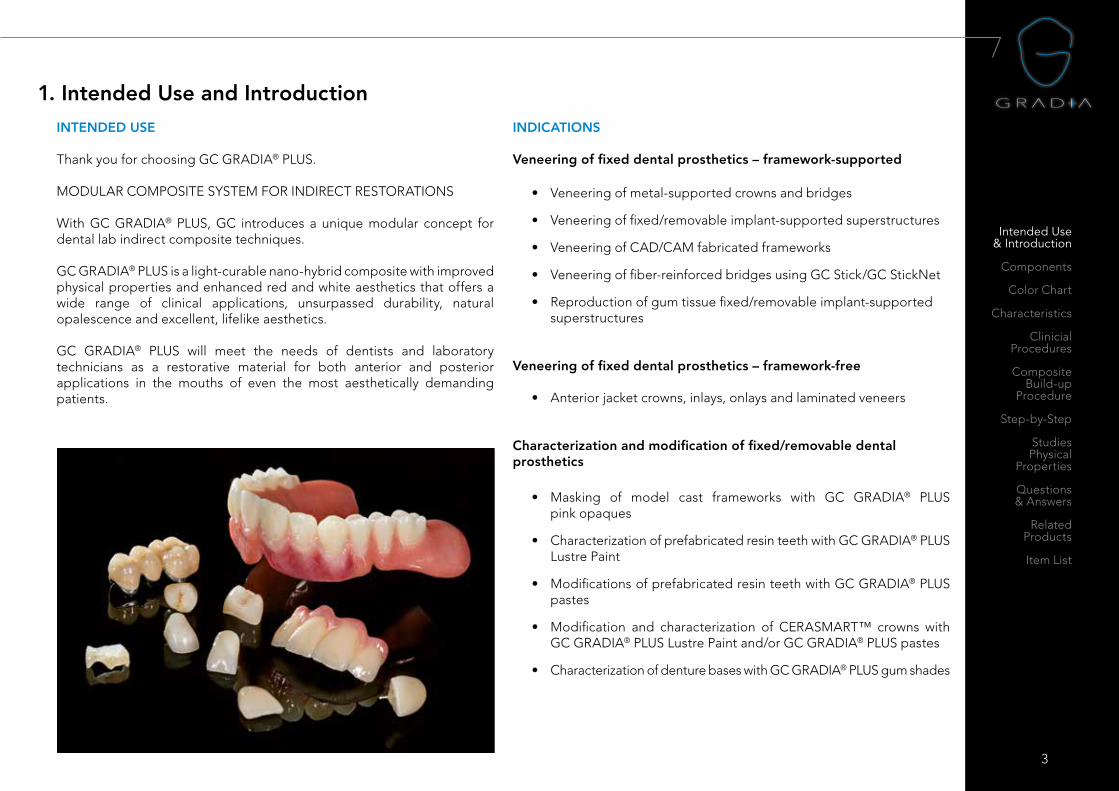
GC GRADIA® PLUS is a light-curable nano-hybrid composite with improved physical properties and enhanced red and white aesthetics that offers a wide range of clinical applications, unsurpassed durability, natural opalescence and excellent, lifelike aesthetics.
GC GRADIA® PLUS will meet the needs of dentists and laboratory technicians as a restorative material for both anterior and posterior applications in the mouths of even the most aesthetically demanding patients.
1. Intended Use and IntroductionINDICATIONS
Veneering of fixed dental prosthetics – framework-supported
• Veneering of metal-supported crowns and bridges
• Veneering of fixed/removable implant-supported superstructures
• Veneering of CAD/CAM fabricated frameworks
• Veneering of fiber-reinforced bridges using GC Stick/GC StickNet
• Reproduction of gum tissue fixed/removable implant-supported superstructures
Veneering of fixed dental prosthetics – framework-free
• Anterior jacket crowns, inlays, onlays and laminated veneers
Characterization and modification of fixed/removable dental prosthetics
• Masking of model cast frameworks with GC GRADIA® PLUS pink opaques
• Characterization of prefabricated resin teeth with GC GRADIA® PLUS Lustre Paint
• Modifications of prefabricated resin teeth with GC GRADIA® PLUS pastes
• Modification and characterization of CERASMART™ crowns with GC GRADIA® PLUS Lustre Paint and/or GC GRADIA® PLUS pastes
• Characterization of denture bases with GC GRADIA® PLUS gum shades

4
INTRODUCTION
Light-cured composites for dental restorations have become popular thanks to their excellent physical properties and ease of use. With growing demand for higher aesthetics in dental treatments, superior quality has also become a crucial requirement. Consequently, one would expect to see more high-quality composites, with superior aesthetics to rank alongside porcelain.Dentists and dental technicians, likewise, want a durable dental composite that rivals the aesthetics and durability of porcelain, but so far composite fillers have affected the translucency and opalescence of crown and bridge composite systems. With this as background and with all these requirements in mind, GC developed GC GRADIA® PLUS.The GC GRADIA® PLUS project resulted in an advanced, high-strength, nano-hybrid, light-curing composite with brightness, translucency and chroma in the oral environment that is similar to porcelain. The aesthetic potential of this novel composite system has been thoroughly reviewed. It features a bright and chromatic color approach that makes it similar to the best porcelains now available. Once in the mouth, GC GRADIA® PLUS has an appearance that perfectly replicates the natural tooth.
STATE-OF-THE-ART CERAMIC-POLYMER TECHNOLOGY
Thanks to GC‘s nano-filler technology - use of high-density and homogeneously dispersed ultra-fine fillers blended into the resin matrix - GC GRADIA® PLUS offers high mechanical properties achieved by light-curing only.GC GRADIA® PLUS stands out for its high wear-resistance, compacted surface and surface smoothness, which delivers durability and high gloss retention.Taking into account its superior mechanical properties, GC GRADIA® PLUS can be considered “gentle” on opposing teeth, which makes it particularly suitable for posterior high-wear, high-pressure restorations that are prone to chipping or cracking when made with porcelain.
MIX AND MASK
For masking metal or other frame materials, there are four V-colored opaques and one base opaque ready to be mixed to obtain the classic V-shades. Having an excellent flow and optimized curing properties, these opaques mask color effectively and are easily and quickly light-cured.
INDICATION-RELATED CONSISTENCY OF PASTES
The different GC GRADIA® PLUS pastes have been fine-tuned based on their typical indication and area of application. Two paste viscosities - Heavy Body and Light Body - ensure easier reproduction of the different areas of tooth structure and gingival tissue. For production of high-aesthetic crown and bridge work, the layering technique using both consistencies in the same restoration - offers an almost unlimited number of color and texture combinations.For fast and easy monolithic reproduction of standard V-shades, the single One Body pastes can be used with ideal results. As they are a “light body” type, they can easily be injected using a transparent mold and light-cured accordingly.
OUTSTANDING WORKABILITY
Both GC GRADIA® PLUS Heavy Body and Light Body pastes have excellent handling properties. Heavy Body pastes ensure a stable build-up of larger areas. They will keep their shape during the creation of internal dentin structures. The paste is non-sticky and can be shaped using a modeling spatula. Light Body pastes are applied in smaller volumes using a modeling spatula or brush. They can even be mixed together to create your own color tone.Both paste types can be used together in the same restoration and are very technique tolerant. As they both have the same mechanical properties, they can easily be polished to a beautiful, natural and durable gloss.

5
Intended Use & Introduction
Components
Color Chart
Characteristics
Clinicial Procedures
Composite Build-up
Procedure
Step-by-Step
Studies Physical
Properties
Questions & Answers
Related Products
Item List
RED AND WHITE IN PERFECT HARMONY
As well as lifelike tooth shades, the GC GRADIA® PLUS system approach offers a solution for the most complex “red” aesthetic cases. The GC GRADIA® PLUS GUM set contains key gum shades that reproduce gingival tissue for indications such as implant superstructures and other fixed or removable prostheses like crowns, bridges and partial dentures.The strength, durability and handling properties of GC GRADIA® GUM shades are the same as GC GRADIA® PLUS tooth shades (Light Body and Heavy Body pastes). The wide variety of red shades allows you to closely match a patient’s gingival tissue in color and texture, regardless of their age or ethnicity. PAINT COLOR AND GLOSS PROTECT YOUR AESTHETICS
The numerous GC GRADIA® PLUS Lustre Paint colors provide an extremely simple way to add long-lasting color and surface gloss. On top of that, thanks to our renowned nano-filler technology, your restorations achieve a high wear resistance.The versatility of the Lustre Paints will impress you. You can choose from a wide variety of colors, both for internal and external characterization, leading to perfect aesthetics. They can easily be mixed together to produce even more color nuances. You can even create your own preferred consistency using the Lustre Paint Diluting Liquid.Using this light-cured characterization coating on the surface of your work reduces the polishing stage, saving you valuable time and the technique is easy.
CURING AT THE SPEED OF LIGHT
All GC GRADIA® PLUS shades completely polymerize in short irradiation times with the all-new GC Labolight DUO. The days when you needed two curing devices in your laboratory (one for intermediate and another for final curing) are now a thing of the past. Our state-of-the-art multi-functional light-curing device combines two curing modes: pre-curing (step mode) and final curing (full mode).
Equipped with the latest double wavelength LED technology, the Labolight DUO can be used to cure any of GC’s composites in a safe and durable way, while the high power outlet means quicker light-curing cycles. Its automated rotary system and reflective plate distributes the light with optimum efficiency and exposes your work from all sides. The curing stand carefully positions the objects during all light-curing cycles.The Labolight DUO causes no change whatsoever to the GC GRADIA® PLUS color, so it allows technicians to see subtle colors in the final restoration throughout all phases of fabrication.
MODULAR APPROACH
GC GRADIA® PLUS is a modular concept that allows you to step into the system wherever you like, choosing the module (set) that meets your demands or indications. You can easily add more modules, each time opening up more aesthetic possibilities and case solutions.The color range of this novel composite has been carefully chosen, fine-tuned and adapted to the needs of the dental technician. Compared to conventional composite systems, GC GRADIA® PLUS has fewer standard colors, making it more compact and cost-effective. COMPACT BUT COMPLETE - LESS IS MORE
More compact but also more complete.The range of Light Body shades and their unique consistency allow you to use it pure or mix shades together without reducing its superior strength. To match specific enamel areas you can easily create your own Light Body mixture: “Enamel-Opal” or “Transpa-Blue”. To match more chromatic areas of dentin, simply mix your Light Body “Dentin-Orange”.So, finally you have a composite that can be mixed and that offers you a way of working similar to that of ceramic veneering.To make it even more complete, the innovative internal and external paintable Lustre Paint colors can be used to create numerous individual colors.And at the same time, when used externally it gives you the gloss and protection you want for your beautiful work.

6
A NEW STANDARD IN LIFELIKE MIXING AND LAYERING OF SHADES
GC GRADIA® PLUS sets a new standard for composite indirect techniques with improved aesthetics and superior mechanical properties, ensuring a long-term, permanent solution. We are convinced that GC GRADIA® PLUS will meet the needs of dentists and laboratory technicians as a restorative material for both anterior and posterior applications in the mouths of the most aesthetically demanding patients.
2. GC GRADIA® PLUS ComponentsOPAQUE (O)A paste-type opaque with exceptional light-curing characteristics. A paste-type opaque that applies readily, flows easily yet will not drip or run. Exceptional masking properties. The 4 Opaques - A,B,C,D - and Opaque Base express all 16 basic V-tooth shades when mixed together.
Shades: O-Base, OA, OB, OC, OD.
MODULAR COMPOSITE SYSTEM FOR INDIRECT RESTORATIONS
GRADIA® PLUS – Opaque
OPAQUE0.5 mm
O-BASE OA OB OC OD
GRADIA® PLUS – Paste Heavy Body
DENTIN1.0 mm
HB-DA1 HB-DA2 HB-DA3 HB-DA3.5 HB-DB1 HB-DB3 HB-DC3 HB-DD2 HB-DW
ENAMEL1.0 mm
HB-EL HB-ED HB-PE HB-CLF
OPAQUE DENTIN1.0 mm HB-ODA HB-ODB HB-ODC HB-ODD HB-ODW
GRADIA® PLUS – Paste Light Body
BASE1.0 mm
LB-Base D LB-Base E LB-Base CLF LB-Base OD LB-Base Opal
EFFECT1.0 mm
LB-Orange LB-Red LB-Yellow LB-Blue LB-Grey LB-Milky
INLAY1.0 mm
LB-Inlay E LB-Inlay TD
BLEACH1.0 mm
LB-DW LB-ODW Image by S. Maffei
7
Intended Use & Introduction
Components
Color Chart
Characteristics
Clinicial Procedures
Composite Build-up
Procedure
Step-by-Step
Studies Physical
Properties
Questions & Answers
Related Products
Item List
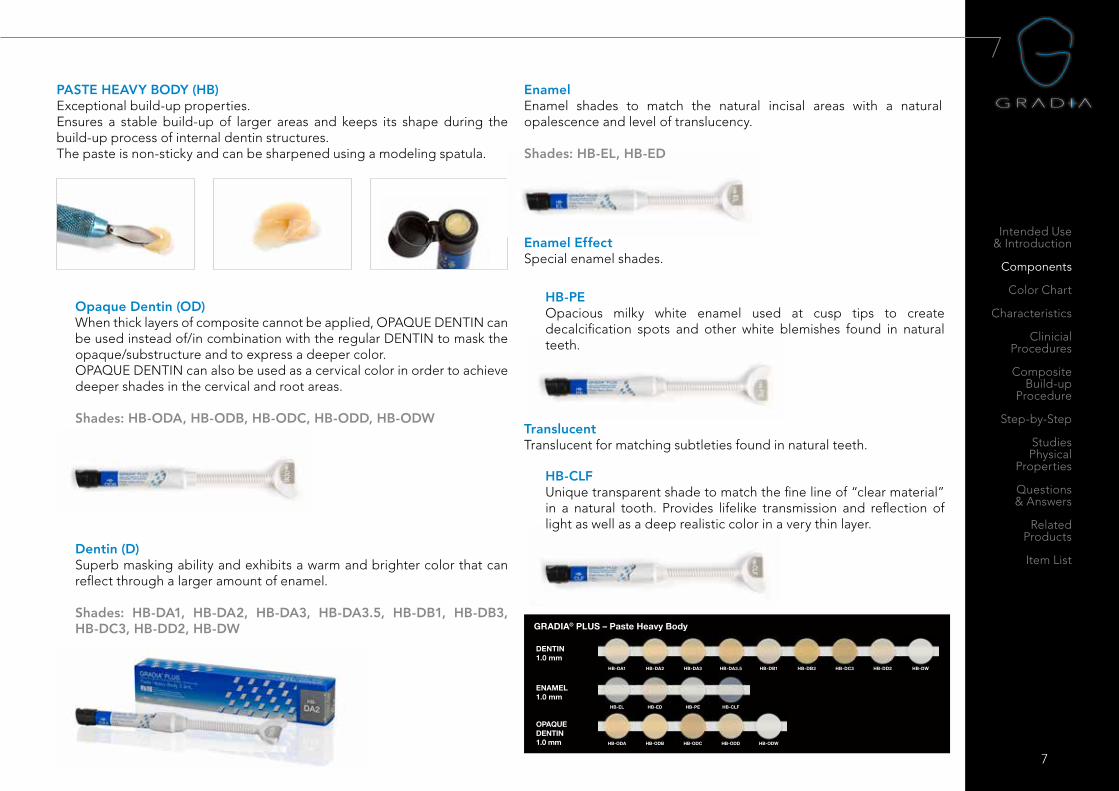
PASTE HEAVY BODY (HB)Exceptional build-up properties. Ensures a stable build-up of larger areas and keeps its shape during the build-up process of internal dentin structures. The paste is non-sticky and can be sharpened using a modeling spatula.
Dentin (D)Superb masking ability and exhibits a warm and brighter color that can reflect through a larger amount of enamel.
Shades: HB-DA1, HB-DA2, HB-DA3, HB-DA3.5, HB-DB1, HB-DB3, HB-DC3, HB-DD2, HB-DW
MODULAR COMPOSITE SYSTEM FOR INDIRECT RESTORATIONS
GRADIA® PLUS – Opaque
OPAQUE0.5 mm
O-BASE OA OB OC OD
GRADIA® PLUS – Paste Heavy Body
DENTIN1.0 mm
HB-DA1 HB-DA2 HB-DA3 HB-DA3.5 HB-DB1 HB-DB3 HB-DC3 HB-DD2 HB-DW
ENAMEL1.0 mm
HB-EL HB-ED HB-PE HB-CLF
OPAQUE DENTIN1.0 mm HB-ODA HB-ODB HB-ODC HB-ODD HB-ODW
GRADIA® PLUS – Paste Light Body
BASE1.0 mm
LB-Base D LB-Base E LB-Base CLF LB-Base OD LB-Base Opal
EFFECT1.0 mm
LB-Orange LB-Red LB-Yellow LB-Blue LB-Grey LB-Milky
INLAY1.0 mm
LB-Inlay E LB-Inlay TD
BLEACH1.0 mm
LB-DW LB-ODW Image by S. Maffei
HB-PEOpacious milky white enamel used at cusp tips to create decalcification spots and other white blemishes found in natural teeth.
HB-CLFUnique transparent shade to match the fine line of “clear material” in a natural tooth. Provides lifelike transmission and reflection of light as well as a deep realistic color in a very thin layer.
Enamel Enamel shades to match the natural incisal areas with a natural opalescence and level of translucency.
Shades: HB-EL, HB-ED
Enamel EffectSpecial enamel shades.
Translucent Translucent for matching subtleties found in natural teeth.
Opaque Dentin (OD) When thick layers of composite cannot be applied, OPAQUE DENTIN can be used instead of/in combination with the regular DENTIN to mask the opaque/substructure and to express a deeper color. OPAQUE DENTIN can also be used as a cervical color in order to achieve deeper shades in the cervical and root areas.
Shades: HB-ODA, HB-ODB, HB-ODC, HB-ODD, HB-ODW

8
LB-Base ODThis opaque dentin shade can be used instead of/in combination with the regular DENTIN to mask the opaque/substructure and express a deeper color. OPAQUE DENTIN can also be used as a cervical color in order to achieve deeper shades in the cervical and root areas.
LB-Base OpalHigh opalescent effect shade.Can be used pure or can be mixed with other Light Body shades to create your own color tone e.g. increasing the opalescence of the enamel shade - mixing LB-Opal with LB-Base Enamel.
PASTE LIGHT BODY (LB)Base shades can be considered as neutral effect shades.
LB-Base DSuperb masking ability.Exhibits a warm and brighter color that can reflect through a larger amount of enamel. Can be used pure or mixed with other Light Body shades to create your own color tone e.g. increasing the chroma of the shade saturation - mixing in LB-Orange with LB-Base Dentin.
LB-Base EEnamel shade to match the natural incisal areas with a natural opalescence and level of translucency. Can be used pure or mixed together to create your own color tone e.g. increasing the opalescence of the enamel shade - mixing in LB-Opal with LB-Base Enamel.
LB-Base CLFUnique transparent shade to match the fine line of “clear material” in a natural tooth. Provides lifelike transmission and reflection of light as well as a deep realistic color in a very thin layer.
MODULAR COMPOSITE SYSTEM FOR INDIRECT RESTORATIONS
GRADIA® PLUS – Opaque
OPAQUE0.5 mm
O-BASE OA OB OC OD
GRADIA® PLUS – Paste Heavy Body
DENTIN1.0 mm
HB-DA1 HB-DA2 HB-DA3 HB-DA3.5 HB-DB1 HB-DB3 HB-DC3 HB-DD2 HB-DW
ENAMEL1.0 mm
HB-EL HB-ED HB-PE HB-CLF
OPAQUE DENTIN1.0 mm HB-ODA HB-ODB HB-ODC HB-ODD HB-ODW
GRADIA® PLUS – Paste Light Body
BASE1.0 mm
LB-Base D LB-Base E LB-Base CLF LB-Base OD LB-Base Opal
EFFECT1.0 mm
LB-Orange LB-Red LB-Yellow LB-Blue LB-Grey LB-Milky
INLAY1.0 mm
LB-Inlay E LB-Inlay TD
BLEACH1.0 mm
LB-DW LB-ODW Image by S. Maffei
9
MODULAR COMPOSITE SYSTEM FOR INDIRECT RESTORATIONS
GRADIA® PLUS – Opaque
OPAQUE0.5 mm
O-BASE OA OB OC OD
GRADIA® PLUS – Paste Heavy Body
DENTIN1.0 mm
HB-DA1 HB-DA2 HB-DA3 HB-DA3.5 HB-DB1 HB-DB3 HB-DC3 HB-DD2 HB-DW
ENAMEL1.0 mm
HB-EL HB-ED HB-PE HB-CLF
OPAQUE DENTIN1.0 mm HB-ODA HB-ODB HB-ODC HB-ODD HB-ODW
GRADIA® PLUS – Paste Light Body
BASE1.0 mm
LB-Base D LB-Base E LB-Base CLF LB-Base OD LB-Base Opal
EFFECT1.0 mm
LB-Orange LB-Red LB-Yellow LB-Blue LB-Grey LB-Milky
INLAY1.0 mm
LB-Inlay E LB-Inlay TD
BLEACH1.0 mm
LB-DW LB-ODW Image by S. Maffei
Intended Use & Introduction
Components
Color Chart
Characteristics
Clinicial Procedures
Composite Build-up
Procedure
Step-by-Step
Studies Physical
Properties
Questions & Answers
Related Products
Item List
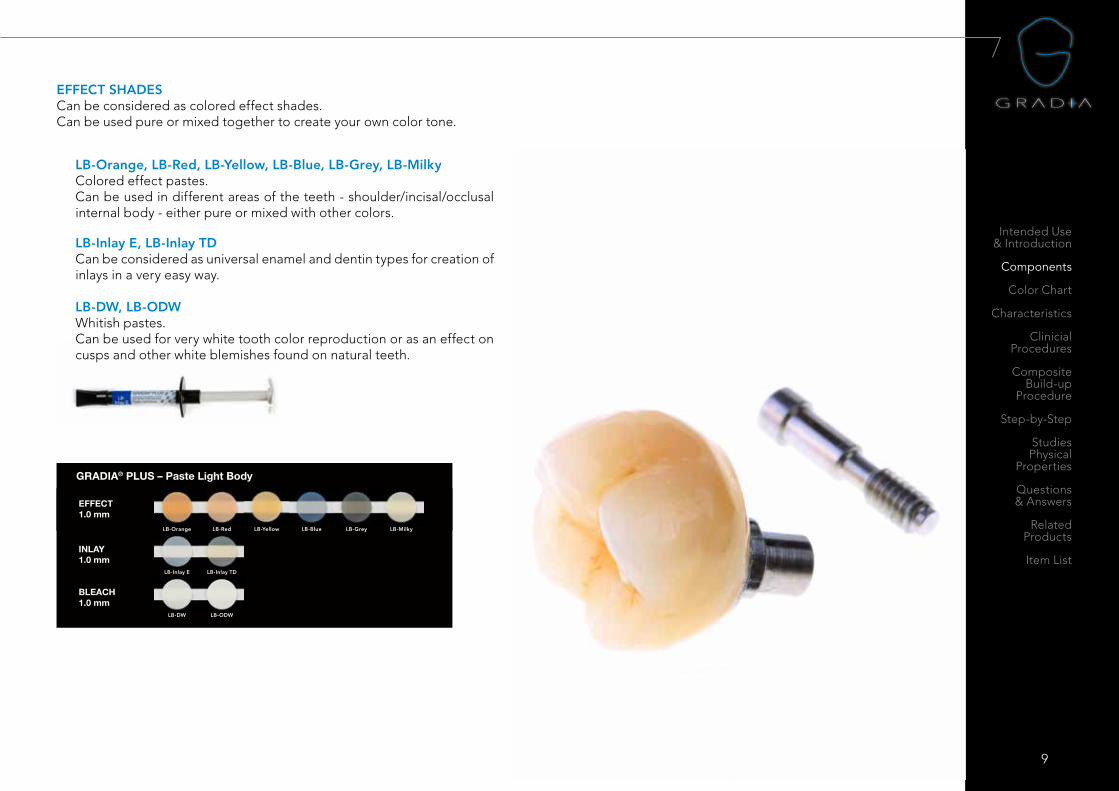
EFFECT SHADESCan be considered as colored effect shades. Can be used pure or mixed together to create your own color tone.
LB-DW, LB-ODWWhitish pastes.Can be used for very white tooth color reproduction or as an effect on cusps and other white blemishes found on natural teeth.
LB-Orange, LB-Red, LB-Yellow, LB-Blue, LB-Grey, LB-MilkyColored effect pastes. Can be used in different areas of the teeth - shoulder/incisal/occlusal internal body - either pure or mixed with other colors.
LB-Inlay E, LB-Inlay TDCan be considered as universal enamel and dentin types for creation of inlays in a very easy way.
MODULAR COMPOSITE SYSTEM FOR INDIRECT RESTORATIONS
GRADIA® PLUS – Opaque
OPAQUE0.5 mm
O-BASE OA OB OC OD
GRADIA® PLUS – Paste Heavy Body
DENTIN1.0 mm
HB-DA1 HB-DA2 HB-DA3 HB-DA3.5 HB-DB1 HB-DB3 HB-DC3 HB-DD2 HB-DW
ENAMEL1.0 mm
HB-EL HB-ED HB-PE HB-CLF
OPAQUE DENTIN1.0 mm HB-ODA HB-ODB HB-ODC HB-ODD HB-ODW
GRADIA® PLUS – Paste Light Body
BASE1.0 mm
LB-Base D LB-Base E LB-Base CLF LB-Base OD LB-Base Opal
EFFECT1.0 mm
LB-Orange LB-Red LB-Yellow LB-Blue LB-Grey LB-Milky
INLAY1.0 mm
LB-Inlay E LB-Inlay TD
BLEACH1.0 mm
LB-DW LB-ODW Image by S. Maffei

10
MODULAR COMPOSITE SYSTEM FOR INDIRECT RESTORATIONS
GRADIA® PLUS – One Body
DENTIN1.0 mm
LB-A LB-B LB-C LB-D
BLEACH1.0 mm
LB-W
GRADIA® PLUS – Gum
GUM OPAQUE0.5 mm
GO-1 GO-2
GUM LIGHT BODYGUM HEAVY BODY1.0 mm GLB-1
GHB-1 GLB-2GHB-2
GLB-3GHB-3
GLB-CLGHB-CL
GRADIA® PLUS – Lustre Paint
LP-A LP-B LP-C LP-D
LP-Cream LP-Grey LP-Lavender LP-Blue LP-CLF
GLP-Violet GLP-Bright red LP-CL
GLASSCLEAR
GLASSCLEAR
PASTE LIGHT BODY (LB) FOR ONE BODY TECHNIQUEFor fast and easy monolithic reproduction of standard V-shades, the single One Body pastes can be used with ideal results. As they are a “light body” type, they can easily be injected using a transparent mold/key and light-cured accordingly.Perfect in combination with the Lustre Paint colors for more individualization and glossy effect.
Shades: LB-A, LB-B, LB-C, LB-D, LB-W
GC GRADIA® PLUS Lustre Paint Diluting Liquid Dedicated diluting liquid for Lustre Paint colors.By adding a drop of this diluting liquid to the Lustre Paint colors, you can create your own preferred consistency and color tone.
LUSTRE PAINT Paint color and gloss - protect your aestheticsThe 12 GC GRADIA® PLUS Lustre Paint colors provide an extremely simple way to add long-lasting color and surface gloss. On top of that, thanks to our renowned nano-filler technology, your restorations achieve a high wear resistance.You can choose from a wide variety of colors, both for internal and external characterization, leading to perfect aesthetics. They can easily be mixed together to produce even more color nuances. You can even create your own preferred consistency using the Lustre Paint Diluting Liquid.Using this light-cured characterization coating on the surface of your work reduces the polishing stage, saving you valuable time - and the technique is easy.
Shades: • Fitting the V-shades reproduction (fluorescent character): LP-A, LP-B, LP-C, LP-D • For more individualization (fluorescent character):
LP-Cream, LP-Grey, LP-Lavender, LP-Blue, LP-CLF (Clear)• For gum individualization (non-fluorescent):
GLP-Violet, GLP-Bright Red, LP-CL (Clear)
11
Intended Use & Introduction
Components
Color Chart
Characteristics
Clinicial Procedures
Composite Build-up
Procedure
Step-by-Step
Studies Physical
Properties
Questions & Answers
Related Products
Item List
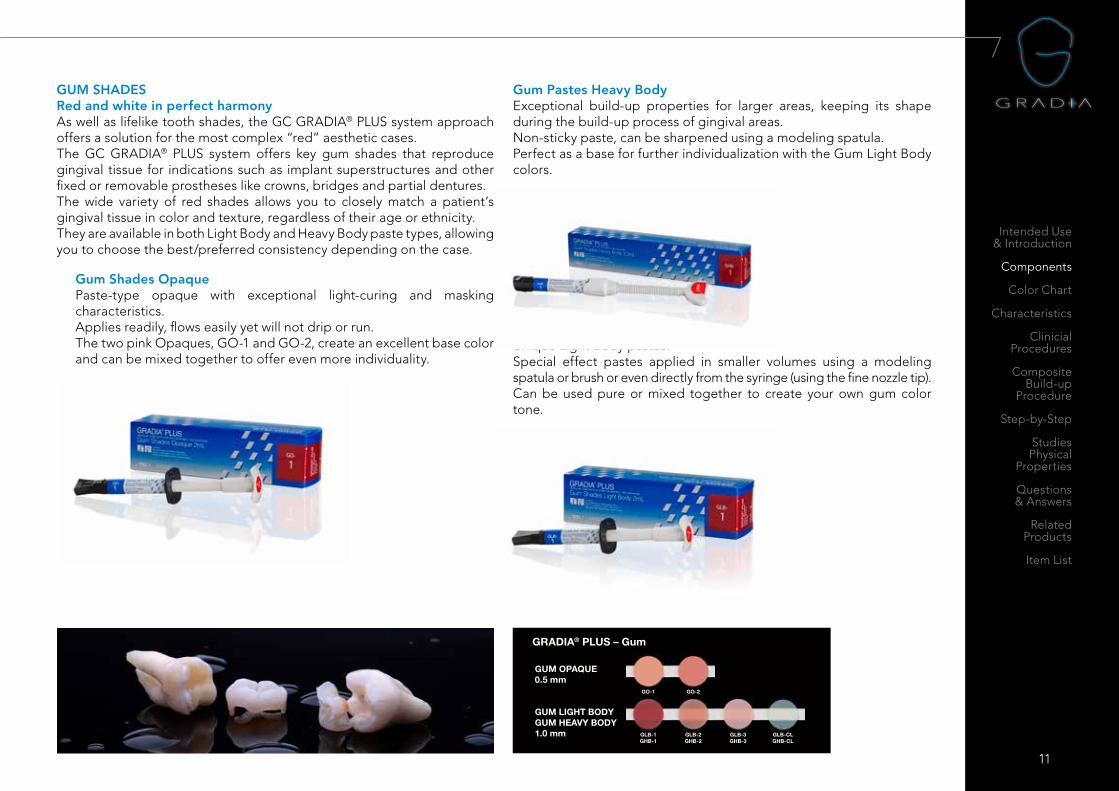
GUM SHADES Red and white in perfect harmonyAs well as lifelike tooth shades, the GC GRADIA® PLUS system approach offers a solution for the most complex “red” aesthetic cases. The GC GRADIA® PLUS system offers key gum shades that reproduce gingival tissue for indications such as implant superstructures and other fixed or removable prostheses like crowns, bridges and partial dentures.The wide variety of red shades allows you to closely match a patient’s gingival tissue in color and texture, regardless of their age or ethnicity.They are available in both Light Body and Heavy Body paste types, allowing you to choose the best/preferred consistency depending on the case.
Gum Shades OpaquePaste-type opaque with exceptional light-curing and masking characteristics. Applies readily, flows easily yet will not drip or run.The two pink Opaques, GO-1 and GO-2, create an excellent base color and can be mixed together to offer even more individuality.
Shades: GO-1, GO-2
Gum Shades Light BodyUnique Light Body pastes.Special effect pastes applied in smaller volumes using a modeling spatula or brush or even directly from the syringe (using the fine nozzle tip). Can be used pure or mixed together to create your own gum color tone.
Shades: GLB-1, GLB-2, GLB-3, GLB-CL
MODULAR COMPOSITE SYSTEM FOR INDIRECT RESTORATIONS
GRADIA® PLUS – One Body
DENTIN1.0 mm
LB-A LB-B LB-C LB-D
BLEACH1.0 mm
LB-W
GRADIA® PLUS – Gum
GUM OPAQUE0.5 mm
GO-1 GO-2
GUM LIGHT BODYGUM HEAVY BODY1.0 mm GLB-1
GHB-1 GLB-2GHB-2
GLB-3GHB-3
GLB-CLGHB-CL
GRADIA® PLUS – Lustre Paint
LP-A LP-B LP-C LP-D
LP-Cream LP-Grey LP-Lavender LP-Blue LP-CLF
GLP-Violet GLP-Bright red LP-CL
GLASSCLEAR
GLASSCLEAR
Gum Pastes Heavy BodyExceptional build-up properties for larger areas, keeping its shape during the build-up process of gingival areas. Non-sticky paste, can be sharpened using a modeling spatula. Perfect as a base for further individualization with the Gum Light Body colors.
Shades: GHB-1, GHB-2, GHB-3, GHB-CL

12
DIAPOLISHER PASTEFine diamond-containing polisher paste.Used on a felt wheel to apply a lustrous finish to restorations.
PRIMERS
GC offers a variety of specialized primers that nicely fit the various indications of GC GRADIA® PLUS.Please consult the dedicated Instructions for Use of the respective GC Primers before use.
How to ensure an optimal bond between … Recommended GC Primer
Metal framework – GC GRADIA® PLUS Opaque METAL PRIMER Z
GC GRADIA® PLUS – GC GRADIA® PLUS Lustre Paint CERAMIC PRIMER II
GC GRADIA® PLUS – GC GRADIA® PLUS Paste CERAMIC PRIMER II
Acrylics – GC GRADIA® PLUS Gum Shade GC Acrylic Primer
Zirconiumdioxide framework – GC GRADIA® PLUS Opaque CERAMIC PRIMER II
CERASMART™ CAD/CAM Block – GC GRADIA® PLUS Paste CERAMIC PRIMER II
GC ACRYLIC PRIMER Light-curing primer for bonding GC GRADIA® PLUS to acrylics.Increases the adhesiveness of GC GRADIA® PLUS to conventional acrylic resins used in dental laboratory procedures like the modification of denture teeth or denture base resins.
METAL PRIMER ZOne-step resin-to-metal bonding agent.For a strong connection between metal framework and GC GRADIA® PLUS use METAL PRIMER Z, an easy-to-use and proven bonding agent. A tenacious bonding agent between the first GC GRADIA® PLUS layer e.g. Opaque and the metal framework.
CERAMIC PRIMER II Bonding agent used for the additional application / repair of GC GRADIA® PLUS layers (V-shades, Gum shades) and GC GRADIA® PLUS Lustre Paint.When individualizing hybrid ceramic CAD/CAM blocks like CERASMART™ from GC, use CERAMIC PRIMER II as the bonding agent.
ACCESSORIES
GC GRADIA® PLUS Modeling Liquid Modeling liquid to lubricate the spatula when applying the resin pastes.Aid for modeling the pastes. Wetting of spatula or brush in order to smoothen the surface.Glass-filled (nano-filled) - no compromises in strength. To be used moderately.
GC GRADIA® PLUS DIE HARDENERWhen coated on dies, hardens and preserves the surface during fabrication of inlays, jacket crowns etc.
GC GRADIA® PLUS SEPARATORA composite resin separator that is applied to working stone models when making inlays and onlays. It functions optimal on a Die Hardener-treated stone surface.
GC GRADIA® PLUS AIR BARRIERThis agent creates an air barrier to guarantee a complete polymerization of the composite surface and to prevent the inhibition layer.

13
Intended Use & Introduction
Components
Color Chart
Characteristics
Clinicial Procedures
Composite Build-up
Procedure
Step-by-Step
Studies Physical
Properties
Questions & Answers
Related Products
Item List
MODULAR COMPOSITE SYSTEM FOR INDIRECT RESTORATIONS
GRADIA® PLUS – Opaque
OPAQUE0.5 mm
O-BASE OA OB OC OD
GRADIA® PLUS – Paste Heavy Body
DENTIN1.0 mm
HB-DA1 HB-DA2 HB-DA3 HB-DA3.5 HB-DB1 HB-DB3 HB-DC3 HB-DD2 HB-DW
ENAMEL1.0 mm
HB-EL HB-ED HB-PE HB-CLF
OPAQUE DENTIN1.0 mm HB-ODA HB-ODB HB-ODC HB-ODD HB-ODW
GRADIA® PLUS – Paste Light Body
BASE1.0 mm
LB-Base D LB-Base E LB-Base CLF LB-Base OD LB-Base Opal
EFFECT1.0 mm
LB-Orange LB-Red LB-Yellow LB-Blue LB-Grey LB-Milky
INLAY1.0 mm
LB-Inlay E LB-Inlay TD
BLEACH1.0 mm
LB-DW LB-ODW Image by S. Maffei
3. Color ChartThe GC GRADIA® PLUS color range enables restorations to appear more like porcelain than other composites. MODULAR COMPOSITE SYSTEM FOR INDIRECT RESTORATIONS
GRADIA® PLUS – One Body
DENTIN1.0 mm
LB-A LB-B LB-C LB-D
BLEACH1.0 mm
LB-W
GRADIA® PLUS – Gum
GUM OPAQUE0.5 mm
GO-1 GO-2
GUM LIGHT BODYGUM HEAVY BODY1.0 mm GLB-1
GHB-1 GLB-2GHB-2
GLB-3GHB-3
GLB-CLGHB-CL
GRADIA® PLUS – Lustre Paint
LP-A LP-B LP-C LP-D
LP-Cream LP-Grey LP-Lavender LP-Blue LP-CLF
GLP-Violet GLP-Bright red LP-CL
GLASSCLEAR
GLASSCLEAR

14
4. GC GRADIA® PLUS CharacteristicsNATURAL AESTHETICS
GC GRADIA® PLUS translucency and color tones are similar to those of natural teeth
Its level of brightness and light transmission is similar or closer to porcelain than conventional indirect composites. Where required, the underlying tooth preparation can be masked while maintaining lifelike, natural-looking crowns. GC GRADIA® PLUS’s build-up technique mirrors that used for ceramics, either layered or painted.
Nature analogue light dynamics
When a conventional composite crown is seated under the light conditions found in the mouth, the excessively opalescent color makes it impossible to reproduce the natural color, especially when using translucent colors, and this could not be avoided until now. That has all changed thanks to the most recent polymer technology, used in GC GRADIA® PLUS colors.
GC GRADIA® PLUS has been fine-tuned in its translucent, opalescent and fluorescent characteristics by optimizing the filler particle size, thereby controlling and adjusting the diffusion of light through the material. The result is a more nature analogue light dynamic maintaining the desired color, created at dentin level, also when the restoration is seated in the mouth.
Masking capacity of the pastes
Opacity Levels
100% High Mid-High Middle Mid-Low LowO-BASE HB-ODA HB-DA1 LB-A HB-EL HB-CLF
OA HB-ODB HB-DA2 LB-B HB-ED LB-Base CLF
OB HB-ODC HB-DA3 LB-C HB-PE LB-Inlay CLF
OC HB-ODD HB-DA3.5 LB-D LB-Base E LB-Inlay E
OD HB-ODW HB-DB1 LB-W LB-Orange GLB-CL
GO-1 HB-DB3 HB-DD2 LB-Yellow LB-Blue
GO-2 HB-DC3 HB-DW LB-Milky LB-Grey
LB-Base OD LB-Base D LB-Base Opal
LB-ODW LB-DW LB-Red
GLB-1 GLB-2
GLB-3

15
Intended Use & Introduction
Components
Color Chart
Characteristics
Clinicial Procedures
Composite Build-up
Procedure
Step-by-Step
Studies Physical
Properties
Questions & Answers
Related Products
Item List
Opalescence levels of the pastes
Opalescence Levels
High Middle LowLB-Base Opal HB-EL Others
HB-ED
HB-PE
LB-Base E
LB-W
LB-Milky
Reflected light
Transmitted light
Comparative indirect composites under different light conditions
In transmitted visible light, the nature analogue light dynamic properties of GC GRADIA® PLUS restorations become evident - opalescence and translucency similar to natural teeth.
When using incident light, the fluorescence and luminosity of GC GRADIA® PLUS restorations becomes visible and plays and supports the true-to-nature light dynamics of GC GRADIA® PLUS restorations.
GRADIA® PLUS
HB-EL
GRADIA® PLUS
LB-Inlay E
GRADIA® PLUS
LB-Base Opal
GRADIA® E2
SR Nexco®
paste*Signum®
ceramis*
CERA-MAGE®
I59.
crea.lign®
E2*
Vis
ible
Lig
ht
1 2 3 4 5 6 7 8
Op
ales
cenc
e
9 10 11 12 13 14 15 16
Fluo
resc
ence
17 17 19 20 21 22 23 24
Note:*no GC Brands. Findings based on internal testing.

16
WHEN-STATE-OF-THE-ART TECHNOLOGY IS A MUST HAVE
Today’s patients not only expect their restorations to look perfect, they also expect that brilliant smile to last “forever”. GC GRADIA® PLUS doesn’t stand out just because of its aesthetic features; the technological evolution of this new material means it also stands out for its high wear-resistance, compacted surface and surface smoothness, and it therefore delivers durability and high gloss retention.
The strength, durability and handling properties of the entire GC GRADIA® PLUS shade range are the same, regardless of whether you are working with the V-shades or gum shades, or are working with the Light Body or Heavy Body pastes.
The ultra-fine fillers are homogeneously dispersed into the resin matrix offering a high-density network
Besides being strong, GC GRADIA® PLUS is also “gentle” on opposing teeth, making it particularly suitable for posterior high-wear, high-pressure restorations that are prone to chipping or cracking when made with porcelain.
All of this is thanks to GC‘s nano-filler technology - using high-density and homogeneously dispersed ultra-fine fillers blended into the resin matrix - and it is all achieved just by light-curing.
Thanks to a special surface treatment of the ultra-fine fillers the surface properties such as wear resistance and gloss retention are enhanced resulting in high physical properties of all GC GRADIA® PLUS pastes.
0
50
100
150
GRADIA® GRADIA®
PLUSHB
GRADIA®
PLUSLB
GRADIA®
PLUSGLB
Occlusal Wear (vs bovin’s enamel)(µ) After 200.000 times
200
0
50
100
150
GRADIA® GRADIA®
PLUSHB
GRADIA®
PLUSLB
GRADIA®
PLUSGLB
Flexural Strength (MPa)
200
0
10
20
30
GRADIA® GRADIA®
PLUSHB
GRADIA®
PLUSLB
GRADIA®
PLUSGLB
Vickers Hardness (Hv)
50
40
70
60
17
Intended Use & Introduction
Components
Color Chart
Characteristics
Clinicial Procedures
Composite Build-up
Procedure
Step-by-Step
Studies Physical
Properties
Questions & Answers
Related Products
Item List
5. Clinical Procedure
0.3mm
0.5mm
2mm
0.8mm
1.3mm0.8 1.0mm
1.5 2mm
0.8 1.0mm0.8 1.2mm
1mm
1.3 mm
1.3 1.8 mm 1.3 1.8 mm
0.8 1mm
2.0 mm
1mm1.3mm
1mm1.3 1.8mm
0.8mmmin.
0.8mmmin.
YES YES NO NO
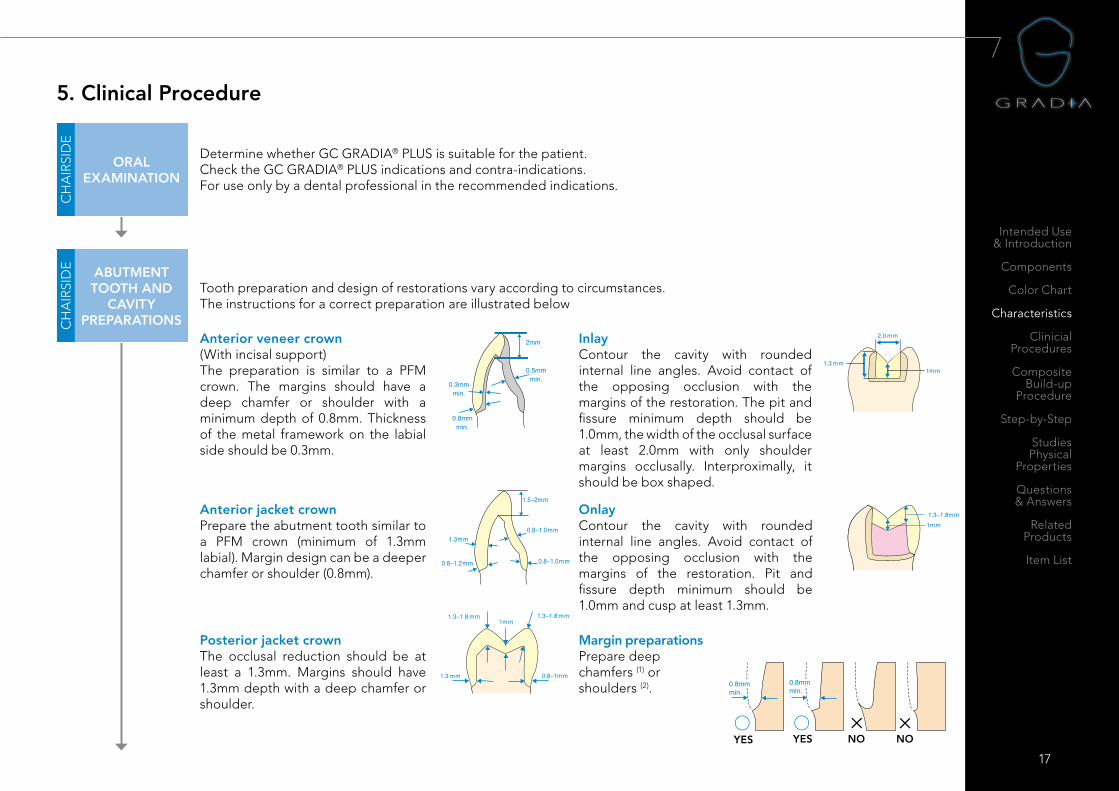
Determine whether GC GRADIA® PLUS is suitable for the patient.Check the GC GRADIA® PLUS indications and contra-indications. For use only by a dental professional in the recommended indications.
Posterior jacket crownThe occlusal reduction should be at least a 1.3mm. Margins should have 1.3mm depth with a deep chamfer or shoulder.
Margin preparationsPrepare deep chamfers (1) or shoulders (2).
Anterior veneer crown(With incisal support)The preparation is similar to a PFM crown. The margins should have a deep chamfer or shoulder with a minimum depth of 0.8mm. Thickness of the metal framework on the labial side should be 0.3mm.
Anterior jacket crownPrepare the abutment tooth similar to a PFM crown (minimum of 1.3mm labial). Margin design can be a deeper chamfer or shoulder (0.8mm).
InlayContour the cavity with rounded internal line angles. Avoid contact of the opposing occlusion with the margins of the restoration. The pit and fissure minimum depth should be 1.0mm, the width of the occlusal surface at least 2.0mm with only shoulder margins occlusally. Interproximally, it should be box shaped.
OnlayContour the cavity with rounded internal line angles. Avoid contact of the opposing occlusion with the margins of the restoration. Pit and fissure depth minimum should be 1.0mm and cusp at least 1.3mm.
Tooth preparation and design of restorations vary according to circumstances.The instructions for a correct preparation are illustrated below
CH
AIR
SID
E
ORAL EXAMINATION
CH
AIR
SID
E ABUTMENT TOOTH AND
CAVITY PREPARATIONS

18
GC UNIFAST III
GC FUJIROCK® EP
EXABITE II NDS
GC FREEGENOL
Retract gingiva in the normal manner. Use a precise vinyl polyether silicone impression material such as GC EXA’lence in combination with GC Impression Trays.
Use GC EXABITE II to make the occlusal or bite registration. Determine the preferred shade of the natural tooth after tooth cleaning with the help of a classic V-shade guide. Individual characteristics have to be considered when determining the tooth shade.
Fabricate a temporary restoration with GC Unifast III or GC Revotek LC and cement with a eugenol-free temporary cement such as GC FREEGENOL or GC Fuji TEMP LT.
GC BASE STONE
TRAYS
CH
AIR
SID
E
IMPRESSION TAKING
CH
AIR
SID
E BITE REGISTRATION
AND SHADE RECORDING
CH
AIR
SID
E/
LAB
SID
E
TEMPORARY RESTORATION
Pour and prepare a working model with a Type IV die stone such as GC FUJIROCK® EP Classic/Premium Line & GC BASE STONE.. LA
BSI
DE POUR AND PREPARE MASTER MODEL
GC FujiTEMP LT
EXAMIX NDS
EXA’LENCE
EXAFLEX

19
Intended Use & Introduction
Components
Color Chart
Characteristics
Clinicial Procedures
Composite Build-up
Procedure
Step-by-Step
Studies Physical
Properties
Questions & Answers
Related Products
Item List
Labolight DUO
See BUILD-UP PROCEDURE.
CH
AIR
SID
E
PRODUCTION OF THE
RESTORATION
Remove temporary restoration, sealing material or cement. Clean cavity. Rinse and dry cavity thoroughly.
CH
AIR
SID
E REMOVAL OF THE
TEMPORARY RESTORATION
AND CLEANING
CH
AIR
SID
E
TRY INTry-in the restoration and check the adaptation using GC Fit Checker Advanced or GC Fit Checker Advanced Blue
CH
AIR
SID
E CLEANING AND TREATMENT OF
THE RESTORATION FOR BONDING
1 primer for all restorations: Composites, Hybrid Ceramics, Ceramics, Zirconia, Alumina, Non-precious & Precious Alloys, Glass fiber posts
PRODUCTION OF THE RESTORATION
Bond to glass-ceramics, hybrid ceramics and composite
Bond to zirconia, alumina and non-precious metals
Bond to precious metals
Silane
MDP
MDTP
GC Pliers
20
Inlays & onlays Crowns & bridges Posts & inlay-cores Veneers
Metal
• Feldspathic ceramics
• Leucite-reinforced ceramics
• Lithium disilicate
• Composite (e.g. G
C GRAD
IA® PLUS)
Hybrid ceramics (e.g. CERASM
ART™)
• Metal (e.g. G
C Initial™ Cast N
P)
• Zirconia (e.g. GC Initial™
Zirconia disk)
• Alumina
• Lithium disilicate
• Composite (e.g. G
C GRADIA
® PLUS)
• Feldspathic ceramics
• Leucite-reinforced ceramics
Hybrid ceramics (e.g. CERASM
ART™)
Fibre reinforced (e.g. everstick®PO
ST & GC FIBER PO
ST)
Metal
Zirconia (e.g. GC Initial™
Zirconia disk)
• Feldspathic ceramics
• Leucite reinforced ceramics
• Lithium disilicate
• Hybrid ceramics (e.g. CERASM
ART™)
• Composite
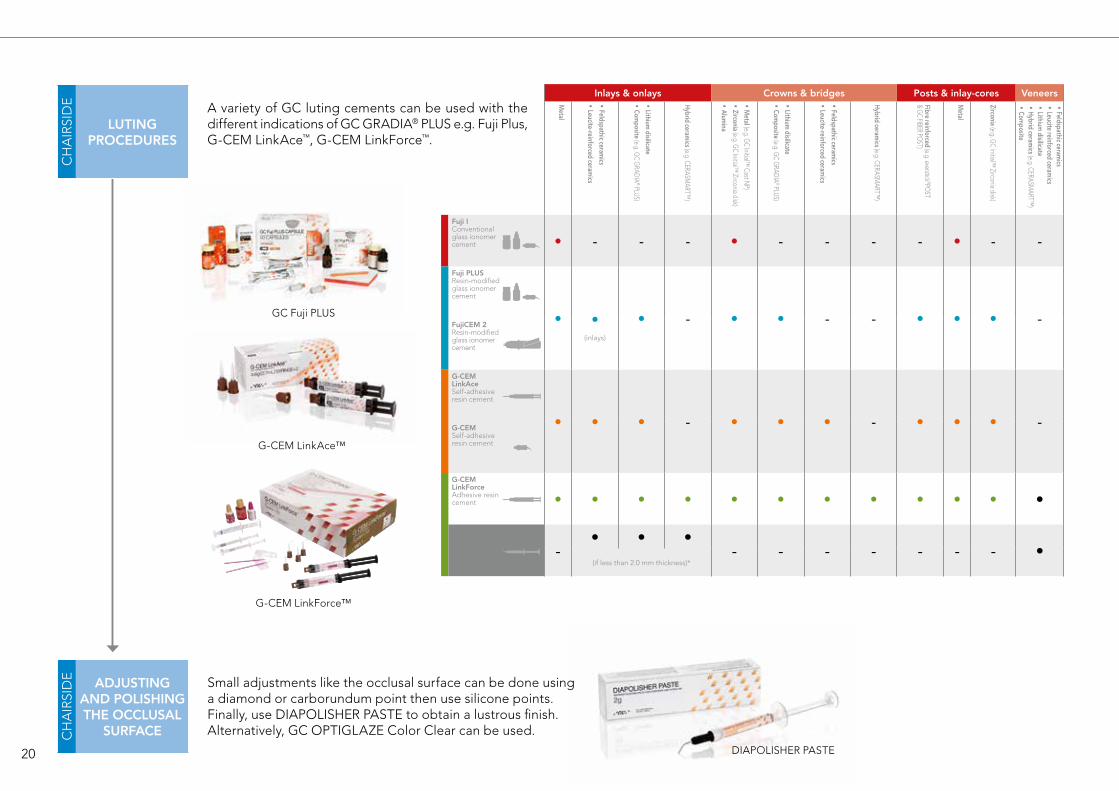
Fuji I Conventional glass ionomer cement • - - - • - - - - • - -
Fuji PLUS Resin-modified glass ionomer cement
• •(inlays)
• - • • - - • • • -FujiCEM 2 Resin-modified glass ionomer cement
G-CEM LinkAce Self-adhesive resin cement
• • • - • • • - • • • -G-CEMSelf-adhesive resin cement
G-CEM LinkForce Adhesive resin cement • • • • • • • • • • • •
G-ænial Universal Flo Adhesive resin cement -
• • •- - - - - - - •
(if less than 2.0 mm thickness)*
DIAPOLISHER PASTE
GC Fuji PLUS
G-CEM LinkForce™
G-CEM LinkAce™
A variety of GC luting cements can be used with the different indications of GC GRADIA® PLUS e.g. Fuji Plus, G-CEM LinkAce™, G-CEM LinkForce™.
CH
AIR
SID
E
LUTING PROCEDURES
Small adjustments like the occlusal surface can be done using a diamond or carborundum point then use silicone points. Finally, use DIAPOLISHER PASTE to obtain a lustrous finish. Alternatively, GC OPTIGLAZE Color Clear can be used.C
HA
IRSI
DE ADJUSTING
AND POLISHING THE OCCLUSAL
SURFACE
21
Intended Use & Introduction
Components
Color Chart
Characteristics
Clinicial Procedures
Composite Build-up
Procedure
Step-by-Step
Studies Physical
Properties
Questions & Answers
Related Products
Item List
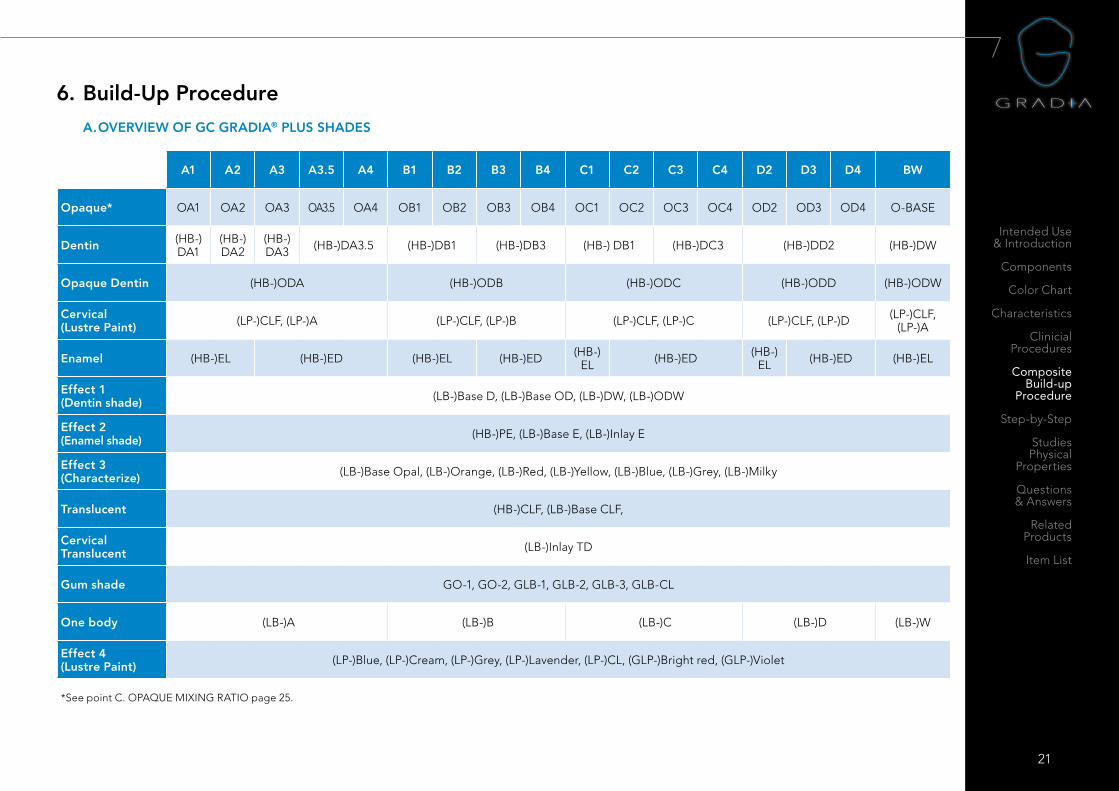
6. Build-Up Procedure
A1 A2 A3 A3.5 A4 B1 B2 B3 B4 C1 C2 C3 C4 D2 D3 D4 BW
Opaque* OA1 OA2 OA3 OA3.5 OA4 OB1 OB2 OB3 OB4 OC1 OC2 OC3 OC4 OD2 OD3 OD4 O-BASE
Dentin (HB-)DA1
(HB-)DA2
(HB-)DA3 (HB-)DA3.5 (HB-)DB1 (HB-)DB3 (HB-) DB1 (HB-)DC3 (HB-)DD2 (HB-)DW
Opaque Dentin (HB-)ODA (HB-)ODB (HB-)ODC (HB-)ODD (HB-)ODW
Cervical (Lustre Paint) (LP-)CLF, (LP-)A (LP-)CLF, (LP-)B (LP-)CLF, (LP-)C (LP-)CLF, (LP-)D (LP-)CLF,
(LP-)A
Enamel (HB-)EL (HB-)ED (HB-)EL (HB-)ED (HB-)EL (HB-)ED (HB-)
EL (HB-)ED (HB-)EL
Effect 1(Dentin shade) (LB-)Base D, (LB-)Base OD, (LB-)DW, (LB-)ODW
Effect 2(Enamel shade) (HB-)PE, (LB-)Base E, (LB-)Inlay E
Effect 3(Characterize) (LB-)Base Opal, (LB-)Orange, (LB-)Red, (LB-)Yellow, (LB-)Blue, (LB-)Grey, (LB-)Milky
Translucent (HB-)CLF, (LB-)Base CLF,
Cervical Translucent (LB-)Inlay TD
Gum shade GO-1, GO-2, GLB-1, GLB-2, GLB-3, GLB-CL
One body (LB-)A (LB-)B (LB-)C (LB-)D (LB-)W
Effect 4(Lustre Paint) (LP-)Blue, (LP-)Cream, (LP-)Grey, (LP-)Lavender, (LP-)CL, (GLP-)Bright red, (GLP-)Violet
*See point C. OPAQUE MIXING RATIO page 25.
A. OVERVIEW OF GC GRADIA® PLUS SHADES
22
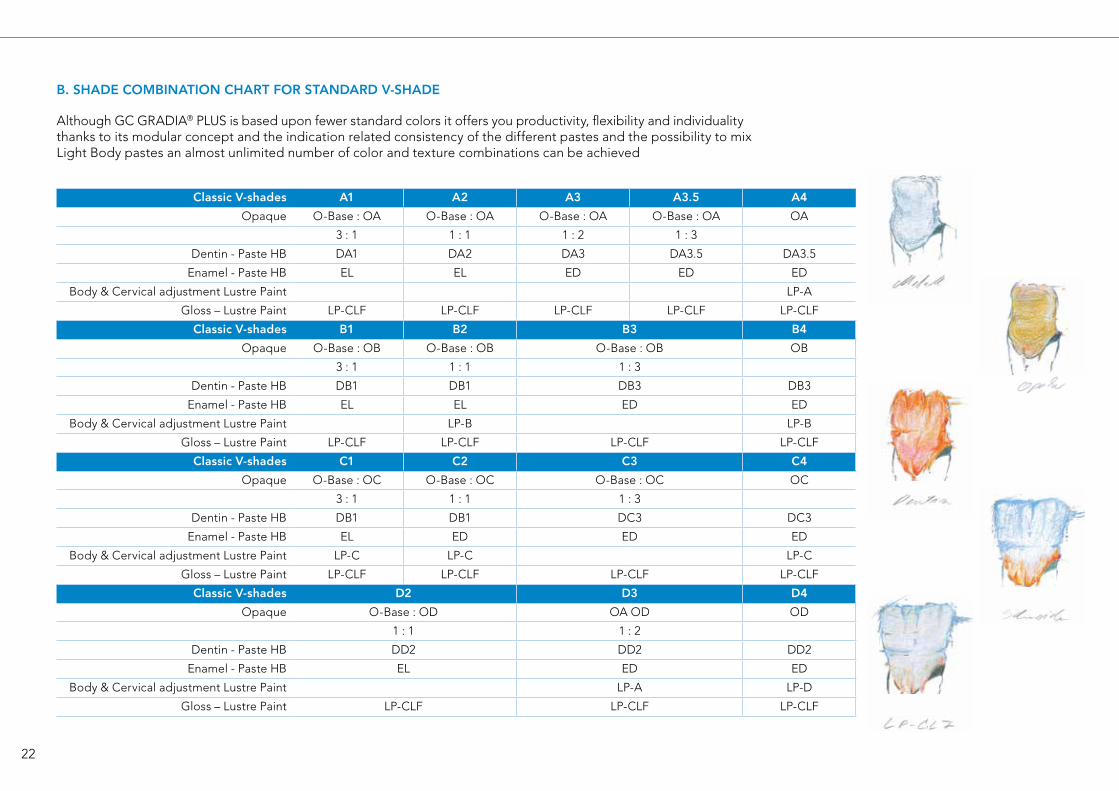
B. SHADE COMBINATION CHART FOR STANDARD V-SHADE
Although GC GRADIA® PLUS is based upon fewer standard colors it offers you productivity, flexibility and individuality thanks to its modular concept and the indication related consistency of the different pastes and the possibility to mix Light Body pastes an almost unlimited number of color and texture combinations can be achieved
Classic V-shades A1 A2 A3 A3.5 A4
Opaque O-Base : OA O-Base : OA O-Base : OA O-Base : OA OA
3 : 1 1 : 1 1 : 2 1 : 3
Dentin - Paste HB DA1 DA2 DA3 DA3.5 DA3.5
Enamel - Paste HB EL EL ED ED ED
Body & Cervical adjustment Lustre Paint LP-A
Gloss – Lustre Paint LP-CLF LP-CLF LP-CLF LP-CLF LP-CLF
Classic V-shades B1 B2 B3 B4
Opaque O-Base : OB O-Base : OB O-Base : OB OB
3 : 1 1 : 1 1 : 3
Dentin - Paste HB DB1 DB1 DB3 DB3
Enamel - Paste HB EL EL ED ED
Body & Cervical adjustment Lustre Paint LP-B LP-B
Gloss – Lustre Paint LP-CLF LP-CLF LP-CLF LP-CLF
Classic V-shades C1 C2 C3 C4
Opaque O-Base : OC O-Base : OC O-Base : OC OC
3 : 1 1 : 1 1 : 3
Dentin - Paste HB DB1 DB1 DC3 DC3
Enamel - Paste HB EL ED ED ED
Body & Cervical adjustment Lustre Paint LP-C LP-C LP-C
Gloss – Lustre Paint LP-CLF LP-CLF LP-CLF LP-CLF
Classic V-shades D2 D3 D4
Opaque O-Base : OD OA OD OD
1 : 1 1 : 2
Dentin - Paste HB DD2 DD2 DD2
Enamel - Paste HB EL ED ED
Body & Cervical adjustment Lustre Paint LP-A LP-D
Gloss – Lustre Paint LP-CLF LP-CLF LP-CLF

23
Intended Use & Introduction
Components
Color Chart
Characteristics
Clinicial Procedures
Composite Build-up
Procedure
Step-by-Step
Studies Physical
Properties
Questions & Answers
Related Products
Item List
23
C. OPAQUE MIXING RATIO
OA1 OA2 OA3 OA3.5 OA4
O-Base: OA O-Base: OA O-Base: OA O-Base: OA OA
3:1 1:1 1:2 1:3
OB1 OB2 OB3 OB4
O-Base:OB O-Base:OB O-Base OB OB
3:1 1:1 1:3
OC1 OC2 OC3 OC4
O-Base:OC O-Base:OC O-Base OC OC
3:1 1:1 1:3
OD2 OD3 OD4
O-Base:OD OA:OD OD
1:1 1:2
Easy dosage of the opaque’s O-base and OA (2). Easy mixing of O-base (1) and OA (2) to create A3 opaque color. Perfect masking properties of the framework.

24
For creating fast and easy the 16 standard V-shades follow the shade combination chart
The combination chart is based upon the use of only a few steps using only few colors.
The opaques will mask and cover perfectly the framework – The dentin allows you to create the body and the enamel the insical part of the crown.
The different Lustre Paint colors can be used to make body and/or cervical adjustments and the Lustre Paint CLF can be used for creating gloss and protection of your realizations (alternative to manual polishing).
Opaque DentinOptional Effect
Dentin Lustre PaintOptional Effect
CLF Optional Effect
EnamelFramework Opaque
D. LAYERING SCHEME FOR STANDARD V-SHADE REPRODUCTIONS
MASKING LAYERING GLOSS
25
Intended Use & Introduction
Components
Color Chart
Characteristics
Clinicial Procedures
Composite Build-up
Procedure
Step-by-Step
Studies Physical
Properties
Questions & Answers
Related Products
Item List
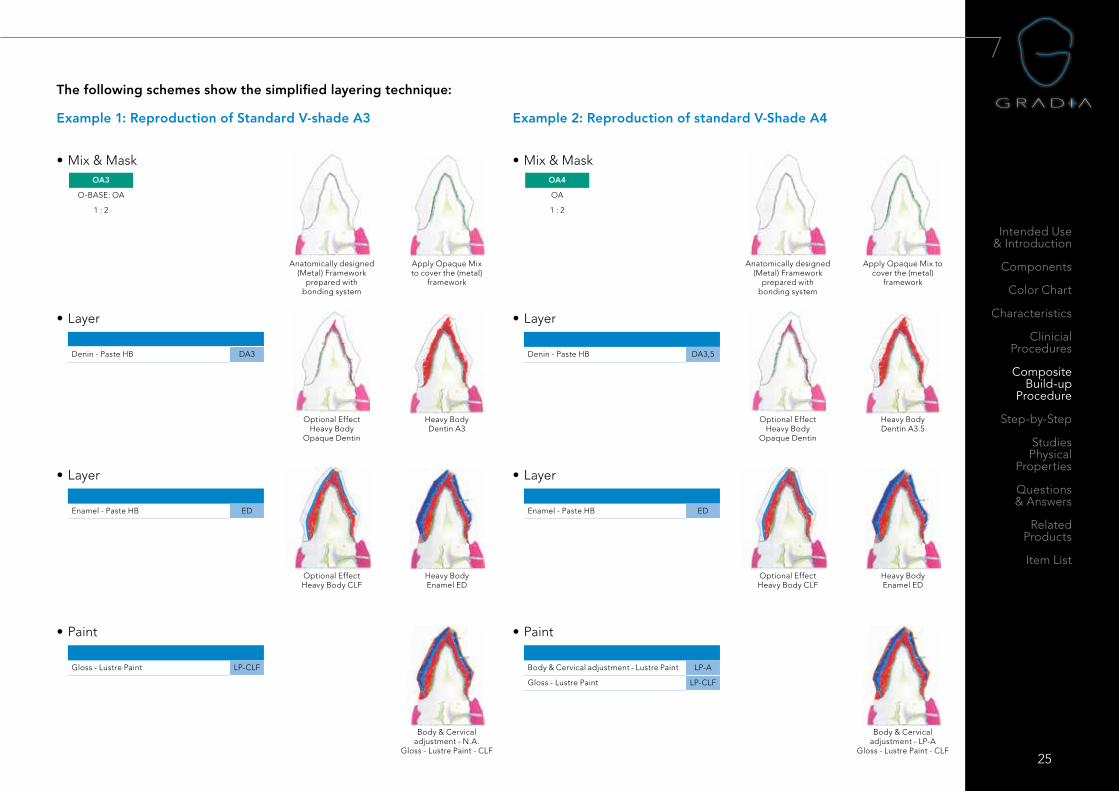
The following schemes show the simplified layering technique:
Example 2: Reproduction of standard V-Shade A4Example 1: Reproduction of Standard V-shade A3
• Layer
Denin - Paste HB DA3
• Layer
Denin - Paste HB DA3,5
Optional EffectHeavy Body
Opaque Dentin
Optional EffectHeavy Body
Opaque Dentin
Heavy Body Dentin A3
Heavy Body Dentin A3.5
• Paint
Gloss - Lustre Paint LP-CLF
• Paint
Body & Cervical adjustment - Lustre Paint LP-A
Gloss - Lustre Paint LP-CLF
Body & Cervical adjustment - N.A.
Gloss - Lustre Paint - CLF
Body & Cervical adjustment - LP-A
Gloss - Lustre Paint - CLF
• Layer
Enamel - Paste HB ED
• Layer
Enamel - Paste HB ED
Optional EffectHeavy Body CLF
Optional EffectHeavy Body CLF
Heavy Body Enamel ED
Heavy Body Enamel ED
• Mix & Mask • Mix & Mask
Anatomically designed (Metal) Framework
prepared with bonding system
Anatomically designed (Metal) Framework
prepared with bonding system
Apply Opaque Mix to cover the (metal)
framework
Apply Opaque Mix to cover the (metal)
framework
OA3
O-BASE: OA
1 : 2
OA4
OA
1 : 2
26
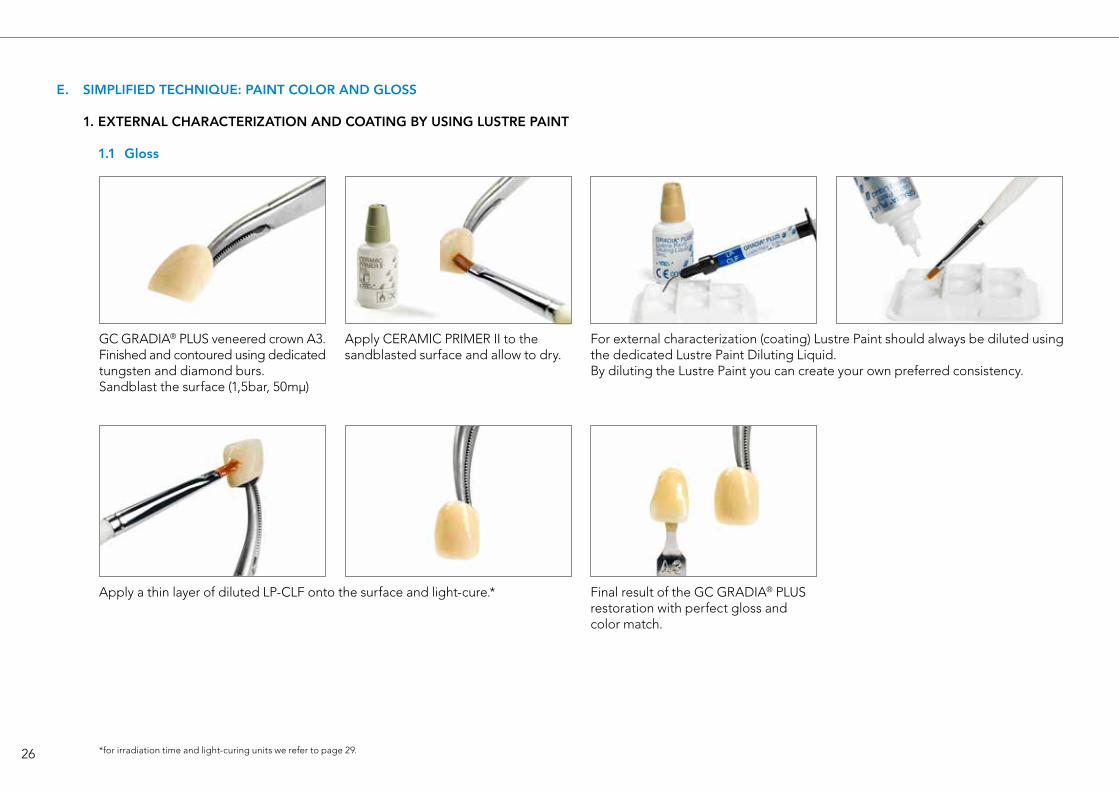
E. SIMPLIFIED TECHNIQUE: PAINT COLOR AND GLOSS
1. EXTERNAL CHARACTERIZATION AND COATING BY USING LUSTRE PAINT
1.1 Gloss
GC GRADIA® PLUS veneered crown A3.Finished and contoured using dedicated tungsten and diamond burs.Sandblast the surface (1,5bar, 50mµ)
For external characterization (coating) Lustre Paint should always be diluted using the dedicated Lustre Paint Diluting Liquid.By diluting the Lustre Paint you can create your own preferred consistency.
Apply CERAMIC PRIMER II to the sandblasted surface and allow to dry.
Apply a thin layer of diluted LP-CLF onto the surface and light-cure.* Final result of the GC GRADIA® PLUS restoration with perfect gloss and color match.
*for irradiation time and light-curing units we refer to page 29.
27
Intended Use & Introduction
Components
Color Chart
Characteristics
Clinicial Procedures
Composite Build-up
Procedure
Step-by-Step
Studies Physical
Properties
Questions & Answers
Related Products
Item List
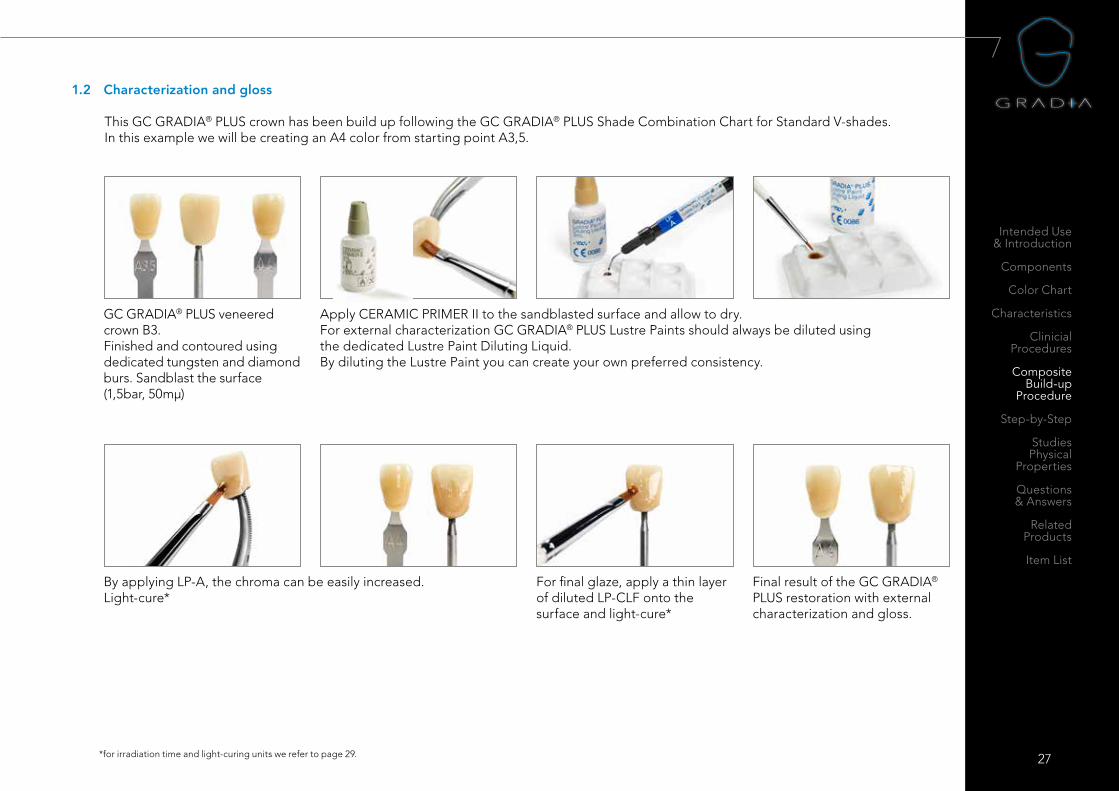
1.2 Characterization and gloss
This GC GRADIA® PLUS crown has been build up following the GC GRADIA® PLUS Shade Combination Chart for Standard V-shades. In this example we will be creating an A4 color from starting point A3,5.
GC GRADIA® PLUS veneered crown B3.Finished and contoured using dedicated tungsten and diamond burs. Sandblast the surface (1,5bar, 50mµ)
Apply CERAMIC PRIMER II to the sandblasted surface and allow to dry.For external characterization GC GRADIA® PLUS Lustre Paints should always be diluted using the dedicated Lustre Paint Diluting Liquid.By diluting the Lustre Paint you can create your own preferred consistency.
By applying LP-A, the chroma can be easily increased.Light-cure*
For final glaze, apply a thin layer of diluted LP-CLF onto the surface and light-cure*
Final result of the GC GRADIA® PLUS restoration with external characterization and gloss.
*for irradiation time and light-curing units we refer to page 29.

28
2. INTERNAL CHARACTERIZATION BY USING LUSTRE PAINT
This GC GRADIA® PLUS Crown has been build up following the GC GRADIA® PLUS Shade Combination Chart for Standard V-shades.In this example we will be creating a B4 color from starting point B3.
Use HB-ED to layer enamel and contour the final shape.Optional effect: a very thin layer of CLF (HB or LB) can be applied inbetween the dentin core and the enamel. Light-cure*. Finishing and contouring using dedicated tungsten and diamond burs.
Apply CERAMIC PRIMER II to the sandblasted surface and allow to dry.
*for irradiation time and light-curing units we refer to page 29.
For internal characterization GC GRADIA® PLUS Lustre Paints can be used pure or diluted using the dedicated Lustre Paint Diluting Liquid. By applying LP-B, the chroma can be easily increased. Shade check can easily be done with a dedicated shade tab, if required adjustments can be done. Light-cure.*
Creating gloss: follow protocol above under 1.1.
29
Intended Use & Introduction
Components
Color Chart
Characteristics
Clinicial Procedures
Composite Build-up
Procedure
Step-by-Step
Studies Physical
Properties
Questions & Answers
Related Products
Item List
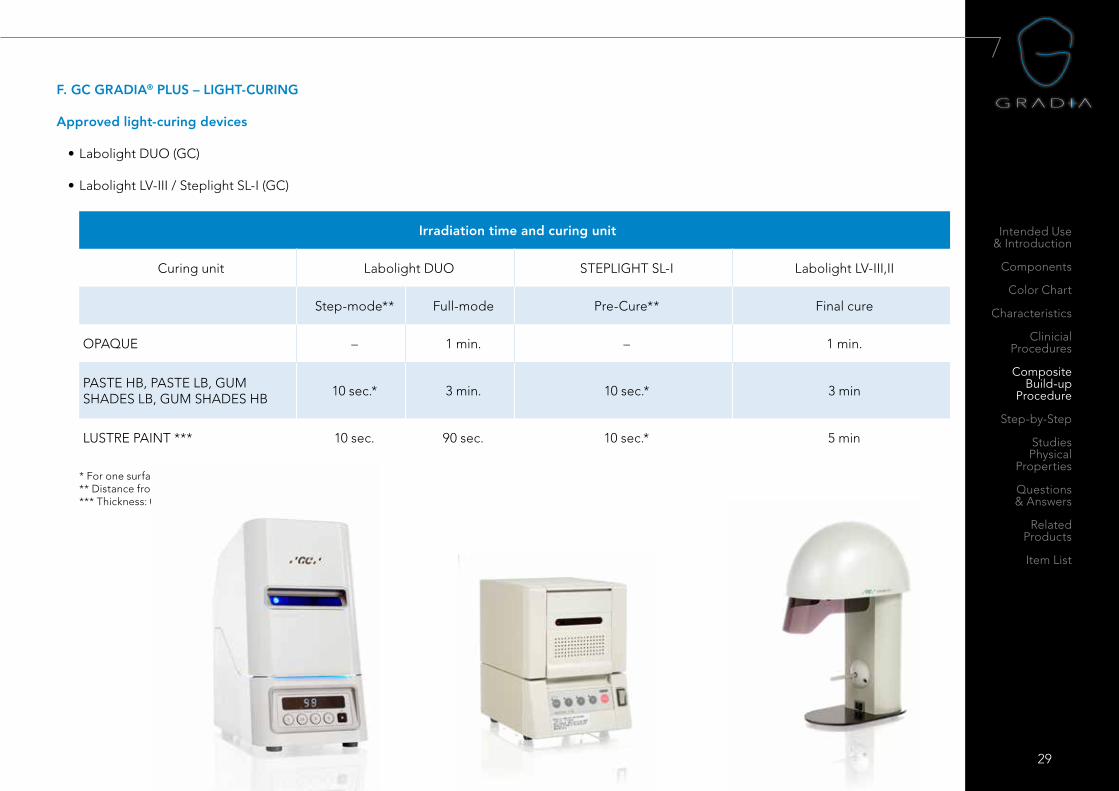
F. GC GRADIA® PLUS – LIGHT-CURING
Approved light-curing devices
• Labolight DUO (GC)
• Labolight LV-III / Steplight SL-I (GC)
Irradiation time and curing unit
Curing unit Labolight DUO STEPLIGHT SL-I Labolight LV-III,II
Step-mode** Full-mode Pre-Cure** Final cure
OPAQUE – 1 min. – 1 min.
PASTE HB, PASTE LB, GUM SHADES LB, GUM SHADES HB
10 sec.* 3 min. 10 sec.* 3 min
LUSTRE PAINT *** 10 sec. 90 sec. 10 sec.* 5 min
* For one surface of a single crown.** Distance from light source: 3 cm.*** Thickness: 0,1 mm or less.

30
When only the best aesthetics will doMeeting all aesthetic requirements is of paramount importance in today’s dentistry. With the new GC GRADIA® PLUS system from GC, you will be able to closely match any oral situation: both the white and the red, in the anterior and posterior region, from single crowns to full rehabilitations.
The GC GRADIA® PLUS system encompasses all you need from the start, to create brightness, translucency, chroma and a natural opalescence in the oral environment similar to porcelain.

31
Intended Use & Introduction
Components
Color Chart
Characteristics
Clinicial Procedures
Composite Build-up
Procedure
Step-by-Step
Studies Physical
Properties
Questions & Answers
Related Products
Item List
7.1 METAL BASED RESTORATIONS
BUILD UP PROCEDURE FOR METAL SUPPORTED CROWN / STANDARD V-SHADEFor irradiation time and light-curing units we refer to page 29.
1. Production of metal framework
Wax up framework conventionally, make sure the framework has an anatomical design, supporting the GC GRADIA® PLUS composite. Respect minimal thicknesses. Apply retention beads to the to be veneered surfaces.
Cast in the usual manner.
Sandblast the metal frame. Clean and dry with air gun.Immediately apply METAL PRIMER Z to the to be veneered surfaces and allow to dry.
DentinApply Dentin shades1, 2, building up to the desired thickness. Pre-cure.
Enamel:Apply enamel progressively from incisal to cervical creating the final shape of the crown. Light-cure.Apply GC GRADIA® PLUS AIR BARRIER on the surface and light-cure for 3 minutes. Remove GC GRADIA® PLUS AIR BARRIER with water.
2. Build up procedure
7. Step-by-step
Immediately apply a layer of OPAQUE and light-cure for 1 minute.
Repeat this process until the metal color is masked out.
Tip: For easy application of the opaque, block out the retentive areas applying LB-Base CLF and light-cure for one minute.
1 Processing aid like MODELING LIQUID can be used. See page 12.2 Depending on shade or internal characterization, Lustre Paint can be used. See page 22.
32
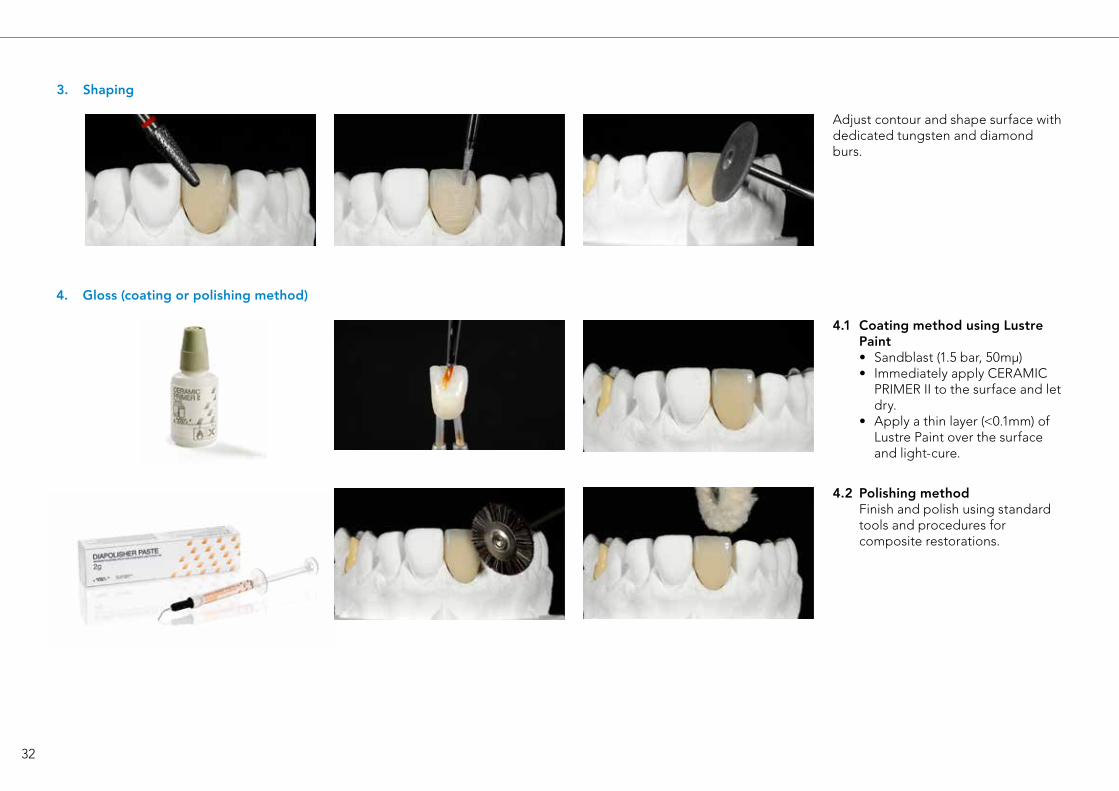
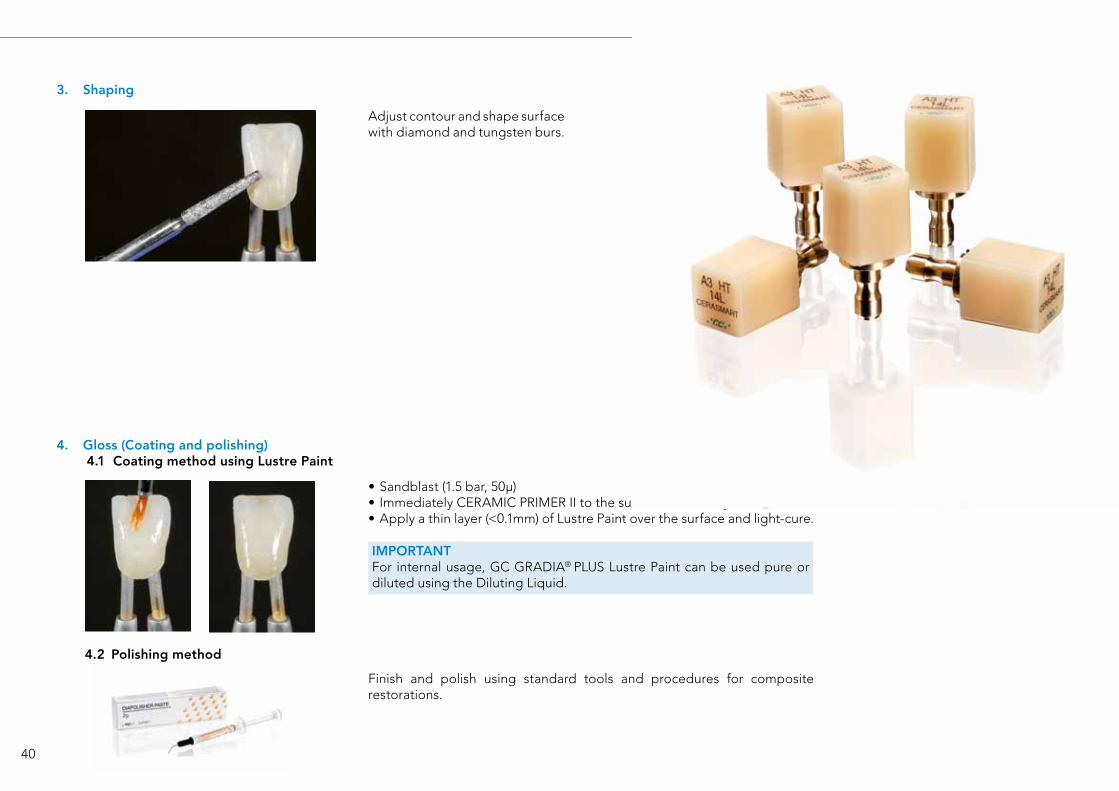
3. Shaping
Adjust contour and shape surface with dedicated tungsten and diamond burs.
4. Gloss (coating or polishing method)
4.2 Polishing method Finish and polish using standard
tools and procedures for composite restorations.
4.1 Coating method using Lustre Paint• Sandblast (1.5 bar, 50mµ) • Immediately apply CERAMIC
PRIMER II to the surface and let dry.
• Apply a thin layer (<0.1mm) of Lustre Paint over the surface and light-cure.

33
BUILD UP PROCEDURE METAL SUPPORTED IMPLANT BRIDGE / POLYCHROMATIC LAYERINGFor irradiation time and light-curing units we refer to page 29.
1. Production of metal framework
2. Build up procedure
Immediately apply a layer of opaque and light-cure for 1 minute. Repeat this process until the metal color is masked out.
Tip: Opaque O-Base can be used as a wash opaque.
Gingival areas can be covered with gum opaque GO-1 and/or GO-2.Light-cure.
Tip: Different opaque shades can be used.
DentinApply Dentin shades1,2, building up to the desired thickness. Pre-cure. Cover the entire body with a thin layer of the fluorescent transpa material CLF (LB or HB). This will create the effect of depth. Light-cure.
Tip: Shaping of the mamelon structure in the dentine can be done using an instrument or a brush.
Intended Use & Introduction
Components
Color Chart
Characteristics
Clinicial Procedures
Composite Build-up
Procedure
Step-by-Step
Studies Physical
Properties
Questions & Answers
Related Products
Item List
1 Processing aid like MODELING LIQUID can be used. See page 12.2 Depending on shade or internal characterization, lustre paint can be used. See page 29.
Design, cast and prepare the metal framework according to the general guidelines for metal supported bridgeworks.
Sandblast the metal frame, clean and dry with air gun.Immediately apply METAL PRIMER Z to the to be veneered surfaces and allow to dry.

34
To increase chroma on the palatinal side, effect shades can be used.e.g. LB-Orange, LB-Red, etc.Light-cure.
Complete the anatomical design using Dentin / Enamel / Effect.Internal characterization can be done by using Lustre Paint. Light-cure.
Incisal effects can be achieved by using light body effect shades. e.g. LB-Opal, LB-Grey, LB-Blue, etc.Light-cure.
The final shape is formed using enamel shades. Light-cure.
4. Gloss (coating or polishing method)
4.1 Coating method using Lustre Paint• Sandblast (1.5 bar, 50µ) • Immediately apply CERAMIC
PRIMER II to the surface and let dry.• Apply a thin layer (<0.1mm) of
Lustre Paint over the surface and light-cure.
4.2 Polishing methodFinish and polish using standard tools and procedures for composite restorations.
Use heavy body gum shade to create volume in the gingival area. Use light body gum shades to obtain effects and smooth transition. For depth effect, apply translucent shade CL to the surface (GLB or GHB). Apply GC GRADIA® PLUS AIR BARRIER on the surface and light-cure for 3 minutes. Remove GC GRADIA® PLUS AIR BARRIER with water.
Tip: Use a darker shade in between the roots and a lighter shade to imitate the root.Use the Gum Lustre Paints for extra individualization and characterization. e.g. veins, natural pigmentation, etc.
3. Shaping
Adjust contour and shape surface with diamond and tungsten burs. (see previous)

35
Intended Use & Introduction
Components
Color Chart
Characteristics
Clinicial Procedures
Composite Build-up
Procedure
Step-by-Step
Studies Physical
Properties
Questions & Answers
Related Products
Item List
BUILD UP PROCEDURE FOR ONE BODY FLASK TECHNIQUEFor irradiation time and light-curing units we refer to page 29.
1. Production of metal framework We refer to metal based restorations for the production of the metal framework.
2. Apply and light-cure opaque For applying the opaque onto the metal framework, we refer to metal based restorations.
3. Flask preparation GC GRADIA® PLUS One Body pastes can be easily used to inject or press into a transparent mold.
Please use a hard silicone to avoid deformations. For an optimal result the matrix material should be completely transparent to obtain perfect light transmission.
Fit check the metal structure on the model.
4. Injecting and light-curing the GC GRADIA® PLUS One Body LB shades
Inject or press the GC GRADIA® PLUS Light Body into the mold.
Tip: LB-Base OD can be used to cover thin or basal areas.
36
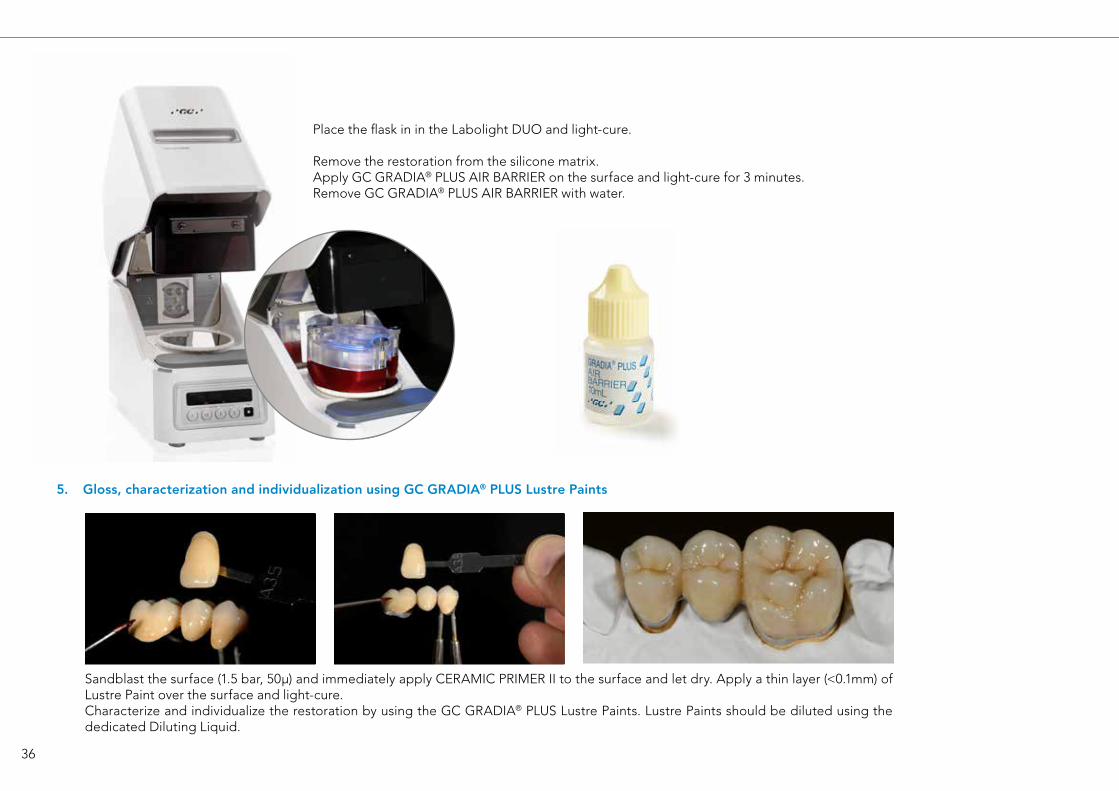
Place the flask in in the Labolight DUO and light-cure.
Remove the restoration from the silicone matrix. Apply GC GRADIA® PLUS AIR BARRIER on the surface and light-cure for 3 minutes. Remove GC GRADIA® PLUS AIR BARRIER with water.
5. Gloss, characterization and individualization using GC GRADIA® PLUS Lustre Paints
Sandblast the surface (1.5 bar, 50μ) and immediately apply CERAMIC PRIMER II to the surface and let dry. Apply a thin layer (<0.1mm) of Lustre Paint over the surface and light-cure. Characterize and individualize the restoration by using the GC GRADIA® PLUS Lustre Paints. Lustre Paints should be diluted using the dedicated Diluting Liquid.
37
Intended Use & Introduction
Components
Color Chart
Characteristics
Clinicial Procedures
Composite Build-up
Procedure
Step-by-Step
Studies Physical
Properties
Questions & Answers
Related Products
Item List
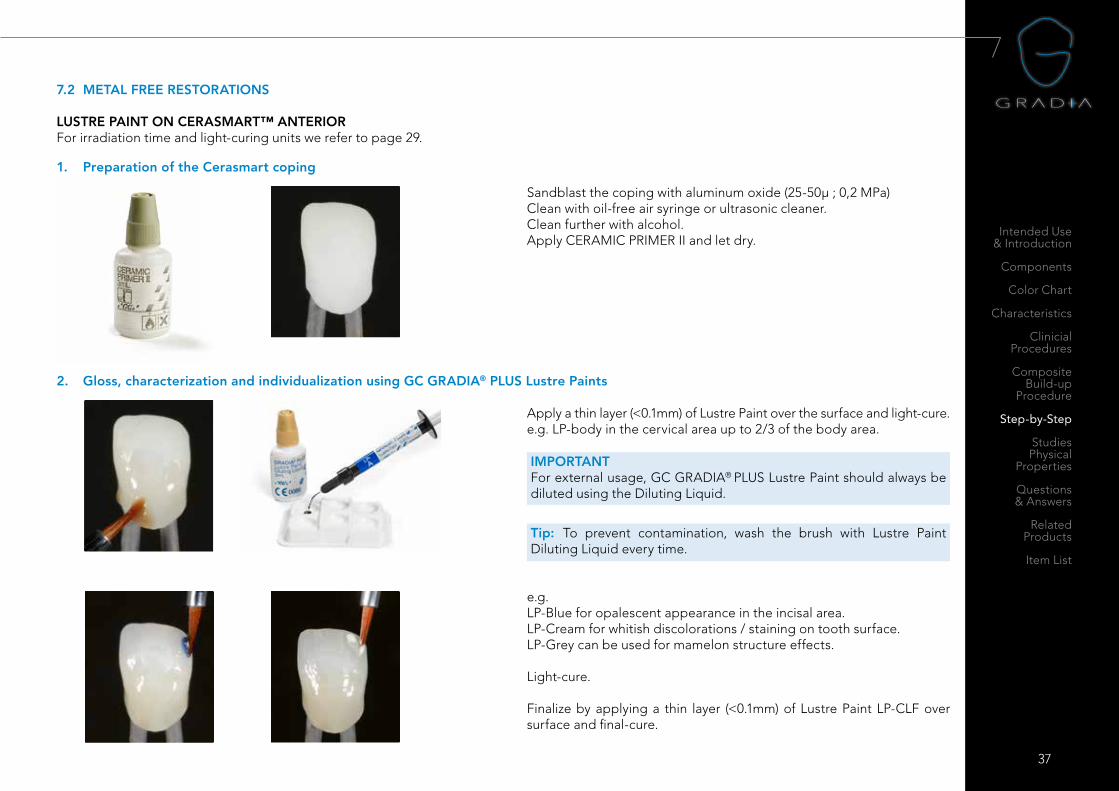
1. Preparation of the Cerasmart coping
7.2 METAL FREE RESTORATIONS
LUSTRE PAINT ON CERASMART™ ANTERIOR For irradiation time and light-curing units we refer to page 29.
Apply a thin layer (<0.1mm) of Lustre Paint over the surface and light-cure. e.g. LP-body in the cervical area up to 2/3 of the body area.
IMPORTANTFor external usage, GC GRADIA® PLUS Lustre Paint should always be diluted using the Diluting Liquid.
Tip: To prevent contamination, wash the brush with Lustre Paint Diluting Liquid every time.
2. Gloss, characterization and individualization using GC GRADIA® PLUS Lustre Paints
Sandblast the coping with aluminum oxide (25-50µ ; 0,2 MPa)Clean with oil-free air syringe or ultrasonic cleaner.Clean further with alcohol.Apply CERAMIC PRIMER II and let dry.
e.g.LP-Blue for opalescent appearance in the incisal area.LP-Cream for whitish discolorations / staining on tooth surface.LP-Grey can be used for mamelon structure effects.
Light-cure.
Finalize by applying a thin layer (<0.1mm) of Lustre Paint LP-CLF over surface and final-cure.

38
1. Preparation
LUSTRE PAINT ON CERASMART™ POSTERIOR For irradiation time and light-curing units we refer to page 29.
Apply a thin layer (<0.1mm) of Lustre Paint over the surface and light-cure.
e.g. LP-body in the cervical area up to 2/3 of the body area and in fissures and pits for occlusal characterization.
Tip: To prevent contamination, wash the brush with Lustre Paint Diluting Liquid every time.
Finalize by applying a thin layer (<0.1mm) of Lustre Paint LP-CLF over surface and final-cure.
2. Gloss, characterization and individualization using GC GRADIA® PLUS Lustre Paints
Sandblast the coping with aluminum oxide (25-50µ ; 0,2 MPa).Clean with oil-free air syringe or ultrasonic cleaner.Clean further with alcohol.Apply CERAMIC PRIMER II and let dry.
IMPORTANTFor external usage, GC GRADIA® PLUS Lustre Paint should always be diluted using the Diluting Liquid.

39
Intended Use & Introduction
Components
Color Chart
Characteristics
Clinicial Procedures
Composite Build-up
Procedure
Step-by-Step
Studies Physical
Properties
Questions & Answers
Related Products
Item List
1. Preparation of the Cerasmart coping
BUILD UP PROCEDURE FOR CERASMART™ CUTBACK COPING For irradiation time and light-curing units we refer to page 29.
2. Characterization and build up
A B C A. To add extra effect in the incisal area, use GC GRADIA® PLUS Light Body. e.g. LB-Base OpalB. Slight effects can be done with Lustre Paints. e.g. LP-Cream for whitish discolorations in the incisal areaC. Apply enamel (Heavy Body or Light Body) progressively from incisal
to cervical creating the final shape of the crown.
Tip: To prevent contamination, wash the brush with Lustre Paint Diluting Liquid every time.
Sandblast the coping with aluminum oxide (25-50µ ; 0,2 MPa).Clean with oil-free air syringe or ultrasonic cleaner.Clean further with alcohol.Apply CERAMIC PRIMER II and let dry.
Internal characterization with GC GRADIA® PLUS Lustre Paint.
IMPORTANTFor internal usage, GC GRADIA® PLUS Lustre Paint can be used pure or diluted using the Diluting Liquid.
Apply a thin layer (<0.1mm) of Lustre Paint over the surface and light-cure.
Build up with GC GRADIA® PLUS hybrid composite.
40
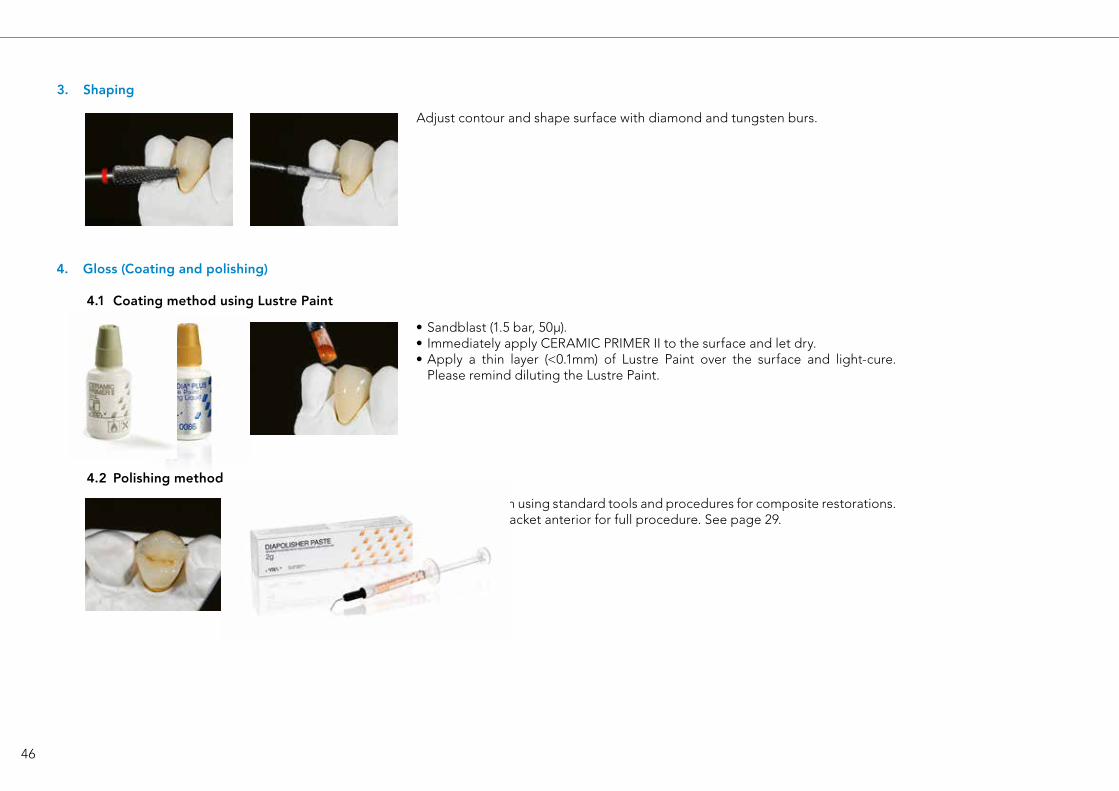
3. Shaping
Adjust contour and shape surface with diamond and tungsten burs.
4. Gloss (Coating and polishing)4.1 Coating method using Lustre Paint
Finish and polish using standard tools and procedures for composite restorations.
• Sandblast (1.5 bar, 50µ) • Immediately CERAMIC PRIMER II to the surface and let dry.• Apply a thin layer (<0.1mm) of Lustre Paint over the surface and light-cure.
IMPORTANTFor internal usage, GC GRADIA® PLUS Lustre Paint can be used pure or diluted using the Diluting Liquid.
4.2 Polishing method

41
Intended Use & Introduction
Components
Color Chart
Characteristics
Clinicial Procedures
Composite Build-up
Procedure
Step-by-Step
Studies Physical
Properties
Questions & Answers
Related Products
Item List
BUILD UP PROCEDURE FOR INLAYFor irradiation time and light-curing units we refer to page 29.
1. Model Preparation
Pour the model using GC FUJIROCK® EP and prepare the dies. Coat dies with GC GRADIA® DIE HARDNER. Block out undercuts with wax.Coat cavity with GC GRADIA® SEPARATOR.
Coat surface with GC GRADIA® PLUS AIR BARRIER to eliminate air inhibition layer. Final light-cure 3 minutes.Remove GC GRADIA® PLUS AIR BARRIER with water.
2. Build up procedure
Dentin Gradually fill up the cavity using LB-Inlay TD. Natural tooth color will show through.
Tip: If tooth is discolored, first apply thin layer of opaque or LB-Base OD.
Enamel create the final occlusal shape with LB-Inlay E and/or effect shades. Lustre Paints can be used for internal effects and discolorations. Light-cure.
Tip: For occlusal modeling, use a brush or eject the light body directly from the syringe.
42
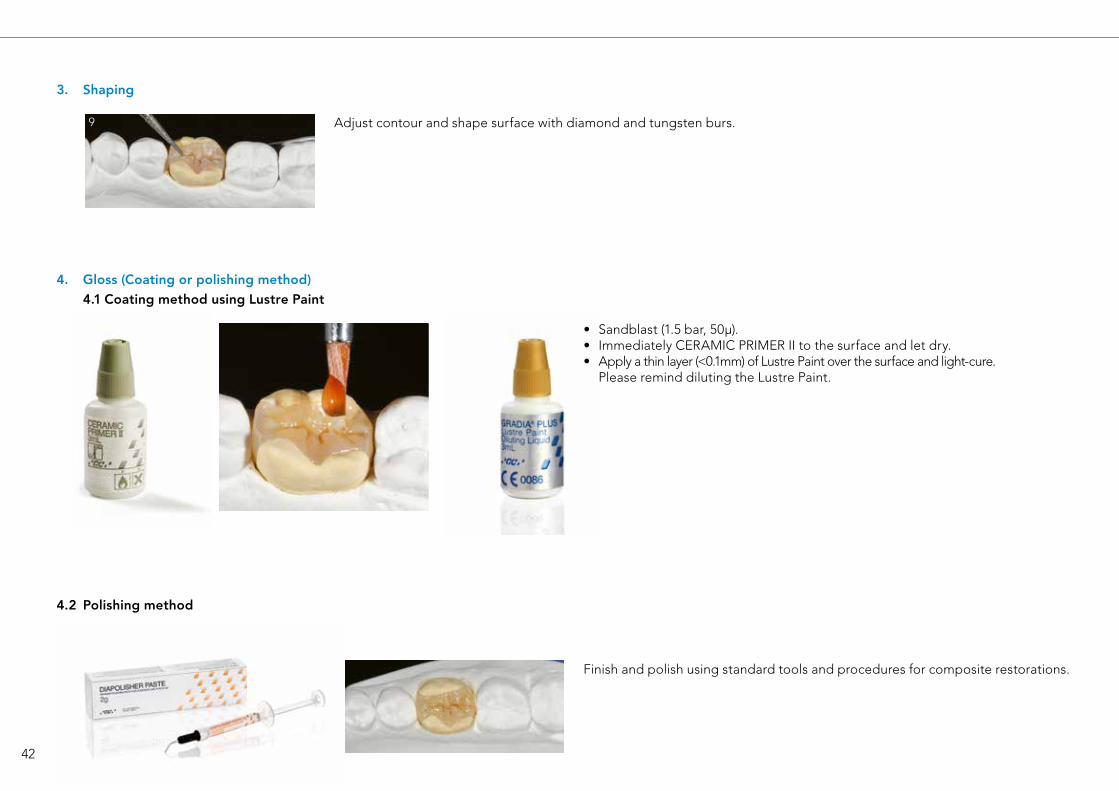
4. Gloss (Coating or polishing method) 4.1 Coating method using Lustre Paint
• Sandblast (1.5 bar, 50µ). • Immediately CERAMIC PRIMER II to the surface and let dry.• Apply a thin layer (<0.1mm) of Lustre Paint over the surface and light-cure. Please remind diluting the Lustre Paint.
4.2 Polishing method
Adjust contour and shape surface with diamond and tungsten burs.
3. Shaping
9
Finish and polish using standard tools and procedures for composite restorations.
43
Intended Use & Introduction
Components
Color Chart
Characteristics
Clinicial Procedures
Composite Build-up
Procedure
Step-by-Step
Studies Physical
Properties
Questions & Answers
Related Products
Item List
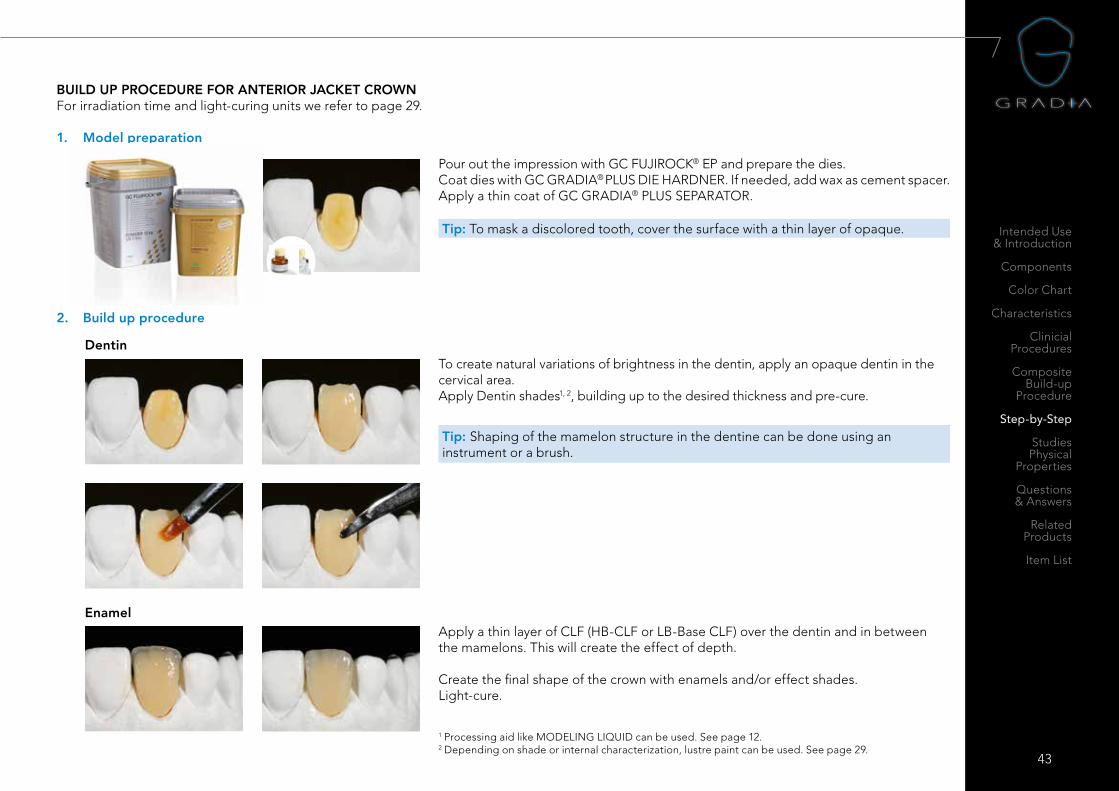
BUILD UP PROCEDURE FOR ANTERIOR JACKET CROWNFor irradiation time and light-curing units we refer to page 29.
1. Model preparation
2. Build up procedure
To create natural variations of brightness in the dentin, apply an opaque dentin in the cervical area. Apply Dentin shades1, 2, building up to the desired thickness and pre-cure.
Tip: Shaping of the mamelon structure in the dentine can be done using an instrument or a brush.
Apply a thin layer of CLF (HB-CLF or LB-Base CLF) over the dentin and in between the mamelons. This will create the effect of depth.
Create the final shape of the crown with enamels and/or effect shades.Light-cure.
Enamel
Dentin
1 Processing aid like MODELING LIQUID can be used. See page 12.2 Depending on shade or internal characterization, lustre paint can be used. See page 29.
Pour out the impression with GC FUJIROCK® EP and prepare the dies. Coat dies with GC GRADIA® PLUS DIE HARDNER. If needed, add wax as cement spacer. Apply a thin coat of GC GRADIA® PLUS SEPARATOR.
Tip: To mask a discolored tooth, cover the surface with a thin layer of opaque.

44
Adjust contour and shape surface with diamond and tungsten burs.
4. Gloss (Coating and polishing)4.1 Coating method using Lustre Paint
3. Shaping
• Sandblast (1.5 bar, 50µ).• Immediately CERAMIC PRIMER II to the surface and let dry.• Apply a thin layer (<0.1mm) of Lustre Paint over the surface and light-cure.
Please remind diluting the Lustre Paint.
Finish and polish using standard tools and procedures for composite restorations.
Complete lingual surface and proximal areas. Slightly over contour proximal surfaces to allow grinding and polishing. Light-cure.Coat surface with GC GRADIA® AIR BARRIER to eliminate air inhibition layer and to guarantee complete polymerization. Light-cure for 3 minutes.Remove GC GRADIA® PLUS AIR BARRIER with water.
4.2 Polishing method

Intended Use & Introduction
Components
Color Chart
Characteristics
Clinicial Procedures
Composite Build-up
Procedure
Step-by-Step
Studies Physical
Properties
Case Presentations
Questions & Answers
Related Products
Item List
4545
Intended Use & Introduction
Components
Color Chart
Characteristics
Clinicial Procedures
Composite Build-up
Procedure
Step-by-Step
Studies Physical
Properties
Questions & Answers
Related Products
Item List
BUILD UP PROCEDURE FOR POSTERIOR JACKET CROWNFor irradiation time and light-curing units we refer to page 29.
1. Model preparation
Pour out the impression with GC FUJIROCK® EP and prepare the dies. Coat dies with GC GRADIA® PLUS DIE HARDNER. If needed, add wax as cement spacer.Apply a thin coat of GC GRADIA® PLUS SEPARATOR.
Tip: To mask a discolored tooth, cover the surface with a thin layer of opaque.
To create natural variations of brightness in the dentin, apply an opaque dentin in the cervical area.Apply dentin shades1,2, building up to the desired thickness and pre-cure. Apply a thin layer of CLF (HB-CLF or LB-Base CLF) over the dentin and in between the mamelons. This will create the effect of depth.
1 Processing aid like MODELING LIQUID can be used. See page 12.2 Depending on shade or internal characterization, lustre paint can be used. See page 29.
2. Build up procedure
Dentin
EnamelInternal characterization, pits and fissures or chroma adjustments can be done using the Lustre Paints.Creating the final shape of the crown with enamels and/or effect shades.Light-cure.Apply GC GRADIA® PLUS AIR BARRIER on the surface and light-cure for 3 minutes. Wash of GC GRADIA® PLUS AIR BARRIER with water.
3. Shaping
Adjust contour and shape surface with diamond and tungsten burs.
4. Gloss (Coating and polishing)
4.1 Coating method using Lustre Paint
• Sandblast (1.5 bar, 50µ).• Immediately apply CERAMIC PRIMER II to the surface and let dry.• Apply a thin layer (<0.1mm) of Lustre Paint over the surface and light-cure.
Please remind diluting the Lustre Paint.
Finish and polish using standard tools and procedures for composite restorations. See metal free jacket anterior for full procedure. See page 29.
4.2 Polishing method
46

47
BUILD UP PROCEDURE FOR FACINGFor irradiation time and light-curing units we refer to page 29.
DentinApply Dentin shades1, 2, building up to the desired thickness. Pre-cure.
Tip: Shaping of the mamelon structure in the dentine can be done using an instrument or a brush.
Cover the entire body with a thin layer of the fluorescent transpa material CLF (LB or HB). This will create the effect of depth.Light-cure.
EnamelApply enamel progressively from incisal to cervical creating the final shape of the crown.Light-cure.
Apply GC GRADIA® PLUS AIR BARRIER on the surface and light-cure for 3 minutes. Remove GC GRADIA® PLUS AIR BARRIER with water.
2. Build up procedure
Prepare GC FUJIROCK® EP dies. Coat dies with GC GRADIA® PLUS DIE HARDNER.If needed, add wax as cement spacerApply thin coat of GC GRADIA® PLUS SEPARATOR.
Tip: To mask discolored natural tooth, cover the surface with a thin layer of opaque.
1. Model Preparation
Intended Use & Introduction
Components
Color Chart
Characteristics
Clinicial Procedures
Composite Build-up
Procedure
Step-by-Step
Studies Physical
Properties
Questions & Answers
Related Products
Item List
1 Processing aid like MODELING LIQUID can be used. See page 12.2 Depending on shade or internal characterization, lustre paint can be used.
See page 29.

48
Adjust contour and shape surface with diamond and tungsten burs.See previous.
3. Finishing
4. Gloss (coating or polishing method)
4.1. Coating method using Lustre Paint• Sandblast (1.5 bar, 50mµ).• Immediately apply CERAMIC PRIMER II to the surface and let dry.• Apply a thin layer (<0.1mm) of Lustre Paint over the surface and light-cure.
4.2 Polishing method Finish and polish using standard tools and procedures for composite
restorations.
49
Intended Use & Introduction
Components
Color Chart
Characteristics
Clinicial Procedures
Composite Build-up
Procedure
Step-by-Step
Studies Physical
Properties
Questions & Answers
Related Products
Item List
49
BUILD UP PROCEDURE FOR ONE BODY FIBRE REINFORCED CROWN OR BRIDGE For irradiation time and light-curing units we refer to page 29.
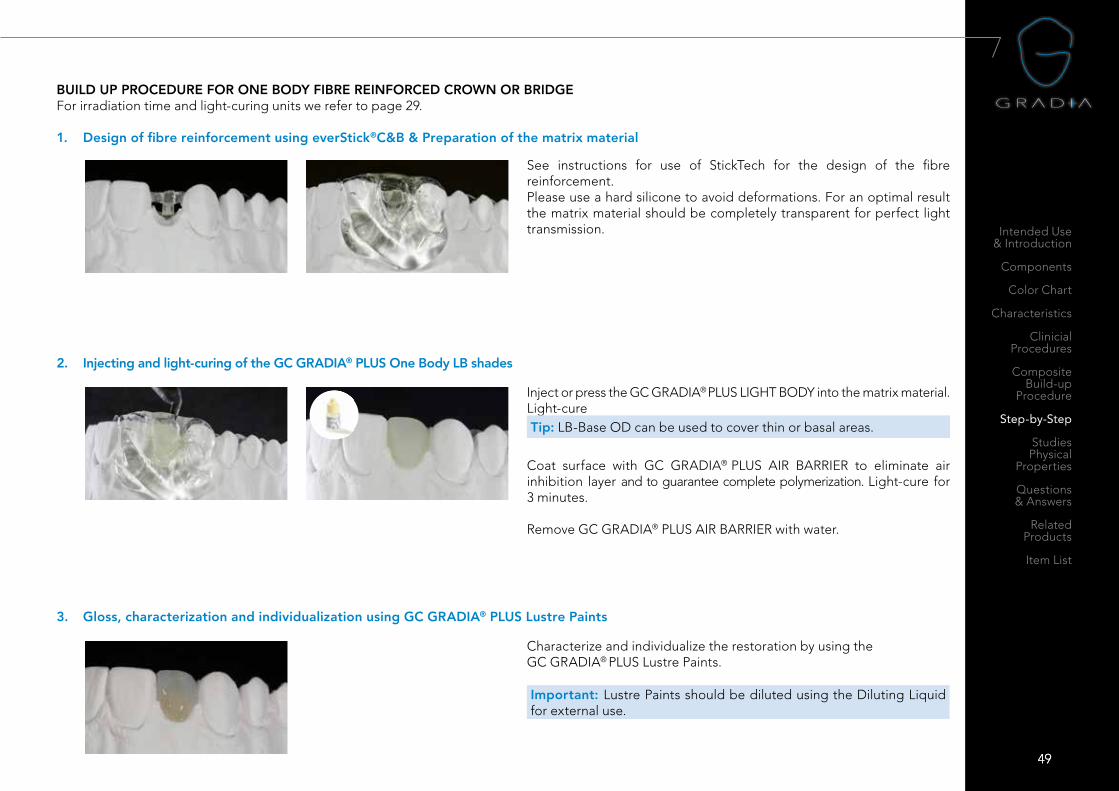
1. Design of fibre reinforcement using everStick®C&B & Preparation of the matrix material
Characterize and individualize the restoration by using the GC GRADIA® PLUS Lustre Paints.
Important: Lustre Paints should be diluted using the Diluting Liquid for external use.
3. Gloss, characterization and individualization using GC GRADIA® PLUS Lustre Paints
See instructions for use of StickTech for the design of the fibre reinforcement. Please use a hard silicone to avoid deformations. For an optimal result the matrix material should be completely transparent for perfect light transmission.
Inject or press the GC GRADIA® PLUS LIGHT BODY into the matrix material.Light-cureTip: LB-Base OD can be used to cover thin or basal areas.
Coat surface with GC GRADIA® PLUS AIR BARRIER to eliminate air inhibition layer and to guarantee complete polymerization. Light-cure for 3 minutes.
Remove GC GRADIA® PLUS AIR BARRIER with water.
2. Injecting and light-curing of the GC GRADIA® PLUS One Body LB shades

50
7.3 DENTURE
INDIVIDUALIZATION/CHARACTERIZATION OF ACRYCLIC BASED DENTUREFor irradiation time and light-curing units we refer to page 29.
1. Preparation of acrylic denture
Roughen acrylic surface by sandblasting with aluminum oxide (50µm, 0,2mpa) or by roughening with tungsten burs. Provide enough space in the cutback for layering.Clean the surface by steam cleaner or clean with oil free air. The prepared surface should not be touched anymore.Dispose a few drops of GC Acrylic Primer into a dispensing dish.Wet the area (e.g. tooth area) with GC Acrylic Primer by using a brush and light-cure. Make sure GC Acrylic Primer is applied over the entire surface.
2. Build up procedure
2.1. building up tooth structures
Apply a thin layer of LB-Base CLF onto the dentin area to imitate sclerotic dentin. This will create depth.Light-cure.Create mesial and distal edges with enamel, e.g. HB-PE, and light-cure.
Internal characterizations can be made using Lustre Paint or Light Body and light-cure. E.g. LP-Cream for small internal decalcification spots. LB-Yellow is used to create a mamelon structure.Apply enamel progressively from incisal to cervical creating the final shape of the crown. Light-cure.
51
Intended Use & Introduction
Components
Color Chart
Characteristics
Clinicial Procedures
Composite Build-up
Procedure
Step-by-Step
Studies Physical
Properties
Questions & Answers
Related Products
Item List
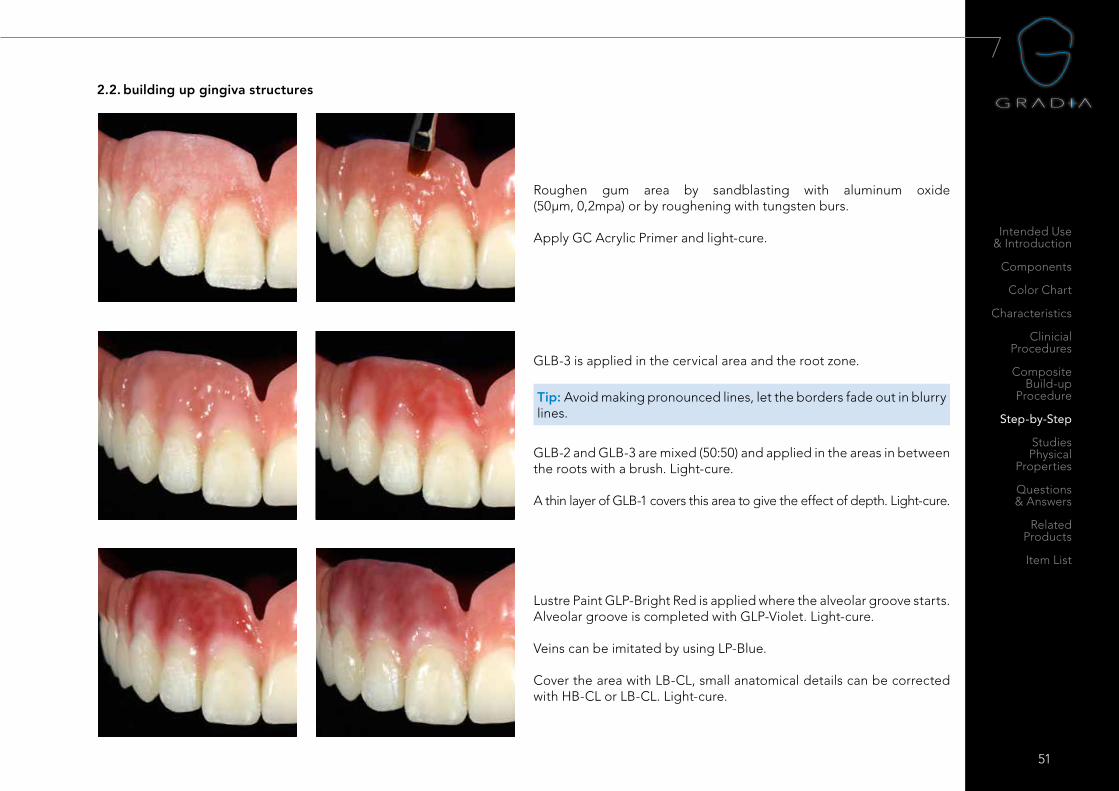
Roughen gum area by sandblasting with aluminum oxide (50µm, 0,2mpa) or by roughening with tungsten burs.
Apply GC Acrylic Primer and light-cure.
GLB-3 is applied in the cervical area and the root zone.
Tip: Avoid making pronounced lines, let the borders fade out in blurry lines.
GLB-2 and GLB-3 are mixed (50:50) and applied in the areas in between the roots with a brush. Light-cure.
A thin layer of GLB-1 covers this area to give the effect of depth. Light-cure.
2.2. building up gingiva structures
Lustre Paint GLP-Bright Red is applied where the alveolar groove starts. Alveolar groove is completed with GLP-Violet. Light-cure.
Veins can be imitated by using LP-Blue.
Cover the area with LB-CL, small anatomical details can be corrected with HB-CL or LB-CL. Light-cure.
52
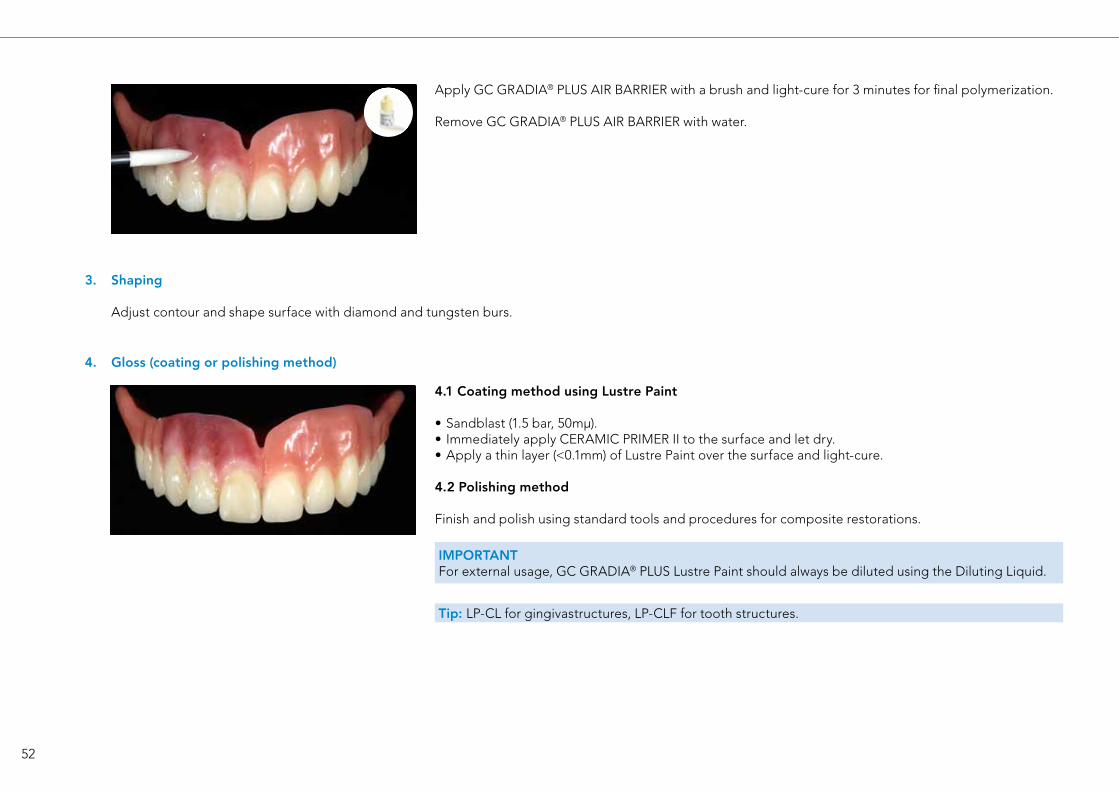
Apply GC GRADIA® PLUS AIR BARRIER with a brush and light-cure for 3 minutes for final polymerization.
Remove GC GRADIA® PLUS AIR BARRIER with water.
3. Shaping
Adjust contour and shape surface with diamond and tungsten burs.
4. Gloss (coating or polishing method)
4.1 Coating method using Lustre Paint
• Sandblast (1.5 bar, 50mμ).• Immediately apply CERAMIC PRIMER II to the surface and let dry.• Apply a thin layer (<0.1mm) of Lustre Paint over the surface and light-cure.
4.2 Polishing method
Finish and polish using standard tools and procedures for composite restorations.
IMPORTANTFor external usage, GC GRADIA® PLUS Lustre Paint should always be diluted using the Diluting Liquid.
Tip: LP-CL for gingivastructures, LP-CLF for tooth structures.

53
Intended Use & Introduction
Components
Color Chart
Characteristics
Clinicial Procedures
Composite Build-up
Procedure
Step-by-Step
Studies Physical
Properties
Case Presentations
Questions & Answers
Related Products
Item List
GC GRADIA® PLUS from GC – where white and red are in perfect harmony
Regardless of your preferred approach - Layering or One Body - with GC GRADIA® PLUS you can complete a wide range of clinical applications, from metal-free inlays, veneers and jacket crowns to frame-supported crowns and bridges and implant superstructures … always achieving a highly aesthetical “red and white” reproduction.

55
Intended Use & Introduction
Components
Color Chart
Characteristics
Clinicial Procedures
Composite Build-up
Procedure
Step-by-Step
Studies Physical
Properties
Questions & Answers
Related Products
Item List
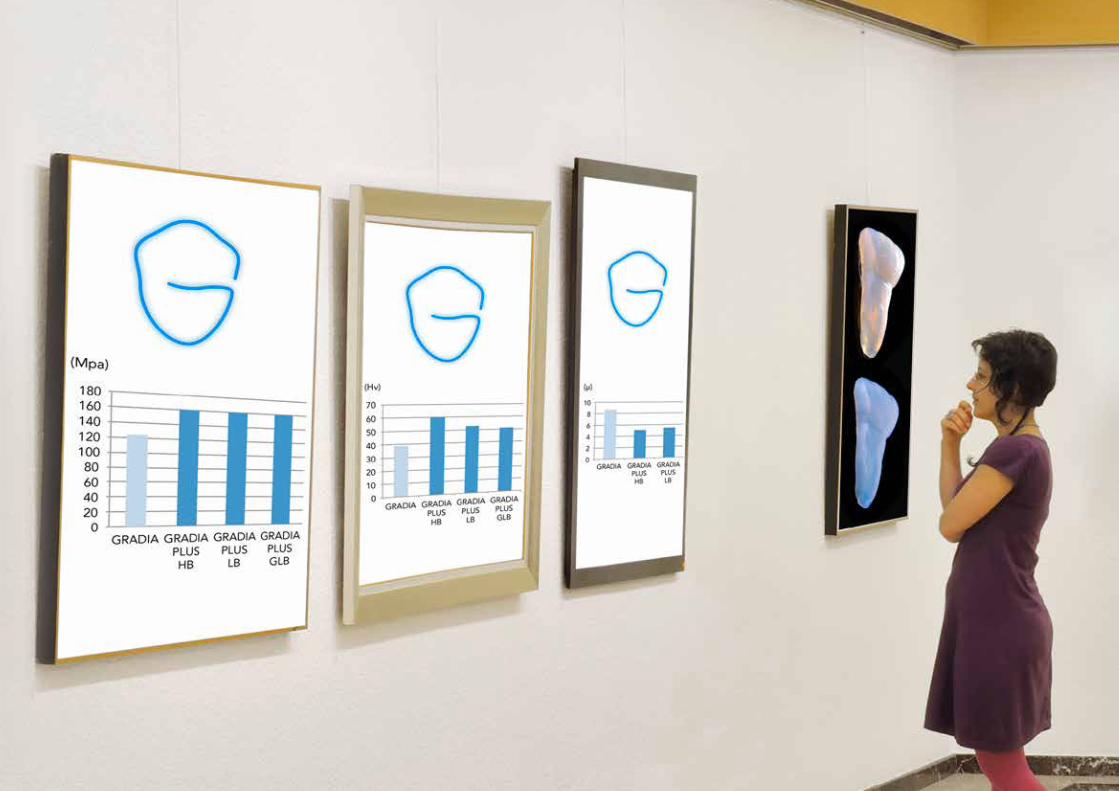
8. Studies / Physical properties
COMPOSITE WEAR RESISTANCE OF NEW INDIRECT COMPOSITEStudy by H. Kato, D. Machida, T. Ueno, T. Kumagai (Research & Development Department, GC Corp., Tokyo, Japan)Presented during EPA: European Prosthodontic Association, Halle, Germany, 2016, 9/15-17
1. AbstractA new indirect composite system has been developed:GC GRADIA® PLUS LB (Light Body, flowable type) / HB (Heavy Body, paste type) (Fig. 1). GC GRADIA® PLUS overcomes weaknesses of Micro-Filled Resin (MFR) by adopting nano-filler technology, the same as G-ænial Universal Flo (GC) and CERASMART™ (GC). All demonstrate high gloss retention and high mechanical properties.
2. Study purposeEvaluate the wear resistance of GC GRADIA® PLUS and other indirect composites against an enamel antagonist after a three-body wear test.
3. Materials
Code / Material Manufacturer Lot No. Glass filler size
GPL / GC GRADIA® PLUS LB* GC 1506191G 300nm
GPH / GC GRADIA® PLUS HB* GC 1506201G 300nm
GR / GC GRADIA® GC 1411101 1µm
CRM / CERAMAGE Shofu 031546 1-6µm
SC / Signum Ceramics Heraeus Kulzer 010205A 0.6-1µm
CLF / crea.lign flow Bredent N144514 40nm
CLP / crea.lign paste Bredent 144309 40nm
NP / SR nexco paste Ivoclar/Vivadent T20056 10-50nm
* LB: Light Body (flowable type) / HB: Heavy Body (paste type)Specimens of each indirect composite were formed for each material using a metal mold and cured according to the manufacturer’s instructions for use.
4. Methods
Flow chart of wear test
Specimens were prepared with 1000-grid SiC paper
Stored in 37°C water for 24h(TC0), or under thermal cycling (5-55°C for 10,000 cycles)(TC10000).
Performed three-body wear test for 100,000 cycles (load 0.84 MPa, n=4) (Fig.2)
• Calculated wear value from a difference of specimen height, before and after wear test. (Fig.3a)
• Observed wear surface with electron microscope (SEM, SU-70, HITACHI) (Fig.4)
Measured wear value with 3D Measurement Macroscope (VR-3100, KEYENCE) (Fig.3b)
Bovine enamel was prepared with 4000-grid SiC paper
Results were statistically analyzed by one-way ANOVA (p<0.05).
Fig. 2 Shape of specimen (left) and diagram of three-body wear test (right)
Load 0.84MPa (300g): collision and sliding
PMMA powder + glycerin
Specimen
Wear surface Bovine enamel
10mm
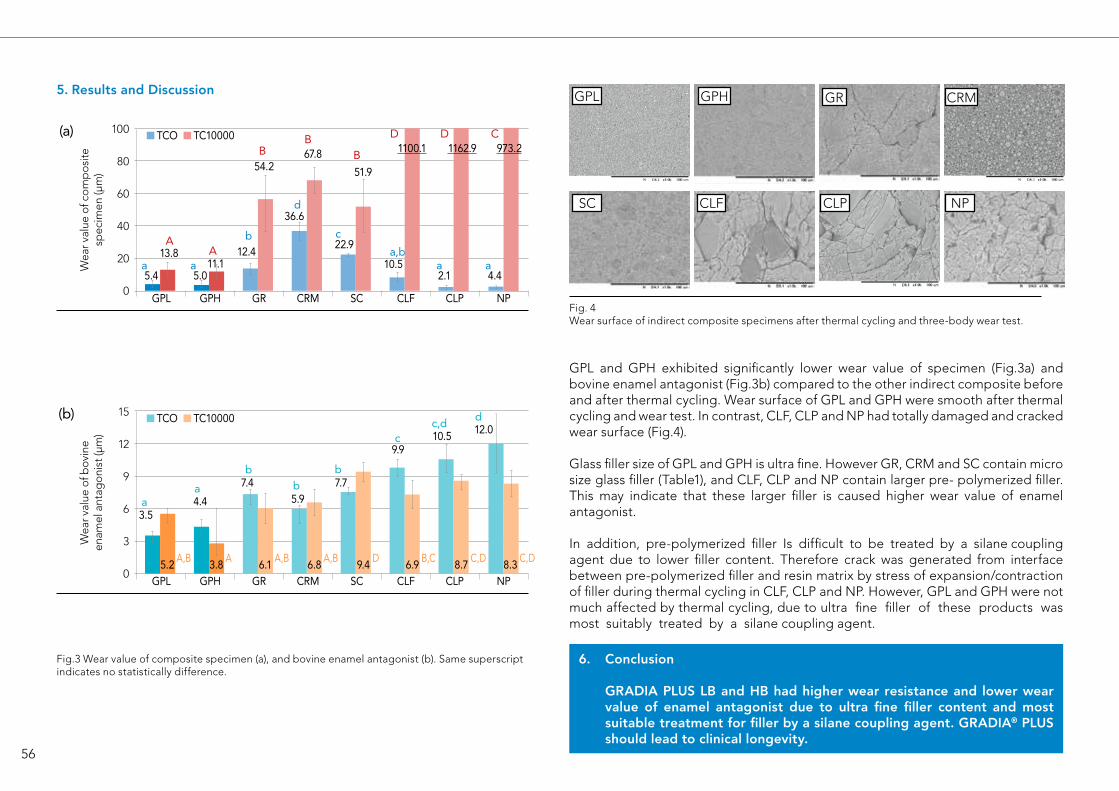
56
5. Results and Discussion
Fig.3 Wear value of composite specimen (a), and bovine enamel antagonist (b). Same superscript indicates no statistically difference.
GPL and GPH exhibited significantly lower wear value of specimen (Fig.3a) and bovine enamel antagonist (Fig.3b) compared to the other indirect composite before and after thermal cycling. Wear surface of GPL and GPH were smooth after thermal cycling and wear test. In contrast, CLF, CLP and NP had totally damaged and cracked wear surface (Fig.4).
Glass filler size of GPL and GPH is ultra fine. However GR, CRM and SC contain micro size glass filler (Table1), and CLF, CLP and NP contain larger pre- polymerized filler. This may indicate that these larger filler is caused higher wear value of enamel antagonist.
In addition, pre-polymerized filler Is difficult to be treated by a silane coupling agent due to lower filler content. Therefore crack was generated from interface between pre-polymerized filler and resin matrix by stress of expansion/contraction of filler during thermal cycling in CLF, CLP and NP. However, GPL and GPH were not much affected by thermal cycling, due to ultra fine filler of these products was most suitably treated by a silane coupling agent.
6. Conclusion
GRADIA PLUS LB and HB had higher wear resistance and lower wear value of enamel antagonist due to ultra fine filler content and most suitable treatment for filler by a silane coupling agent. GRADIA® PLUS should lead to clinical longevity.
Fig. 4 Wear surface of indirect composite specimens after thermal cycling and three-body wear test.
SC CLF CLP NP
GPL GPH GR CRMW
ear v
alue
of b
ovin
een
amel
ant
agon
ist (
μm)
15
12
9
6
3
0A,B A A,B A,B D B,C C,D C,D
b b
TCO TC10000
GPL GPH GR CRM SC CLF CLP NP
a
c,d
a
3.54.4
7.45.9
7.7
9.910.5
d12.0
c
(b)
b
5.2 3.8 6.1 6.8 9.4 6.9 8.7 8.3
Wea
r val
ue o
f com
pos
itesp
ecim
en (μ
m)
100
80
60
40
20
0
BB
B
D D C
A b c
TCO TC10000
54.267.8
51.9
GPL GPH GR CRM SC CLF CLP NP
Aa aa a5.4 5.0
12.4
36.6
22.9
10.52.1 4.4
13.811.1
a,b
(a)
d
1100.1 1162.9 973.2

58
NOTCHLESS TRIANGULER PRISM FRACTURE TOUGHNESS OF NEW INDIRECT COMPOSITE.
Study by H. Kato, D. Machida, T. Ueno, T. Kumagai (Research & Development Department, GC Corp., Tokyo, Japan), presented during ADM2016
1. AbstractA new indirect composite system has been developed, GC GRADIA® PLUS LB (Light Body, flowable type) / HB (Heavy body, paste type) (Fig.1). GRADIA® PLUS overcomes weaknesses of Micro-Filled Resin (MFR) by adopting nano-filler technology, the same as G-ænial universal flo (composite resin, GC) and CERASMART™ (CAD/CAM resin block, GC). All demonstrate with high wear resistance and high mechanical properties. Fracture toughness of dental materials is evaluated as a method to measure a resistance level of the destruction. Notchless trianguler prism (NTP) fracture toughness test has been paid attention as an effective method for measuring fracture toughness of composite resin. The purpose of this study is to evaluate the NTP fracture toughness of GC GRADIA® PLUS and other indirect composite resin.
2. Materials (Table 1)
Code / Material Manufacturer Lot No.
GPL / GC GRADIA® PLUS LB* GC 1506191G
GPH / GC GRADIA® PLUS HB* GC 1506201G
GR / GC GRADIA® GC 1411101
SC / Signum Ceramics Heraeus Kulzer 010205A
CLF / crea.lign flow Bredent N144514
CLP / crea.lign paste Bredent 144309
NP / SR nexco paste Ivoclar/Vivadent T20056 Specimens of each indirect composite resin were formed for each material using metal mold and cured according to the manufacturers’ instructions for use.
3. Filler of each material (Table 2)
GPL GPH GR SC CLF CLP NP
Glass filler size 300nm 300nm 1μm 0.6-1μm 40nm 40nm 10-50nm
Pre-polymerized filler size none 10μm 10μm 20μm 20μm 20μm 20μm
GPL and GPH exhibited significantly higher NTP fracture toughness, flexural strength and flexural elastic modulus compared to the other indirect composite resin (Fig. 4). Products which exhibited high flexural strength and high flexural strength tended to exhibit high NTP fracture toughness (Fig. 5).
GR, SC, CLF, CLP and NP which contained pre-polymerized filler (Fig.3, Table2) exhibited lower NTP fracture toughness and flexural strength. Pre-polymerized filler is difficult to be treated by a silane coupling agent due to lower filler content, so it causes low cohesion between pre-polymerized filler and resin matrix. GPL and GPH contain polyfunctional monomer and are filled ultra fine filler at high density which is most suitably treated by a silane coupling agent. Polyfunctional monomer forms a complicated network by polymerization and abundant ultra fine filler raise strength of composite resin more. Therefore, GPL and GPH exhibited higher properties.
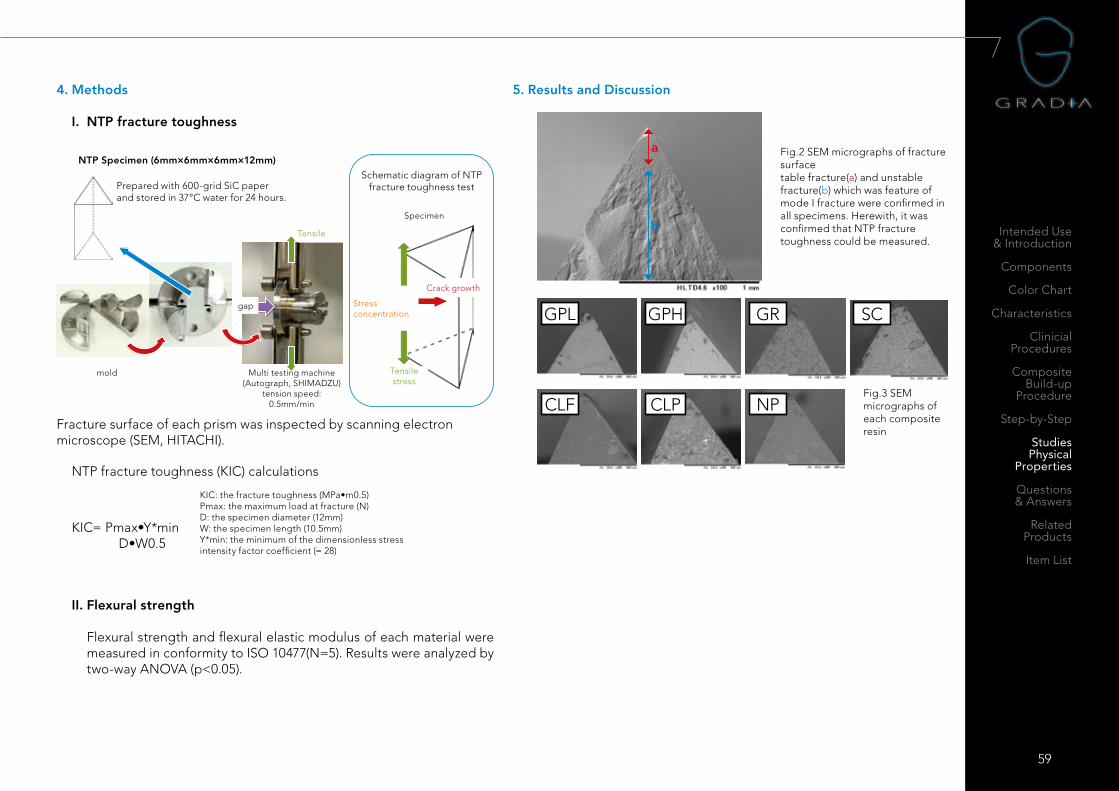
59
Intended Use & Introduction
Components
Color Chart
Characteristics
Clinicial Procedures
Composite Build-up
Procedure
Step-by-Step
Studies Physical
Properties
Questions & Answers
Related Products
Item List
NTP Specimen (6mm×6mm×6mm×12mm)
Prepared with 600-grid SiC paperand stored in 37°C water for 24 hours.
Schematic diagram of NTP fracture toughness test
Specimen
Crack growth
Tensile stress
Multi testing machine(Autograph, SHIMADZU)
tension speed: 0.5mm/min
mold
Tensile
gap
Fracture surface of each prism was inspected by scanning electron microscope (SEM, HITACHI).
NTP fracture toughness (KIC) calculations
KIC: the fracture toughness (MPa•m0.5)Pmax: the maximum load at fracture (N)D: the specimen diameter (12mm)W: the specimen length (10.5mm)Y*min: the minimum of the dimensionless stress intensity factor coefficient (= 28)
KIC= Pmax•Y*min D•W0.5
II. Flexural strength
Flexural strength and flexural elastic modulus of each material were measured in conformity to ISO 10477(N=5). Results were analyzed by two-way ANOVA (p<0.05).
5. Results and Discussion
Fig.2 SEM micrographs of fracture surfacetable fracture(a) and unstable fracture(b) which was feature of mode I fracture were confirmed in all specimens. Herewith, it was confirmed that NTP fracture toughness could be measured.
a
b
Fig.3 SEM micrographs of each composite resin
4. Methods
I. NTP fracture toughness
Stress concentration GPL
CLF
GPH
CLP
GR
NP
SC

60
6. Conclusion
New indirect composite, GC GRADIA® PLUS LB and HB, exhibited higher NTP fracture toughness than the other indirect composite resin, and it may suggest that GC GRADIA® PLUS is not easily fractured in clinical use.
NTP
frac
ture
toug
hnes
s (M
Pa•m
05)
Correlation coefficient: R-0.82
Flexural strength (MPa)
Correlation coefficient: R-0.75
Flexural elastic modulus (GPa)
NTP
frac
ture
toug
hnes
s (M
Pa•m
05)
Fig. 5 Correlation between KIC and flexural strength (a), or flexural elastic modulus (b).
Fig. 4 NTP fracture toughness (A), flexural strength (B) and flexural elastic modulus (C) of each material. Same superscript indicates no statistically difference.
Flex
ural
ela
stic
mod
ulus
(GPa
)Fl
exur
al s
tren
gth
(MPa
)N
TP fr
actu
re to
ughn
ess:
KIC
(MPa
•m0.
5 )
61
62
9. Questions and Answers1. Will the bond strength of GC METALPRIMER Z be affected if the alloy
surface is touched after sandblasting? Yes. Sandblast the alloy surface again and reapply GC METALPRIMER Z.
2. Should sandblasted metal be ultrasonic or steam cleaned? No. Simply use filtered air pressure to remove aluminum oxide residue.
3. Opaque is a little thick when dispensing from the syringe. Is this a problem? No. GC GRADIA® PLUS pastes are thixotropic (certain gels exhibit this property
but they become more fluid when stirred or put into motion, e.g. by a syringe plunger). The thixotropic property helps to control the flow and prevents OPAQUE from flowing into undesired areas.
4. Can OPAQUE be diluted to improve flow? No, it cannot be diluted. The flow can be improved by stirring it with a brush or
spatula.
5. Is it possible to cover RETENTION BEADS with a single layer of OPAQUE? This will depend on the amount and size of the used retention beads. You
should apply the opaque in a fine layer and light-cure. Repeat this process until the metal color is masked out. Alternatively, use the LB CLF (clear) to cover the retention beads, light-cure and then cover as usual with the opaque.
6. The OPAQUE did not cure well. The OPAQUE layer might be applied too thick. Remove it and apply two very
thin layers instead of one thick layer. Check that your light-curing device is functioning correctly.
7. How can entrapping air bubbles be prevented? There are two ways:
1. Before applying the resin, lightly tap the top of the paste surface with a spatula (the spatula edge should not be nicked or rough as this will also cause bubbles).
2. Use GC GRADIA® PLUS Modeling Liquid by wetting spatula or brush in order to smoothen the surface. Use moderately. Light-cure for one minute before applying the next paste layer.
8. Which paste should be used on the hollow part of a pontic? Build-up with CL-F, contour to conform to the adjacent area, light-cure, apply
OPAQUE and light-cure again.
9. Which light-curing unit should be used? Refer to page 29. GC GRADIA® PLUS can be light-cured with GC Labolight DUO (step and final
cure), GC LABOLIGHT LV-III (final cure), GC STEPLIGHT SL I (step cure only).
10. How do I obtain a nice gloss on the surface? In order to obtain a good gloss on the composite you can choose between
polishing methods:A. By using our dedicated GC GRADIA® PLUS Lustre Paint as a surface coating
agent.1. Roughen the resin surface using a carbide bur or sandblast (1.5 kg/cm2)
to obtain the mechanical retention. Dry and clean with an air gun.2. Priming: Immediately apply a silane coupling agent CERAMIC PRIMER II (GC)
to the resin surface and dry.3. Coloring, coating and final light-curing: Apply a thin layer (<0.1mm) of
Lustre Paint over the resin surface and final-cure. To prevent contamination, wash the brush with LP Diluting Liquid every
time. Refer to page 26-27.B. By manual polishing using our dedicated GC DIAPOLISHER PASTE
Use proper instruments and burs to polish and finish the prosthesis, and to confirm, remove any agent or paste for polishing and finishing in the proper way and see that the surface has a proper shine.
11. The paste starts curing while I’m working with it. Avoid working in direct sunlight (near a window) or within 30cm of a lab light.
GC GRADIA® PLUS is designed to promptly react to light for better physical properties.
Use a working plate with a cover to protect from light. Always close the syringes.
12. Are there any contra indications? GC GRADIA® PLUS should not be used for malocclusions, clenching or bruxism.
There should be no occlusal contacts at metal composite margins. Avoid use of this product in patients with known allergies to methacrylate
monomer, methacrylate polymer or alcohol.
13. How should GC GRADIA® PLUS be stored? Recommended for optimal performance, store in a cool place (4-25°C / 39.2-77.0°F).
away from high temperatures or direct sunlight. Shelf life: 3 years from the date of manufacture.
63
Intended Use & Introduction
Components
Color Chart
Characteristics
Clinicial Procedures
Composite Build-up
Procedure
Step-by-Step
Studies Physical
Properties
Questions & Answers
Related Products
Item List
14. Can I use GC GRADIA® PLUS to veneer zirconium dioxide frameworks?
Yes, but consider the following points in order to have a secure working procedure:• Framework:
The framework should be anatomic in design, supporting the composite (same thicknesses everywhere)
Create a lingual band and eventually also a small vestibular band, small mechanical retention/stress breakers are advised
• Step by step : Sandblast zirconium framework and steam clean and then apply
CERAMIC PRIMER II to the zirconium surface and let it dry (1min) To ensure a correct wettability, directly apply GC GRADIA® PLUS
Opaque, alternatively use GC GRADIA® PLUS Light Body (colored or clear) and light-cure as usual
Apply the next GC GRADIA® PLUS pastes in the usual step-by-step way
15. Can I use GC GRADIA® PLUS to veneer PEEK/PEKK frameworks?Yes. Please follow the recommendations of the respective PEEK/PEKK and consider following points concerning the framework in order to have a secure working procedure.The framework should be anatomic in design, supporting the composite (same thicknesses everywhere).Create a lingual band and eventually also a small vestibular band, small mechanical retention/stress breakers are advised.Based upon internal testing, the following recommendations for the building up procedure of peek are:1. Sandblast the PEEK/PEKK framework (0.2MPa, 50 micro-meter,
Al2O3) .2. Clean and dry with air gun.3. Apply GC GRADIA® PLUS Opaque and light-cure.4. Proceed by following the usual step by step procedures of
GC GRADIA® PLUS.
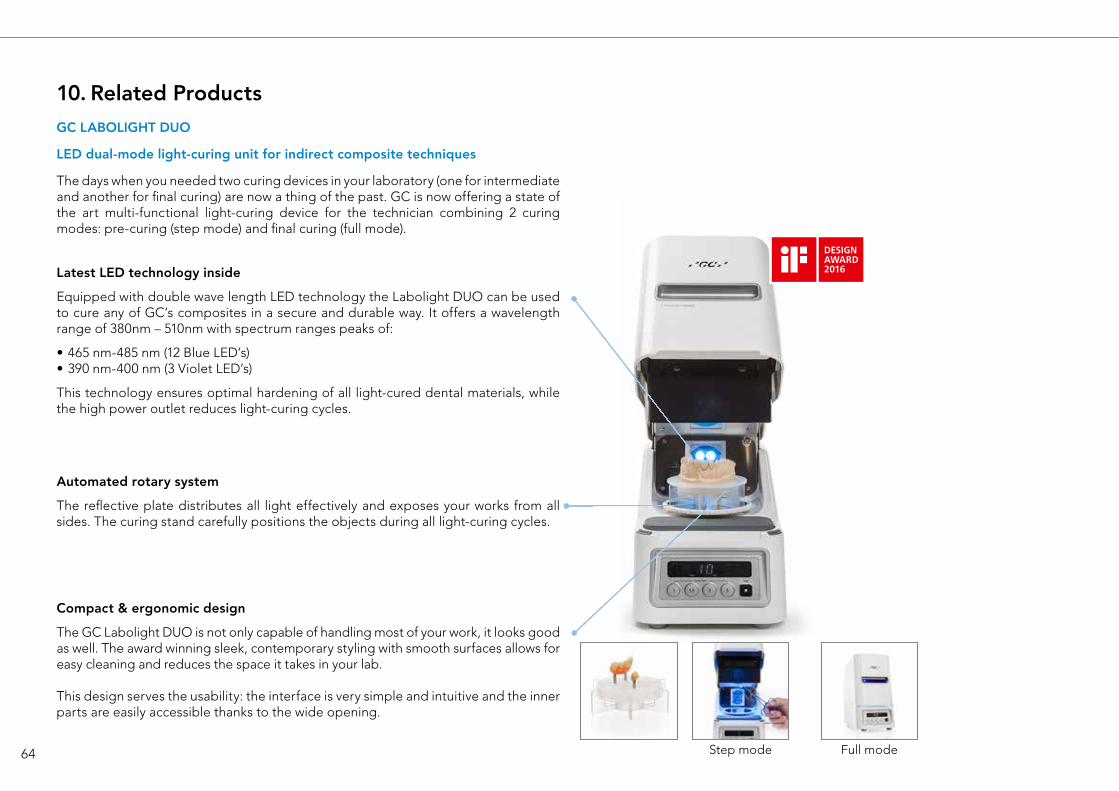
64
10. Related ProductsGC LABOLIGHT DUO
LED dual-mode light-curing unit for indirect composite techniques
The days when you needed two curing devices in your laboratory (one for intermediate and another for final curing) are now a thing of the past. GC is now offering a state of the art multi-functional light-curing device for the technician combining 2 curing modes: pre-curing (step mode) and final curing (full mode).
Full modeStep mode
Latest LED technology inside
Equipped with double wave length LED technology the Labolight DUO can be used to cure any of GC’s composites in a secure and durable way. It offers a wavelength range of 380nm – 510nm with spectrum ranges peaks of:
• 465 nm-485 nm (12 Blue LED’s)• 390 nm-400 nm (3 Violet LED’s)
This technology ensures optimal hardening of all light-cured dental materials, while the high power outlet reduces light-curing cycles.
Automated rotary system
The reflective plate distributes all light effectively and exposes your works from all sides. The curing stand carefully positions the objects during all light-curing cycles.
Compact & ergonomic design
The GC Labolight DUO is not only capable of handling most of your work, it looks good as well. The award winning sleek, contemporary styling with smooth surfaces allows for easy cleaning and reduces the space it takes in your lab.
This design serves the usability: the interface is very simple and intuitive and the inner parts are easily accessible thanks to the wide opening.
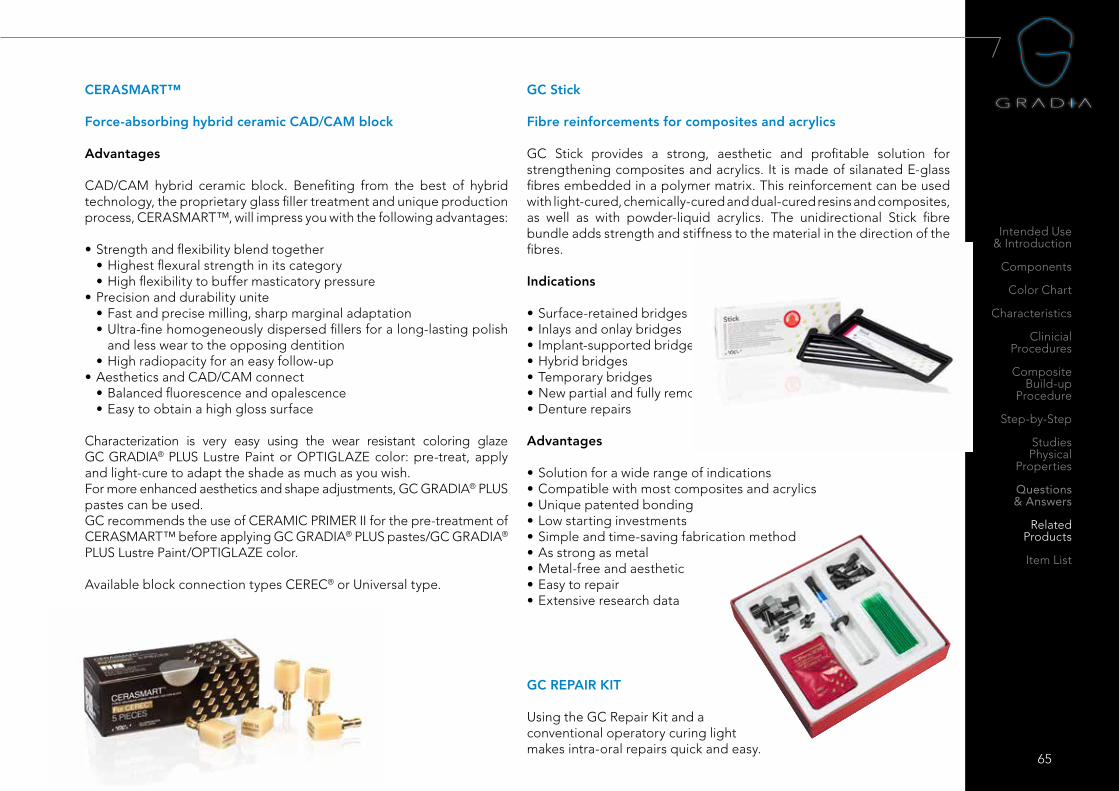
65
Intended Use & Introduction
Components
Color Chart
Characteristics
Clinicial Procedures
Composite Build-up
Procedure
Step-by-Step
Studies Physical
Properties
Questions & Answers
Related Products
Item List
GC Stick
Fibre reinforcements for composites and acrylics
GC Stick provides a strong, aesthetic and profitable solution for strengthening composites and acrylics. It is made of silanated E-glass fibres embedded in a polymer matrix. This reinforcement can be used with light-cured, chemically-cured and dual-cured resins and composites, as well as with powder-liquid acrylics. The unidirectional Stick fibre bundle adds strength and stiffness to the material in the direction of the fibres.
Indications
• Surface-retained bridges• Inlays and onlay bridges• Implant-supported bridges• Hybrid bridges• Temporary bridges• New partial and fully removable dentures• Denture repairs
Advantages
• Solution for a wide range of indications• Compatible with most composites and acrylics • Unique patented bonding• Low starting investments• Simple and time-saving fabrication method• As strong as metal• Metal-free and aesthetic• Easy to repair• Extensive research data
CERASMART™
Force-absorbing hybrid ceramic CAD/CAM block
Advantages
CAD/CAM hybrid ceramic block. Benefiting from the best of hybrid technology, the proprietary glass filler treatment and unique production process, CERASMART™, will impress you with the following advantages:
• Strength and flexibility blend together• Highest flexural strength in its category • High flexibility to buffer masticatory pressure
• Precision and durability unite• Fast and precise milling, sharp marginal adaptation • Ultra-fine homogeneously dispersed fillers for a long-lasting polish
and less wear to the opposing dentition • High radiopacity for an easy follow-up
• Aesthetics and CAD/CAM connect• Balanced fluorescence and opalescence • Easy to obtain a high gloss surface
Characterization is very easy using the wear resistant coloring glaze GC GRADIA® PLUS Lustre Paint or OPTIGLAZE color: pre-treat, apply and light-cure to adapt the shade as much as you wish.For more enhanced aesthetics and shape adjustments, GC GRADIA® PLUS pastes can be used. GC recommends the use of CERAMIC PRIMER II for the pre-treatment of CERASMART™ before applying GC GRADIA® PLUS pastes/GC GRADIA® PLUS Lustre Paint/OPTIGLAZE color. Available block connection types CEREC® or Universal type.
GC REPAIR KIT
Using the GC Repair Kit and a conventional operatory curing light makes intra-oral repairs quick and easy.

66
GC INITIAL™ CAST NP
Dental casting alloy for crown and bridge work
For framework-based restorations, the foundation for a durable, aesthetic dental restoration is a high-performance dental alloy. With Initial™ CAST NP, GC offers a cobalt chrome-based casting alloy that sets new benchmarks for versatility, performance, handling and aesthetics. GC Initial™ CAST NP has been designed for ceramic (GC Initial™) and composite (GC GRADIA® PLUS) veneering techniques. This one alloy covers a wide variety of applications - everything from a crown to a long-span bridge.
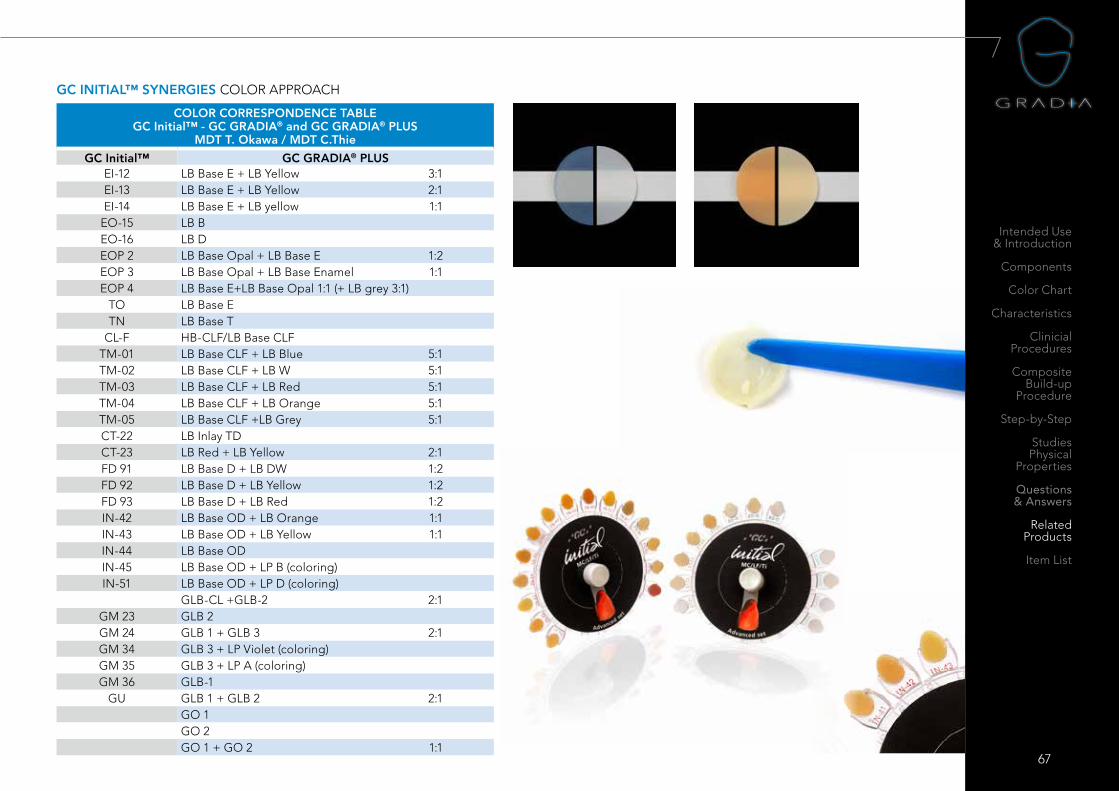
Intended Use & Introduction
Components
Color Chart
Characteristics
Clinicial Procedures
Composite Build-up
Procedure
Step-by-Step
Studies Physical
Properties
Questions & Answers
Related Products
Item List
67
GC INITIAL™ SYNERGIES COLOR APPROACH
COLOR CORRESPONDENCE TABLE GC Initial™ - GC GRADIA® and GC GRADIA® PLUS
MDT T. Okawa / MDT C.Thie
GC Initial™ GC GRADIA® PLUSEI-12 LB Base E + LB Yellow 3:1EI-13 LB Base E + LB Yellow 2:1EI-14 LB Base E + LB yellow 1:1
EO-15 LB BEO-16 LB DEOP 2 LB Base Opal + LB Base E 1:2EOP 3 LB Base Opal + LB Base Enamel 1:1EOP 4 LB Base E+LB Base Opal 1:1 (+ LB grey 3:1)
TO LB Base ETN LB Base T
CL-F HB-CLF/LB Base CLFTM-01 LB Base CLF + LB Blue 5:1TM-02 LB Base CLF + LB W 5:1TM-03 LB Base CLF + LB Red 5:1TM-04 LB Base CLF + LB Orange 5:1TM-05 LB Base CLF +LB Grey 5:1CT-22 LB Inlay TDCT-23 LB Red + LB Yellow 2:1FD 91 LB Base D + LB DW 1:2FD 92 LB Base D + LB Yellow 1:2 FD 93 LB Base D + LB Red 1:2IN-42 LB Base OD + LB Orange 1:1 IN-43 LB Base OD + LB Yellow 1:1 IN-44 LB Base OD IN-45 LB Base OD + LP B (coloring)IN-51 LB Base OD + LP D (coloring)
GLB-CL +GLB-2 2:1GM 23 GLB 2GM 24 GLB 1 + GLB 3 2:1GM 34 GLB 3 + LP Violet (coloring)GM 35 GLB 3 + LP A (coloring)GM 36 GLB-1
GU GLB 1 + GLB 2 2:1GO 1GO 2GO 1 + GO 2 1:1

68
LayerSET
Layer ProSET
Gum ShadesSET
Paint SET
Accessory SET
One BodySET
The unique modular concept allows you to step into the system wherever you like. There is always a set or a combination that will meet your demands regarding indications or technique, from classic or multi-chromatic build-up to a monolithic approach, with or without gingival colours.
GRADIA® PLUS from GC – where rational means modular
The colour range of this remarkable composite has been carefully chosen, fine-tuned and adapted to the needs of today’s dentistry. With fewer standard colours but more individual mixing and layering options, GC GRADIA® PLUS is more compact and cost-effective.
When you just want something simple and uncomplicated
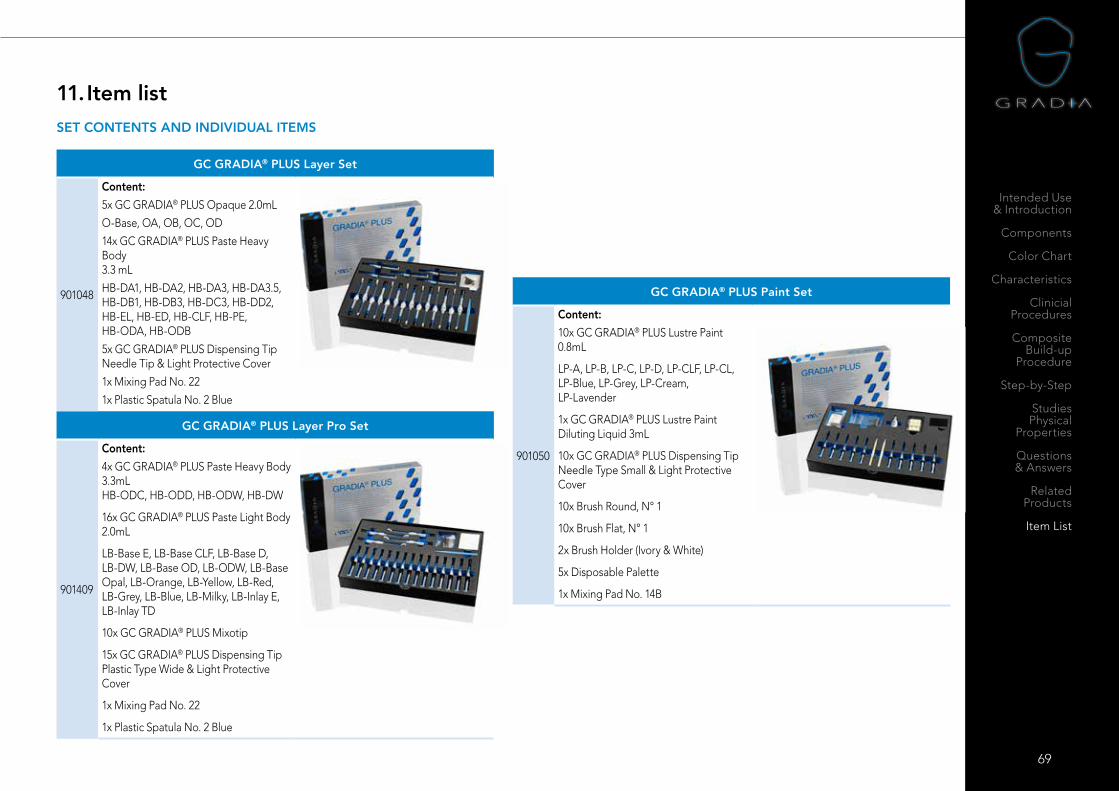
69
Intended Use & Introduction
Components
Color Chart
Characteristics
Clinicial Procedures
Composite Build-up
Procedure
Step-by-Step
Studies Physical
Properties
Questions & Answers
Related Products
Item List
11. Item list
GC GRADIA® PLUS Layer Set
901048
Content:
5x GC GRADIA® PLUS Opaque 2.0mL
O-Base, OA, OB, OC, OD
14x GC GRADIA® PLUS Paste Heavy Body 3.3 mL
HB-DA1, HB-DA2, HB-DA3, HB-DA3.5, HB-DB1, HB-DB3, HB-DC3, HB-DD2, HB-EL, HB-ED, HB-CLF, HB-PE, HB-ODA, HB-ODB
5x GC GRADIA® PLUS Dispensing Tip Needle Tip & Light Protective Cover
1x Mixing Pad No. 22
1x Plastic Spatula No. 2 Blue
GC GRADIA® PLUS Layer Pro Set
901409
Content:
4x GC GRADIA® PLUS Paste Heavy Body 3.3mL HB-ODC, HB-ODD, HB-ODW, HB-DW
16x GC GRADIA® PLUS Paste Light Body 2.0mL
LB-Base E, LB-Base CLF, LB-Base D, LB-DW, LB-Base OD, LB-ODW, LB-Base Opal, LB-Orange, LB-Yellow, LB-Red, LB-Grey, LB-Blue, LB-Milky, LB-Inlay E, LB-Inlay TD
10x GC GRADIA® PLUS Mixotip
15x GC GRADIA® PLUS Dispensing Tip Plastic Type Wide & Light Protective Cover
1x Mixing Pad No. 22
1x Plastic Spatula No. 2 Blue
GC GRADIA® PLUS Paint Set
901050
Content:
10x GC GRADIA® PLUS Lustre Paint 0.8mL
LP-A, LP-B, LP-C, LP-D, LP-CLF, LP-CL, LP-Blue, LP-Grey, LP-Cream, LP-Lavender
1x GC GRADIA® PLUS Lustre Paint Diluting Liquid 3mL
10x GC GRADIA® PLUS Dispensing Tip Needle Type Small & Light Protective Cover
10x Brush Round, N° 1
10x Brush Flat, N° 1
2x Brush Holder (Ivory & White)
5x Disposable Palette
1x Mixing Pad No. 14B
SET CONTENTS AND INDIVIDUAL ITEMS

70
GC GRADIA® PLUS Gum Shades Set
901051
Content:
1x GC GRADIA® PLUS Opaque 2.0mL O-Base
2x GC GRADIA® PLUS Gum Shades Opaque 2.0mL GO-1, GO-2
1x GC GRADIA® PLUS Lustre Paint 0.8mL LP-CL
2x GC GRADIA® PLUS Gum Shades Lustre Paint 0.8mL
GLP-Bright Red, GLP-Violet
4x GC GRADIA® PLUS Gum Shades Light Body 2.0mL
GLB-1, GLB-2, GLB-3, GLB-4
1x GC GRADIA® PLUS Gum Shades Heavy Body 3.3mL
GHB-2
1x GC GRADIA® PLUS Lustre Paint Diluting Liquid 3mL
10x GC GRADIA® PLUS Mixotip
5x GC GRADIA® PLUS Dispensing Tip Plastic Type Wide & Light Protective Cover
5x GC GRADIA® PLUS Dispensing Tip Needle Type Small & Light Protective Cover
5x GC GRADIA® PLUS Dispensing Tip Needle Tip & Light Protective Cover
10x Brush Round, N° 1
10x Brush Flat, N° 1
2x Brush Holder (Ivory & White)
5x Disposable Palette
1x Mixing Pad No. 14B
1x Plastic Spatula No. 2 Blue
GC GRADIA® PLUS One Body Set
901052
Content:
5x GC GRADIA® PLUS Opaque 2.0mL
O-Base, OA, OB, OC, OD
1x GC GRADIA® PLUS Paste Light Body 2.0mL
LB-Base OD
5x GC GRADIA® PLUS One Body 2.0mL
LB-A, LB-B, LB-C, LB-D, LB-W
10x GC GRADIA® PLUS Dispensing Tip Plastic Type Wide & Light Protective Cover
5x GC GRADIA® PLUS Dispensing Tip Needle Tip & Light Protective Cover
1x Mixing Pad No. 22
1x Plastic Spatula No. 2 Blue
GC GRADIA® PLUS Accessory Set
901053
Content:
1x GC GRADIA® PLUS AIR BARRIER 10mL
1x GC GRADIA® PLUS SEPARATOR 5mL
1x GC GRADIA® PLUS DIE HARDNER 5mL
1x GC GRADIA® PLUS Modeling Liquid 3mL
1x CERAMIC PRIMER II 3mL
1x Metalprimer Z 5mL
1x Acrylic Primer 5mL
1x Diapolisher Paste 2g
10x Brush Round, N° 1
10x Brush Flat, N° 1
2x Brush Holder (Ivory & White)
1x Brush N° 7
1x Shade Guide Kit
1x Mixing Pad No. 22

71
Intended Use & Introduction
Components
Color Chart
Characteristics
Clinicial Procedures
Composite Build-up
Procedure
Step-by-Step
Studies Physical
Properties
Questions & Answers
Related Products
Item List
GC GRADIA® PLUS Liquids
901138 GC ACRYLIC PRIMER, 6mL, 1pce
901128 GC GRADIA® PLUS AIR BARRIER, 10mL, 1pce
901129 GC GRADIA® PLUS Modeling Liquid, 3mL, 1pce
901127 GC GRADIA® PLUS LP Diluting Liquid, 3mL, 1pce
901130 GC GRADIA® PLUS SEPARATOR, 5mL, 1pce
901131 GC GRADIA® PLUS DIE-HARDENER, 5mL, 1pce
GC GRADIA® PLUS Refills
GC GRADIA® PLUS Opaque syringe - 2.0mLO-Base, OA, OB, OC, OD, GO-1, GO-2
GC GRADIA® PLUS Paste Heavy Body syringe - 3.3mLHB-DA1, HB-DA2, HB-DA3, HB-DA3.5, HB-DB1, HB-DB3, HB-DC3, HB-DD2,HB-DW, HB-EL, HB-ED, HB-PE, HB-CLF, HB-ODA, HB-ODB, HB-ODC HB-ODD, HB-ODW, GHB-1, GHB-2, GHB-3, GHB-4
GC GRADIA® PLUS Paste Light Body syringe - 2.0mLLB-Base E, LB-Base CLF, LB-Base D, LB-Base OD, LB-Base Opal, LB-Orange, LB-Red, LB-Yellow, LB-Blue, LB-Grey, LB-Milky, LB-Inlay E, LB-Inlay TD, LB-DW, LB-ODW, GLB-1, GLB-2, GLB-3, GLB-4
GC GRADIA® PLUS Lustre Paint syringe - 0.8mLLP-A, LP-B, LP-C, LP-D, LP-Cream, LP-Grey, LP-Lavender, LP-Blue, LP-CLF (Glass Clear), GLP-Violet, GLP-Bright Red, LP-CL (Glass Clear)
GC GRADIA® PLUS ONE BODY syringe - 2.2mLLB-A, LB-B, LB-C, LB-D, LB-W
72
z L
MA
EN
8/8
1 11
/17
GC EUROPE N.V. Head Office
Researchpark Haasrode-Leuven 1240Interleuvenlaan 33B-3001 LeuvenTel. +32.16.74.10.00Fax. [email protected]://www.gceurope.com
GC AMERICA INC. 3737 West 127th Street USA-Alsip, ILL. 60803 Tel. +1.708.597.0900 Fax. +1.708.3771.5103 [email protected] www.gcamerica.com
GC GERMANY GmbHSeifgrundstraße 2D-61348 Bad HomburgTel. +49.61.72.99.59.60Fax. [email protected]://germany.gceurope.com
GC ITALIA S.r.l.Via Calabria 1I-20098 San Giuliano MilaneseTel. +39.02.98.28.20.68Fax. [email protected]://italy.gceurope.com
GC UNITED KINGDOM Ltd.16-23, Coopers CourtNewport PagnellUK-Bucks. MK16 8JSTel. +44.1908.218.999Fax. [email protected]://uk.gceurope.com
GC FRANCE s.a.s.8 rue Benjamin FranklinF-94370 Sucy en Brie CedexTel. +33.1.49.80.37.91Fax. [email protected]://france.gceurope.com
GC IBÉRICA Dental Products, S.L. Edificio Codesa 2 Playa de las Américas 2, 1°, Of. 4ES-8290 Las Rozas, MadridTel. +34.916.364.340Fax. [email protected]://spain.gceurope.com
GC AUSTRIA GmbHTallak 124A-8103 Gratwein-StrassengelTel. +43.3124.54020Fax. [email protected]://austria.gceurope.com
GC BENELUX B.V.Edisonbaan 12NL-3439 MN NieuwegeinTel. +31.30.630.85.00Fax. [email protected]://benelux.gceurope.com
GC EUROPE N.V.East European OfficeSiget 19BHR-10020 ZagrebTel. +385.1.46.78.474Fax. [email protected]://eeo.gceurope.com
GC NORDIC ABFinnish BranchVanha Hommaksentie 11BFIN-02430 MasalaTel. & Fax. [email protected]://finland.gceurope.com
GC NORDIC AB Danish Branch Harbour House Sundkrogsgade 21 DK-2100 Københamn Tel. +45 23 26 03 [email protected]://denmark.gceurope.com
GC NORDIC ABVaruvägen 9S-125 30 ÄlvsjöTel. +46 8 410 344 90 Fax. +46 8 555 788 05 [email protected]://nordic.gceurope.com
GC AUSTRIA GmbHSwiss OfficeBergstrasse 31cCH-8890 FlumsTel. +41.81.734.02.70Fax. [email protected]://switzerland.gceurope.com
GC AUSTRALASIA DENTAL PTY LTD1753 Botany RdBanksmeadowSydney, NSW 2019AustraliaTel. +61.2.9301.8200Fax. +61.2.9316.4196www.gcaustralasia.com
GC SOUTH AMERICARua Heliodora, 399, Santana - São Paulo, SP,BrasilCEP: 02022-051Tel. +55-11-2925-0965CNPJ: 08.279.999/0001-61Resp. Téc: Mayara de Santis RibeiroCRO/SP 105.982


