Download - How To Create New Web Forms

SAP NetWeaver How-To Guide
How To... Create New Web Forms
Applicable Releases:
SAP NetWeaver 7.0 SPS14
IT Practice: User Productivity Enablement
IT Scenario: Enterprise Knowledge Management
Version 2.0
July 2008

© Copyright 2008 SAP AG. All rights reserved.
No part of this publication may be reproduced or
transmitted in any form or for any purpose without the
express permission of SAP AG. The information contained
herein may be changed without prior notice.
Some software products marketed by SAP AG and its
distributors contain proprietary software components of
other software vendors.
Microsoft, Windows, Outlook, and PowerPoint are
registered trademarks of Microsoft Corporation.
IBM, DB2, DB2 Universal Database, OS/2, Parallel
Sysplex, MVS/ESA, AIX, S/390, AS/400, OS/390,
OS/400, iSeries, pSeries, xSeries, zSeries, z/OS, AFP,
Intelligent Miner, WebSphere, Netfinity, Tivoli, Informix,
i5/OS, POWER, POWER5, OpenPower and PowerPC are
trademarks or registered trademarks of IBM Corporation.
Adobe, the Adobe logo, Acrobat, PostScript, and Reader
are either trademarks or registered trademarks of Adobe
Systems Incorporated in the United States and/or other
countries.
Oracle is a registered trademark of Oracle Corporation.
UNIX, X/Open, OSF/1, and Motif are registered
trademarks of the Open Group.
Citrix, ICA, Program Neighborhood, MetaFrame,
WinFrame, VideoFrame, and MultiWin are trademarks or
registered trademarks of Citrix Systems, Inc.
HTML, XML, XHTML and W3C are trademarks or
registered trademarks of W3C®, World Wide Web
Consortium, Massachusetts Institute of Technology.
Java is a registered trademark of Sun Microsystems, Inc.
JavaScript is a registered trademark of Sun Microsystems,
Inc., used under license for technology invented and
implemented by Netscape.
MaxDB is a trademark of MySQL AB, Sweden.
SAP, R/3, mySAP, mySAP.com, xApps, xApp, SAP
NetWeaver, and other SAP products and services
mentioned herein as well as their respective logos are
trademarks or registered trademarks of SAP AG in
Germany and in several other countries all over the world.
All other product and service names mentioned are the
trademarks of their respective companies. Data contained
in this document serves informational purposes only.
National product specifications may vary.
These materials are subject to change without notice.
These materials are provided by SAP AG and its affiliated
companies ("SAP Group") for informational purposes only,
without representation or warranty of any kind, and SAP
Group shall not be liable for errors or omissions with
respect to the materials. The only warranties for SAP
Group products and services are those that are set forth in
the express warranty statements accompanying such
products and services, if any. Nothing herein should be
construed as constituting an additional warranty.
These materials are provided “as is” without a warranty of
any kind, either express or implied, including but not
limited to, the implied warranties of merchantability,
fitness for a particular purpose, or non-infringement.
SAP shall not be liable for damages of any kind including
without limitation direct, special, indirect, or consequential
damages that may result from the use of these materials.
SAP does not warrant the accuracy or completeness of the
information, text, graphics, links or other items contained
within these materials. SAP has no control over the
information that you may access through the use of hot
links contained in these materials and does not endorse
your use of third party web pages nor provide any warranty
whatsoever relating to third party web pages.
SAP NetWeaver “How-to” Guides are intended to simplify
the product implementation. While specific product
features and procedures typically are explained in a
practical business context, it is not implied that those
features and procedures are the only approach in solving a
specific business problem using SAP NetWeaver. Should
you wish to receive additional information, clarification or
support, please refer to SAP Consulting.
Any software coding and/or code lines / strings (“Code”)
included in this documentation are only examples and are
not intended to be used in a productive system
environment. The Code is only intended better explain and
visualize the syntax and phrasing rules of certain coding.
SAP does not warrant the correctness and completeness of
the Code given herein, and SAP shall not be liable for
errors or damages caused by the usage of the Code, except
if such damages were caused by SAP intentionally or
grossly negligent.
Disclaimer
Some components of this product are based on Java™. Any
code change in these components may cause unpredictable
and severe malfunctions and is therefore expressively
prohibited, as is any decompilation of these components.
Any Java™ Source Code delivered with this product is only
to be used by SAP’s Support Services and may not be
modified or altered in any way.

Document History Document Version Description
1.00 First official release of this guide
2.00 Chapter 6 added

Typographic Conventions Type Style Description
Example Text Words or characters quoted from the screen. These include field names, screen titles, pushbuttons labels, menu names, menu paths, and menu options.
Cross-references to other documentation
Example text Emphasized words or phrases in body text, graphic titles, and table titles
Example text File and directory names and their paths, messages, names of variables and parameters, source text, and names of installation, upgrade and database tools.
Example text User entry texts. These are words or characters that you enter in the system exactly as they appear in the documentation.
<Example text>
Variable user entry. Angle brackets indicate that you replace these words and characters with appropriate entries to make entries in the system.
EXAMPLE TEXT Keys on the keyboard, for example, F2 or ENTER.
Icons Icon Description
Caution
Note or Important
Example
Recommendation or Tip

Table of Contents
1. Business Scenario............................................................................................................... 1
2. Prerequisites ........................................................................................................................ 1
3. Step-by-Step Description.................................................................................................... 2 3.1 Create the necessary XML- and XSL-Files .................................................................. 2
3.1.1 Define Web form .............................................................................................. 2 3.1.2 Define Presentation of the Web form............................................................... 7 3.1.3 Upload Files to the etc Repository................................................................... 9
3.2 Working Through Configuration Steps for New Web Forms ...................................... 11 3.2.1 Creating a KM Resource Type ...................................................................... 12 3.2.2 Creating a Web Resource Type .................................................................... 12 3.2.3 Extending the Configuration of Existing Web Resource Types and
Containers...................................................................................................... 14 3.2.4 Referencing the XSL File in the Stylesheet Object........................................ 16 3.2.5 Creating a Stylesheet Group ......................................................................... 16 3.2.6 Referencing the XML File in the Document Type.......................................... 17 3.2.7 Restart the Portal ........................................................................................... 17
4. Result.................................................................................................................................. 18
5. Changing and Translating Labels for Web Content....................................................... 20 5.1 Creating a bundle file project...................................................................................... 20
5.1.1 Import the bundle file project ......................................................................... 20 5.1.2 Maintain the property files.............................................................................. 20 5.1.3 Generate the par-file and upload it to the portal ............................................ 22 5.1.4 Reference the bundle files into the KM configurables ................................... 22 5.1.5 Restart the portal ........................................................................................... 23
5.2 Result.......................................................................................................................... 23
6. Available element types.................................................................................................... 25 Check box component component............................................................................. 25 HTML edit component ................................................................................................ 25 Advanced HTML edit component ............................................................................... 26 Image Select component............................................................................................ 26 Input field component ................................................................................................. 27 Language select input field component...................................................................... 27 People Picker Component.......................................................................................... 27 Region select input field component .......................................................................... 27 Text edit component ................................................................................................... 27 Link component .......................................................................................................... 28

How To... Create New Web Forms
1. Business Scenario With the Web Page Composer, you use Web forms to enter content for web pages. If you want to use your own Web forms and they are structured differently to the Web forms delivered by SAP, you must work through some configuration steps. With the new Web Form a new type of Web Content will be created.
In this How-To Guide we want to explain how to create new Web forms for Web Page Composer. In order to do so we use the Web form called “Mini Article” as an example.
At the end of this How to Guide you will get a step by step description for the translation of labels for the new Web Form.
2. Prerequisites Before you go on, please ensure that the following prerequisites are fulfilled:
• SAP NetWeaver 7.0 SPS 14 Usage Type EP
• WPC Add on (SAP Note 1080110: “Installing the Web Page Composer (SP13/SP14)”)
• You own the Content Adminstrator Role and the System Administrator Role
• You own the WPC Editor Role (Required only for testing)
• You have installed SAP NetWeaver Developer Studio
July 2008 1

How To... Create New Web Forms
3. Step-by-Step Description Work through the following steps to be able to use new Web forms: ...
1. Create XML and XSL files
2. Work through the configuration steps for new Web forms
3. Restart the portal
3.1 Create the necessary XML- and XSL-Files
3.1.1 Define Web form Create an XML file and name it “wpc_mini_article.xml” (the attached zip-file contains this file as example). The XML definition contains information about the document schema.
In our example XML file “wpc_mini_article.xml” we use the following description: <!-- documenttype element --> <documenttype id="wpc_mini_article" description="mini_article" showpreview="true"
showelementlist="true">
<!-- properties section --> <properties>
<property id="name" description="xml.xlbl.name" type="inputfield" size="25" isrequired="true" isfilename="true" /> <property id="createdBy" description="xml.xlbl.created_by" type="peoplepicker" size="25" isrequired="true"/> <property id="includeInRSS" description="xml.xckl.include_in_rss" type="checkbox" defaultvalue="false" property="wpc_wcm_rss"/> <property id="displayNewIcon" description="xml.xckl.display_new_icon" type="checkbox" defaultvalue="false" property="wpc_wcm_new"/>
</properties>
<!-- elements section --> <elements>
<element id="title" description="xml.xlbl.name" type="inputfield" default="true" singleinstance="true" size="75" maxlength="75" nodelete="true"/> <element id="image" description="xml.xlbl.image" type="imageselect" default="true" singleinstance="true"/> <element id="abstract" description="xml.xlbl.abstract" type="htmledit" size="5" default="true" singleinstance="true" nodelete="true"/> <element id="heading1" description="xml.xlbl.heading1" type="inputfield" size="50" default="true" /> <element id="paragraph" description="xml.xlbl.paragraph" type="htmledit" default="true" /> <element id="relatedLinks" description="xml.xlbl.related_links" type="wpclink" hastitle="true" />
</elements>
</documenttype>
July 2008 2

How To... Create New Web Forms
Explanatory notes: ...
1. The <documenttype> Element:
The <documenttype> element is the root element. The attributes of this element define the general settings for the editor when editing documents of this type.
The <documenttype> element must contain exactly one <properties> element and exactly one <elements> element.
Available attributes of the <documenttype> Element:
In our example we define the attributes showpreview and showelementlist as follows:
• showpreview="true"
• showelementlist="true"
We do so in order to be enabled to use the preview function and to be able to insert additional elements into the new document of the type “Mini Article” when editing it in the portal:
July 2008 3

How To... Create New Web Forms
2. The <properties> Section:
The <properties> section must contain one or more <property> elements. These elements define the document properties.
Available attributes of the <property> Element:
July 2008 4

How To... Create New Web Forms
In our example we define the properties name, created by, include in RSS and display new icon that are visible in the Properties section of the Web Form. The asterix right from the property “Name” and “Created By” indicates that it is a mandatory attribute (isrequired=true):
July 2008 5

How To... Create New Web Forms
3. The <elements> Section:
The <elements> section of the document type must contain one or more <element> elements. These elements define the content of the editor.
Available attributes of the <element> Element:
July 2008 6

How To... Create New Web Forms
In our example we define the elements title, image, abstract, heading1, and paragraph.
• The abstract, heading1, and paragraph can be added as additional elements (no entry for: singleinstance="true").
• The title and abstract can´t be deleted from the Web form (nodelete="true").
• The abstract and paragraph elements do use an html-editor (type="htmledit").
If you want to get more information about available elements that can be used in your web form please take a look into chapter 6.
3.1.2 Define Presentation of the Web form Create an XSL file and name it “wpc_mini_article.xsl” (the attached zip-file contains this file as example).
In our example XSL file “wpc_mini_article.xsl” we use the following description:
<?xml version="1.0"?>
<!DOCTYPE stylesheet>
<!ENTITY apos "'" ><!-- replace ' with html escape character for ' -->
<xsl:stylesheet version="1.0" xmlns:xsl="http://www.w3.org/1999/XSL/Transform"
xmlns:wpc="com.sap.nw.wpc.km.service.linkmanager.XsltHelper">
<xsl:output method="html"/>
July 2008 7

How To... Create New Web Forms
<xsl:template match="/"> <div class="featurebox clearfixleft">
<xsl:if test="starts-with(document/elements/element[@type='image'],'/')"> <img class="featureimage">
<xsl:attribute name="src"><xsl:value-of disable-output-escaping="yes"
select="wpc:getMimeLink(string(document/elements/element[@type='image']))"/> </xsl:attribute>
<xsl:if test="string-
length(document/elements/element[@type='image']/@width)!=0"> <xsl:attribute name="width"><xsl:value-of disable-output-escaping="yes"
select="document/elements/element[@type='image']/@width"/></xsl:attribute>
</xsl:if> <xsl:if test="string-
length(document/elements/element[@type='image']/@height)!=0">
<xsl:attribute name="height"><xsl:value-of disable-output-escaping="yes" select="document/elements/element[@type='image']/@height"/></xsl:attribute>
</xsl:if>
</img>
</xsl:if>
<h2 >
<a> <xsl:value-of disable-output-escaping="yes"
select="document/elements/element[@type='title']" />
</a>
<xsl:if
test="document/properties/property[@type='displayNewIcon']/@value='true'"> <span class="new" valign="top"><xsl:value-of disable-output-
escaping="yes" select="wpc:getString('xsl.xmsg.new',
string(document/@locale))"/></span> </xsl:if>
</h2>
<br/>
<div id="teaser_zoom">
<xsl:value-of disable-output-escaping="yes"
select="document/elements/element[@type='abstract']" /> </div>
<xsl:for-each select="document/elements/element">
<xsl:if test="@type='heading1'">
<h2> <xsl:value-of disable-output-escaping="yes" select="current()" />
</h2>
July 2008 8
How To... Create New Web Forms
</xsl:if>
<xsl:if test="@type='paragraph'">
<p><xsl:value-of disable-output-escaping="yes" select="current()"
/></p> </xsl:if>
<xsl:if test="@type='relatedLinks'"> <div>See also: <a>
<xsl:attribute name="href">
<xsl:value-of disable-output-escaping="yes" select="wpc:getAccessLink(string(@rid), string(/document/@locale))"/>
</xsl:attribute>
<xsl:value-of disable-output-escaping="yes" select="@title"/> </a></div>
</xsl:if> </xsl:for-each>
</div>
</xsl:template>
</xsl:stylesheet>
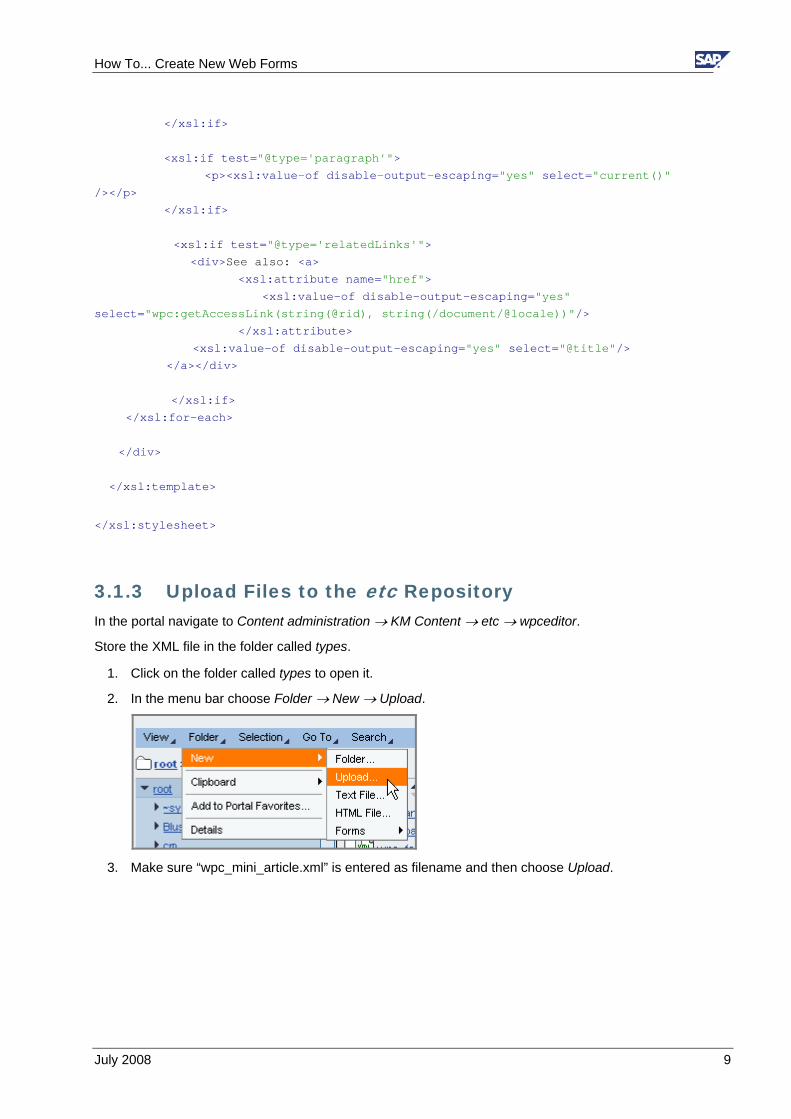
3.1.3 Upload Files to the etc Repository In the portal navigate to Content administration → KM Content → etc → wpceditor.
Store the XML file in the folder called types. ...
1. Click on the folder called types to open it.
2. In the menu bar choose Folder → New → Upload.
3. Make sure “wpc_mini_article.xml” is entered as filename and then choose Upload.
July 2008 9

How To... Create New Web Forms
July 2008 10

How To... Create New Web Forms
4. Store the XSL file in the folder called styles.
a. Click on the folder called styles to open it.
b. In the menu bar choose Folder → New → Upload.
c. Make sure “wpc_mini_article.xsl” is entered as filename and then choose Upload.
Note Alternatively you can use SAP NetWeaver Portal Drive to upload the files to their specific repository.
3.2 Working Through Configuration Steps for New Web Forms
Use You must work through several configuration steps in the Knowledge Management configuration to be able to use new Web forms with the Web Page Composer.
To get the correct label name for the new web content form, for the commands etc. you have to specify our own resource bundles, this will be described in chapter 4. In the following example we will complete the configuration steps without any language bundle file reference. Therefore some of the commands and labels show the technical name.
The following configuration steps are necessary: ...
1. Create a KM Resource Type
2. Create a Web Resource Type and assign the KM Resource Type to it
3. Extending the Configuration of Existing Web Resource Types and Containers
4. Referencing the XSL File in the Stylesheet Object
5. Creating a Stylesheet Group
6. Referencing the XML File in the Document Type
7. Restart the portal
July 2008 11

How To... Create New Web Forms
Procedure
3.2.1 Creating a KM Resource Type For the new Web Form you have to create a resource type in KM: ...
1. In the portal, choose System Administration → System Configuration → Knowledge Management → Content Management → Global Services → Resource Types → Resource Types.
Create a separate resource type for the Web form. Enter values for the Name and Resource Type ID parameters. To keep it simple, we recommend entering the same information in both parameters.
CAUTION Always use the prefix wpc_ for these values (see below).
Name: wpc_miniarticle
Resource Type ID: wpc_miniarticle
2. Activate the Reserved for Application parameter, so that the resource type can only be used for Web Page Composer purposes.
3. Leave the Bundle File and Key for Description field empty. Chapter 5 [page 20] will explain how to configure your custom bundle files.
4. Enter "WPC Miniarticle" in the short description.
5. To save the new resource type, choose OK.
3.2.2 Creating a Web Resource Type To assign the resource type, you require a separate Web resource type in the configuration of the Web Page Composer. ...
1. In the KM configuration, choose Web Page Composer → Web Content Types → Web Resource Type.
2. To create the Web resource type for the page with predefined values, search for the wpc_webarticle instance, select it and choose Duplicate.
July 2008 12

How To... Create New Web Forms
Make sure that the following values are entered in the following parameters:
Parameter Value
Name Change the name. To keep it simple, we recommend using the name of the resource type used in the previous step.
Name: wpc_miniarticle
Generates UI Command Yes -> This option came with SP14 NW07. If this is activated the UI commands for creating and editing Web Forms are generated automatically
Published No
Requires Framework No
Allowed child types No selection here
Allowed Parent Types wpc_content_folder, wpc_page
Allowed Repositories No selection here so that the new Web form can be created in all repositories.
Allowed Layouts default
Default Layout editorcontainer
Allowed RIDs /wpccontent/Cross-Site Content/**,**/Site Content/**
You do not need to enter values for any other parameters.
3. To save the new web resource type, choose OK.
July 2008 13

How To... Create New Web Forms
3.2.3 Extending the Configuration of Existing Web Resource Types and Containers
CAUTION Be aware that with the following configuration changes of the wpc_page Web Resource Type and in the container definition of the suggested containers we are changing configuration data from SAP. This configuration data might be overwritten from SAP during a software update. To prevent that the configuration data is overwritten you can use your own Web Forms (Web Resource Types) for page layouts that you created yourself. If necessary, create copies of the page layouts (and related configuration) delivered by SAP.
3.2.3.1 Extend the Web Resource Type of Web Pages ...
1. In the KM configuration, open the list of Web resource types. Choose Web Page Composer → Web Resource Types → Web Resource Types.
2. Search for the wpc_page instance and open it for editing.
3. Enter the Web resource type that belongs to the Web form in the Allowed Child Types parameter of wpc_page (see following screenshot).
4. To save changes, choose OK.
July 2008 14

How To... Create New Web Forms
3.2.3.2 Extend the Main page ...
1. In the KM configuration, open the Main WPC Page. Choose Web Page composer → Main Page → Main WPC Page.
2. Open the Main WPC Page for Editing and enter the resource type that belongs to the Web form in the Allowed Child Types parameter (see following screenshot).
3. To save changes, choose OK.
3.2.3.3 Extend the Web Resource Type of Containers You must enter the corresponding resource type in the configuration of the containers that are assigned to the corresponding page areas so that you can use the new Web form in the page areas (containers) of the selected page layouts. ...
1. In the KM configuration, choose Web Page Composer → Containers → Containers.
2. Enter the Web resource type that belongs to the new Web form in the Allowed Web Content Types parameter and choose OK to save changes.
In our example we assign the new Web form to the following page areas (containers):
• wpc_container_def_cell_A1
• wpc_container_def_cell_A2
• wpc_container_def_cell_A3
By now you should have this view:
July 2008 15

How To... Create New Web Forms
3.2.4 Referencing the XSL File in the Stylesheet Object The XSL file that you have created must be referenced in the KM configuration. ...
1. In the KM configuration, choose Web Page Composer → Editor → Stylesheets → StyleSheets → Document Styles.
2. Choose New to create a new stylesheet object. Name it “wpc_miniarticle”.
3. Specify the XSL Location.
XSL Location: /etc/wpceditor/styles/wpc_mini_article.xsl
Bundle File: keep the default -> once the language bundle is defined this will be replaced
Key for Description: leave empty -> once the language bundle is defined this will be replaced
4. To save the new stylesheet object, choose OK.
3.2.5 Creating a Stylesheet Group For technical reasons, the stylesheet object must be entered in a stylesheet group. ...
1. In the KM configuration, choose Web Page Composer → Editor → Stylesheets → StyleSheet groups → Document Styles Groups.
2. Choose New to create a new stylesheet group and choose the stylesheet object that you have just created.
3. Specify the other parameters.
Name: miniarticle
Styles: wpc_miniarticle
Description: Style Group for Mini Article
4. To save the new stylsheet group, choose OK.
July 2008 16

How To... Create New Web Forms
3.2.6 Referencing the XML File in the Document Type In addition to the XSL file, you must also reference the XML file that describes the new Web form in the KM configuration. Create a new document type for the Web form and specify the path to the XML file. ...
1. In the KM configuration, choose Web Page Composer → Editor → Document Types → Document Types.
2. Choose New to create a new document type.
3. Specify the other parameters.
Name: wpc_miniarticle
Default style: wpc_miniarticle
Resource Type: wpc_miniarticle
Style Group: miniarticle
Bundle File: keep the default -> once the language bundle is defined this will be replaced
Key for Description: keep the default -> once the language bundle is defined this will be replaced
XML Location: /etc/wpceditor/types/wpc_mini_article.xml
4. To save the new document type, choose OK.
3.2.7 Restart the Portal Note
It is essential to restart the portal. Otherwise changes will not take effect.
July 2008 17

How To... Create New Web Forms
4. Result After you have completed all steps, owners of the WPC Editor Role can use your new Web form to create web content. This web content can be used within Web Page Composer to build web pages.
A new command is available for the creation of web content with the new Web form.
The Web form in our example should look like the following with an empty entry for Preview:
July 2008 18

How To... Create New Web Forms
If you open the page editor the new Web Form is allowed in three of the containers:
July 2008 19
How To... Create New Web Forms
5. Changing and Translating Labels for Web Content
For all the new configuration objects that are required for creating and using a new Web Form you can specify bundle files that contain keys and labels for translation purposes.
5.1 Creating a bundle file project In order to be able to implement your own bundle files for the WPC configuration, you must create a project in the SAP NetWeaver Developer Studio. You can take the example project that is added to the following note: 817876.
As second option you can import the Resource Bundle project in the attached zip-file.
5.1.1 Import the bundle file project Follow the explanations in documentation about importing an Example Project into SAP NetWeaver Developer Studio. Additional information can be found in the referenced note 817876 that contains the example project. You can take the NW04 zip file also for the NW7.0 portal.
The Resource Bundle project in the attached zip-file contains the project with the final configuration. The import of the project is identical to the described example in the note 817876.
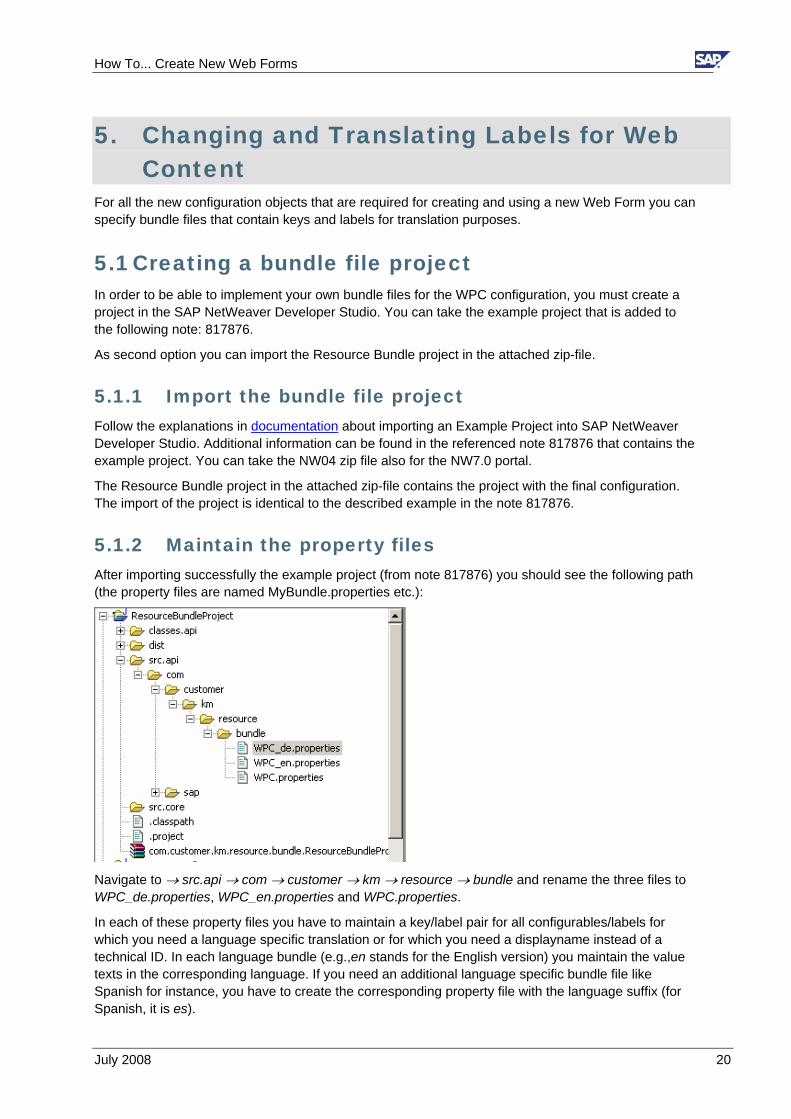
5.1.2 Maintain the property files After importing successfully the example project (from note 817876) you should see the following path (the property files are named MyBundle.properties etc.):
Navigate to → src.api → com → customer → km → resource → bundle and rename the three files to WPC_de.properties, WPC_en.properties and WPC.properties.
In each of these property files you have to maintain a key/label pair for all configurables/labels for which you need a language specific translation or for which you need a displayname instead of a technical ID. In each language bundle (e.g.,en stands for the English version) you maintain the value texts in the corresponding language. If you need an additional language specific bundle file like Spanish for instance, you have to create the corresponding property file with the language suffix (for Spanish, it is es).
July 2008 20

How To... Create New Web Forms
5.1.2.1 WPC.property file Let’s start with the WPC.property file. This is the bundle file that covers the default language which is English in our example. You have now to check what labels need to be maintained in the file.
In the screenshots in the Results chapter you can see that there are different area’s for which a bundle file specification is needed:
• The two commands for the new Web forms (new/edit)
• The labels of the Web Form
• Displaying the label of new Web Form in the container description
...
1. These are the keys needed to be configured: xmlb_miniarticle=Mini article
This key will be used for displaying the label of the new Web form commands and for displaying the label of the new Web form in the container description. cod.xtit.wpc_miniarticle=Mini article
This is the key for the name of the Web form in the editor: cod.xlbl.wpc_miniarticle=Mini article
This is the key for the name of the Web form in the Preview listing.
2. If you plan to use your own keys for elements or properties in the xml file you’ll need to maintain the key/label pairs additionally in your bundle property file.
From SP14 on you can reuse the keys for elements or properties from SAP without the need of referencing them in your bundle file. The system checks if a bundle file for the keys is available and uses it.
In our example the element for “image” is displayed as Image:
We want to rename it as Picture. To achieve this you need to maintain the following entry: xml.xlbl.image=Picture
3. Finally the property file should contain the following entries: xmlb_miniarticle=Mini article
cod.xtit.wpc_miniarticle=Mini article
cod.xlbl.wpc_miniarticle=Mini article
xml.xlbl.image=Picture
5.1.2.2 WPC_en.property file You can copy the content of the WPC.property file into the WPC_en.property file as both are using English as language.
July 2008 21

How To... Create New Web Forms
5.1.2.3 WPC_de.property file Copy the content of the WPC.property file into the WPC_de.property file and translate the labels into German. You should have the following entries:
xmlb_miniarticle=Mini Artikel
cod.xtit.wpc_miniarticle=Mini Artikel
cod.xlbl.wpc_miniarticle=Mini Artikel
xml.xlbl.image=Bild
5.1.3 Generate the par-file and upload it to the portal Once your bundles are maintained, right-click the root-folder of your project and select "export". Select "PAR File" Select the project you want to export. You can either deploy this par-file directly or have it saved on your computer and deploy it manually.
Follow the explanation of the documentation if you want to deploy the par-file manually.
5.1.4 Reference the bundle files into the KM configurables In the configuration of the following configuration objects, enter the name of the bundle file and specify the keys. ...
1. In the portal navigate to System Administration → System Configuration → Knowledge Management → Content Management → Content Management → Global Services → Resource Types → Resource Types and filter for the newly created Resource Type “wpc_miniarticle”
Open the “wpc_miniarticle” for Editing and add the following configuration:
Bundle File: com.customer.km.resource.bundle.WPC
Key for description: xmlb_miniarticle
2. In the portal navigate to System Administration → System Configuration → Knowledge Management → Content Management → Content Management → Web Page Composer → Editor → Document Types → Document Types and filter for the newly created Document Type “wpc_miniarticle”
Open the “wpc_miniarticle” for Editing and add the following configuration:
Bundle File: com.customer.km.resource.bundle.WPC
Key for description: cod.xtit.wpc_miniarticle
3. In the portal navigate to System Administration → System Configuration → Knowledge Management → Content Management → Content Management → Web Page Composer → Editor → Stylesheet → Stylesheets and filter for the newly created Document Style "wpc_miniarticle"
Open the "wpc_miniarticle" for Editing and add the following configuration:
Bundle File: com.customer.km.resource.bundle.WPC
Key for description: cod.xlbl.wpc_miniarticle
July 2008 22

How To... Create New Web Forms
5.1.5 Restart the portal Note
It is essential to restart the portal. Otherwise the complete changes will not take effect.
5.2 Result After you have completed all steps, owners of the WPC Editor Role can use your new Web form to create web content. This web content can be used within Web Page Composer to build web pages.
The commands for the creation and editing of web content with the new Web form are changed (language specific):
The Web form in our example should look like the following with a filled Preview Selection field and with a changed Image text:
• English Version
July 2008 23

How To... Create New Web Forms
• German Version
In the page editor the container description should look like:
July 2008 24

How To... Create New Web Forms
6. Available element types The following table contains all Element IDs. You need to enter these Element Ids in the XML file in order to use the elements in your own Web Forms:
Name Element ID
Check box component component checkbox
HTML edit component htmledit
HTML edit component htmleditadvanced
Image Select component imageselect
Input field component inputfield
Language select input field component languageselect
People Picker Component peoplepicker
Region select input field component regionselect
Text edit component textedit
Link component wpclink
Check box component component Users can check or uncheck the check box.
HTML edit component Users can edit text and use basic formating features. The editor allows to copy & paste html from other html pages.
July 2008 25

How To... Create New Web Forms
Advanced HTML edit component Users can edit text, create tables and use advanced formating features. The Advanced Editor offers the same capabilities as the HTML Editor used in Knowledge Management (KM).
Image Select component Users can browse for images stored in Knowledge Management (KM). They can change the size of the image.
The following image shows the Image Select Component after the selection of the image.
July 2008 26

How To... Create New Web Forms
Input field component Users can enter text in the single line Input field. The Text Edit Component offers a multi line text input field.
Language select input field component This is a read only field that shows the current language.
People Picker Component Users can select a user from the User Management. The user selection dialog is the same as used in Knowledge Management and in Collaboration.
Region select input field component This is a read only field that shows the current language.
Text edit component Users can edit text in this multi line text input field.
July 2008 27

How To... Create New Web Forms
Link component Users can enter a name for a link and browse for a Knowledge Management document. The Link will be shown as hyperlink of the link title.
July 2008 28

www.sdn.sap.com/irj/sdn/howtoguides


