
How to Make Anonymous Paymentswith Bitcoin: A Step-by-Step Guide
The Internet is the perfect place for maintaining several anonymous
identities. You can run an anonymous blog, parody Twitter account, or
workers’ NGO — all without associating your real, offline identity with
your online accounts.
But administering these identities might require you to handle funds.
How do you make financial transactions online without compromising
your identity?
The answer is Bitcoin. When used correctly, Bitcoin can safeguard your
anonymity so nobody can link your offline identity to your online
presence.
This guide will show you how to set up a safe environment in which
you can anonymously communicate, browse the web, and send and
receive bitcoins. You will start by setting up a separate operating
system equipped with privacy software that is easy to set up. You will
then set up encryption keys and a Bitcoin wallet to communicate and
transact in private.

Jump to...
How to Make Anonymous Payments with Bitcoin: A Step-by-Step Guide.........................................1
Jump to…....................................................................................................................................1
Set Yourself Up................................................................................................................................3
Step 1: Get Tails..........................................................................................................................3
Step 2: Start Tails........................................................................................................................4
Step 3: Enable persistence...........................................................................................................4
Step 4: Set up KeePassX.............................................................................................................5
Step 5: Get a PGP key.................................................................................................................7
Step 6: Set Up Electrum..............................................................................................................9
Step 7: Communicate via XMPP and OTR...............................................................................12
Step 8: Back Everything Up With PGP.....................................................................................14
Step 9: Repeat the Above Steps for Each Identity You Have....................................................16
Acquire Bitcoins............................................................................................................................17
Buy Bitcoins In Person.............................................................................................................17
Get Bitcoin From an ATM........................................................................................................17
Accept Bitcoins as a Payment or Donation...............................................................................18
Mine Bitcoins............................................................................................................................18
Obfuscate Transfers Between Identities........................................................................................19
Helix..........................................................................................................................................19
Joinmarket.................................................................................................................................20
Darkwallet.................................................................................................................................21
Sharedcoin.................................................................................................................................21
Bitmixer....................................................................................................................................22

Set Yourself Up
Step 1: Get Tails
Tails is a Linux operating system that you run from a DVD or USB stick.
You do not need to install it on your computer. It comes with all
important software pre-installed and routes all your traffic through the
Tor network.
The easiest way to get Tails is to ask somebody who already has it to
write a copy onto your USB stick using the Tails Installer program
found inside the operating system.
Another option is to download Tails from their official website, verify it,
and install it manually using their step-by-step instructions. While the
instructions on the Tails website may seem confusing at first, they’re
well written and not difficult if you follow them carefully.
Step 2: Start Tails
Find a computer, plug your USB stick into it or put the DVD into the
drive, and start up the computer. Some computers will automatically
detect the drive and start running Tails, but in most cases you will
have to enter the BIOS setup. This guide will help you use BIOS. If you
run into any trouble, try searching online to find out how to enter BIOS
for your particular computer.
Everything you do around a particular identity should be done within
Tails, whether you’re browsing, chatting, making Bitcoin transactions,

or typing documents. Keep your browsing focused, and do not log into
your private Facebook or the blog associated with another one of your
identities at the same time.
Step 3: Enable persistence
Without having persistence enabled, you won’t be able to save any
data in Tails.
Under Applications > Tails, select Configure persistent volume.
To use this option, your USB stick must have been created using the
Tails Installer program. If you created your USB stick manually (as
described above), you need to copy Tails over using another USB stick.
The Tails installer is under Applications > Tails > Tails installer.
You will be asked to create a passphrase. Check out our blog post
about Diceware to learn how to create secure passwords. Length is
more important than complexity. You will be asked for this passphrase
every time you start Tails.
You will also have to select which information you want Tails to
remember. The less Tails remembers, the more secure you are, but
you’ll have to remember more things yourself and set them up again
each time you start Tails.
To seamlessly run all the features you will need in this guide we
recommend selecting Personal Data, GnuPG, Pidgin, Network
Connections, Browser Bookmarks, Bitcoin client, and Icedove.
Restart Tails with persistence and enter your passphrase. Remember

that only the files in the folder named “Persistence” will be saved
when you shut down your computer.
Step 4: Set up KeePassX
KeePassX is a password manager that requires you to remember only
a few passwords and still have secure unique passwords. Access
KeePassX under Applications > Accessories > KeePassX. Create a
new password database by selecting File > Create New Database.
Use Diceware to set a long but memorable password to access
KeePassX. This will be the second of maximally two or three passwords
you need to remember. All other passwords can be created and
accessed with KeePassX.
Save your database in the “Persistent” folder in your home folder.
To create a new password, click on the button with the yellow key
called Add New Entry.
Give it a title and fill in the other information as well if you like. The
most important button is labelled Gen. You find it right of the field
‘Repeat’.
Click the button Gen to the right of the field “Repeat”. This will
generate a random password. You can define its length and whether it
should contain numbers or special characters. For maximum security,
don’t even look at it. There is no need for you to see it. And, in the
unlikely event that something or someone is capturing your screen, all
they will see are stars instead of the password. Just generate it and

copy and paste it over to the site you need it for.
A screenshot of KeePassX. Your password shows up as dots.
Step 5: Get a PGP key
Once you are inside Tails you can create a new PGP key under
Applications > Utilities > Passwords and Keys.

Create a PGP key.
Click on the blue “plus” symbol under GnuPG keys and enter a name and email
address. You can make this information up, but if you plan to use this key later
to send and receive encrypted emails, you should enter an email address that
you control.

Enter a name and email address.
Enter a password for your PGP key. You can create a password using Diceware
or KeePassX. You will need this password every time you send an email or
decrypt a file.
After a few seconds, your PGP key will appear in the GnuPG keys list.
Congratulations! You can now use it to backup your own data or
securely send yourself files that only you can access. More on this in
Step 8: Back Everything Up With PGP.

This is what your PGP signature might look like.
Step 6: Set Up Electrum
The Bitcoin Wallet is under Applications > Internet > Bitcoin
Wallet.
Electrum is a lightweight Bitcoin wallet. That means it does not rely on
its own copy of the Blockchain (the immutable record of all Bitcoin
transactions that ever took place), but instead relies on several other
nodes.
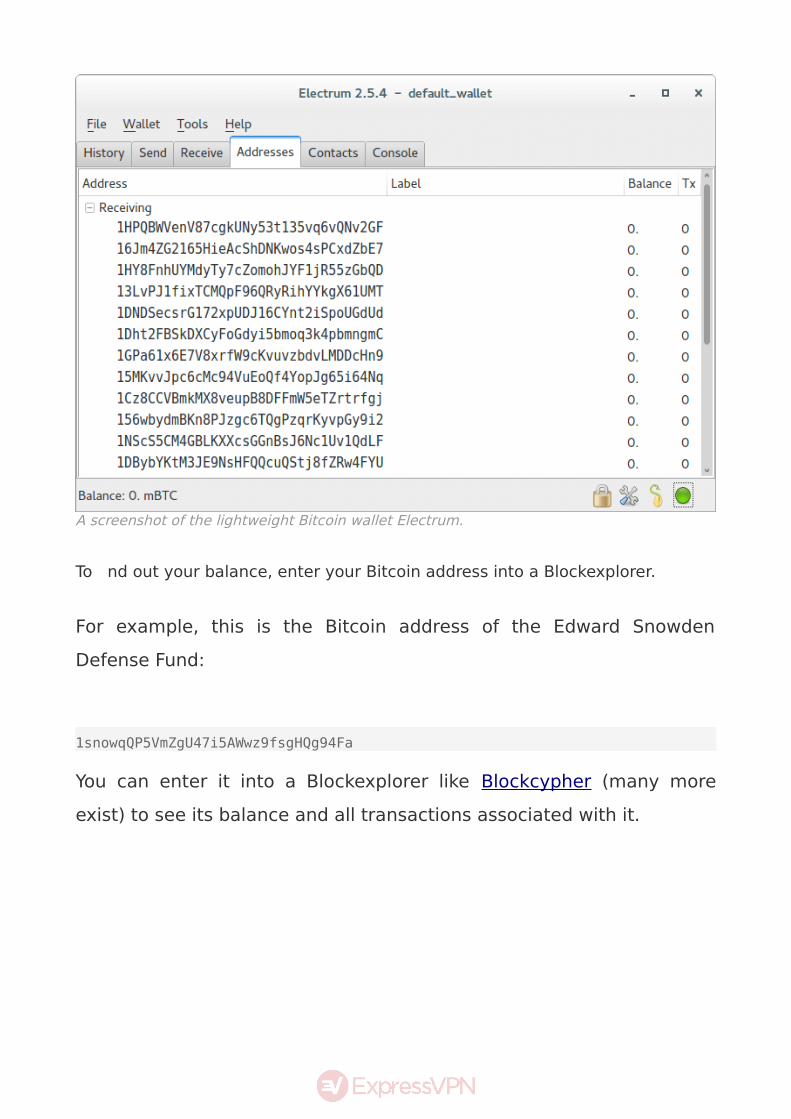
A screenshot of the lightweight Bitcoin wallet Electrum.
To find out your balance, enter your Bitcoin address into a Blockexplorer.
For example, this is the Bitcoin address of the Edward Snowden
Defense Fund:
1snowqQP5VmZgU47i5AWwz9fsgHQg94Fa
You can enter it into a Blockexplorer like Blockcypher (many more
exist) to see its balance and all transactions associated with it.

The Edward Snowden Defense Fund in Blockcypher.
Create a new wallet by opening Electrum. A “standard wallet” will do fine. You
will see 13 English words, which represent your wallet seed. This seed is more
than just a password to your wallet. Anybody who has this seed can take your
Bitcoins, so be careful about where you store these words.
To store your wallet seed words safely, you can create a new entry in
your KeePassX database and paste them into the comment field, or
you can write them on a piece of paper and lock it away. Either way,
do not save it in a text file anywhere on an unencrypted drive.
Press proceed and enter your wallet seed into the next window, then
choose a password, ideally by creating one with KeePassX. You will

need this password every time you make a transaction.
Great! You can now receive and make Bitcoin payments. You can find
your Bitcoin addresses and their balances under “Addresses”.
You can set up multiple wallets for your identity. You can create a new
wallet for a single transaction if you so wish. Having separate wallets
makes it easier to keep funds separate for accounting or privacy
purposes.
Step 7: Communicate via XMPP and OTR
Pidgin is a chat program. As anonymous email accounts are hard to
come by, it might be easier to chat with your contacts using this tool.
The only downside is that you cannot receive messages when you’re
offline.
Pidgin is under Applications > Internet > Pidgin.
Launch Pidgin. Add an account and choose XMPP as your protocol.
There are many public XMPP servers. Here is a comprehensive guide
to anonymous chatting. We chose the server provided by the privacy-
friendly search engine duckduckgo.
Pick a username, enter dukgo.com as the domain and pick a
password, then tick the box Create this new account on the
server. Close the window and connect to enable the new chat
account in Pidgin. You may be prompted again to enter your username
and password. Use KeePassX to create a secure and unique password.

Add a new pidgin chat account is simple as a round of duck duck goose.
Your [email protected] address can now be given out to your contacts. You
will need to approve each individual contact before you can initiate a
conversation with them.You have now set up xmpp chat (also called jabber).
Note: Even though [email protected] looks like an email address, it is not
an email address and cannot be used to receive messages while offline.
To chat securely, you need to use OTR encryption. Click on OTR >
Start private conversation.

You can verify the integrity of the conversation by clicking on OTR >
Authenticate Buddy.
The easiest way to reliablly verify each other is to exchange each
other’s fingerprints outside the chat. which you can see under Manual
authentication. To share your fingerprint with other individuals, you
can paste it into the signature on a message board, or publish it on
your website.
Step 8: Back Everything Up With PGP
The trickiest part of a secure and yet private backup process is to back
up the PGP Key. The more effort you undertake to lock your key away,
the less accessible the key becomes to you in case you need it.
We recommend the following: Choose a very strong password with
Diceware when you create your PGP Key. Load the key onto a USB
stick and leave the stick with your family, friends, or a lawyer.
You can also make more than one copy of the backup if you fear your
first copy could get damaged or lost.
If your password is long enough (more than 25 characters), it should
not be possible for anybody to read your communications or access
your backups even in case they get a hold of the key, because the key
is still encrypted with your password.
We highly recommend making regular backups of the documents that
you cannot afford to lose, as well as your KeePassX password database
and Bitcoin wallets.

Select all the files and folders that you want to back up. You can, for
example, select the entire “Persistence” folder. Right-click the
selection and select Encrypt. A window will ask you which keys you
want to encrypt your selection with. Select only your own PGP key. Do
not tick the sign option unless you want it to be verifiable that this
backup was made by you. If you don’t sign it and somebody finds the
backup, they will only know that this backup was made for you, not by
you.
If you selected multiple files, you will be asked how you want them
packaged. We recommend encrypting them packed together because
this leaves the least metadata and creates one single file that will be
easy to keep track of, instead of multiple small files. The process
might take a while. After they’ve been packaged, you will have two
files: one ending in .tar.gz (the unencrypted package)and the other in
.tar.gz.gpg (the encrypted backup). The .gpg file is the file you are
interested in. Load it onto a CD or USB and store it away.
When it comes time to decrypt the file, just double-click on the .gpg
file, enter the password to your PGP key, and let the computer do its
work. It is wise to test this process out before you rely on it for
restoring your backups.
Step 9: Repeat the Above Steps for Each Identity You
Have
Repeat steps 1 to 8 for each of the identities that you have. You should
have a separate USB stick with Tails for each pseudonym, company,
activity that you control and want to keep separate. Each of these
sticks should have its own passwords, PGP keys, and KeePassX

databases.
Keep all your identities separate!
Don’t label all of this too obviously, and consider keeping everything in
separate locations.
Acquire Bitcoins
No matter how you acquire Bitcoins, it will likely not be anonymous.
This section highlights a few options for acquiring Bitcoins that are
relatively private, or at least not overwhelmingly invasive. To increase
your privacy, do not carry devices with you that have SIM cards in
them, and never log your location with GPS.

Buy Bitcoins In Person
You can buy bitcoins in person at Bitcoin meetups, through the
“marketplace” option of the Mycelium wallet (the marketplace exists
on the Android version only), or by finding traders on the localbitcoins
platform.
The best place to meet traders in person is in a busy but not crowded
place that offers free Wi-Fi. Public libraries or cafes are great venues
for these appointments.
Both parties should allow enough time to wait for at least one
confirmation of the Bitcoin transaction. To make sure your Bitcoin
transaction gets confirmed by the network, you don’t need to bring a
Bitcoin wallet with you; just knowing your address is enough. Enter the
address into the search field on Blockcypher or any other Blockchain
explorer and watch as the transaction comes in and confirms.
Get Bitcoin From an ATM
Bitcoin ATMs are common in some countries but rare in others. Check
Coin ATM Radar to see if there’s one near you! Make sure to check the
“other services” box in the bottom-left corner, or you might be missing
out on some places where bitcoins are sold as vouchers.
Each machine differs in how it handles your personal information.
Some might not ask for anything other than your Bitcoin address and
cash, while others might want your phone number, fingerprint or
passport. Just try the machine out with a small amount. Asking the
machine’s operator can be tricky, because there’s a risk they might

file a suspicious activity report.
If there is video surveillance at the Bitcoin ATM, you might not be able
to hide from it. Even still, showing up at a Bitcoin ATM with a ski mask
would make you look too suspicious, no matter how much you value
your privacy.
Accept Bitcoins as a Payment or Donation
If you’re regularly spending bitcoins, it makes perfect sense to accept
them as payment too as you will no longer need to worry about how to
acquire them The bitcoins you accept will not be anonymous either
since there might be a record somewhere that they were paid to you,
but they are likely already more difficult to link to you for a passive
observer than the bitcoins you buy at an exchange, where records are
kept in detail and made available to several parties
Mine Bitcoins
Mining Bitcoin is not a profitable endeavor for hobbyists, but if you
need a steady flow of Bitcoin and you have access to cheap electricity
and free cold air, along with excess capital lying around, it can be an
interesting alternative for acquiring bitcoins.
To mine Bitcoin, get yourself a Bitcoin mining machine, paid with cash
or credit card, plug it in, point it to a mining pool, and watch the
earnings come in daily.
Be aware, though: you are making an immense bet on the Bitcoin
network, and there are many ways you might lose your investment.

Make sure to read a lot about this topic before you start!
Obfuscate Transfers Between Identities
Every time you move funds between your identities you will need to
obfuscate them. To do that, you can “obfuscate”, “tumble” or “mix”
your bitcoins. There are many ways to do that, many of which are
described in our comprehensive guide on protecting your financial
privacy with Bitcoin. In this section we recommend services that use
the concept of “Coinjoin”, in which the transactions of many users are
combined into one transaction to obfuscate which user controls which
funds.
Helix
Helix uses a long chain of coinjoin transactions to tumble your
bitcoins.
Grams, the makers of Helix, is trying to be the Google of the dark web
by indexing dark websites, building reviews, and allowing users to mix
and tumble their coins.
Using Helix requires a membership, but you can use Helix Light
without a membership. Just navigate to
http://grams7enufi7jmdl.onion/helix/light and enter the recipient
address (or the address of your identity that you want to send bitcoins
to). You can add a random delay (which might be a few hours) and ask
for more layers of transactions to make your payment more
anonymous.

You can record your helix status ID or the URL if you want to come
back later to check your transaction status. The fee per transaction is
2.5% and a 0.02 Bitcoin minimum transaction amount.
As a member, Grams allows you to use the regular Helix service,
which supposedly differs from Helix Light by handing you coins that
have never been used on a dark market before. Of course this is
difficult to verify, as Grams has no way knowing where the funds come
from either. A membership will cost you 0.01 BTC as an entry fee,
although this fee will be applied to your balance.
Joinmarket
Joinmarket is a decentralized network that allows you to use Coinjoin
with other users without the need for a centralized party and without
requiring you to put trust in the other users. Unlike using a centralized
service, when you use Joinmarket, your bitcoins never leave an
address that you control, and you don’t run into the risk of the service
shutting down during your transaction, or the service maliciously
stealing your bitcoins.
Installing and using Joinmarket requires a considerable amount of
technical knowledge. Despite this, we encourage you to read their
guides and try it out because the lower risks and fees are worth
climbing the learning curve!
Darkwallet
Darkwallet was developed by Peter Todd, Amir Taaki, and other
distinguished privacy advocates. Unfortunately it’s still in alpha

version and has been for a while, which means it is untested software
that likely contains a few bugs. It is not recommended to use it on a
day-to-day basis, as unexpected behavior might even lead you to lose
your Bitcoin.
Sharedcoin
Sharedcoin is the mixing service integrated into wallet provider
Blockchain.info. You can create and reach your wallet at
https://blockchainbdgpzk.onion/ via Tor.
Open the page in Tor and create a new wallet. The only thing you need
to use Sharedcoin is a password. Create your password with KeePassX,
record the wallet identifier and back up your database. If you lose the
password, you will lose access to these funds!
You can find the option Shared Coin under ‘Send Money > Shared
Coin’. Enter the recipient’s address (the address of the identity you
want to send money to), select what level of privacy you desire, and
make the payment. The process will take a while, but you can see the
status bar in the window in which you initiate the transaction.
Bitmixer
Bitmixer is a Bitcoin tumbler.
When you send Bitmixer your Bitcoin, Bitmixer tumbles them in a
bucket and returns to you the exact number of bitcoins you sent them,
randomly selected from the bucket. You will receive bitcoins previously
owned by other people and your bitcoins will also eventually be

passed on to others. This way there is no trail on the Blockchain
between your old and new Bitcoin.
It is recommended to set your own fee and add a time delay to
increase your anonymity. If you set the fee yourself it becomes more
difficult to associate a transaction with a specific service. Bitmixer
says they delete all records of your transactions after 24 hours, but
there is no way to prove this. There is also no recourse mechanism if
one day Bitmixer does not return your coins.
According to their FAQ, Bitmixer only processes transactions larger
than one Bitcoin, charging a minimum 0.5% fee.
You can also access Bitmixer through Tor at
http://bitmixer2whesjgj.onion/, but the functionality on this site seems
to be broken, and their original website is not available for Tor users,
further diminishing your privacy.


