www.bispsolutions.com www.bisptrainings.com 1
IBM Data Stage Lab Guide#13
Loading Unique Records from Flat Files to SQL Server
Description:
BISP is committed to provide BEST learning material to the beginners and
advance learners. In the same series, we have prepared a list of beginner’s
guide and FAQs for IBM Data Stage. We have built complete financial Data
Model and various data transformation techniques. Download many such
learning documents, student guide, Lab Guide and Hands-on practice
materials. This document guide you through how to Load sorted data into SQL
Server from Flat File. Join our professional training to learn from Experts.
History: Version Description Change Author Publish Date 0.1 Initial Draft Varun Khare 12th Aug 2012 0.1 Review#1 Amit Sharma 18
th Aug 2012

www.bispsolutions.com www.bisptrainings.com 2
Mapping Sheet
Unique Value Load.
Source- Flat File
Target- Sql Server

www.bispsolutions.com www.bisptrainings.com 3
Step-1 :- In Windows Click Designer Client of DataStage
Step-2 :- New Window opens, then click Jobs ,then click Parallel Job because we are using parallel jobs.
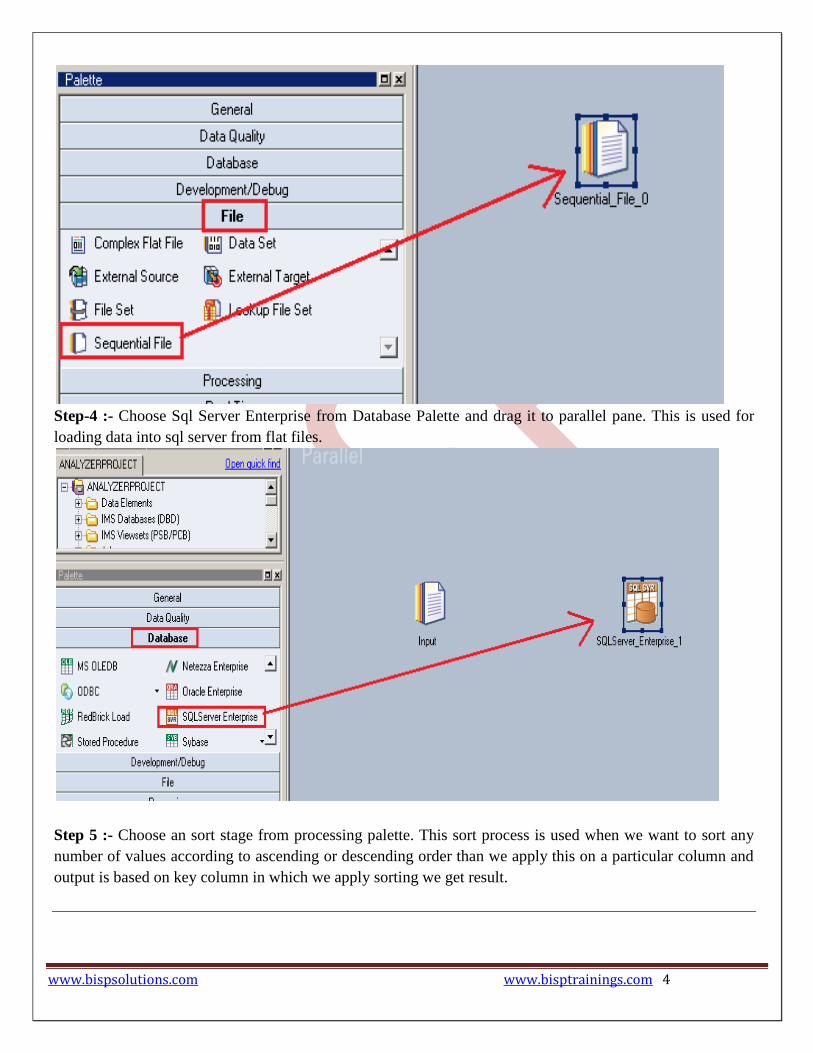
Step-3 :- First go on File Palette then scroll the cursor and choose Sequential File and drag it to Parallel pane
and rename it. This file is used for input data.
www.bispsolutions.com www.bisptrainings.com 4
Step-4 :- Choose Sql Server Enterprise from Database Palette and drag it to parallel pane. This is used for
loading data into sql server from flat files.
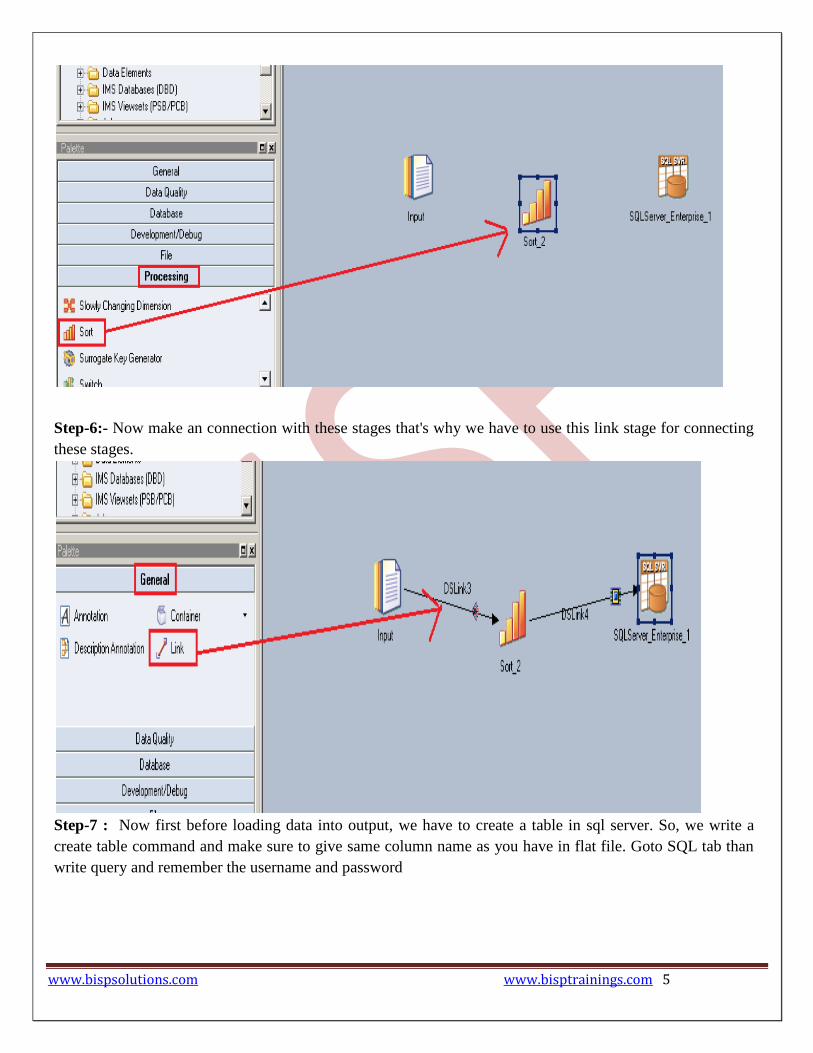
Step 5 :- Choose an sort stage from processing palette. This sort process is used when we want to sort any
number of values according to ascending or descending order than we apply this on a particular column and
output is based on key column in which we apply sorting we get result.
www.bispsolutions.com www.bisptrainings.com 5
Step-6:- Now make an connection with these stages that's why we have to use this link stage for connecting
these stages.
Step-7 : Now first before loading data into output, we have to create a table in sql server. So, we write a
create table command and make sure to give same column name as you have in flat file. Goto SQL tab than
write query and remember the username and password

www.bispsolutions.com www.bisptrainings.com 6
Step-8:- Double click on Input file and browse an input file that can be .txt,.csv any test file.
Step-9 Go to Format tab and Remove double Quote because we don't need them then Click on OK.
Note:- If you use date as a input than specify here which type of format you used

www.bispsolutions.com www.bisptrainings.com 7
Step-10 :- Here I'm using this date format so we specify here than we able to load the date from flat file.
Step-11:- Go to Columns tab and enter same column names as declared in Input file and put datatype, length
than click on View Data. This will show your Input Data.

www.bispsolutions.com www.bisptrainings.com 8
Step-12:- After Clicking on View Data if your data shows like this than our Data is valid and if some error
comes than we have to rectify them and check our column names.
Step-13:- After choosing file, select 'True' from First line in column Names dropdown for removing first line
from Input file.

www.bispsolutions.com www.bisptrainings.com 9
Step-14 :- Make input file and remember column names.
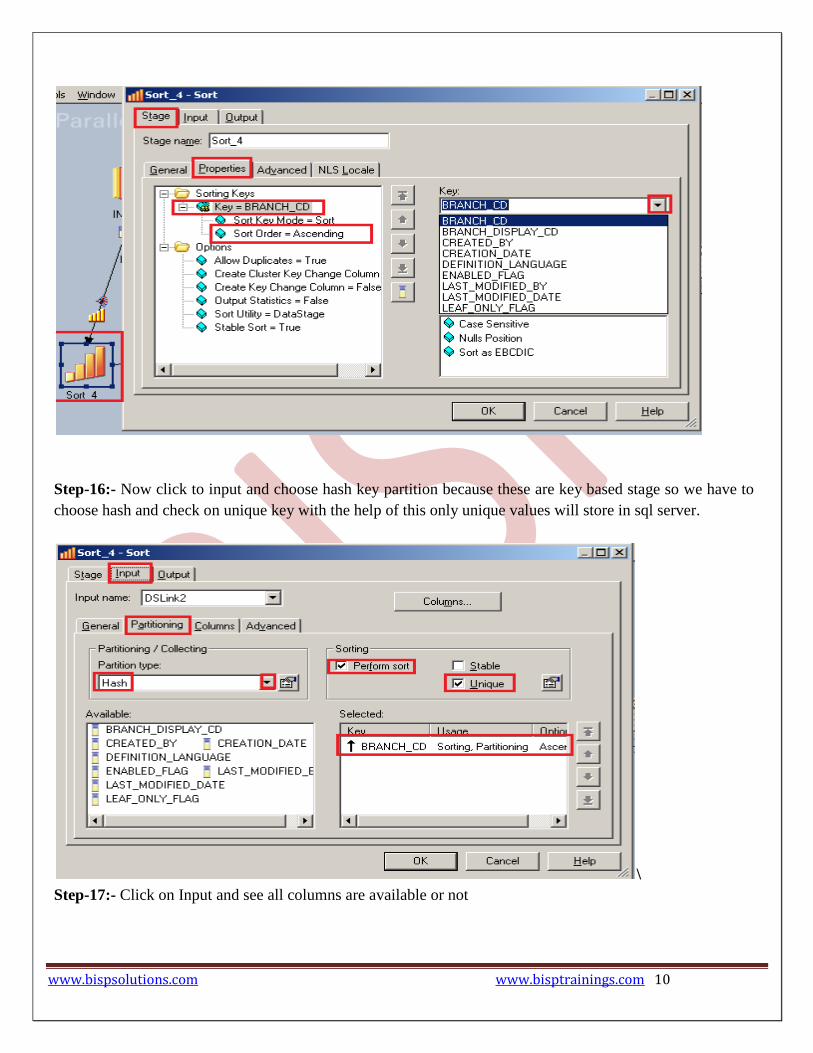
Step-15:- Now double click on sort stage and see here there are some field showing like key field here we
have to specify in which column we want to apply sorting so we select here and we also specify in which
order we want our target data.
www.bispsolutions.com www.bisptrainings.com 10
Step-16:- Now click to input and choose hash key partition because these are key based stage so we have to
choose hash and check on unique key with the help of this only unique values will store in sql server.
\
Step-17:- Click on Input and see all columns are available or not

www.bispsolutions.com www.bisptrainings.com 11
Step-18 Now go to output tab than select all links and drag them into OutLink for sending data which
satisfies filter condition into output links..
Step-20:- Now double click on Sql Server enterprise stage then it looks like below screenshot. Here we have
to enter our table name where we want to insert our data. Multiple options are there for write mode
dropdown. If we directly want to load data than we simple used write method as load otherwise we manually
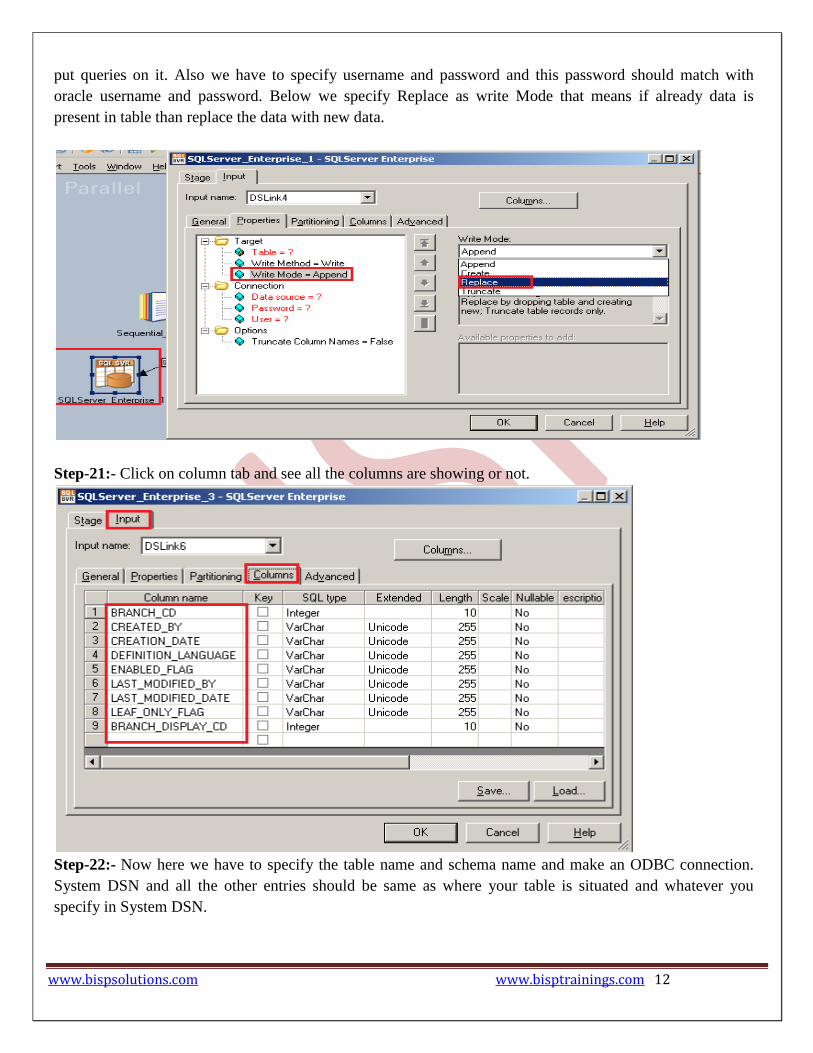
www.bispsolutions.com www.bisptrainings.com 12
put queries on it. Also we have to specify username and password and this password should match with
oracle username and password. Below we specify Replace as write Mode that means if already data is
present in table than replace the data with new data.
Step-21:- Click on column tab and see all the columns are showing or not.
Step-22:- Now here we have to specify the table name and schema name and make an ODBC connection.
System DSN and all the other entries should be same as where your table is situated and whatever you
specify in System DSN.

www.bispsolutions.com www.bisptrainings.com 13
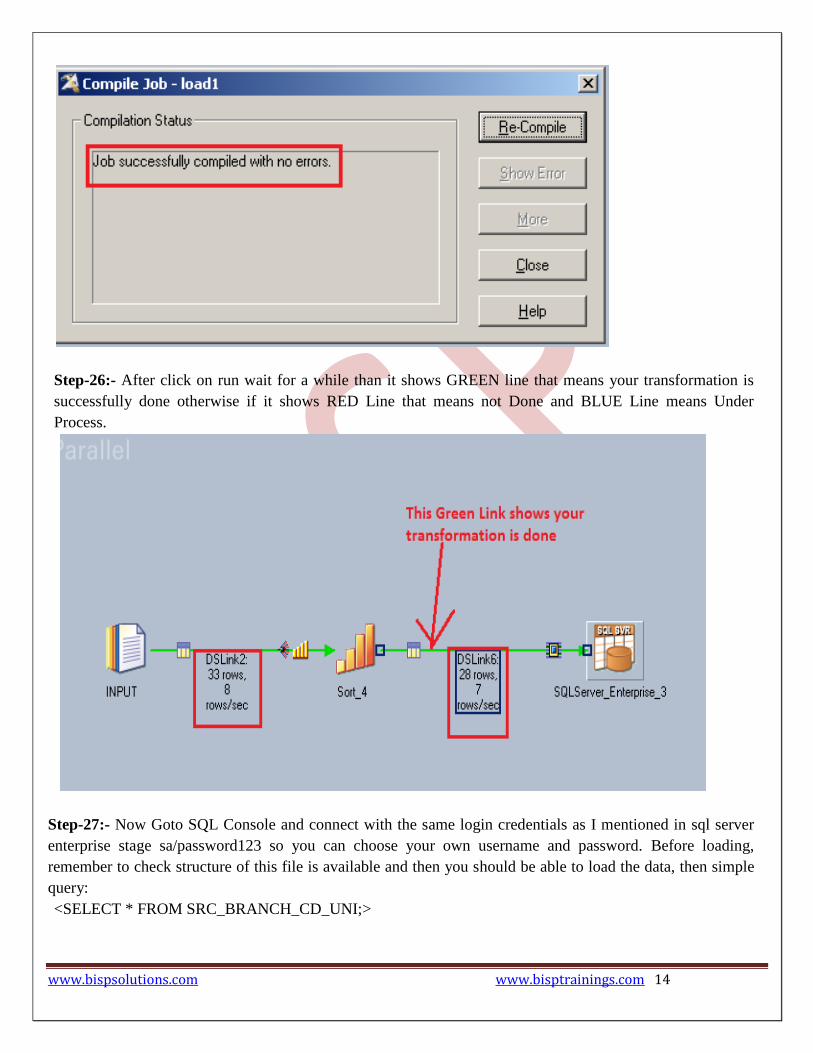
Step-23:- Now compiling the job, click on compile button.
\
Step-24:- If this is shown that means your compilation is done otherwise it shows error. Now click on run
button or (CTRL+F5).
www.bispsolutions.com www.bisptrainings.com 14
Step-26:- After click on run wait for a while than it shows GREEN line that means your transformation is
successfully done otherwise if it shows RED Line that means not Done and BLUE Line means Under
Process.
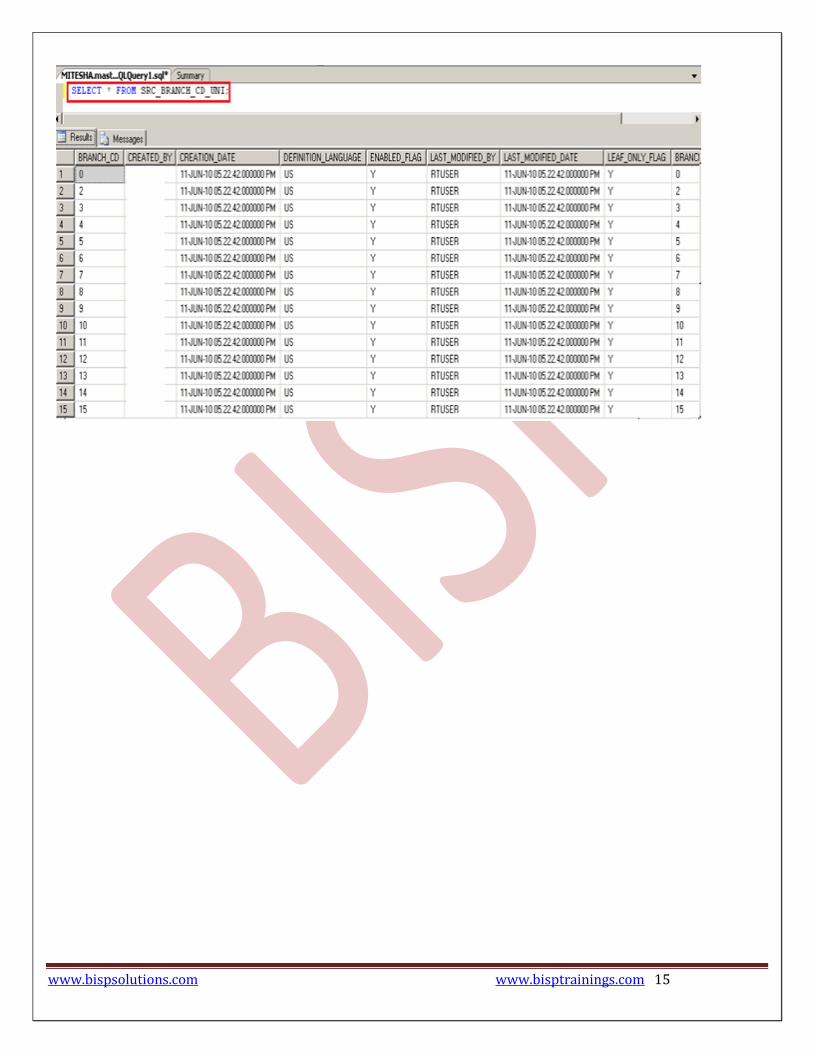
Step-27:- Now Goto SQL Console and connect with the same login credentials as I mentioned in sql server
enterprise stage sa/password123 so you can choose your own username and password. Before loading,
remember to check structure of this file is available and then you should be able to load the data, then simple
query:
<SELECT * FROM SRC_BRANCH_CD_UNI;>
www.bispsolutions.com www.bisptrainings.com 15


