
Chapter 8
Implementation, Testing and Deployment
8.1 Testing of PCI Controller subsystem. 1978.2 Testing of JTAG-ICE subsystem. 2018.3 Testing of Modules. 2078.4 System Integration and Testing. 2138.5 Discussion on Testing Strategy. 214

197
Chapter 8 Implementation Testing and Deployment.
The testing strategy for the project is to test all possible test points and to
verify functional correctness, and also to test system components iteratively
when they are implemented. This chapter combines the implementation
testing phase as shown in figure 2.1 of chapter 2. Designing of circuit along
with PCB is described in detail design phase and the sample examples of
firmware programs are also listed. Having hands on the PCI card repeatedly
for proper functioning of this design is illustrated in this chapter. Testing each
subsystem and getting satisfactory output result in their integration for full
proof working of PCI card based microcontroller based trainer system. Each
of the subsystems described in chapter 8 were fabricated as an individual
prototype and then the same design was transferred to the PCI card
schematic and printed circuit board. The PC with Microsoft Windows XP
Professional with SP2/SP3 is used to test the PCI card.
8.1 Testing of PCI Controller subsystem.
The drivers for all the popular OS are available from the website of MosChip
Semiconductor Technology. Download the appropriate driver for the working
OS. Install the driver as shown in the operating manual of chapter 9. Initially
only the MCS9835CV chip is to be tested for working, after then the next
subsystem will be tested.
The following steps involved to test the PCI controller subsystem must be
followed:
Install the device drivers for MCS9835CV and reboot the PC, do check the
device manager configuration as shown in figure 8.1.
1. Solder the MCS9835CV chip in the area provided along with the
22.1184 MHz crystal and the resistors and decoupling capacitors as
shown in figure 7.9 of chapter 7. The figure 8.2 shows the only the PCI
chip soldered. Here it important to solder the header JP3 which is used
for testing purpose here, so that it can be shorted by inserting 2-pin
jumper.

198
Figure 8.1 MCS9835CV chip soldered.
2. Insert the PCI card into the PCI slot checking the 5V notch on the card.
Push in the card firmly so that it cannot vibrate easily. Be sure to
maintain distance from other non-insulated cables, so that they do not
touch any part of the card. The figure 8.3 shows the card inserted into
the PCI slot of the PC. During the entire procedure of step 3 the PC
must be power off.
JP3 shorted using 2- pin jumper

199
Figure 8.2 PCI card inserted into PCI slot
Figure 8.3 View of PCI card installed.
MCS9835CV UARTA Serial COM PORT
PCI card Installed
MCS9835CV UARTB to ATmega128
5V Notch

200
3. Now start the PC and open the Device Manager as shown in figure 8.3
and see to it that all the items appear same as in this figure if not
repeat the steps to install the device drivers. Now insert the 2-pin
jumper on header JP3, this shorts the pin 109 RXA i.e a serial receive
pin of UARTA and pin 105 TXA i.e. a serial transmit pin of UARTA.
4. Open the windows default communication application software Hyper-
terminal and set Baud rate 9600 and other protocols 8-N-1 with no
hardware flow control. Select the option to echo back the character
typed. If having problems with these settings, use Hercules application
program from HW-group.com. This is easy to use as multiple
characters can be entered and also the HEX format can be inserted.
Setup shown in figure 8.4 is used. The characters that are sent must
be echo backed.
Figure 8.4 Setting of COM port.
Thus the testing of PCI controller subsystem is completed.

201
Troubleshooting.
If the character sent are not received back then check for the crystal
connectivity, also be sure not to route the UART signals under the
MCS9835CV. If the design does not work then the PCB routing must be
checked for proper routing of PCI signals, the PCI signaling rules may not
have been followed. The best part is to send the design to the technical
support executive of the MosChip Company. If the design does not work in 2
layers PCB, then re-route the same for 4 layers PCB with the layers stack as
pointed in section 7.2 of chapter 7.
8.2 Testing of JTAG-ICE subsystem.
After successfully testing the PCI controller subsystem, the next step is to test
the initial working of firmware of the JTAG-ICE flashed through the bootloader
developed in section 7.3 of chapter 7. Before flashing the JTAG-ICE firmware
the bootloader must be tested using the AVRProg commands given in table in
section 7.3 of chapter 7. The serial port UARTA of the PCI card is used to
communicate with the Amega16L the same that is demonstrated in section
9.2. The figure 8.6 shows the response of the bootloader in the ATmega16L.

202
Figure 8.5 AVRProg response from ATmega16L
The bootloader JtagISP.hex can be flashed by any AVR programmer as
described in the operating manual section 9.2 of chapter 9, here it is flashed
using ISP with AVR Dragon.
Follow the steps to test the JTAG –ICE protocol as per the Atmel application
note AVR 060 JTAG ICE Communication Protocol.
1. After flashing the bootloader, momentarily hold the 2-pin jumper on
header W2 so that the ATmega16L will be reset. Now the JTAG LED
blinks and it‘s the signal that the bootloader is ready to take
commands. Put the 2-pin jumper on W1 header so that the
ATmega16L goes to the ISP mode.
2. In the AVR Studio click on the Tools menu and then on AVR Prog, here
the bootloader will communicated with AVR Prog. Now select the file
ugrade.edn from folder C:\Program Files\Atmel\AVR Tools\JTAGICE\

203
and press the program button. Here the JTAG-ICE is programmed
inside the ATmega16L.
3. Just reset the ATmega16L and use the JTAG-ICE. The JTAG signal
pins from ATmega16L are connected to the JTAG port of ATmega128;
also the same signals are taken at JP7. This is the facility to use the
external target AVR other than the on-board ATmega128, only if
ATmega128 is not soldered. At this point we do not solder the on-board
ATmega128, but use an external target AVR ATmega32 in a general
purpose board. Be sure not to have Vcc power contention with external
board from JP7 pin 2, 5Vcc.
4. Open the Hercules setup utility and set the Baud at 19200 and protocol
as 8-N-1 with hardware control off. Give the commands of table 8.1
and see the response in figure. Give command and after that
Sync_CRC/EOP = 0X20, 0X20. Here the response will be in hex format
that has to be converted to its ASCII format for better clarity, some of
the commands will not show results, but it is not like that, the display is
not in ASCII. Here the testing of JTAG-ICE communication protocol is
done with AVR Application Note 060.
Hex Command SEQUENCE ASCII response
TESTED
0x20 Get Synch [Resp_OK] A
0x53 Get Sign
On
[Sync_CRC/EOP] [Resp_OK]
[“AVRNOCD”] [Resp_OK]
AAVRNOCDA
0x64 Get Debug
Info
[Sync_CRC/EOP] [Resp_OK]
[0x00] [Resp_OK]
AA
Table 8.1 JTAG-ICE commands
5. Open the AVR Studio and select the JTAG-ICE platform and the serial
PORT given to UARTA of MCS9835CV and click connect button as
shown in the figure 8.6.

204
Figure 8.6\Selection of JTAG-ICE.
Select the target as ATmega32 as per the step 1 as shown in figure 8.7.
Figure 8.7 Select the Target.

205
6. Check the power on the target supply by clicking on the HW settings
tab as shown in the figure 8.8.
Figure 8.8 Reading the Target Voltage.
Figure 8.9 Program mode of JTAG-ICE.

206
7. To program any hex file into the target just go to the Program tab and
input the path of hex file and press Program button. The figure 8.9
shows the screenshot of the program mode of JTAG-ICE.
The above step confirms that the JTAG-ICE firmware that was flashed was
correct. Next step is test the debugger section
The detail discussion of using the JTAG debugger for the target ATmega32 is
as follows:
1. Just follow the above steps for using the JTAG interface and confirm
the working of the AVR JTAG-ICE. The demonstration of debugging is
shown using the sample program of the STK500 kit that is applicable to
our target ATmega32 board. Here no external circuit is to be
connected.
2. Open the project in AVR Studio or create a new project while selecting
target chip as ATmega32 and click Build and run in the Build main
menu. Now single step each instruction and examine the changes in
the respective register, I/O and RAM. The figure 8.10 shows the
debugging of a simple program. Just examine the affecting registers.
Figure 8.10 JTAG debugging window.

207
Detail description on how to debug in AVR Studio is in section Operating
manual of chapter 9. After successful testing of these subsystems the target
ATmega128 along with SRAM 62256, 24C512 and the external card
connecting to header JP8 ext2 will soldered and connected.
The JTAG debugger/programmer developed here supports the following
AVRs:
ATmega128, ATmega128L, AT90CAN128
ATmega16, ATmega16L
ATmega162, ATmega162L, ATmega162V
ATmega165, ATmega165V
ATmega169, ATmega169L, ATmega169V
ATmega32, ATmega32L
ATmega323, ATmega323L
ATmega64, ATmega64L
8.3 Testing of Modules.
For testing each of the modules developed in section 7.5 an UART interface
may be supported for feedback of the results. The above two sections
described the testing of PCI controller and JTAG-ICE and this section
describes the testing of programs for target ATmega128 soldered on the PCI
card.
8.3.1 Basic Input/Output Module with external interrupts.
To test the basic I/O connect the external board, the circuit diagram is shown
in figure 7.20 of chapter 7. The actual board PCB pattern is shown in figure
8.11.

208
Figure 8.11 External I/O card
The TUT_14.hex file and TUT_14.cof file is generated by Flowcode and use
the TUT_14.cof in the AVR studio for simulation. As this code is generated
outside the AVR Studio, it has to be imported to AVR Studio. After running the
code, it is observed that the LEDs are running from left to right.
8.3.2 PWM interface control via UART0 module.
The example shows the dimming of the LED4 on the external I/O card using
the PWM phase correct method of ATmega128 at its pin OC0, PB4 and the
change in dimming can be done through UART0 of ATmega128. Connecting
them to the UARTB of the PCI card, hex data can be send to vary the
dimming effect of LED4. The AVR project for this module is developed using
AVR assembler in AVR Studio
To test this code just open the COM port related to UARTB of PCI card and
Run the program in the AVR Studio. Now input the hex characters to observe
the change in brightness of LED4.
8.3.3 I2C Interface EEPROM module.
The AT24C512 stores 64Kbytes. The sample program for storing data in U7 is
demonstrated. Data is stored from address 11 to 20 of U7 and retrieved back
using UART0 of ATmega128. The firmware is developed in BASCOM-AVR
using BASIC lauguage for AVR microcontroller. Try opening the current

209
project from the AVR studio and select the M128I2CEPROM.OBJ file and
load it. The Studio will automatically create the project and open the project
after selecting the JTAG-ICE platform and target as ATmega128. The COM
port displays the result of storing data into the AT24C512. A detail regarding
using BASCOM-AVR for debugging is described in section operating manual
of chapter 9.
8.3.4 Parallel interface SRAM module.
The XMEM interface of ATmega128 can interface to external SRAM,
EEPROM, ADC. DAC other bus supported peripherals. Here SRAM is
interface externally using 74AC573 latch so that the ATmega128 supports
32Kbytes of SRAM along with 4Kbytes of internal SRAM. The project of
assembly program listing is given in section 7.5.4 of chapter 7. Running the
project in single step mode it is noticed that writing/reading data to internal
SRAM is a simple task, but to access utmost care must be taken to refer the
external address. The configuration of figure 8 must be taken into
consideration before using XMEM. The AVR assembly language has
instruction well capable to understand which memory to address due to its
RISC Havard architecture. The table 8.2 gives proper understanding for the
access of address in ATmega128.
Actual Memory in
HEX
Memory of Internal SRAM Memory of External SRAM
0x204 0x204 -NA-
0x8204 -NA- 0x204
0x7204 -NA- 0x7204
Table 8.2 Example of addressing SRAM using XMEM
8.3.5 ADC module via UART0
For testing the ADC of ATmega128 simple potentiometer is attached to pin
PF0, ADC0 and AVref is connected to 5Vcc so that 0 to +5V dc can be
measured. The measured result is send to the UART0 of ATmega128, which
is connected to UARTB of MCS9835CV and is viewed on the Hercules serial
setup. The coding of this module is available in sample exercise. The coding
is done for single-ended mode operation. The program is developed in
BASCOM-AVR compiler. The values of spot voltage on pin PF0 is shown

210
continuously on the terminal. The same can be verified using DMM at pin
PF0, the results are perfect.
8.3.6 1-wire iButton interface.
The iButton device from Maxim-Dallas DS1990A is worked on and an article
is also published in the Electronics For You magazine in November 2010. It
features the 1 – wire technology that do not require power for its working but it
lives on the parasitic power when it is accessed as stated by the company.
Simplest form of 1-wire device DS1990A is a stainless steel button in which
there is a computer chip on which 64-bit permanent laser printed ROM. The
address of the DS1990A is used for identification as it is unique and is
displayed on the serial terminal. Just single pull-up is required at pin 25 PD0
that acts as external interrupt. There is a lot of support for 1-wire devices on
the website. The program for this module is developed in BASCOM-AVR
using its 1 wire library and can be debugged in JTAG-ICE as discussed in the
above modules.
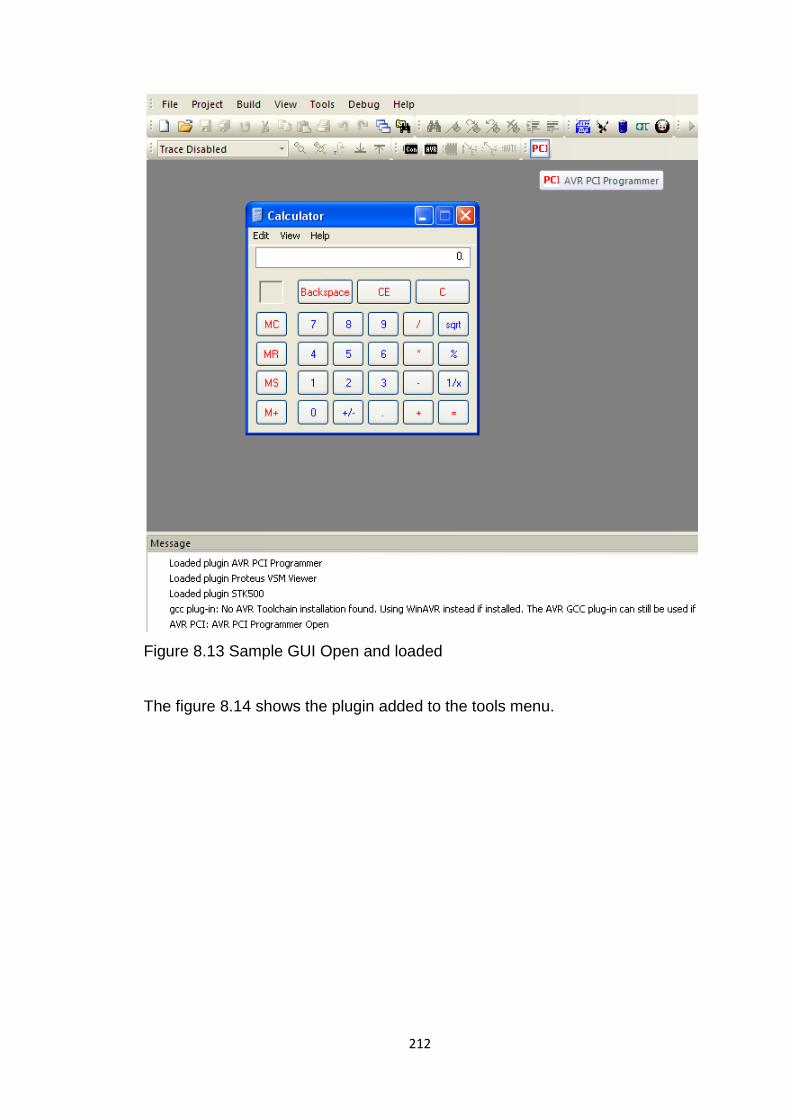
8.3.7 AVR Studio GUI plugin.
The AVR GUI plugin is developed using AVR Studio SDK, which is a Dynamic
Link Library DLL file. The coding of the plugin is done in purely VC++, but it is
imported to VC++.NET using Microsoft Visual Studio 2008 and compiled for
the DLL. It is found in the directory as shown in figure 8.13.

211
Figure 8.12 Project folder of GUI Plugin
The DLL file to be is to be registered in windows to use it using command
regsvr32 in the run command line of start button of Windows OS. After
registering the DLL file the figure 8.13 shows the GUI sample of calculator
opened and loaded.
VC++ Project of GUI using wizard
VC++ code file to be edited.
212
Figure 8.13 Sample GUI Open and loaded
The figure 8.14 shows the plugin added to the tools menu.

213
Figure 8.14 Plugin added to Tools Menu
8.4 System Integration and Testing.
System integration is done after executing and working on with subsystems in
the testing phase, the simultaneously taking each of the subsystems and
combining to give the required result. After testing the PCI controller
subsystem and the JTAG ATmega16 section along with target ATmega128
performs the role of system integration.
Testing the functioning of MCS9835CV, JTAG-ICE and target ATmega128
with peripherals and using target ATmega128 for interfacing GSM modem
and serial memory and µC-OS II RTOS that is specially designed for AVR
ATmega128 contributes to system integration firmly. The developed PCI card
is also ready for loading RTOS available from various companies.

214
8.5 Discussion of Testing Strategy.
The use of Development tools such as compiler toolchain, debugger, and
prototype platform for the target microcontroller depend much on the testing
strategy. Because the toolchain including the IDE must support the debugging
frontend application software properly, maintain communication between the
device drivers of the host PC also.
The testing strategy tells that build the hardware so as to accomplish the
requirement and check it using DMM and DSO. Program the firmware and
check the resultant output is up to the mark. The main point behind the testing
strategy is to divide and work. Just divide the program into specific parts and
after successful results of each of the part just work on the next related part,
so the same strategy is adopted for 1 wire DS1990A device. The
implementation of developing a proper bootloader is a little tedious job, but
going step by step the concept is realized.


