INDOT Consultant New User
Quick Start Guide ProjectWise (Thick Client and Web Server), ITAP, DOTWise
Project Creator, Connection Information
12/14/2016
State of Indiana
INDOT CAD Support

Contents
1. Welcome to INDOT CAD ....................................................................................................................... 5
2. Requesting ProjectWise Access and the DOTWise Project Creator .................................................. 7
2.1 Business and User Enrollment in ITAP........................................................................................ 7
2.2 Requesting Access ProjectWise and the DOTWise Project Creator .......................................... 8
3. ProjectWise at INDOT ........................................................................................................................ 13
3.1 Creating ProjectWise Folders Using the Project Creator ........................................................ 13
3.2 Using the ProjectWise Web Server ........................................................................................... 16
3.2-1 Changing your Password .................................................................................................. 19
3.3 Using the ProjectWise Explorer Client ...................................................................................... 20
3.3-1 ProjectWise Explorer Client Connection Settings ............................................................ 21
3.3-2 ProjectWise First Connection ........................................................................................... 22
3.3-3 Changing Your Password .................................................................................................. 24
3.4 INDOT ProjectWise Basics ........................................................................................................ 25
3.4-1 ProjectWise Folder Layout ................................................................................................ 25
3.4-2 Consultant Folder Structure ............................................................................................. 26
3.4-3 ProjectWise Security ......................................................................................................... 26
4. CAD Support and Documentation Resources ................................................................................. 29
4.1 INDOT CAD Website .................................................................................................................. 29
4.2 DOTWise .................................................................................................................................... 29
4.3 ProjectWise Documents Folder ................................................................................................ 30
4.4 Bentley User Community .......................................................................................................... 30
4.5 Signing up for Gov Delivery and CAD Emails ........................................................................... 30
4.6 Contacting INDOT CAD Support................................................................................................ 30


5
1. Welcome to INDOT CAD
A Message from CAD Support
What you need to know
The purpose of this document is to quickly get you started on the right road at INDOT in terms of your
firm doing business with INDOT. This document is what we call a quick start guide and will contain
how- to’s on everything from ITAP (creating an account and requesting access to a new application)
to creating a Consultant Folder in ProjectWise. Anyone wishing to use/access INDOT’s ProjectWise
datasource must enroll via ITAP. This document will also discuss what ProjectWise is and how to
navigate within it and also the IN.gov site (related to CAD) and GovDelivery subscriptions (important
notifications about CAD software).
Thanks,
Jason Kuhn
Kennedy Huynh

6
7
2. Requesting ProjectWise Access and the DOTWise Project Creator
Usage of INDOT’s ProjectWise system is rapidly becoming a normal means for INDOT users and
consultants to share data, or for consultants to work out of to take advantage of our managed
workspace configuration. This chapter will look at the steps necessary for a consultant to (1) get
their firm access to the INDOT Technical Applications Pathway (ITAP) (2) individual users request an
ITAP account (3) users enrolling for INDOT ProjectWise (DOTWise) access and to our Project Creator
system.
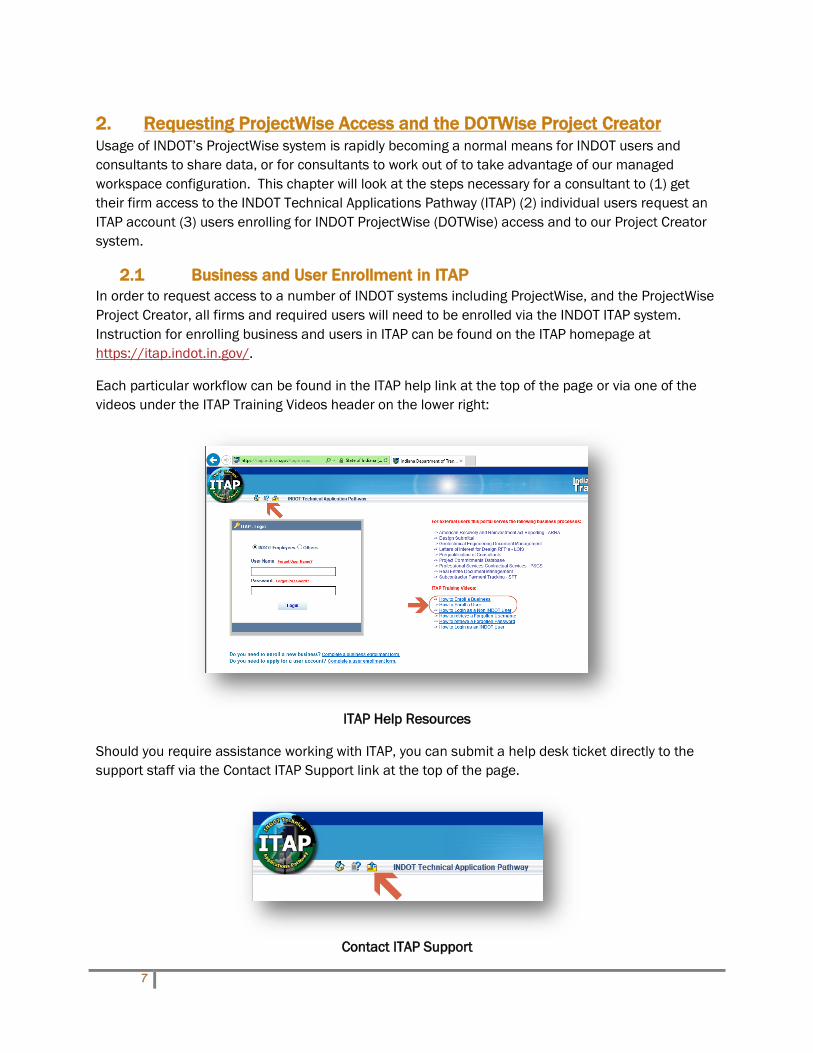
2.1 Business and User Enrollment in ITAP
In order to request access to a number of INDOT systems including ProjectWise, and the ProjectWise
Project Creator, all firms and required users will need to be enrolled via the INDOT ITAP system.
Instruction for enrolling business and users in ITAP can be found on the ITAP homepage at
https://itap.indot.in.gov/.
Each particular workflow can be found in the ITAP help link at the top of the page or via one of the
videos under the ITAP Training Videos header on the lower right:
ITAP Help Resources
Should you require assistance working with ITAP, you can submit a help desk ticket directly to the
support staff via the Contact ITAP Support link at the top of the page.
Contact ITAP Support

8
2.2 Requesting Access ProjectWise and the DOTWise Project Creator
With your firm and users enrolled for ITAP access, users may now begin the process to enroll for
ProjectWise access. Previously requesting access to this was separate to the Project Creator, but
these functions have been combined into a single access request. The following steps illustrate the
end user process for requesting and receiving access.
To request access to ProjectWise and the DOTWise Project Creator you will start out by going to the
following location:
1. A User may request access to a new INDOT application from the ITAP Menu and from the
ITAP Home Page.
a. Option #1 -To request a new application from the ITAP Menu, select Application, and
then Request New Application.
Request New Application

9
b. Option #2-To request a new application from the ITAP Home Page, click on the link
“Click here to request access to new application”.
Request New Application
2. Selecting Request New Application from the ITAP Menu or the link “Click here to request
access to new application” from the ITAP Home Page will display the Application Enrollment
panel.
Application Enrollment

10
3. In the Application Enrollment panel, select one of the ProjectWise entry, followed by the
DOTWise listing underneath it from the left side of the panel. Application Details and
Available Roles (if applicable) will be displayed on the right side of the Application Enrollment
panel.
DOTWise Application Enrollment
Note: Roles are for internal use only and will have no affect when selected by external users.
External users will have their roles configured specific to their firm.
4. To complete the application enrollment, select the Submit button on the bottom of the right
hand panel.
5. If the Submit was successful the Message below displays, click on the OK button.
Successful Request

11
6. If your account already has a pending request for the application, you’ll receive the following
message. Select OK to continue, this indicates that a request is currently outstanding and
awaiting additional input.
Pending Request
Once the request has been completed, you will receive an email with a recap of what has been
requested. In addition to this information, it will also contain the name of the business administrator
responsible for approving the next step in the process.
Request Acknowledgement
Note: INDOT CAD Support acts on account requests in the order we receive them, normally in 1
business day. For external users, please note that all requests must go through your firm’s business
administrator for approval. If you do not receive a timely response to your account request, please
contact [email protected] and we can provide the name of your business administrator.
Please keep in mind however, we cannot circumvent the approval process.
Upon approval of the application enrollment, two emails will be received. First will be an automated
email from the ITAP system stating that approval has been granted to the application. The second

12
email in most cases will be a confirmation from the INDOT CAD Support staff with relevant
information including username and password information for the INDOT ProjectWise system. Note
that the password for the INDOT ProjectWise system will be different from the one used to access
the ITAP system.

13
3. ProjectWise at INDOT
ProjectWise is a suite of software provided by Bentley Systems aimed at helping to manage, find, and
share active project data; including CAD and geospatial content, as well as Office documents.
Standard Key Benefits
Save time finding, validating and accessing project information
Reduce project risk with a single source of truth for all project information
Improve quality and consistency of all project deliverables
Meet deadlines
Share work across multiple offices and locations
Access to INDOT’s Managed Workspace
Key Benefits for Consultants working on INDOT Projects
The sharing of Data with INDOT staff
No more using of FTP sites to transfer data
No more burning of data to CD’s
No need to mail CD’s or physically carry CD’s of data to INDOT
No more attempting to attach large files to emails and hoping they get there when you send
them
Quick visual confirmation that the data is in the folder (audit trail)
Work on projects in different Districts and see them in one screen using ProjectWise
INDOT has positioned ProjectWise as their active project storage system for CAD and other
associated project data. However it is not a replacement for ERMS and any data upload
requirements that are otherwise specified for the agency. From the consultant standpoint, INDOT’s
ProjectWise system can be a convenient way to share and collaborate on data in a single system
directly with INDOT personnel.
3.1 Creating ProjectWise Folders Using the Project Creator
To maintain a consistent folder structure and security model for each project, and prevent
unnecessary loss of data; all top level folder structures (discipline level, consultant folders) are
created using our on-demand folder creation tool. As part of the initial user access request via ITAP
that was discussed in the previous section, access to this tool is also granted.
Note that only top level folders are created using this tool such as those folders for the designation
number, discipline folders (ex. Design, Environmental Services), and consultant folders (ex. Design
Firm A Inc., Survey Firm B LLC). Subfolders may be created underneath these folders as long as a
user has the appropriate permissions for these folders.

14
Creating a Project/Folders
Most currently active INDOT projects should already have a ProjectWise folder structure. Depending
on the state that the project is at it could have as few as one discipline, or a number of different
discipline folders. Being on demand, folders are only created when necessary eliminating additional
project clutter where possible. Please keep in mind that it’s entirely possible that the Designation
Number may not exist, but as part of the project creation tool, will be created.
To create your consultant project folder:
1. Log in to ITAP (https://itap.indot.in.gov/login.aspx), and locate the ProjectWise entry under
INDOT Applications. Expand this entry and select DOTWise. Select the “Click here to access
application” link.
Accessing the DOTWise Project Creator
2. Once in the Project Creator you will be prompted to enter the information for your project.
The first piece of required information is the Designation Number. Enter the number for your
project and select “Click her to validate the entered Des Number” field.
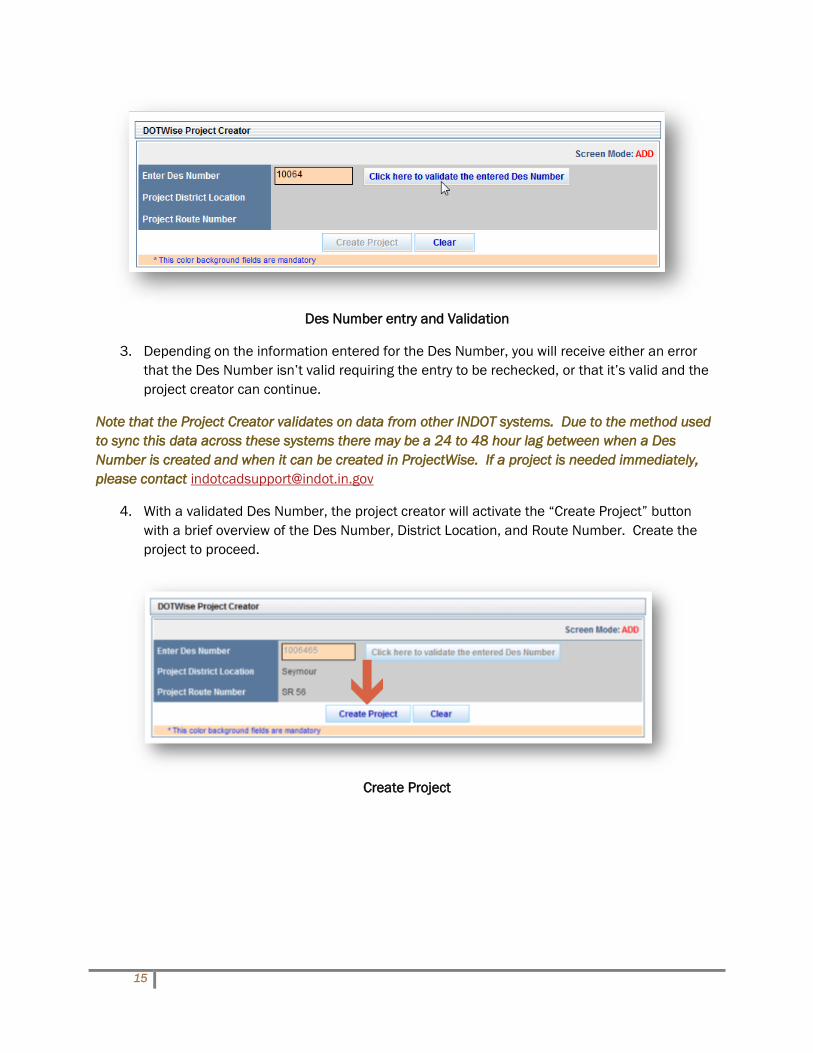
15
Des Number entry and Validation
3. Depending on the information entered for the Des Number, you will receive either an error
that the Des Number isn’t valid requiring the entry to be rechecked, or that it’s valid and the
project creator can continue.
Note that the Project Creator validates on data from other INDOT systems. Due to the method used
to sync this data across these systems there may be a 24 to 48 hour lag between when a Des
Number is created and when it can be created in ProjectWise. If a project is needed immediately,
please contact [email protected]
4. With a validated Des Number, the project creator will activate the “Create Project” button
with a brief overview of the Des Number, District Location, and Route Number. Create the
project to proceed.
Create Project
16
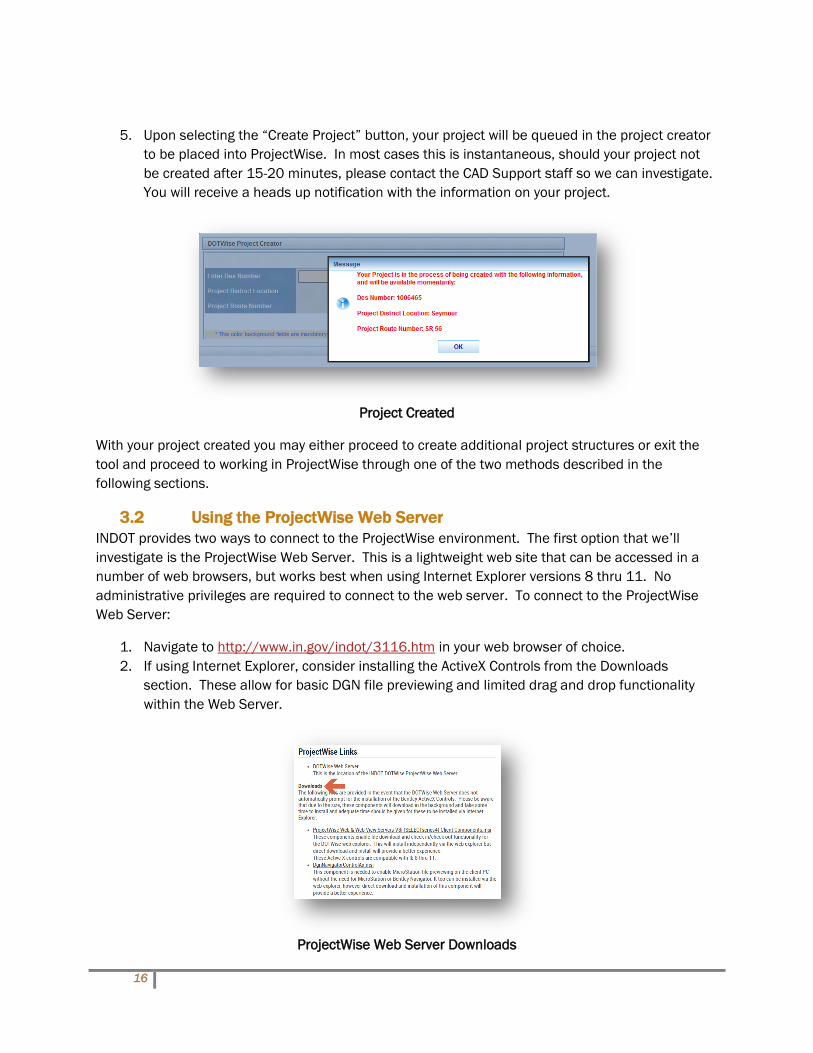
5. Upon selecting the “Create Project” button, your project will be queued in the project creator
to be placed into ProjectWise. In most cases this is instantaneous, should your project not
be created after 15-20 minutes, please contact the CAD Support staff so we can investigate.
You will receive a heads up notification with the information on your project.
Project Created
With your project created you may either proceed to create additional project structures or exit the
tool and proceed to working in ProjectWise through one of the two methods described in the
following sections.
3.2 Using the ProjectWise Web Server
INDOT provides two ways to connect to the ProjectWise environment. The first option that we’ll
investigate is the ProjectWise Web Server. This is a lightweight web site that can be accessed in a
number of web browsers, but works best when using Internet Explorer versions 8 thru 11. No
administrative privileges are required to connect to the web server. To connect to the ProjectWise
Web Server:
1. Navigate to http://www.in.gov/indot/3116.htm in your web browser of choice.
2. If using Internet Explorer, consider installing the ActiveX Controls from the Downloads
section. These allow for basic DGN file previewing and limited drag and drop functionality
within the Web Server.
ProjectWise Web Server Downloads
17
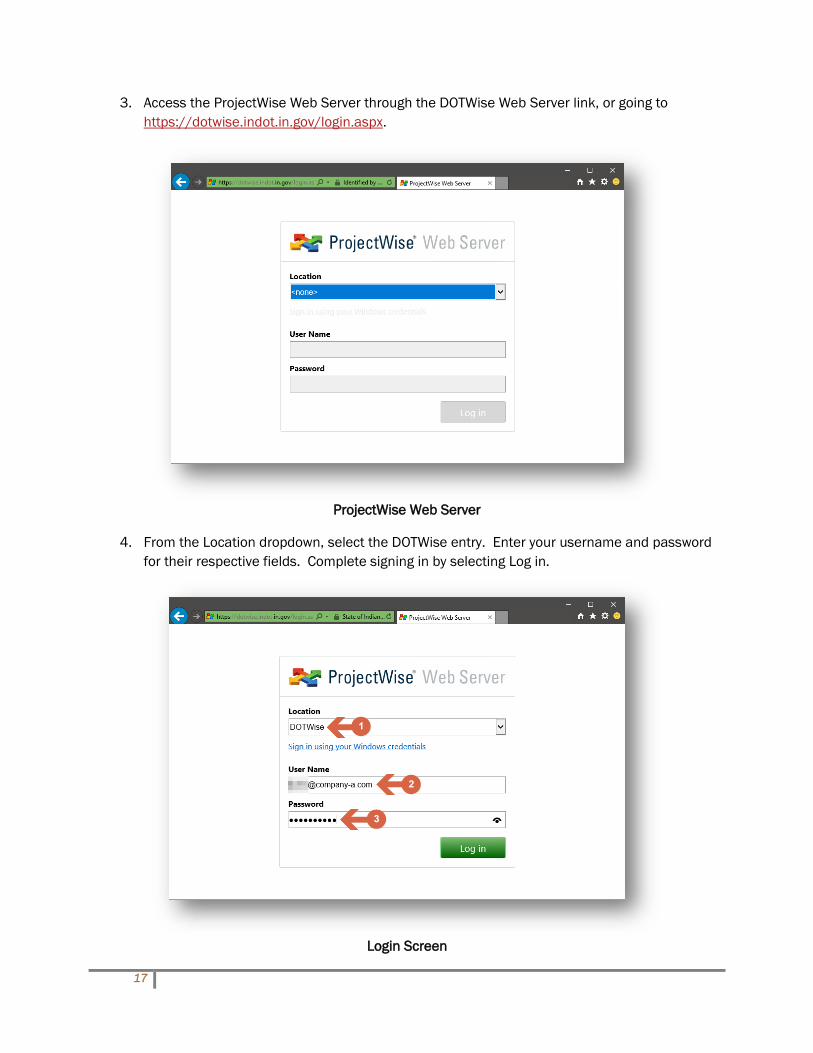
3. Access the ProjectWise Web Server through the DOTWise Web Server link, or going to
https://dotwise.indot.in.gov/login.aspx.
ProjectWise Web Server
4. From the Location dropdown, select the DOTWise entry. Enter your username and password
for their respective fields. Complete signing in by selecting Log in.
Login Screen
18
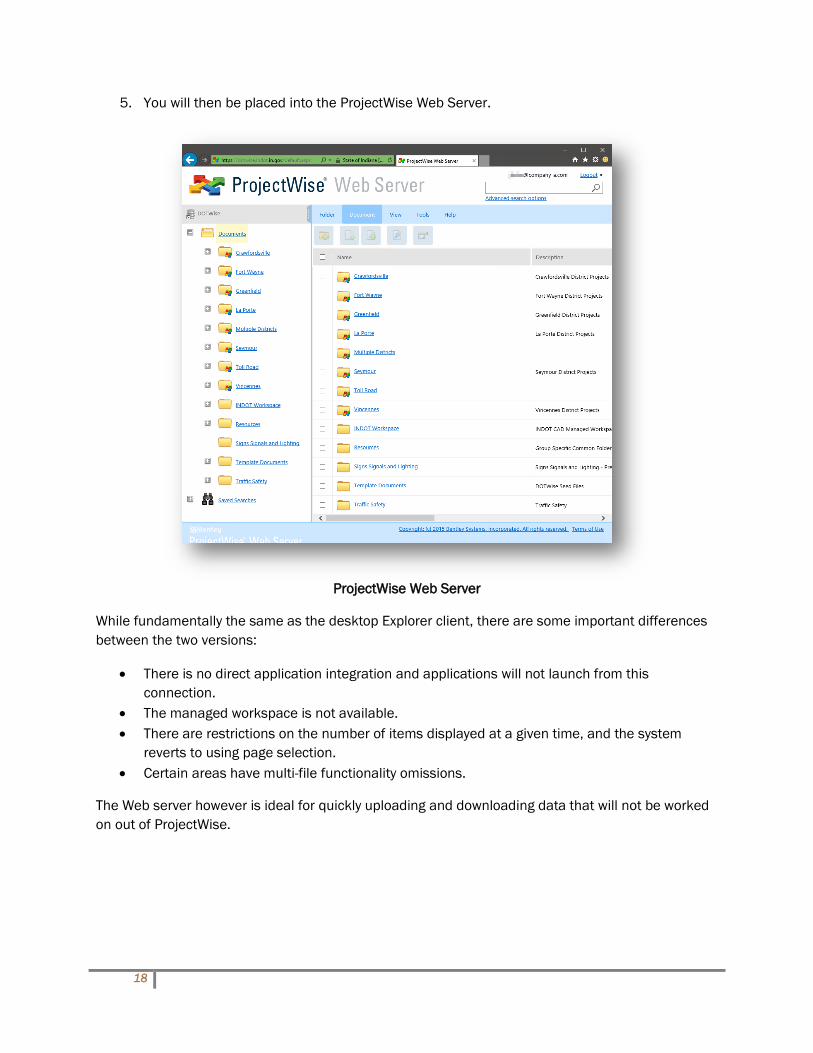
5. You will then be placed into the ProjectWise Web Server.
ProjectWise Web Server
While fundamentally the same as the desktop Explorer client, there are some important differences
between the two versions:
There is no direct application integration and applications will not launch from this
connection.
The managed workspace is not available.
There are restrictions on the number of items displayed at a given time, and the system
reverts to using page selection.
Certain areas have multi-file functionality omissions.
The Web server however is ideal for quickly uploading and downloading data that will not be worked
on out of ProjectWise.
19
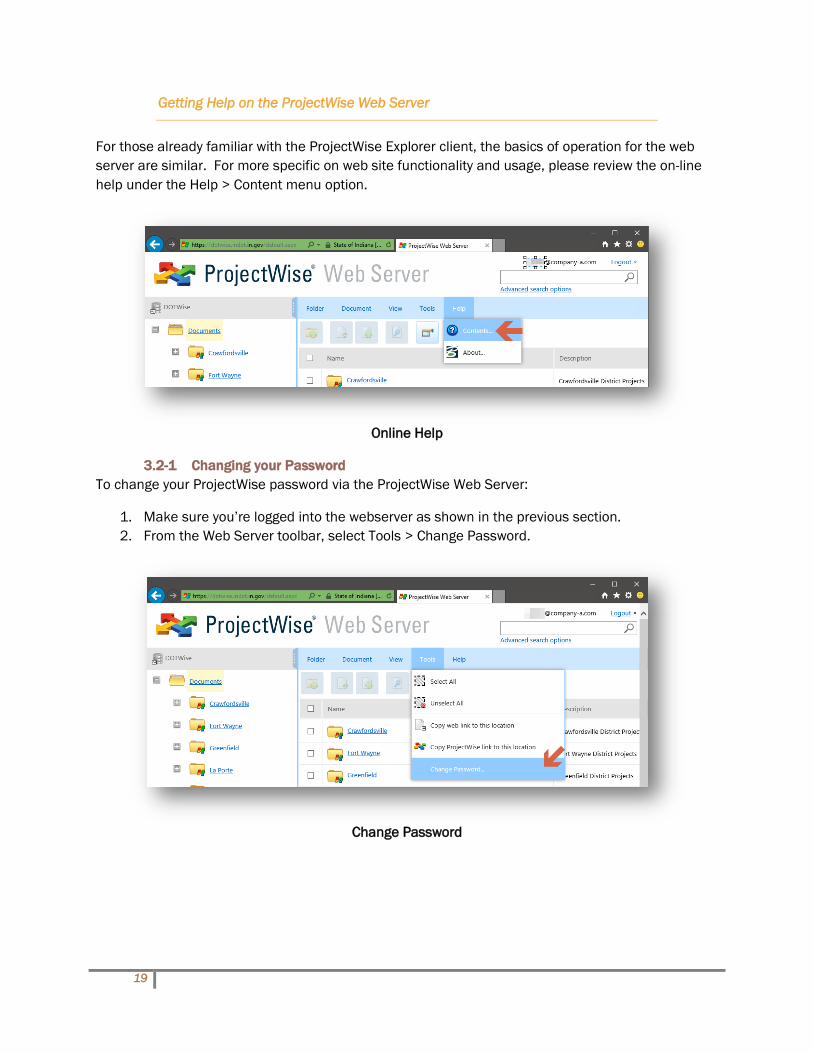
Getting Help on the ProjectWise Web Server
For those already familiar with the ProjectWise Explorer client, the basics of operation for the web
server are similar. For more specific on web site functionality and usage, please review the on-line
help under the Help > Content menu option.
Online Help
3.2-1 Changing your Password
To change your ProjectWise password via the ProjectWise Web Server:
1. Make sure you’re logged into the webserver as shown in the previous section.
2. From the Web Server toolbar, select Tools > Change Password.
Change Password
20
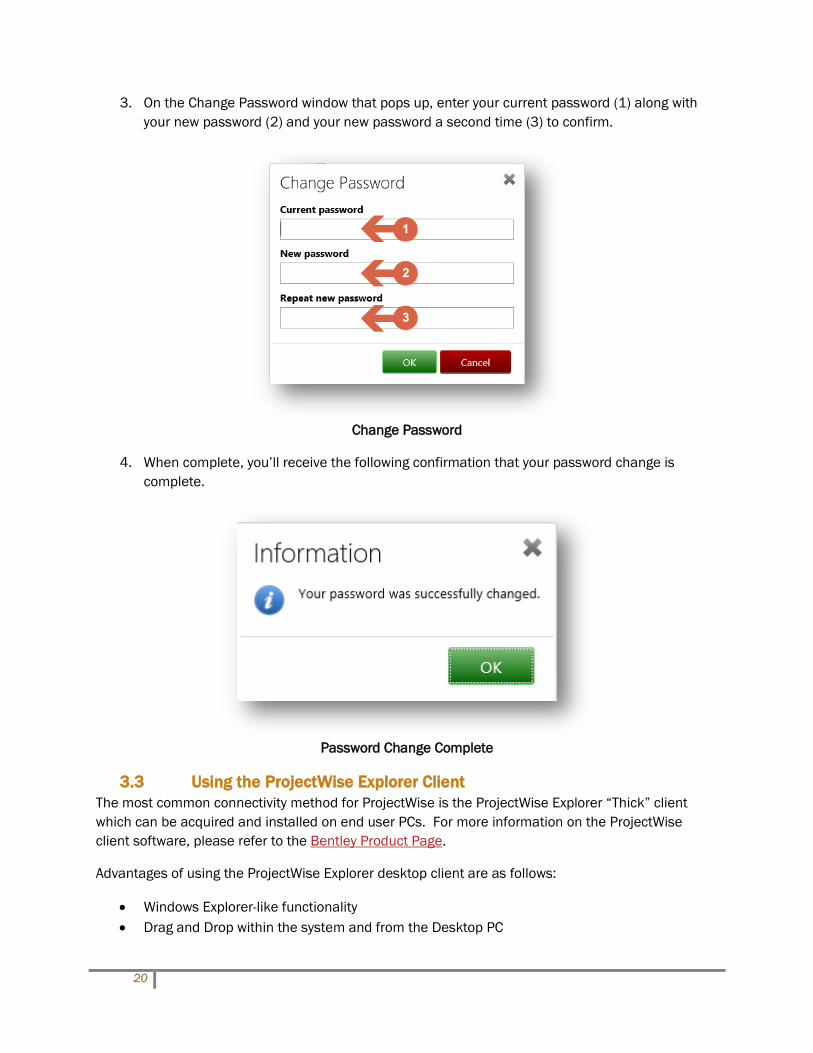
3. On the Change Password window that pops up, enter your current password (1) along with
your new password (2) and your new password a second time (3) to confirm.
Change Password
4. When complete, you’ll receive the following confirmation that your password change is
complete.
Password Change Complete
3.3 Using the ProjectWise Explorer Client
The most common connectivity method for ProjectWise is the ProjectWise Explorer “Thick” client
which can be acquired and installed on end user PCs. For more information on the ProjectWise
client software, please refer to the Bentley Product Page.
Advantages of using the ProjectWise Explorer desktop client are as follows:
Windows Explorer-like functionality
Drag and Drop within the system and from the Desktop PC
21
Direct MicroStation integration and access to the INDOT managed workspace for direct
delivery of CAD resources
Office Application Integration for Open/Save/Save As functionality
Currently INDOT is operating on ProjectWise SS4 Servers which allows for client users to use any
version of ProjectWise Explorer from V8i up through all SELECTSeries releases and through the
current Connect releases. This ensures a wide range of compatible versions and should be able to
accommodate those consultants who may be on other versions of the client software.
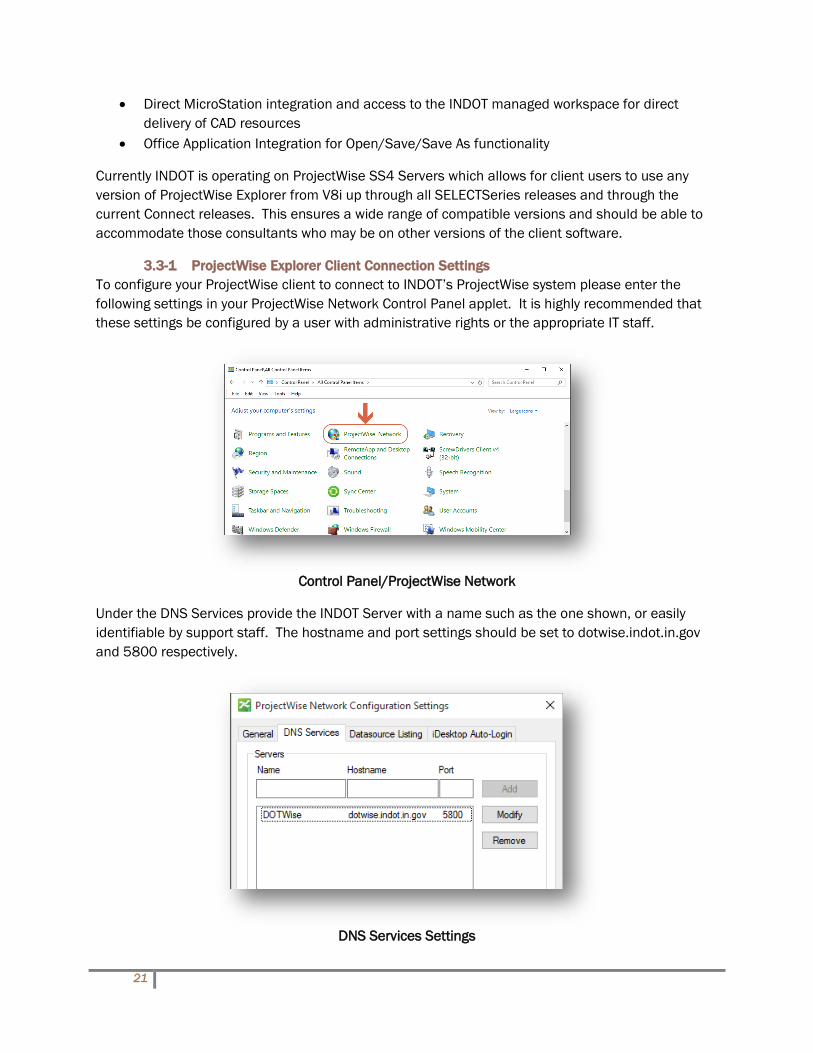
3.3-1 ProjectWise Explorer Client Connection Settings
To configure your ProjectWise client to connect to INDOT’s ProjectWise system please enter the
following settings in your ProjectWise Network Control Panel applet. It is highly recommended that
these settings be configured by a user with administrative rights or the appropriate IT staff.
Control Panel/ProjectWise Network
Under the DNS Services provide the INDOT Server with a name such as the one shown, or easily
identifiable by support staff. The hostname and port settings should be set to dotwise.indot.in.gov
and 5800 respectively.
DNS Services Settings

22
On the Datasource Listing tab, again enter a name easily identifiable and the hostname and port to
dotwise.indot.in.gov and 5800. When ready, select OK or Apply to save your settings.
Datasource Listing
With these settings entered alongside any additional ProjectWise connections, you can then launch
the ProjectWise Explorer software and login to the DOTWise datasource.
3.3-2 ProjectWise First Connection
With ProjectWise now configured, you can enter the software and connect to the INDOT DOTWise
datasource. In your datasource tree you’ll see a new entry for DOTWise in the left hand panel. Left
click on the plus [+] symbol to initiate the login prompt.
Logging into DOTWise
23
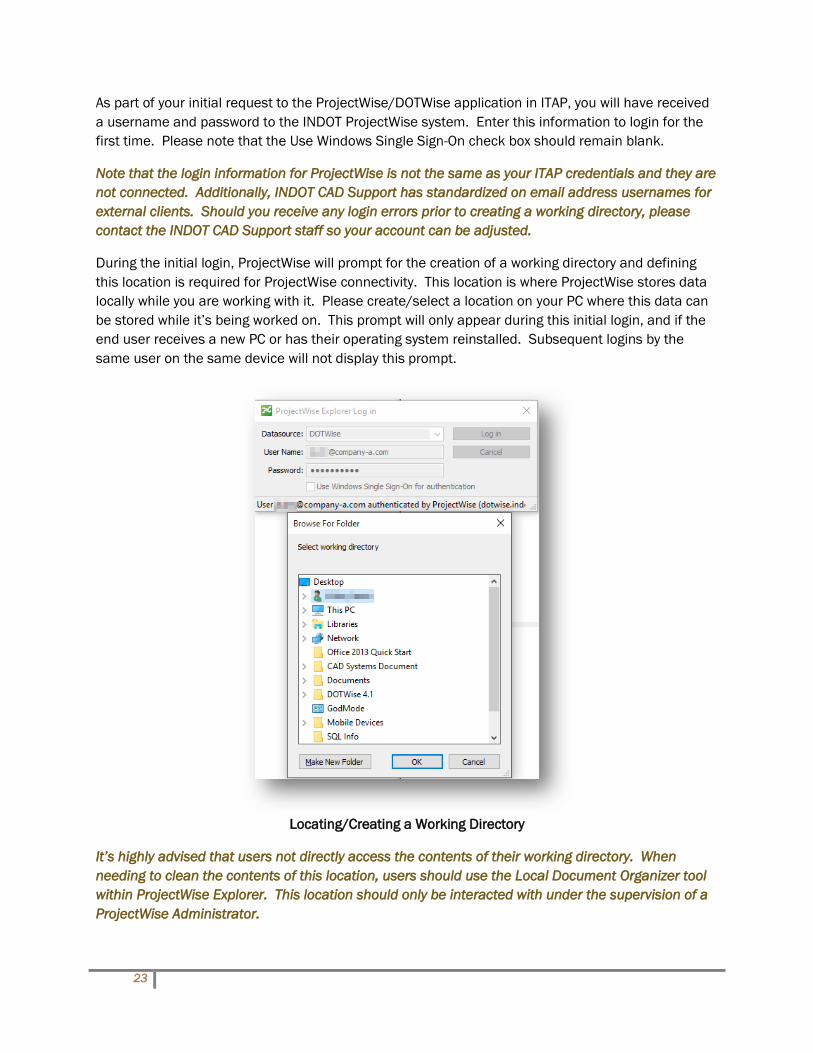
As part of your initial request to the ProjectWise/DOTWise application in ITAP, you will have received
a username and password to the INDOT ProjectWise system. Enter this information to login for the
first time. Please note that the Use Windows Single Sign-On check box should remain blank.
Note that the login information for ProjectWise is not the same as your ITAP credentials and they are
not connected. Additionally, INDOT CAD Support has standardized on email address usernames for
external clients. Should you receive any login errors prior to creating a working directory, please
contact the INDOT CAD Support staff so your account can be adjusted.
During the initial login, ProjectWise will prompt for the creation of a working directory and defining
this location is required for ProjectWise connectivity. This location is where ProjectWise stores data
locally while you are working with it. Please create/select a location on your PC where this data can
be stored while it’s being worked on. This prompt will only appear during this initial login, and if the
end user receives a new PC or has their operating system reinstalled. Subsequent logins by the
same user on the same device will not display this prompt.
Locating/Creating a Working Directory
It’s highly advised that users not directly access the contents of their working directory. When
needing to clean the contents of this location, users should use the Local Document Organizer tool
within ProjectWise Explorer. This location should only be interacted with under the supervision of a
ProjectWise Administrator.

24
With the initial connection completed, you may now begin to working within the INDOT ProjectWise
system.
3.3-3 Changing Your Password
As part of the initial email with your account information and password, INDOT CAD Support highly
recommends that you change your password after the first login. As always, good and secure
passwords:
1. Use a unique password for each of your important accounts.
2. Use a mix of letters, numbers, and symbols in your password.
3. Don't use personal information or common words as a password.
To change your ProjectWise password from within the ProjectWise Explorer client, first login to
DOTWise. When in the system, go under the Tools menu and select Options.
Tools > Options
On the following panel, you will then need to enter your current password (1) along with your new
password (2) and your new password a second time (3) to confirm.
Changing Your Password
25
3.4 INDOT ProjectWise Basics
INDOT’s ProjectWise system can be split into two major usage groups, those who are using it to
share data, and those who are using it for CAD workspace delivery. For those in the latter group,
please review the DOTWise documentation that can be found on the Downloads & Information page
of the INDOT CAD Support Website. This documentation covers most aspects of the CAD workspace
and how to interact with our workspace when using ProjectWise along with where to find and how to
use data within the system.
The remainder of this section will cover the basics of how ProjectWise is structured and how to work
with data you’re given access to.
3.4-1 ProjectWise Folder Layout
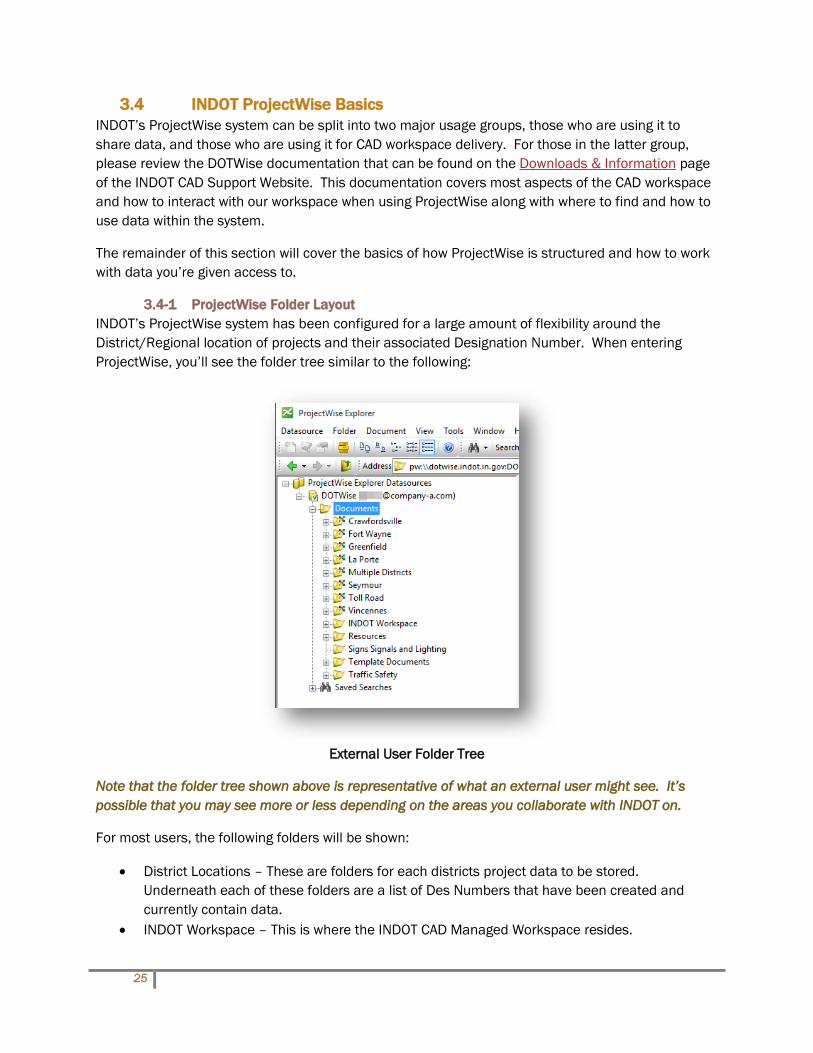
INDOT’s ProjectWise system has been configured for a large amount of flexibility around the
District/Regional location of projects and their associated Designation Number. When entering
ProjectWise, you’ll see the folder tree similar to the following:
External User Folder Tree
Note that the folder tree shown above is representative of what an external user might see. It’s
possible that you may see more or less depending on the areas you collaborate with INDOT on.
For most users, the following folders will be shown:
District Locations – These are folders for each districts project data to be stored.
Underneath each of these folders are a list of Des Numbers that have been created and
currently contain data.
INDOT Workspace – This is where the INDOT CAD Managed Workspace resides.
26
Resources – Plotting Files for ProjectWise Plot Organizer and Documentation can be found
here.
Template Documents – Seed files for various CAD products and other template documents
can be found here.
Unless otherwise directed, all project data and work is done under a district location\Des Number
folder. When participating as a consultant you will have your own folder structure under the Des
Number which is discussed in the next section.
3.4-2 Consultant Folder Structure
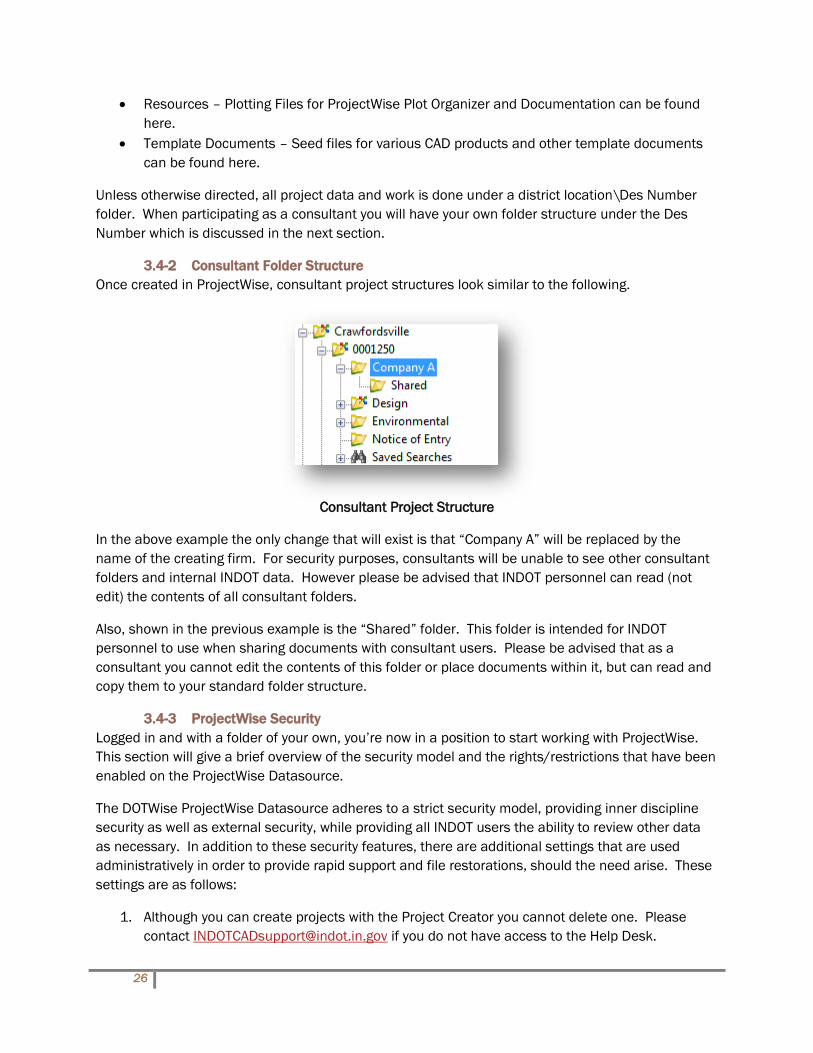
Once created in ProjectWise, consultant project structures look similar to the following.
Consultant Project Structure
In the above example the only change that will exist is that “Company A” will be replaced by the
name of the creating firm. For security purposes, consultants will be unable to see other consultant
folders and internal INDOT data. However please be advised that INDOT personnel can read (not
edit) the contents of all consultant folders.
Also, shown in the previous example is the “Shared” folder. This folder is intended for INDOT
personnel to use when sharing documents with consultant users. Please be advised that as a
consultant you cannot edit the contents of this folder or place documents within it, but can read and
copy them to your standard folder structure.
3.4-3 ProjectWise Security
Logged in and with a folder of your own, you’re now in a position to start working with ProjectWise.
This section will give a brief overview of the security model and the rights/restrictions that have been
enabled on the ProjectWise Datasource.
The DOTWise ProjectWise Datasource adheres to a strict security model, providing inner discipline
security as well as external security, while providing all INDOT users the ability to review other data
as necessary. In addition to these security features, there are additional settings that are used
administratively in order to provide rapid support and file restorations, should the need arise. These
settings are as follows:
1. Although you can create projects with the Project Creator you cannot delete one. Please
contact [email protected] if you do not have access to the Help Desk.

27
2. You can create sub-folders under your project you cannot delete one- Contact CAD support
for deletion request.
3. Users will not have folder delete privileges; this will aid in CAD Support’s ability to process
restore requests (no guarantees).
4. Document delete privileges will be granted (you are responsible for your own data) if you
need something restored that was deleted we will make an attempt (no guarantees).

28
29
4. CAD Support and Documentation Resources
As has been mentioned at various points in this document, there are a number of resources
available to make working with INDOT CAD and ProjectWise successful. This section will cover a
number of these resources and where to access them.
4.1 INDOT CAD Website
INDOT CAD currently maintains our own external website as part of the IN.gov web portal. To get to
our site in particular, navigate to http://www.in.gov/indot/3084.htm in the browser of your choice.
Alternatively, our site can be reached by going to http://www.in.gov/indot and navigating to Doing
Business with INDOT > Other Business > CAD Support.
On our webpage, you can find a number of resources including:
News and Information on our workspace and releases, along with system maintenance
notifications such as ProjectWise outages, etc.
Downloads and Information where you can find our workspace releases and their associated
documentation.
ProjectWise Web Server access and the required downloads for its usage.
Current Version information on the Bentley software versions and other assorted applications
in use at INDOT.
Links to other CAD resources such as the Indiana Design Manual, sample style sheets, and
other resources.
4.2 DOTWise
For those users who are using the INDOT CAD Workspace either externally or connected to our
ProjectWise managed workspace, INDOT CAD Support publishes our DOTWise manual twice yearly
(March and September). These releases coincide with our typical workspace release schedule and
allow for us to publish a variety of changes and documentation updates on a regular schedule.
The DOTWise manual in particular is our major CAD workflow and usage document and covers a
number of topics including:
ProjectWise and MicroStation tools
Working with InRoads and OpenRoads in ProjectWise
Survey deliverable production
Design plan production
Workspace change logs
Many other items!
Please keep in mind that INDOT is a ProjectWise integrated shop, and that the resources and
procedures called out in this document are all written with ProjectWise usage in mind. Most of the
procedures should be easily adjusted for non-ProjectWise usage, but if there are any questions about
the content of this document, please don’t hesitate to ask.
30
4.3 ProjectWise Documents Folder
In addition to our website resources, we also publish our documentation to our ProjectWise server
for access through those means. Our documentation folder is available both internally and externally
and can be found in ProjectWise under the Documents\Resources\Documentation folder location, or
at the following ProjectWise link if you’re using the ProjectWise Explorer Client: Documentation
4.4 Bentley User Community
Newly created during the Fall of 2016, INDOT has partnered with Bentley to have a hosted Bentley
Communities site. To use this site, you must have an active Bentley Communities account, and
request access to our community. Instructions for doing so can be found at
http://www.in.gov/indot/files/INDOT_Communities.pdf.
The purpose of the communities’ site is to share ideas, have discussions, make suggestions, and
network amongst likeminded individuals. Please join our community to contribute to the discussion!
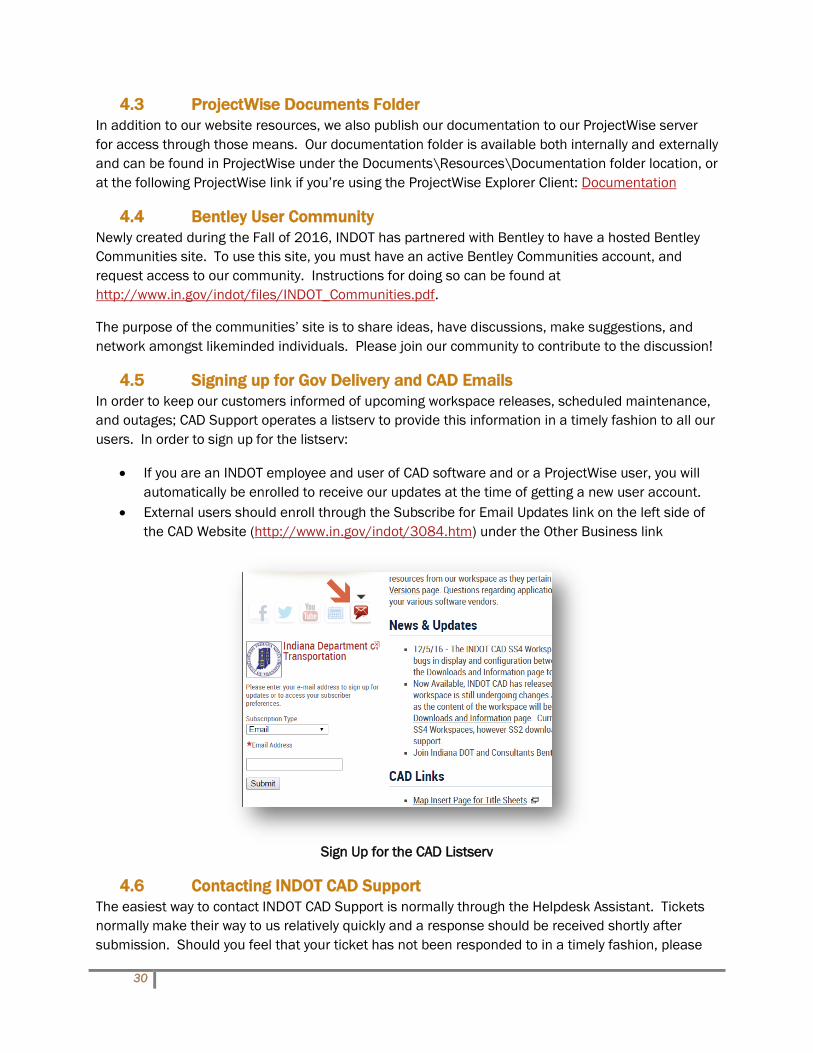
4.5 Signing up for Gov Delivery and CAD Emails
In order to keep our customers informed of upcoming workspace releases, scheduled maintenance,
and outages; CAD Support operates a listserv to provide this information in a timely fashion to all our
users. In order to sign up for the listserv:
If you are an INDOT employee and user of CAD software and or a ProjectWise user, you will
automatically be enrolled to receive our updates at the time of getting a new user account.
External users should enroll through the Subscribe for Email Updates link on the left side of
the CAD Website (http://www.in.gov/indot/3084.htm) under the Other Business link
Sign Up for the CAD Listserv
4.6 Contacting INDOT CAD Support
The easiest way to contact INDOT CAD Support is normally through the Helpdesk Assistant. Tickets
normally make their way to us relatively quickly and a response should be received shortly after
submission. Should you feel that your ticket has not been responded to in a timely fashion, please

31
contact the members of the CAD Support team by forwarding your ticket to
[email protected] so we can see if it’s been assigned incorrectly. Please keep in mind
however, that our SLA is 1 business day and not all issues can be addressed immediately.
For those instances where no ticket has been submitted, the same email address may be used to
contact our staff by both internal and external users.


